

Page 1
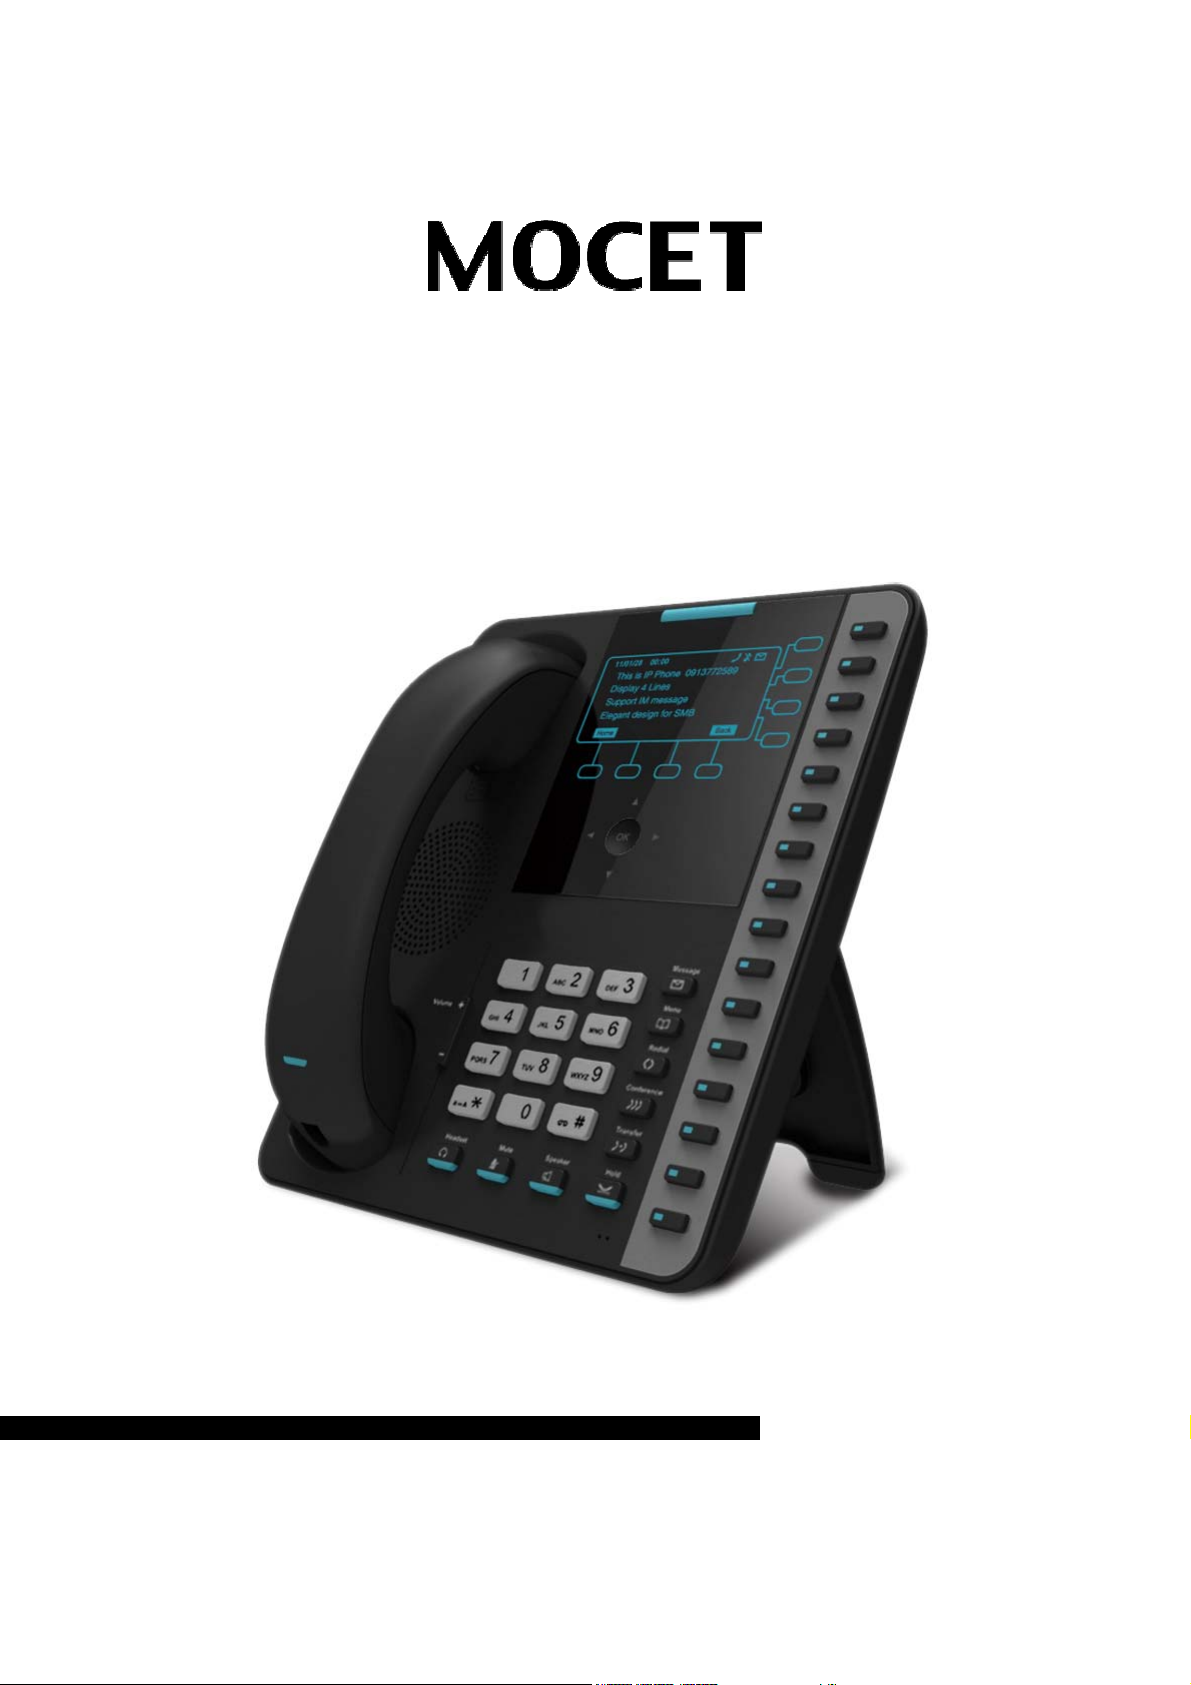
IP3062 Professional IP Phone
Administrators’ Guide
Copy right © 20 12, All Rights Reserved.
Ver: R01 D/C: 101-0924
Page 2

MOCET IP3062 Professional IP Phone Administrators' Guide
FCC Statement
This equipment generates, uses and can radiate radio frequency energy and, if not installed and
used in accordance with the instructions in this guide, may cause interference to radio
communications. This equipment as been tested and found to comply with the limits for a Class B
computing device pursuant to Subpart J of Part 15 of FCC rules, which are designed to provide
reasonable protection against radio interference when operated in a commercial environment.
Operation of this equipment in a residential area is likely to cause interference, in which case the
user, at is own expense, will be required to take whatever measures are necessary to correct the
interface.
CE Declaration of Conformity
This equipment complies with the requirements relating to electromagnetic compatibility, EN55022
class B for ITE and EN 50082-1. This meets the essential protection requirements of the European
Council Directive 89/336/EEC on the approximation of the laws of the Member States relating to
electromagnetic compatibility.
Environment
The phone you have purchas ed , as wel l as any used batteries must not be disposed of wit h
household waste. You should return these to your distributor if they are to replaced or dispose of
them in an approved recycling center.
Trademarks
Windows 98/2000/XT/NT™ and Internet Explorer™ are registered trademarks of Microsoft
Corporation. All other company, brand and product names, like Metaswitch™, Broadsoft™,
Freeswitch™ and Asterisk™ are registered trademarks of their respective owners.
WARNING! ▼
1. Read these installation instructions carefully before connecting the IP phone to its power.
2. To reduce the risk of electric shock, do not remove the cover from the IP phone or attempt to
dismantle it. Opening or removing covers may expose you to dangerous voltage levels.
Equally, incorrect reassembly could cause electric shock on re-use of the appliance.
3. Do not expose the IP Phone to Fire, direct sunlight or excessive heat.
4. Do not expose the IP Phone to rain or moisture and do not allow it to come into contact with
water.
5. Do not install the IP phone in an environment likely to present a THREAT OF IMPACT.
6. You may clean the IP phone using a fine damp cloth. Never use solvents (such as
trichloroethylene or acetone), which may damage the phone’s plastic surface and LCD screen.
Never spray the phone with any cleaning product whatsoever.
7. Take care not to scratch the LCD screen.
8. The IP phone is designed to work in temperatures from 5
9. The IP phone must be installed at least 1 meter from radio frequency equipment, such as TVs,
radios, hi-fi or video equipment (which radiate electromagnetic fields).
10. Do not connect the LAN/PC port to any network other than an Ethernet network.
11. Do not attempt to upgrade your IP phone in an unstable power environment. This could cause
unexpected issues.
12. Do not work on the system or connect or disconnect cables during lightning storms.
13. Children don't recognize the risks of electrical appliances. Therefore use or keep the phone
only under supervision of adults or out of the reach from children.
14. No repair can be performed by the end user, if you experience trouble with this equipment, for
repair or warranty information, please contact your supplier.
!
o
C to 40oC.
Page 2
Page 3

MOCET IP3062 Professional IP Phone Administrators’ Guide
Table of Content
Introduction......................................................................................................7
About This Guide........................................................................................................7
Who Should Read This Guide? .................................................................................7
How This Guide is Organized....................................................................................7
Getting Help and Support ..........................................................................................9
Part 1: Getting Started ..................................................................................10
Chapter 1: Welcome to the MOCET IP3062 Professional IP Phone.........11
Key Features of IP3062 IP Phone ............................................................................11
Chapter 2: IP3062 Professional IP Phone Firmware Architecture ...........13
Where IP3062 Phones Fit in Your Network.............................................................13
Understanding IP3062 Phone Firmware Architecture ...........................................14
What are the Configuration Files? ...................................................................15
What are the Resource Files? ..........................................................................15
Features Available on IP3062 Phones ....................................................................15
Basic User Features..........................................................................................15
Advanced Features ...........................................................................................16
Audio Features ..................................................................................................17
Security Features..............................................................................................18
Part 2: Setting Up Your System ...................................................................19
Chapter 3: Setting Up Your Phone Network...............................................20
Establishing Link Connectivity................................................................................20
Wired Connection..............................................................................................20
Wireless Connection.........................................................................................21
Security and Quality of Service Settings................................................................21
VLANs.................................................................................................................21
802.1X Authentication.......................................................................................21
QoS with DSCP..................................................................................................21
IPSec...................................................................................................................21
IP Communication Settings .....................................................................................21
Provisioning Server Discovery................................................................................22
Phone Network Menus .............................................................................................22
Page 3
Page 4

MOCET IP3062 Professional IP Phone Administrators' Guide
Admin Setting Menu..........................................................................................22
Network Type Menu...........................................................................................23
IP Version Type Menu.......................................................................................23
Static IP Menu....................................................................................................23
802.1X Menu.......................................................................................................23
VLAN Menu ........................................................................................................23
QoS Settings Menu............................................................................................24
IPSec Tunnel Items Menu .................................................................................24
Security and Certificates Items Menu..............................................................25
Chapter 4: Setting Up the Provisioning Server..........................................27
Why Use a Provisioning Server?.............................................................................27
Preparation for Auto-Provisioning Service ............................................................27
Provisioning Files..............................................................................................27
Auto-Provisioning Service Settings.................................................................27
The Hierarchy of File System in Provisioning Server ....................................28
Provisioning Procedure ...........................................................................................29
Provisioning Work Flow....................................................................................29
Getting the APS Server Address......................................................................30
Firmware Upgrade.............................................................................................30
Getting the Configuration File..........................................................................31
APS Check Timing.............................................................................................31
APS Check Retry...............................................................................................31
Part 3: Configuring Your System ................................................................33
Chapter 5: Setting Up Advanced Phone Features.....................................34
Assigning Multiple Line Keys Per Registration .....................................................34
Example Multiple Line Keys Configuration.....................................................34
Assigning Call Progress Tones...............................................................................35
Configuring Network Address Translation.............................................................36
Using Corporate LDAP Directory ............................................................................36
Configuring Shared Line Appearances ..................................................................37
Example Shared Line Appearances Configuration ........................................38
Using Busy Lamp Field............................................................................................38
Enabling Voicemail Integration ...............................................................................38
Example Voicemail Configuration....................................................................38
Enabling Multiple Registrations ..............................................................................39
Page 4
Page 5

MOCET IP3062 Professional IP Phone Administrators’ Guide
Setting up Backup Servers ......................................................................................40
Backup Servers Settings ..................................................................................40
SIP Servers Registration Procedure................................................................41
Chapter 6: Setting Up Phone Audio Features ............................................42
Acoustic Echo Cancellation and Voice Activity Detection ...................................42
Generating Dual Tone Multi-Frequency (DTMF) Tones.........................................42
Audio Codecs............................................................................................................43
Chapter 7: Setting Up User and Phone Security Features .......................44
Local User and Administrator Passwords..............................................................44
Web Configuration Interface.............................................................................44
Local Phone User Interface..............................................................................44
Locking the Phone....................................................................................................45
Part 4: System Maintenance Tasks .............................................................46
Chapter 8: Upgrading Your IP3062 Phones Firmware ..............................47
Auto-Provision Upgrade with MOCET APS ............................................................48
Upgrade from USB Memory Dongle........................................................................48
Upgrade Using Web Browser on a Specified Computer .......................................48
Kernel Upgrade..................................................................................................48
Application Pack Upgrade................................................................................49
Software Patch Upgrade................................................................................... 49
Upgrade Using TFTP/FTP/HTTP/HTTPS Server .....................................................49
Engineering Key Sequences on Root Menu...........................................................50
Emergency Upgrade on Boot ..................................................................................50
Updating Images through Console by U-boot........................................................51
Chapter 9: Miscellaneous Maintenance Tasks ..........................................52
Real-Time Transport Protocol (RTP) Port Base .....................................................52
Configuration File Backup .......................................................................................52
Configuration File Updates......................................................................................52
Optional SIP Header .................................................................................................54
SIPs Parameters .......................................................................................................54
RTP Options..............................................................................................................54
Dial Plan ....................................................................................................................55
System Log ...............................................................................................................56
Session Timer ...........................................................................................................57
Reset to Default ........................................................................................................57
Page 5
Page 6

MOCET IP3062 Professional IP Phone Administrators' Guide
Part 5: Using USB Accessories ...................................................................58
Chapter 10: Using USB Memory Dongle for User Profile Back-ups........59
Chapter 11: Using USB Memory Dongle for Firmware Upgrade..............61
Chapter 12: Using USB Wi-Fi Adapter to Connect to A WLAN ................62
Part 6: References.........................................................................................64
Chapter 13: IP3062 Firmware Menu System ..............................................65
Appendix A – Upgrading Images through Console by U-boot ................67
Preparing Materials ..................................................................................................67
Software List......................................................................................................67
Hardware List..................................................................................................... 67
Software Environment Setup...................................................................................67
Hardware Environment Setup..................................................................................68
Upgrading Image through Console Port.................................................................69
Exiting Debug Mode .................................................................................................73
Setting MAC Address ...............................................................................................73
Page 6
Page 7

MOCET IP3062 Professional IP Phone Administrators’ Guide
Introduction
About This Guide
The IP3062 Professional IP Phone Administrators’ Guide provides instructions for
installing, provisioning, and administering IP3062 phones. This guide will help you
understand the MOCET VoIP network and telephony components, and provides
descriptions of all available phone features.
Part 1: Getting Started of this guide gives you an overview of the IP3062 IP Phone.
Part 2: Setting Up Your System provides you essential information on how to setup your
phone network and a provisioning server.
Part 3: Configuring Your System is devoted to descriptions of the phone features you can
configure on the phones, which include brief examples of feature configurations.
Part 4: System Maintenance Tasks provides you firmware upgrade methods as well as
phone maintenance tasks.
Part 5: Using USB Accessories provides you essential information on how to use USB
memory dongle to do firmware upgrade and user profile backups, and how to use USB
Wi-Fi adapter to connect to a WLAN.
Part 6: References show IP3062 firmware menu structure.
This guide will help you perform the following tasks:
Install and configure your phone on a network server
Configure your phone’s features and functions
Configure your phone’s user settings
This guide describes a method for provisioning IP3062 phones. Although there are other
methods, the method described in this guide provides the most flexibility and
manageability, and is the recommended approach for enterprise installations.
Who Should Read This Guide?
System administrators and network engineers should read this guide to learn how properly
to set up IP3062 phones. This guide describes administration-level tasks and is not
intended for end users.
How This Guide is Organized
This guide is organized into five parts. Each part contains multiple chapters. The parts are
sequenced in the same way you would deploy IP3062 phones.
Page 7
Page 8

MOCET IP3062 Professional IP Phone Administrators' Guide
The parts contain the following chapters:
Part 1: Getting Started
Chapter 1, “Welcome to the MOCET IP3062 Professional IP Phone”, introduces the
MOCET IP3062 Professional IP Phone.
Chapter 2, “IP3062 Professional IP Phone Firmware Architecture”, shows you how IP3062
IP Phones fit in your organization and details about IP3062 IP Phone firmware architecture.
Part 2: Setting Up Your System
Chapter 3, “Setting Up Your Phone Network”, describes how to set up your network.
Chapter 4, “Setting Up the Provisioning Server”, provides basic and advanced instructions
on how to set up a provisioning server, deploy the IP3062 phones from the provisioning
server, and upgrade the phone’s firmware.
Part 3: Configuring Your System
Chpater 5, “Setting Up Advanced Phone Features”, shows you how to configure and use
advanced phone features like corporate directory and voice mail.
Chapter 6, “Setting Up Audio Features”, provides informaiton on configuring and using
audio features.
Chapter 7, “Setting Up User and Phone Security Features”, describes how to configure
and use security features like locking the phone.
Part 4: System Maintenance Tasks
Chapter 8, “Upgrading Your IP3062 Phones Firmware”, give informations about firmware
upgrade methods.
Chapter 9, “Miscellaneous Maintenance Tasks”, shows you how to maintain the IP3062
phones, that includes configuration file backup and updates, dial plan, system log and
reset to default.
Part 5: Using USB Accessories
Chapter 10, “Using USB Memory Dongle for User Profile Back-ups”, describes how to do
user profile back-ups to an external USB memory dongle.
Chapter 11, “Using USB Memory Dongle for Firmware Upgrade”, shows you how to do
firmware upgrade from an external USB memory dongle.
Chapter 12, “Using USB Wi-Fi Adapter to connect to a WLAN“, shows you how to install a
dedicated USB Wi-Fi adapter and configure the IP3062 phone to connect to a WLAN.
Page 8
Page 9

MOCET IP3062 Professional IP Phone Administrators’ Guide
Part 6: References
Chapter 13, “IP3062 Firmware Menu System”, shows the menu structure of the IP3062 IP
Phone firmware.
Getting Help and Support
If you are looking for help or technical support for your phones, the following types of
documents are available:
Quick User Guide, which describes how to assemble IP3062 phone and the basic
phone features
User Guide, which describes both basic and advanced phone features
Release Note, which describes the new and changed features and fixed problems in
the latest version of the firmware
Page 9
Page 10

MOCET IP3062 Professional IP Phone Administrators' Guide
Part 1: Getting Started
Part 1 gives you an overview of the MOCET IP3062 Professional IP Phone and consists of
the following chapters:
Chapter 1: Welcome to the MOCET IP3062 Professional IP Phone
Chapter 2: IP3062 Professional IP Phone Firmware Architecture
Page 10
Page 11

MOCET IP3062 Professional IP Phone Administrators’ Guide
Chapter 1: Welcome to the MOCET IP3062
Professional IP Phone
This chapter introduces the MOCET IP3062 Professional IP Phone.
The MOCET IP3062 Standard SIP phone is an easy-to-use high quality desk phone with
many advanced features including support for secure calling with trusted layer security
(TLS) and Secure Real-time Transfer Protocol (SRTP), a built-in IP Security (IPSEC)
virtual private network (VPN) client, and instant messaging capabilities. Utilizing a next
generation capacitive touch sensitivity panel design, the IP3062 supports up to four
simultaneous lines and can, multiple tilt angles and wall mount options as well as
automatic support for power over Ethernet (PoE). The IP3062 has 16 programmable
buttons and can be configured through the simple built in menus displayed on the blue
backlit LCD or from the phone’s Web Configuration Interface. The IP3062 can be
automatically provisioned from a local or Internet based server using the built-in MOCET
auto-provisioning and management protocols.
The IP3062 IP Phone supports many advanced features including 5-way on-phone
conferencing, can transfer and receive calls using industry-standard SIP protocols, and
can provide built-in music-on-hold (MoH) over IP network. The IP3062 is interoperable with
a wide range of SIP services and servers including those based on Metaswitch™,
Broadsoft™, Freeswitch™ and Asterisk™. Therefore, the IP3062 can be deployed and
used anywhere there is a suitable local area network (LAN) with Internet access and a
local or remotely hosted SIP server. Since it is a stand-alone and “always-on” device, it
does not require connection to a computer for it to work.
In addition, the IP3062 has a large LCD display to show all calls in progress at once and
supports HD audio through the use of the G.722 wideband codec, has a dedicated
external headset port, USB 2.0 host type A and Mini type B ports, and an Extended Dial
Module port. These functions make the IP3062 a more powerful and flexible IP phone to
meet the demands of a busy professional user.
Key Features of IP3062 IP Phone
Features Description
LCD
Physical line keys
Multiple line appearances
Multiple call appearances
Conference
Page 11
128 x 64 pixels
6 lines x 21 characters
4 keys
Up to 4 line appearances
Up to 16 call appearances
Up to 5-party
Page 12

MOCET IP3062 Professional IP Phone Administrators' Guide
Navigation Key
(Up, Down, Left, Right and OK)
Programmable keys
Audio quality
(Speaker, Handset Receiver)
Voice Codec
Ethernet
Power Supply
AC adaptor
Yes (capacitive touch)
16 keys
HD
G.711 (A-law/Mu-law)
G.722
G.723.1
G.726-32
G.729A/B
iLBC
10M/100M (2 ports: LAN, PC)
Built-in IEEE802.3af PoE port
Local Power (DC5V)
5V/ 2A
Tilt stand
Wall mount
Accessories
Yes (3 steps. 30°, 51° and 60°)
Yes (Optional)
Headset
IP-EDMX (up to 2pcs)
Dedicated USB Wi-Fi adapter
USB keyboard
USB memory dongle
Page 12
Page 13

MOCET IP3062 Professional IP Phone Administrators’ Guide
Chapter 2: IP3062 Professional IP Phone
Firmware Architecture
This chapter provides an overview of the IP3062 Professional IP Phone firmware big
picture, specifically an understanding of how the phone fits into the network configuration.
If you want to begin setting up your IP3062 phones, go to Setting Up Your Phone Network.
The IP3062 phone supports the following deployment scenarios.
The Session Initiation Protocol (SIP) is the Internet Engineering Task Force (IETF)
standard for multimedia communications over IP. It is an ASCII-based, application-layer
control protocol (defined in RFC3261) that can be used to establish, maintain, and
terminate calls between two or more endpoints. Like other voice over IP (VoIP) protocols,
SIP is designed to address the functions of signaling and session management within a
packet telephony network. Signaling allows call information to be carried across network
boundaries. Session management provides the ability to control the attributes of an endto-end call.
For IP3062 phones to successfully operate as a SIP endpoint in your network, it will
require:
A working IP network
Routers configured for VoIP
VoIP gateways configured for SIP
An active, configured call server to receive and send SIP messages
The rest of this chapter consists of the following sections:
Where IP3062 Phones Fit in Your Network
Understanding IP3062 Phone Firmware Architecture
Features Available on Your IP3062 Phones
If you want to begin setting up your IP3062 phones on the network, go to Setting Up Your
Phone Network.
If you want to begin configuring the features available for your IP3062 phones, go to Part 3:
Configuring Your System.
Where IP3062 Phones Fit in Your Network
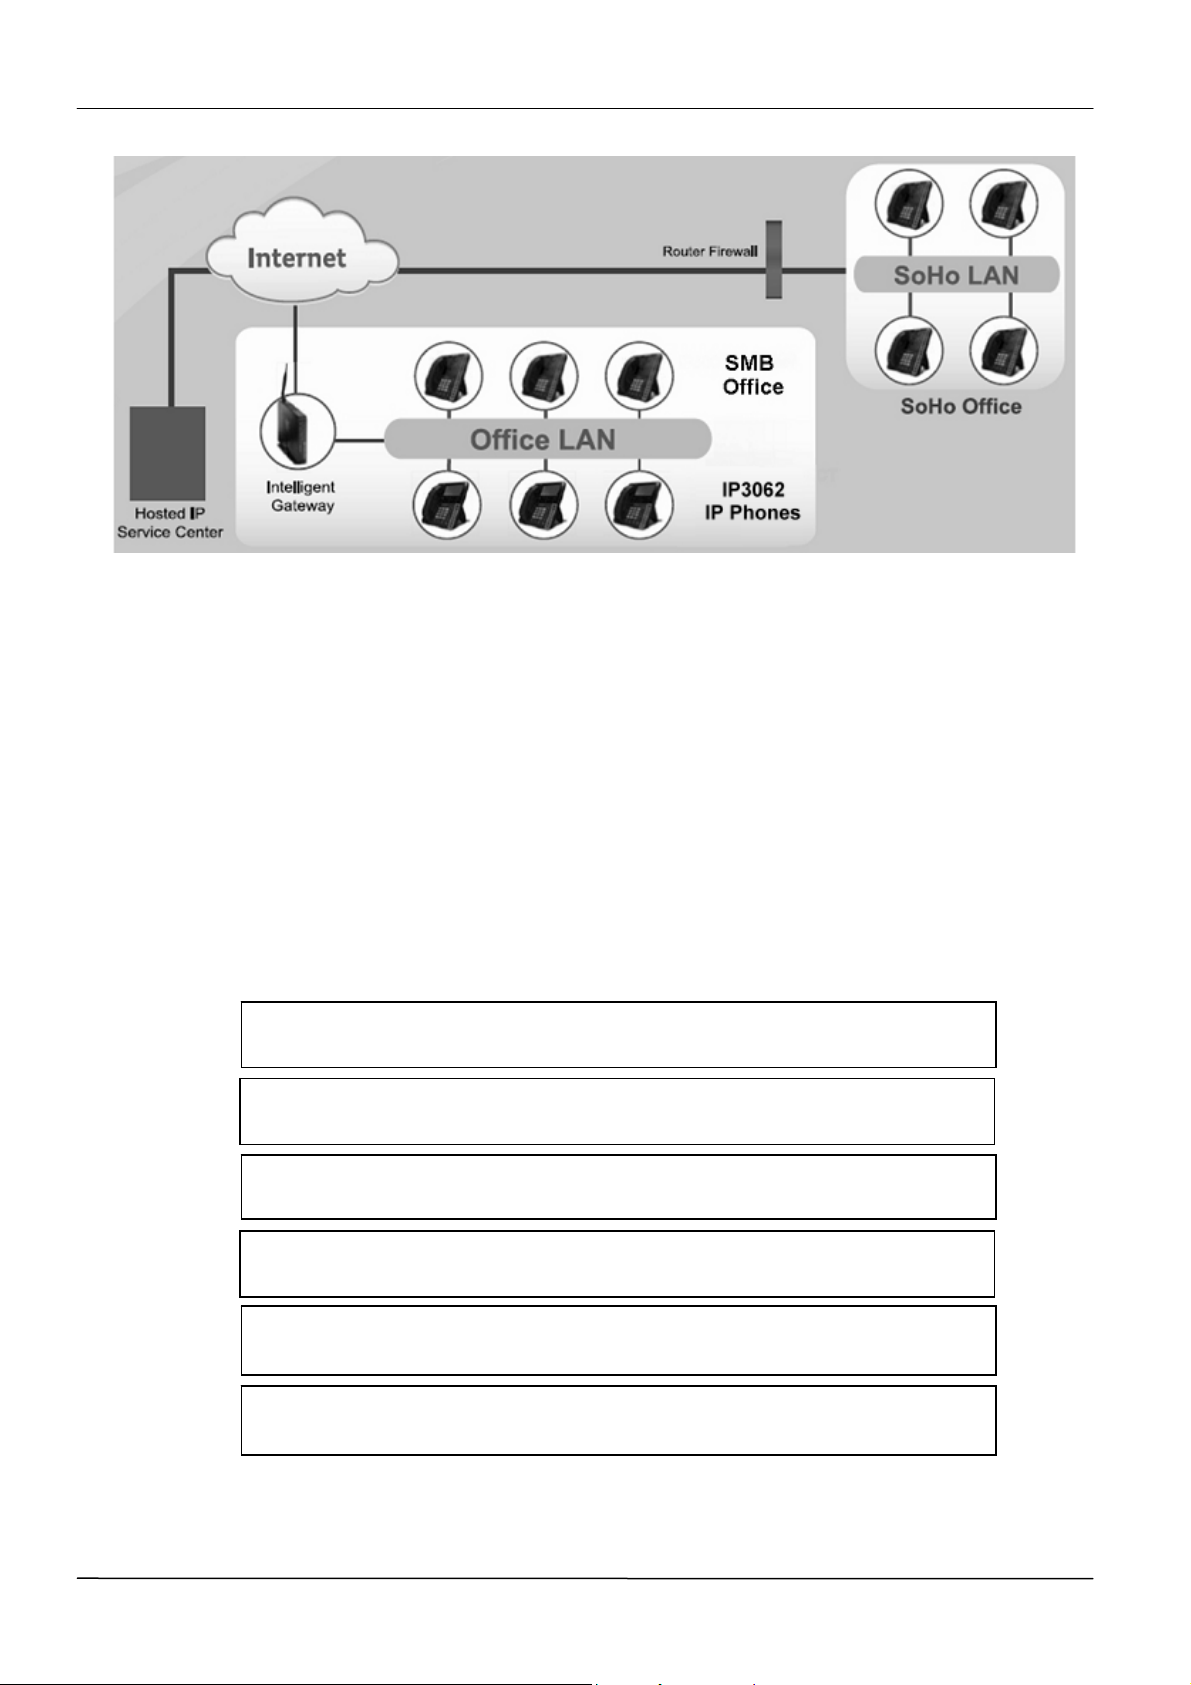
IP3062 phones connect physically through a Category 5 (Cat-5) cable to a standard office
twisted -pair (IEEE 802.3) 10/100 megabits per second Ethernet LAN, and send and
receive all data using the same packet-based technology.
There are many ways to set up a phone network using IP3062 phones. The figure below is
just one example of a network setup.
Page 13
Page 14
MOCET IP3062 Professional IP Phone Administrators' Guide
Understanding IP3062 Phone Firmware Architecture
The IP3062 phone firmware is made of six basic components:
Bootloader – The firmware that loads first when the phone is powered on
Kernel
Root File System
Application Software – The software that implements the phone functions and
features
Configuration files – Files that contain the phone’s settings
Resource files – Optional files that contain setting for advanced features
RReessoouurrccee FFiilleess
CCoonnffiigguurraattiioonn FFiilleess
AApppplliiccaattiioonn SSooffttwwaarree
RRoooott FFiillee SSyysstteemm
KKeerrnneell
BBoooottllooaaddeerr
For each release of firmware, there is one combined image and one update pack.
Page 14
Page 15

MOCET IP3062 Professional IP Phone Administrators’ Guide
A combined image contains bootloader, kernel, root file system, application software
and configuration files.
An update pack is used when updating some, but not all, in a combined image; we also
call it a “hot fix”; a “hot fix” is used when possible to reduce upgrade time and network
bandwidth requirements.
What are the Configuration Files?
The configuration files are valid XML files that you can modify using an XML editor.
You can configure IP3062 phones automatically through configuration files stored on a
central provisioning server. Or, you can manually configure a phone using the phone’s
menu system via the local user interface. If you want, you can use the Web Configuration
Interface, or use a combination of the automatic and manual methods.
We recommend that you configure phones automatically through a central provisioning
server. If a provionsing server is not available, you can use one of the manual methods to
update most phone settings.
What are the Resource Files?
Examples of resource files include:
Contacts Directories
Ringtones
Features Available on IP3062 Phones
This section briefly outlines the features available on IP3062 phones.
Basic User Features
Configuring Call Forwarding – Provides a flexible call forwarding feature to
forward calls to another destination.
Enabling Call Hold – Pauses activity on one call so that you can use the phone
for another task, such as making or receiving another call.
Configuring the Call Logs – Contains call information such as remote party
identification, time and date, and call duration in three separate lists, dialed calls,
missed calls, and answered calls.
Configuring Call Park and Retrieve – Park an active call – puts it on hold to a
specific location, so it can be retrieved by any phone. This feature requires call
server support.
Understanding the Call Timer – Maintains a timer, in hours, minutes, and
seconds, for each call in progress.
Page 15
Page 16

MOCET IP3062 Professional IP Phone Administrators' Guide
Using Call Transfer – Transfer a call in progress to some other destinations.
Configuring Call W aiting Alerts – Visually presents an incoming call on the
screen, and plays a configurable sound effect, when you are in another call.
Called Party Identification – Displays and logs the identity of the party in an
outgoing call.
Enabling Conference Management – Add, hold, mute, and remove conference
participants, and obtain information about participants.
Configuring Calling Party Identification – Displays a caller’s identity, derived from
the network signaling, when an incoming call is presented – if the information is
provided by the call server.
Connected Party Identification – Displays and logs the identity of the party to
whom you are connected to (if the name is provided by the call server).
Applying Distinctive Ringing – Enables you to select a ring tone for contacts in
the contact directory.
Configuring Do Not Disturb – Temporarily stops all incoming calls.
Configuring the Handset and Speakerphone.
Creating Local and Centralized Conferences – Join calls to create local
conferences. The user can call into centralized conferences using conference
bridge numbers. This feature requires call server support.
Using the Local Contact Directory – The phone maintains a local private contact
directory that can be edited locally, and a local public contact directory that can
be downloaded from a dedicated web server.
Microphone MUTE – Mutes the phone’s microphone so other parties cannot
hear you.
Enabling Missed Call Notification – Displays the number of missed calls you
have since you last looked at the Missed Calls list.
Using the Speed Dial Feature – Enables you to place calls quickly from
dedicated keys as well as from a speed dial menu.
Setting the Time and Date Display – Time and date can be displayed in different
format.
Advanced Features
Enabling Shared Line Appearance – Allows a line extension or phone number to
appear on multiple user’s phones. This feature requires call server support.
Page 16
Page 17

Using Busy Lamp Field – You can monitor the hook status of remote parties with
the busy lamp field (BLF) LEDs and you can display your status on an attendant
phone. This feature requires call server support.
Resetting to Factory Defaults – Enables users to reset the phone to the factory
default settings.
Using the Corporate Directory – You can configure the phone to access your
corporate directory if it has a standard LDAP interface.
Using Instant Messaging – Supports the sending and receiving of instant text
messages.
Using Multiple Call Appearances – Supports multiple concurrent calls. You can
place any active call on hold to switch to another call.
Assigning Multiple Line Keys Per Registration – You can assign Multiple Line
Keys to a single registration.
Enabling Multiple Registrations – Supports multiple registrations per phone.
Configuring Network Address Interface Translation – Phones can work with
certain types of network address translation (NAT).
Quick Setup – Provides a simplified interface to enter provisioning server
parameters whil e your phone boots.
Configuring Voicemail – Configures to access a compatible voice mail server.
Audio Features
Acoustic Echo Cancellation – Employs advanced acoustic echo cancellation for
handsfree operation.
Audible Ringer Location – Choose how to play out audio tones.
Audio Codecs – Enables access to a wide range of industry standard audio
codecs.
Volume Control – Choose the volume levels for the various audio outputs on the
phone.
Comfort Noise – Provides a consistent noise level to the remote user.
Customizing Audio Sound Effects – Enables you to customize sound effects
associated with incoming calls and other events.
DTMF Event RTP Payload – Conforms to RFC2833, which describes a standard
RTP-compatible technique for conveying DTMF dialing and other telephony
events over an RTP media stream.
MOCET IP3062 Professional IP Phone Administrators’ Guide
Page 17
Page 18

MOCET IP3062 Professional IP Phone Administrators' Guide
Generating Dual Tone Mulit-Frequency (DTMF) Tones – Generates dual tone
multi-frequency (DTMF) tones in response to user dialing on the dial pad.
IEEE 802.1p/Q – The phone may tag all Ethernet packets it transmits with an
802.1Q VLAN header.
Voice Activity Detection – Conserves netowork bandwidth by detecting periods
of relative “silence” in the transmit data path and replacing that silence with
special packets that indicate silence is occuring.
Security Features
Configuration File Encryption – Confidential information stored in configuration
files can be protected (encrypted). The phone can recognize encrypted files,
which it downloads from the provisioning server.
Digital Certificates – Supports digital certificates and associated private keys.
Local User and Administrator Passwords – Local settings menus are protected
with two privilege levels – user and administrator – each with its own password.
Locking the Phone – Prevent access to the phone menu and to key presses.
Secure Real-Time Transport Protocol – Encrypting audio streams to avoid
interception and eavesdropping.
802.1X Authentication – Authenticate devices connecting to a loacl area network
(LAN).
For instructions on how to set up each feature on IP3062 phone, see the feature sections
in Part 3: Configuring Your System.
Page 18
Page 19

MOCET IP3062 Professional IP Phone Administrators’ Guide
Part 2: Setting Up Your System
Part 2 provides you with essential information on how to set up your phone network and a
provisioning server. You will find basic and advanced instructions on how to set up a
provisioning server, how to deploy IP3062 phones from the provisioning server, and how
to upgrade the firmware.
Part 2 consists of the following chapters:
Chapter 3: Setting Up Your Phone Network
Chapter 4: Setting Up the Provisioning Server
Page 19
Page 20

MOCET IP3062 Professional IP Phone Administrators' Guide
Chapter 3: Setting Up Your Phone
Network
This chapter shows you several automated and manaul ways to configure IP3062 phones
to operate in a LAN.
Connecting your IP3062 phone to the LAN will initiate a start-up sequence. Note that only
step 1 is required and automatic (except for phones on a WLAN). Steps 2, 3, and 4 are
optional as all these settings can be manually configured on the phone. It is common to
complete step 3 using a DHCP server whinin the LAN. The phone uses the following startup sequence:
1. The phone establishes network connectivity.
IP3062 phone will establish 10M/100M network link with an Ethernet switch
device. However, when IP3062 phone connets with a dedicated USB Wi-Fi
adapter, it will establish a Wi-Fi (802.11b/g/n) connection to a wireless access
point. The phone will not be able to make and receive calls until this link is
established. If IP3062 phone can not establish a link to the LAN, an error
message Check Network Connection will display on the LCD.
2. Apply appropriate security and Quality of Service (QoS) settings (optional).
Assign the phone to a VLAN and/or 802.1X authentication.
3. Establish DHCP negotiation with the network and IP address, network addressing
options, network gateway address, and time server.
4. Provisioning server discovery. (optional)
Once the provisioning server discovery is complete, the phone will initiate the provisioning
process, which is described in the next chapter Setting Up the Provisioning Server.
These steps are described in more detail in the following sections of this chapter:
Establishing Link Connectivity
Security and Quality of Service Settings
IP Communication Settings
Provisioning Se rver Discovery
Phone Network Menus
Establishing Link Connectivity
Wired Connection
IP3062 phone supports the following Ethernet line rates: 10Mbps and 100Mbps. Ethernet
line rates are automatically negotiated so that no special configuration is required.
Page 20
Page 21

MOCET IP3062 Professional IP Phone Administrators’ Guide
Wireless Connection
You must connect the IP3062 phone with a dedicated USB Wi-Fi adapter, and configure
wireless setting before they can establish a connection to a wireless network.
To install a dedicated USB Wi-Fi adapter and change the wireless settings that may need
to be set up to connect your device to the Wireless LAN(WLAN), go to Chapter 12: Using
USB Wi-Fi Adapter to Connect to A WLAN.
Security and Quality of Service Settings
You have the option of using several layer-2 and layer-3 mechanisms that increase
network security and minimize audio latency. This section describes each of the network
security and quality of service options.
VLANs
A Virtual LAN (VLAN) can be used to seperate and assign higher priority to a voice VLAN
as a way of minimizing latency. IP3062 supports Static method. The VLAN ID can be
manually set from the phone web or menu interface or from a configuration file. To change
this parameter, go to VLAN Menu.
802.1X Authentication
802.1X authentication is a technology that originated for authenticating Wi-Fi clients. It has
also been adopted for authenticating PCs and other devices in LAN deployments. To
change this parameter, go to 802.1X Menu.
QoS with DSCP
Differentiated Services Code Point (DSCP) is a field in an IP packet that enables different
levels of service to be assigned to network traffic. This is achieved by marking each packet
on the network with a DSCP code and appropriating it to the corresponding level of service.
To change this parameter, go to QoS Settings Menu.
IPSec
Internet Protocol Security (IPSec) is a protocol suite for securing Internet Protocol (IP)
communications by authenticating and encrypting each IP packet of a communication
session. It can be used in protecting data flows between a pair of hosts (host-to-host),
between a pair of security gateways (network-to-network), or between a security gateway
and a host (network-to-host). IP3062 supports IPSec in a host-to-host transport and in
network tunnel modes. To change this parameter, go to IPSec Tunnel Items Menu.
IP Communication Settings
When the phone has established network connectivity, it needs to acquire several IP
network settings to proceed with IP communication. These settings are typically obtained
automatically from a DHCP server.
Page 21
Page 22

MOCET IP3062 Professional IP Phone Administrators' Guide
You have the option to set the IP communication settings manually from the phone web or
menu interface.
Provisioning Server Discovery
By default, the IP3062 Auto-Provisioning function is disabled. If you need to use IP3062
Auto-Provisioning function, please go to Chapter 4: Setting Up the Provisioning Server.
Phone Network Menus
You have the option of modifying the phone network configuration.
After your phone starts and enters standby mode, the Network Setting menu is accessible
from the phone’s main menu.
Select Menu > Admin Setting > Network Setting.
To access the Admin Setting menu, you will have to enter the administrator’s password.
For more information, see Local User and Administrator Passwords in Chapter 7: Setting
Up User and Phone Security Features.
Use the soft keys, the arrow keys, and the OK key to make changes.
Some advanced network configuration items, for example, QoS Settings,
IPSec Tunnel Items and Security and Certificates Items, are only accessible
through Web Configuration Interface. So, if possible, using Web
Configuration Interface to do Network Setting and Security and Certificates
Setting configurations is more convenient.
Admin Setting Menu
Name Description
Network Type
IP Version Type
Static IP
802.1X
SNTP
VLAN
Ping
See Network Type Menu.
See IP Version Type Menu.
See Static IP Menu.
See 802.1X Menu.
The Simple Network Time Protocol (SNTP) server is the phone
obtains the current time from.
See VLAN Menu.
The Ping function is for administrator to debug when the phone
can not connect to LAN.
Page 22
Page 23

MOCET IP3062 Professional IP Phone Administrators’ Guide
Network Type Menu
Name Description
Static IP
DHCP
If enabled, the phone will use the parameters configured in Static
IP menu.
The default setting. DHCP is used to obtain the parameters of IP
Address, Subnet Mask, Default Gateway and DNS.
IP Version Type Menu
Name Description
IPv4
IPv6
The default setting. When the phone is enabled Static IP, it will
use the configured IPv4 address.
If enabled as well as Static IP, the phone will use the configured
IPv6 address.
Static IP Menu
Name Description
IP Address
When the phone is enabled Static IP and IPv4, it will use the
configured IPv4 address.
IPv6 Address
Subnet Mask
Default Gateway
DNS
When the phone is enabled Static IP and IPv6, it will use the
configured IPv6 address.
When the phone is enabled Static IP, it will use the configured
subnet mask.
When the phone is enabled Static IP, it will use the configured
default gateway.
When the phone is enabled Static IP, it will use the configured
DNS.
802.1X Menu
Name Description
802.1X Type
802.1X Identity
802.1X Password
Three options: Off, EAP-MD5 and EAP-TLS. The default is Off.
The selected EAP typ e is used for authentication.
The identity is required for 802.1X authentication.
The password is required for 802.1X authentication.
VLAN Menu
Name Description
Page 23
Page 24
VLAN Mode
MOCET IP3062 Professional IP Phone Administrators' Guide
Two options: None and Static. The default is None.
If Static is enabled, the phone will use the configured Voice
VLAN ID and VLAN Priority in the TCP/IP stack, so that every
Ethernet frame sent to network will contains VLAN tag.
Voice VLAN ID
VLAN Priority
The phone’s 802.1Q VLAN identifier. The default value is 2. The
range is from 1 to 4096.
The phone’s 802.1Q VLAN priority. The default value is 0.
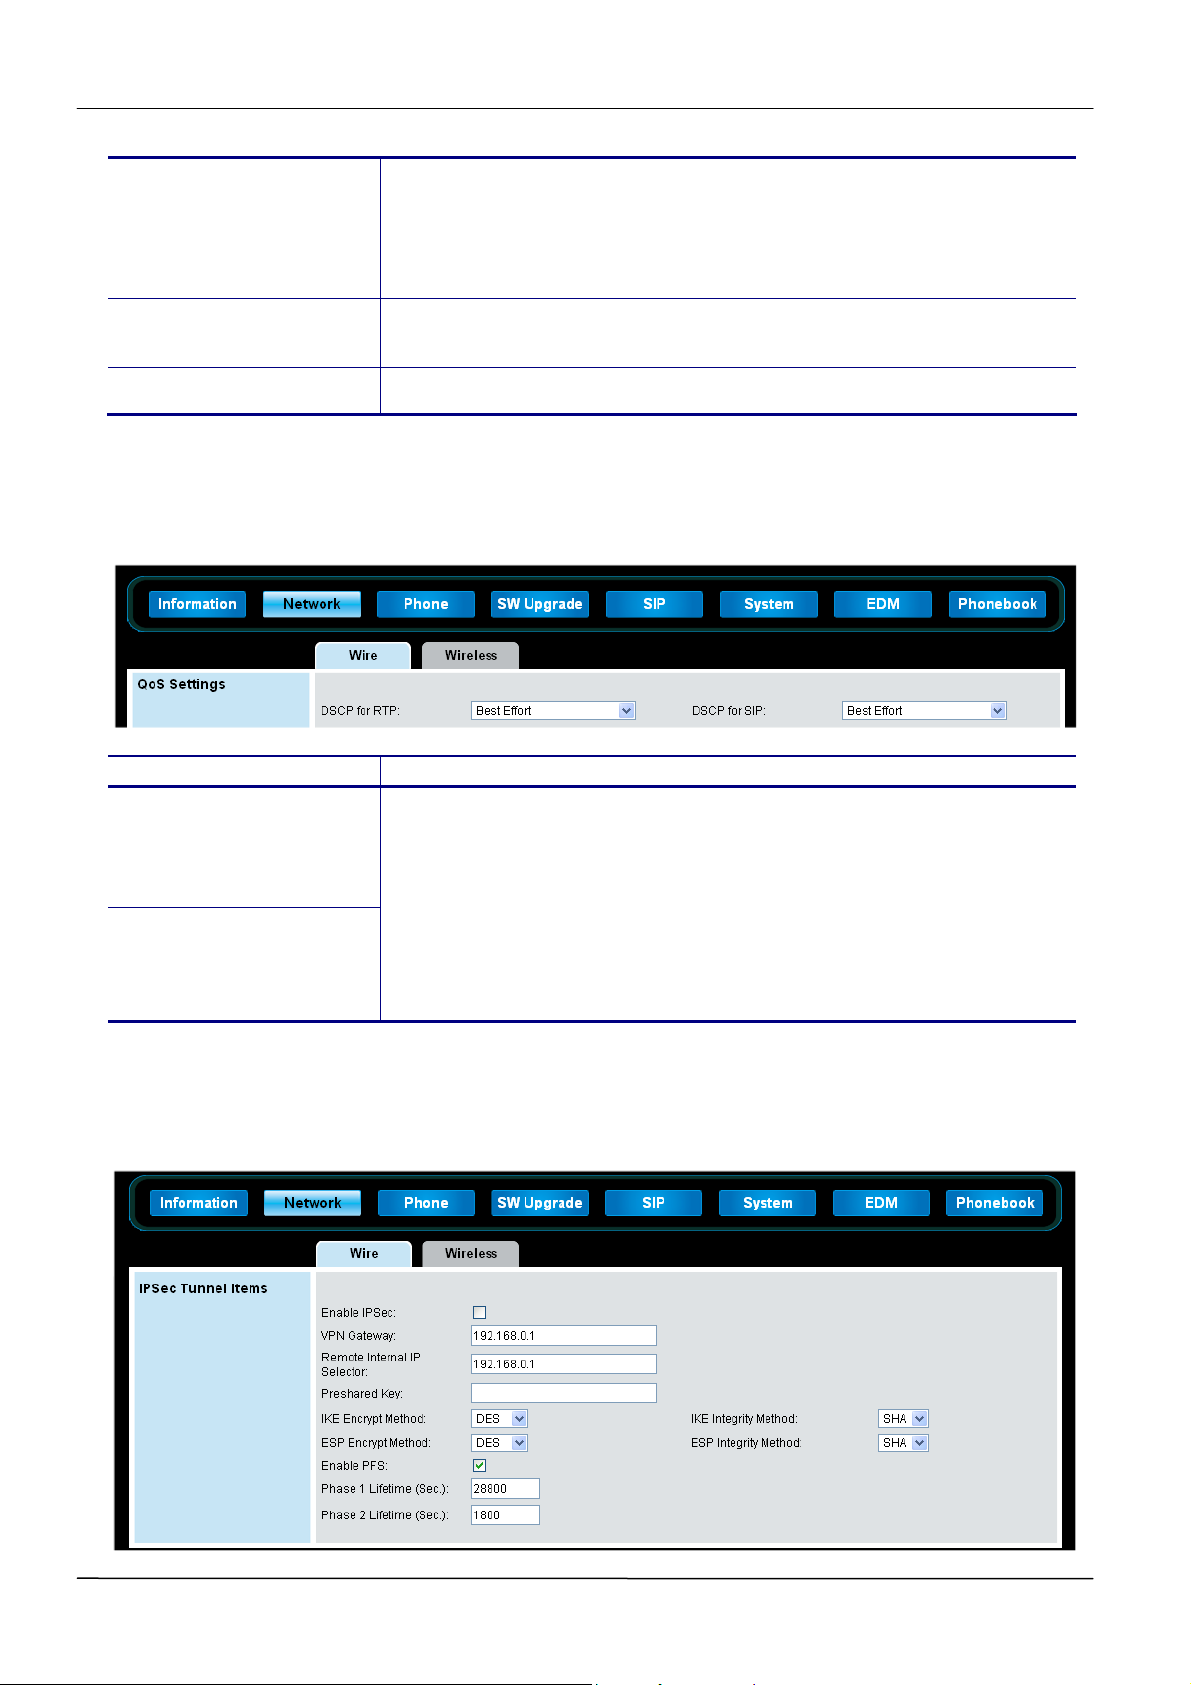
QoS Settings Menu
The QoS Settings menu is accessible from W eb Configuration Interface only.
Name Description
DSCP for RTP
DSCP for SIP
Fourteen options: Best Effort, AF Class 1(Low Drop), AF Class
1(Medium Drop), AF Class 1(High Drop), AF Class 2(Low Drop),
AF Class 2(Medium Drop), AF Class 2(High Drop), AF Class
3(Low Drop), AF Class 3(Medium Drop), AF Class 3(High Drop),
AF Class 4(Low Drop), AF Class 4(Medium Drop), AF Class
4(High Drop), Expedited Forwarding. The default is Best Effort.
IPSec Tunnel Items Menu
The IPSec Tunnel Items menu is accessible from Web Configuration Interface only.
Page 24
Page 25

MOCET IP3062 Professional IP Phone Administrators’ Guide
Name Description
The default is disabled. When enabled, the phone will use the
Enable IPSec
configured parameters in IPSec Tunnel Items to create virtual
private networks (VPN) for communications.
The default IP address of VPN Gateway and Remote Internal IP
Selector is 192.168.0.1.
VPN Gateway
In transport mode, you can set “VPN Gateway and Remote
Internal IP Selector” as the same with remote phone’s IP
address.
In tunnel mode, you need to set the correct VPN Gateway, so
Remote Internal IP
Selector
phone can setup VPN tunnel with this gateway, and
communicate with Remote Internal IP Selector directly and
secretly.
Preshared Key
IKE Encrypt Method
IKE Integrity Method
ESP Encrypt Method
ESP Integrity Method
Enable PFS
Phase 1 Lifetime (sec)
Phase 2 Lifetime (sec)
The default is null.
Three options: DES, 3DES, AES. The default is DES.
Two options: SHA, MD5. The default is SHA.
Three options: DES, 3DES, AES. The default is DES.
Two options: SHA, MD5. The default is SHA.
The default is enabled.
The default value is 28800.
The default value is 1800.
Security and Certificates Items Menu
The Security and Certificates items menu is accessible from Web Configuration Interface
only.
Name Description
Page 25
Page 26

MOCET IP3062 Professional IP Phone Administrators' Guide
802.1x Private Key
802.1x Personal Cert
802.1x Root Cert
SIPs Private Key
SIPs Personal Cert
SIPs Root Cert
Select desired 802.1x Private Key (.pem) and press Update
button to upgrade.
Select desired 802.1x Client Cert (.pem) and press Update
button to upgrade.
Select desired 802.1x Root Cert (.pem) and press Update button
to upgrade.
Select desired SIPs Private Key (.pem) and press Update button
to upgrade.
Select desired SIPs Client Cert (.pem) and press Update button
to upgrade.
Select desired SIPs Root Cert (.pem) and press Update button
to upgrade.
Page 26
Page 27

MOCET IP3062 Professional IP Phone Administrators’ Guide
Chapter 4: Setting Up the Provisioning
Server
This chapter provides basic instructions for setting up your IP3062 phones with a
provisioning server.
This chapter consists of the following sections:
Why Use a Provisioning Server
Preparation for Auto-Provisioning Service
Provisioning Procedure
Why Use a Provisioning Server?
A provisioning server allows for flexibility in installing, upgrading, maintaining, and
configuring the IP3062 phones. The provisioning server can be set up on the local LAN or
anywhere on the Internet. The IP3062 phone is designed such that if it can not locate a
provisioning server when it boots up, it will operate with internally saved parameters. This
is useful when the provisioning server is not available.
Preparation for Auto-Provisioning Service
To use Auto-Provisioning Service, you need to make sure provisioning files, provisioning
server and IP3062 Auto-Provisioning Service setting are configured ready. See below
sections to know how to prepare each of them.
Provisioning Files
IP3062 Auto-Provisioning function supports configuration file update and firmware upgrade.
The provisioning configuration files are in XML format.
Only those settings to be provisioned are required to be included in the XML file. All
settings in the XML file will be applied and treated as changes even the values are the
same as the current settings on the phone.
Auto-Provisioning Service Settings
The Auto-Provisioning Service function uses FTP/ TFTP/ HTTP/ HTTPS as transport
protocol. As to HTTP/ HTTPS, it will support Basic and Digest authentication.
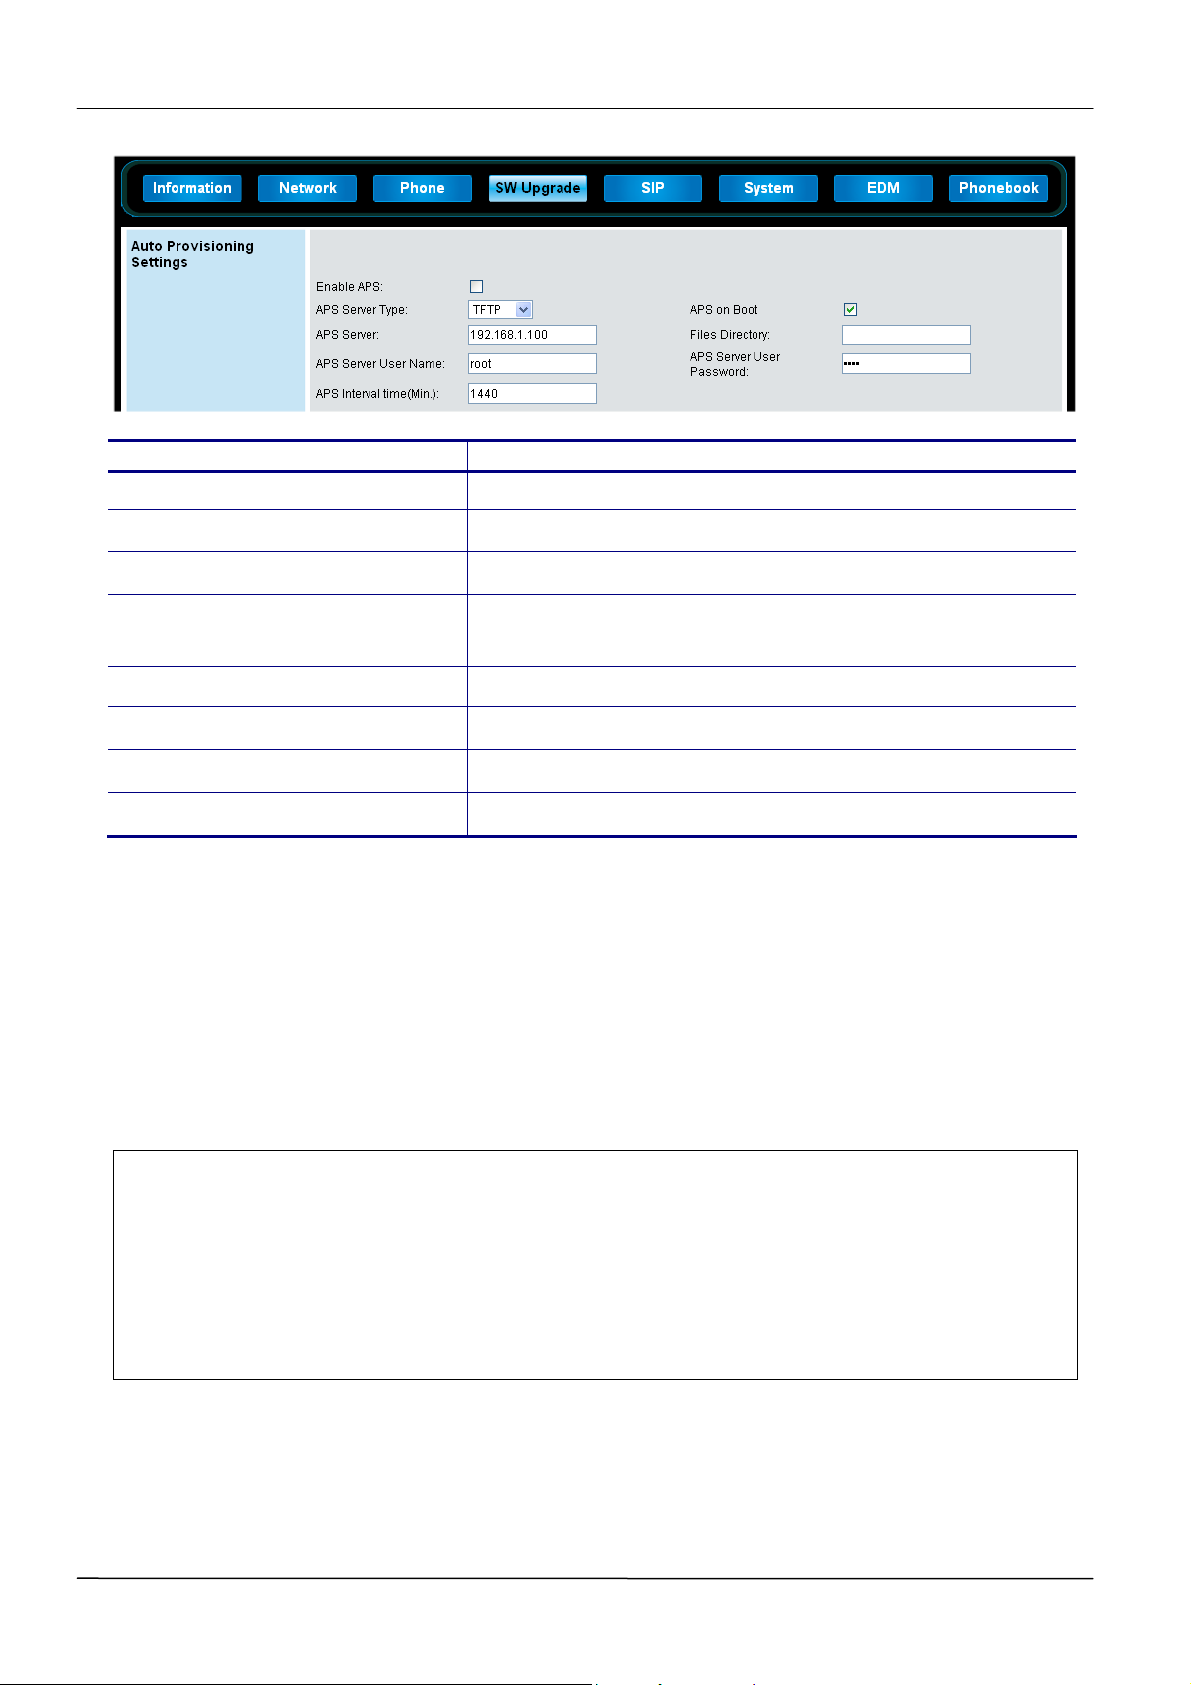
There are eight options for auto-provisioning setting through the Web Configuration
Interface.
Page 27
Page 28
MOCET IP3062 Professional IP Phone Administrators' Guide
Name Description
Enable APS
APS Server Type
APS on Boot
APS Server
File Directory
APS Server User Name
APS Server User Password
APS Interval Time
Enable or disable APS func tion.
Select APS server type: HTTPS/ HTTP/ TFTP/ FTP.
Do APS or not when phone on boot.
The server address can be an IP address or FQDN, or
together with port.
The fil e directory of APS server.
The login name of APS server.
The login password of APS server.
The interval time (minutes) to retry APS.
The Hierarchy of File System in Provisioning Server
Following part will only describe how to provision via HTTP.
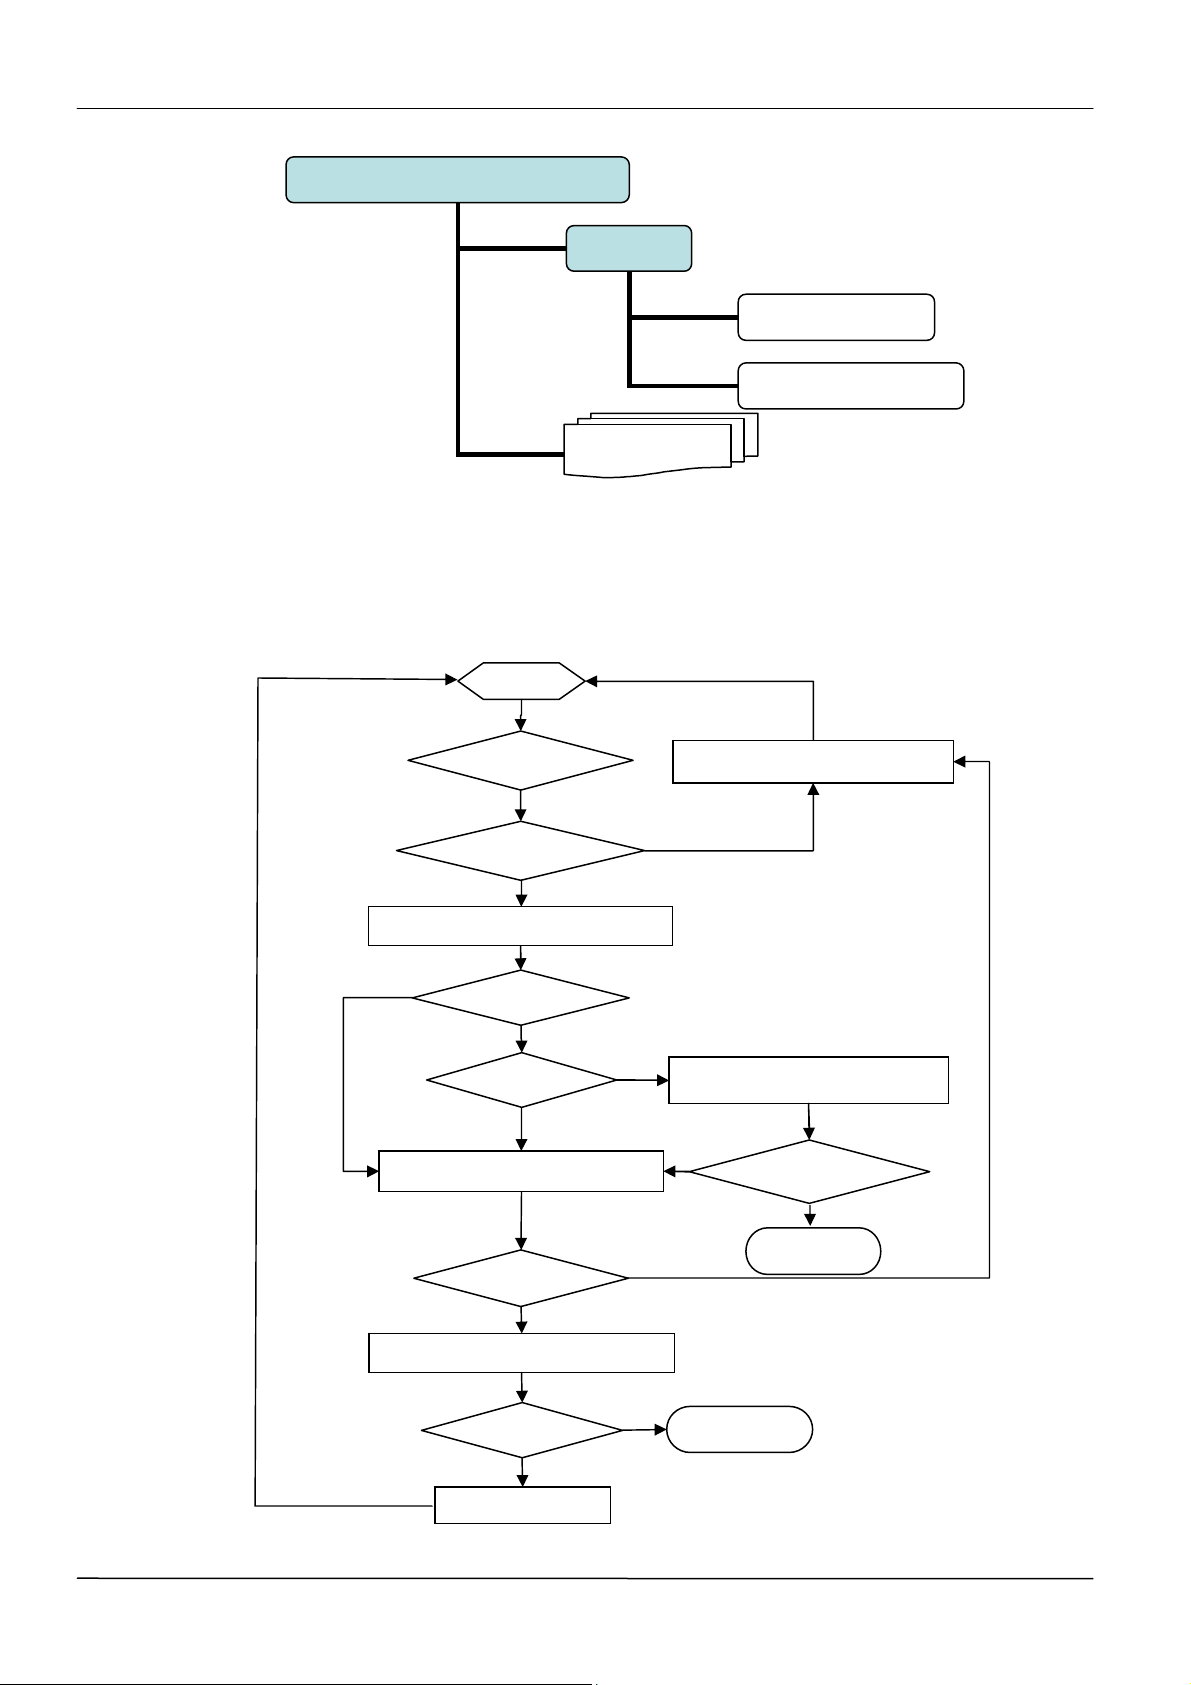
The configuration file name for IP3062 is TCM_IP3062.xml. It is an XML document that
indicates the latest version number and the latest firmware’s URL of IP3062.
For example, the following content indicates its newest version is F_5_3_1.0.30, and its
firmware URL is http://172.16.11.254:5000/provisioning/firmware/update.ip3062.
<?xml version=" 1.0" encoding="utf - 8" standal one="yes"?>
<Firmware>
<Firmware_Version>F_5_3_1.0.30</Firmware_Version>
<Firmware_URL>http://172.16.11.254:5000/provisioning/firmware/update.ip3062</Firmware_URL>
</Firmware>
The hierarchy of file system in Auto-Provisioning Service server is as below. Please note
that if firmware is put in another server, the file location will still need to follow this
hierarchy.
Page 28
Page 29
MOCET IP3062 Professional IP Phone Administrators’ Guide
A
APS Server Root Directory
Provisioning Procedure
Provisioning Work Flow
Firmware
$MAC.xml
Update.IP3062
TCM_IP3062.xml
Start
PS start?
N
Phone idle?
Get model file and Parse file
N
Provisioning: Get configure
Success?
Y
Update?
N
Success?
Start timer to retry after 10s
N
Y
Provisioning: Get Firmware
N
Success?
N
Reboot
Y
Y
Provisioning: Update configure
Y
Reboot?
N
Start APS timer
Reboot
Page 29
Page 30
MOCET IP3062 Professional IP Phone Administrators' Guide
Getting the APS Server Address
The default APS server must be pr ovided by the Operat or/ ITSP or DHCP options.
Users are allowed to change the APS server by option “APS Server Address” via Web
Configuration Interface, and they can disable APS function by clear this op tion or un check
the “Enable APS” option. “Enable APS” option is fal se by default.
For example, find options below in $MAC.xml, and modify the values.
<APS_Enable type="integer">1</APS_Enable>
<APS_Server_Type type="integer">0</APS_Server_Type>
<APS_Server type="string">172.16.1.198</APS_Server>
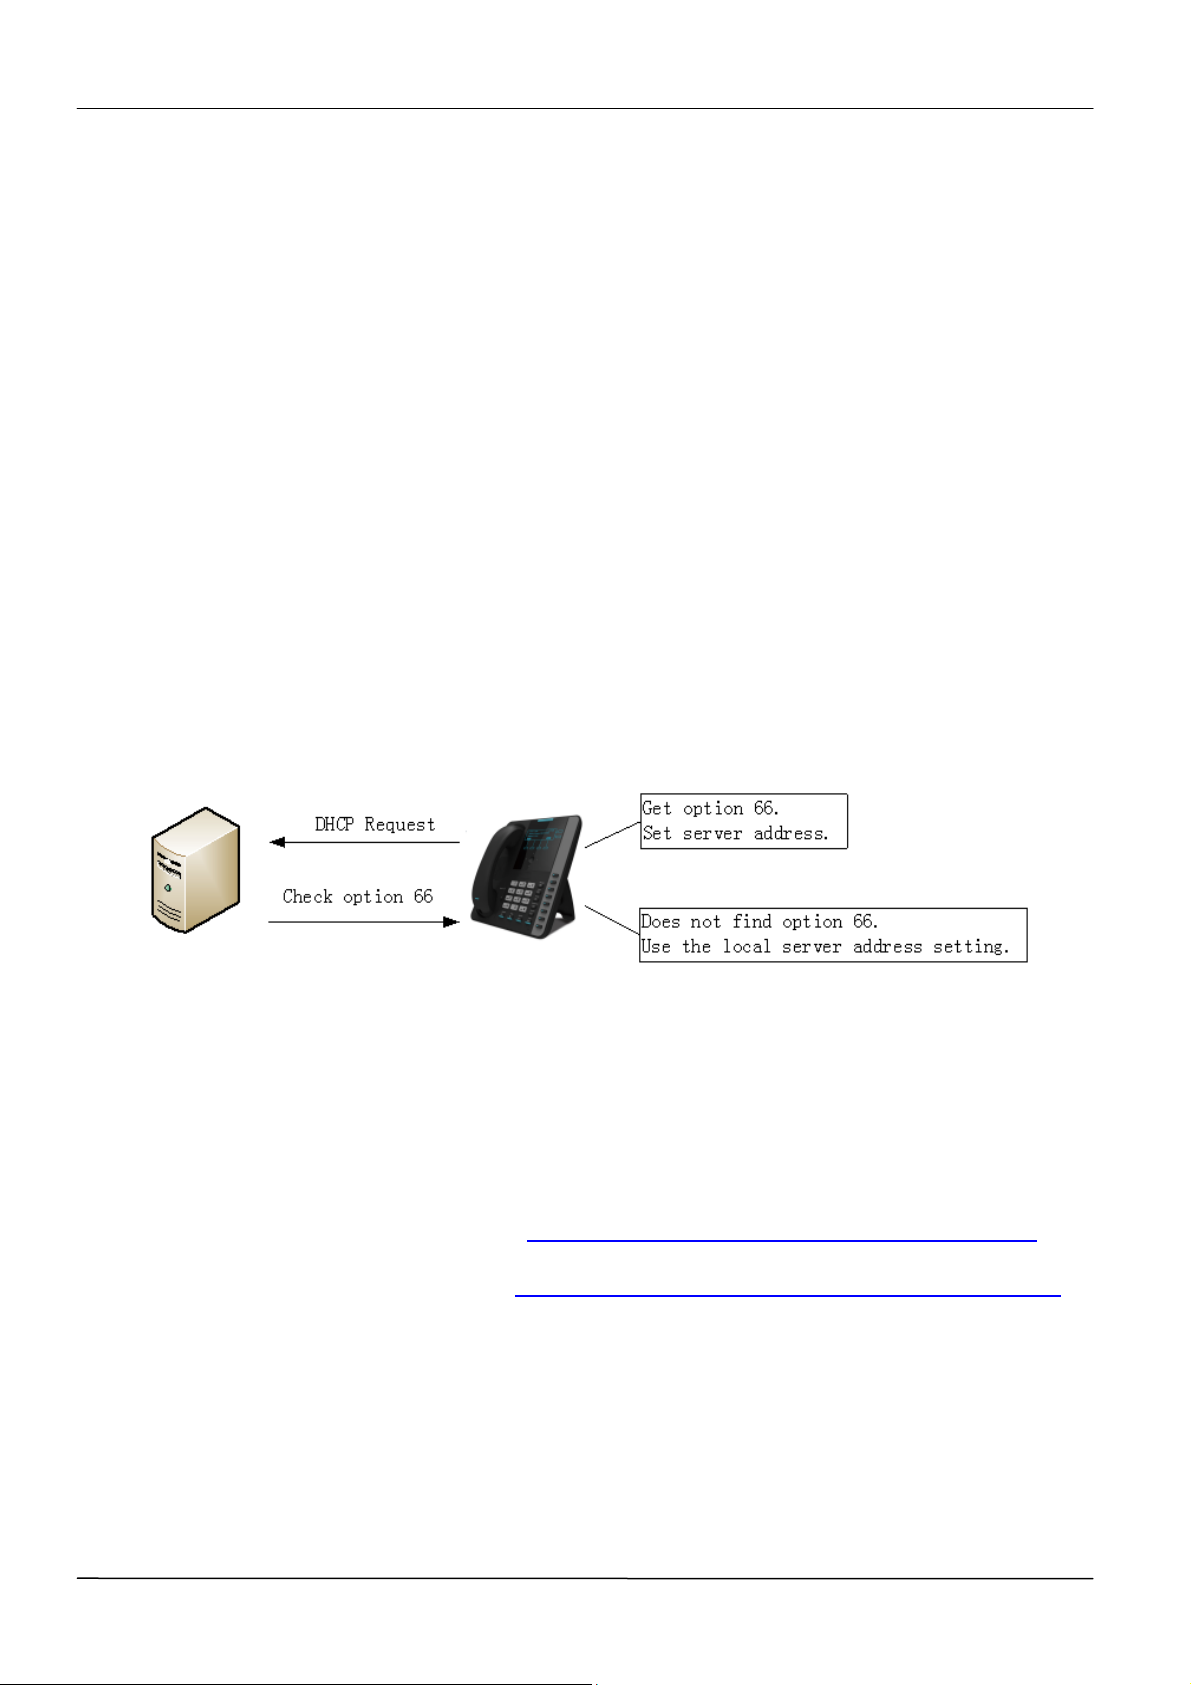
DHCP Type (Default Network Type)
IP3062 phone will try to get the APS server address from DHCP option 66/150/159/160.
The option checking priority will be 160/159/150/66, and APS Server address supports
both IP address and URL.
If the phone does not get this information, it will use the local APS server address setting.
Static IP
The phone will use the APS server address specified in the web interface of the phone.
Firmware Upgrade
After the APS is enabled manually, IP3062 phone will try to download TCM_IP3062.xml
from the APS se rver with the format of http://server-address/firmware/TCM_IP3062.xml .
For example, it will request the file as http://aps.customer.com/firmware/TCM_IP3062.xml.
When the provisioning IP3062 XML file is downloaded successfully, then it will perform the
firmware upgrade check by checking <Firmware_Version>.
1. If the version of firmware in the phone is different from the what is specified in the
provisioning file, the phone will try to download the new firmware from the address
specified in the <Firmware_URL>. After the firmware upgrade, the phone will reboot
and perform the same provision action above again.
Page 30
Page 31

MOCET IP3062 Professional IP Phone Administrators’ Guide
2. If the firmware version is the same, the phone will skip the firmware upgrade and
proceed to configuration update.
3. If the <Firmware_URL> is not specified in the xml file, it will use the same server
address as specified for downloading the TCM_IP3062.xml.
Getting the Configuration File
If the firmware version requested is the same as the version on the phone, or the firmware
update fails, it will try to download the $MACADDRESS.xml file from the APS server wi th
the format of http://server-address/$MAC.xml .
For example, the phone will request http://aps.customer.com/001915123456.xml.
APS Check Timing
The IP3062 phone will check and download the $MACADDRESS.xml periodic ally when
the Interval Time expires and phone is in an idle state (i.e., not on a call). The polling
interval can be set in the Auto Provisioning section of the web interface in seconds. If it is
not specified in $MACADDRESS.xml, IP3062 phone will use default setting of 1440
minutes; if it is set to 0, the phone will only poll the $MACADDRESS.xml when the phone
boots up.
<APS_Period type="int eger">1440</APS_Period>
The timing for the phone to perform the APS c hecking :
1. Boot up and be initialized if the APS_On_Boot is set to “1”.
<APS_On_Boot type="integer">0</APS_On_Boot>
2. Interval time elapse.
3. APS Server address is changed or “APS Enable” is switched to “on”.
4. APS chec k retry (Refer to the next section).
The APS checking UI:
When upgrading firmware from APS server, success or fail, LCD will show alerting
information to let user know the upgrading state and result.
For example, IP3062 LCD shows “Updating… Please Wait!” or “Update Fail!” or “Update
Success!”.
APS Check Retry
Now we have defined some provisioning parameters as defaults.
APSCheckPeriod: 1440 minutes.
Note: It could be configured by the provision file: 30~65535 minutes.
Page 31
Page 32

MOCET IP3062 Professional IP Phone Administrators' Guide
APSErrorRetryTimes: 5.
APSErrorRetryDelay: 60 seconds.
If the phones send the Provisioning Request, but fails to get the $MACADDRESS.xml file,
or decrypting the file fails, the APS will be contacted again after APSErrorR etryDelay, and
try APSErrorRetryTimes. If not successful after t hat, the phone will then provision after
APSCheckPeriod.
If the provisioning is successful, the phone will poll the server again after APSCheckPeriod
to check if there is newer firmware or a newer configuration file.
Page 32
Page 33

MOCET IP3062 Professional IP Phone Administrators’ Guide
Part 3: Configuring Your System
Part 3 describes the advanced phone features you can configure for your IP3062 phones.
These features include a number of phone features that add efficiency and convenience,
audio and video features, and several security features.
Part 3 consists of the following chapters:
Chapter 5: Setting Up Advanced Phone Features
Chapter 6: Setting Up Phone Audio Features
Chapter 7: Setting Up User and Phone Security Features
Page 33
Page 34
MOCET IP3062 Professional IP Phone Administrators' Guide
Chapter 5: Setting Up Advanced Phone
Features
This chapter will show you how to configure all available advanced phone features and call
features. It provides important informaiton you need to know in order to successfully
perform configuration changes for the following advanced features:
Assigning Multiple Line Keys Per Registration
Assigning Call Progress Tones
Configuring Network Address Translation
Using a Corporate LDAP Directory
This chapter also shows you how to make configuration changes for the following
advanced call server features:
Configuring Shared Line Appearances
Using Busy Lamp Field
Enabling Voicemail Intergration
Enabling Multiple Registrations
Setting Up Backup Servers
Assigning Multiple Line Keys Per Registration
You can assign a single registered phone line to multiple line keys on IP3062. This feature
can be useful for managing a high volume of calls to a line.
Example Multiple Line Keys Configuration
IP3062 can support up to 4 line keys with the same registered line address. In this
example, it will show you how to enable four line keys with the same registered line
number, 2100.
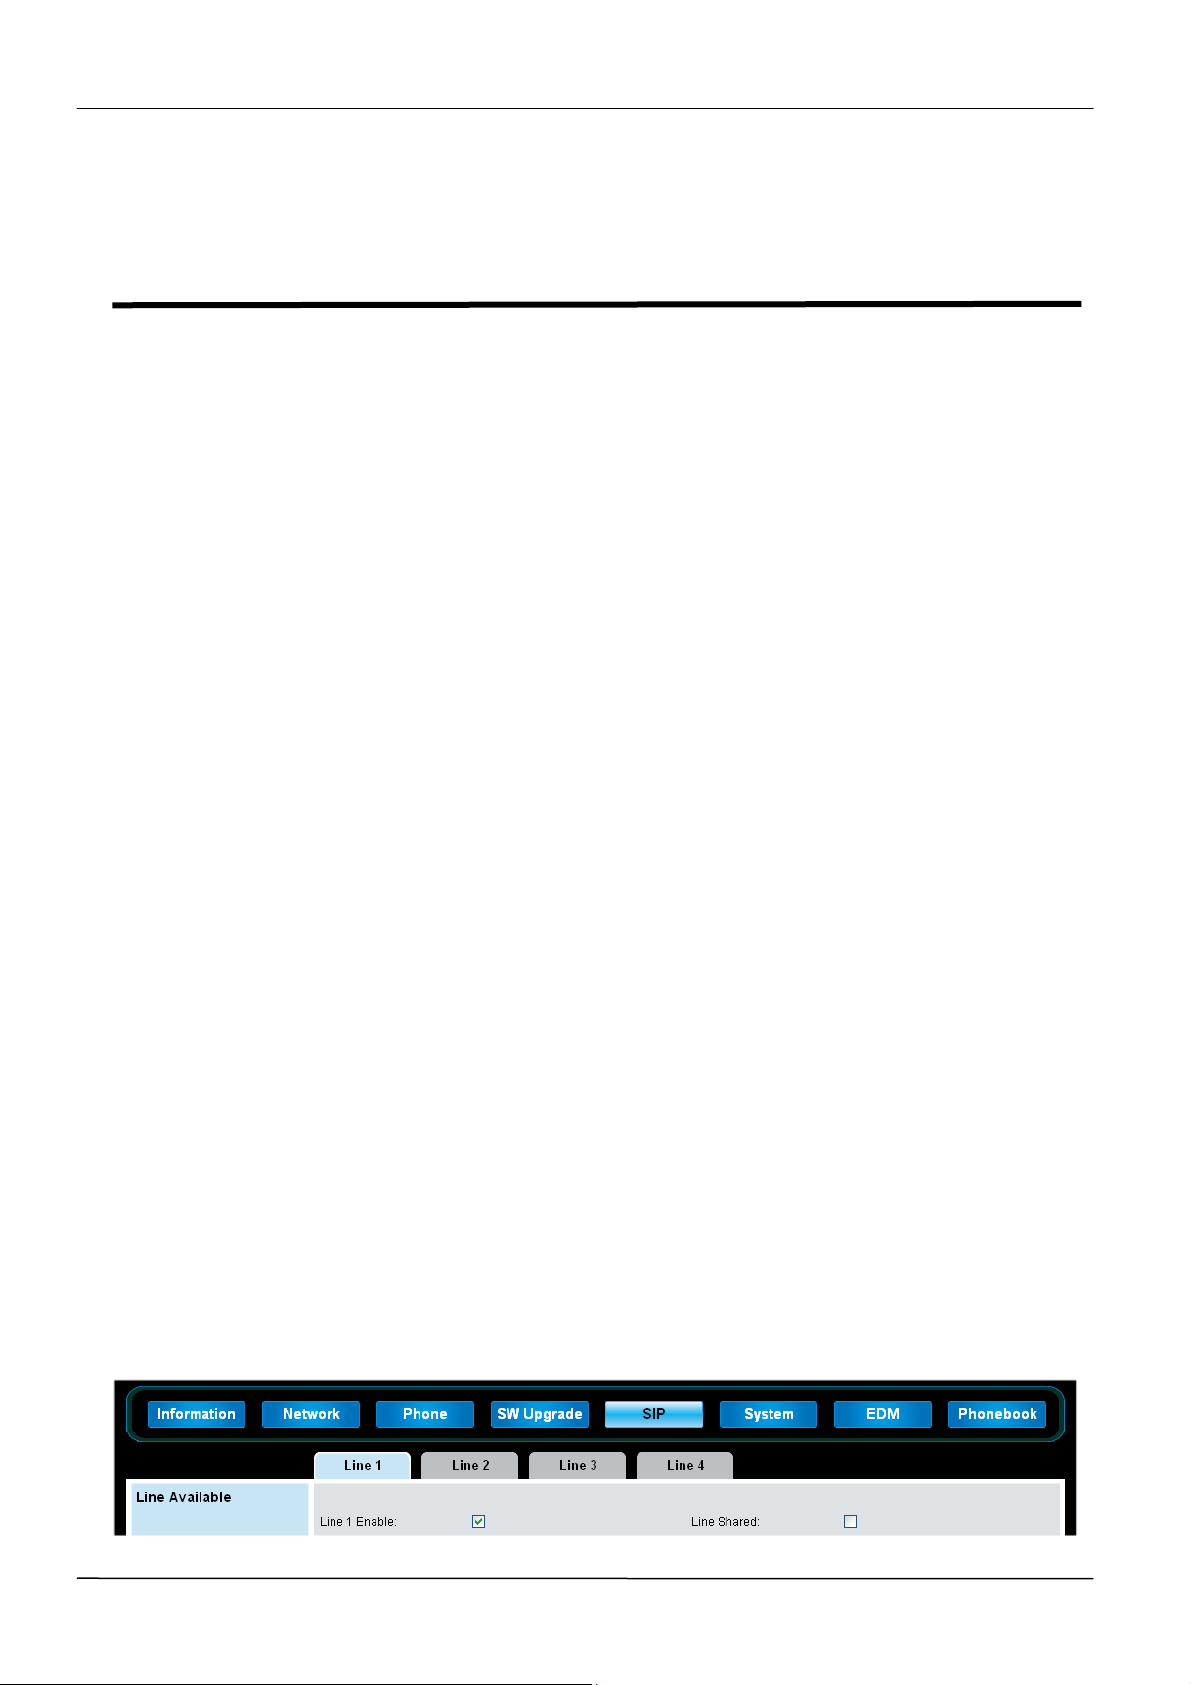
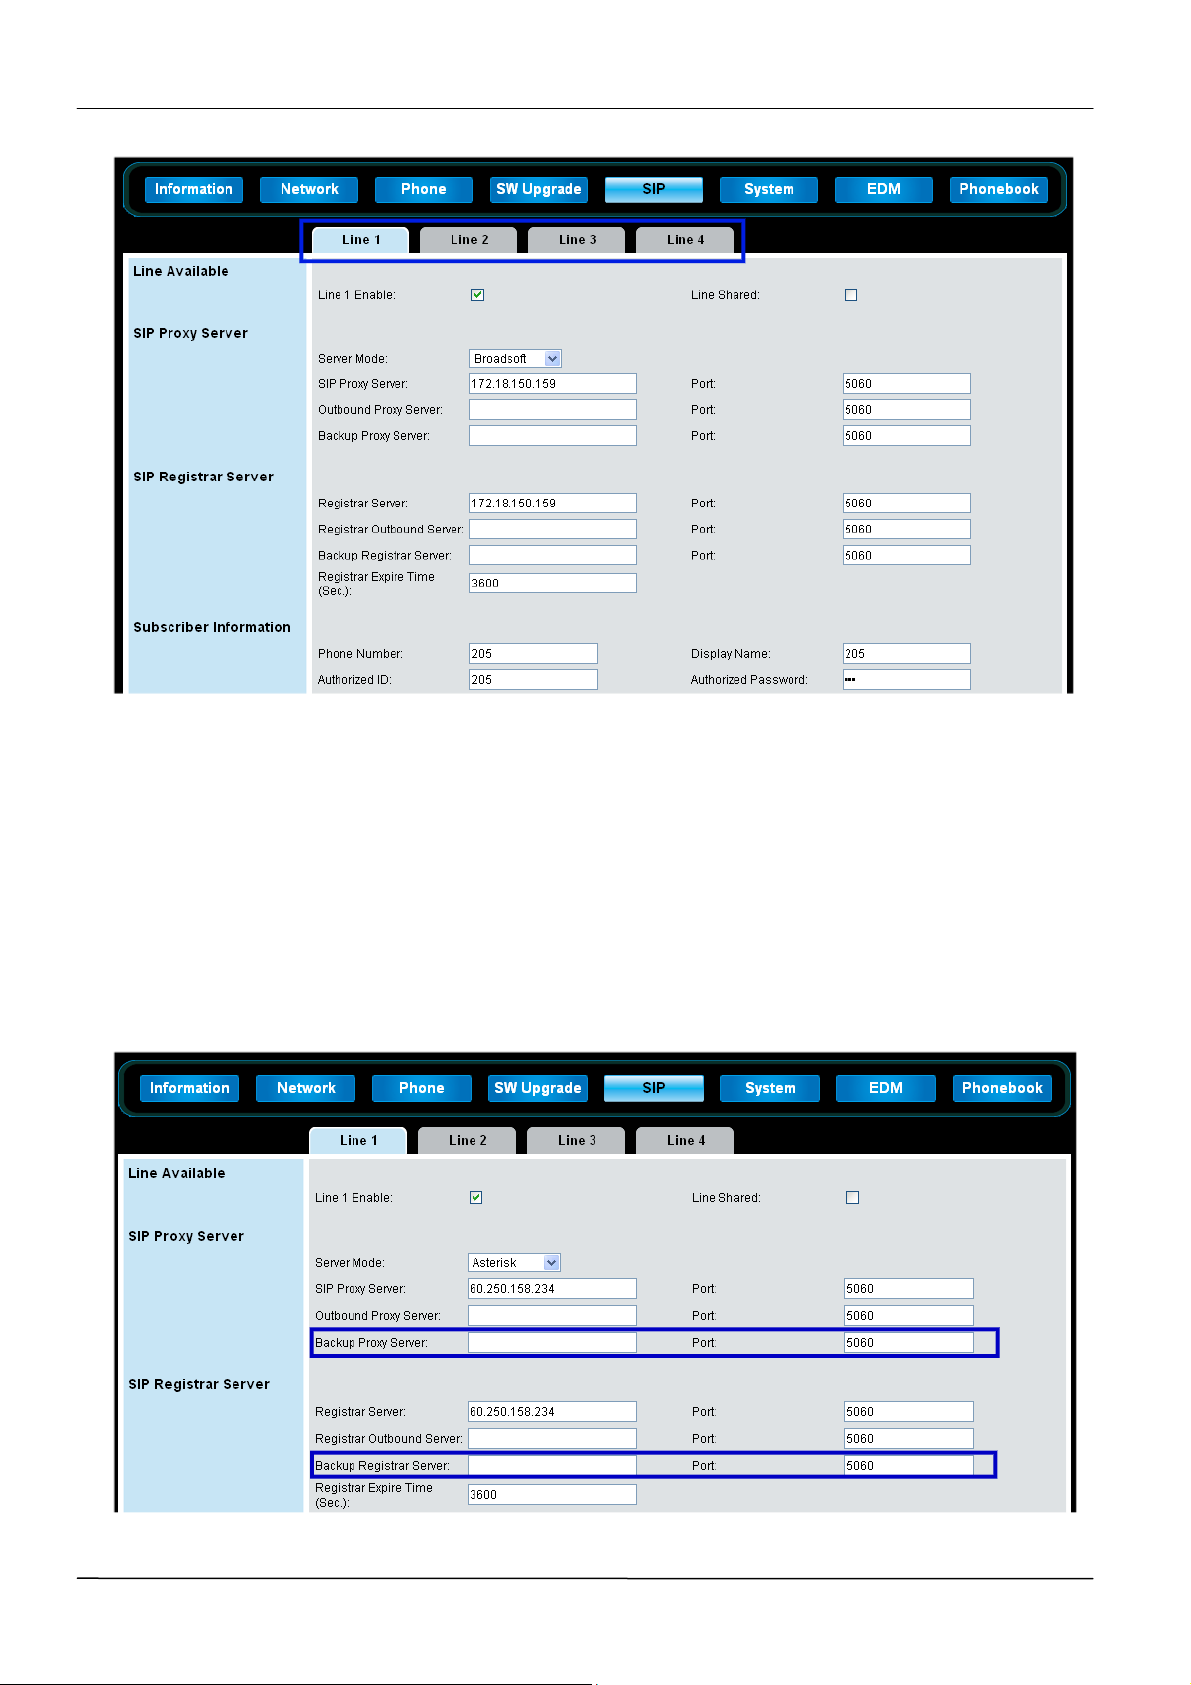
1. Configure Line1 as the registered line number, 2100.
A. Access the Web Configuration Interface by entering the phone’s IP
address in a web browser, for example, http://<phone IP address>. For
administrators, log in as Admin, and the default password is 1234.
B. Select Line1 tab which is under SIP tab.
Page 34
Page 35
MOCET IP3062 Professional IP Phone Administrators’ Guide
C. Scroll down to Line Available, and then tick the Line1 Enable item.
D. Scroll down to SIP Proxy Server, SIP Registrar Server, Subscriber
Information,….etc, and then enter all required registration information of
the line number, 2100.
E. Scroll down to the bottom, and then press “Save Settings” button to save
the configuration parameters.
2. Duplicate Line1 configuration file to Line2.
A. Scroll down to Line Configuration Mirroring i n Line1 tab.
B. Select “Line2” option, and then press “Dup” button to duplicate Line1
configuration parameters to Line2.
C. Select Line2 tab which is under SIP tab.
D. Scroll down to Line Available, and then tick the Line2 Enable item.
E. Scroll down to the bottom, and then press “Save Settings” button to save
the configuration parameters.
3. Duplicate Line1 configuration file to Line3 and Line4
A. Follow Step2 procedure to duplicate Line1 configuraiton file to Line3 and
Line4.
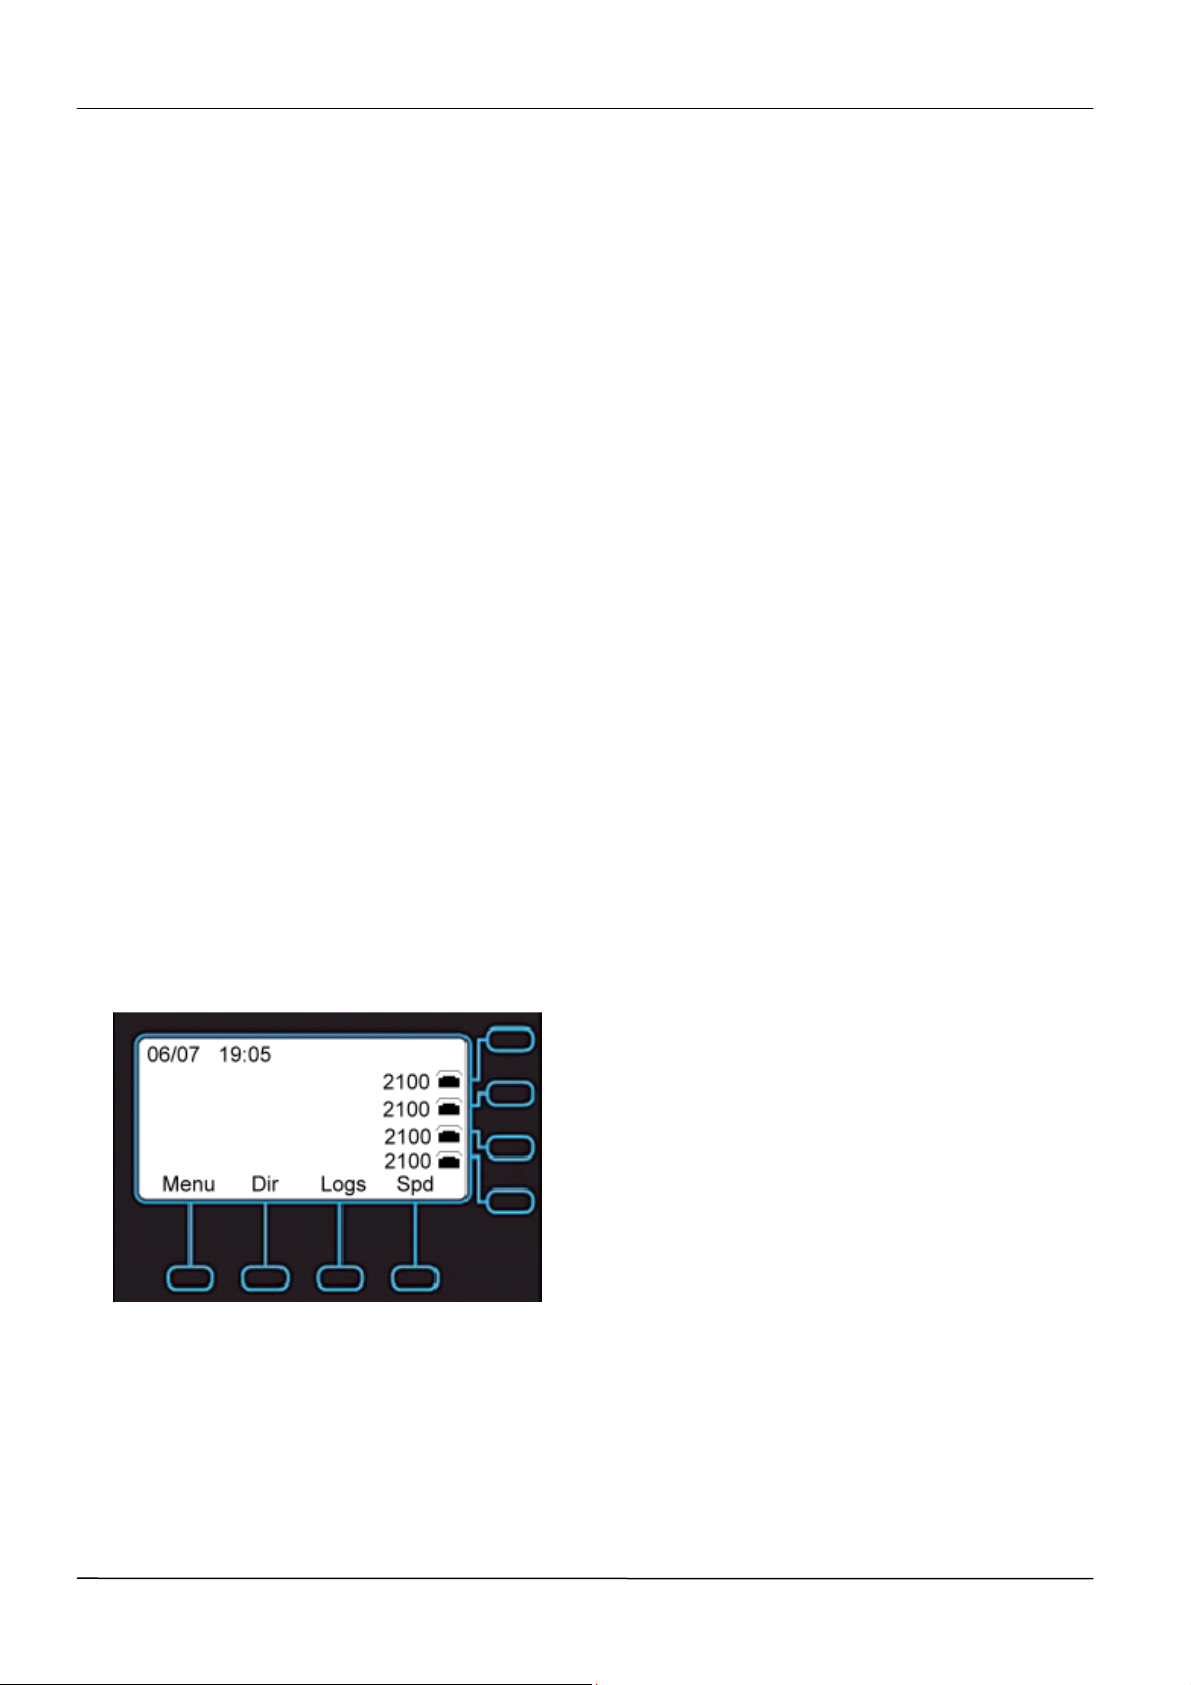
The IP3062 phone will display the registered line number 2100 on four line keys, as shown
next.
Assigning Call Progress Tones
IP3062 phone plays call signals and alerts, called call progress tones, such as busy
signals, ringback sounds, and call waiting tones. It can support 11 different call progress
tones for the following countries.
United States
China
Page 35
Page 36
MOCET IP3062 Professional IP Phone Administrators' Guide
United Kingdom
Canada
Japan
France
Korea
Germany
Singapore
HongKong
Taiwan
The default call progress tones on IP3062 phone match standard United States tones. You
can assign your IP3062 phone to match the standard tones in your region.
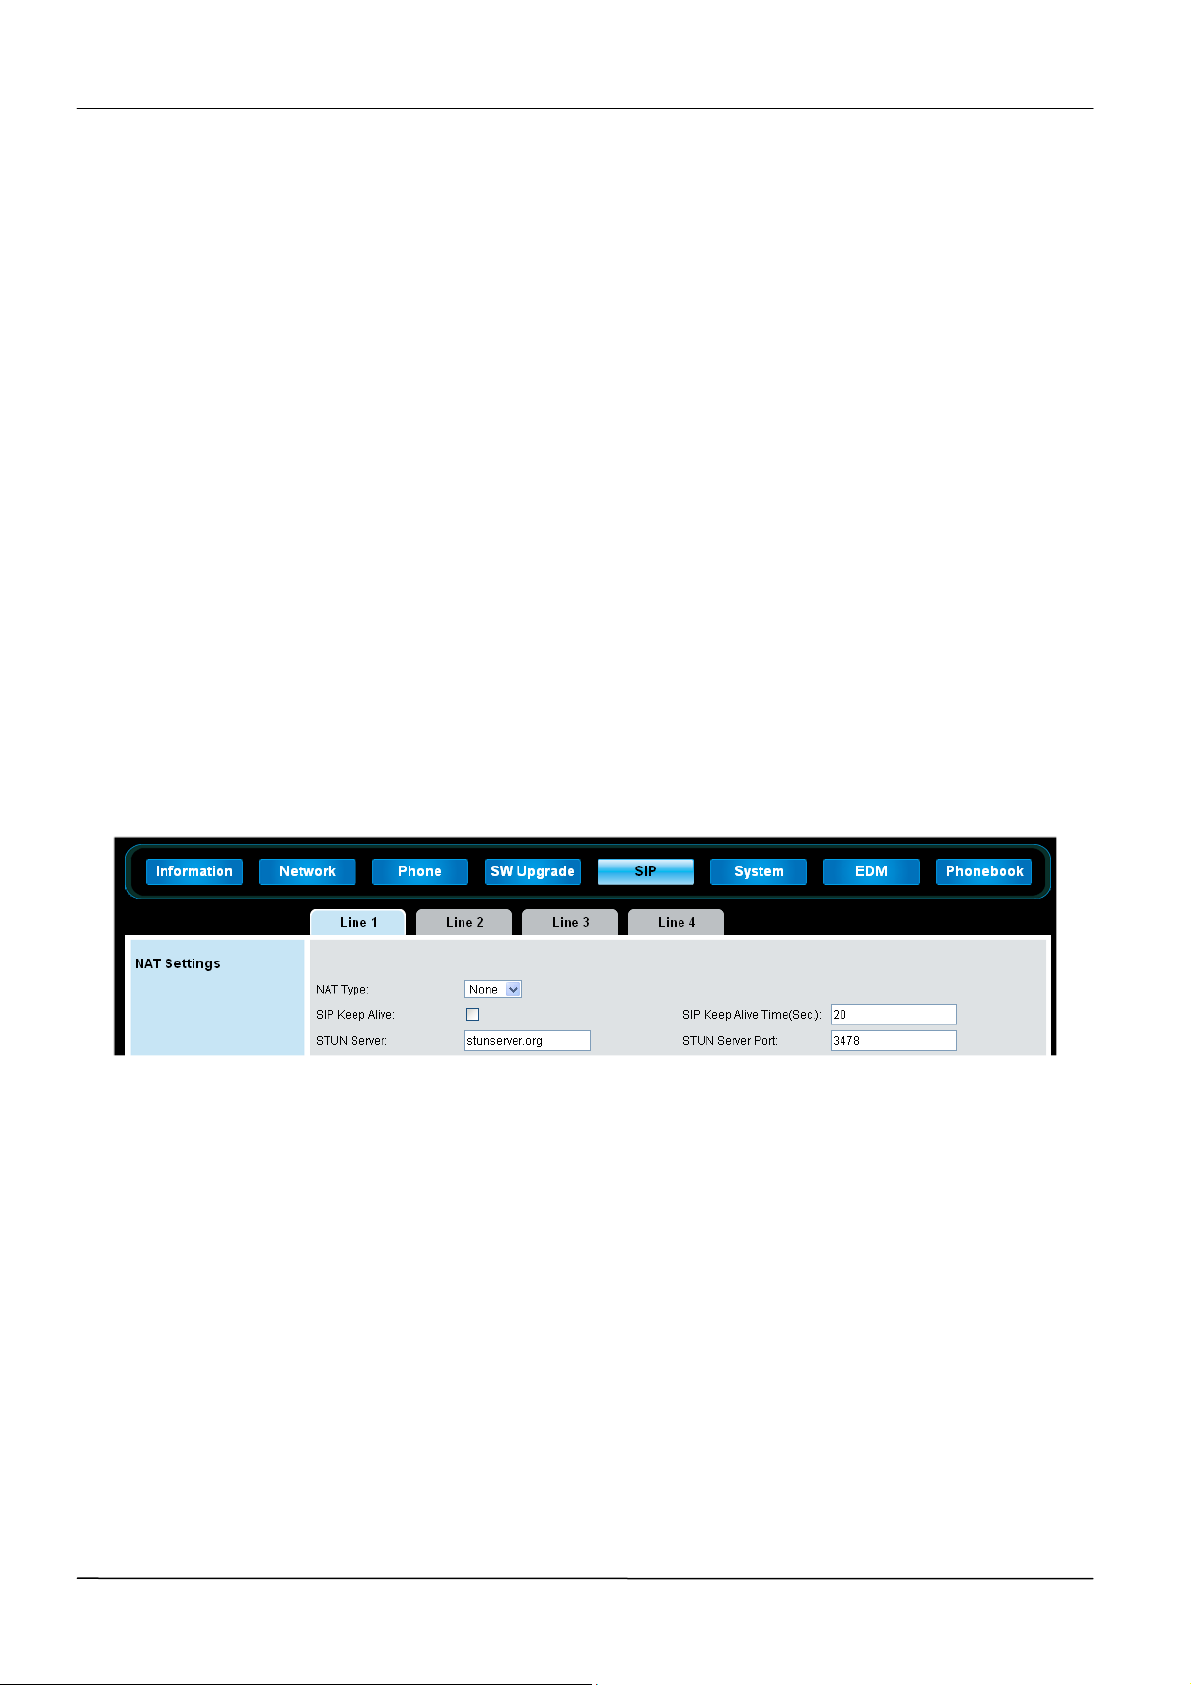
Configuring Network Address Translation
IP3062 phone can support STUN (Simple Traversal of UDP through Network Address
Translators - RFC 3489) type of NAT. The STUN type of NAT allows IP3062 phone
operating behind a NAT to discover the presence of the network address translator and to
obtain the mapped NAT address and port number that the NAT has allocated for the
IP3062 phone's UDP connections to remote hosts. IP3062 phone requires assistance from
a third-party network server (STUN server) located on the opposing (public) side of the
NAT, usually the public Internet. However, please note that STUN does not work with
symmetric NAT which is often found in the networks of large companies.
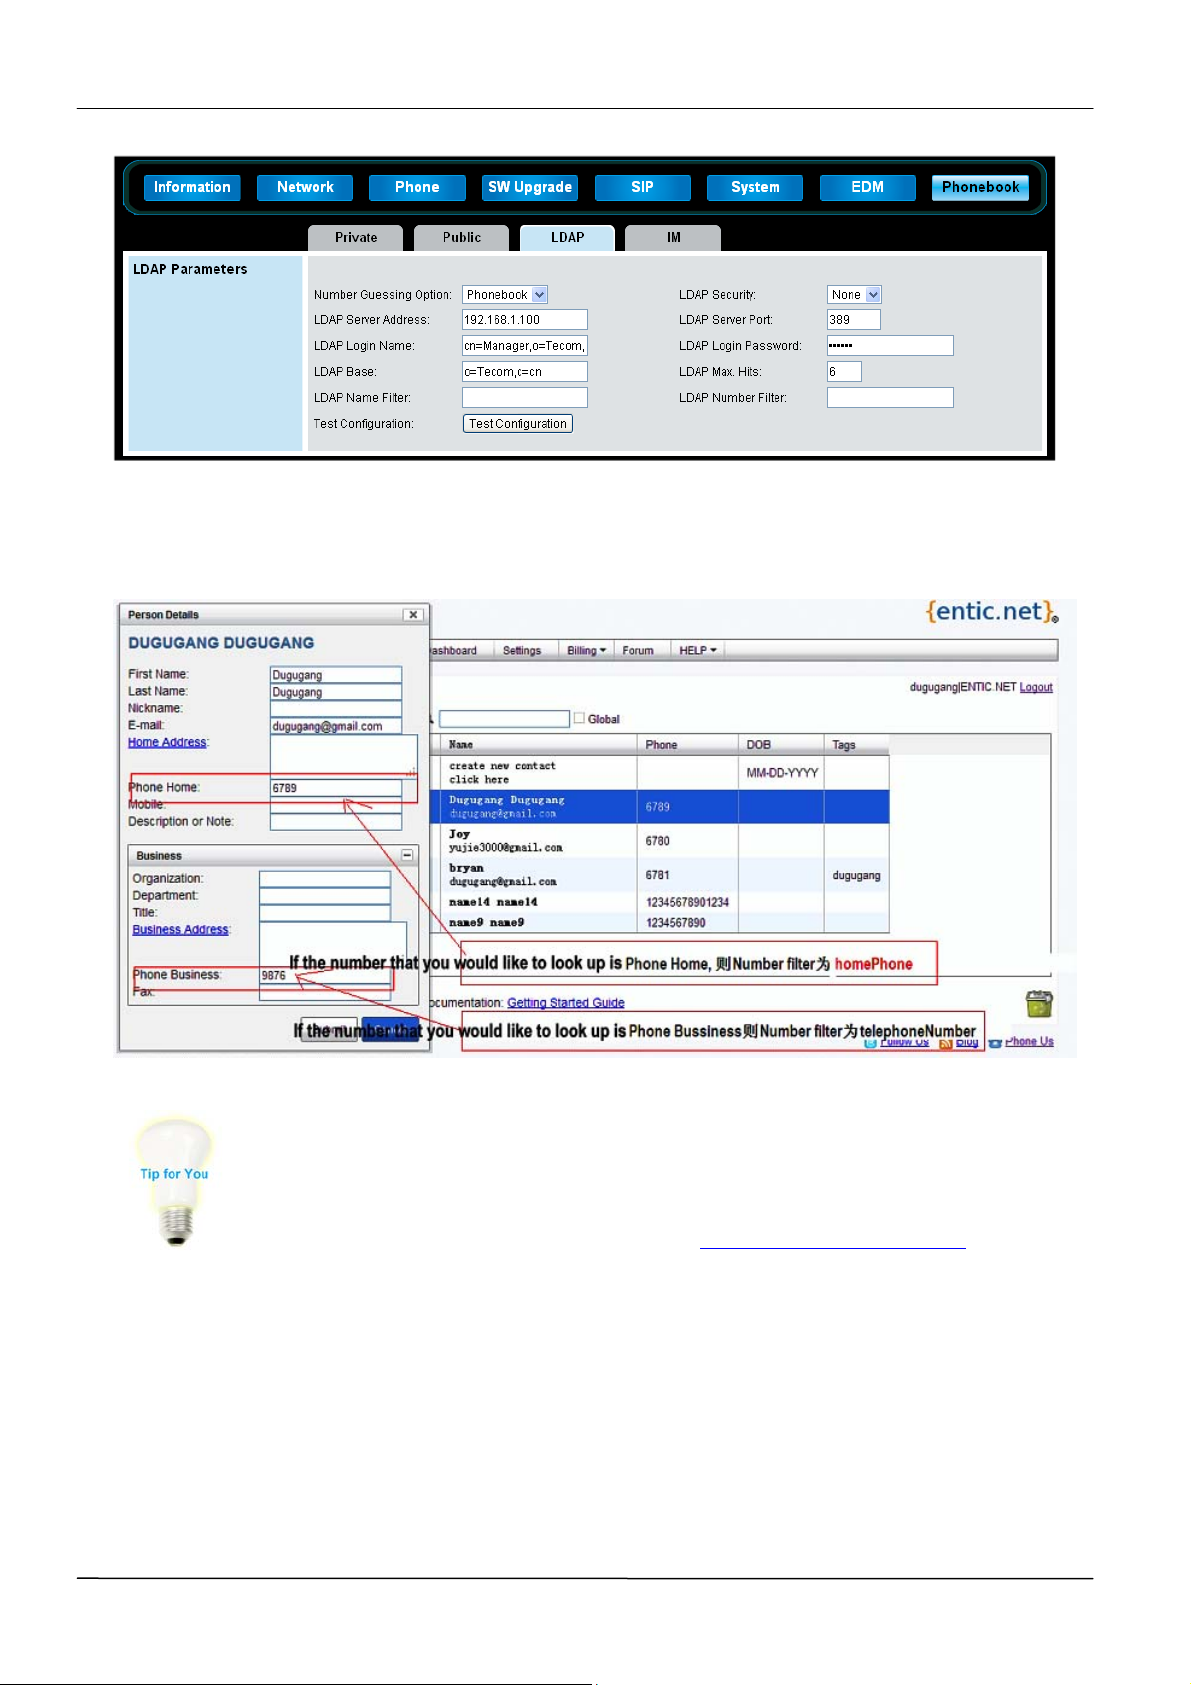
Using Corporate LDAP Directory
You can connect your IP3062 phone to a corporate directory server that supports
Lightweight Directory Access Protocol (LDAP). The corporate directory is a flexible feature
and the following table links you to the parameters you can configure. W hen the
configuration is done, you can call number you retrieve from the LDAP server on the
IP3062 phone.
Please note that if you would like to make the corporate directory be used for number
lookup on incoming calls, you need to configure Number Guessing Option as LDAP, and
specify a parameter for LDAP Number Filter field.
Page 36
Page 37
MOCET IP3062 Professional IP Phone Administrators’ Guide
Hereunder is an example. When there are many phone number types for a contact in the
LDAP server, you should specify a parameter for the LDAP Number Filter field according
to your need.
IP3062 phone currently supports Open LDAP Directory Servers, but others
may wo r k as wel l .
To learn how to configure Open LDAP Directory server in your network,
please refer to the content in the website, http://www.openldap.org/
.
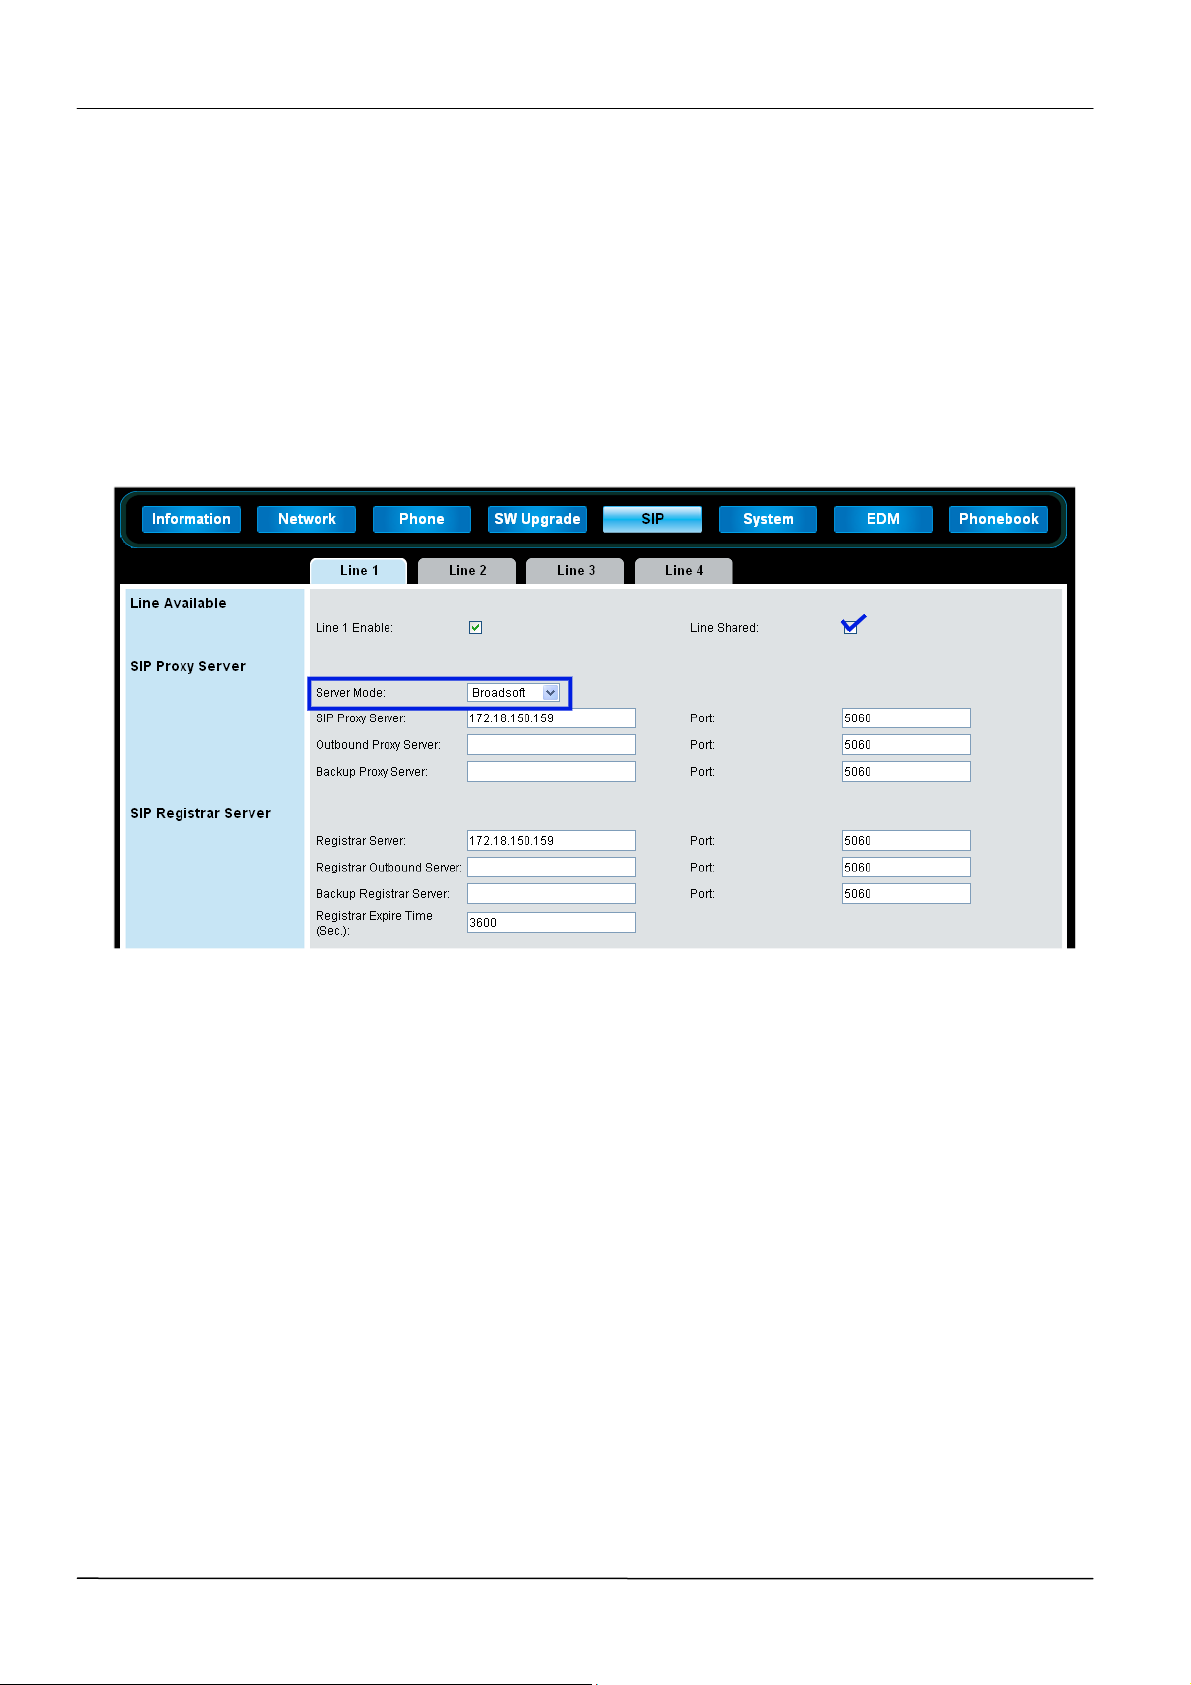
Configuring Shared Line Appearances
Shared Line Appearances connect calls and lines to multiple phones. With the shared line
appearances feature enabled, an active call displays simultaneously on multiple phones in
a group. By default, the answering phone has sole access to the incoming call, called line
seize. You can enable another phone in the group the ability to enter a conversation,
called a barge in. If the answering phone places the call on hold, that call becomes
available to all phones of the groups. The parameters you can configure are listed as
Page 37
Page 38
MOCET IP3062 Professional IP Phone Administrators' Guide
below. All call state of a call – active, inactive, on hold – are displayed on all phones of a
group.
Example Shared Line Appearances Configuration
This feature is dependent on support from a SIP call server. IP3062 phone currently
supports Broadsoft PBX only.
To enable shared call appearances on your phone, you will need to obtain a shared line
address from your SIP service provider and make settings on SIP tab of the Web
Configuration Interface.
Using Busy Lamp Field
The busy lamp field (BLF) feature enables user to monitor the status of lines on remote
phones, display remote party information, and answer incoming calls to remote phones
(called directed call pickup). The BLF feature must be supported by a call server and the
specific functions will vary with the call server you use. You may need to consult your SIP
server partner to find out how to configure BLF.
Enabling Voicemail Integration
The phone is compatible with voicemail servers. You can configure each line registration
per phone to access voicemail with a sequence numbers. When IP3062 phone gets new
message(s), it will give a visual alert on MWI LED and text display on LCD screen.
Example Voicemail Configuration
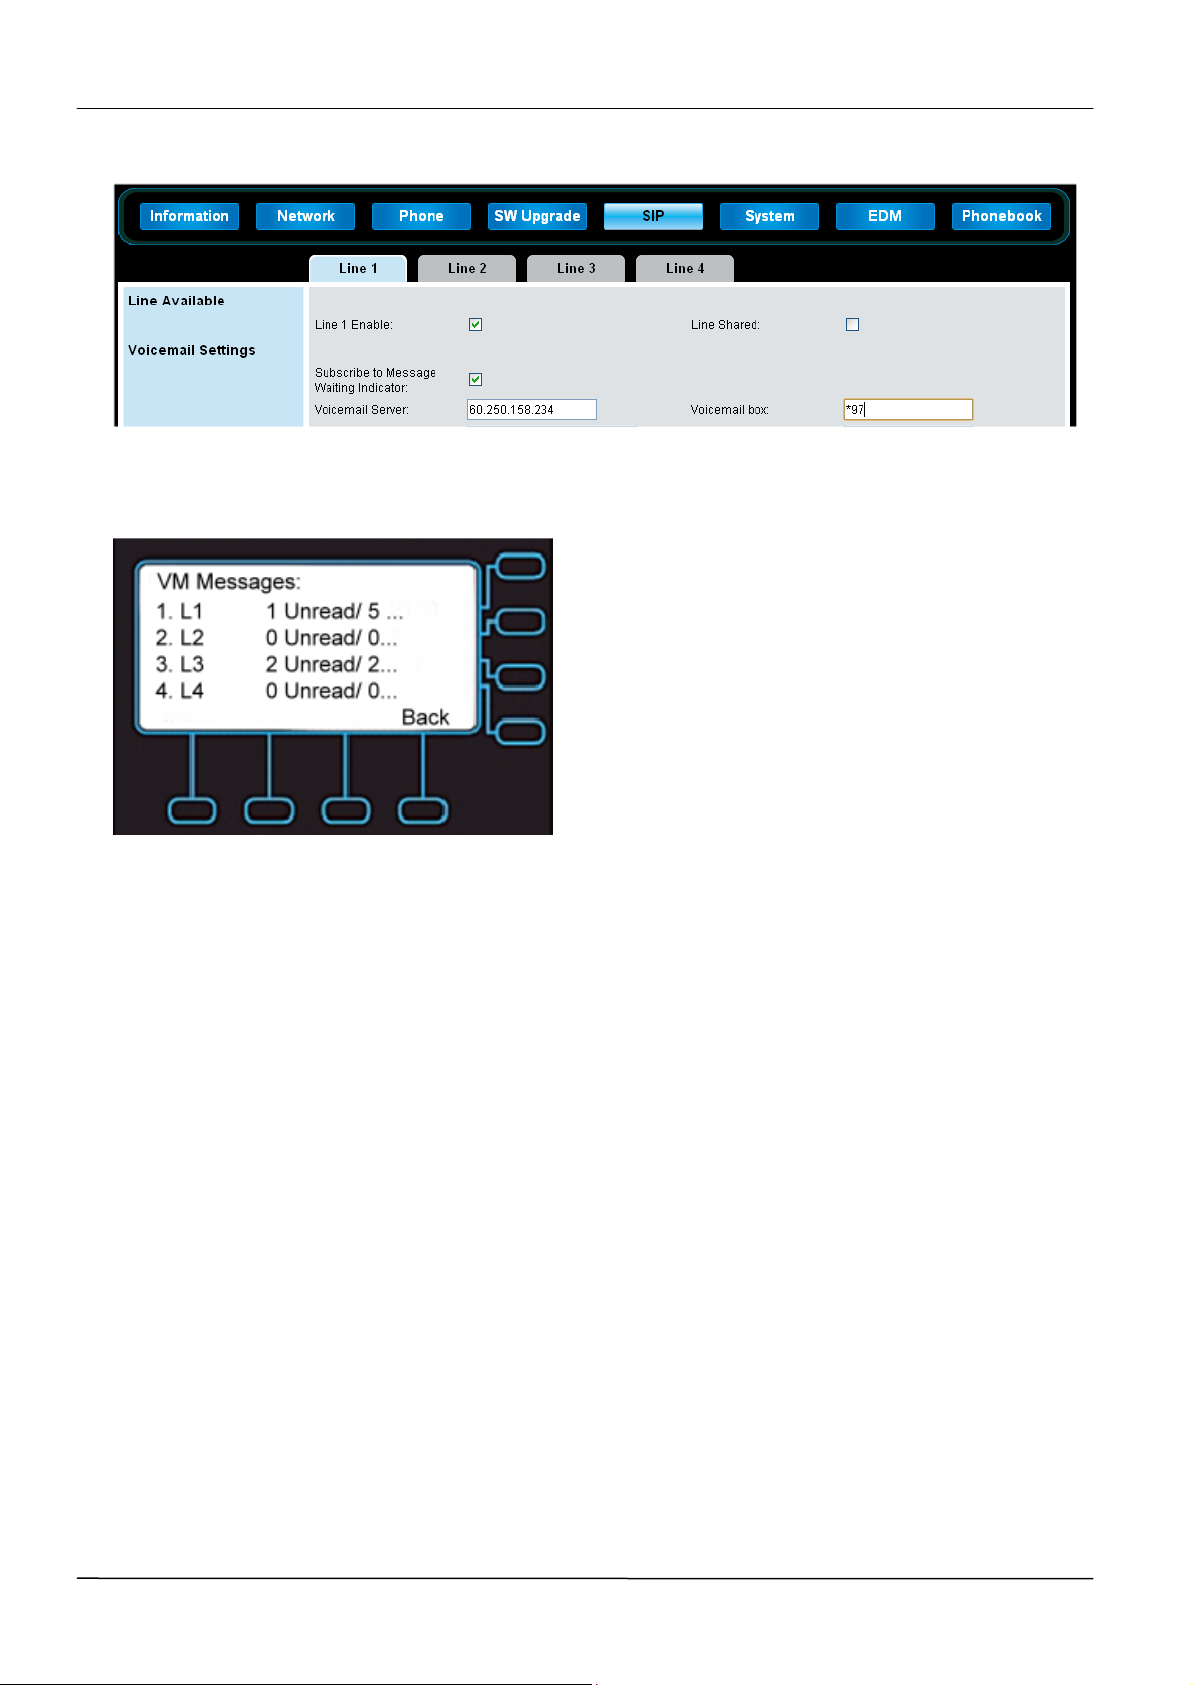
The following illustration shows you how to enable one-touch to access voicemail server.
In the illustration, line1 is configured to subscribe to Message Waiting Indicator and to the
voicemail server at 60.250.158.234; the configured sequence numbers to access
Voicemail box is *97.
Page 38
Page 39
MOCET IP3062 Professional IP Phone Administrators’ Guide
When user presses the Message key of IP3062, the phone will display the configured line1
Voicemail Messages, for example as below.
Enabling Multiple Registrations
IP3062 phone can support up to four registrations. The following illustration explains the
registration parameters and options on the Web Configuration Interface. Each registration
can be mapped to one or more line keys. Note that a line key can be used for only one
registration. The user can select which registration to use for outgoing calls or which to use
when initiating new instant message dialogs.
Page 39
Page 40
MOCET IP3062 Professional IP Phone Administrators' Guide
Setting up Backup Servers
Backup Servers are often required in VoIP deployments to ensure continuity of phone
service if, for example, the call server needs to be taken off-line for maintenance, the
server fails, or the connection between the phone and the server fails.
Backup Servers Settings
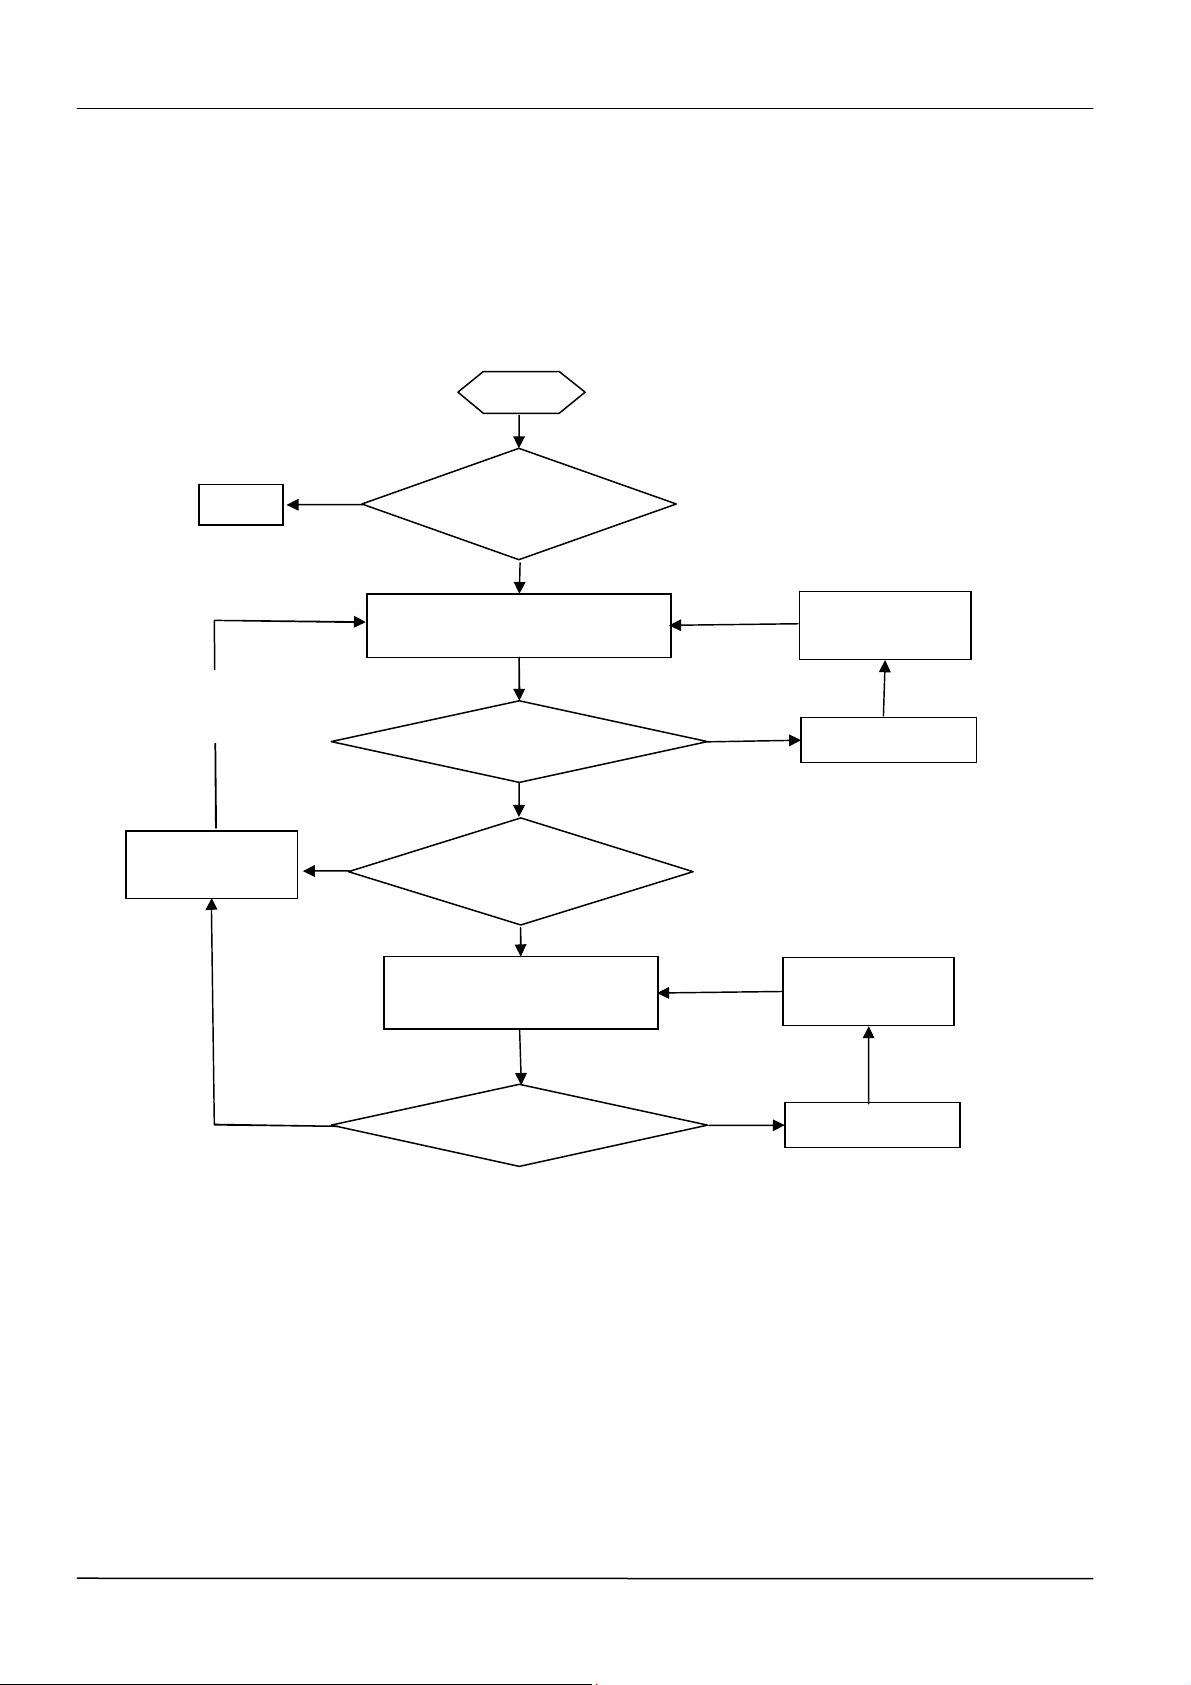
To use backup servers, you need to configure the Backup Proxy Server and Port fields
and the Backup Registrar Server and Port fields as the following illustration.
Page 40
Page 41
MOCET IP3062 Professional IP Phone Administrators’ Guide
SIP Servers Registration Procedure
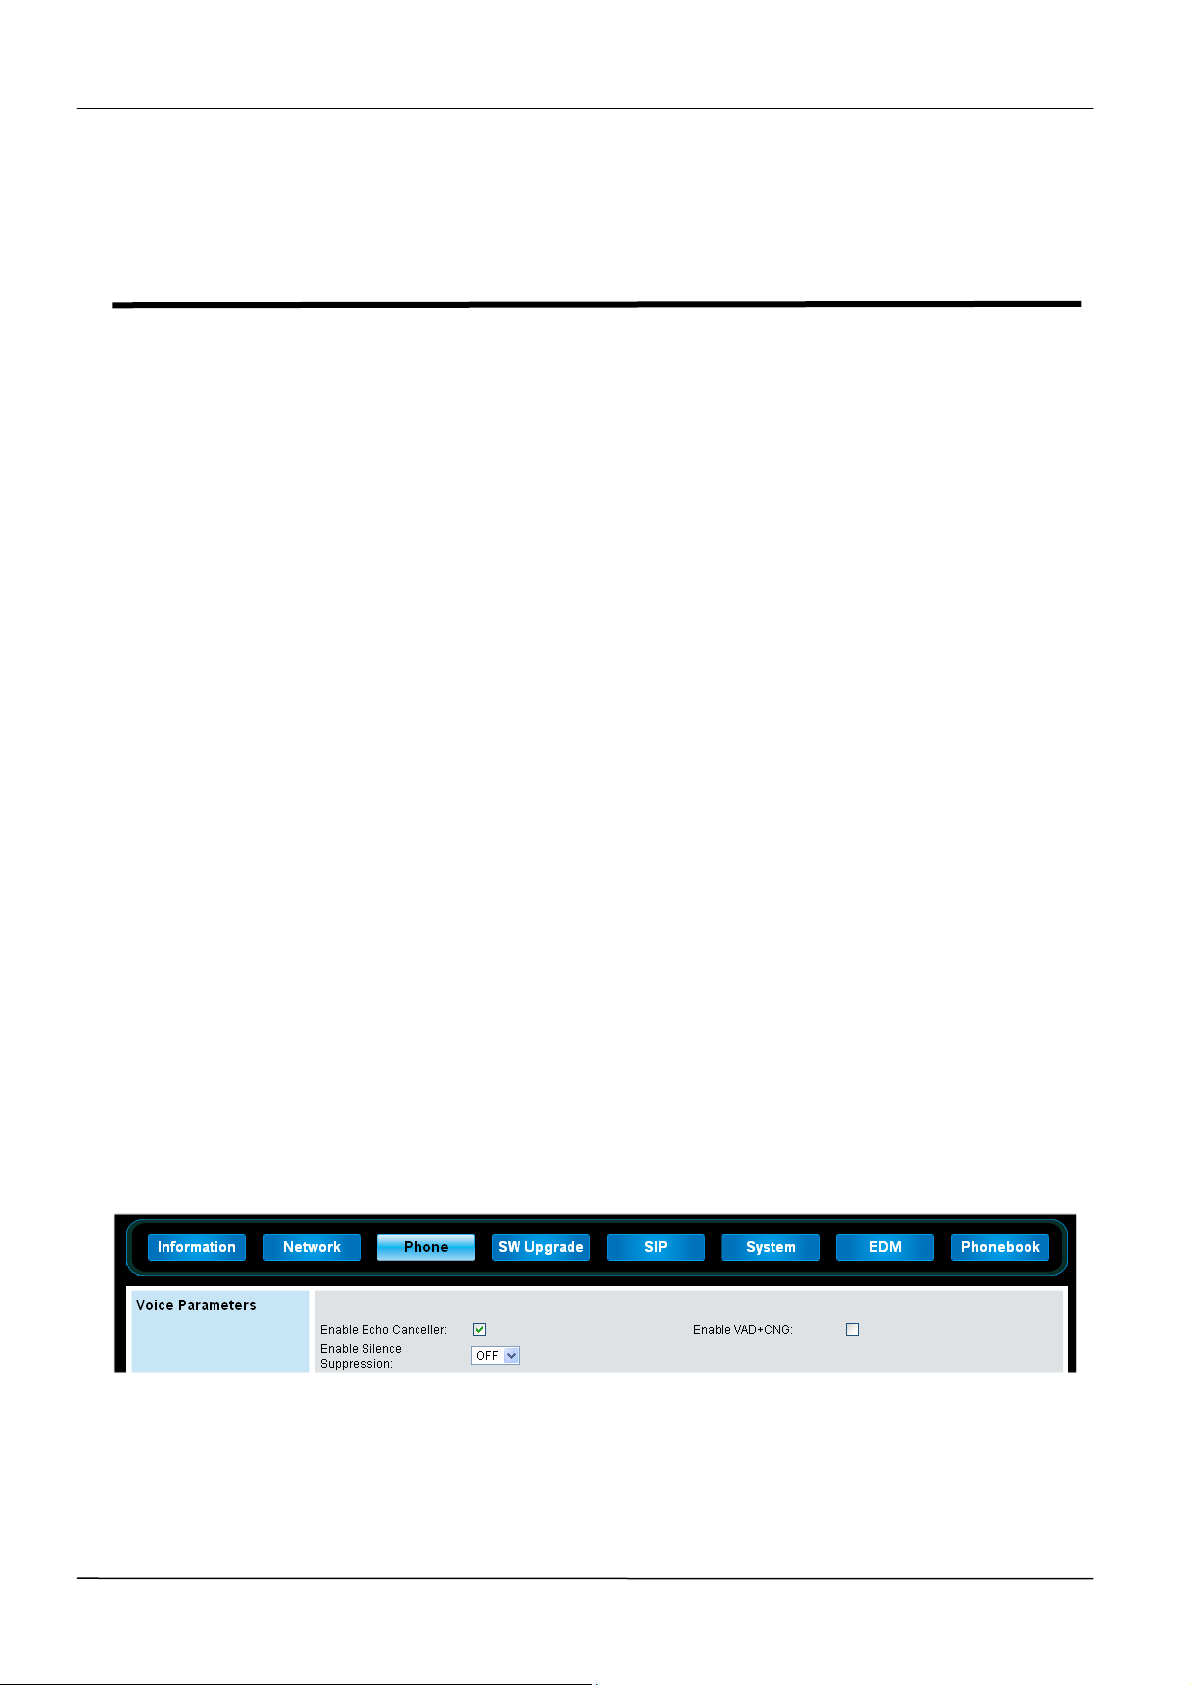
From the following illustration, you can learn how a phone registers to the first SIP servers
and when it will use the backup servers.
Start
Stop
TimeOut
Retry
Start Retry
Timer
N
N
Has Valid SIP
server?
Y
Send REGISTER to
First SIP Server
Received 200 OK?
N
Has Backup SIP
Server?
Y
Send REGISTER to
Backup SIP Server
TimeOut
Refresh
Y
TimeOut
Refresh
Start Refresh
Timer
Registered
Start Refresh
Timer
N
Received 200 OK?
Y
Registered
Page 41
Page 42
MOCET IP3062 Professional IP Phone Administrators' Guide
Chapter 6: Setting Up Phone Audio
Features
After you set up your IP3062 phones on the network, users can send and receive calls
using the default configuration. However, you might consider modifications that optimize
the audio quality of your network.
Frequency bandwidth is one of the most critical elements affecting the intelligibility of
speech in telephony. Complicating the intelligibility of telephony speech in today’s world is
background noise, variations in environmental reverberation, and communication among
persons speaking a variety of native languages. While VoIP technology can broaden the
frequency bandwidth and improve sound quality and intelligibility, it can also increase the
network load and create a demand for lower raw bit rates.
This chapter describes the audio sound quality features and options you can configure for
your IP3062 phones. Use these features and options to optimize the conditions of your
organization’s phone network system.
This chapter shows you how to update your configuration for the following audio-related
features:
Acoustic Echo Cancellation and Voice Activity Detection
Generating Dual Tone Multi-Frequency (DTMF) Tones
Audio Codecs
Acoustic Echo Cancellation and Voice Activity Detection
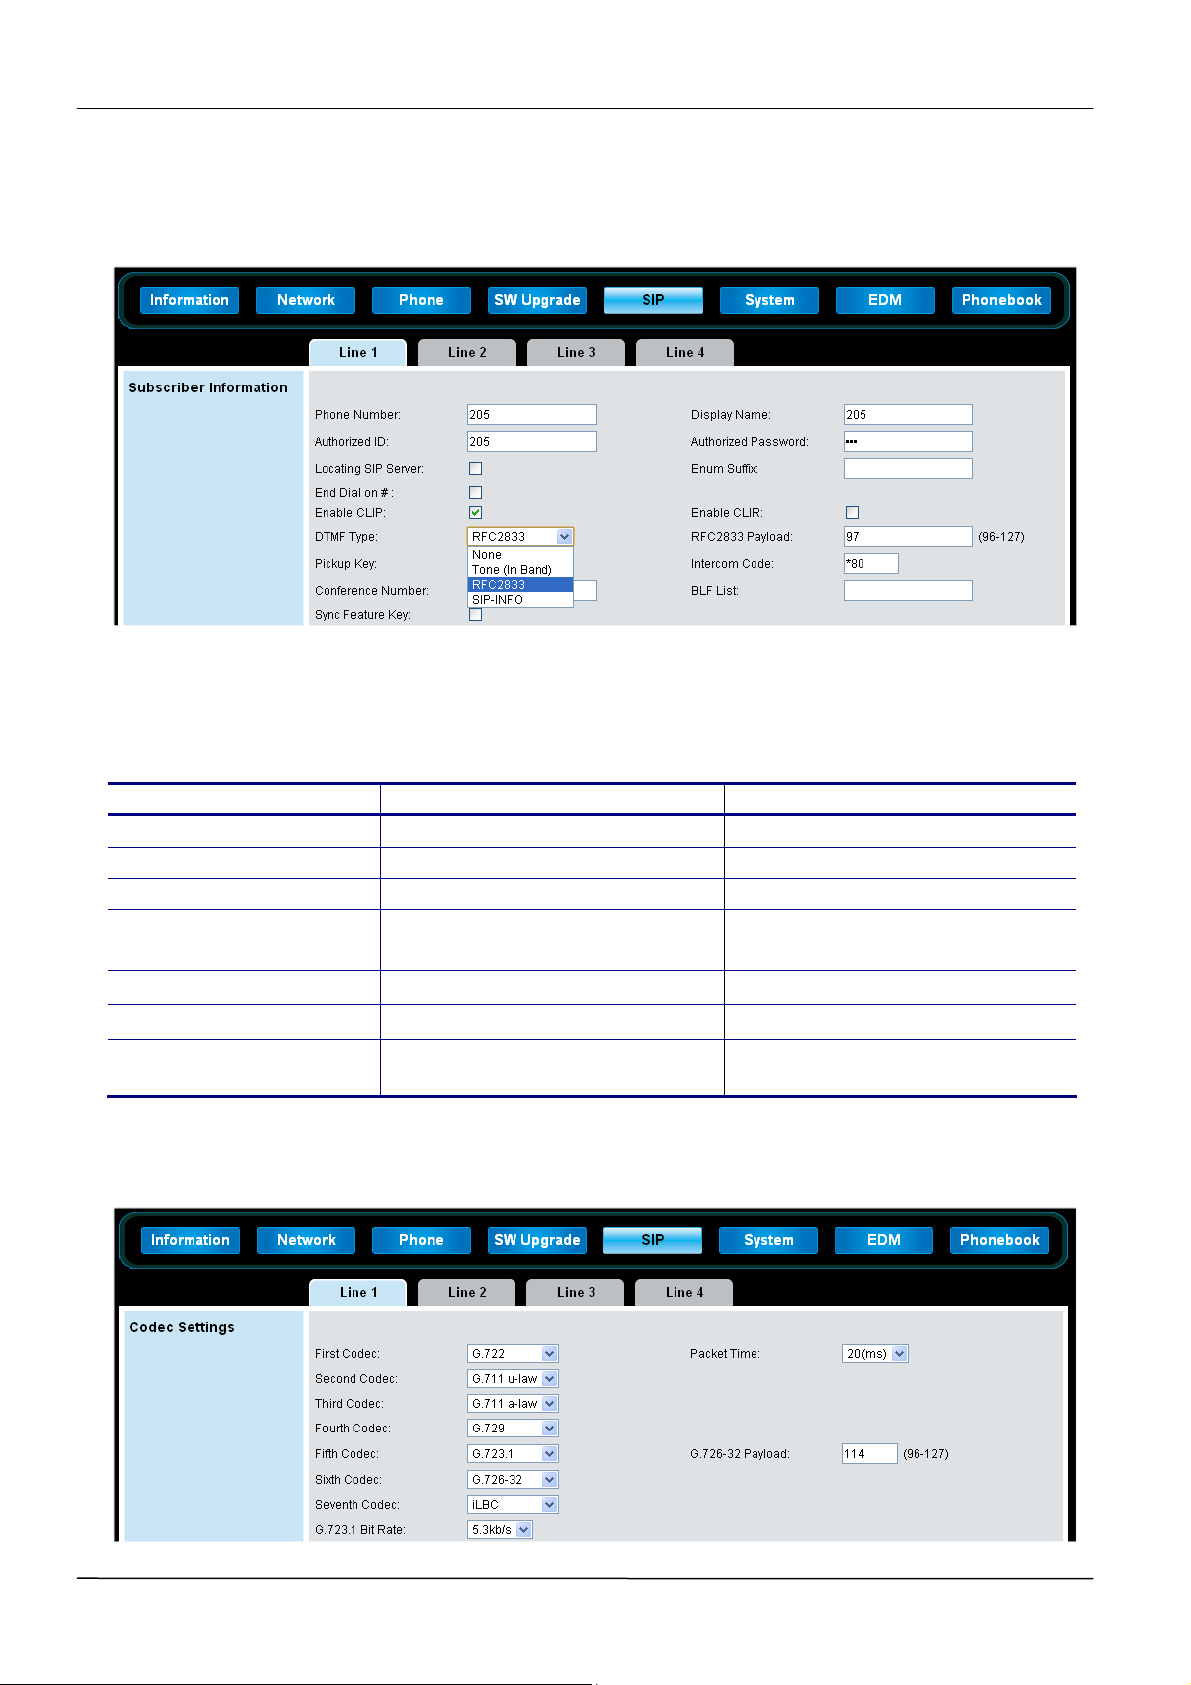
The IP3062 phone uses advanced acoustic echo cancellation (AEC) for handsfree
operation using the speakerphone. In addition, it also provides voice activity detection
(VAD) which is to detect periods of silence in the transmit data path, so the phone doesn’t
have to transmit unnecessary data packets for outgoing audio. This process conserves
network bandwidth. The AEC and VAD parameters in the following illustration will help you
set up this feature.
Generating Dual Tone Multi-Frequency (DTMF) Tones
The IP3062 phone generates dual tone multi-frequency (DTMF) tones in response to user
dialing on the dial pad. These tones are transmitted in the real-time transport protocol
(RTP) streams of connected calls. The phone can encode the DTMF tones using the
Page 42
Page 43
MOCET IP3062 Professional IP Phone Administrators’ Guide
active voice codec or using RFC2833-compatible encoding. The DTMF parameters in the
following illustration will help you set up this feature. For the DTMF Type selection, you
may need to consult your SIP server partner to find out which is the suitable one.
Audio Codecs
The following table details the audio codec support for IP3062 phone.
Audio Codec Raw Bit Rate Default Payload Size
G.711 u-law
G.711 A-law
G.722
G.723.1
G.726-32
G.729
iLBC
You can find Codec Settings in the Web Configuration Interface, as shown in the following
illustration.
64 Kbps 20 ms
64 Kbps 20 ms
64 Kbps 20 ms
5.3 Kbps
6.3 Kbps
32 Kbps 20 ms
8 Kbps 20 ms
15.2 Kbps
13.33 Kbps
30 ms
30 ms
20 ms
30 ms
Page 43
Page 44
MOCET IP3062 Professional IP Phone Administrators' Guide
Chapter 7: Setting Up User and Phone
Security Features
After setting up your IP3062 phones on your network, users can place and answer calls
using the default configuration. However, you may require some security-related changes
to optimize your system for best results.
This chapter shows you how to update your configuration for the following security-related
features:
Local User and Administrator Passwords
Locking the Phone
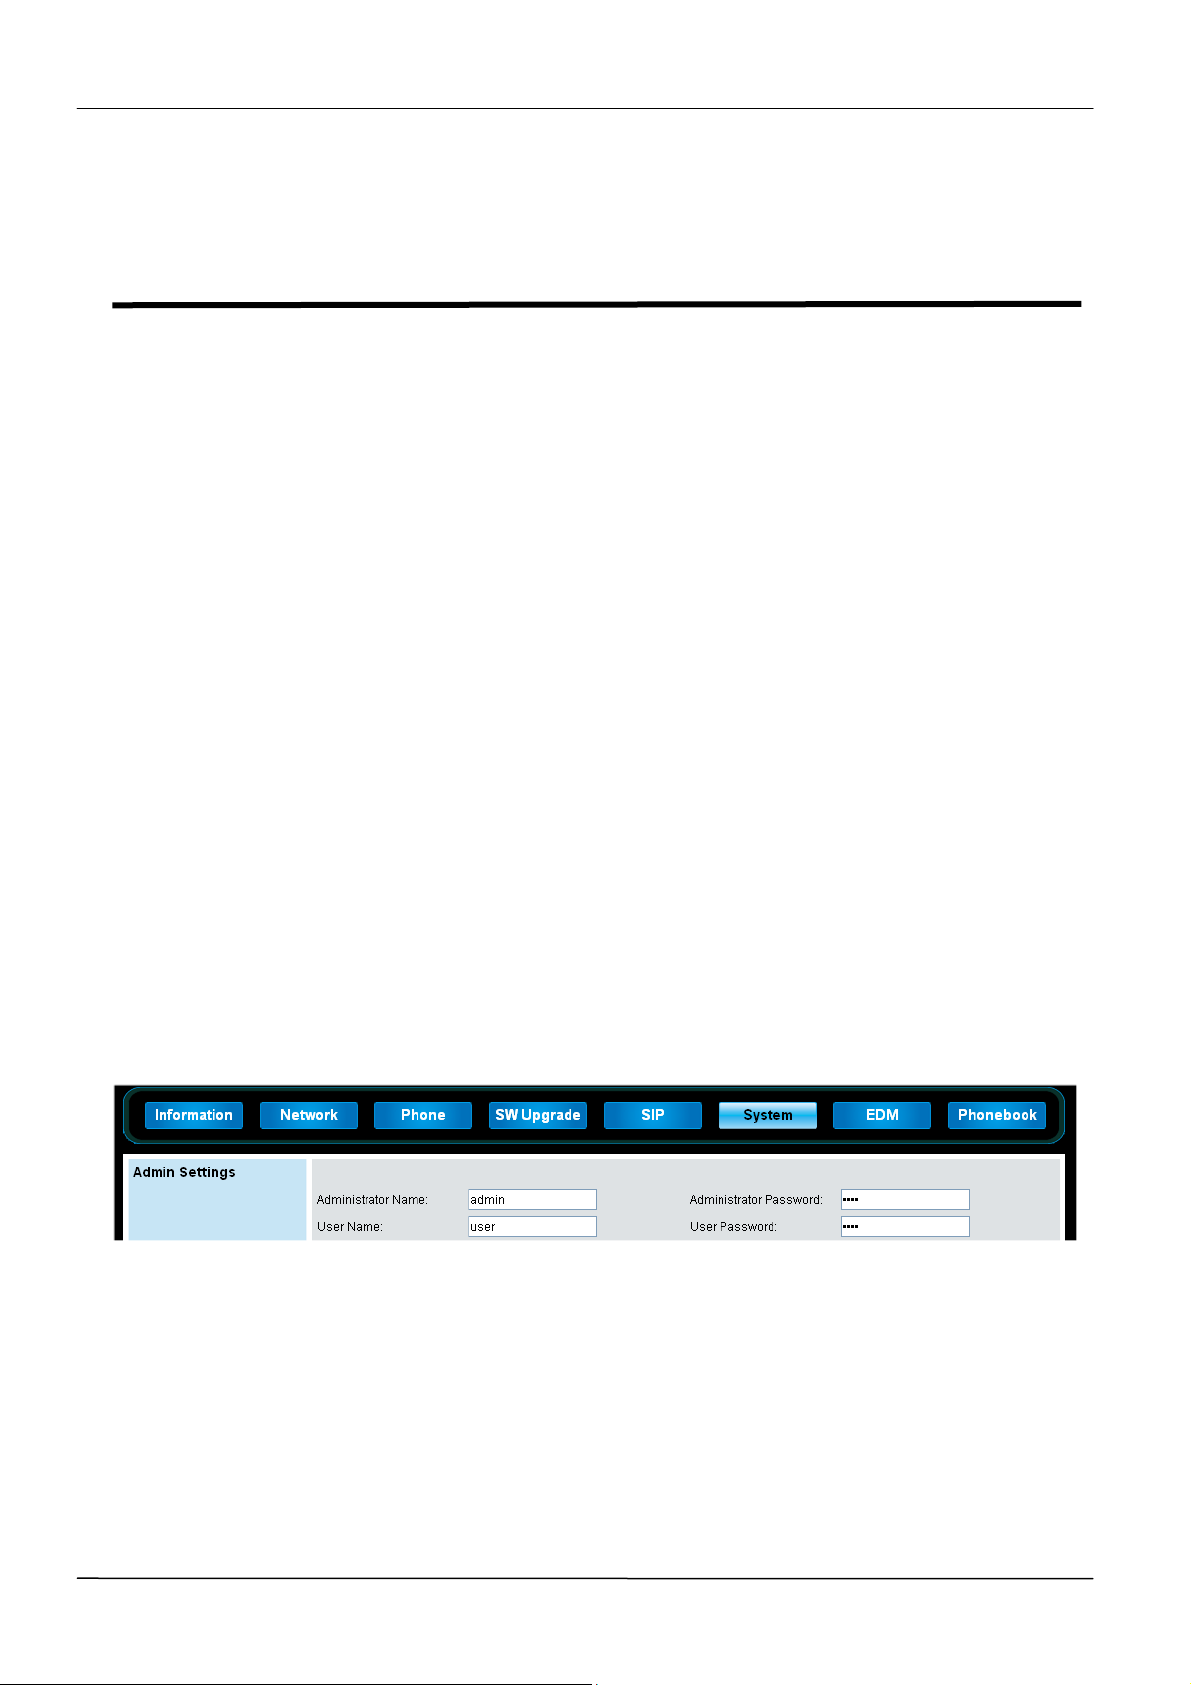
Local User and Administrator Passwords
Several local settings menus are protected with administrator password. The phone will
prompt for administrator password before granting access to the menu options. The Web
Configuration Interface is protected by the user and administrator password and different
page will display depending on which is used. The default user name is user, and the
default user password is 1111. The default administrator name is admin, and the default
administrator password is 1234. You should change the administrator password from the
default value.
Web Configuration Interface
To change the user or administrator password, navigate to System tab. To change the
administrator password, you must log in to the Web Configuration Interface as an
administrator.
Local Phone User Interface
To change the administrator password, navigate to Menu > Admin Setting, enter the
current administrator password, and select Account Setting > Admin Name and Admin
Password.
To change the user password, navigate to Menu > Admin Setting, enter the current
administrator password, and select Account Setting > User Name and User Password.
Page 44
Page 45
MOCET IP3062 Professional IP Phone Administrators’ Guide
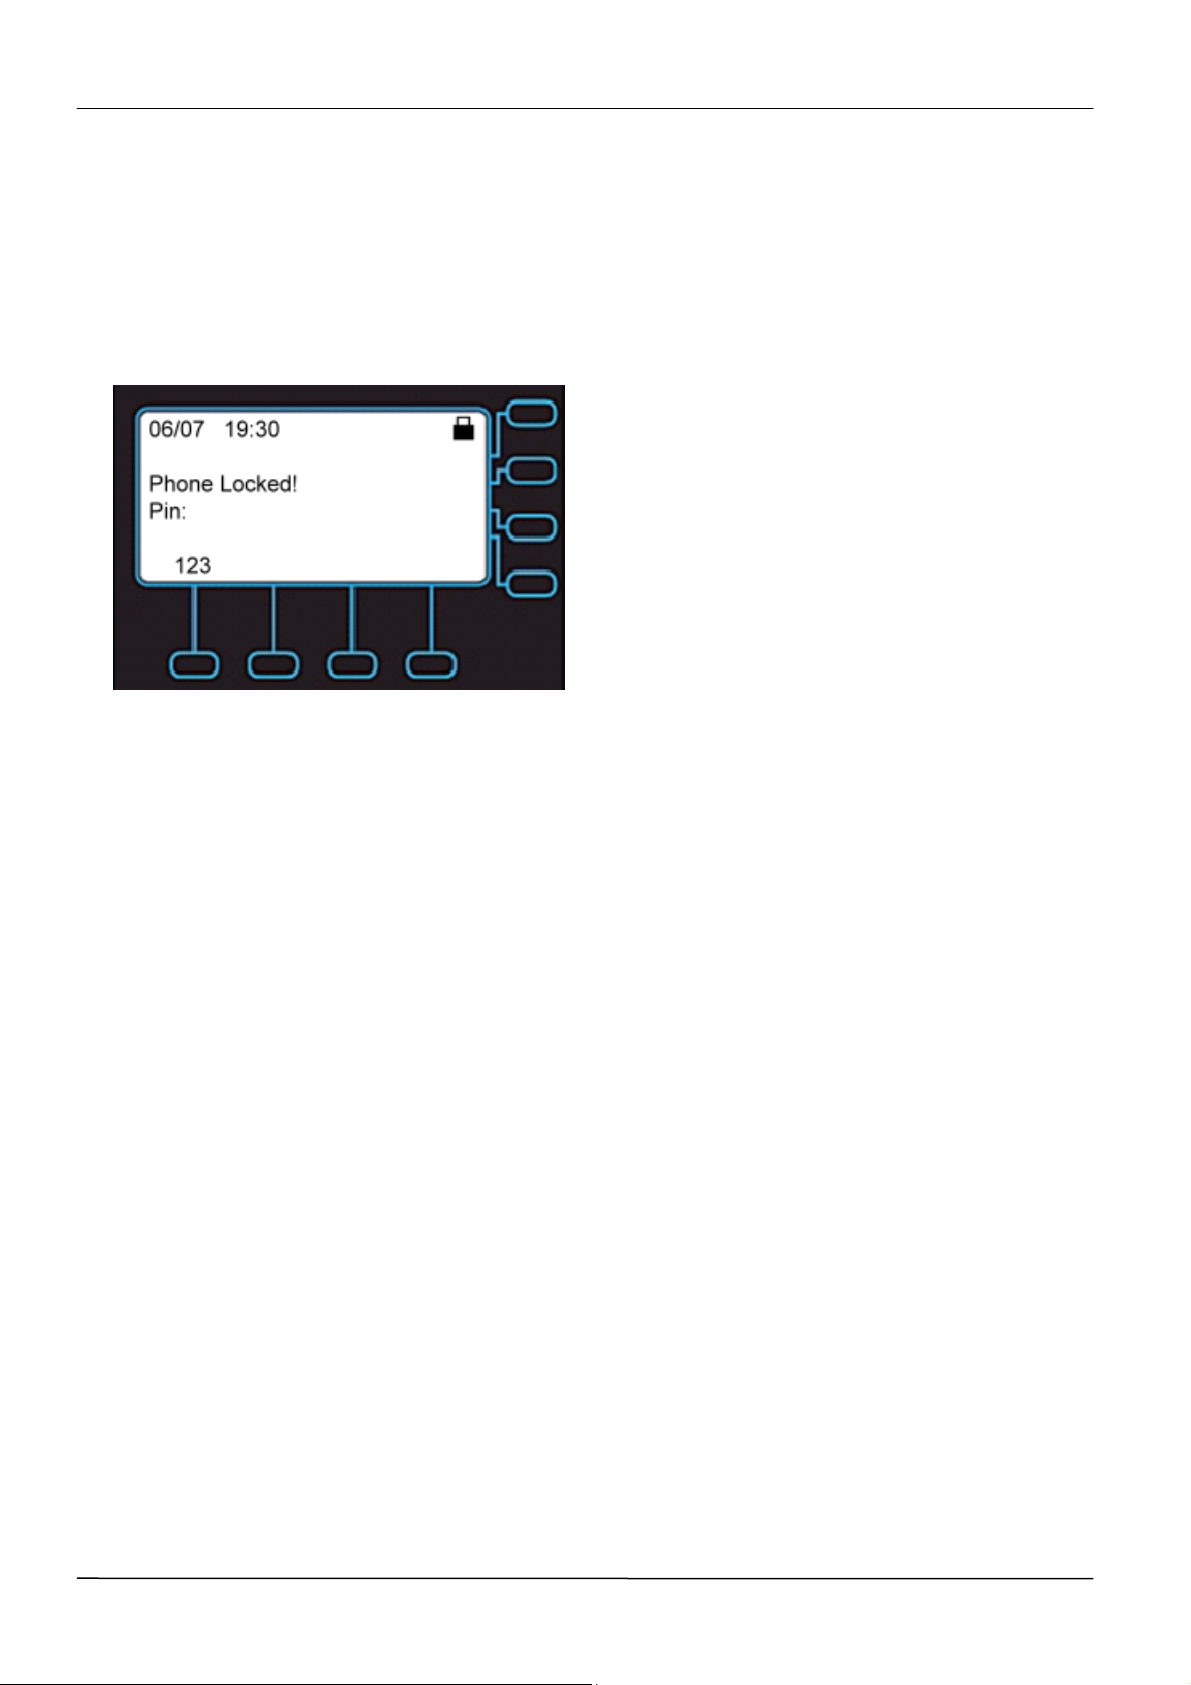
Locking the Phone
User can lock their phones, and prevent access to the menu or key presses, by entering
Phone Locked mode through the phone menu.
Once the phone is locked, all user features and access to menus are disabled. The phone
screen will show as below.
However, the IP3062 phone still can receive incoming calls.
To unlock the phone, the user enters the PIN code (Default: 1111 as user password for
Web Configuration Interface access), and presses OK key; if it is entered correctly, the
phone returns to its normal idle state.
In case the user forgets their PIN code, the system administrator can unlock their phone
by entering admin password (Default: 1234 as administrator password for Web
Configuration Interface access), and pressing the OK key.
Page 45
Page 46

MOCET IP3062 Professional IP Phone Administrators' Guide
Part 4: System Maintenance Tasks
Part 4 provides you with the information for upgrading your IP3062 phones firmwares and
some maintenance tasks such as configuration file backup and updates, dial plan, system
log and reset to default.
Part 4 consists of the following chapters:
Chapter 8: Upgrading Your IP3062 Phones Firmware
Chapter 9: Miscellaneous Maintenance Tasks
Page 46
Page 47

MOCET IP3062 Professional IP Phone Administrators’ Guide
Chapter 8: Upgrading Your IP3062
Phones Firmware
IP3062 phones support several different ways to update its firmware, please refer to the
following table.
No. Method Description User Admin. Dist.
Software Patch (update.ip3062)
Auto-Provision
1
Upgrade with MOCET
APS
Upgrade from USB
2
Memory Dongle
upgrade via TFTP/ FTP/ HTTP/
HTTPS mass provisioning by using
Tecom APS protocol with encrypted
XML configuration file.
Download SW Update Pack,
includes Linux kernel, application
pack and software patch, from USB
memory dongle.
Upgrade using Web
Browser on A
3
Specified Computer
Upgrade Using
TFTP/FTP/HTTP/HTTPS
4
Server
Engineering Key
5
Sequences on Root
Menu
Emergency Upgrade
6
on Boot
Updating Images
through Console by
7
U-boot
Download SW Update Pack,
includes Linux kernel, application
pack and software patch, from web
browser on a PC.
Software Patch (update.ip3062) and
XML configuration file update via
TFTP/FTP/HTTP/HTTPS server.
Download Software Patch
(update.ip3062) from TFTP server or
USB memory dongle.
When the system partition on flash is
damaged, press the special keys
combination in booting to download
complete flash image from TFTP
server at fixed IP address.
This method is required to have a
dedicated console cable and take
apart housings.
It downloads image from TFTP
server by issuing download
commands through a dedicated
console cable.
Page 47
Page 48
MOCET IP3062 Professional IP Phone Administrators' Guide
Auto-Provision Upgrade with MOCET APS
To learn how to set up the provisioning server, please refer to Chapter 4: Setting up the
Provisioning Se rver .
Please note that for general users, they are unable to use auto-provision upgrade if their
Operator/ ITSP do not provide Auto-Provisioning System (APS).
Upgrade from USB Memory Dongle
To learn how to use USB memory dongle to do firmware upgrade, please refer to Chapter
11: Using USB Memory Dongle for Firmware Upgrade
Upgrade Using Web Browser on a Specified Computer
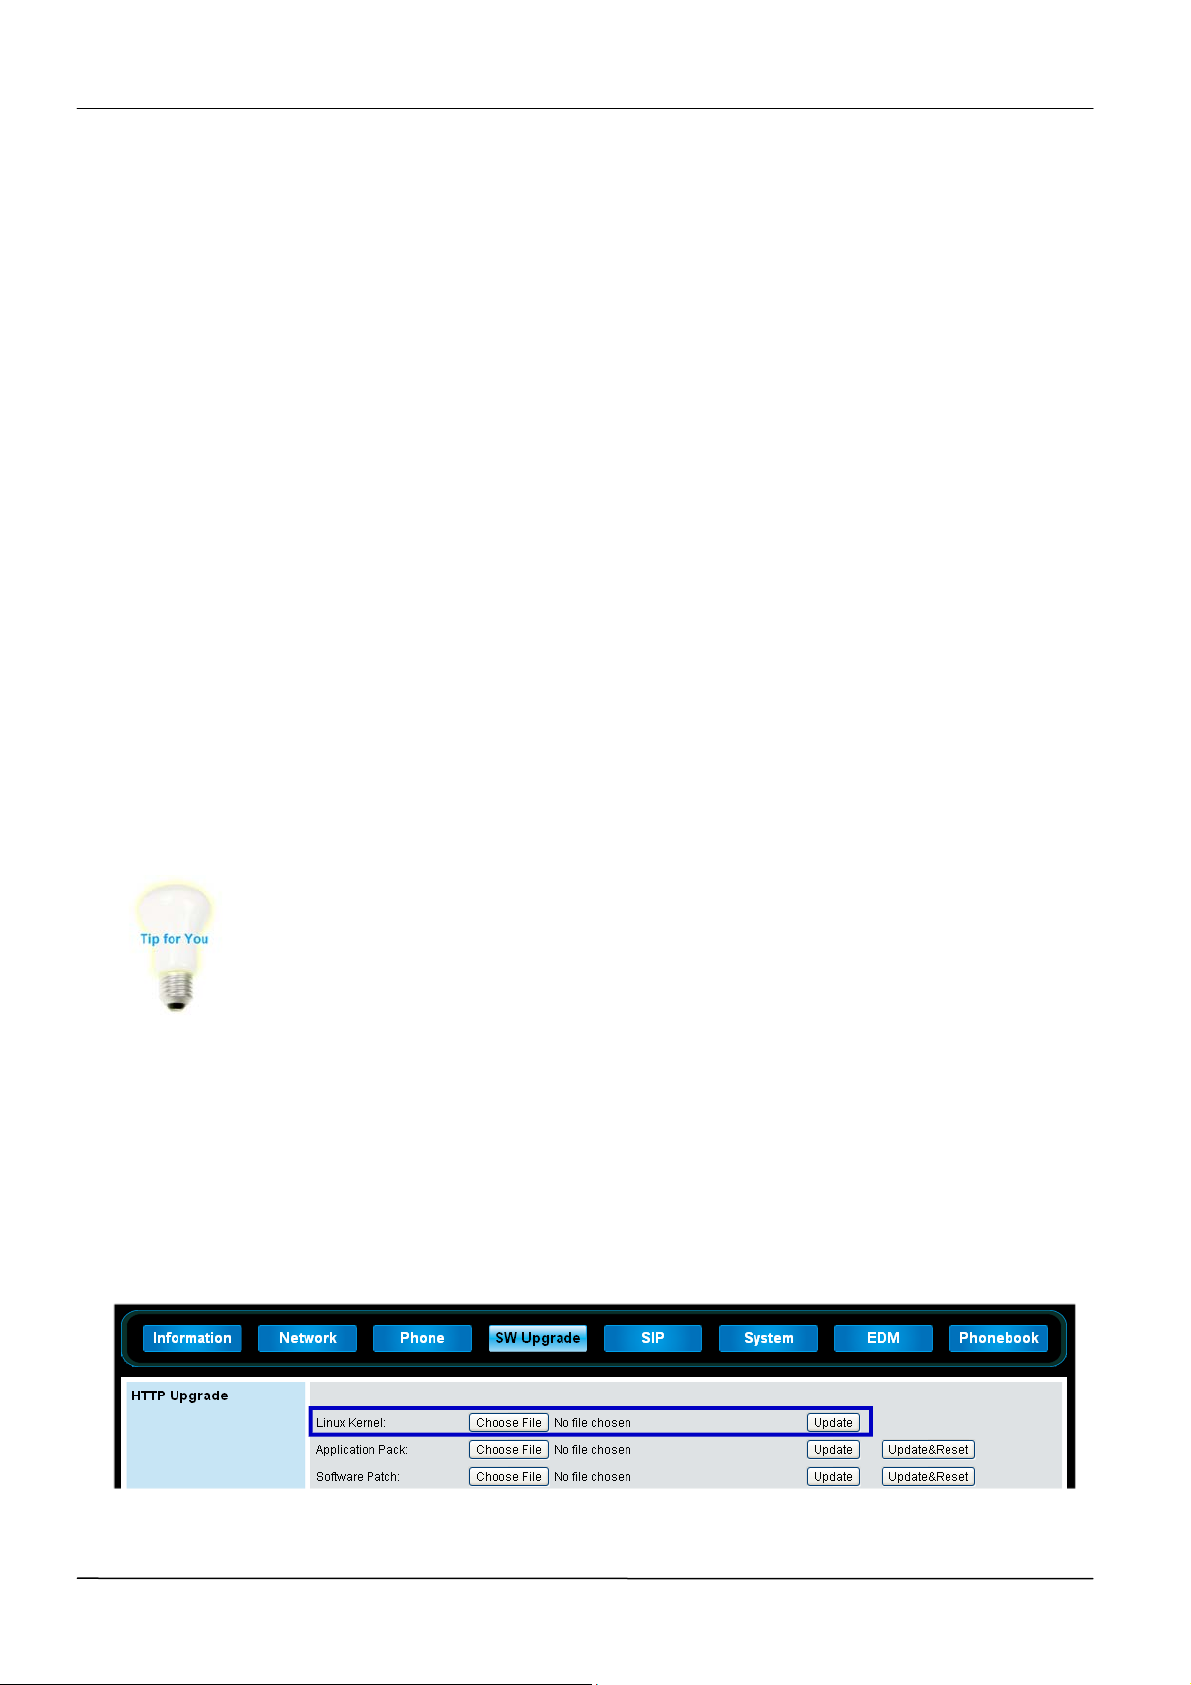
You can upgrade IP3062 phone firmware through Web Configuration Interface on
administrator mode.
To save upgrade time, IP3062 supports individual firmware upgrade as following.
Kernel Upgrade
Application Pack Upgrade
Software Patch Upgrade
Please note that you have to wait for the firmware update completed and
make sure there is no interrupt during the update progress.
Kernel Upgrade
1. Select SW Upgrade tab of Web Configuration Interface.
2. Press Choose File button to select a kernel image named as, kernel.ip3062,
for Linux Kernel option.
3. Press Update button to start Kernel Upgrade.
Page 48
Page 49
MOCET IP3062 Professional IP Phone Administrators’ Guide
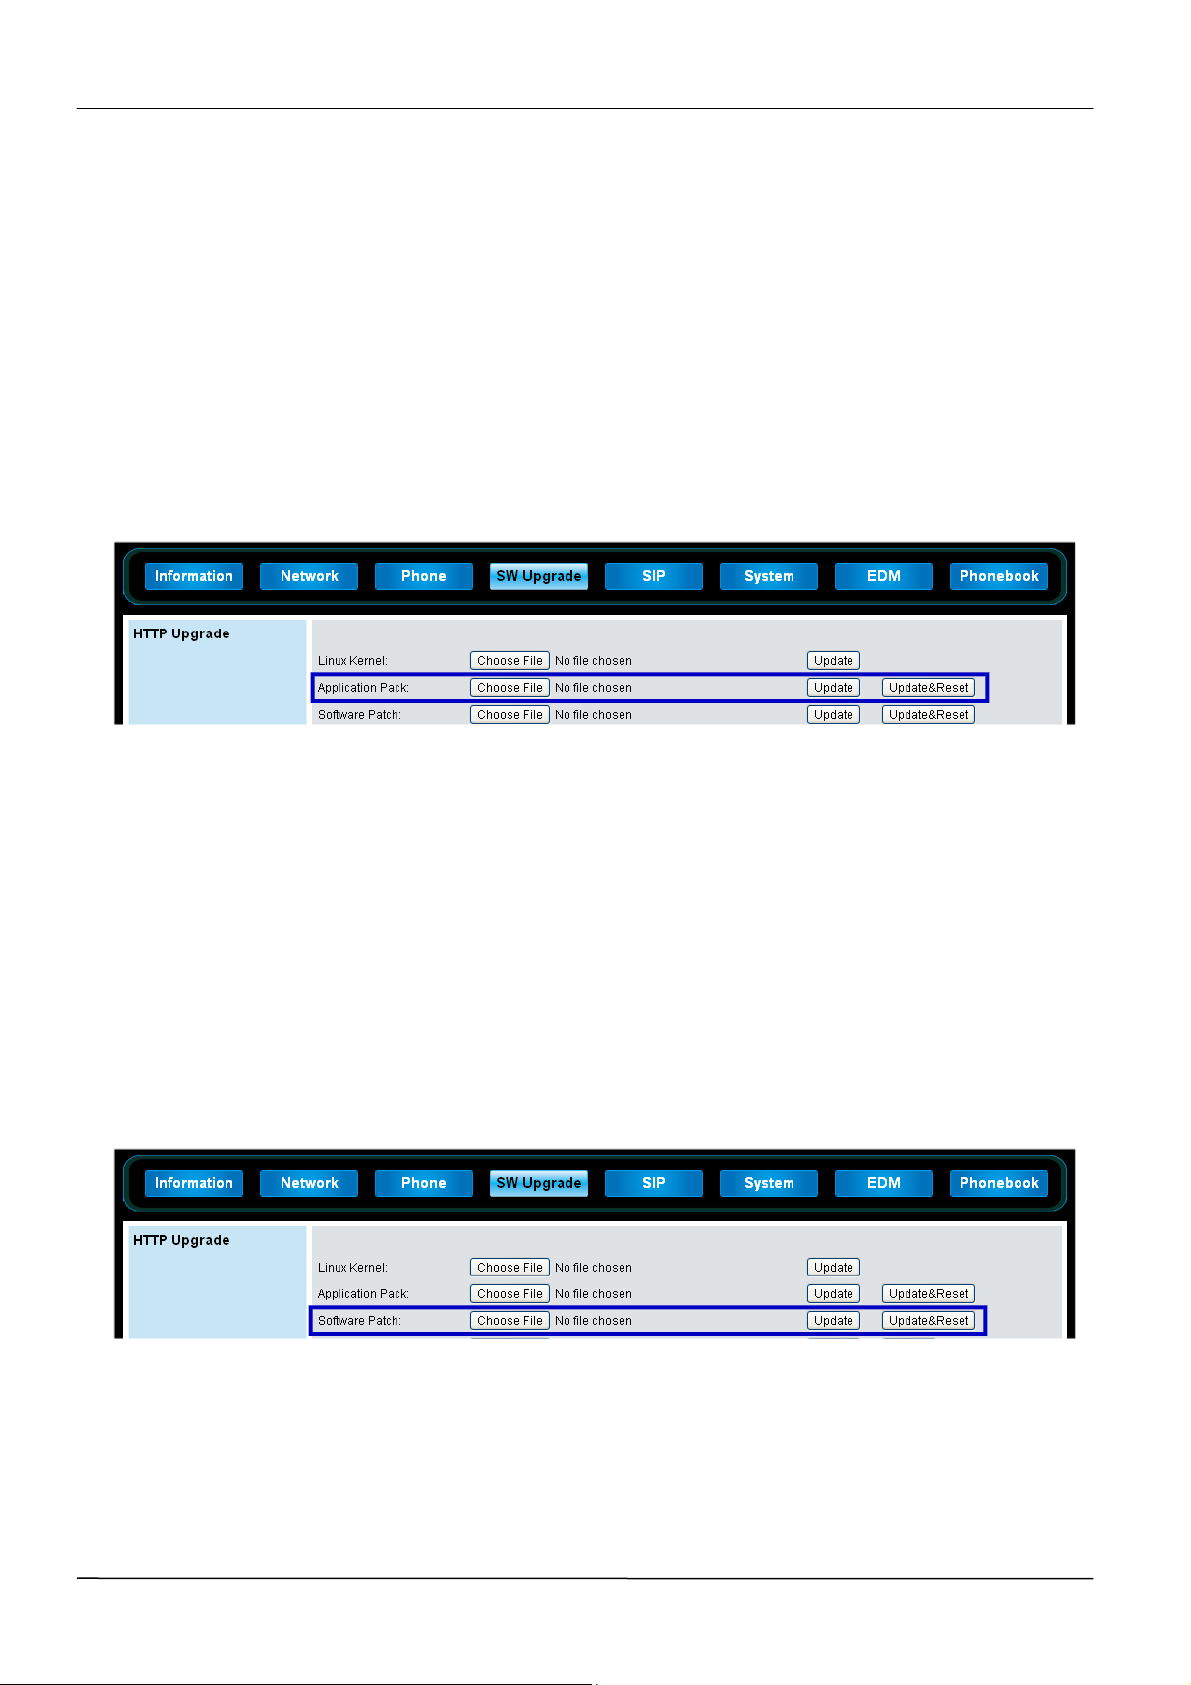
Application Pack Upgrade
It is used to upgrade related folder in which the applications are changed frequently such
as /tcmhome, /etc.
1. Select SW Upgrade tab of Web Configuration Interface.
2. Press Choose File button to select an application pack named as,
apps.ip3062, for Application Pack option.
3. Press Update button to start Application Pack Upgrade, or press
Update&Reset button to make the update start and also reset the
configuration settings to the factory default.
Software Patch Upgrade
It is used to upgrade some applications such as tcconfig, tecomphone, webs, network,
tcmgui, www and so on for bug hot fixes.
1. Select SW Upgrade tab of Web Configuration Interface.
2. Press Choose File button to select a patch image named as, update.ip3062,
for Software Patch option.
3. Press Update button to start Software Patch Upgrade, or press Update&Reset
button to make the update start and also reset the configuration settings to the
factory default.
Upgrade Using TFTP/FTP/HTTP/HTTPS Server
When you have many phones to update, but the Auto-Provisioning System is not available,
then the TFTP/FTP/HTTP/HTTPS Server Upgrade function will help you to save time
when updating phones.
Page 49
Page 50
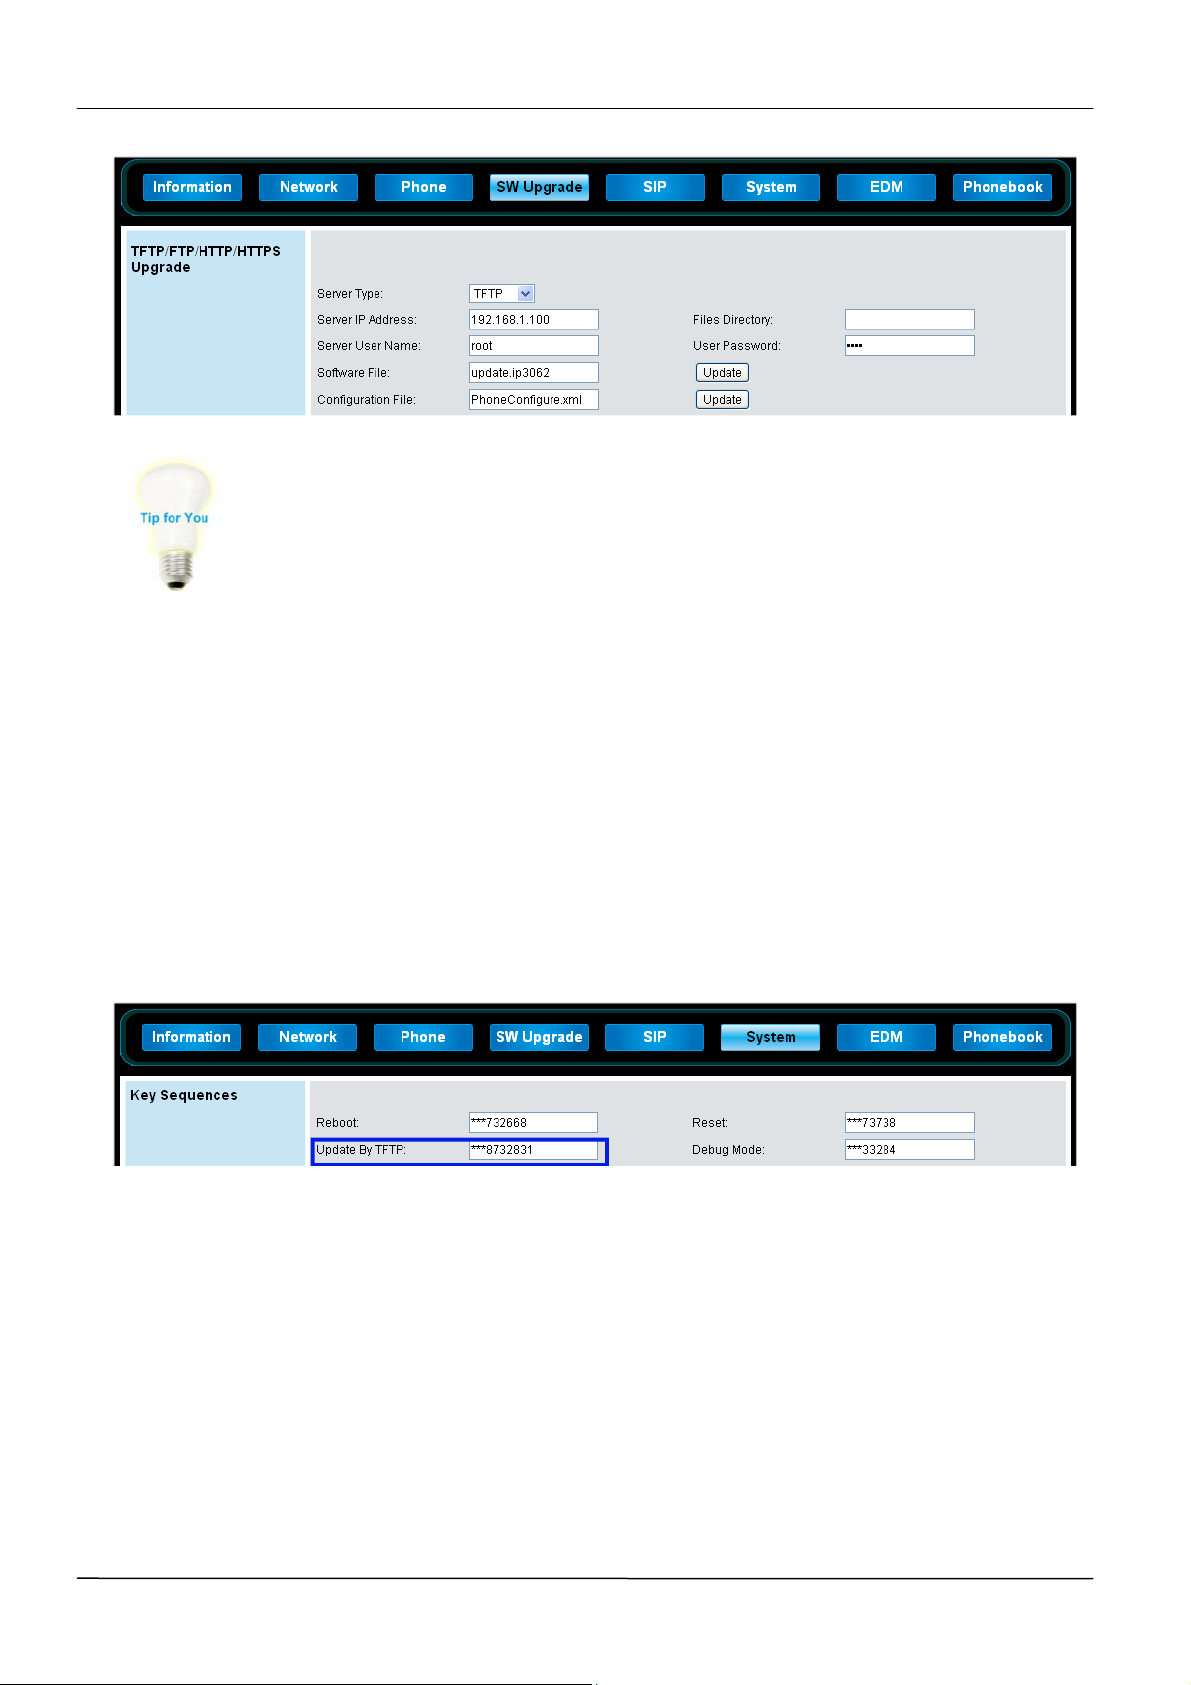
MOCET IP3062 Professional IP Phone Administrators' Guide
Please note that the upgrade method only supports Software Patch
upgrade; the software file name is update.ip3062.
Engineering Key Sequences on Root Menu
During the phone reboot, press engineering key sequences on root menu to download
Software Patch (update.ip3062) from TFTP server or USB memory dongle.
The default Engineering Key Sequences for updating from TFTP server:
“***” + ”873283” (“update” in the keypad) + ”1”
You can configure the Key Sequences through Web Configuration Interface on
administrator mode. As for the IP address of TFTP server, you can input its IP address in a
popup window of the phone menu after pressing the Key Sequences on root menu.
As for downloading Software Patch (update.ip3062) from USB memory dongle, please
refer to Chapter 11: Using USB Memory Dongle for Firmware Upgrade.
Emergency Upgrade on Boot
When your phone is unable to boot up, you may try this emergency upgrade method to
recover your phone. By pressing special keys combination in booting, the phone will
download complete flash image from a specified download server.
Please note that IP address of the specified download server and IP address of the phone
are fixed, and are unable to configure.
IP address of the phone: 192.168.1.10
Page 50
Page 51

MOCET IP3062 Professional IP Phone Administrators’ Guide
IP address of the specified download server: 192.168.1.100
Hereunder is the procedure for emergency upgrade on boot.
1. Set up a TFTP server with IP address: 192.168.1.100.
2. Put the image file and the corresponding file of MD5 checksum in the same directory
of the TFTP server.
3. Connect the phone and the TFTP server in the same LAN.
4. Unplug power from the phone.
5. Press the following key sequences, and do not release the buttons.
Press button “*” and “3” at the same time, it will update U-BOOT image.
The image file:nandboot.flash.ip3062
The corresponding file of MD5 checksum: nandboot.flash.ip3062.md5
Press button “*” and “6” at the same time, it will update Kernel image.
The image file: uImage.ip3062
The corresponding file of MD5 checksum: uImage.ip3062.md5
Press button “*” and “9” at the same time, it will update Root File System
image.
The image file: dspg.jffs2.ip3062
The corresponding file of MD5 checksum: dspg.jffs2.ip3062.md5
Press button “*” and “Line” at the same time, it will update blob image.
The image file: ip3062.image.blob
The corresponding file of MD5 checksum: ip3062.image.blob.md5
6. Plug power to the phone.
7. Release the key sequence buttons after the phone’s MWI LED turns on.
Updating Images through Console by U-boot
This firmware upgrade method is only applicable for distributor who has been authorized in
the local repair right. For its upgrade guide, please refer to Appendix A - Updating Images
through Console by U-boot.
Page 51
Page 52
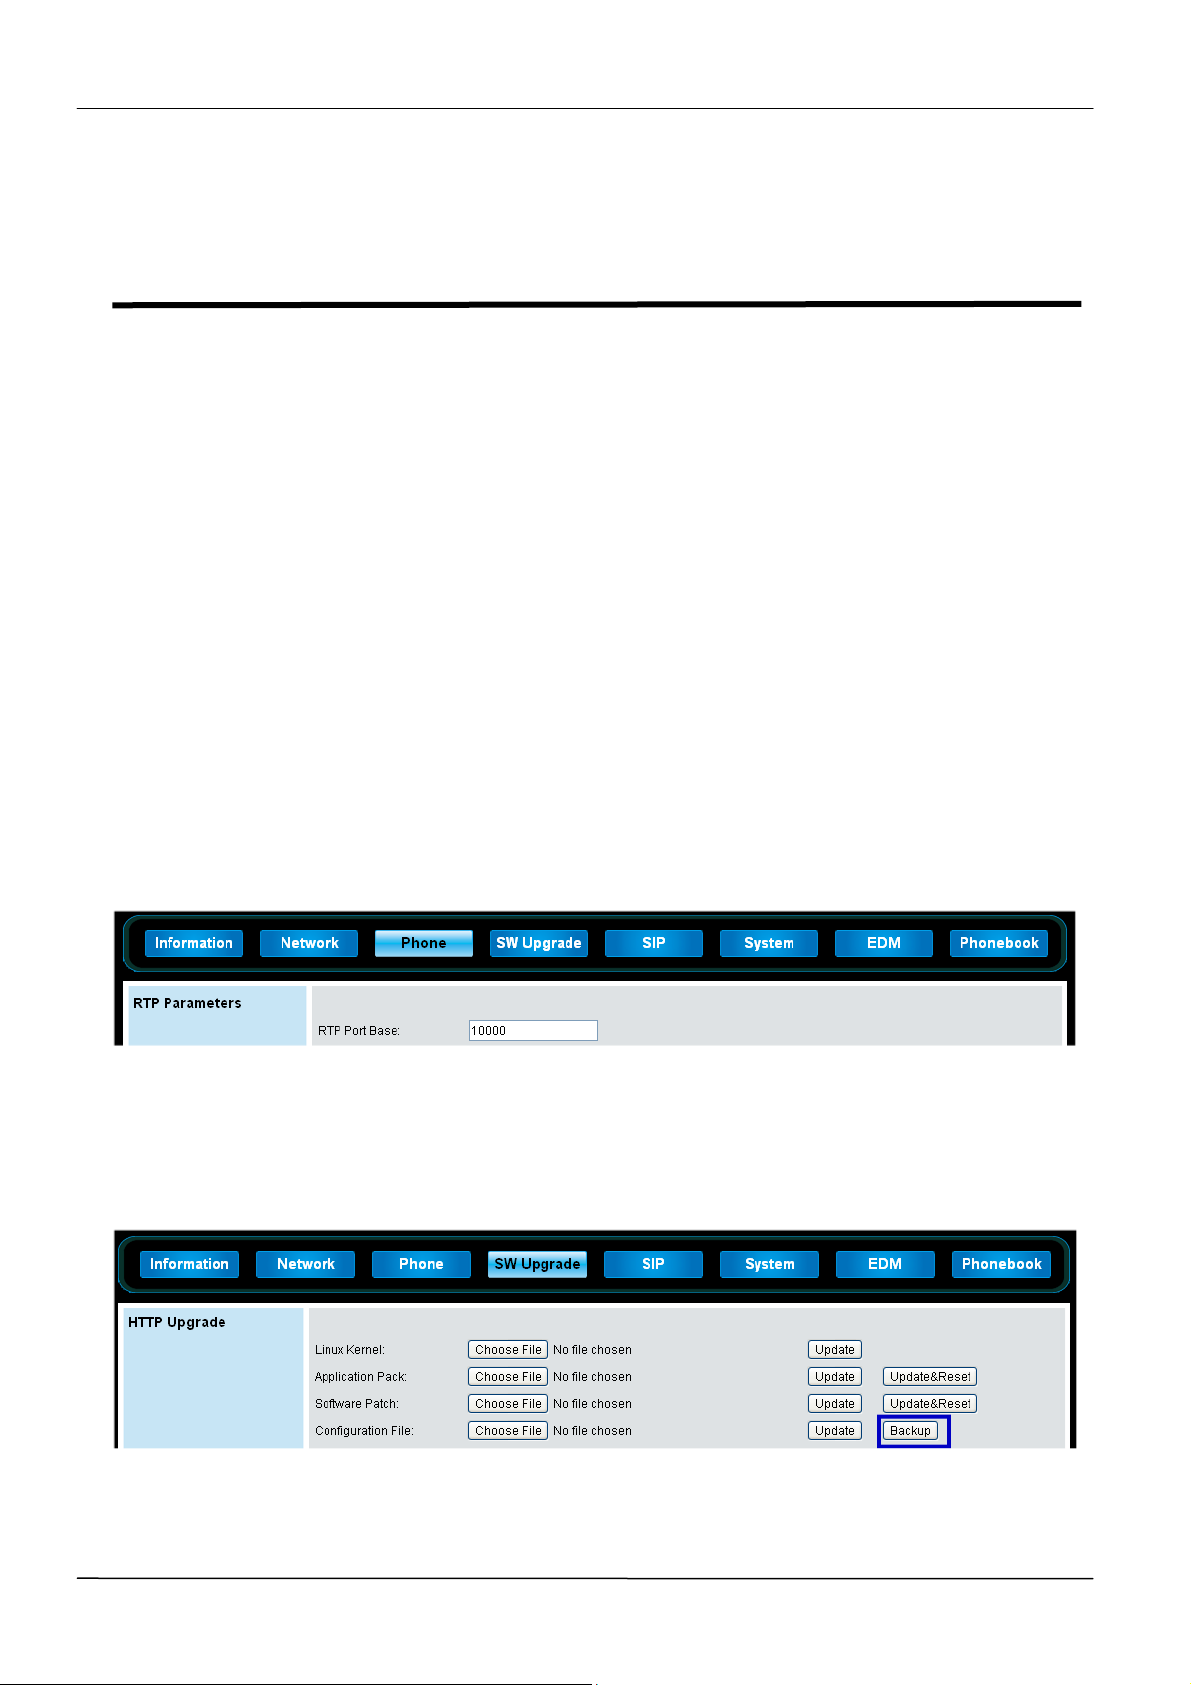
MOCET IP3062 Professional IP Phone Administrators' Guide
Chapter 9: Miscellaneous Maintenance
Tasks
This chapter shows you how to maintain the IP3062 phones. This includes:
RTP Port Base
Configuration File Backup
Configuration File Updates
Optional SIP Header
SIPs Parameters
RTP Options
Dial Plan
System Log
Session Timer
Reset to Default
Real-Time Transport Protocol (RTP) Port Base
You can specify the IP3062 phone’s RTP starting port. Since IP3062 phone supports
conferencing and multiple RTP streams, the phone can use serval ports concurrently. The
default parameter of RTP starting port is 10000. You can configure it based on your
requirement. Please note that the starting port number must be entered as an even integer.
Configuration File Backup
To back up the configuration file of your phone, you can use the backup function through
Web Configuration Interface. The backup configuration file name is PhoneConfig.xml.
Configuration File Updates
Page 52
Page 53
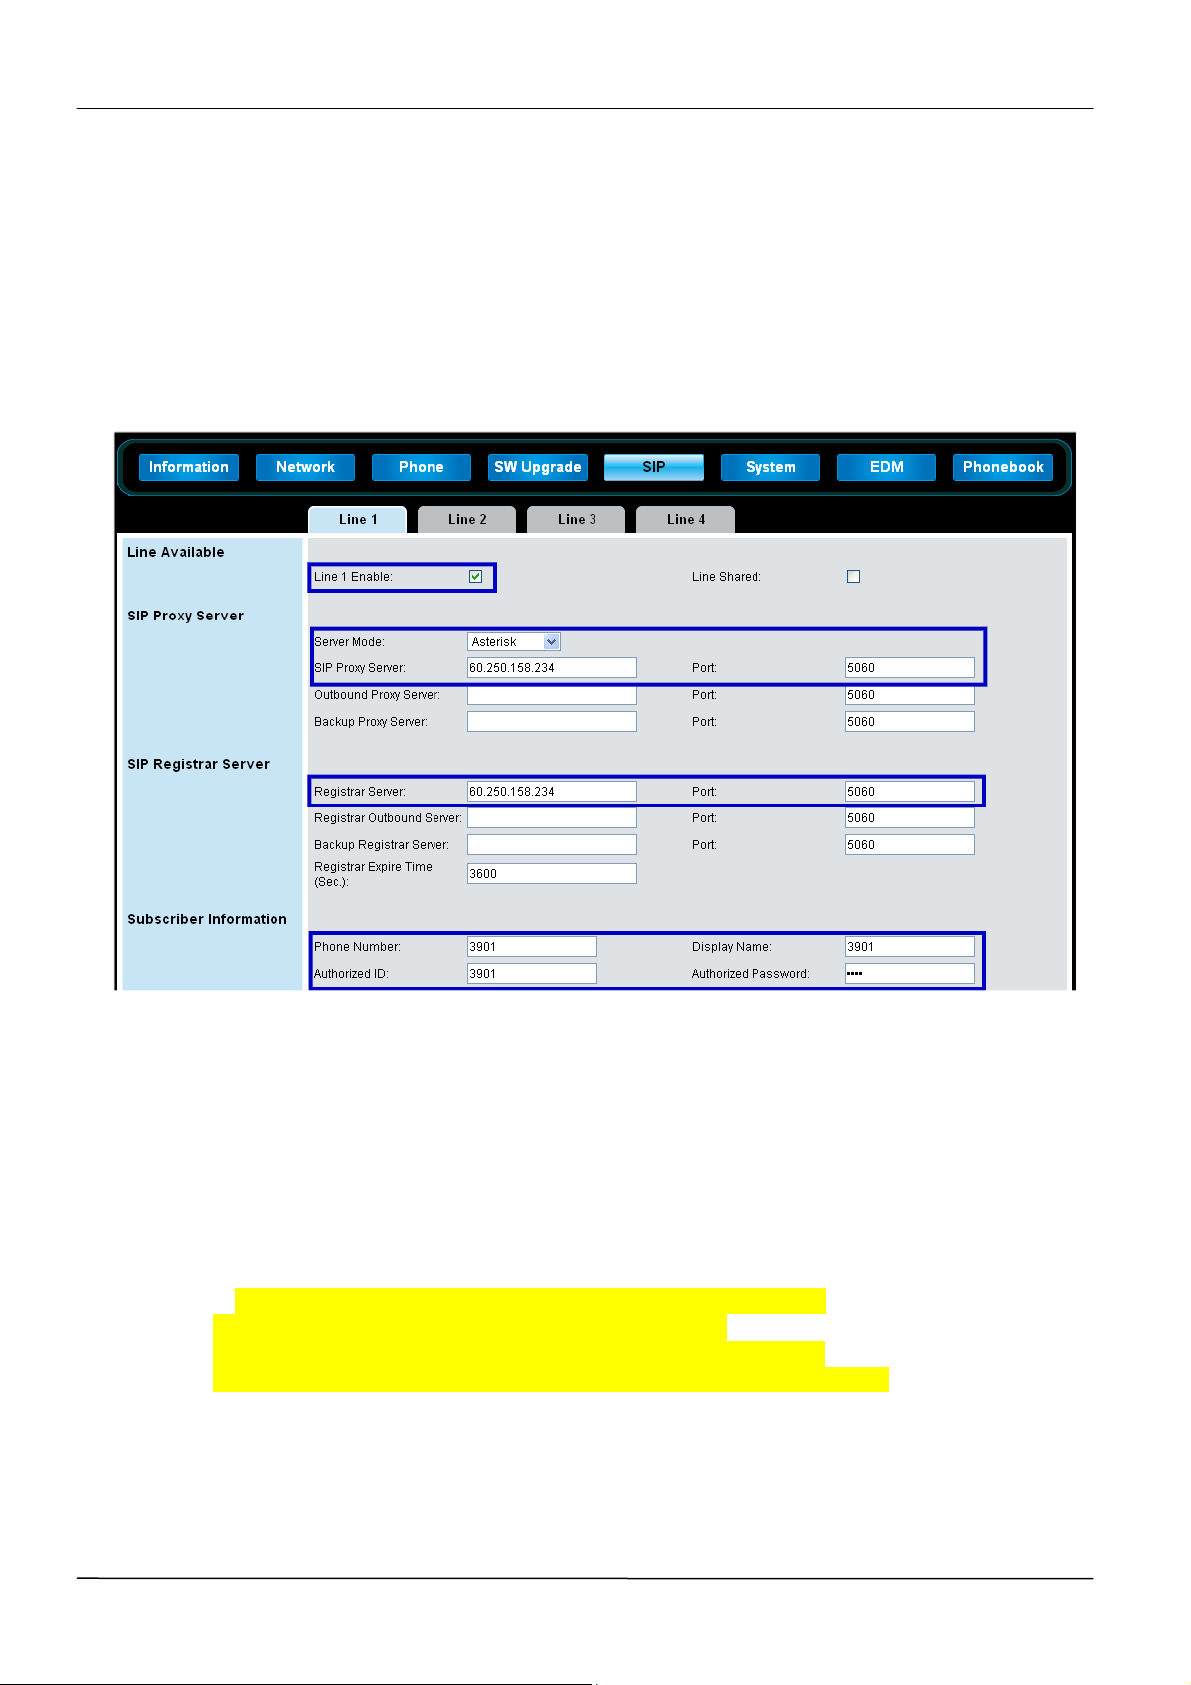
MOCET IP3062 Professional IP Phone Administrators’ Guide
When you have many phones to deploy, but Auto-Provisioning System is not available,
then Configuration File Updates function will help you to save time to configure phones.
Hereunder is an example with the minimum necessary information to configure a working
phone on a SIP server.
1. Configure Line1 settings under SIP tab.
The following fields marked by blue rectangles are the minimum necessary configuration
to make the phone work on a SIP server.
2. Use Configuration File Backup function to download its configuration file as a template.
3. Use XML editor to modify the configuration file for other phones. The minimum
necessary configuration includes the following four fields:
Line_Extension, Line_User, Line_Password and Line_DisplayName
<LineSettings index="0">
<Line_Server_Mode type="integer">3</Line_Server_Mode>
<Line _E na ble type="integer">1</Line_Enable>
<Line _E x t e n tion type="string">2102</Line_Extention>
<Line_User type="string">2102</Line_User>
<Line_P assw o rd type="string">2102</Line_Password>
<Line_DisplayName type="string">2102</Line_DisplayName>
……
……
</LineSettings>
4. Use Configuration File Updates function to upload the modified configuration file to its
corresponding phone.
Page 53
Page 54
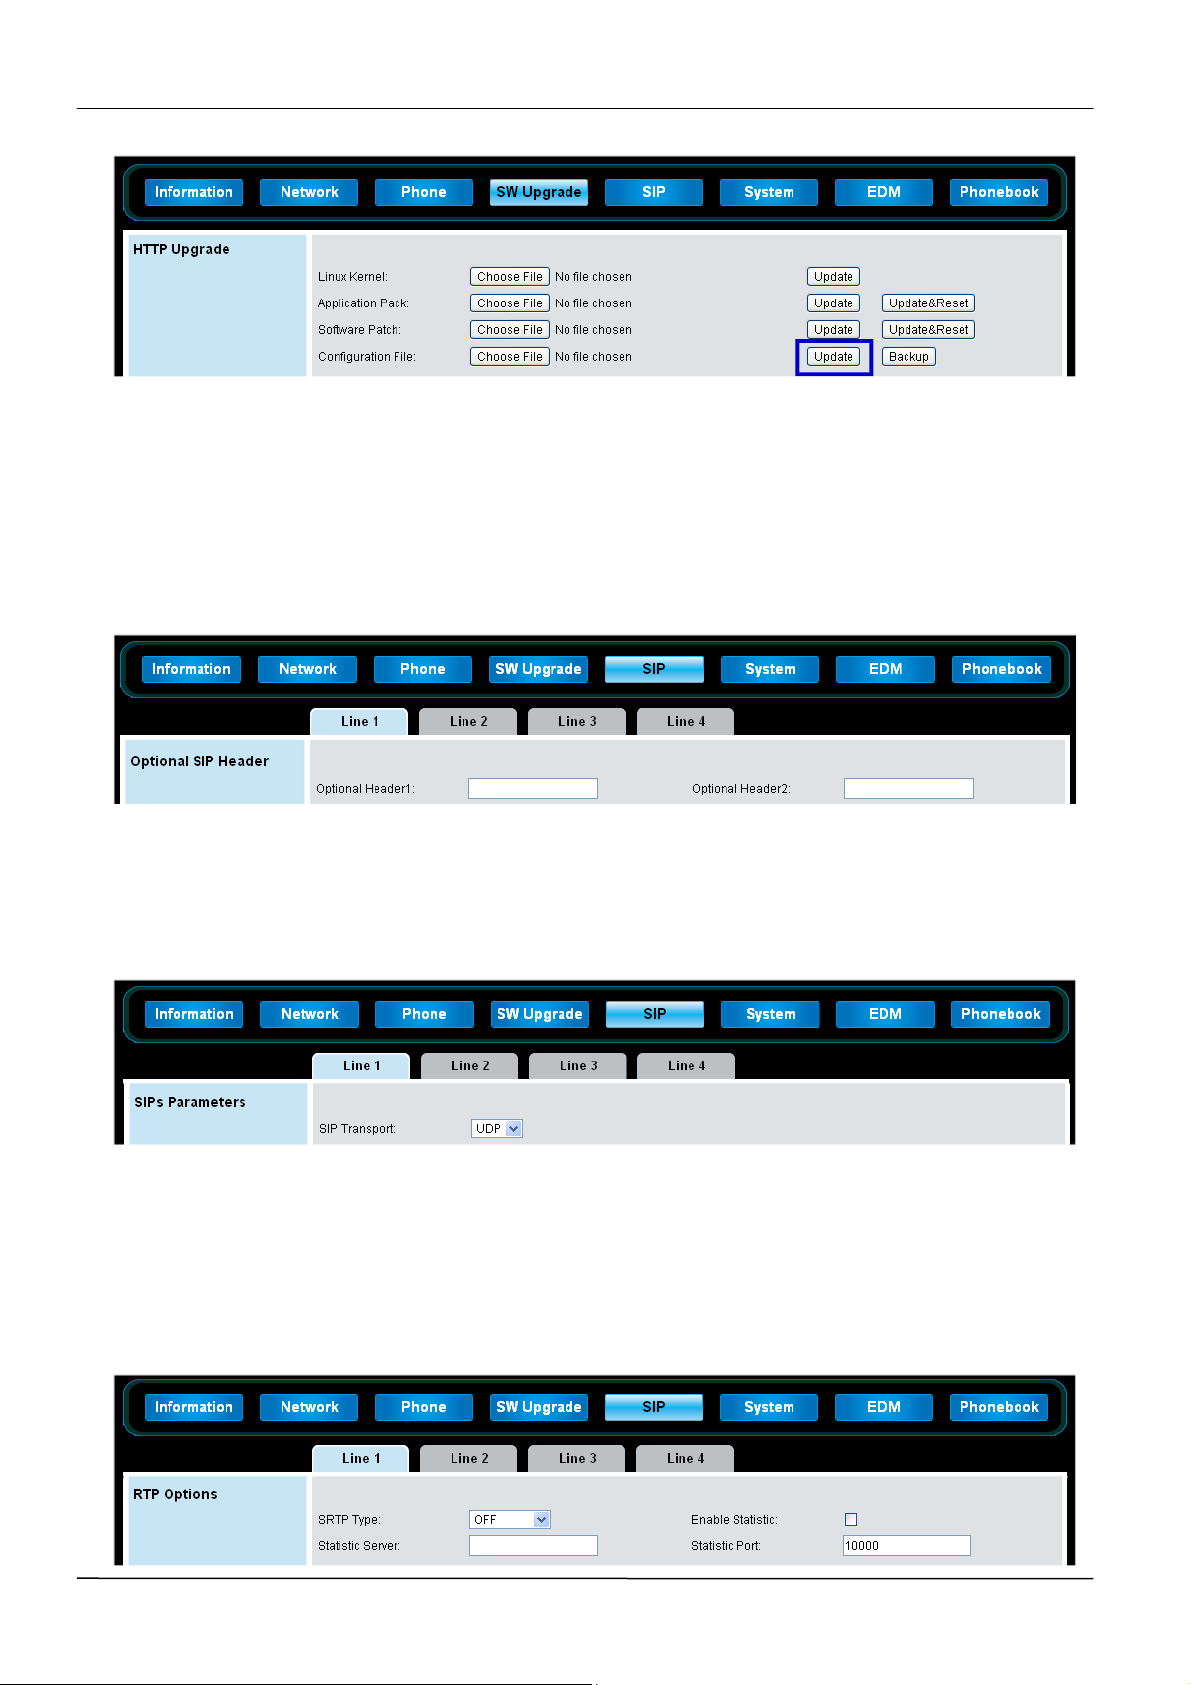
MOCET IP3062 Professional IP Phone Administrators' Guide
Optional SIP Header
Optional SIP Header allows the service provider or administrator to define a custom SIP
header. The SIP header will be contained in invite packets when making calls. The SIP
Header format is: header_name: header_value.
For example: PhoneMAC: 00:19:15:33:ff:cc.
SIPs Parameters
SIP Parameters defines what kind of transmission method to be used for SIP signals.
There are options: UDP, TCP and TLS.
RTP Options
RTP Options allows the service provider or administrator to configure:
1. SRTP for RTP
2. RTP Statistics to be sent to a specific server
Page 54
Page 55
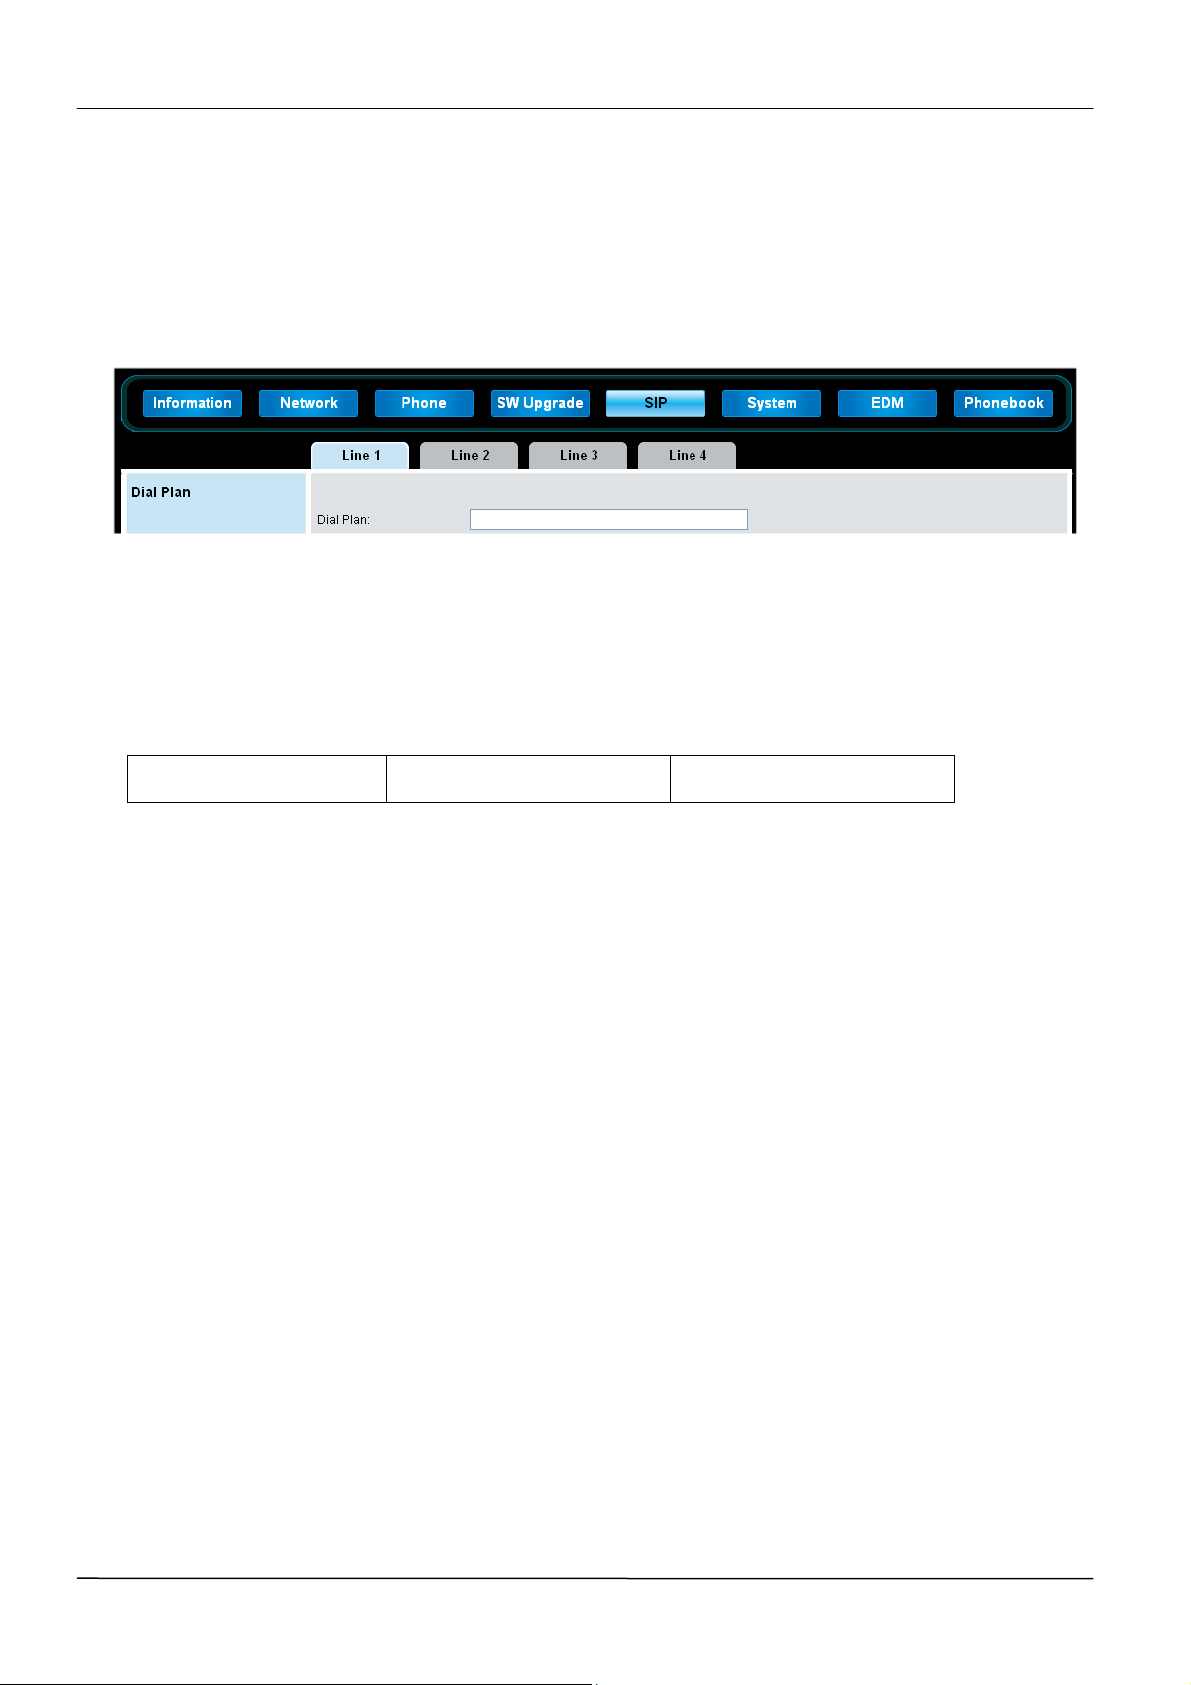
MOCET IP3062 Professional IP Phone Administrators’ Guide
Dial Plan
This parameter allows you to create a specific routing path for outgoing SIP calls. When
outgoing SIP call fits the dial plan, it will be called out immediately without waiting for Dial
Timeout time.
A dial plan is a set of rules for determining whether a complete set of numbers has been
entered. IP3062 uses industry-standard Regul ar expressions to match dialed numbers.
Dial Plan Entries
Dial plan entries have three parts. The parts may be separated with character “|”.
Regex Pattern Result pattern Flags
The first part contains a regex pattern which is used for matching the dialed number. The
second part contains the result or the dial plan step, and the third (optional) part contains
flags that set additional processing attributes. The following flags are available:
The “d” flag means that the number is complete and can be dialed. For example:
“([0-9]{5})|\1|d” means that a number with five digits will be dialed automatically.
The “i” flag means that the comparisons should be done case-insensitive.
The “t” flag means that an additional time out period (default is 4 seconds) should take
place before automatic dialing starts.
A new value (2-9) after “t” flag can overwrite the default time.
For example: “t8” means the time out is 8 seconds.
On the phone, a dial plan can contains multiple dial plan entries, use space character to
separate them.
For example:
^911$|sip:[email protected]|d ([0-9]{4})|\1|di ([a-z]{8})|sip:\[email protected]|t5
This dial plan has three entries:
Page 55
Page 56
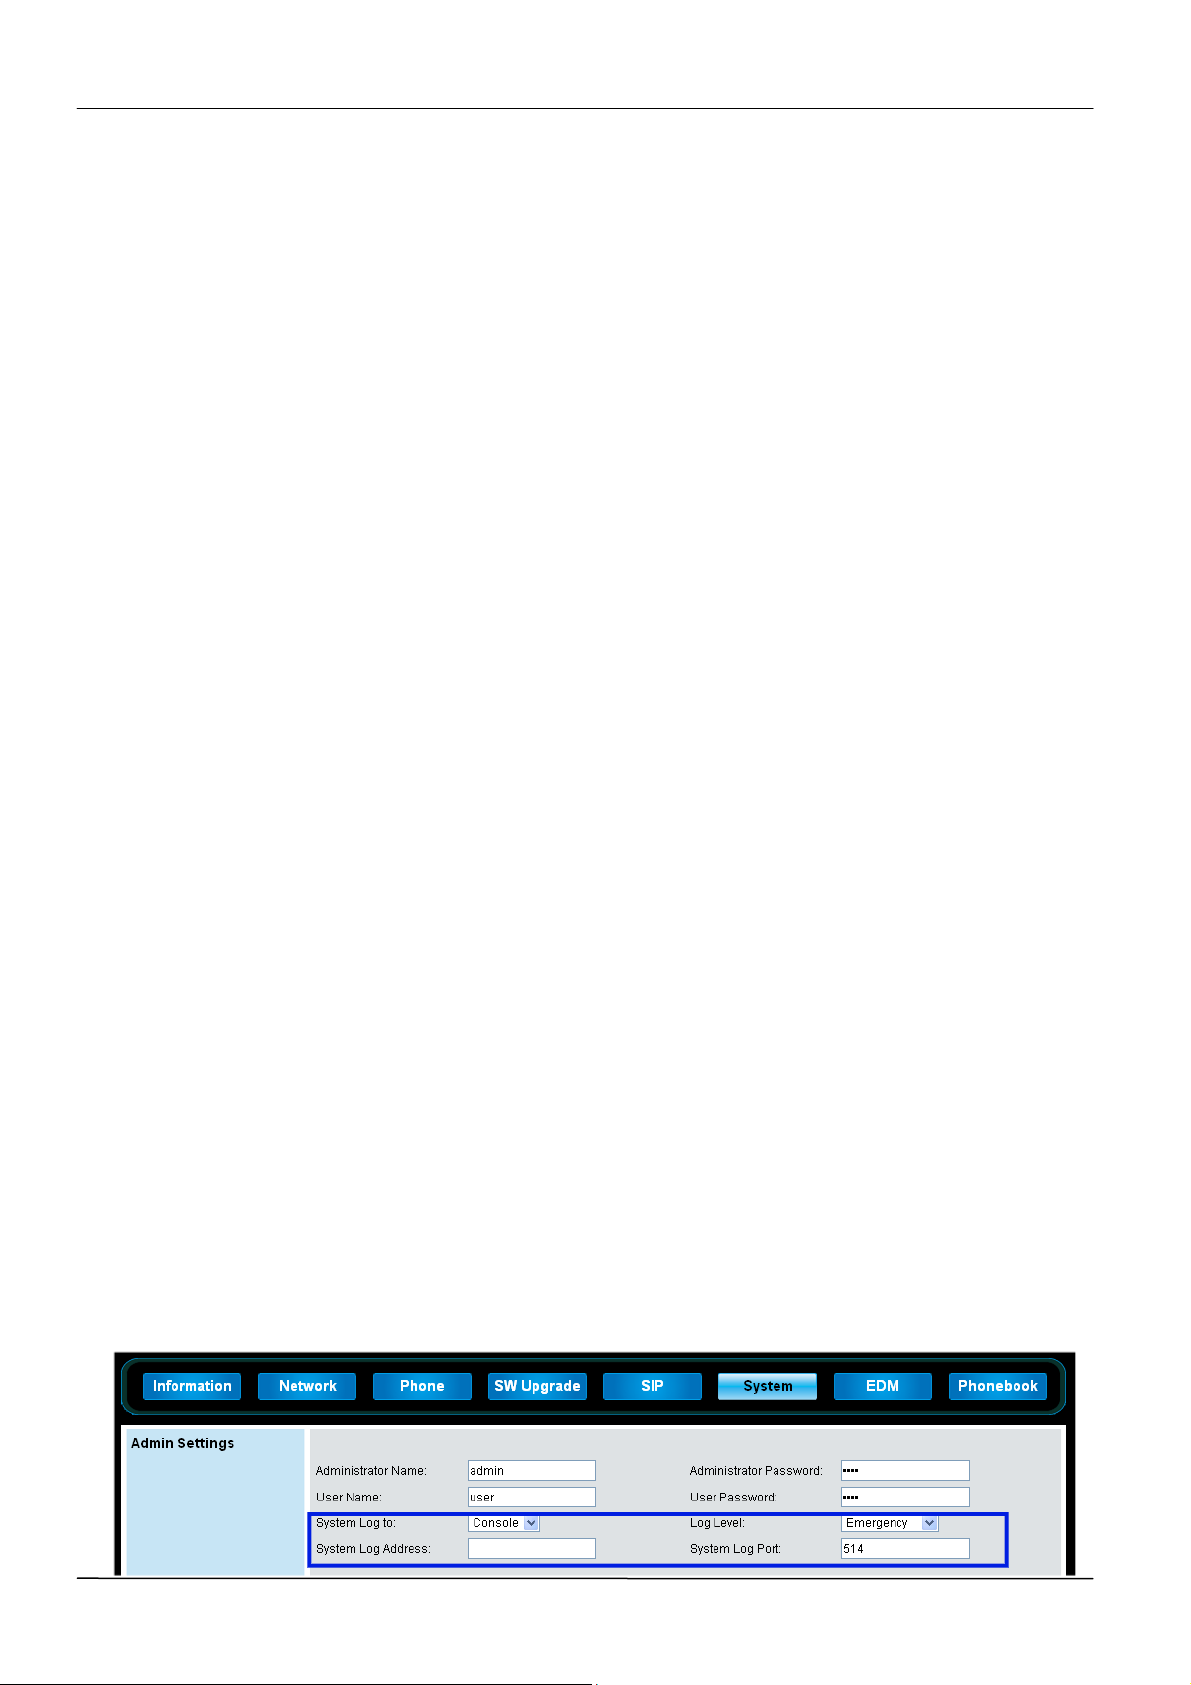
MOCET IP3062 Professional IP Phone Administrators' Guide
Substitutions
Substitutions are found in the second part of the dial plan entry. Substitutions are marked
by a leading character “ \”.
The “d” replacement inserts the name of the SIP proxy.
For example:
“[0-9]{4}|sip:999@\d|d” inserts the SIP proxy behind the “@“ symbol.
Numbers are back references to match-groups of the Regex part according to RFC2915.
For example:
“[0-9]*|sip:\[email protected]|t” inserts a “sip:” before the string (which is the first match), and add
“@1.1.1.1” after it.
Note: Only the back references 1-4 are available.
Examples for Dial Plans
Convert an emergency number into a SIP URL.
This pattern could look like this: ^911$|sip:emergency@\d|d
Separated by the exclamation mark, it contains the pattern for the 911 and the resulting
SIP URI. The d flag indicates that there is no need to press the OK key after dialing this
number.
Make the phone dial a number when the pound key is pressed.
The pattern could look like this: ([^#]+)#|sip:\1@\d|d
This dial plan entry will look for a pattern ending in a pound symbol and use this as the
user name in a SIP URI (not including the pound symbol).
Matching an International Number
Just put the 011 pattern at the front of the pattern: ^011([0-9]*)$|sip:+\1@\d|t
System Log
For System Log settings, you can set System Log to as Console, Local or Remote.
Page 56
Page 57
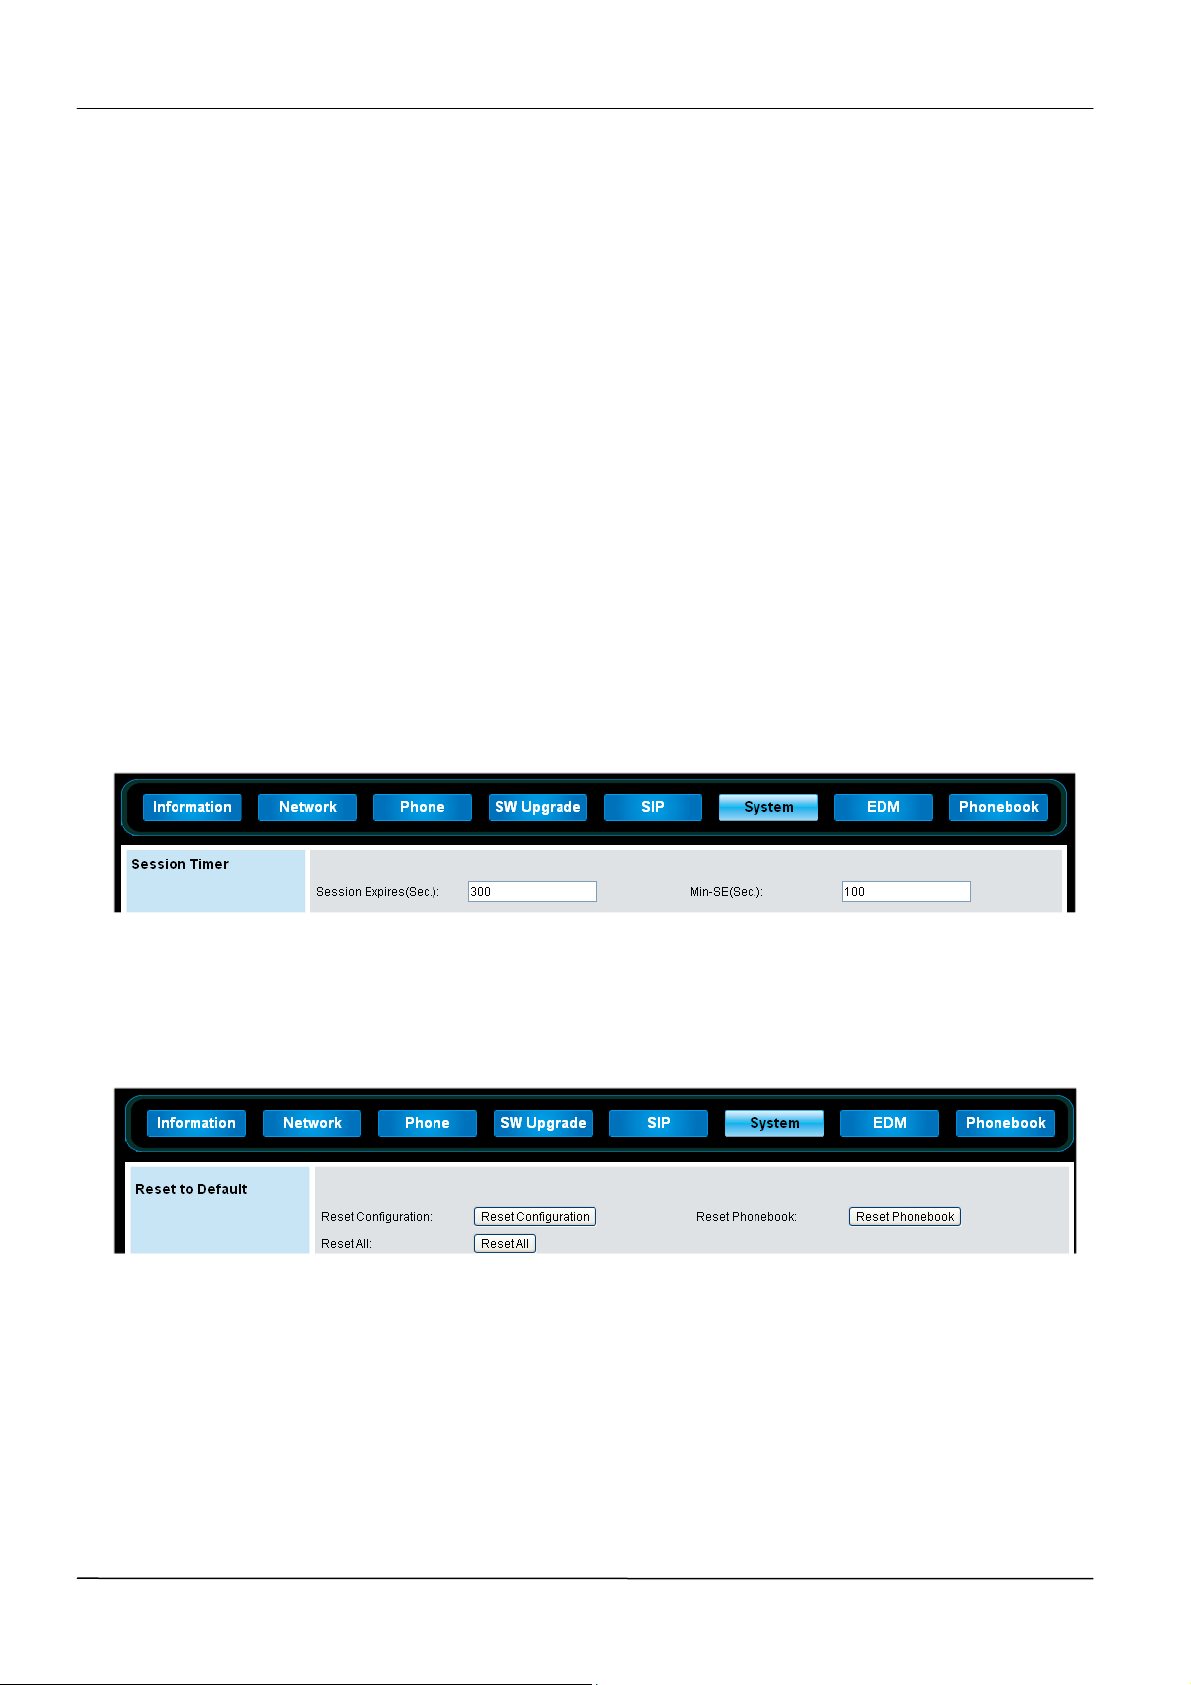
MOCET IP3062 Professional IP Phone Administrators’ Guide
When “System Log to” is set as Console, the system log will be printed to console.
When “System Log to” is set as Local, the system log will be saved in local PC.
When “System Log to” is set as Remote, the system log will be send to system log server.
Please remember to fill in the fields of System Log Address and System Log Port, they are
the system log server address and system log server port.
In addition, you can choose what log level that you want to view. There are eight levels for
selection, Emergency, Alert, Critical, Error, Warning, Notice, Informational and Debug.
Session Timer
In Session Timer settings, it has two fields, one is for Session Expires time, and the other
is for minimal Session Expires time. With the feature support, it adds IP3062 phone the
capability to periodically refresh SIP sessions by sending repeated INVITE requests.
Session Timer: the default time is 300 seconds.
Minimum Session Expiration (Min-SE): the default time is 100 seconds.
Reset to Default
For Reset to Default settings, you can choose Reset Configuration only, Reset Phonebook
only or Reset All (Reset Configuration and Phonebook).
Page 57
Page 58

MOCET IP3062 Professional IP Phone Administrators' Guide
Part 5: Using USB Accessories
Part 5 provides you with essential information on how to use USB accessories. You will
find instructions on how to use USB memory dongle to do firmware upgrade and user
profile back-ups, and how to use USB Wi-Fi adapter to connect to a WLAN.
Part 5 consists of the following chapter:
Chapter 10: Using USB Memory Dongle for User Profile Back-ups
Chapter 11: Using USB Memory Dongle for Firmware Upgrade
Chapter 12: Using USB Wi-Fi Adapter to connect to a WLAN
Page 58
Page 59

MOCET IP3062 Professional IP Phone Administrators’ Guide
Chapter 10: Using USB Memory Dongle
for User Profile Back-ups
This chapter shows you how to use an USB memory dongle to do IP3062 user profile
back-ups. With this function, you can easily export your user profile from one IP3062
phone to an USB memory dongle, and use the profile to log in another IP3062 phone
through its USB port.
The user profile contains the following items:
Configuration File
When user logs out from one phone and then logs in another phone by using USB
memory dongle, the configuration file will be used in the current phone.
Private Phone Book
When user logs out from one phone and then logs in another phone by using USB
memory dongle, the private phone book will be used in the current phone.
The procedure for using USB memory dongle to do user profile back-ups through IP3062
phone menu:
1. Insert an USB memory dongle into the USB port of your IP3062 phone. The
main screen of IP3062 will display an USB memory dongle icon .
2. Select Menu > Admin Setting > Profile Export > Export new profile.
3. The phone will display a message to ask you to input a New Profile Key.
4. After inputting a New Profile Key, then press OK key to confirm.
Note: Please write down the New Profile Key that you will need to use it to
log in the other IP3062 phone with the user profile.
5. The phone will display a message, Export Succeed!, when the user profile
was exported to USB memory dongle successfully.
6. Unplug the USB memory dongle, and insert it into other IP3062 phone that
you would like to use.
7. After plugging in the USB memory dongle, the phone will display a message
to ask you to input a Profile Key.
8. Input the Profile Key that you used for profile exporting, and then press OK
key to confirm.
Page 59
Page 60
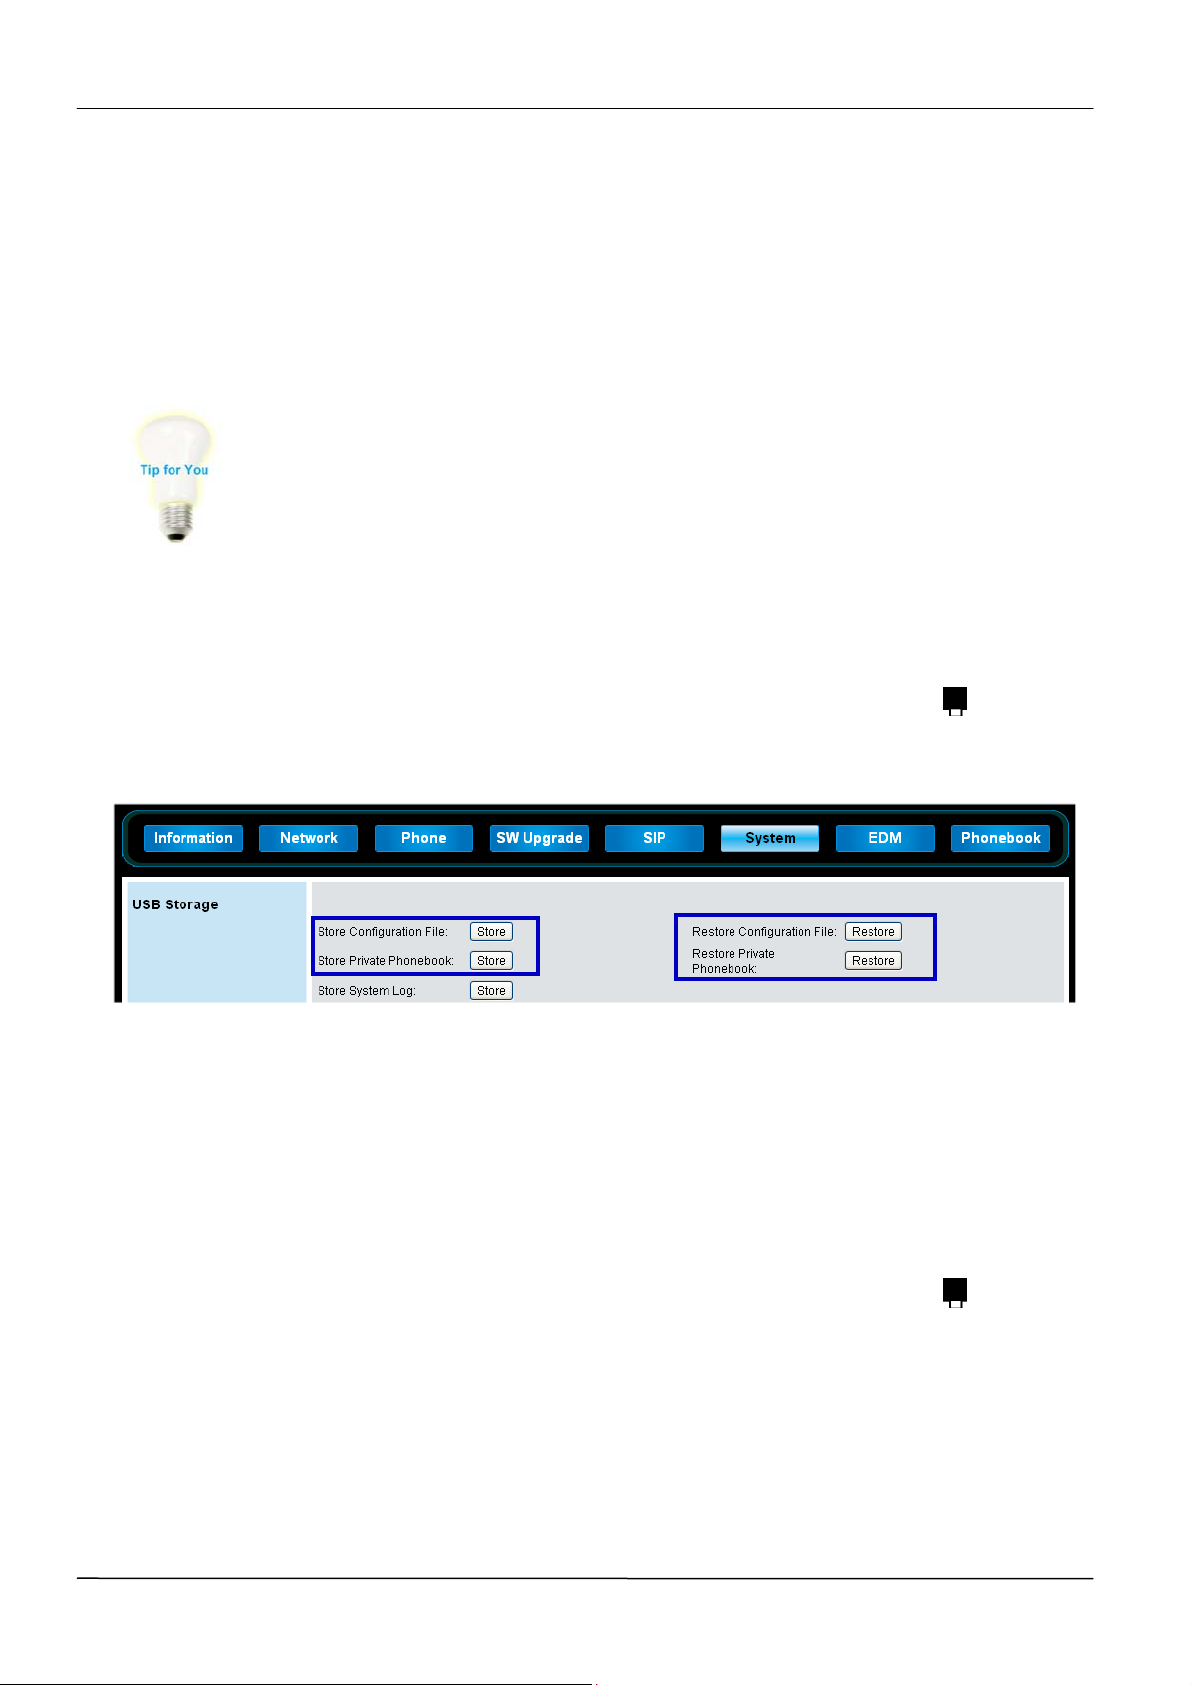
MOCET IP3062 Professional IP Phone Administrators' Guide
9. The phone will display “P” icon on the main screen to indicate the phone is
using the user profile stored in the external USB memory dongle.
During log in period, any changes on the profile will be auto-saved
in the external USB memory dongle.
10. When you unplug the external USB memory dongle, then the phone will log
out from the profile immediately. The “P” icon will disappear as well.
Please note that there is an alternative method to log in and log out the
profile through the phone menu.
Select Menu > Profile > Login / Logout
In addition, you can use USB memory dongle to do user profile back-ups through IP3062
Web Configuration Interface. Refer to the procedure below.
1. Insert an USB memory dongle into the USB port of your IP3062 phone. The
main screen of IP3062 will display an USB memory dongle icon .
2. Login the Web Configuration Interface, and select System tab.
3. Press “Store” button, and then the phone will export the Configuration File/
Private Phonebook to the USB memory dongle and also display a message
“USB store success.” on its screen after it exports the Configuration File/
Private Phonebook successfully.
After doing the procedures as above, you can use the USB memory dongle to export
Configuration File/ Private Phonebook to the IP3062 phone.
1. Insert an USB memory dongle into the USB port of the IP3062 phone. The
main screen of IP3062 will display an USB memory dongle icon .
2. Login the Web Configuration Interface, and select System tab.
3. Press “Restore” button, and then the phone will import the Configuration File/
Private Phonebook from the USB memory dongle and also display a
message “Update success.” on its screen after it imports the Configuration
File/ Private Phonebook successfully.
Page 60
Page 61
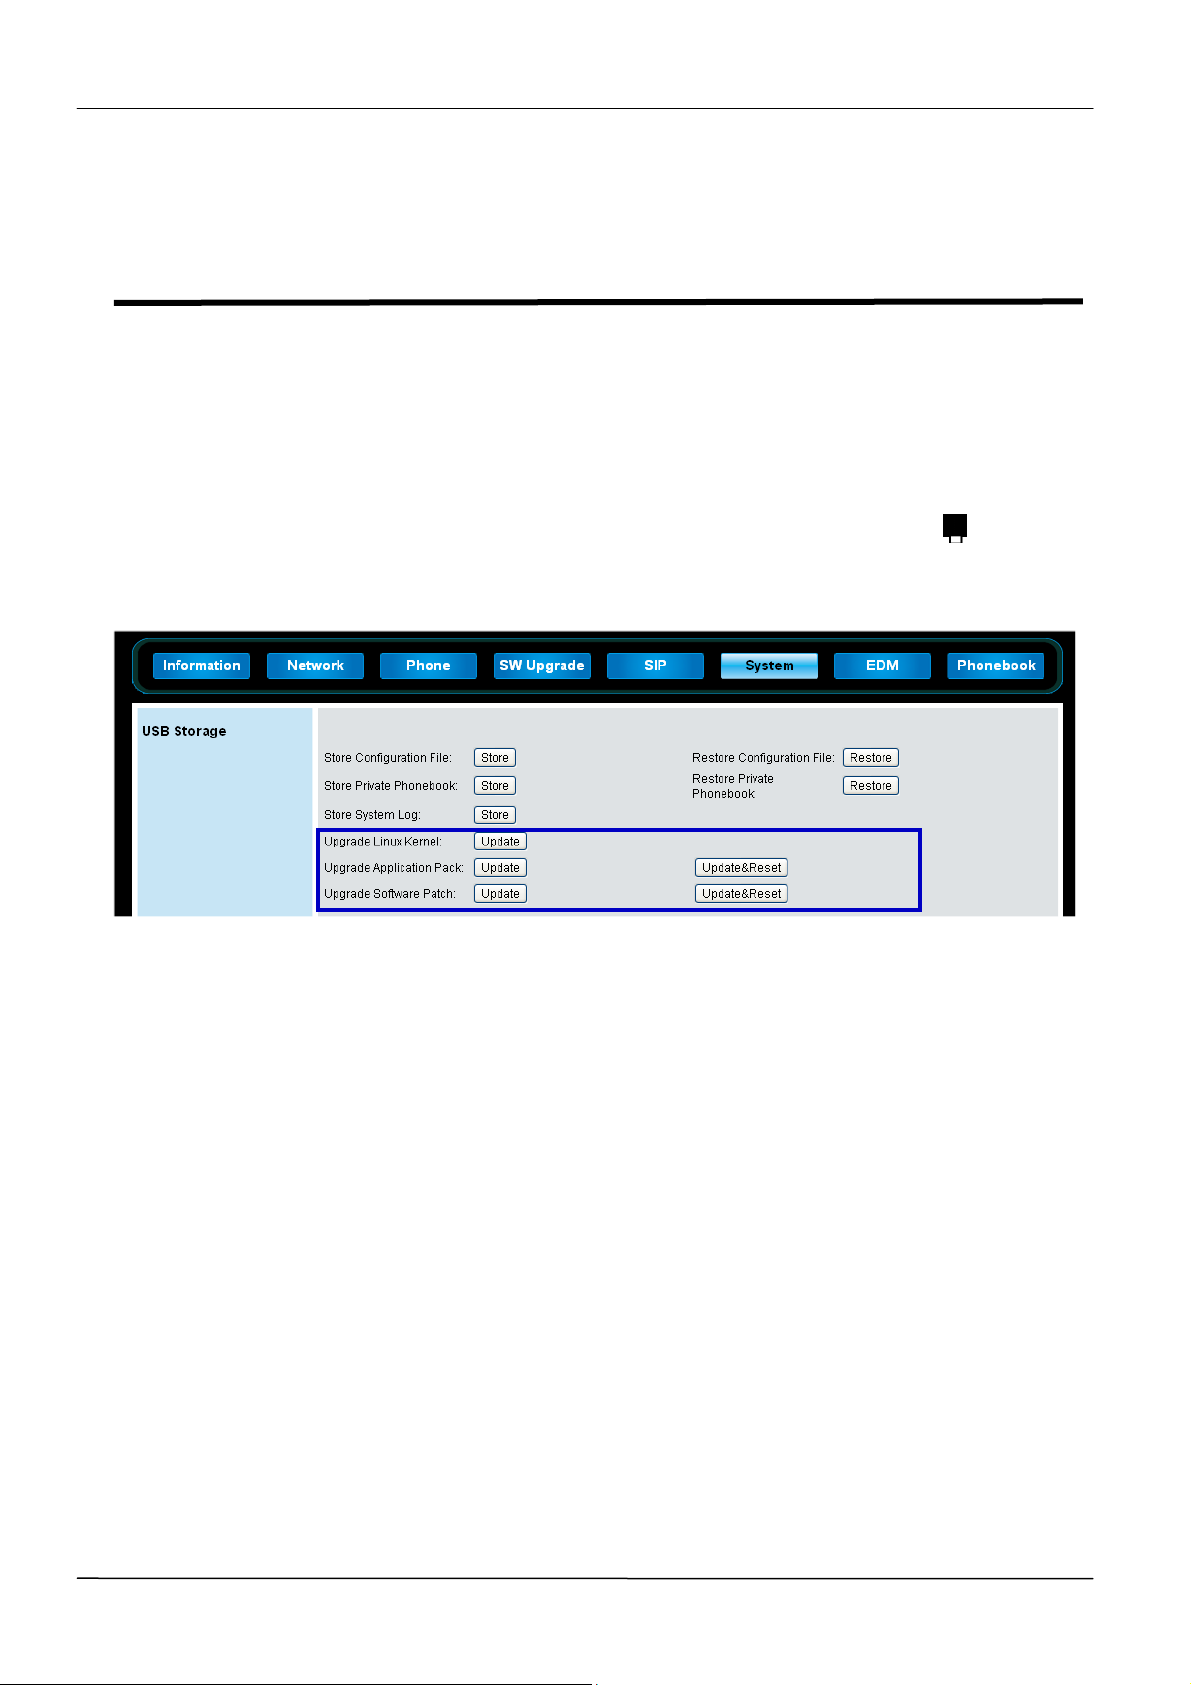
MOCET IP3062 Professional IP Phone Administrators’ Guide
Chapter 11: Using USB Memory Dongle
for Firmware Upgrade
This chapter shows you how to upgrade phone firmware from an external USB memory
dongle through the IP3062 Web Configuration Interface.
The procedure for using USB memory dongle to do firmware upgrade is as below.
1. Insert an USB memory dongle into the USB port of your IP3062 phone. The
main screen of IP3062 will display an USB memory dongle icon .
2. Login the Web Configuration Interface, and select System tab.
3. Press “Update” button, and then the phone will get the firmware from the
USB memory dongle and start upgrading; or press “Update&Reset” button,
and then the phone will do firmware upgrade and reset configuration file to
default.
Please note that phone will check whether the USB memory dongle contains
firmwares, such as Linux kernel (kernel.ip3062), application pack
(apps.ip3062) and software patch (update.ip3062) under the folder /tecom. If
not, the Web Configuration Interface will prompt a warning message.
Besides, there is another firmware upgrade method through a USB memory dongle.
During the phone reboot, press engineering key sequences on root menu to download
Software Patch (update.ip3062) from USB memory dongle.
The default Engineering Key Sequences for updating from USB memory dongle:
“***” + ”873283” (“update” in the keypad) + ”2”
You can configure the Key Sequences through Web Configuration Interface, please refer
to Chapter 8: Upgrading Your IP3062 Phones Firmware.
Page 61
Page 62
MOCET IP3062 Professional IP Phone Administrators' Guide
Chapter 12: Using USB Wi-Fi Adapter to
Connect to A WLAN
This chapter shows you how to use a dedicated USB Wi-Fi adapter to connect to a WLAN.
The procedure for using a dedicated USB W-Fi adapter to connect to a WLAN through
Phone Menu is as below.
1. Insert a dedicated USB Wi-Fi adapter into the USB port of your IP3062 phone.
The main screen of IP3062 will display an USB W i-Fi dongle icon .
2. Select Menu > Admin Setting > Wireless Setting > Wireless Enable.
3. Set Wireless Enable: On, then save the setting. The IP3062 phone will auto
reboot to make the configuration take effect.
4. After the phone reboots, you can use Site Survey or Manual Setting function
to connect the IP3062 phone to a Wi-Fi access point.
By Site Survey:
5-1. Select Menu > Admin Setting > Wireless Setting > Site Survey. The
IP3062 phone will scan Wi-Fi access points, and display available Wi-Fi
access points list.
Note: The IP3062 phone only displays 16 Wi-Fi access points at maxima.
5-2. View the list by pressing “Prev” and “Next” soft keys.
5-3. Select a desired Wi-Fi access point, and press “Conn” soft key to connect
the IP3062 to the Wi-Fi access point. If the selected Wi-Fi access point has
key protection, the IP3062 phone will ask you to input Private Key to connect
to the Wi-Fi access point. After the IP3062 connects with Wi-Fi access point
successfully, the main screen of IP3062 will display a Wi-Fi signal strength
icon .
By Manual Setting:
6-1. Select Menu > Admin Setting > Wireless Setting > Manual Setting.
6-2. Configure WIFI Network Type, SSID, Auto Mode, Encrypt Type and Private
Key.
6-3. Press “Conn” soft key to connect the IP3062 to the Wi-Fi access point. After
the IP3062 connects with Wi-Fi access point successfully, the main screen of
IP3062 will display a Wi-Fi signal strength icon .
Page 62
Page 63
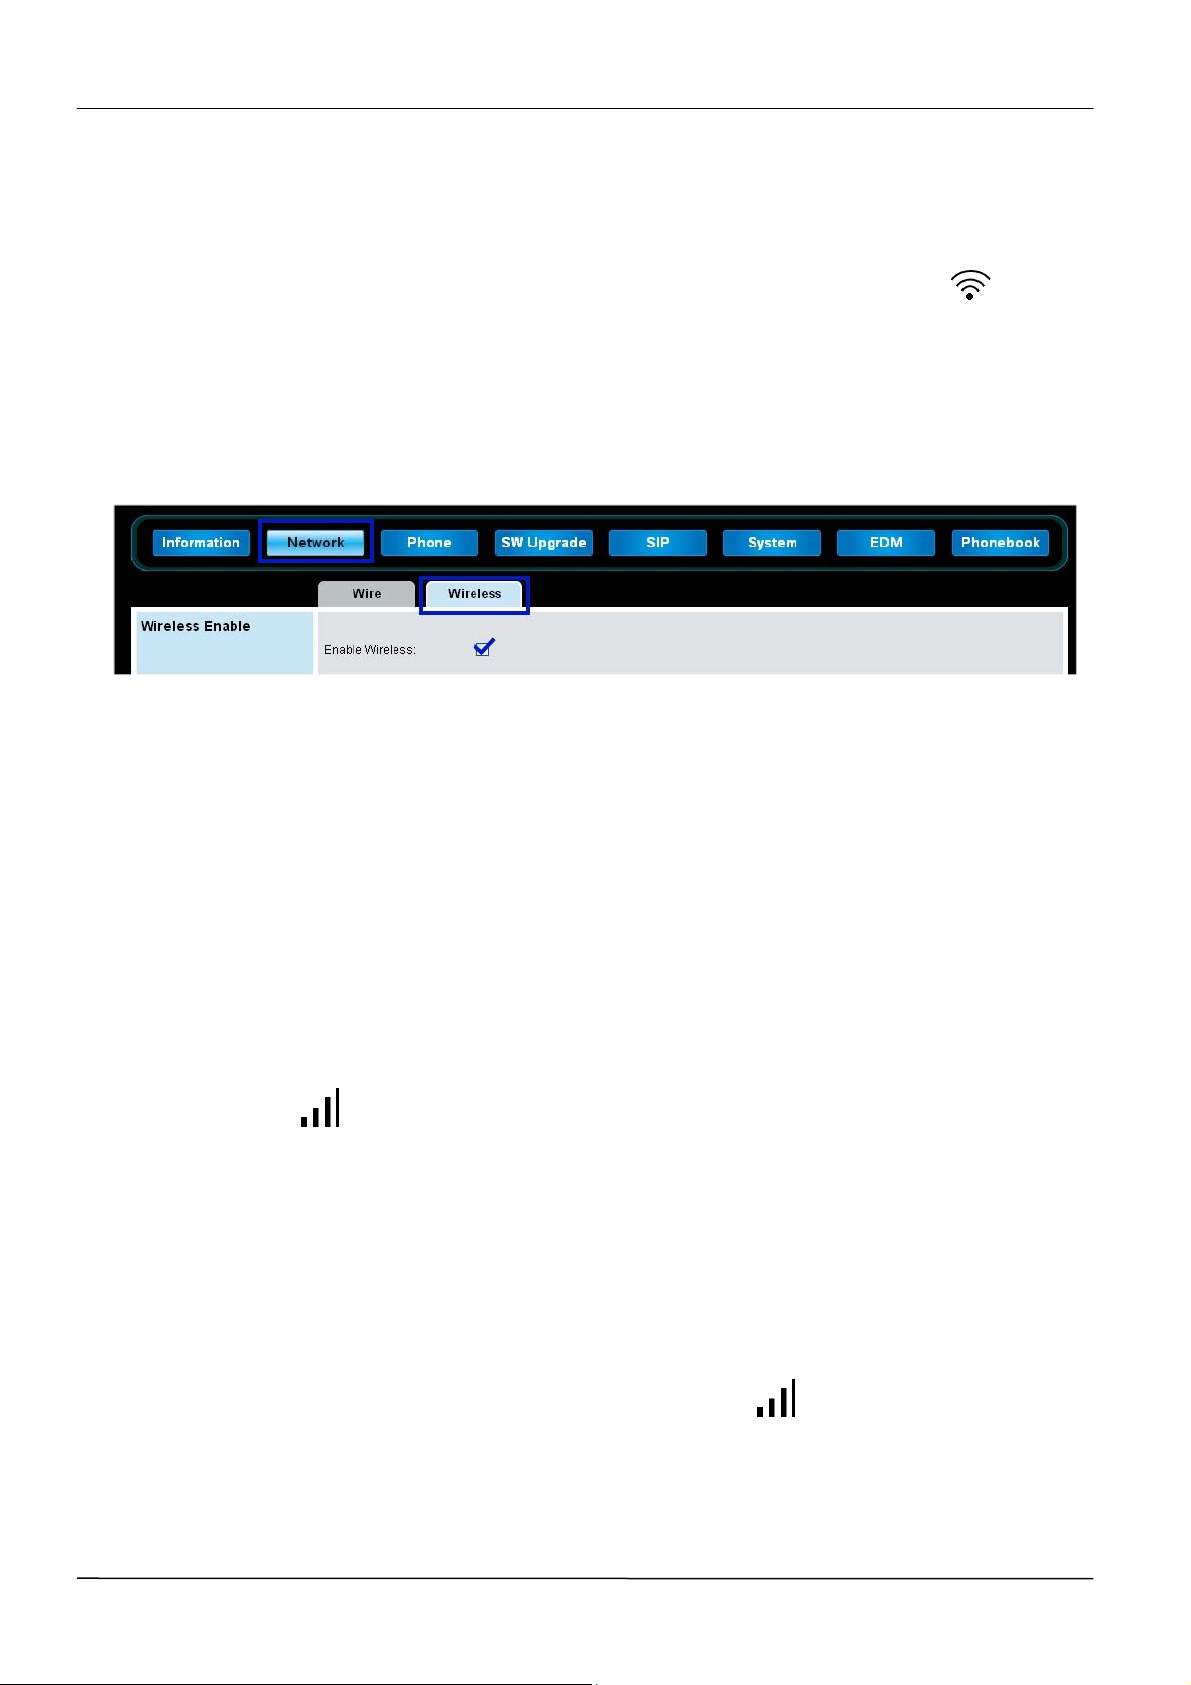
MOCET IP3062 Professional IP Phone Administrators’ Guide
In addition, you can configure the wireless setting through the IP3062 Web Configuration
Interface. Refer to the procedure below.
1. Insert a dedicated USB Wi-Fi adapter into the USB port of your IP3062 phone.
The main screen of IP3062 will display an USB W i-Fi dongle icon .
2. Login the Web Configuration Interface, and select Network tab, then Wireless
tab.
3. Enable Wireless option, and then press Save Settings button. The IP3062
phone will auto reboot to make the configuration take effect.
4. After the phone reboots, you can use Access Point Scan or Manual Setting
function to connect the IP3062 phone to a Wi-Fi access point.
By Access Point Scan:
5-1. Press Scan button, the IP3062 phone will scan Wi-Fi access points, and
display available Wi-Fi access points list.
Note: The IP3062 phone only displays 16 Wi-Fi access points at maxima.
5-2. Press Connect button of the desired Wi-Fi access point to connect
the IP3062 to the Wi-Fi access point. If the selected Wi-Fi access point has
key protection, the IP3062 phone will ask you to input Private Key to connect
to the Wi-Fi access point. After the IP3062 connects with Wi-Fi access point
successfully, the main screen of IP3062 will display a Wi-Fi signal strength
icon .
By Manual Setting:
6-1. Press Manual Setting button, the IP3062 Web Configuration Interface will
pop up a window to ask you to input Network Type, SSID, Authentication,
Encrypt Type and Private Key.
6-2. Press “Connect” button to connect the IP3062 to the Wi-Fi access point. After
the IP3062 connects with Wi-Fi access point successfully, the main screen of
IP3062 will display a Wi-Fi signal strength icon .
Page 63
Page 64

MOCET IP3062 Professional IP Phone Administrators' Guide
Part 6: References
Part 6 provides you with reference information about the IP3062 firmware menu structure
as it appears on IP3062 phones.
Part 6 consists of the following chapter:
Chapter 13: IP3062 Firmware Menu System
Page 64
Page 65
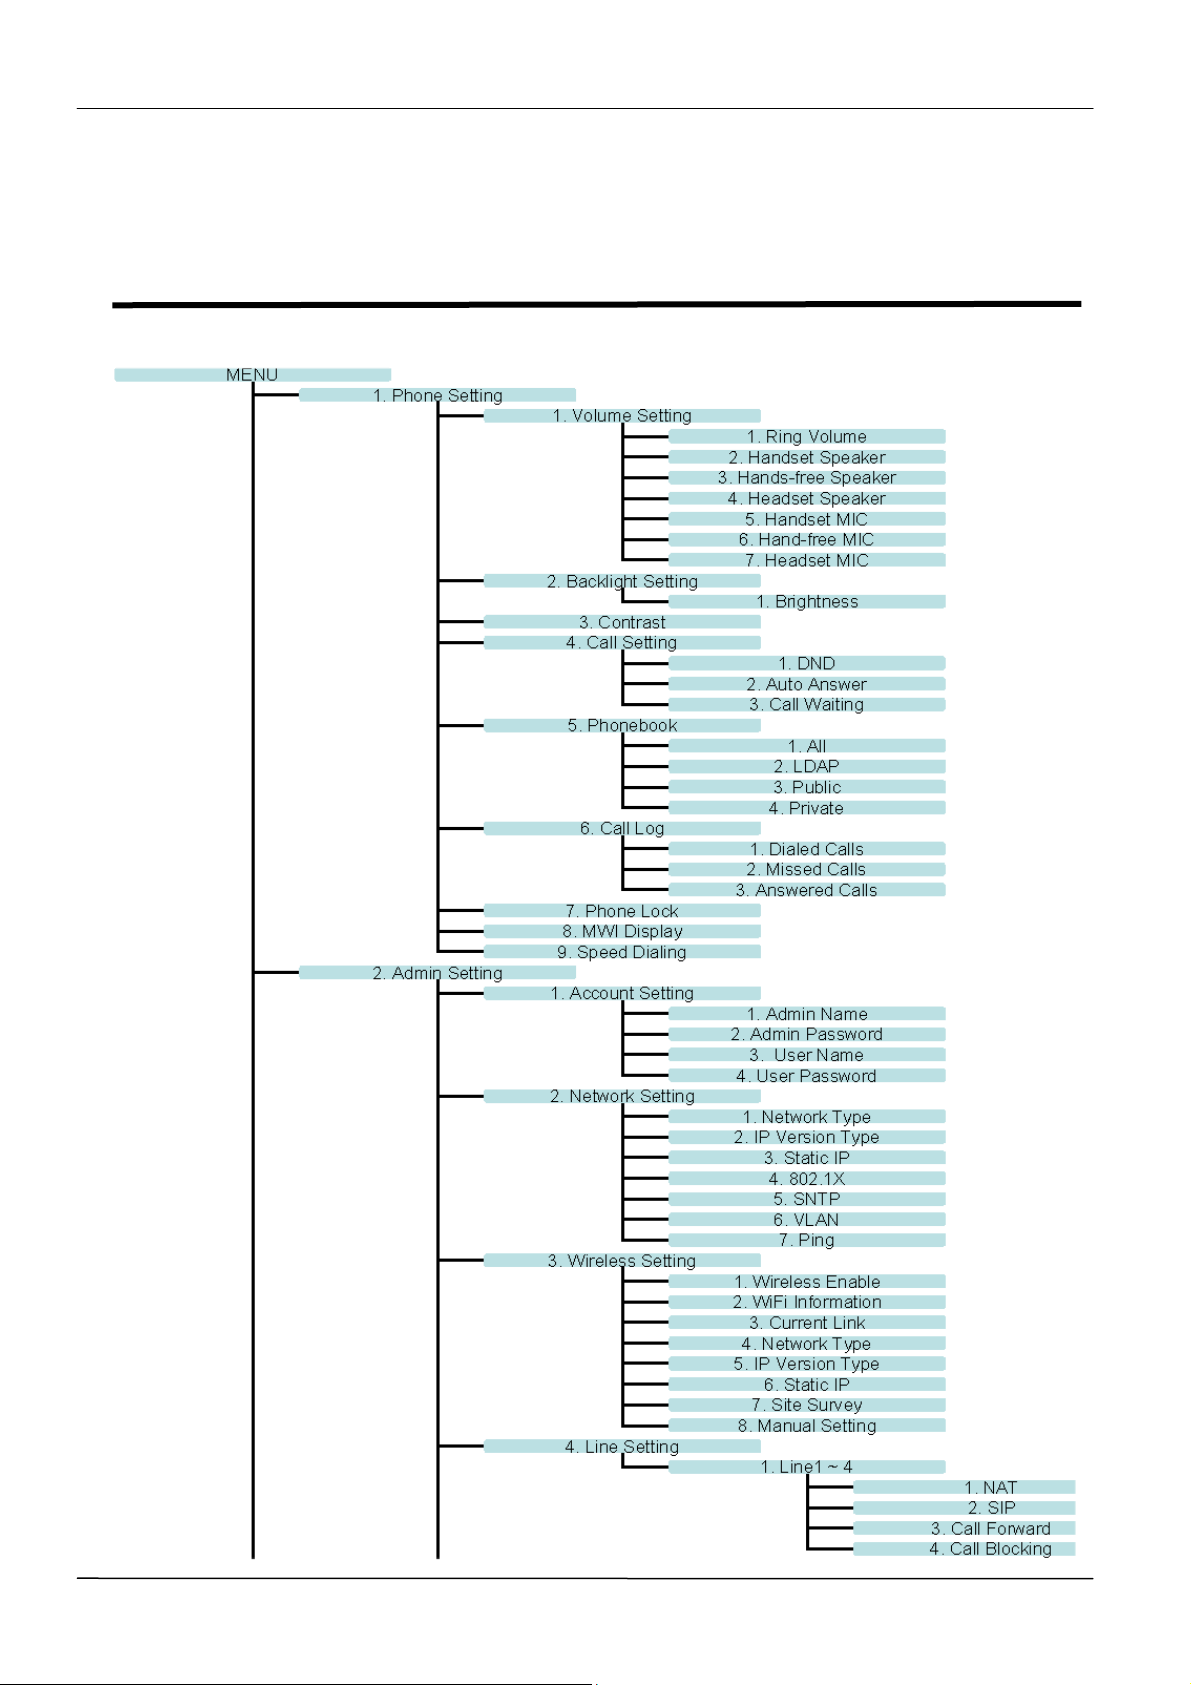
MOCET IP3062 Professional IP Phone Administrators’ Guide
Chapter 13: IP3062 Firmware Menu
System
Page 65
Page 66
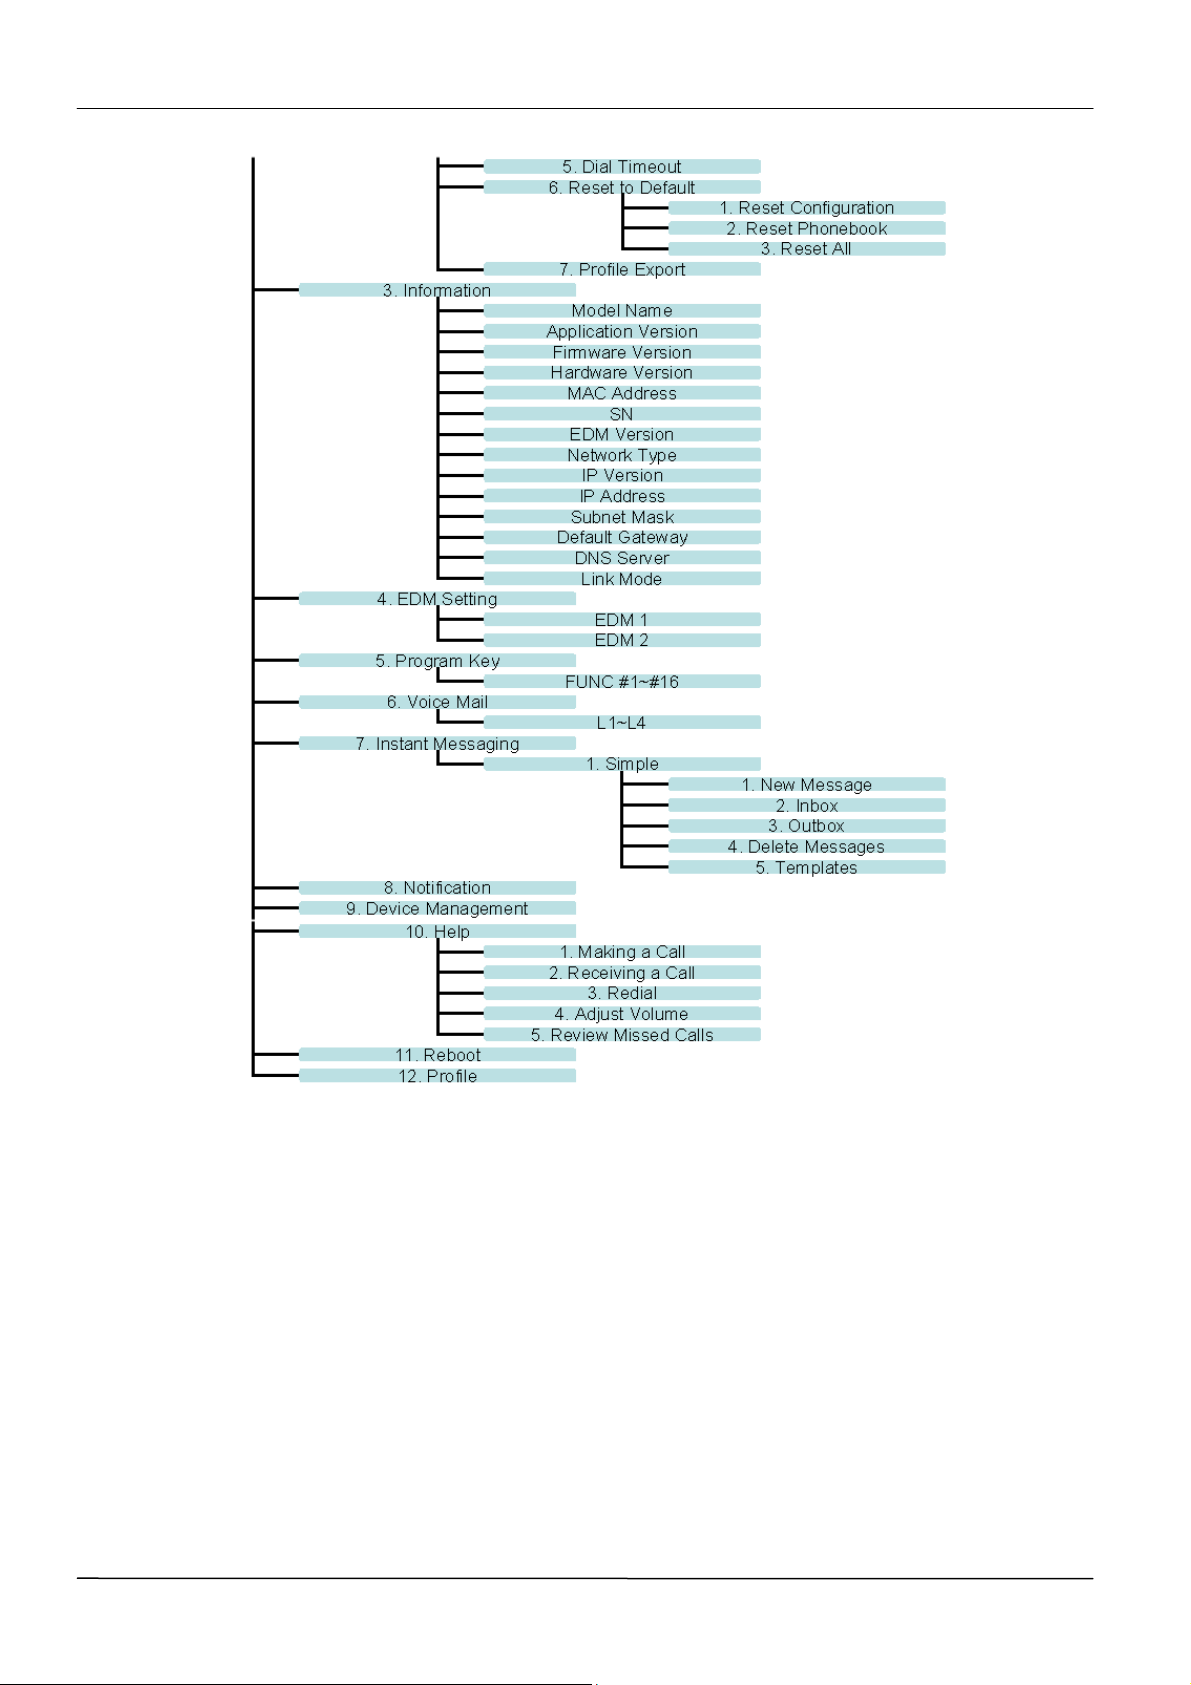
MOCET IP3062 Professional IP Phone Administrators' Guide
Page 66
Page 67
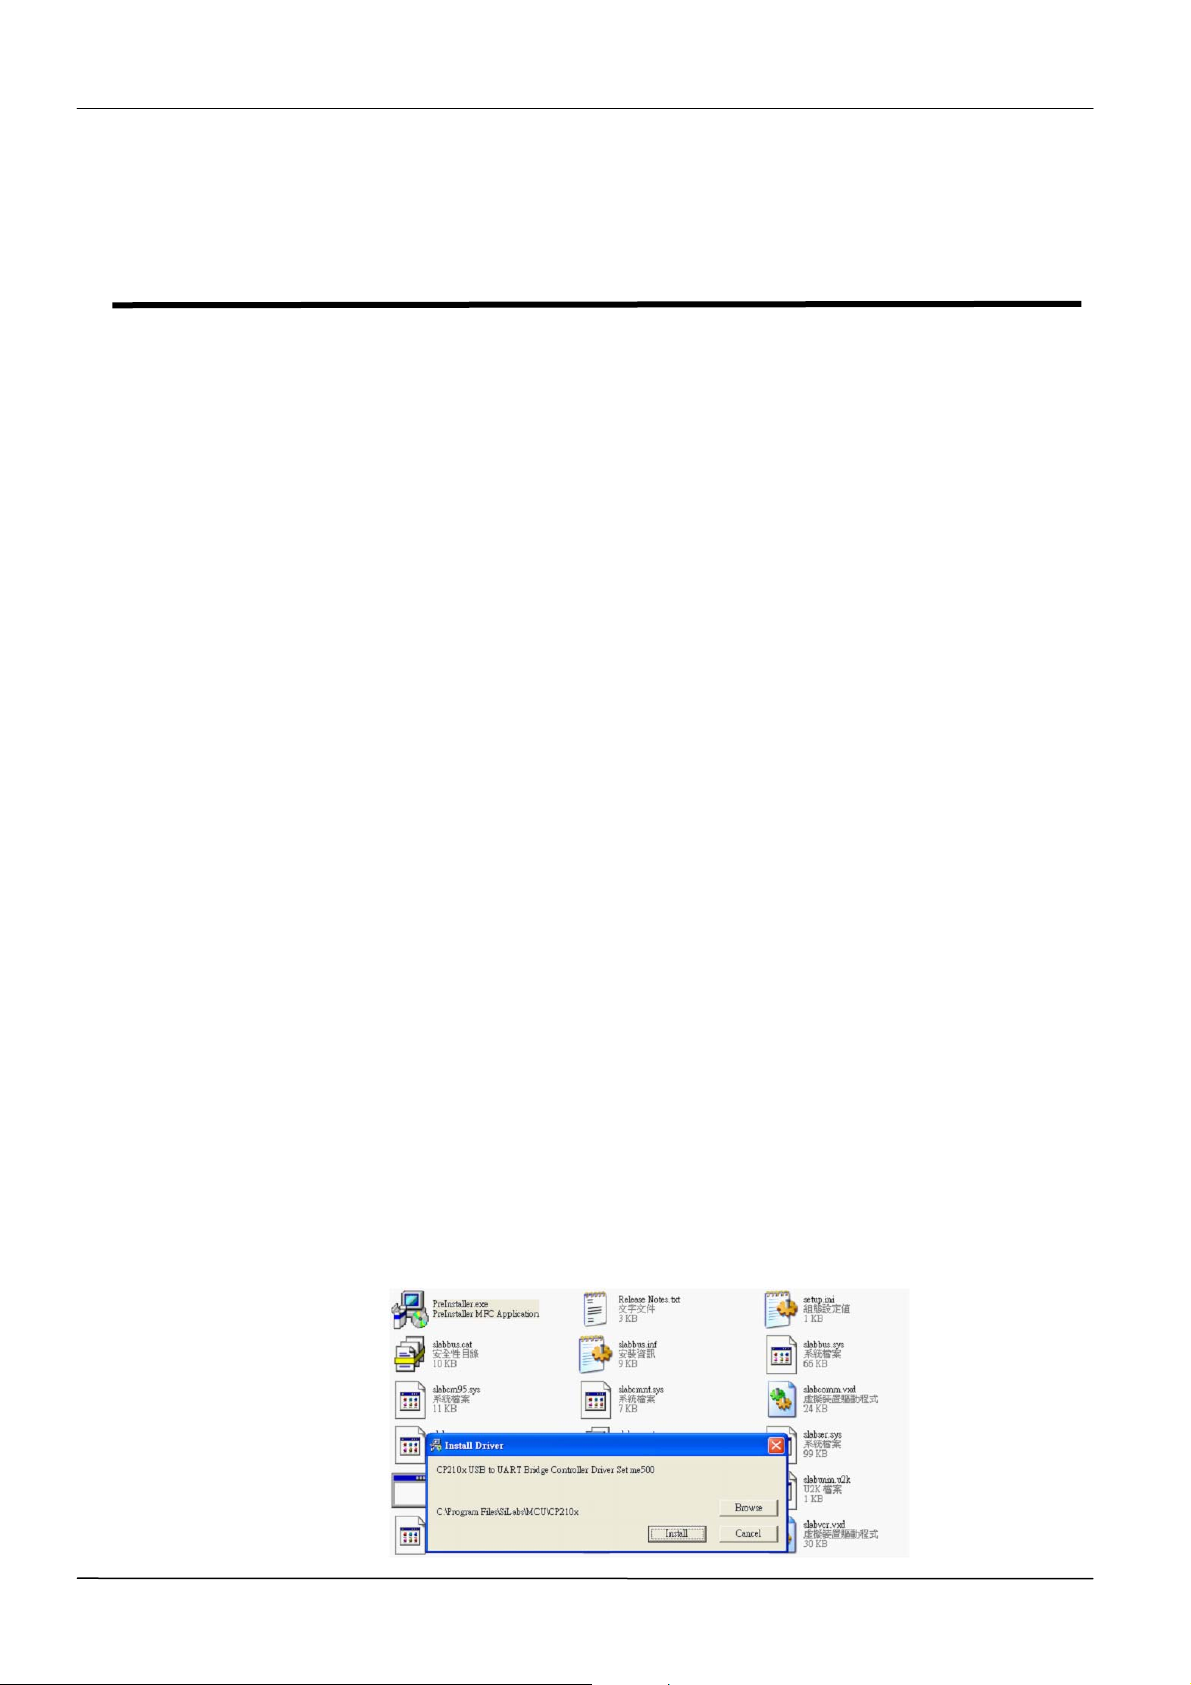
MOCET IP3062 Professional IP Phone Administrators’ Guide
Appendix A – Upgrading Images through
Console by U-boot
This firmware upgrade method is only applicable for distributor who has been authorized in
the local repair right.
Preparing Materials
Before starting upgrade, please make sure you have the following materials ready.
Software List
TFTP software (file name: tftpd32.328)
Console cable driver (file name: Console cable driver-CP210x_Drivers)
Telnet client software (file name: teraterm_utf8-4.58.exe)
IP3062 combined image file (file name: ip3062.image.blob)
The corresponding file of MD5 checksum for IP3062 combined image file (file
name: ip3062.image.blob.md5)
Hardware List
IP3062 phone and its adapter----- 1 unit
PC or Notebook with one USB port and Ethernet port ------1 unit
Console cable for IP3062 -----1 unit
Switch hub and its adapter----- 1 unit
Ethernet cable ----- 2 pcs
Software Environment Setup
Installing the Console Cable Driver
Step1: Open the file of “Console cable driver-CP210x_Drivers”.
Step2: Open the file of “PreInstaller.exe”, and then the screen below will show up.
Step3: Press “Install” to start installation. (You may encounter some warning messages
during installation. Please skip it. Finally, the installation completion message will show up.)
Page 67
Page 68
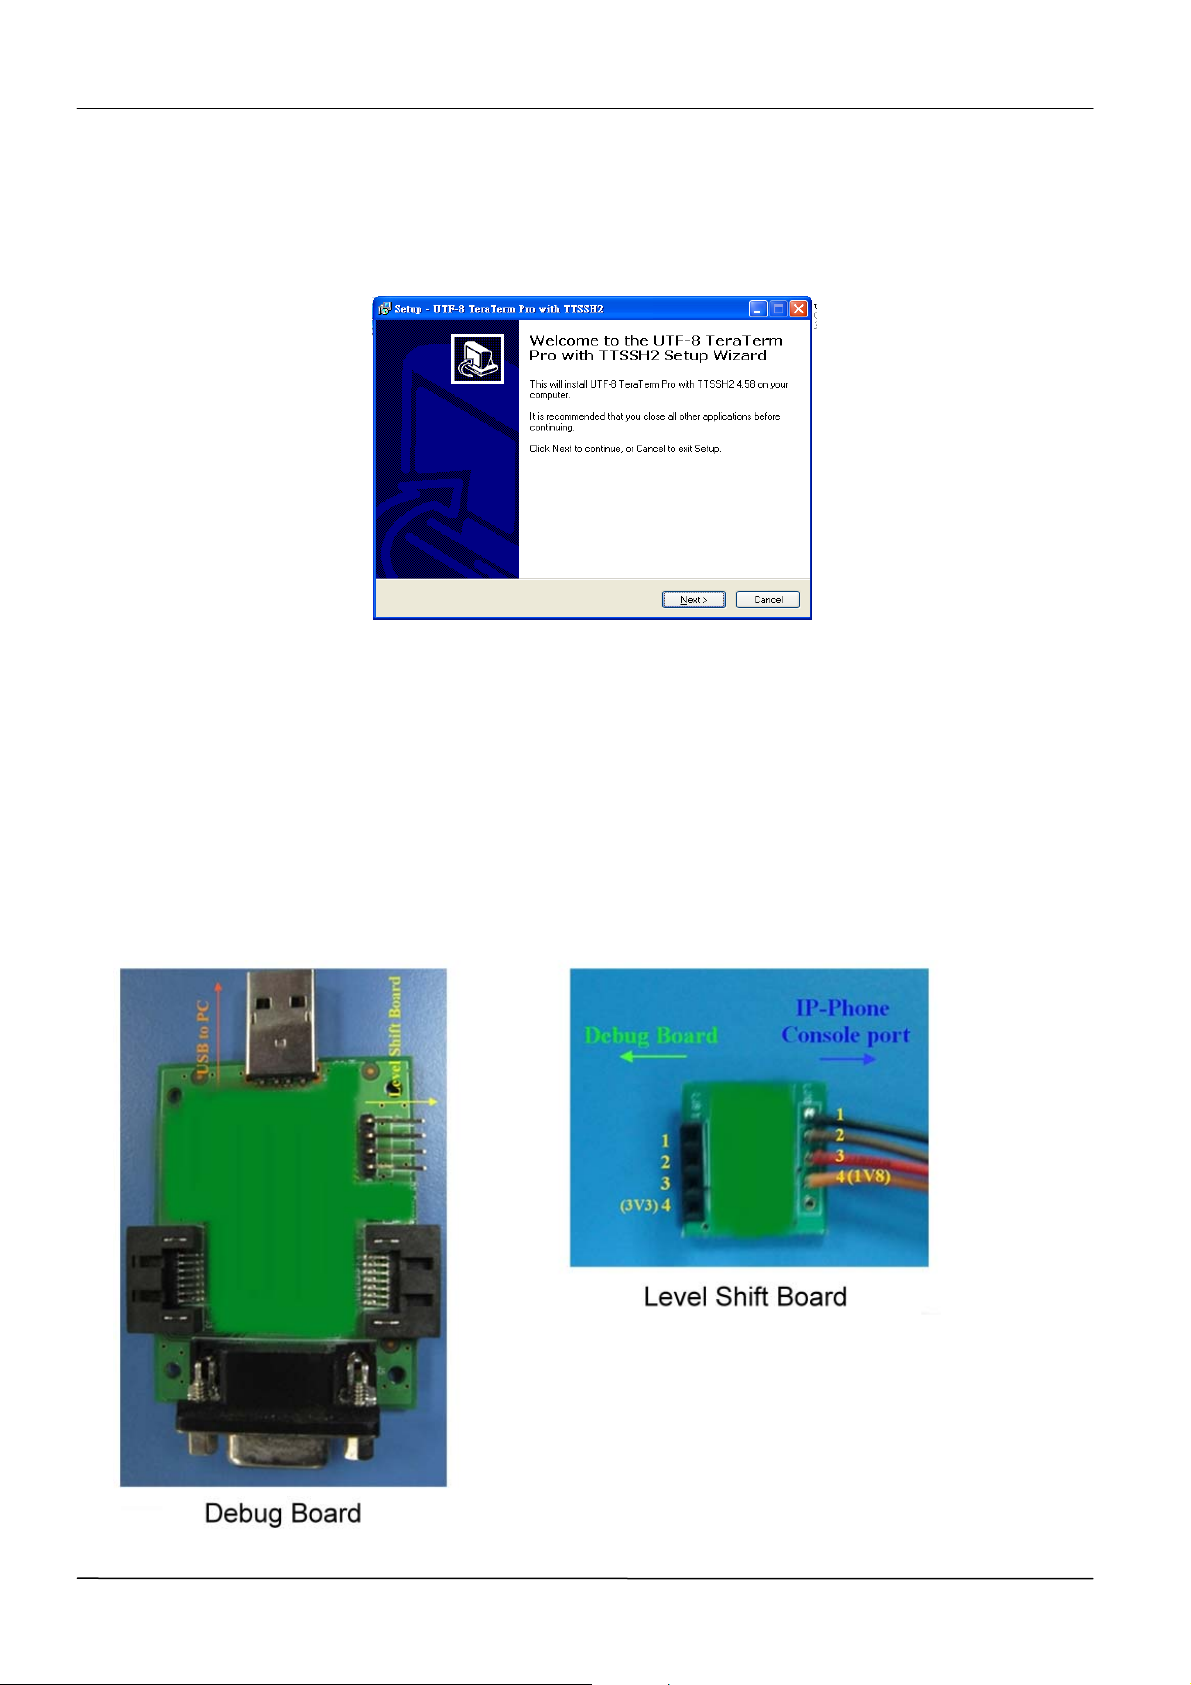
MOCET IP3062 Professional IP Phone Administrators' Guide
Installing the Telnet Client Software
Step1: Open the file of “teraterm_utf8-4.58.exe”, and then the screen below will show up.
Step2: Press “Next” to continue the installation until installation completed.
Step3: Put “ip3062.image.blob” and “ip3062.image.blob.md5” in the file of tftpd32.328.
Hardware Environment Setup
Make Sure You Use the Correct Console Cable
Check your console cable is consisted of a debug board and a level shift board.
Page 68
Page 69
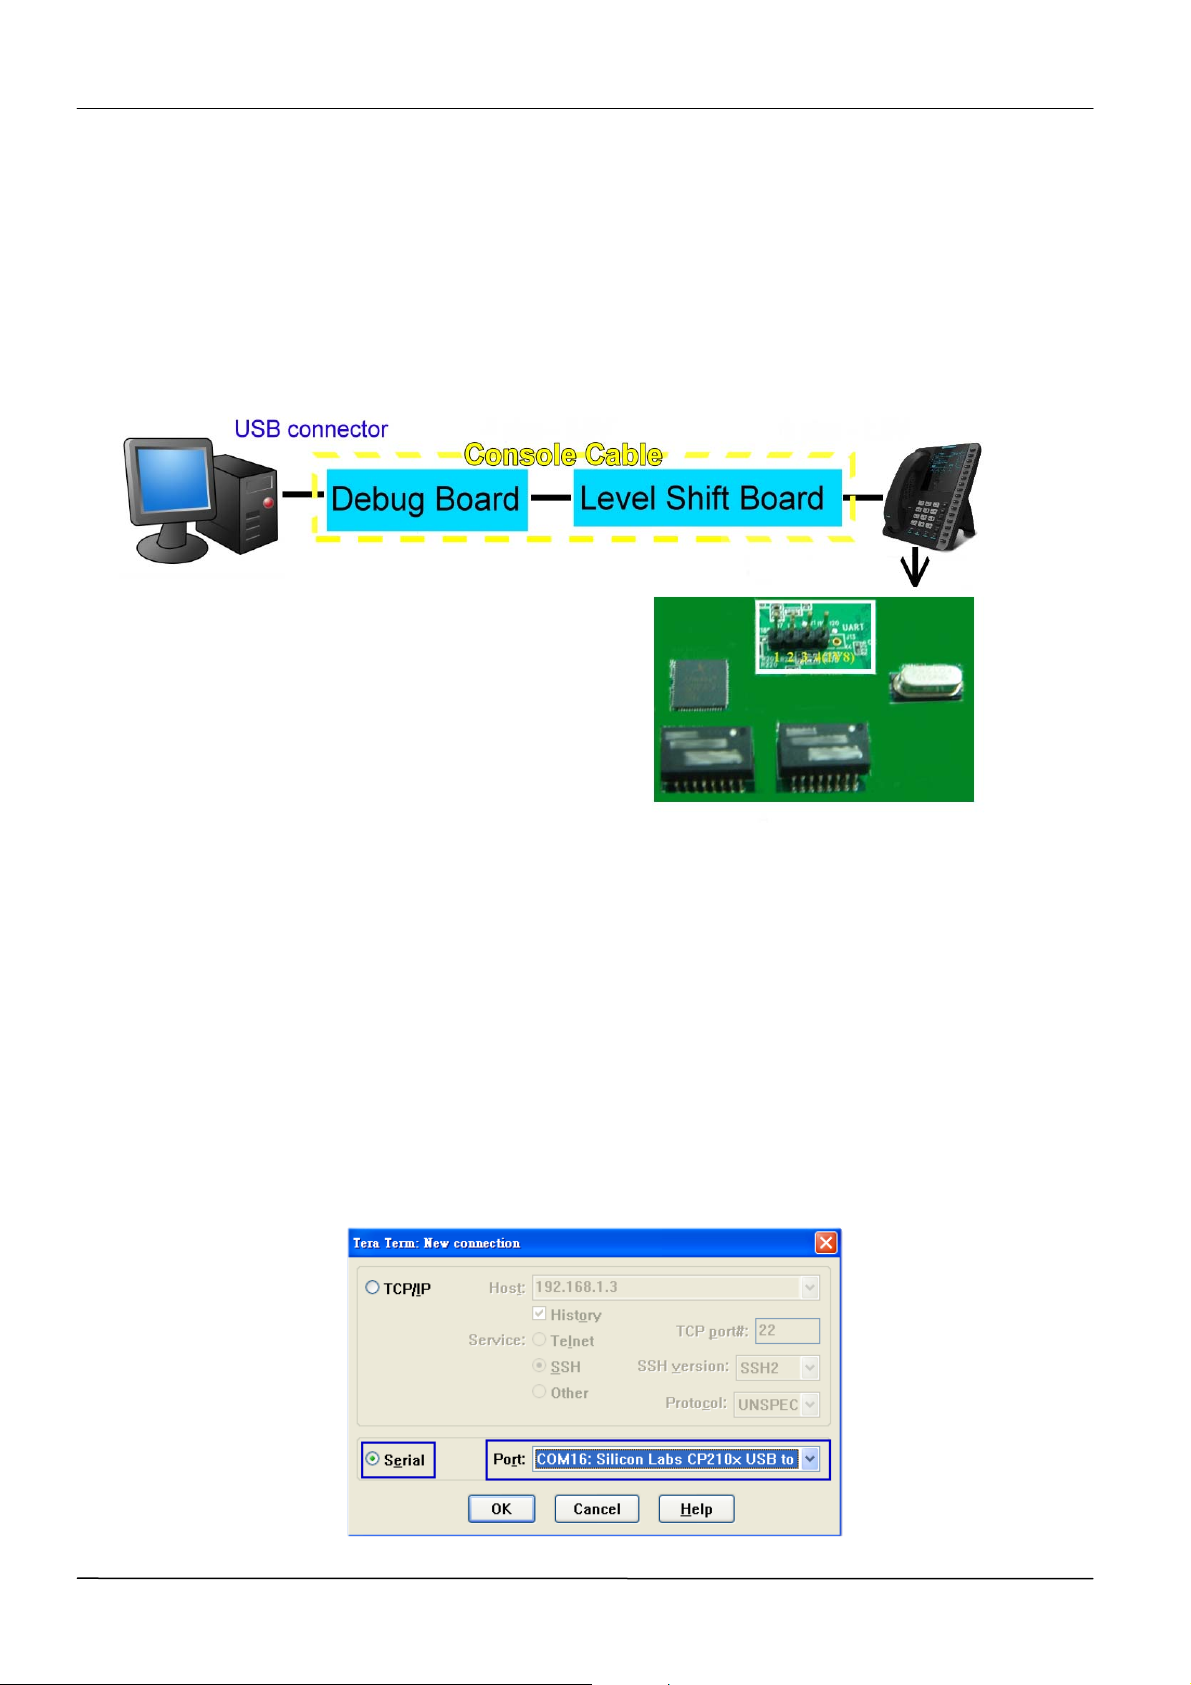
MOCET IP3062 Professional IP Phone Administrators’ Guide
Connecting the Console Cable with PC/Notebook and the IP3062
Step1: Take apart IP3062 phone housing.
Step2: Insert USB plug of the console cable into USB port of PC/Notebook.
Step3: Insert 4 pin connector of the console cable into the 4 pin header on the main board
of IP3062. Please note the direction of the connector.
Connecting an Ethernet Cable with PC/Notebook and Switch Hub
Connecting an Ethernet Cable with IP3062 Phone and Switch Hub
Upgrading Image through Console Port
Opening Telnet Client Window
Step1: Select “UTF-8 Tera Term Pro”.
Step2: Select” Serial”, and set Port to “COM?” (COM? depends on the USB port that the
console cable is connecting with.)
Page 69
Page 70
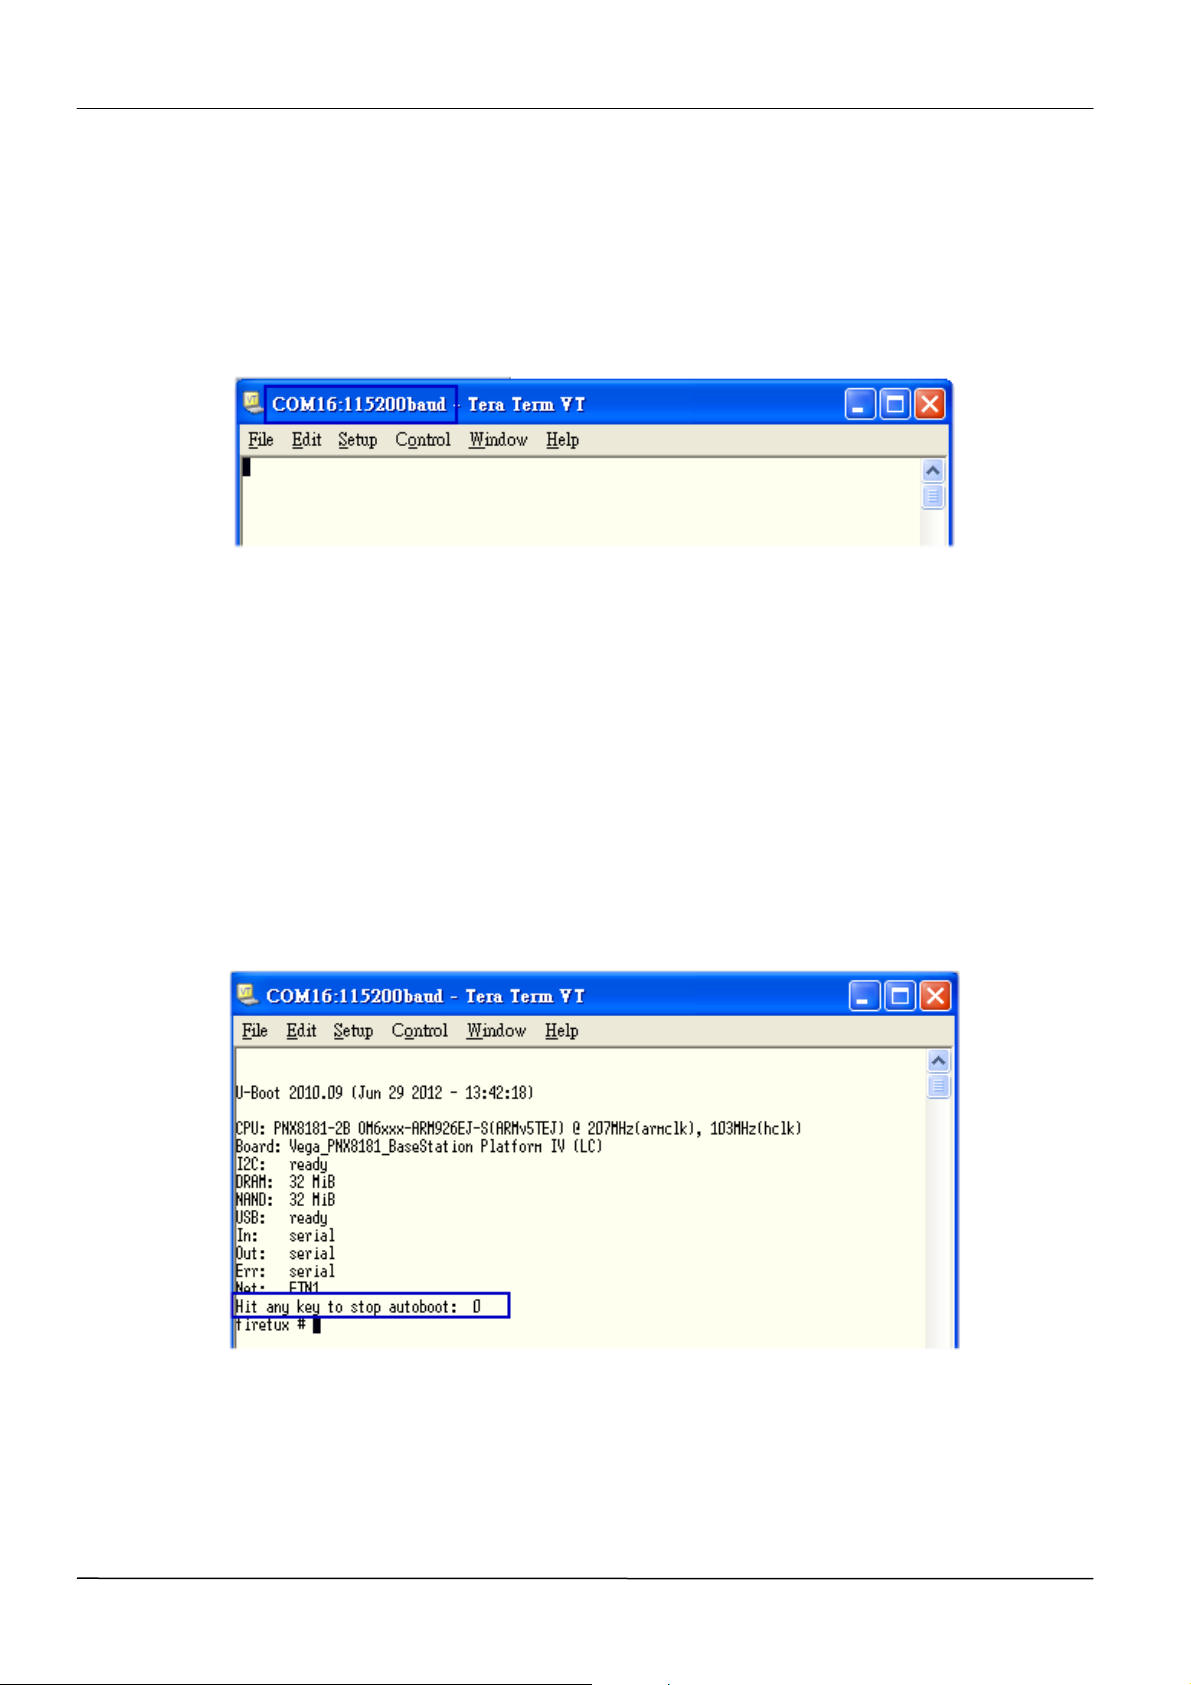
MOCET IP3062 Professional IP Phone Administrators' Guide
Step3: Press “OK”. The new window will pop up.
Step4: Select “Serial port” in the “Setup” menu of the new window.
Step5: Change baud rate from default, 9600, to 115200. Then press “OK”.
Step6: Then the screen below will show up. Please keep the window open.
Opening TFTP Window
Step1: Open “tftpd32.exe”.
Step2: Change “server interface IP” to the IP address of PC/Notebook. Please keep the
window open.
Environment Setting
Step1: Power on IP3062 phone, and then the telnet window will show the IP3062 phone
running status. Before the count down number to “0”, press any key to stop the count
down, so that you can enter commands through the console cable.
Step2: Set up the environment.
Enter a command: run AtherosS, and press “Enter” key to confirm.
Enter a command: TurnOffRefClk, and press “Enter” key to confirm.
Enter a command: print, and press “Enter” key to confirm.
Page 70
Page 71
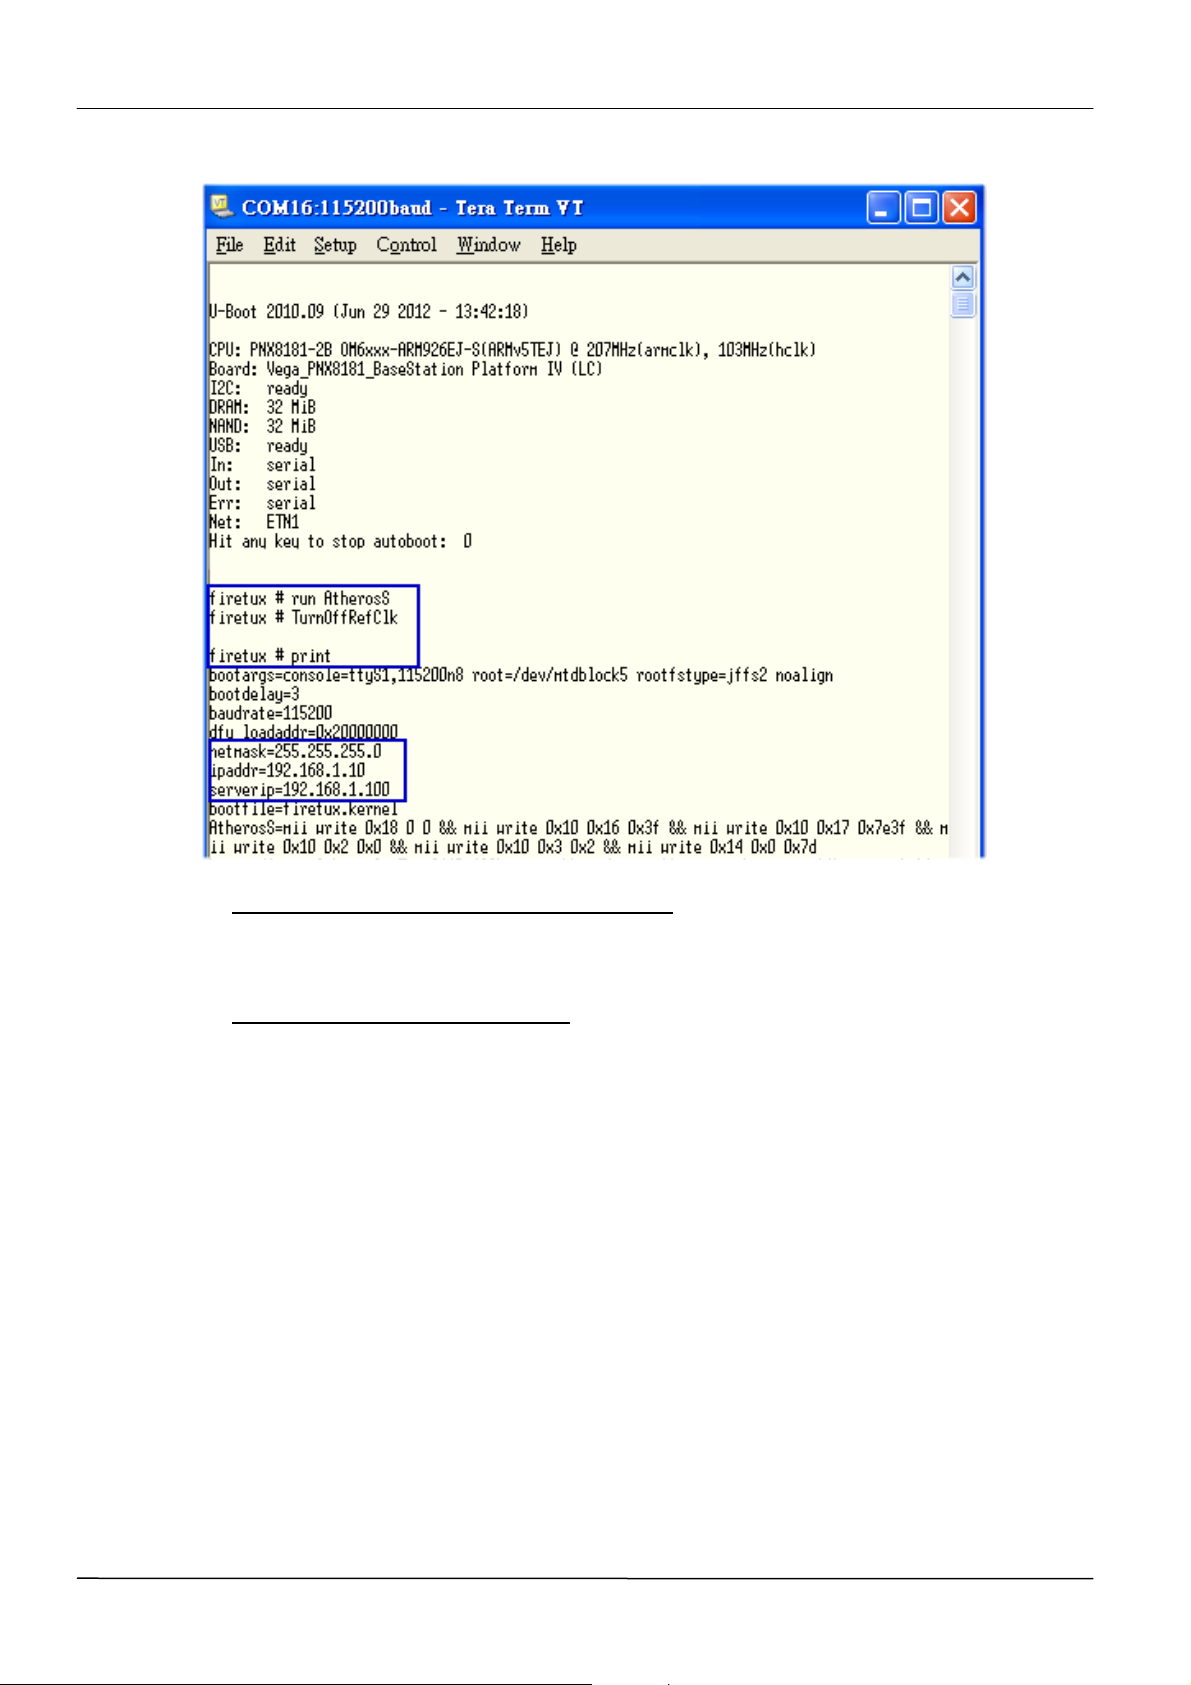
MOCET IP3062 Professional IP Phone Administrators’ Guide
Step3: Set TFTP server IP address of your computer.
Enter a command: setenv serverip 172.18.149.62, and press “Enter” key to confirm.
Step4: Set IP address of the IP3062 phone.
Enter a command: setenv ipaddr 172.18.149.100, and press “Enter” key to confirm.
Upgrading the Firmware
Step1: Upload the combined image file to the phone.
Enter a command: tftpboot 0x20000000 ip3062.image.blob, and press “Enter” key to
confirm.
Page 71
Page 72
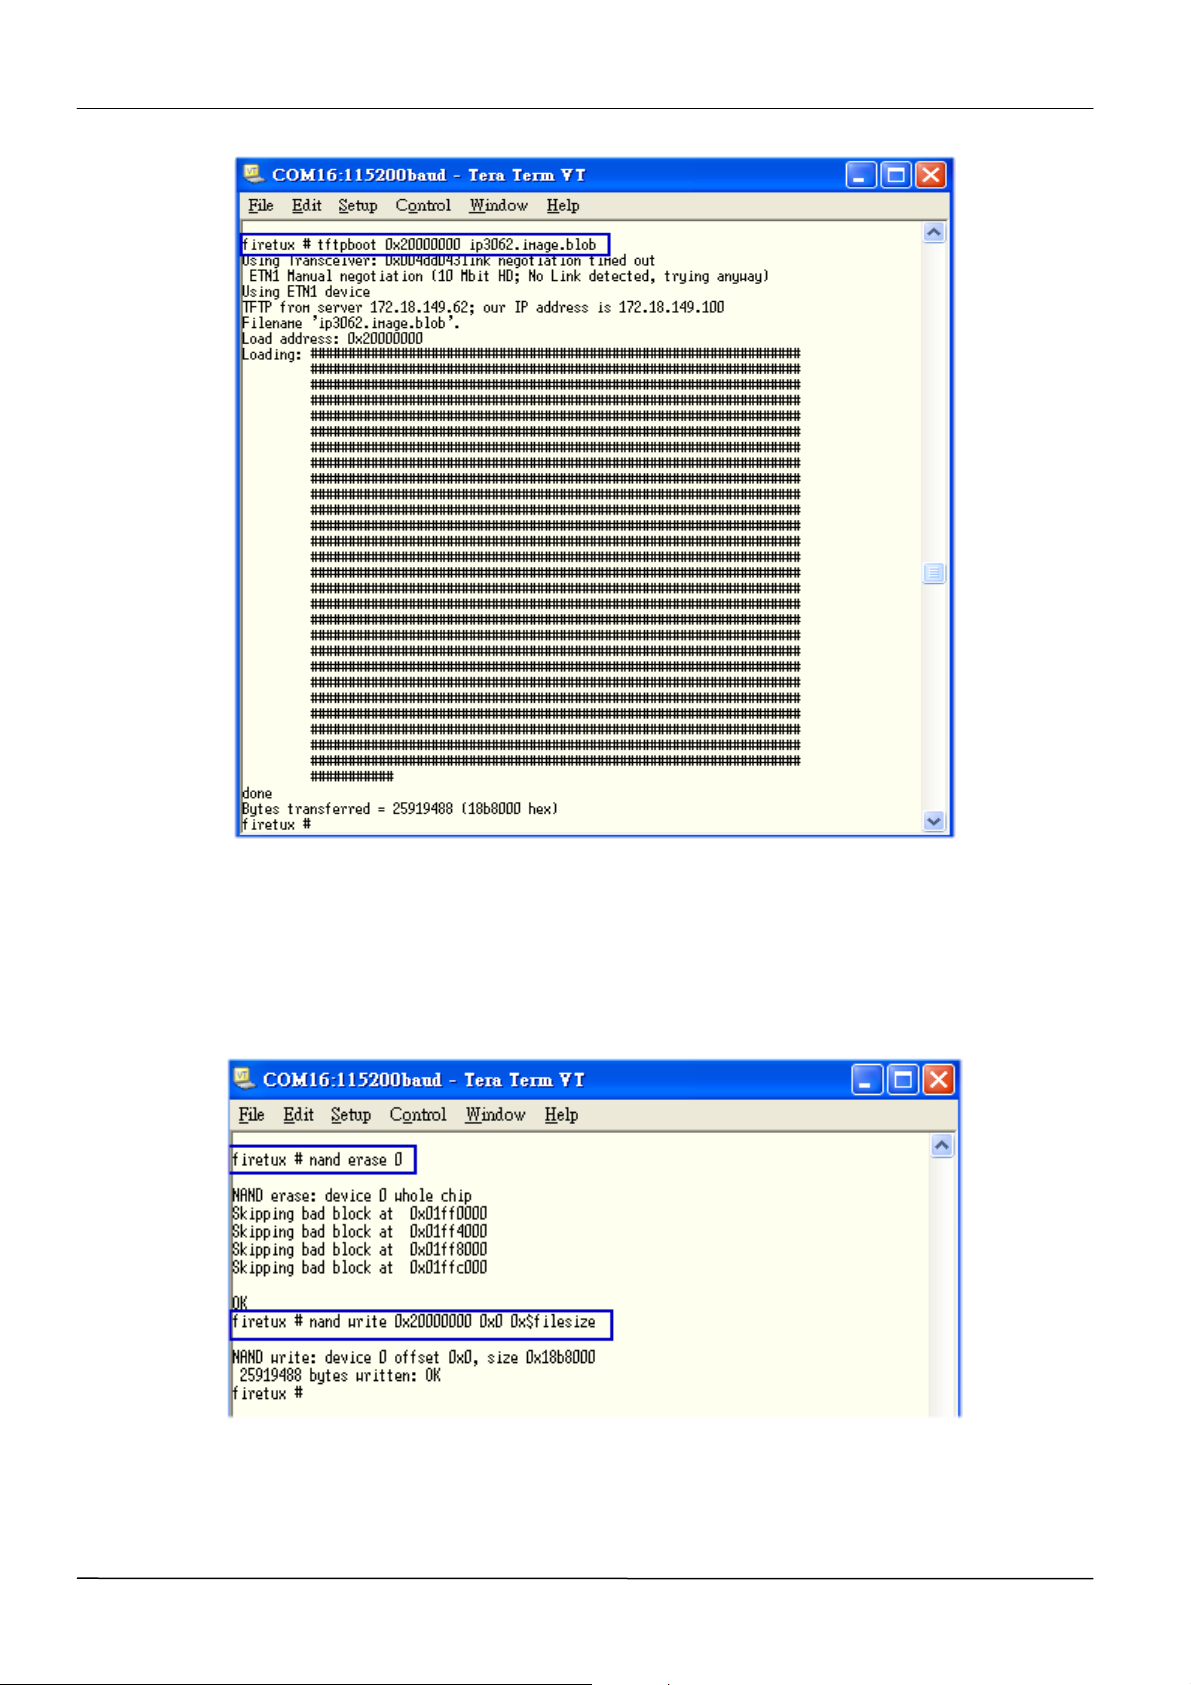
MOCET IP3062 Professional IP Phone Administrators' Guide
Step2: Write the image file on the phone.
Enter a command: nand erase 0, and press “Enter” key to confirm.
Enter a command: nand write 0x20000000 0x0 0x$filesize, and press “Enter” key to
confirm.
Step3: Reset the phone after the image written done.
Enter a command: reset, and press “Enter” key to confirm.
Page 72
Page 73
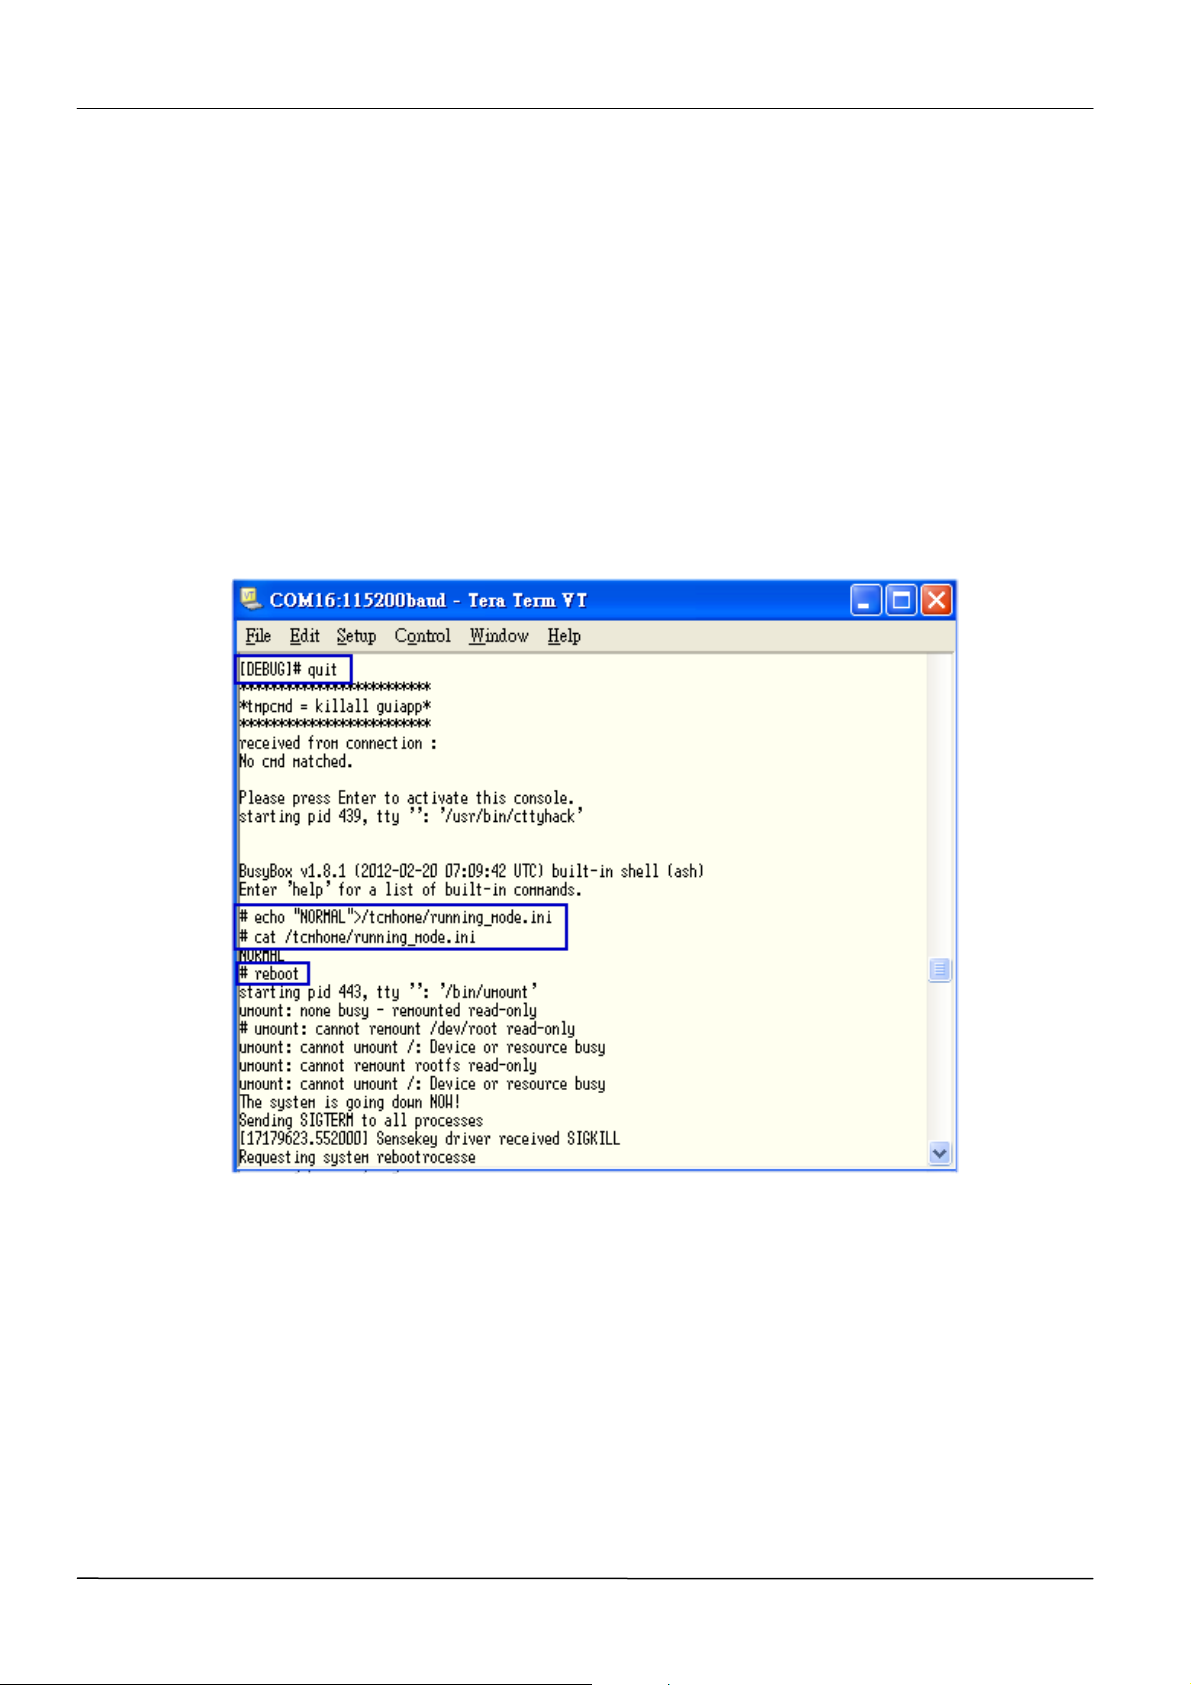
MOCET IP3062 Professional IP Phone Administrators’ Guide
Exiting Debug Mode
Step1: After booting, the IP3062 phone will enter “Debug Test” mode.
Step2: Exit from “Debug Test” mode to “Normal” mode.
Enter a command: quit, and press “Enter” key to confirm.
Enter a command: echo “NORMAL”> /tcmhome/running_mode.ini, and press “Enter”
key to confirm.
Enter a command: cat /tcmhome/running_mode.ini, and press “Enter” key to confirm.
Enter a command: reboot, and press “Enter” key to confirm.
Setting MAC Address
Please note that the IP3062 phone’s MAC address will be reset to default after you
complete the combined image upgrade. You should set the original MAC address of the
phone through console before you start to use the phone. Otherwise, you will encounter
MAC address conflict when using the phone. Please follow the steps below to set MAC
address.
Step1: During the IP3062 reboots, press any key to stop the count down before the count
down number to “0”, so that you can enter commands through the console cable.
Page 73
Page 74
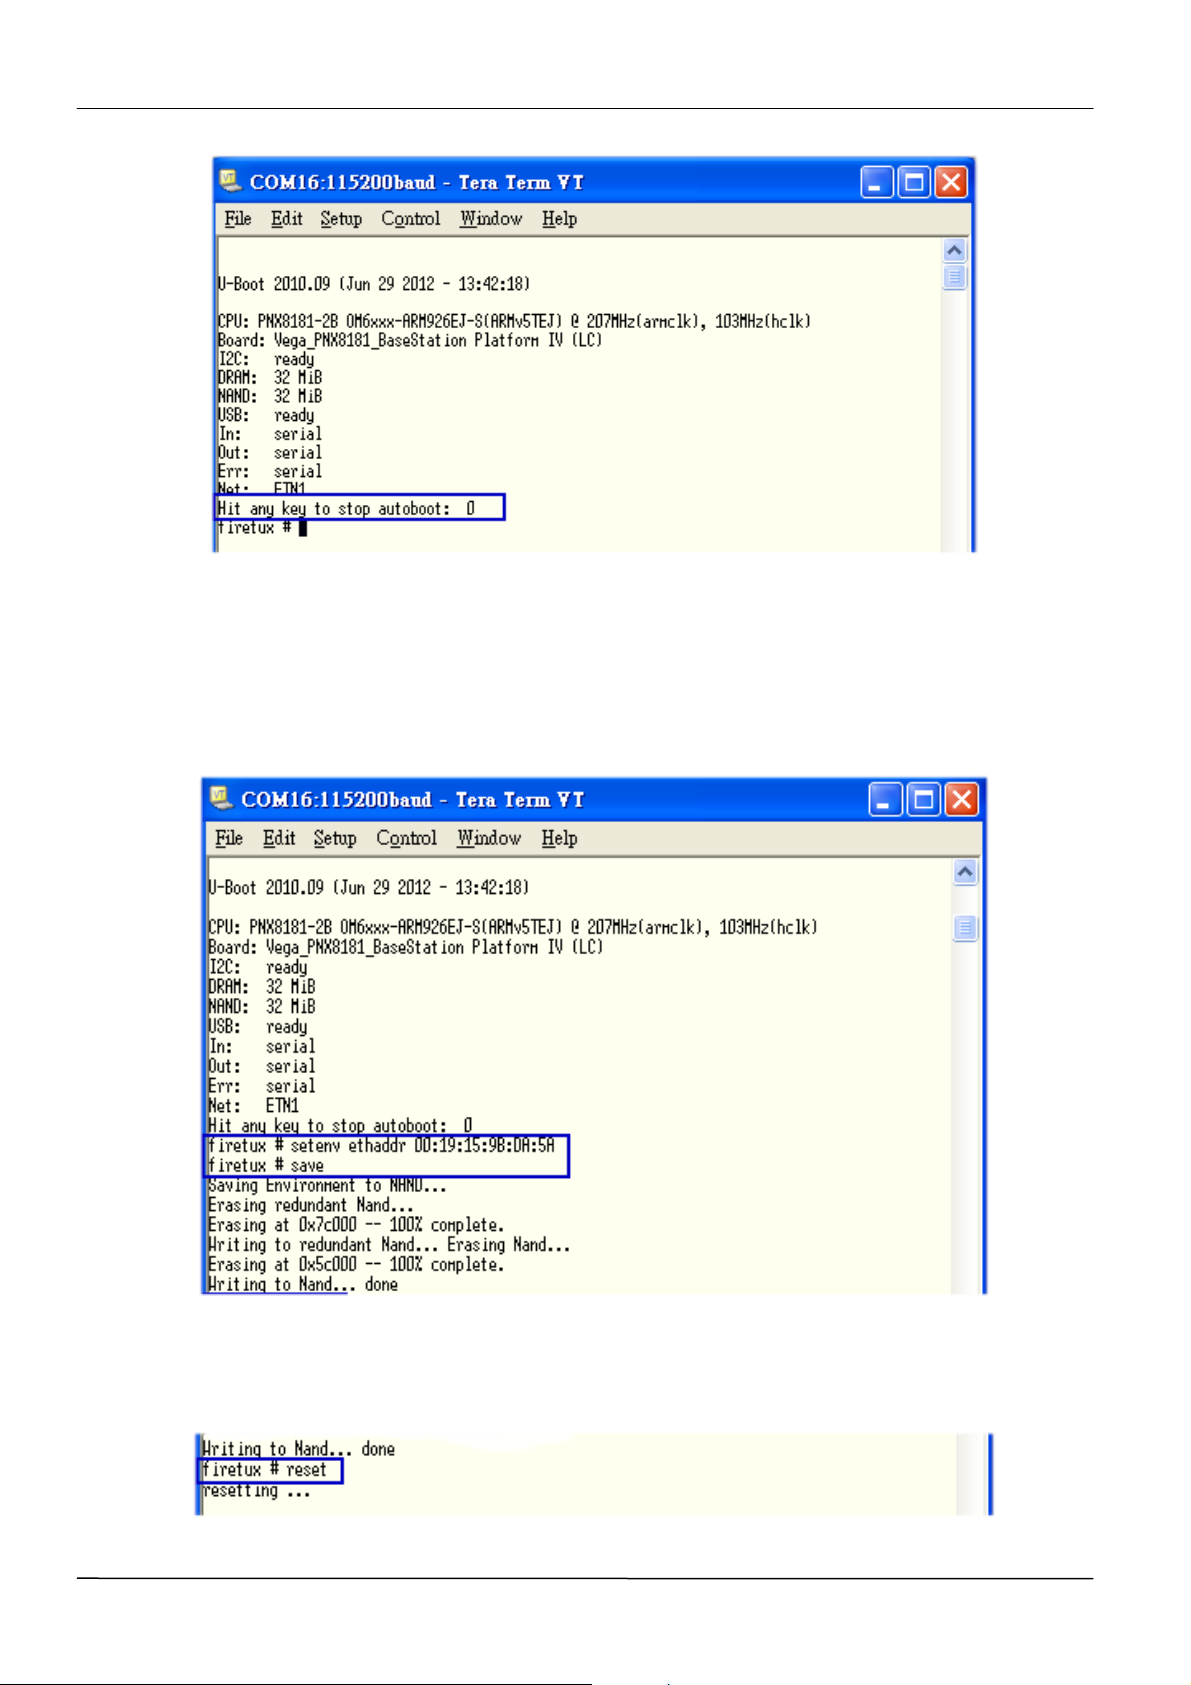
MOCET IP3062 Professional IP Phone Administrators' Guide
Step2: Set and Save MAC address on its U-boot.
Enter a command: setenv ethaddr 00:19:15:9B:DA:5A, and press “Enter” key to
confirm.
Enter a command: save, and press “Enter” key to confirm.
Step3: Reset the phone after the MAC address written done.
Enter a command: reset, and press “Enter” key to confirm.
Page 74
 Loading...