

Page 1
IP300S
User Guide
www.atltelecom.com
Page 2

IP SIP Phone v2 User’s Guide Mar. 2005
Directory
DIRECTORY ...............................................................................................................................................................2
1. OVERVIEW....................................................................................................................................................... 6
1.1. FEATURES................................................................................................................................................... 6
1.2. TECHNICAL SPECIFICATIONS ......................................................................................................................7
1.2.1. CALL CONTROL CAPABILITY ......................................................................................................................7
1.2.2. REAL-TIME VOICE STREAMING................................................................................................................... 8
1.2.3. NAT AND FIREWALL .................................................................................................................................. 8
1.2.4. MANAGEMENT............................................................................................................................................ 8
2. LAYOUT......................................................................................................................................................... 10
2.1. HARDWARE .............................................................................................................................................. 10
2.1.1. FRONT VIEW .............................................................................................................................................10
2.1.2. REAR VIEW............................................................................................................................................... 10
2.1.3. BACK VIEW .............................................................................................................................................. 11
2.2. KEYS ........................................................................................................................................................ 11
2.3. KEYPAD.................................................................................................................................................... 14
3. OPERATION.................................................................................................................................................... 15
3.1. KEY DEFINITIONS IN MENU MODE ........................................................................................................... 15
3.2. ENTER ALPHABETS AND NUMBERS........................................................................................................... 16
3.3. ADDRESS-OF-RECORD (SIP AOR) ............................................................................................................ 16
4. STARTUP........................................................................................................................................................17
4.1. PREREQUISITE...........................................................................................................................................17
4.1.1. NETWORK................................................................................................................................................. 17
4.1.1.1. DHCP .................................................................................................................................................. 18
4.1.1.2. STATIC IP (FIXED IP) ...........................................................................................................................18
4.1.1.3. PPPOE ................................................................................................................................................. 18
4.1.1.4. VERIFY NETWORK CONFIGURATION.................................................................................................... 19
4.1.2. SIP SERVICE ............................................................................................................................................. 19
4.1.3. CONFIGURE NAT AND FIRE WALL .............................................................................................................20
4.2. INITIALIZATION.........................................................................................................................................21
4.3. REGISTRATION ..........................................................................................................................................22
5. SHUTDOWN ................................................................................................................................................... 22
5.1. UNREGISTRATION .....................................................................................................................................22
6. IDLE............................................................................................................................................................... 23
6.1. REGISTERED ............................................................................................................................................. 23
6.2. NOT REGISTERED YET OR REGISTRATION EXPIRES .................................................................................... 23
6.3. REGULAR REGISTRATION ......................................................................................................................... 23
7. TAKE CALLS ..................................................................................................................................................24
[2/100]
Page 3

IP SIP Phone v2 User’s Guide Mar. 2005
RINGING ................................................................................................................................................... 24
7.1.
7.2. REJECT CALL............................................................................................................................................ 25
7.3. FORWARD CALL ....................................................................................................................................... 25
7.4. ANSWER CALL.......................................................................................................................................... 25
7.5. CONNECTED.............................................................................................................................................. 26
7.6. DISCONNECTED ........................................................................................................................................ 26
7.7. FORWARD AND DND ................................................................................................................................ 28
7.7.1. DO NOT DISTURB (DND) ......................................................................................................................... 28
7.7.2. CALL FORWARD ....................................................................................................................................... 28
7.7.2.1. ALL CALLS FORWARD ......................................................................................................................... 29
7.7.2.2. BUSY FORWARD .................................................................................................................................. 29
7.7.2.3. NO ANSWER FORWARD........................................................................................................................ 29
7.7.3. FORWARDING RULES ................................................................................................................................29
8. MAKE CALLS................................................................................................................................................. 30
8.1. DIAL SCHEME ...........................................................................................................................................31
8.1.1. GUARDING TIME ....................................................................................................................................... 34
8.1.2. ENUM SAMPLE ........................................................................................................................................ 35
8.2. REDIAL .....................................................................................................................................................37
8.3. ADDRESS BOOK ........................................................................................................................................37
8.4. CALL HISTORY ......................................................................................................................................... 38
8.5. SPEED DIAL .............................................................................................................................................. 39
8.6. CALL RETURN .......................................................................................................................................... 41
8.7. CALLING ................................................................................................................................................... 41
8.8. CALL FAILURE.......................................................................................................................................... 42
8.9. AUTO-REDIAL ........................................................................................................................................... 42
8.10. ONE-TOUCH DIAL..................................................................................................................................... 43
9. CALL PROCESSING......................................................................................................................................... 45
9.1. HANDSET, SPEAKER-PHONE, EAR-PHONE AND LOUD-SPEAKER ................................................................ 45
9.2. HOLD........................................................................................................................................................ 45
9.3. MUTE........................................................................................................................................................ 46
9.4. TRANSFER.................................................................................................................................................46
9.4.1. CONSULTATIVE TRANSFER .......................................................................................................................47
9.4.2. BLIND TRANSFER......................................................................................................................................48
9.4.3. PHONE LOCKED ........................................................................................................................................ 48
9.5. CONFERENCE ............................................................................................................................................49
9.5.1. HEURISTICS AND CONSTRAINT.................................................................................................................. 49
9.5.2. CONFERENCE TIPS .................................................................................................................................... 50
9.6. BLOCK CALLS........................................................................................................................................... 51
10. CALL PREFERENCE ................................................................................................................................... 54
[3/100]
Page 4

IP SIP Phone v2 User’s Guide Mar. 2005
CALL WAITING .........................................................................................................................................54
10.1.
10.2. DIAL TIMEOUT .......................................................................................................................................... 55
10.3. HOLD RECALL ..........................................................................................................................................55
10.4. AUTO HOLD ON CALL SWITCH ................................................................................................................. 56
10.5. AUTO REDIAL........................................................................................................................................... 56
10.6. SILENTLY FOLLOW REDIRECTION............................................................................................................. 57
10.7. DIAL PLAN................................................................................................................................................ 57
10.7.1. INTER-DIGIT TIMEOUT .........................................................................................................................57
10.7.2. DIAL KEY .............................................................................................................................................58
10.7.3. LAN DIAL ........................................................................................................................................... 58
10.7.4. CALL COMMAND ................................................................................................................................. 59
10.7.4.1. CALL RETURN...................................................................................................................................... 60
10.7.4.2. ANONYMOUS CALL (CLIP & CLIR) .................................................................................................... 60
10.8. MESSAGE ALERT....................................................................................................................................... 61
10.9. AUTO-ANSWER......................................................................................................................................... 61
10.10. CODEC PREFERENCE.......................................................................................................................... 64
10.10.1. ENABLE PERSONAL PREFERENCE......................................................................................................... 67
10.11. COMFORT NOISE GENERATION ............................................................................................................ 67
10.12. REGISTRATION ON DEMAND ................................................................................................................ 68
10.13. MULTI-DOMAIN REGISTRATION .......................................................................................................... 70
11. VOICE VOLUME ADJUSTMENT.................................................................................................................. 72
11.1. RINGER ..................................................................................................................................................... 72
11.2. HANDSET .................................................................................................................................................. 72
11.3. SPEAKER PHONE .......................................................................................................................................72
11.4. EAR PHONE............................................................................................................................................... 73
12. SERVICE.................................................................................................................................................... 74
12.1. VOICE MAIL ............................................................................................................................................. 74
12.1.1. SET UP VOICE MAIL............................................................................................................................. 75
12.1.2. ACCESS VOICE MAIL ...........................................................................................................................76
12.2. INSTANT MESSAGING ............................................................................................................................... 76
12.3. SYNCHRONIZE TIME ................................................................................................................................. 77
12.4. AUTO PROVISION...................................................................................................................................... 79
12.5. SOFT-SWITCH (PBX) FEATURE ACCESS ...................................................................................................82
13. NAT TRAVERSAL ..................................................................................................................................... 85
13.1. PUBLIC INTERNET CONFIGURATION.......................................................................................................... 85
13.2. LAN CONFIGURATION TO TRAVERSE NAT AND FIREWALL ..................................................................... 86
13.2.1. STATIC NAT ROUTE ............................................................................................................................ 86
13.2.2. NAT TRAVERSAL BY STUN................................................................................................................ 89
APPENDIX A - AVAILABLE NTP SERVERS ............................................................................................................... 91
[4/100]
Page 5

IP SIP Phone v2 User’s Guide Mar. 2005
PPENDIX B – TROUBLE SHOOTING ........................................................................................................................ 96
A
APPENDIX C – TONES............................................................................................................................................ 100
[5/100]
Page 6

IP SIP Phone v2 User’s Guide Mar. 2005
1. Overview
1.1. Features
z DHCP or PPPoE for host IP, gateway, network mask, DNS (optional, 2 DNS at most), TFTP
server, NTP server, and TTL; all those settings could be static assigned as well.
z If provided by DHCP server, it could use DHCP to get NTP server.
z Ear-phone, speaker-phone for hand-free, handset and loud-speaker support (all are volume
adjustable). Changeable ringing tone.
z Supports 2 concurrent calls.
z Multiple service domains for easy access to different ISPs (3 domains at most).
z Address book (up to 500 entries) and call history (10 most recently received calls, 10 most
recently missed calls and 10 most recently dialed numbers).
z Call return, speed dials (20 numbers), redial, auto-redial, call-screening (20 numbers) and
detail records of the latest three calls.
z Call forwarding: configurable forwarding number, unconditionally forward all calls, forward
calls on busy and forward calls on no response (adjustable waiting time).
z Call processing includes: hold (music on hold), mute, Caller ID, Call waiting (alerting tone,
LED indication and screen popup), call transfer (blind transfer, consultative transfer,
semi-supervised transfer, and take-back), call forward, call reject, do not disturb (DND).
z Call preferences include: call waiting, auto-answer (server-side invoked, locally activated
and selectively auto-answer), dial-timeout, adjustable hold recall timer, auto-hold on call
switch, auto-redial criterion (stop-on-ringing or stop-on-connected), accept call diversion or
not, inter-digit time-out, message alerting, and per call Calling Line Identification
Restriction.
z 3-way local conferencing
z Message Waiting Indication (MWI)
z 180 locally generated ringing and 183 remotely generated call progress tone.
z Out-of-dialog instant messaging, and flashing SMS without user interaction.
z NAT & firewall support by STUN or pre-configured NAT Gateway port mapping;
Auto-update or notify the change of NAT IP by STUN if NAT employs DHCP as well (such
as xDSL dial-up).
z Symmetric RTP flow for cases where only one endpoint is behind a NAT.
z Voice activity detection to reduce network bandwidth consumption.
z Comfort noise generation and dynamic de-jitter buffer to deliver better voice quality.
z 8 Programmable DSS keys.
z One-touch dialing (Hot lines)
【
z Configurable dial-key (#, *, & or dedicated DSS key as
inclusion of “#, *, or &” in dial strings.
Dial-】key ) to facilitate the
[6/100]
Page 7

IP SIP Phone v2 User’s Guide Mar. 2005
z Regular alarm and one-time alarm.
z Prompt user on call diversion for better security support (Configurable)
z Menu driven configuration by keypad, Web browser or TELNET.
z Use of Simple Network Time Protocol (SNTP) to synchronize time with network time server
and adjust to time-zone (configurable) and daylight saving time (configurable).
z Use of Trivial File Transport Protocol (TFTP) and HTTP for auto-provisioning and image
update
z IEEE 802.1Q VLAN tagging support
z Support both 802.1P link layer precedence bits and IP layer type-of-service (ToS) bits for
voice streaming, such that IP SIP Phone would perfectly replace your desktop analog phone
within a switched network.
z SNMPv2 for network management and supervision.
z Call-related statistics, including total inbound/outbound calls, average conversation duration,
connected ratio of the last 50 calls, and the conversation time distribution (less than 3
minutes, 3-20 minutes and longer than 20 minutes) during the last 72 hours, or since system
startup.
1.2. Technical Specifications
1.2.1. Call Control Capability
z Fully complies with RFC 3261 (SIP) with RFC 2543 backward compatible.
z Fully complies with RFC 2327 (SDP) and RFC 3264 for capability negotiation based on SDP
offer and answer model.
z Multiple Outbound Proxy, Registrar and Redirect server support, up to 3 different service
domains.
z Support SIP server authentication procedure (HTTP digest authentication scheme)
z On-demand registration and re-registration on network configuration changed (auto-detect
the changed IP of host, NAT, Dynamic DNS)
z Auto-locating SIP server (RFC 3263) by DNS NAPTR/SRV record (RFC 2782) lookup
z Supports SIP multicast registration to 224.0.1.75
z Call Transfer (RFC3515 for REFER method, RFC3420 for sipfrag support, RFC3891 for
replaces header and RFC3892 for Referred-by header).
z Message waiting indication, MWI, (RFC 3842).
z Fully Implementation of RFC 2916 (E.164 and DNS) for ENUM translation by NAPTR
(RFC 2915)
z Configurable SIP signaling port (default 5060), support both UDP and TCP.
z Support rport and received in VIA header (RFC3581) (Configurable)
z Redundancy SIP proxy server support by DNS NAPTR/SRV/AAAA records.
[7/100]
Page 8

IP SIP Phone v2 User’s Guide Mar. 2005
z Support REGISTER, INVITE, ACK, CANCEL, BYE, OPTION, REFER, MESSAGE,
SUBSCRIBE, NOTIFY, INFO methods
z Support “alert-info” header for distinctive ring.
1.2.2. Real-time Voice Streaming
z Fully complies with RFC 1889 (RTP / RTCP), RFC 1890 (AVT profiles), RFC 3551 (RTP
Profile for Audio and Video Conference with Minimal Control) and RFC 3555 (MIME Type
Registration of RTP Payload Formats).
z Support both in-band DTMF mixed with RTP voice stream and out-of-band DTMF over RTP
(RFC2833).
z Dynamic RTP de-jitter buffer and lost packets concealment management.
z Speech CODEC supports: G.711 (A-law and µ-law), G.723.1/G.723.1A (both 5.3 and 6.4
kbps), and G.729A/G.729AB. CODEC precedence is configurable to adjust to your network
link speed.
z 3-way local conferencing
z Voice activity detection (VAD) and comfort noise generation (CNG).
z Voice and ringer volume control
z Real-time acoustic echo canceller.
z IP Type of Service (ToS) bits set for RTP/RTCP packet prioritization
z 802.1P precedence bits support to prioritize RTP voice frames within switched network.
z Configurable RTP / RTCP ports.
1.2.3. NAT and Firewall
z Support static NAT mapping (both NAT IP and SIP/RTP ports are configurable)
z Support Simple Traversal of UDP through NAT, (RFC 3489 STUN).
z Support auto-detect (auto-update) the change of NAT IP by STUN (in case the NAT has no
static IP and employ dial-up to public internet).
z draft-ietf-mmusic-sdp4nat-03.txt (RTCP attribute in SDP)
z Symmetric RTP flow for the cases where only one endpoint behind NAT.
z Support STUN server redundancy by DNS SRV/AAAA records
1.2.4. Management
z TFTP and HTTP for Auto-Provision
z HTTP configuration by web browser
z Key-pad configuration
z TELNET configuration
[8/100]
Page 9

IP SIP Phone v2 User’s Guide Mar. 2005
z SNMPv2 for network management:
MIB2: RFC1213
Get and Set operation for internal state (Proprietary Enterprise MIB for system
configuration access).
Trap:
System startup
System shutdown (by command/SNMP/Image upgrade)
SIP Registrar availability
Call-Channel Status.
[9/100]
Page 10
IP SIP Phone v2 User’s Guide Mar. 2005
2. Layout
2.1. Hardware
2.1.1. Front View
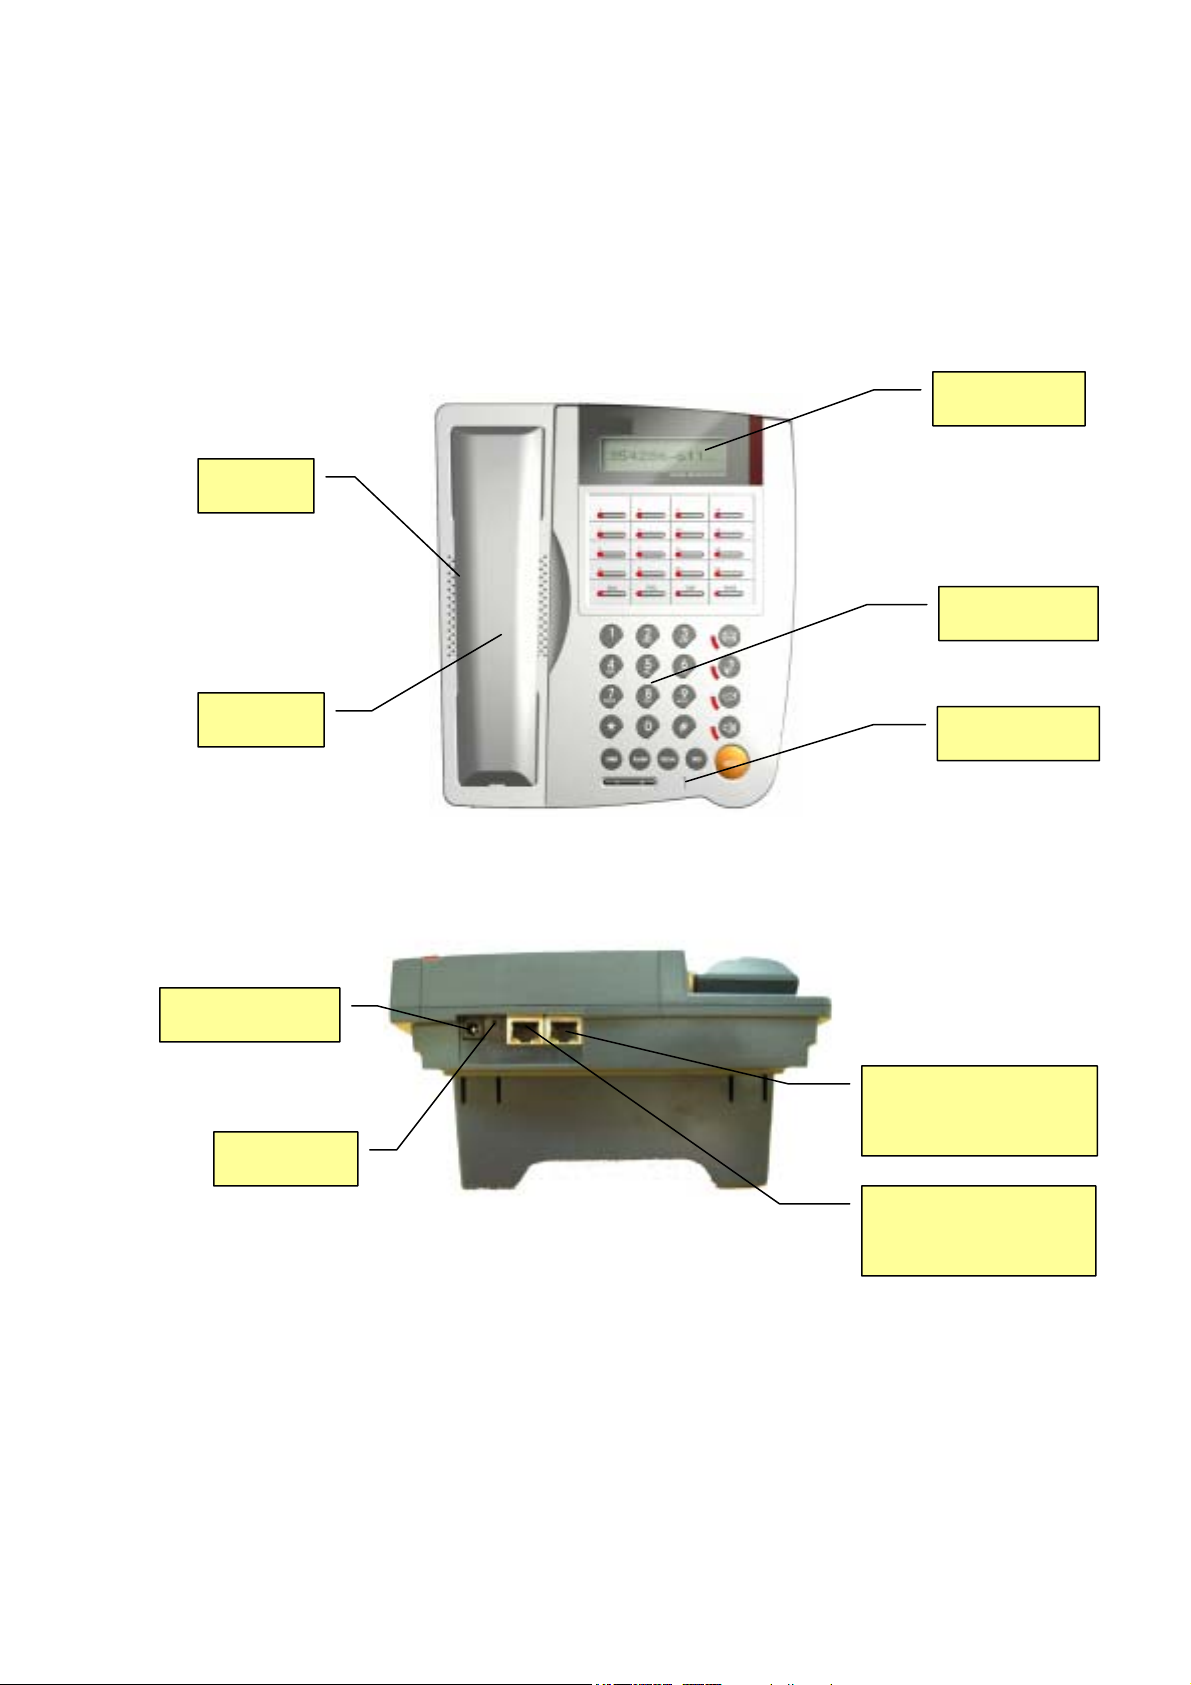
Speaker
2x16 LCD
Keypad
Handset
2.1.2. Rear View
Power adaptor
Reset SW
Microphone
RJ-45 Ethernet
switch to PC
RJ-45 Ethernet Jack
to LAN
[10/100]
Page 11
IP SIP Phone v2 User’s Guide Mar. 2005
2.1.3. Back View
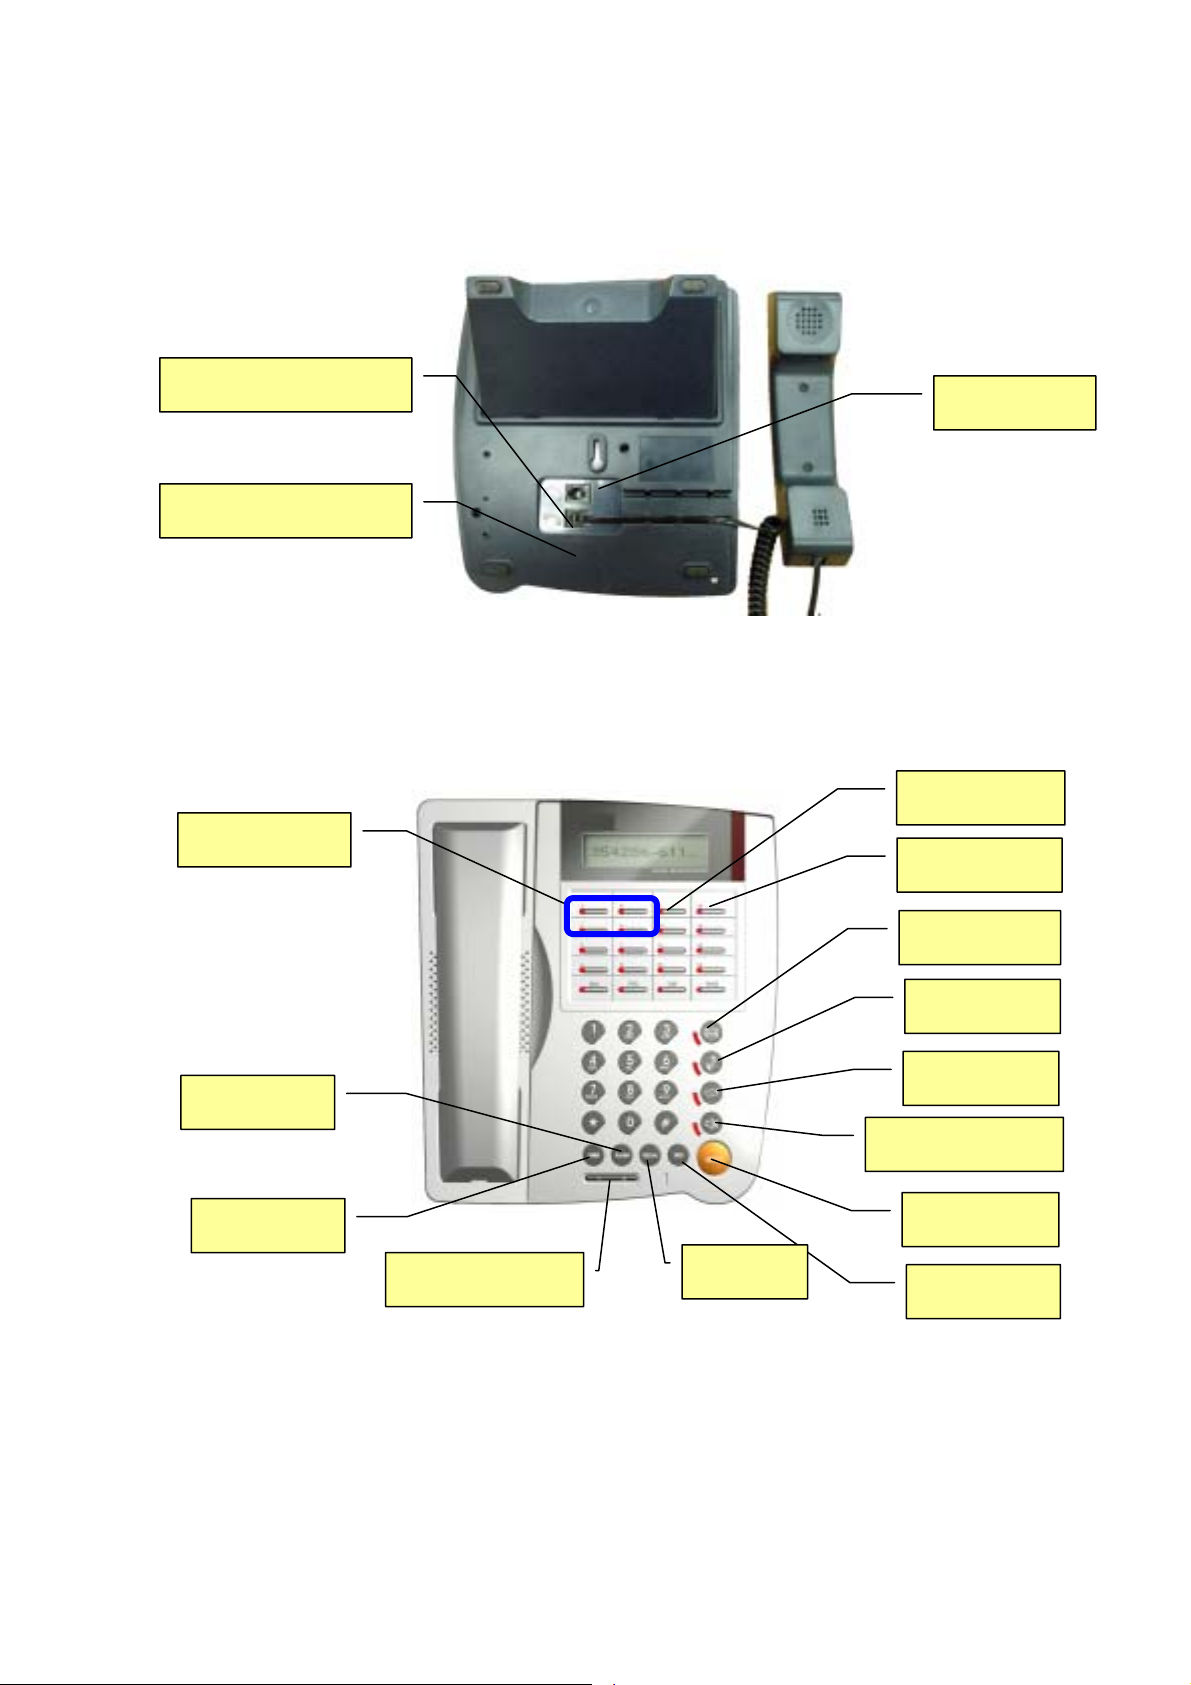
RJ-11 Earphone Jack
RJ-11 Handset Jack
Wall mount
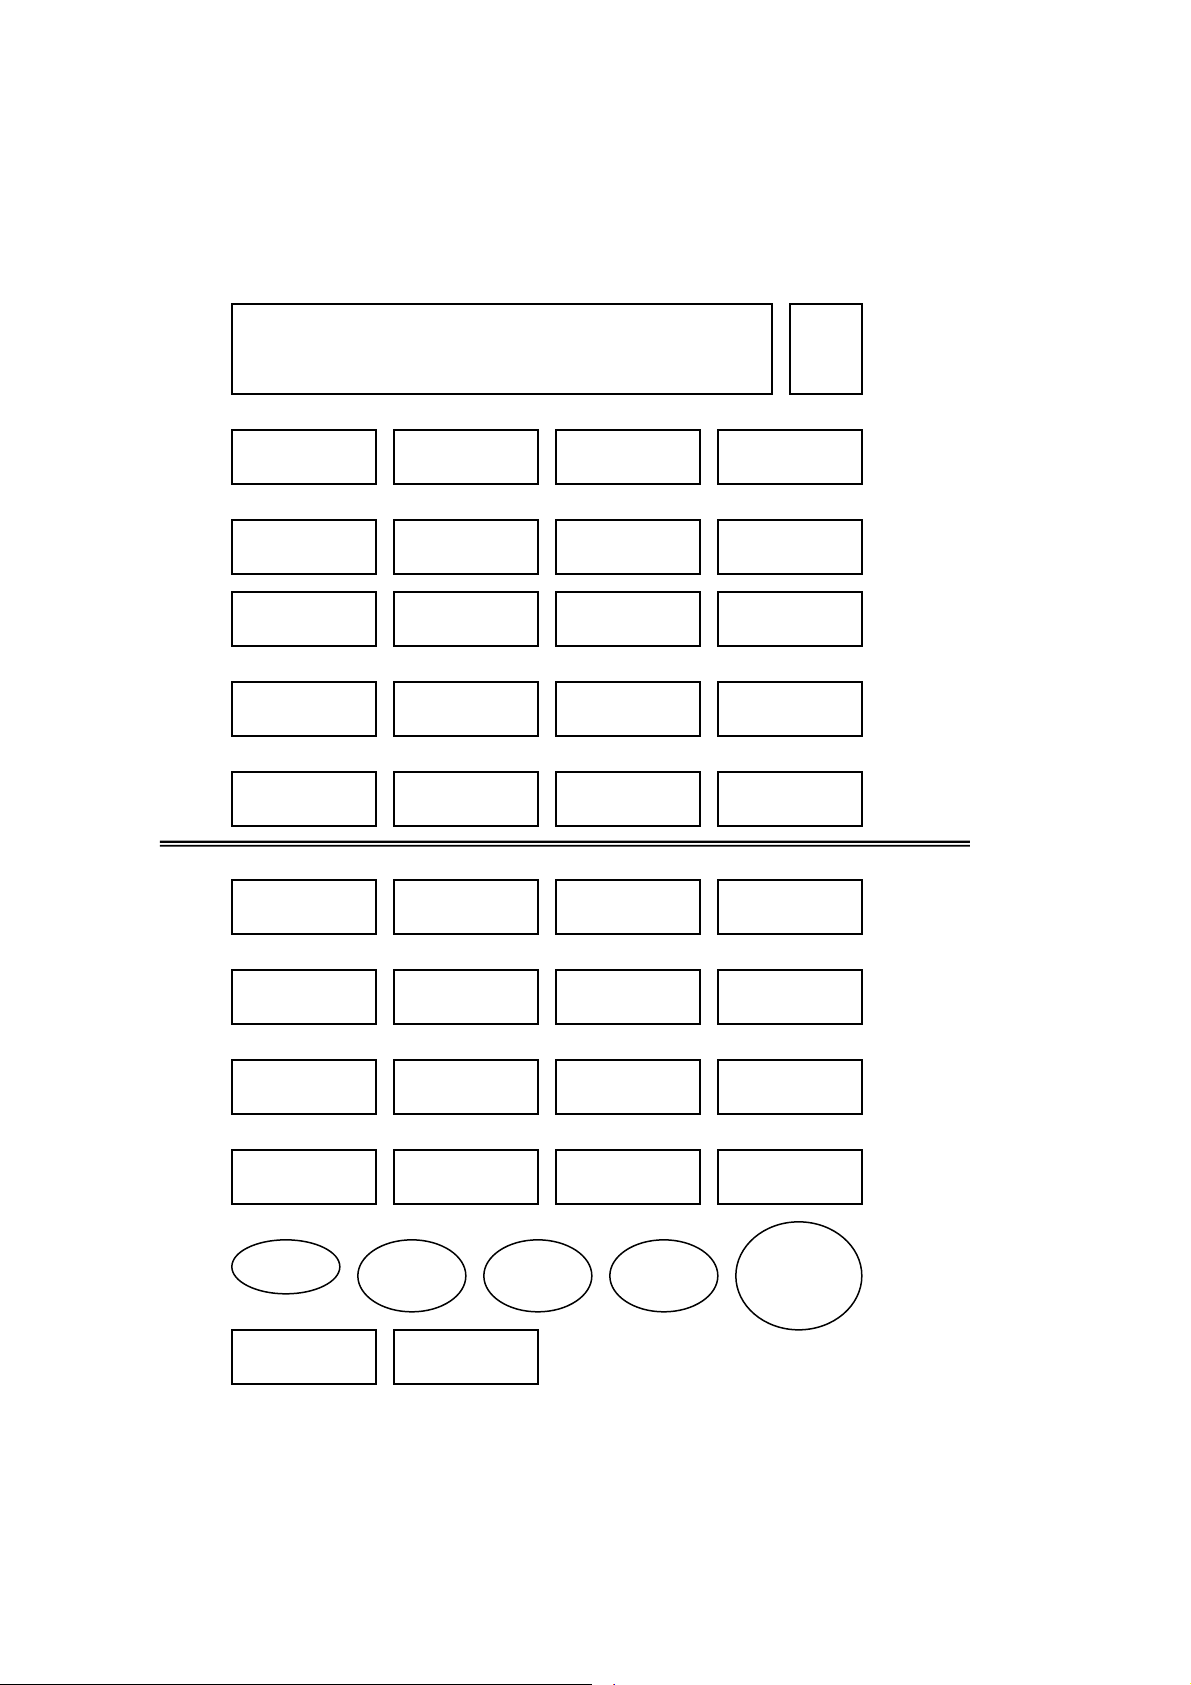
2.2. Keys
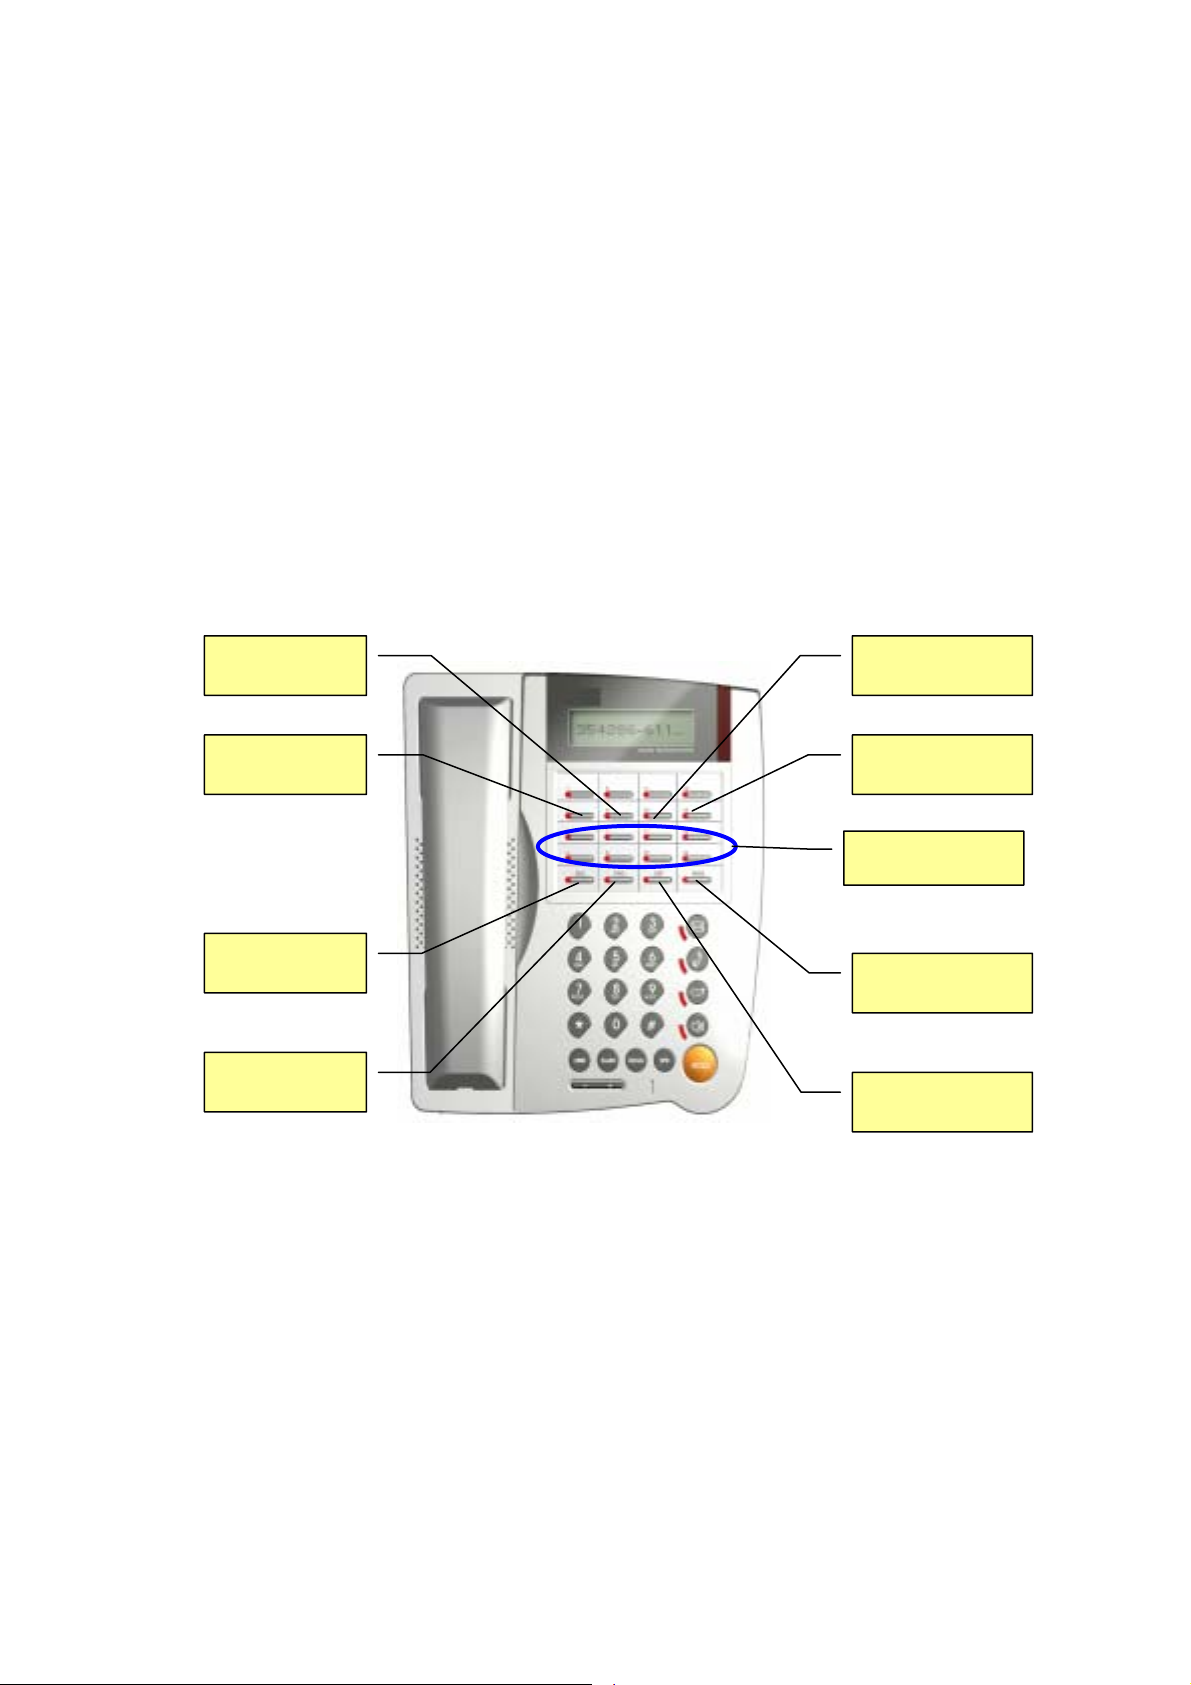
A/B Channel
FLASH
XFER
Volume【−,+】
REDIAL
Service Realm
Reject
MWI
MUTE
FUNC
SPK/Hands-free
HOLD
SPD
【
Keys
】:
Function when in-call or idle | Fun c tion on menu mode
【A / B Channel】:Call lines (2 concurrent calls at most) / Review the calling information on this
channel during conversation.
【Service Realm】:Display the registration status of each active service domain on idle; switch
target service domain (ISP) while making calls.
[11/100]
Page 12
IP SIP Phone v2 User’s Guide Mar. 2005
【Reject】:Reject incoming waiting calls
【MWI】:Message Waiting Indication, MWI: Access to voice mail system
【MUTE】: Mute | Delete character
【FUNC】:Menu | Return to upper level submenu
【SPK】:Hands-free | Exit menu
【HOLD】:Hold | Confirm, Save
【SPD】:Speed Dial
【Redial】:Redial the last dialed number.
【FLASH】:Take back or cancel transferring calls; cancel conference.
【XFER】:Transfer
【Volume】:
【+】:Volume UP (Ringer, headset, handset, speaker) | Next item、Move cursor to right
【-】:Volume down (Ringer, headset, handset, speaker) | Previous item、Move cursor to left
Registration
URL
Auto-redial Address Book
DSS: F1-F8
DND
Call History
Forward
Conference
【Registration】:Re-register. The LED indicates the registration status of each active service
domain:
Green LED On: Successfully register to all active service domains.
Red LED On: At least one service domain could not be registered.
Green LED Flashes: Registration is in progress. Note, IP SIP Phone will regularly refresh
SIP Address-or-Record registration as necessary.
Red LED Flashes: No service domains have ever registered successfully.
LED is off: Users explicitly logs out all SIP service and goes off-line ‘till user presses the
【Registration】key again to go on-line (re-register to all SIP service).
【Auto-redial】:Auto-redial the last dialed number ‘till connected (ringing)
【DND】:Do Not Disturb (red LED indicates on)
[12/100]
Page 13

IP SIP Phone v2 User’s Guide Mar. 2005
【Forward】:Forward incoming waiting calls
【URL】:Use keypad to enter alphabets and numbers (red LED on).
【Address Book】:Access to address book (search an entry or list all entries).
【Call History】:Missed calls / Received calls / Dialed Number. If the red LED is on, it indicates
there are unread records of missed calls.
【Conference】:Three-way local conferencing
【F1-F8】:User programmable DSS keys for easy access to various phone features. The default
mappings of these function keys are:
【F1】:Forward menu – shortcut to activate incoming calls forwarding menu.
【F2】: Channel info–show information of the last call on each call channel【A / B】.
【F3】: Call Detail - show detail records of the latest three connected and finished calls.
【F4】: Speed dials – activate speed dial list.
【F5】
: Messaging; Out-of-dialog instant messaging.
【F6】: Packetization - adjust the voice packetization based on your network link speed.
【F7】: Network Info - show the current active host IP, MAC address and DNS IP(s).
【F8】: Call Return - place a call to the last incoming call, either a missed or received one.
[13/100]
Page 14
IP SIP Phone v2 User’s Guide Mar. 2005
i
2.3. Keypad
LCD 2x16
Lamp
R
ng
A Call B Call
Service Realm
Reject
Auto-Redial Registration
URL Addr. Book
Fwd Menu
Channel info
Call detail(CDR)
Speed dials
Messaging
Packetization
Network info
Call Return
DND Forward Conference
Call History
1 2(abc) 3(def) MWI
4(ghi) 5(jkl) 6(mno) MUTE
7(pqrs) 8(tuv) 9(wxyz) FUNC
*
0(oper)
#
SPK
XFER
Flash SPD
Re-Dial
HOLD
Vol Down Vol Up
Those keys in blue font (which are referred as DSS function keys hereafter) can be
dynamically re-configured by user from menu-3.2 DSS Functions.
[14/100]
Page 15

IP SIP Phone v2 User’s Guide Mar. 2005
3. Operation
3.1. Key Definitions in Menu Mode
【】HOLD
【MUTE】
【】FUNC
【】SPK
【Õ】 / 【Ö】
Enter the selected menu item or confirm the modification.
Delete the current character or the previous character if the cursor is
positioned at the end.
Return to upper level menu.
Exit the menu
Circle through the selected menu items and adjust volume.
【0 - 】 9
Cursor
Direct-selection / setting / jump-to-specific-item.
1. Insert mode only
2. Positioned on the currently setting value.
3. Positioned on the 1
st
menu item.
[15/100]
Page 16
IP SIP Phone v2 User’s Guide Mar. 2005
)
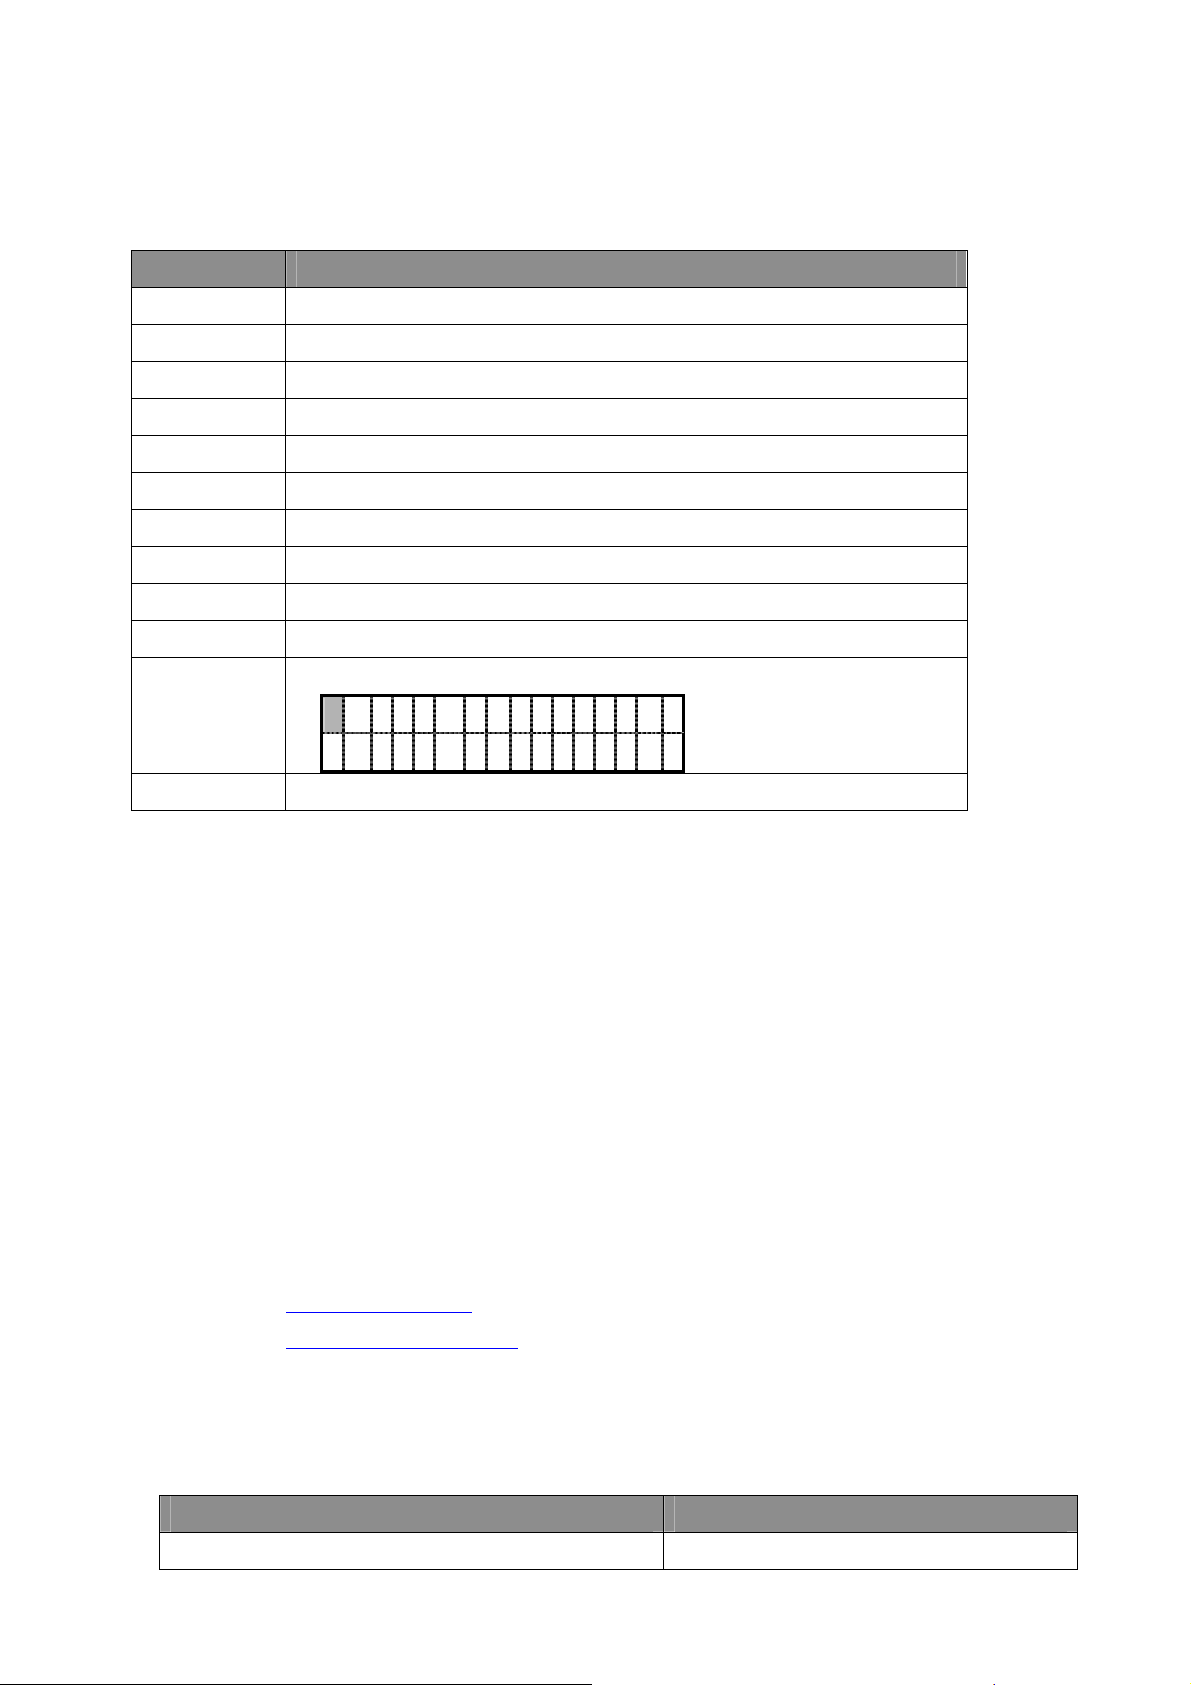
3.2. Enter Alphabets and Numbers
Circular input by pressing the same key
Key Alphabet & Number
1 1
2 2->a->b->c->A->B->C
3 3->d->e->f->D->E->F
4 4-> g->h->i->G-> H->I
5 5->j->k->l->J->K->L
6 6->m->n->o->M->N->O
7 7->p->q->r->s->P->Q->R->S
8 8->t->u->v->T->U->V
9 9->w->x->y->z->W->X->Y->Z
0 0->[Space]
* Punctuation Table:
. @ - * # _ ? & $ / \ , : ; + (
‘ ! “ ¥ % < > | § = ٪ {}Φ ±
# #
3.3. Address-of-Record (SIP AoR)
The general form of SIP address-of-record is:
“Display” <protocol:email-like-address>;tag=param
z The “Display” field is optional. If present, it consists of any ASCII characters except
for ‘<’ and ‘>’. If the “Display” is present, the following address must be enclosed in a
paired ‘<’ and ‘>’.
z Protocol: Usually in lower case, such as “sip”, “tel” or “sips”. Note, “sip”, “tel” and
“sips” protocol names MUST be specified in lower case, which is stipulated on
RFC3261.
z email-like-address: in the form of “user-part@domain” where user-part is optional and
the domain part could be either a dotted IP or a domain name record, such as:
[email protected]
[email protected]
192.168.3.100 (Note, the user-part is optional in direct IP dialing mode)
+886-3-5639025
z “tag=param”: Multiple parameters could be present (separated by ‘;’)
Example Note
Michael <sip:[email protected]>
[16/100]
Page 17

IP SIP Phone v2 User’s Guide Mar. 2005
Mike Jackson <sip:[email protected]>
“Voice Mailbox” <sip:[email protected]> Display with enclosing ‘”’.
sip:[email protected] AoR without display
sip:192.168.3.100 AoR without user part (in dotted IP)
tel:+886-3-5639025 ENUM AoR
sip:[email protected];user=phone ENUM AoR with SIP proxy support
4. Startup
Basically you have the following ways to configure your IP SIP Phone.
z Press
keypad.
z Use any modern web browser to configure the phone from a PC. The default login
password for both privileged and user-level password is “0000”.
z TELNET into the phone by any TELNET client. The default TELNET port is TCP port
23, login password is as the same as your phone password set in menu-3.1 on “IP SIP
Phone v2 Keypad-TELNET Administration“ (the default phone password is “0000”)
and the max concurrency is 4. IP-Range will not apply the changes until user presses
[Ctrl] +’s’ to apply the modifications or the client disconnected by [Ctrl] +’c’.
z Auto-provision on phone startup. Please refer to “Menu-7.4 Auto-provision.” on “IP SIP
Phone v2 Keypad- TELNET Administration”.
Note, before you can configure your phone-set from your PC, such as by a TELNET
【】
FUNC +
client or poi nt you r brows er to t he pho ne-set , you must have configured its IP via
keypad properly.
【】
# to activate the configuration menu and configure it via
4.1. Prerequisite
Initially, your phone can only be configured via keypad since it bears no valid IP yet. After
finishing configuring your network, you could use either a web browser (HTTP port 80) or a
TELNET client (TCP port 23) if you have a small number phone-sets to configure.
However, we recommend you to use TFTP for auto-provision if you have to administer
large amounts of phone-sets. For TFTP provision, please refer to 12.4 Auto Provisioning on this
document.
4.1.1. Network
To configure your network:
z Press 【FUNC】+ 【#】
z Go to 【6.Network】\【1.General】
Please configure the phone based on your network configuration: DHCP, static IP or
[17/100]
Page 18

IP SIP Phone v2 User’s Guide Mar. 2005
PPPoE.
4.1.1.1. DHCP
z Pick【1.Mode】\【1.DHCP】
z Disable【4.Use Static DNS】by choosing 【2.DHCP】
Note: if you want to assign a different domain name server instead of using those obtained by
DHCP, you should choose【1.Static DNS】and set the IP of your specific DNS into
【5.Static DNS】, such as “1.Primary DNS” = 192.168.3.254
The supported DHCP options are:
z Client PC address
z DHCP option 1—Client Subnet Mask
z DHCP option 3—Gateway IP on the client’s subnet
z DHCP option 6—One or two Domain Name servers
z DHCP option 15—Domain name
(
modify this as necessary)
.
z DHCP option 42—Network Time Protocol servers
z DHCP option 66 (TFTP server name)
【
Note: To make DHCP option 6 take effect, you must disable
MENU】=>【6.Network】
/ 【1.General” /【4.Use static DNS】 by picking 【2.DHCP】
Note: If DHCP option 42 is present, it will overwrite the SNTP server in menu-7.3.2
【
Server IP】
Note: DHCP option 66 will overwrite the Auto-provision server in Menu-7.4.2 【TFTP
server】
4.1.1.2. Static IP (Fixed IP)
z Pick【1.Mode】\【2.Static assign】
z Go to【2.Static Settings】, and enter your network configurations based on your ISP.
For example:
1. Host IP = 210.201.210.132
2. Network mask = 255.255.255.0
3. Gateway IP = 210.201.210.128
z Enable【4.Use Static DNS】by choosing【1.Static DNS】
(modify this as necessary)
(modify this as necessary)
(modify this as necessary)
】
z Assign【5.Static DNS】, such as: 【1.Primary DNS
= “168.95.1.1” (modify this as
necessary)
4.1.1.3. PPPoE
z Pick【1.Mode】\【3.PPPoE】
z Go to【3.PPPoE settings】and enter your PPPoE authentication information, such as:
1. Login ID = MyPPPoEAccount
2. Password = PPPoEDialupPassword
(modify this as necessary)
(modify this as necessary)
[18/100]
Page 19

IP SIP Phone v2 User’s Guide Mar. 2005
3. Service Name = Optional, some ISP requires it
(modify this as necessary).
4.1.1.4. Verify Network Configuration
Press 【F7】 (which default is a shortcut to menu【8.Advanced】\【4.System Status】\
【1.Network】) to check current active network settings:
1 9 2 . 1 6 8 . 2 1 0 . 1 1 3
MA C :
1 9 2 . 1 6 8 . 2 1 0 . 1
It will display the host IP, Ethernet MAC address and the active DNS IP (secondary DNS IP
will be shown if available) in order.
Once finishing network configuration, you should be able to place a point-to-point call. For
example, if your phone IP is “192.168.1.10” and you want to dial another SIP phone which IP is
“192.168.1.20”, please dial “*20**5060” (or just “*20” if the target phone listens on UDP port
5060; otherwise you must dial the target UDP port as well). This is “LAN dialing” (Refer to
section 8.1-“Dialing Scheme” on this document). If the call could be set up correctly, then your
network configuration is fine; otherwise, please refer to B-1 on Appendix B-“Trouble Shooting”.
Note, if you reside on a LAN without gateway, you should specify the gateway IP as
“0.0.0.0” rather than assigning a non-existent or an invalid IP; otherwise the network packets may
not be routed correctly (which may result in no voice packets could be sent from this phone)!
This constrain applies to DHCP and PPPoE as well: DHCP and PPPoE server should not
designate a non-existent or invalid gateway.
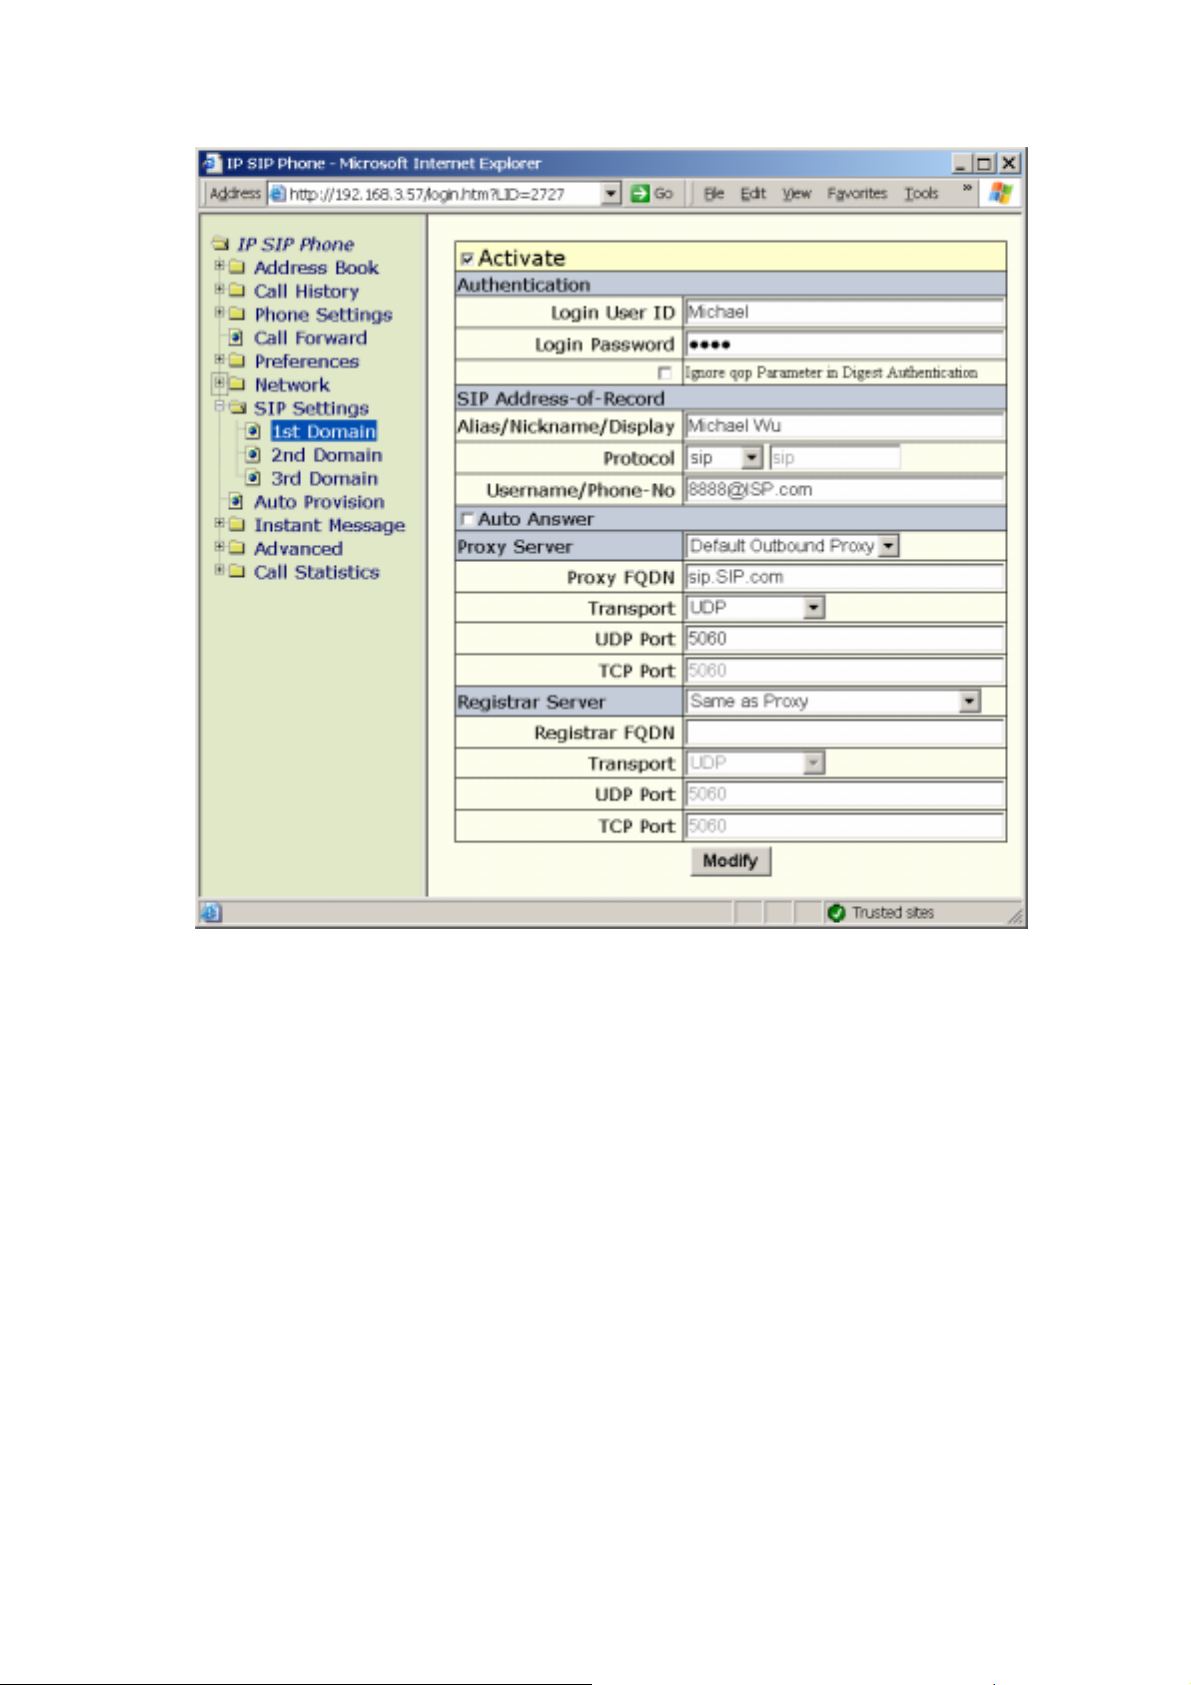
4.1.2. SIP Service
Before you start, you should ensure you have SIP-related data from your ISP. For example,
if you get the following information from your SIP ISP:
i. Account: Michael
ii. Password: secret
iii. SIP address-of-record: [email protected]
iv. SIP Proxy / Registrar Server: sip.isp.com, which serves on UDP port 5060
Then you could configure your IP SIP Phone by a web browser as below:
[19/100]
Page 20
IP SIP Phone v2 User’s Guide Mar. 2005
Alternatively, you mayo to 『Main Menu』=>”6.Network” / ”2.SIP settings” / ”1.1
to configure these information by keypad.
i. If you have applied for more than one service domains, please repeat step I and II
until all active domains are properly configured. IP SIP Phone supports three
different service domains at most.
ii. After saving the configuration, the system will try to register to those activated SIP
domains. The flashing green LED of 【Registration】 key indicates that the
registration is undergoing. Once the green LED stops flashing, you could know the
registration result by the LED. Please refer to section-10.11 “Registration on
Demand” and section-10.12 “Multi-domain Registration” on this user’s guide for
detail.
iii. If you failed to register your phone to SIP registrar, please refer to Appendix
B-“Trouble Shooting” on this document.
4.1.3. Configure NAT and Firewall
st
Realm”
If your SIP server locates on public internet, whereas your phone resides on a local area
[20/100]
Page 21
IP SIP Phone v2 User’s Guide Mar. 2005
network, please refer to chapter 13-“NAT Traversal” on this user’s guide if your phone-set is
behind network address translator (NAT) and / or firewall.
4.2. Initialization
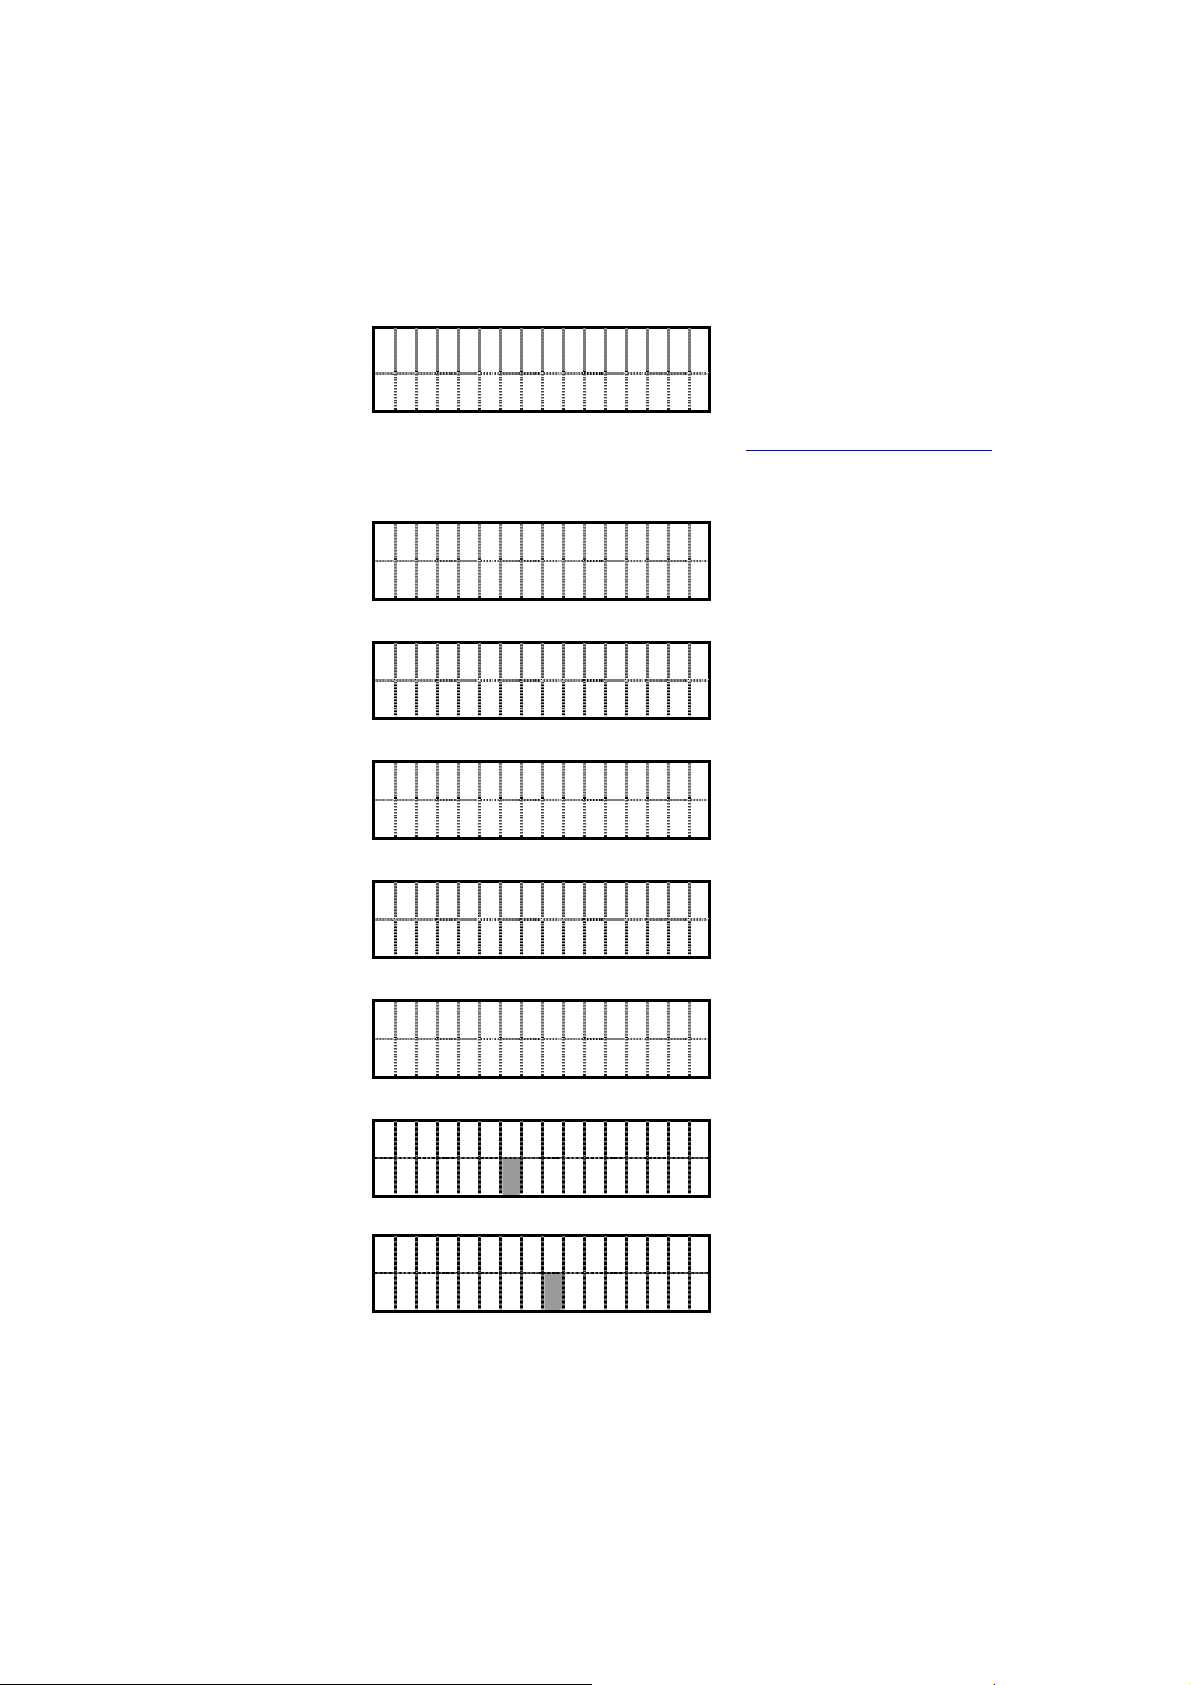
(a) Startup:
I P S I P P
V ersion
hone
(b) Check for auto-provision. Please refer to section 12.4 Auto Provisioning on this
document for detail
i. Auto-provision is on but no TFTP server specified:
A u t o - p r o v i s i o n
N o T F T P s e r v e r !
ii. Download configuration files from TFTP server
T F T P servername
i p r a n g e r . c f g . . . .
iii. Download failed:
T F T P ipranger.cF
T i m e d o u t
iv. Download successfully and apply changes:
A u t o - p r o v i s i o n
v. If auto-provision does not apply any changes to current settings:
(c) Check Date and Time:
Note:
IP SIP Phone will go the Idle ready Mode after 5 seconds if user dose not enter
any digit. The default system time on start-up is January 1, 1970, 00:00,
GMT.
i p r a n g e r . c f G . . . .
A u t o - p r o v i s i o n
U s e R O M s e t t i n g s
C u r R e n t d a t e :
MM/ DD/ YYYY
C u r R e n t t i m e :
h h: mm: s s
[21/100]
Page 22

IP SIP Phone v2 User’s Guide Mar. 2005
User entry any digit for Time & Date. It must press 【HOLD】Key to be Idle
Ready Mode Display.
The phone will synchronize its time by Simple Network Time Protocol, SNTP,
with network time server regularly if SNTP is enabled. If you want to keep the
time you manually set previously, you must disable SNTP. Please refer to
section-4.4.1 “Date/Time” on “IP SIP Phone v2 Web Administration” for
detail.
You can just ignore the date & time settings on boot, leaving the phone to
synchronize its clock with network time server. Please check menu-3.3.4:
“Time zone” (by TELNET or keypad) to adjust your time zone otherwise the
synchronized time may be several hours late (earlier) than your local time.
Please refer to section-4.4.1 “Date/Time” on “IP SIP Phone v2 Web
Administration” for detail.
4.3. Registration
(a) Registering
R eg t o r egistrar
. si p . f c i .com.tw
The registered on-line timeout is 3600 seconds (1 hour).
(b) Registration Done
R eg i s t e r ed
E xp i r e s in 3600s
System will refresh registration after 90% of the expiration interval elapsed.
(c) Registration Failed
R eg e r r : host unr
r ac h a b l e
This message will freeze the screen for a while, such as 5 seconds, for the user to figure
out the reason. Failed registration will shorten the re-registration interval to 90 seconds.
5. Shutdown
5.1. Unregistration
U nr e g i s t ering...
[22/100]
Page 23

IP SIP Phone v2 User’s Guide Mar. 2005
6. Idle
6.1. Registered
F ri M M / D D hh:mm
M ic h a e l Wu
6.2. Not registered yet or registration expires
F ri M M / D D hh:mm
M ic h a e l Wu
The registration LED will flash to indicate that the phone set has not been registered to any
service domain. That is, the phone set could only be reached via “Intra-domain Dialing”, “IP
Dialing” or “LAN Dialing” methods; please refer to section 8.1- “Dial Scheme” on this user’s
guide for detail.
6.3. Regular Registration
1. Registering
R eg t o r egistrar
. si p . f c i .com.tw
2. Registration Done
R eg i s t e r ed
E xp i r e s in 3600s
3. Registration Failed
R eg e r r : host unr
r ac h a b l e
This error message will freeze the screen for a while on idle state, such as 5 seconds,
for the user to figure out the reason. Failed registration will shorten the re-registration
interval to 90 seconds. You could perform registration on demand by pressing
【】
Registration to force an immediate registration.
[23/100]
Page 24

IP SIP Phone v2 User’s Guide Mar. 2005
7. Take Calls
In menu mode, you cannot receive calls. If there is incoming calls when you are configuring
your phone, the call will be silently rejected with a 486 busy response.
Besides, if you enter menu by DSS keys (see menu-3.2 DSS features), the phone will start
ringing when incoming calls are waiting. To pick up the incoming call, you must exit menu first
then take it as a normal incoming call (lifting the handset has no effect in menu mode).
7.1. Ringing
Play rings, and blink both red and green lamp of related 【A / B / 】C Call
(a) On Idle State
F ro m mm:ss
S co t t S u n
(b) Other calls are in progress:
1. Pop up the caller ID for 7 seconds. It may show the display name if the caller ID
could be found on the address book. The “mm:ss” keeps track of the time elapsed
after the call arrived.
F ro m mm:ss
S co t t S u n
2. The channel LED of this incoming waiting call,
【】
3.
Forward and
call.
4. Call waiting alarm will alert the user twice in 7 seconds.
Note: If the caller ID is too long to accommodate into a line or you want to review the caller ID
after the screen pop-up disappeared, you can review the call information on each channel
【】
by pressing
Those records (with their caller IDs, AoR, shown) are volatile in memory such that they
F2 , which is mapped to “Channel info” by default.
A . C A l l e r I D ( A o R )
B . C A l l e r I D ( A o R )
【】
Reject LEDs will be on for the user to handle this incoming
【
A / B / 】C Call , will flash fast.
will be clean up every time the system reboots. If you review them on idle mode, you may
press 【Redial】to dial a specific number. Each record keeps the following call-related
information:
[24/100]
Page 25

IP SIP Phone v2 User’s Guide Mar. 2005
1 . C A l l e r I D ( A o R )
2 . F r o m ( C O n t a c t )
3 . C O D E C
4 . U s e r A g e n t
5 . M e d i a S e s s i o n
1. Caller ID: address-of-record of the peer (press 【Redial】to dial this number).
2. From: Contact IP of the peer for SIP signaling (press 【Redial】to dial this number).
3. CODEC: CODEC employed for the call.
4. User agent: The phone tool used by the peer for this call.
5. Media session: display the local and remote RTP/RTCP session.
1 . L o c a l R T P
2 . R e m o t e R T P
Display the RTP IP and port pair of CPE for RTP/RTCP media stream.
1 9 2 . 1 6 8 . 3 . 1 : 6 2 2 6
2 / 6 2 2 6 3
The format comes in the format “xxx.xxx.xxx.xxx:RTP/RTCP”, which specifies the IP
of CPE and the UDP port used for RTP and RTCP session. The information will be
timely updated in call connection and the unavailable information will be shown as
“N/A”.
7.2. Reject Call
【】
Press
“received call”.
Reject on an incoming ringing call to reject it as busy and recorded it as a
7.3. Forward Call
【】
Press
available or reply it as busy if not available. This forwarded call will be recorded as a “received
call”.
Forward on an incoming ringing call to forward it to a preconfigured number if
To configure the target number to forward to, please go to menu “4.Call Forward” / “1.
Target Number.” (by TELNET or keypad); alternatively, you may refer to section 4.5 “Call
Forward” on “IP SIP Phone v2 Web Administration” for detail.
This may also be a network feature, handled from a network configuration by the system
administrator.
7.4. Answer Call
mm:ss
[25/100]
Page 26

IP SIP Phone v2 User’s Guide Mar. 2005
S co t t S u n
The “mm:ss” keeps track of the time elapsed after answered.
(A) On Idle State:
a. Press
b. Pick up the handset or turn on the speaker phone to answer it. Note: if you turn the
(B) Other calls are in progress
a. Press
b. The
【
A / B / 】C Call to answer the call
ear-phone on, the voice will be output to ear-phone and the speaker LED will flash
to notify that ear-phone is active.
【
A / B / 】C Call to answer the call
【】
Reject and
incoming waiting call as busy by pressing
target number by pressing
【】
Forward LEDs will be on such that you may reject the
7.5. Connected
mm:ss
S co t t S u n DTMF
7.6. Disconnected
【】
Reject or forward it to a predefined
【】
Forward .
(a) Peer hangs up
R el e a s e d mm:ss
S co t t S u n
Where “mm:ss” indicates the duration of the call. If the user is on speaker phone mode, it
will return to IDLE state in 5 seconds.
(b) User hands up
1. Ringing calls are waiting => Back to Ringing State
2. Answered calls are waiting:
The “Holding calls recall” will be triggered on expiry to alarm the user that
there are still some holding calls. User could pick up the holding call by hooking up
again; otherwise the holding call will be disconnected after ringing for 1 minute.
After disconnected, you may review the call detail record (CDR) by pressing
which is mapped to “Call detail” by default. “Call detail” keeps track of CDR of the latest three
connected and finished calls (either incoming or outgoing). Those records (with their caller IDs,
【】
F3 ,
AoR, shown) are sorted by their finished time with latest comes first. Besides, they are volatile
in memory such that they will be clean up every time the system reboots.
[26/100]
Page 27

IP SIP Phone v2 User’s Guide Mar. 2005
)
1 . C A l l e r I D ( A o R )
2 . C A l l e r I D ( A o R )
3 . C A l l e r I D ( A o R )
You may press 【Redial】to dial the target’s SIP address-of-record.
Each record keeps the following call-related information:
1 . C A l l e r I D ( A o R
2 . T i m e o f c a l l
3 . D u r a t i O n
4 . F r o m ( C O n t a c t )
5 . C O D E C
6 . U s e r a g e n t
7 . M e d i a T r a f f i c
1. Caller ID: address-of-record of the peer (press 【Redial】to dial this number).
2. Time of call
3. Duration: call active time.
4. From: Contact IP of the peer for SIP signaling (press
【
Redial】to dial this number).
5. CODEC: CODEC employed for the call.
6. User agent: The phone tool used by the peer for this call.
7. Media traffic:
The media-related information will be available only when the call lasted for more
than 20 seconds. But the information about RTP session such as local and remote IP
/ port for RTP session is always available.
1 . R T P s e s s i o n
2 . P a c k e t s
3 . B y t e s
4 . P a c k e t l o s t
5 . D e l a y
7-1 RTP session:
1 . L o c a l R T P
2 . R e m o t e R T P
Display the RTP IP and port pair of CPE for RTP media stream.
1 9 2. 168. 3. 1: 6226
2 / 62263
The format comes in the format “xxx.xxx.xxx.xxx:RTP/RTCP”, which
specifies the IP of CPE and the UDP port used for RTP and RTCP session.
7-2 Packets: Received / Sent RTP packets
[27/100]
Page 28

IP SIP Phone v2 User’s Guide Mar. 2005
@
S e nt : 1, 234, 567
R c vd: 1, 234, 567
7-3 Bytes: Received / Sent bytes, including IP / UDP / RTP header and payload
S e nt : 1, 234, 567KB
R c vd: 1, 234, 567KB
7-4 Packet lost: Received / Sent RTP packet lost ratio.
S e nt : 11. 21%
R c v d : 9 . 3%
7-5 Delay: One-way / Round-trip delay
O n e- way: 1, 234 mS
R o Und-trip:N/A
7.7. Forward and DND
You can configure the target number to forward to while this phone is busy or not answered
within a predefined guarding interval. This forwarding number is also employed while the phone
is engaged in Do Not Disturb (DND) mode or while the user presses
【】
Forward key on an
incoming waiting call.
The system forwarding rules will check Do Not Disturb mode first, then All Calls Forward,
Busy Forward, finally going to No Answer Forward while no-answer timer expires.
7.7.1. Do Not Disturb (DND)
You can block incoming calls by configuring the Do Not Disturb feature. Blocked calls are
logged in the Missed Calls.
【】
Press
DND to toggle Do Not Disturb feature.
7.7.2. Call Forward
To configure the target number to forward to while this phone is busy or not answered within
a predefined guarding interval:
z By keypad or TELNET:
Press
【】
FUNC
【】
+ # to activate menu.
Go to submenu “4. Call forward” / “1. Target number”.
Press
【】
HOLD to pick an entry from address book. . Use 【Õ】and 【 Ö】to
view the current number.
M I c h a e l < s i P : 8 8 8 8
Q u a n t i e r T e c h . c o
【】
Press MUTE to remove the current mapping of forward number.
[28/100]
Page 29
IP SIP Phone v2 User’s Guide Mar. 2005
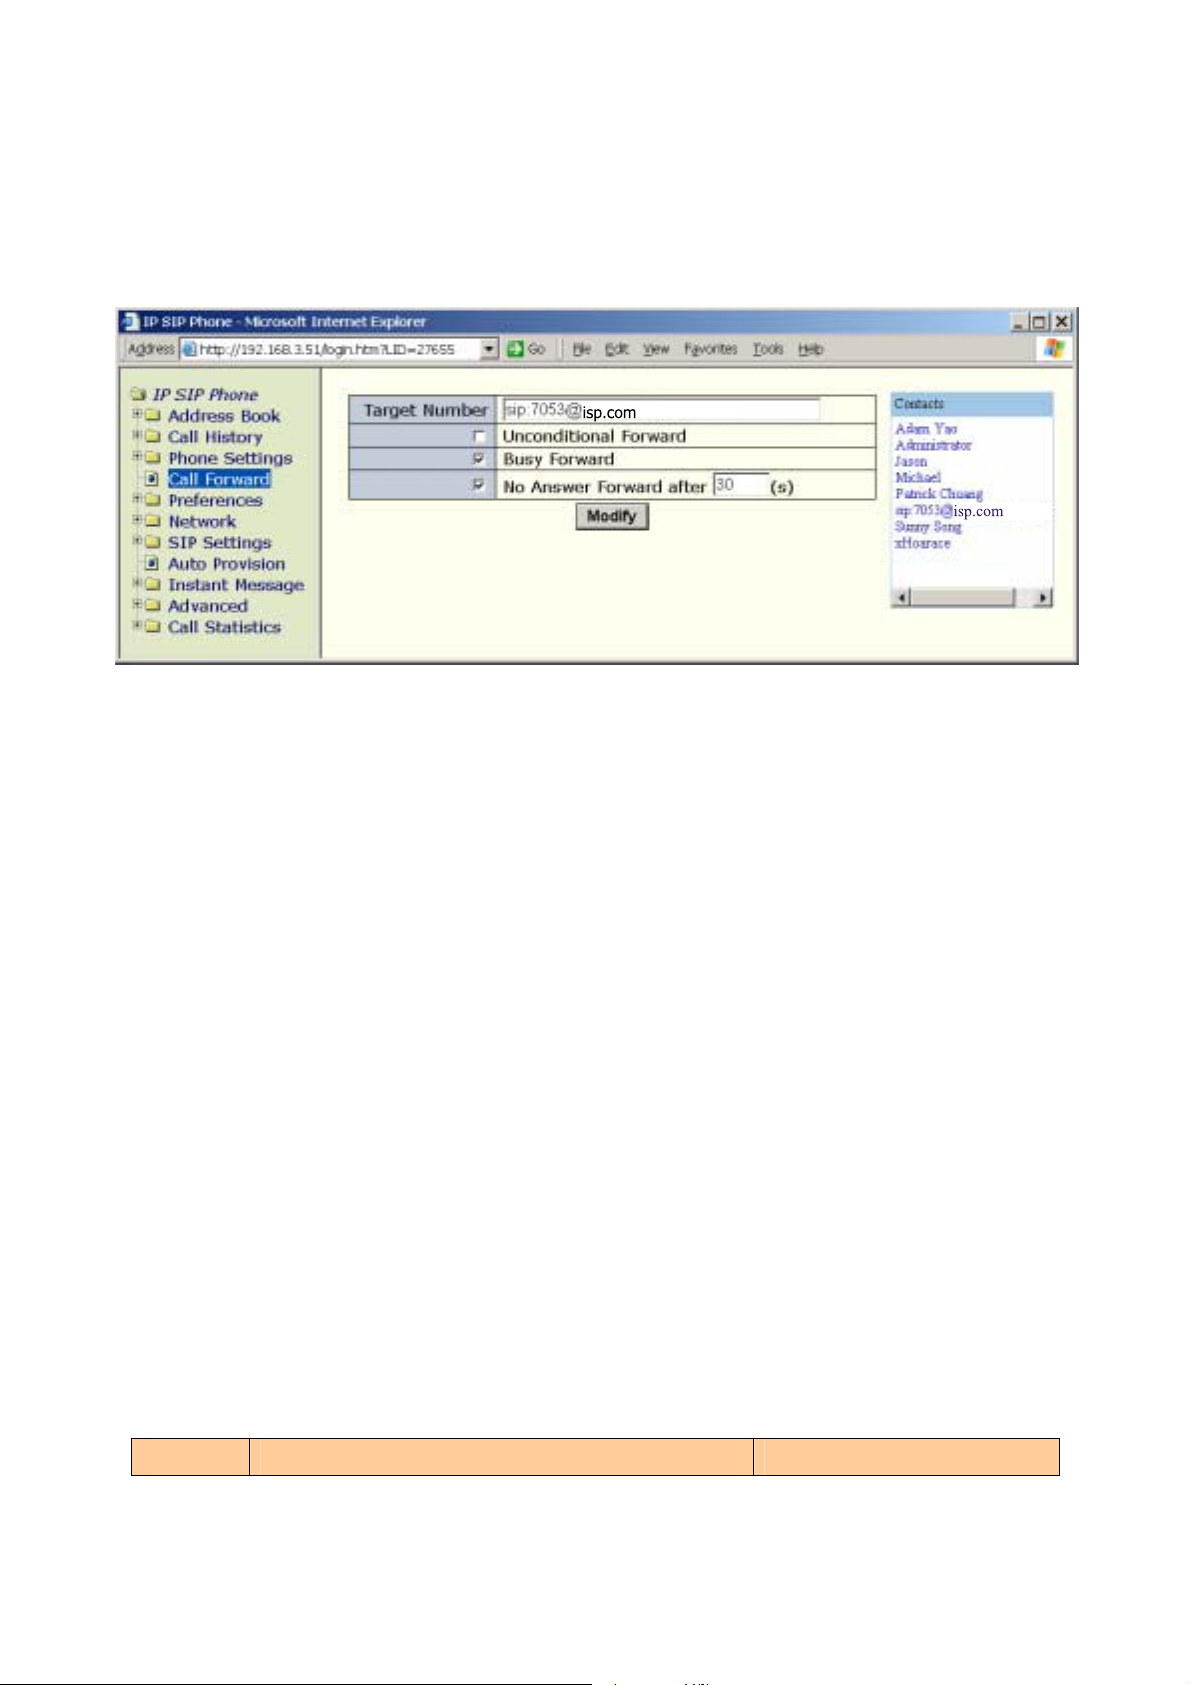
z By web browser:
Go to
an entry from the address book to set it as “Target Number”.
Delete the number in the text input to remove it.
Note: by default,
This target forwarding number is also employed while the phone is engaged in Do Not
Disturb (DND) mode or while the user presses
『
Call Forward』 page, then click the “Contacts” on the right panel to pick
isp.com
isp.com
【F1】
is mapped to the “Call Forward” menu.
【】
Forward key on an incoming waiting call.
7.7.2.1. All Calls Forward
You can configure to unconditionally forward all incoming calls by enable the All Calls
Forward feature from menu 4-2 “All Calls Fwd” or on 『Call Forward』 web page. Forwarded
calls are logged in the Missed Calls, menu 2-1. If this feature is enabled, the corresponding
【】
Forward LED will blink slowly to remind user. Default is disabled.
7.7.2.2. Busy Forward
You can configure to forward incoming waiting calls when the system is busy, on which time
all lines are occupied, from menu 4-3 “Busy Forward” or on 『Call Forward』 web page.
Forwarded calls are logged in the Missed Calls, menu 2-1. Default is disabled.
7.7.2.3. No Ans wer Forward
You can configure to forward incoming waiting calls after ringing for a predefined interval
from menu 4-4 “No answer fwd” or on 『Call Forward』 web page. Forwarded calls are logged
in the Missed Calls, menu 2-1.
7.7.3. Forwarding Rules
Priority Conditions Results
[29/100]
Page 30

IP SIP Phone v2 User’s Guide Mar. 2005
All Calls
Forward
Busy
Forward
【】
DND is on1
Forwarding number is
available
Forward the incoming call to
the target forwarding number.
1. Reply as 480 Temporarily
Forwarding number is
unavailable.
unavailable
2. Recorded as a missed call
Both
1. All calls forward feature is on
2. Forwarding number is available
Forward the incoming call to
the target forwarding
number.
Others Normal incoming call
Both
1. Busy forward feature
Forward the incoming call to
the target forwarding number.
is on
System call capacity is
2. The forwarding
full loaded
number is available.
1. Reply as busy.
others
2. Record as a missed call.
No
Answer
【】
Press
Forward on a
ringing call.
Both
1. No answer forward
feature is on
Forwarding number is
available
Forwarding number is
unavailable
Forwarding number is
available
Forward the incoming call to
the target forwarding number.
1. Reply as busy
2. Record as a received call.
Forward the incoming call to
the target forwarding number.
1. Reply as no-answer.
Forwarding number is
Forward
2. No-answer timer
2. Recorded as a missed call.
unavailable
expires.
Note: Those not-forwarded calls should be recorded as “Missed Calls” and retrievable at a later
time to review. The call history LED should turn on to inform users and turn off after the user
has reviewed them.
Note: Whenever there are un-reviewed missed calls, the Call history LED will be on. Moreover, it
will directly enter into Missed calls menu while the call history LED is on and go into Call
history menu if the LED is off.
8. Make Calls
If system is busy or there is no enough resource available, such as no suitable codec or no call
manager available, to make a call, it will play “Network congestion tone” and show the
following prompt.
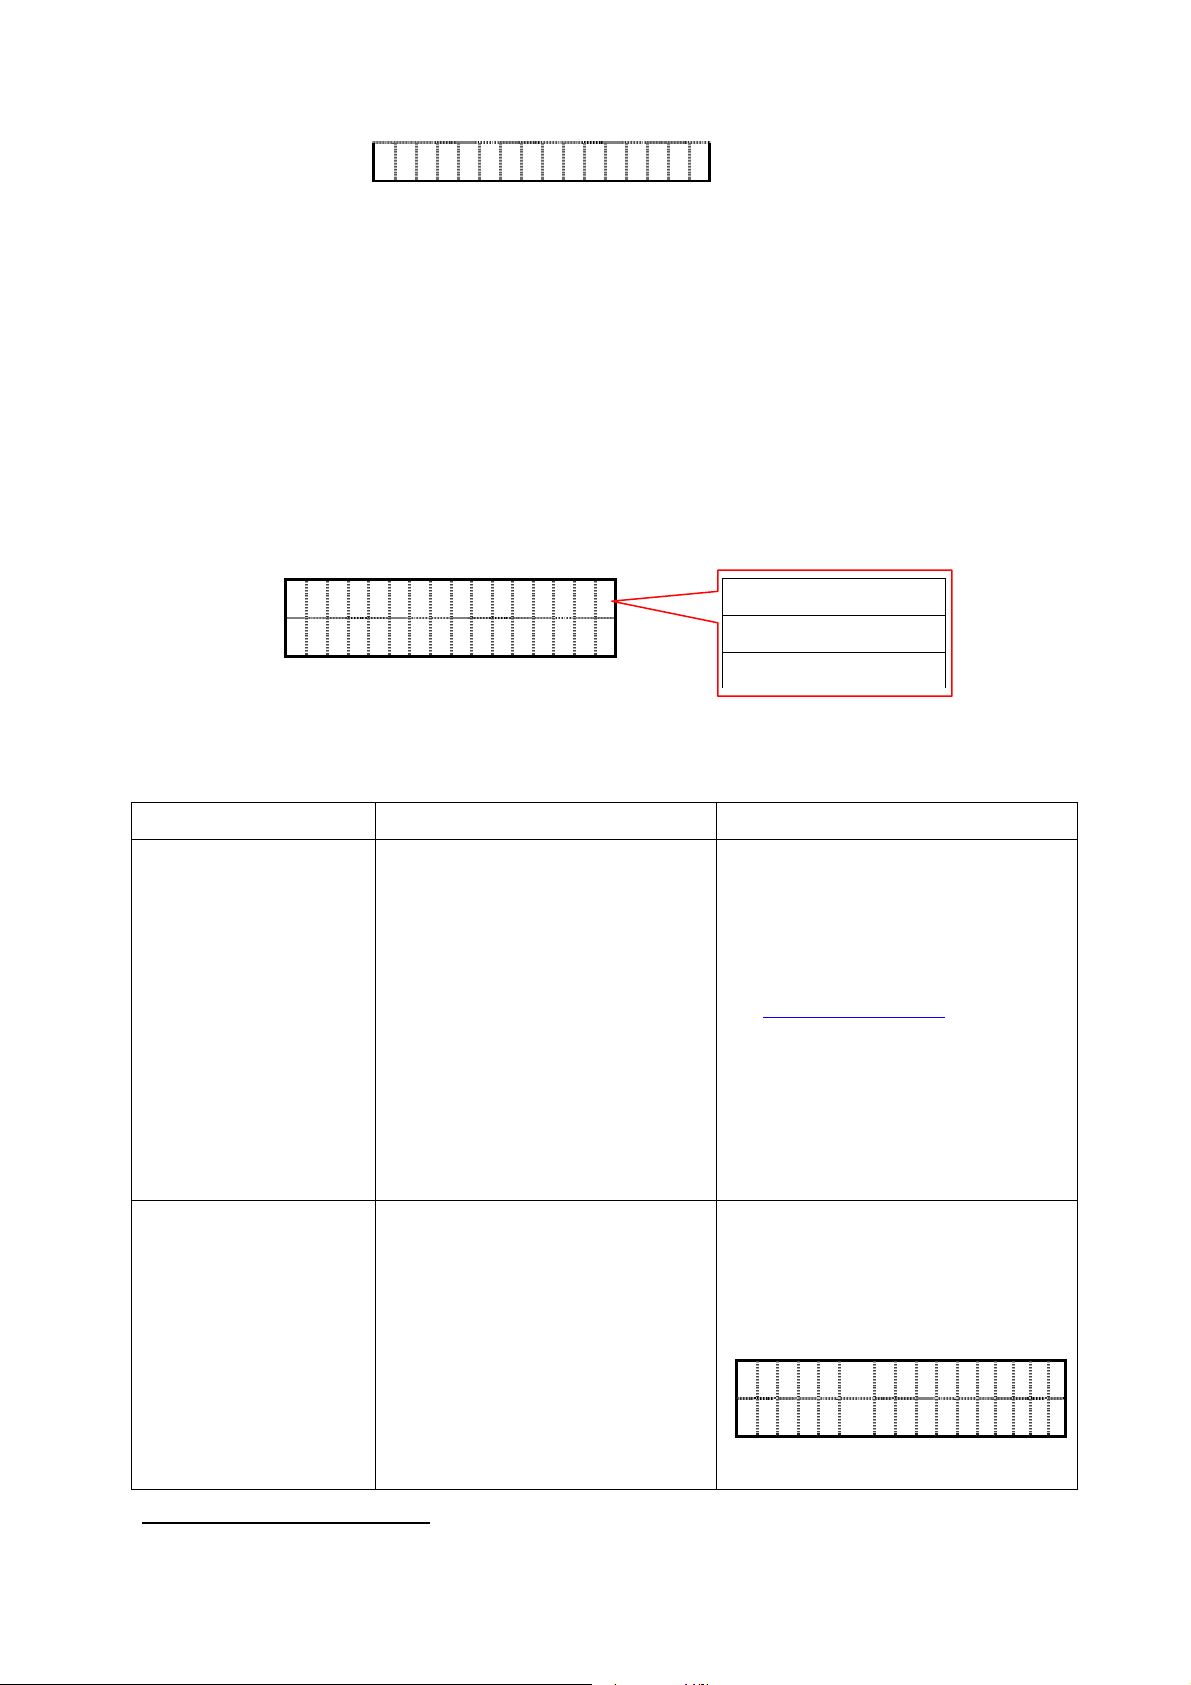
S Y S T E M B U S Y
1
【】
DND , Do Not Disturb, will turn on the corresponding LED.
[30/100]
Page 31
IP SIP Phone v2 User’s Guide Mar. 2005
T r y a g a I n l a t t e r
8.1. Dial Scheme
A. Press
【】
URL to activate alphabets typing via keypad on which time the corresponding LED
will be on, or type numbers directly via DTMF. Press 【MUTE】 to delete typos.
B. The serving domain will appear on the upper-right corner. Press [Domain Switch] to circle the
available service domains. With IP SIP Phone, you could configure up to 3 different service
domains and the default service domain of line-N is service-domain-N. For example, the
default service domain of
【】
B Call is the 2nd service domain. If no corresponding service
domain is available, it will use the 1st service domain by default.
C. Press
f wd . p u l v er.com
3 2 0 0
【】
# to dial the number immediately, or the phone will dial out the number after 4
sip.isp.com
fwd.pulver.com
Auto-locate
seconds (the inter-digit timed-out is programmable).
Method Rule Example
1. Enter address book.
Pick from address
book
ENUM dialing2
2. Search for entry.
3. Press
【】
Redial
Note: The phone will not use the
domain you specified if the
domain part of the dialing AoR is
different from the one you
specified and “Auto-locate” as
picked domain, based on the
domain part in AoR.
1. Starts with a
【】
#, which
will be translated as ‘+’ (if
you enter via keypad).
2. Dial numbers including
country code and area code
(Use 【MUTE】 to delete
previous character on typos).
3. Dial
【】
# to confirm.
1. sip:[email protected]
2. <sip:[email protected]:3000>
3. Scott<sip:[email protected]>
4. [email protected], which is
equal to sip:[email protected]
5. tel:+886-3-5639025
+88635639025, which is equal to
“tel:+886-3-5639025”
To dial “tel:+886-3-5639025”,
please enter “#88635639025#” and
it will show on the LCD as:
Call
+
886356 3 9 0 2 5
2
ENUM capable DNS must be configured and set as the primary DNS of IP SIP Phone.
[31/100]
Page 32

IP SIP Phone v2 User’s Guide Mar. 2005
4. Valid ENUM dial strings
must be longer than 6
(configurable) and containing
only digits, optional ‘-‘,
spaces, ‘(‘ or ‘)’, such as
“#886-3 5639025”, “+86 (3)
5639025” or “#8863”.
5. Those not recognized as valid
ENUM dial string will be
dialed “as is” even they start
with a ‘#’. For example,
“#86” will be dialed as
Intra-domain Dialing
(Both Caller’s &
callee’s SIP
address-of-record must
be the same domain
and both have been
registered).
1. Press
alphabets typing via keypad,
or type numbers directly via
DTMF (Use 【MUTE】 to
delete previous character on
typos).
2. The serving domain will
appear on the upper-right
corner. Press [Domain
Switch] to change the service
domain.
3. Dial # to confirm.
Contact Dialing
3
1. Use ‘*’ as ‘@’.
2. Use ‘*’ as dot, ‘.’.
3. Use “**” as ‘:’ then follows
peer’s SIP UDP port
(optional, but must assigned
whenever the target agent
does not listen on SIP
【】
URL to activate
If the caller is [email protected],
he could call [email protected]
by dialing “3200”.
s i p . i s p .com
3200
Dial “[email protected]”
s i p . i s p .com
albert
1. Call [email protected]
320
0*192* 1 6 8 * 1 0 *200
2.Call [email protected]:5070
3 2 0 0 @ 192*
168.10 * 2 0 0 * * 5070
UDP-5060).
4. Dial # to confirm.
3
If the caller does not use default outbound proxy but the callee does, then the conversation may not be hanged up
properly if the callee hangs up first (but the other direction could). This is due to the nature of stateful proxy to reply a
481 “Call/Transaction doesn’t exist” response for those calls whose INVITE messages not flowing through the default
outbound proxy.
[32/100]
Page 33
IP SIP Phone v2 User’s Guide Mar. 2005
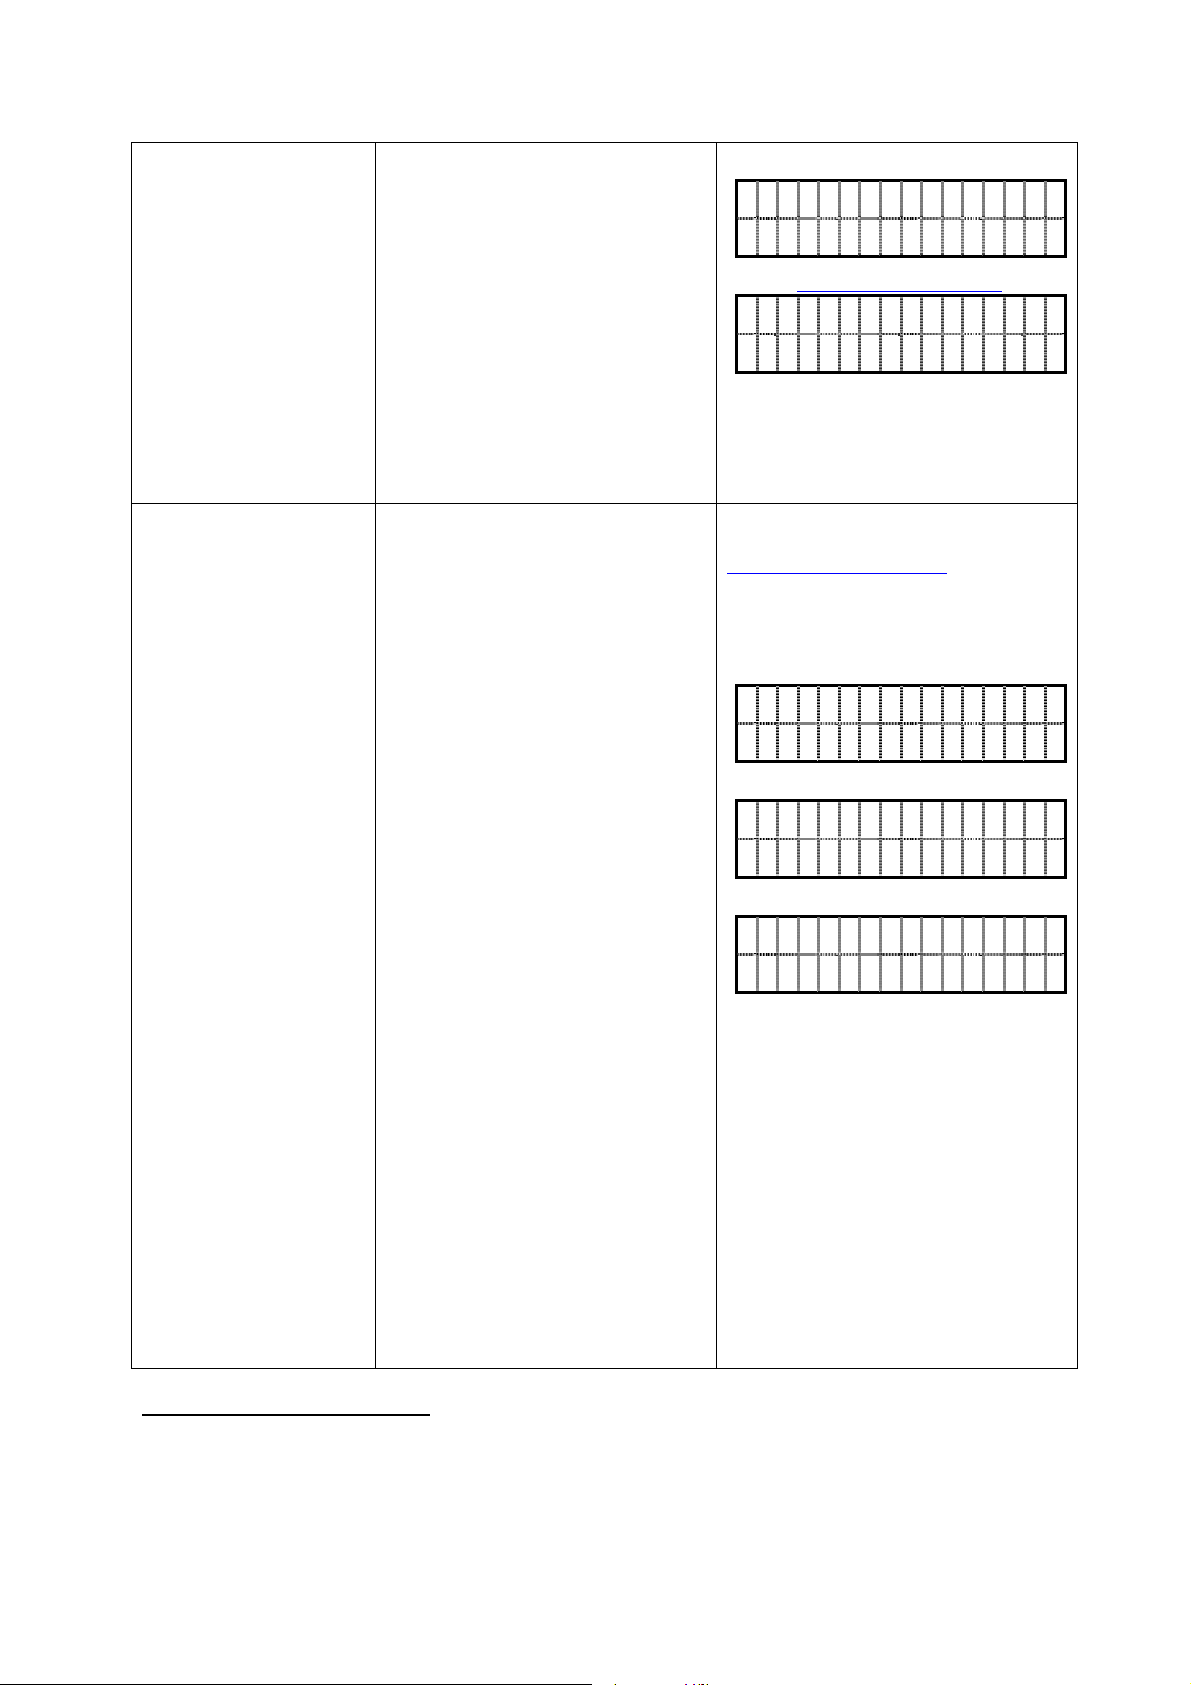
IP Dialing4
(Anonymous Call)
LAN Dialing
(Caller & Callee must
be on the same LAN)5
1. Use ‘*’ as dot, ‘.’.
2. Use “**” as ‘:’ then follows
peer’s SIP UDP port
(optional, but must assigned
whenever the target agent
does not listen on SIP
UDP-5060).
3. Use 【MUTE 】 to delete
previous character on typos.
4. Dial # to confirm.
1. Starts with a ‘*’
2. Dial the last 1/2/3 field(s) of
the callee’s IP.
3. Then follows SIP signaling
peer’s SIP UDP port
(optional, must assigned
whenever the target agent
1. Call 192.168.10.200
192* 1 6 8 * 1 0 *200
2. Call 192.168.10.200:5070
192*
168.10 * 2 0 0 * * 5070
If the caller’s contact is
[email protected] and the
callee’s IP is 192.168.10.200,
dialing “200” will be treated as
“192.168.10.200” in IP Dialing.
*200
does not listen on SIP
UDP-5060); use “**” as ‘:’.
4. Use 【MUTE 】 to delete
previous character on typos.
5. “*69” is reserved for call
return. Please use “*069”
instead.
6. “*0” is reserved for server
feature access code and will
be transmitted as is (no
translation), any digits larger
than 255 will be dialed “as is”
as well (such as “*311”).
7. “*050” is as the same as
“*50”.
8. You may disable LAN
dialing overly if those
To call 192.168.10.200:5070
*200** 5 0 7 0
Alternatively, you may dial:
*10*20 0 * * 5 0 7 0
4
If the caller configures to use default outbound proxy, the proxy may reply “404 Not found” due to the missing user
part.
5
The same constrains of “IP Dialing” applies to “LAN Dialing” as well. LAN dialing in fact is a short-hand of
IP-Dialing.
[33/100]
Page 34

IP SIP Phone v2 User’s Guide Mar. 2005
numbers should send “as
is” by disabling this feature
from menu “5.Preferences”
-> “7.Dial plan” -> “3.LAN
dial”.
z To facilitate “Contact Dialing”, “IP Dialing” and “LAN dialing” (where most users forget
to dial the SIP signaling port of the peer, and end in no responses if the peer doesn’t listen
on the standard UDP port 5060 for SIP signaling), IP SIP Phone always listens on
UDP-5060 for SIP signaling in addition to the user configured SIP service port. However,
if UDP-5060 is overlapped with RTP ports for media session, it will not lis ten on UDP-5060
for SIP signaling to avoid conflict. This help when both parties are IP SIP Phone and
reside on the same LAN.
【】
z The
# is used to denote end of dialing phase only while the user performs a dialing via
keypad. If the number is picked from the address book or call history, the
translated. As a result, if you dialing “#8863” via key pad, it will be translated as “+8863”, but
if you redial an entry from address book, which number is “#8863”(where the 【#】 is entered
as an punctuation), it will be dialed as is (no translation will be done). If your intention is to
dial “+8863” on address book, please enter ‘+’ via punctuation table rather than a
when you add such entry into your address book.
z Multi-domain note:
A. If the dialed AoR has no user part, it will use auto-locating (ignore the user specified
domain) to facilitate IP-dialing.
B. If the dialed AoR has no domain part (such as intra-domain dialing or the number in
address book specify no domain), it will use the domain you specified. Besides, if you
pick “Auto-locate”, then the default domain of the current channel (A / B / C call) will be
used.
C. If the dialed AoR has both user part and domain part, and you don’t specify “Auto-locate”,
then:
i. If the domain part of dialing AoR could match one of those registered domains, it
will use the matched domain instead.
【】
# will not be
【】
#
ii. If the domain part of dialing AoR matches none of those registered domains
1. If the domain part is in dotted IP format, it will use the user specified domain.
2. Otherwise, use “Auto-locate”.
D. For all others, it will use the domain you specified while making calls.
8.1.1. Guarding Time
z User hooks up already:
The first digit timeout is 15 seconds and it will play network fail tone on expiry.
Besides, the default inter-digit timeout is 4 seconds and it will dial out the collected
[34/100]
Page 35

IP SIP Phone v2 User’s Guide Mar. 2005
digits on expiry as well.
finishing dialing.
z User does not hook up yet:
The default inter-digit timeout is 4 seconds and the phone will dial out the collected
digits either on timer expiry or user presses the pound, # , key.
z If the call is made by speaker phone, it will return to IDLE state on call finish.
The inter-digit timeout is configurable:
z To change it by TELNET or keypad, go to
Plan” / “1. Inter-Digit”.
z To configure it by web browser, go to
Please refer to section-10.7.1 “Inter-Digit Timeout” on this document for detail.
To speed up the dialing process, press # key whenever finishing dialing.
To speed up the dialing process, press # key whenever
【】
【
MENU】=> “5. Preferences” / “7. Dial
『
Preferences』=> “Inter-Digit Timeout (s)”
【】
【】
8.1.2. ENUM Sample
1. Configure your IP SIP Phone to use a NAPTR capable DNS server. If you use auto-locating
SIP server instead of default outbound proxy for next hop delivery, your DNS must have SRV
and A records like the following (please change those host and IP in red font accordingly):
$ORIGIN SIP.isp.com
;; Pref Weight Port Target
_sip_udp.SIP.isp.com. IN SRV 0 0 1000 proxy.sip.SIP.isp.com.
_sip._tcp.SIP.isp.com IN SRV 10 0 1000 proxy.sip.SIP.isp.com.
proxy.sip.SIP.isp.com IN A 192.168.192.99.
2. Suppose you want to register your mobile number, +886-939342017 as an ENUM number
associated with your SIP AoR, sip:[email protected]. Moreover, we assume that you
configure your SIP phone to use the standard E.164 suffix for ENUM, “e164.arpa”, then you
should add a NAPTR record under the domain “7.1.0.2.4.3.9.3.9.6.8.8.e164.arpa” (which is
the reverse of your mobile phone number appended with “e164.arpa” suffix) like the
following:
$ORIGIN 7.1.0.2.4.3.9.3.9.6.8.8.e164.arpa
;; order pref flags service regexp replacement
IN NAPTR 100 10 "u" "E2U+sip" "!^.*$!sip:[email protected]!" .
Note: IP SIP Phone accepts both “sip+E2U” (RFC2916) and “E2U+sip”
(draft-ietf-sipping-e164-04.txt) as NAPTR service strings.
3. The E.164 suffix for ENUM is configurable from menu-6.2.3 “ENUM & E.164”.
[35/100]
Page 36
IP SIP Phone v2 User’s Guide Mar. 2005
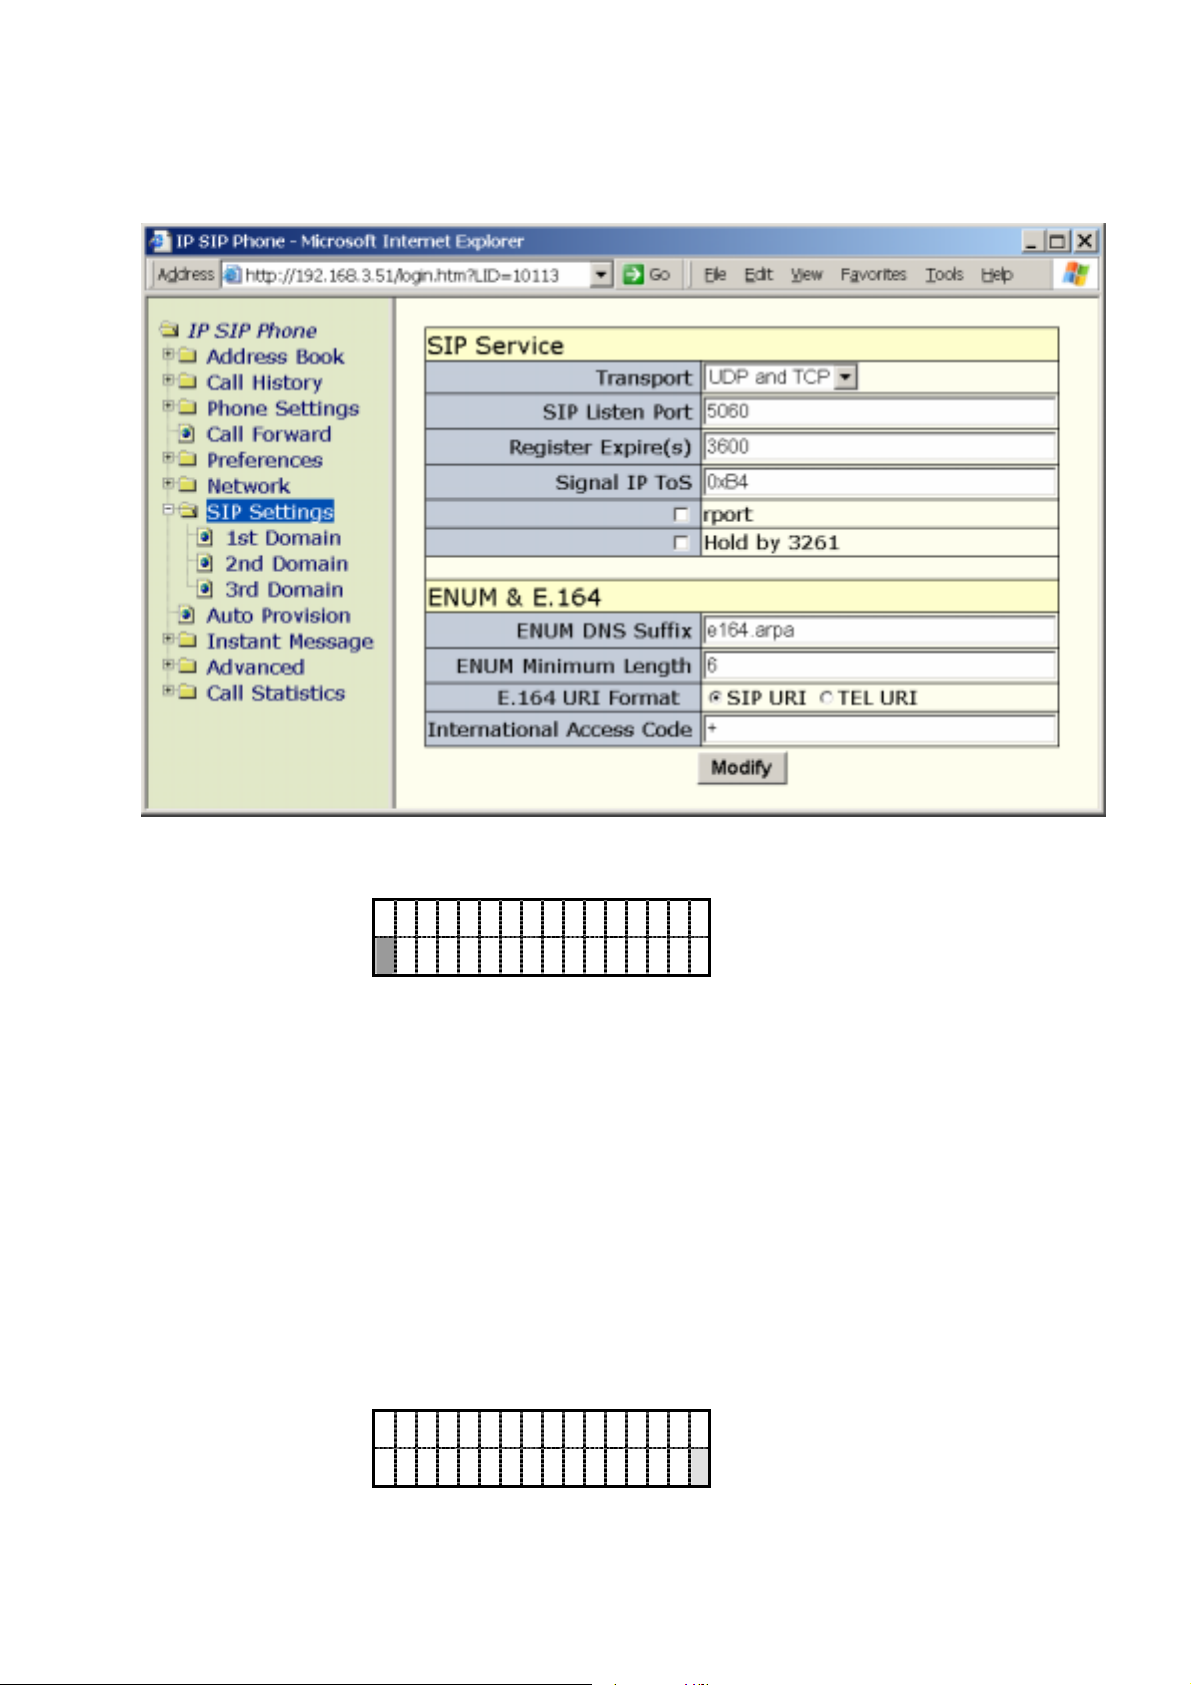
Alternatively, you may go to 『IP SIP Phone』/『SIP Settings』page by web browser and
configure “ENUM & E.164”.
Below illustrates how to configure them by keypad (TELNET).
3.1. ENUM suffix for DNS query:
E N U M D N S s u f f i x :
e 1 6 4 . a r P a
Set the ENUM suffix for E.164 query on DNS. Leaving it blank or setting it as “e164.arpa”
to comply with RFC 2916 standard ENUM suffix, otherwise you may set it to a proprietary
suffix, such as “e164.net”. Default is “e164.arpa”.
E.g., if the dial string is "+886-3-5639025", the ENUM query string send to DNS server to
resolve will be:
Strip off all non-digits.
Reverse the string.
Insert a dot, '.', between each digit.
Append the ENUM suffix, such as "e164.arpa".
Send to DNS to resolve.
Thus, the resultant DNS query string would be: "5.2.0.9.3.6.5.3.6.8.8.e164.arpa".
3.2. Minimum Valid ENUM Digit Length:
M i n v a l i d l e n g t h
[ 1 - 1 6 ] d i g i t s : 6
Configure the minimum digit length of a valid ENUM dial string.
A valid ENUM dial string must starts with a '#', which will be translated to as a '+', and
[36/100]
Page 37

IP SIP Phone v2 User’s Guide Mar. 2005
follows at least "Min length" digits. If this rule failed does not comply, the dial string will be
dial "as is" without any attempt to carry out an ENUM resolution. Default is 6 digits.
3.3. If IP SIP Phone fails to resolve an ENUM number to SIP address-of-record, AoR, it will
render the request line based on the URI format you specified in menu-6.2.3.3 “URI
Format”.
1 . S I P U R I
2 . T E L U R I
3.3.1. SIP URI: IP SIP Phone will send the request to the specified SIP service domain proxy
in the following form:
INVITE sip: +PhoneNumber@domain:port;user=phone
For example, if you dial “+88635639025” and IP SIP Phone fails in ENUM
resolution, it will send:
INVITE sip:[email protected];user=phone
3.3.2. TEL URI: IP SIP Phone will send request to the specified SIP service domain proxy in
the form:
INVTTE tel: +PhoneNumber
For example, if you dial “+88635639025” and IP SIP Phone fails in ENUM
resolution, it will send: INVITE tel:+88635639025
3.3.3. In either format, you could also configure whether the leading ‘+’ in request line should
be replaced or not by configure menu-6.2.3.4 “Int’l access”.
R e p l a c e t e l : + a s
+
This setting configures whether the leading ‘+’ should replace with an international access
code, which is “00” in most countries, before actually sending it to proxy server. The default
is leave the leading ‘+’ intact for proxy (or PSTN gateway) to replace it with the international
access code based on their geographic locations.
8.2. Redial
Press
【】
Redial to dial the last dialed number. It will turn on the speaker phone
automatically if the user has not done so yet.
8.3. Address Book
You can pick an entry from the address book, press 【Redial】 to dial out the specified
number.
z 『Main Menu』=>『1.Address book』\『1.Search』 (Or press DSS key 【Address
Book】to activate it).
z Enter the prefix of the target number (display) to search or press 【HOLD】 with
[37/100]
Page 38
IP SIP Phone v2 User’s Guide Mar. 2005
any input to go to the first entry on address book.
z On listing mode, press
【8】
consecutively for 3 times will jump to the first entry prefixed with a ‘U’.
【2】
twice to first entry prefixed with an ‘A’ (or press
etc.)
z Press 【Redial】 to dial the selected number.
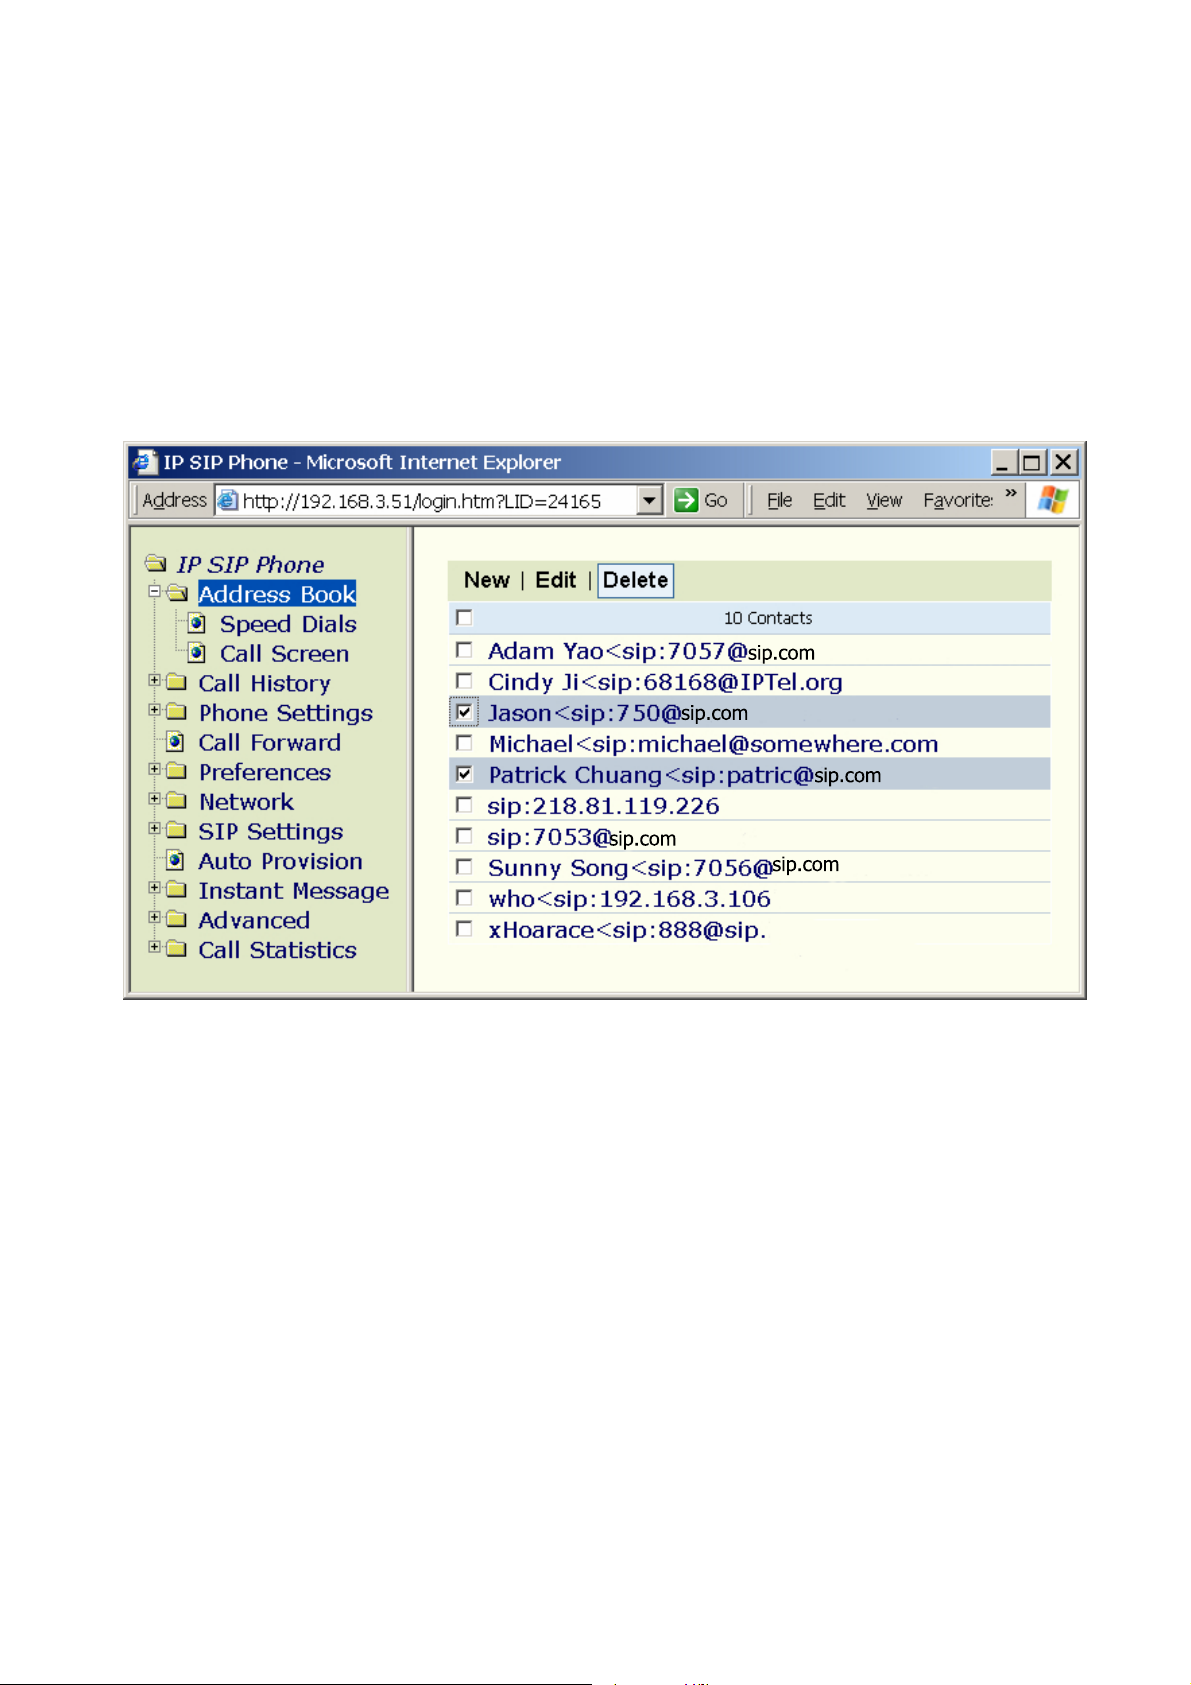
You may configure your address book by pointing web browser to your terminal’s IP and
go to page 『IP SIP Phone』/ 『Address Book』.
sip.com
sip.com
sip.com
sip.com
sip.com
Please refer to section-4.2 “Address Book” on “IP SIP Phone v2 Web Administration”
for detail.
8.4. Call History
You can pick an entry from the call history, either missed calls, received calls or dialed
numbers, press 【Redial】 to dial out the specified number on list mode. Those calls are listed on
a last come first shown manner.
z 『Main Menu』=>『2.Call History』 (or press 【Call History】 button directly)
z Choose the desired call list, such as “Missed Calls”.
z Traverse the list, and locate the target number.
z Press 【Redial】 to dial the selected number.
Note: if you press 【Call History】 while its red LED is flashing (indicating there are
unviewed missed calls), it will enter the “Missed calls” list directly.
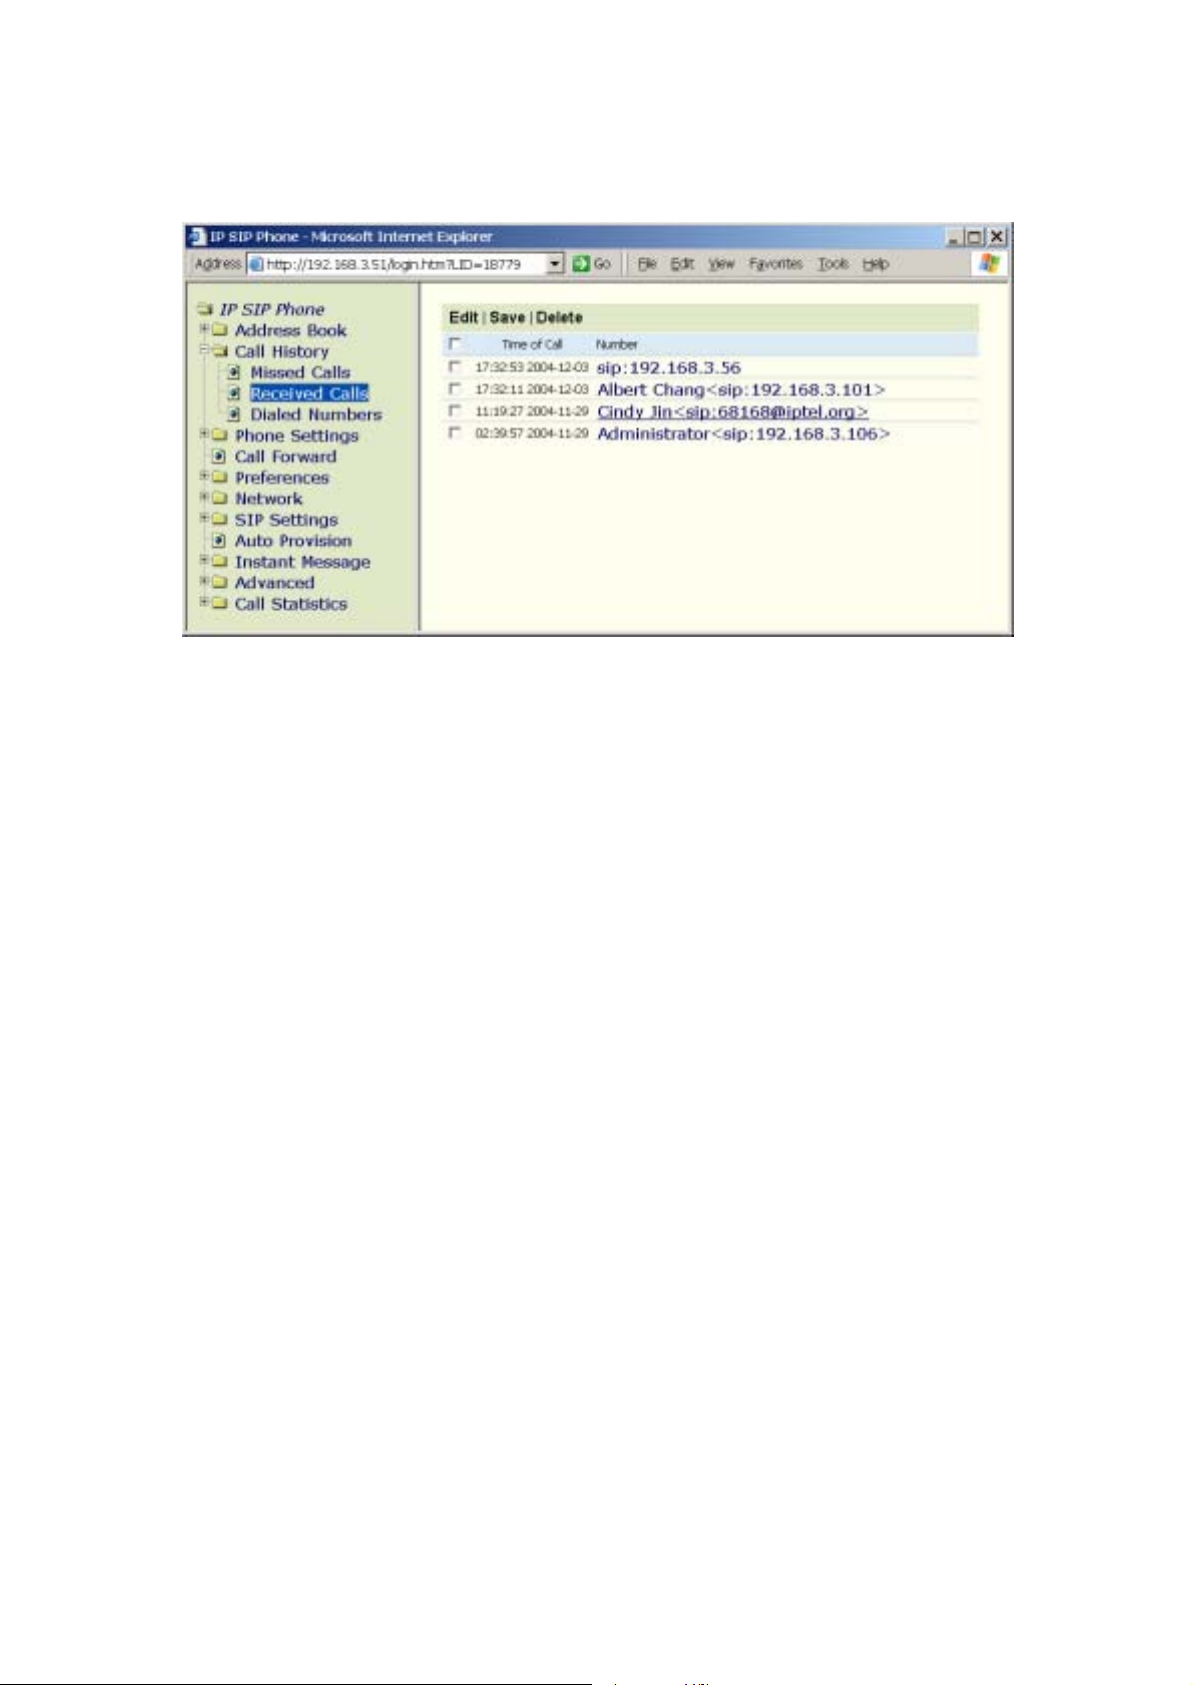
You may configure your address book by pointing web browser to your terminal’s IP and
[38/100]
Page 39
IP SIP Phone v2 User’s Guide Mar. 2005
go to page 『IP SIP Phone』/ 『Call History』=> 『Missed Calls』 , 『Received Calls』or
『
Dialed Numbers』.
Please refer to section-4.3 “Call History” on “IP SIP Phone v2 Web Administration” for
detail.
8.5. Speed Dial
(1) Add speed dial number:
z 『Main Menu』=>『1.Address Book』\『4.Speed Dials』
z Go to the digit you want to set for speed dial and press 【Hold】
z Pick the target number from address book to associate with this speed dial digit.
Press 【Hold】to save.
(2) Remove a specific speed dial entry:
z 『Main Menu』=>『1.Address Book』\『4.Speed Dials』
z Go to the digit you want to set for speed dial.
z Press 【MUTE】to remove the current speed dial mapping.
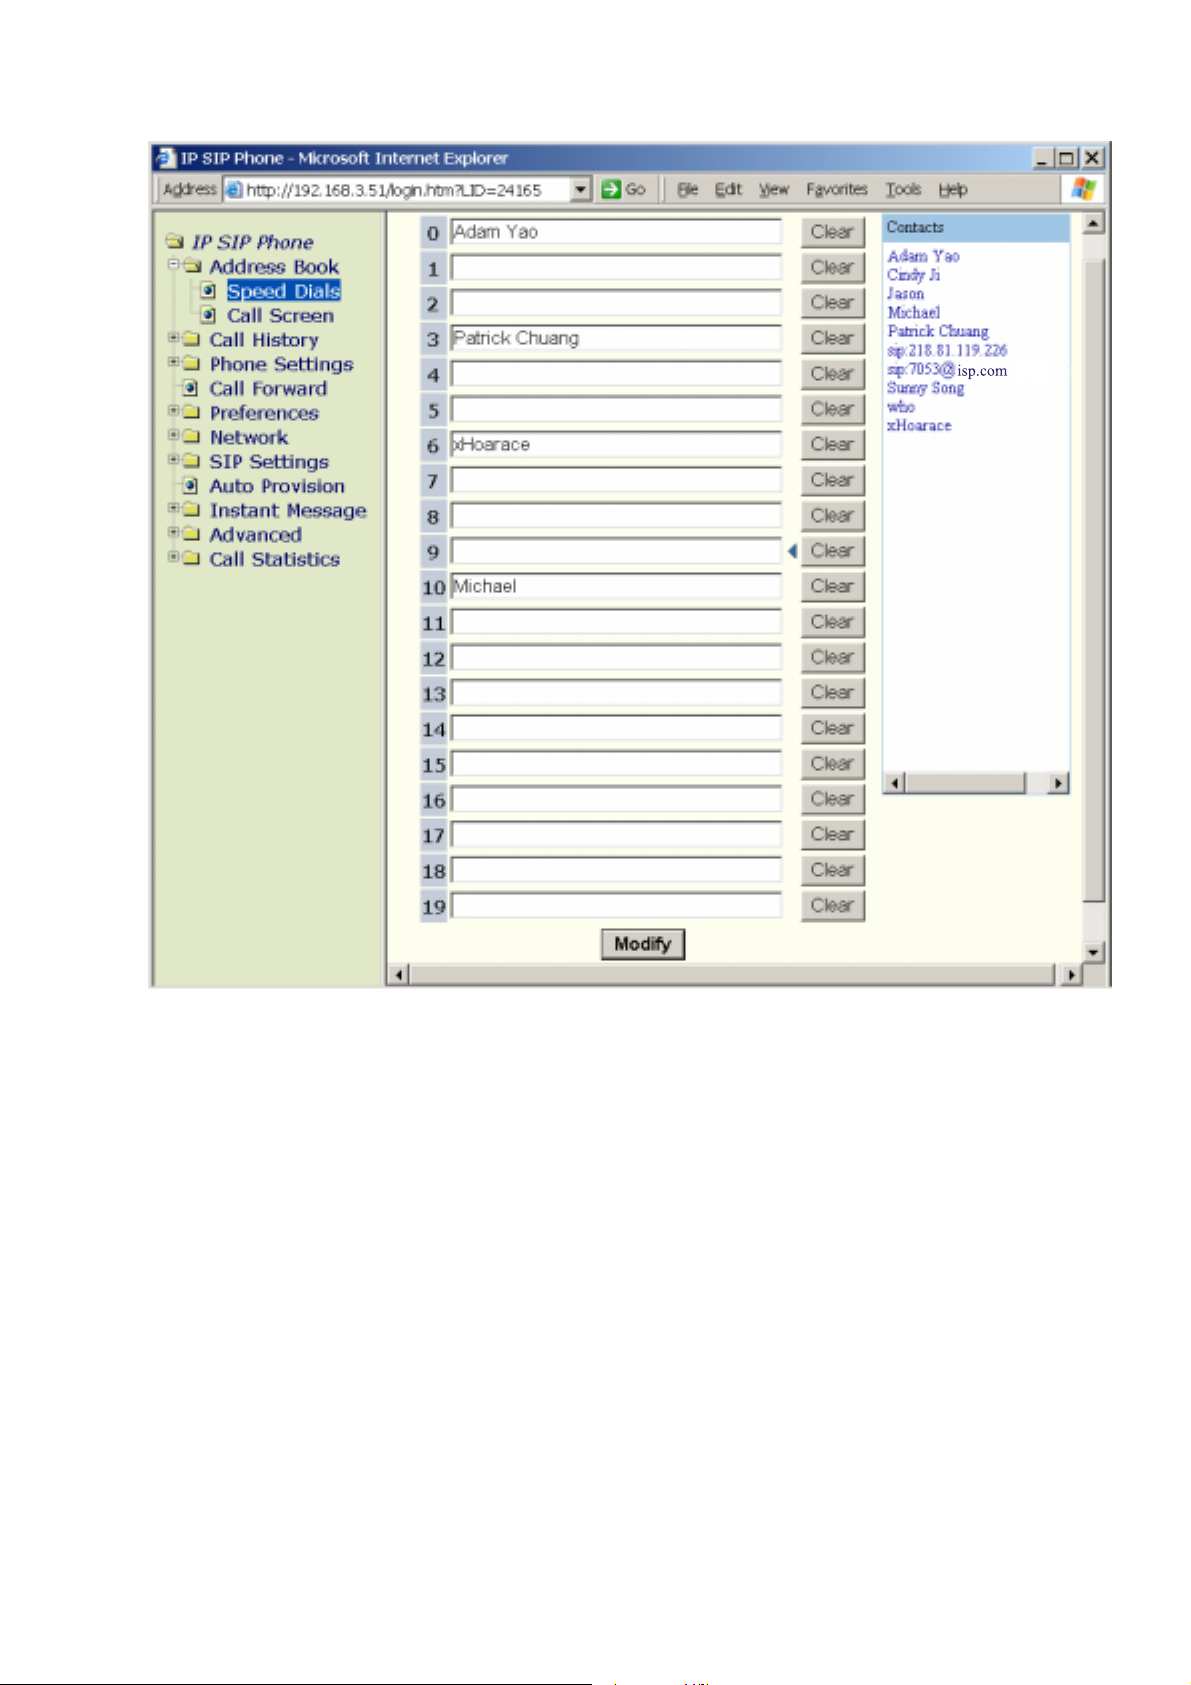
(3) Alternatively, you may configure the speed dial numbers by pointing web browser to
『
your terminal’s IP and go to page
Dials』. Please refer to section-4.2.1 “Speed Dials” on “IP SIP Phone v2 Web
Administration” for detail.
IP SIP Phone』/ 『Address Book』/ 『Speed
On default, all entries are unassigned. If the assigned entry has been erased from address
book, the mapping will be removed from speed dials automatically.
[39/100]
Page 40
IP SIP Phone v2 User’s Guide Mar. 2005
isp.com
z To assign a speed dial entry:
Position cursor on the text input which you want to assign a speed dial mapping.
Click the “Contacts” on the right panel to pick an entry from address book to map
to a specific speed dial entry.
z To clear a speed dial mapping:
Position cursor on the text input which you want to clear the speed dial mapping.
Click “Clear” collocates with each speed dial entry to remove the mapping.
(4) Perform Speed Dial:
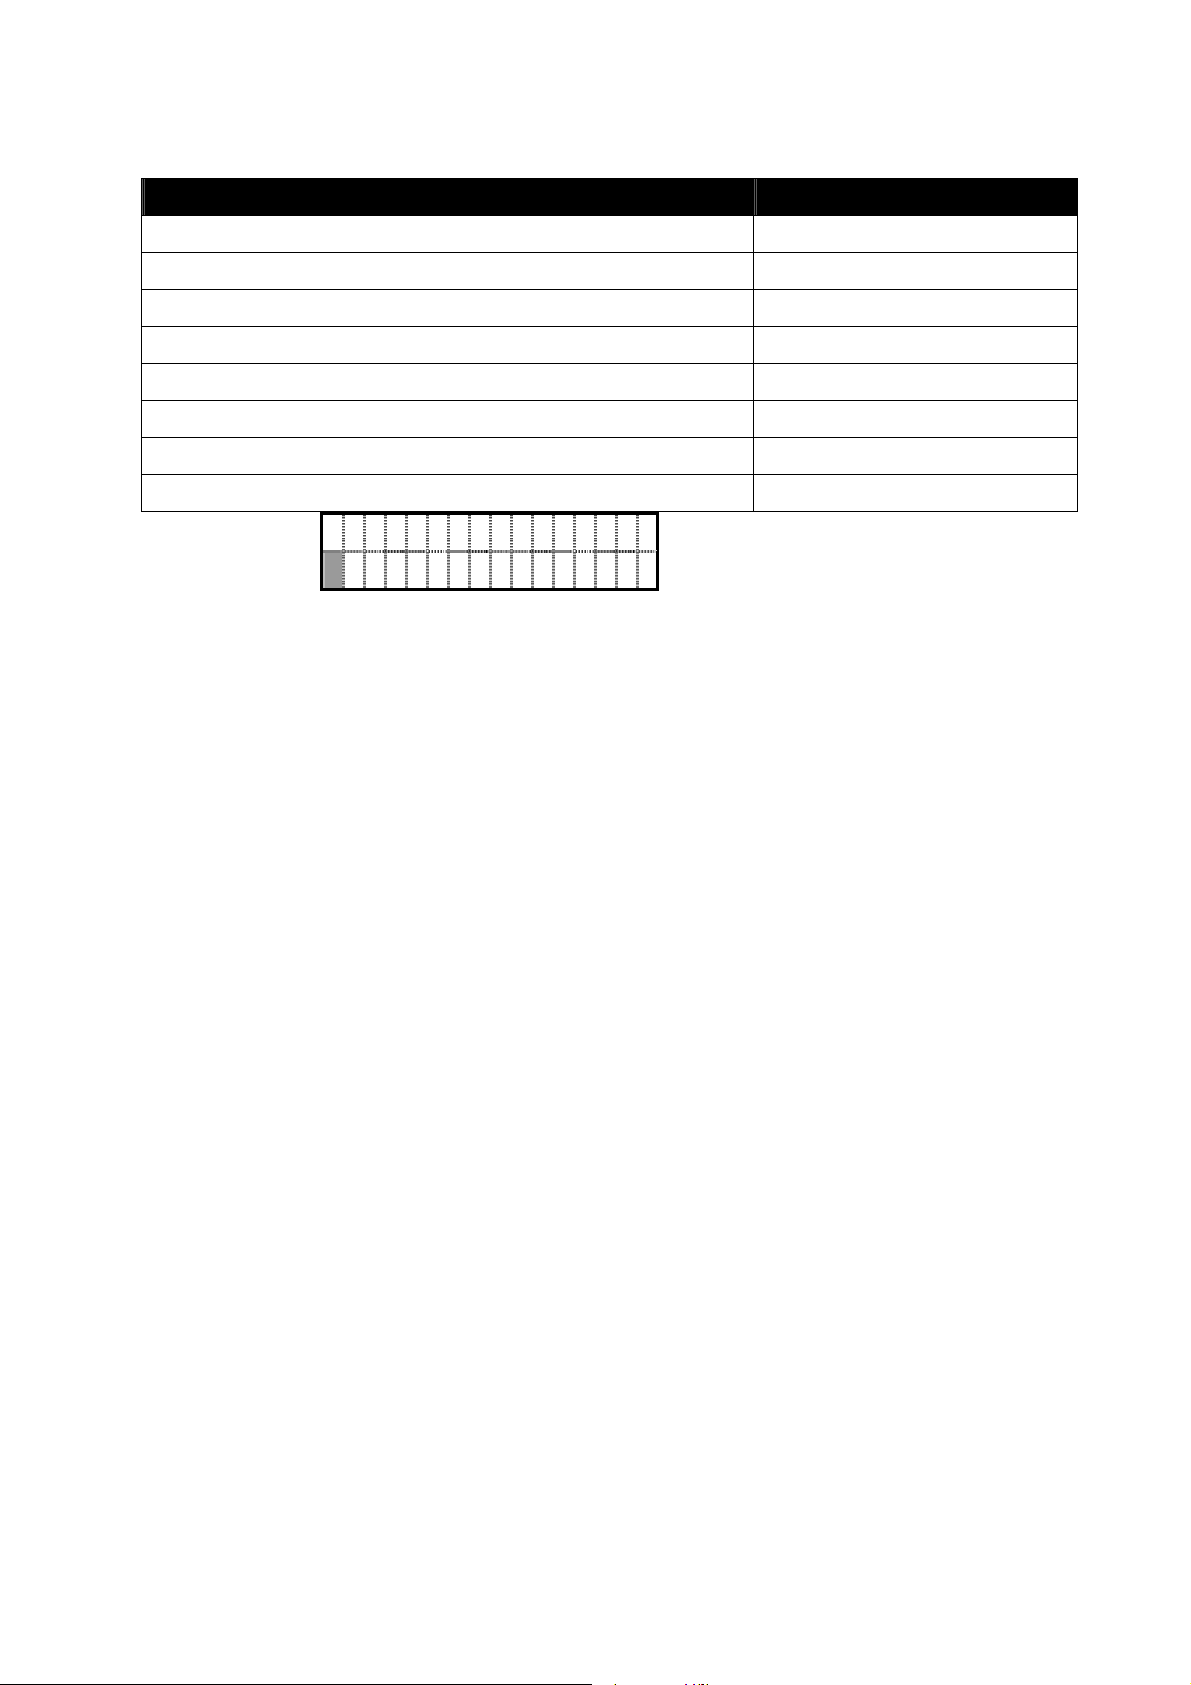
IP SIP Phone supports two different ways to perform speed dial:
i. [0-19] + 【SPD】; e.g.,
ii. 【SPD】+ [00-19]; e.g., 【SPD】+ “01”
Note: if you want to dial single digit o nly, such as 【SPD】+
additional
until inter-digit timeout, which default is 4 seconds. For example, 【SPD
【】
1 +【SPD】, or “01” +【SPD】
【】
1 , please press an
【】
# to finish dialing; otherwise, it will wait for the second digit
】
[40/100]
Page 41
IP SIP Phone v2 User’s Guide Mar. 2005
+
【】
1+ 【#】.
Key Description
【】
SPD +’0’, ‘0’+
【】
SPD +’1’, ‘1’+
【】
SPD +’2’, ‘2’+
… …
【】
SPD +’9’, ‘9’+
【】
SPD +’10’ or ‘10’+
… …
【】
SPD +’19’ or ‘19’+
If he phone have not been hooked off yet, the phone will turn on the speaker phone
automatically.
【】
SPD ,
【】
SPD ,
【】
SPD ,
【】
SPD ,
S pe e d d i al:
【】
SPD +’00’ or ‘00’+
【】
SPD +’01’ or ‘01’+
【】
SPD +’02’ or ‘02’+
【】
SPD +’09’ or ‘09’+
【】
SPD Dial the 10th speed dial number.
【】
SPD Dial the 19th speed dial number.
【】
SPD Dial the 0th speed dial number.
【】
SPD Dial the 1st speed dial number.
【】
SPD Dial the 2nd speed dial number.
【】
SPD Dial the 9d speed dial number.
8.6. Call Return
Call return allows the user to call back the last caller. The user can either dial a special
feature code such as “*69” to dial up the last caller or select from a list of callers on his or her
phone. You could use it as either a network core system feature or a phone-set feature.
If you dial the special feature code “*69” (which is configurable, see below), the phone will
send the dialing string “sip:*[email protected]” to default outbound proxy server, and depends
on proxy server to keep the latest call history for each user to cover the phone off-line interval.
Moreover, the phone must have been configured to use the call-return capable default SIP
outbound proxy server.
On the other hand, if you mapped the DSS key to the phone-set feature “Call Return”, it will
find the latest incoming calls from call history of “Missed Calls” and “Received Calls” then dial
out the latest incoming call number. By default,
Return”.
The phone-set feature access code can be configured by
z TELNET or keypad: 【MENU】=> “5.Preferences” / “7.Dial Plan” / “3.Call Command”
/ “1.Call Return”)
『
z Web browser:
Return”.
IP SIP Phone』/『Preferences』/ 『Call Command』=> “Call
【F8】
is mapped to phone-set feature “Call
8.7. Calling
Dialing state
[41/100]
Page 42

IP SIP Phone v2 User’s Guide Mar. 2005
C al l i n g mm:ss
M ic h a e l Wu
Callee reached
T ry i n g mm:ss
M ic h a e l Wu
Ringing
R in g i n g mm:ss
M ic h a e l Wu
8.8. Call Failure
Busy
M ic h a e l Wu
B us y h e r e
No Answer
M ic h a e l Wu
N o a n s w e r
Unavailable
M ic h a e l Wu
T em p o r a r ily unav
Others
M ic h a e l Wu
N ot F o u n d
M ic h a e l Wu
5 88
No error description available only error ID is shown.
8.9. Auto-redial
You can press 【Auto-】redial after finishing dialing while making a phone call but before
connected or hanging up. If you press【 Auto-】redial on idle mode, it is effectively as the same
as press【 R】edial follows by a【 Auto-】redial . After activating auto-redial, the system will
lighten its corresponding LED, launch the auto-redial process and re-dial the target number
regularly ‘till “connected”. To manually cancel auto-redial, press 【Auto-redial】 again. This
feature will be automatically canceled if either the stop criterion is met or the total activation
duration is expired. Pressing the 【Auto-redial】 button has no effect if no active auto-redial.
The semantics of “connected” could be configured from 『Main Menu』=>『5.Preferences』
/ 『5.Auto-Redial』 / 『1.Stop Criterion』
[42/100]
Page 43
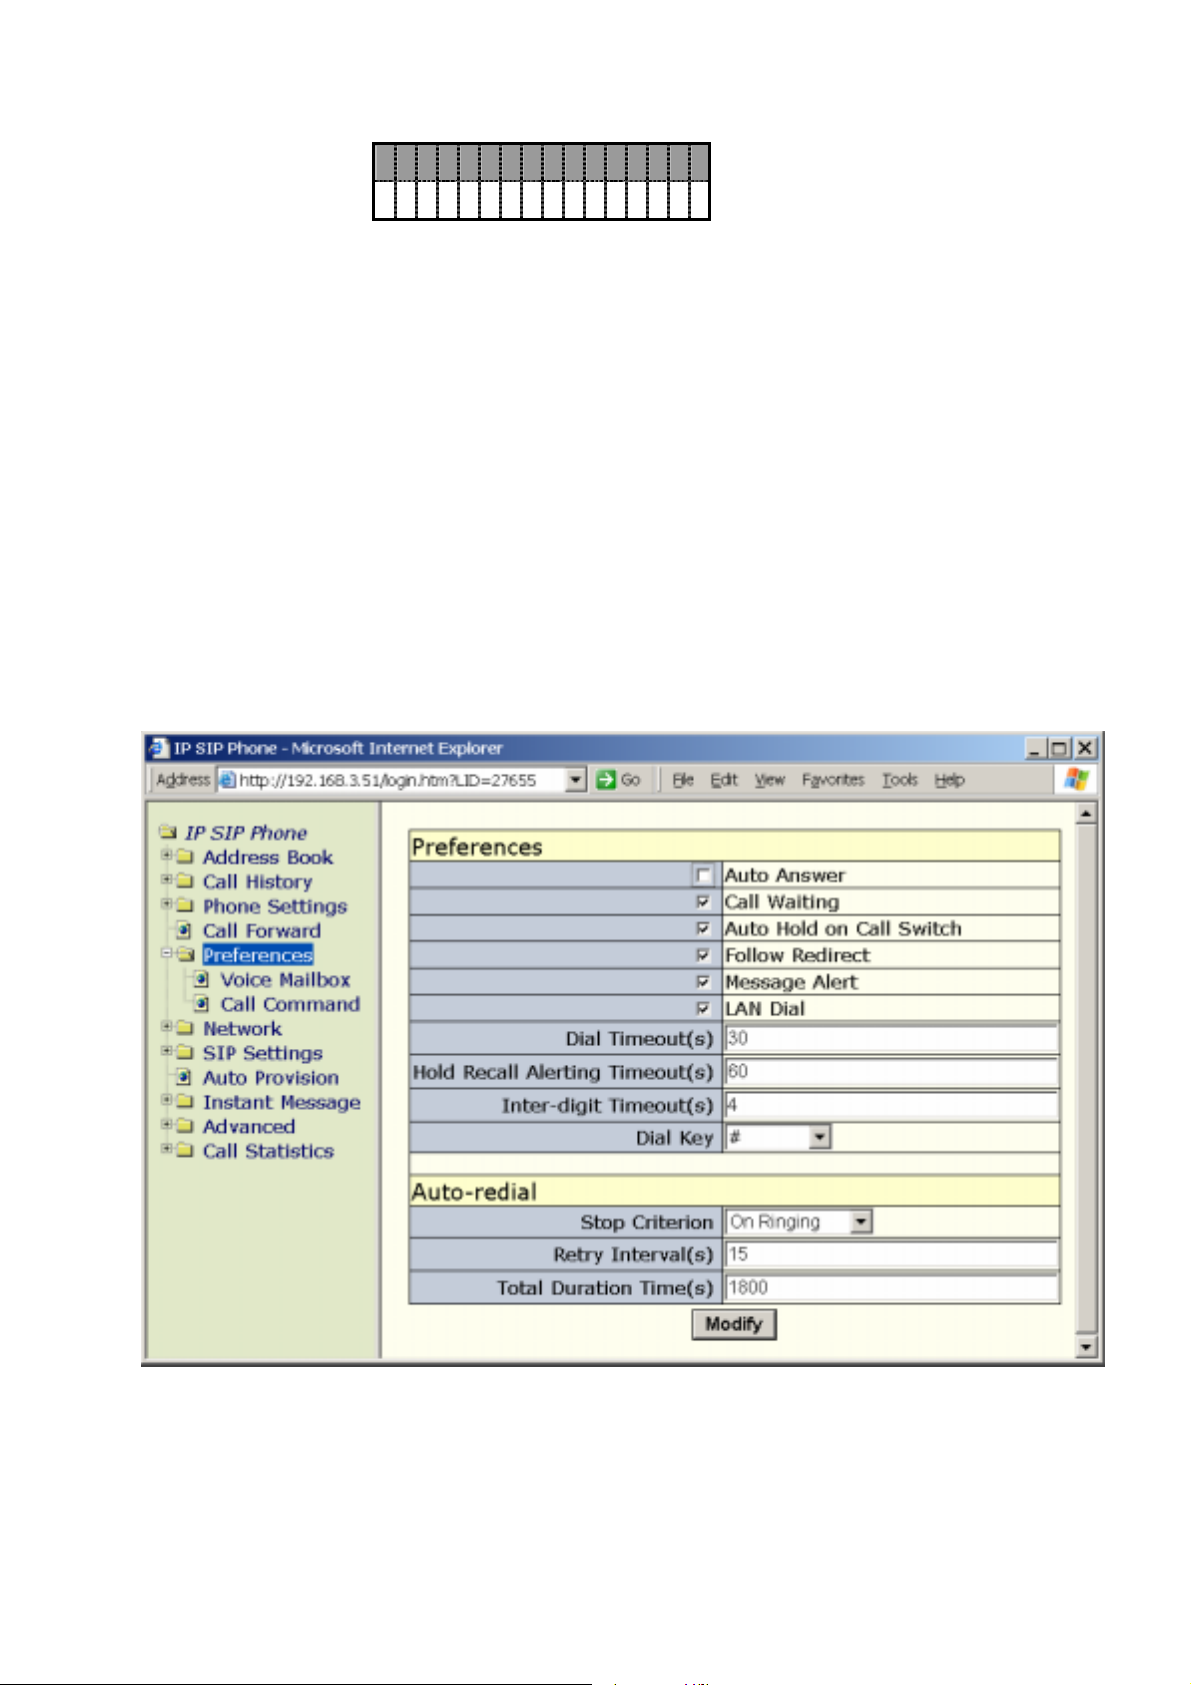
IP SIP Phone v2 User’s Guide Mar. 2005
1 . R i n g i n g
2 . C o n n e c t e d
z Ringing: only when the peer starts ringing back will auto-redial process stops (Default).
z Connected: Only when the peer picks up will auto-redial process stops.
Note: active auto-redial will be canceled whenever the phone is locked out.
To specify the gap (measured in seconds) between two successive re-dials to avoid
overflowing the networks with fast retries, please go to『Main Menu』=>『5.Preferences』 /
『5.Auto-Redial』 / 『2.Retry Interval』. The default redial interval is 15 seconds.
To specify the activation duration of this auto-redial feature once starts (measured in
seconds), please go to 『Main Menu』=>『5.Preferences』 / 『5.Auto-Redial』 / 『3.Total
Duration』. Once this duration expires, the auto-redial feature will be silently canceled. System
default is 1800 seconds (3 minutes).
You may also configure it from web browser by going to 『Preferences』=> “Auto-Redial”
page.
8.10. One-Touch Dial
IP SIP Phone supports one-touch dial by mapping some DSS keys as hot lines such that the
user could dial out frequently used numbers by pressing the associated function key(s) directly.
To configure one-touch dial key(s):
[43/100]
Page 44
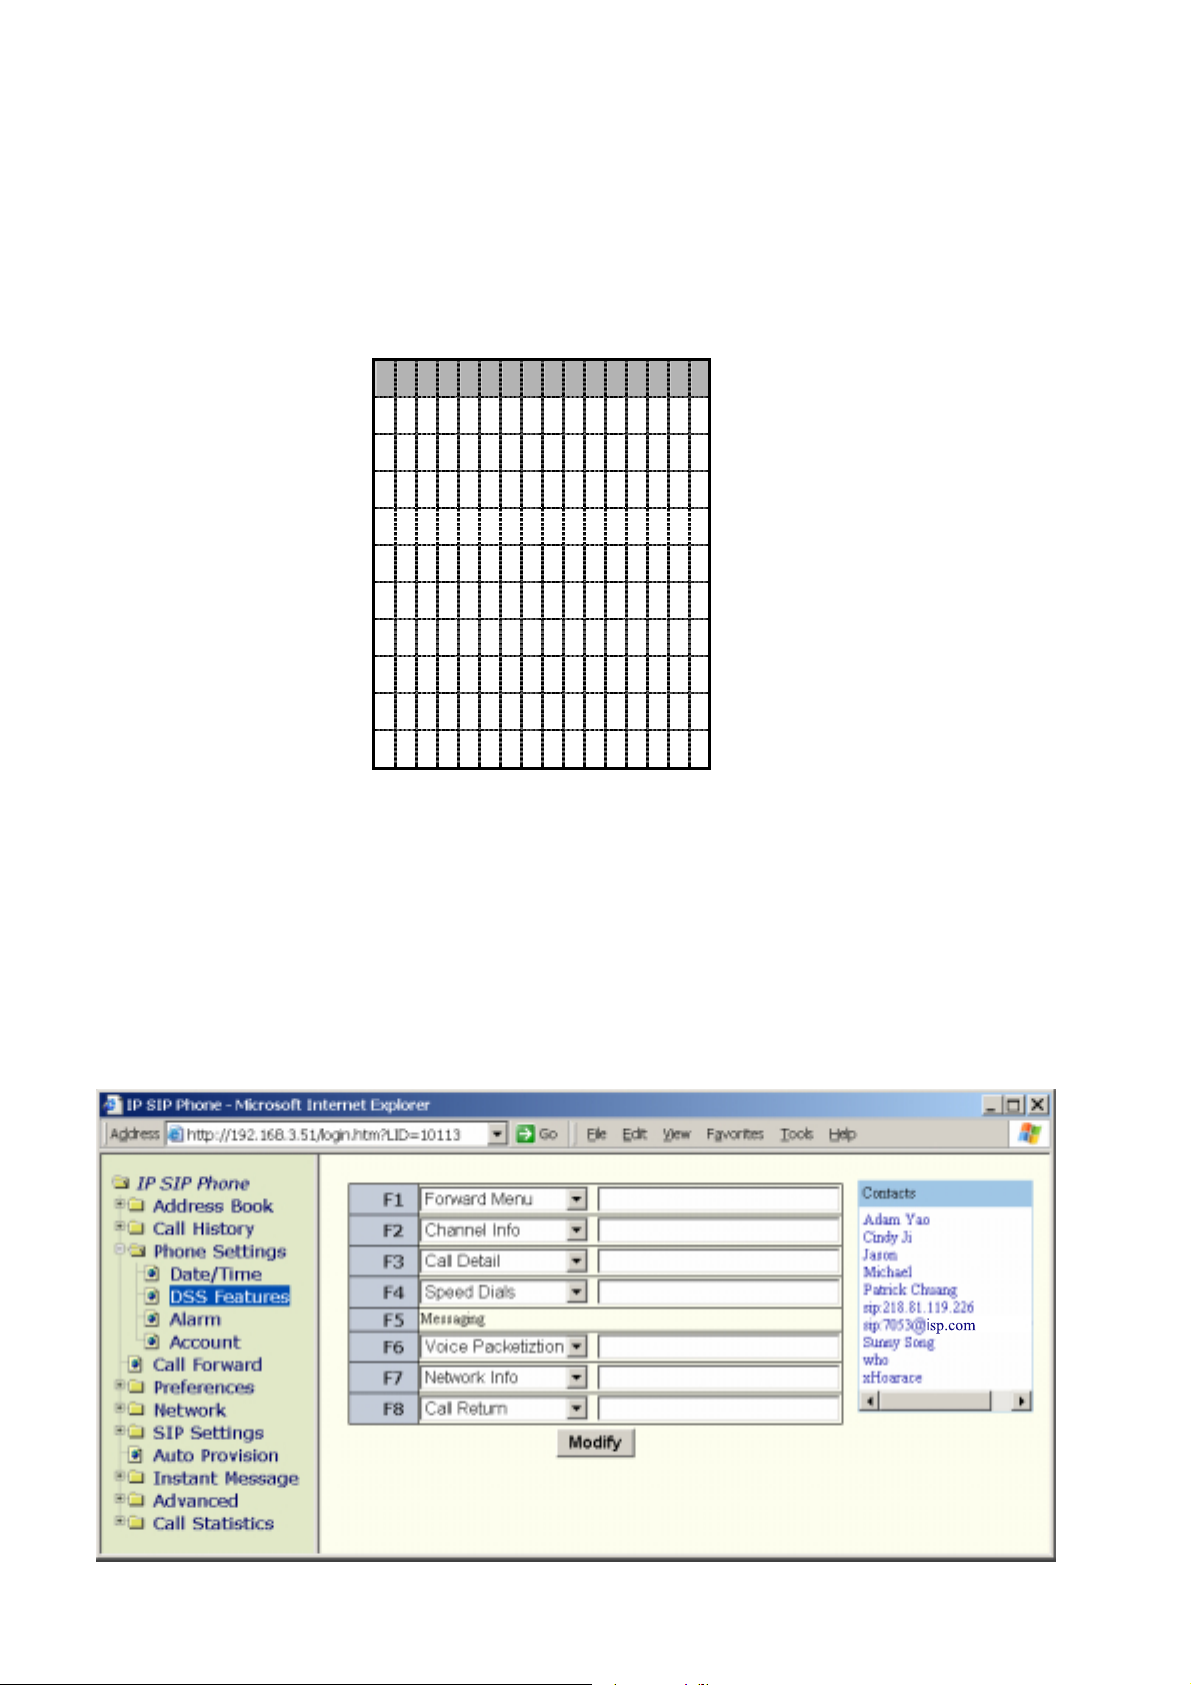
IP SIP Phone v2 User’s Guide Mar. 2005
W
W
z Press
【】
FUNC +【#】 to enter menu.
z Go to menu “3.Phone Settings” / ”2.DSS Features”
z Pick the function key which you want to act as one-touch dial, and press 【HOLD】 to
choose the mapped feature.
z Choose “Hot Line” as the mapped feature and press 【HOLD】 to pick an entry from
the address book to associate with this hot line.
A d a m Y a o
A l b e r t C h a n g
F e l i x C h a n g
H o r a c e F u
J a c k y Wang
J u n D e n g
M a x y M a
M i c h a e l
S c o t t S u n
S u n n y S o n g
u
i l l i a m G u
Enter the 1st character will jump to the 1st entry starts with the same prefix; e.g., press
st
【2】 three times consecutively will jump to the 1
entry with prefix ‘B’.
z Repeat from step-b to step-d if you want to set up more than one hot line.
Note: the associated hot line number will be invalidated whenever the corresponding
address book entry has been erased.
You may also configure it from web browser by going to 『IP SIP Phone』 / 『Phone
Settings』/ 『DSS Features』.
isp.com
[44/100]
Page 45

IP SIP Phone v2 User’s Guide Mar. 2005
9. Call Processing
9.1. Handset, Speaker-phone, ear-phone and
Loud-speaker
z Press
z However, if you are in ear-phone mode, then press
z To switch to loud-speaker phone (open-listening), you should turn the speaker on while
are many listeners at the same room but only one person is talking at any time. If the talker is
far away from the phone-set, then it may be inappropriate to employ hands-free mode. Instead,
the talker should talk by handset to makes the voice more clear to the peer, and turn on the
speaker to make the conversation heard by all by-listeners.
(off-hooked), the phone will be in loud-speaker mode: it continues transmitting voice from
handset, not from microphone, and played voice to both speaker and handset receiver
simultaneously. The phone will activate microphone for voice transmission only when it is on
【
SPK】to switch between speaker-phone and handset. The red LED of 【SPK】
indicates speaker-phone is on or off.
【
SPK】will switch between handset
and ear-phone. The flashing red LED of
keeping handset lifted (off-hooked). Then you can continue talking by handset while all
by-listeners in the same room could hear your conversation from the speaker.
IP SIP Phone supports loud speaker (open-listen mode) to facilitate meeting where there
The loud-speaker works as follow: if you switch to hands-free mode with handset lifted
【
SPK】indicates it is now in ear-phone mode.
hands-free mode and the handset is on hook. This applies to ear-phone mode as well. In loud
speaker mode with ear-phone enabled, the ear-phone could hear voice but not speak-able
unless the handset is on hook.
9.2. Hold
1. Put the peer on hold, press
H ol d i n g mm:ss
M ic h a e l
2. To unhold the peer, you could:
a. Press
b. Press 【A / B 】Call
c. On idle mode, press
Note: there will be hold recall timer to alert the user while some calls are holding. For example,
【】
HOLD again to unhold the peer.
if you put A Call on hold, then the green led of A Call will flash. Upon the “hold
recall” timer expires (to configure “Hold Recall Timer”, go to menu “5. Preferences” / “2.
【】 【】
【】
HOLD once.
【】
HOLD to unhold the last holding call.
[45/100]
Page 46

IP SIP Phone v2 User’s Guide Mar. 2005
Hold Recall” by keypad or web configuration page 『IP SIP Phone』 / 『Preferences』
=> “Hold Recall Alerting Timeout (s) “):
z If you are in on-hook state:
i. The phone will ring.
ii.
The green LED of A Call flash fast.
iii. The recall state continues ‘till user picks up the call. However, if user does not
answer the call within 1 minute, the call will be disconnected.
z If you are in off-hook state, either engaged in other calls or about to making calls:
i.
The green LED of A Call flashes slowly but the ringer does not ring.
ii. Play hold recall tone once to remind the user that some calls are in hold.
iii. Reset the hold recall timer for next time alarm.
3. If the user is put on hold by the peer, LCD will show:
B eH e l d mm:ss
M ic H a e L
Note: if you are held by the peer, IP SIP Phone will play music-on-hold.
【】
【】
9.3. Mute
mm:ss
M ic H a e l
z Set up a connected call.
z Press【MUTE】to toggle your voice transmission. On muting state, the red LED of
【MUTE】will be on, and you can hear still the peer’s voice; however they cannot hear
you.
9.4. Transfer
Call Transfer allows a user, on any existing two-party call, to place the existing call on hold
and originate another call to a third party. The user may consult privately or connect the original
call to the third party.
There are two types of transfers:
z Blind Transfer—With blind transfer you transfer the caller to another party without
announcing the caller to the called party. To blind transfer a caller, you would press
【XFER】 to place the caller on hold. You will hear a dial tone and can dial the
number you want to transfer the call to. It will immediately transfer the call and you
rd
could hang up as soon as finishing dialing or wait until the 3
party picks up then
[46/100]
Page 47

IP SIP Phone v2 User’s Guide Mar. 2005
disconnect from the other party.
z Consultative Transfer -With consult transfer you consult the other party before
transferring the call. To consult transfer a caller, you would press the 【XFER】 button
to place the caller on hold. You will hear a dial tone and can dial the number you want
to transfer the call to. Wait until the other party answers the call and inform them you
are transferring the call. Press the 【XFER】 button on the phone set to complete the
transfer or just hangs up the call it will also perform the transfer.
Note, you can not transfer two inbound calls to each other. Instead, you can blindly
transfer each call to a third party. On which time, the channel LED in question,
will be red (v.s. green).
9.4.1. Consultative Transfer
Follow the following steps to do a consultative transfer: announce it first before actually
transfer the call.
z Set up a connected call to party-A
z Press【XFER】to put A on hold and gain dial-tone.
z Dial the target number of party-B and press 【#】 to finish dial.
z Wait ‘till B picks up, announcing the call from A (consultation).
z If B is unwilling to take this call, you may press 【FLASH】to cancel the transfer
operation and take back A (alternatively, you may press 【A/B Channel】to cancel
transfer and take back A as well).
z Press【XFER】again (or you could just hang up the call to B) to transfer party-A to
party-B. Note, you may do so even when B has not picked up the consultation call
yet (such as it is in ringing back phase) to perform a call-transfer; and this is the
【
A / B】,
so-called Semi-attended transfer or ring-transfer.
z (Optional) Alternatively, you may press 【Conference】to hold a 3-way conference
with A and B instead of transferring A to B.
Alternatively, you may do a consultative transfer as follows:
z Take an incoming call from party-A on【A Channel】.
z Get an empty channel by pressing 【B Channel】to perform a call switch (effectively
put A on hold), then make an outbound call to party-B.
z After talking to party-B, you decide to transfer A to B, press 【XFER】 on 【B
Channel】 to perform a call-transfer. Note, you may do so even when B has not
picked up the consultation call yet (such as it is in ringing back phase) to perform a
call-transfer; and this is the so-called Semi-attended transfer or ring-transfer
z However, if you decide to host a conference among party-A and party-B rather than
[47/100]
Page 48

IP SIP Phone v2 User’s Guide Mar. 2005
transfer from call-A to call-B, you should press【Conference】to conference both
parties in.
9.4.2. Blind Transfer
Follow the following steps to do a blind transfer: transfer the call without asking the
transferring target first.
z Set up a connected call to party-A
z Press【XFER】to put A on hold and gain dial-tone.
z Dial the target number of party-B without an ending 【#】; instead, you SHOULD
press 【XFER】 immediately to transfer party-A to party-B; alternatively, you MAY
just hang up (on B-channel) as soon as finishing dialing B’s number without an
ending【#】.
z (Optional) During dialing phase, if you decide not to transfer but to take back
party-A, press 【FLASH】to abandon blind transfer and take back A (alternative, you
may press 【A/B Channel】to cancel blind transfer and take back A as well).
Note, if you press
transfer.
Alternatively, you may do a blind transfer as follows:
z Take an incoming call from party-A on【A Channel】.
z Get an empty channel by pressing 【B Channel】to perform a call switch (effectively
put A on hold), and gain dial tone.
z Dial the target number of party-B without an ending 【#】; instead, you SHOULD
press 【XFER】 immediately to transfer party-A to party-B; alternatively, you MAY
just hang up (on B-channel) as soon as finishing dialing B’s number without an
ending【#】.
Note, you can not transfer two inbound calls to each other. Instead, you can blindly
transfer each call to a third party. On which time, the channel LED in question,
will be red (v.s. green).
【】
# to finish dialing, it behaves just the same as consultative
【
A / B】,
9.4.3. Phone Locked
Under station lock, you can receive calls but not making calls. Moreover, you cannot perform
call transfer either. The phone will show the following alarm to warn you:
[48/100]
Page 49

IP SIP Phone v2 User’s Guide Mar. 2005
S t a t i o n l o c k e d !
U n l o c k f i rst.
9.5. Conference
IP SIP Phone supports Ad Hoc 3-way local conference.
The 【Conference】 key on phone set allows the user to set up a conference call with a
number of people. To set up a conference call:
z Call the first person and press the 【Conference】 button to create a conference, on
which time the red LED of 【Conference】 will be on, indicating that the a conference
has been created.
z Call the second person and press the 【Conference】 button to add the second caller to
the conference, on which time the green LED of 【Conference】 would be on,
indicating that a 3-way local conference has been set up. Otherwise the 【Conference】
led will be off if it failed to create a 3-way local conference.
z Repeat until all callers are added to the call. To conference in additional callers, the last
person called with an IP SIP Phone can call an additional person, that new person can
then call someone else, and so on. This is called “daisy-chaining.
z (Optional) To tear down the 3-way local conference, press 【FLASH】to stop voice
mixing and separate them into two independent calls.
Note: During a conference, an auditable tone will be played regularly from the hosting phone
to notify all parties that a conference is un dergoing. The alerting tone is as the same as
the hold-recall tone and the alerting interval is identical to the hold-recall interval set in
“5. Preferences” / “3.Hold recall”.
9.5.1. Heuristics and constraint
IP SIP Phone supports only 3-way local conference, and it takes some heuristics on hosting a
conference:
【】
z Case 1: if you are talking to
a.
The red LED of Conference will be on if a conference can be created.
b. IP SIP Phone will switch to another available channel and wait for user dials out. them.
【】
A Channel while pressing
【】
Conference :
c. After setting up another call successfully, this new call will be added into the
conference automatically if a conference can be hosted.
d.
Otherwise, the red LED of Conference will flash for a while to indicate a
conference cannot be set up properly. This may due to th e fact that both connect ed
parties demand a low bit-rate compressed voice CODEC, such as G.723.1(A) or
G.729 (A/B), and thus a conference cannot be held between them since the low
bit-rate compressed voice CODEC is shared between them (IP SIP Phone equips with
only one hardware low bit-rate G.723/G.729 CODEC).
【】
[49/100]
Page 50

IP SIP Phone v2 User’s Guide Mar. 2005
z on Case 2: you have two calls at hand already, and you press
active channel:
a. The green LED of
among them.
Otherwise, the red LED of Conference will flash for a while to indicate a
b.
conference cannot be set up properly. Thi s may due to the fact that both connect ed
parties demand a low bit-rate compressed voice CODEC, such as G.723.1(A) or G.729
(A/B), and thus a conference cannot be held between them since the low bit-rate
compressed voice CODEC is shared between th em ( IP SIP Phone equips with only one
hardware low bit-rate G.723/G.729 CODEC).
c.
Note: When a conference is undergoing, IP SIP Phone will take or receive no more calls (just
like in busy state).
【】
Conference will be on if IP SIP Phone can host a conference
【】
【】
Conference on either
9.5.2. Conference Tips
z Once the conference call initiator disconnects, the calls are terminated between all parties.
z To disconnect a specific party in a three-way local conference, you may ask the party to
whom you want to disconnect to hang up first. Alternatively, you may press 【FLASH】 to
tear down the conference and separate them into 2 independent calls first, then disconnect
each of them as your wish.
z To place a conference call on hold, press the 【HOLD】 key. The other parties can not talk
among themselves. To avoid disrupting the other callers, consider muting the call instead.
To mute the call, press the 【MUTE】 button.
z To place a conference call on speakerphone, press 【SPK】.
z Press 【MUTE】 to mute the speakerphone. The conference parties cannot hear you but you
can hear them.
z The phone only allows three parties in a conference call.
z Call waiting calls cannot be conferenced in; the conferencing node must establish both legs
of the 3-Way conference.
z A holding call will be unhold automatically before adding into a conference. Besides, you
could put all parties on hold after setting up conference.
z Muting calls will be un-mute automatically before being conferenced in.
z You cannot perform transfer on conference calls.
z To conference in additional callers, the last person called with an IP SIP Phone can call an
additional person, that new person can then call someone else, and so on. This is called
“daisy-chaining.
[50/100]
Page 51
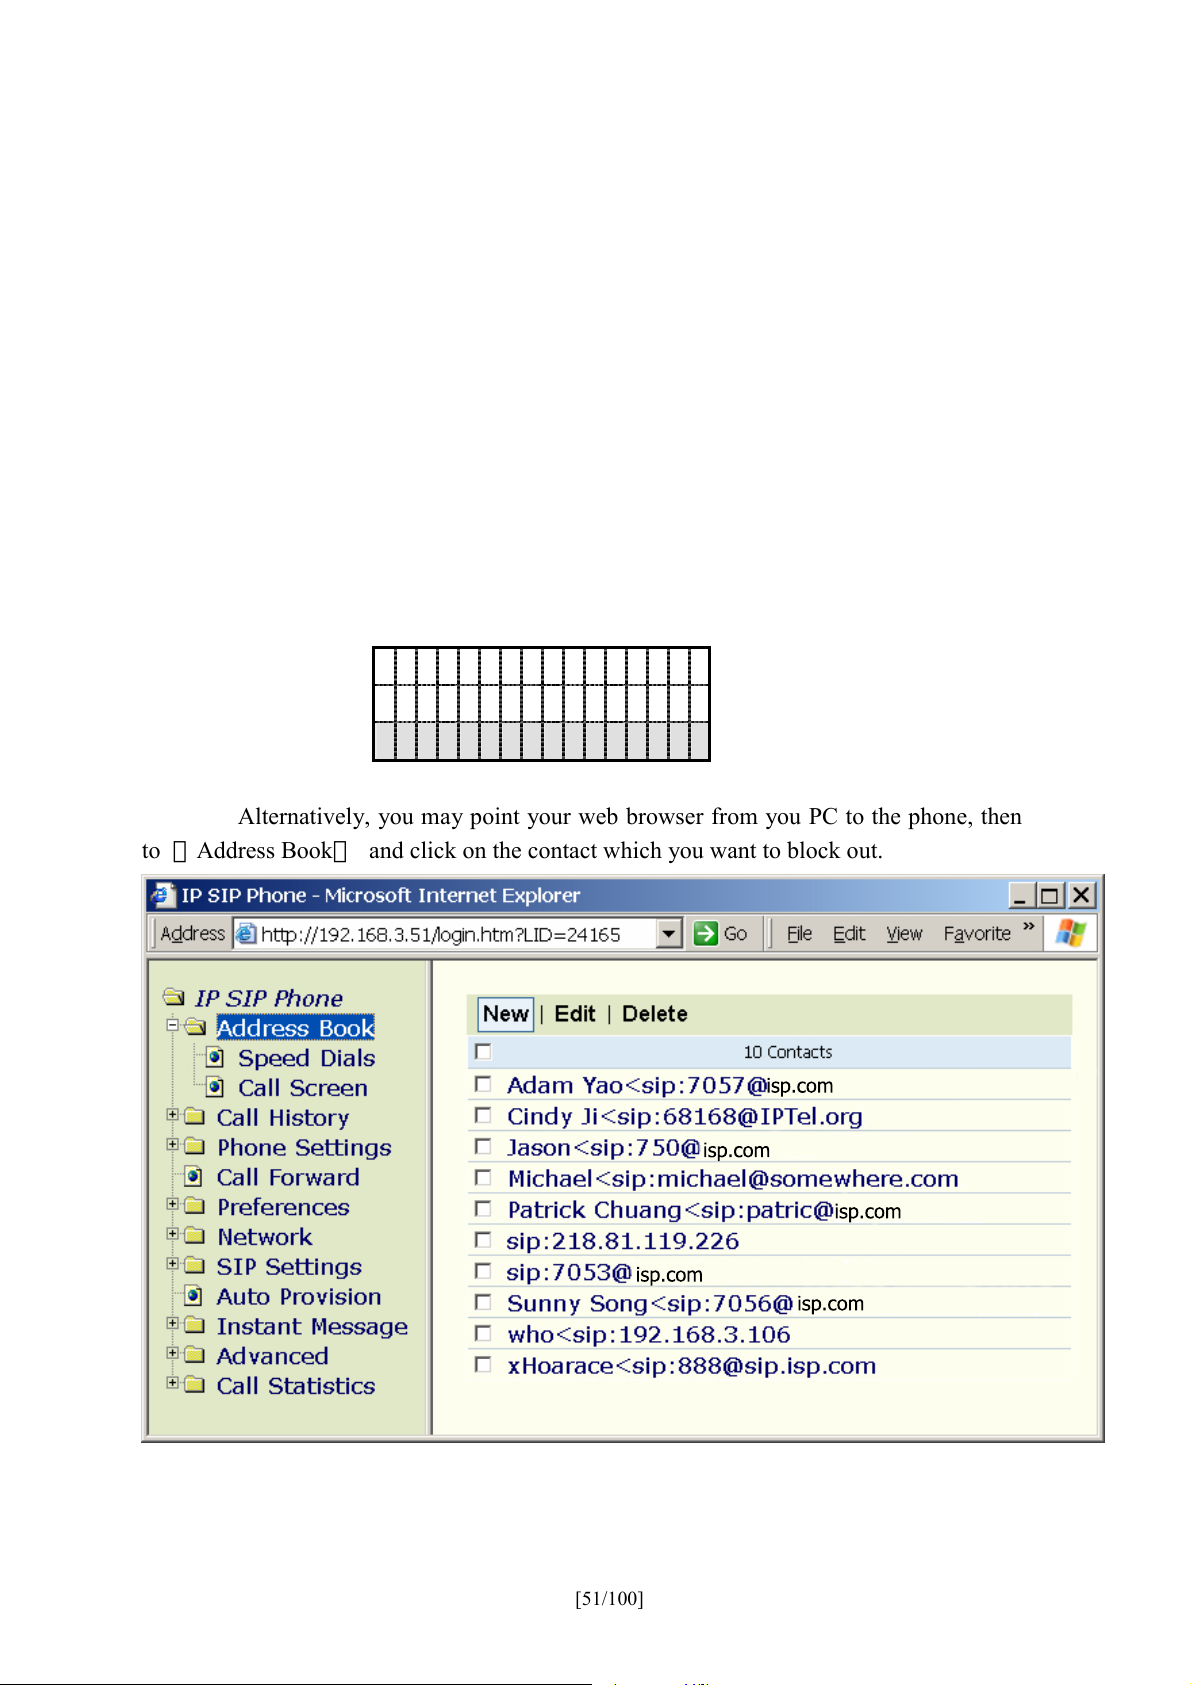
IP SIP Phone v2 User’s Guide Mar. 2005
9.6. Block Calls
IP SIP Phone can add entries on address book into blocking list and filter out calls from those
parties. On receiving calls from those parties, IP SIP Phone will drop them silently with a
response “480 Temporarily unavailable” (same as DND). Currently the max blocking list
capacity is 20.
1. Add entries into blocking list
a. Press
【】
FUNC +
【】
# to activate menu.
b. Go to submenu “1. Address book” / “1. Search”, and locate the party you want to
block.
c. Choose “screen call” to add it into blocking list (press
【】
HOLD again to toggle
between addition and removal).
1 . M o d i f y
2 . E r a s e
3 . S c r e e n c a l l s
Alternatively, you may point your web browser from you PC to the phone, then go
to 『Address Book』 and click on the contact which you want to block out.
isp.com
isp.com
isp.com
isp.com
Then click “Add to Call Screen” to add this contact into black list.
isp.com
[51/100]
Page 52
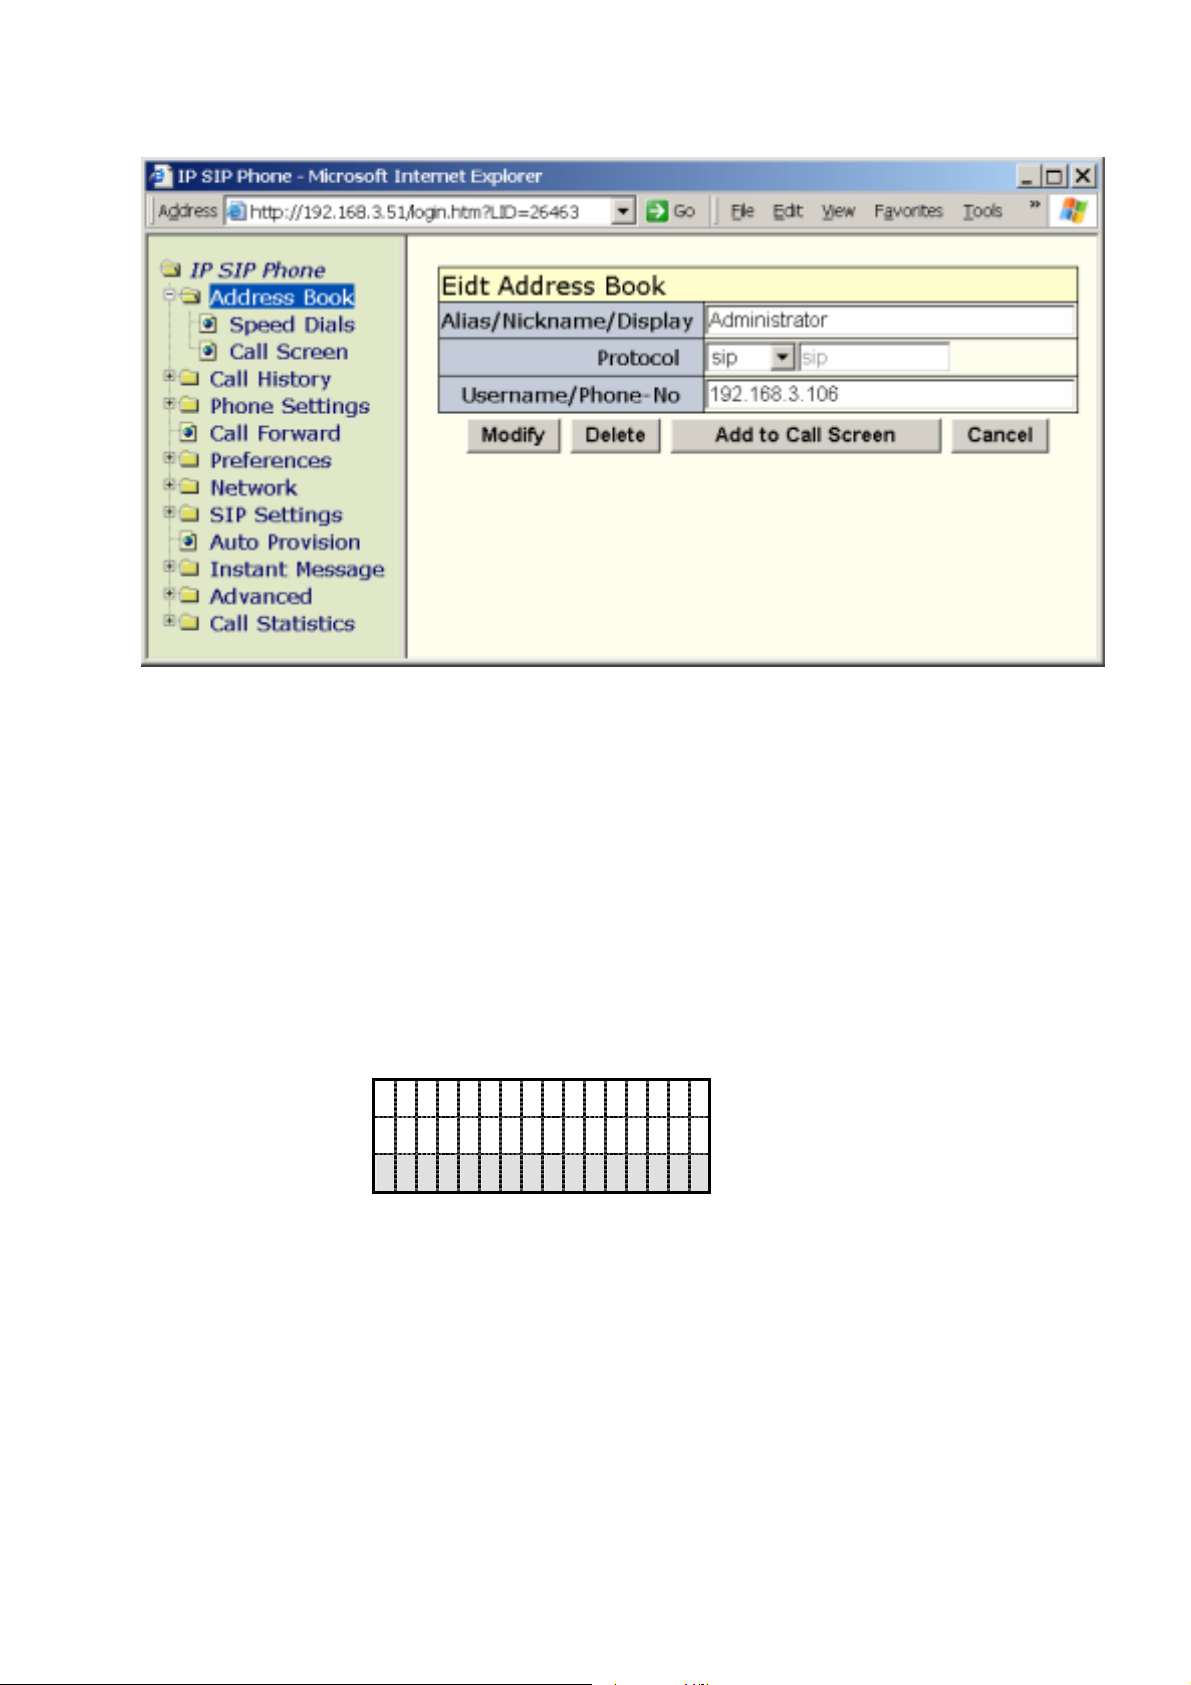
IP SIP Phone v2 User’s Guide Mar. 2005
2. View call records of screening parties
a. Press
【】
FUNC +
【】
# to activate menu.
b. Go to submenu “1. Address book” / “5. Call Screening”, and locate the entry you are
interested in from the list.
3. Remove entries from blocking list
a. Press
【】
FUNC +
【】
# to activate menu.
b. Go to submenu “1. Address book” / “5. Call Screening”, and locate the entry
you want to remove from the blocking list.
c. Choose “Revoke” to remove it from the blocking list.
1 . T i m e o f c a l l
2 . C a l l a t t e m p t s
3 . R e v o k e
Alternatively, you may point your web browser from you PC to the phone, then go to
『Address Book』/ 『Call Screen』to view and remove contacts from screening list.
[52/100]
Page 53
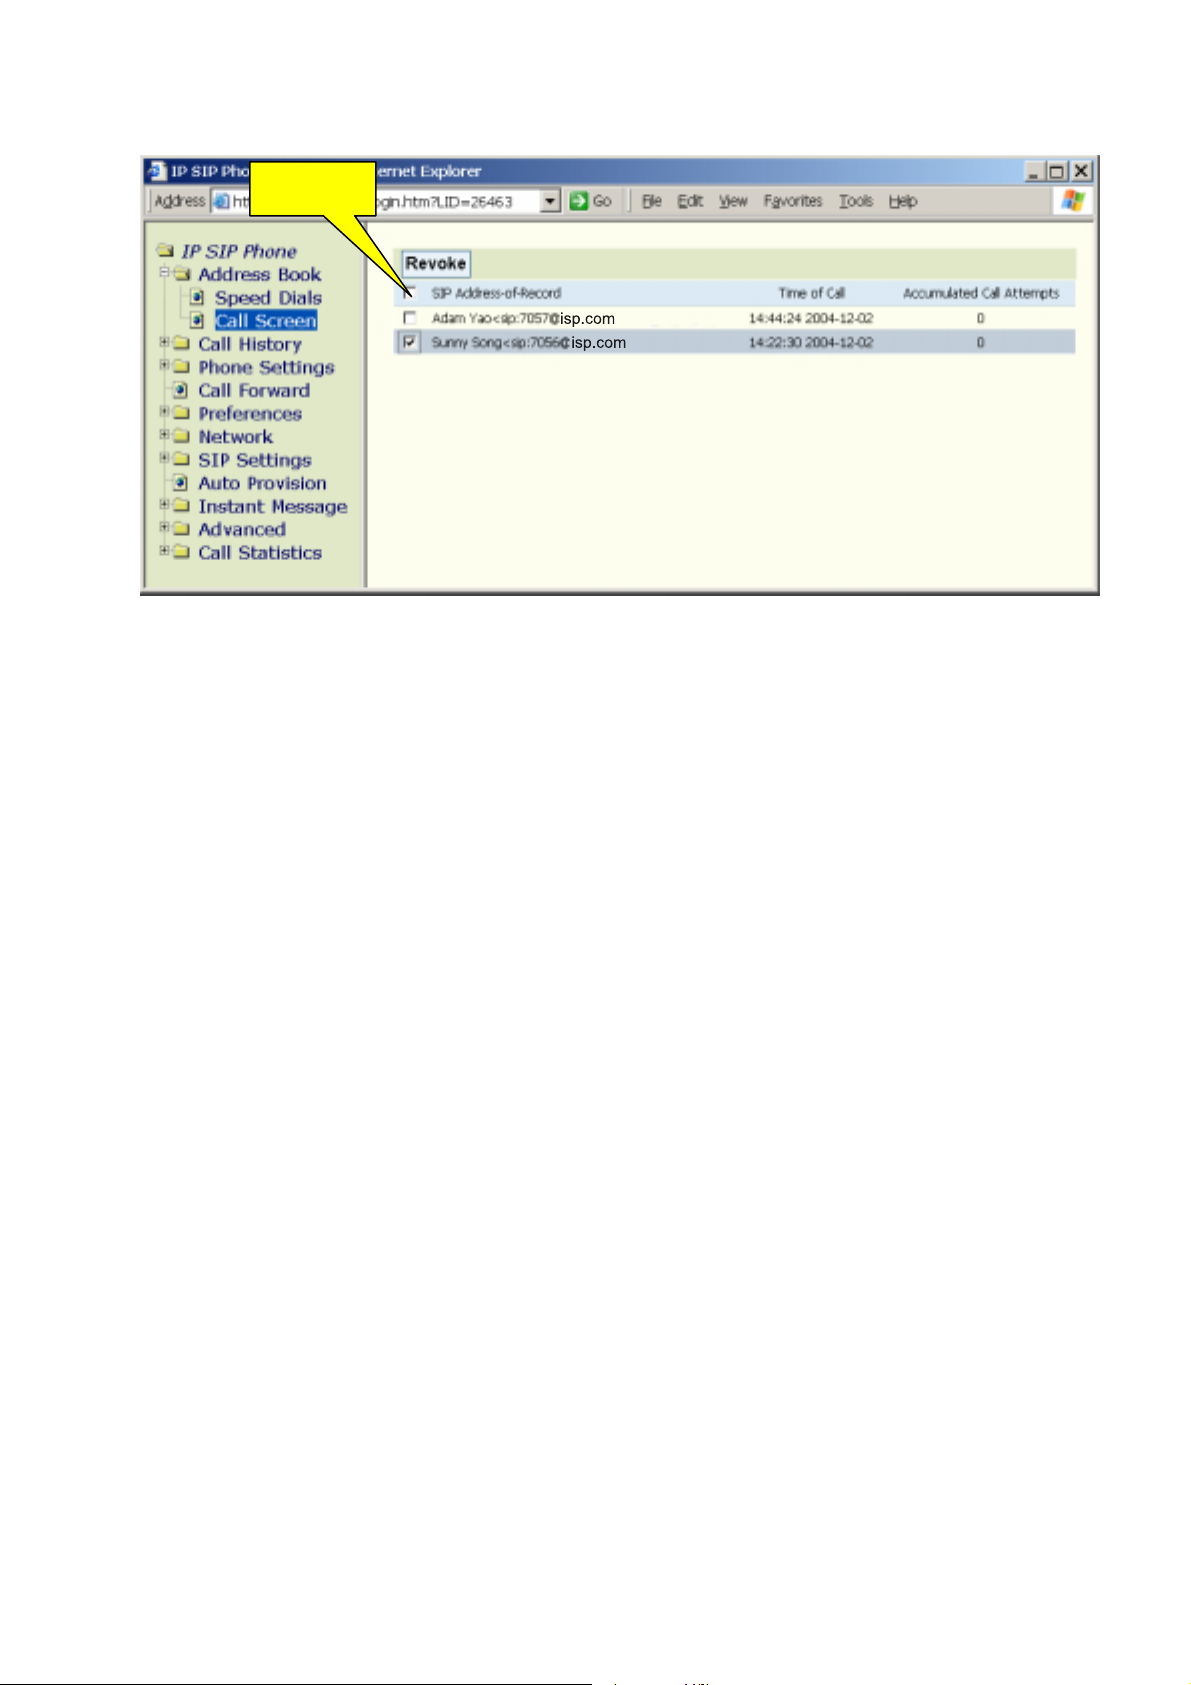
IP SIP Phone v2 User’s Guide Mar. 2005
Select All
isp.com
isp.com
[53/100]
Page 54
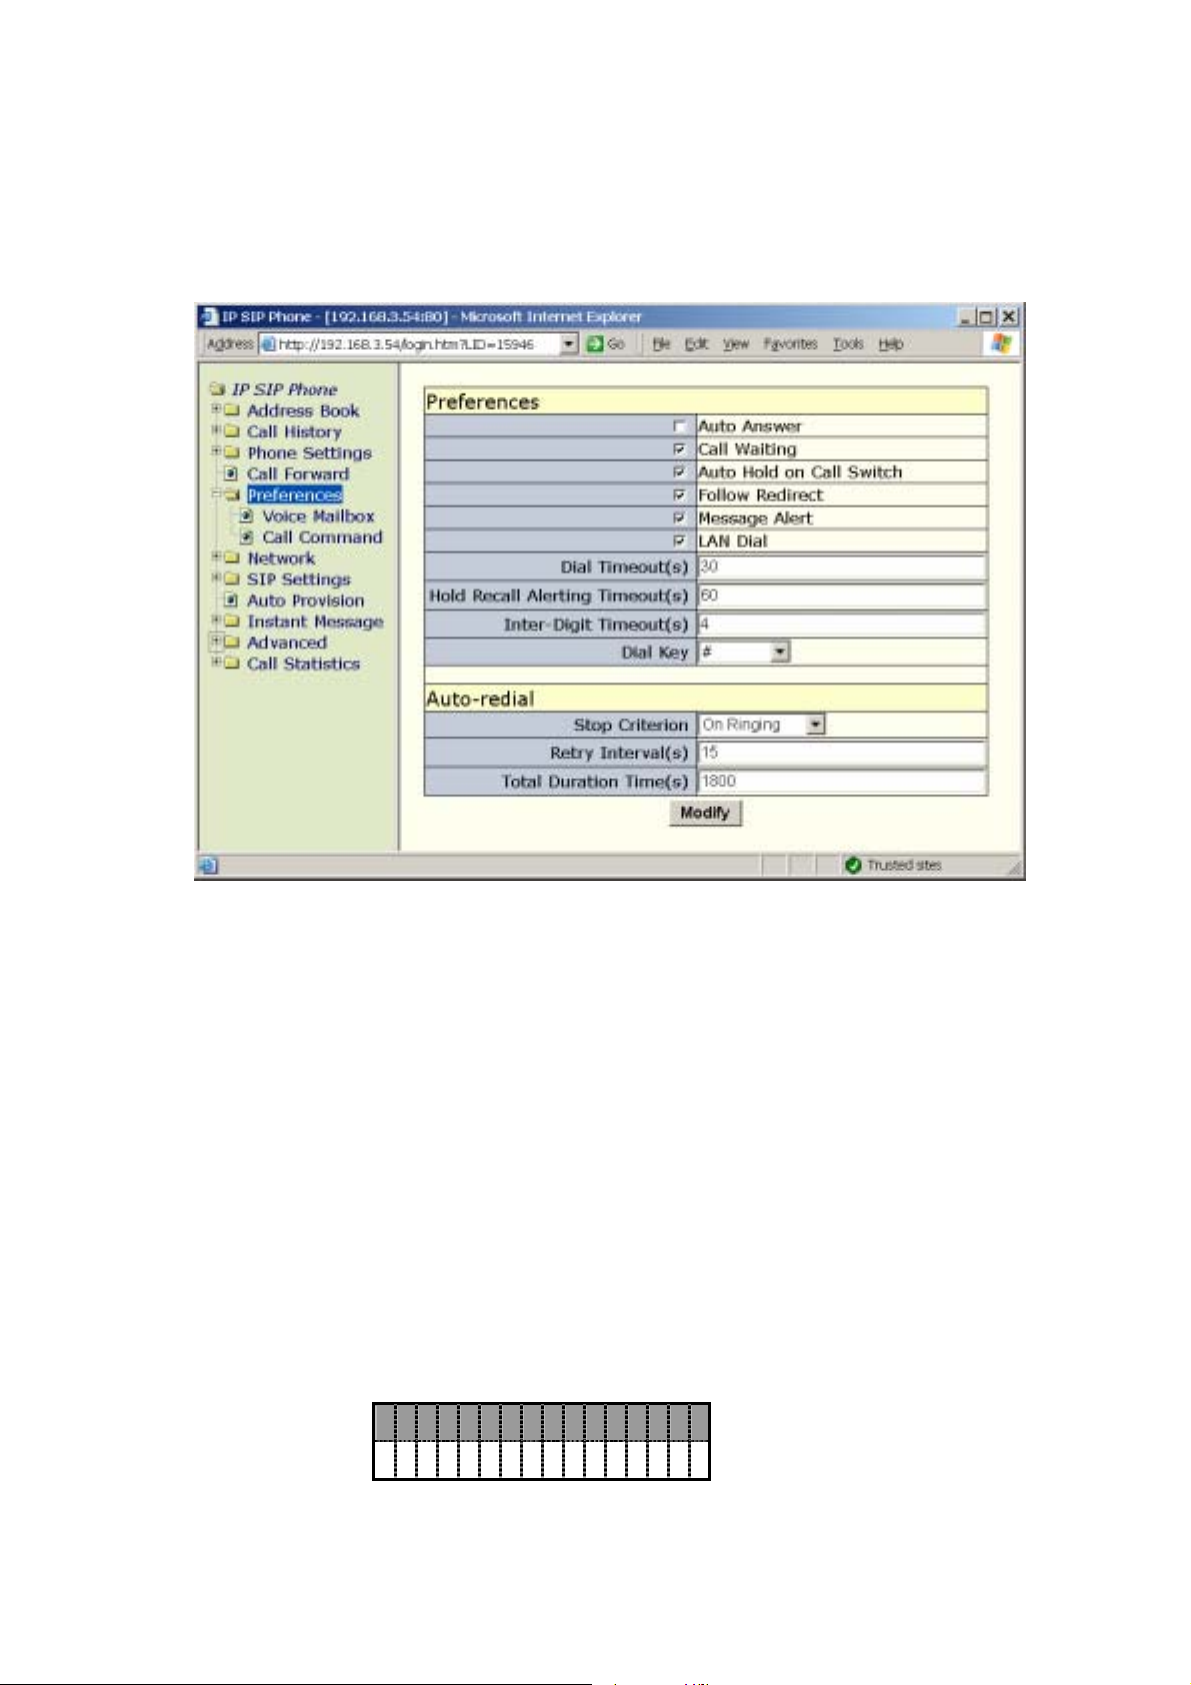
IP SIP Phone v2 User’s Guide Mar. 2005
10. Call Preference
You can configure personal preferences by pointing web browser to your terminal’s IP and
go to 『IP SIP Phone』 / 『Preferences』.
Subsections in this chapter illustrate how to configure it by keypad (TELNET).
10.1. Call Waiting
Call Waiting notifies the user, who is on an established call, that an additional external call
has been present and is “waiting to be answered.” The waiting call receives normal ringing until it
is answered, the incoming calling party abandons the call, or the ringing cycle timer expires, and
the call is given No-Answer-Forward treatment (if applicable).
When the user has engaged in a call, and some new incoming calls are waiting for answer, the
phone will play an auditable tone twice in 7 seconds to alert the user on active channel and the
indicator LED will fast blink as well. You could change this setting such that the phone will
decline an incoming call by a “486 Busy Here” while you are busy.
【】
a. Press
b. Go to submenu “5. Preferences” / “1. Call Waiting”.
c. Configure to enable or disable the alerting auditable tone.
FUNC +
【】
# to activate menu.
1 . E n a b l e d .
2 . D i s a b l e d
d. Alternatively, you may go to web page 『IP SIP Phone』 / 『Preferences』=> “Call
Waiting” to configure it.
[54/100]
Page 55

IP SIP Phone v2 User’s Guide Mar. 2005
System default is enabled.
10.2. Dial Timeout
You could configure the dialing timeout if no response (no ringing back) from the peer. If the
timer expires before the peer starts ringing back, it will play disconnect tone and prompt the user
“Dial timeout”.
System default is 30 seconds
To configure Dial timeout:
a. Press
b. Go to submenu “5. Preferences” / “2. Dial Timeout”.
c. Set the timer.
d. Alternatively, you may go to web page 『IP SIP Phone』 / 『Preferences』=> “Dial
【】
FUNC +
Timeout (s)” to configure it.
【】
# to activate menu.
D i a l i n g T i m e o u t :
[ 1 0 - 6 0 0 ] s e c 3 0
10.3. Hold Recall
When some calls are put on hold, the phone will play an auditable tone regularly to alert user
on active channel and the indicating LED will blink as well. The default alerting interval is 60
seconds. Besides, the phone will start ringing if the handset is placed on-hook and there is a call
currently on hold.
Note: During a conference, an auditable tone will be played regularly from the hosting
phone to notify all parties that a conference is undergoing. The alerting tone is as
the same as the hold-recall tone and the alerting interval is identical to the
configured hold-recall interval.
The alerting process is as following:
(A) User are in on-hook state:
i. The phone will ring.
ii. The green LED of
iii. The recall state continues ‘till user picks up the call. However, if user does not
answer the call within 1 minute, the call will be disconnected.
(B) User are in off-hook state, either engaged in other calls or about to making calls:
i. The green LED of
ii. Play hold recall tone once to remind the user that some calls are in hold.
iii. Reset the hold recall timer for next time alarm.
To configure the alerting interval:
a. Press
b. Go to submenu “5. Preferences” / “3. Hold Recall”.
【】
FUNC +
【】
A Call flash fast.
【】
A Call flashes slowly but the ringer does not ring.
【】
# to activate menu.
[55/100]
Page 56
IP SIP Phone v2 User’s Guide Mar. 2005
c. Set the interval.
A l a r t I n t e r v A l :
[ 1 0 - 6 0 0 ] s e c 6 0
d. Alternatively, you may go to web page 『IP SIP Phone』 / 『Preferences』=>
“Hold Recall Alerting Timeout (s)” to configure it.
10.4. Auto Hold on Call Switch
Enable the “Hold on call switch” feature will automatically put calls on hold whenever the
user performs call switch by pressing 【A / B / 】C Call . If this feature is disabled, the phone treats
call-switch as disconnection signal: hanging up the active call then switch to designated call.
Note: Press the button standing for current call has no effect, such as pressing
during A-line is active has no effect.
To configure Dial timeout:
a. Press
b. Go to submenu “5. Preferences” / “4. Hold on Switch”.
c. Set your preference.
d. Alternatively, you may go to web page 『IP SIP Phone』 / 『Preferences』=> “Auto Hold
System default is enabled.
【】
FUNC +
on Call Switch” to configure it.
【】
# to activate menu.
1 . E n a b l e d .
2 . D i s a b l e d
【】
10.5. Auto Redial
You can configure when to stop auto-redial (once activated) by going to 【MENU】=>
“5.Preferences” / “ 5.Auto-Redial” / “1. Stop Criterion” to specify the stop criterion:
1 . R i n g i n g
A Call
2 . C o n n e c t E d
1. Only when the peer starts ringing back will auto-redialing stops (Default).
2. Only when the peer picks up will auto-redialing stops.
When you dial a number and fail to reach the peer, you will hear a busy tone. You can press
【Auto-redial】 to activate this feature. When the auto-redial is in progress, the corresponding
LED will be on, and it will re-dial the failed number ‘till the stop criterion is met or this feature is
canceled. To cancel auto-redial manually, press 【Auto-redial】again. This feature will be
automatically canceled if either the stop criterion is met or the total activation duration is
expired.
The total activation duration is configurable by 【MENU 】=> “5.Preferences” /
“ 5.Auto-Redial” / “3. Total Duration”. Default is 1800 seconds (30 minutes).
[56/100]
Page 57

IP SIP Phone v2 User’s Guide Mar. 2005
A c t i v a t i o n t i m e :
[ 3 0 - 8 6 4 0 0 ] 1 8 0 0
To avoid overflow the network with redial retries, the phone will wait a gap between each
redial (default is 15 seconds). You can configure this redial interval from【MENU】=>
“5.Preferences” / “ 5.Auto-Redial” / “2.Retry Interval”.
R e d i a l I n t e r v a l
[ 1 - 2 5 5 ] s e c 1 5
Alternatively, you may go to web page 『IP SIP Phone 』 / 『Preferences』=>
“Auto-redial” to configure it.
10.6. Silently Follow Redirection
You can configure the phone to ask user to confirm the redirection before continuing calling
attempts. For example,
F WD t o x y z@somew
( 1 = Y , 2 = N ) 1
It will stop making calls whenever it is redirected to somewhere else and the user choose not
to accept the redirection such that the outbound calls are more secure. On the contrary, you may
configure it to automatically follow those redirections until the target number is reached or a loop
(ping-pong redirect) is detected.
The default is to silently follow the redirections on making calls without user’s interference.
To configure Silently Follow Redirection:
【】
a. Press
b. Go to submenu “5. Preferences” / “6. Accept Divert”.
c. Configure “Accept” or “Reject” redirections on making calls.
d. Alternatively, you may go to web page 『IP SIP Phone』 / 『Preferences』=>
“Follow Redirect” to configure it.
FUNC +
【】
# to activate menu.
10.7. Dial Plan
10.7.1. Inter-Digit Timeout
You can configure the inter-digit timeout while dialing numbers. The default is 4 seconds. If
you dial the alphabets very often, such as URL, then you may increase the inter-digit timeout to,
say, 6 seconds. While making calls, the first digit timeout is 15 seconds, and the inter-digit timeout
after the first digit is defined here. The phone will dial out the collected digits on timer expired.
To speed up the dial process, press
To configure inter-digit timeout:
a. Press
b. Go to submenu “5. Preferences” / “7.Dial Plan / “1. Inter-Digit”.
【】
FUNC +
【】
# key whenever finishing dial.
【】
# to activate menu.
[57/100]
Page 58

IP SIP Phone v2 User’s Guide Mar. 2005
c. Enter the preferred inter-digit timeout, measured in seconds.
I n t e r - D i g i t T i m e
[ 3 - 9 ] s e c o n d s 4
d. Alternatively, you may go to web page 『IP SIP Phone』 / 『Preferences』=>
“Inter-Digit Timeout (s)” to configure it.
System default is 4 seconds.
10.7.2. Dial key
You can configure which key denotes the end of a dialing string (exclusive). You may use
the pound sign, 【#】, the flash button, 【FLASH】, or assign a DSS key as “Dial key”.
Default is the pound sign,【#】
To configure the “Dial-key”:
a.
b. Go to submenu “5. Preferences” / “7.Dial Plan / “2. Dial Key”.
c. Pick your favorite dial key.
d. To enable “4. DSS Dial key”, you SHOULD map one of the DSS keys
e. Alternatively, you may go to web page 『IP SIP Phone』 / 『Preferences』=> “Dial
【】
Press FUNC
1 . P o u n d K e y : #
2 . S t a r K e y : *
3 F l a s h K e y : &
4 . D S S : D i a l K e y
(【F1】~【F8】) as 【Dial-key】from 【MENU】=> “3.Phone Settings” / “2.
DSS Features”. For example, you may 【F4】as 【Dial-Key】by picking “Dial
Key” on 【F4】.
Note, the DSS dial key will function as well even you pick
【
FLASH】 as dial key.
Key” to configure it.
【】
+ # to activate menu.
【#】, 【*】
or
10.7.3. LAN Dial
You can configure whether a dial string starting with a star, ‘*’, key signals a LAN dial. For
example, if your IP is “192.168.3.10” and you want to make a direct IP call to another host (either
a phone-set or a PC) which IP is “192.168.3.20”, you may dial “*20” to make a call to it. To
specify the UDP port, you may dial “*20**9999” to call to “192.168.3.20:9999”.
Generally, to make LAN dial, you should use a star sign, ‘*’, as a dot, ‘.’; and double stars,
“**”, as a colon, ‘:’, to specify the UDP port the callee listens on. Besides, you may specify the last
1, 2 or 3 fields of the peer’s IP, plus additional port.
By default, this feature is enabled. You may want to disable LAN dial if it conflicts with some
dial numbers and/or you want to send those LAN dial strings “as is” (for example, “*123” may be
[58/100]
Page 59
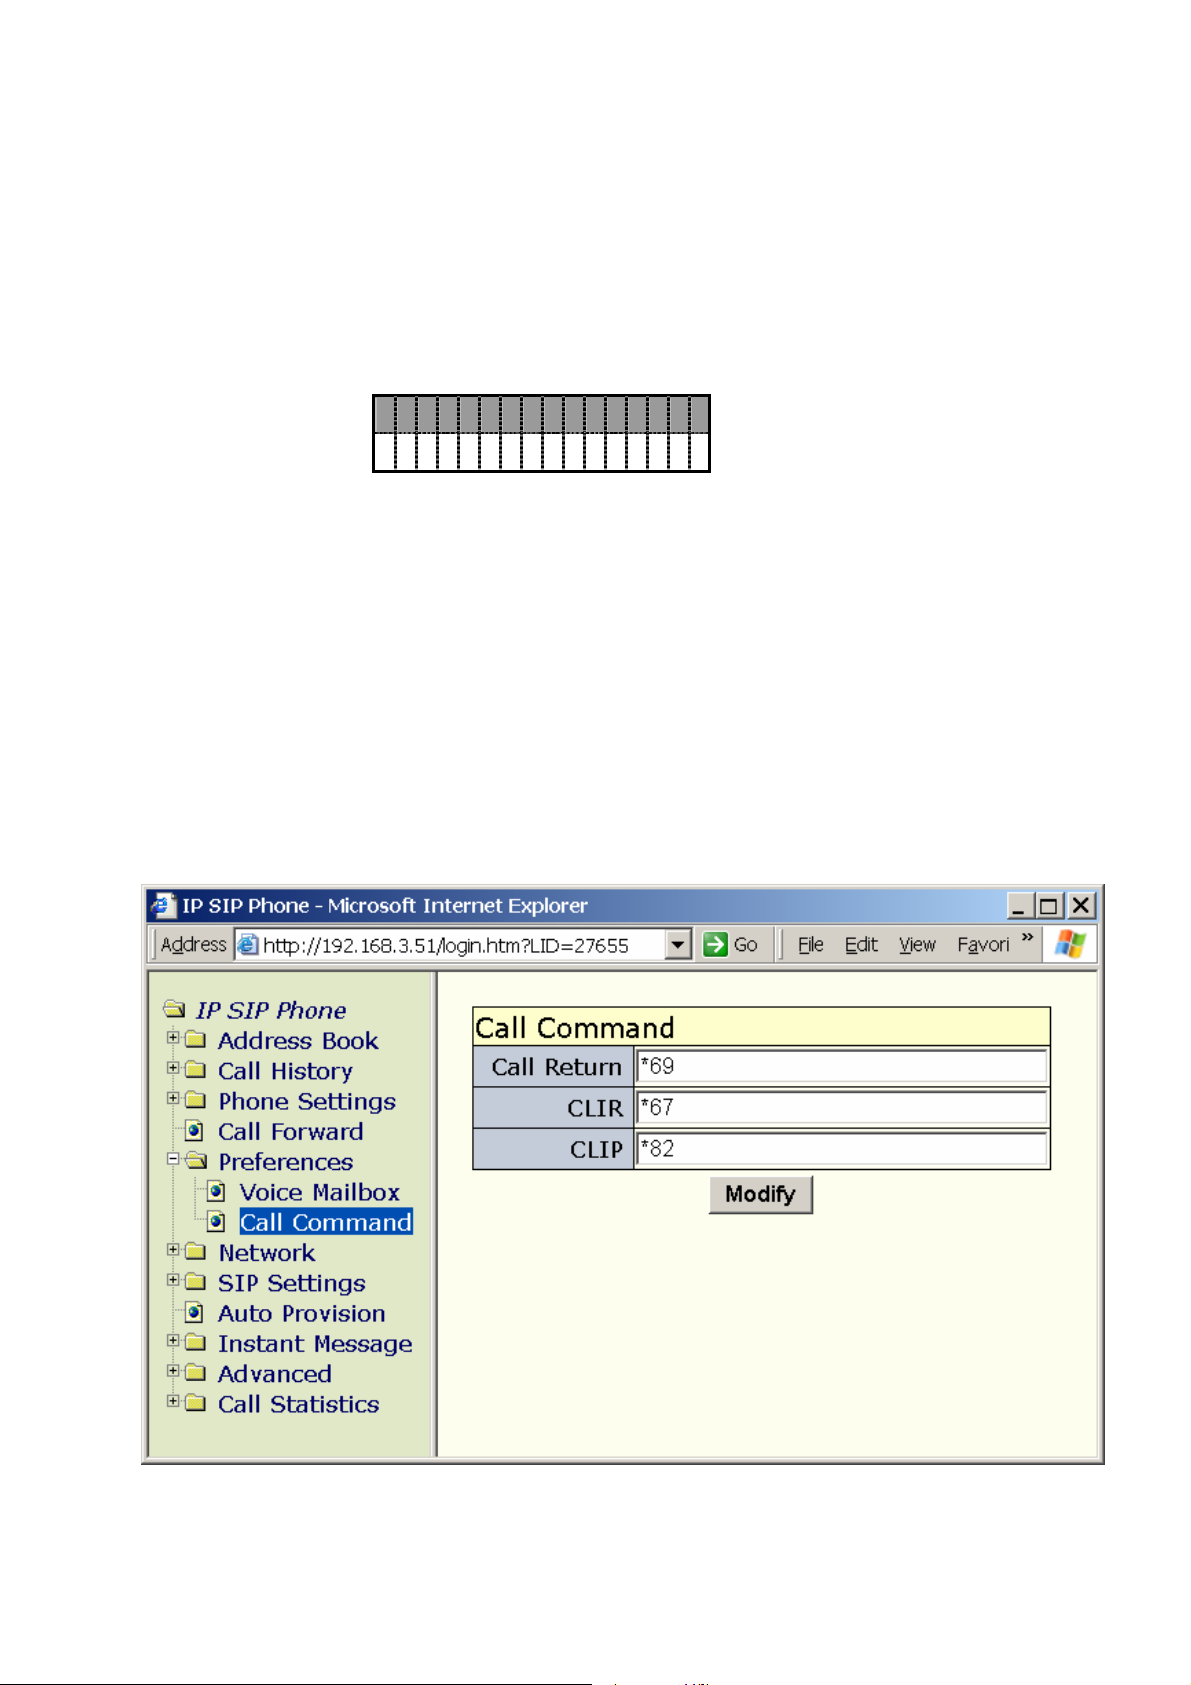
IP SIP Phone v2 User’s Guide Mar. 2005
reserved by ISP for server feature access).
Please refer to section 8.1 - “Dial Scheme” for LAN dialing, and section 12.5 - “Soft-Switch
(PBX) Feature Access”.
To disable this LAN dial feature:
a.
b. Go to submenu “5. Preferences” / “7.Dial Plan / “3. LAN Dial” to configure this
c. Alternatively, you may go to web page 『IP SIP Phone』 / 『Preferences』=> “LAN
Default is enabled.
【】
Press FUNC
feature.
1 . E n a b l e d .
2 . D i s a b l e d
Dial” to configure it.
【】
+ # to activate menu.
10.7.4. Call Command
You can configure various call commands, such as Calling Line Identification Restriction
(CLIR), or Calling Line Identification Presentation (CLIP), on a per call basis. Alternative, you
may change server feature access code to fit your local regulation, such as change the “Call
Return” access call from “*69” to “#69”.
You may point web browser to your terminal’s IP and go to page 『IP SIP Phone』 /
『Preferences』/ 『Call Command』 to configure available call commands.
Subsections below illustrate how to configure them by keypad (TELNET).
[59/100]
Page 60

IP SIP Phone v2 User’s Guide Mar. 2005
10.7.4.1. Call Return
Configure the code to access soft-switch feature: “call return”. Whenever your dial string
matched the specified call-return string, IP SIP Phone will send the dial-string “as is” (with SIP
domain appended) to the SIP proxy server, such as “sip:*[email protected]”, and depends on
proxy server to keep the latest call history for each user to cover the phone off-line interval.
To configure the access code:
a.
【】
Press FUNC
【】
+ # to activate menu.
b. Go to submenu “5. Preferences” / “7.Dial Plan / “4. Call Command” / “1. Call Return”.
c. Enter the call return access code to meet your local regulation.
C a l l R e t u r n : :
* 6 9
System default is “*69”.
Note: this is a server feature which replies on the SIP proxy server support. This differs
from the DSS “Call return”, which is a phone-set feature. If you map one of the DSS keys
(【F1】~ 【F8】) to “Call return” function, it will find the latest incoming calls from call history
of “Missed calls” and “Received calls” (which both are kept locally) then dial out the latest
incoming call number. By default, 【F8】is mapped to “Call return”.
10.7.4.2. Anonymous Call (CLIP & CLIR)
System default is to enable Calling Line Identification Presentation, CLIP, all the time. You
may enable the Call Line Identification Restriction, CLIR on a per-call basis by using the call
command dial string. To enable CLIR on a per-call basis requires that the dial string sequence
(typically *67) that users enter on their dial-pad prior to dialing the phone number match the
specified CLIR string defined in the call command. Whenever the prefix is detected in dial string,
it will be stripped off from the original dial string and send to proxy with CLIR enabled. The SIP
INVITE message sent by IP SIP Phone would look like:
INVITE sip:[email protected] SIP/2.0
Via: SIP/2.0/UDP 192.168.3.253:5060;branch=abc7801
Via: SIP/2.0/UDP 192.168.3.51:5060
From: "Anonymous" <sip:[email protected]>;tag=22516
To: <sip:[email protected]>
Call-ID: [email protected]
CSeq: 1 INVITE
Contact: "Anonymous" <sip:[email protected]:5060>
User-Agent: IP-Phone/2.0
Content-Length: 171
Content-Type: application/sdp
[60/100]
Page 61
IP SIP Phone v2 User’s Guide Mar. 2005
v=0
o=m000dc300051 0 0 IN IP4 192.168.3.5
To configure the access code:
a.
【】
Press FUNC
【】
+ # to activate menu.
b. Go to submenu “5. Preferences” / “7.Dial Plan / “4. Call Command” / “2.
Anonymous Call”.
c. Enter your customized CLIR access code, following the destination number:
C L I R A c c e s s C o d e
* 6 7
Note: Once the CLIR activation code is detected, the RED channel LED (
【】
A/B Call
will be on (instead of the green one) to remind user that CLIR is currently on. To
cancel CLIR, you may hang on then restart the whole dial process or alternatively,
you may enter the CLIP activation code to counter CLIR.
System default activation code for CLIR is “*67”, and “*82” for CLIP.
10.8. Message alert
After sending an instant message or receiving a new message, the phone will play an
auditable tone to remind user. You can configure the phone whether the auditable tone should be
played or not.
a. Press
【】
FUNC +
【】
# to activate menu.
b. Go to submenu “5. Preferences” / “8.Message Alert”.
1 . E n a b l e d .
2 . D i s a b l e d
c. Alternatively, you may go to web page 『IP SIP Phone』 / 『Preferences』=> “Message
Alert” to configure it.
System default is enabled
10.9. Auto-Answer
If auto-answer feature is enabled when an incoming call arrives, the phone-set will play
distinguished auditable tone shortly, then answer the call by turning on speaker-phone (or headset
if it is enabled) on idle mode; otherwise proceed as a normal incoming call.
By idle, it means the phone-set is either engaging in no calls or putting a call on hold.
IP SIP Phone implements various ways to support auto-answer features:
i. Server-side invoked auto-answer for urgent calls:
Use of a private header “P-Auto-answer” in the initial INVITE message for the server-side
invoked auto-answer extension:
a. P-Auto-answer: normal
z Respond a “486 Busy Here” if all lines are occupied.
[61/100]
Page 62

IP SIP Phone v2 User’s Guide Mar. 2005
z Otherwise, auto-answer
(1)
this incoming call.
b. P-Auto-answer: urgent
z Dropped an inactive call if all lines are occupied.
z Put any on-going calls to hold and auto-switch to an available line if not idle.
z auto-answer
(1)
the newly arrived call.
c. P-Auto-answer: imperious
z Identical to “P-Auto-answer: urgent” except that the phone-set will
auto-answer this call even the do-not-disturb (DND) or all-calls-forward feature
has been activated.
Note, the header, “P-Auto-Answer”, and its keyword, “normal”, “urgent” or “imperious”, are
all case-sensitive.
ii. Phone-set locally configured to auto-answer all incoming calls unconditionally (suitable for
attendant in call center service).
a. Unconditionally auto-answer all incoming calls on idle mode can be achieved by either
configuring the global phone-set setting and/or map the auto-answer feature as a
programmable key.
b. To configure the global phone-set setting for auto-answer:
【】
Press FUNC
z
【】
+ # to activate menu.
z Go to submenu 『5. Preferences』 / 『9.Auto-Answer』.
1 . E n a b l e d .
2 . D i s a b l e d
System default is Disabled
c. Alternatively, you may configure this system-wide feature from web page 『IP SIP
Phone』 / 『Preferences』 => “Auto Answer”.
d. If you have mapped one of your DSS keys to “Auto-Answer”, press this DSS to toggle
auto-answer mode. Once enabled, the corresponding red LED of mapped DSS key will be
on, and the phone will auto-answer
(1)
all incoming calls arrive on idle mode. Besides,
unmap this DSS feature will turn off auto-answer configuration as well.
iii. Auto-Answer incoming calls arrive on specific registered SIP address-of-records.
For each service domain, you can configure to auto-answer all incoming calls to this SIP
account (<FROM> header in the initial INVITE message). This is particularly useful for
IP-PBX to implement broadcast feature. Alternatively this feature is also useful when the user
have 2 SIP accounts (or more), one for public and one for private use only, and he/she wants
to auto-answer all calls to his/her private account.
To configure the account-specific auto-answer feature:
z
z Go to submenu 『6. Network』/『2.SIP Settings』/『2.Service Domain』/『N
【】【】
Press FUNC + # to activate menu.
-th
[62/100]
Page 63
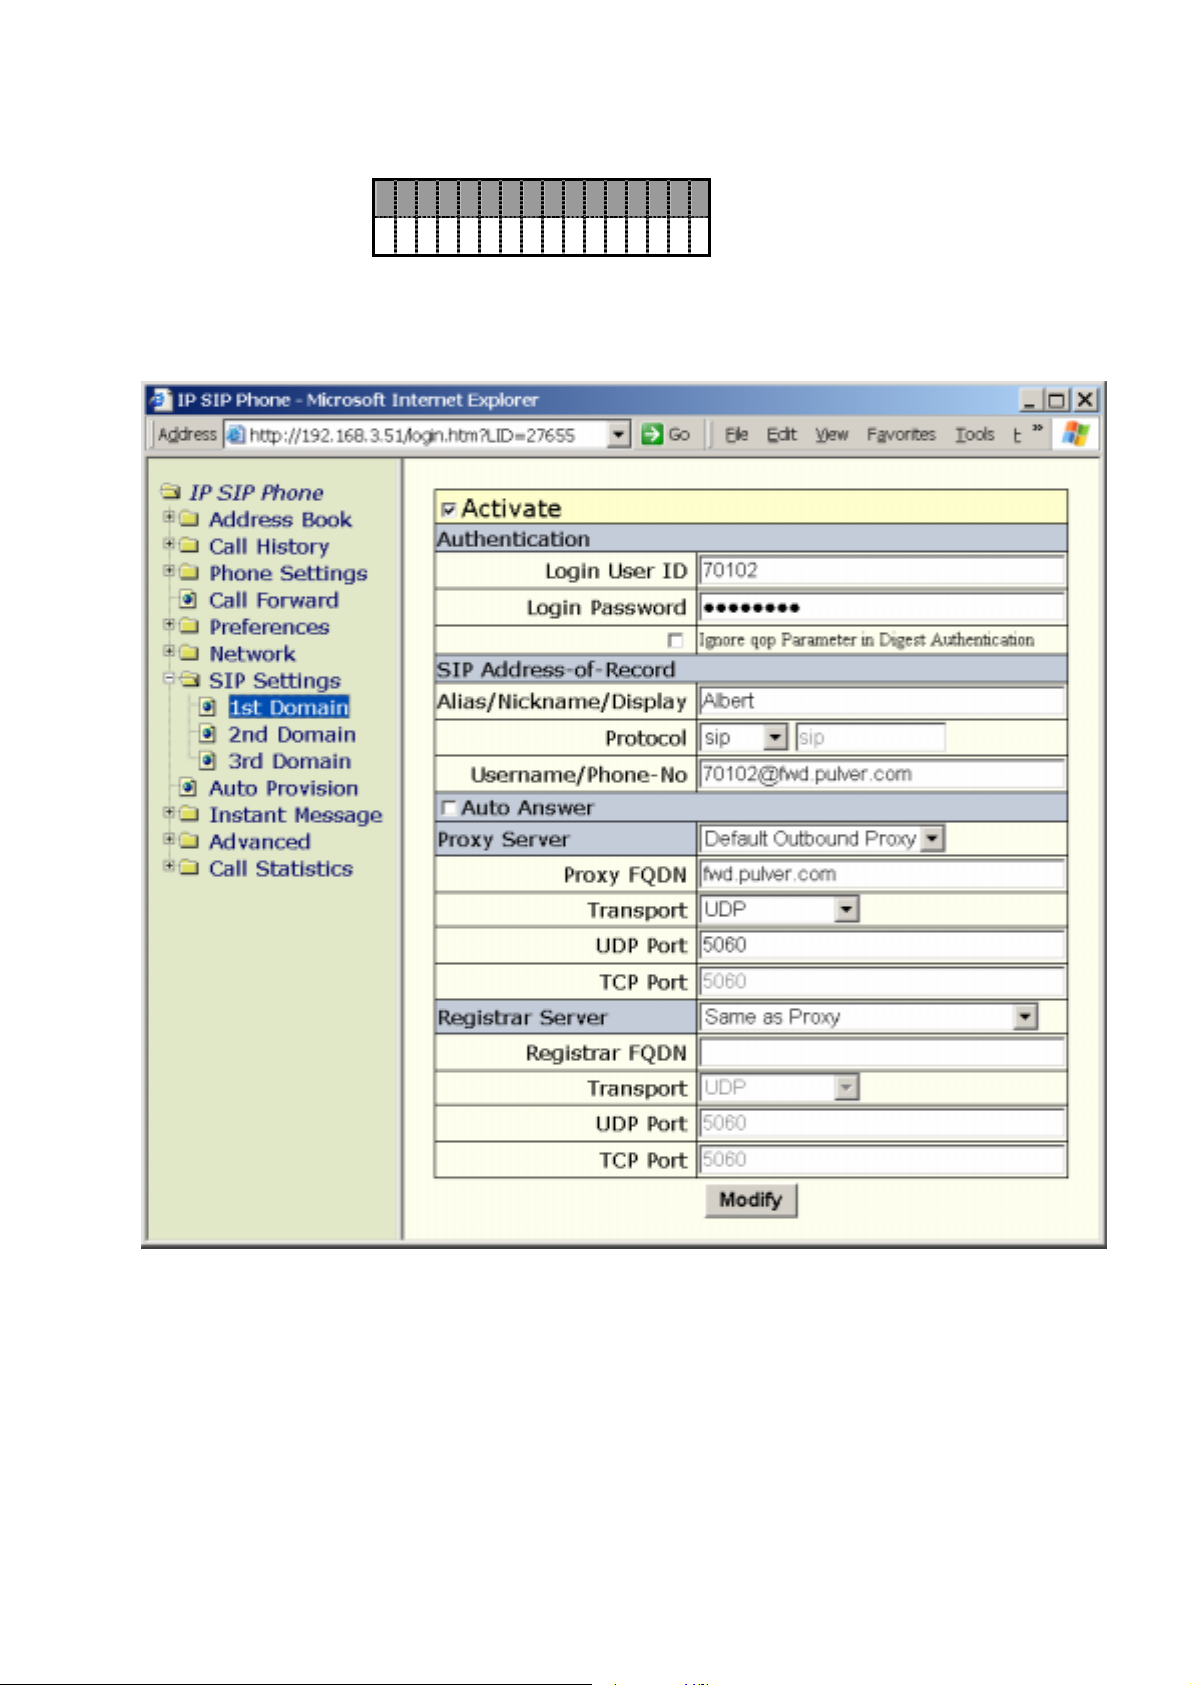
IP SIP Phone v2 User’s Guide Mar. 2005
Realm』 /『Auto-Answer』.
1 . E n a b l e d .
2 . Di s a b l e d
Default is Disabled.
z Alternatively, you may configure this account-specific feature from web page
『IP SIP Phone』 / 『SIP Settings』/ 『N
-th
Domain』 => “Auto Answer”.
a. Once enabled, all calls destined to this specific service account will be auto-answered on
idle mode.
b. This works even when the system-wide auto-answering is off.
z auto-answer
i. On idle mode, the phone-set will play a distinguished auditable tone shortly, then answer
(1)
operation:
the call by turning on speaker-phone (or headset if applicable). By idle, it either takes no
call or is putting a call on hold.
[63/100]
Page 64

IP SIP Phone v2 User’s Guide Mar. 2005
ii. Otherwise, proceed as normal incoming calls
z Incoming call processing rules (by precedence):
i. Check for the server-side invoked auto-answer feature, if “P-Auto-answer: imperious” is
present, auto-answer it.
ii. If the phone is engaged in do-not-disturb mode, then DND wins
iii. Otherwise, if the phone has turned on unconditionally forward feature, then all incoming
calls are forwarded.
iv. Check for auto-answer feature:
a. Check for server-side auto-answer feature.
b. Check for the global switch for auto-answer feature.
c. Match this call against all enabled service domains for auto-answering feature, if a
match is located, auto-answer it.
v. Otherwise, proceed as normal incoming calls.
10.10. CODEC Preference
The CODECs available on the phone includes G.711A (64kbps), G.711µ (64kbps), G.729A /
G.729AB (8 kbps), G.723.1 / G.723.1A (both 5.3 and 6.4 kbps). The default preference is to
prioritize them based on their compressed voice quality: the higher quality it is, the higher priority
it will be. That is, the default CODEC preference is G.711A, G.711µ, G.729A then G.723.1A (in
that order).
High quality comes in a price: it consumes more precious bandwidth. Take G.711µ for
example, it takes as much as 64 kbps per call, as opposed to 5.3 kbps if G.723.1A is employed.
Thus, if you have limited bandwidth for VoIP, you should consider prioritize those CODECs
come with lower bit-rates such that it will use the most preferred CODEC on making / taking calls.
You could also configure the default voice packetization transmitted to the peer:
z By keypad (TELNET):
a.
b. Go to submenu “8. Advanced” / ”1. CODEC” / “2.Packetization”.
c. Configure the default voice packetization transmitted from your IP SIP Phone to the
【】
Press FUNC
【】
+ # to activate menu.
peer.
z By web configuration:
a. go to 『IP SIP Phone』/ 『Advanced』 / 『CODEC』
[64/100]
Page 65
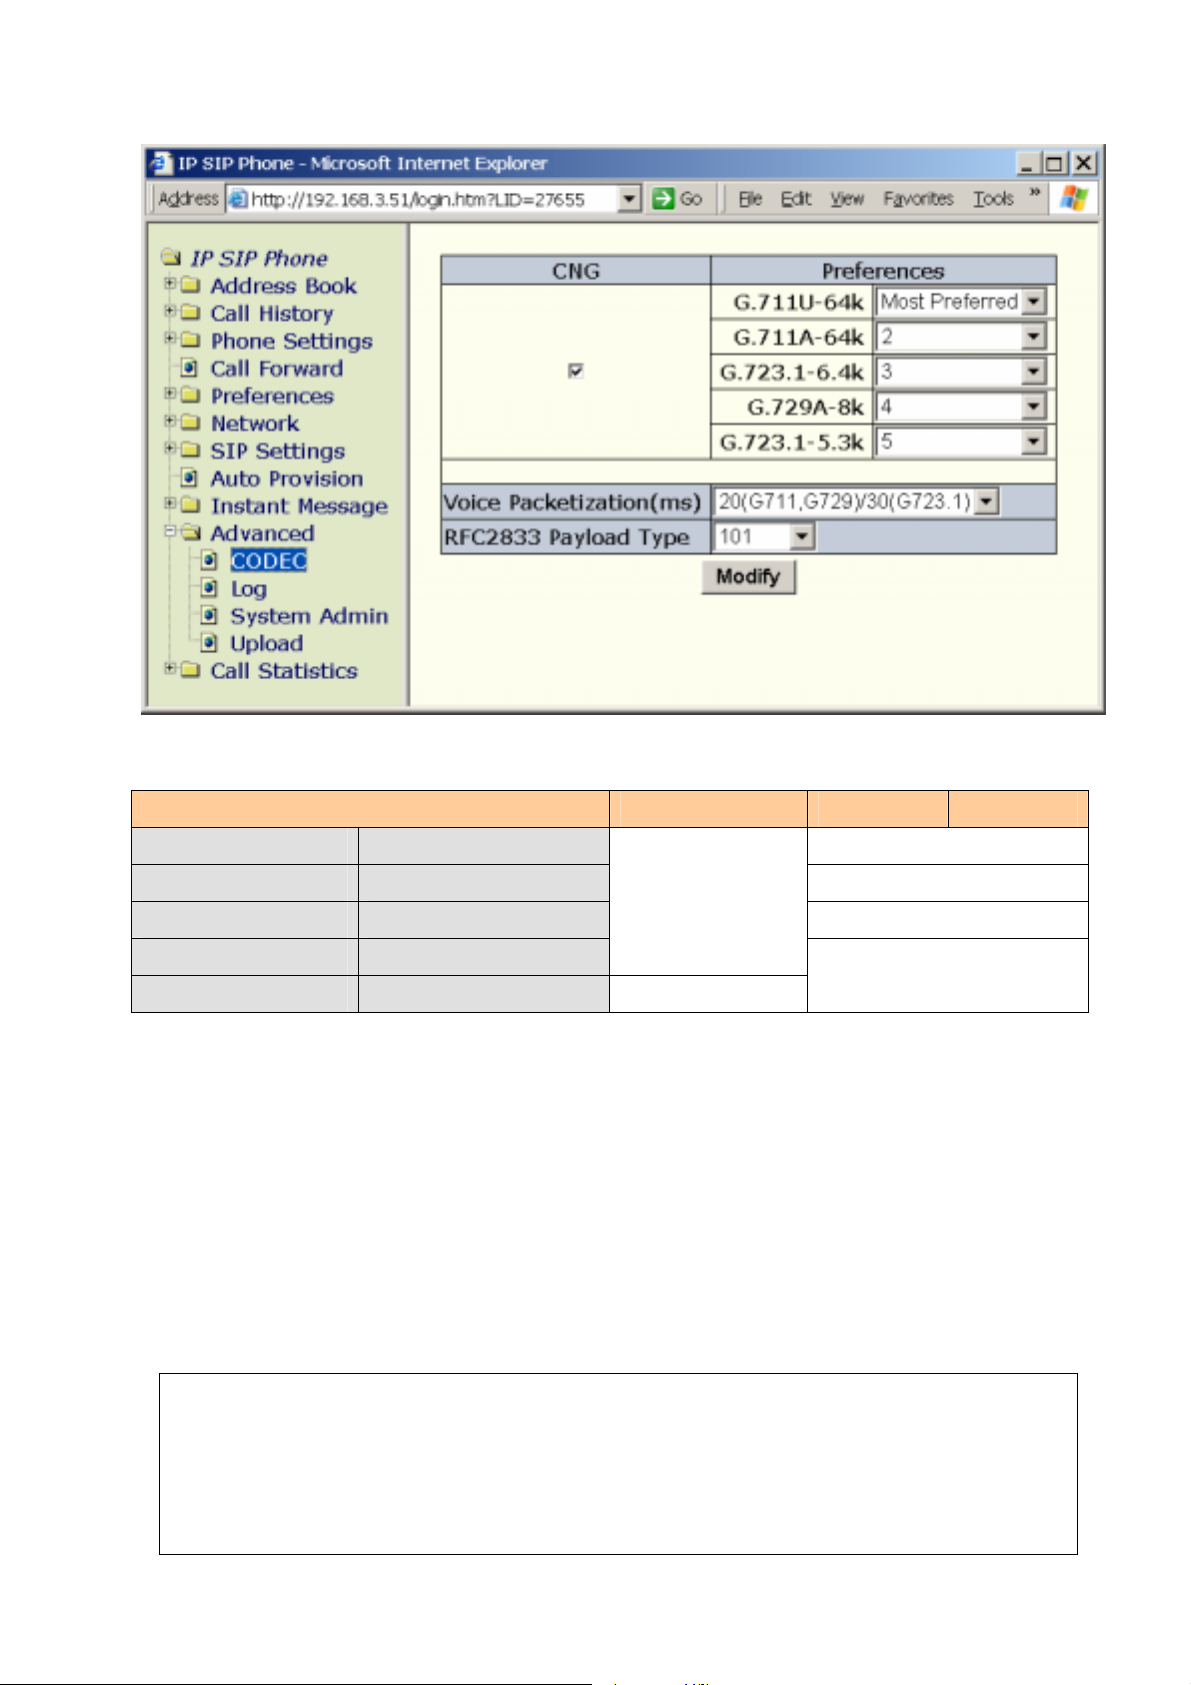
IP SIP Phone v2 User’s Guide Mar. 2005
The phone will adjust the audio frames carried per RTP packet (voice packetization) based
on this setting:
Voice Packetization
10/30(G.723.1)-ms LAN
20/30(G.723.1)-ms xDSL, ISDN
G.723.1 G.729A G.711
1 Frames (10 ms)
2 Frames (20 ms)
1 Frame (30 ms)
30-ms xDSL, ISDN, Cable
3 Frames (30 ms)
40/30(G.723.1)-ms 56 kbps MODEM
4 Frames (40 ms)
40/60(G.723.1)-ms Limited bandwidth
2 Frames (60 ms)
The default is “20/30(G.723.1)ms”: 1 audio frame (30 ms voice) per RTP packet for G.723.1
CODEC, and 2 frames (20 ms voice) per packet for all other CODECs such as G.729A and G.711.
Before changing this setting, please refer to the following table “Packet Rate and VoIP
Bandwidth Consumption” to find out the optimal value fit into your environment. We suggest a
reasonable packetization should NOT longer than 40 milliseconds. Pick the longer packetization
time unless you have a very limited bandwidth access at the expense of more latency.
Note: IP SIP Phone will dynamically adjust its voice packetization on a per call basis if the
“ptime” attribute is specified in the peer’s SDP. For example: if “a=ptime:10” is specified, the
IP SIP Phone will ignore the global voice packetization and adjust to the negotiated
packetization time:
INVITE sip:[email protected] SIP/2.0
Via: SIP/2.0/UDP 192.168.3.51:5060;branch=abc7801
From: 7751 <sip:[email protected]>;tag=22516
To: <sip:[email protected]>
Call-ID: [email protected]
[65/100]
Page 66

IP SIP Phone v2 User’s Guide Mar. 2005
CSeq: 1 INVITE
Contact: "7751" <sip:[email protected]:5060>
User-Agent: SIP-Phone/1.1
Content-Length: 171
Content-Type: application/sdp
v=0
o=m000dc300051 0 0 IN IP4 192.168.3.51
m=audio 5102 RTV/AVP 0 8 18
a=ptime:10
z VoIP Bandwidth
Packet rate is especially important for sizing a network against a router because routers
are not only constrained by bandwidth but the number of packets per second (PPS) that they
can process.
This table calculates the bandwidth consumption based on uni-directional voice only. So
for the total bandwidth used for media during a simple two-way call, you should multiply the
value by two.
CODEC
Frame per
RTP Packet
(Packet Rate)
IP
(kbps)
PPP
(kbps)
Link
Ethernet
802.3
Averaged
Delay
Band-width
(ms)
Utilization
Mean
Opinion
Score
(MOS6)
1 (35 pps7) 16.8 18.4 21.6 28% 37.5
2 (17 pps) 11.2 12 13.6 43.2% 67.5
G.723.1
3 (12 pps) 9.3 9.9 10.9 52.8% 97.5
3.5-3.7
5.3 kbps
4 (9 pps) 8.4 8.8 9.6 59.3% 127.5
5 (7 pps) 7.8 8.2 8.8 64.1% 157.5
6 (6 pps) 7.5 7.7 8.3 67.7% 187.5
1 (35 pps) 17.9 19.5 22.7 31.9% 37.5
2 (17 pps) 12.3 13.1 14.7 47.9% 67.5
G.723.1
3 (12 pps) 10.5 11 12.1 57.1% 97.5
3.8-4.0
6.4 kbps
4 (9 pps) 9.5 9.9 10.7 63.8% 127.5
5 (7 pps) 9 9.3 9.9 68.1% 157.5
6 (6 pps) 8.6 8.9 9.4 71.4% 187.5
G.729ab
1 (100 pps) 42 46.8 56.4 16.5% 15 3.7-4.2
6
Mean Opinion Score is very subjective and varies from one scoring episode to another depending on a variety of
things, e.g., sample size, acoustic environment, and methodology. The values presented here are for audio with no
packet loss. Some codecs fare better than others under packet-loss conditions.
7
PPS: Packet per Second.
[66/100]
Page 67

IP SIP Phone v2 User’s Guide Mar. 2005
8 kbps
G.711
64 kbps
Those values in blue font are near optimal settings for the specific CODEC in terms of
bandwidth consumption and delay. In general, the more frames carried in one RTP packet, the
less bandwidth it consumes but in the cost of more delay. We suggest a good setting should not
introduce a delay for more than 60 ms.
2 (50 pps) 25.2 27.6 32.4 28.2% 25
3 (35 pps) 19.6 21.2 24.4 36.8% 35
4 (25 pps) 16.8 18 20.4 43.5% 45
5 (20 pps) 15.1 16.1 18 48.8% 55
6 (17 pps) 14 14.8 16.4 53.1% 65
1 (100 pps) 100.8 105.6 115.2 59.9% 10
2 (50 pps) 84 86.4 91.2 73.4% 20
3 (33 pps) 78.4 80 83.2 79.5% 30
4 (25 pps) 75.6 76.8 79.2 82.9% 40
5 (20 pps) 73.9 74.9 76.8 85.1% 50
6 (17 pps) 72.8 73.6 75.2 86.6% 60
4.3-4.7
10.10.1. Enable Personal Preference
To set up personal CODEC preference:
【】
a. Press
b. Go to submenu “8. Advanced” / ”1. CODEC” / “1. Preferences”.
c. The CODECs will be listed based on their priorities. The smaller the value is, the higher
the priority would be. Those disabled voice CODECs, which preference is zero, will be
listed last.
d. Edit the priority value you want to set: the smaller the value is, the higher the priority will
be.
Note: if you disable all CODECs, it will auto-arrange the available CODECs and those come
with lower bit-rates take precedence. Besides, you should just lower the priorities of G.711 in
most circumstances rather than overly disabling them such that the phone could gracefully fall
back to G.711A or G.711µ when the peer does not support those low bit-rate CODECs for voice
compression.
FUNC +
【】
# to activate menu.
10.11. Comfort Noise Generation
You can prioritize those CODECs which are not CNG (Comfortable Noise Generation”)
capable over those are capable of CNG. If you disable “CNG”, then IP SIP Phone will first try
those not-CNG capable CODECs (such as G.729A and G.723.1 instead of G.729AB and
G.723.1A) during call setup. Note, this is only a best-effort attempt: whenever IP SIP Phone
received a silence packet from the peer (SID packets if G.723.1A is adopted), it will automatically
[67/100]
Page 68

IP SIP Phone v2 User’s Guide Mar. 2005
switch to the corresponding CNG-capable CODEC, even you have disabled “CNG”.
To configure Voice Activity Detection
a. Press
b. Go to submenu “8. Advanced” / ”3. CNG”.
c. Configure to “Enable” or “Disable” silence suppression.
【】
FUNC +
【】
# to activate menu.
10.12. Registration on Demand
You can dictate the terminal to refresh registration immediately to all service domains by
pressing
【】
Registration key, it will restart regular auto-registration scheduling as necessary too. During
registration, the corresponding green LED will flash. Based on the registration result, the LED will
have different indications:
【
Regis】tration . If you have gone offline (see-below), by pressing
Green LED On: Successfully register to all activated service domains.
Red LED On: At least one activated service domain could not be registered.
Green LED Flashes: Registration is in progress. Note, IP SIP Phone will regularly refresh
SIP Address-of-Record registration as necessary.
Red LED Flashes: No activated service domains have ever registered successfully.
LED is off: Users explicitly logs out all SIP service and goes off-line ‘till user presses the
【Registration】key again to go on-line (re-register to all SIP service).
I. To can go off-line explicitly by:
z From keypad (TELNET): going to
Admin】and pick 【1.Logout】.
z From web browser:
Go to 『IP SIP Phone』/ 『Advanced』 / 『System Admin』=> “Un-REGISTER”
to go offline.
【
Main Menu】/【 8.Advanced】 / 【3.System
[68/100]
Page 69
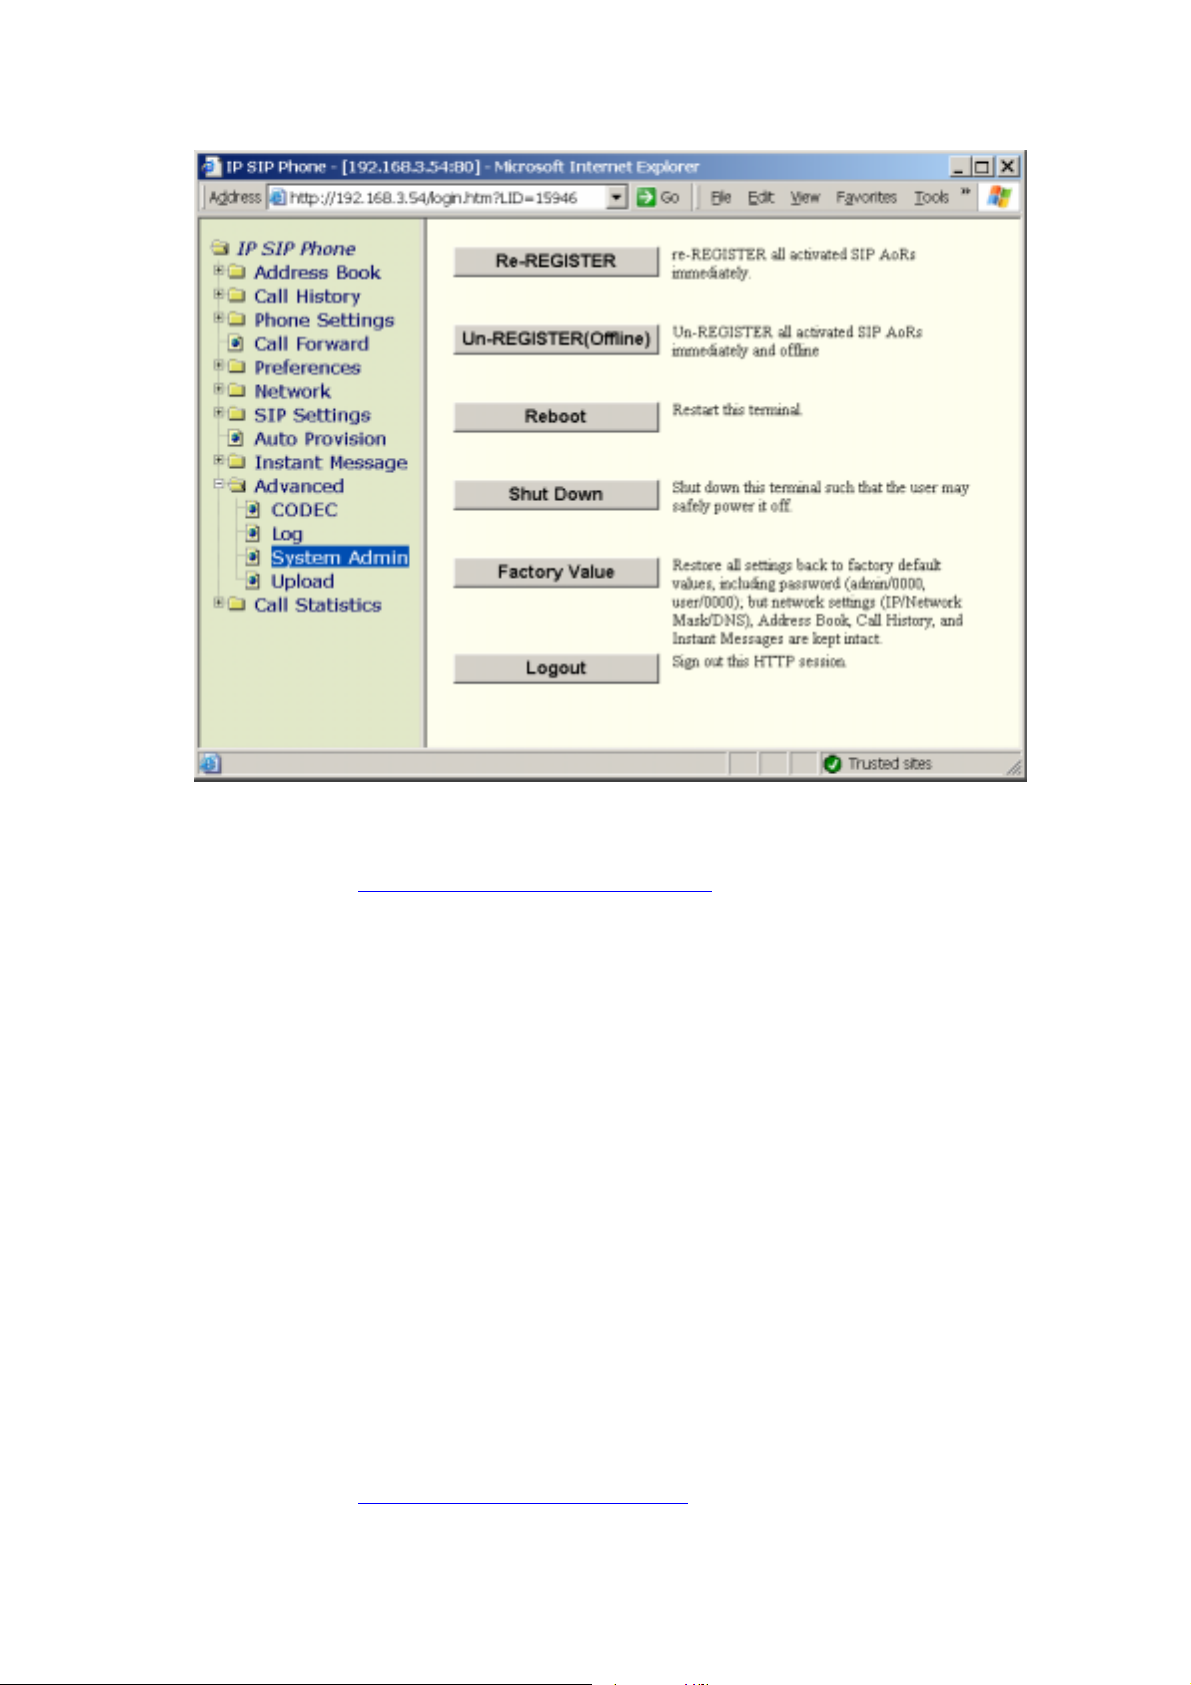
IP SIP Phone v2 User’s Guide Mar. 2005
Alternatively you may issue the following HTTP Get command from your web
browser to go online:
http://terminal_ip_address/unregister
where terminal_ip_address is the IP address of your terminal. Those command web
pages are password protected.
Please refer to section 4.11.3.1- “Issue Commands by HTTP Get” on “IP SIP Phone
v2 Web Administration” for detail.
Once off-line, the terminal will unregister to all activated SIP service domains and cease
regular auto-registration scheduling until the 【Registration】key is explicitly pressed again.
Note: reboot the phone-set will clear this status and register the SIP address-of-record after
boot-up.
II. To can go on-line explicitly by:
z From keypad: press【Registration】key explicitly.
z From web browser:
Point the web browser to your terminal and go to 『IP SIP Phone』/ 『Advanced』
/ 『System Admin』=> “Re-REGISTER” to go online again.
Alternatively you may issue the following HTTP Get command from your web
browser to go online:
http://terminal_ip_address/register,
where terminal_ip_address is the IP address of your terminal. Those command web
[69/100]
Page 70
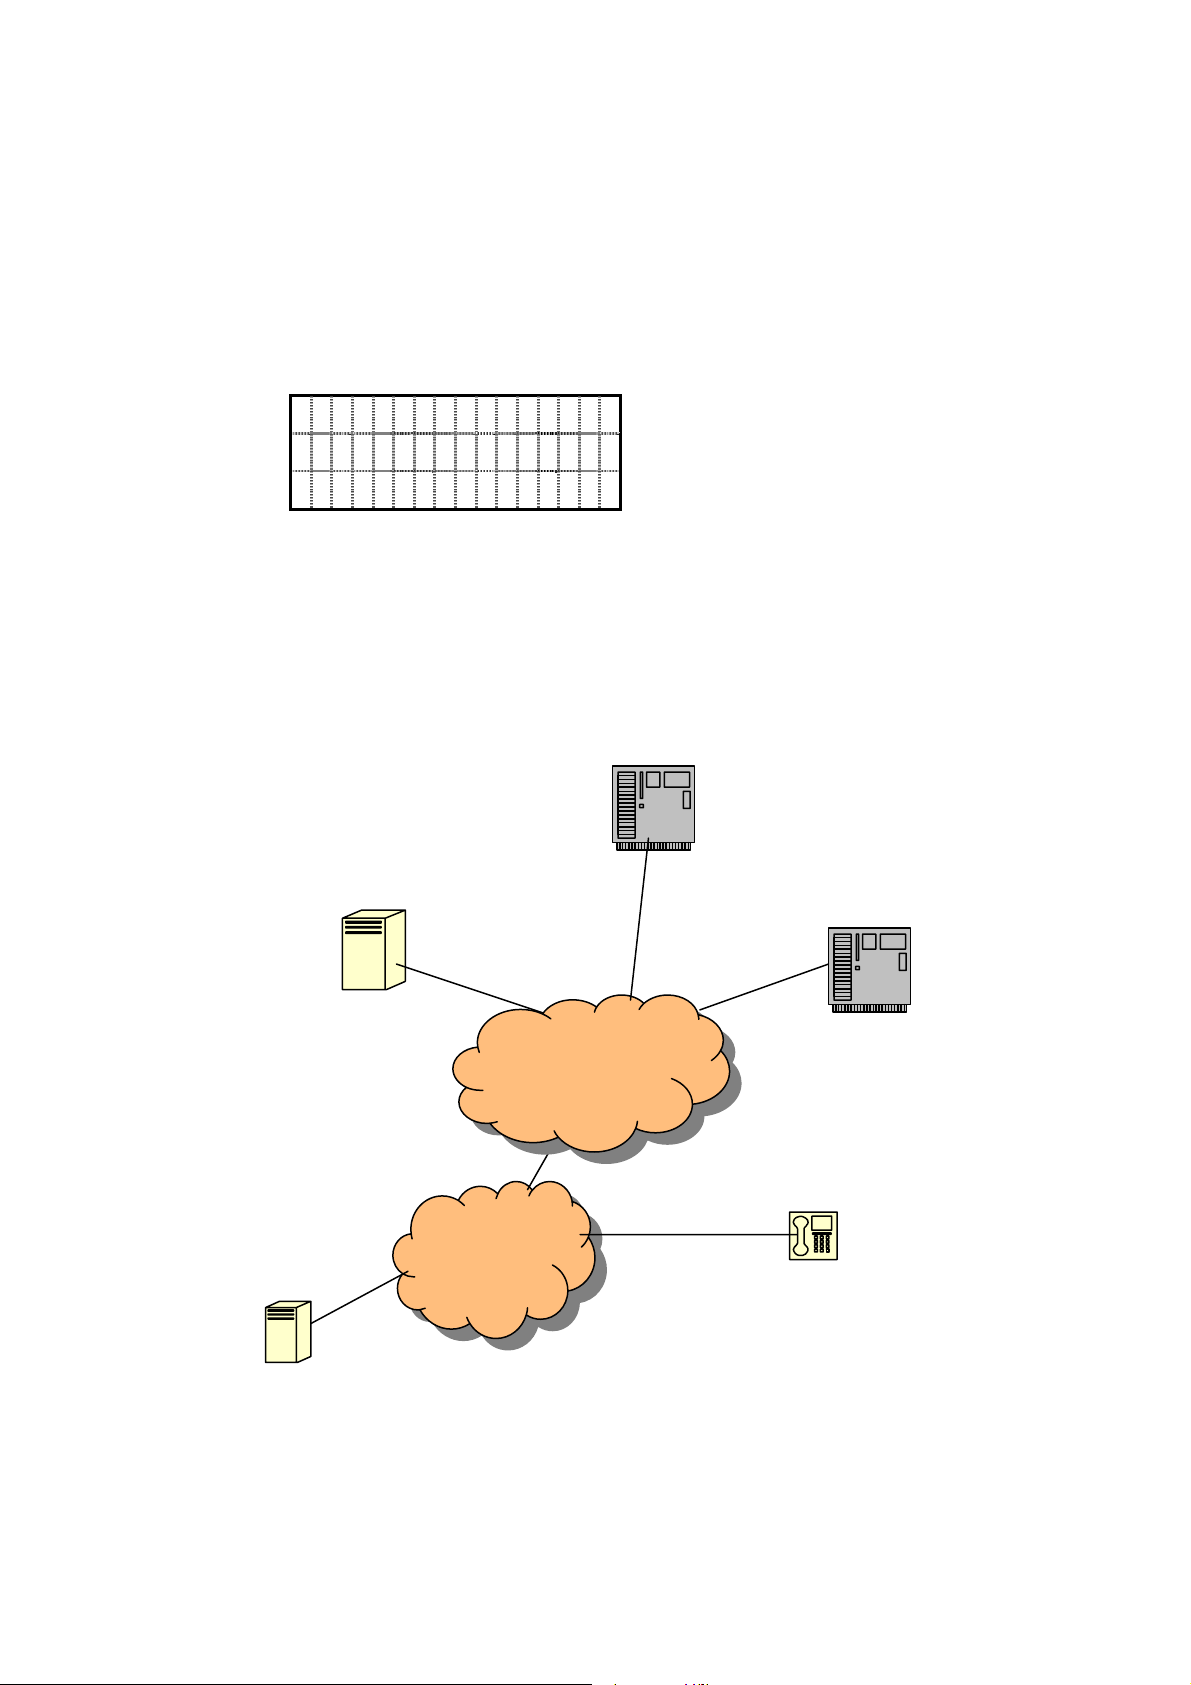
IP SIP Phone v2 User’s Guide Mar. 2005
pages are password protected.
Please refer to section 4.11.3.1- “Issue Commands by HTTP Get” on “IP SIP Phone
v2 Web Administration” for detail.
You could view registration status of each service domain by pressing
idle status. It will prefix a ‘X’ mark on the unregistered domain, and a ‘0’ mark on the registered
domain.
0 : Qu a n t i e rTech.c
0 : fw d . p u l ver.com
X : un k n o w n .com
【】
Service Realm on
10.13. Multi-Domain Registration
You could register to multiple domains simultaneously such that you could receive calls
from those registered domains and make calls to users belonging to different realm. For example,
you may have several SIP addresses from different ISPs. Your configuration may be similar to
the following:
SER.iptel.org
Proxy.fwd.pulver.com
WAN
Company
LAN
sip:business@SIP.isp.com
sip:free@fwd.pulver.com
sip:home@isp.com
SIP.isp.com
By default, you can gain access to active Service-Domain-N by line-N whenever applicable.
sip:personal@iptel.org
Softswtch.ISP.com
[70/100]
Page 71
IP SIP Phone v2 User’s Guide Mar. 2005
That is, the default service domain of
【】
B Call is 2nd active service domain if available;
otherwise, it will use the 1st active service domain as default.
Moreover, you could change the target service domain while making calls by pressing
【】
Service Realm to circle those active service domains (no matter whether they have registered
or not), but must before dialing the
【】
# , which finishes the dialing. The active service domain
will appear on the upper-right corner.
f wd . p u l v er.com
3 2 0 0
SIP.isp.com
fwd.pulver.com
Auto-locate
In addition to those service domains, you could also specify the call as “Auto-locating”. That
is, if you have registered 2 service domains, you have 3 items to pick from:
a. SIP.isp.com
s i p . i sp.com
3 2 0 0
b. fwd.pulver.com
f wd . p u l v er.com
3 2 0 0
c. Auto-locating
A u t o - locate
3 2 0 0
[71/100]
Page 72

IP SIP Phone v2 User’s Guide Mar. 2005
11. Voice Volume Adjustment
11.1. Ringer
You could adjust the ringing volume either during the phone set is ringing or from the menu.
z Press【Õ】and 【 Ö】to adjust the ringing volume while the phone set is ringing.
R i n g e r v o l u m e :
█ █ █ █ █ █ █ █ █ █
z To adjust ringer volume from menu:
a. Press
b. Go to submenu “3. Phone settings” / ”4. Ringer” / ”1.Ringer Volume”.
c. Adjust the ringing volume by【Õ】and 【 Ö】keys, and it will play the ringing tone
Besides, you may pick another ringing tone by to play on calls arrival:
z
Press FUNC + # to active menu.
z Go to submenu “3. Phone settings” / ”4. Ringer” / ”2.Ringer Type”.
z Pick your favorite ringing tone to use when incomng calls arrive.
IP SIP Phone
Note,
RFC3261, “alert-info” header dictates the phone to use an alternative ringing tone, which is
specific for that call. The header value should be something like “ringtone-X” (case-sensitive),
where X is the number of one of the available ringing tones (0~11). This is useful to distinguish
calls, for example local calls from calls coming from PSTN. Besides, this header is ignored for
re-INVITE. If the specified tone is out of range, the current ringer is used.
【】
FUNC +
on adjustment.
【】【】
supports the “alert-info” header in the first INVITE message as per
【】
# to active menu.
11.2. Handset
H an d s e t volume:
█████████
Activate when speaker phone is off and the phone set is hooked off or at least one call is
engaged. Use【Õ】and 【 Ö】 keys to adjust volume.
11.3. Speaker Phone
S pe a k e r phoNe:
█████████
Activate when speaker phone is on or while at least one call is engaged. Use [Õ] and [Ö]
keys to adjust volume.
[72/100]
Page 73

IP SIP Phone v2 User’s Guide Mar. 2005
11.4. Ear Phone
E ar P h o n e:
█████████
Activate when ear phone is on and the phone set is hooked off or while at least one call is
engaged. Use【Õ】and 【 Ö】keys to adjust volume.
[73/100]
Page 74

IP SIP Phone v2 User’s Guide Mar. 2005
12. Service
12.1. Voice Mail
Voice mail allows you to access messages left by callers when you are unavailable to take
their call. Voice mail is an optional feature configured by your system administrator. Your
particular phone setup might not support accessing voice mail in this way.
IP SIP Phone supports messages waiting indication as per RFC3842. It accepts NOTIFY
messages with or without prior SUBSCRIBE.
z MWI Subscription
If you have configured the voice mailbox link, IP SIP Phone will SUBSCRIBE to this
link by sending the SUBSCRIBE message to SIP server. Please refer to the following
message flow (suppose your SIP AoR is sip:[email protected] and the voice mailbox
you configured is sip:[email protected]):
SUBSCRIBE sip:[email protected] SIP/2.0
Via: SIP/2.0/UDP 192.168.3.50
From: John <sip:[email protected]>;tag= 17542c1
To: John <sip:[email protected]>
Call-ID: [email protected]
Cseq: 281 SUBSCRIBE
Contact: sip:[email protected]
Event: message-summary
Accept: application/simple-message-summary
Expires: 3600
User-Agent: SIP-Phone /1.1
Content-Length: 0
SIP/2.0 202 Accepted
Via: SIP/2.0/UDP 192.168.3.50
Record-Route: <sip:192.168.3.1;lr=1>
Contact: sip:192.168.3.1:6060
Expires: 3600
User-Agent: ABS GW v5.1.0
To: John <sip:[email protected]>;tag=980765
From: John <sip:[email protected]>;tag= 17542c1
Call-ID: [email protected]
CSeq: 281 SUBSCRIBE
Content-Length: 0
z Out-of-Dialog MWI Notification
IP SIP Phone accepts unsolicited MWI NOTIFIY messages as well. The sample
NOTIFY message is as follows (suppose “sip.isp.com” is one of your active service
domains and your SIP AoR is sip:[email protected]):
NOTIFY sip:[email protected] SIP/2.0
Via: SIP/2.0/udp 192.168.0.1;branch=z9hG4bKcfb4
Content-Type: application/simple-message-summary
[74/100]
Page 75
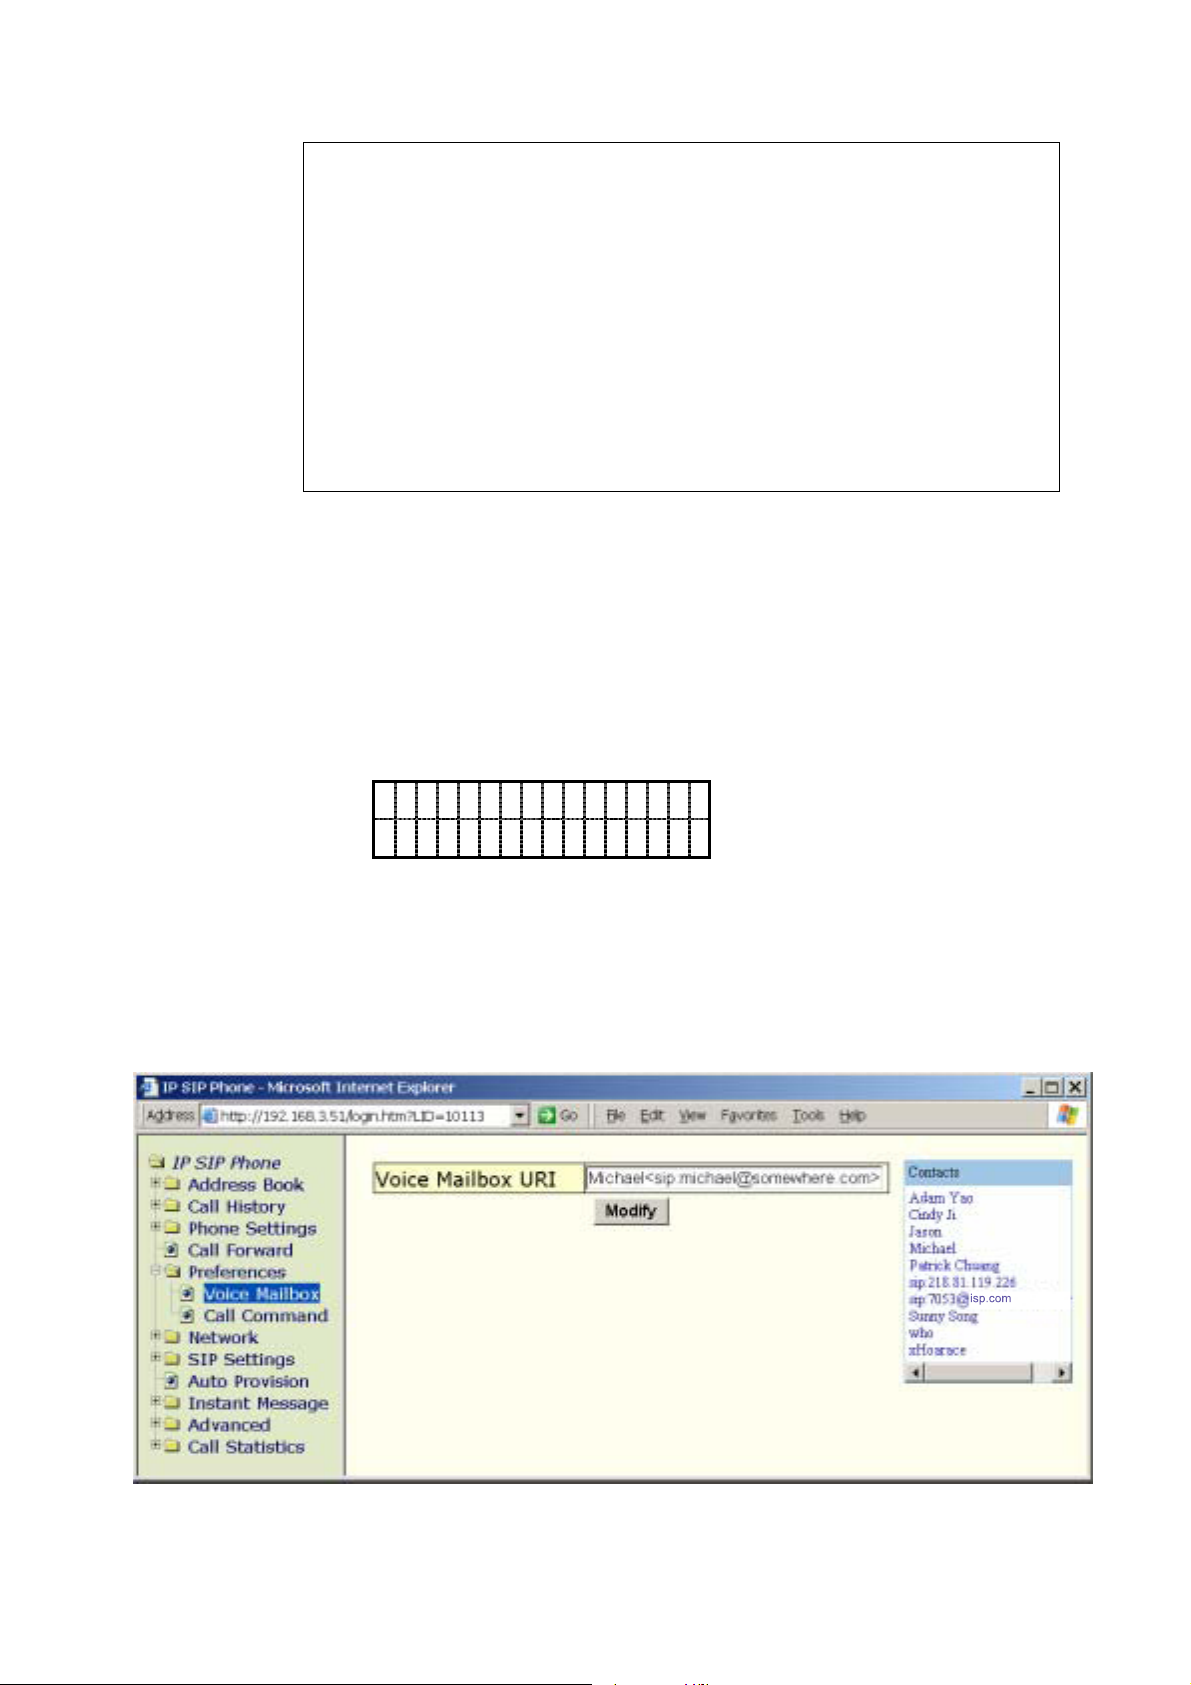
IP SIP Phone v2 User’s Guide Mar. 2005
@
Contact: sip:192.168.0.1:6060
User-Agent: ISP Soft-Switch
Event: message-summary
Subscription-State: active
To: <sip:1234@sip.isp.com>
From: <sip:[email protected]>;tag=d8370cb
Call-ID: d07b59da8e
CSeq: 224493566 NOTIFY
Content-Length: 39
Max-Forwards: 70
Messages-Waiting: yes
Message-Account: sip: [email protected]
Voice-Message: 4/8 (1/2)
12.1.1. Set up Voice Mail
z To set up voice mail access number by TELNET or keypad:
a. Press
【】
FUNC +
【】
# key to activate menu.
b. Go to submenu “7. Service” / “1. Voice mail URI”
c. Configure the voice-mail number to dial
【】
HOLD to pick an entry from address book. Use 【Õ】and 【 Ö】to view the whole
when the MWI】 button is pressed. Press
【
link.
M i c h a e l < s i p : 8 8 8 8
Q u a n t i e r T e c h . c o
d.
【】
Press MUTE to remove current voice mailbox mapping.
z To set up voice mail access number from web browser, go to 『Preferences』/ 『Voice
Mailbox』, then click the “Contacts” on the right panel to pick an entry from your address
book.
isp.com
[75/100]
Page 76
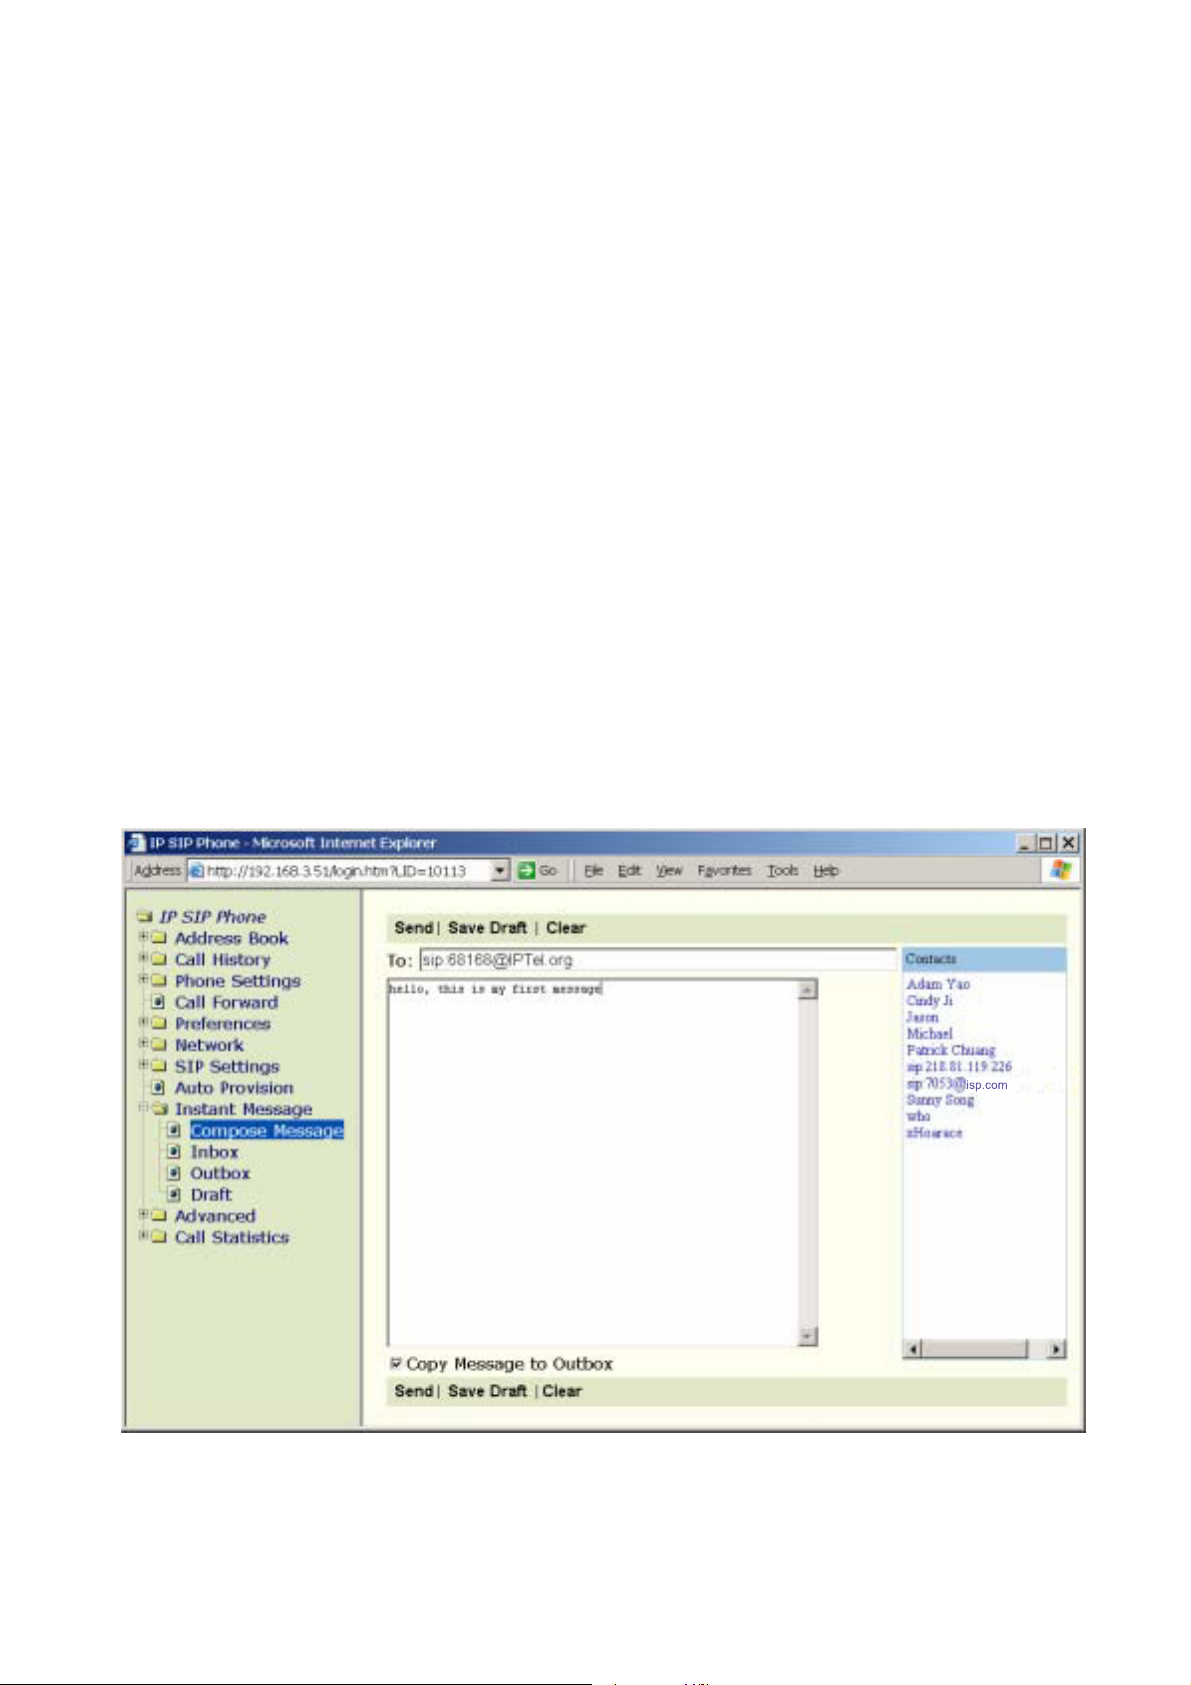
IP SIP Phone v2 User’s Guide Mar. 2005
12.1.2. Access Voice Mail
To access voice mail, press the 【MWI】 button and follow the voice instructions. The red
LED adjunct to the 【MWI】button also will be flashing whenever you have unread and/or new
voice messages (Message Waiting Indication) in your voice mailboxes.
Note, when the MWI LED is off while pressing【MWI】, it will dial to the voice mailbox
your configured. However, when the MWI LED is flashing and you press 【MWI】, it will make
a call to the Message-Account stipulated on the latest NOTIFY message it received (if this field
is absent or is not a SIP AoR, the AoR in request is used instead). If there are unsolicited
out-of-dialog NOTIFY messages received from different service domains, those voice mailboxes
will be called in turn (in circular fashion) each time 【MWI】is pressed.
12.2. Instant Messaging
IP SIP Phone supports instant short message (255 characters). Its operation is very similar
to the short message on modern mobile phones.
z To take advantage of instant messaging by TELNET or keypad:
【】
a. Press
b. Go to submenu “7. Service” / “2. Message “.
z To take advantage of instant messaging by web browser, go to 『Instant Message』page.
FUNC +
【】
# key to activate menu.
isp.com
Please refer to section-4.10 “Instant Message” on “IP SIP Phone v2 Web Administration” for
detail.
[76/100]
Page 77

IP SIP Phone v2 User’s Guide Mar. 2005
By default, DSS key 【F5】 is dedicated to 【Messaging】function key, and cannot be
re-assigned. The LED of 【F5】 will be flashing whenever there are unread messages in your
INBOX, and will be off after you press 【F5】 to enter Inbox directly. If you press 【F5】 while
the corresponding LED is off, it will enter the normal message menu.
Note, IP SIP Phone supports “flashing short message” to display received out-of-dialog
message on LCD without user interaction (or any alert) for 2~3 seconds. Such flashing messages
are for server-side notification, and they will not be saved (thus “flashing”). To activate such
feature, the received out-of-dialog instant message must carry a proprietary header “P-Flash-SMS:
on” (case-sensitive) in received MESSAGE messages.
12.3. Synchronize Time
You could synchronize the time on your phone with external time server by Simple Network
Time Protocol, SNTP.
z To configure NTP / SNTP server on your phone:
a. Press
【】
FUNC +
【】
# key to activate menu.
b. Go to submenu “7. Service” / “3. SNTP “.
1 . S N T P m o d e
2 . S e r v e r I P
c. Set up SNTP mode to meet your demand.
1 . U n i c a s t
2 . M u l t i c a s t
3 . A n y c a s t
4 . D i s a b l e
z To configure NTP / SNTP from web browser, go to 『IP SIP Phone
Settings』/ 『Date / Time』
』
/ 『Phone
[77/100]
Page 78
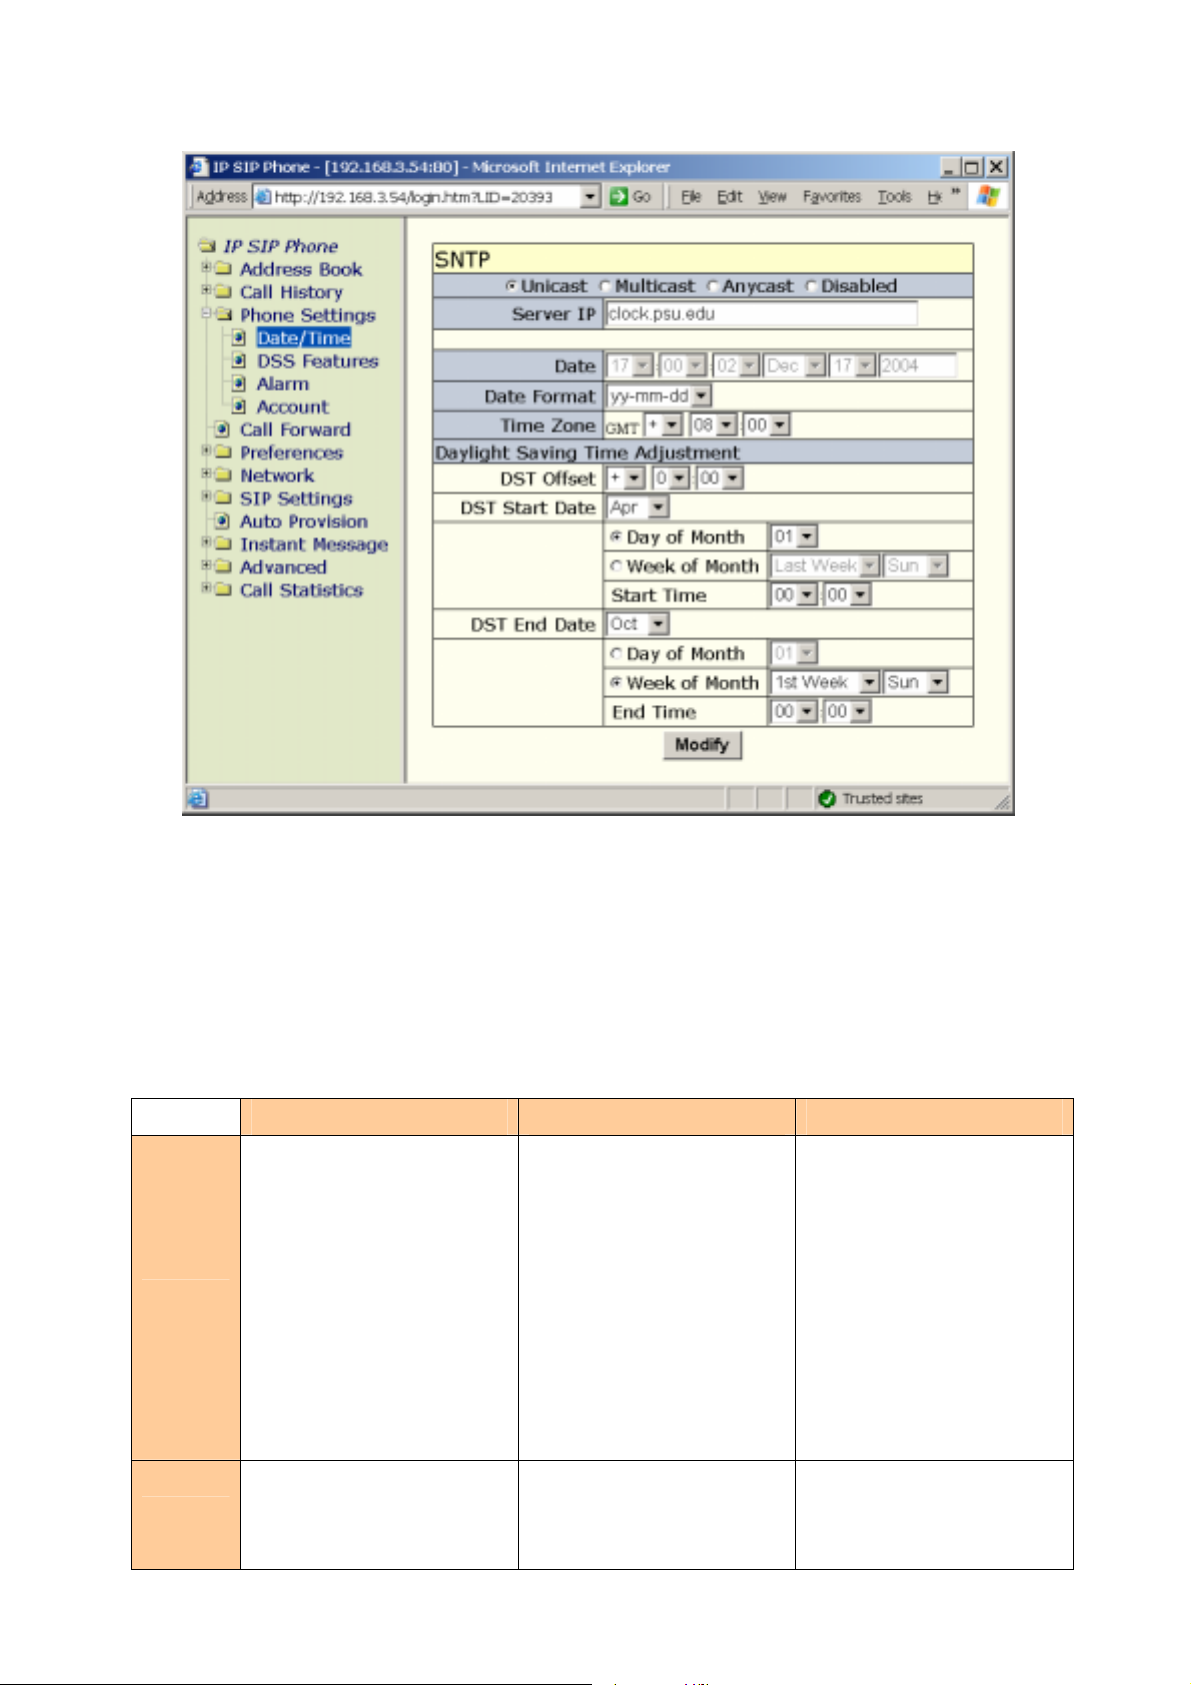
IP SIP Phone v2 User’s Guide Mar. 2005
The Simple Network Time Protocol is used to synchronize time with
IP SIP Phone
. If you
set SNTP server to Anycast mode, the phone will send SNTP query to LAN broadcast address.
Otherwise, it sends a request to the specified SNTP / NTP server, extracting the reported time
from the reply, and overwrites the phone’s time. Typically, SNTP / NTP servers operating in
broadcast mode send update messages every 64 to 1024 seconds. The default time on system
starting up is 00:00, January 1, 1970, GMT.
Unicast Multicast Anycast
SNTP request to the
specified SNTP server if
available.
Sends
Nothing
When in multicast mode,
SNTP requests are not
sent.
SNTP packet to the local
network broadcast
address, 224.0.1.1.
After the first SNTP
response is received, the
phone switches to unicast
mode with the server
Receives
SNTP response from the
SNTP server and ignores
responses from other
SNTP data via the SNTP /
NTP multicast address
from the local network
being set as the one who
first responded.
Unicast SNTP data from
the SNTP server that first
responded to the network
[78/100]
Page 79
IP SIP Phone v2 User’s Guide Mar. 2005
SNTP servers. broadcast address from
broadcast request.
any server on the network.
The default multicast
address is 224.0.1.1.
a. Assign the IP of NTP / SNTP server.
2 1 1 . 1 7 9 . 1 9 . 1 3 3
Assign the SNTP server. You can use either a dotted IP address or a DNS name.
Note: If you enable DHCP, the NTP server may be acquired by DHCP option 42.
For available SNTP / NTP servers near your location, please refer to Appendix A – Available
NTP servers.
12.4. Auto Provision
You can configure your phone to download configuration files from provision server for
auto-provisioning. This feature is available for administrator batch configures the phones in a
whole and still leave room for customized service for each phone. If the feature is enabled, the
phone will try to download two configuration files from the provisioning server via either TFTP or
HTTP on system startup; otherwise, it will use the current settings stored in flash ROM. Please
refer to section-4.9 “Auto Provision” and section-4.9.6 “Available Configuration” on “IP SIP
Phone v2 Web Administration” for configuration file format and available tags.
z To enable auto-provisioning on system startup:
a. Press
【】
FUNC +
【】
# key to activate menu.
b. Go to submenu: “7. Service” / “4 Auto provision”.
l . P r o t o c o l
2 . S e r v e r
3 . B a t c h D e f a u l t
4 . P h o n e - s p e c i f i c
On this menu, you could select which protocol to use for auto-provision, specify
where the auto-provision server locates and which configuration files to download. The
applying rule is: settings read from “Phone-specific” configuration file will overwrite
those read from “Batch default” which in turn overwrites that of Flash ROM settings.
Note: If you enable DHCP, th e TFTP server may be acquired by DHCP option 66
(TFTP server name).
That is, the phone will first load configuration from flash ROM, then download the
“Batch default” configuration file from provision server and apply it (if applicable)
immediately. Finally, it will try to download the “Phone-specific” configuration file from
the provision server (The server location and Phone-specific file may have been changed
after applying “Batch default”) again. If the customized file could be fetched from
provision server, the setting read from the “Customized” file will overwrite the settings
[79/100]
Page 80
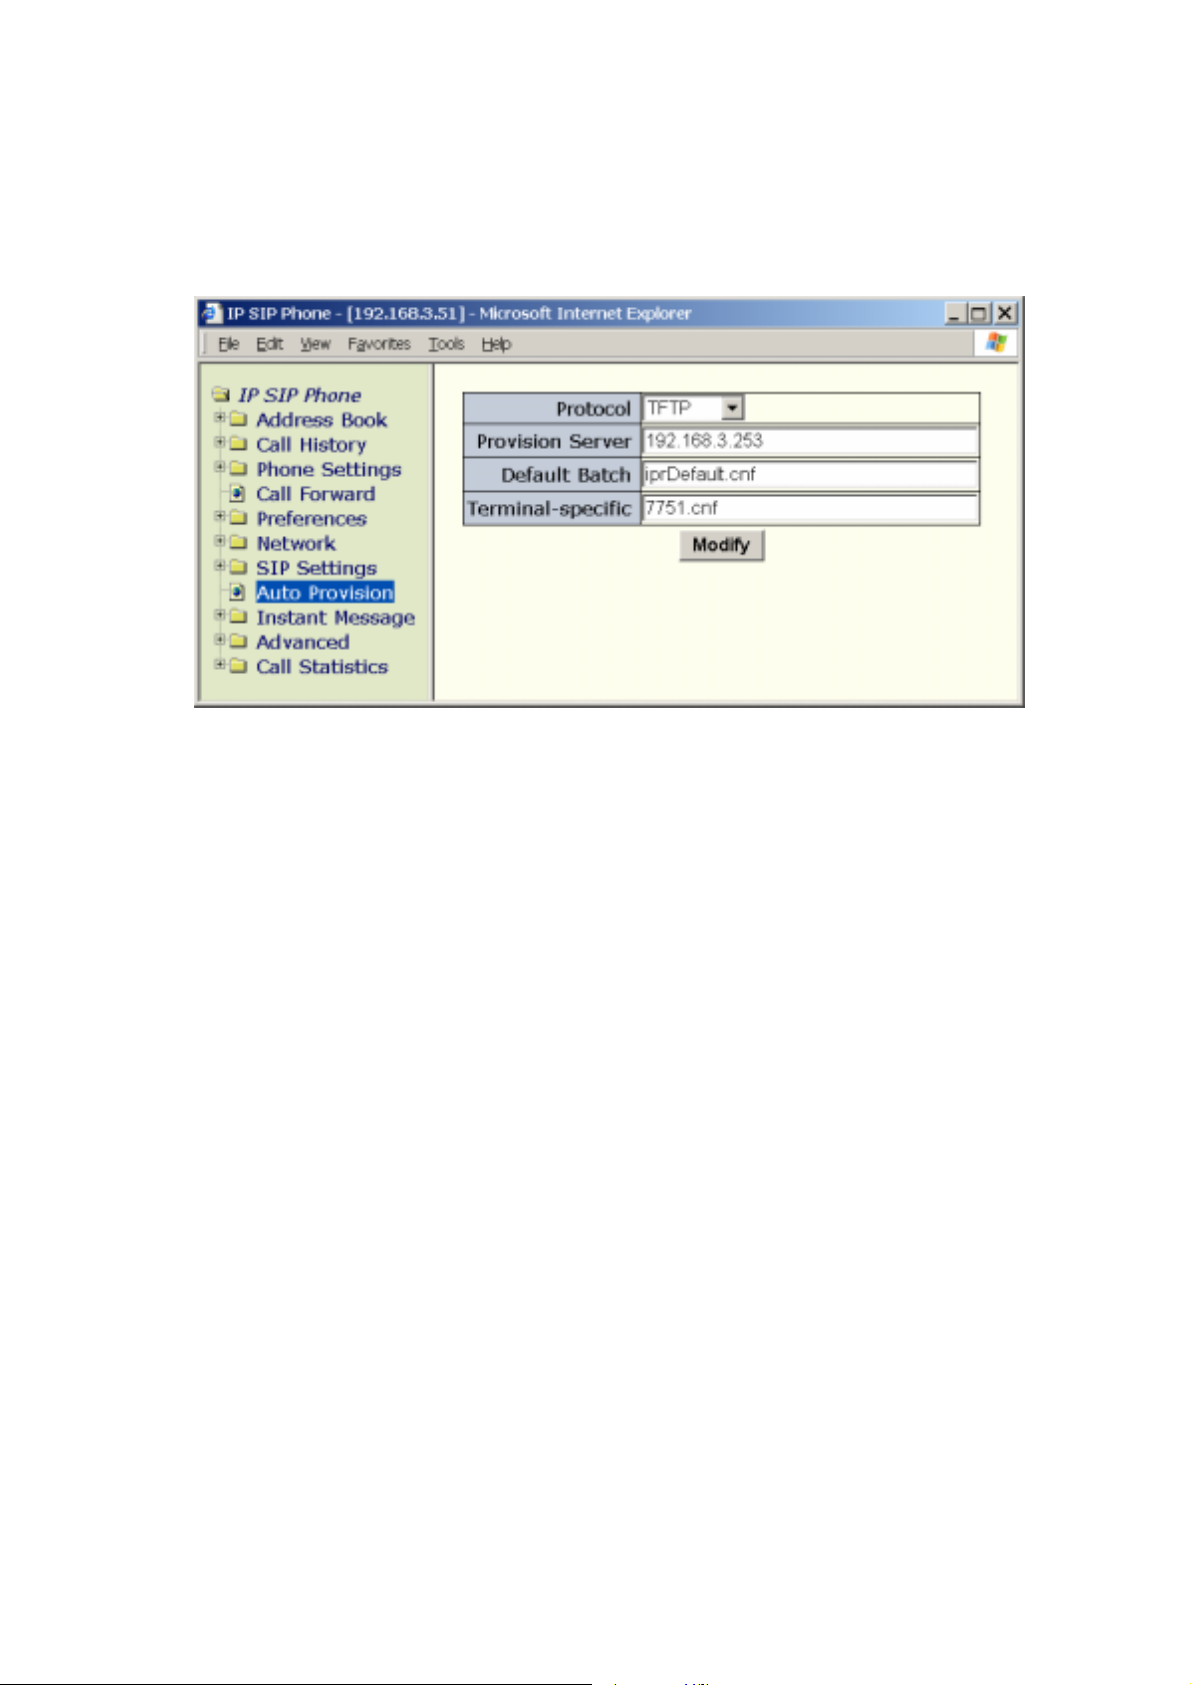
IP SIP Phone v2 User’s Guide Mar. 2005
from “Batch settings” and those read from flash ROM.
z To configure auto-provisioning by web browser:
a. Go to 『IP SIP Phone』/『Auto Provision』
[80/100]
Page 81
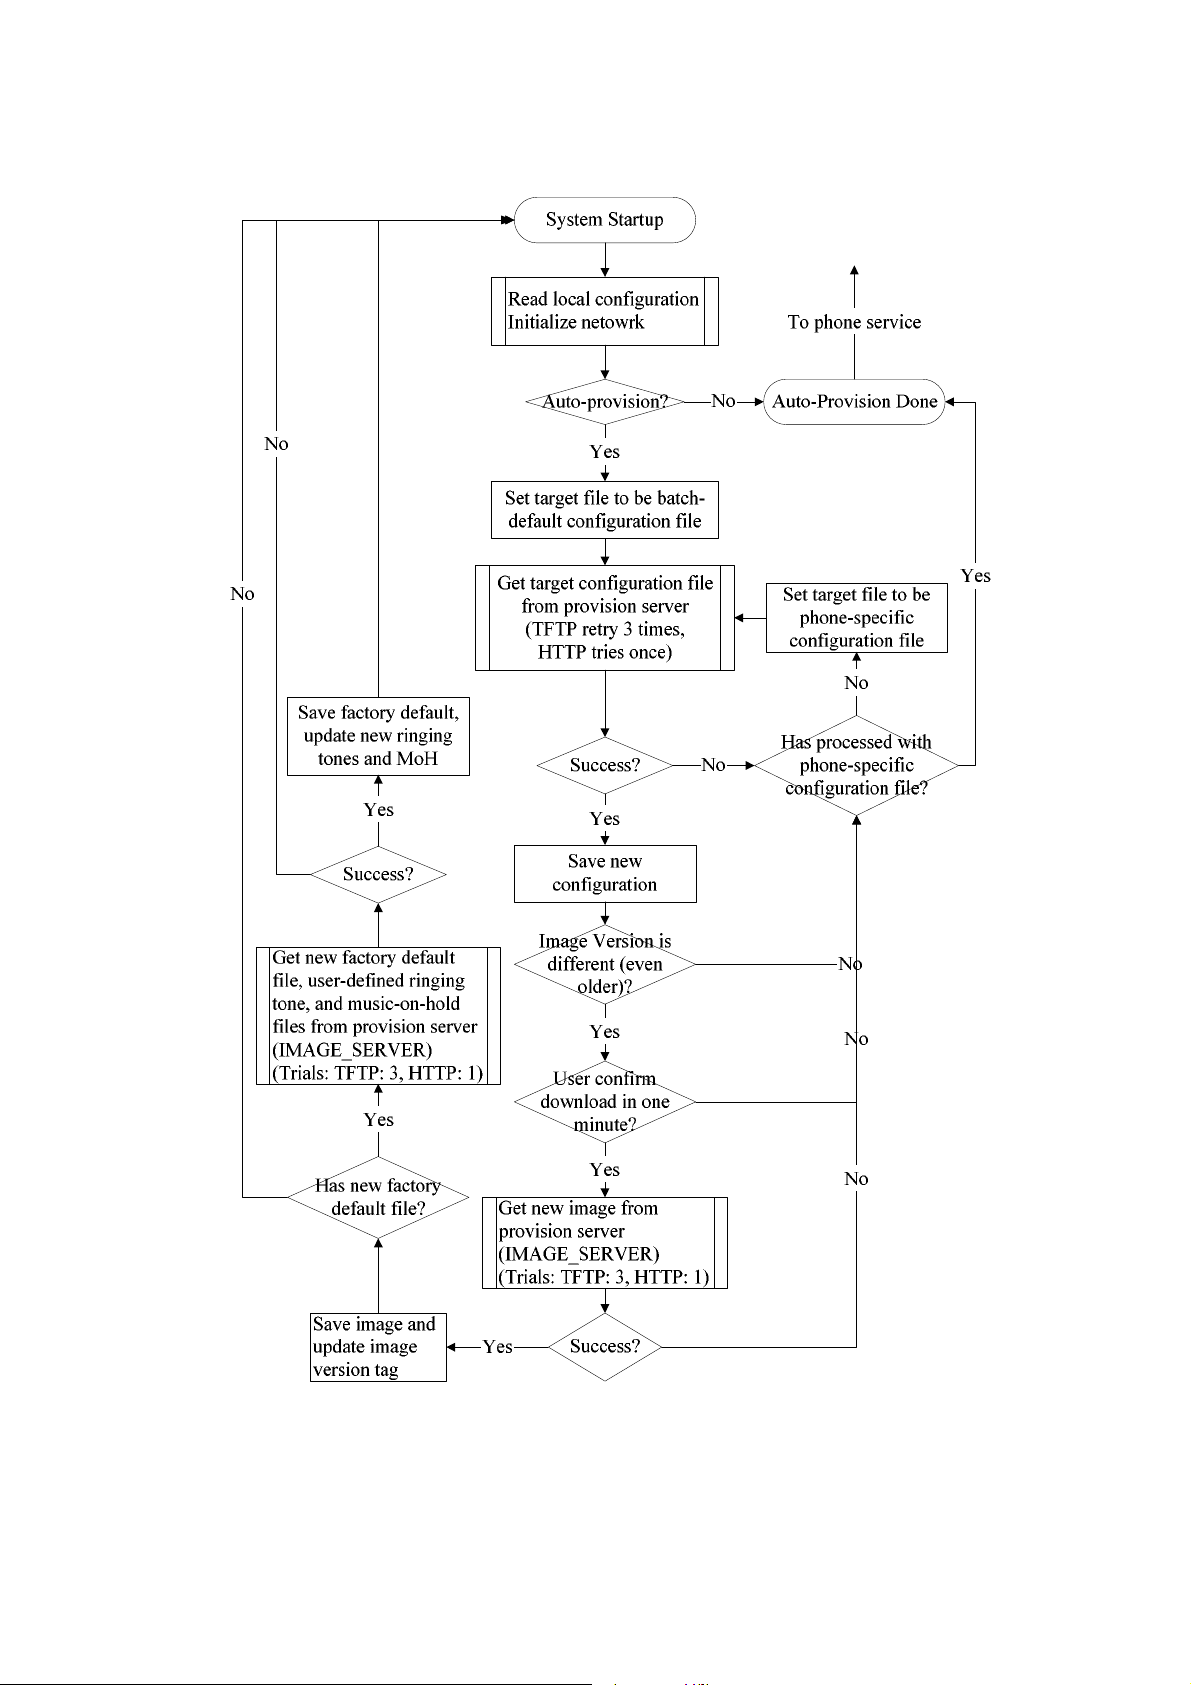
IP SIP Phone v2 User’s Guide Mar. 2005
z Auto-Provision Flow
[81/100]
Page 82
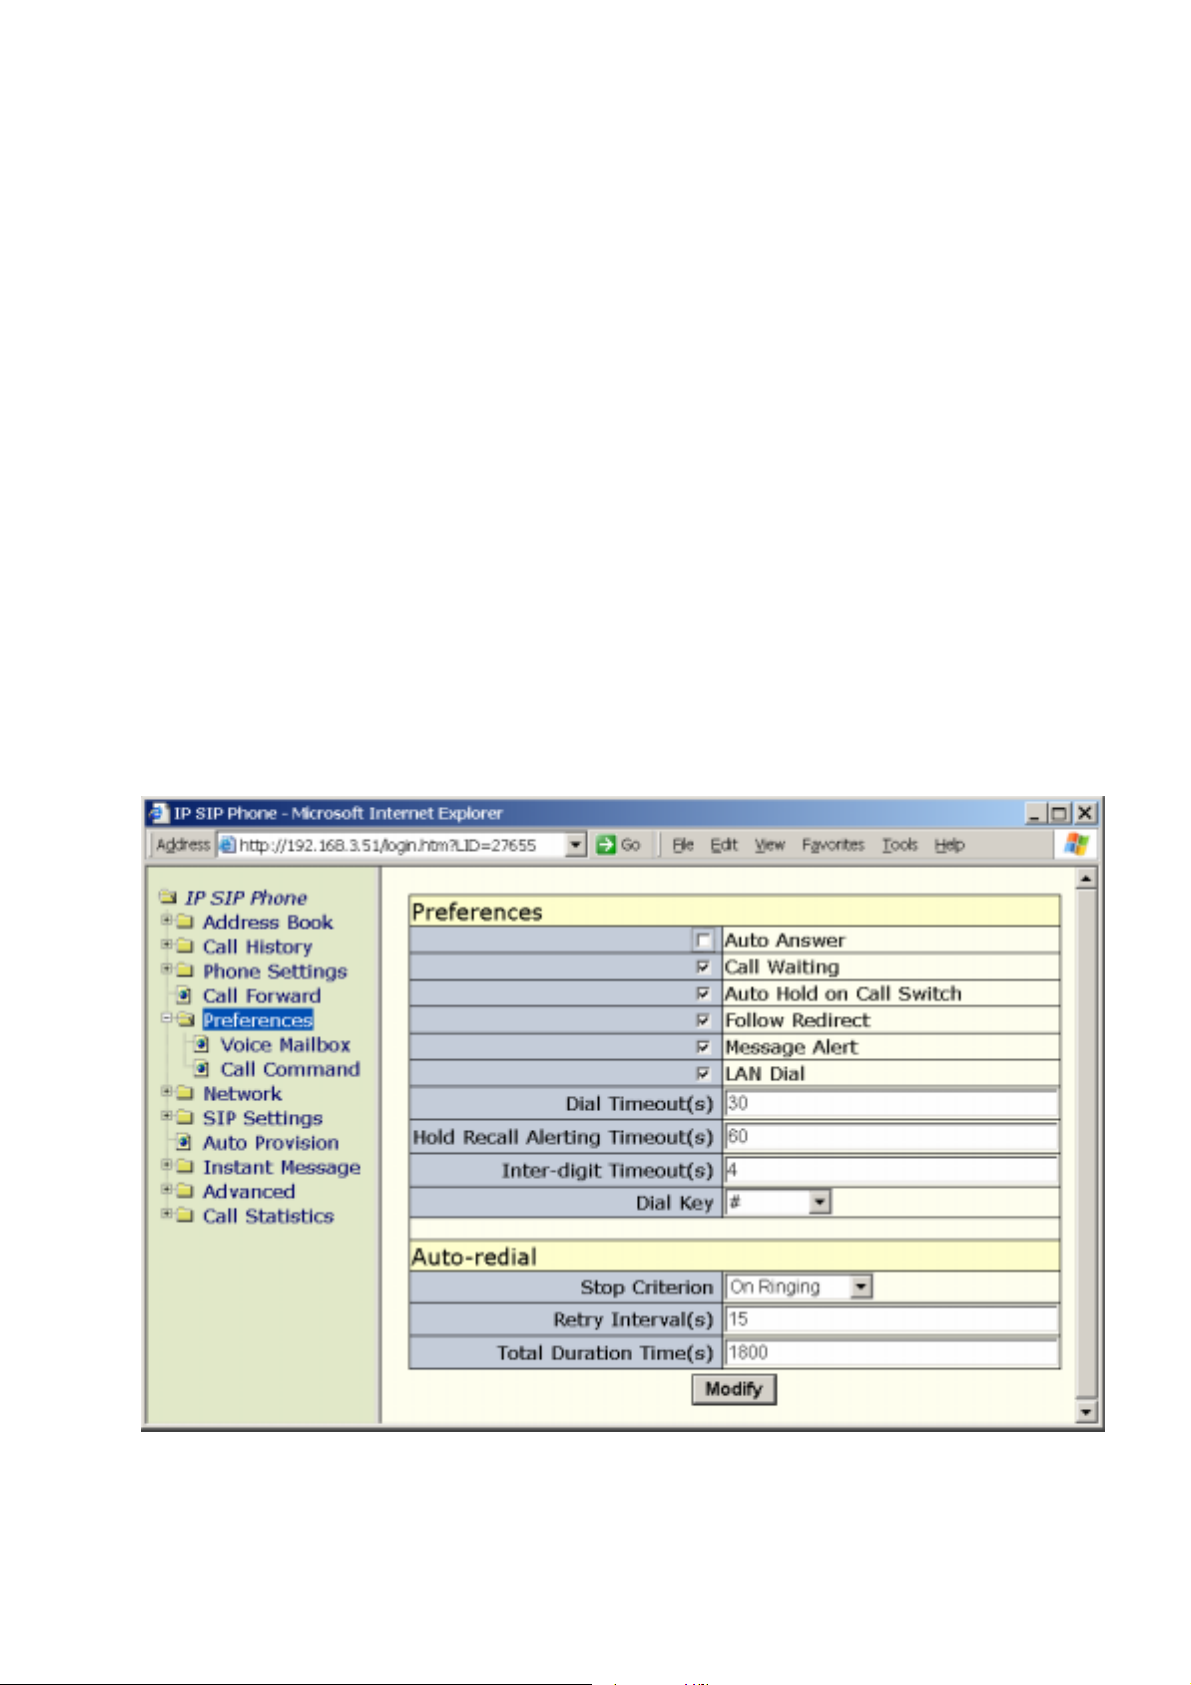
IP SIP Phone v2 User’s Guide Mar. 2005
We suggest that you use the default configuration file to define values for SIP parameters that
are common to all phones. Doing so will make controlling and maintaining your network easier.
You can then define only those parameters that are specific to a phone in the phone-specific
configuration file. Phone-specific parameters should be defined only in a phone-specific
configuration file, or they should be manually configured.
12.5. Soft-Switch (PBX) Feature Access
Many Soft-switches, including IP-PBX and SIP proxies implement various proprietary
features such as group pick up or call return. Most often, end users on such systems could gain
access to these supplant features by dialing special numbers such as “*69” or “#7”.
The star sign, ‘*’, and the pound sign, 【#】, bear special meaning on IP SIP Phone (where a
dialing string starts with a ‘*’ denotes LAN dialing, whereas a dialing string starts with a 【#】
denotes ENUM dialing), but it reserves “*”, “#”, “*0”, “#0”, “#1”, “#2”, “#3”, “#4”, “#5”, “#6”,
“#7”, “#8”, “#9” and all dialing strings starting with a star sign except for “*XXX” where XXX
is between 1 and 255 (denotes LAN dialing) for server features access. You could send all LAN
dial strings “as is” by disable this feature from 【MENU】=> “5.Preferences” / “7.Dial plan”
/ “3.LAN dial”. Alternatively, you may disable this feature by pointing your web browser to
your terminal and go to
『
IP SIP Phone
』/『
Preferences』=> “LAN Dial”.
Note, ENUM dial strings must longer than the minimum valid digit length configured in
【MENU】=> “6.Networ” / “2.SIP settings” / “4.ENUM &E.164” / “2.Min length” (web page
[82/100]
Page 83
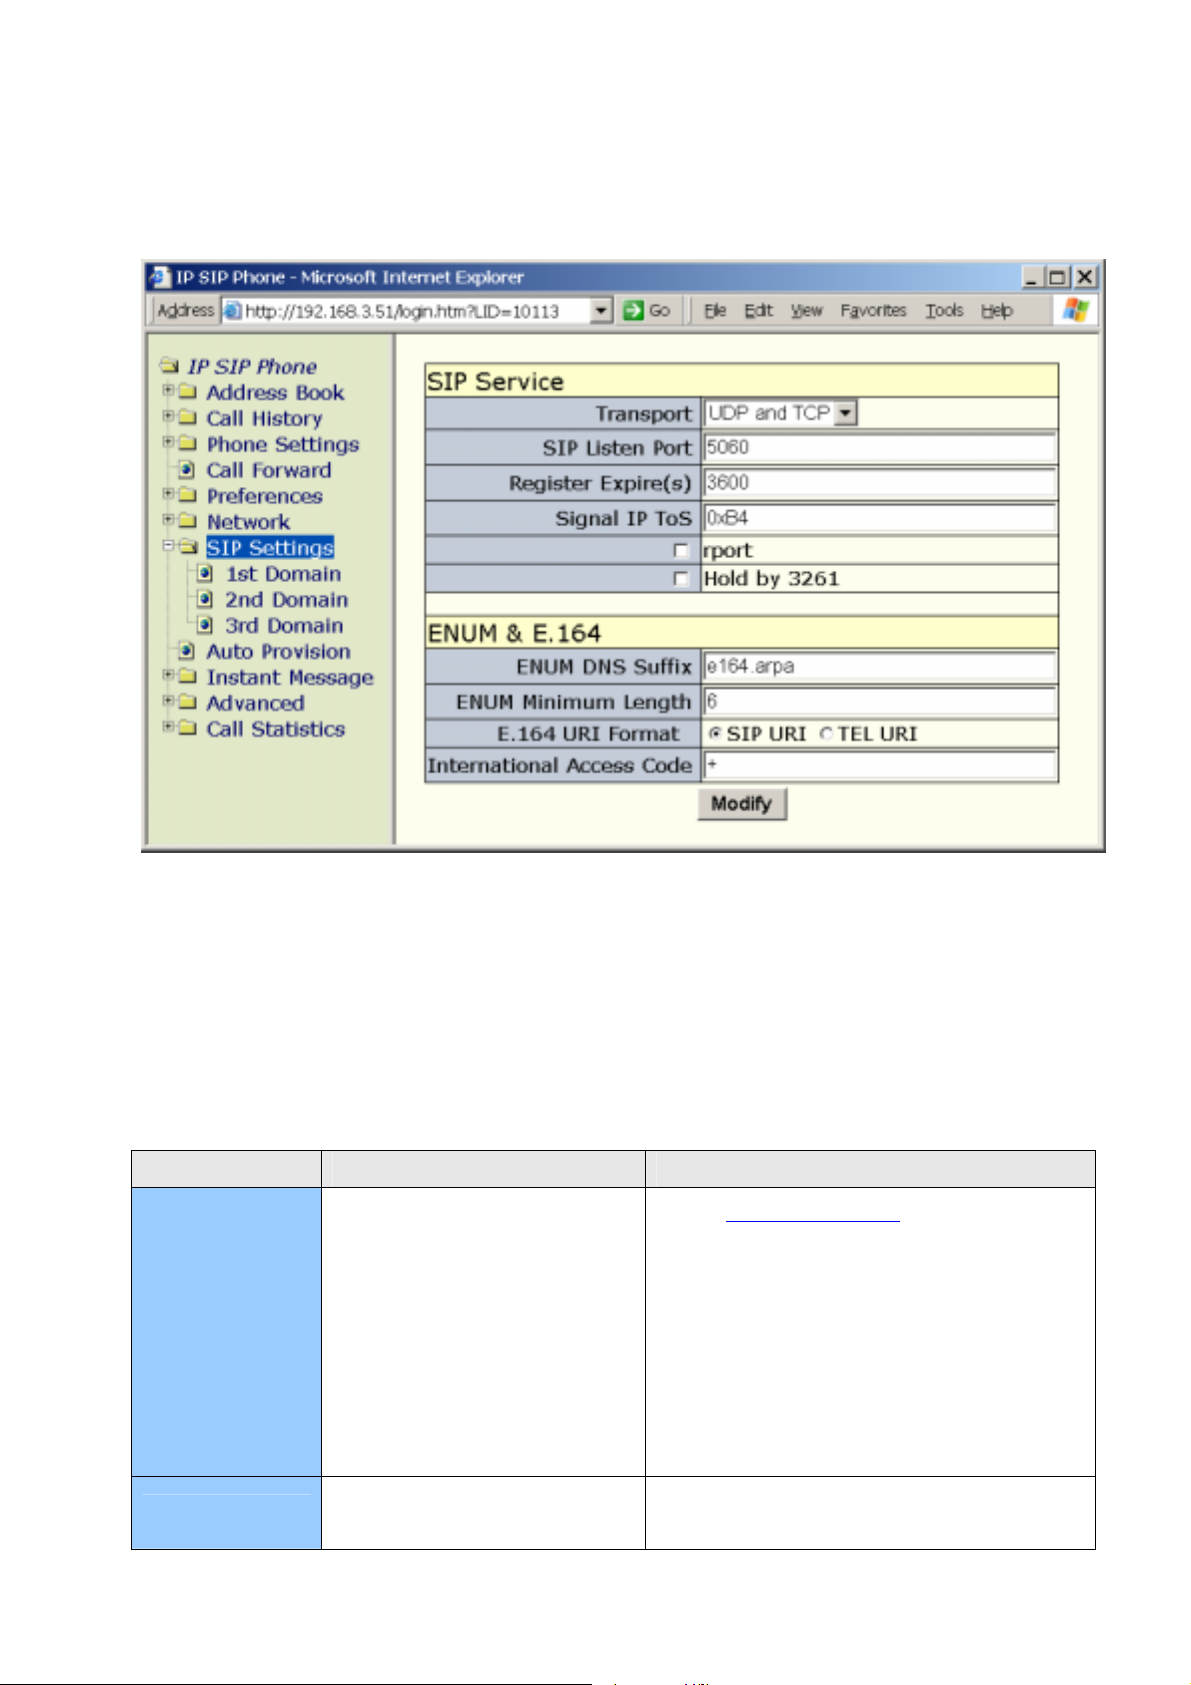
IP SIP Phone v2 User’s Guide Mar. 2005
『
IP SIP Phone
』
/ 『SIP Settings』 => “ENUM & E.164” / “ENUM Minimum Length”), which
default is 6-digits, and only consists of digits (optionally a leading ‘+‘). Therefore, any string
starts with a ‘#’ but is not recognized as ENUM dial string will dial “as is”, too.
Moreover, IP SIP Phone users can also employ the 【FLASH】 key as well. During dialing
phase, whenever the user press 【FLASH】 key, the system will interpret it as an ampersand, ‘&’,
and put it into dialing string. For example, if the group pick-up access code is “&7”, user could
dial 【FLASH】+’7’ to gain access to such server feature.
For most servers (IP-PBXs), the feature access code is configurable; please consult to
system administrator for prefix reconfiguration.
This table summarizes the heuristics taken by IP SIP Phone (suppose your SIP domain is
“SIP.isp.com” and your phone resides on “192.168.1.xxx” network segment).
Category Explanation Example
“*69” => send as is to activate
server SIP supplementary
service: Call return.
*69 -> *[email protected]
Note: the server access code to activate
“Call Return” feature is configurable from
【】
MENU => “5.Preferences” / “7.Dial
Call Return
Plan” / “3.Call Command” / “Call Return”,
』
or from web page 『IP SIP Phone
/
『Preferences』/ 『Call Command』 =>
LAN dialing
1. Pattern: “*ddd”, where
“ddd” is between 1 and 255.
“Call Return”.
1. *10 => sip:192.168.1.10
2. *020 => sip:192.168.1.20
[83/100]
Page 84

IP SIP Phone v2 User’s Guide Mar. 2005
ENUM Dialing
2. This is a short-hand to
directly dial the IP of a SIP
CPE residing on the same
LAN segment.
1. Pattern: #NNNN[N]*.
2. The dialing string must
longer than the minimum
valid digit length configured
in 【MENU】=>
“6.Network” / “2.SIP
Settings” / “4.ENUM &
E.164” / “2.Min length”
(which default is 6-digits),
and only consists of digits
(Web page
『
IP SIP Phone
/ 『SIP Settings』 =>
“ENUM & E.164” /
3. *069 => sip:192.168.1.69
4. *50**3000 => sip:192.168.1.50:3000
5. *1*20**9999 => sip:192.168.1.20:9999
1. #5639025 => tel:+5639025
2. #3-5639025 -> tel+35639025
3. #(86) 3 5639025 => tel:+88635639025
』
Soft-switch
supplementary
service
activation
“ENUM Minimum Length”.
1. *, #
2. Any string starts with a ‘*’
and is not recognized as
LAN dialing.
3. Any string stars with a ‘#’
and is not recognized as
ENUM dialing.
4. Any string starts with a ‘&’
(flash).
1. * => sip:*@SIP.isp.com
2. ** => sip:**[email protected]
3. *311 => sip:*[email protected]
4. #72 => sip:[email protected]
5. &911 => sip:&[email protected]
[84/100]
Page 85
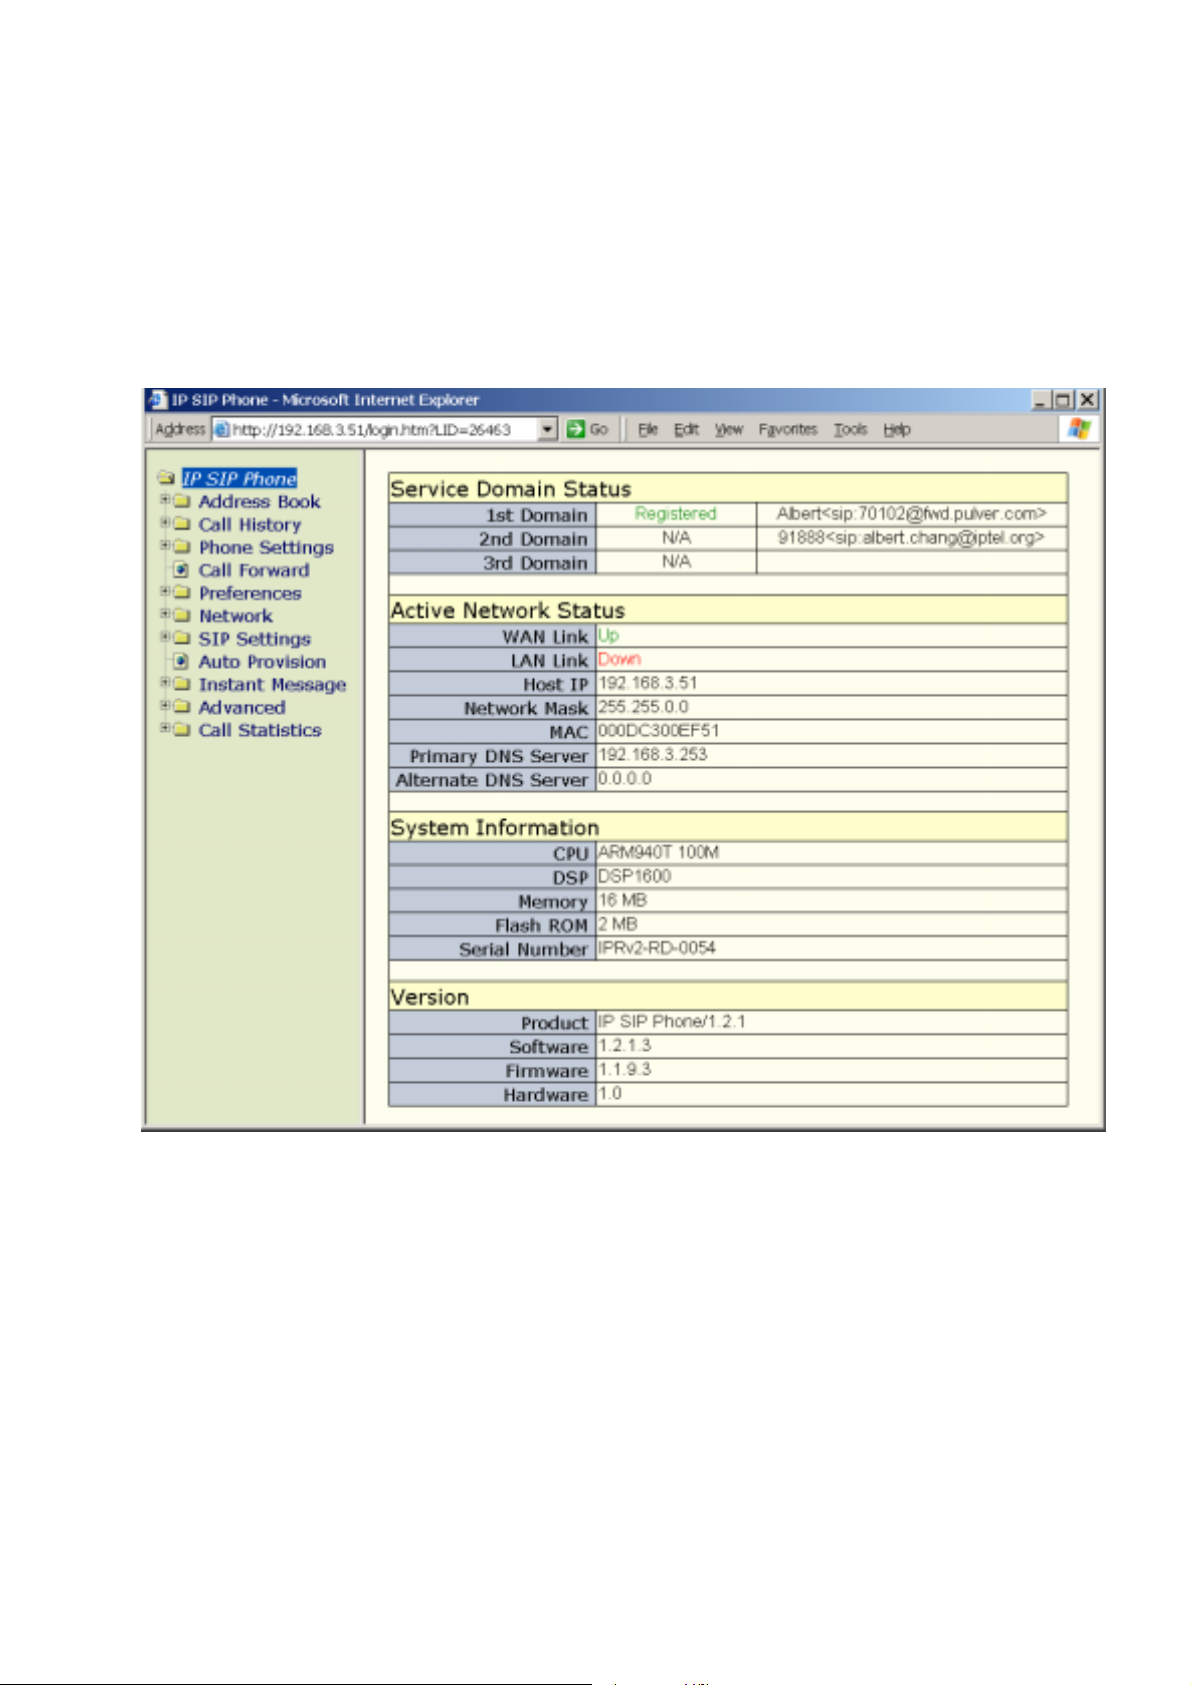
IP SIP Phone v2 User’s Guide Mar. 2005
13. NAT Traversal
If this terminal locates within a local area network and you want to place a call to public
internet, you must configure your terminal to traverse the NAT and firewall it currently behind.
To learn determine whether you resides on public internet or local area network, please
click 『IP SIP Phone』 to show the current Host IP:
If your host IP is within any of the listed ranges, then your terminal resides on LAN,
otherwise, it locates on public internet.
z 10.0.0.0 ~ 10.255.255.255 (10.xxx.xxx.xxx).
z 172.16.0.0 ~ 172.31.255.255 (172.16.xxx.xxx ~ 172.31.xxx.xxx).
z 192.168.0.0 ~ 192.168.255.255 (192.168.xxx.xxx).
Note: if your host IP is 127.0.0.1, you should reconfigure your network to acquire a valid IP.
13.1. Public Internet Configuration
[85/100]
Page 86
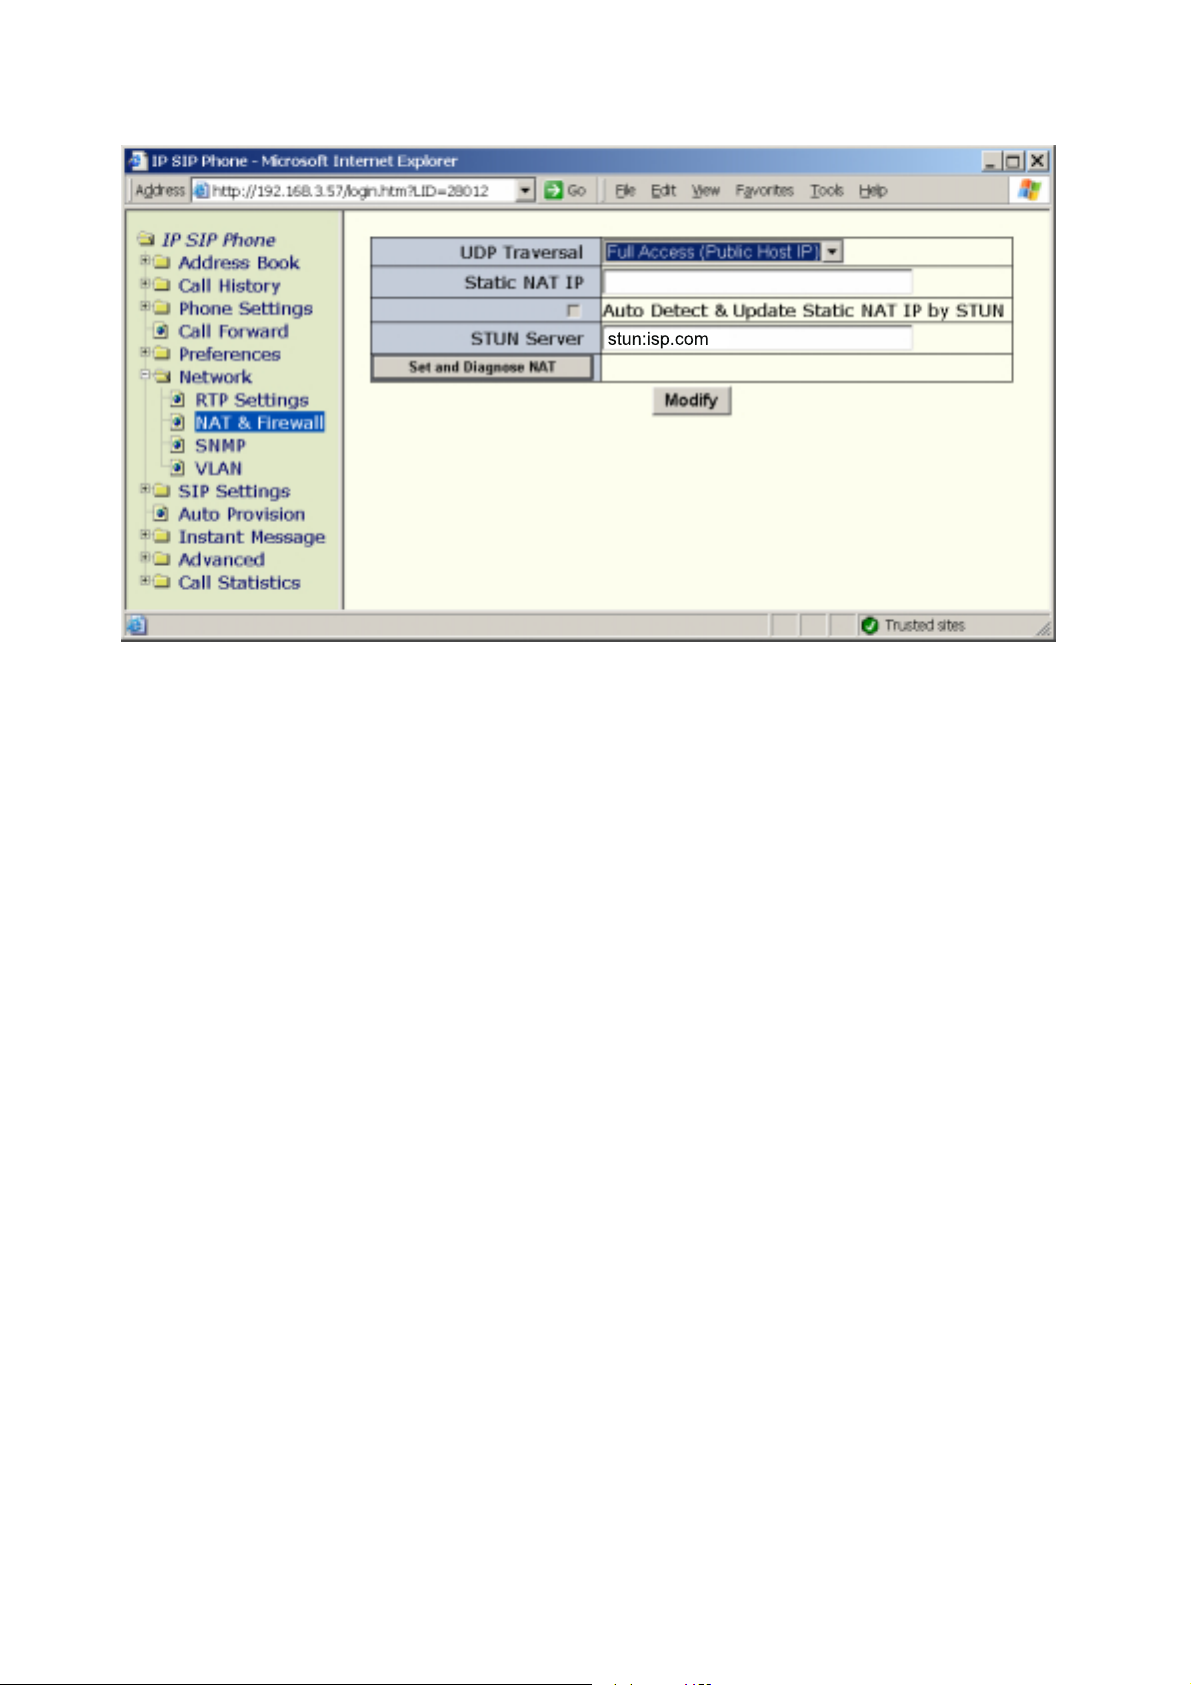
IP SIP Phone v2 User’s Guide Mar. 2005
stun:isp.com
z UDP Traversal: Full Access (Public Host IP)
13.2. LAN Configuration to Traverse NAT and
Firewall
There are basically two options for CPE to traverse NAT and Firewall:
z Option 1: Set up a static route in the NAT gateway (Recommend)。
z Option 2: Use STUN to measure out ports.
Please adopt suitable option based on your network configuration.
Note: some SIP ISPs may provide SIP-aware routers (NAT/Firewall) for their customers.
When you use a SIP-aware router, NAT detection should be set to "Off" as if you were on the
public internet and the configuration is the same as “Public Internet Configuration”: set
Traversal』 to be 『Full Access (Public Host IP)』, which is to say that you do not have to worry
about the NAT, nor firewall.
『
UDP
13.2.1. Static NAT Route
If you have access to your NAT/Firewall, you may contact your network administrator to
configure your NAT/Firewall route.
z Contact your network administrator and acquire consecutive UDP ports (at least 5
UDP ports in case of IP SIP Phone) mapped from the NAT to your terminal. For
example:
NAT IP = 218.81.107.51 (you may detect your NAT IP by clicking
NAT』)
『
Diagnose
[86/100]
Page 87
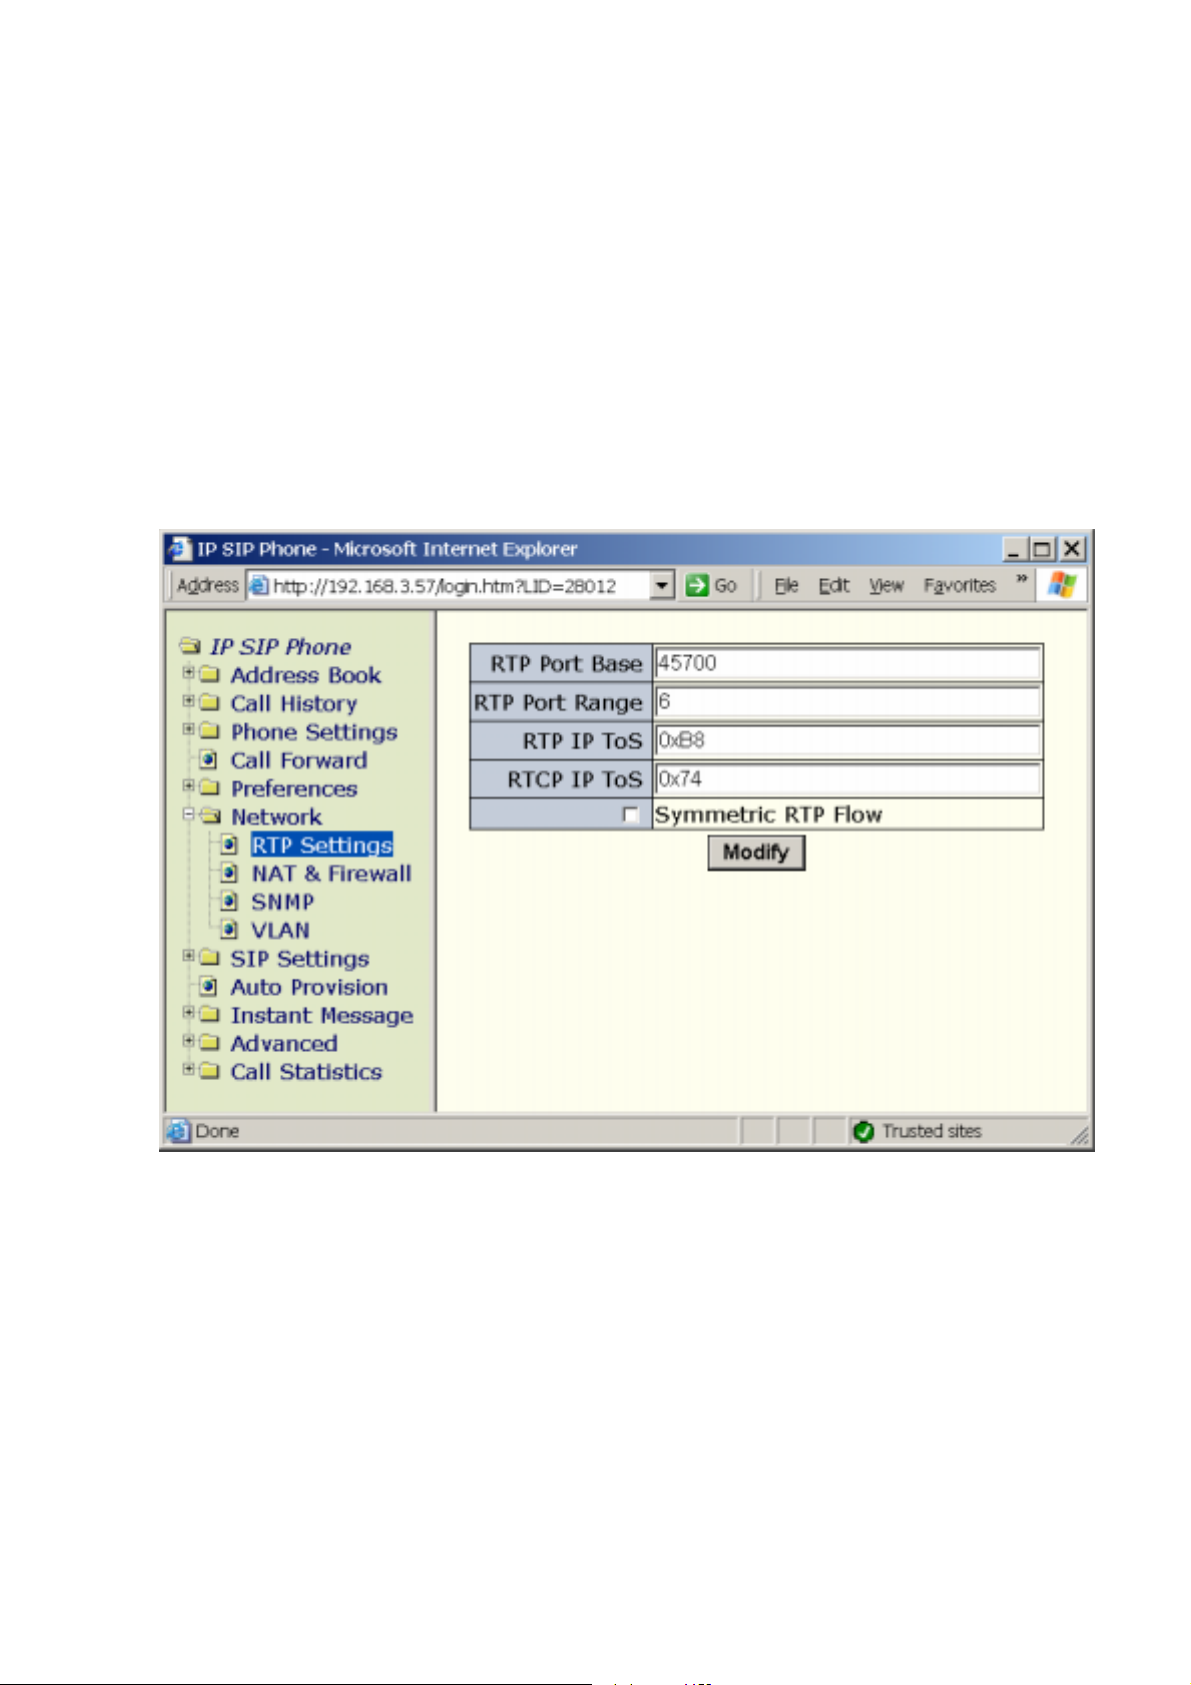
IP SIP Phone v2 User’s Guide Mar. 2005
The network administrator has mapped 7 consecutive UDP ports, 45700 ~ 5706,
from NAT to your terminal, which the terminal IP is 192.168.3.57.
Note 1: Since the network administrator has to configure the NAT/firewall to map
those UDP ports to your terminal statically, thus you should use static IP instead of
DHCP as your network configuration. Otherwise you take the risk that the ATA
would get a different IP from the currently set into the mapping when it reboot and
re-get its IP by DHCP.
Note 2: If there are several terminals reside under the same NAT, their NAT port
mappings must not be overlapped since they all share the same NAT resource!
z Configure RTP ports
RTP Port Base: 45700 (Must be an even number and between 2 and 65534).
RTP Port Range: 6 (This value must be an even number, and larger than or equal to
2); for IP SIP Phone, it should be at least 4 to support two concurrent calls.
Such RTP setting effectively designates 6 consecutive UDP ports ranging from 45700 to
45705 (inclusive) for media transaction.
Note: RTP/RTCP ports are used for media transmission. Those ports must be
consecutive and start with an even number. Besides, the total allocated UDP ports
SHOULD at least double the max concurrent calls supported by your terminal since
each active call takes 2 ports for RTP/RTCP.
[87/100]
Page 88
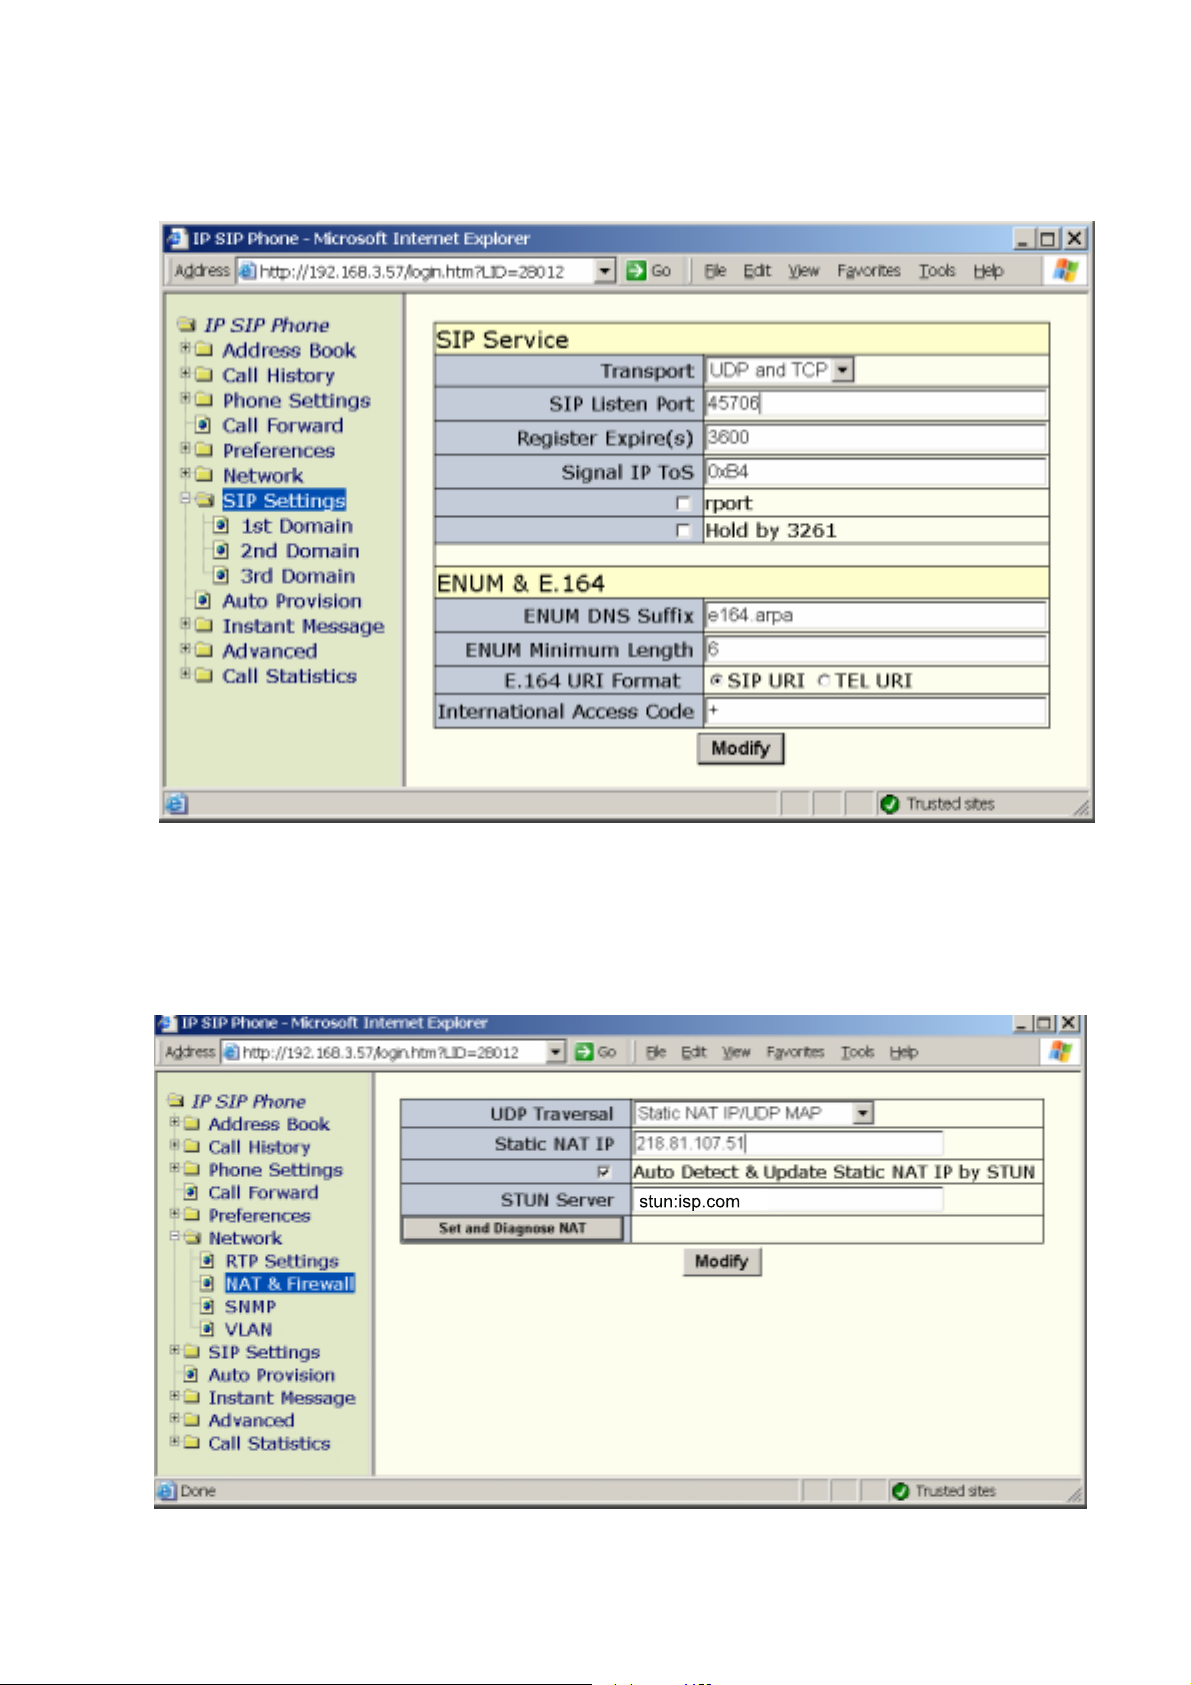
IP SIP Phone v2 User’s Guide Mar. 2005
z Configure SIP service signaling port:
Take the scenario above as an example:
Transport: UDP and TCP (or “UDP”, you must include UDP anyway).
SIP Listen port: 45706
z Assign static NAT IP:
stun:isp.com
Diagnose NAT (optional): you may detect your NAT IP by clicking
Diagnose NAT』.
『
Set and
[88/100]
Page 89

IP SIP Phone v2 User’s Guide Mar. 2005
Note, this diagnosis utilize STUN server, you must have assigned a valid/viable STUN
server first.
Static NAT IP: Fill in the acquired NAT IP from network administrator, such as
218.81.107.51 mentioned above.
UDP traversal: Static NAT IP/UDP Map
Note, if your NAT equipped with no fixed IP, such as those NATs dial into WAN by
PPPoE, then you must synchronize the NAT IP currently set into IP SIP Phone
whenever your NAT IP changed (such as NAT re-dialup). By default, the system will
regularly (every 10 minutes) auto-detect t he NAT IP (if t
valid and viable server
whenever it determines a m ismatch between the stati c NAT IP you configured an d
the one it auto-discovered by STUN protocol.
Alternatively, you may enable Auto』 Detect & Update Static NAT IP by STUN to
auto-
refresh the newly changed NAT IP into Static NAT IP field whenever it
detects an inconsistency.
) and notify you on the IP SIP Phone』 status page
『
『
『』
『』
he STUN server set a
13.2.2. NAT Traversal by STUN
Setting up the NAT router is impossible in many cases, and new equipment may be too
expensive. For these environments, "Simple Traversal of UDP Through NATs" (STUN) has come
to rescue. To enable STUN, you must acquire the IP of your served STUN server and diagnose
your NAT to see if STUN is viable.
z To determine whether you are currently NATed or behind a firewall:
STUN server: configure your STUN server, such as “qt.com” (IP SIP Phone will
try to locate the STUN server of “qt.com” domain via DNS SRV query
(_stun._udp.qt.com) or you may explicitly specify the STUN server as
“STUN.qt.com” or 61.222.26.124. You can enter both dotted IP and DNS record.
Click
Note: The NAT bundled with Windows 2000/XP/2003 can NOT be traversed by STUN
『
Set and Diagnose NAT』to detect your NAT type. If the diagnosis is one
of the following, you could consider to enable STUN as a way to traverse NAT;
otherwise you should adopt option 1-『Stati』c NAT Route .
(a) Public internet (neither NAT nor Firewall is involved).
(b) Symmetric UDP Firewall
(c) Full cone NAT
(d) Restricted cone NAT
(e) Port restricted cone NAT.
protocol, even though it may wrongly detected by STUN as Port-restricted NAT.
[89/100]
Page 90
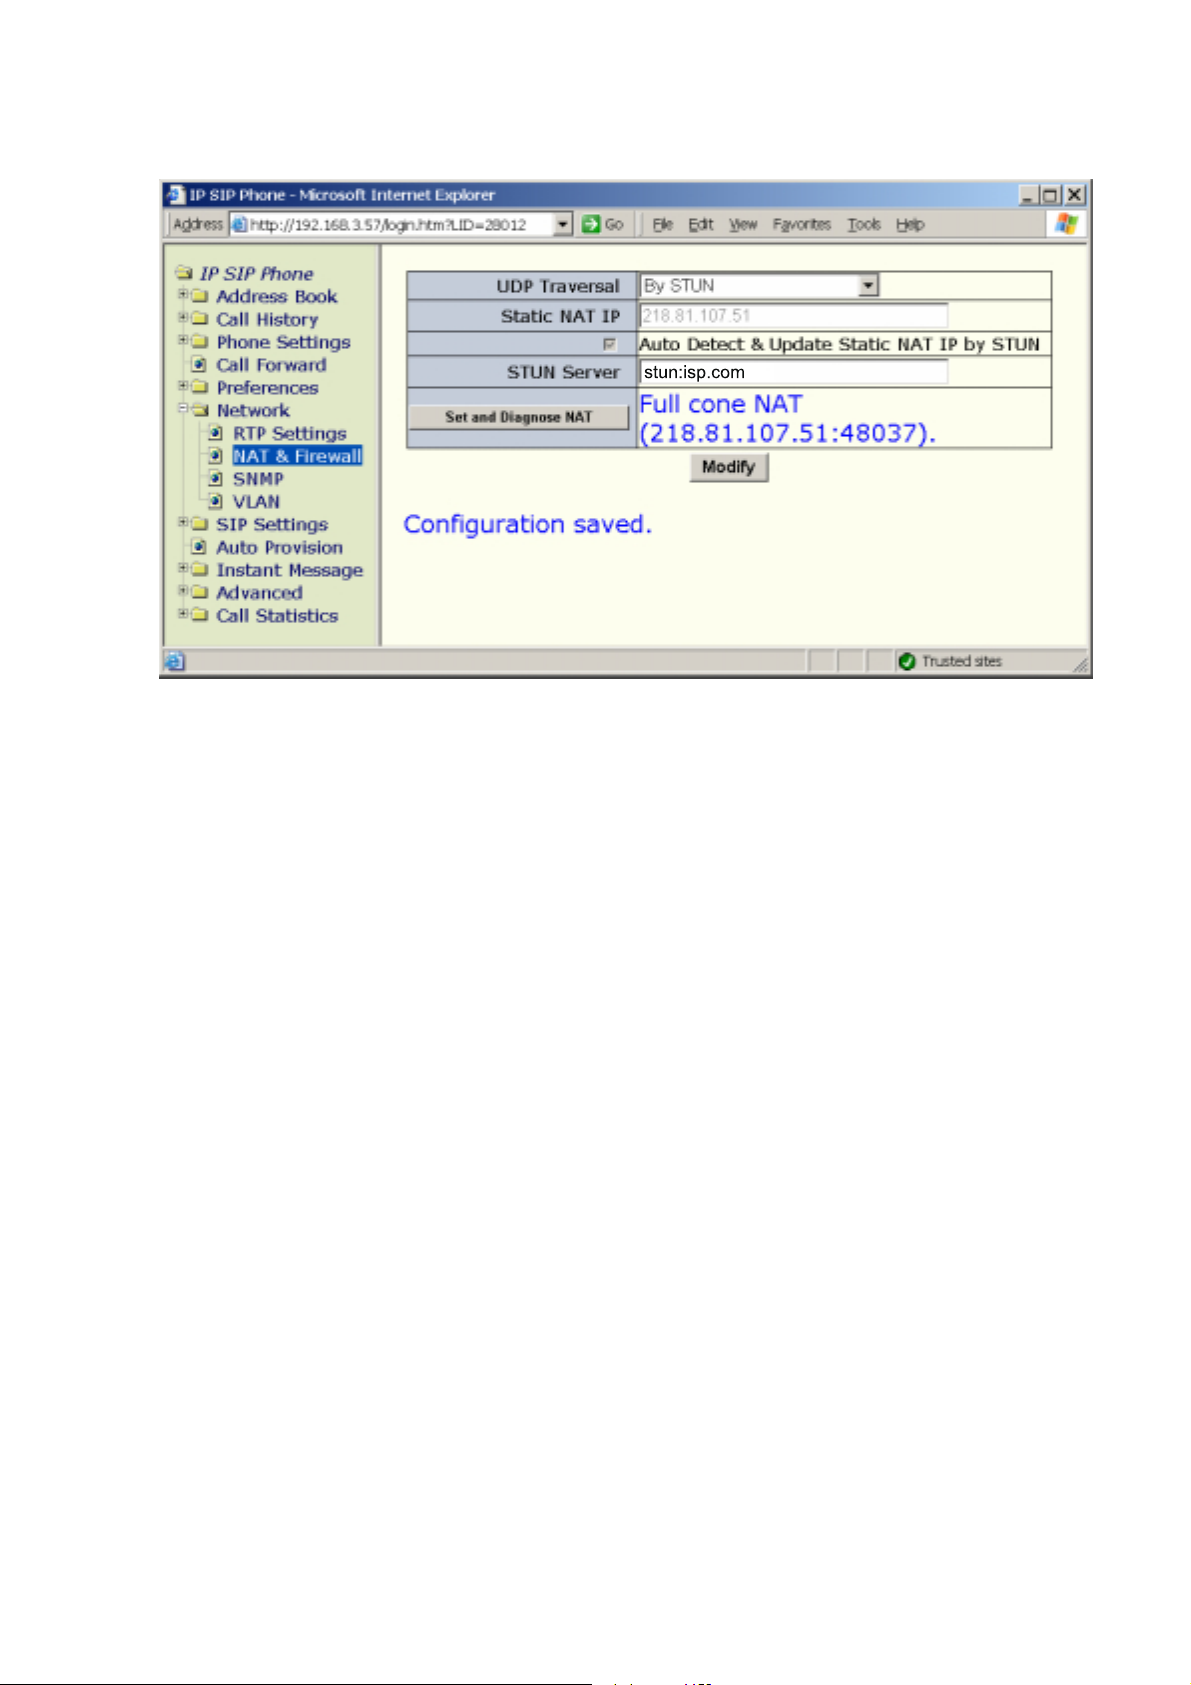
IP SIP Phone v2 User’s Guide Mar. 2005
z Activate STUN Mode
stun:isp.com
STUN server: Enter a functional and reachable STUN server IP for STUN to
work.
UDP Traversal: Enable STUN
[90/100]
Page 91

IP SIP Phone v2 User’s Guide Mar. 2005
Appendix A - Available NTP servers
Service Level 2 NTP Server Service Area
North America
Ontario, Canada: University of
Toronto
Quebec, Canada: Canadian
Meteorological Center
Ontario, Canada: National
Research Council of Canada
Service Area
Saskatchewan, Canada:
University of Regina
Mexico: Audiotel office ntp2a.audiotel.com.mx;
Santa Cruz, CA: Scruz-net, inc. 165.227.1.1: ns.scruz.net Western U.S.
San Diego, CA: UCSD Academic
Computing Services / Network
Operations
tick.utoronto.ca
tock.utoronto.ca
ntp1.cmc.ec.gc.ca
ntp2.cmc.ec.gc.ca
time.chu.nrc.ca;
time.nrc.ca
142.3.100.15: timelord.uregina.ca Canada
ntp2c.audiotel.com.mx;
ntp2b.audiotel.com.mx
132.239.254.49: ntp.ucsd.edu CERFNET; NSFNET,
Eastern Canada
Eastern Canada
Canada
Avantel, MCINet, and
Mexico
SDSC region, and nearby
Quincy, California ntp1.mainecoon.com;
ntp2.mainecoon.com
Newark, DE: University of
Delaware
Atlanta, GA: CNSG ntp.shorty.com Southeast U.S.
Kennesaw, GA: PeachNet rolex.peachnet.edu;
Urbana-Champaign, IL:
University of Illinois
Chicago, IL: Argonne National
Laboratory
West Lafayette, IN: Purdue
University
Manhattan, KS: KansasNet
128.175.1.3: louie.udel.edu CAIRN, Abilene, and
timex.peachnet.edu
ntp-0.cso.uiuc.edu;
ntp-1.cso.uiuc.edu;
ntp-2.cso.uiuc.edu
ntp-1.mcs.anl.gov;
ntp-2.mcs.anl.gov
gilbreth.ecn.purdue.edu;
harbor.ecn.purdue.edu;
molecule.ecn.purdue.edu
199.240.130.1: ntp1.kansas.net
North America
vBNS
PeachNet (Georgia) and
Southeast U.S.
CICNET, Midwest, and
NCSA region
NSF / ANSNet, CICNet,
NetIllinois, and ESNet
NSFNET and CICNET
area
Central U.S. and Great
OnLine Services
Boston, MA: UMass-Boston CS 158.121.104.4: New England
199.240.130.12: ntp2.kansas.net
Plains
[91/100]
Page 92

IP SIP Phone v2 User’s Guide Mar. 2005
dept. timeserver.cs.umb.edu
Minneapolis / St Paul, MN:
University of Minnesota
Columbia, MO: University of
Missouri-Columbia
Omaha, NE: Radiks Internet
ns.nts.umn.edu;
CICNET region
nss.nts.umn.edu
128.206.206.12:
MOREnet
everest.cclabs.missouri.edu
205.138.126.83: allison.radiks.net Midwest U.S.
Access
Las Vegas, NV: University of
Nevada System Computing
131.216.1.101: cuckoo.nevada.edu NevadaNet, NSFNET, and
SDSC region
Services
Las Vegas, NV: UNLV College of
Engineering
New York City, NY: Columbia
tick.cs.unlv.edu;
Sprintnet
tock.cs.unlv.edu
ntp.ctr.columbia.edu Sprintlink and NYSERnet
University
Ithaca, NY: Cornell University 192.35.82.50: ntp0.cornell.edu NSFNET and NYSER
region
New York, NY: Morningside
sundial.columbia.edu NYSERnet
Campus, Columbia University
New York City, NY: Columbia
University Computer Science
timex.cs.columbia.edu PSINET; NSFNET, and
NYSER region
Department
Norman, Oklahoma: University of
Oklahoma
129.15.22.8:
constellation.ecn.uoknor.edu
Midnet
Coos Bay, OR: Koala Computers 207.48.109.6: tick.koalas.com Northwestern U.S.
University Park, PA: Penn State
University
128.118.25.3: clock.psu.edu Internet2, vBNS,
CERFnet(AT&T IP
Services), PSC / NCNE,
and CASC
Pittsburgh, PA: Pittsburgh
128.182.58.100: fuzz.psc.edu NSFNET and PSC region
Supercomputing Center
Pittsburgh, PA: Carnegie Mellon
Electrical and Computer
ntp-1.ece.cmu.edu;
ntp-2.ece.cmu.edu
PREPNET and PSC region
Engineering
Dallas, TX: Cox School of
Business, Southern Methodist
129.119.80.126: ntp.cox.smu.edu NSFNET and SESQUI
region
University
Hughes Springs, TX: First
209.144.20.76: ntp.fnbhs.com Northeast Texas
National Bank
Houston, Tx: Baylor College of 128.249.1.10: ntp.tmc.edu NSFNET and SESQUI
[92/100]
Page 93

IP SIP Phone v2 User’s Guide Mar. 2005
Medicine region
College Station, TX: Texas A&M
University
Plano, TX: Greyware Automation
Products
Blacksburg, VA: Virginia Tech
Computing Center
Arlington, VA: Center for
Seismic Studies
Richland, WA: Washington State
University
Washington, U.S.: Mill Creek time.ultimeth.net Northwest U.S.
Wisconsin, U.S.: Computer
Science Department, University
of Wisconsin-Madison
165.91.52.110: ntp5.tamu.edu NSFNET, SESQUI region,
THEnet, and TAMUSDSN
tick.greyware.com;
tock.greyware.com
ntp-1.vt.edu;
ntp-2.vt.edu
140.162.1.3: ntp.cmr.gov NSFNET and SURA
192.31.216.30:
clock.tricity.wsu.edu
ntp1.cs.wisc.edu;
ntp2.cs.wisc.edu;
ntp3.cs.wisc.edu
South-Central U.S.
Southeast U.S.
region
NSFNET and
NorthWestNet
U.S. and any
South America
Buenos Aires, Argentina:
Network Access Point
Buenos Aires, Argentina: Sinectis
S.A.
Brazil: Brazilian Research
Network
Venezuela: VELUG, Grupo de
Usuarios Linux de Venezuela
200.49.40.1: tick.nap.com.ar
200.49.32.1: tock.nap.com.ar
time.sinectis.com.ar Argentina
200.144.121.33: ntp.cais.rnp.br Brazil
150.185.192.250: ntp.linux.org.ve Arica
Argentina
Europe
Zurich, Switzerland: Swiss Fed.
Inst. of Technology
Location: Copenhagen, Denmark,
Europe
Spain: Altea slug.ctv.es Spain
Pieksamaki, Finland:
Keski-Savon Oppimiskeskus
129.132.98.11: bernina.ethz.ch
clock.netcetera.dk;
clock2.netcetera.dk
tick.keso.fi;
tock.keso.fi
Switzerland and Europe
Denmark, Scandinavia,
and Northern Europe
Finland
Meudon, France: Observatoire de
Paris-Meudon
Lyon, France: CISM ntp.univ-lyon1.fr France, Switzerland, Italy,
Paris, France: VIA, Ecole
Centrale
ntp.obspm.fr France and Europe
and Europe
138.195.130.70: ntp.via.ecp.fr France and Europe
[93/100]
Page 94

IP SIP Phone v2 User’s Guide Mar. 2005
Budapest, Hungary: KFKI
148.6.0.1: time.kfki.hu HUNGARNET
Research Institute for Particle and
Nuclear Physics
Italy: Net4u Srl, Vercelli, Italy 195.32.52.129: ntps.net4u.it Italy
Oslo, Norway: University of Oslo 129.240.64.3: fartein.ifi.uio.no NORDUnet
Oslo, Norway: Alcanet
time.alcanet.no Europe
International
Krakow, Poland: Academic
149.156.4.11: info.cyf-kr.edu.pl Poland and Europe
Computer Centre
Lund, Sweden: Lund Institute of
130.235.20.3: ntp.lth.se Sweden and NORDUnet
Technology
Ljubljana, Slovenia: Institute of
biofiz.mf.uni-lj.si 193.2.69.11 Slovenia and Europe
Biophysics, University of
Ljubljana
Ljubljana, Slovenia:
hmljhp.rzs-hm.si Slovenia and Europe
Hydrometeorological Institute of
Slovenia
Ljubljana, Slovenia: Academic
and Research Network of
ntp1.arnes.si;
ntp2.arnes.si
Slovenia
Ljubljana, Slovenia: J. Stefan
time.ijs.si Slovenia and Europe
Institute
British Isles
Dublin, Ireland: School of
Mathematics, Trinity College
Glasgow, Scotland: Strathclyde
University
Cambridge, U.K. ntp0.uk.uu.net
Manchester, England: University
ntp.cs.tcd.ie;
ntp.maths.tcd.ie;
ntp.tcd.ie
ntp.cs.strath.ac.uk U.K., Europe, and any
ntp1.uk.uu.net;
ntp2.uk.uu.net
ntp2a.mcc.ac.uk;
Slovenia and Europe
Ireland and U.K.
UUNET (formerly known
in the U.K. as PIPEX) and
U.K.
U.K.
of Manchester
ntp2b.mcc.ac.uk;
ntp2c.mcc.ac.uk;
ntp2d.mcc.ac.uk
Buckinghamshire U.K.: Wibble
tick.tanac.net Service area: U.K.
U.K., Aylesbury
Asia
Moscow, Russia: Landau Institute 193.233.9.7: ntp.landau.ac.ru Service area: Russia
[94/100]
Page 95

IP SIP Phone v2 User’s Guide Mar. 2005
for Theoretical Physics
Russia: Pushchino (near Moscow) 194.149.67.130: ntp.psn.ru Service area: Russia
Chernogolovka, Russia:
Chernogolovka Scientific Center
(near Moscow)
193.233.46.10: sign.chg.ru Russia
Far East and Pacific Rim
Tokyo, Japan: Cyber Fleet, Inc. 203.139.30.195: ntp.cyber-fleet.net Japan and East Asia
Seoul, Korea: Inet, Inc. time.nuri.net Korea, Japan, Hong Kong,
and East Asia
Hamilton, New Zealand: The
University of Waikato
Singapore and the Philippines ntp.shim.org
truechimer.waikato.ac.nz;
truechimer1.waikato.ac.nz;
truechimer2.waikato.ac.nz;
truechimer3.waikato.ac.nz
New Zealand
Singapore
Africa
Lagos, Nigeria: Supernet300 ntp.supernet300.com Western Africa (primarily
Nigerian NITEL
Pietermaritzburg, South Africa:
Natal University
Australia
Adelaide, South Australia: The
University of Adelaide
Carlton, Victoria, Australia: eSec
Limited
backbone)
143.128.82.200: ntp.cs.unp.ac.za South Africa
129.127.28.4:
augean.eleceng.adelaide.edu.au
129.127.40.3: ntp.adelaide.edu.au
203.21.37.18: ntp.saard.net
203.21.84.4: time.esec.com.au
AARNet
[95/100]
Page 96

IP SIP Phone v2 User’s Guide Mar. 2005
Appendix B – Trouble shooting
1.
To verify your network, please go to Advanced , then type a domain name to ping its
reachability and/or aliveness, like “yahoo.com”, “iptel.org” or “fwd.pulver.com”. If the
response is “Host unreachable”:
i. Check your network link, make sure it works normally (RJ-45 jack plugs into the right
hole and the LAN indication LED should be on.
ii.
Check your IP, DNS, and gateway settings on Network setting page. Note: if you
do not statically assign domain name server by picking Static DNS Server , you
must enable e
configured into the Primary DNS Server and Alternate DNS server item.
iii. If you reside on LAN without gateway, you should specify “0.0.0.0” as your gateway IP
to disable gateway routing rather than assign a non-existent or an invalid IP; otherwise
the network packets may not be routed correctly (which may result in no voice packets
could be sent from this phone)! This constrain applies to DHCP and PPPoE as well:
DHCP and PPPoE server should not designate a non-existent or an invalid gateway.
iv.
Go to IP SIP Phone
matches those configured. Specifically, if the active DNS is 0.0.0.0, then you may have
wrongly configured to 『Static DNS』 Server without setting a valid DNS IP in either
『
『』『』
ither DHCP or PPPoE ; otherwise, it will use the static DNS IP
『』『 』
』『』
page to make sure that those Active Network Status
『』
『』
『』
『』『 』
Primary DNS server or Alternate DNS Server (see point-2 for detail).
2. To verify SIP settings:
i.
Go to SIP Settings』 page:
a.
b.
Go to Network / RTP S』ettings :
ii.
a. Your
b.
c.
iii.
Go to N
『
『』 『』
Your Transport setting should include UDP. Verify the network settings to
see whether it works normally.
『
Your SIP Listen P』ort setting must be less than 65536 and greater than 0. We
suggest a value greater than 5000 to avoid accidentally conflicting with system
service ports. System default is 5060.
『』『
『』
RTP Port Base should be an even number ranges between 2 and 65534.
『』
Your RTP Port Range setting should be an even number and larger than or
equal to 2. At least 4 ports should be configured for IP SIP Phone since it has a
maximum capacity of two concurrent calls and each call consumes two consecutive
UDP port pair (one for RTP and the other for RTCP). We suggest a range value of 6
The sum of RTP Port Base and RTP Port Range must be less than 65536,
and must not overlap with SIP Settings
『
『』『 』
-th
Domain』 and configure
『
』『
/ SIP List』en Port .
a. Authentication
b. SIP Address-of-Record
[96/100]
Page 97

IP SIP Phone v2 User’s Guide Mar. 2005
c. Proxy Server
d. Registrar
Configure SIP domain applied from service provider as appropriate. To apply for a public
domain account, you may go to www.freeworlddialup.com
or www.iptel.org.
3. Check for NAT and Firewall settings:
Go to Network / NAT & firewall , enter the STUN server IP provided by your
『』『 』
service provider. For example, you may enter “stun.qt.com” or “qt.com” or “larry.gloo.net”
for test purpose.
Please refer to chapter 6 –
『』
NAT Traversal to determine the best way to traverse your
network address translator or firewall deployed by your ISP or company.
4. Experience long-delay or poor response time on making calls (roughly 10 seconds):
The most possible cause is that you have enabled STUN to traverse NAT, but the STUN server
is either down or unreachable.
To verify the exact reason, please go to Network / NAT & firewall and click Set
and Diagnose NAT to figure it out. If the result is Firewall blocks UDP and you are
』『』
『』『 』 『
pretty sure that you are not under such a network condition, you should check for the DNS and
STUN server, making sure they works normally by Pinging for their viability. Otherwise, you
should pick Static NAT IP/UDP 』Map as the way to traverse NAT.
『
5. After setting up a call, it always disconnects automatically after 32 seconds.
This may be due to the fact that either the involved SIP proxy servers and / or the terminals
(either the caller or callee) are behind NAT, such that the ACK signal cannot be transmitted
through the signaling path.
If only the terminals are behind the NAT, please refer to previous parts for NAT & firewall
traversal. On the contrary, if it is the SIP proxy that behind NAT , which has a private
unroutable IP address, then it hardly leaves room to solve this problem except for direct IP
dialing (because most proxy servers demands record-route, but it fails if any of the involved
servers bear private IP).
6. Experience one-way voice (or no voice could be heard by either party) after call setup.
This is because one of the terminals resides behind NAT and it does not specify a way to
traverse it reliably. Normally, the one who cannot hear voice mainly because it specifies a
private IP address to receive voice media on call setup phase; as a result, the peer starts to send
voice media to this unroutable private IP address and the voice packets will get lost since
private IP are not routable. To verify the real cause:
i. If both parties have connected and engage in calls already, please
go to Call
『
Statistics / Channel Info page to view the following information and check
』『 』
[97/100]
Page 98

IP SIP Phone v2 User’s Guide Mar. 2005
whether they convey private IPs (alternatively, you may activate by alternatively,
you may press DSS key
『』
Channel Info ):
【F2】
, which default maps to “Channel Info”, to activate
a. From(Contact)
b. Media Session => both local and remote RTP session.
ii. If you have hanged up the call, please go to 『Call Statistics』 / 『Call Detail』 to
check for the following information and figure out whether they convey private IPs
(alternatively, you may activate by alternatively, you may press DSS key
『
which default maps to “Call Detail”, to activate
Call Detail』):
【F3】
,
a. From(Contact)
b. Media Traffic / RTP Session => both local and remote RTP session.
iii. The format of
『
Contact』 is xxx.xxx.xxx.xxx:port, which specifies the peer’s contact
information for SIP signaling.
iv. The format of RTP/RTCP session comes in the format “xxx.xxx.xxx.xxx:RTP/RTCP”,
which specifies the IP of CPE and the UDP port used for RTP and RTCP session.
For IP SIP Phone, if either side is behind NAT and conveying its private IP, please specify a
way to solve this problem from page
『
Network
』『 』
/ NAT & firewall , and refer to chapter
『』
6 –
NAT Traversal to determine the best way to traverse your network address translator
or firewall deployed by your ISP or company.
7. Sometimes there would be only one party be held successfully on conference mode when
the conference master presses 【HOLD】:
This happens only on some SIP proxy server implementations, such as the VOCAL server
(both 1.4 and 1.5) from www.vovida.com
. The problem is due to the fact that those
implementations will increase their “nounce” on authorization (www-authorization),
therefore forbid multiple concurrent transactions originated from the same host.
The same problem happens on those servers when you have multiple calls on hold!
8. Direct IP dialing or LAN dialing cannot work:
Most often it is due to the SIP service port does not match. For example, if your dial string is
something like “*100”, then the default SIP service port of the called party is UDP 5060. If
the called party does not run its SIP service port on UDP 5060, then it definitely will not ring.
To solve it, please dial the port as well if the called party listens on port other than UDP 5060.
For example, dial “192*168*1*200**6666” to reach “192.168.1.200:6666” (you first dial the
IP dial prefix to activate IP dial plan as appropriate).
IP SIP Phone by default will always listen on UDP port 5060 in addition to the user
configured SIP Listen port on 『SIP Settings』 page.
9. Received “Unsupported Media” or “Not Acceptable” while making calls.
This message will be shown if both sides fail to negotiate a CODEC for media session. The
[98/100]
Page 99

IP SIP Phone v2 User’s Guide Mar. 2005
failure cause is due to the mutual exclusion of both parties’ CODEC capabilities. For example,
if you specify explicitly to use only G.723.1 for voice stream whereas the peer is only capable
of G.711, then the conversation cannot proceed.
To ensure the phone will gracefully fall back to G.711, either party of the call should not
disable G.711 CODEC. To check CODEC settings on IP SIP Phone, please go to
『
Advanced
』『
/ CODEC
』『
page to check for Preference』 section. If you prefer to use
G.729 or G.723.1 for voice compression, consider lower the priority of G.711 rather than
disabling them.
10. I can call others, but some of them or all others can not ring me.
Possible cause:
i. You are in All Call Forward mode (You could hear stuttering dial tone while picking
up handset).
ii. Both of you are under on the same NAT, and either one of you
STUN
』
or 『Static NAT IP/UDP Map』 to traverse NAT. This is largely because
employs Enable
『
some NATs will not loop packets back if the source and destination are on the same
NAT.
iii. You use
on NAT & Firewall page does not match the real IP of your NAT. (This is
『
Static NAT IP/UDP Map』 to traverse NAT but the assigned static NAT IP
『』
possible especially when your NAT does not come with a fixed IP but employ PPPoE
or DHCP to gain access to WAN instead). By default, IP SIP Phone will auto-detect
the NAT IP (if the STUN server configured into NAT & Firewall page is viable)
『』
and notify you whenever you hit the Network / NAT & Firewall page if it
『』『 』
detects a mismatch between the static NAT IP you configured and the one it
auto-discovered by STUN protocol. Alternatively, you enable the option –『Auto
Update Static NAT IP by STUN to auto-refresh the newly changed NAT IP
』
whenever it detects an inconsistency.
[99/100]
Page 100
IP SIP Phone v2 User’s Guide Mar. 2005
Appendix C – Tones
TONE Usage
NULL_TONE Stop tone playing
DIAL_TONE
RECALLDIAL_TONE
ALERT_RING_TONE
RINGBACK_TONE
BUSY_TONE
REORDER_TONE
FAST_BUSY_TONE
FAST_BUSY_2_TONE
CALLWAITING_TONE
COVERAGE_TONE
INTERCEPTION_ERROR_TONE X (No voice)
LOCAL_ERROR_TONE X (No voice)
CONFIRMATION_TONE
STUTTERDIAL_TONE
REGISTRATION_FAILURE_TONE
CONNECTION_LOST_TONE
AUDIBLE_RINGING_TONE
CALLWAITING_INSIDE_TONE X (No voice)
CALLWAITING_OUTSIDE_TONE X (No voice)
Dialtone.wav
RingbackTone.wav
Busy.wav
Peer busy
Reorder.wav
Fastbusy.wav
Coverage.wav
Dial tone
Re-call Dial tone.wav
Alert Ring Tone.wav
Dial tone on call transfer
Ringing on incoming calls
Ring back
Network failure
Call transfer failed. (600 ms)
FastBusy2.wav
CallWaiting.wav
1st digit timeout
Hold recall
Conference alerting
Call transfer succeeded
Confirmation.wav
StutterDialTone.wav
ConnectionLostTone.wav
AudibleRingingTone.wav
Call-waiting alert
RegistrationFailureTone.wav
System busy
Peer Hangs up
[100/100]
 Loading...