

Page 1

IP 250
Thank you for choosing your Atl IP250 telephone. You have selected a carefully designed
telephone that incorporates the very latest technology, offering a stylish instrument, and
providing many years of excellent service.
This booklet will ensure you obtain the best use of your IP telephone.
User Guide
Page 2

IP250 IP Phone
Web Conguration Manual
To access the web conguration and status pages for your phone simply open up your
preferred web browser and enter the IP address of your IP250 into the address URL eld.
The web interface has two privilege levels: Administrator and User. Both privilege levels are
password protected by default. The user names for the Administrator and User are “admin”
and “user” respectively. And the default password for both privilege levels is “voip”.
The major difference between an Administrator and a User is that the Administrator has full
control over the IP250 device while the User mode only allows limited changes.
2
Page 3

Table of Contents
IP250 IP Phone
1 HOME 5
2 LAN 6
2.1 LAN Status 6
2.2 LAN Settings 7
2.3 PPPoE 8
2.4 IPSEC 9
3 SIP 10
3.1 Server 10
3.2 Extension 11
3.3 Digit Map 13
3.4 User 1 14
3.5 OOB Signaling 15
3.6 Tos/Diffserv 15
3.7 Tone 16
3.8 Ring 17
3.9 Service Code 18
3.10 Phonebook 19
4 CODECS 20
5 SYSTEM 21
5.1 Security 21
5.2 Timeout 22
5.3 Localization 23
5.4 Handset 24
5.5 Port Number 25
5.6 Ringer Tone 25
5.7 SNMP 26
6 DOWNLOAD 27
6.1 HTTP Download method 27
6.2 AutoUpdate 28
Page 4

7 CONFIGURATION 29
7.1 Backup 29
7.2 Restore 30
8 RESET 31
PHONE FUNCTIONS
MESSAGE 32
ENTER 32
DELETE 32
STORE 32
FORWARD 32
SET 32
CLID 32
MUTE 33
HOLD 33
CONF 33
AUTO RD 33
REDIAL/OUT 33
SPEAKER/HEADSET 33
VOLUME UP AND DOWN 33
TRANSFER 33
OPERATION 33
CALLER ID 35
PHONE BOOK 35
PHONE SETTING 37
SAFETY INSTRUCTIONS 39
32
GUARANTEE 39
MANUFACTURER’S DECLARATION 40
4 37
Page 5

1 HOME
This following page is the rst page displayed when the device is logged in to. Figure 1
and 2 show the variations in pages dependent on an Administrator or a User logging in. As
the screenshots show below, the user level privilege (Figure 1) doesn’t have access to the
conguration page of CODECS, Download and Conguration.
It displays how long the device has been running since its last reboot, the IP address the
device is currently using, whether or not the device is password protected, and also displays
the main application and downloader application rmware versions. In addition, the MAC
address of the WAN port, and serial number of the device, if it has one, are also displayed in
this page.
Figure 1 - User Privilege Mode
Figure 2 - Administrator Privilege
Page 6

2 LAN
2.1 LAN Status
The following page allows conguration of the phone’s local network settings. Sub-pages
are available for the following on the left of page: the LAN interface status, conguration of
the LAN interface settings, and conguration of DHCP server settings, and Port Forwarding
(NAPT) Settings.
2.1 LAN Status
The page displays the current status of the LAN interface, including the IP address and other
network settings the interface is currently using.
6 35
Page 7

2.2 LAN Settings
The following page allows the user to congure the private LAN interface settings. Assign an
IP address to the LAN Ethernet port. This IP address is also the default router address for the
devices on the private LAN. The default LAN interface IP address is set to 192.168.1.1. Enter
the subnet mask for the private LAN. If you wish to set the broadcast and multicast limits for
the bridge/router, enter these values as percentages of the LAN interface Ethernet bit rate.
Leaving these values blank will imply values of 100%.
Press “Save LAN Settings” to save and apply the LAN interface settings. Any new settings will
take effect immediately.
Page 8

2.3 PPPoE
This page allows you to congure the phone to authenticate to your network using PPPoE. If
you wish to use this authentication method please ll out the appropriate elds and select Yes
in the Enable PPPoE’s selection Box. Please note that you will need to obtain your username
and password from who ever provides your network service.
8 33
Page 9

2.4 IPSEC
UPDATE TO FOLLOW
Page 10

3 SIP
3.1 Server
The following page allows conguration of the SIP server and endpoint settings.
Enter the address and port value of the SIP server. The address may be an IP address or
the name of the server. If no SIP server address is entered, the device will attempt to self
provision a SIP server using a DNS query. For this to be successful, ensure that the DNS
settings on the device include a DNS server address which is congured with the SIP server
address and will respond to the query, and the appropriate domain name of the network.
If you wish to specify a special SIP domain name, you may enter the domain name here. If
no domain name is entered, the SIP domain name will be set to that of the network (i.e. that
which is obtained via DHCP, or specied on the LAN settings page).
The currently provisioned SIP Server and Domain are displayed beside “SIP Server Settings”
for informational purposes. Select whether or not to send a Registration Request to the SIP
server by checking the box next to “Send Registration Request”.
For the endpoint, set the dial plan to be used by all lines, and select the transport method to
be used for SIP signaling (either UDP or TCP). For each line on the endpoint (NOTE: The IP
Phone has a single line), enter the Line Phone Number, Caller-ID Name, signaling port value,
authentication Username and Password, and select if AEC is to be performed on this line.
Press “Save SIP Settings” to save the new values.
10 31
Page 11
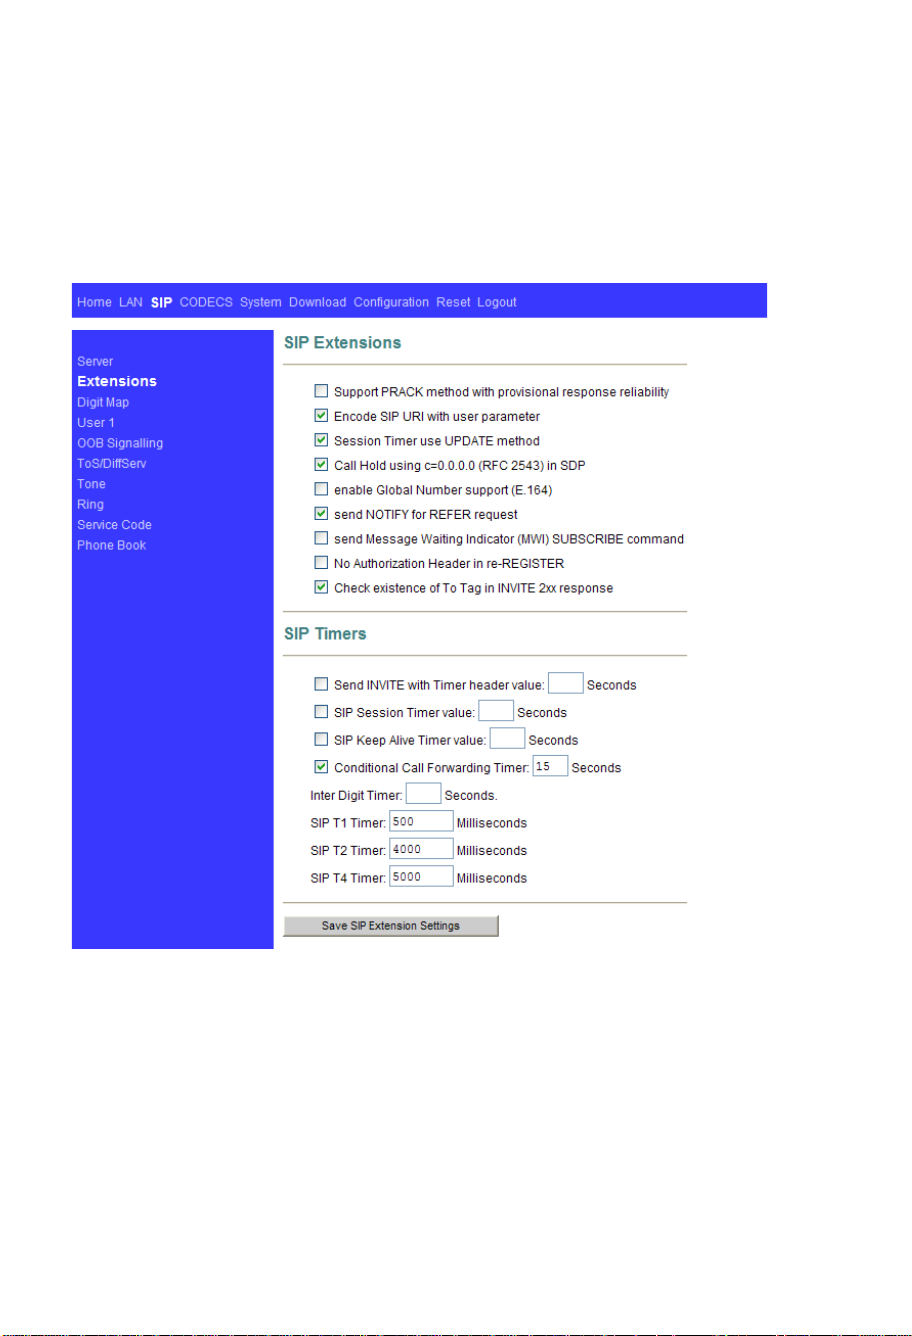
3.2 Extension
The following page allows specication of the SIP signaling stack behavior under certain
scenarios.
Support PRACK method: If you wish for the SIP stack to implement reliable transmission
►
of provisional responses according to RFC 3262 (using the PRACK method) ,check
the option.
Encode SIP URI with user parameter: include the user parameter “user=phone” in the
►
SIP URI headers.
Session Timer use UPDATE method: Session timer use update instead of reinvite.
►
Call Hold using C=0.0.0.0: using the call hold method described in RFC2543. If
►
unchecked, the call hold would follow RFC3263 method.
Page 12

Enable Global Number support (E.164): add prex “+” for dialed numbers in sip
►
invitation.
Send NOTIFY for REFER request: send out NOTIFY request to transferer for
►
unattended and attended call transfer.
Send Message Waiting Indicator (MWI) SUBSCRIBE command: send SUBCRIBE
►
after registered to server to check if there are any messages to be read.
Send INVITE with Timer header: encode Timer header in all INVITE requests for
►
ringing timeout.
Enable SIP session timer: If you wish for the SIP stack to implement a session timer
►
according to “draft-sipsession-timer”, select the option.
SIP T1 Timer, SIP T2 Timer, and SIP T4 Timer: please refer to RFC3261.
►
Press “Save SIP Extension Settings” to save the new values.
12 29
Page 13

3.3 Digit Map
UPDATE TO FOLLOW
Page 14

3.4 User 1
The following page allows the user to congure the phone to connect to an IPPBX or a SIP
service. Enter the phone number, caller ID, username and password specied by the your
ITSP or the administrator of your IPPBX.
14 27
Page 15
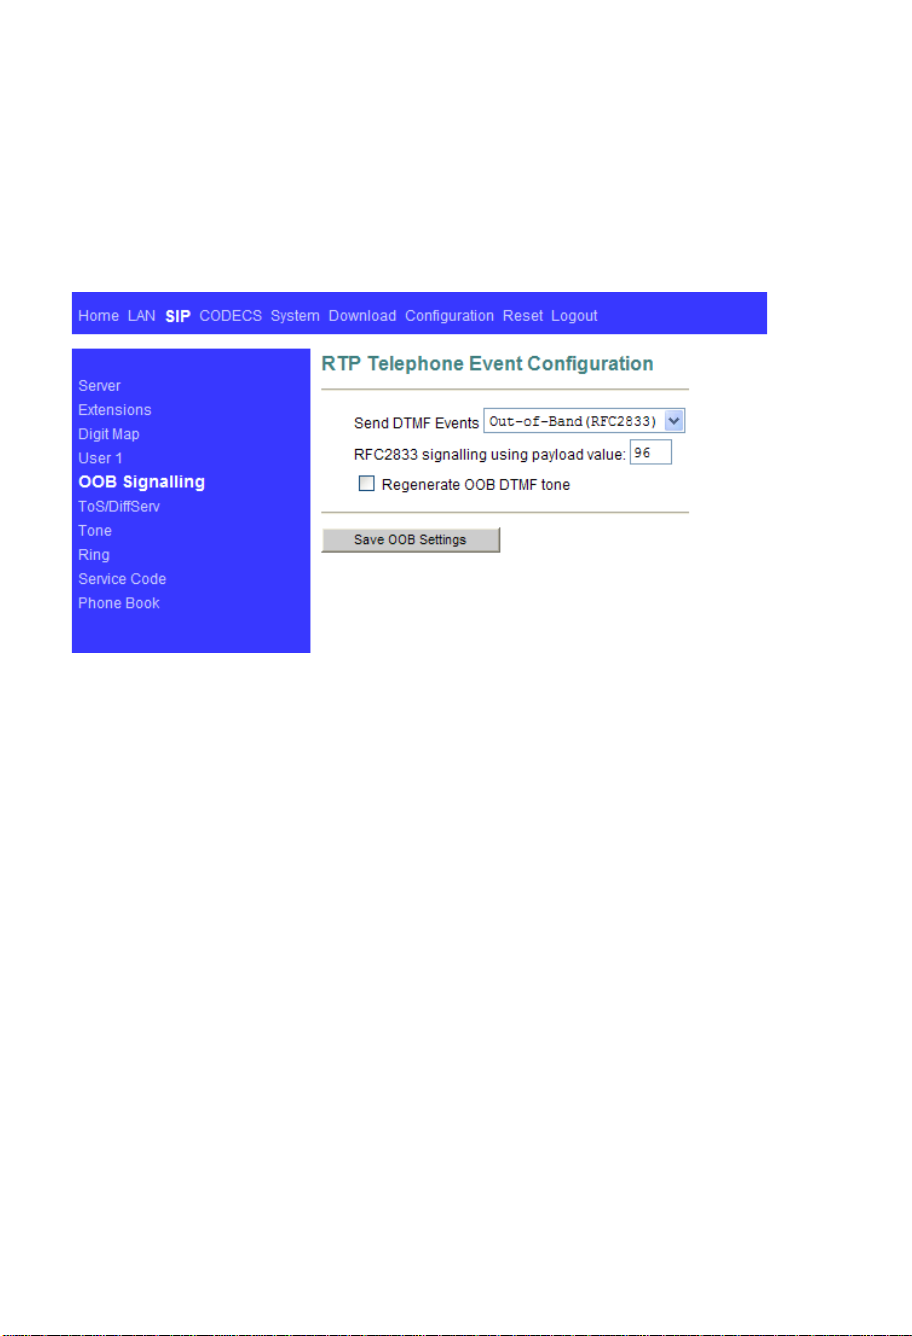
3.5 OOB Signaling
The following page allows conguration of the out-of-band signaling options for SIP. Select
whether OOB telephone event signaling is to be done using the SIP INFO message, or to be
done via RFC2833 RTP signaling.
3.6 Tos/Diffserv
The following page is used to congure the Type-of-Service/Diffserv byte values which are
to be used in the IP header of all transmitted SIP signaling packets and RTP packets. The
ToS/DiffServ byte values are entered as two-digit hexadecimal values. If no special ToS/Diff-
Serv value is to be used for a particular trafc type, enter”00” or leave the setting empty.
Press “Save ToS/DiffServ Settings” to save these new settings.
Page 16
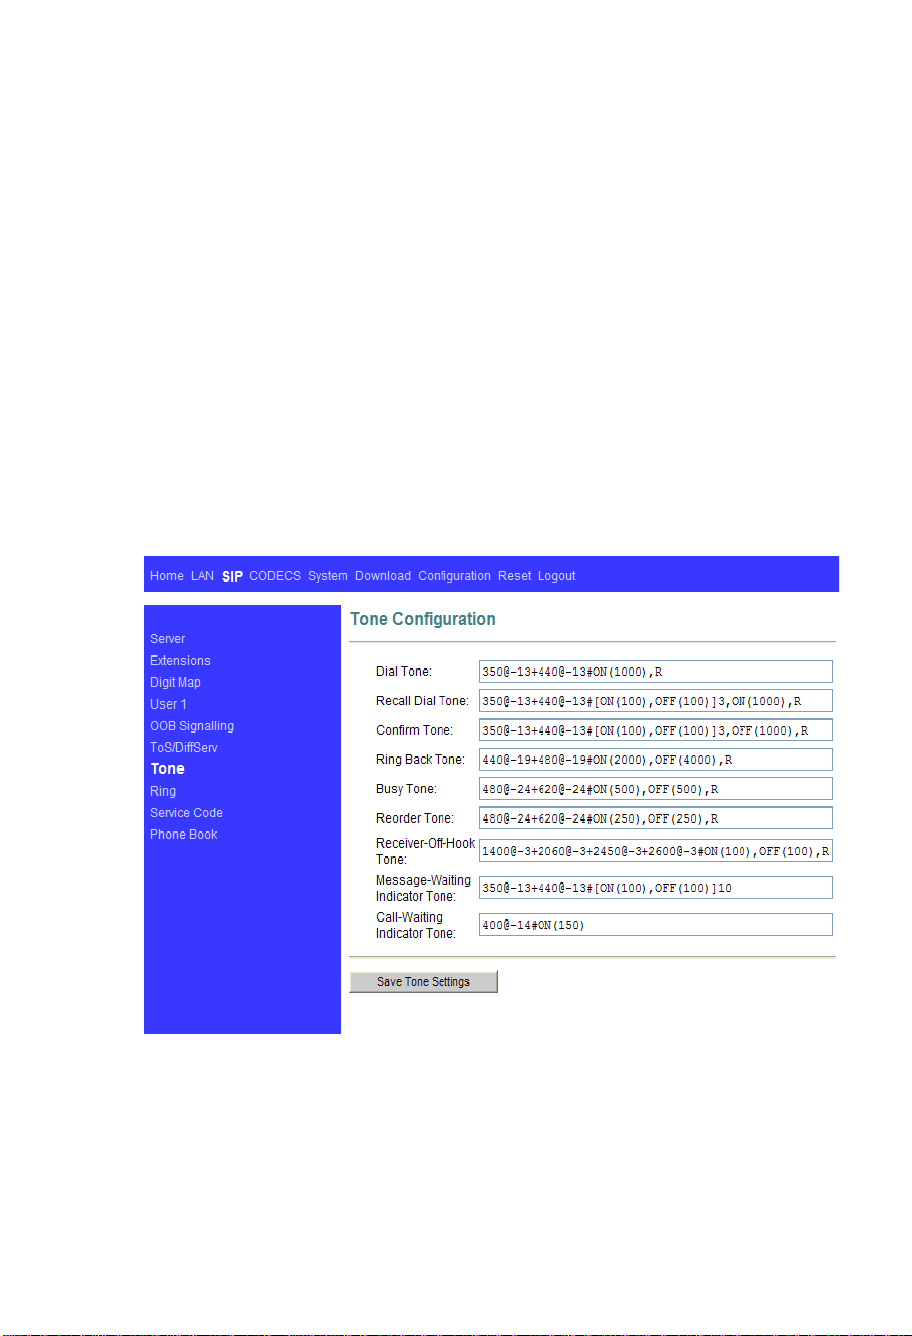
3.7 Tone
The following page is used to congure Tones which applies in order to acknowledge users.
Dial Tone: The tone you hear when you pick up handset
►
Recall Dial Tone: The tone when you hold callee and prepare to make another call.
►
Conrm Tone: The tone after you’ve set up some service, like DND (Do Not Disturb),
►
Call Forwarding, etc.
Ring Back Tone: The audible ringing you hear before callee picks up and answers
►
your call.
Busy Tone: The tone indicates the number you dialed is in busy now.
►
Reorder Tone: The tone you hear if you dial an invalid number or the call is not
►
available.
Receiver-Off-Hook Tone: The tone to alert you to place the handset on-hook.
►
Message-Waiting-Indicator Tone: The tone to notify you to call for message box.
►
Call-Waiting-Indicator Tone: The tone to make you aware of the second incoming
►
call while you’re in conversations.
16 25
Page 17

3.8 Ring
The following page is used to congure Ring Cadences required by Rings, Call-Waiting-
Indicator, and Distinctive Ring features.
Default Ring: Default ring cadence when the phone rings.
►
Call-Waiting Reminder Ring: Ring cadence of Call-Waiting Reminder Ring.
►
Distinctive Ring 1-8: Ring cadences provided for distinctive ring function.
►
You may customise them according to the xed format.
For example,
ON(500),OFF(500),R
Will cause 500 milliseconds ring on, then 500 milliseconds off, and repeat steadily.
Page 18

3.9 Service Code
The following page is used to congure the service codes available on the phone, you can
setup a service by setting the code you wish to dial through the keypad.
Service Code Conguration:
Conditional Call Forwarding: *70#
Call Forward On: *72#
Call Forward Off: #72#
Do Not Disturb On: *74#
Do Not Disturb Off: #74#
Call Transfer: *98#
Call Return: *69#
Speed Dial: *68
Note: Do NOT change the service code values unless there is a conict between the settings
of your VoIP device and the settings provided by your service provider.
18 23
Page 19

3.10 Phonebook
This page allows you to setup 10 numbers you wish to store on your phone. To add an entry
into your phone book ll out the number section with the phone number of the person you wish
to add. Once the number has been entered then you will need to enter the sip domain that
the phone number is registered to in the IP Address eld along with a port number in the Port
eld. The default port number for sip is 5060. When you have nished lling out the contact
details you will need to click the Save SIP Phone Book Settings button at the bottom of the
page to save your new entries.
Page 20

4 CODECS
If the device is running one of the four VoIP applications, the following page is available for
conguring the audio CODEC parameters, as well as the Jitter Buffer settings for the CODEC
decoders.
Enter which CODECs are to be supported. For some protocols (e.g. H.323 and SIP), the
G711U and G711A protocols are always supported by default. For MGCP and H.248, it is
possible to remove these CODECs from the devices list of supported “capabilities”.
Select which complex codec is to be supported. Due to memory limitations, it is not possible
to select more than one complex codec.
Select the packetization period to be used for each selected CODEC. For MGCP, a range of
packetizations may be provided for each CODEC (to be advertised in the device’s “capabilities”
set).
Select whether Silence Suppression is to be supported for each CODEC.
The Jitter Buffer settings apply to all active CODEC decoders. You may choose between an
adaptive jitter buffer and a xed jitter buffer. For an adaptive jitter buffer, choose the maximum
allowable playout delay (in milliseconds). For a xed jitter buffer, choose the xed playout
delay (in milliseconds).
Finally, select whether or not a decoder should automatically switch from an adaptive
jitter buffer to a xed jitterbuffer upon fax/modem tone detection. Adaptive jitter buffers
are sometimes detrimental to fax transmission over G711 CODECs if they have to adapt
too rapidly or too extensively due to inconsistent and widespread packet delays. In these
adverse network conditions, a xed jitter buffer provides superior performance when handling
incoming fax transmissions over G711 CODECs. Press “Save CODEC Settings” to save the
new CODEC parameters.
20 21
Page 21

5 SySTEM
5.1 Security
The password needed to access the VoIP device via web interface can be set in the following
page. First enter the old password, then enter the new password and conrm the new
password. Click on the Change Password button to save the change. The VoIP device will log
the user out and redirect the user to the login page.
Page 22

5.2 Timeout
This eld will only be active if the admin password is set.To change the Authenication time out
open the System menu from the top headings. This will bring up the system sub menus on the
left hand side of the page. Select Timout from the menu. In HTTP Authentication Timeout eld,
input the timeout value you wish to use, then press the Change Time button. The phone’s
browser authenication will now timeout according to the time you have set in this eld. Once
the timout expires the user will be prompted to log into the phone again before being allowed
to change anymore settings.
22 19
Page 23

5.3 Localization
Timezone:
Find the current time from a list of cities.
Country Caller ID:
The caller ID can nd out who’s calling you and keep track of how often they call.
Users should set the country eld according to their geographical location, otherwise the
Caller ID function might not work properly.
Timezone setting:
Click “System” on the top menu.
Click “Localization” on the left menu.
In NTP Server eld, enter a NTP server IP address.
If you want to use the default NTP server, this eld should be blank.
In Time Zone drop down menu, select one time zone.
In Adjust clock for daylight savings checkbox, if your country has daylight savings time, you
can enable it. Press Save Localization Settings button, then system will redirect to the web
page of reset.
Country Caller ID setting:
Click “System” on the top menu.
Click “Localization” on the left menu.
In Country drop down menu, select one country.
Press Save Localization Settings button, then system will redirect to the web page of reset.
Page 24
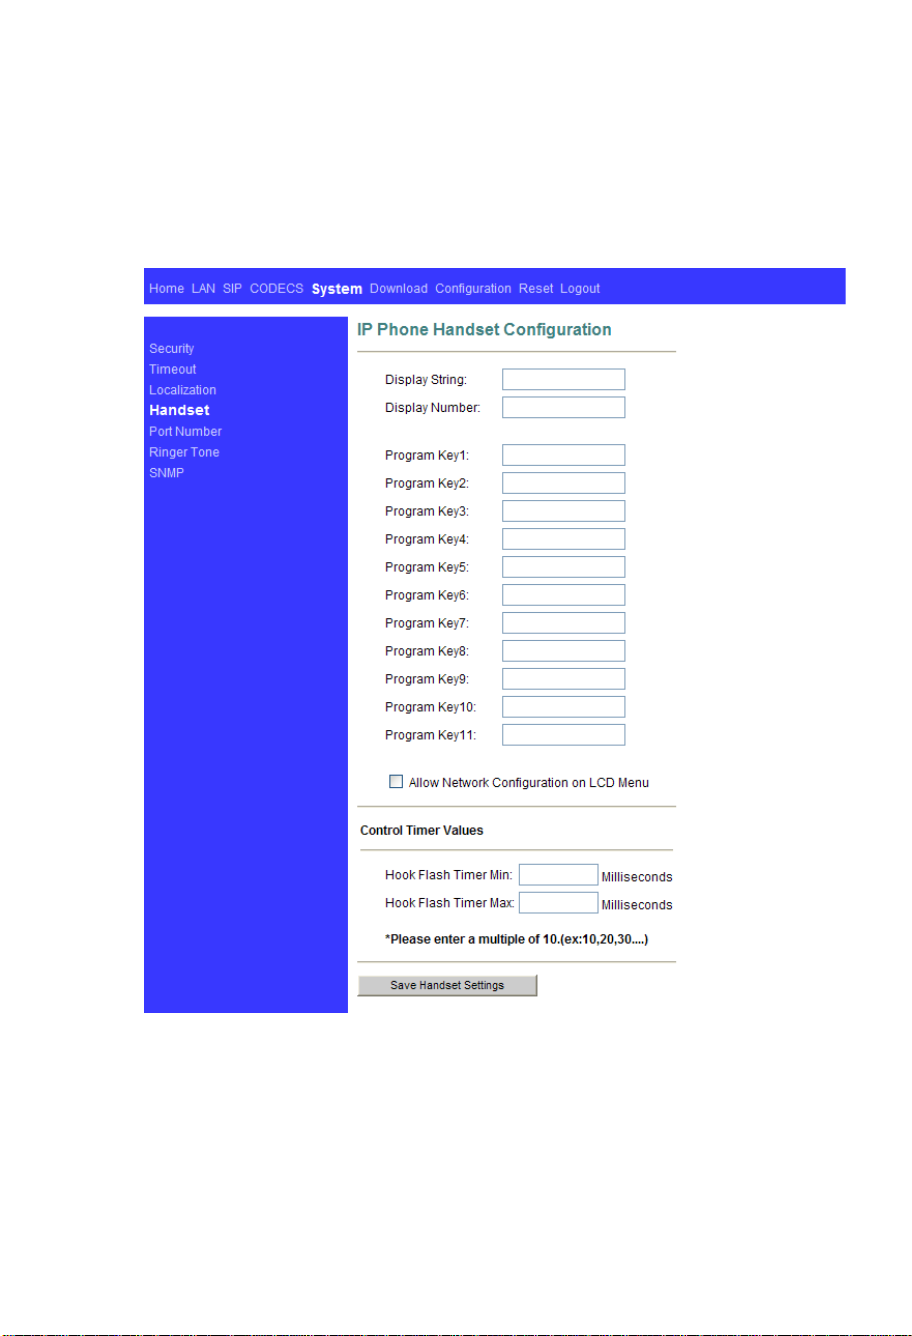
5.4 Handset
The following page allows user to congure the ash hook time interval.
24 17
Page 25

5.5 Port Number
This allows the device to use different port number for the http server. The default port number
is 80.
5.6 Ringer Tone
The following page allows users to select desired ring tone from the drop down list, click
Save Ring Tone Setting once selected.
Page 26

5.7 SNMP
The following page is used for conguring the device’s SNMP manager. Congure the SNMP
Trap Host IP address and community, the SNMP read and write community parameters, and
the SNMP System Description and System Object ID parameters.
Press “Save SNMP Settings” to apply the new values. These settings will only take effect
when the device is rebooted.
26 15
Page 27

6 DOWNLOAD
The following page provides two options for downloading a new rmware application image to
the device. If you wish to download the new rmware image using TFTP, enter the lename of
the ROM image and enter the IP address of the TFTP server on which this le resides.
To initiate the TFTP download process, press “Start TFTP Download.” If the ROM image is
stored on the same local machine you are using to access the device’s web pages, you can
choose to download the ROM le to the device using an HTTP post. Enter the lename of the
ROM image or press “Browse” to help locate the le.
To initiate the HTTP download process, press “Start HTTP Download.”
If the main application is executing at the time, the device will automatically reboot itself
into the downloader mode and begin the download process. If the downloader application is
executing at the time, the download process will begin. The download status will be displayed
when the image download process is complete. Please refer to Section A “The Downloader
Application” for more details on the download process.
6.1 HTTP Download method
When using http to upgrade rmware, it will check rmware version before starting download
process.
In Filename eld, press Browsing Button.
Press Start HTTP Download button to start downloading le.
If rmware version doesn’t t in with old version, it won’t allow updating.
Page 28

6.2 AutoUpdate
AutoUpdate: This feature is an auto-installation system. It can update device conguration
values or rmware through TFTP, HTTP, or HTTPS.
Click “Download” item on the top menu.
Click “AutoUpdate” item on the left menu.
Select “YES” from Enable AutoUpdate drop down menu.
Select item form Update Protocol drop down menu.
In Update Server Address eld, key in IP address by connected server.
In Update Server Port eld, key in port number by connected server. (e.g.: 23/80/443)
Press “Save AutoUpdate” button.
The web system will redirect to reset web page.
28 13
Page 29

7 CONFIGURATION
7.1 Backup
Backup conguration values of system settings to a le from the device:
Click “Conguration” item on the top menu.
Click “Backup” item on the left menu.
Press Backup Congure File button to save conguration le.
Page 30

7.2 Restore
The following page is used to restore conguration values of system settings from a previously
saved conguration le, or default factory values that stored inside the device.
Restore conguration from a le:
Click “Conguration” item on the top menu.
Click “Restore” item on the left menu.
Press Browsing button to select le by backup from local machine.
Press Start Download button to process downloading le.
After downloading le is nished, the web system will redirect to restart device.
Restore default factory values form device:
Click “Conguration” item on the top menu.
Click “Restore” item on the left menu.
Press “Start Restore Default Factory” button.
After restoring default factory, the web system will redirect to restart device.
30 11
Page 31

8 RESET
The following page provides options for resetting the device. Select whether you wish to reset
the device and start executing the main (default) application, or whether you wish to reset
the device and start executing the internal downloader application. Press “Reset” to reset the
device
Page 32

Phone Functions
MESSAGE
Press to link to voicemail server to retrieve voice messages
UP and DOWN arrows
Navigation keys
ENTER
Press to move to sub-menus
DELETE
1. Delete digits or characters under the circumstances of editing
a. Press to edit the number while initiating a call or a call conference or pre-dial
b. Press to edit the number when setting forwarding number
c. Press to edit data when add new contact information to phone book
d. Press to edit the phone number when programming speed dial
2. Press to delete contact information
a. Delete contact information from phone book
b. Delete contact information from received calls
c. Delete contact information from missed calls
d. Delete contact information from outgoing calls
STORE
Conrm settings
a. Conrm forwarding phone number
b. Add new phone number to phone book
c. Store speed-dial memory
d. Conrm ring melody
e. Conrm phone settings
FORWARD
a. Press to activate forwarding function to forward incoming call to an assigned
telephone number
b. Press to deactivate forwarding function if it is previously activated
SET
Press to enter sub-menus for phone settings
CLID
Press to enter received and missed calls selection page
32 9
Page 33

MUTE
a. Press to mute all microphones
b. Press to resume conversation from mute
HOLD
a. Press to put an active call on hold
b. Press to resume conversation from hold
CONF
a. Press to join a third party into a conference call
b. Press to remove the last joined party from conference call
AUTO RD
On-hook, press to dial out the last dialed number 15 times automatically if phone line of
second party is occupied
REDIAL/OUT
a. On-hook, press to show last dialed number on the LCD
b. Off-hook, press to dial last dialed number automatically
SPEAKER/HEADSET
a. Press to activate speakerphone or headset
b. Press to deactivate speakerphone or headset
VOLUME up and down
a. On handset, press to adjust handset volume
b. On speakerphone, press to adjust speaker volume
c. On headset, press to adjust headset volume
TRANSFER
Press to transfer a call
OPERATION
Make a call
a. Lift up the handset and then dial the number, speak through handset.
b. Press SPEAKER/HEADSET (Headset plugged in and handset down) and then dial
the number, speak through headset
c. Press SPEAKER/HEADSET (Headset not plugged in) and then dial the number,
speak through speakerphone.
d. On-hook, dial the number, and then pick up the handset or press SPEAKER/
HEADSET (Headset plugged in and handset down) or Press SPEAKER/ HEADSET
(Headset not plugged in)
Page 34

Receive a call
a. Lift up handset to conduct conversation through handset
b. Press SPEAKER/HEADSET (Headset plugged in and handset down) to conduct
conversation through headset.
c. Press SPEAKER/HEADSET (Headset not plugged in) to conduct conversation
through speakerphone
End a call
a. On handset: place handset back on-hook
b. Headset: press SPEAKER/HEADSET or lift up handset and put it back on cradle to
terminate a conversation
c. Speakerphone: press SPEAKER/HEADSET button or lift up handset and put it back
on cradle to terminate a conversation
Call transfer
a. During an active call, press TRF to place the current call on hold, call the third party
to which the call is to be transferred, and then hang up the phone.
b. During an active call, press HOLD to place the current call on hold, call the third
party to which the call is to be transferred, press TRF once the call is connected and
then hang up the phone
Conference
a. During a call, either an incoming call or outgoing call, press HOLD or CONF to place
the current call on hold, and then dial the number of third party that is to be joined
into the conference, press CONF again once the call is connected to initiate a 3 way
conference.
b. Press CONF or hook switch anytime during a conference call to remove the last
joined party from the conference.
Call forwarding
a. On-hook: press FWD and enter the telephone number to which the calls are to be
forwarded, press STORE (PROGRAM) to conrm
b. Press FWD to deactivate forwarding function if it is previously activated
Redial
a. On-hook, press REDIAL to view the last dialed number, and then review other last
19 dialed numbers by using navigation keys; select a desired number and lift up the
handset or press SPEAKER/HEADSET to dial out automatically.
b. Off hook, press REDIAL to dial out the last dialed number automatically.
Switch Talk Mode from Handset to Speakerphone or Headset
On handset, press SPEAKER/HEADSET and speak through speakerphone or headset
34 7
Page 35

Switch Talk Mode from Speakerphone or Headset to Handset
On speaker or headset, lift up handset and speak through handset
Pre-dial
On-hook, dial the phone number and then lift up the handset or press SPEAKER/HEADSET
to dial out automatically.
CALLER ID
Caller ID review
On-hook, press CLID and the LCD displays 1.RECEIVED 2.MISSED; select 1 or 2 by using
navigation keys and press ENTER to access 1.received call page or 2.missed call page.
a. Received
corresponding order, select a number and press ENTER to show the details of the call
including name of calling party, phone number, call in date and time.
b. Missed: Use navigation keys to view 100 most recent missed calls in corresponding
order, select a number and press ENTER to show the details of the call including
name of calling party, phone number, call in date and time.
Call back from caller ID
Select a number from received or missed calls, and then lift up the handset or press SPEAKER/
HEADSET to dial out automatically.
Delete caller ID
a. Delete one
bring up sub-menu and select DELETE ONE by using navigation keys, press DELETE
again to conrm
b. Delete all: Press DELETE under received or missed call page to bring up submenu, select DELETE ALL by using navigation keys and press DELETE again to
conrm
: Use navigation keys to view 100 most recent received calls in
: Select a number from received or missed calls, press DELETE to
PHONE BOOK
On-hook, press PHONE BOOK and the LCD displays 1.ADD 2.SEARCH; select 1 or 2 by
using navigation keys and press ENTER to access 1.name input page or 2.view contact
page
View phone book
a. SEARCH
contact information
b. SEARCH: in view contact page, enter the initial of the name to bring up a list of
names with the same initial and then browse contact information by using navigation
keys
: in view contact page, use navigation keys to browse between stored
Page 36

Store contact information to phone book
a. ADD: in name input page, key in the name and press ENTER to access number
input page, key in number and then press STORE (PROGRAM) to conrm
b. Select a number from received or missed calls or outgoing (redial) page, press
PHONE BOOK, select ADD and press ENTER to access name input page, key in the
name and press ENTER to access number input page, press STORE (PROGRAM)
to conrm.
c. Repeat the same approach to add more names and numbers to the phone book, if
maximum capacity of 100 is reached, MEMORY FULL will display on LCD
Remove contact information from phone book
a. DELETE ONE
sub-menu and select DELETE ONE by using navigation keys, press DELETE again
to conrm
b. DELETE ALL: press DELETE under view contact page to bring up sub-menu,
select DELETE ALL by using navigation keys, press DELETE again to conrm
Edit contact information in phone book
Select a contact information to be edited in view contact page, press DELETE to bring up
sub-menu and select EDIT, press DELETE to enter name input page and use DELETE button
to edit name, press ENTER and then edit number in number input page, press STORE to
conrm.
Call from phone book
On-hook, select a desired number in view contact page and lift up the handset or press
SPEAKER/HEADSET button (headset plugged in) or press SPEAKER/HEADSET button
(headset not plugged in) to dial out automatically
: select a number from view contact page, press DELETE to bring up
Auto-redial
On-hook, press AUTO RD to dial out the last dialed number repeatedly and activate
speakerphone.
Program speed-dial key
Press STORE (PROGRAM) and key in telephone number that is to be set as speed-dial
number, assign a memory location on the face plate and press it to conrm.
Speed dialing
a. On-hook, press desired speed-dial button corresponding to the stored number and
then lift up the handset or press SPEAKER/HEADSET to dial out automatically
b. Off-hook, press desired speed-dial button corresponding to the stored number to
dial out automatically
36 5
Page 37

Volume adjustment
a. On handset, press volume up and down button to adjust handset volume
b. Speakerphone mode, press volume up and down button to adjust speakerphone
volume
c. Headset mode, press volume up and down button to adjust headset volume
Hold
Mute and resume conversation
When MUTE key is pressed, the transmitter microphone on the handset, speakerphone, and
headset will be muted. All microphones will remain muted until the MUTE button is pressed
again.
Message storage and retrieval
PHONE SETTING
Date Format
On-hook, press SET to enter submenus, select Phone Set Up and press ENTER, select Date
and Time and press ENTER, select Date Format to access date format selection page, select
desired date format and press STORE to conrm
a. DD-MM
b. MM-DD
c. DD-MM-YY
d. MM-DD-YY
Time Format
On-hook, press SET to enter submenus, select Phone Set Up and press ENTER, select Date
and Time and press ENTER, select Time Format to access date format selection page, select
desired time format and press STORE to conrm
a. 12HR
b. 24HR
Ringer Tone
On-hook, press SET to enter submenus, select Phone Set Up and press ENTER, select
Ringer and press ENTER, select Ringer Tone to access Ringer Tone selection page, select
from 1 to 8 by pressing number key and then press STORE to conrm
Ringer Volume
On-hook, press SET to enter submenus, select Phone Set Up and press ENTER, select
Ringer and press ENTER, select Ringer Volume to access Ringer Volume adjustment page,
adjust the volume by using volume adjusting keys and then press STORE to conrm.
Handset Volume
On-hook, press SET to enter submenus, select Phone Set Up and press ENTER, select
Page 38

Ringer and press ENTER, select HS Mic Gain to access Handset Volume adjustment page,
adjust the volume by using volume adjusting keys and then press STORE to conrm.
Speaker Volume
On-hook, press SET to enter submenus, select Phone Set Up and press ENTER, select
Ringer and press ENTER, select HF Mic Gain to access Speaker Volume adjustment page,
adjust the volume by using volume adjusting keys and then press STORE to conrm.
View IP address
On-hook, press SET to enter submenus, select Network Cfg and press ENTER, select Host
Cong and press ENTER, select IP Cong and press ENTER to access IP Address acquiring
page, press ENTER again to show IP Address on the LCD
View MAC address
On-hook, press SET to enter submenus, select Network Cfg and press ENTER, select Host
Cong and press ENTER, select MAC Address and press ENTER to access MAC Address
acquiring page where MAC Address is shown on the LCD
View Net Mask address
On-hook, press SET to enter submenus, select Network Cfg and press ENTER, select Host
Cong and press ENTER, select NetMask Cong and press ENTER to access NetMask
Address acquiring page, press ENTER again to show NetMask Address on the LCD
View Host name
On-hook, press SET to enter submenus, select Network Cfg and press ENTER, select
Host Cong and press ENTER, select Host Name and press ENTER to access Host Name
acquiring page where Host Name is shown on the LCD
View Domain name
On-hook, press SET to enter submenus, select Network Cfg and press ENTER, select Host
Cong and press ENTER, select Domain Name and press ENTER to access Domain Name
acquiring page where Domain Name is shown on the LCD
View Gate Way address
On-hook, press SET to enter submenus, select Network Cfg and press ENTER, select
Router Cfg and press ENTER, select Gateway Addr and press ENTER to access Gateway
Address acquiring page where Gateway address is shown on LCD
View DNS Server address
On-hook, press SET to enter submenus, select Network Cfg and press ENTER, select
DNS Server and press ENTER to access DNS address acquiring page where DNS Server
address is shown on LCD
38 3
Page 39

Safety Instructions
Please read the following instructions carefully to ensure correct use and to prevent unexpected
accident and damage caused by incorrect use.
Do not disassemble or modify the IP250 phone or power adaptor if applicable.
The warranty will not cover any defect that occurs due to such mishandling.
Install the unit on a at, stable surface to enusre safe operation.
Do not install the unit in such a location whereby the unit can be affected by dust or gas.
Do not install the unit in a place subject to direct sunlight or near heat surfaces such as
radiators.
Do not install the unit in a humid location to avoid damage, overheating and electric shock.
Make sure to turn off the power supply switch before disconnecting the mains lead.
Disconnecting the mains with the power switch on will cause damage to the unit.
make sure to only use the power adaptor supplied with the IP250.
Disconnect the power cable when the unit is not in use for an extended period of time.
Guarantee
Your IP250 telephone is designed and manufactured to exacting quality standards. This
enables ATL Telecom Limited to offer a 1 year guarantee from the date of purchase. This
guarantee protects against faulty material or workmanship, applies to the UK only and is not
transferable.
The terms and conditions under which the guarantee will be valid are as set out below.
Misuse or any modication carried out to the telephone, or operation other than in
1.
accordance with the instructions supplied, will invalidate the guarantee.
Damage arising from incorrect installation, accidental damage or consequential loss,
2.
are not covered under the guarantee.
In the event of a fault developing during the period of the guarantee, the complete
3.
telephone should be returned to your supplier, adequately and safely packed, together
with proof of date of purchase.
The liability of ATL Telecom Limited will be limited to the cost of repair or complete
4.
replacement of the same defective instrument, at the discretion of the company. In
the event that the same item is not available, a suitable alternate will be offered.
The terms of this guarantee do not affect your statutory rights.
5.
39
Page 40

Manufacturer’s Declaration
ATL Telecom Limited declares that this product is in conformity with the essential requirements
of the ‘R&TTE directive 1999/5/EC’
Note: A copy of the Declaration of Conformity is available upon request from ATL Telecom
Limited.
ATL Telecom Limited
Fountain Lane
St Mellons
Cardiff
Wales
UK
CF3 0FB
Technical Support
Telephone: +44 (0) 2920 500799
Facsimile: +44 (0) 2920 500701
Email: [email protected]
www.atltelecom.com
1/429/001/610 Issue 01 Jan 2007
40
 Loading...