

Page 1
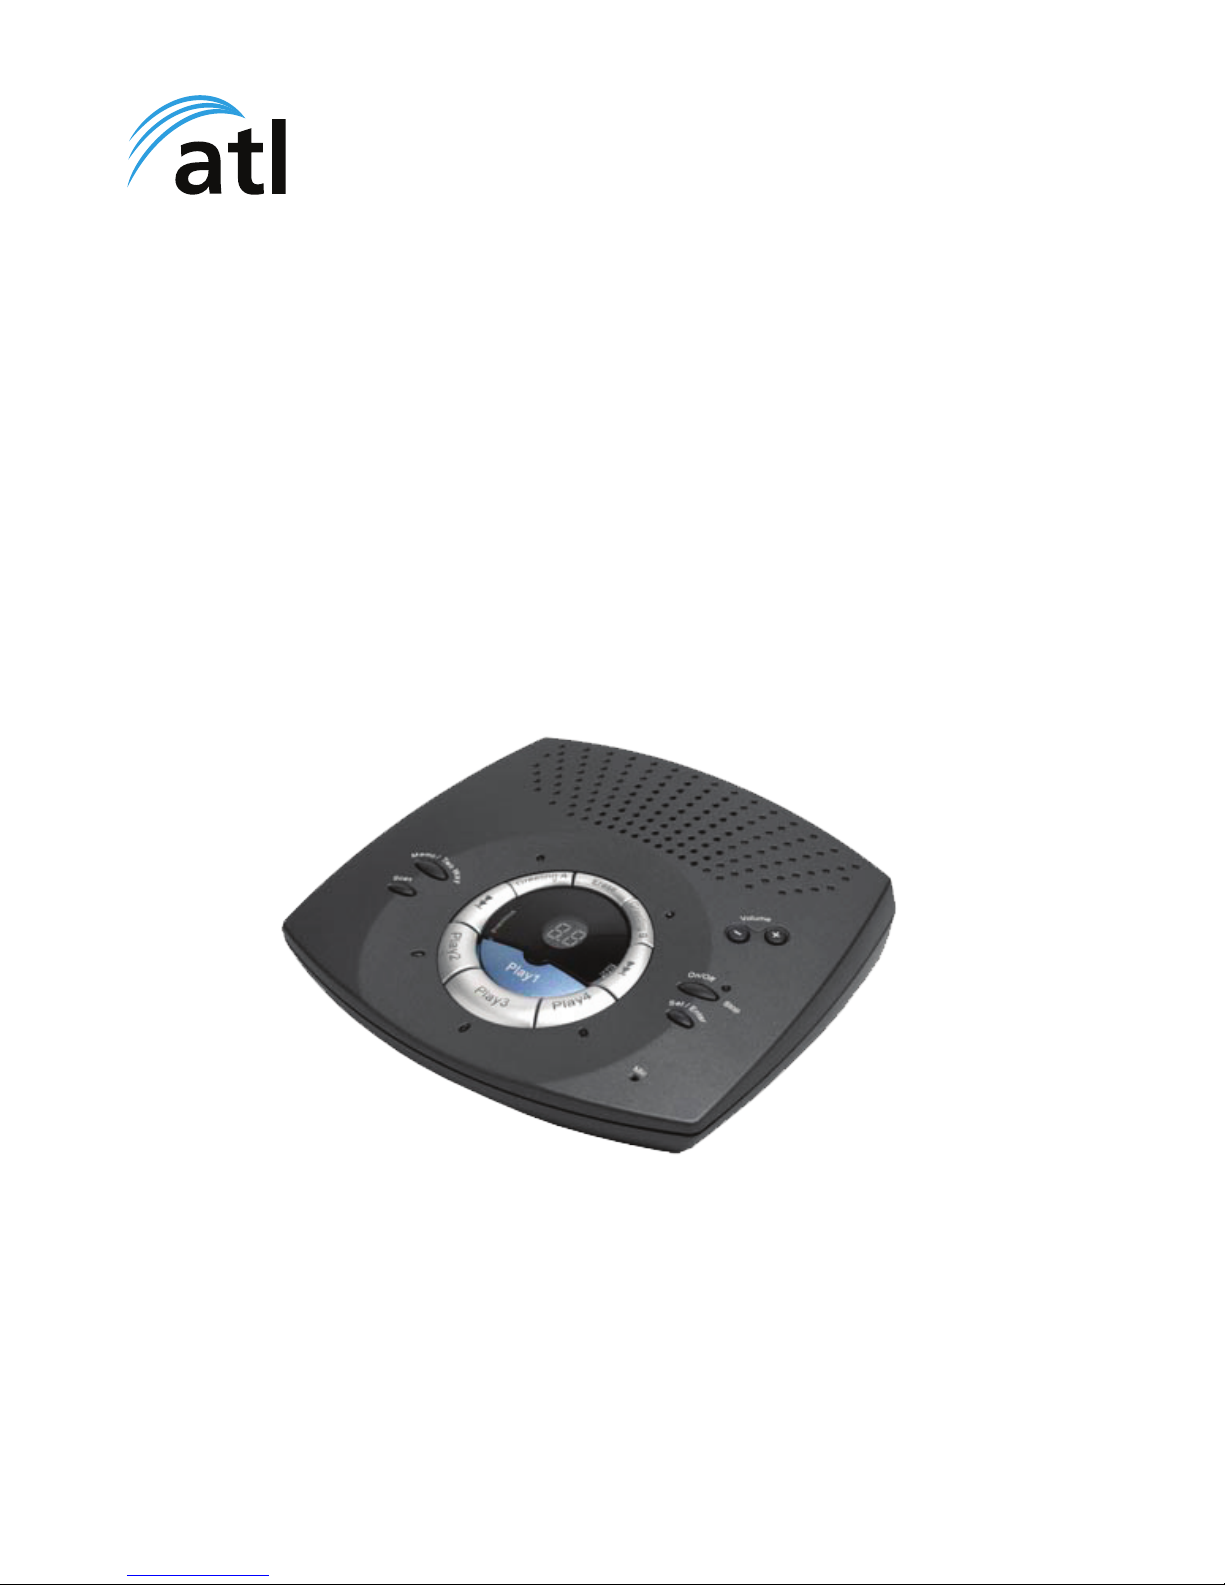
Delta 40
Thank you for choosing a Delta 40 Answer Machine. You have selected a
carefully designed answer machine that incorporates the latest technology
giving 40 minutes total recording time, a unique product that will provide years
of excellent service.
This user guide will ensure you obtain the best use of your answer machine.
USER GUIDE
Page 2

Page 3

TABLE OF CONTENTS
LOCATION OF CONTROLS AND FEATURE ............................5
GETTING STARTED ...................................................................6
PACKAGE CONTENTS .............................................................................6
TELEPHONE WALL SOCKET .................................................................. 6
RECORDING THE GREETING .................................................................7
DEFAULT MAILBOX FOR INCOME MESSAGES ................................... 7
Mailbox 1 ............................................................................................. 7
REVIEWING A GREETING ........................................................................ 7
SETUP .........................................................................................7
ERASING A GREETING ...........................................................................8
RETURNING TO THE DEFAULT GREETING ...........................................8
REVIEWING THE SETTINGS ....................................................................8
CHANGING THE SETTINGS .....................................................................8
SETTING THE TIME ..................................................................................8
To Set the Hour ....................................................................................9
To Set the Minutes ...............................................................................9
To Set the Day ......................................................................................9
SETTING THE RINGS TO ANSWER ........................................................9
CALL SAVER ............................................................................................ 9
SETTING THE INCOMING MESSAGE LENGTH .....................................9
SETTING THE SECURITY CODE ............................................................10
USING YOUR DELTA 40 ...........................................................11
ADJUSTING THE VOLUME ....................................................................11
GREETING INDICATORS .........................................................................11
ANSWER ON/OFF INDICATOR ............................................................... 11
MESSAGES COUNTER ........................................................................... 11
MAILBOX INDICATORS ........................................................................... 11
PLAYING MESSAGES .............................................................................12
WHILE PLAYING MESSAGES ................................................................. 12
MESSAGE MOVE ..................................................................................... 12
MESSAGE SCAN ..................................................................................... 13
WHILE SCANNING MESSAGES ............................................................. 13
ERASING ALL MESSAGES IN A MAILBOX ...........................................13
LEAVING A MEMO ...................................................................................14
TWO-WAY RECORD ................................................................................14
SCREENING CALLS (AUTO DISCONNECT FEATURE) ........................14
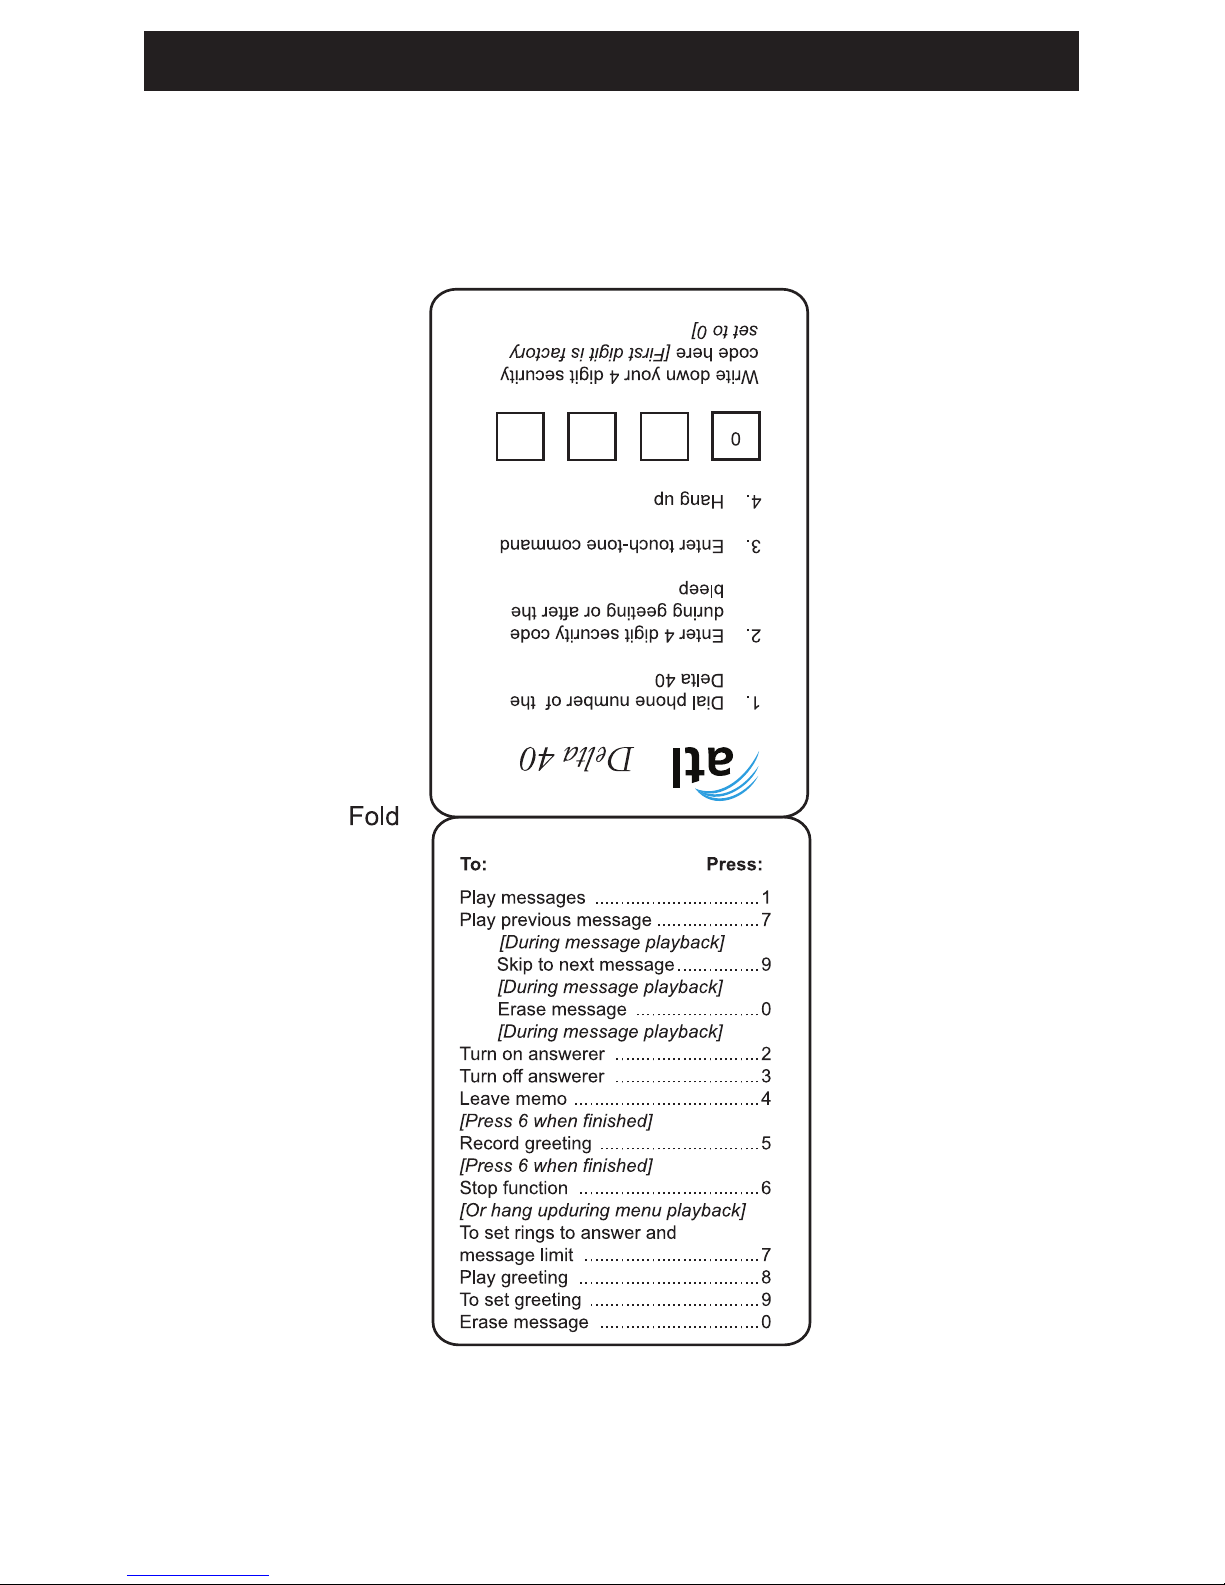
REMOTE ACCESS ...................................................................................14
REMOTE ACCESS CARD .........................................................17
Page 4

TABLE OF CONTENTS
DECLARATIONS .......................................................................19
GUARANTEE ............................................................................................ 19
SAFETY DECLARATION .........................................................................19
EN60950-1 Safety Instructions .......................................................... 19
MANUFACTURERS DECLARATION* .....................................................19
Page 5
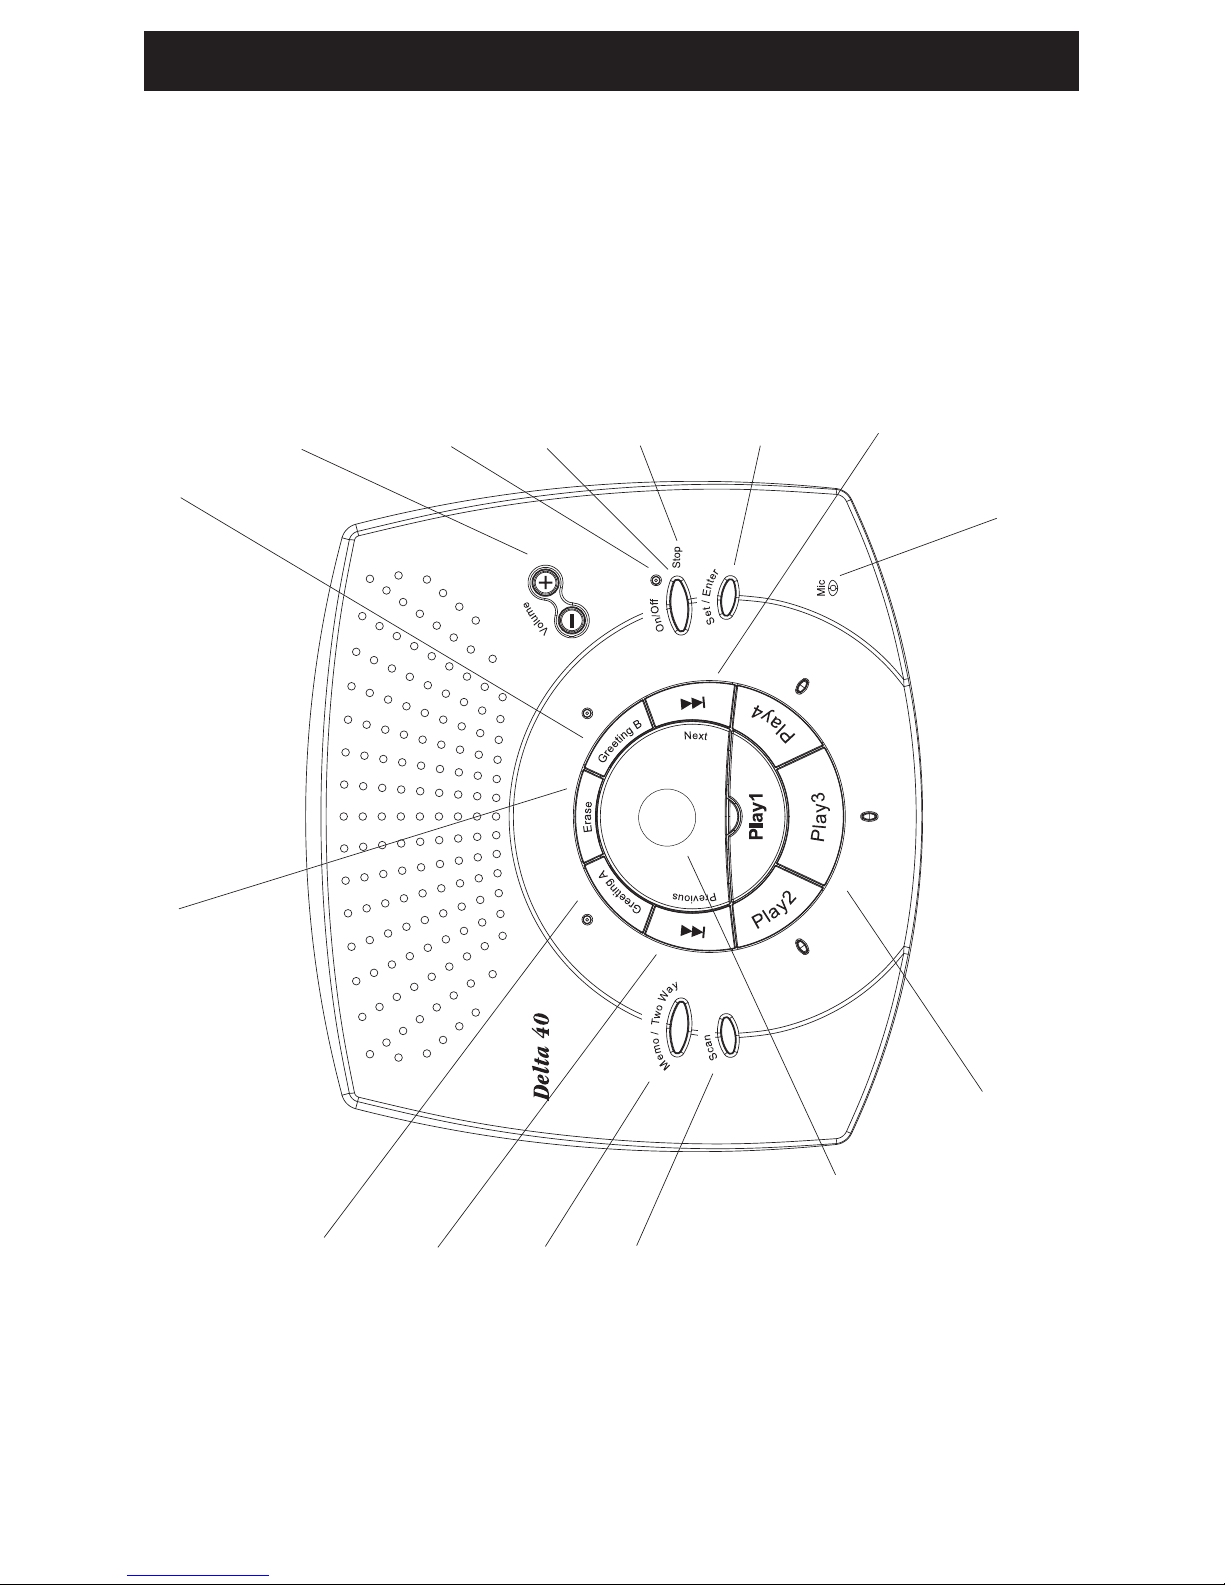
LOCATION OF CONTROLS AND FEATURE
Volume +/-
Adjusts volume of
message playback, OGM
and voice prompts.
Answer on-off
Switches the answer
machine on and off.
Answer on-off Indicator
Stop
Stops message playback
and any other operation.
Microphone
For recording your outgoing
message or memo.
Set/Enter
Reviews and alters anwer
machine settings (i.e. time,
date, ring,etc).
Next
Used to skip forward to
next message
or option.
Greeting B
Allows the recording and
playback of OGM.
Greeting A
Allows the recording and
playback of OGM.
Erase
Allows the recorded OGM(s)
and message(s) to be
erased.
Previous
Used to skip backwards to
previous message
or option.
Memo/Two Way
Allows a memo or two
way call recording.
Scan
Message scan reviews first
5 seconds of each message
within a mailbox.
Play 1~4
Playback recorded
messages or memos.
Message indicator
Number of recorded
messages.
5
Page 6

GETTING STARTED
PACKAGE CONTENTS
Make sure your package includes the
following items:
Delta 40 Answer Machine
BS6312 line cord
5V AC Plug Top Power Supply
Unit [5/500/000/076]
User Guide
TELEPHONE WALL SOCKET
You need a BT wall socket to connect
your Delta 40. If you do not have
a modern BS6312 wall socket, call
telephone service provider.
Installation
Plug the telephone line cord
into your BS6312 wall socket.
Connect the Delta 40 line
cord from your telephone into
the line socket on the back of
your Delta 40 marked “LINE”.
(Note: You do not have to
connect your telephone in
order for the Delta 40 to
record incoming messages).
Connect the small end of the
power supply into the power
socket on the back of the Delta
40 marked as “~5V 50Hz”. Plug
the other end into an AC power
outlet. The unit beeps three
times and is ready for set up or
to answer calls with the default
greeting and settings.
1.
2.
3.
4.
1.
2.
3.
6
Page 7

RECORDING THE GREETING
Before using your new Delta 40,
you should record a greeting (the
announcement callers hear when your
answering system answers a call).
Two greetings can be recorded. If
you do not record a greeting, callers
hear a default greeting which says.
“the person you called is currently not
available, please leave your message
after the tone, thank you for calling.”
You can record two types of greetings,
one to use only one mailbox, or one
to direct callers to leave messages in
specic mailboxes. This is especially
useful for active families or small
businesses.
When recording the greeting you
should be about six inches from the
unit. This ensures the best recording
quality. Eliminate as much background
noise as possible.
Both types of greeting are recorded by
the following:
Prepare your greeting
Sample Single Mailbox Greet-
ing: “Hi, this is (use your name
here). I cannot answer the phone
right now, so please leave your
name, number and a brief mes-
sage after the tone, and I will
get back to you. Thank you for
calling”.
NOTE: You can direct callers to leave
messages in a specic mailbox by having them press the
1.
desired mailbox (1-4) after the
greeting plays. If no mailbox is
selected, the incoming messages automatically go into
mailbox 1.
Note: The greeting must be two
seconds or longer to be valid.
DEFAULT MAILBOX FOR INCOME
MESSAGES
Mailbox 1
Sample Multi-Mailbox Greeting:
“Hi this is (use your name here).
We cannot answer the phone
right now, so please press
1 to direct your message to
(name1), press 2 to direct your
message to (name 2), press
3 to direct your message to
(name 3), press 4 to direct your
message to (name4). Leave
your name, number, and a brief
message after the tone, and we
will get back to you. Thanks for
calling”.
Hold down the desired
GREETING button. The unit
displays o1 for greeting A record
and o2 for greeting B record.
After the tone, say your greeting.
Release GREETING A or B
when you nish.
REVIEWING A GREETING
To review the greeting, press and
release GREETING A or B.
1.
2.
3.
SETUP
7
Page 8

ERASING A GREETING
There are two ways to erase your
greeting.
To erase your greeting while
listening to it, press and hold
ERASE until the unit announces,
“Greeting Erased.” Then record
your new greeting.
To re-record your greeting
from any point, press and hold
GREETING A or B. After the
tone, say our greeting. Release
GREETING A or B when
nished.
RETURNING TO THE DEFAULT
GREETING
To return to the Delta 40’s default
greeting after you have recorded
one, press and hold the GREETING
A or GREETING B button until a
beep sound is heard and release the
button.
Alternatively, you can also press
and hold the ERASE button when
the greeting is playing, release the
ERASE button until the unit announces
“greeting erased.”
REVIEWING THE SETTINGS
This function allows you to review
the current time/day, number of rings
before the unit answers a call, incoming
message length, and the security code.
Press and release the SET button to
review the current setting. The unit
announces the current setting.
1.
2.
NOTE: To exit review, press and re-
lease STOP.
CHANGING THE SETTINGS
Press and hold the SET button to enter
the change mode. The unit announces
the current time and day. To change,
press NEXT or PREVIOUS. To set and
go on to the next item, press SET.
NOTE: To scroll from one setting to the
next, press and release SET.
To exit the change list, press
STOP.
SETTING THE TIME
For each message received, a time/
day stamp is added at the end of the
message.
SETUP
DEFAULT SETTINGS
Time 12 am Sunday
Rings to Answer 4
Message Length 2 minutes
Security Code 0123
►
►
►
►
RANGE OF SETTINGS
Time
Hour 12 a.m. - 11 - p.m.
Minute 0 - 59
Day Sunday - Saturday
Rings 2, 3, 4, 5, 6, 7, 8, to
Answer call saver
Message Length 1, 2, 3, 4
minutes
Security Code 0, 0-9, 0-9, 0-9
►
►
►
►
►
►
►
8
Page 9

To Set the Hour
Press and release NEXT
or PREVIOUS until the unit
announces and displays the
correct hour.
Once the hour is set, press SET
to enter the minutes menu.
To Set the Minutes
Press and release NEXT or
PREVIOUS until the unit
announces and displays the
correct minutes.
Once the minutes are set, press
SET to enter the day menu.
To Set the Day
Press and release NEXT
or PREVIOUS until the
unit announces and
displays the correct day.
Once the day is set, press SET.
The unit announces the time/
day, then enters the rings to
answer the menu.
NOTE: The days of the week show in
the display as numbers. For
example, “Sunday” shows as
0.
SETTING THE RINGS TO ANSWER
This feature is used to set the unit to
answer a call after a specic number
of rings.
1.
2.
1.
2.
1.
2.
The unit announces the rings to
answer. To change, press NEXT or
PREVIOUS. To set and go on to the
next item, press SET.
Press and release NEXT
or PREVIOUS until the unit
announces and displays the
correct number of rings for the
Delta 40 pick up.
Once the rings to answer is set,
press SET. The unit announces
the rings to answer, then enters
the incoming message length
menu.
CALL SAVER
The call saver is the nal setting in the
Rings to Answer menu. This feature
allows you to know if you have new
messages when calling the machine
from a remote phone. If you have
new messages, the unit will ring twice
before answering. If you do not, it will
ring four times. This allows you to hang
up before the machine answers so that
you do not have to pay call charges.
NOTE: The message counter displays
00 for call saver.
SETTING THE INCOMING
MESSAGE LENGTH
The message length is the length
of time (in minutes) the caller has to
leave a message.
The unit announces and displays the
current message length. To change,
press NEXT or PREVIOUS. To set and
1.
2.
SETUP
9
Page 10

SETUP
IMPORTANT
The set up settings will not be erased
even after a power outage.
10
go on to the next item, press SET.
Press and release NEXT
or PREVIOUS until the unit
announces and displays the
correct incoming message
length.
Once the length is set, press
SET. The unit announces the
message length, then enters
the security code menu.
SETTING THE SECURITY CODE
The security code is a programmable
4-digit code which can be used to
access remote functions.
Press and release NEXT or
PREVIOUS to choose the
second digit (the rst digit is
not programmable). The unit
announces all 4 digits, but only
the selected digit will change.
Once you have the desired
second digit, press SET to save
it and move on to the third digit.
Press and release NEXT or
PREVIOUS to choose the third
digit. Only the third digit will
change.
1.
2.
1.
2.
3.
Once you have the desired third
digit, press SET to save it and
move on the fourth digit.
Press and release NEXT or
PREVIOUS to choose the fourth
digit. Only the fourth digit will
change.
Once you have the desired
fourth digit, press SET to save
it. The Delta 40 repeats all the
settings.
NOTE: To exit any menu, press and
release STOP. Also, set up will
cancel if no buttons have been
pushed within 30 seconds.
4.
5.
6.
IMPORTANT
The rst digit is factory set at zero
and cannot be changed. The unit
announces the current security code.
To change, press NEXT or PREVIOUS.
To set and exit press SET.
Page 11

USING YOUR DELTA 40
11
ADJUSTING THE VOLUME
Use the VOLUME + and - buttons to
increase the volume up and down. The
unit bleeps when it is not announcing
a setting or playing a message. It also
beeps three times when the maximum
or minimum volume is reached.
GREETING INDICATORS
The GREETING indicators let you
know what greeting will be used to
answer a call.
GREETING A indicator is on -
Greeting A will be used.
GREETING B indicator is on -
Greeting B will be used.
ANSWER ON/OFF INDICATOR
When the Delta 40 is off, it will answer
an incoming call after ten rings and
enters a monitor only mode. In this
mode the Delta 40 does not initiate a
greeting or take messages .
Indicator is ON - Delta 40 is
on and will not answer calls
according to the Rings to
Answer setting.
Indicator is OFF - Delta 40 is
off, but you might still have
messages.
NOTE: You can play messages,
review/change settings, and
►
►
►
►
review/change the greeting
even if the Delta 40 is off.
MESSAGES COUNTER
The MESSAGES counter gives
you a numeric display of how many
messages you have.
MESSAGES counter has a
number displayed (not ashing)
- No new messages. Shows
total of old messages.
MESSAGES counter has a
ashing number displayed
- There are new messages.
Shows total of new and old
messages.
MESSAGES counter has bars
(--) - Unit is OFF or in remote
control mode.
MESSAGES counter has an “F”
ashing on the display - memory
is full.
NOTE While the messages are play-
ing, the MESSAGES counter
will display the messages in
the order they were received.
MAILBOX INDICATORS
The mailbox indicators tell you if you
have any messages in each individual
mailbox and if they are new or old.
Mailbox indicator is on - There
are no new messages, but there
are old ones.
►
►
►
►
►
Page 12

USING YOUR DELTA 40
12
Mailbox indicator is off - there
are either no messages or the
Delta 40 is turned off.
Mailbox indicator is ashing -
there are new messages.
NOTE: An old message is one that
has been listened to completely, including the time/day
stamp. A new message is one
that has NOT been listened to
completely. Stopping a message before listening to the
time/day stamp makes the
message remain as new.
PLAYING MESSAGES
You can play the messages in each
individual mailbox separately.
To play messages, press and release
the desired mailbox button.
WHILE PLAYING MESSAGES
To stop playback, press and release
STOP.
To restart the message that is playing,
press and hold PREVIOUS.
To listen to a previous message, press
and release PREVIOUS.
To skip to the next message, press
and release NEXT.
To fast forward within a message,
press and hold NEXT.
►
►
To erase a message while it is playing,
press and release the ERASE button.
The Delta 40 announces, “Message
Erased” to conrm the message has
been erased.
NOTE: When messages are played,
the new messages are
played rst, followed by the
old messages in the order
they were received. When
all messages are old, the
messages play back in the
order they were received.
MESSAGE MOVE
The Message Move feature allows you
to easily move messages from one
mailbox to another.
Press and release the desired
mailbox where the message
you want to move is located.
Press and release NEXT or
PREVIOUS until the desired
message to move is playing.
Press and release the mailbox
button where you want the
message to move. The unit
announces the message has
been moved.
1.
2.
3.
TIP
You can stop the unit from erasing a
message you just tried to erase by
pressing PREVIOUS before the unit
says, “End of Messages.”
Page 13

NOTE: New messages must be heard
completely, including the time/
day stamp, before they can
be erased. The unit will announce you have no messages to erase, if not.
ERASING ALL MESSAGES IN A
MAILBOX
When the Delta 40 is not playing
or recording messages, press
and hold ERASE. The Delta 40
will ask you to select a mailbox.
Press and release the mailbox
button you want to erase
the Delta 40 announces the
messages have been erased.
You may retrieve a deleted message by
pressing the button for the mailbox from
which you just deleted the message.
The Message Counter shows the
original number of messages stored
in that mailbox before the message
deletion.
Do not press any other button before
you retrieve a deleted message,
otherwise the message is permanently
deleted.
1.
2.
USING YOUR DELTA 40
TIP
The Delta 40 is equipped with a special
feature to retrieve deleted messages.
13
Release the mailbox button.
The move message is now a
“new” message in that mailbox.
MESSAGE SCAN
Message Scan allows you to listen to
the rst ve seconds of each message
within a mailbox.
Press and release SCAN. The
unit shows Sc and asks you to
select a mailbox.
Press the desired mailbox
button. The unit plays back
the rst ve seconds of each
message in the mailbox. When
nished, it automatically exits
Scan mode.
WHILE SCANNING MESSAGES
To stop playback, press and release
STOP.
To hear the complete message, press
and release the mailbox button where
the message is located before the unit
goes on to the next message.
To restart the message, press and
hold PREVIOUS. To skip to the next
message, press and release NEXT.
To erase the message, press and hold
ERASE until the unit announces it has
been erased.
To move the message to another
mailbox, press and release the desired
mailbox where you want to move the
message.
4.
1.
2.
Page 14

USING YOUR DELTA 40
14
NOTE: If there are unheard messages
in a mailbox, they will not be
erased by Erase All. If there
are only new messages in a
mailbox, the unit will announce
“Zero messages erased.”
LEAVING A MEMO
This feature allows you to leave a
memo for someone in a specic
mailbox.
Press and release the MEMO/
TWO WAY button. The unit
shows Lc on the display and
asks you to select a mailbox.
Press and hold the desired
mailbox button. Record after
the tone.
Release the mailbox button
when you nish. The unit
treats the memo as a message,
as the MESSAGES counter and
mailbox indicator show.
NOTE: The length of time for record-
ing a memo depends on how
many messages are currently
stored by the Delta 40.
TWO-WAY RECORD
Two-Way Record allows you to record
both sides of a phone conversation.
Pick up an extension phone or
answer a call before the machine
answers the call. Please note,
the extension phone must be off
hook.
1.
2.
3.
1.
Press and hold MEMO/TWO
WAY. Release after the
announcement. The unit shows
Lr on the display will ask you to
select a mailbox.
Press and release the
desired mailbox button. The
conversation starts recording
after the tone.
To stop two-way record, press and
release STOP or MEMO/TWO WAY.
The unit treats the 2-way recorded
conversation as a message, as the
MESSAGES counter and mailbox
indicator show.
NOTE: The length of time for record-
ing a conversation depends on
how many messages are currently stored by the Delta 40.
SCREENING CALLS (AUTO
DISCONNECT FEATURE)
You can screen incoming calls
by listening as the caller leaves a
message. If you want to talk to that
caller, pick up any extension phone.
REMOTE ACCESS
You can access your Delta 40 from any
touch-tone phone by entering your 4digit security code (the default security
code is 0123). The remote functions
do not work with rotary or push-button
pulse-dialling phones. You can cut
out the wallet-size remote card near
the back of the User’s Guide so you
know the touch-tone commands when
2.
3.
Page 15

15
you are picking up messages from
another location.
To access your Delta 40:
Call your telephone number
After you hear the beep that
follows the greeting, enter your
4-digit security code. To bypass
the greeting, you can enter your
4-digit security code at any time
while the greeting is playing.
The unit plays the remote
menu after the correct security
code has been entered. Menu
selections can be made at any
time while the menu is playing.
NOTE: The unit answers on the tenth
ring when it is turned off or the
memory is full. To access the
Delta 40, enter the 4-digit security code after the beep. If
memory is full, play messages
and erase some of them to restore memory. If the Delta 40
is off, press 2 to turn it on.
NOTE; After the unit plays the remote
menu it will wait several seconds for a command, then disconnect.
1.
2.
3.
USING YOUR DELTA 40
Page 16

16
Page 17
17
REMOTE ACCESS CARD
Cut out this remote access card so
that you can take it with you to help
you use the remote features.
Page 18

18
Page 19

GUARANTEE
Your Delta 40 answer machine is
designed and manufactured to
exacting quality standards. This enables
atl telecom Limited to offer a 2-year
guarantee from the date of purchase.
This guarantee protects against faulty
material or workmanship, and applies
to the UK only and is not transferable.
The terms and conditions under which
the guarantee will be valid are as set
out below.
Misuse or any modication carried out
to the answer machine, or operation
other than in accordance with the
instructions supplied, will invalidate
the guarantee.
Damage arising from incorrect
installation, accidental damage or
consequential loss, are not covered
under the guarantee.
In the event of a fault developing
during the period of the guarantee,
the complete telephone should be
returned to your supplier, adequately
and safely packed, together with the
proof of purchase.
The liability of atl telecom Limited
will be limited to the cost of repair or
complete replacement of the same
defective instrument, at the discretion
of the company. In the event that the
same item is not available, a suitable
alternative will be offered.
The terms of this agreement do not
affect your statutory rights.
SAFETY DECLARATION
EN60950-1 Safety Instructions
It is IMPORTANT that the plug to
power unit supplied with your Delta 40
is plugged into an easily accessible
240V ac mains socket that is located
near the equipment.
MANUFACTURERS
DECLARATION*
ATL Telecom Limited declares that
this product is in conformity with the
essential requirements of the R & TTE
directive 1999/5/EC.
*A copy of the Declaration of
Conformity is available, upon request,
from atl telecom Limited.
DECLARATIONS
19
Page 20

ATL Telecom Limited,
Cypress Drive,
St Mellons,
Cardiff. CF3 0EG
Tel: (029) 2050 0700
Fax: (029) 2050 0701
www.atltelecom.com
1/393/001/610 Issue 1.0 Nov 05
 Loading...