

Page 1
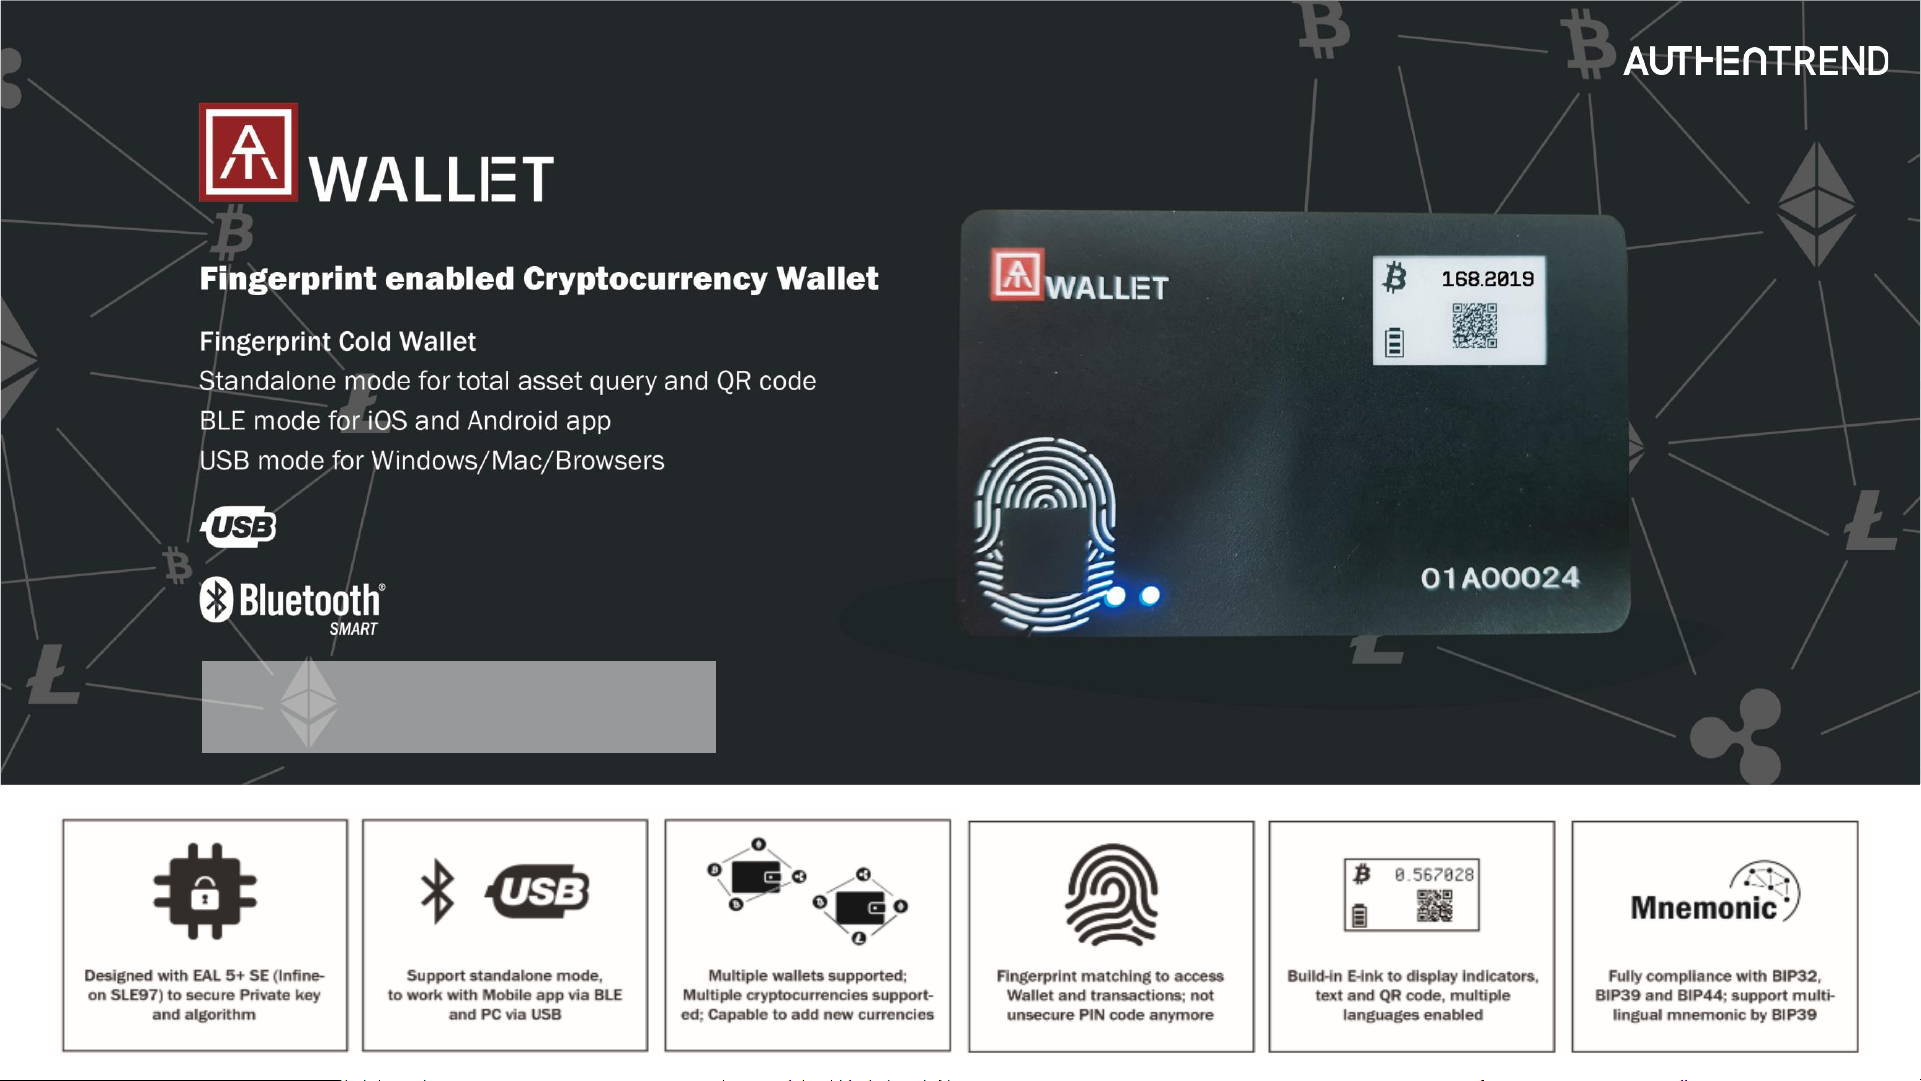
User Guide rev: 1.4
Page 2
2
| Table of Content
Before Start …
Page 3
Outlook
Page 5
Power and Power button
Page 6
Quick Start
Page 8
AT.Wallet Diagram
Page 9
Mobile app layout …
Page 10
BLE Pairing
Page 11
Fingerprint enrollment
Page 12
Initial Wallet
Page 13
Add Cryptocurrency
Page 15
BIP84
Page 16
Transaction - Receive
Page 17
Transaction –Send
Page 18
Menu bar and Settings
Page 19
Standalone mode
Page 33
LED and E
-Ink
Page 34
Fingerprint things
Page 35
Regulations
Page 36
Windows/Mac app layout …
Page 23
BLE Pairing or USB connecting
Page 24
Fingerprint enrollment
Page 25
Initial Wallet
Page 26
Add Cryptocurrency
Page 29
Transaction - Receive
Page 30
Transaction –Send
Page 31
Settings
Page 32
Page 3
3
| Before Start
Before Starts …
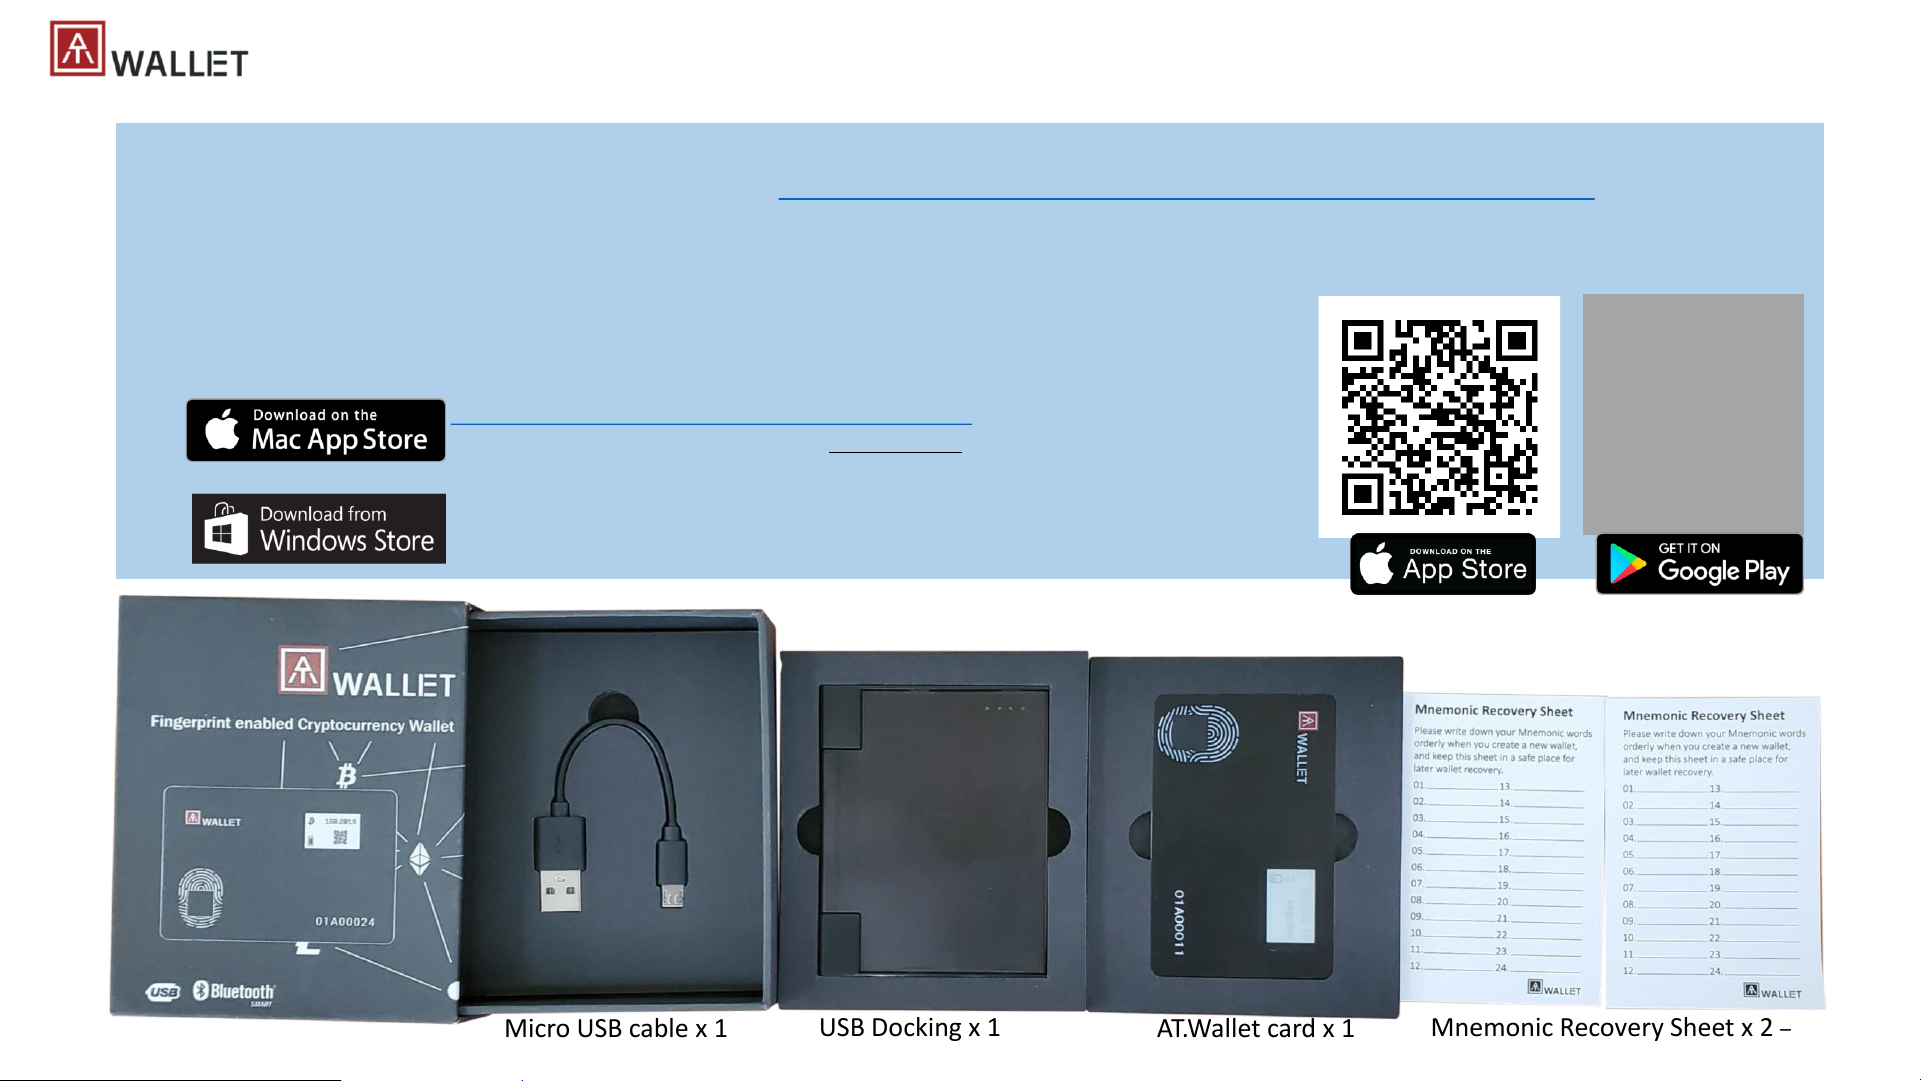
• Please do battery charging before you use the card – insert card to docking to connect to USB port or any USB power adaptor
• If AT.Wallet connects to USB port but nothing happened (no LED ON), please wait for a while since there is protect circuit to make sure the battery voltage is not
lower than 3.0V
• USB port of PC: USB mode, AT.Wallet can work as USB Wallet with Windows and Mac app
• USB power adaptor: BLE mode, AT.Wallet can work as BLE Wallet with iOS, Android, Windows and Mac app
• Download app from (QR code or links for download)
Mnemonic Recovery Sheet x 2 –
one for main wallet, one for hidden wallet
Micro USB cable x 1
USB Docking x 1
AT.Wallet card x 1
update later
Update later
https://apps.apple.com/us/app/at-wallet/id1490097962?mt=12
Or search “AT.Wallet” from your regional Mac App Store, it belongs to “Utility” category
Page 4
4
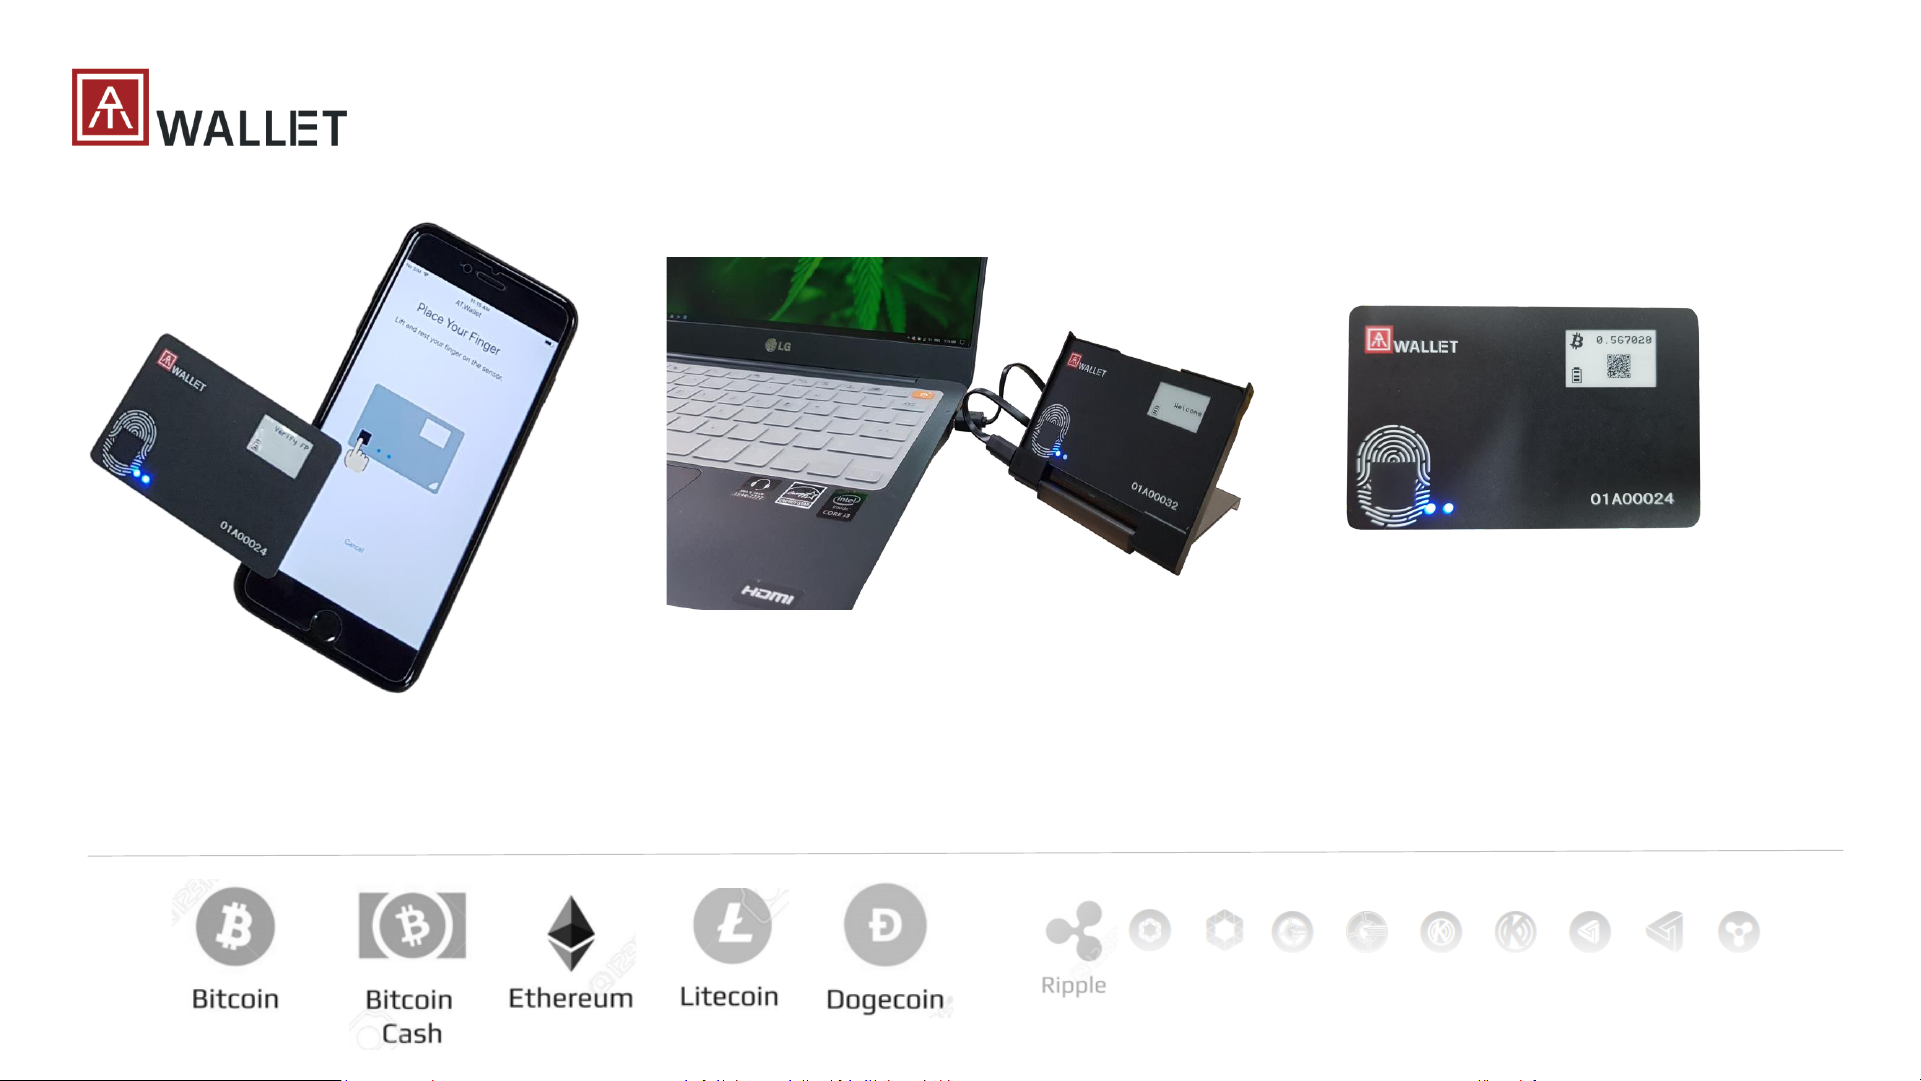
• Pair and connect via BLE (Bluetooth Low
Energy); working with mobile app (iOS and
Android) and also Windows/Mac app.
• Stay on Docking via USB to connect with PC by
Windows/Mac app
• Do battery charging via USB docking in parallel
• Standalone mode to check amount
• Standalone mode to receive transaction via
QR code
More cryptocurrencies support later by firmware and app upgrade …
Page 5
5
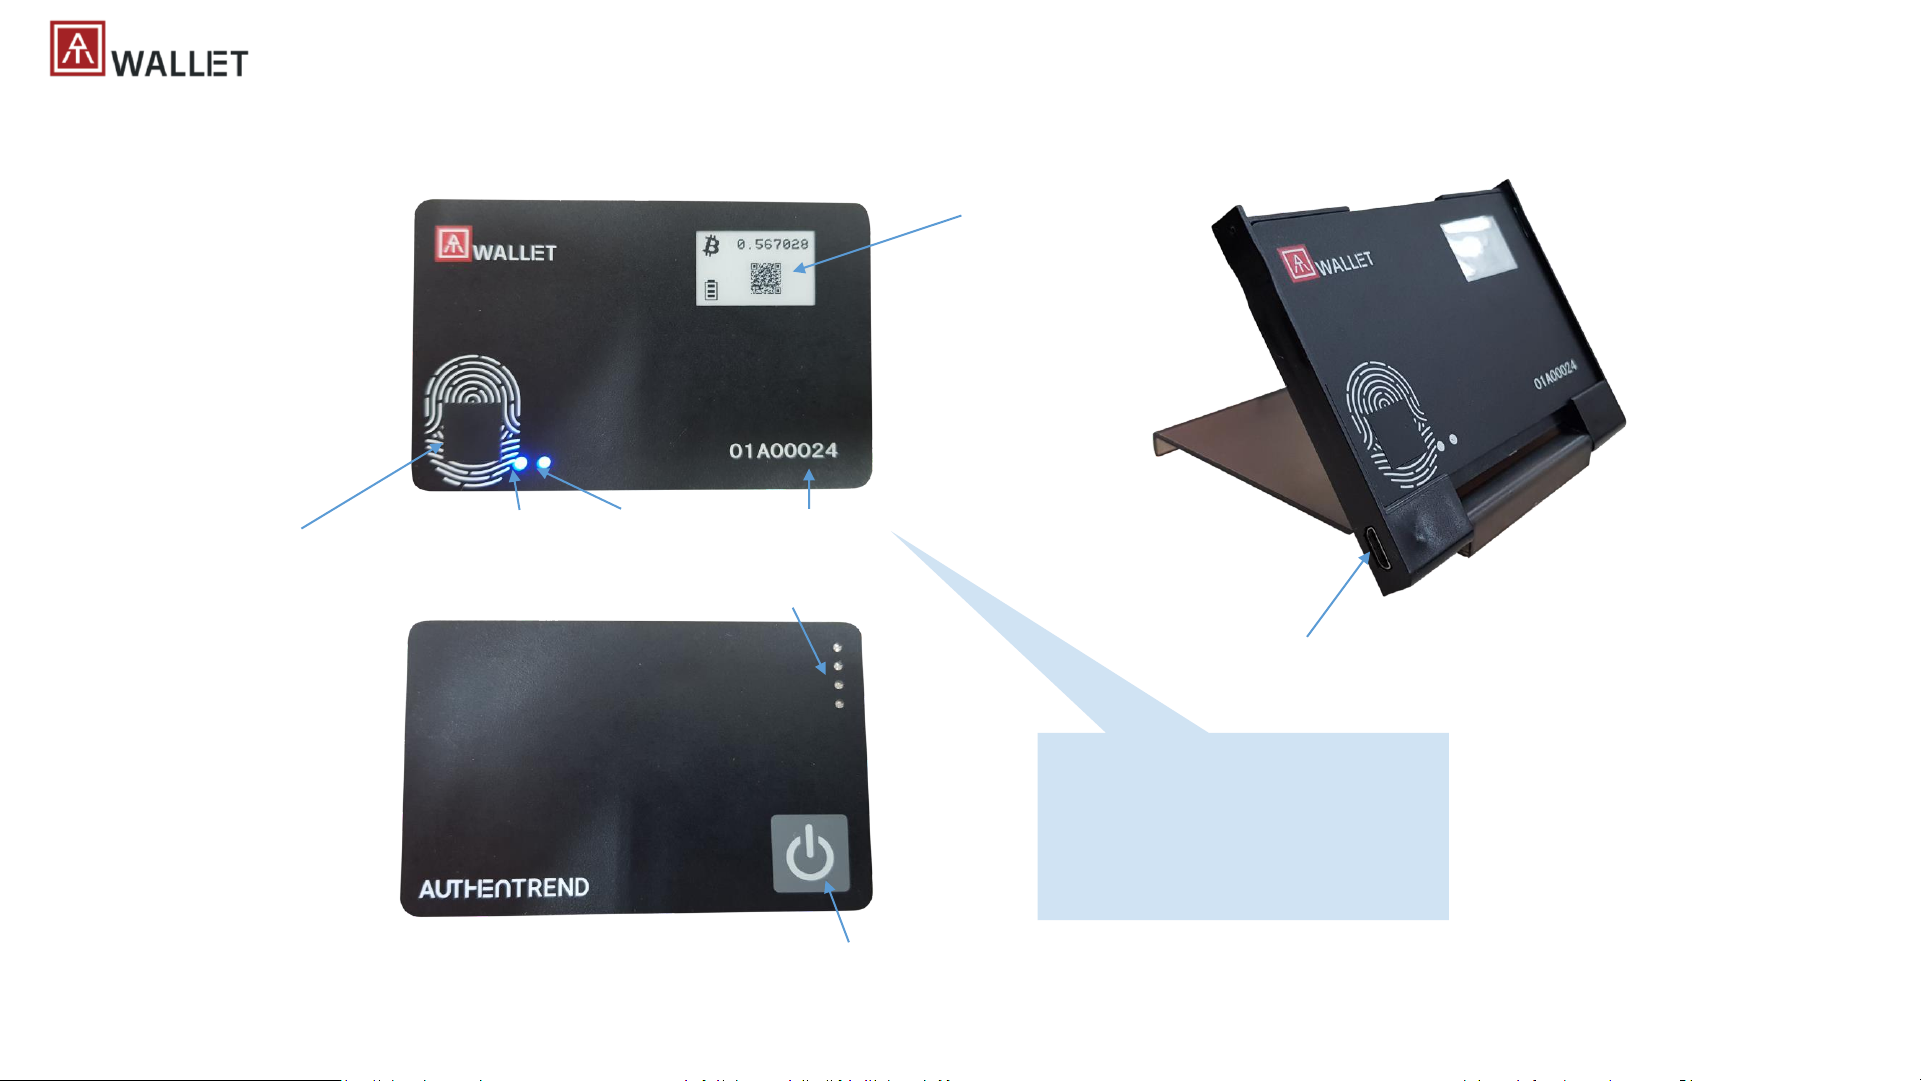
| Outlook
Fingerprint sensor
Up to 8x fingerprints
E-ink display
Power button
USB ports
MicroUSB connector
LED#1
LED#2
Keycode
• It’s an unique code of each card;
• Keycode will show on APP to
identify the card
• Keycode is also a serial number for
tracking – production, service and
warranty
Page 6
6
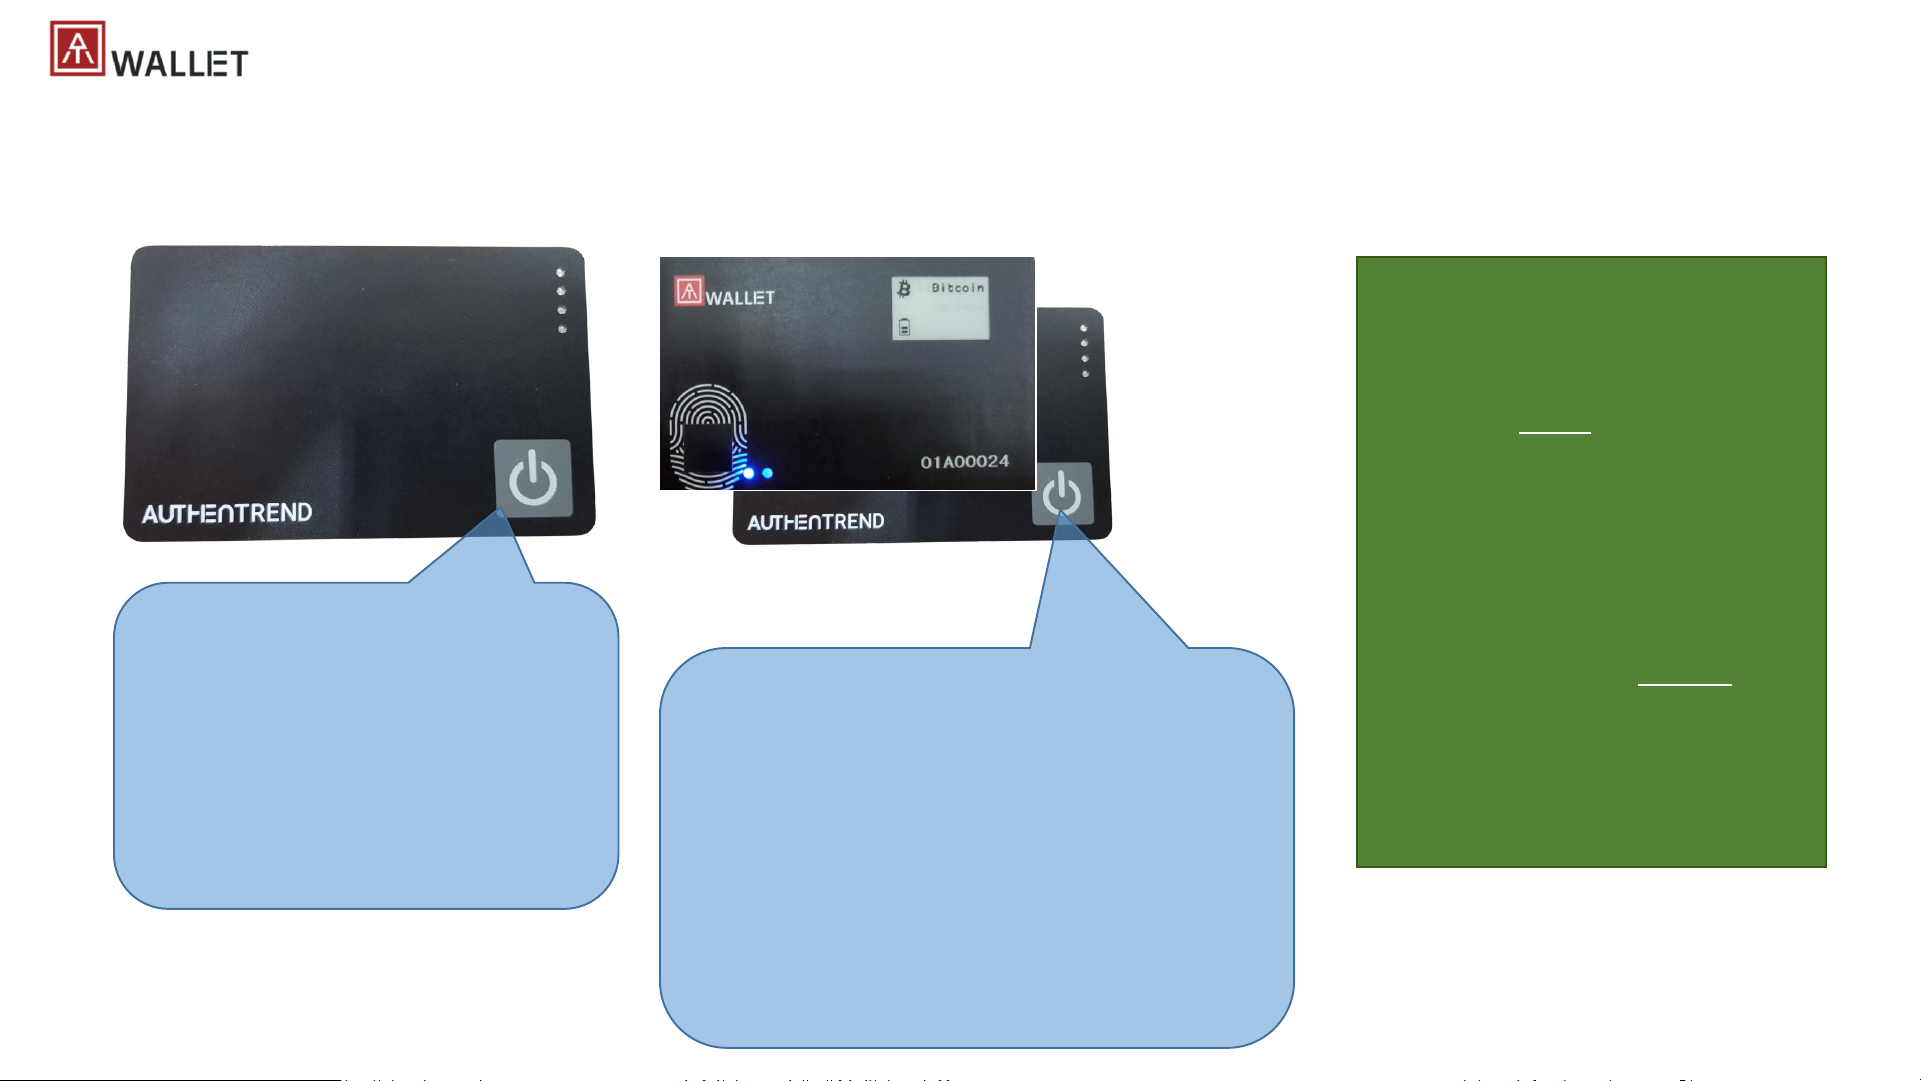
| Power and Power Button
• Click once – power on, then
• Double-click: entering BLE
secure pairing mode
• long-press over 4 seconds:
power off (E-ink will refresh
from black to blank)
• Connected to USB – Power ON
automatically
• Standalone mode
• Single-click: toggle to next page
• Power ON
• Verify fingerprint
• Loading, then Main wallet name
• 1stcryptocurrency summary
• 1stcryptocurrency QR code
• 1stcryptocurrency address
• 2ndcryptocurrency summary …
• Toggle to loop …
BLE mode power saving policy:
• When AT.Wallet card connects
with host app (BLE mode), if there
is no any operations (app and
card) for 60 sec., BLE will
disconnect (avoid battery
consuming continuously), and app
will remind you about “Session
expired”
• if AT.Wallet card has no BLE or USB
connection, it will power off
automatically after 120 sec.
without any operations to avoid
battery consuming.
• Please “Log out” from App and
click specific Wallet card to login
again by fingerprint
Page 7
7
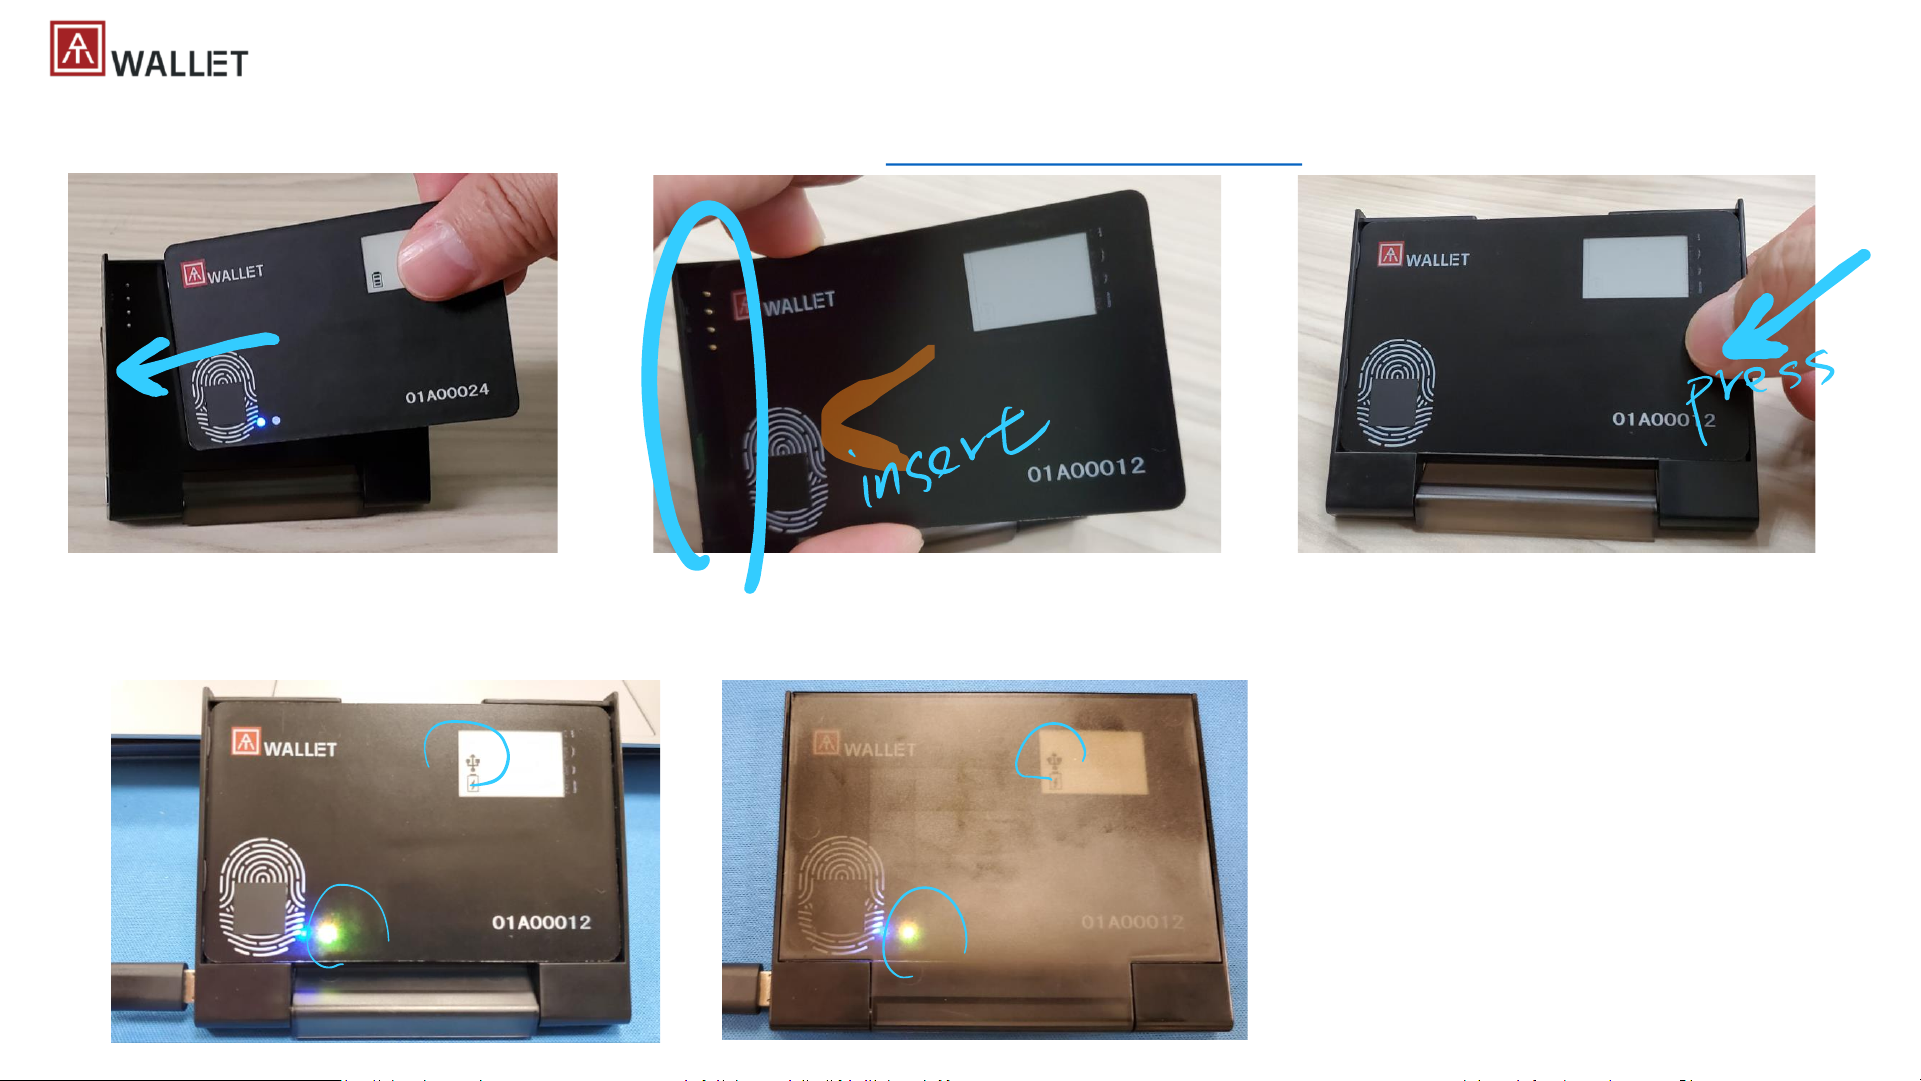
| Docking
• Insert Wallet into docking: you can see it from YouTube - https://youtu.be/mSfReGrRFWg
• Connect to PC, USB icon will appear, LED#2 will be yellow flashing (battery charging; if LED#2 is off, it means battery full charged already)
Page 8
8
| Quick Start
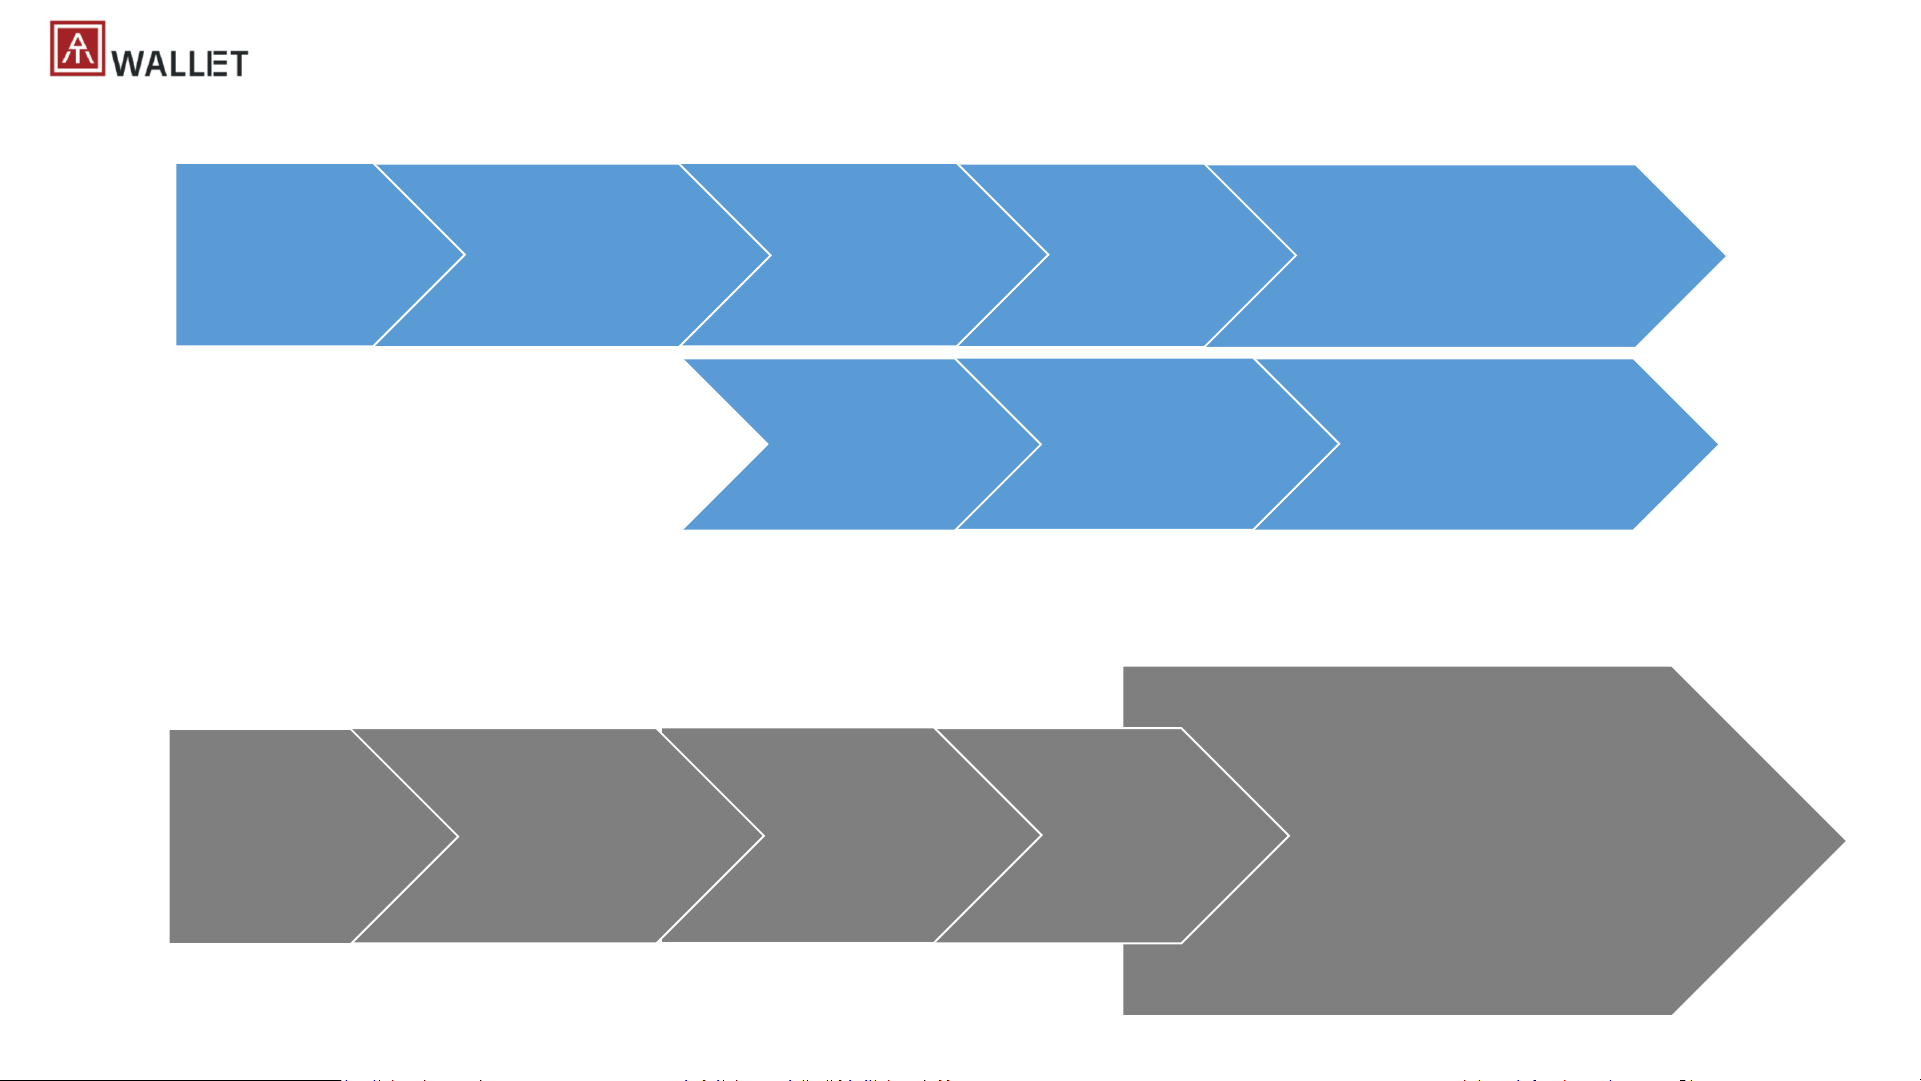
BLE pairing
App – AT.Wallet card
Enroll fingerprint(s)
& matching
Create new Wallet
Add supported
cryptocurrency
Transaction(s) or Settings
(Write down
Mnemonic words)
BLE connecting
App – AT.Wallet card
Fingerprint(s)
matching to login
Cryptocurrency
synchronization
Transaction(s)
Send/Receive
Settings
• Initial hidden wallet (create new or
recover wallet)
• Switch to hidden wallet
• Enroll/delete fingerprint(s)
• Add/delete cryptocurrency
• Logout
• Reset
• Select currency
Recover Wallet
from Mnemonic
Select
cryptocurrency &
synchronizations
Initial Wallet
Login Wallet for target actions
or
(1)
(2)
(3)
(4)
(5)
(3)
(4)
(5)
(1)
(2)
(3)
(4)
(4)
or
* It can be USB here if you start
with Mac or Windows app
* It can be USB here if you start
with Mac or Windows app
Transaction(s) or Settings
Page 9
9
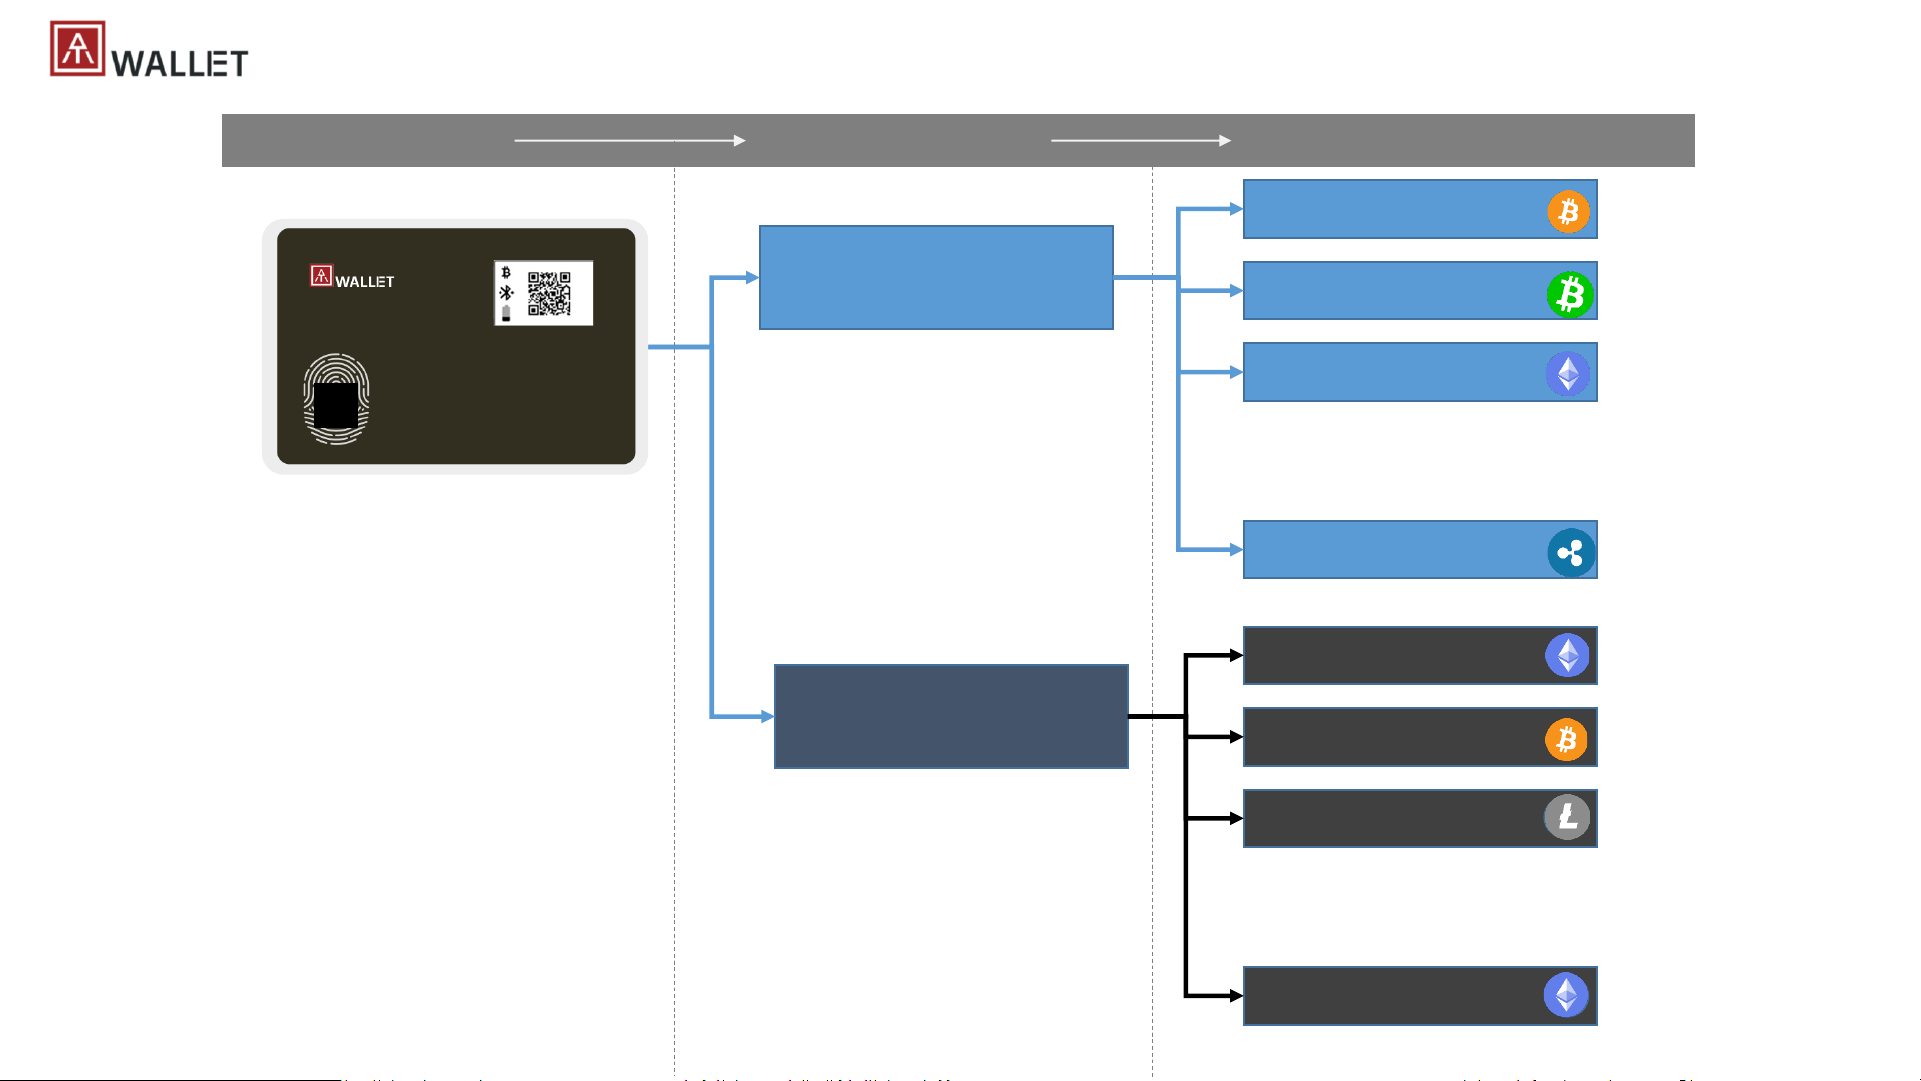
| Diagram
Main Wallet
Hidden Wallet
Cryptocurrency #1
Cryptocurrency #2
Cryptocurrency #3
Cryptocurrency #10
Cryptocurrency #1
Cryptocurrency #2
Cryptocurrency #3
Cryptocurrency #10
AT.Wallet card allows 2x wallets
• Main wallet + Hidden wallet
• Login Hidden wallet from Main
wallet
…..
…..
1x AT.Wallet card 2x Wallet(s) per card 10x Cryptocurrencies per wallet
Page 10
10
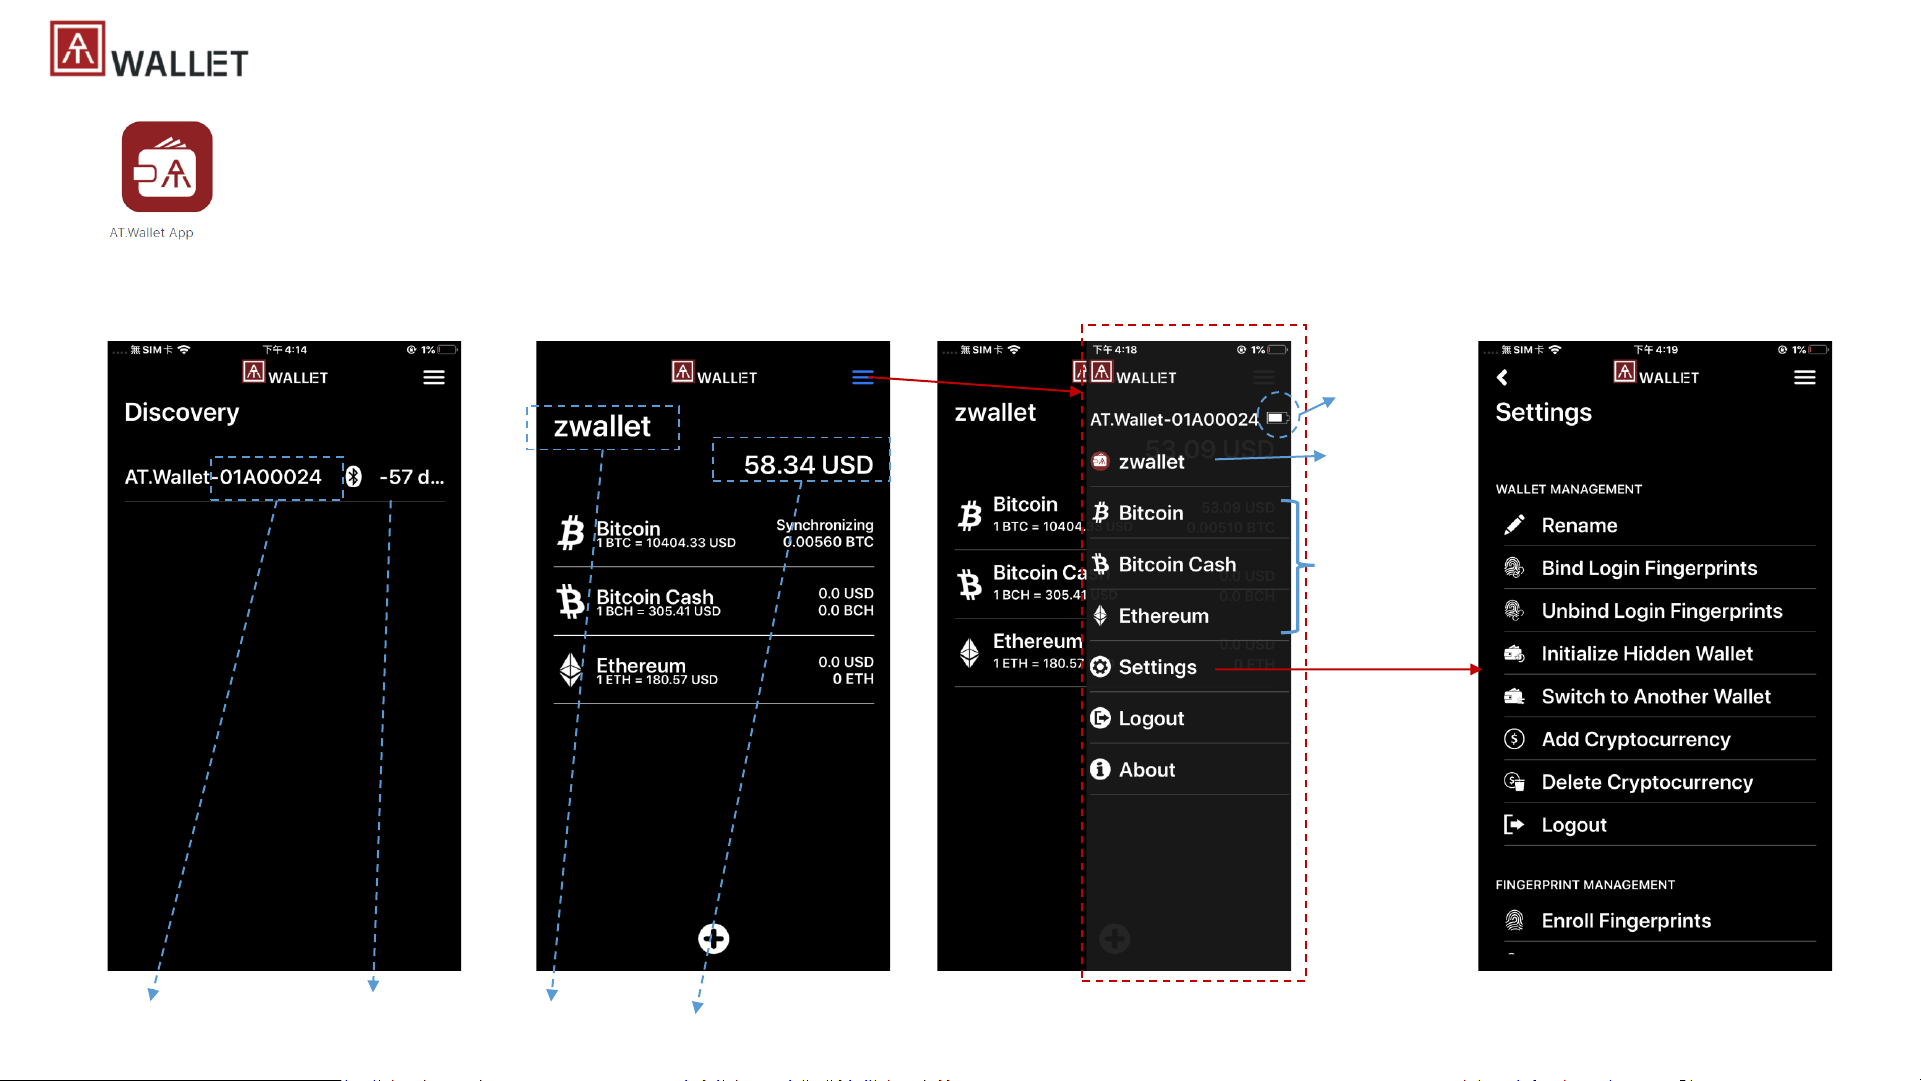
| Mobile APP – GUI Layout
Listing available AT.Wallet cards Home Page
Listing selected cryptocurrencies
keycode
Bluetooth
RSSI value
Wallet name
Total amount of this wallet;
Default currency is following the region of host device (mobile, PC)
Menu bar
Shortcuts to
each currency
Battery status
of Wallet card
Back to Home
page
Settings
Page 11
11
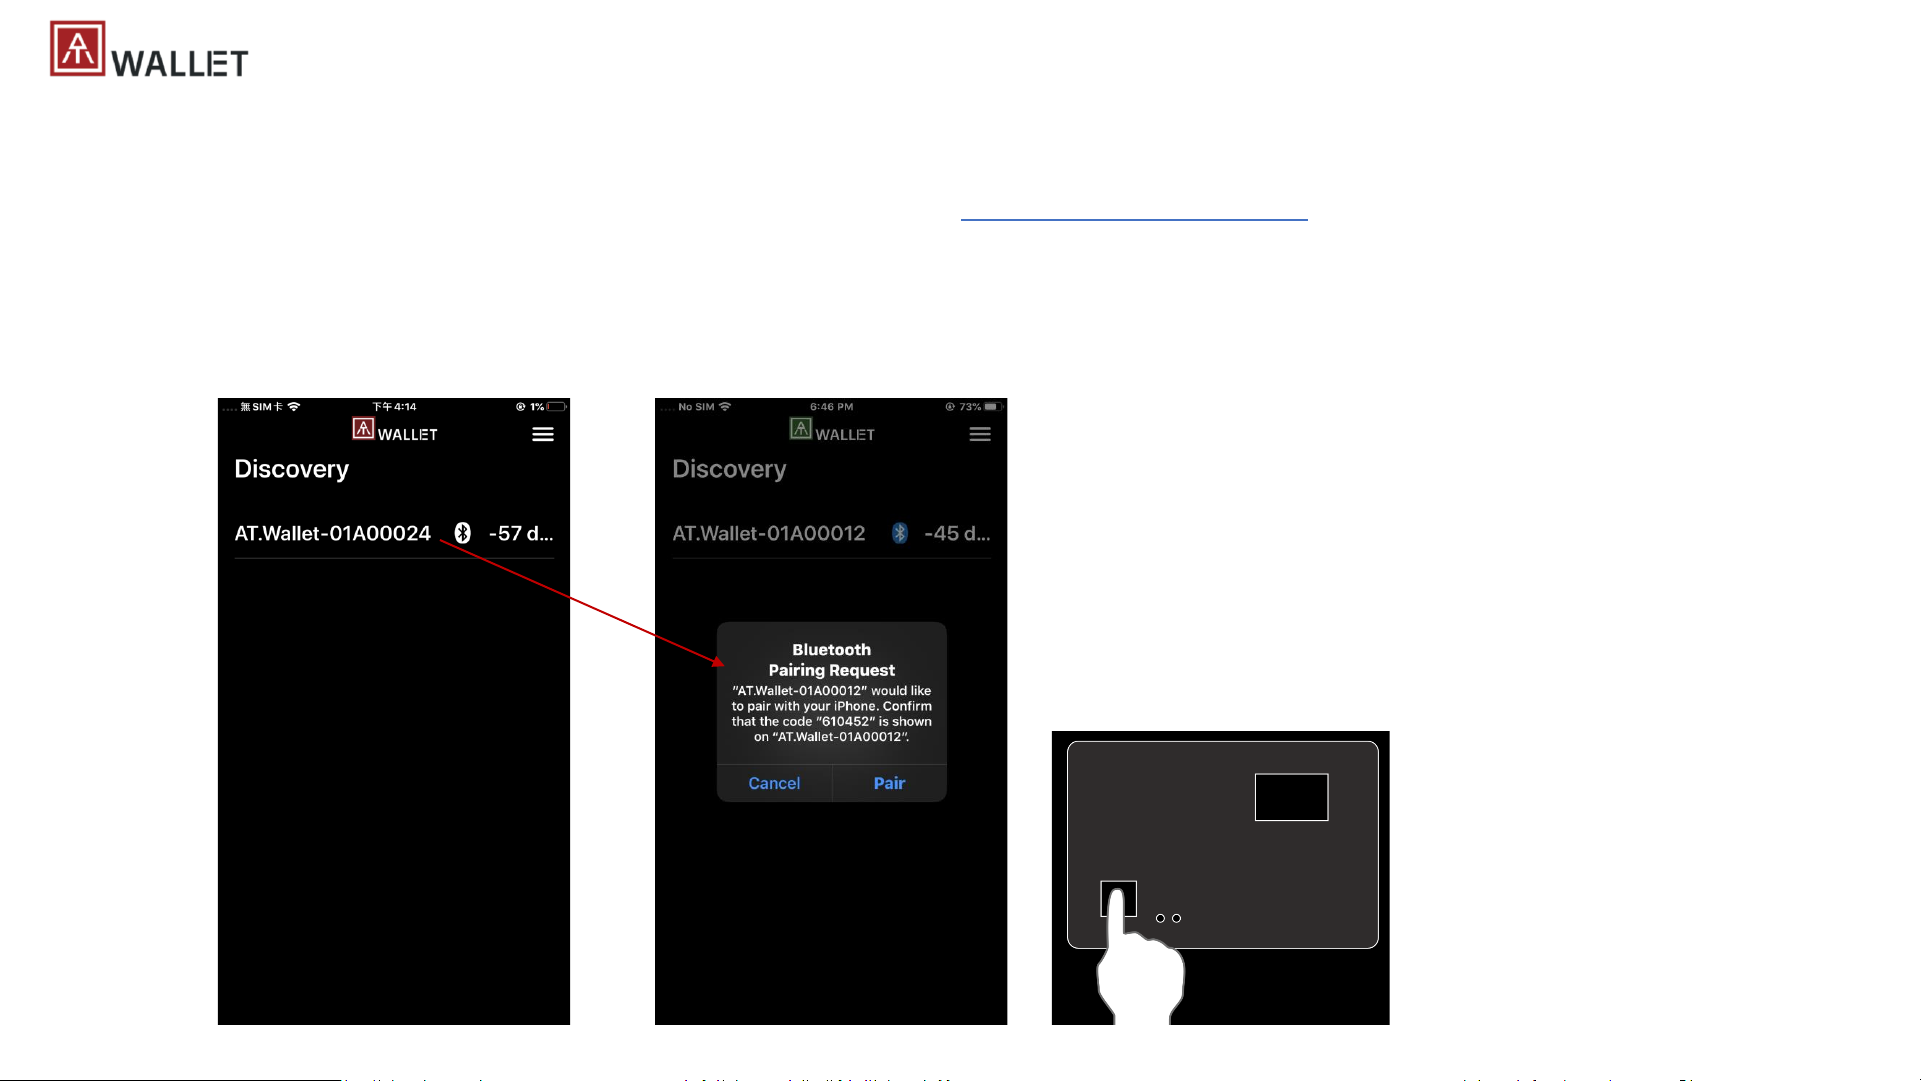
| Mobile APP – (1) BLE pairing
a) [App] launch AT.Wallet app (turn Bluetooth ON of the phone)
b) [Card] Power on AT.Wallet card (click power button on back side), double click power button to get into BLE secure pairing mode
(LED#2 is cyan flashing)
c) [App] available AT.Wallet cards will show on the list (you can identify target card by “keycode”)
d) [App] click target Wallet card to pair
e) [Card] LED#2 is white flashing - touch fingerprint sensor to confirm pairing; [app] confirm “Pair” from APP
(c) (d)
(e)
(e)
Page 12
12
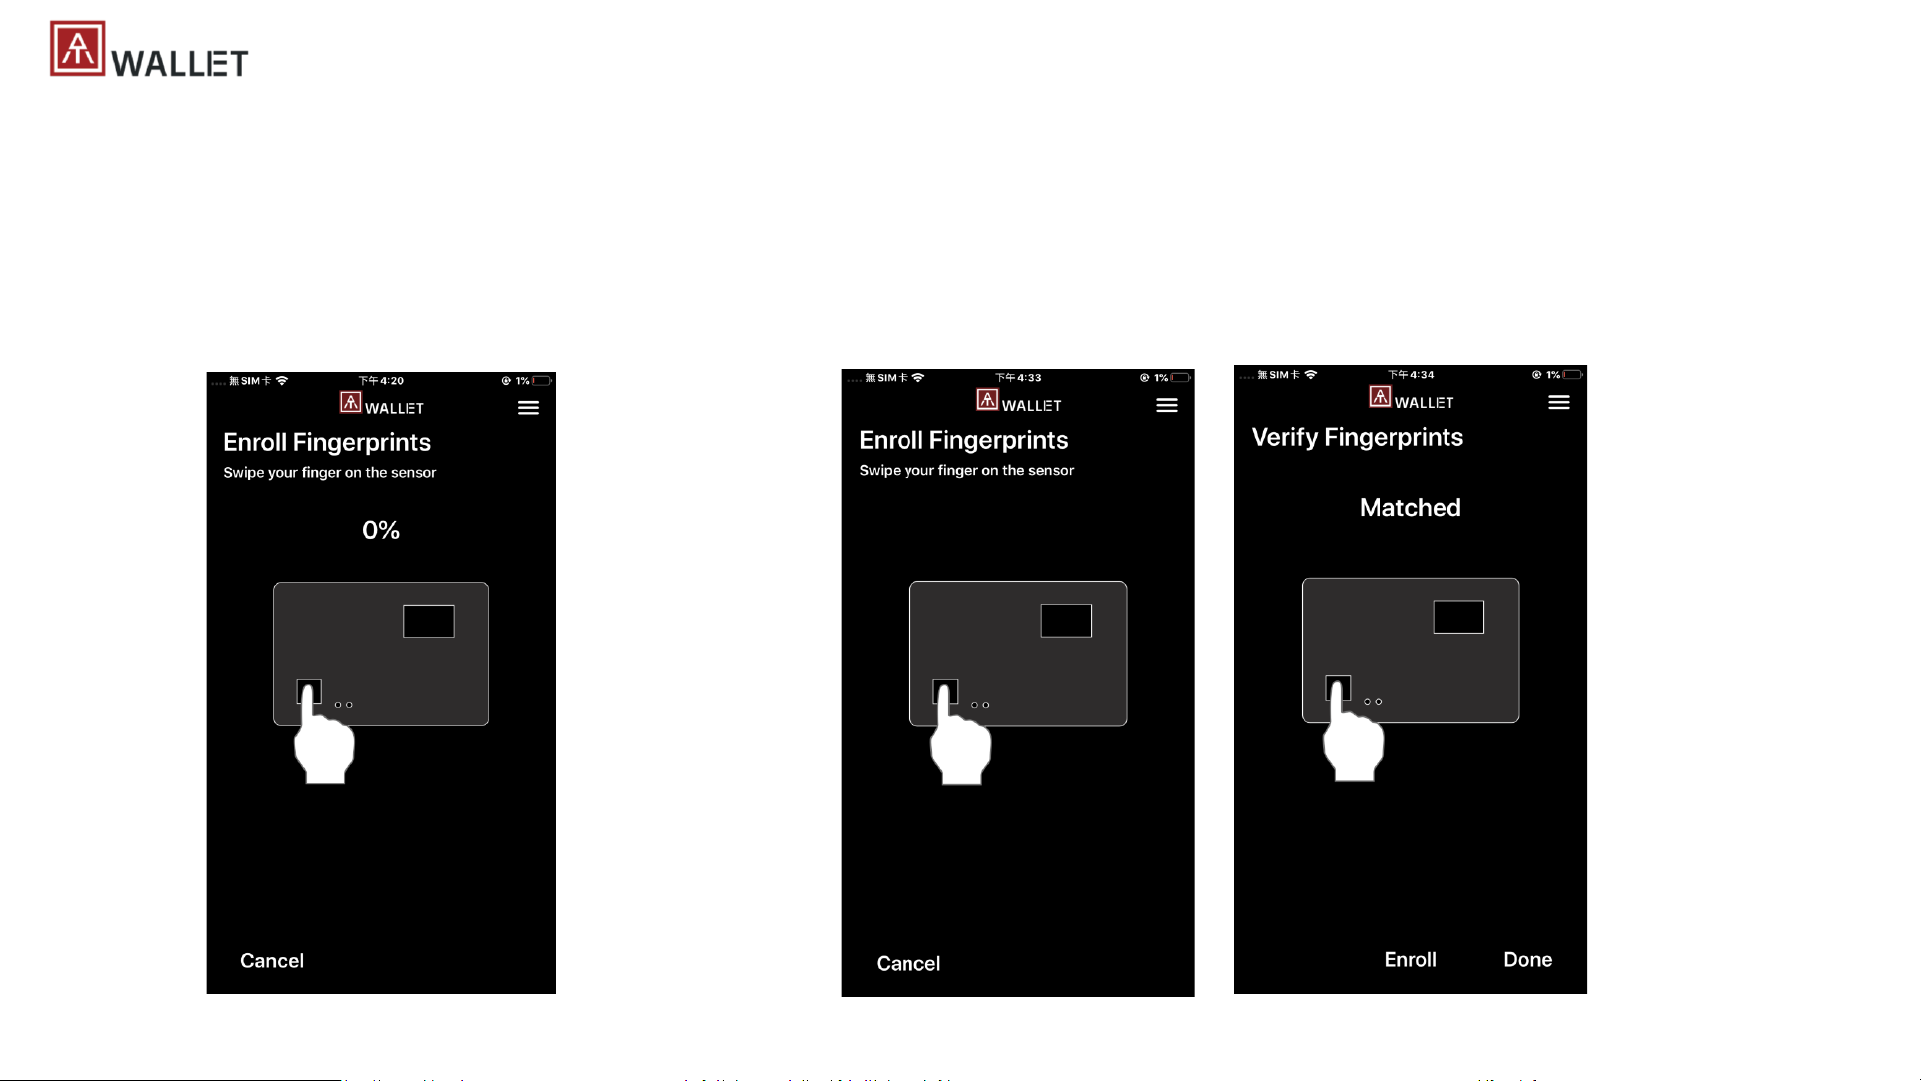
| Mobile APP – (2) Fingerprint Enrollment
a) [Card] enroll fingerprint (Put your specific finger on sensor, touch fingerprint sensor around 14~16 times)
b) [App] percentage of enrollment is increasing, until 100%
c) [Card] Verify enrolled fingerprint – “Matched” (LED#2 shows GREEN); if it’s “Mismatched” (LED shows RED), please touch again to verify
d) [App] click “Enroll” to enroll more fingerprints in, or click “Done” to end enrollment
100%
(a)
(b)
(c) (d)
Page 13
13
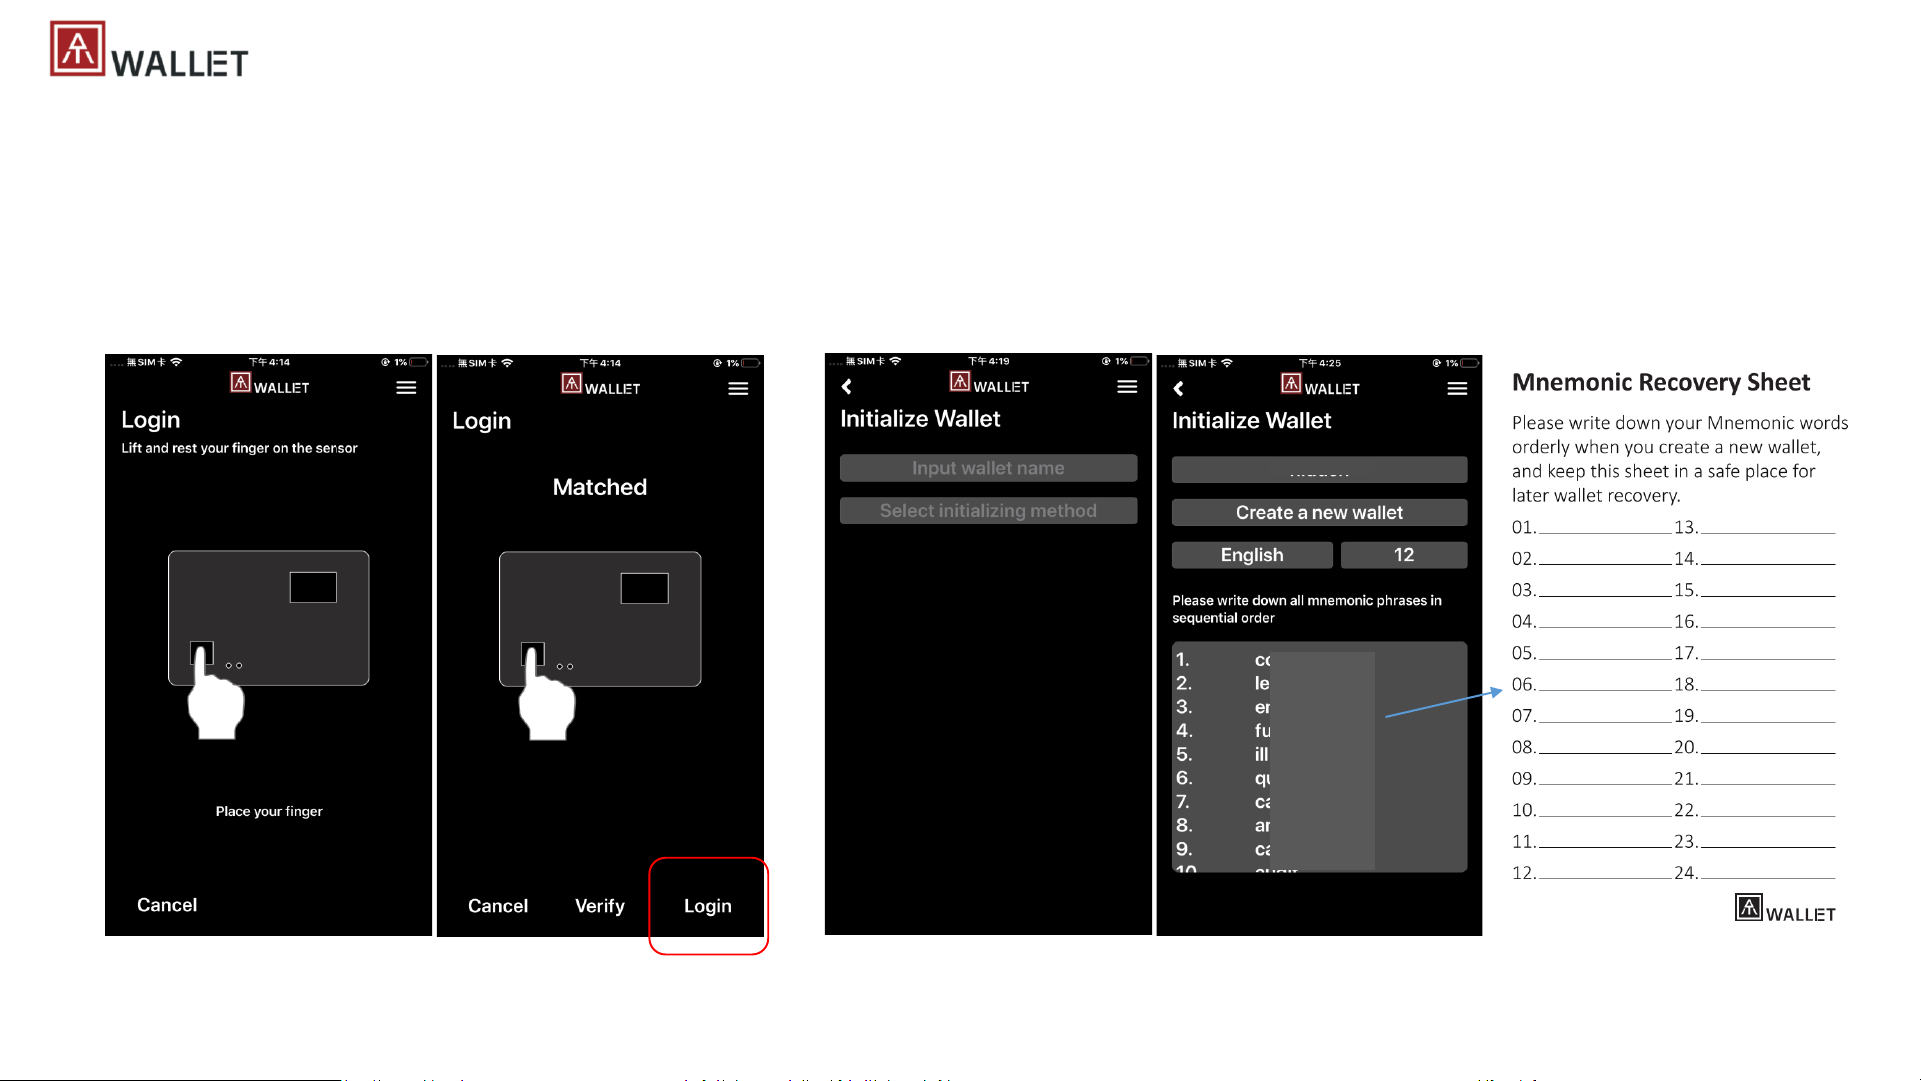
| Mobile APP – (3) Login to Initial Main Wallet
a) [Card] Verify enrolled fingerprint – “Matched” (LED#2 shows GREEN); if it’s “Mismatched” (LED shows RED), please touch again to verify
b) [App] fingerprint matched, click “Login” to initial wallet
c) [App] assign a name of the main wallet => Create new wallet => select language for Mnemonic => select length of Mnemonic
d) [App] write down Mnemonic words to the “Recovery Sheet” inside the box
wallet1
(b)
(c) (d)
Page 14
14
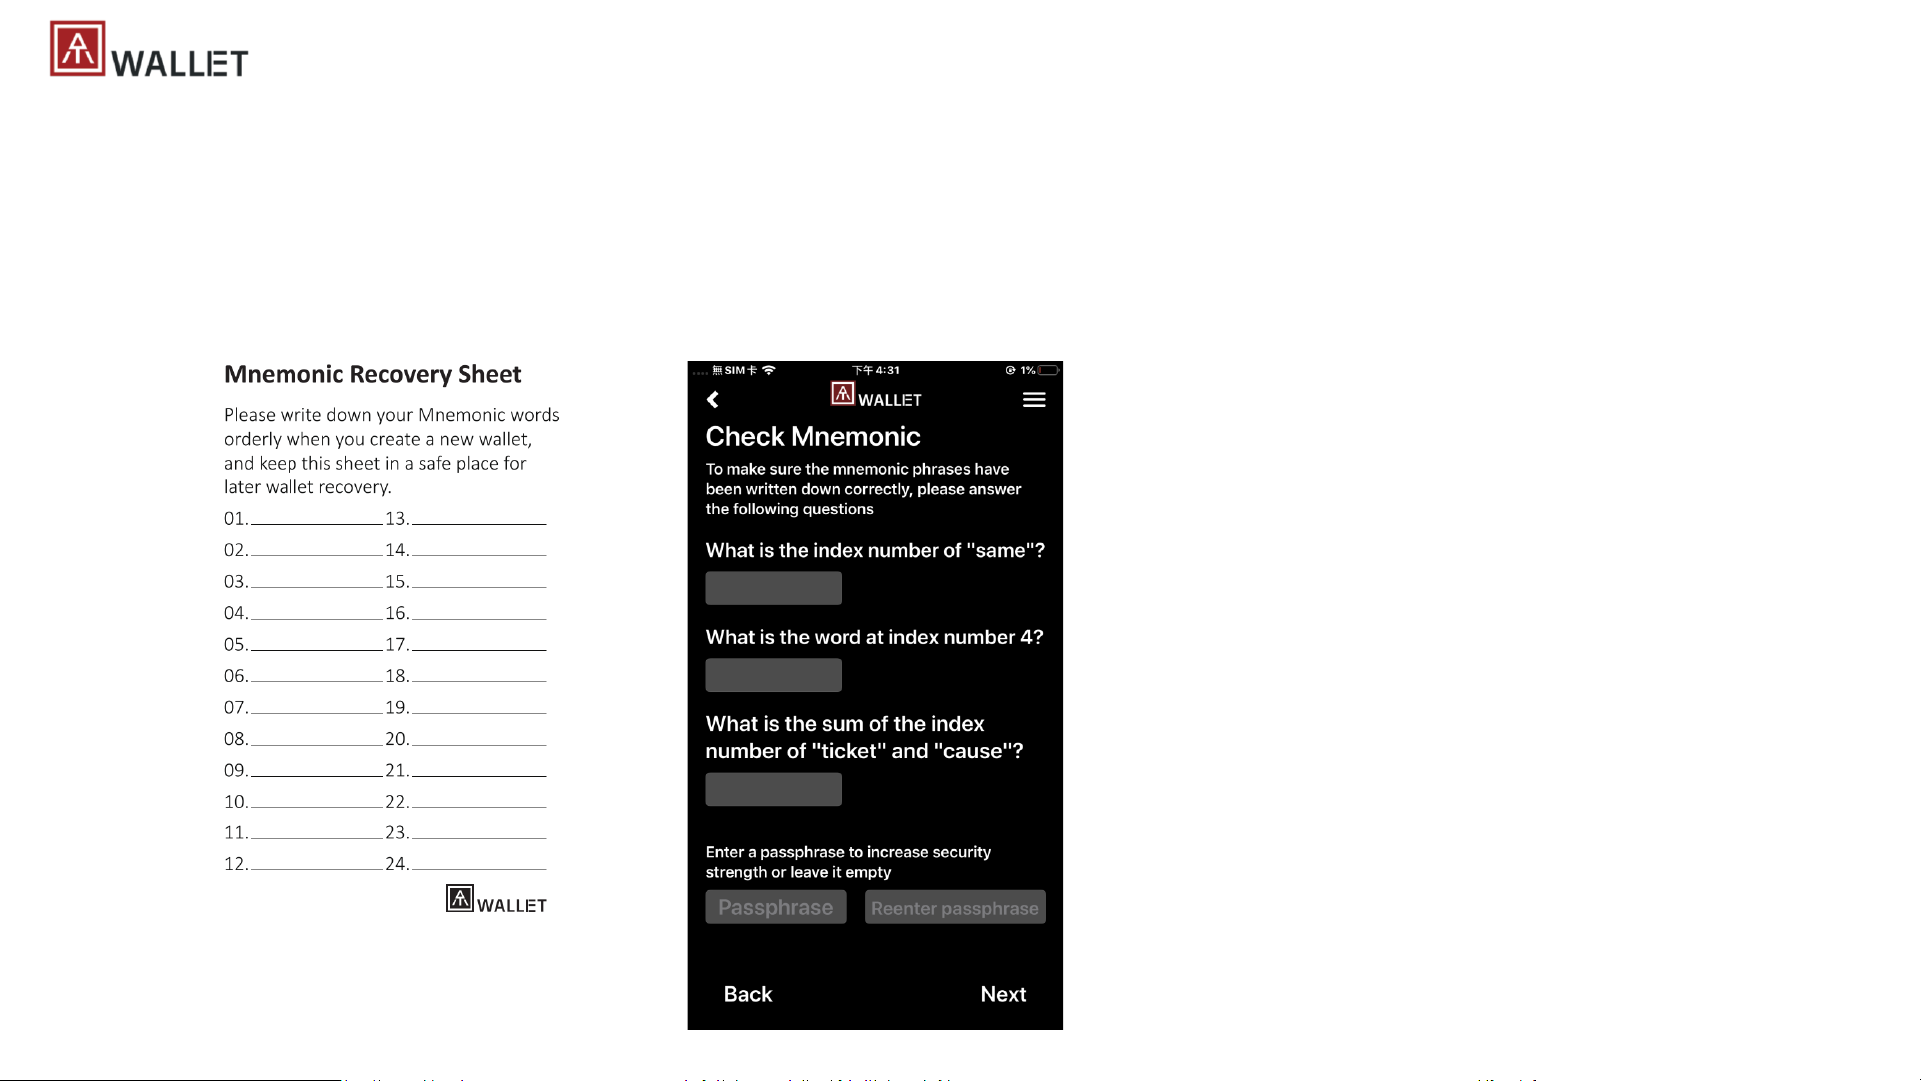
| Mobile APP – (3) Login to Initial Main Wallet
a) [App] answer questionnaires following the “Recovery Sheet” that you wrote down
b) [App] (option) for better security, you can assign “Passphrase” for those “Mnemonic words” for recovery, so when you do “recover wallet
base on Mnemonic words”, it needs type in correct “Passphrase” to recover (please remember your Passphrase, we can’t record it)!
Page 15
15
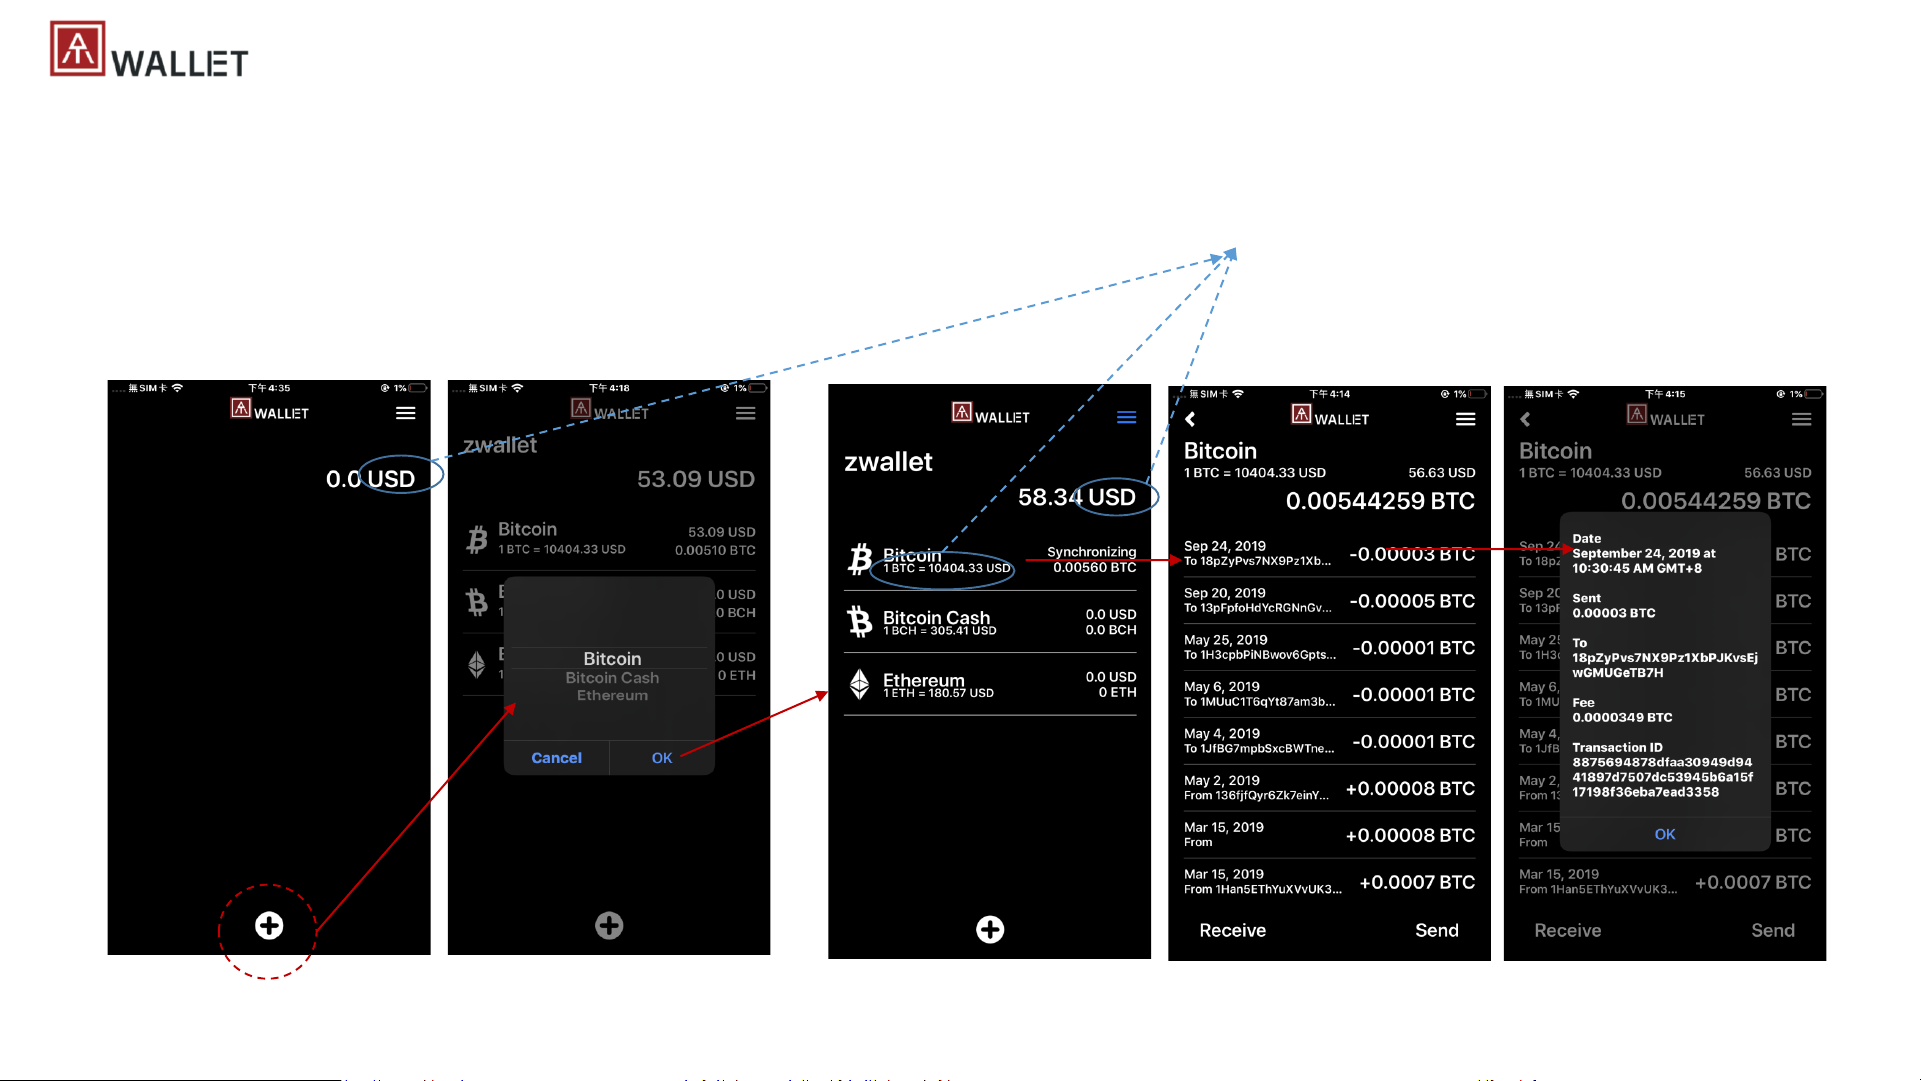
| Mobile APP – (4) add supported cryptocurrency
a) [App] Select and add specific cryptocurrency, we allow max 10x cryptocurrencies, and it can be duplicated (for example, 2x Bitcoin, 3x
Ethereum, ….)
b) [App] each cryptocurrency will sync with chain to show the total amount, also the default currency/exchange rate – following region of host
app (Mobile, PC), it’s adjustable from settings
zwallet
Transaction records of selected
cryptocurrency
Add Cryptocurrency
Select available
cryptocurrency
Detail of each transaction
record
Page 16
16
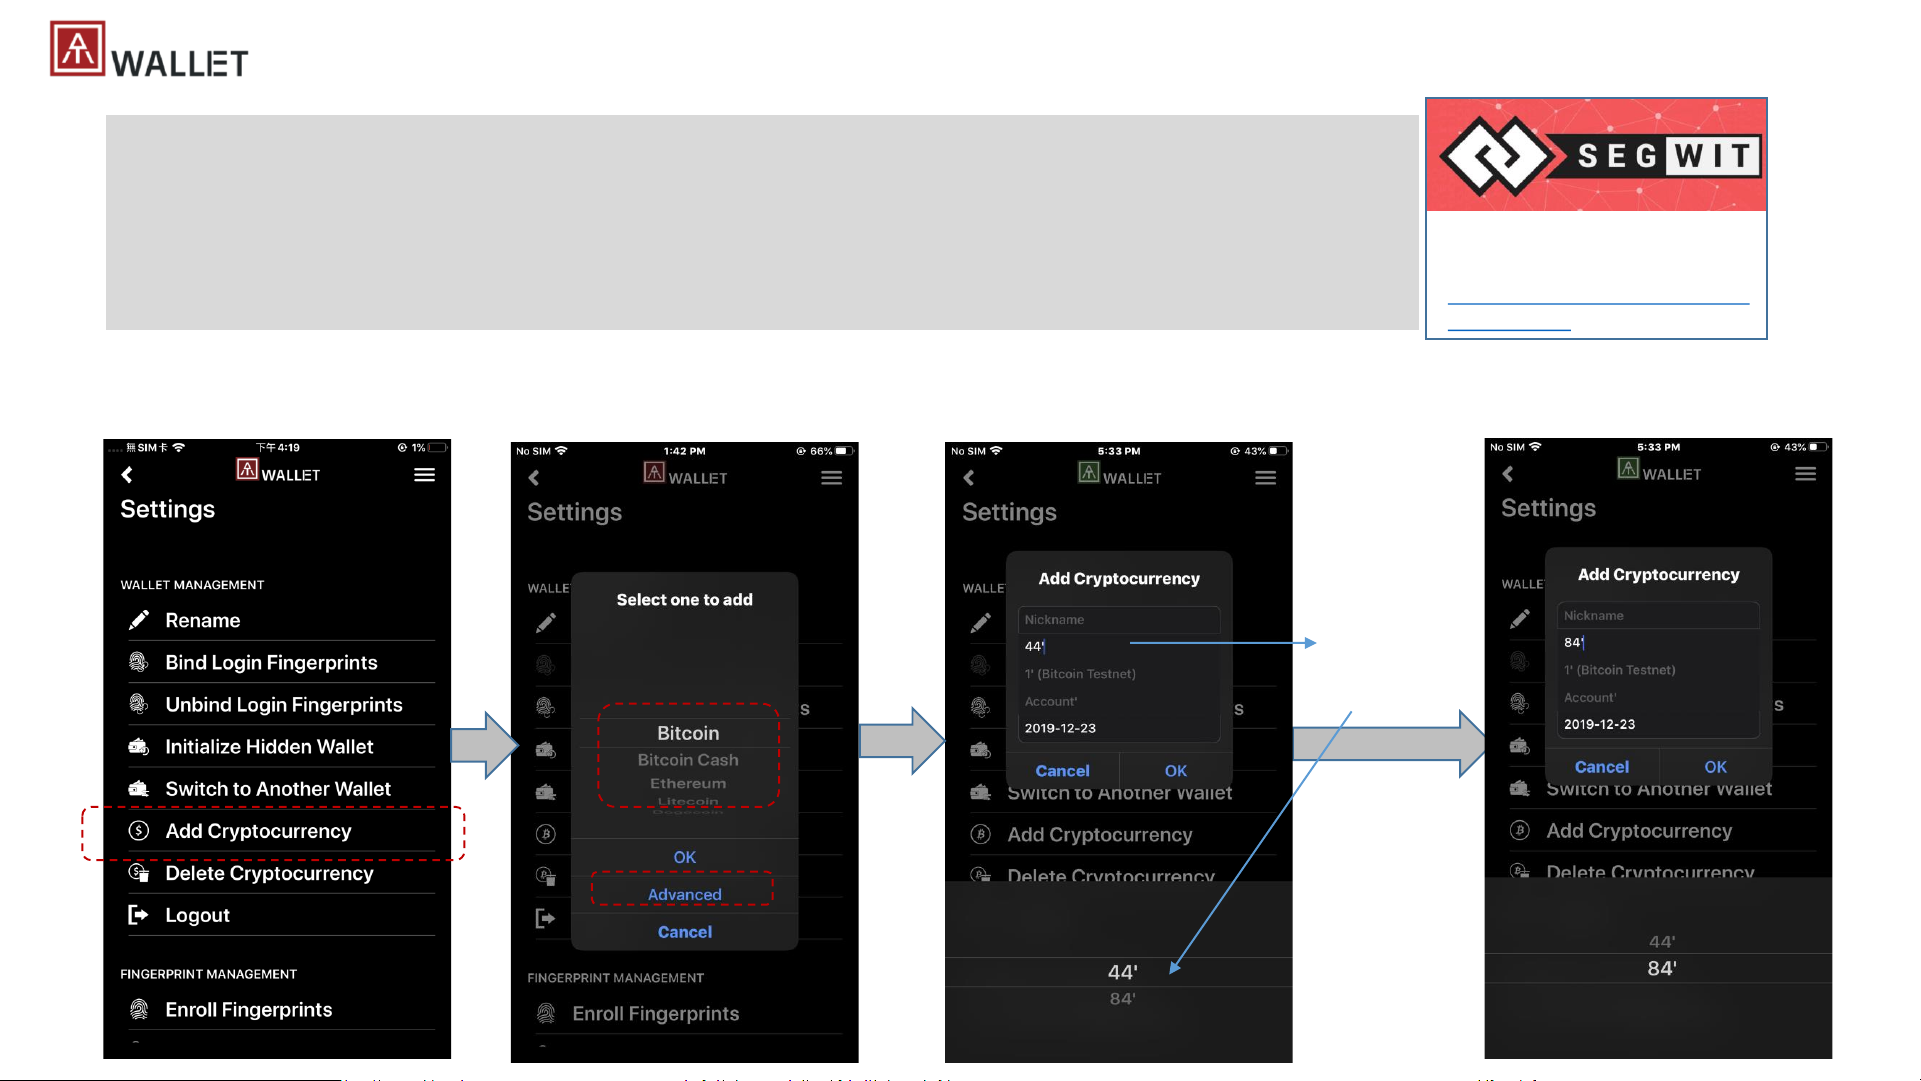
| Mobile APP – (4) add supported cryptocurrency – BIP84
• BIP44 refers to the accepted common standard to derive non segwit addresses. These
addresses always begin with a 1. (default of AT.Wallet)
• BIP84 refers to the accepted common standard of deriving native segwit addresses. These
addresses always begin with bc1 - and are referred to bech32 addresses.
• You can switch to BIP84 when you are adding new cryptocurrency (Bitcoin or LiteCoin only) as below
https://blockgeeks.com/guides/w
hat-is-segwit/
What’s Segwit? Check here
for ideas
Default is 44’,
click it to show
up options
From “Settings” =>
Add Cryptocurrency
Select Bitcoin or Litecoin for BIP84;
then click Advance
Page 17
17
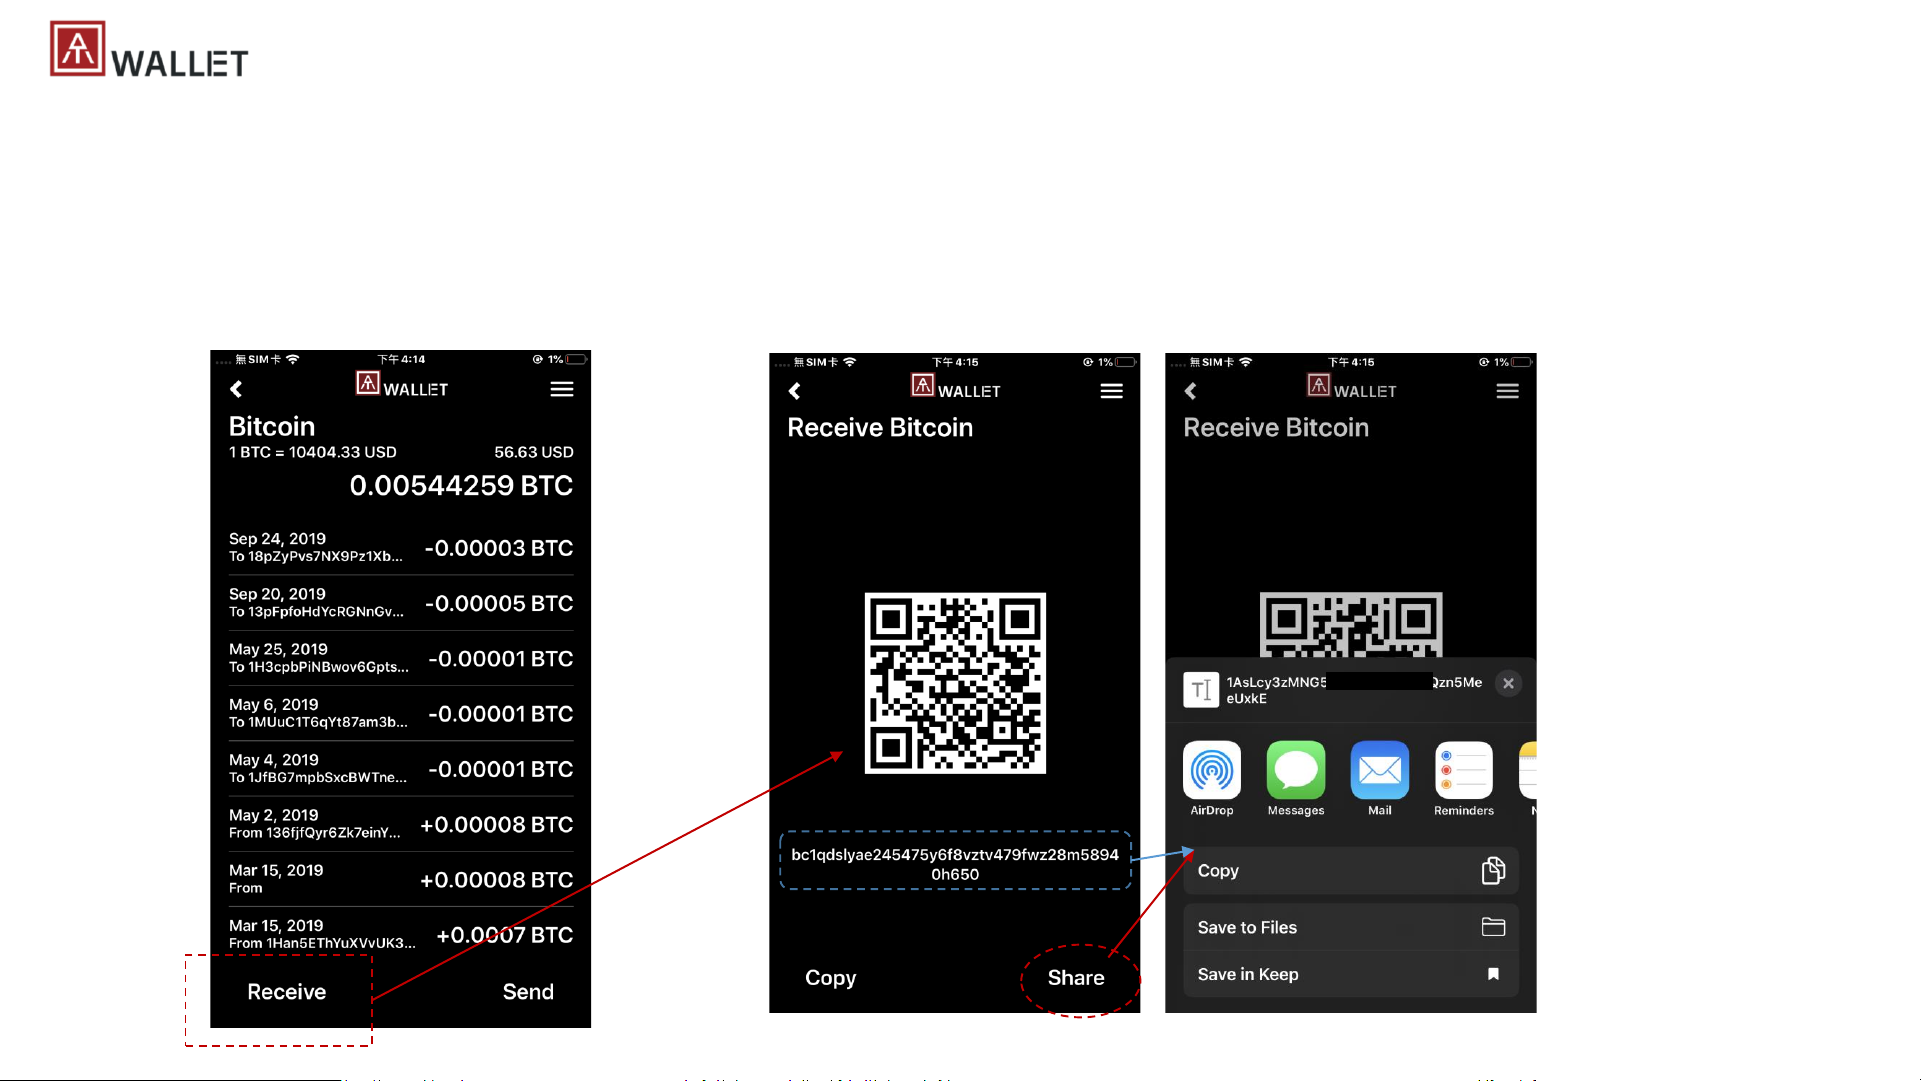
| Mobile APP – (5) transactions - Receive
a) [App] Select type of Cryptocurrency, click “Receive” button
b) [App] showing QR code and address
c) [App] Sender can do QR code scan to get sending address to send; or we can share the QR code/address to user via app or by “copy &
paste” to share it manually
d) [Card] Fingerprint verification is NOT necessary for receiving cryptocurrency from sender
Page 18
18
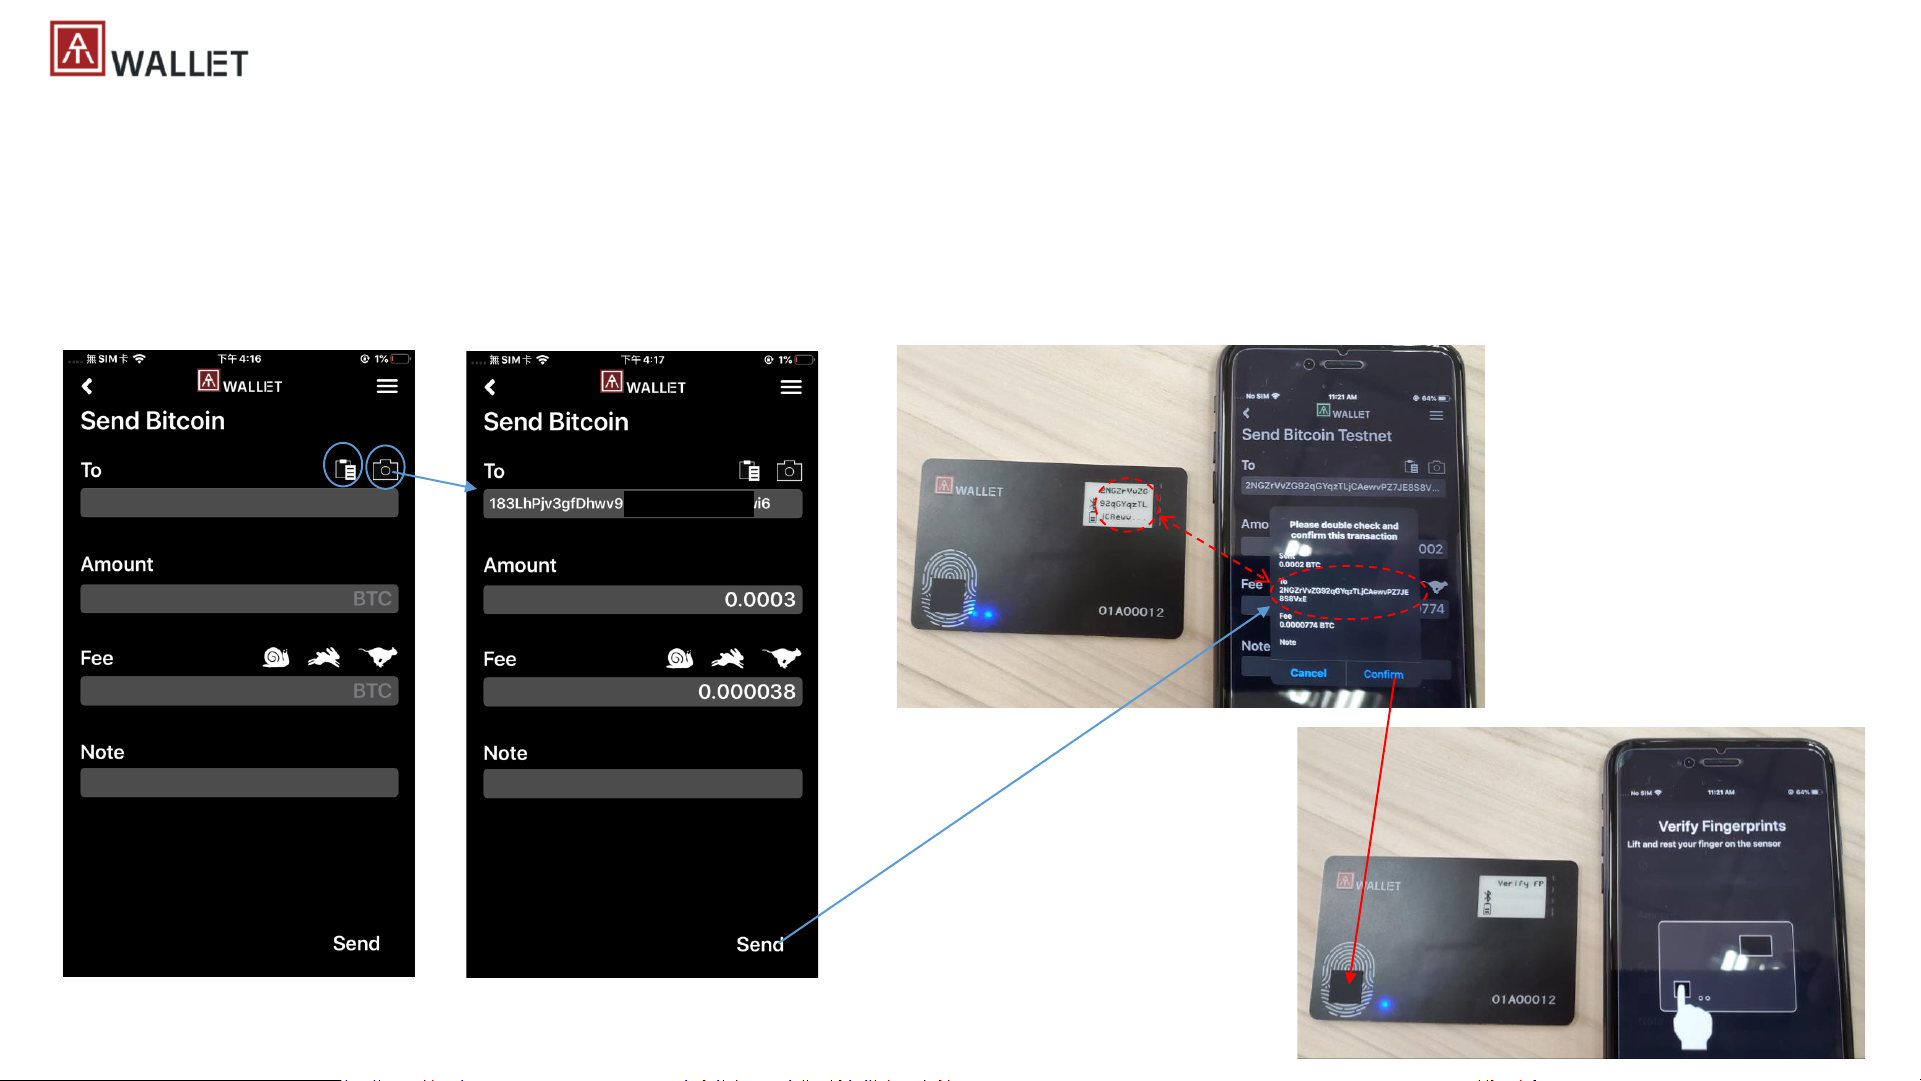
| Mobile APP – (5) transactions - Send
a) [App] Select type of Cryptocurrency, click “Send” button
b) [App] Send to target wallet by scan QR Code (Camera), or paste target address from clip board
c) [App] type in amount (cryptocurrency) and select the gas fee (3 levels – higher gas fee can speed up the transaction), or type in manually – but if the
type in amount is lower than min. gas fee, we will just assign the min. demanding fee
d) [App] Double confirm the “send to address” and amounts
e) [Card] Confirm to verify “bound” fingerprint(s) or enrolled fingerprint if there is bound wallet => Matched => Done => Send Success or Fail notifications
(a) “Send” page
(b) (c) Scan QR code or paste address
to send; type in amounts
(d) Check the address (APP
and E-ink) and amounts (APP)
to confirm
(e) Verify by bound
fingerprint(s); or verify by
any enrolled fingerprint if
there is no binding
Page 19
19
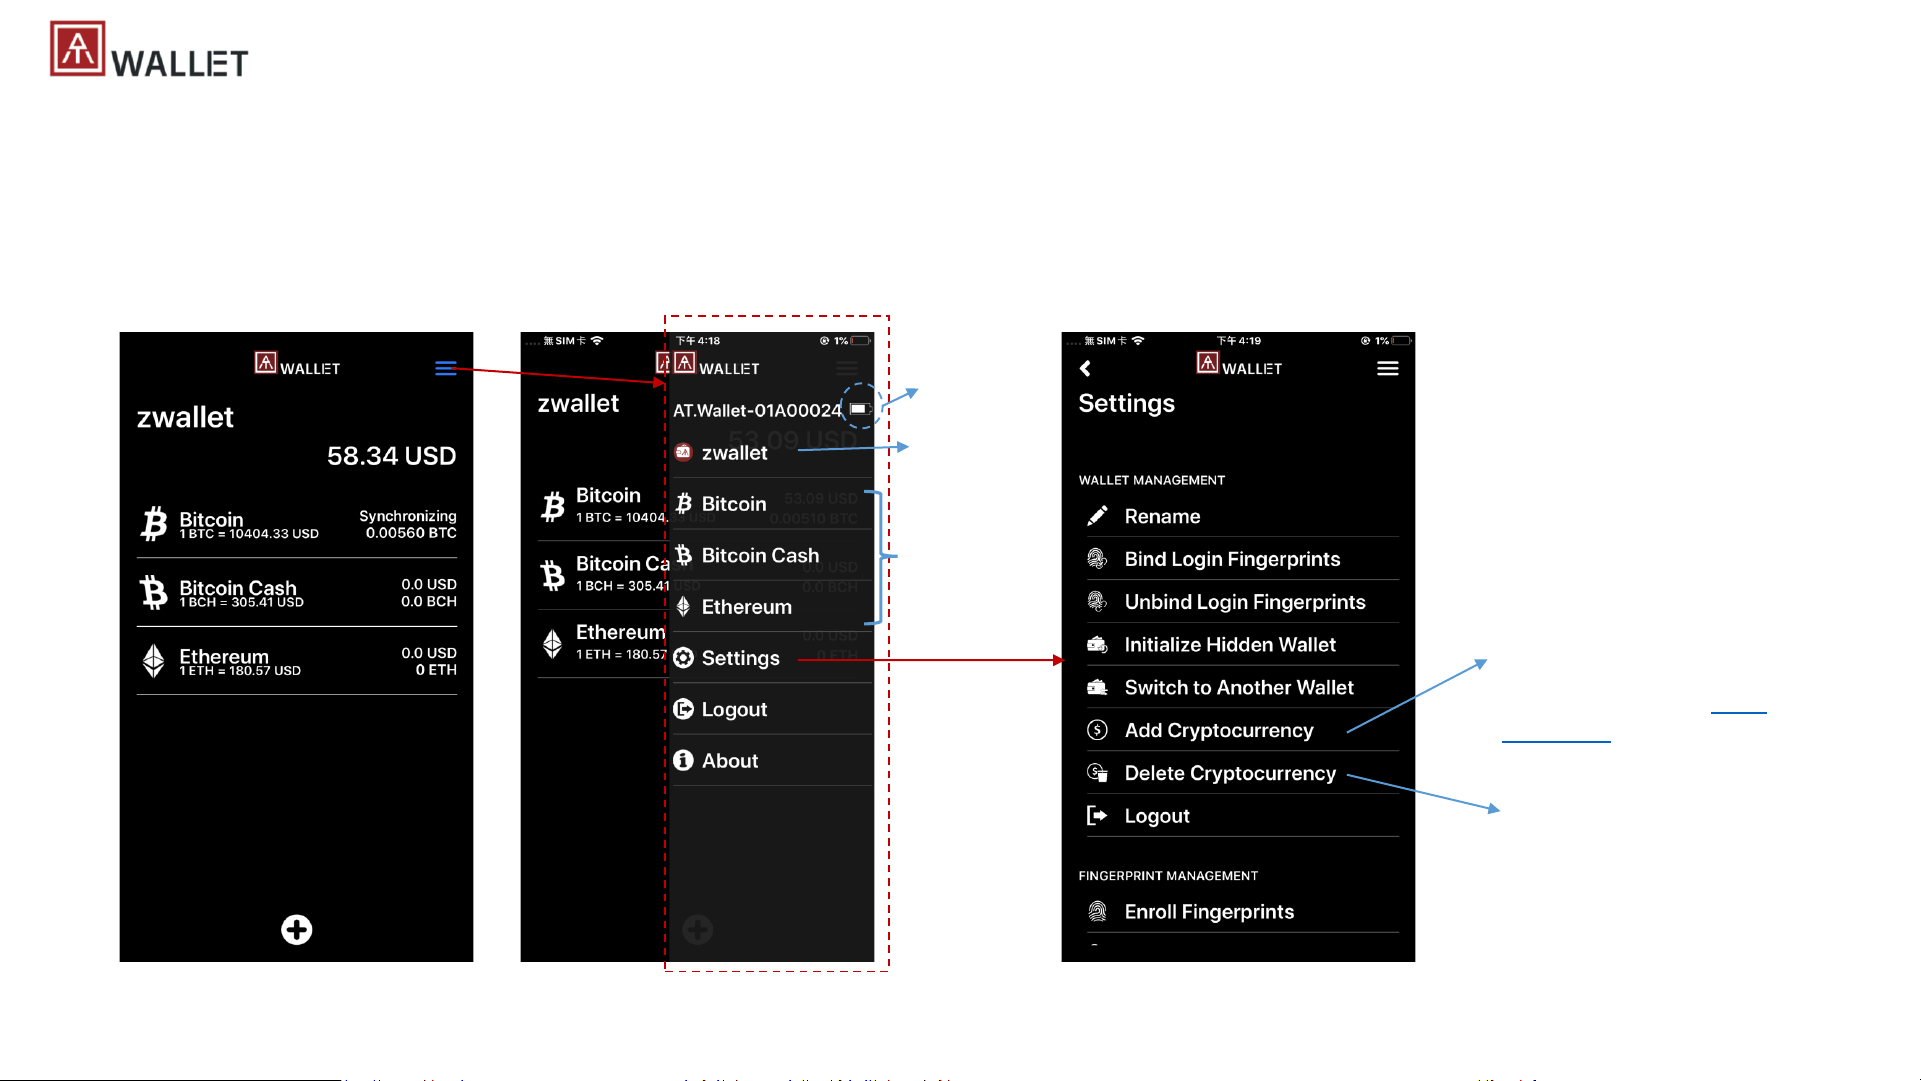
| Menu bar and Settings
Home Page
Listing selected cryptocurrencies
Menu bar
Shortcuts to
each currency
Battery status
of Wallet card
Back to Home
page
Settings
You only can delete created
cryptocurrency here
You can add new cryptocurrency
here;
If you want to enable BIP84 for
Bitcoin or Litecoin, here is the
only place to enable (check
BIP84 page)
Page 20
20
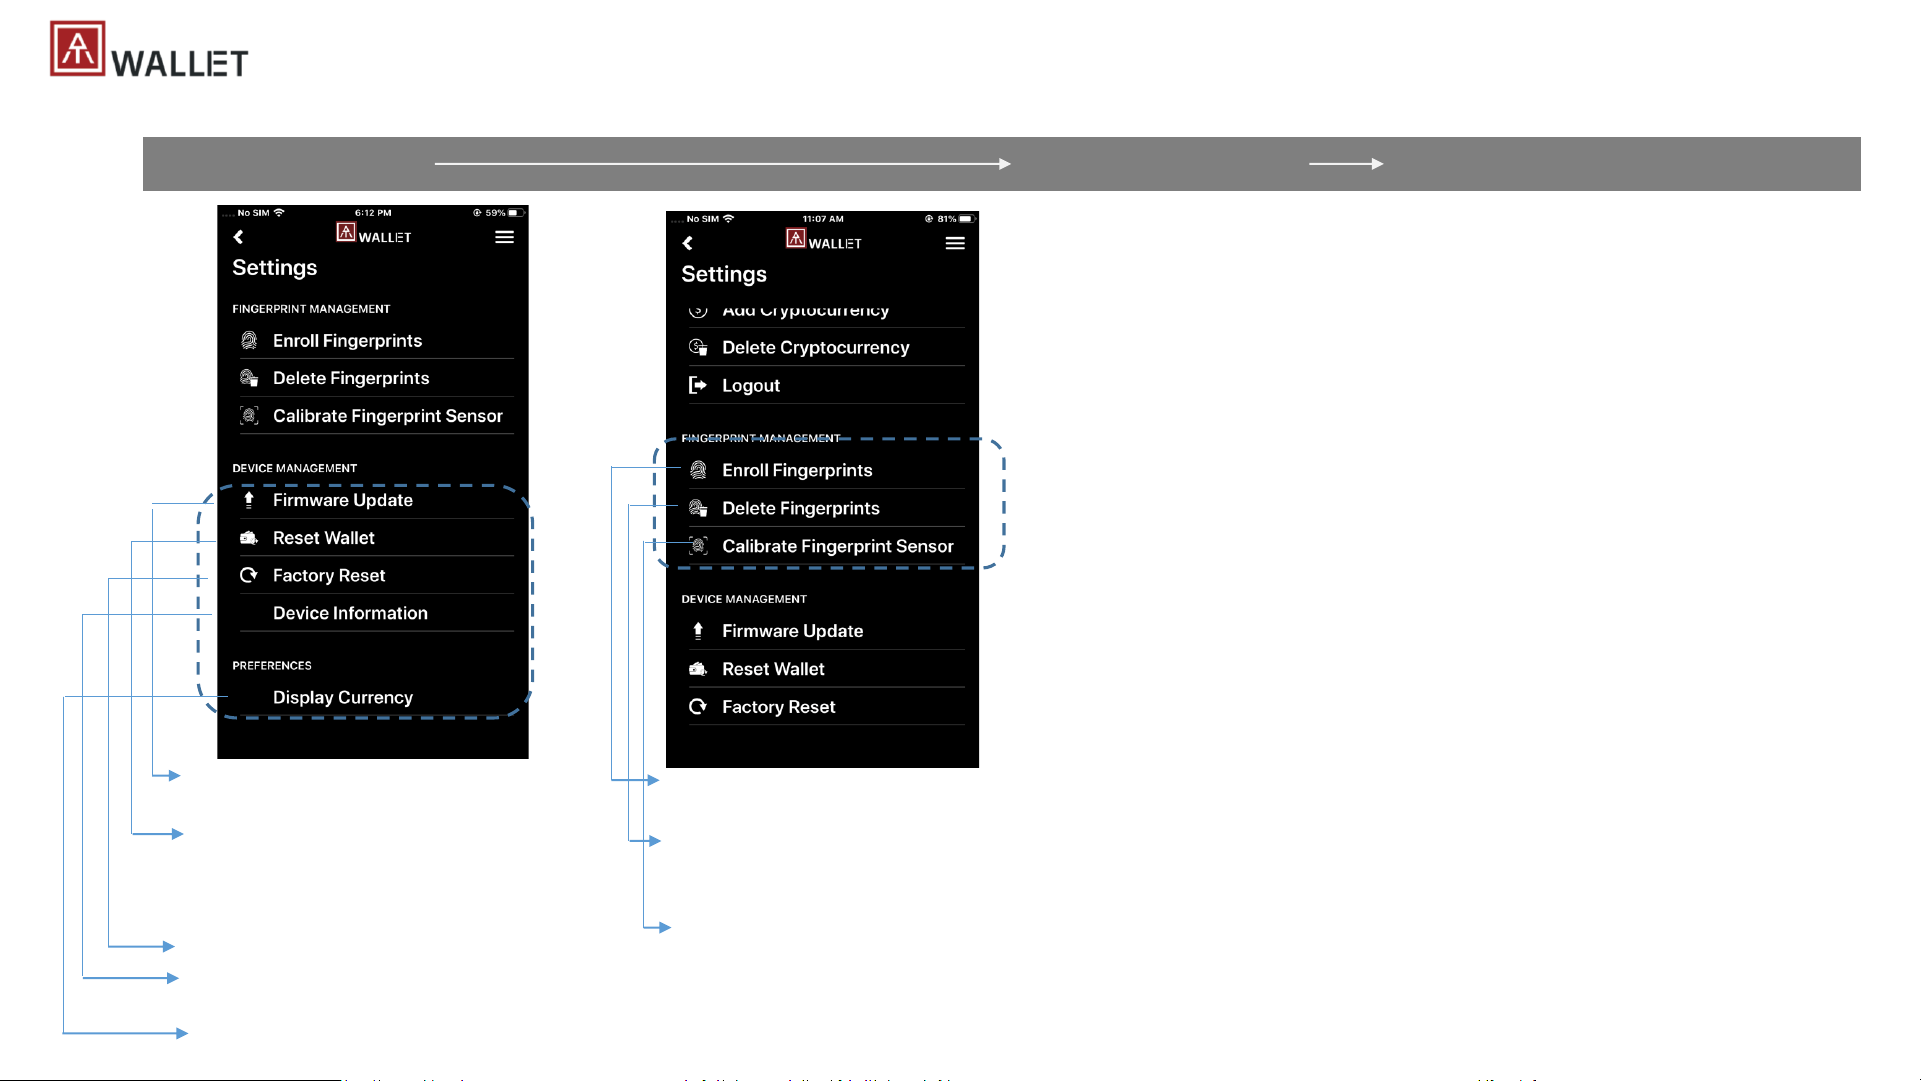
| Settings (for AT.Wallet card)
1x AT.Wallet card 2x Wallet(s) per card 10x Cryptocurrencies per wallet
• Check and upgrade
firmware automatically
• Wallets are gone – user
can re-create or recover
wallet; enrolled
fingerprints are still there.
• Everything is gone
• AT.Wallet card ID, Firmware
version, battery status
• Select currency
• Enroll new fingerprint(s) – up to 8x fingers
(only delete to add)
• Delete fingerprints – delete the fingerprint you
verified; but if the fingerprint bound with
assigned wallet, it can’t be deleted
• If there is something wrong from your
fingerprint sensor (environment or
temperature), do it to re-calibrate sensor to
work (during calibration, don’t touch
fingerprint sensor!!)
Page 21
21
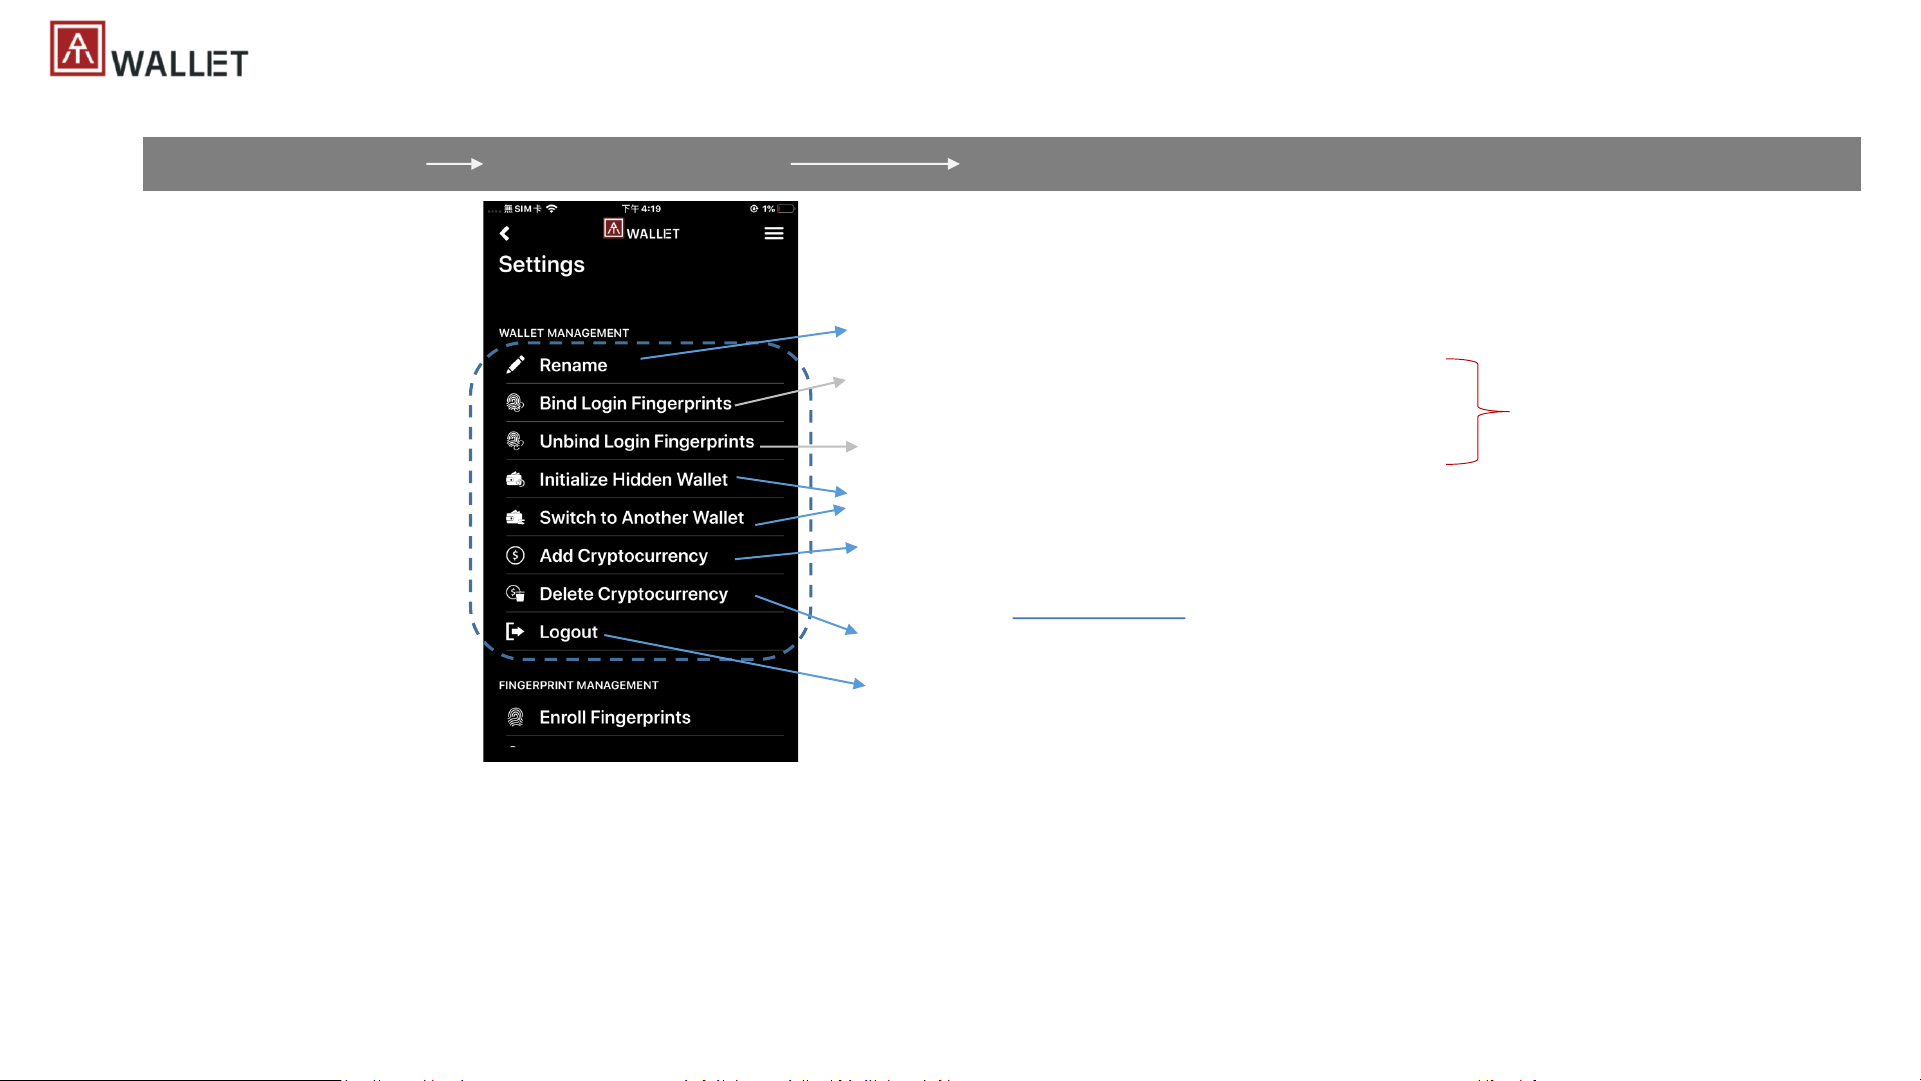
| Settings (for Wallet)
1x AT.Wallet card 2x Wallet(s) per card 10x Cryptocurrencies per wallet
• Rename current wallet (main or hidden wallet), or rename
cryptocurrency (nickname)
• Assign to bind specific finger to login wallet – so only the
bound finger can login the wallet
• Unbind finger to login wallet – so any enrolled finger can
login wallet(s)
• Initial hidden wallet here – hidden wallet can login via
“Switch to Another Wallet” from here
• You can add new cryptocurrency here; if you want to
enable BIP84 for Bitcoin or Litecoin, here is the only place
to enable (check BIP84 page)
• Delete Cryptocurrency – you only can delete created
cryptocurrency here
• Logout wallet, BLE disconnected; or Wallet card is power off
(no operations for a while), please log out here, then re-login
• If there is no any fingerprint bound with specific wallet
• Login main wallet via any enrolled fingerprint
• Switch to Hidden wallet from Main wallet
• Standalone mode is only for main wallet
• Bind specific fingerprint(s) to login Wallet
• Assign one or more fingerprints to login – please remember which fingerprint(s) to bind the
wallet, we can’t help to record it
• If you assign multiple fingerprints to bind the wallet, it’s “OR” scenarios, that means you need
to verify bound fingerprints one by one (no sequence, click “Verify” button for next
fingerprint), click DONE to login
• You can login Main wallet or hidden wallet via bound fingerprint(s)
Fingerprint binding is
disabled at current release
Page 22
22
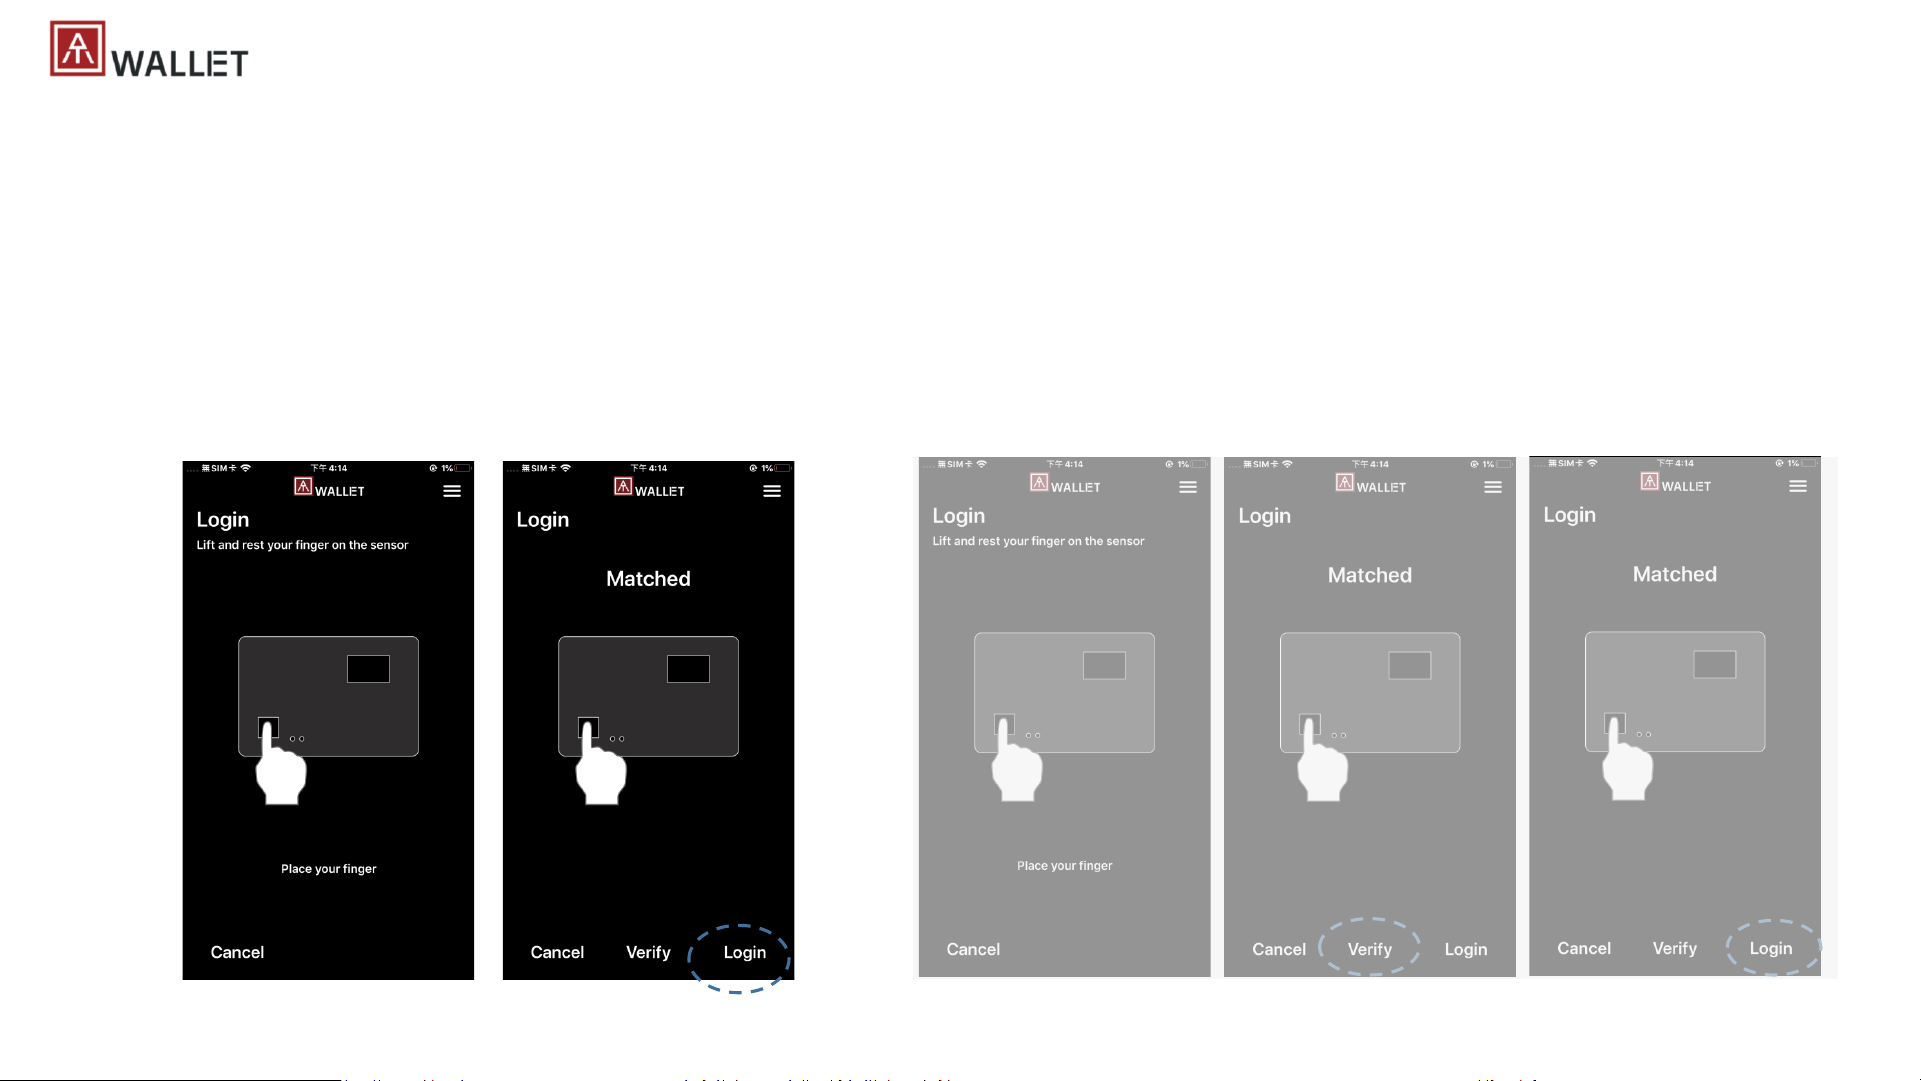
| Settings - Bind Login Fingerprint
• If there is no any fingerprint bound with specific wallet
• Login main wallet via any enrolled fingerprint
• Switch to Hidden wallet from Main wallet
• Standalone mode is only for main wallet
• Bind specific fingerprint(s) to login Wallet – we disabled fingerprint bind at current release
• Assign one or more fingerprints to login – please remember which fingerprint(s) to bind which wallet, we can’t help to record it
• If you assign multiple fingerprints to bind the wallet, it’s “OR” scenarios, that means you need to verify bound fingerprints one by one (no
sequence, click “Verify” button for next fingerprint), click DONE to login
• You can login Main wallet or hidden wallet via bound fingerprint(s)
No bound fingerprint:
Verify any enrolled finger, “Matched”, click “Login” to main wallet
bound fingerprint (ex. finger#1 and finger#2 for main wallet):
Finger#1 verified, “Matched”, click “Verify” for 2ndfingerprint;
Finger#2 verified, “Matched”, click “Login” to the wallet
Page 23
23
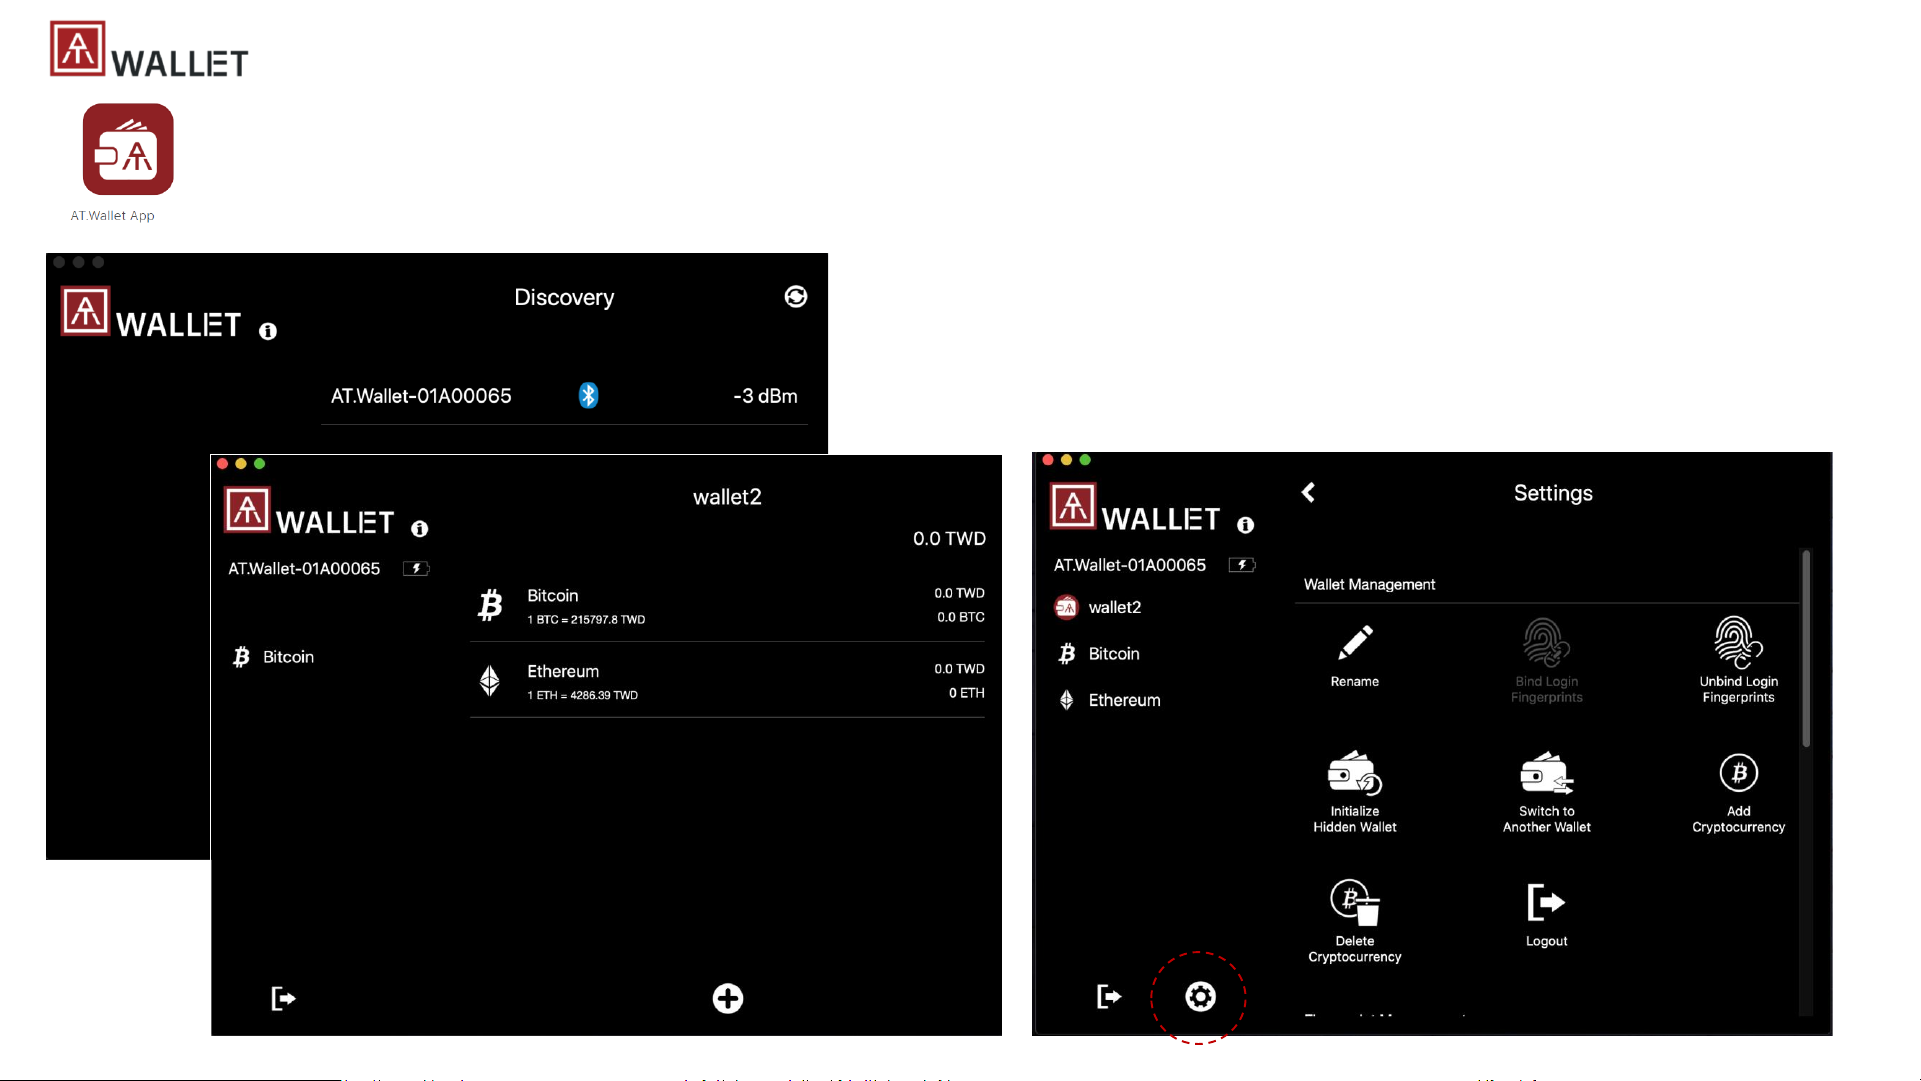
| Windows/Mac APP – GUI Layout
Listing available, paired or connected AT.Wallet cards
Home Page, Listing selected cryptocurrencies
Settings Page
Log out Wallet app
Page 24
24
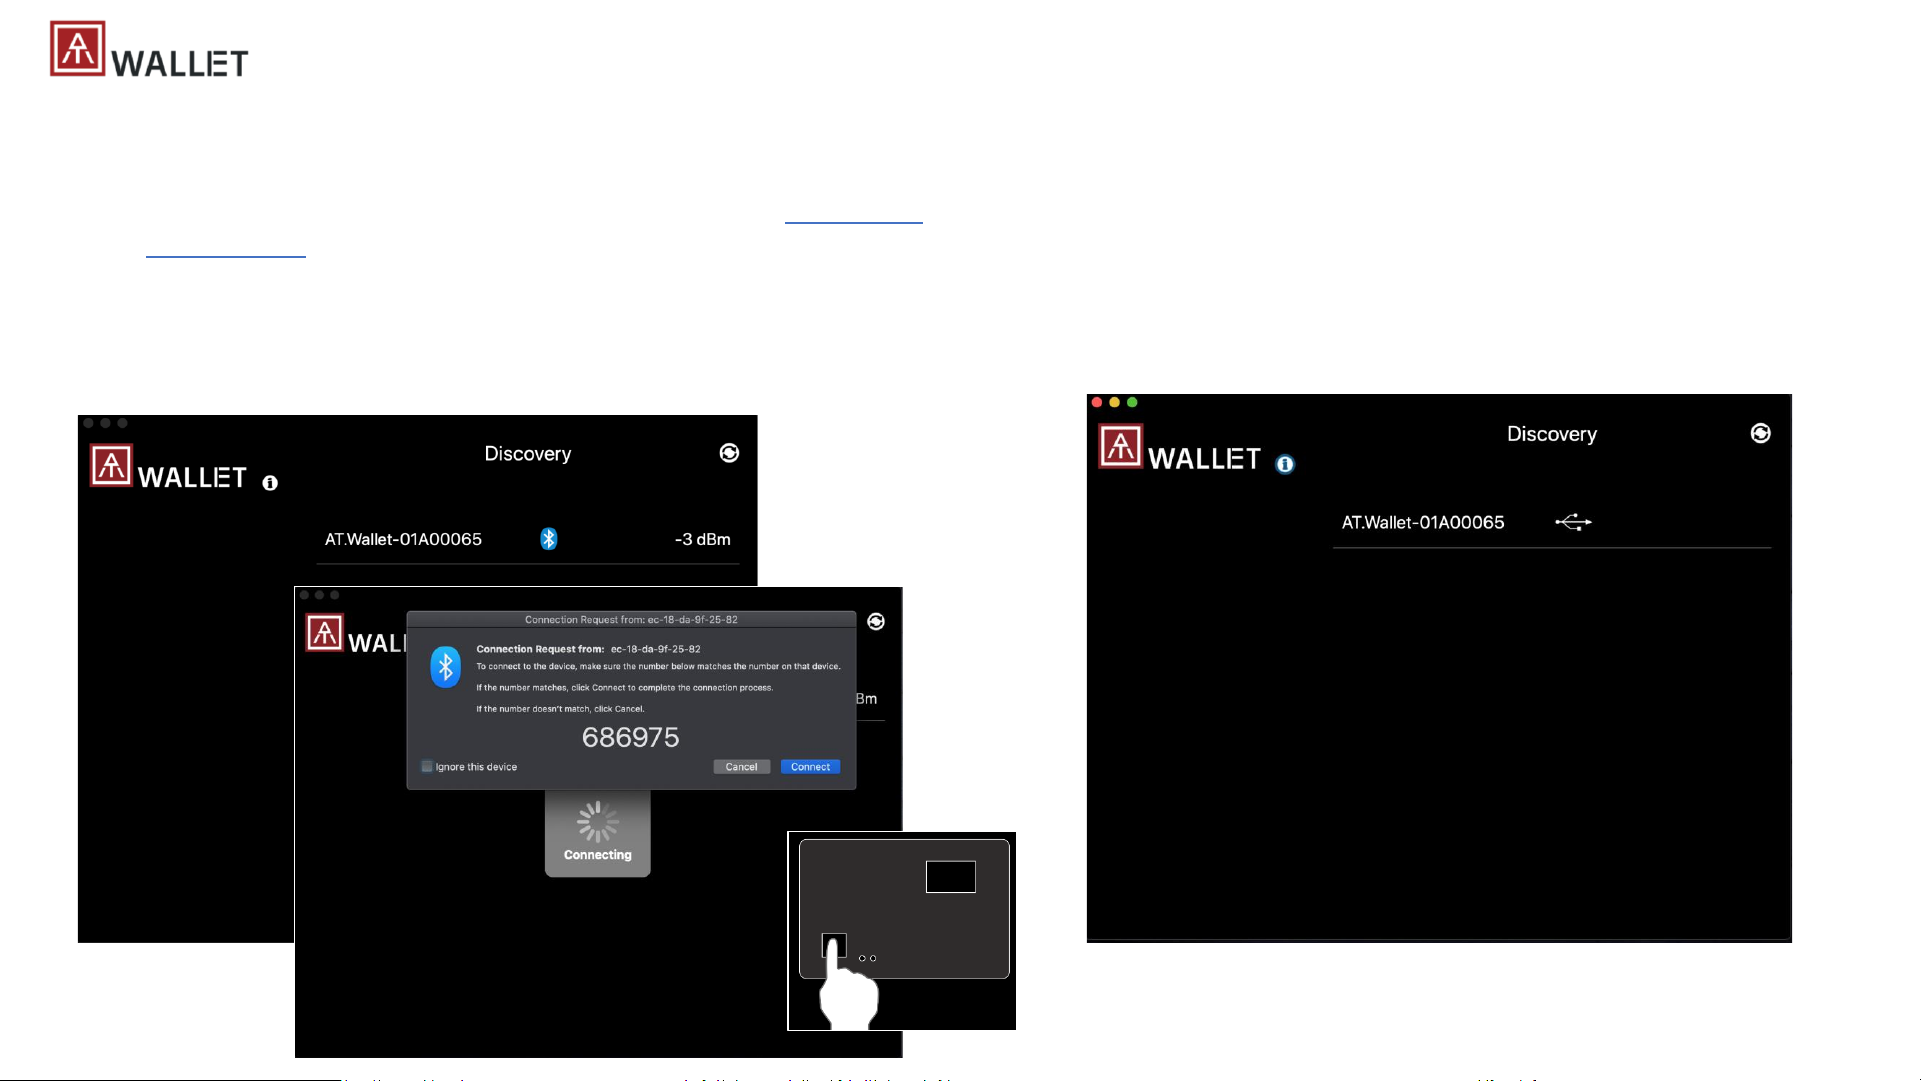
| Windows/Mac APP – BLE Pairing or USB connecting
Connect via BLE:
a) [App] launch AT.Wallet app (turn Bluetooth ON of the Windows/Mac)
b) [Card] Power on AT.Wallet card (click power button on back side), double click
power buttonto get into BLE secure pairing mode (LED#2 is cyan flashing)
c) [App] available AT.Wallet cards will show on the list (you can identify target card by
“keycode”)
d) [App] click target Wallet card to pair
e) [Card] LED#2 is white flashing - touch fingerprint sensor to confirm pairing; [app]
confirm “Connect” from APP
a) [App] launch AT.Wallet app
b) [Card] Put card on docking, connect USB to Windows/Mac, card
will power on automatically
c) [App] connected AT.Wallet cards will show on the list [App] click
target Wallet card to connect
Connect via USB:
(c ),(d)
(e)
(c )
Page 25
25
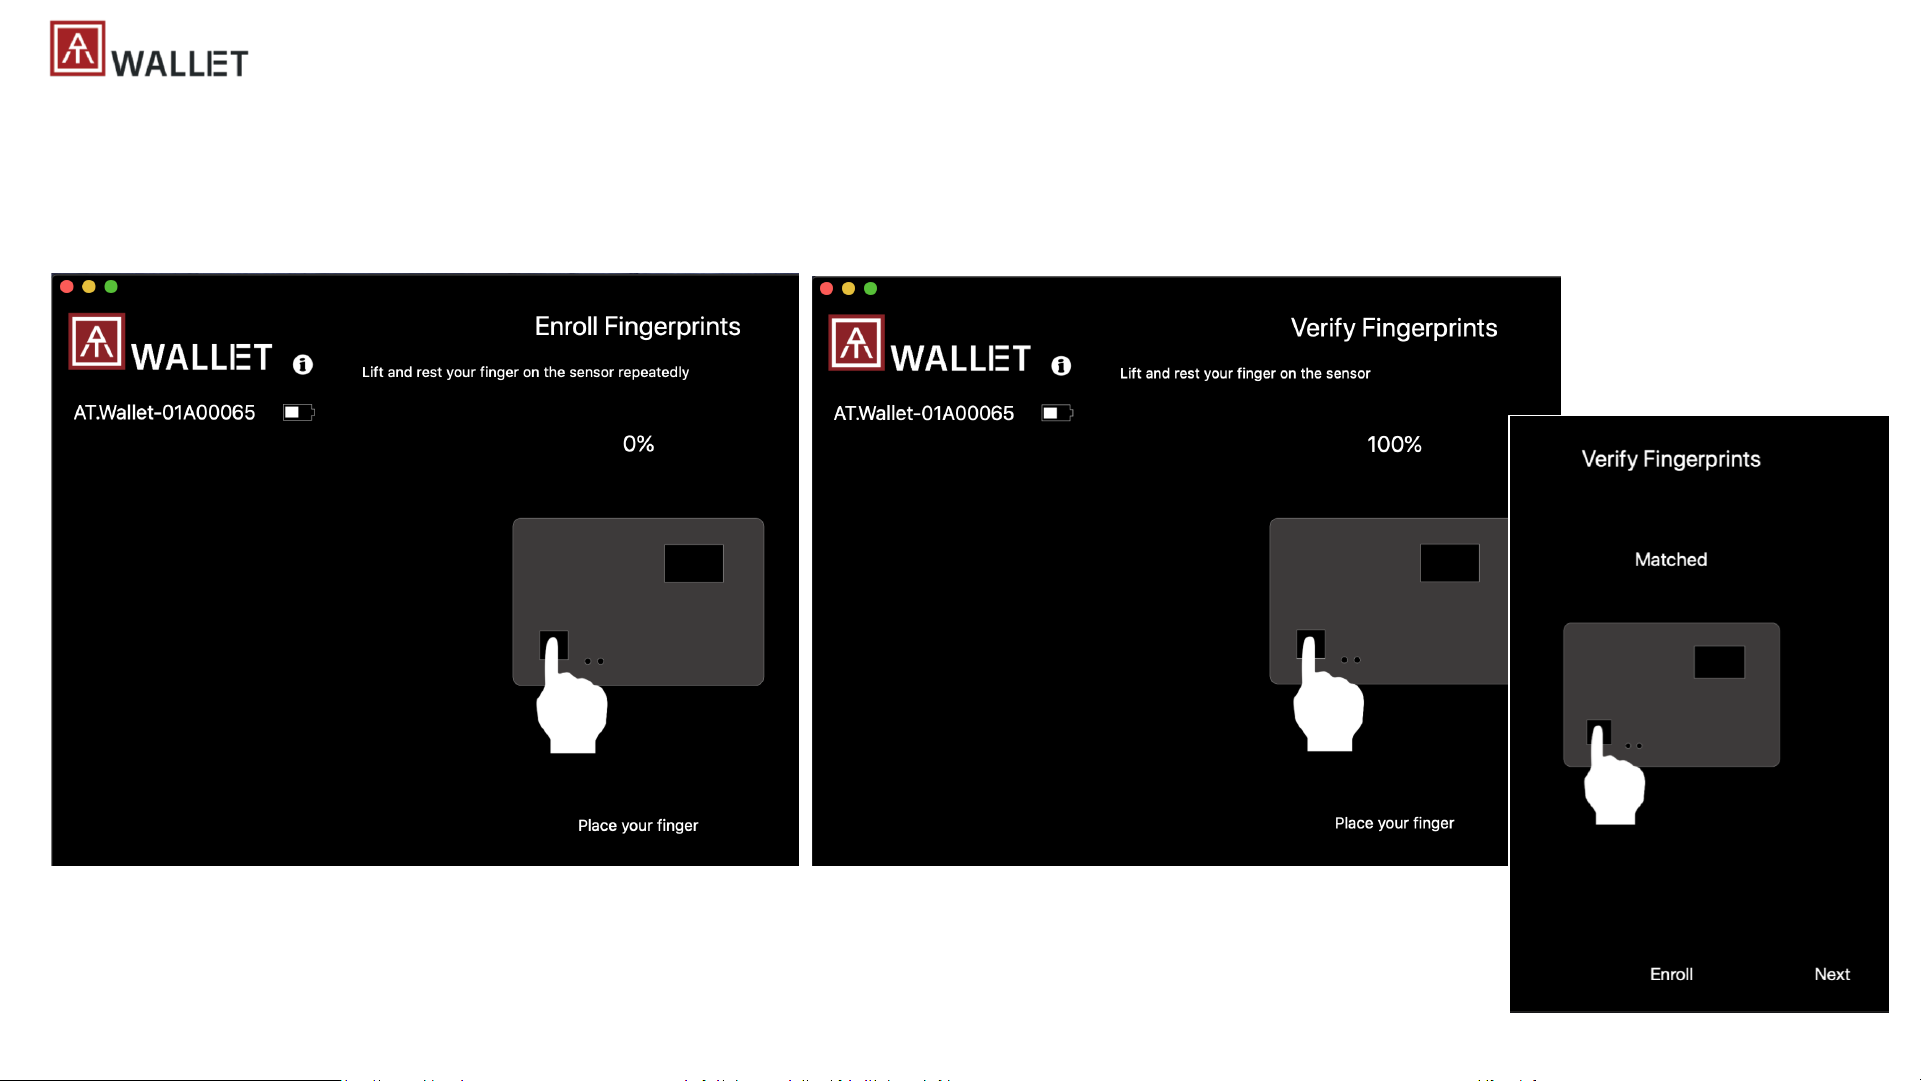
| Windows/Mac APP – (2) Fingerprint Enrollment
a) [Card] enroll fingerprint (Put your specific finger on sensor, touch fingerprint sensor around 14~16 times)
b) [App] percentage of enrollment is increasing, until 100%
c) [Card] Verify enrolled fingerprint – “Matched” (LED#2 shows GREEN); if it’s “Mismatched” (LED shows RED), please touch again to verify
d) [App] click “Enroll” to enroll more fingerprints in, or click “Next” to end enrollment
(a) (b)
(c) (d)
Page 26
26
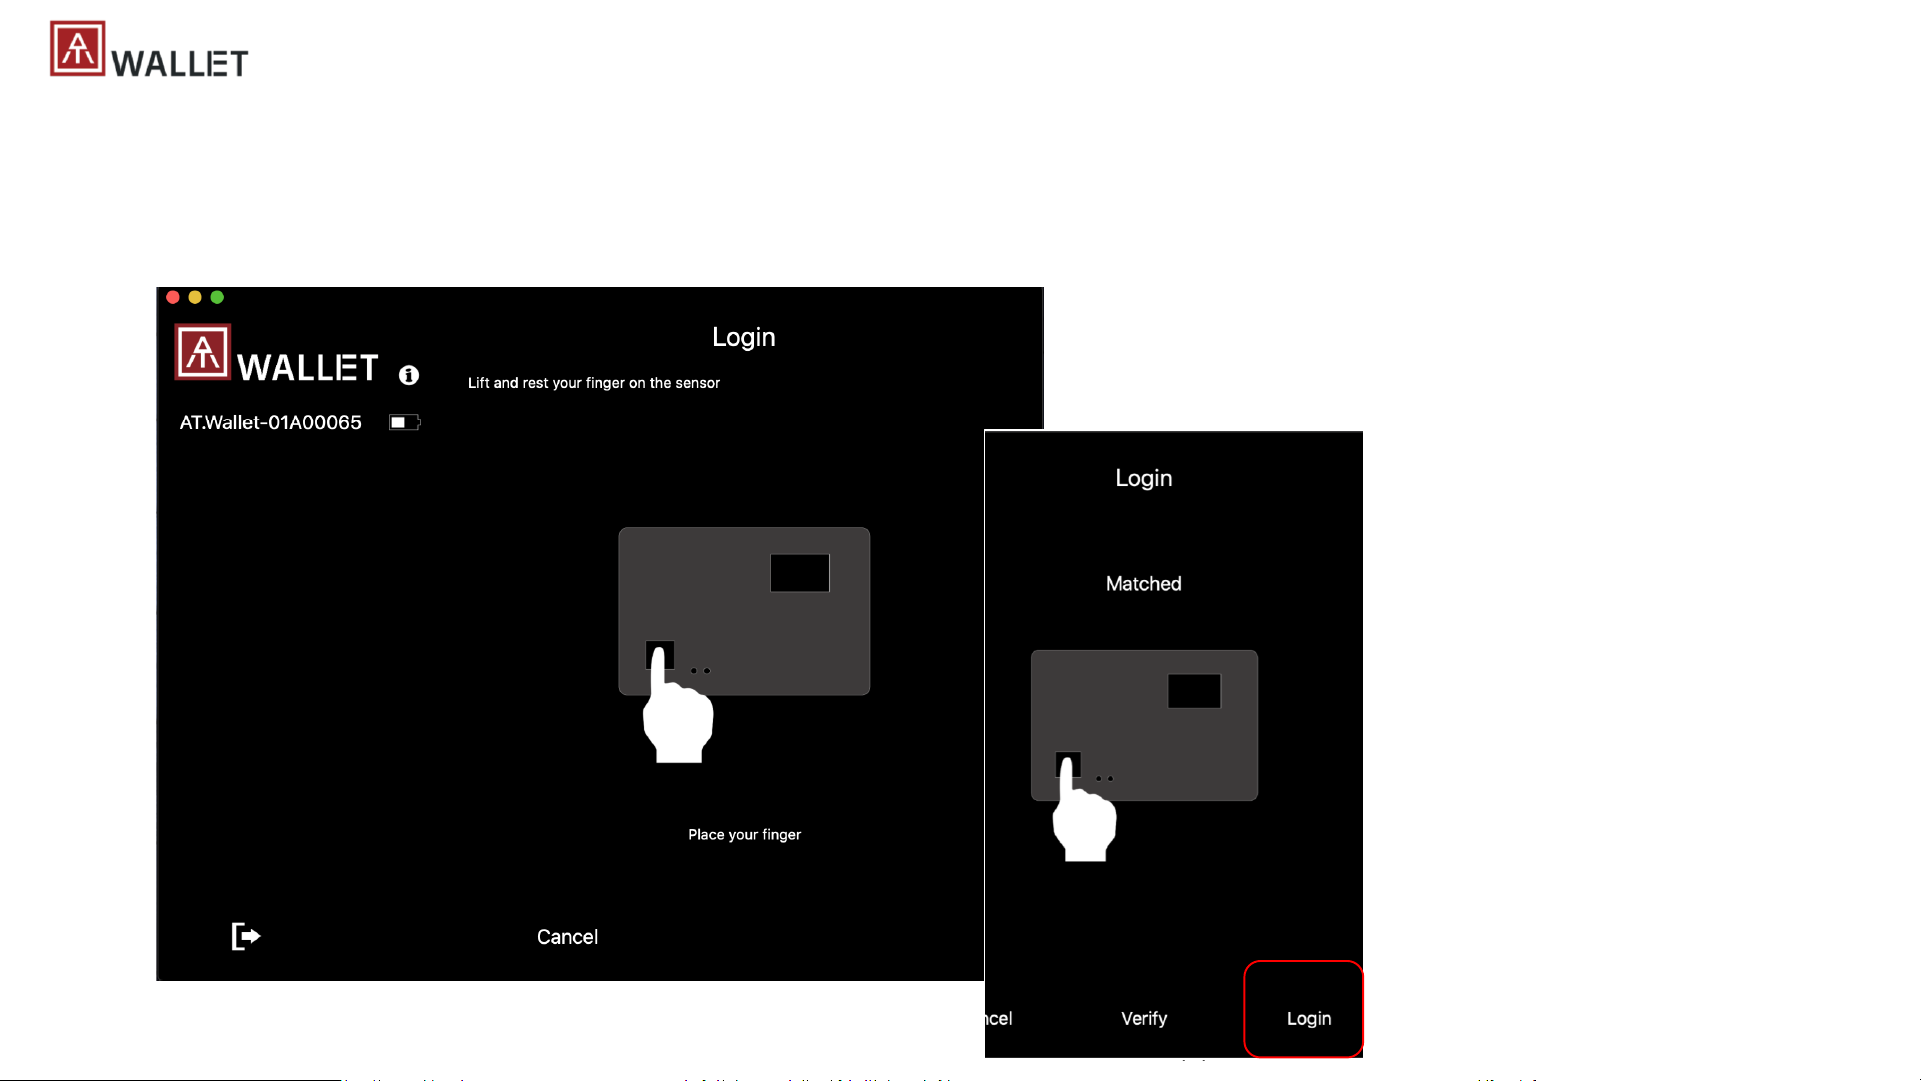
| Windows/Mac APP – (3) Login to Initial Main Wallet
a) [Card] Verify enrolled fingerprint – “Matched” (LED#2 shows GREEN); if it’s “Mismatched” (LED shows RED), please touch again to verify
b) [App] fingerprint matched, click “Login” to initial wallet
(b)
Page 27
27
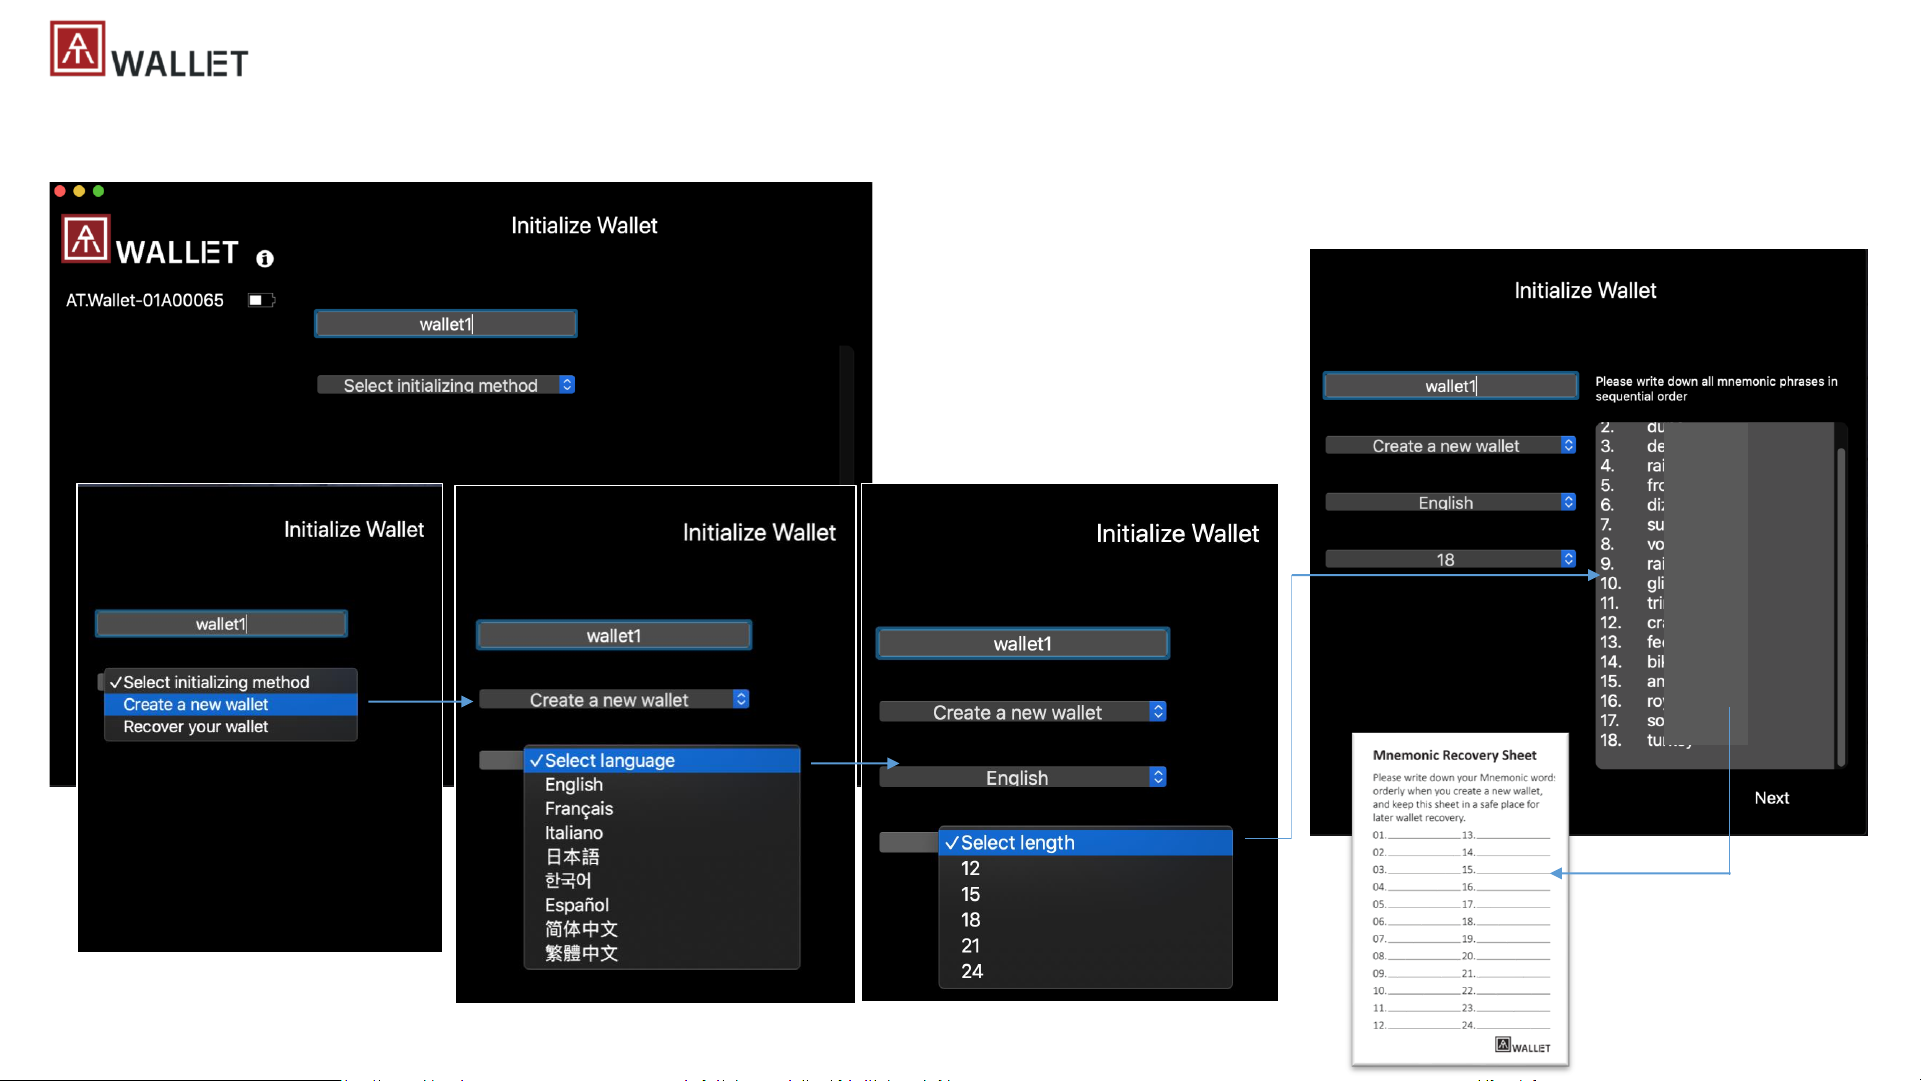
| Windows/Mac APP – (3) Login to Initial Main Wallet
a) [App] assign a name of the main wallet => Create new wallet => select language for Mnemonic => select length of Mnemonic
b) [App] write down Mnemonic words to the “Recovery Sheet” inside the box
hand writing
Page 28
28
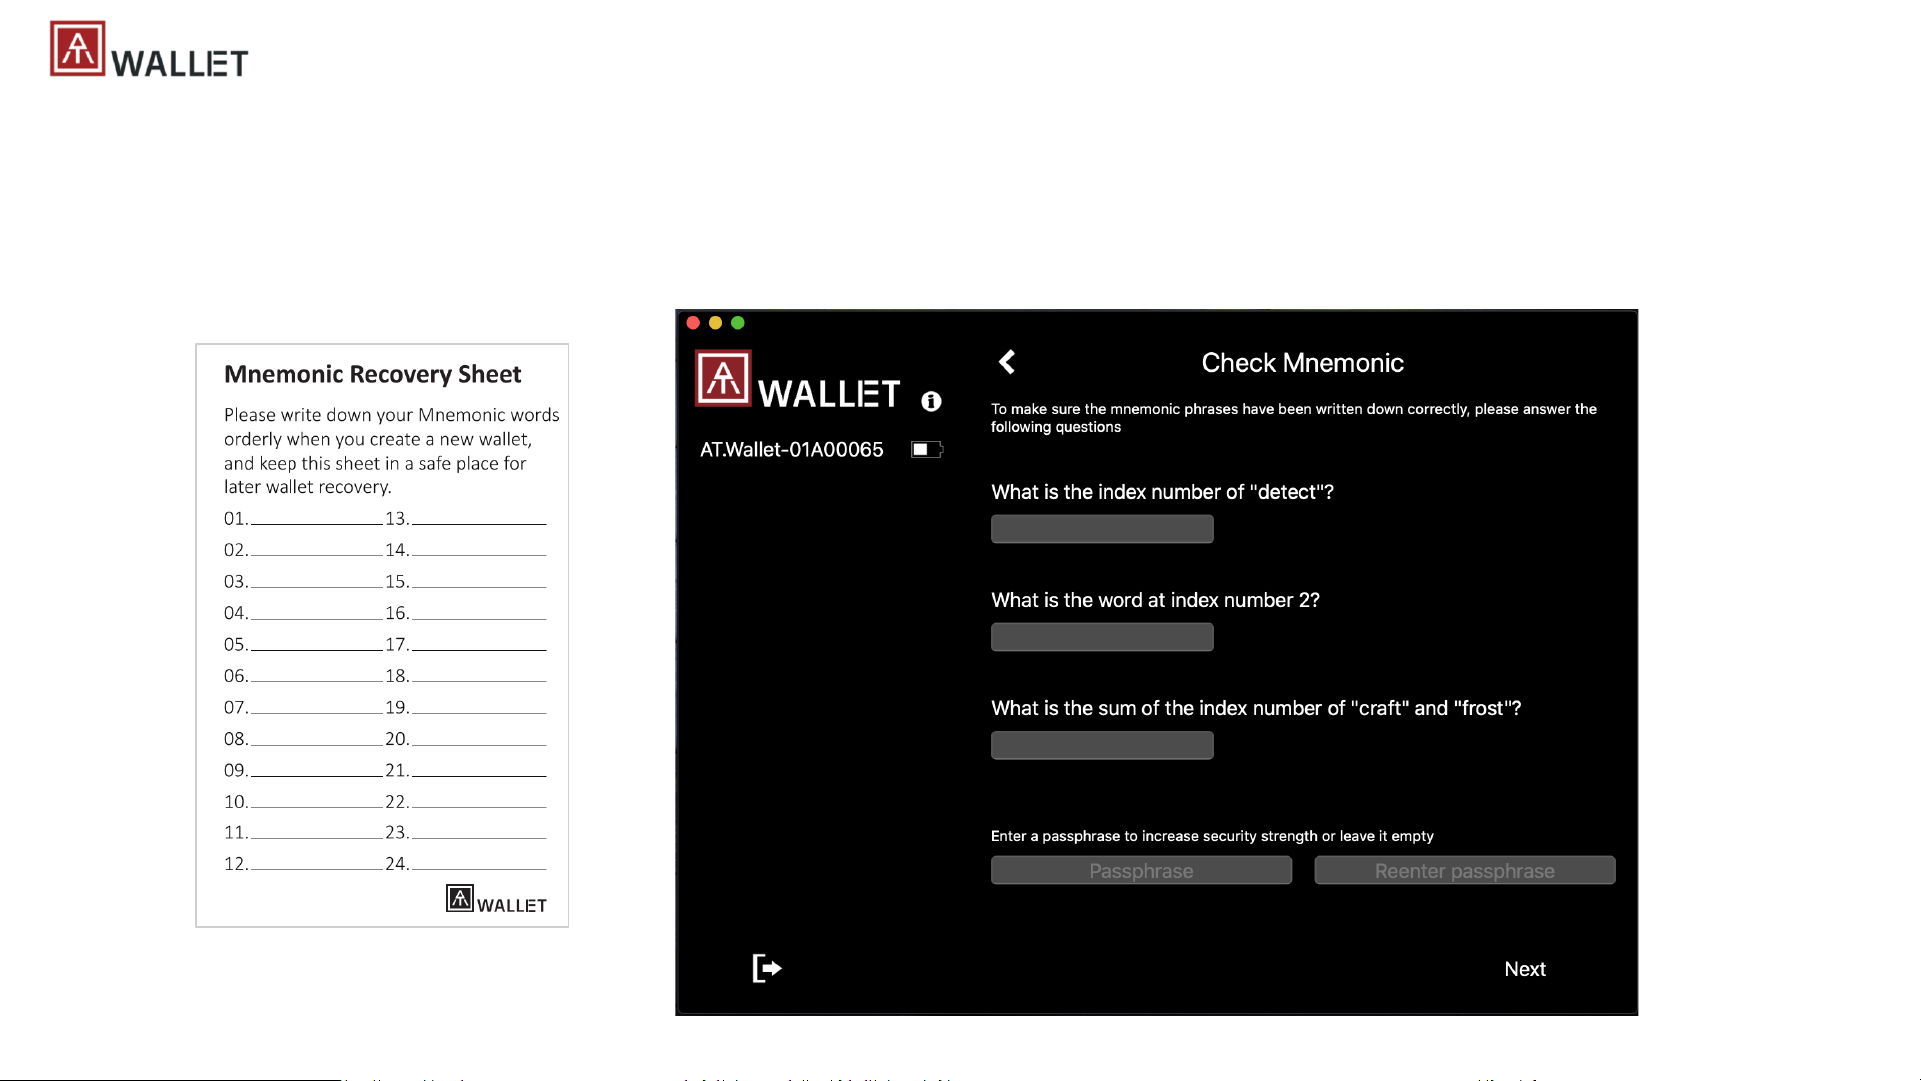
| Windows/Mac APP – (3) Login to Initial Main Wallet
a) [App] answer questionnaires following the “Recovery Sheet” that you wrote down
b) [App] (option) for better security, you can assign “Passphrase” for those “Mnemonic words” for recovery, so when you do “recover wallet
base on Mnemonic words”, it needs type in correct “Passphrase” to recover (please remember your Passphrase, we can’t record it)!
Page 29
29
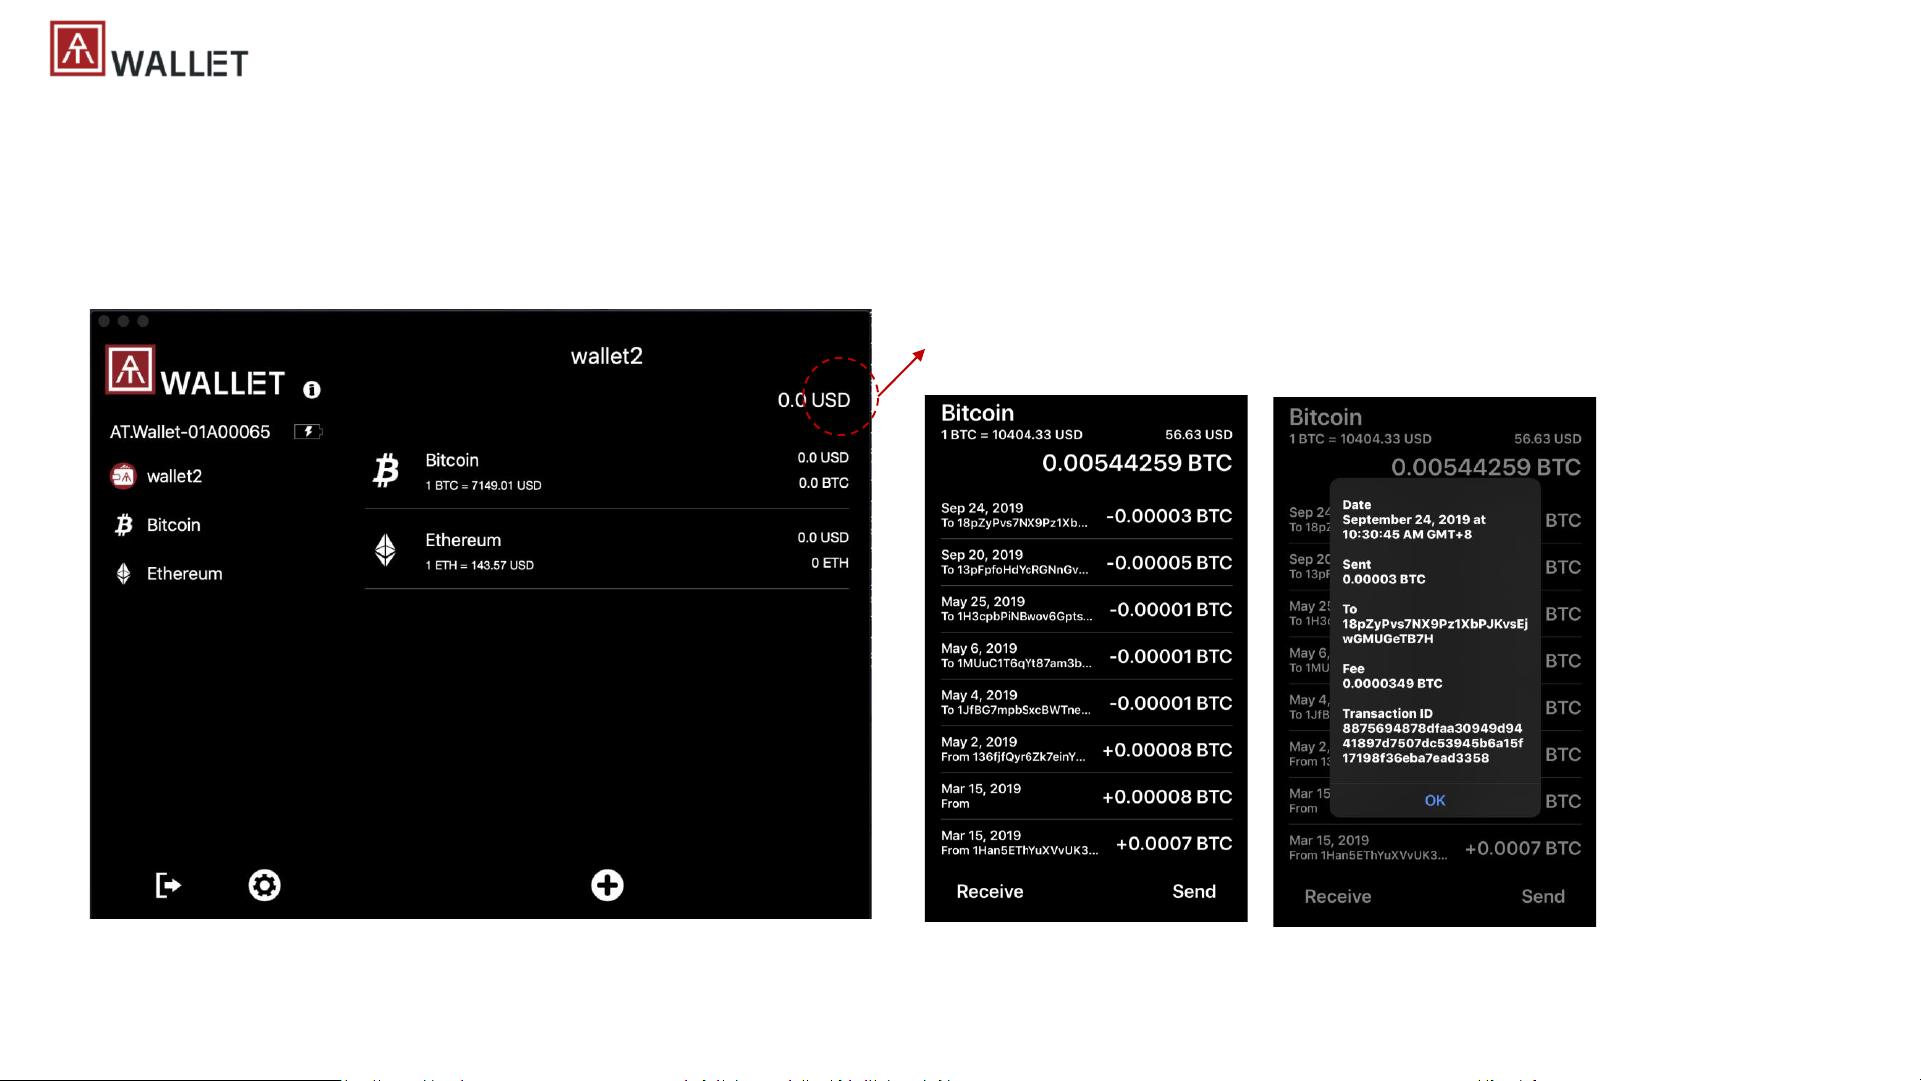
| Windows/Mac APP – (4) add supported cryptocurrency
a) [App] Select and add specific cryptocurrency, we allow max 10x cryptocurrencies, and it can be duplicated (for example, 2x Bitcoin, 3x
Ethereum, ….)
b) [App] each cryptocurrency will sync with chain to show the total amount, also the default currency/exchange rate – following region of host
app (Mobile, PC), it’s adjustable from settings
Transaction records of selected
cryptocurrency
Detail of each transaction
record
Exchange rate can be selected form Settings;
default is following the region of Windows/Mac OS;
Page 30
30
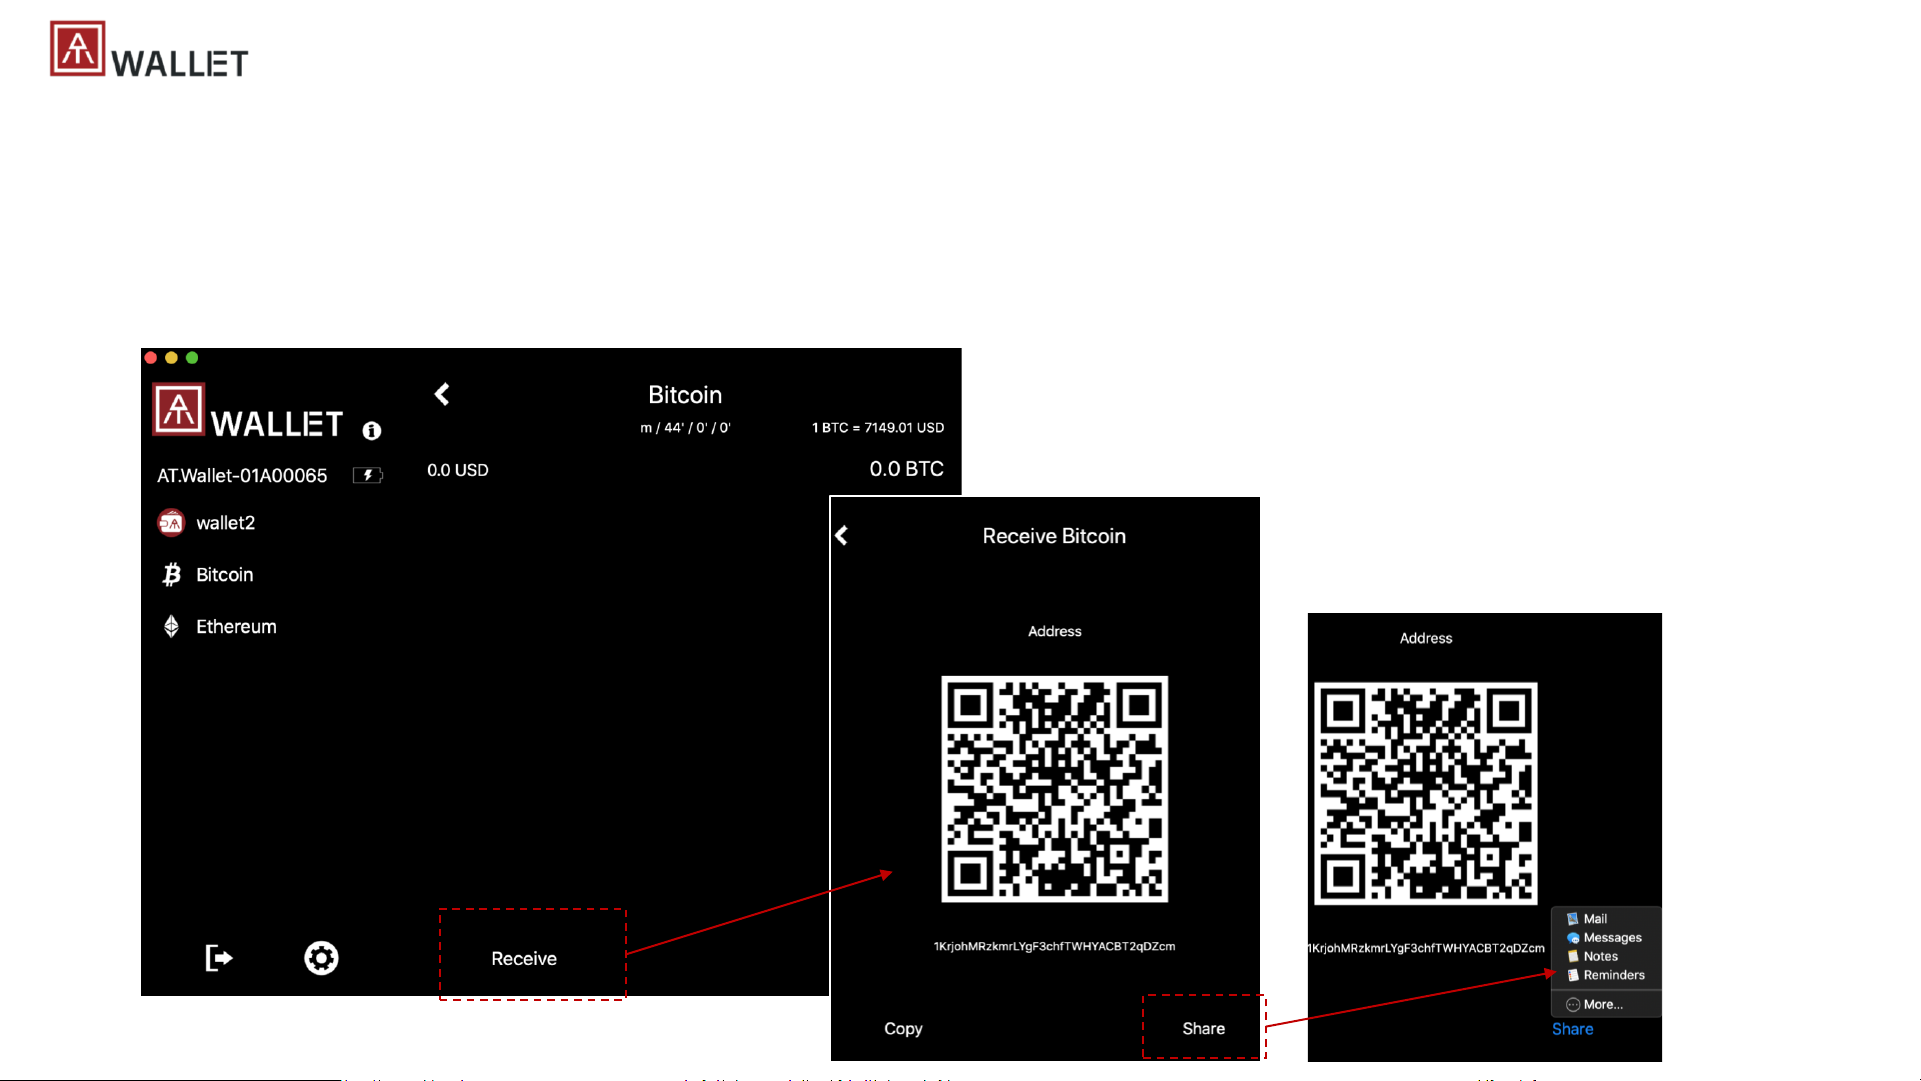
| Windows/Mac APP – (5) transactions - Receive
a) [App] Select type of Cryptocurrency, click “Receive” button
b) [App] showing QR code and address
c) [App] Sender can do QR code scan to get sending address to send; or we can share the QR code/address to user via app or by “copy &
paste” to share it manually
d) [Card] Fingerprint verification is NOT necessary for receiving cryptocurrency from sender
Page 31
31
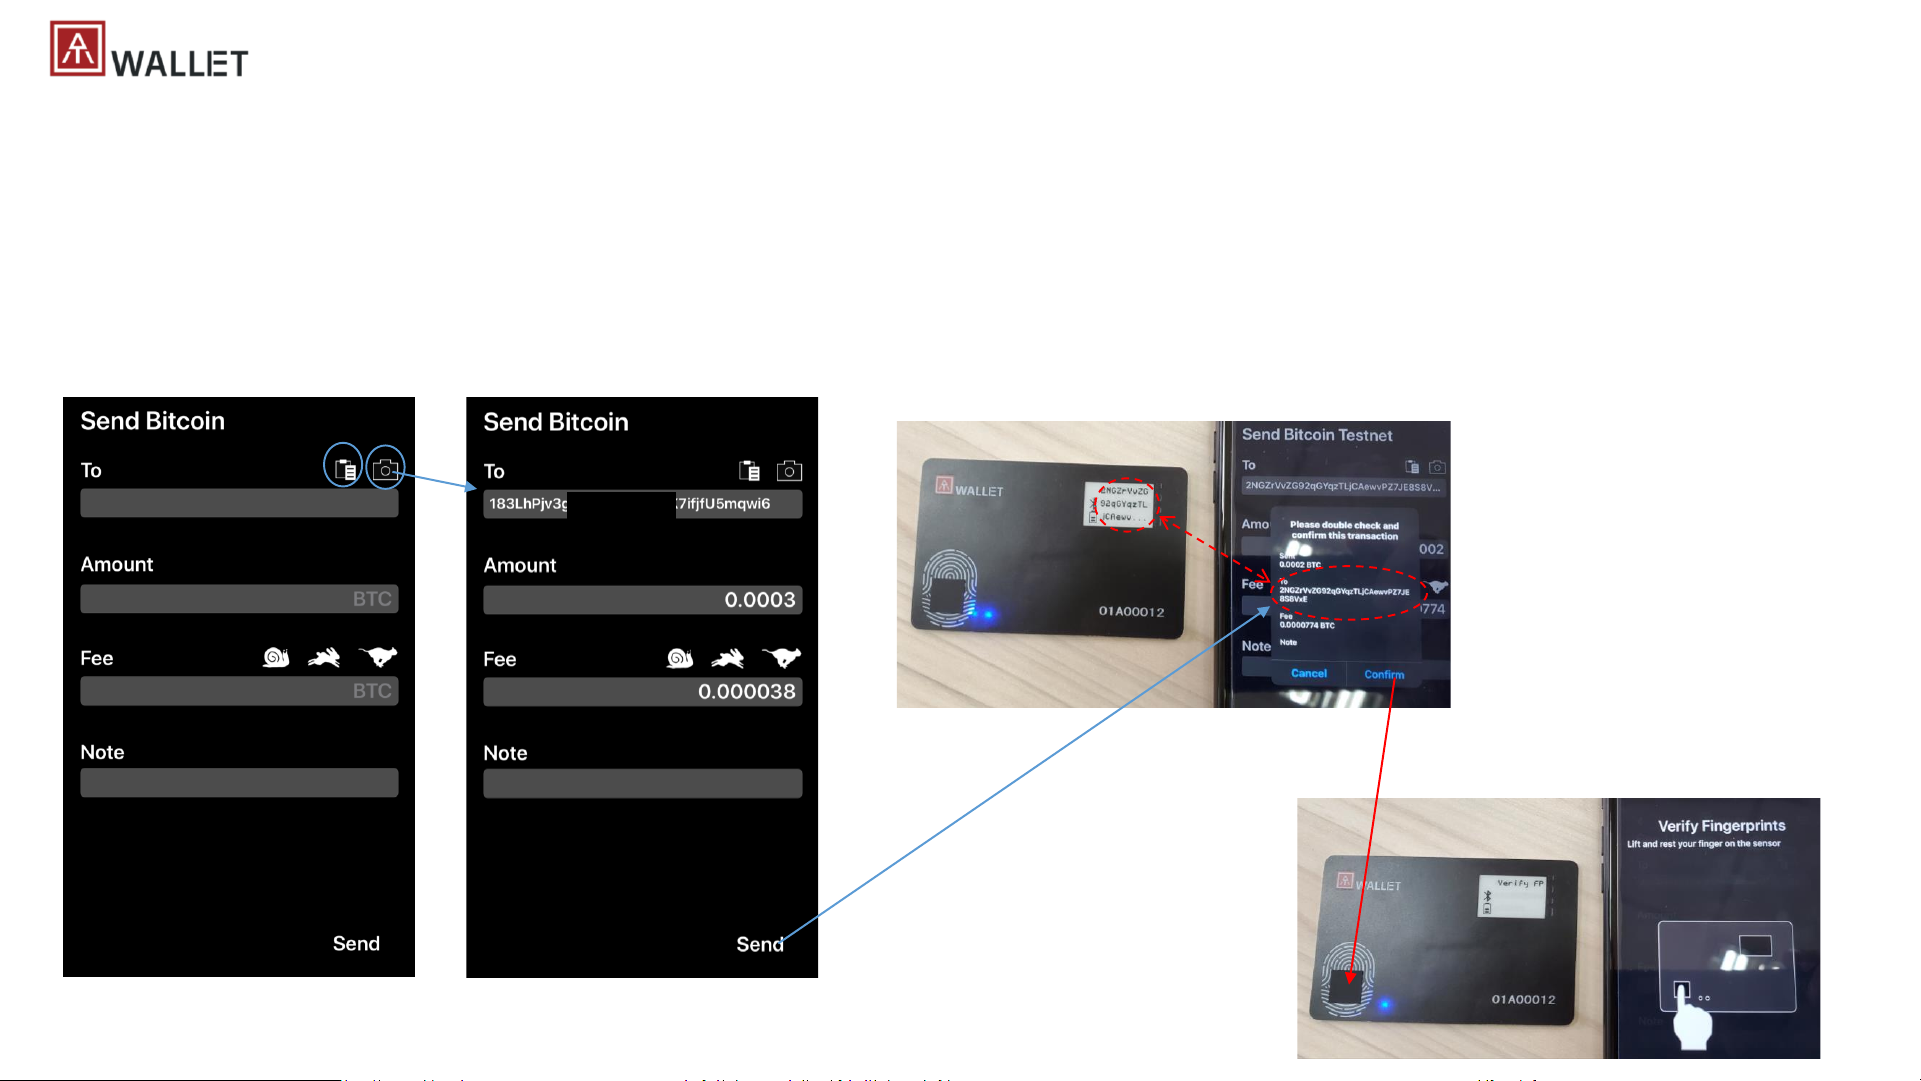
| Windows/Mac APP – (5) transactions - Send
a) [App] Select type of Cryptocurrency, click “Send” button
b) [App] Send to target wallet by scan QR Code (Camera), or paste target address from clip board
c) [App] type in amount (cryptocurrency) and select the gas fee (3 levels – higher gas fee can speed up the transaction), or type in manually – but if the
type in amount is lower than min. gas fee, we will just assign the min. demanding fee
d) [App] Double confirm the “send to address” and amounts
e) [Card] Confirm to verify “bound” fingerprint(s) or enrolled fingerprint if there is bound wallet => Matched => Done => Send Success or Fail notifications
(a) “Send” page
(b) (c) Scan QR code or paste address
to send; type in amounts
(d) Check the address (APP
and E-ink) and amounts (APP)
to confirm
(e) Verify by bound
fingerprint(s); or verify by
any enrolled fingerprint if
there is no binding
Page 32
32
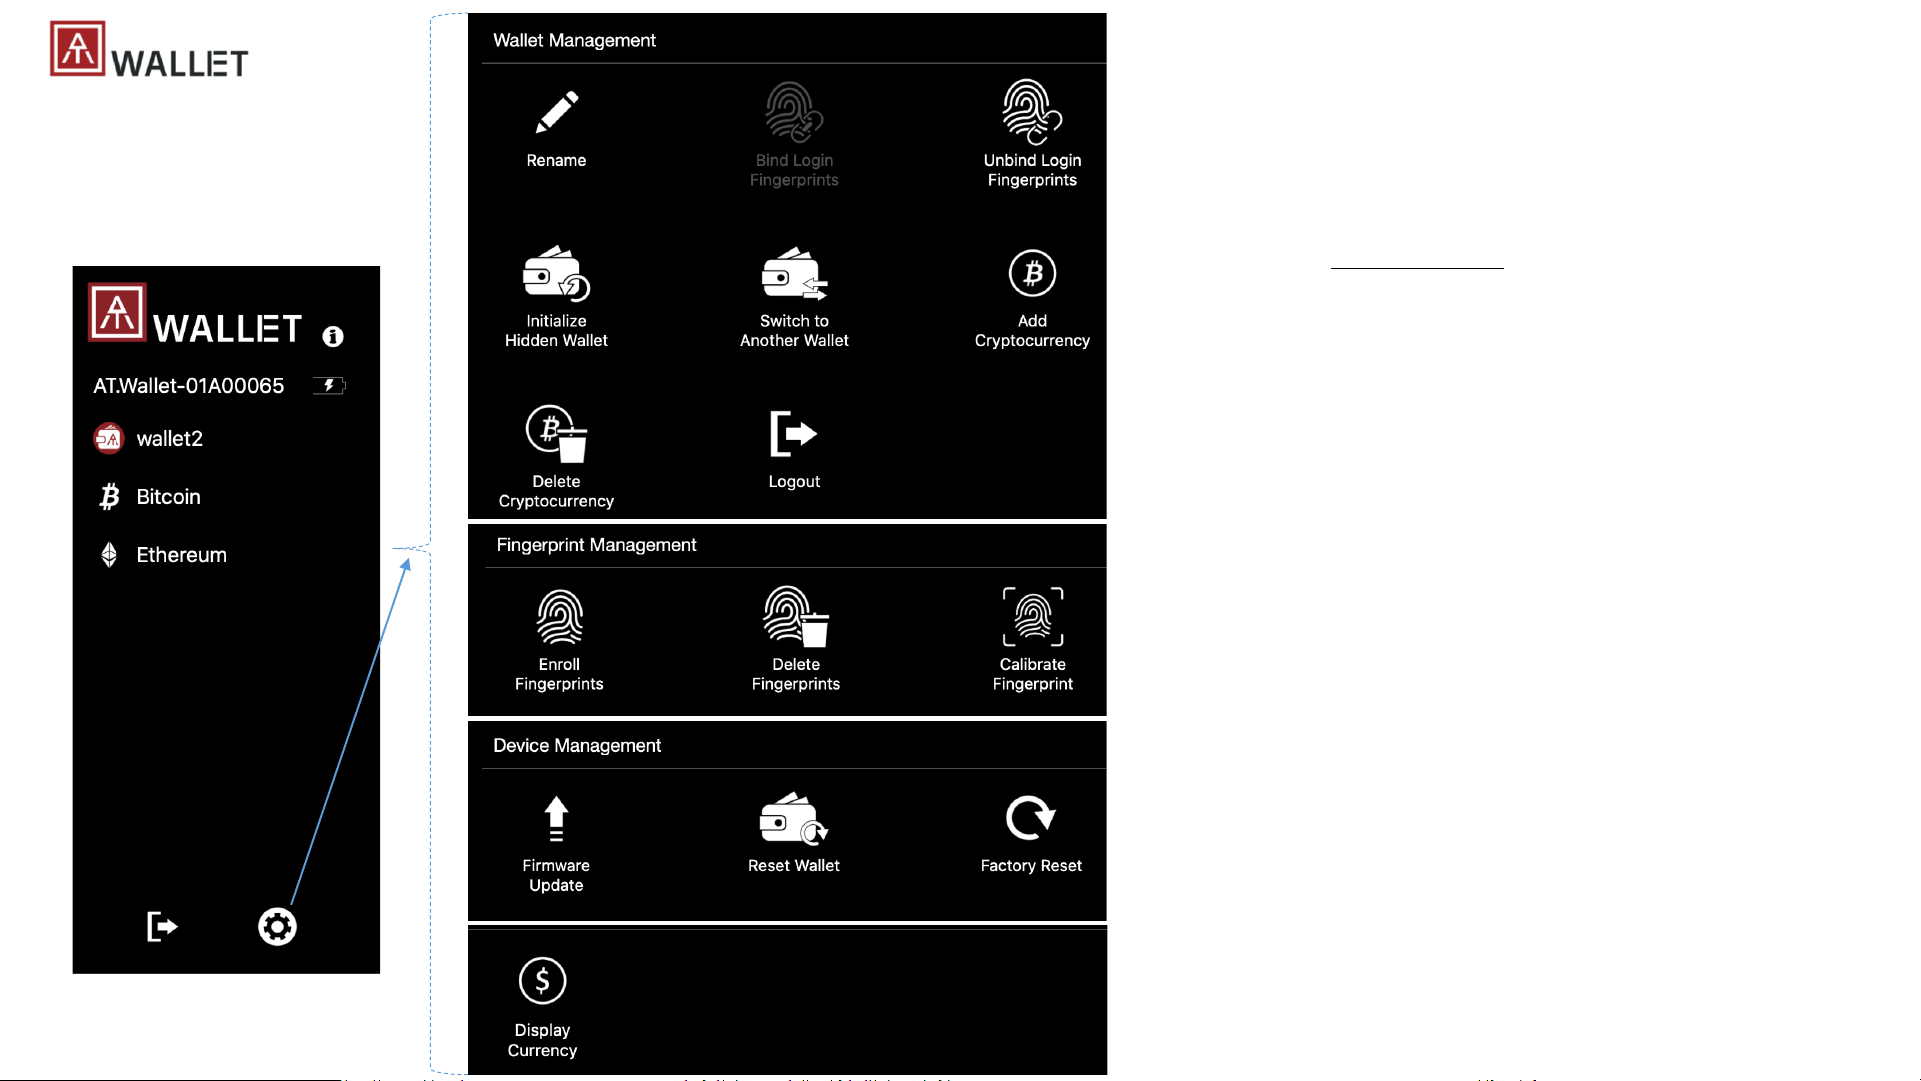
| Settings
Current login wallet
Fingerprint(s) for AT.Wallet card
AT.Wallet card management
Select your preferred currency (country)
for the exchange rate to cryptocurrency
• Delete fingerprint: deleted the finger you verified
• Calibrate Fingerprint: if you feel fingerprint accuracy is not same as
before, or something wrong from fingerprint sensor, do re-calibrate
to make it back to normal (don’t touch the sensor when it’s doing
calibration)
• Create a new hidden wallet, or recover wallet to this hidden
wallet,; the hidden wallet can only login here, it won’t show on
standalone mode.
• Add Cryptocurrency: You can add new cryptocurrency here; if
you want to enable BIP84 for Bitcoin or Litecoin, here is the only
place to enable (check BIP84 page)
• Delete Cryptocurrency: you only can delete created cryptocurrency
here
• Firmware update - it’s better connecting via USB; checking any
available new firmware on server for updating.
• Reset Wallet – reset current login wallet, so it needs to initial wallet
again but enrolled fingerprints are still kept.
• Factory reset – reset everything and back to factory state
Page 33
33
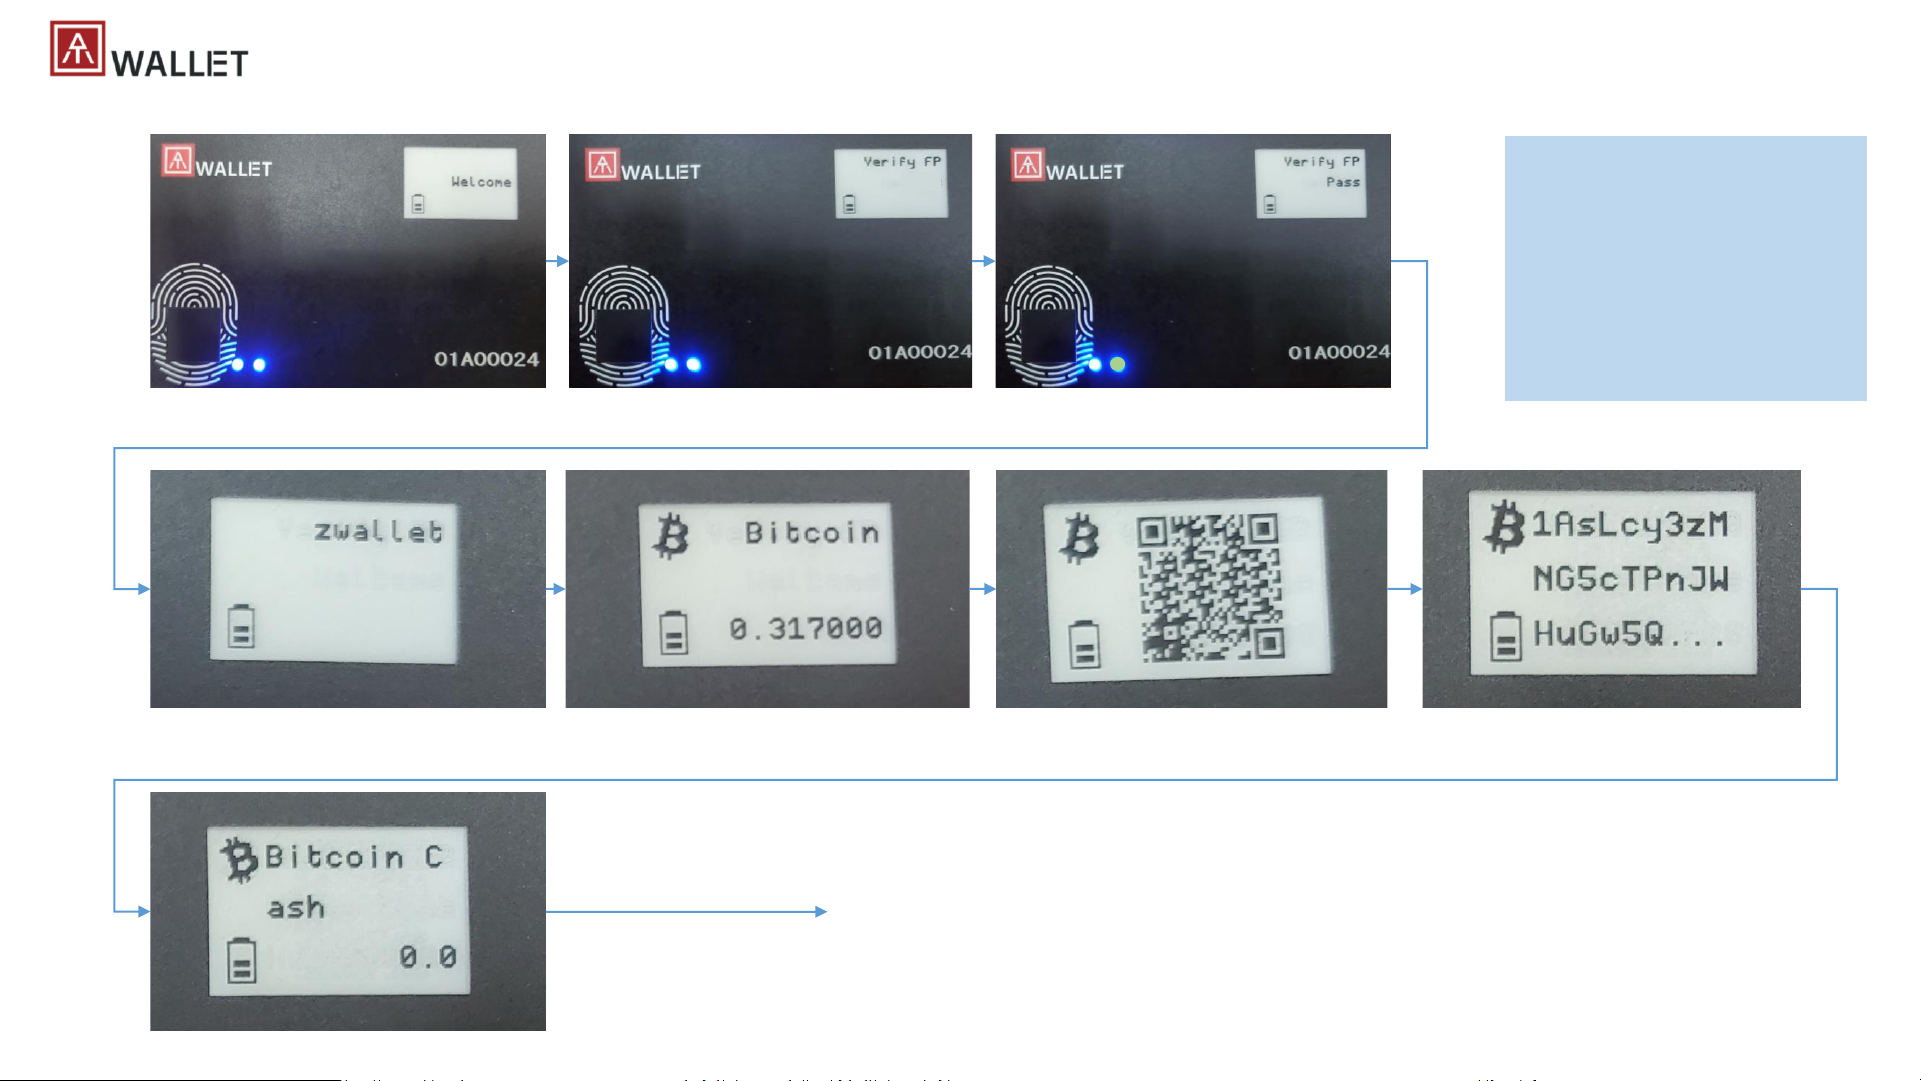
| Standalone mode
Power on
Verify assigned fingerprint to login
main wallet
Fingerprint matched to login main
wallet
Name of Main wallet
1stcryptocurrency summary
1stcryptocurrency QR Code for
receive transaction
1stcryptocurrency address for
receive transaction
2ndcryptocurrency summary
Toggle power button to next
page continuously
• If there is no any bound
wallet, here will be
always login main wallet
• If you bound fingerprint
for specific wallet, please
verify by all bound finger
to login
Loading …
Page 34
34
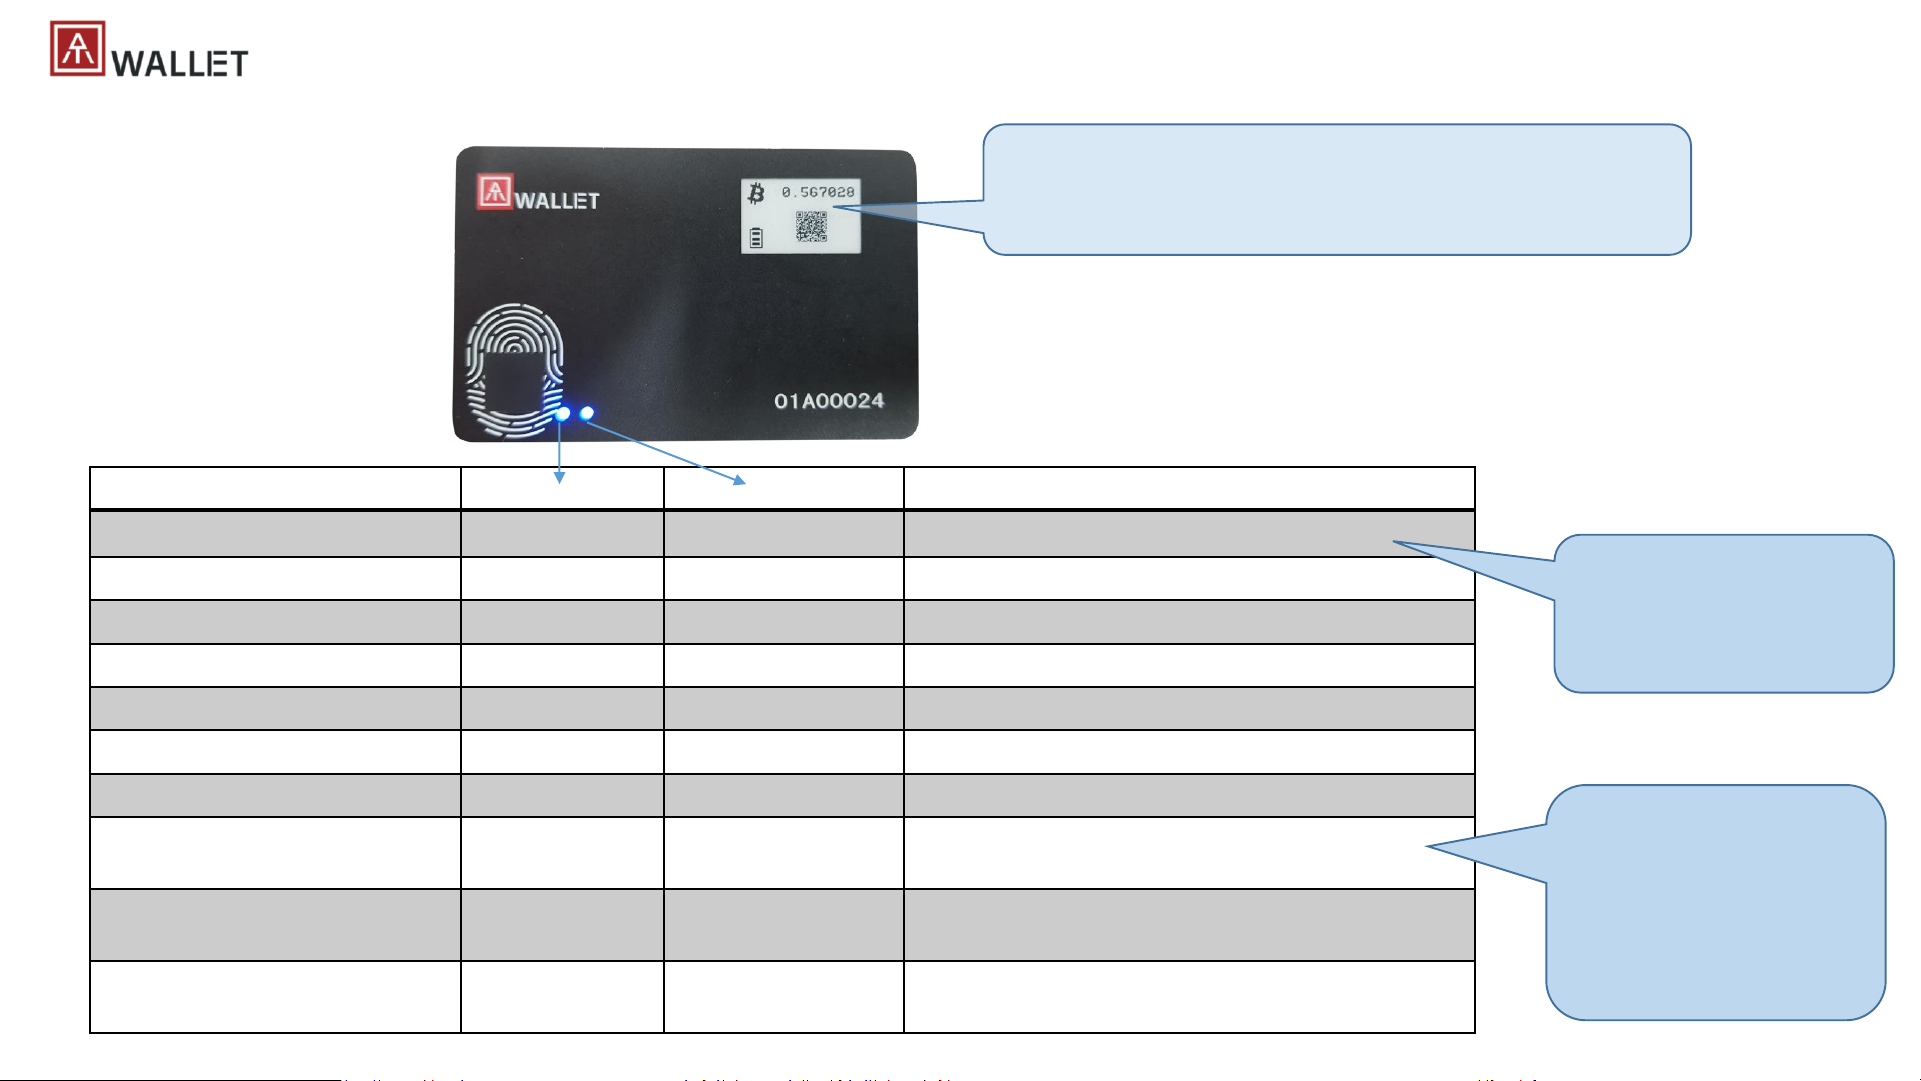
| LED indicator and E-ink display
LED#1 LED#2 E-ink
Power ON Static Blue Blue flashing (icon) BLE or USB – (icon) Battery – [Welcome]
BLE pairing mode Static Blue Cyan flashing (icon) Battery – [message]
BLE pairing confirmation Static Blue White flashing
BLE connected to host Static Blue Static Blue
Waiting for fingerprint matching Blue flashing Blue (icon) BLE or USB – (icon) Battery – [message]
Fingerprint matched Blue Green ON (icon) BLE or USB – (icon) Battery – [message]
Fingerprint not matched Blue RED ON (icon) BLE or USB – (icon) Battery – [message]
Battery charging Blue Yellow flashing (icon) USB – (icon) battery charging
(icon) battery charging
Low battery Blue RED flashing (icon) battery low (from low to fully charge, it needs
more than 1 hours)
Battery charging till booting N/A RED flashing No display (from none to low – card power on, it may
need ~30 minutes)
Level3: full (85%~100%)
Level2: 35%~85%
Level1: <35%, low battery, and
LED#2 is RED flashing
• E-Ink: Icons + message (English and Japanese now).
• Message language is following APP “OS language” (of
phone or PC) to show Japanese or English.
• USB icon: card is
connecting to USB data
port and be recognized
as a HID device
• w/o USB icon: card is
connecting to USB but
battery charging only
Battery icon:
Page 35

35
| Fingerprint Things
Fingerprint is a key benefits of AT.Wallet, some highlights here:
• You must enroll your fingerprint into AT.Wallet first
• Connect AT.Wallet card to app to enroll
• When you need doing fingerprint verification?
• LED#2 is blue flashing
• Login Wallet
• Transaction – Send cryptocurrency
• How many fingerprints allow to enroll into Wallet card?
• 8x fingerprints
• How to enroll fingerprint into Wallet card?
• Through APP to guide you, touch and lift fingerprint sensor 12~16 times to complete the enrollment for one finger
Page 36
36
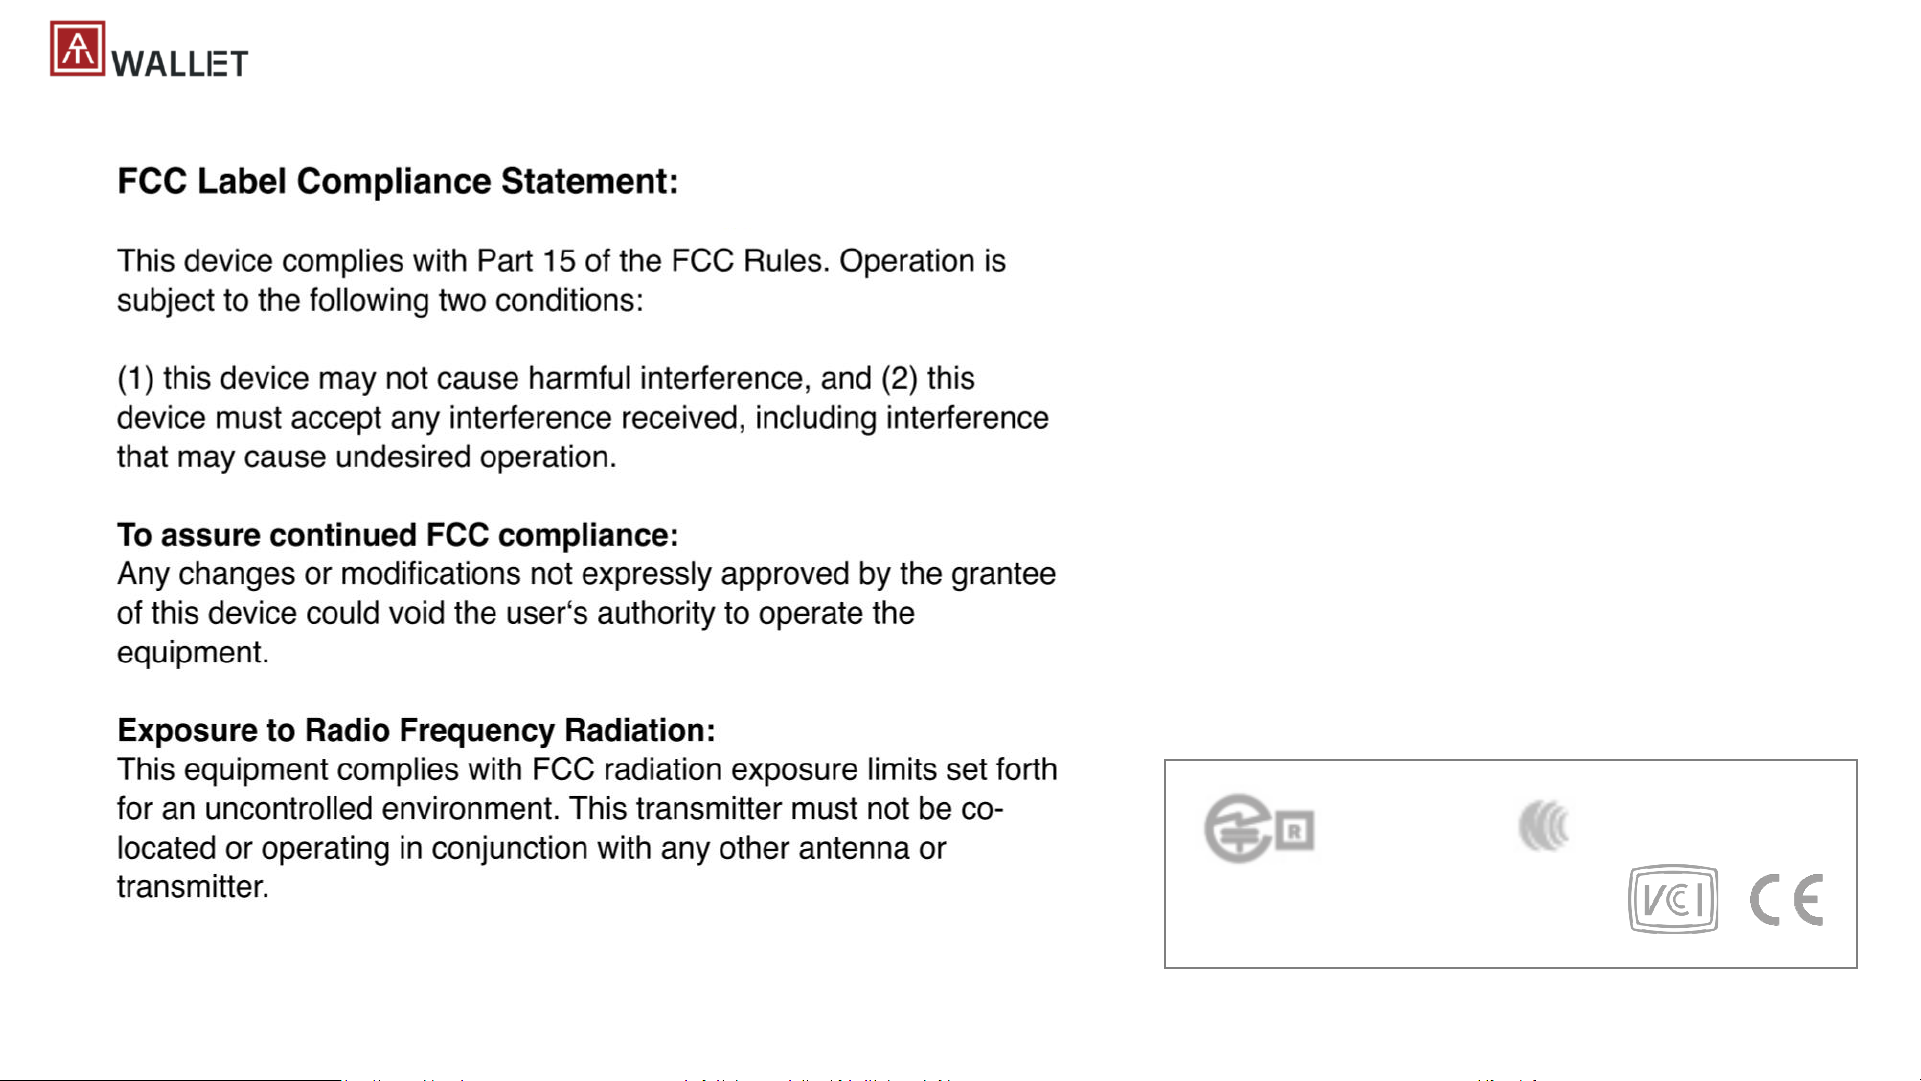
| Regulation
CCAO19LP0810T6
FCC ID: 2AOPY-ATWALLET01
209-J00375
Page 37
Thank You!!
www.authentrend.com
contact@authentrned.com
 Loading...