

Page 1

XCLAIM™ TV
INSTALLATION GUIDE
P/N: 107-70006-10 Rev.A
Page 2

Disclaimer
While every precaution has been taken in the preparation of this
document, ATI Technologies Inc. assumes no liability to any party for
errors or omissions contained in the Software or related documentation,
any interruption of service, loss or interruption of business or
anticipatory profits or for incidental or consequential damages in
connection with the furnishing, performance, or use of the Software and
related documentation.
ATI Technologies Inc. reserves the right to make changes without further
notice to a product or system described herein to improve reliability,
function or design.
Page ii
Copyright © 1997, by ATI Technologies Inc.
ATI and XCLAIM are trademarks and/or registered trademarks of
ATI Technologies Inc. All other company and/or product names are
trademarks and/or registered trademarks of their respective
manufacturers. Pricing, availability, features, performance and
specifications are subject to change without notice. Product may not be
exactly as shown in the diagrams.
All rights reserved, including those to reproduce this manual or parts
thereof, in any form without the express written permission of
ATI Technologies Inc.
Page 3

Installation
Introduction
With a simple connection to XCLAIM VR, XCLAIM TV
brings the broadcast world to your desktop. By using
XCLAIM TV with Xclaim Video Player, ATI’s video
capture and intelligent TV application, your Macintosh
can receive a television or VCR signal and display it on
your monitor as you work.
What’s in the Package
The XCLAIM TV package contains the following
hardware, software, and documentation:
• XCLAIM TV tuner module
• Enhanced S-video cable
• Stereo Audio cable
• 3.5” installation disk with the latest
Xclaim Video Player software
• XCLAIM TV Installation Guide
• Xclaim Video Player User’s Guide
What Y ou’ll Need
XCLAIM TV operates with the following minimum
system requirements:
• PCI Macintosh with XCLAIM VR installed
• Cable TV or amplified antenna signal source
• Mac OS System software 7.5.2 or later (Mac OS 7.5.5
or later recommended)
• QuickTime (version 2.5 or later)
• XCLAIM TV software, version 1.0 or later (supplied)
Page 1
Page 4
Related Documentation
The README file summarizes the latest product
revisions. Click the README icon on the installation disk
to open this file.
All of the intelligent television functions of XCLAIM TV
are controlled by the Xclaim Video Player software which
came with the XCLAIM TV package. For complete
instructions on using XCLAIM TV, refer to the
Video Player User’s Guide
.
Xclaim
XCLAIM TV’ s Connectors
XCLAIM TV is equipped with all the necessary
connectors so you can put TV on your desktop – right out
of the box. Using the video and audio inputs, you can also
connect a VCR, camcorder, or video conferencing camera
to XCLAIM TV, so you can watch a videotape or live
video on your computer.
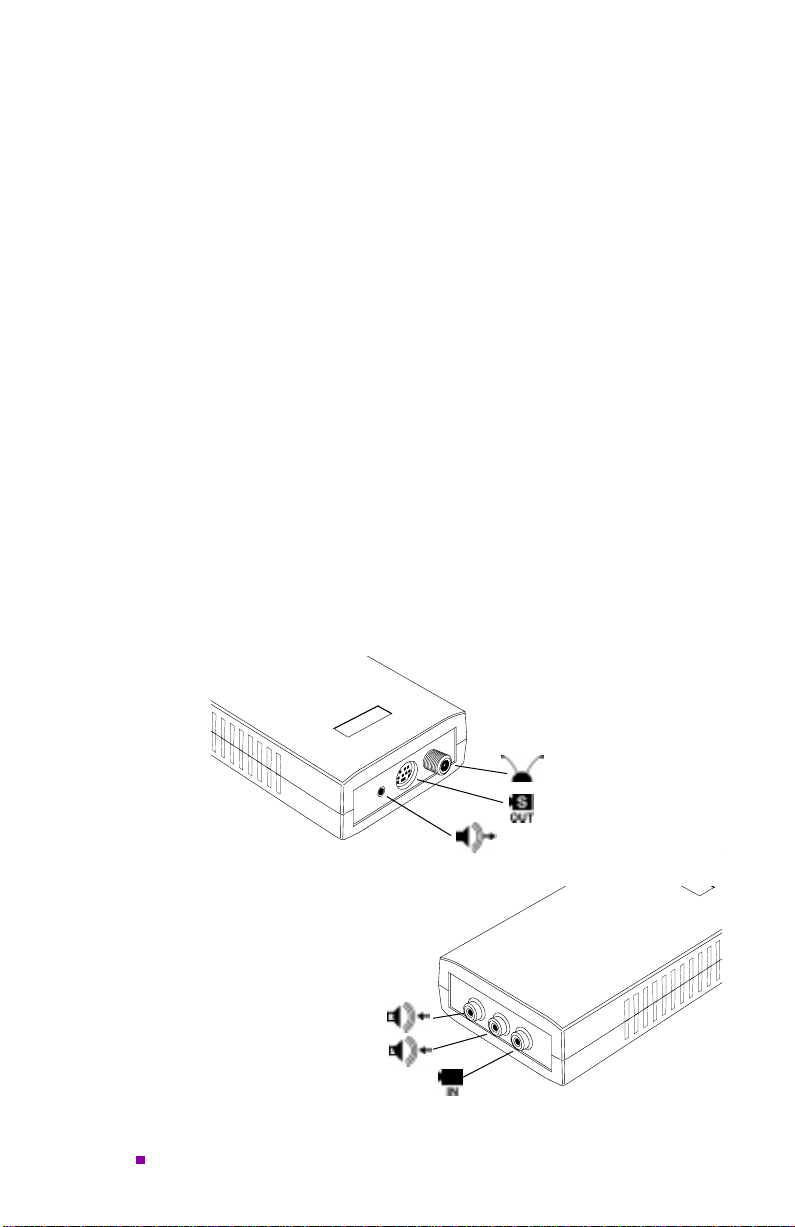
The XCLAIM TV connectors, and their associated icons,
are summarized in the following diagram:
Page 2
CATV or Antenna Input
S-Video Output
Audio Output (Stereo Miniplug)
Right Audio Input (Red)
Left Audio Input (White)
Composite Video Input (Yellow)
Page 5

Making the Connections
123
4
!
• Static electricity can damage sensitive electronic
components. Discharge your body’s static electric
charge by touching a grounded surface — for
example, the metal area of the computer chassis —
before performing any hardware procedure.
• The manufacturer assumes no liability for any
damage, caused directly or indirectly, by improper
installation of components by unauthorized service
personnel.
performing the installation, consult a qualified
technician
• Make sure power is off during installation;
otherwise, damage to the TV tuner, the graphics
accelerator card, and injury to yourself may result.
Connecting XCLAIM TV to your computer
Use the Shut Down command to turn off your
computer.
Align the pins at one end of the enhanced S-video
cable with the S-video input connector (
the back of your XCLAIM VR card, and insert
(refer to the illustration on the next page).
If you do not feel comfortable
.
S VID IN)
on
gently
Align the pins at the other end of the S-video cable
with the S-Video Output connector ( ) on your
XCLAIM TV tuner, and insert
Connect the cable TV or antenna line to the CATV
input ( ) on your XCLAIM TV tuner.
gently
.
Page 3
Page 6

XCLAIM VR Card
5
Enhanced
S-Video Cable
S-Video Input
TV OUT
S VID IN
S-Video
Connector
VID IN
TV
Coax
To Cable Service
or Amplified Antenna
Connect one end of the audio cable (with stereo
miniplug) to the Audio Output connector ( ) on
your XCLAIM TV tuner, and the other end to the
Sound Input port ( ) of your computer.
If you have an externally-powered (amplified) speaker
Stereo
Miniplug
Page 4
system, you can simply connect the speakers to the
Audio Output connector on your XCLAIM TV tuner .
Page 7

Sound Input port
Audio Output
OR
Connect the audio cable to
the Sound Input port OR
to externally-powered speakers
Connecting Video Equipment to XCLAIM TV
If you are planning to use XCLAIM VR to capture video
and sound from a VCR, camcorder or other external video
equipment, you should make the connections using the
composite video and audio input connectors on your
XCLAIM TV tuner . These connectors provide a ‘passthrough’ function that routes the video and sound from the
external equipment to your XCLAIM VR card. Once you
have made the appropriate connections, simply select
‘S-Video’ as your input sour ce using the Remote Control
palette to enable the pass-through function (refer to the
Xclaim V ideo Player User’s Guide
for help in selecting video
sources).
To make the connections, you can use three separate
cables, or an all-in-one cable (three joined cables – one
video and two audio) with RCA connectors at each end
(available at most electronic supply stores). The yellow
connector is for the composite video signal, the red
connector is for the right channel audio, and the white
connector is for the left channel audio (refer to the
illustration on the next page).
Page 5
Page 8

NOTE
If you are connecting mono video equipment (i.e., only
one audio channel), you can use either the left or right
audio input on XCLAIM TV for the audio connection, but
typically the left (white) audio input is used.
Video Input
(Yellow)
Left Audio Input
(White)
Right Audio Input
(Red)
Third cable not needed
for mono VCR
RCA
Connector
Video Input
Left Audio Input
(White)
(Yellow)
Out
Video Audio
(Mono equipment)
– OR –
VCR
Out
Video
Audio
(Stereo equipment)
Camcorder
L
R
Right Audio Input
(Red)
Third cable not needed
for mono camcorder
Page 6
Page 9

NOTE
1
2
NOTE
With XCLAIM TV connected to XCLAIM VR’s S-video
input, you can still use XCLAIM VR’s composite video
input for connecting external video equipment to
XCLAIM VR. However, since the composite video input
provides a video-only connection, you will need to
disconnect XCLAIM TV’s audio cable from the Sound
Input port on your computer in order to make the audio
connection from your external video equipment.
If your video source provides composite video and
S-video,
you must first remove the S-video cable that connects
XCLAIM TV to the card, and then connect your S-video
equipment to XCLAIM VR in the usual manner .
S-video will produce better results
. However ,
Selecting the Sound Input
Before installing and running the software, select the correct
sound input in the “Monitors & Sound” control panel (or
equivalent). The Sound Input setting should match the
audio input connection that you are using. If you are using
the Sound Input port ( ) on your Power Mac, the Sound
Input setting is typically “External Microphone”; if you are
using RCA audio connections (available on some Power
Mac systems), the Sound Input setting is typically “External
Audio Input”. (You will not be able to change this control
panel setting while Xclaim Video Player is running.)
Installing the Software
The XCLAIM TV installation disk installs all of the
components necessary to operate both XCLAIM VR and
XCLAIM TV (including Xclaim Video Player 1.5 or later).
Insert the XCLAIM TV installation disk into your drive.
Double-click on the XCLAIM TV Installer icon.
The ATI
splash screen
appears.
Page 7
Page 10

Click the Continue button.
3
4
5
6
789
An ATI information and disclaimer screen appears.
Click the Continue button.
The
XCLAIM TV
Standard
Install window
appears. To
install only
certain
components,
click Custom.
Click the Install button.
Before installing Xclaim Video Player, you will be
prompted to specify a folder location.
Select a folder location and click Install.
Upon
completion, a
list of installed
files appears.
Click Show
Me to locate
where a file
has been
installed.
Click OK.
A dialog reminds you that to complete the installation, you
must restart your computer.
Click OK.
If you are finished, click Restart.
Your system restarts.
Or,
To perform further installations, click Continue.
The XCLAIM TV Standard Install window appears.
Page 8
Page 11

Or,
To return to Finder, click Quit.
You must manually restart your system to complete the
installation of XCLAIM TV’s software.
Once you have completed the installation and restarted
your system, you are ready to watch TV on your
computer! For help in using the XCLAIM TV features, see
the
Xclaim Video Player User’s Guide
.
Specifications
System Requirements
• Power Macintosh with PCI
• XCLAIM VR graphics accelerator card
• Mac OS System software 7.5.2 or later (7.5.5 or later
highly recommended)
• QuickTime (version 2.5 or later)
Connectors
• Enhanced 7-pin S-Video (12 V power input, S-Video
output)
• 3.5 mm (1/8˝) Stereo Audio Jack (output)
• Triple RCA Video input (Left Audio, Right Audio,
and Composite Video)
• F-type (TV signal input)
Power
• +12 V @ 50 mA typical
• +5 V @ 200 mA typical
Environment
• Ambient Temperature: 50° to 140° F (10° to 60° C)
operation. –4° to 162° F (–40° to 70° C) storage.
• Relative Humidity: 5% to 90% non-condensing
operation. 0% to 95% storage.
Page 9
Page 12

MTBF
• 390,000 hours
EMC Certification
• FCC Part 15, Subpart B, Class B, including Part 15.118
for cable-ready consumer electronics equipment
Safety
• PCB, materials, and enclosure meet or exceed the
safety and flammability standards of UL1950 and
EN 60950 for information technology equipment
Compliance Information
FCC Compliance Information
This device is in conformity with part 15 of the FCC
Rules. Operation of this product is subject to the
following two conditions: (1) this device may not cause
harmful interference, and (2) this device must accept
any interference received, including interference that
may cause undesired operation.
Page 10
This equipment has been tested and found to comply
with the limits for a Class B digital device, pursuant to
Part 15 of the FCC Rules. These limits are designed to
provide reasonable protection against harmful
interference in a residential installation.
This equipment generates, uses and can radiate radio
frequency energy and, if not installed and used in
accordance with manufacturer's instructions, may cause
harmful interference to radio communications. However,
there is no guarantee that interference will not occur in a
particular installation.
If this equipment does cause harmful interference to radio
or television reception, which can be determined by
turning the equipment off and on, the user is encouraged
to try to correct the interference by one or more of the
following measures:
Page 13

• Re-orient or relocate the receiving antenna.
• Increase the separation between the equipment and
receiver.
• Connect the equipment to an outlet on a circuit
different from that to which the receiver is connected.
Consult the dealer or an experienced technician for help.
!
• The use of shielded cables for connection of the
tuner to the graphics card is required to ensure
compliance with FCC regulations.
• Changes or modifications to this unit not expressly
approved by the party responsible for compliance
could void the user's authority to operate this
equipment.
Industry Canada Compliance Statement
Supplementary Television Broadcasting Receiving
Apparatus Canada GRR Part II
Appareils supplémentaires de réception de télévision,
RGR, Partie II, Canada
CE Compliance Information
EMC Directive 89/336/EEC and Amendment 92/31/
EEC, Class B Digital Device
EN 50081-1, Generic Emissions Standard for Residential,
Commercial and Light Industrial Products
(EN 55022/CISPR 22, Limits and Methods of
Measurement of Radio Interference Characteristics
Information Technology Equipment)
Class B product. In a domestic environment this product may
cause radio interference in which case the user may be required
to take adequate measures.
Warning: This is a
EN 50082-1, Generic Immunity Standard for Residential,
Commercial and Light Industrial Products
(IEC 801-2, IEC 801-3, IEC 801-4)
Page 11
Page 14

Directive EMC 89/336/CEE et amendement 92/31/CEE,
dispositif numérique de Classe B
EN 50081-1, Norme sur les émissions génériques pour les
produits domestiques, commerciaux et industriels légers
(EN 55022/CISPR 22, Limites et méthodes de mesure des
caractéristiques d'interférences radiophoniques, Matériel
des technologies de l'information)
Mise en garde: ceci est un
produit de Classe B. Il risque produire des interférences
radiophoniques dans un environnement domestique auquel cas
l'utilisateur peut se voir demandé de prendre des mesures
adéquates.
EN 50082-1, Norme sur l'immunité générique pour
produits domestiques, commerciaux et industriels légers.
(CEI 801-2, CEI 801-3, CEI 801-4)
EMC Richtlinie 89/336/EEC und Änderung 92/31/EEC,
Digitales Gerät der Klasse B
EN 50081-1, Allgemeiner Emissions-Standard für
Haushalt- und kommerzielle Produkte sowie Erzeugnisse
der Leichtindustrie
(EN 55022/CISPR 22, Beschränkungen und Verfahren der
Messung von informationstechnischen Ausrüstungen mit
Funkstörmerkmalen)
Page 12
Warnung: Dies ist ein Erzeugnis der Klasse B. Dieses
Erzeugnis kann Funkstörungen im Wohnbereich
verursachen; in diesem Fall können entsprechende
Maßnahmen seitens des Benutzers erforderlich sein.
EN 50082-1. Allgemeiner Unempfindlichkeits-Standard
für Haushalt- und kommerzielle Produkte sowie
Erzeugnisse der Leichtindustrie
(IEC 801-2, IEC 801-3, IEC 801-4)
 Loading...