

Page 1

XCLAIM
TM
GA
User’s Guide
Version 2.0 - October 1995
P/N: 10701M0120
Copyright © 1995, by ATI Technologies Inc.
ATI,
trademarks of ATI Technologies Inc. All other company and/or
product names are trademarks and/or registered trademarks of
their respective manufacturers. Pricing, availability, features,
performance and speciÞcations are subject to change without
notice. Product may not be exactly as shown in the diagrams.
All rights reserved, including those to reproduce this manual or
parts thereof, in any form without the express written permission
of ATI Technologies Inc.
Printed in Canada 95 10 P/N: 10701M0120
mach64
and XCLAIM are trademarks and/or registered
Page 2

Disclaimer
While every precaution has been taken in the preparation of this
document, ATI Technologies Inc. assumes no liability to any party
for errors or omissions contained in the Software or related
documentation, any interruption of service, loss or interruption of
business or anticipatory proÞts or for incidental or consequential
damages in connection with the furnishing, performance, or use
of the Software and related documentation.
ATI Technologies Inc. reserves the right to make changes without
further notice to a product or system described herein to improve
reliability, function or design.
ii
Page 3
1
Getting Started
Introduction
CONGRATULATIONS! You have just purchased
one of the most advanced 64-bit graphics acceleration
technologies available on the market today, from the
award winning graphics leader ATI Technologies Inc.
The XCLAIM GA is the ultimate solution for the
graphics professional. By combining ATIÕs advanced
mach64
Macintosh virtually eliminates the time delay of
processing intense computer graphics.
The 4MB VRAM conÞguration supports resolutions
up to 1600x1200, or 16.7 million colors at 1152x870
resolution. The 2MB VRAM conÞguration supports
resolutions up to 1600x1200, or 16.7 million colors
at 832x624 resolution. Refresh rates up to 75Hz are
supported for all resolutions and color depths.
Other key features include both Apple and VGA
monitor connectors, as well as extensive software
graphics chip with a PCI local bus, your Power
Page 1 Getting Started
Page 4

utilities allowing you to directly control and modify
your desktop environment dynamically.
What does all this technology mean to you? Superior
application performance by reducing the main
processor work load in the graphics equation, and
taking advantage of the Òwicked fastÓ PCI local bus.
Before you install your new card, please read this
manual thoroughly. It contains important information
on installing and operating your XCLAIM GA.
What's in the Package
The XCLAIM GA package contains the following
hardware, software, and documentation:
¥ XCLAIM GA card
¥ 3.5Ó installation disk
¥ This UserÕs Guide
If any item is missing or damaged, immediately
contact the dealer from whom the unit was purchased.
What You'll Need
The XCLAIM GA card runs with the following minimum
system requirements:
¥ Power Macintosh with a PCI expansion slot
¥ Macintosh System software 7.5.2 or higher
¥ Any Apple monitor or VGA monitor supporting
a minimum resolution of 640x480
Related Documentation
The README Þle summarizes the latest product
revisions. Click the ReadMe icon on the installation
disk to open this Þle.
Page 2 Getting Started
Page 5
The XCLAIM GA card comes with ATI Guide which
provides online help for conÞguring your card. Please refer
to the ATI Guide to get information on the following topics:
¥ ConÞguring your card for your display type
¥ Setting up an extended desktop
¥ Turning on zoom features
¥ Activating the ATI Popup Menu
When the ATI Displays control panel is active, access
the ATI Guide by clicking the icon in the ATI Displays
control panel.
Page 3 Getting Started
Page 6

Page 4 Getting Started
Page 7
2
Installing Your Card
The XCLAIM GA Þts into connectors called expansion
slots, inside your computer.
Your Macintosh comes with several slots, each designed
to accept Peripheral Component Interconnect (PCI) cards.
!
¥ The manufacturer assumes no liability for any
¥ Make sure power is off during installation; otherwise,
WARNING
damage, caused directly or indirectly, by improper
installation of components by unauthorized service
personnel.
the installation, consult a qualiÞed technician.
damage to system components, the graphics
accelerator card, and injury to yourself may result.
If you do not feel comfortable performing
Page 3 Installing Your Card
Page 8
NOTE
The following procedure details the installation of a card
in a typical Macintosh PCI tower. If your system does not
match this conÞguration, please refer to your system
userÕs guide for expansion card installation instructions.
To install your XCLAIM GA:
1. Turn off your computer, and disconnect the monitor
cable.
Page 4 Installing Your Card
Page 9
2. Remove the computer cover. If necessary, consult your
computer system manual for removal instructions.
3. Choose the PCI expansion slot you wish to use.
4. Touch the metal part of the power supply case.
Touching the grounded portion of the power supply
case will discharge your bodyÕs static electricity.
Power Supply
Page 5 Installing Your Card
Page 10
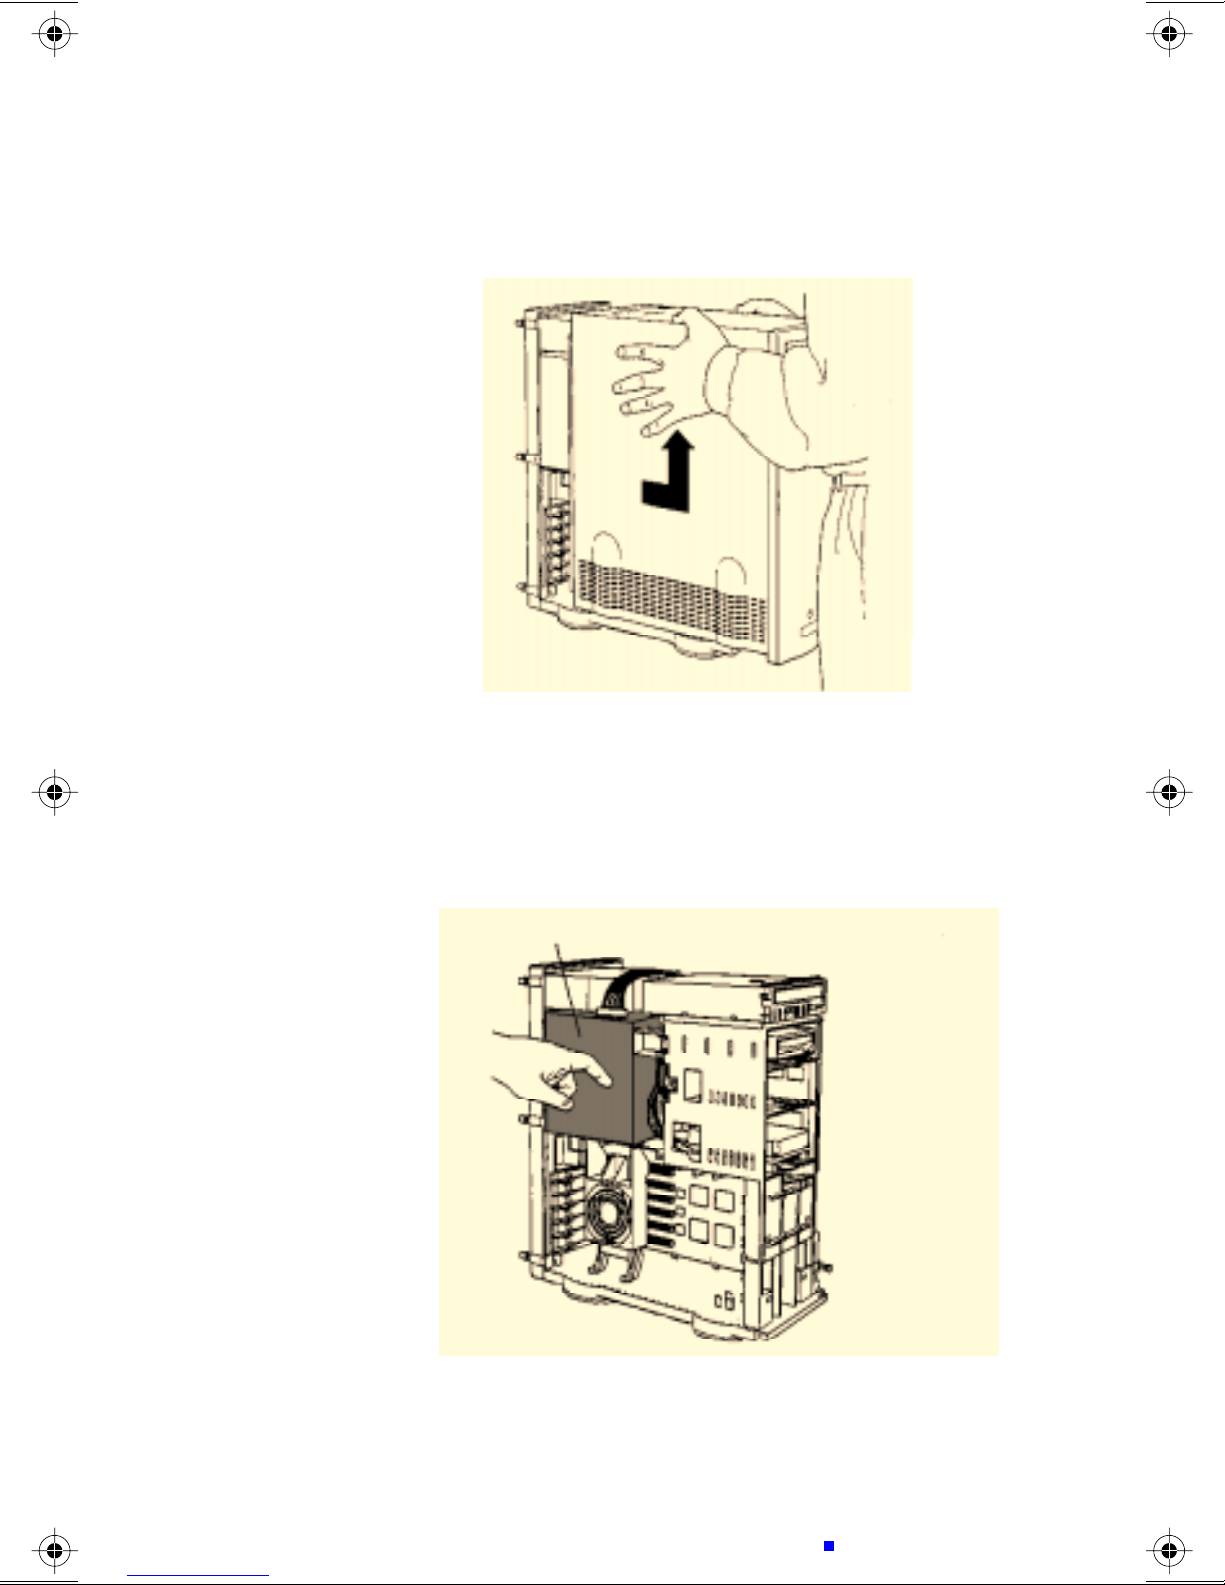
5. Lower the auxiliary fan.
To lower the fan, squeeze the sides to unlatch it.
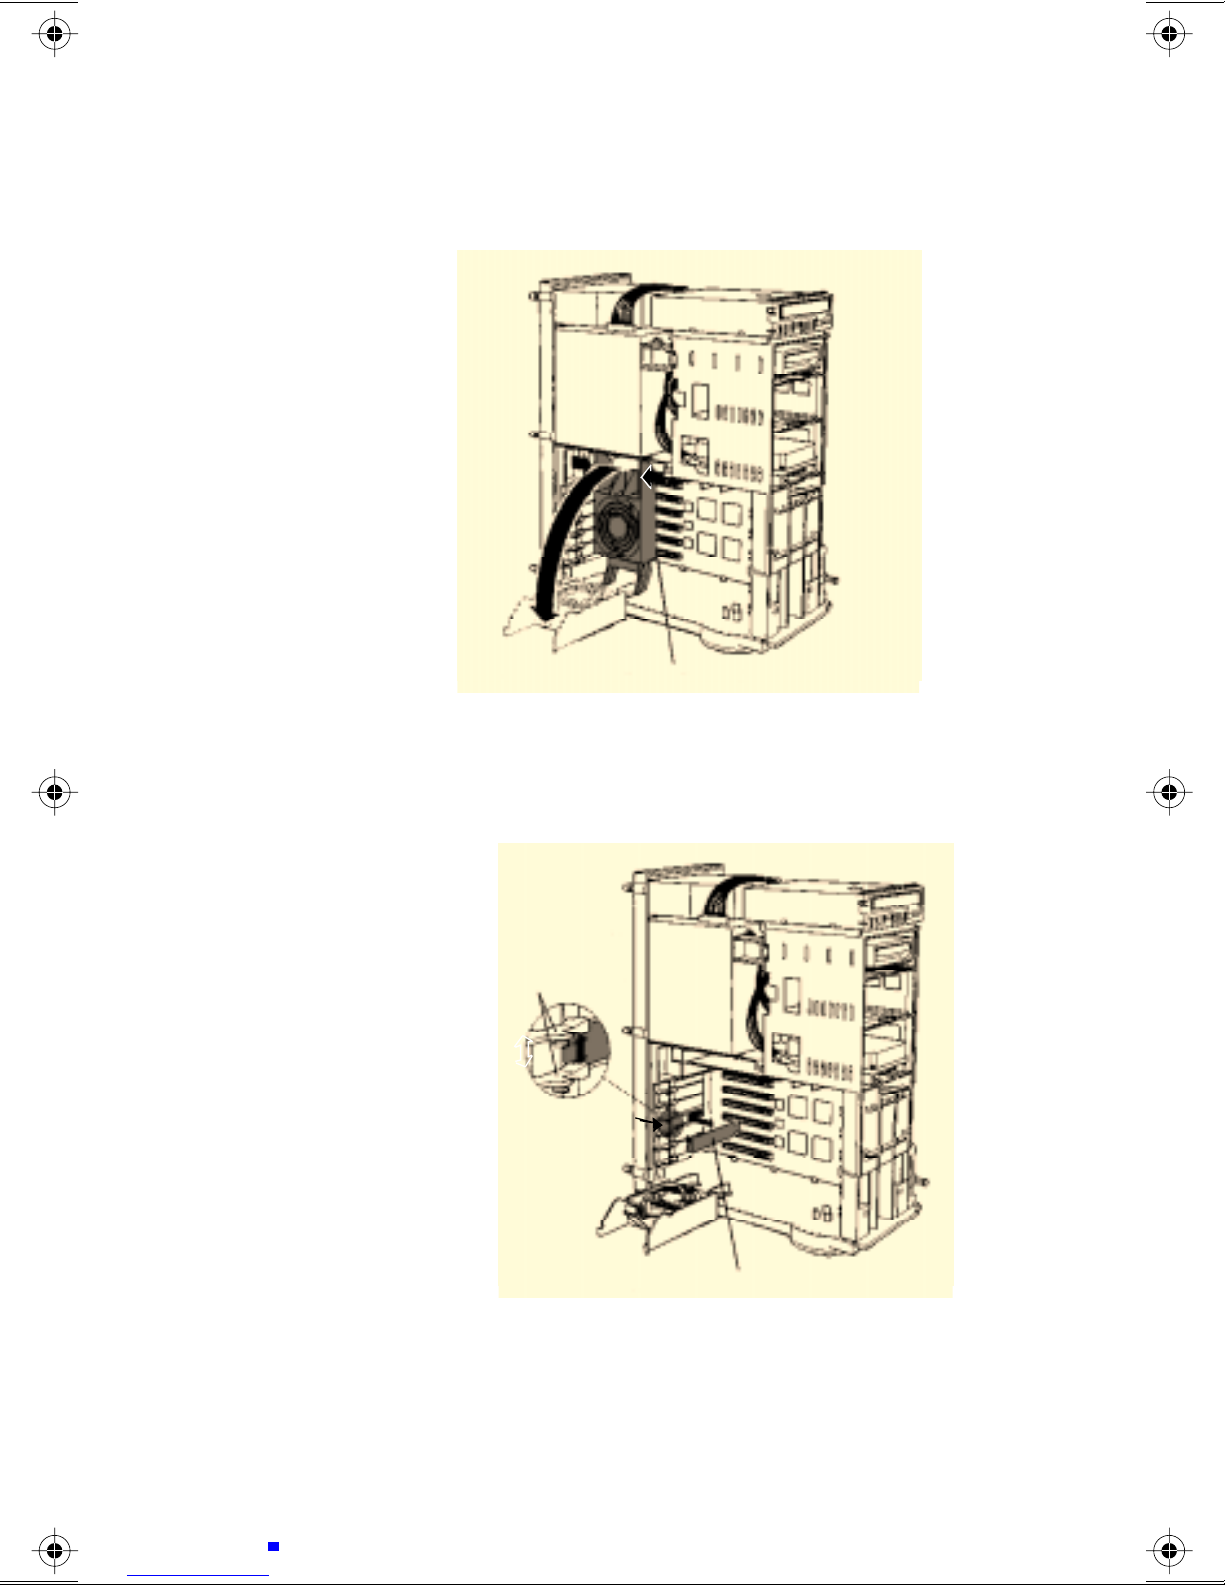
6. Remove the metal access cover fr om the expansion slot
you want to use.
1. To release the
access port cover,
pull the two levers
next to the access
port apart
2. Slide the access port cover out and away from the access port.
Page 6 Installing Your Card
Page 11
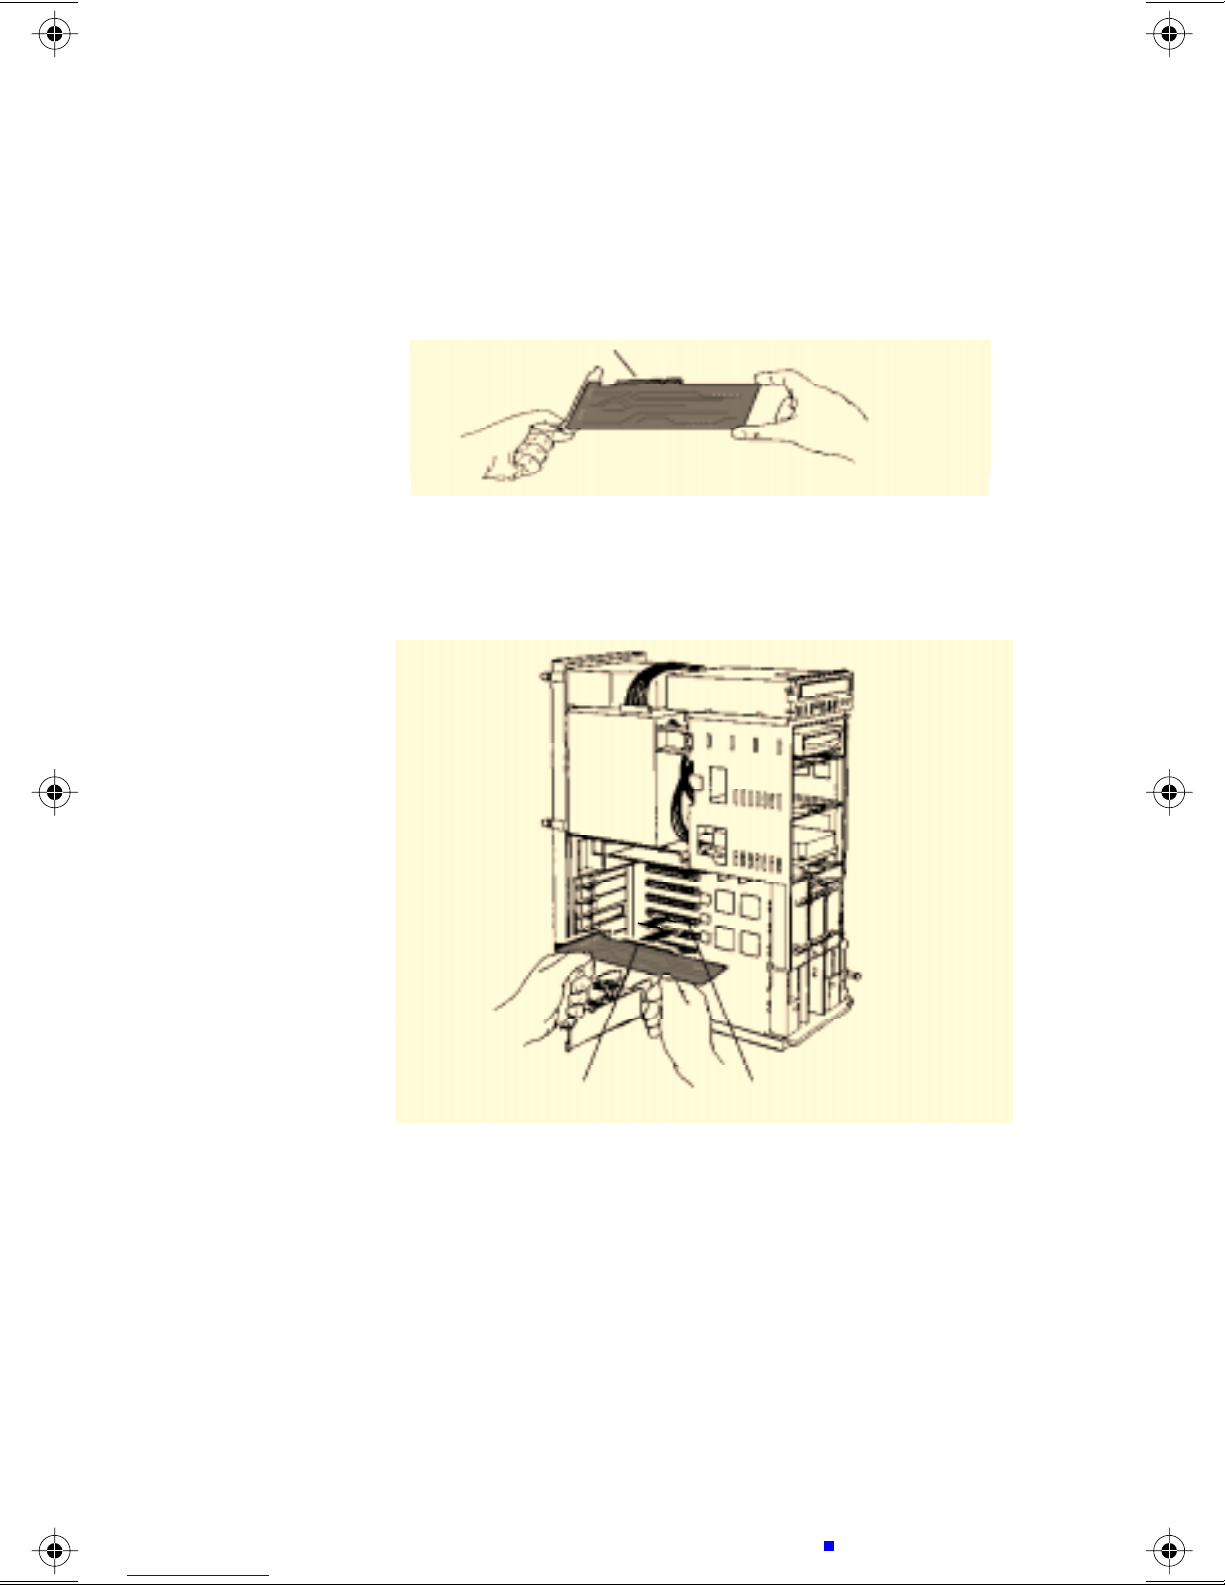
7. Align the connector on the card with the PCI
expansion slot and press firmly until fully seated.
Connector
Do not force the card; if you encounter excessive
resistance, remove the card and try again.
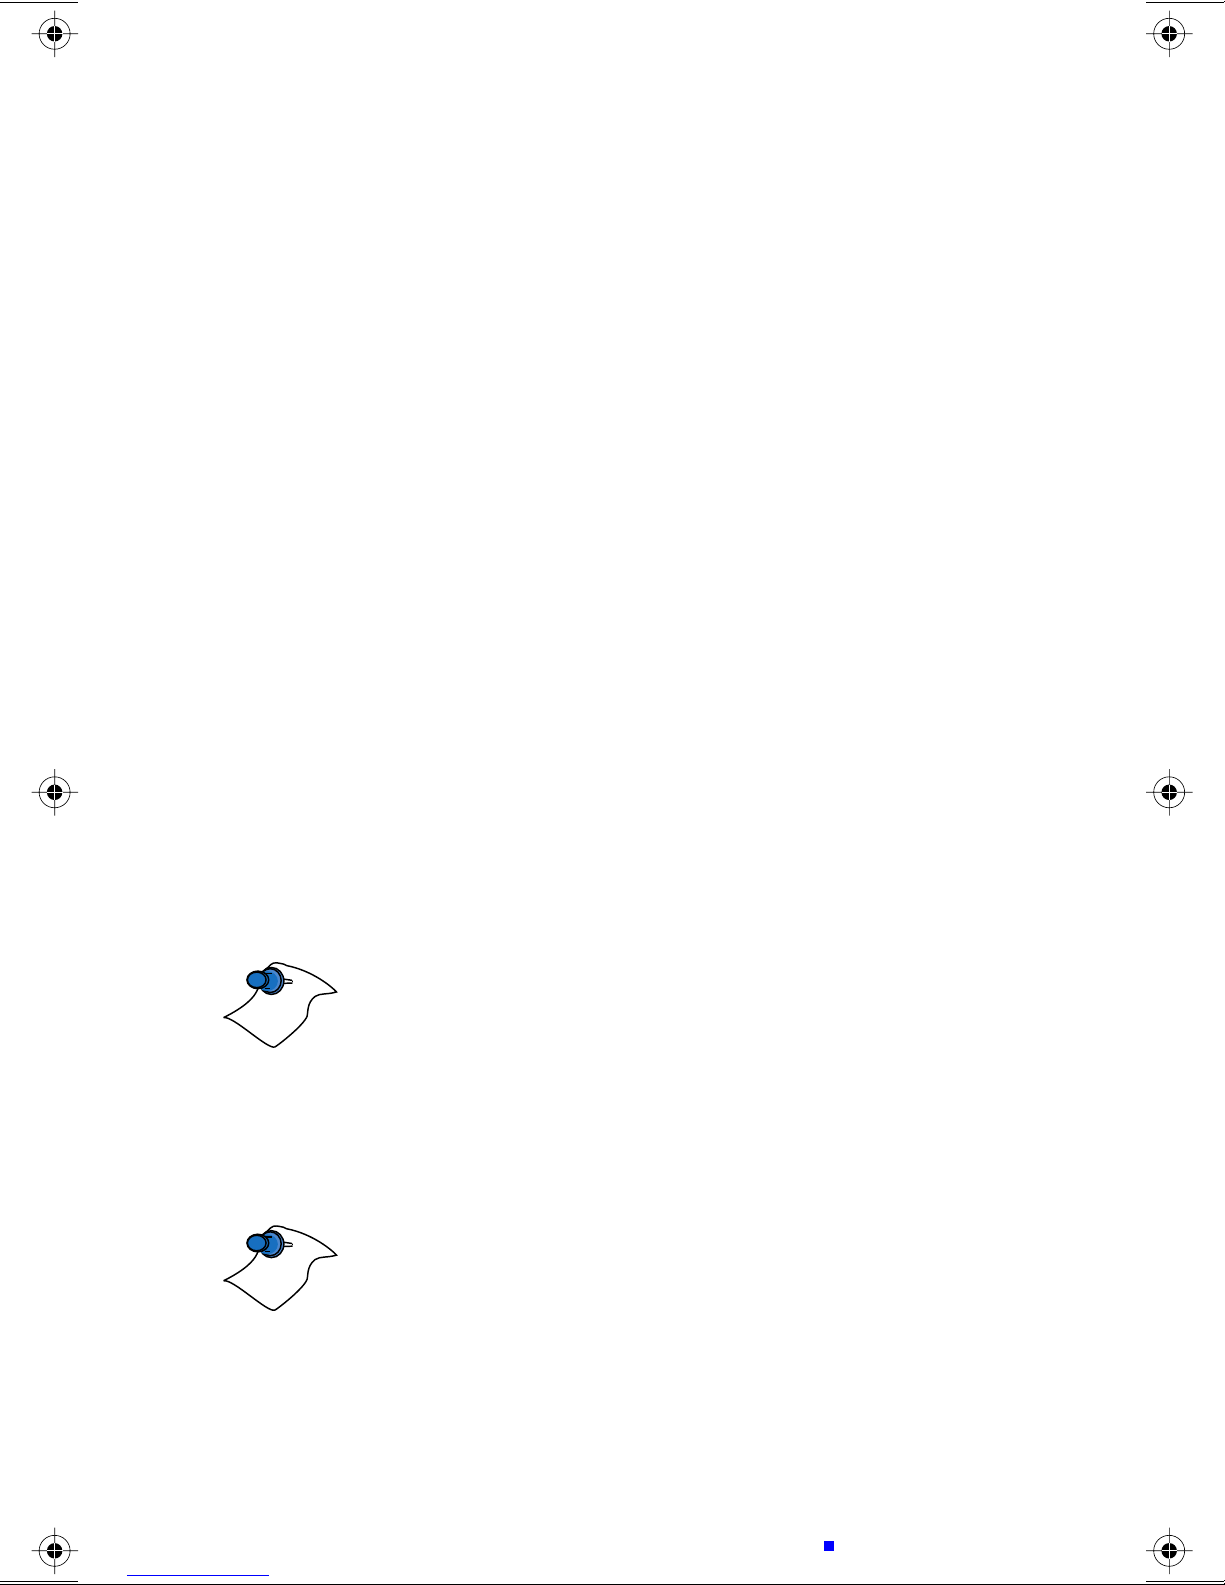
8. Replace the auxiliary fan.
Connector
PCI Expansion Slot
If you plan to use multiple displays, you must install
a card for each monitor. Repeat steps 6 and 7 for each
display.
Page 7 Installing Your Card
Page 12

9. Replace the computer cover.
10. Connect the monitor cable to the card.
Apple monitor port
VGA monitor port
If you have an Apple monitor, connect it to the Apple
monitor port. If you have a VGA monitor, connect it
to the VGA monitor port.
Only connect one monitor
to the card.
!
¥ Serious damage to your system may occur if you
If your monitor is connected to the Apple monitor port, it
NOTE
Page 8 Installing Your Card
must support AppleÕs Òmonitor senseÓ protocol, either
directly or through an appropriate adapter. Otherwise,
all of the resolutions supported by your monitor will not
WARNING
connect more than one monitor to the card. If you
have more than one monitor you must connect it
to another graphics card.
Page 13
be available for selection. For more information, refer to
About Monitor Sensing
below.
Installation of your XCLAIM GA is now complete and
you are ready to install the software. Refer to
Installing Your Software
.
Chapter 3,
About Monitor Sensing
AppleÕs ÒMonitor SensingÓ speciÞcation allows graphics
cards to identify the attached monitor. During startup,
the XCLAIM GA checks the status of three of the Þfteen
pins on the Apple monitor port. It then auto-conÞgures
itself according to the monitor sense code detected and
enables all resolutions supported by the monitor. Since
the XCLAIM GA relies on this sense code to correctly
auto-conÞgure during startup, the monitor must supply
the appropriate sense code.
In a case where your monitor does not directly supply
the sense code information, an adapter can be used to set
the appropriate sense code for your monitor. Typically,
an adapter is used to connect a VGA monitor to the
Apple monitor port, or to simply supply the correct
monitor sense code information.
NOTE
NOTE
If the adapter supplies the sense code information for
only one resolution, then that resolution will be the only
one available, even if the monitor supports multiple
resolutions. Therefore, when using an adapter to supply
the sense code, it must be designed to supply the proper
code for the monitor you are using it with; otherwise, the
XCLAIM GA cannot correctly auto-conÞgure itself for
the attached monitor.
Although the XCLAIM GA card does not output Syncon-Green (SOG) signals directly, adapters are available
that can overlay the Composite Synchronization Signal
and send it through the Green video signal line so that
you can use an SOG monitor. Monitors requiring an SOG
signal usually have only three BNC connectors (RGB).
Page 9 Installing Your Card
Page 14

Page 10 Installing Your Card
Page 15

3
Installing Your Software
About ATI Software
The XCLAIM GA needs three components installed in
your System folder and an online help in the Preferences
folder to run. The ATI Installer will do this for you. The
following items are installed:
ATI Displays Control Panel
The ATI Displays control panel lets you conÞgure your
card and to access software features. These features
are described later in this chapter.
ATI Extension
The ATI extension will be placed in your system folder. It
provides extra functionality for the ATI Displays control
panel.
Page 9 Installing Your Software
Page 16

Graphics Accelerator Extension
The Graphics Accelerator extension is the driver that
interacts with your card to provide graphics acceleration.
ATI Guide File
The ATI Guide Þle is the online help for the ATI Displays
control panel. It is placed in the Preferences folder within
the System folder.
Page 10 Installing Your Software
Page 17

Installing Software
1. Insert the ATI Graphics Accelerator Installation disk
into your disk drive.
2. Double-click on the ATI Installer icon.
The ATI splash screen appears.
3. Click the Continue button.
An ATI information and disclaimer screen appears.
4. Click the Continue button.
A message appears: ÒThe XCLAIM GA software will
now be installed into your system. Please restart
your system once the process is complete.Ó
5. Click the Install button.
NOTE
A status bar is displayed, followed by the message
ÒInstallation was successfulÓ.
6. Click OK.
The Installer automatically quits. To complete the
installation, you must now restart your computer.
ATI Displays Control Panel
The ATI Displays control panel provides access
to the various features you need to conÞgure your
XCLAIM GA card and to enhance your working
environment.
A general description of the features is explained below.
For detailed instructions on how to set up and use these
features, please refer to the ATI Guide, which can be
accessed through the ATI Displays control panel.
Page 11 Installing Your Software
Page 18

Displays
The Displays feature allows you to identify the type
of display that is connected to the XCLAIM GA card.
If you have more than one XCLAIM GA card in your
system, the Displays feature lets you select a monitor
type for each.
Monitors
The Monitors feature provides access to the standard
Apple Monitors control panel. You can use this panel to
select color depths and resolutions, and set up multiple
monitors. For more information on this panel refer to the
Macintosh Guide that comes with your system.
DeskScape
The DeskScape feature lets you select a desktop size that
is larger than your display size, providing you with an
extended working area. You can then pan and zoom to
view different parts of the desktop.
Page 12 Installing Your Software
Page 19

Hot Keys
The Hot Keys feature lets you deÞne four short-cut keys
that will quickly change your working environment.
¥ The DeskScape On/Off key activates and deactivates
the DeskScape mode.
¥ The Zoom In key magniÞes a portion of the desktop.
¥ The Zoom Out key allows you to see a larger view
of the desktop. Objects will appear smaller.
¥ The Popup Menu key activates a popup menu that
lets you instantly change color depths and resolutions
while working in other applications.
Multiple Displays
If you have more than one display connected to your
system, you can use the ATI Displays control panel to
identify and conÞgure each display independently. The
ATI Displays control panel will identify all the displays
connected to your system but will only conÞgure
displays that are connected to XCLAIM GA cards.
Popup Menu
ATI also provides a pop-up menu that allows you to
change the color depth and resolution of your desktop
without exiting your current application. You activate this
menu by holding down a hot key combination while
clicking the mouse. The ATI Popup Menu appears where
the mouse pointer is currently sitting on the screen;
therefore, it will affect the display that you are working on.
Page 13 Installing Your Software
Page 20

256 Grays
256 Colors
Thousands
Millions
640 x 480, 67Hz
832 x 624, 75Hz
1024 x 768, 75Hz
ATI Popup Menu
The Popup Menu selections are dependent on your
conÞguration and monitor capabilities; therefore the
appearance of the Popup Menu may differ.
ATI Guide
The ATI Guide is the main source of information when
you are working with the ATI Displays control panel.
It behaves similarly to the Macintosh Guide that comes
with your system, providing full coach marked and task
assisted instructions.
Access the ATI Guide by clicking on the Apple Guide
icon on the ATI Displays control panel. The ATI Guide
stays in front of other windows on the screen so the
instructions are always visible. To move the ATI Guide
window to another location, drag it by the title bar.
Select a topic from the main ATI Guide window to get
detailed instructions for a speciÞc task. To return to the
main ATI Guide window, click the icon in the lowerleft corner of the Guide window. When youÕre Þnished
using ATI Guide, click the close box.
Balloon Help
Balloon Help is also available for the ATI Displays control
panel. Turn balloon help on in the usual way. Select Show
Balloons from the Guide menu in the menubar.
Page 21

Page 15 Installing Your Software
Page 22

Page 16 Installing Your Software
Page 23

A
Video Modes
The video mode table below lists the color depth
capabilities for the supported resolutions on the 2MB
and 4MB XCLAIM GA cards.
Please consult your monitorÕs speciÞcations to determine
which resolutions are available with your display.
Color depth is measured in bits per pixel (bpp):
¥ 8 bpp = 256 colors
¥ 16 bpp = thousands (32,768 colors)
¥ 32 bpp = millions (16.7 million colors)
Display
Type
21” Color/Two
Page
19” RGB 1024x768 60.24 74.92 thousands millions
16” Color 832x624 48.72 74.55 millions millions
Display
Resolution
1152x870 68.68 75.06 thousands millions
Horizontal
Refresh
kHz
Vertical
Refresh
Hz
Maximum
Colors at
2MB
Maximum
Colors at
4MB
Page 15 Video Modes
Page 24

Display
Type
Display
Resolution
Horizontal
Refresh
kHz
Vertical
Refresh
Hz
Maximum
Colors at
2MB
Maximum
Colors at
4MB
15” RGB
640x870 68.85 75.00 thousands millions
Portrait
13” Color 640x480 35.00 66.66 millions millions
12” Mono 640x480 35.00 66.66 256 256
15” Multi Scan 640x480 35.00 66.66 millions millions
15” Multi Scan 832x624 49.72 74.55 millions millions
17” Multi Scan 640x480 35.00 66.66 millions millions
17” Multi Scan 832x624 49.72 74.55 millions millions
17” Multi Scan 1024x768 60.24 74.92 thousands millions
Page 16 Video Modes
Page 25

Display
Type
20” Multi Scan 640x480 35.00 66.66 millions millions
20” Multi Scan 832x624 49.72 74.55 millions millions
20” Multi Scan 1024x768 60.24 74.92 thousands millions
20” Multi Scan 1152x870 68.68 75.06 thousands millions
20” Multi Scan 1280x1024 79.97 75.02 256 thousands
VGA 640x480 31.46 60 millions millions
SVGA 800x600 35.15 55.98 millions millions
VESA 800x600 37.87 60.31 millions millions
VESA 800x600 48.07 72.18 millions millions
VESA 800x600 46.87 75.00 millions millions
VESA 1024x768 48.36 60.00 thousands millions
VESA 1024x768 56.47 70.00 thousands millions
VESA 1024x768 60.02 75.00 thousands millions
VESA 1280x960 75.00 75.00 256 thousands
VESA 1280x1024 64.30 60.02 256 thousands
VESA 1280x1024 80.0 75.03 256 thousands
VESA 1600x1200 78.2 60.00 256 thousands
VESA 1600x1200 87.2 66.66 256 thousands
VESA 1600x1200 95.2 76.00 256 thousands
Display
Resolution
Horizontal
Refresh
kHz
Vertical
Refresh
Hz
Maximum
Colors at
2MB
Maximum
Colors at
4MB
Memory Upgrade
If you currently have a 2MB XCLAIM GA card, you can
upgrade to 4MB by adding a 2MB VRAM upgrade module.
A 4MB XCLAIM GA card gives you more color depths in
high resolution modes. Please refer to the
above to determine which resolutions and color depths are
available for your monitor with 2MB or 4MB of memory.
Please consult your monitorÕs speciÞcations to determine
which resolutions are available with your display.
To obtain a memory module upgrade, please contact
your dealer.
Video Modes table
Page 17 Video Modes
Page 26

B
Specifications
System Requirements
¥ Power Macintosh with PCI.
Operating System
¥ Macintosh System software 7.5.2 or higher.
Graphics Controller
¥ ATI
Video Display Buffer
¥ 2MB VRAM memory (upgradeable to 4MB).
¥ 64-bit memory interface.
Bus
¥ 32-bit PCI local bus compliant with PCI version
mach64
accelerator chip (ATI-88800GX).
2.0 speciÞcation.
64-bit graphics and multimedia
Page 17 Specifications
Page 27

Sync Signals
¥ Separate horizontal and vertical sync at TTL levels.
¥ Composite sync at TTL levels.
Video Memory Address
¥ Supports PCI Multimedia Standard.
¥ Supports 16MB relocatable memory aperture.
Video Output Connector
¥ Apple Connector - Apple DB-15
¥ VGA Connector - Standard VGA
Video Interrupt
¥ PCI interrupt request enabled; interrupt is auto
conÞgured by system.
Power
¥ +5V +/- 5%, @ 1.3A typical.
Environment
¥ Ambient Temperature:
50° to 122° F (10° to 50° C) operation.
32° to 162° F (0° to 70° C) storage.
¥ Relative Humidity:
5% to 90% non-condensing operation.
0% to 95% storage.
MTBF
¥ 120,000 hours.
EMC Certification
¥ FCC Class B
Page 18 Specifications
Page 28

Safety
¥ PCB made from UL-listed ßame retardant material.
Page 19 Specifications
Page 29

C
Troubleshooting T ips
Before Contacting Customer Support
The following troubleshooting tips are a compilation of
known problems and frequently-asked questions
concerning the XCLAIM GA graphics card. Therefore, if
you have a general question, or encounter problems with
your card, please review this information completely
before contacting Customer Support.
A problem report form can be initiated from the ATI
Displays control panel. Please refer to the ATI Guide for
instructions on generating this problem report, and for
general troubleshooting tips not covered in this section
(for more information, refer to ATI Guide on page 13).
Before calling about a suspected problem, please
complete the problem report, and have the report Þle
either on-screen or printed out for reference during your
call. Important information about your system is
automatically included when you generate the report.
Page 19 Troubleshooting Tips
Page 30

Solutions to Common Problems
Why can't I get a resolution higher than 640x480?
If the monitor is connected to the VGA monitor port on
your XCLAIM GA card...
¥ go to the ATI Displays control panel, click ÒDisplaysÓ,
and select a monitor type which matches the
speciÞcations of your monitor. This allows more
resolutions to be available for selection in the Monitors
control panel.
If the monitor is connected to the Apple monitor port on
your XCLAIM GA card...
¥ The problem likely relates to Monitor Sensing (refer to
page 8). Any monitor connected to an Apple-type
monitor port must supply "sense code information" so
that the graphics card can conÞgure itself for the
attached monitor. If the detected sense code does not
represent the capabilities of your monitor, then the card
cannot conÞgure itself properly. You need to attach a
monitor adapter that supplies the proper sense code
for your monitor. Monitor adapters can be obtained
from the monitor manufacturer, or from your local
Apple Authorized Dealer.
I am using a monitor adapter to supply the sense code,
but I only get one resolution, even though I have a
multiscan monitor. Why?
¥ If the adapter is conÞgurable, you need to adjust it to
I have a monitor with three BNC connectors. Why
won't it work with my XCLAIM GA card?
¥ Monitors that only have three BNC connectors require
Page 20 Troubleshooting Tips
one of the multiscan options that best matches your
monitor. If the adapter is not conÞgurable, you need a
new adapter with the proper sense code for a
multiscan monitor.
Page 31

a synchronization (ÒsyncÓ) signal to be sent down the
green line. This is called Sync-on-Green (SOG). ATI
accelerator cards do not output an SOG signal.
Adapters are available for your Macintosh to convert
the separate sync signal from the ATI card to an SOG
signal for the monitor. Check with your local Apple
Authorized Dealer for availability of SOG adapters.
I have a monitor with Þve BNC connectors. Why won't
it work with my XCLAIM GA card?
¥ For a cable with Þve BNC connectors, ensure that they
are all connected to the monitor. If only three of the
cables are connected (i.e., R, G, and B), the monitor is
expecting a Sync-on-Green (SOG) signal.
¥ Some monitors may have a switch to set the monitor to
either SOG or separate sync. If the switch is set to SOG,
the monitor will show a scrambled display. Setting the
switch to separate/composite sync may resolve the
problem.
¥ A number of BNC cables, even though they are
designed for Macintosh computers, do not supply the
sense code needed by the graphics card. Using an
adapter which sets the appropriate sense code should
solve the problem.
After selecting a monitor type in the ATI Displays
control panel, I couldnÕt change the resolution in the
Available Resolutions window.
¥ This window in the ATI Displays control panel only
shows the available resolutions for the monitor type
selected, and will not allow you to select and change
resolutions. Changing resolutions can only be done
through the Monitors control panel, or by using the
Popup Menu supplied with the XCLAIM GA card.
Can the XCLAIM GA work in all Power Macintosh
Page 21 Troubleshooting Tips
Page 32

computers?
¥ No, the XCLAIM GA only works with the newer PCI-
based Power Macintosh computers. Current models
include the 7200, 7500, 8500, and 9500 systems. The
minimum system requirements for the XCLAIM GA
are:
a) Power Macintosh with PCI expansion slots,
b) Macintosh System Software version 7.5.2 or later,
and
c) A monitor that supports a minimum resolution of
640x480, with a minimum refresh rate of 60Hz.
Where can I get a memory module upgrade for my
XCLAIM GA card?
¥ Memory upgrade modules are available either from
your dealer, or they can be purchased directly from ATI
Customer Support.
What is the main difference between the mach64
graphics card bundled with the 9500/120 and the
XCLAIM GA card?
¥ The card bundled with the 9500/120 is a special
version, based closely upon the XCLAIM GA. It is built
speciÞcally for Apple Computer and does not support
the ATI Displays control panel.
¥ The ATI Displays control panel and the dynamic pan
and zoom features are only supported by XCLAIM
GA. Other differences are outlined in the following
Page 22 Troubleshooting Tips
Page 33

chart:
Features
XCLAIM
GA
9500/120
A TI Displays Control Panel:
Zoom In/Out yes no
DeskScape (panning feature) yes no
Popup menu yes no
ATI Guide yes no
Monitor Connectors:
Apple-type
VGA-type
arranty:
W
yes yes
yes no
AppleCare one-year warranty no yes
ATI five-year warranty yes no
Supported Resolutions:
640x480 to 1280x1024 yes yes
1600x1200 yes no
Memory:
2MB (upgradeable to 4MB) yes yes
Page 23 Troubleshooting Tips
Page 34

Page 24 Troubleshooting Tips
Page 35

D
NOTE
Regulatory Compliance
FCC Compliance Statement
This device complies with FCC Rules Part 15. Operation is
subject to the following two conditions:
¥ This device may not cause harmful interference, and
¥ This device must accept any interference received,
This equipment has been tested and found to comply with the
limits for a Class B digital device, pursuant to Part 15 of the FCC
Rules. These limits are designed to provide reasonable protection
against harmful interference in a residential installation. This
equipment generates, uses and can radiate radio frequency
energy and, if not installed and used in accordance with
manufacturer's instructions, may cause harmful interference to
including interference that may cause undesired
operation.
Page 23 Regulatory Compliance
Page 36

radio communications. However, there is no guarantee that
interference will not occur in a particular installation.
If this equipment does cause harmful interference to
radio or television reception, which can be determined
by turning the equipment off and on, the user is encouraged to
try to correct the interference by one or more of the following
measures:
¥ Re-orient or relocate the receiving antenna.
¥ Increase the separation between the equipment and
receiver.
¥ Connect the equipment to an outlet on a circuit different
from that to which the receiver is connected.
¥ Consult the dealer or an experienced radio/TV technician
for help.
!
WARNING
¥ The use of shielded cables for connection of the
monitor to the graphics card is required to assure
compliance with FCC regulations.
¥ Changes or modiÞcations to this unit not expressly
approved by the party responsible for compliance could
void the user's authority to operate this equipment.
Industry Canada Compliance Statement
ICES-003 This Class B digital apparatus meets all
requirements of the Canadian InterferenceCausing Equipment Regulations.
Cet appareil numŽrique de la Classe B Respecte
toutes les exigences du R•glement sur le matŽrial
brouiller du Canada.
Page 24 Regulatory Compliance
Page 37

CE Compliance Information
EMC Directive 89/336/EEC and Amendment 92/31/EEC,
Class B Digital Device
EN 5008-1, Generic Emissions Standard for Residential, Commercial and Light Industrial Products
(EN 55022/CISPR 22, Limits and Methods of Measurement of
Radio Interference Characteristics Information Technology
Equipment)
Warning: This is a Class B product. In a domestic environment this
product may cause radio interference in which case the user may be
required to take adequate measures.
EN 50082-1, Generic Immunity Standard for Residential, Commercial and Light Industrial Products
(IEC 801-2, IEC 801-3, IEC 801-4)
Page 25 Regulatory Compliance
Page 38

A
M
About ATI Software 9
About Monitor Sensing 8
Apple Monitor Port 1, 7, 20
ATI Displays Control Panel 9
ATI Displays Control Panel Features 10
ATI Extension 9
ATI Guide 13, 19
ATI Installer 9
B
Balloon Help 13
Before Contacting Customer Support 19
C
Color Depth 12, 15
Common Problems 19
D
DeskScape Feature 11
Displays Feature 11
G
Getting Started
What YouÕll Need 2
WhatÕs in the Package 2
Graphics Accelerator extension 9
Graphics Controller 17
H
Help 13
Hot Keys Feature 12
Monitor Type 11, 19
Monitors Feature 11
Multiple Displays 6, 12
P
PCI expansion slot 4, 6
PCI local bus 1, 17
Peripheral Component Interconnect (PCI) 3
Popup Menu 12
Popup Menu key 12
R
Resolution 12, 19
S
Specifications 17
Supported Resolutions 15
Sync Signals 17, 20
System Requirements 17, 21
T
Troubleshooting Tips 19
V
VGA Monitor Port 1, 7, 19
Video Display Buffer 17
Video Interrupt 18
Video Memory Address 17
Video Modes 15
Video Output Connectors 18
VRAM upgrade module 16, 22
I
Installing Your Card 3
Installing Your Software 9
Z
Zoom In Key 12
Zoom Out Key 12
Page 25 Index
Page 39

Page 40

1. Getting Started ..............................................................1
Introduction ..................................................................1
What's in the Package ..................................................2
What You'll Need .........................................................2
Related Documentation ...............................................2
2. Installing Your Card .....................................................3
About Monitor Sensing ...............................................8
3. Installing Your Software ..............................................9
About ATI Software .....................................................9
Installing Software .....................................................10
ATI Displays Control Panel ......................................10
Multiple Displays .......................................................12
Popup Menu ...............................................................12
ATI Guide ....................................................................13
Balloon Help ...............................................................13
A. Video Modes ................................................................15
Memory Upgrade .......................................................16
B. Specifications ...............................................................17
C. Troubleshooting Tips ..................................................19
Before Contacting Customer Support .....................19
Solutions to Common Problems ..............................19
D. FCC Compliance Statement .......................................23
DOC Compliance Statement .....................................24
iii
Page 41

 Loading...