

Page 1

Mac Edition
Getting Started Guide
P/N 117-40155-30
Copyright © 2003, ATI Technologies Inc. All rights reserved.
ATI and all ATI product and product feature names are trademarks and/or registered trademarks of
ATI Technologies Inc. All other company and/or product names are trademarks and/or registered
trademarks of their respective owners. Features, performance and specifications are subject to change
without notice. Product may not be exactly as shown in the diagrams.
Reproduction of this manual, or parts thereof, in any form, without the express written permission of
ATI Technologies Inc. is strictly prohibited.
Page 2

i
The User’s Guide
Your ATI Graphics Accelerator comes complete with a User’s
Guide in Portable Document Format (PDF). The User’s Guide
describes in detail the features and functions of your ATI Graphics
Accelerator and the associated software. The User’ s Guide is
installed with the software and can also be found on the installation
CD-ROM. F o r more inf ormation see User’ s Guide on page 10.
Disclaimer
While every precaution has been taken in the preparation of this
document, ATI Technologies Inc. assumes no liability with respect
to the operation or use of ATI hardware, software or other products
and documentation described herein, for any act or omission of A T I
concerning such products or this documentation, for any
interruption of service, loss or interruption of business, loss of
anticipatory profits, or for punitive, incidental or consequential
damages in connection with the furnishing, performance, or use of
the ATI hardware, software, or other products and documentation
provided herein.
ATI Technologies Inc. reserves the right to make changes without
further notice to a product or system described herein to improve
reliability, function or design. With respect to ATI products which
this document relates, ATI disclaims all express or implied
warranties regarding such products, including but not limited to, the
implied warranties of merchantability, fitness for a particular
purpose, and non-infringement.
Page 3

ii
Table of Contents
The User’s Guide .............................................................................. i
Disclaimer.......................................................................................... i
ATI Graphics Accelerator:
Getting Started Guide ................................................... 1
Before Installing the ATI Graphics Accelerator ............................ 1
Installing your ATI Graphics Accelerator card.................... ... ... ... . 3
Installing a RADEON 9800 PRO Mac Edition.................................6
Connecting to the Hard Drive power connector......................................6
NTSC/PAL Support............................................... .................................. 8
To change the setting to PAL ..................................................................8
Installing The Software.................................................................... 9
About ATI Software.......................................................................... 9
User’s Guide ...................................... ............................ ........................10
Solutions to Common Problems .................................................. 11
Warranty Information..................................................................... 13
Product Warranty Registration ..............................................................13
CustomerCare ........................................................................................13
Hardware Warranty Service Statement..................................................13
Warranty Service ............................................................................ ... .... 14
Compliance Information................................................................ 16
CE Compliance Information..................................................................17
Page 4
1
ATI Graphics Accelerator:
Getting Started Guide
Before Installing the ATI Graphics
Accelerator
ATI Technologies Inc. (ATI) provides customer service to
registered users. To ensure you receive all Service and Warranty
options available to you, your product must be registered online
at:
www.ati.com/online/registration
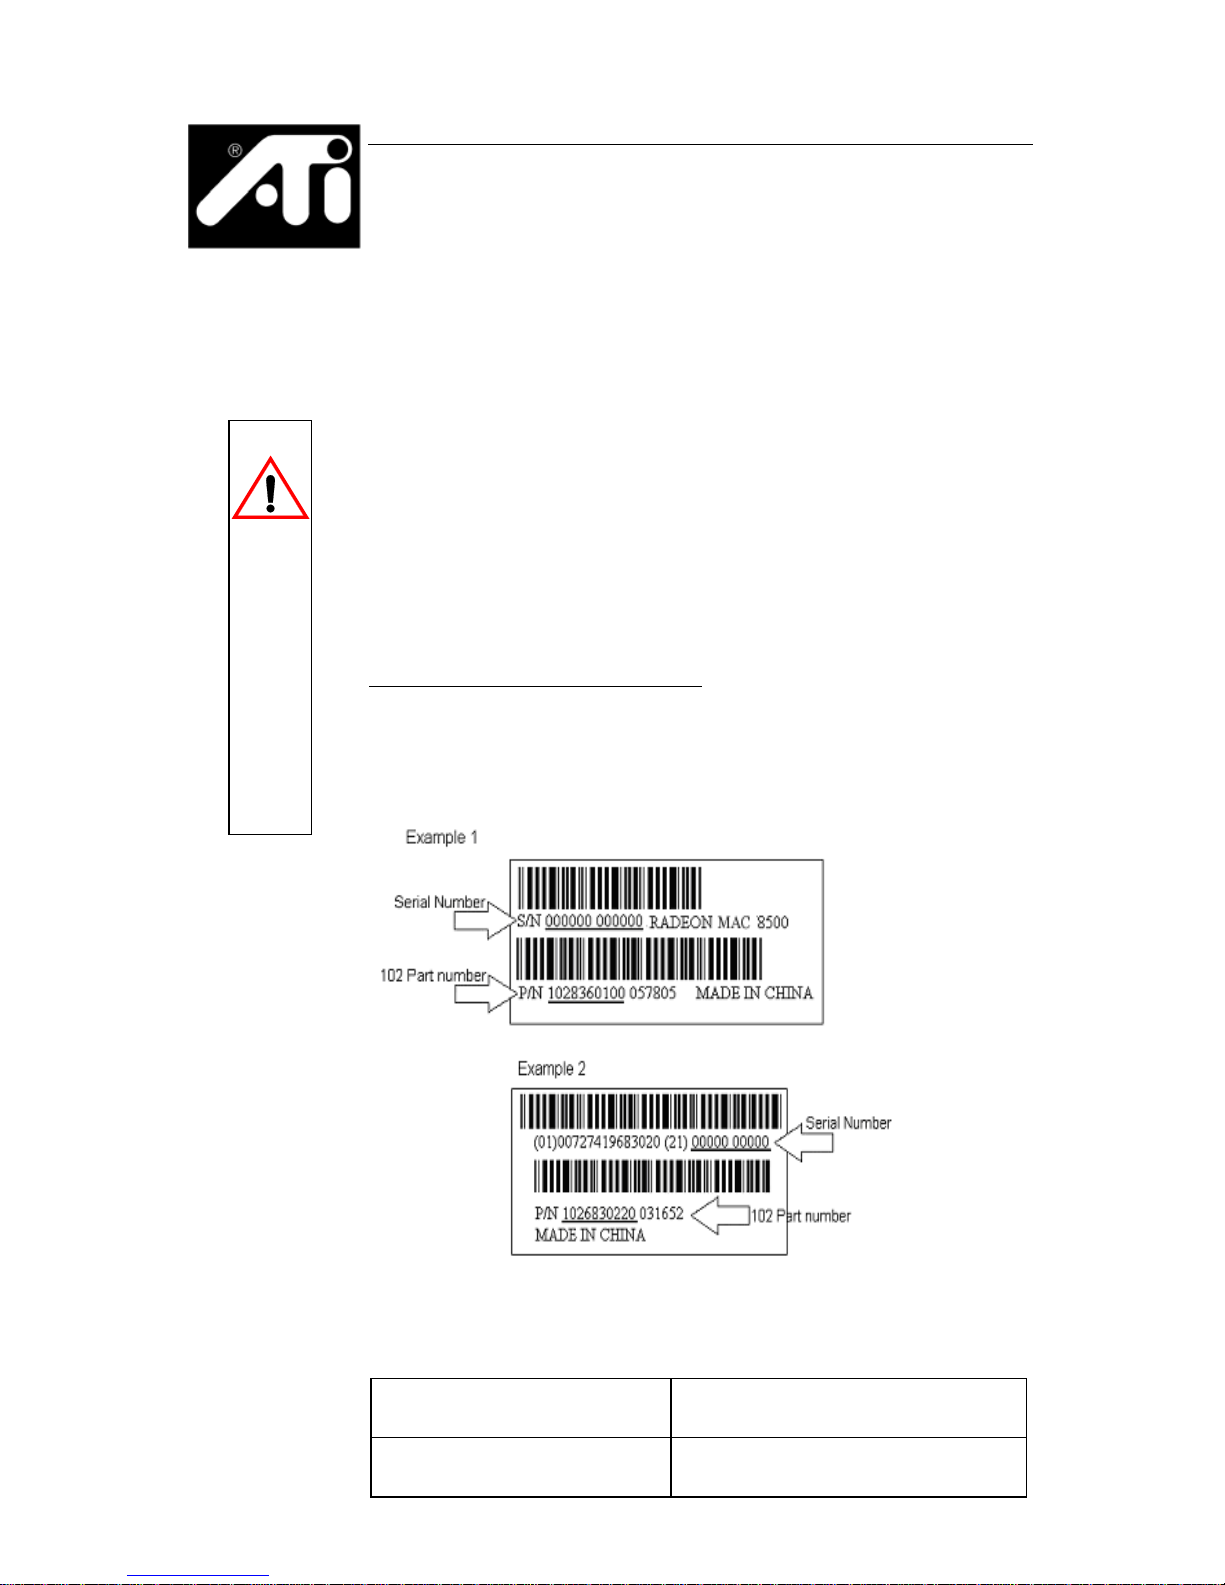
The 102 part number (p/n) and the serial number (s/n) printed
on the video card is required for registration.
Write these numbers down before installing your new ATI
product.
Enter your serial number (s/n)
here:
Enter your 102 part number
(p/n) here:
IMPORTANT
Page 5
2
The ATI Graphics Accelerator fits into connectors called
expansion slots, inside your Apple
®
Macintosh computer.
Your Power Macintosh computer has one or more expansion
slots designed to accept Peripheral Component Interconnect
(PCI) cards and/or one Accelerated Graphics Port (AGP) card.
The following procedure details the installation of a card in a
typical Apple
®
G4-based computer. If your computer does not
match this configuration, please refer to the expansion card
installation instructions that came with your computer.
For Mac OS 9.x users only:
• If your computer stops responding (hangs) after
installing the ATI Graphics Accelerator, you may have
an incompatible graphics accelerator extension. This can
occur when Mac OS software or other ATI graphics
accelerators are installed.
• Restart your computer and hold down the SHIFT k ey
during startup. This disables all extensions from loading.
After disabling extensions, you can update the graphics
accelerator extension by installing the software included
with your card. For more information about installing
the software, see “Installing The Software” on page 9.
Turn off the power to your system and discharge your
body’s static electric charge by touching a grounded
surface—for example, the metal surface of the power
supply—before performing any hardware procedure.
The manufacturer assumes no liability for any damage,
caused directly or indirectly, by improper installation of
any components by unauthorized service personnel. If you
do not feel comfortable performing the installation, consult
a qualified computer technician.
Damage to system components, the accelerator card, and
injury to yourself may result if power is applied during
installation.
READ ME FIRST
IMPORTANT
Page 6
3
Installing your ATI Graphics
Accelerator card
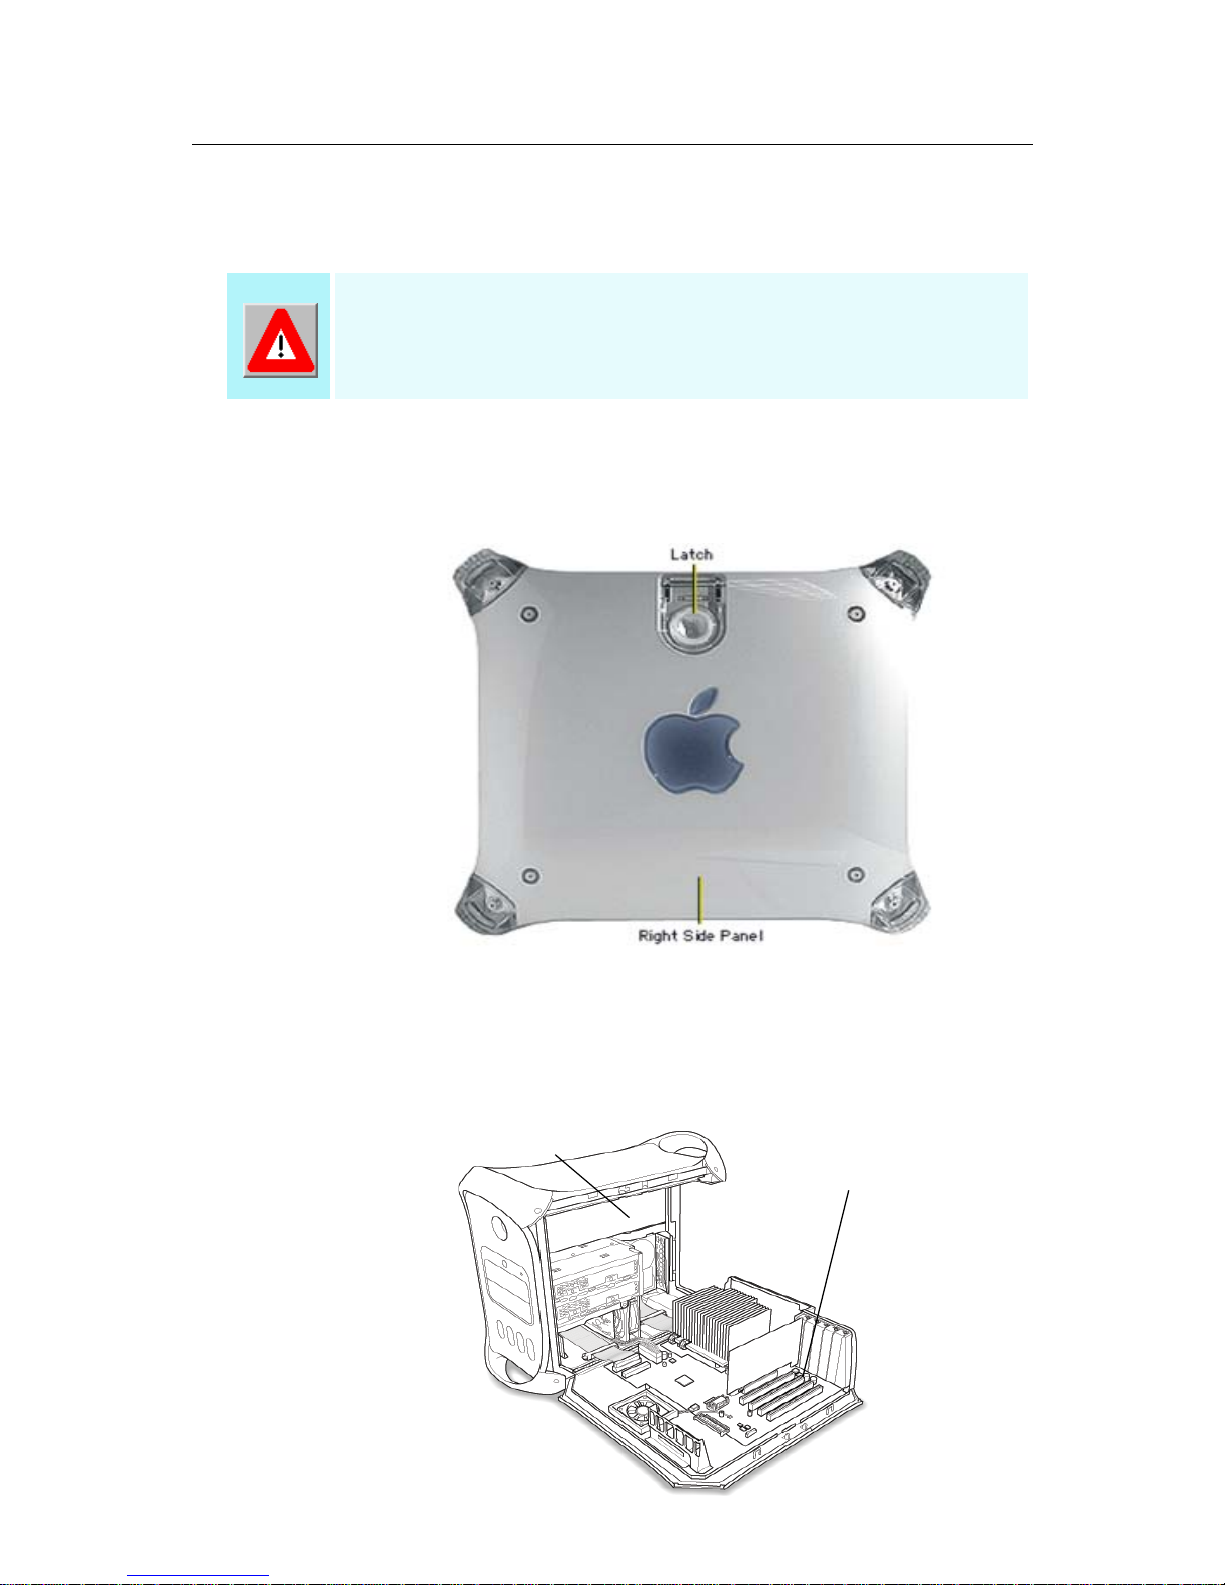
1. Turn off your co mputer, and disconnect the monitor cable.
2. Open your computer. If necessary, consult your computer
system manual for instructions.
3. Choose the PCI or the AGP expansion slot yo u wi sh t o use.
4. Touch the m etal part of the power supply case.
Touching the grounded portion of the power supply case will
discharge your body’s static electricity.
To install a RADEON 9800 PRO MAC EDITION
see “Installing a RADEON 9800 PRO Mac Edition”
on page 6.
Power Supply
Expansion Slots
Page 7

4
5. Align the connector on the card with the selected expansion
slot, and press firmly until fully seated.
6. Close the computer case.
7. Connect the monitor cable to the card.
If you have a VGA monitor, connect it to the VGA monitor port. If
you have a TV, connect it to the TV Out port. If you have a digital
flat panel, connect it to the DVI-I port.
AGP Connector
PCI Connector
Do not force the card. It should fit snugly into the expansion slot.
VGA monitor
port
VGA Connector
DVI-I Connector
DVI-I monitor
port
TV Out
port
Page 8

5
Some ATI RADEON Graphics Accelerator cards have an ADC
(Apple
®
Display Connector) which allows direct connection to
your Apple
®
monitor. These graphic accelerator cards typically
do not support TV Out.
To connect an Apple
®
monitor to some ATI Graphics
Accelerators, you will need an Apple
®
adapter. Simply connect
your Apple
®
monitor connector to the Apple® adapter, and then
plug the Apple
®
adapter into the VGA monitor port
ATI RADEON Graphics Accelerator with ADC
Installation of your
ATI Graphics Accelerator is now complete,
and you are ready to install the software. See “Installing The
Software” on page 9.
Powered Apple
®
monitors using the ADC (Apple® Display
Connector) may need to be supported using a third party
powered adapter.
ADC Connector
DVI-I monitor
port
ADC monitor
port
Page 9

6
Installing a RADEON 9800 PRO Mac
Edition
Connecting to the Hard Drive power
connector
For users living in countries that use the PAL Television
standard see “NTSC/PAL Support” on page 8.
Use the supplied Power Extension Cable to connect the
RADEON 9800 PRO Mac Edition to the computer’ s Hard Dri ve
power connector.
1. Locate the AGP slot, if necessary, removing the metal
cover:
• Align your ATI Graphics Accelerator card with the
AGP slot.
• Press it in firmly until the card is fully seated.
2. Replace the screw to fasten the card in place.
3. Connect A of the Power Extension Cable to the RADEON
9800 PRO Mac Edition power connector as shown. (The
cable may already be connected to the graphics card.)
4. Connect B to the power supply connector.
Note: If there is no spare power connector:
Remove the power cable from the Hard Drive power connector
and complete steps 3 and 4 above.
Connect optional connector to the Hard Drive power connector.
(See inset diagram below.)
The RADEON 9800 PRO Mac Edition requires
connection to your Mac’s internal power supply
for operation. Consult your system
documentation to ensure your system has an
adequate power supply. In order to maintain
enough resources to support the widest range
of other add-in components ATI recommends a
300 watt power supply or greater to ensure
normal system operation.
Page 10

7
5. Plug the monitor cable into your card.
6. Turn on the computer and monitor.
A graphic image of a video card with a
flashing red power connector will appear on
your display and the computer will not start if
the RADEON 9800 PRO Mac Edition is not
correctly connected to the power supply.
Page 11

8
NTSC/PAL Support
The RADEON 9800 Pro Mac Edition provides both NTSC and
PAL support. NTSC is the TV standard used in North America.
PAL is the TV standard for most of Europe.
To change the setting to PAL
1. Remove the RADEON 9800 PRO Mac Edition from your
computer.
2. Locate the orange switch near the fan (see illustration on
page 7).
3. Use a sharp pencil to move slider switch number 1 as
shown in the illustration.
Re-install the graphics accelerator card into your computer.
You can also change your P A L/NTSC settings through software
using the ATI Displays contr ol panel. For mor e information see the
User Guide or the online Help for ATI Displays.
The default sett ing f or the RADEON 9800 PR O Mac
Edition is NTSC. If you liv e in North America there is
no need to change this setting unless you intend to
use PAL standard equipment (for example, PAL
Camcorder/PAL VCR) and do not wish to change
this setting in software.
You can also change the PAL/NTSC se tting thro ugh
software using the ATI Displays control panel or
Mac OS X’s Displays preference panel. For more
information see the User Guide or the online Help
for ATI Displays.
i
Page 12

9
Installing The Software
1. Insert the ATI Installation CD.
2. Double-click on the ATI Graphics Accelerator Installer
icon.
The ATI splash and legal notice screens appear.
OS X users may be prompted for the Administrator’s password.
3. Follow the instructions that appear on the screen.
Upon completion of the installation process, a file containing a
list of installed files and their location on your har d disk is cr eated
allowing you to locate any file installed during the installation
process.
4. When you see a message that the installation was
successful, click Restart.
or
To perform further installations, click OK.
You need to manually restart your computer to complete
the installation of the ATI Graphics Accelerator software.
About ATI Software
The ATI Graphics Accelerator requires several additional
components be added to your System folder. The ATI Graphics
Accelerator Installer application does this for you, installing the
following components:
ATI Displays Control Panel
The ATI Displays control panel lets you configure your card and
access software and hardware features. These features are
described in the User’s Guide that came with your ATI Graphics
Accelerator card.
Page 13

10
ATI Multimedia Components
ATI’s Multimedia Components are placed in the Extensions
folder, located within the System Folder in Mac OS 9.x and in
the System/Library/Extensions folder in Mac OS X. They
enable all of the advanced features of your card, including 3D
and 2D acceleration where applicable.
ATI Help
All online help for RADEON based products is available in ATI
Help. For more information about using the HELP system see
the User’s Guide that came with your ATI Graphics Accelerator
card.
User’s Guide
Your ATI Graphics Accelerator comes with a User’s Guide that
provides indepth information of the video card’s many features
and functions. The User’s Guide provides reference,
specification, disclaimer, le gal, and compliance information that
is not contained in this Getting Started guide.
In Mac OS X the User’s Guide can be found in the ATI Utilities
folder. Mac OS 9 users will find the User’s Guide in the ATI
Manuals folder.
To access the User’s Guide in Mac OS X:
•Click on Finder
• Click the Applications folder
• Click the Utilities folder
• Click the ATI Utilities folder
• Double-click User’s Guide
To access the User’s Guide in Mac OS 9:
•Click on Hard Drive
• Click the Documents folder
• Click the ATI Manuals folder
• Double-click User’s Guide
Page 14

11
Troubleshooting Tips
If you have a general question, or encounter problems with your
card, please review this information completely. Further
troubleshooting information can be found on the ATI Technical
Support website at www.ati.com.
Use Apple
®
System Profiler found in the Utilities folder, to
generate a report outlining your system configuration.
Solutions to Common Problems
Why can't I get a resolution higher than 800x600?
If the monitor is connected to the VGA monitor port on your
ATI Graphics Accelerator...
• go to the Display control panel found in System
Preferences in Mac OS X or Monitors control panel in OS
9. This control panel allows you to change to a higher
resolution supported by your monitor.
I have a monitor with three BNC connectors. Why won't it
work with my ATI Graphics Accelerator?
• Monitors that only have three BNC connectors require a
synchronization (“sync”) signal to be sent down the green
line. This is called Sync-on-Green (SOG). ATI Graphics
Accelerators do not output a SOG signal. Adapters are
available for your Mac OS computer to convert the separate
sync signal from the ATI card to a SOG signal for the
monitor. Check with your local Apple
®
Authorized Dealer
for availability of SOG adapters.
Page 15

12
I have a monitor with five BNC connectors. Why w o n't it
work with my ATI Graphics Accelerator?
• For a cable with five BNC connectors, ensure that they are
all connected to the monitor. If only three of the cables are
connected (i.e., R, G, and B), the monitor is expecting a
Sync-on-Green (SOG) signal.
• Some monitors may have a switch to set the monitor to
either SOG or separate sync. If the switch is set to SOG, th e
monitor will show a scrambled display. Setting the switch
to separate/composite sync may resolve the problem.
• A number of BNC cables, even though they are designed
for Mac OS computers, do not supply the sense code
needed by the graphics card. Using an adapter that sets the
appropriate sense code should solve the problem.
BNC cables do not pass DDC information to the ATI Graphics
Accelerator.
Does the ATI Graphics Accelerator work in all Power
Macintosh computers?
• No, the ATI Graphics Accelerator only works in PCI or
AGP based Power Macintosh computers with a PCI
(33MHz or 66MHz) or AGP e xpansion slot. The minimum
system requirements for your specific ATI Graphics
Accelerator are listed in the “What you’ll need” section of
the User’s Guide.
• Due to the unique design of the Apple
®
G4 Cube, ATI
Graphics Accelerator will not fit into these systems.
Page 16

13
Warranty Information
Product Warranty Registration
To receive CustomerCare you must register your product with
ATI.
Online Product Warranty Registration is available at:
http://www.ati.com/online/registration
CustomerCare
For detailed instructions on how to use your ATI product, refer
to the Online User’s Guide included on your ATI Installation
CD-ROM.
If you require further assistance with your product, the
following options are available:
Online:
For product information, video drivers, Frequently Asked
Questions and Email support visit:
http://www.ati.com
and select CustomerCare for Built By ATI
products.
Telephone:
Available Monday to Friday, 9:00 AM - 7:00 PM EST.
*905-882-2626
*Access to Telephone Support is available to registered users at
no additional cost for the first 30 days from the date of purchase
(long distance charges may apply). For complete details please
visit:
http://www.ati.com/online/customercare
Mail:
ATI TECHNOLOGIES INC.
Attention: Customer Service
1 Commerce Valley Drive East
Markham, Ontario
Canada L3T 7X6
Hardware Warranty Service Statement
Page 17

14
Should the product, in ATI’s opinion, malfunction within the
warranty period, ATI will at its discretion repair or replace the
product upon receipt with an equivalent. Any replaced parts
become the property of ATI. This warranty does not apply to the
software component of a product or a product which has been
damaged due to accident, misuse, abuse, improper installation,
usage not in accordance with product specifications and
instructions, natural or personal disaster, or unauthorized
alterations, repairs, or modifications.
For a detailed description of the ATI Hardware Warranty
Service Statement visit:
http://www.ati.com/online/warranty/statement
Warranty Service
For warranty service instructions visit:
http://www.ati.com/online/warranty
or contact one of our Customer Service Representatives using
one of the aforementioned means.
• Before shipping any unit for repair, obtain an RMA number
for warranty service.
• When shipping your product, pack it securely, show
the RMA and serial number of the product on the
outside, and ship prepaid and insured.
• ATI will not be held liable for damage or loss to the product
in shipment.
Limitations
• This warranty is valid only if the online Product Warranty
Registration form at:
http://www.ati.com/online/registration
is successfully submitted within 30 days of purchase
of said product.
• All warranties for this product, expressed or implied,
will expire three (3) years from date of original
purchase.
* All accompanying cables and accessories are warranted for
90 days.
Page 18

15
• No warranties for this product, expressed or implied,
shall extend to any person who purchases the product
in a used condition.
• The liability of ATI in respect of any defective
product will be limited to the repair or replacement of
such product. ATI may use new or equivalent-to-new
replacement parts. Defective product will be sent in
for repair or replacement only.
ATI makes no other representations or warranties as to fitness
for a particular purpose, merchantability or otherwise in respect
of the product. No other representations, warranties or
conditions, shall be implied by statute or otherwise.
In no event shall ATI be responsible or liable for any damages,
including but not limited to the loss of revenue or profit, arising:
• from the use of the product,
• from the loss of use of the product,
• as a result of any ev ent, circumstance, action or abuse
beyond the control of ATI; whether such damages be
direct, indirect, consequential, special or otherwise
and whether such damages are incurred by the person
to whom this warranty extends or a third party.
Page 19

16
Compliance Information
FCC Compliance Information
This equipment has been tested and found to comply with the limits for a Class
B digital device, pursuant to Part 15 of the FCC Rules. These limits are
designed to provide reasonable protection against harmful interference in a
residential installation. This equipment generates, uses and can radiate radio
frequency energy and, if not installed and used in accordance with
manufacturer's instructions, may cause harmful interference to radio
communications. However , there is no guarantee that interference will not occur
in a particular installation. If this equipment does cause harmful interference to
radio or television reception, which can be determined by turning the equipment
off and on, the user is encour aged to try to correct the interference by one or
more of the following measures:
• Re-orient or relocate the receiving antenna.
• Increase the separation between the equipment and receiver.
• Connect the equipment to an outlet on a circuit different from that to which
the receiver is connected.
• Consult the dealer or an experienced radio/TV technician for help.
Industry Canada Compliance Statement
ICES-003 This Class B digital apparatus complies with Canadian ICES=003.
Cet appareil numérique de la Classe B est conforme à la norme
NMB-003 du Canada.
For further compliance information:
ATI Research Inc.
62 Forest Street.
Marlborough, MA
01752
USA
508-303-3900
The RADEON family of cards complies with FCC Rules Part
15. Operation is subject to the following two conditions
:
• This device may not cause harmful interference, and
• This device must accept any interference received,
including interference that may cause undesired
operation.
• The use of shielded cables for connection of the monitor
to the graphics card is required to ensure compliance
with FCC regulations.
• Changes or modifications to this unit not expressly
approved by the party responsible for compliance could
void the user's authority to operate this equipment.
Page 20

17
CE Compliance Information
EMC Directive 89/336/EEC and Amendment 92/31/EEC, Class B Digital
Device
EN 50081-1, Generic Emissions Standard for Residential, Commercial and
Light Industrial Products
(EN 55022/CISPR 22, Limits and Methods of Measurement of Radio
Interference Characteristics Information Technology Equipment) W arning: This
is a Class B product. In a domestic environment this product may cause radio
interference in which case the user may be required to take adequate measures.
EN 50082-1, Generic Immunity Standard for Residential, Commercial and
Light Industrial Products
(IEC 801-2, IEC 801-3, IEC 801 -4)
Directive EMC 89/336/CEE et amendement 92/31/CEE, dispositif numérique
de Classe B
EN 50081-1, Norme sur les émissions génériques pour les produits
domestiques, commerciaux et industriels légers
(EN 55022/CISPR 22, Limites et méthodes de mesure des caractéristiques
d'interférences radiophoniques, Matériel des technologies de l'information)
Mise en garde: ceci est un produit de Classe B. Il risque produire des
interférences r adiophoniques dans un environnement domestique auquel cas
l'utilisateur peut se voir demandé de prendre de s mesures adéquates.
EN 50082-1, Norme sur l'immunité générique pour produits domestiques,
commerciaux et industriels légers.
(CEI 801-2, CEI 801-3, CEI 801 -4)
EMC Richtlinie 89/336/EEC und Änderung 92/31/EEC, Digitales Gerät der
Klasse B
EN 50081-1, Allgemeiner Emissions-Standard für Haushalt- und kommerzielle
Produkte sowie Erzeugnisse der Leichtindustrie
(EN 55022/CISPR 22, Beschränkungen und Verfahren der Messung von
informationstechnischen Ausrüstungen mit Funkstörmerkmalen)
Warnung: Dies ist ein Erzeugnis der Klasse B. Dieses Erzeugnis kann
Funkstörungen im Wohnbereich verursachen; in diesem Fall können
entsprechende Maßnahmen seitens des Benutzers erforderlich sein.
EN 50082-1. Allgemeiner Unempfindl ichkeits-Standard für Haushalt- und
kommerzielle Produkte sowie Erzeugnisse der Leichtindustrie
(IEC 801-2, IEC 801-3, IEC 801 -4)
 Loading...