

Page 1
RADEON™/RADEON™ VE
Getting Started...
• Safety Instructions for TV Tuner Products
• Installing Your RADEON™/RADEON™ VE
• Installing the ATI Driver for Windows® 98,
Windows® Me
• Installing the ATI Driver for Windows® 2000
• Multiple Display Support: Windows® 98,
Windows® Me
• Troubleshooting Tips
• Using the Online Manual
Please read this guide before attempting to install your card.
Preparing Your Computer
Turn off the power to your system and discharge your body’s static
electric charge by touching a grounded surface—for example, the metal
surface of the power supply—before performing any hardware procedure.
The manufacturer assumes no liability for any damage, caused directly or
indirectly, by improper installation of any components by unauthorized
service personnel. If you do not feel comfortable performing the
installation, consult a qualified computer technician.
Damage to system components, the accelerator card, and injury to
yourself may result if power is applied during installation.
READ ME FIRST
Before installing your RADEON™/RADEON™ VE we recommend that you
first uninstall the driver for your current video card and reconfigure your
NOTE:
operating system to use the standard display driver (VGA) supplied with your
operating system. For more information about changing to the VGA driver, see
your operating system documentation.
RADEON™/RADEON™ VE Version 1.1
Page 2

Safety Instructions for TV Tuner Products
IMPORTANT SAFETY INSTRUCTIONS
• Read Instructions - All the safety and operating instructions should
be read before the product is operated.
• Retain Instructions - The safety and operating instructions should be
retained for future reference.
• Heed Warnings - All warnings on the product and the operating
instructions should be adhered to.
• Compatibility - This option card is for use only with IBM AT or compatible UL listed personal computers that have Installation Instructions
detailing user installation of card cage accessories.
• Grounding - CAUTION: For continued protection against risk of electric shock and fire, this accessory should be installed only in products
equipped with a three-wire grounding plug, a plug having a third
(grounding) pin. This plug will only fit into a grounding-type power outlet. This is a safety feature. If you are unable to insert the plug into the
outlet, contact your electrician to replace the obsolete outlet. Do not
defeat the safety purpose of the grounding-type plug.
• All option card securement pins shall be completely tightened, as to
provide continuous bonding between the option card and the PC chassis.
• Outdoor Antenna Grounding - Since an outdoor antenna or cable
system is connected to the product, be sure that the antenna or cable
system is grounded so as to provide some protection against voltage
surges and built-up static charges. Article 810 of the National Electrical Code, ANSI/NFPA 70, provides information with regard to proper
grounding of the mast and supporting structure, grounding of the leadin wire to the antenna discharge unit, size of grounding conductors,
location of antenna-discharge unit, connection of grounding electrodes, and requirements for the grounding electrode.
• Lightning - For added protection for this product during a lightning
storm, or when it is left unattended and unused for long periods of
time, unplug it from the wall outlet, and disconnect the antenna or
cable system. This will prevent damage to the product due to lightning
and power-line surges.
• Power Lines - An outside antenna system should not be located in the
vicinity of overhead power lines or other light or power circuits, or
where it can fall into such power lines or circuits.
• When installing an outside antenna system, extreme care should be
taken to keep from touching such power lines or circuits, as contact
with them may be fatal.
Note to CATV System Installer - This reminder is provided to call the
CATV systems installer’s attention to Section 820-40 of the NEC, which
provides guidelines for proper grounding and, in particular, specifies that
the cable ground shall be connected to the grounding system of the
building, as close to the point of cable entry as practical.
Page 3
Installing Your RADEON™/RADEON™ VE
Now that you have prepared your computer, you are ready to install your
RADEON™/RADEON™ VE graphics accelerator card.
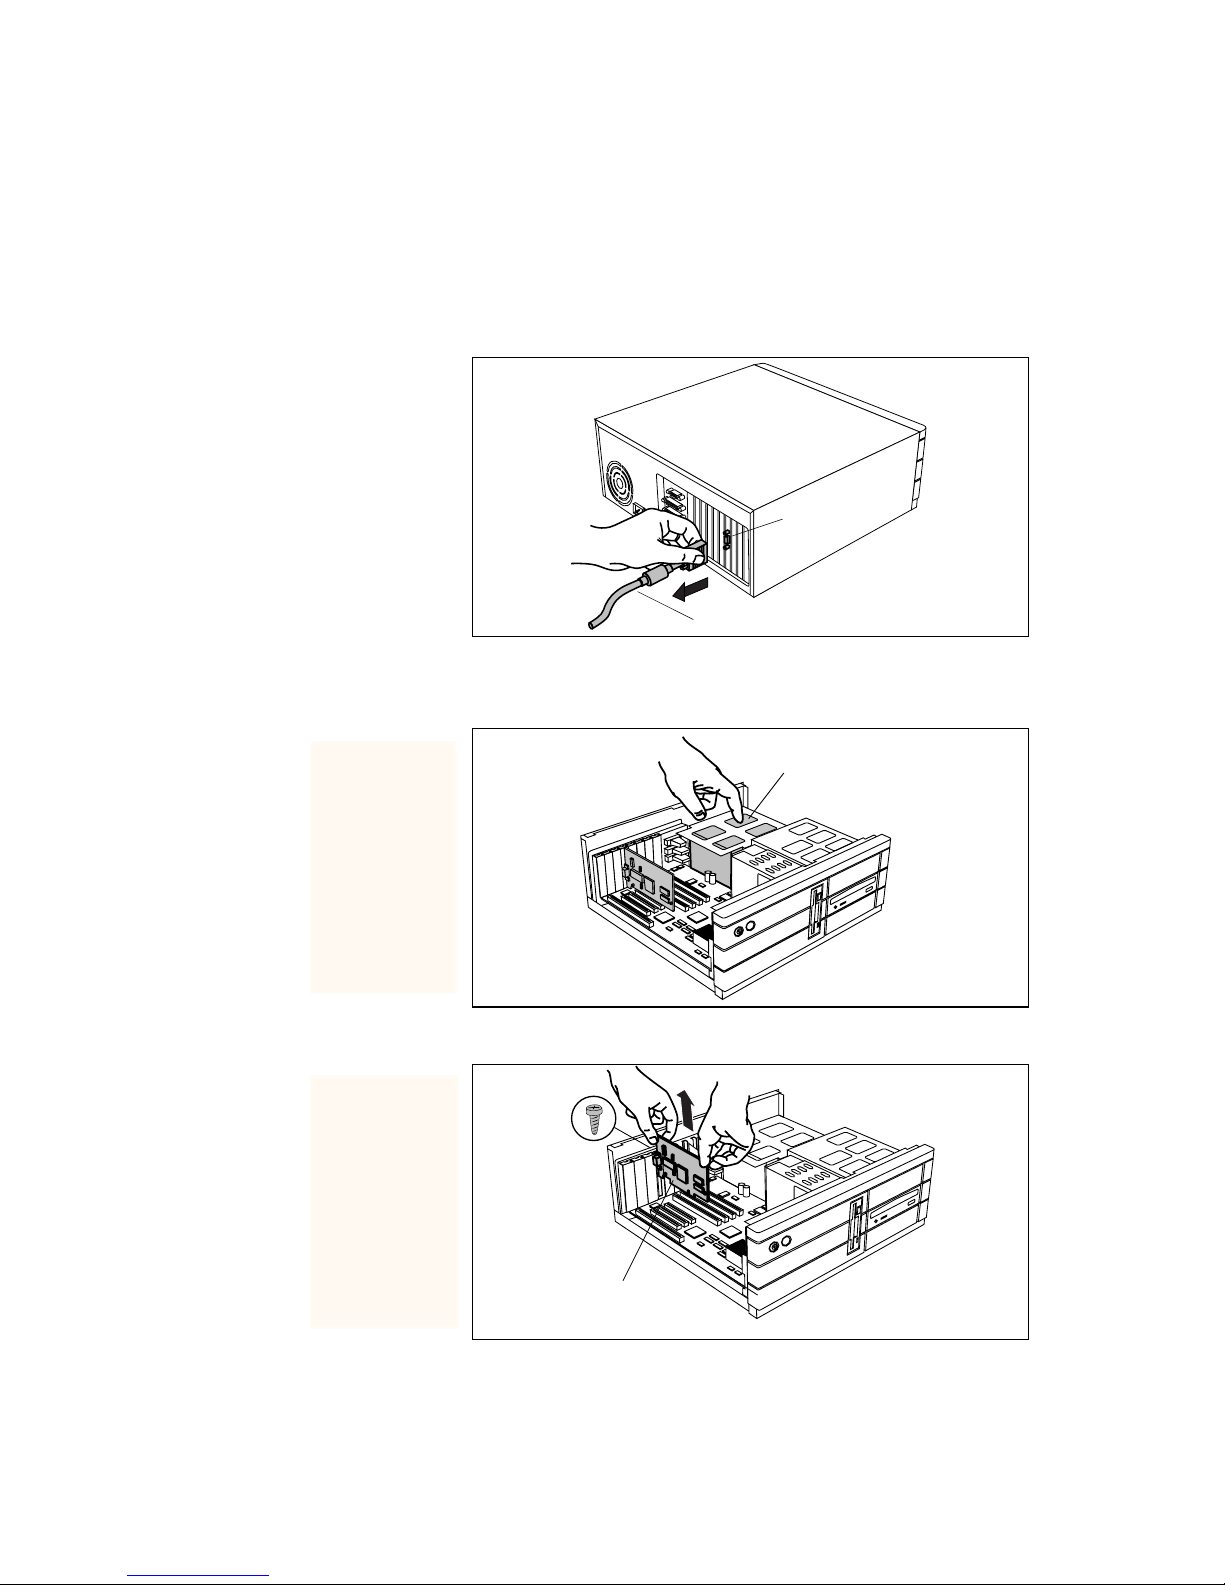
To install your graphics accelerator card
Poweroffthecomputerandmonitor,thendisconnect the display
1
2
cable from the back of your computer.
VIDEO OUTPUT
DISPLAY CABLE
Remove the computer cover. If necessary, consult your computer’s
manual for help in removing the cover.
CONNECTOR
Remember to
discharge your
body’sstatic
electricity by
touching the
metal surface
of the computer
chassis.
Remove any existing graphics card from your computer.
3
If the old
graphics card
sticks, rock it
gently from end
to end.
Remember to
save the screw.
POWER SUPPLY
SCREW
EXISTINGGRAPHICS CARD
Or, if your computer has any on-board graphics capability, you may need to
disable it on the motherboard. For more information, see your computer
documentation.
3
Page 4

Locate the AGP/PCI slot. If necessary, remove the metal cover from this
4
slot; then align your RADEON™/RADEON™ VE with the
AGP/PCI slot, and press it in firmly until the card is fully seated.
Grasp the
RADEON™/
RADEON™
VE by the top
edge and
carefully seat it
into the
AGP/PCI slot.
Ensure that
the metal
contacts are
completely
pushed into
the slot.
Replace the screw to fasten the card in place, and replace the
5
computer cover.
ATI RADEON™/
RADEON™ VE CARD
AGP/PCI SLOT
SCREW
ATI RADEON™/
RADEON™ VE CARD
Plug the display cable into your card; then turn on the computer and
6
monitor. If your RADEON™/RADEON™ VE came with a DVI
connector, you can connect a flat panel display to the appropriate
connector, as shown below...
Make sure all
cables are
securely
connected.
TO VGA MONITOR
(ALL GRAPHICS CARDS)
TO FLAT PANEL DISPLAY
DISPLAY CABLE
(DVI-READY CARDS ONLY)
You are now ready to proceed with the installation of the ATI driver. For detailed
instructions, select your operating system from the list below:
®
• Windows
98 / Windows®Me, see Windows® “New Hardware Found”
on pag e5.
• Windows
®
2000, see page 6.
RADEON™/RADEON™ VE Getting Started... 4
Page 5

Windows®“New Hardware Found”
New hardware will be detected after you restart your computer. To finish setting
up your hardware click Ye s when prompted to restart
To identify new hardware in Windows®98 or Windows®Me
1 Windows®98 or Windows®Me may launch the “Update Device Driver
Wizard” to install the Standard VGA Driver. If it does, follow the step-bystep instructions below to allow Windows
hardware.
If the Wizard does not appear, proceed directly to Installing the ATI Driver for
Windows® 98, Windows® Me on page 5.
2 Click Next.
3 Click Finish.
®
4 Insert your Windows
5 Click OK.
6 Type the following:
D:\WIN98 or D:\WINME
(If D is not your CD-ROM drive, substitute D with the correct drive letter.)
98 or Windows®Me CD into your CD-ROM drive.
®
to correctly identify your new
7 Click OK.
8 Click Ye s to restart your computer.
You are now ready to install the ATI driver. Proceed to Installing the ATI
Driver for Windows® 98, Windows® Me on page 5, and follow the step-by-
step instructions to complete the installation.
Installing the ATI Driver for Windows®98, Windows®Me
With Windows®98 or Windows®Me running on your computer, you need to
install the ATI driver to take advantage of the higher performance, resolutions,
and special graphic features of the RADEON™/RADEON™ VE.
To ensure you install the latest driver, use the ATI Installation CD that shipped
with your RADEON™/RADEON™ VE.
To install the ATI driver for Windows®98 or Windows®Me
1 Insert the ATI INSTALLATION CD into your CD-ROM drive.
If Windows
2 Click Start.
®
runs the CD automatically, proceed to step 6.
3 Select Run.
4 Type the following:
D:\ATISETUP
(If D is not your CD-ROM drive, substitute D with the correct drive letter.)
5
Page 6

5 Click OK.
6 Click on AT I E a s y I n s ta l l to begin the Installation Wizard.
7 Click Next.
8 Click Ye s to the license agreement.
9 Follow the Wizard’s on-screen instructions to complete the installation.
The Express installation option is recommended. If your
RADEON™/RADEON™ VE includes a multimedia component, the software for
that component will automatically be installed, along with the ATI driver, by
selecting this option.
Installing the ATI Driver for Windows®2000
With Windows®2000 running on your computer, you need to install the ATI
driver to take advantage of the higher performance, resolutions, and special
graphic features of the RADEON™/RADEON™ VE.
To ensure you install the latest driver, use the ATI Installation CD that shipped
with your RADEON™/RADEON™ VE.
To install the ATI driver for Windows®2000
1 Insert the ATI INSTALLATION CD into your CD-ROM drive.
If Windows
2 Click Start.
3 Select Run.
4 Type the following:
D:\ATISETUP
(If D is not your CD-ROM drive, substitute D with the correct drive letter.)
5 Click OK.
6 Click on AT I E a s y I n s ta l l to begin the Installation Wizard.
7 Click Next.
8 Click Ye s to the license agreement.
9 Follow the Wizard’s on-screen instructions to complete the installation.
The Express installation option is recommended. If your
RADEON™/RADEON™ VE includes a multimedia component, the software for
that component will automatically be installed, along with the ATI driver, by
selecting this option.
®
runs the CD automatically, proceed to step 6.
RADEON™/RADEON™ VE Getting Started... 6
Page 7

Multiple Display Support: Windows®98, Windows®Me
IMPORTANT: Please read the Readme file on the ATI Installation CD for the
latest information regarding Multiple Display Support.
•
Troubleshooting Tips
The following troubleshooting tips may help if you experience problems.
Contact your dealer or AT I for more advanced troubleshooting information.
• Check that the card is seated properly in the AGP/PCI slot.
• Ensure the display cable is securely fastened to the card’s display connector.
• Make sure that the monitor and computer are plugged in and receiving power.
• If necessary, disable any built-in graphics capabilities on your motherboard.
For more information, consult your computer’s manual or manufacturer.
(NOTE: Some manufacturers do not allow the built-in graphics to be disabled
or to become the secondary display.)
• Make sure you selected the appropriate display device and graphics card
when you installed theATI driver.
• For more troubleshooting tips, right-click the ATI icon in the taskbar and
select Troubleshooting.
• If you have problems during bootup, start your computer in Safe Mode.In
®
Windows
Microsoft
98 and Windows®Me, press and hold the CTRL key until the
®
Windows®Startup Menu appears on the screen. Then select the
number for Safe Mode, and press Enter. (You can also use F8 to bring up the
®
Microsoft Windows
Startup Menu.) In Safe Mode, bring up the Device
Manager and check for duplicate display adapter and monitor entries if you
are only using one graphics card.
• For more assistance, use the Troubleshooting Guide locatedinthe
Windows® Help or contact your computer manufacturer.
• To contact ATI Technical Assistance, see your Technical Support and
Warranty Service guide
7
Page 8

Using the Online Manual
The RADEON™/RADEON™ VE comes with an online manual that describes
its advanced features. The Online Manual provides reference, specification,
disclaimer, legal, and compliance information that is not contained in this
Getting Started guide.
ToopentheOnlineManual
1 Insert the ATI INSTALLATION CD into your CD-ROM drive.
If Windows
2 Click Start.
3 Select Run.
4 Type the following:
D:\ATISETUP
(If D is not your CD-ROM drive, substitute D with the correct drive letter.)
5 Click OK.
6 Click Online User Manual.
®
runs the CD automatically, proceed to step 6.
AT I is a registered trademark of ATI Technologies Inc. in Canada, the United States
and/or other countries. RADEON is a trademark of ATI Technologies Inc. in Canada, the
United States, and/or other countries. Windows is a registered trademark of Microsoft
Corporation in the United States and/or other countries. All other trademarks and/or
registered trademarks are the properties of their respective owners.
© Copyright 2000, ATI Technologies Inc.
RADEON™/RADEON™ VE Getting Started... 8
P/N: 117-40128-20
Printed in Canada
Page 9

9
 Loading...