

Page 1

HYDRAVISION
™
User’s Guide
P/N 137-40319-40
Copyright © 2002, ATI Technologies Inc. All rights reserved.
ATI and all ATI product and product feature names are trademarks and/or registered trademarks
of ATI Technologies Inc. All other company and/or product names are trademarks and/or
registered trademarks of their respective owners. Features, performance and specifications are
subject to change without notice. Product may not be exactly as shown in the diagrams.
Reproduction of this manual, or parts thereof, in any form, without the express written
permission of ATI Technologies Inc. is strictly prohibited.
Page 2

Disclaimer
While every precaution has been taken in the preparation of this
document, ATI Technologies Inc. assumes no liability with respect to
the operation or use of ATI hardware, software or other products and
documentation described herein, for any act or omission of ATI
concerning such products or this documentation, for any interruption
of service, loss or interruption of business, loss of anticipatory profits,
or for punitive, incidental or consequential damages in connection
with the furnishing, performance, or use of the ATI hardware,
software, or other products and documentation provided herein.
ATI Technologies Inc. reserves the right to make changes without
further notice to a product or system described herein to improve
reliability, function or design. With respect to ATI products which this
document relates, ATI disclaims all express or implied warranties
regarding such products, including but not limited to, the implied
warranties of merchantability, fitness for a particular purpose, and
non-infringement.
ii
Page 3

Table Of Contents
Introduction. . . . . . . . . . . . . . . . . . . . . . . . . . . . . . . . . . 1
Installing HYDRAVISION .................................................................... 2
HYDRAVISION for
Windows®2000/Windows® XP . . . . . . . . . . . . . . . . . . 5
HYDRAVISION Properties........................................................................ 6
Desktop Management Controls .............................................................. 6
Dialog control......................................................................................... 7
Window control...................................................................................... 7
General ................................................................................................... 8
To enable Individual Applications
Settings via the Desktop Manager........................................................ 10
To enable Individual Applications Settings
using the HYDRAVISION titlebar button ........................................... 11
Exclusions ............................................................................................ 12
Hot Keys Controls ................................................................................ 13
Create/Remove Hot Keys..................................................................... 14
Using Hot Keys .................................................................................... 15
HydraFX............................................................................................... 16
Transparency Control ........................................................................... 16
3D Controls .......................................................................................... 17
Always On Top .................................................................................... 17
Always Transparent.............................................................................. 18
Move to monitor................................................................................... 19
Restore to monitor ................................................................................ 19
Internet Explorer Feature...................................................................... 19
HYDRAVISION for
Windows®98SE/ Windows® Me . . . . . . . . . . . . . . . . 21
HYDRAVISION Properties...................................................................... 23
Desktop Management Controls ............................................................ 23
Dialog control....................................................................................... 23
Window control.................................................................................... 24
General ................................................................................................. 25
To enable Individual Applications
Settings via the Desktop Manager........................................................ 27
To enable Individual Applications Settings
using the HYDRAVISION titlebar button ........................................... 28
Exclusions ............................................................................................ 29
Hot Keys Controls ................................................................................ 30
Create/Remove Hot Keys..................................................................... 31
Using Hot Keys .................................................................................... 32
iii
Page 4

Always On Top .................................................................................... 33
Move to Monitor .................................................................................. 34
Restore to Monitor................................................................................ 34
Internet Explorer Feature...................................................................... 34
MultiDesk. . . . . . . . . . . . . . . . . . . . . . . . . . . . . . . . . . . 35
Accessing MultiDesk Properties .......................................................... 35
MultiDesk Properties............................................................................ 36
MagnifyFX . . . . . . . . . . . . . . . . . . . . . . . . . . . . . . . . . . 40
Magnification ....................................................................................... 40
Tracking................................................................................................ 40
Define Area .......................................................................................... 41
Copy to Clipboard ................................................................................ 41
iv
Page 5

Introduction
HYDRAVISION™ Multi-monitor Management
Software enables you to tailor your desktop to the way
you work, so you can manage increased amounts of
information and improve your productivity. Your
productivity is increased thanks to two aspects of
HYDRAVISION:
• Breadth - increase your desktop work space by using
up to two monitors.
• Depth - create multiple layers of desktop workspace
1
with MultiDesk.
Flexible and easy to use
Within minutes HYDRAVISION gives you the power to
manage independent monitor display features and:
• Determine the behavior of pop-up windows and
dialogs in different applications.
• Switch between desktop with a mouse click or "Hot
Key".
• Vary your settings from one application to the next.
• Customize the features of HYDRAVISION to an
application.
Increase your productivity
To increase your productivity even more, ATI has
introduced the following innovative features in
HYDRAVISION 3.2:
• Save and Restore Desktop Profiles
• MagnifyFX"
Page 6

2
Installing HYDRAVISION
• HYDRAVISION can easily be installed in the
following operating systems:
• Windows
• Windows
• Windows
• Windows
To install HYDRAVISION perform the following steps:
®
98SE
®
Me
®
2000
®
XP
1 Insert the ATI Installation CD into your CD-ROM drive
If Windows
step 6.
®
runs the CD automatically, proceed to
2 Click Start.
3 Select Run.
4 Type the following:
D:\ATISETUP
If D is not your CD-ROM drive, substitute D with
the correct drive letter.
5 Click OK.
6 Click on ATI Easy Install to start the Installation
Wizard.
7 Follow the ATI Setup program prompts to the Select
Components Dialog.
Page 7

8 Click Custom and then select HYDRAVISION and
3
any other components you wish to install.
The Select Components list may vary.
9 Reboot your system when prompted.
You are now ready to use the ATI Graphics Accelerator
and HYDRAVISION.
The first time HYDRAVISION is loaded a Wizard will
launch automatically and walk you through the
configuration process.
Page 8

4
However, the HYDRAVISION Wizard may be re-run at
any time by doing the following:
1 Click Start.
2 Click Programs.
3 Click AT I HYDRAVISION.
4 Click HYDRAVISION Wizard.
Page 9
HYDRAVISION for
5
Windows
®
2000/Windows
®
XP
HYDRAVISION installation creates a Windows®
program group for HYDRAVISION multi-monitor
management software.
HYDRAVISION and the Desktop Manager are activated
whenever Windows
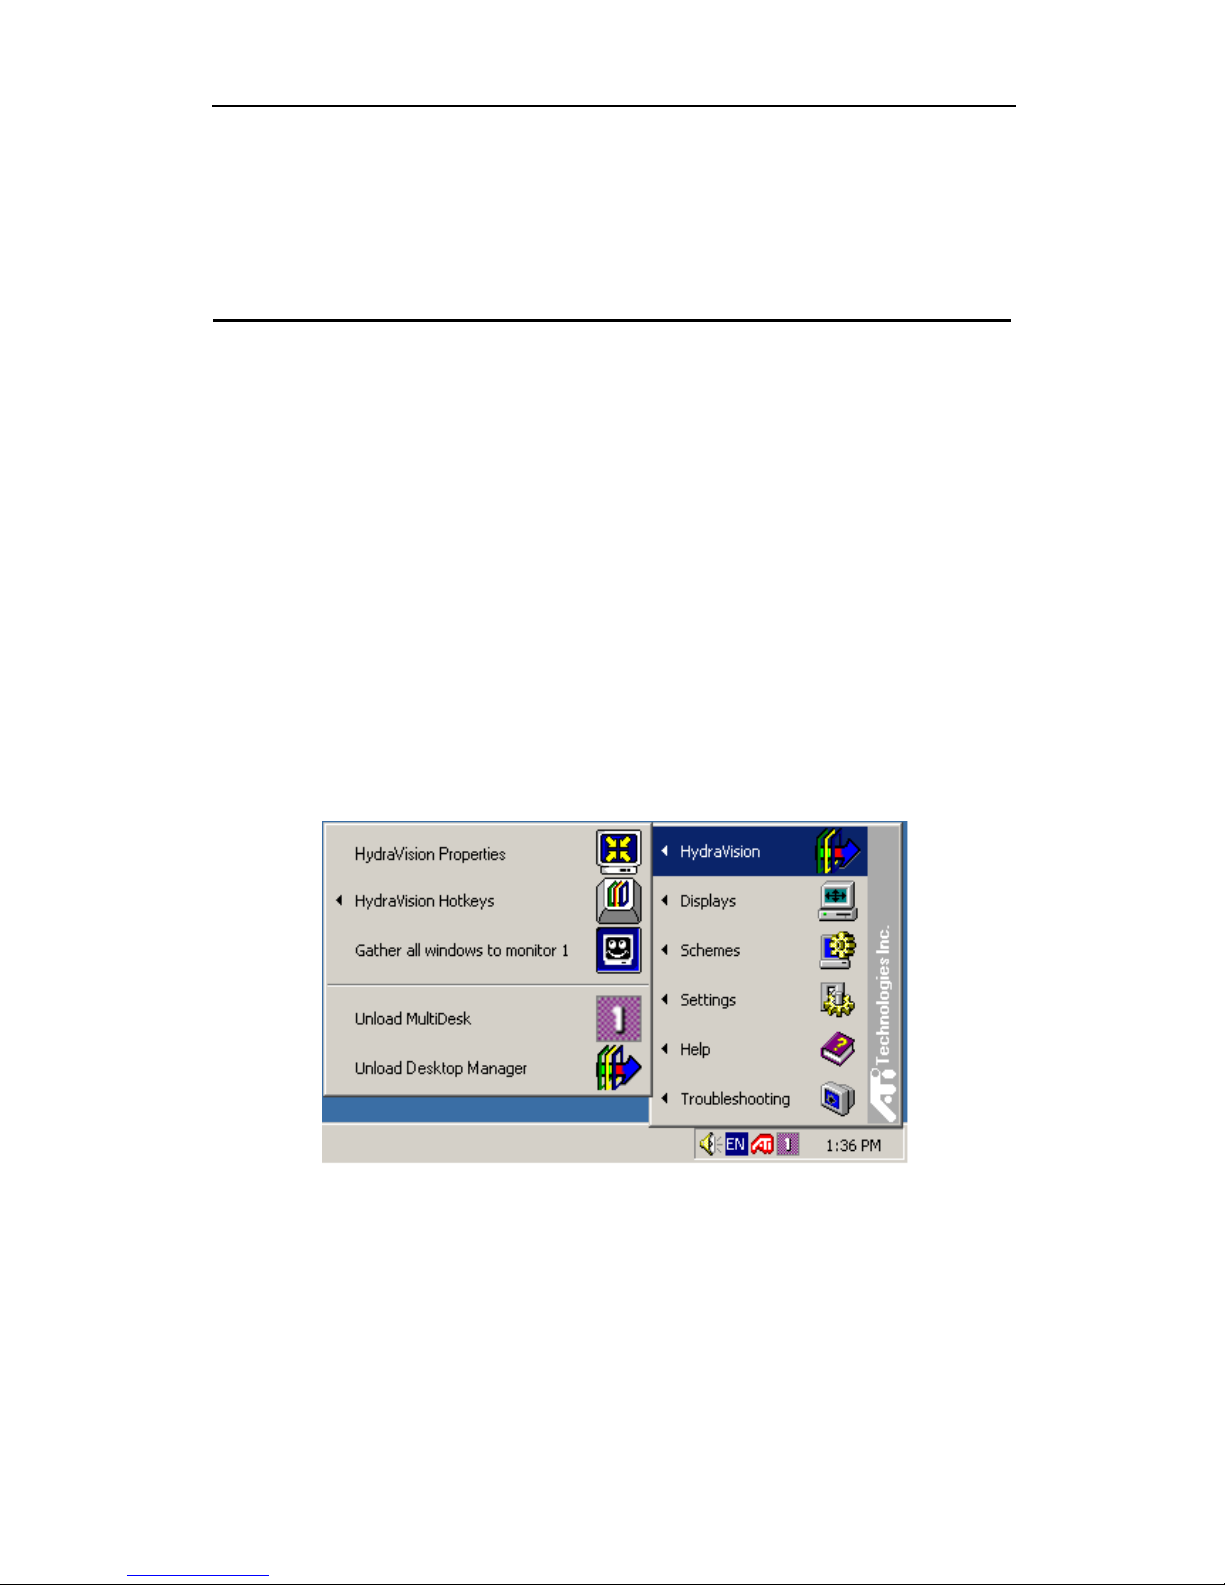
adds menu options to the ATI Icon.
Click on the ATI icon to access the application’s features
and help, or to unload the HYDRAVISION Desktop
Manager.
®
starts. Installing HYDRAVISION
The HYDRAVISION Desktop Manager allows you to
modify your display options. You can access the
Desktop Management and Hot Keys Dialogs by
clicking on the appropriate tab in the Desktop Manager.
Along the bottom of each HYDRAVISION Dialog are
four buttons: OK, Cancel, Apply and Help.
Accessing HYDRAVISION Desktop Manager
Page 10
6
OK implements the changes you’ve made in the
HYDRAVISION Dialog and exits the Desktop Manager.
Changes take effect immediately unless you see a
message prompting you to restart your computer.
Cancel discards all changes made to any section of the
HYDRAVISION Dialog and closes the Desktop
Manager.
Apply implements your changes without closing the
Desktop Manager.
Help opens HYDRAVISION’s online help. You can
also get context-sensitive on-screen help by moving your
mouse over the relevant text for each control.
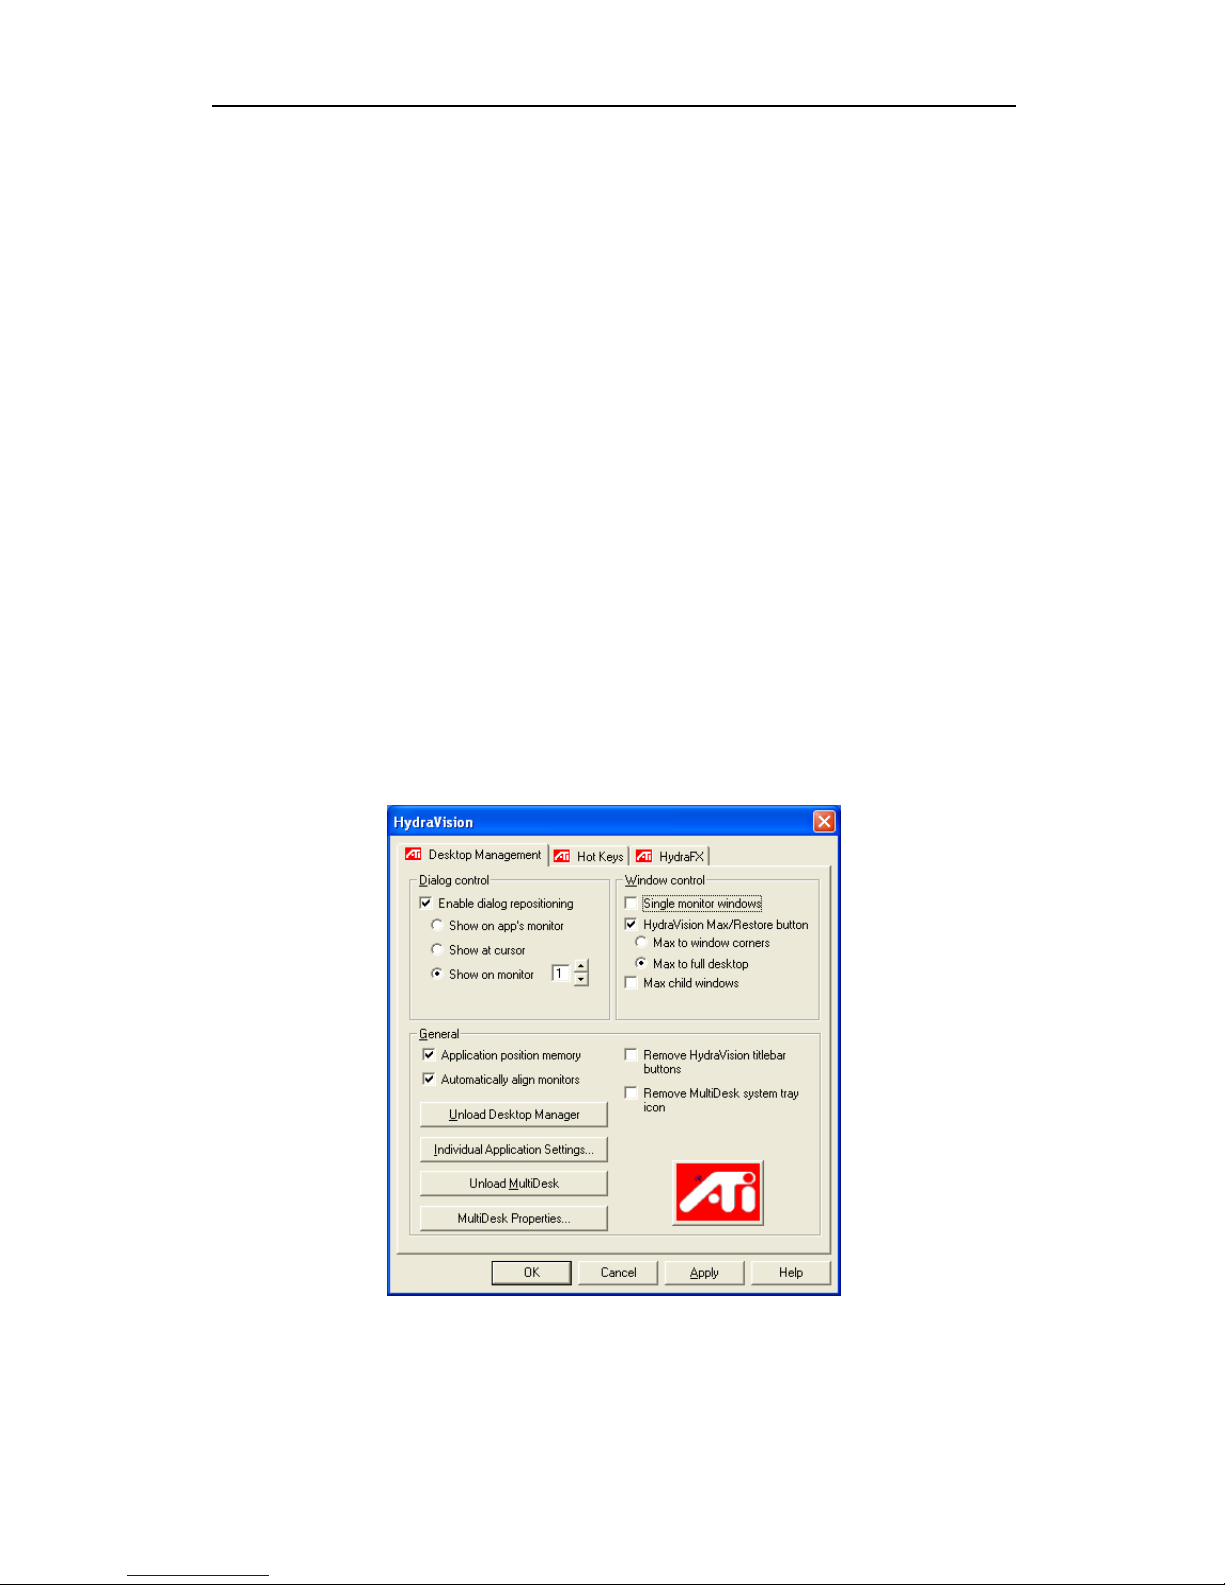
HYDRAVISION Properties
Desktop Management Controls
The Desktop Management Dialog lets you determine
the behavior of pop-up dialogs in a multiple monitor
environment.
The Desktop Management Dialog
Page 11

Dialog control
Enable dialog repositioning: Toggles dialog control on
and off. When it is checked, you can choose to have
dialogs appear on the parent application’s monitor. (The
parent application is the application that generated the
dialog.) If the parent application or associated monitor
cannot be located, the dialog defaults to monitor 1. You
can also choose to have dialogs appear on the monitor in
which the cursor is located or to always appear on a
specific monitor in the array.
Window control
7
Single monitor windows: When this box is checked,
windows are sized no larger than a single monitor.
Windows that are placed on monitor splits are
automatically relocated to the monitor on which most of
the window appears.
Max button management: (HYDRAVISION
Max/Restore button in Windows® XP.) Allows you to
control the behavior of the Max/Restore button. When
HYDRAVISION is running, a HYDRAVISION
Max/Restore button appears in the upper right corner of
your application title bar. Clicking this icon makes the
active window maximize in one of three ways:
• Max to window corners causes windows to
maximize to the monitor(s) that contain the
window’s upper left and lower right corners.
• Max to full desktop causes windows to maximize
to the entire monitor array.
• Max to current monitor (available in Windows
2000 only) causes windows to maximize to the
current monitor.
®
Page 12

8
General
Max child windows: Keeps windows generated by
parent applications from splitting across monitors. (A
child window is a window residing within a parent
application window.) The ability to keep child windows
on a single monitor when maximized is extremely useful
for editing multiple documents side by side in a parent
application.
The HYDRAVISION application titlebar icon changes
from a single square to two smaller squares when a
window is in a HYDRAVISION maximized state.
Clicking the icon again restores the active window to its
default state as a single square.
Application position memory: Check this box to
“remember” the size and location of application
windows when they are closed and reapply those settings
when the application is reopened.
Boot to single monitor: (Windows
®
2000 only) Check
this box to enable a single monitor only when the
computer starts. All other connected devices will be
disabled.
Extended Desktop must be enabled before the computer
is restarted.
Automatically align monitors: (Windows® XP only)
Monitor placement can be manually defined in the
Settings Dialog of the Display Properties. However,
when the Automatically align monitors box is checked,
HYDRAVISION will override the user-defined monitor
placement setting if the monitors are not evenly aligned.
Remove HYDRAVISION title bar buttons: This box
removes or restores the ATI buttons placed on the
titlebar in installed applications.
Page 13

Remove MultiDesk system tray icon: This box
removes or restores the MultiDesk system tray icon.
ATI Logo: Click here to access the About Dialog which
provides software version information and a link to the
ATI Technologies website.
Load/Unload Desktop Manager: This button starts or
stops the HYDRAVISION Desktop Manager tracking
program. You should only stop this option if you do not
want to use any multiple monitor dialog box controls and
window controls or hot keys.
Desktop Manager will not reload automatically when
®
Windows
restarts. You will need to reload Desktop
Manager from the Desktop Management dialog box.
9
Load/Unload MultiDesk: This button starts or stops
multiple desktop functionality.
MultiDesk will not reload automatically when
®
Windows
restarts. You will need to reload MultiDesk
from the Desktop Management dialog box.
MultiDesk Properties: This button gives access to all
the MultiDesk Properties. Here you enable, disable and
name active desktops.
Individual Application Settings: This button allows
you to specify, enable and disable desktop management
settings for individual applications. You can access these
settings by clicking on the down arrow of the
HYDRAVISION icon in the application title bar or by
clicking the Individual Application Settings button in
the Desktop Management Dialog.
Page 14

10
To enable Individual Applications
Settings via the Desktop Manager
These settings override the global settings defined in the
Desktop Management Dialog.
1 Click on the Individual Application Settings button.
2 All open applications will appear in the Individual
settings not enabled Dialog.
3 Drag the desired application to the Individual settings
enabled Dialog.
4 With the application highlighted click Enable
individual application settings.
The name of the application will appear in the top of the
HYDRAVISION Individual Application Settings
Dialog.
5 Click Change Settings to open the HYDRAVISION
Individual Application Settings Dialog.
6 Select the settings you wish to apply to the application
and click OK in the next two dialogs to apply the
changes.
Make certain that Enable individual desktop
management settings for this application is selected.
Page 15

To enable Individual Applications Settings
using the HYDRAVISION titlebar button
1 Open the Individual Application Settings Dialog by
clicking the Individual application Settings button:
11
Text in green reflects Desktop Management settings.
2 Click OK to apply the settings you selected for your
application.
Individual Application Settings Dialog
Page 16

12
Exclusions
This feature allows you to exclude HYDRAVISION
settings from being applied to a specific application or
unload HYDRAVISION completely when a specific
application is started.
To exclude HYDRAVISION settings:
1 Open HYDRAVISION Desktop Management.
2 Click Individual Application Settings button.
3 Click Exclusions button.
4 Click Add button.
5 Browse to the application.
6 Click Open button.
The application will appear in the Excluded
applications Dialog.
7 Click OK to apply the change.
To exclude HYDRAVISION when a specific application is started:
1 Open HYDRAVISION Desktop Management.
2 Click Individual Application Settings button.
3 Click Exclusions button.
4 Click Add button.
5 Browse to the application.
6 Click Open button.
The application will appear in the Excluded
applications Dialog.
7 Double click the application in the Excluded
applications Dialog.
Page 17

8 Click Unload HYDRAVISION in the Edit exclusion
level Dialog.
9 Click OK to apply the setting.
The application will appear in red text in the Excluded
applications Dialog.
HYDRAVISION will not automatically restart when the
application closes. You will need to manually restart
HYDRAVISION.
Hot Keys Controls
HYDRAVISION allows you to specify hot key shortcuts
for common operations such as starting applications,
13
snapping applications to designated monitors, and
changing display resolution.
Hot Keys only work if HYDRAVISION is installed and
loaded.
The Hot Keys Dialog
Page 18

14
Create/Remove Hot Keys
To create custom hot key sequences, select a Modifier
key (Shift, Alt, etc.), a Hot key, and the Hot key
function you want this key combination to perform.
Click Add to enter your new combination in the
Assigned hot keys list box. Click Apply to activate the
assigned hot keys.
ATI recommends that a modifier key be used with any
function key (F1, F2, etc.) assigned as a hot key. This
will prevent interference with the function of these keys
in individual applications.
To delete a hot key from the Assigned hot keys list box,
highlight it, click Remove, and then click Apply.
You can also disable all hot keys listed in the Assigned
hot keys list box by checking the Disable hot keys box
near the bottom of the Hot Keys Dialog.
Page 19

Using Hot Keys
You can use any assigned hot key at any time, from
within any application, to change your display.
Hot key functions include:
Snap App to Monitor
HYDRAVISION Pop-up
Menu
Run Application
Gather All Windows to
Monitor 1
Find Cursor
Zoom Display In/Out
Zoom In/Out on
Monitor
Switch to Desktop
scheme
Next Desktop
Previous Desktop
Jump to Desktop
Move Application to
Desktop
Restore and Tile
Windows
Minimize all apps on
current monitor
Maximize app to
Monitor
Start MagnifyFX...
15
Moves or “snaps” active dialogs from
monitor to monitor for quick
placement and viewing of desktop
contents.
Allows on-the-fly access to
HYDRAVISION controls.
Starts any application with a hot key.
Finds applications that are hidden or
are open and lost on disabled
monitors.
Locates the cursor on a busy or
crowded desktop.
Causes the desktop resolution to
increase or decrease.
Causes the resolution of the active
monitor to increase or decrease.
Switches from one pre-defined
desktop scheme to another
Moves up to the next active desktop.
Moves down to the next active
desktop.
Jumps to a predetermined desktop.
Moves an active application to a
predetermined desktop.
Tiles all open applications on one
display.
Minimizes all open applications on
the current monitor
Maximizes minimized applications to
a predetermined monitor.
Starts MagnifyFX
Page 20

16
HydraFX
HydraFX is only available in Windows® 2000 and
Windows
HYDRAVISION HydraFX adds visual enhancements to
your desktop.You can control the transparency of
windows and application drop-down menus and gives a
window depth by enabling Shadow support.
®
XP.
HydraFX
Transparency Control
Enable Transparency while dragging windows:
Check this box to enable the Visibility slider. Use the
slider to set the degree of Visibility a window has when
being dragged across the display.
Enable Transparent menus: Check this box to enable
the Visibility slider. Use the slider to set the degree of
visibility application drop-down menus has.
Enable Window fade-in: Check this box to cause an
application window to slowly open or ‘fade-in’ to your
desktop.
Page 21

3D Controls
Enable Shadow Support: Check this box to enable the
Shadow support sliders. The Visibility slider sets the
degree of visibility of the shadow. The Shadow size
slider sets the size of the shadow added to an application
dialog.
Always On Top
This feature allows you to keep a specific application on
top of other open applications, even if another
application is opened or moved on your desktop.
• To enable Always on Top right-click the titlebar of
17
the required application and click Always on Top in
the pop-up menu.
This feature remains enabled with the application even
when it is closed. The next time the application is started
it will appear on top of all open applications.
• To disable Always on Top right-click the
application’s titlebar and click Always on Top.
Page 22

18
If a second instance of the same application is opened
when Always on Top has been enabled, the second
instance will appear on top of the first. You will be able
to switch between the two instances as though Always
on Top was disabled. However, any other opened
application will appear underneath the application that
has Always on Top enabled.
Always Transparent
This feature applies a degree of transparency preset in
the HydraFX Dialog for a specific application. This
setting is applied regardless of how Transparency is
configured in the HydraFX Dialog. However, you can
change the degree of transparency in the HydraFX
Dialog.
• Right-click the titlebar of the application you wish to
apply this setting and click Always Transparent in
the pop-up menu.
This feature remains enabled with the application even
when it is closed. The next time the application is started
it will have the same transparency settings as it did when
it was closed.
• To disable Always Transparent right-click the
application’s titlebar and click Always Transparent.
If a second instance of the same application is opened
when Always Transparent has been enabled, the second
instance will have the same transparency settings applied
to it. Disabling Always Transparent of one instance will
disable it in all other instances.
Page 23

Move to monitor
This feature allows you to move an application dialog to
a specific monitor. To do so:
1 Right-click the application titlebar.
2 Select the preferred monitor from the drop-down menu.
Restore to monitor
This feature allows you to specify which monitor a
minimized application will open on. To do so:
1 Right-click a minimized application.
2 Select the preferred monitor from the pop-up menu.
19
Internet Explorer Feature
In a multi-monitor environment, HYDRAVISION
extends the capabilities of Internet Explorer. By rightclicking on a hyperlink, you can choose which monitor
the new page will open on. To do so:
1 Open Internet Explorer.
2 Surf to your favorite website.
3 Right-click a hyperlink.
4 Select the preferred monitor from the drop-down menu.
Double right-click a hyperlink to automatically open it in
a new window on the original display.
Page 24

20
Page 25

HYDRAVISION for
®
Windows
Windows
HYDRAVISION installation creates a Windows®
program group for HYDRAVISION display
management software.
HYDRAVISION and the Desktop Manager are
activated whenever Windows
HYDRAVISION adds menu options to the ATI Icon.
98SE/
®
Me
®
starts. Installing
21
Click on the ATI icon to access the application’s
features and help, or to unload the HYDRAVISION
Desktop Manager.
Accessing HYDRAVISION Desktop Manager
Page 26

22
The HYDRAVISION Desktop Manager allows you to
modify your display options. You can access the
Desktop Management and Hot Keys Dialog by
clicking on the appropriate tab in the Desktop
Manager.
Along the bottom of each HYDRAVISION Dialog are
four buttons: OK, Cancel, Apply and Help.
OK implements the changes you’ve made in the
HYDRAVISION Dialog and exits the Desktop
Manager. Changes take effect immediately unless you
see a message prompting you to restart your computer.
Cancel discards all changes made to any section of the
HYDRAVISION Dialog and closes the Desktop
Manager.
Apply implements your changes without closing the
Desktop Manager.
Help opens HYDRAVISION’s online help. You can
also get context-sensitive on-screen help by moving
your mouse over the relevant text for each control.
Page 27

HYDRAVISION Properties
Desktop Management Controls
23
The Desktop Management Dialog lets you determine
the behavior of pop-up dialogs in a multiple monitor
environment.
Dialog control
Enable dialog repositioning: Toggles dialog control on
and off. When it is checked, you can choose to have
dialogs appear on the parent application’s monitor. (The
parent application is the application that generated the
dialog.) If the parent application or associated monitor
cannot be located, the dialog defaults to monitor 1. You
can also choose to have dialogs appear on the monitor in
which the cursor is located or to always appear on a
specific monitor in the array.
The Desktop Management Dialog
Page 28

24
Window control
Single monitor windows: When this box is checked,
windows are sized no larger than a single monitor.
Windows that are placed on monitor splits are
automatically relocated to the monitor on which most of
the window appears.
HYDRAVISION Max/Restore button management:
Allows you to control the behavior of the Windows®
Maximize button. When HYDRAVISION is running, a
HYDRAVISION Max/Restore button appears in the
upper right corner of your application title bar. Clicking
this icon makes the active window maximize in one of
two ways:
• Max to window corners causes windows to
maximize to the monitor(s) that contain the
window’s upper left and lower right corners.
• Max to full desktop causes windows to maximize
to the entire monitor array.
Max child windows: Keeps windows generated by
parent applications from splitting across monitors. (A
child window is a window residing within a parent
application window.) The ability to keep child windows
on a single monitor when maximized is extremely useful
for editing multiple documents side by side in a parent
application.
The HYDRAVISION application titlebar icon changes
from a single square to two smaller squares when a
window is in a HYDRAVISION maximized state.
Clicking the icon again restores the active window to its
default state as a single square.
Page 29

General
Application position memory: Check this box to
“remember” the size and location of application dialogs
when they are closed and reapply those settings when
the application is reopened.
Automatically align monitors: You can manually
define monitor placement from the Settings Dialog in
the Display Properties Dialog When Automatically
align monitors is checked, HYDRAVISION will
override user-defined monitor placement if the monitors
are not evenly aligned.
This control will work only if all monitors are running at
the same resolution and your desktop is configured as a
25
rectangle (monitors side-by-side).
Remove HYDRAVISION titlebar buttons: This box
removes or restores the buttons placed on the titlebar in
installed applications.
Remove MultiDesk system tray icon: This box
removes or restores the MultiDesk system tray icon.
ATI Logo: Click here to access the About Dialog which
provides software version information and a link to the
ATI Technologies website.
Load/Unload Desktop Manager: This button starts or
stops the HYDRAVISION Desktop Manager tracking
program. Unloading the Desktop Manager returns
display settings to Windows® 98SE and Windows® Me
defaults. You should only select this option if you do not
want to use any multiple monitor dialog controls and
window controls or hot keys.
Desktop Manager will not reload automatically when
Windows
Manager from the Desktop Management Dialog.
®
restarts. You will need to restart Desktop
Page 30

26
Load/Unload MultiDesk: This button starts or stops
multiple desktop functionality.
MultiDesk will not reload automatically when
Windows® restarts. You will need to restart MultiDesk
from the Desktop Management Dialog.
MultiDesk Properties: This button gives access to all
the MultiDesk Properties. Here you can enable, disable
and name active desktops.
Individual Application Settings: This button allows
you to specify, enable and disable desktop management
settings for individual applications. You can access these
settings by clicking on the down arrow of the
HYDRAVISION icon in the application title bar or by
clicking the Individual Application Settings button in
the Desktop Management Dialog.
Page 31

27
To enable Individual Applications
Settings via the Desktop Manager
These settings override the global settings defined in the
Desktop Management Dialog.
1 Click on the Individual Application Settings
button.
2 All open applications will appear in the Individual
settings not enabled Dialog.
3 Drag the desired application to the Individual settings
enabled Dialog.
4 With the application highlighted click Enable
individual application settings.
The name of the application will appear in the top of the
HYDRAVISION Individual Application Settings
Dialog.
5 Click Change Settings to open the HYDRAVISION
Individual Application Settings Dialog.
6 Select the settings you wish to apply to the application
and click OK in the next two dialogs to apply the
changes.
Make certain that Enable individual desktop
management settings for this application is selected.
Page 32

28
To enable Individual Applications Settings
using the HYDRAVISION titlebar button
1 Open the Individual Application Settings Dialog by
clicking the Individual application Setting button.
Text in green reflects Desktop Management settings.
2 Click OK to apply the settings you selected for your
application.
Individual Application Settings Dialog
Page 33

Exclusions
This feature allows you to exclude HYDRAVISION
settings from being applied to a specific application or
unload HYDRAVISION completely when a specific
application is started.
To exclude HYDRAVISION settings:
1 Open HYDRAVISION Desktop Management.
2 Click Individual Application Settings button.
3 Click Exclusions button.
4 Click Add button.
29
5 Browse to the application.
6 Click Open button.
The application will appear in the Excluded applications
Dialog.
7 Click OK to apply the change.
To exclude HYDRAVISION when a specific application is started:
1 Open HYDRAVISION Desktop Management.
2 Click Individual Application Settings button.
3 Click Exclusions button.
4 Click Add button.
5 Browse to the application.
6 Click Open button.
The application will appear in the Excluded applications
Dialog.
7 Double click the application in the Excluded
applications Dialog.
Page 34

30
8 Click Unload HYDRAVISION in the Edit exclusion
level Dialog.
9 Click OK to apply the setting.
The application will appear in red text in the Excluded
applications Dialog.
HYDRAVISION will not automatically restart when the
application closes. You will need to manually restart
HYDRAVISION.
Hot Keys Controls
HYDRAVISION allows you to specify hot key shortcuts
for common operations such as starting applications,
snapping applications to designated monitors, and
changing display resolution.
Hot Keys only work if HYDRAVISION is installed and
loaded.
The Hot Keys Dialog
Page 35

Create/Remove Hot Keys
To create custom hot key sequences, select a Modifier
key (Shift, Alt, etc.), a Hot key, and the Hot key
function you want this key combination to perform.
Click Add to enter your new combination in the
Assigned hot keys list box. Click Apply to activate
assigned hot keys.
ATI recommends that a modifier key be used with any
function key (F1, F2, etc.) assigned as a hot key. This
will prevent interference with the function of these keys
in individual applications.
To delete a hot key from the Assigned hot keys list box,
highlight it, click Remove, and then click Apply.
31
You can also disable all hot keys listed in the Assigned
hot keys list box by checking the Disable hot keys box
near the bottom of the Hot Keys Dialog.
Page 36

32
Using Hot Keys
You can use any assigned hot key at any time, from
within any application, to change your display.
Hot key functions include:
Snap App to Monitor
HYDRAVISION Pop-up
Menu
Run Application
Gather All Windows to
Monitor 1
Find Cursor
Zoom Display In/Out
Zoom In/Out on
Monitor
Switch to desktop
scheme
Next Desktop
Previous Desktop
Jump to Desktop
Move Application to
Desktop
Restore and Tile
Windows
Minimize all apps on
current monitor
Maximize app to
Monitor
Starting MagnifyFX...
Moves or “snaps” active dialogs from
monitor to monitor for quick
placement and viewing of desktop
contents.
Allows on-the-fly access to
HYDRAVISION controls.
Starts any application with a hot key.
Finds applications that are hidden or
are open and lost on disabled
monitors.
Locates the cursor on a busy or
crowded desktop.
Causes the desktop resolution to
increase or decrease.
Causes the resolution of the active
monitor to increase or decrease.
Switches from one pre-defined
desktop scheme to another.
Moves up to the next active desktop.
Moves down to the next active
desktop.
Jumps to a predetermined desktop.
Moves an active application to a
predetermined desktop.
Tiles all open applications on one
display.
Minimizes all open applications on
the current monitor
Maximizes minimized applications to
a predetermined monitor.
Starts MagnifyFX
Page 37

Always On Top
This feature allows you to keep a specific application on
top of other open applications, even if another application
is opened or moved on your desktop.
• To enable Always on Top right-click the titlebar of
the required application and click Always on Top in
the pop-up menu.
33
This feature remains enabled with the application even
when it is closed. The next time the application is started
it will appear on top of all open applications.
• To disable Always on Top right-click the
application’s titlebar and click Always on Top.
If a second instance of the same application is opened
when Always on Top has been enabled, the second
instance will appear on top of the first. You will be able
to switch between the two instances as though Always on
Top was disabled. However, any other opened
application will appear underneath the application that
has Always on Top enabled.
Page 38

34
Move to Monitor
This feature allows you to move an application dialog to a
specific monitor. To do so:
1 Right-click the application titlebar.
2 Select the preferred monitor from the drop-down menu.
Restore to Monitor
This feature allows you to specify which monitor a
minimized application will open on. To do so:
1 Right-click a minimized application.
2 Select the preferred monitor from the pop-up menu.
Internet Explorer Feature
In a multi-monitor environment, HYDRAVISION extends
the capabilities of Internet Explorer. By right-clicking on a
hyperlink, you can choose which monitor the new page
will open on. To do so:
1 Open Internet Explorer.
2 Surf to your favorite website.
3 Right-click a hyperlink.
4 Select the preferred monitor from the drop-down menu.
Double right-click a hyperlink to automatically open it in a
new window on the originating display.
Page 39

MultiDesk
HYDRAVISION software supports multiple desktops.
With MultiDesk, one active desktop will always be
visible, while up to eight active desktops can reside in
the background. When MultiDesk is running, the
MultiDesk icon in the system tray displays the number
assigned to the current desktop.
MultiDesk is installed with HYDRAVISION. However,
multiple desktop support and HYDRAVISION can be
loaded/unloaded and operated independently of each
other.
35
Accessing MultiDesk Properties
MultiDesk can be accessed in several ways. Click on the
MultiDesk Properties button in the Desktop Management
tab or right-click the MultiDesk Icon.
MultiDesk Icon
MultiDesk System Tray Icon
The MultiDesk icon also gives you quick access to all of
the MultiDesk features and to quickly move to a different
desktop. In addition to accessing active desktops from
the system tray, you can also access active desktops with
a Hot key shortcut.
Hot Keys only work if HYDRAVISION is installed and
loaded.
MultiDesk functionality can be removed by selecting
Unload MultiDesk from the pop-up menu of the ATI
Icon or the Desktop Manager.
Page 40

36
MultiDesk will not reload automatically when
®
Windows
restarts. You will need to reload MultiDesk
from the Desktop Manager.
MultiDesk Properties
MultiDesk Properties allows you to control up to nine
desktops. In addition, each desktop can be saved and
restored at any time. Saving a desktop will also save any
open applications. When a saved desktop is restored so
are the applications that were open when the desktop was
saved.
You can also give a desktop a unique name. Doubleclick a desktop tab. The tab will turn grey and a blinking
cursor will appear. Simply type in the new name. When
you have renamed the desktop click on the tab to save the
change.
Switching from one desktop to another can be
achieved simply by right-clicking the MultiDesk icon
and selecting the desired desktop.
You can also switch desktops while in MultiDesk
Properties:
1 Click a Desktop tab.
2 Click Switch to this Desktop button.
The MultiDesk Properties can be transformed into a
floating tool by double-clicking the titlebar. Simply click
the number of the desktop you want to change to.
Double-click the titlebar to return to the MultiDesk
Properties dialog.
Finally, you can cycle through the desktops by clicking
on the MultiDesk icon in the taskbar.
Page 41

37
Set Desktop State allows you to set a specific desktop
Active, Inactive, or Disabled. Inactive desktops MAY
contain open applications; however, they are temporarily
disabled. Disabled desktops cannot contain any
applications. If an Active or Inactive desktop that
contains applications is disabled, the application will be
automatically moved to an Active desktop.
Keep on all desktops allows you to have a selected
application visible on all desktops. Click on an
application in the Active Applications window and check
Keep on all desktops.
Save, Restore, and Remove Desktop Profiles allows
you to save a specific or all desktops which can then be
restored at any time. Any open applications will be saved
with the desktop profile. When the desktop profile is
restored these applications will also be restored.
To save a desktop profile:
1 Open MultiDesk Properties.
2 Click Save in the Desktop Profiles box.
or
1 Right-click the MultiDesk icon in the Windows
taskbar.
®
2 Select Save desktop.
3 Click a specific desktop or All Desktops to save all
Desktop Profiles.
To restore a desktop profile:
1 Open MultiDesk Properties.
2 Click Restore in the Desktop Profiles box.
or
Page 42

38
1 Right-click the MultiDesk icon in the Windows
taskbar.
®
2 Select Restore desktop.
3 Click a specific desktop or All Desktops to restore all
Desktop Profiles.
To remove a saved desktop profile:
1 Open MultiDesk Properties.
2 Click Remove in the Desktop Profiles box.
or
1 Right-click the MultiDesk icon in the Windows
taskbar.
®
2 Select Remove saved desktop.
3 Click a specific desktop or All Desktops to remove all
saved Desktop Profiles.
Apply actions to all Desktops
When selected, all desktops can be saved, restored, or
removed with a single click of the mouse.
Clear Desktop allows you to move all open applications
to Desktop 1 or any specified active desktop.
To Clear Desktop:
1 Open MultiDesk Properties.
2 Click Clear Desktop.
or
1 Right-click the MultiDesk icon in the Windows
taskbar.
®
2 Select Clear Desktop.
3 Click a specific desktop or All Desktops to move all
open applications to Desktop 1.
Page 43

If Apply actions to all Desktops is enabled, Clear
Desktop will move all open applications to the first
active desktop.
Set Background gives you immediate access to the
®
Windows
display properties where you can change the
desktop background.
To Set Background:
1 Open MultiDesk Properties.
2 Click Set Background.
or
39
1 Right-click the MultiDesk icon in the Windows
®
taskbar.
2 Click Set Background.
Number of Desktops to use allows you to restrict the
maximum number of available virtual desktops.
1 Open MultiDesk Properties.
2 Select the maximum number of desktops from the drop-
down menu.
Switch Desktops with mousewheel when enabled,
allows you to scroll through your active desktops using
the mouse scroll wheel.
Page 44

40
MagnifyFX
MagnifyFX allows you to zoom into a specific area of
the desktop. The area of magnification is completely
adjustable. Magnified areas can be copied to the
clipboard and the contents pasted into almost any
graphics or word processing application.
MagnifyFX can be accessed through the
HYDRAVISION Properties:
1 Click HydraFX tab.
2 Click Start MagnifyFX... button.
Magnification
The degree of magnification can be adjusted up to 32
times the original size of an image.
To increase magnification
Move the Magnification slider to the right.
Tracking
Tracking allows you to change the way your desktop is
magnified.
Follow Cursor magnifies the area immediately
surrounding the cursor. Moving the cursor around the
desktop changes the MagnifyFX window contents.
Fixed Area allows you to define a specific area of the
desktop to be magnified.
1 Select Fixed Area.
2 Click Define Area button.
3 Place the cursor on the desired location of the desktop.
Page 45

4 Click and drag until the box surrounds the object(s) to
be magnified.
5 Release the mouse button.
Follow Box causes the cursor to become a visible box.
The area within the box is magnified in the MagnifyFX
window.
Transparent causes a transparent box to appear in the
center of the MagnifyFX window as you move the
window around your desktop. When you stop moving
the MagnifyFX window, the area within the transparent
box is magnified to fill the entire MagnifyFX window.
This feature requires that Show window contents while
dragging is enabled in the Display Properties Effects
41
tab.
Define Area
The Define Area button allows you to define the area of
magnification.
1 Click Define Area.
2 Click and drag to the desired size.
3 Release mouse button.
Copy to Clipboard
Copy to Clipboard copies the contents of the MagnifyFX
window onto the clipboard. The contents can then be
pasted into almost any graphics application or word
processor.
Page 46

42
 Loading...