

Page 1

User's Guide
Page 2

2
D
ISCLAIMER
The manufacturer (MFR) reserves the right to make changes to this
document and the products which it describes without notice. The
MFR shall not be liable for technical or editorial errors or
omissions made herein; not for incidental or consequential
damages resulting from the furnishing, performance, or use of this
material.
The MFR makes no representation that the interconnection of
products in the manner described herein will not infringe on
existing or future patent rights, nor do the descriptions contained
herein imply the granting of license to make, use or sell equipment
constructed in accordance with this description.
The PCI accelerators have been designed to support the PCI local
bus standards. Some computers use proprietary local bus circuitry
and therefore may not be fully compatible with the MFR’s local
bus cards. Although tested successfully in a wide variety of
computer systems, the MFR cannot be held responsible for any
incompatibilities which may occur between this card and the
system configuration you plan to use. We recommend that you
check with the dealer or distributor for your computer system
before installing your card.
© Copyright 1999 Fire GL Graphics. All rights reserved
Page 3

Table of Contents
3
1A
BOUT FIRE
GL1................................................... 5
H
ARDWARE FEATURES
............................................................6
S
OFTWARE FEATURES
.............................................................6
P
ROFESSIONAL
3D R
ENDERING
............................................7
C
ARD LAYOUT
........................................................................8
2H
OW TO USE THIS MANUAL
................................ 9
M
ANUAL CONVENTIONS
.......................................................9
3I
NSTALLING FIRE
GL1............................................ 10
I
NSTALLING THE HARDWARE
................................................10
Preparing your Computer..........................................11
Opening the Computer Cabinet ..............................13
Installing the Card.........................................................14
Reassembling Your Computer..................................15
Connecting the Monitor Cable.................................16
After Installing the Card ............................................. 17
I
NSTALLING SOFTWARE
..........................................................19
General Information ....................................................19
Software Installation for Windows NT4.0............. 20
4F
IRE
GL
1
SOFTWARE UTILITIES
............................ 22
C
HANGING THE VIDEO SETTINGS
........................................23
Setting Resolution and Color Depth.......................24
Choosing Monitors and Display Refresh Rates ....25
Adjusting the Monitor Display .................................. 27
Setting Multiple Monitor Configuration.................. 31
M
ODIFYING APPLICATION PROFILES
.....................................33
5R
EMOVING THE FIRE
GL1 D
RIVERS
..................... 36
Page 4

Table of Contents
4
6 T
ROUBLESHOOTING
...............................................37
C
OMMON PROBLEMS AND SOLUTIONS
............................... 37
A T
ECHNICAL DETAILS
..............................................40
F
EATURES AND PERFORMANCE
............................................. 40
Hardware........................................................................ 40
Software .......................................................................... 41
Hardware Performance .............................................. 42
P
IN ASSIGNMENTS
................................................................... 42
V
IDEO MODES
.......................................................................... 43
B
LOCK DIAGRAM
.................................................................... 44
B G
LOSSARY
...............................................................45
C T
RADEMARKS
..........................................................57
D EMI C
OMPLIANCE INFORMATION
........................58
Page 5

About Fire GL1 5
1
A
BOUT FIRE
GL
1
♦
H
ARDWARE FEATURES
♦
S
OFTWARE FEATURES
♦
P
ROFESSIONAL
3D R
ENDERING
♦
C
ARD LAYO U T
Diamond Fire GL1 is based upon the IBM 256-bit Graphics
Rasterizer, integrating the functionality of a VGA controller, a
2D/3D Raster Engine with Geometry Pipeline Setup processor, and
a 250 MHz RAMDAC in a single package.
Diamond Fire GL1 delivers a balance of 2D power and superior 3D
acceleration providing power for professional 2D and 3D NT
graphics applications:
♦
Mechanical Engineering Analysis (MEA)
♦
Mechanical Computer Aided Design (MCAD)
♦
Electrical Design Automation (EDA)
♦
Digital Content Creation (DCC)
♦
Animation
♦
Visualization
Page 6

6
H
ARDWARE FEATURES
♦
IBM 256-bit Graphics Rasterizer
♦
32 MB SGRAM used for unified framebuffer, Z-, Alpha-,
Overlay-, Window ID and Clip/Stencil buffers, and texture
storage
♦
Single short form factor AGP and PCI versions
⇒
AGP ATX/NLX bus, AGP2x version 2.0 compliant, with
sideband addressing
⇒
PCI bus 32-bit 33/66 MHz version 2.1 compliant
♦
100 MHz clock on raster engine and frame buffer
♦
64 KByte BIOS FlashROM, reprogrammable by software
♦
32-bit RGBα True color 2D and 3D acceleration
♦
Accelerated, double-buffered 32-bit TrueColor up to
1920 x 1200, at 75 Hz refresh rates
♦
24-bit Z- buffer, 4-bit double-buffer, 8-bit single-buffer
overlay
♦
Video engine supports YUV conversion, point and bilinear
scaling
♦
Standard blue 15-pin D-Type video output connector
S
OFTWARE FEATURES
♦
OpenGL 1.2 ICD
♦
Supports Windows NT 4.0
♦
Multiprocessor system support
♦
Software driver supports up to 4 displays
♦
DDC2B support on all operating systems
Page 7

About Fire GL1 7
♦
Supports Streaming SIMD Extensions (70 New Instructions) in
the new Intel Processors
♦
Customized application settings for individual ISV applications
♦
Multithreaded OpenGL pipeline and ThreadSafe OpenGL 1.2
ICD support for dual processors.
♦
Multihead display driver supports up to 4 screens
♦
DDC2B monitor support on all operating system platforms
P
ROFESSIONAL
3D R
ENDERING
♦
Full OpenGL 1.2 feature set
♦
Gouraud shading
♦
Bilinear and trilinear MIP-mapping
♦
Alpha blending
♦
Fogging and depth cueing
♦
Anti-aliased lines and sorted polygons
♦
Scissoring and stippling
♦
Overlay and stencil buffers
♦
Z-buffering
For more information on features and performance of your Fire
GL1 please refer to the section Technical Details.
Important
— You must be running Windows NT 4.0, updated with
Service Pack 4 (or newer) prior to installing the Fire GL1 drivers.
The Service Pack is available from Microsoft's web page,
www.microsoft.com. For most languages you can perform the
Service Pack 4 update from the SuperCD when you run the Quick
Start utility.
Page 8
8
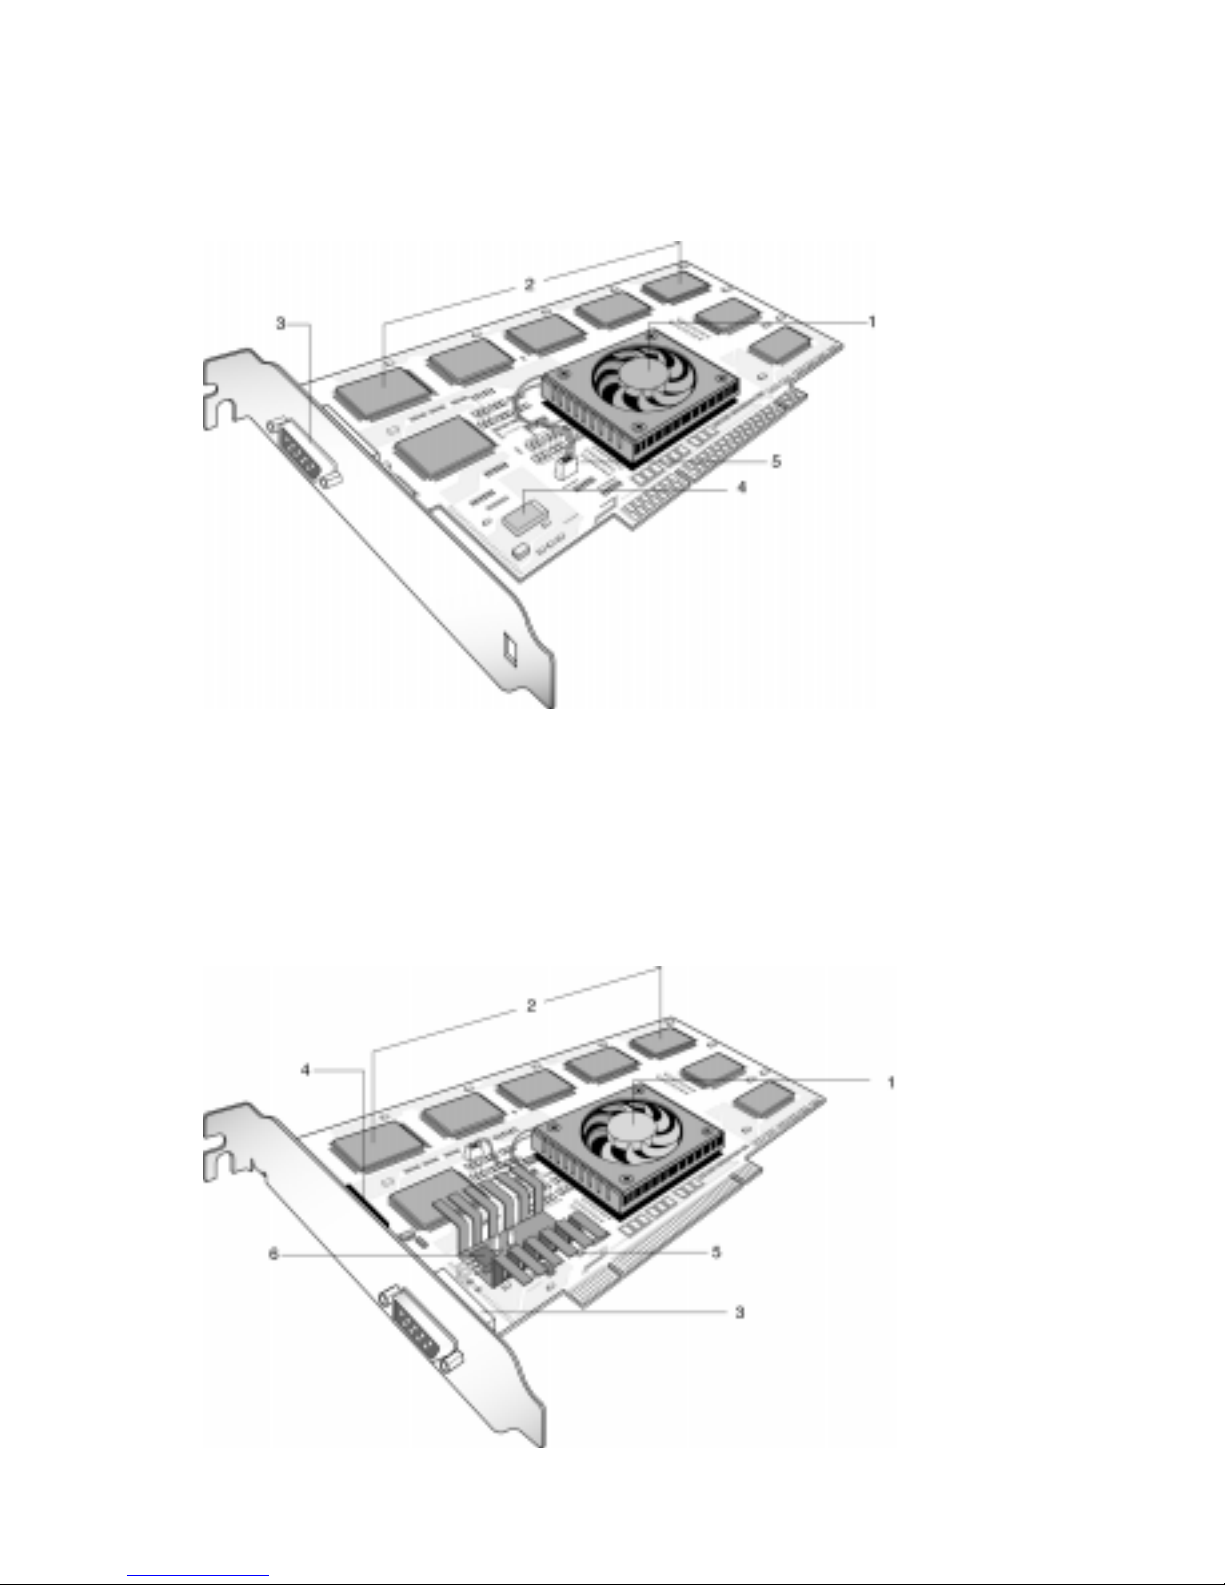
C
ARD LAYOUT
Fire GL1 with AGP bus interface
1 IBM 256-bit Graphics Rasterizer
with fan
4 Flash BIOS PROM
2SG-RAM chips
- also on solder side
5 Oscillator
3 DB-15 monitor connector 6 3.3V/5V voltage supply support with
heatsink
Fire GL1 with PCI bus interface
Page 9
How to Use this Manual 9
2
H
OW TO
U
SE THIS
M
ANUAL
For your convenience, this online User’s Guide has been formatted
as an Adobe
®
Acrobat® PDF file. This format gives you great
flexibility when using this documentation. You can easily print
this manual to access it off-line; it will look like any standard
document with a table of contents and page numbers. You can
also read it online—important links, such as table of contents
entries, worldwide web, and email addresses are active.
This manual might be displayed with slightly-reduced
magnification in your Reader. If you experience any difficulty
reading certain image files online, use the Reader’s
Zoom To
feature from the
View
menu and increase the magnification to
about 133%.
For printing the User’s Guide, a print resolution of 600 dpi is
recommended.
M
ANUAL CONVENTIONS
Your Fire GL1 User’s Guide is organized in a standard, familiar
way. A few icons are used to point out important information:
This icon marks useful tips or important operational notes.
This icon is a warning about possible electrical/software hazards or
problems.
Hypertext links are active. If you are reading this manual online,
place your mouse cursor over Table of Contents entries or main
headings. If the hand icon changes to a pointing index finger,
simply click and you will move to that place in the document.
Some email or World Wide Web addresses inside this manual may
be active as well. Go directly to a Web, FTP site, or email program
simply by clicking on an active link.
Page 10

10
3
I
NSTALLING FIRE
GL
1
♦
I
NSTALLING THE HARDWARE
♦
I
NSTALLING SOFTWARE
I
NSTALLING THE HARDWARE
Notes:
♦
If you plan to set up a multi-monitor system you must install
the primary display adapter and the drivers first, before
installing additional graphics cards.
With the drivers provided you can operate a maximum of four
Fire GL1 Graphics Accelerators. The drivers are designed
exclusively to support Fire GL1 Graphics Accelerators with the
Windows NT 4.0 operating system (updated with Service
Pack 4 or higher). The drivers DO NOT SUPPORT any other
type or brand of graphics card or operating system.
♦
Your Fire GL1 may be either an AGP or PCI type. Follow the
instructions for the specific card that you purchased.
♦
Please note that the illustrations provided in this section are
for instructional use only; the card shown may look different
than the one you purchased.
Page 11

Installing Fire GL1 11
System Requirements and Tools
To use this card, you must have the following:
♦
a motherboard with free PCI/AGP 1.X slots for the number of
Fire GL1 cards you want to install.
♦
a Pentium II PC (or better)
♦
Windows NT 4.0 operating system with Service Pack 4 (or
newer)
♦
A screwdriver to remove and reinstall the PC cover screws and
card mounting screws. See your PC manual for specific
requirements.
♦
SuperCD CD-ROM for Fire GL1
Preparing your Computer
Before removing your old card…
If you are installing your Fire GL1 in place of a card from another
manufacturer, we recommend that you de-install the old card first.
Do the following:
♦
Use the uninstall program for your existing card, if one is
available. Consult the documentation for your old card if
necessary.
♦
If no uninstall program is available, install the standard VGA
driver via the
Display Properties
applet. For more
information refer to the following section, titled Installing the
Standard VGA Driver.
Page 12

12
It is recommended that you set your display driver to Standard
VGA before you shut down your computer and remove the
installed (AGP, PCI, or ISA) VGA card.
Some systems have an integrated graphics solution on the
motherboard. Please refer to the manual or contact your
motherboard manufacturer to determine how to disable your onboard graphics.
The applications for which you want to install drivers also have to
be completely installed for
Standard VGA - 640 x 480
on your
system prior to using the new software. It is a good idea to do this
before removing an existing graphics adapter as not every
application may permit the configuration of its video mode from
the operating system level.
Installing the Standard VGA Driver
To avoid possible driver conflicts between your old and new
graphics card, install the standard VGA driver for your operating
system before installing the new card.
Windows NT 4.0
To set your display to Standard VGA under Windows NT 4.0:
1. From the Start menu, go to
Start > Settings > Control
Panel
, then double-click on
Display
. The
Display Properties
sheet appears.
2. Click the
Settings
tab; then click the
Display Type
button.
3. Under
Adapter Type
, click the
Change
button. The
Change
Display
window appears.
4. Under
Manufacturers
, select (
Standard display types)
.
Under
Display
, choose
VGA compatible display adapter
.
5. Click
OK
. You may need to insert your Windows NT 4.0 CD-
ROM.
Page 13
Installing Fire GL1 13
6. Click
Close
and
OK
as often as necessary to accept the
changes.
7. Windows asks you if you want to restart your computer. Click
No
.
8. Shut down your computer. You are now ready to remove your
old graphics card and install your new Fire GL1 card.
Opening the Computer Cabinet
Warning!
Prevent static electric damage. Avoid touching any
electronic components. Static discharge can cause severe damage
to electronic equipment, but here are some easy ways to see that it
doesn't happen:
♦
Don't touch edge connectors or exposed circuitry.
♦
If possible, ground your body. A metal power supply in your
computer is generally considered the best place to ground
yourself.
♦
Make as few movements as possible to avoid building up static
electricity from your clothing, carpets and furniture.
1. Switch off your computer and all external options (printer,
display, and others) and unplug all power cables from the
electrical source.
Physically remove the power cable from the system and wait
15-30 seconds for Flea Power to dissipate. Damage can occur
to add-in components if power is not physically disconnected
from the system during installation procedures.
2. Remove the cover of the computer. Refer to the instructions in
your computer’s manual for more information.
Page 14
14
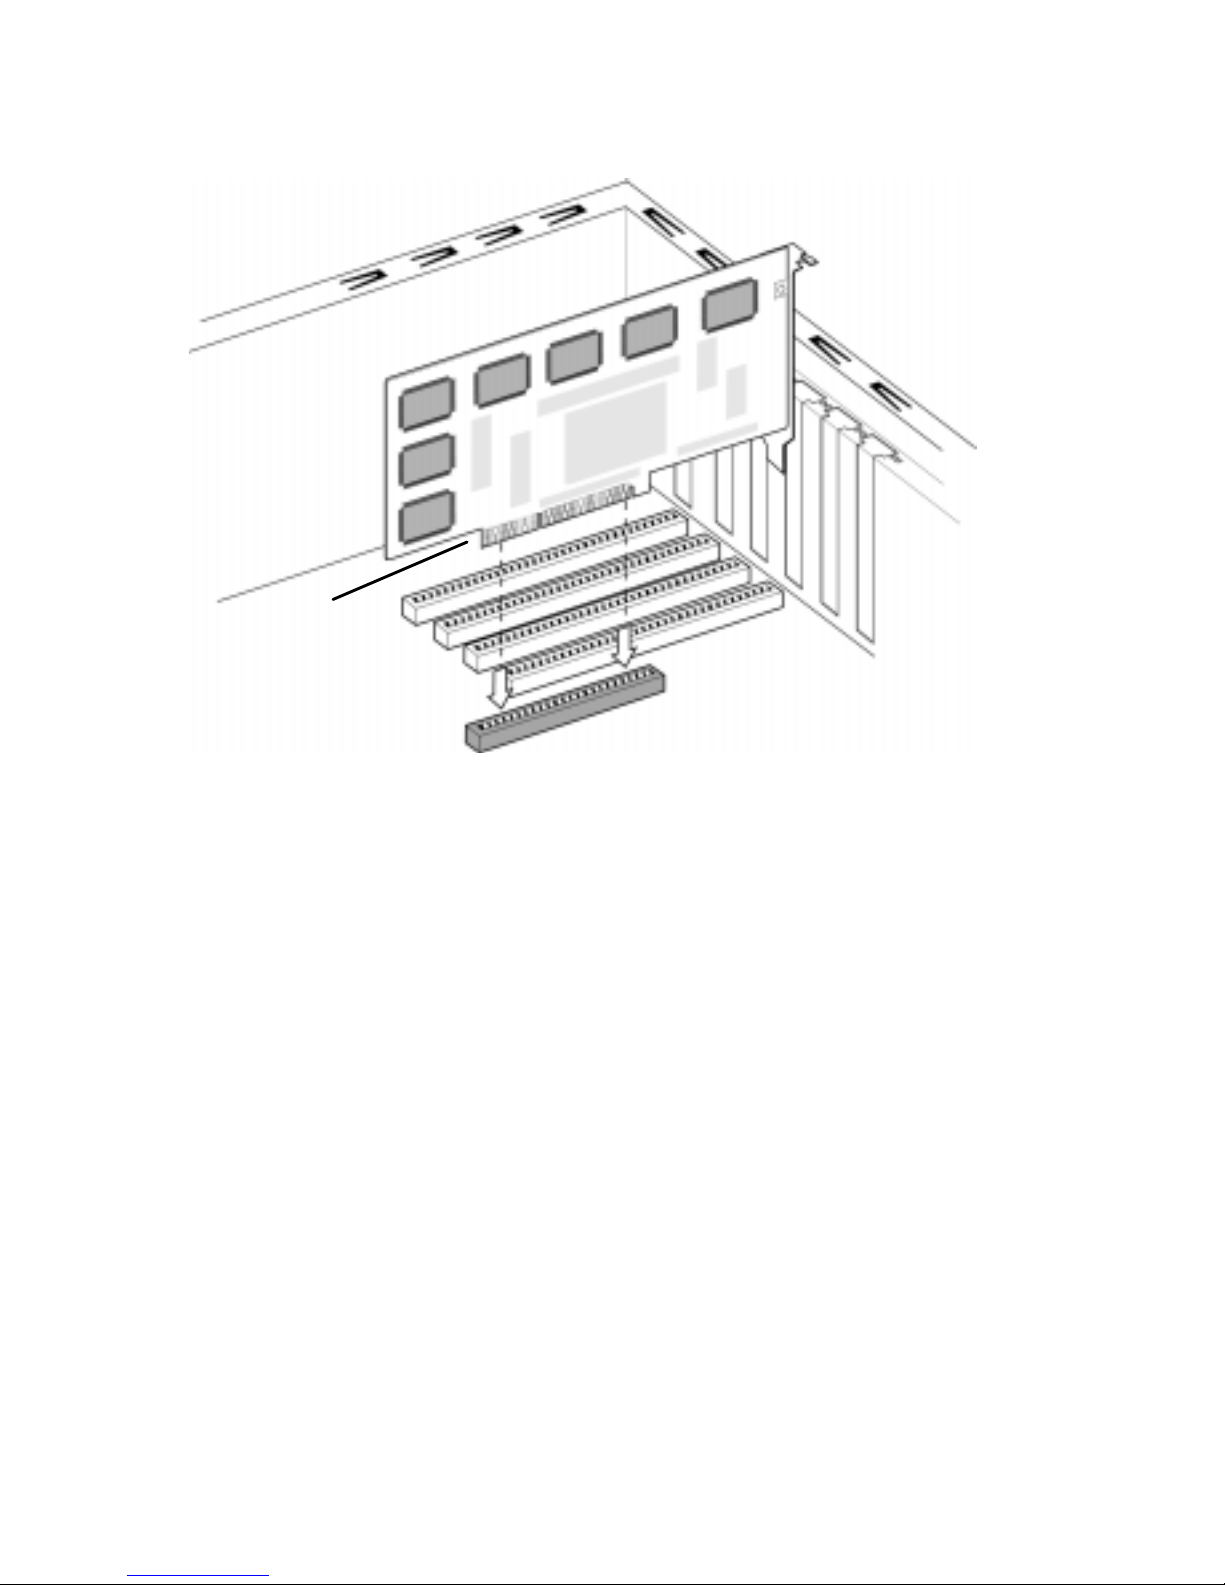
Installing the Card
To install your Fire GL1 PCI or AGP card, follow these steps:
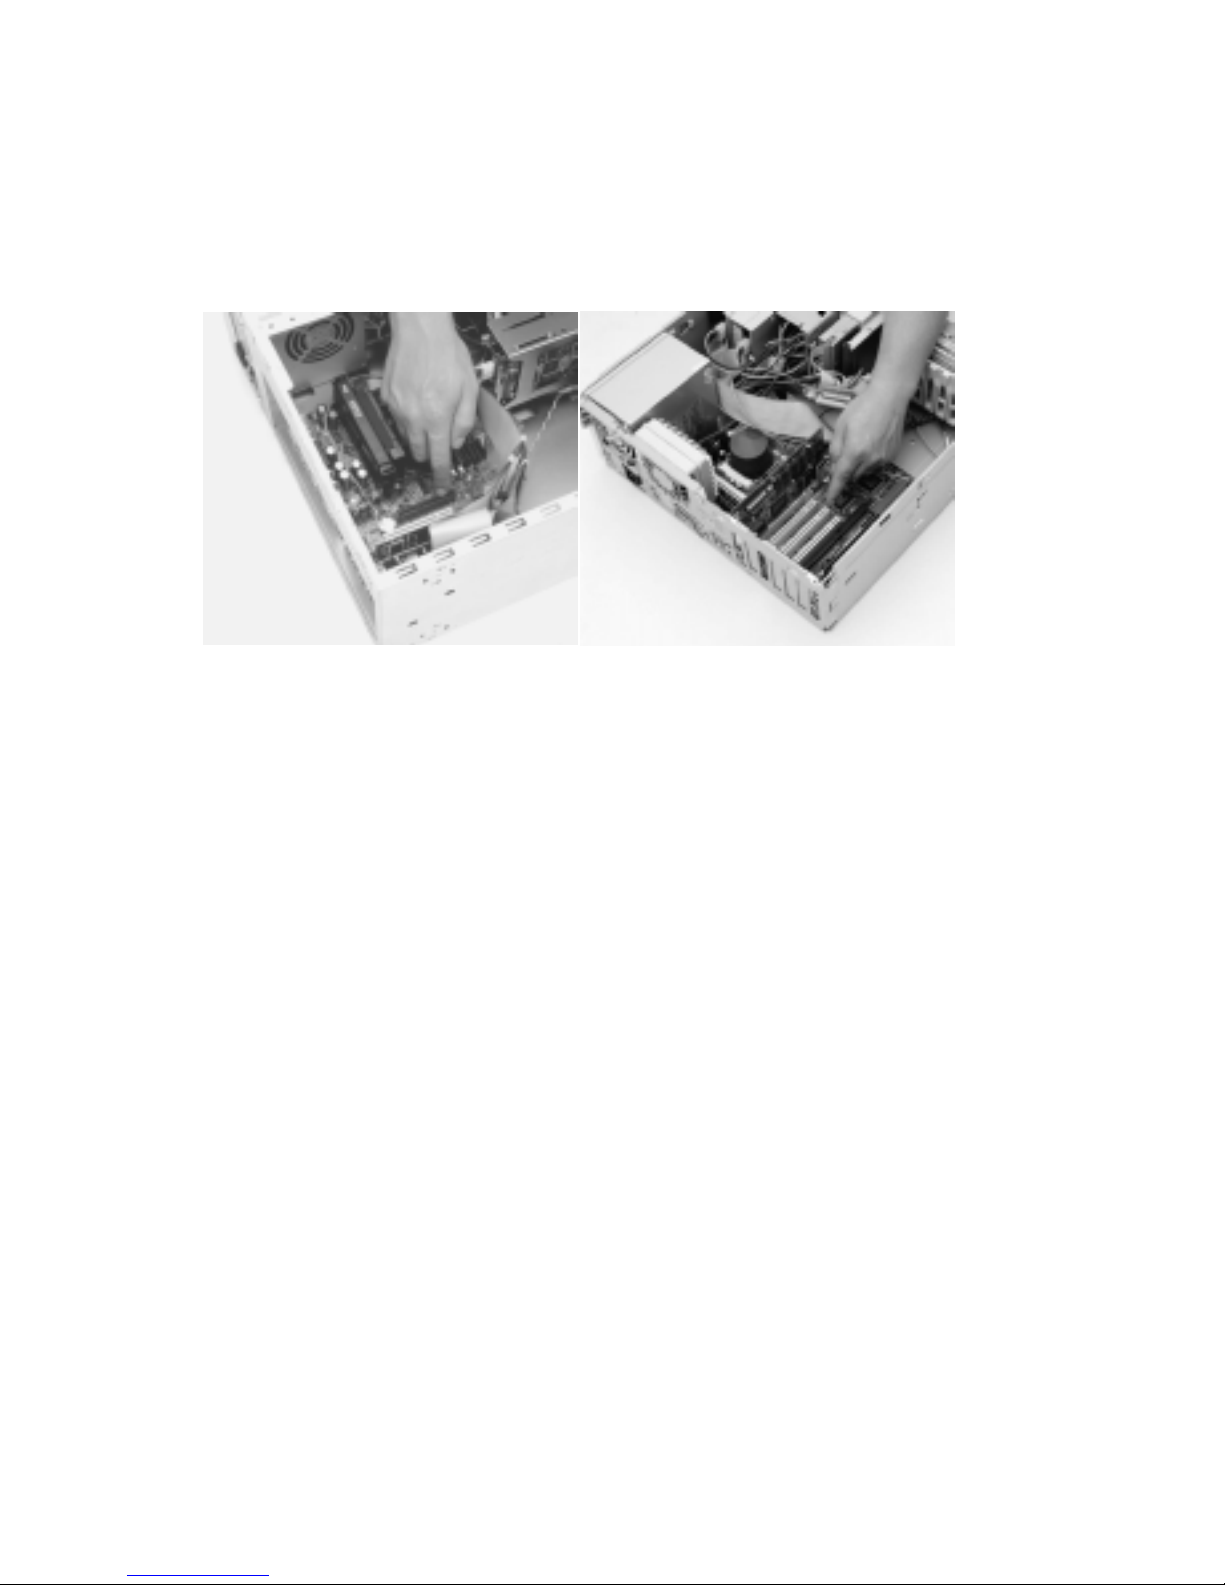
1. Locate the AGP or an available PCI slot.
View of the AGP slot (dark color
)
View of a PCI slot (light color)
2. Remove the metal slot cover. Save the screw to secure the
graphics card later.
3. Hold the card by the edges and position it directly above the
AGP or PCI slot. AGP and PCI cards are designed to fit one
way only. Be sure your card is properly aligned.
4. Insert your Fire GL1 card firmly into the AGP or PCI slot. Take
care to press it evenly and snugly into its slot. Do not force.
5. Align the slot in the mounting bracket of the card with the
screw hole in the rear panel of the computer case. Use the
screw you removed from the expansion slot cover or a
previously installed video adapter to secure the card in place.
Page 15
Installing Fire GL1 15
Installation in an AGP or PCI expansion slot
a
c
b
aFire GL1 card
b Card edge connector
c Expansion slot
Reassembling Your Computer
♦
Secure ribbon cables and gently push them down and out of
the way before you replace the system cover.
♦
Replace the computer cover.
♦
Reconnect any peripheral equipment cables you may have
disconnected.
Page 16

16
Connecting the Monitor Cable
Securely attach your monitor's data cable to the 15-pin VGA
output connector (3) on the card. Attach the cable to the monitor
according to the monitor's instructions.
Fire GL1 with AGP bus interface
3
Fire GL1 with PCI bus interface
3
Page 17

Installing Fire GL1 17
After Installing the Card
If you have correctly installed the card, operating system messages
will appear on your monitor when the boot procedure is finished.
To enjoy the full benefits of your new Fire GL1 card in your PC,
you will need to install a package of basic drivers. Refer to Installing
Software.
To enable and set up a multi-monitor configuration use the
MultiScreen
dialog in the
Display Properties
menu after you
have installed the FireGL1 drivers.
If your system does NOT boot as it should...
♦
Check again to verify that the installation instructions were
properly followed.
♦
Check that the system BIOS has assigned a system interrupt to
the AGP or PCI slot where the card is installed.
⇒
Check the system configuration utility of your operating
system for the interrupt assignments.
⇒
Inspect your system BIOS setup for an option that says
"Assign IRQ to VGA" or something similar and ensure that
this option is enabled.
♦
Some older ISA legacy add-in cards (with jumpers, non-Plugn-Play) may cause a conflict if they are not configured in the
ESCD (extended system configuration data) area of the system
BIOS. Please refer to your computer’s User’s Guide for
information on using the ISA Configuration Utility ICU to add
legacy card resource requirements to the system.
♦
Contact the Technical Support.
Page 18
18
Additional Instructions
♦
Switch on your monitor before you switch on your computer.
Failing to do so could damage your monitor.
♦
Note that your monitor is running in standard modes and that
higher refresh rates etc. are not available at this stage of the
installation! After you have successfully installed the Fire GL1
drivers, use the dialogs in the
Display Properties
menu allow
to adjust the video settings.
♦
The board has been designed to take advantage of 'plug–nplay' without requiring additional installation or configuration.
Please refer to the Troubleshooting section for more information,
if it appears that the card is not performing optimally.
Monitor Compatibility
This graphics solution offers high-performance resolutions, refresh
rates and color depths. It is optimally configured to be combined
with high-resolution MultiSync or multi-frequency monitors. You
can also connect the Fire GL1 to other VGA monitors.
Note:
You can use the full power of the graphics card only if your
monitor supports the horizontal (kHz) and vertical (Hz) refresh
rates as required by the graphics card.
Warning!
Be sure the refresh rates you select are compatible with
your monitor. Incompatible refresh rate selection may damage
your monitor. Refer to your monitor's documentation for
recommended refresh rates.
If you can switch the impedance values on your monitor, use the
following recommended settings:
R, G, B video input: 75 Ohm
Synch: 2.2 kOhm
Try other 'Synch' settings if you cannot achieve a stable video
image.
If the impedance setting options are 'High' and 'Low' only, try the
setting that provides the most satisfactory monitor display.
Page 19

Installing Fire GL1 19
I
NSTALLING SOFTWARE
Now that you have installed the Fire GL1 hardware and rebooted
your computer, complete your installation using the following
directions for your operating system.
You will need to install a package of basic drivers
♦
if you install the card to your system
♦
if you are re-installing or upgrading your operating system
Important
— You must have Microsoft Windows NT Service Pack
4 installed prior to installing the Fire GL1 drivers. The Service Pack
is available from Microsoft's web page, www.microsoft.com. For
most languages you can also perform the Service Pack 4 update
from the SuperCD when you run the Quick Start utility.
To install or remove the Fire GL1 drivers, you need administrator
rights or you must be logged on as a user with administrator rights
under Windows NT.
General Information
Before installing the Diamond Fire GL1 video driver, close all open
applications and disable any anti-virus software that is running on
your computer until the driver installation is complete!
To install or uninstall the Fire GL1 drivers, you need administrator
rights or you must be logged on as a user with administrator rights
under Windows NT.
The Diamond installation dialog will display in English if your
operating system’s language is not supported.
Note:
If you have added Fire GL1 cards to your system for a
multi-monitor configuration you do not need to install the
software drivers again for each card. Go to
MultiScreen
in the
Display Properties
menu to enable and set up your multi-
monitor configuration.
Page 20

20
Tips and Hints
The software installation procedure later in this chapter describes
how to install the drivers for your graphics card after you have
installed the new card for the first time and have rebooted your
computer.
This section offers some additional tips if you want or need to
install the graphics card drivers in a special working scenario, for
example, if you have re-installed your operating system, or if you
want to perform a manual installation.
♦
You can always install the drivers using the Quick Start utility
on the SuperCD.
The Quick Start utility will start automatically, if you insert the
SuperCD into your CD-ROM drive after the operating system
has started. If your CD-ROM auto-run is not enabled and/or
the Quick Start program does not start automatically:
Click the
Start
button in the task bar, click
Run
, and then
select START.EXE from the root directory of the SuperCD.
Select
Readme
from the
SuperCD Fire GL1
start menu to
display a readme file. Refer to this file for additional and ‘last
minute’ information. Information in this file may not appear in
printed documentation or online help
♦
You must be running Windows NT 4.0, updated with Service
Pack 4 (or newer) before installing the Fire GL1 drivers. For
most languages you can perform the Service Pack 4 update
from the SuperCD when you run the Quick Start utility.
Software Installation for Windows NT4.0
1. Run the Quick Start utility. The Quick Start utility will start
automatically, if you insert the SuperCD into your CD-ROM
drive after the operating system has started. If your CD-ROM
auto-run is not enabled and/or the Quick Start program does
not start automatically:
Click the
Start
button in the task bar, click
Run
, and then
select START.EXE from the root directory of the SuperCD.
Page 21

Installing Fire GL1 21
2. Click
Start Installation
.
Note:
The installation routine now checks if your Windows NT 4.0
is correctly updated with Service Pack 4. If not, you are prompted
if you want to install the drivers and Service Pack 4 at this time –
if the appropriate language version is available on the SuperCD.
If the SuperCD cannot install the Service Pack to your system, the
driver installation aborts. Obtain Windows NT Service Pack 4 from
Microsoft, update your Windows NT4.0, and run the the Quick
Start utility again.
3. Click the button corresponding to the type of installation you
want. If you select
Custom
, a list of software components will
be displayed. Select the check boxes to specify the components
you want to install.
4. Click
Next
to continue the installation.
5. When the
DIAMOND Install
dialog displays the components
to be installed click on
Next
. (Depending on which
components you chose different windows might appear. Click
on the corresponding buttons to continue the installation.)
6. When the
Installation complete
message appears click
Next
again. This will restart your computer.
7. Click
Start > Settings > Control Panel > Display >
Settings
, or right-click on the Windows desktop, select
Properties
and
Settings
.
8. Set the resolution, color depth, and refresh rate that best suit
your requirements and your monitor's performance.
9. Click
OK
.
Note:
You can select the refresh rates individually for each
monitor in the
Monitor
dialog of the
Display Properties
menu.
However, you can set the refresh rate for the monitor on your first
or primary display adapter only in the
Settings
dialog.
Page 22

22
4
F
IRE
GL
1
S
OFTWARE
U
TILITIES
♦
C
HANGING THE VIDEO SETTINGS
♦
M
ODIFYING APPLICATION PROFILES
As part of its Windows NT drivers, Fire GL1 installs additional
property pages to your
Display Properties
control panel. They
are named Monitor, Adjustment, MultiScreen, Configuration, and
Information.
Use the Configuration dialog to customize application profiles for
individual application settings. Refer to page 33 for more
information.
The
Information
dialog displays some card-specific hardware and
driver information. These data may be helpful when contacting the
TechSupport.
Use the
Monitor, Adjustment,
and
MultiScreen
dialogs,
together with the
Settings
dialog, to set resolution, color depth,
refresh rates, and multi-monitor configuration of your monitor(s).
Page 23

Fire GL1 Software Utilities 23
C
HANGING THE VIDEO SETTINGS
The dialogs in the
Display Properties
menu allow setting and
adjusting the video settings to suit your requirements best.
♦
Settings
: set resolution and color depth
♦
Monitor
: choose monitors and display refresh rates
♦
Adjustment
: adjust the monitors’ display
♦
MultiScreen
: set up multiple monitor configuration
- available only if additional graphics accelerators are
installed -
To access the
Diplay Properties
menu:
1. Start Windows NT 4.0.
2. After Windows NT 4.0 has finished booting, click
Start >
Settings > Control Panel
.
3. Double-click the
Display
icon. The
Display Properties
window appears.
Notes:
You can also display the
Display Properties
window by
right-clicking the Windows Desktop background and then selecting
the
Properties
option from the pop-up menu.
If you have made a modification that causes your screen to go
blank or to be unreadable, the keyboard shortcut for ‘Undo’ is
Alt-U
.
Page 24

24
Setting Resolution and Color Depth
Select the
Settings
dialog in the
Display Properties
window.
♦
Set the resolution and color depth that best suit your
requirements and your monitors' performance.
♦
Also set the refresh rate for the monitor on your first or
primary display adapter.
Notes:
(1)
The resolution and color depth setting applies to all monitors
in a multi-monitor configuration. Check the documentation of
your monitors and make sure that all monitors support your
resolution and color depth setting.
(2)
The refresh rate set in the
Settings
dialog will apply only to
the monitor on the first or primary display adapter. Use the
Monitor
dialog to select the display refresh rates individually for
all other monitors in a multi-monitor configuration.
Page 25

Fire GL1 Software Utilities 25
Choosing Monitors and Display Refresh
Rates
1. Select the
Monitor
dialog in the
Display Properties
window.
For each Fire GL1 Graphics Accelerator in your system you can
customize the settings of the connected monitor. For more
information on setting up the monitor(s) refer to the context
sensitive online help.
2. Click the tab for the card where the monitor you want to set up
is attached.
Page 26

26
3. Set the desired operation mode for the selected monitor.
Custom Modes
Use resolution and refresh rates for this monitor as specified in the
Settings
dialog in
Display Properties
. This option allows you to take
full advantage of the resolution/refresh rate capabilities of the video chip.
Warning!
Selecting a resolution or refresh rate that your monitor
does not support can permanently damage the monitor.
Check the monitor’s documentation and verify that it supports the
selected resolution and refresh rate.
Select from list
Use resolution/refresh rate settings optimized for your specific monitor.
A. Select your monitor from the displayed monitor list. To select your
monitor, scroll to the manufacturer of your monitor and highlight the
manufacturer in the list. Click on the + sign and select your monitor.
A list on the right menu pane displays resolutions and - for each
resolution - the maximum refresh rate, as supported by the selected
monitor.
If the current video mode (specified in the
Settings
dialog) is not
supported by the selected monitor, the resolution/refresh rate setting
will be automatically reduced.
B. Select the desired refresh rate in the
Refresh
Frequency
section. All
refresh rates supported by the monitor for the currently selected
resolution are displayed.
C.
Click the
Apply
or
OK
button to enable your monitor selection.
If the list does not display your monitor type and you have a disk from
the monitor manufacturer, use the
Have Disk
button to import the
monitor information to the internal monitor list.
A. Click the
Have Disk
button, insert the disk, and select the directory
or file containing information about your monitor.
B.
Then select your monitor and click the
Apply
or
OK
button.
Click the
Display Diamond Monitor List
button to switch the
displayed monitor list back from the manufacturer's disk to the
internal monitor list.
Page 27

Fire GL1 Software Utilities 27
DDC Monitor
Select this option and click the
Apply
or
OK
button if you want the
driver to automatically decode the monitor's DDC (Display Data Channel)
information on each reboot/NT 4.0 start.
To detect a new DDC monitor immediately, click the
Detect now
button.
An error message will be displayed if the connected monitor does not
support DDC.
The
Refresh Rate
section displays the maximum refresh rate supported
by the monitor for the currently selected resolution.
4. Click the
Apply
or
OK
button to enable your monitor settings.
5. Repeat steps 2 through 5 for each monitor you want to set up.
Adjusting the Monitor Display
1. Select the
Adjustment
dialog in the
Display Properties
window.
For each Fire GL1 Graphics Accelerator in your system you can
adjust the display of the connected monitor. For more
information on adjusting the monitors’ display refer to the
context sensitive online help.
2. Click the tab for the card where the monitor you want to set is
attached.
Note:
You can adjust
Monitor Tuning
and
Gamma
Correction
only for those monitors that are currently assigned to
your working desktop. For example, you cannot adjust your
second monitor's display while your desktop is set for single
monitor operation.
Page 28

28
3.
Monitor Tuning
: With the buttons in the
Move
and
Size
sections you can tune the position and size of the monitor's
display for the indicated resolution and refresh rate.
Notes: (1)
Use the hardware setting controls on your monitor,
if available, to adjust your display size or position - instead of
the software controls in 'Adjustment - Monitor Tuning.' Check
the documentation of your monitor for information on your
monitor's hardware controls.
(2)
Resizing the display slightly changes the actual refresh
rate. If you operate a fixed-frequency monitor check the
documentation of your monitor for information on refresh rate
tolerances.
Page 29

Fire GL1 Software Utilities 29
♦
Sync Polarity
: If you do not get a satisfactory display with
the default sync polarity setting for the current resolution,
you may try and change the settings.
♦
Undo
: Click this button to undo the last change you made
(when you clicked
Apply
). If you have made a modification
that causes your screen to go blank or to be unreadable, the
keyboard shortcut for ‘Undo’ is
Alt-U
.
♦
Default
: Click this button to set the
Monitor Tuning
to
the manufacturer's default settings.
Notes:
(1)
Press the
ESC
key on your keyboard to undo the changes if
your monitor has lost synchronization. You may also use the
keyboard shortcut for ‘Undo’ -
Alt-U
.
(2)
If you change the resolution (in
Settings
) and/or the
refresh rate (in
Monitor
), you may need to re-adjust the
monitor's display.
Page 30

30
4.
Gamma Correction Adjustment
: Adjust the monitor's
gamma correction for optimal brightness with the red, green
and blue slider bars.
Note:
You cannot adjust
Gamma Correction
for 256-color
modes
When these sliders are changed the gamma correction table
modifies each pixel's color value.
The brightness produced at the face of the display is
proportional to the input voltage raised to the power gamma.
This nonlinearity must be compensated to achieve correct
reproduction of the image's brightness. The effect of display
gamma is to darken the midtones relative to the dark and light
regions. The gamma correction adjustment affects the entire
screen display. The possible setting range is 0.3 - 4.0. The
default setting is 1.0.
With
Link sliders
selected, the three sliders move together as
you drag any individual slider. With the check box unchecked,
you can adjust colors individually by dragging the applicable
slider.
Click the
>1<
button - for each color - to set the gamma
correction to the default value of 1.0.
5. Click the
Apply
or
OK
button to enable your
Adjustment
settings.
6. Repeat steps 2 through 5 for each monitor you want to set.
Page 31

Fire GL1 Software Utilities 31
Setting Multiple Monitor Configuration
1. Select the
MultiScreen
dialog in the
Display Properties
window.
Refer to the context online help for more information on
setting up your MultiScreen configuration.
Page 32

32
2. Select your monitor combination in the Define Desktop dropdown list. Click the
Apply
or
OK
button to enable your multi-
monitor setting.
Notes:
Click on a monitor icon in the
MultiScreen
dialog to identify the
corresponding monitor. For example, if you click on the monitor
icon 2 in the
MultiScreen
dialog, your second monitor will
display a 2.
Use the drag-n-drop method to swap the logical positions of your
monitors with respect to the graphics accelerator card(s) without
physically reconnecting the monitors.
3. Select the
Window Placement
settings
Fullscreen
Select if you want a full screen window displayed
On all
monitors, or only on the
Current monitor
- that is the
monitor where your mouse cursor currently is.
Windows
Select how you want to display sizeable windows that
normally appear in the center of the screen:
Unchanged
, or
Move
d fully to that monitor where the top left corner of the
window is.
Reports
Select a monitor where you want to display Windows messages
that normally display in the center of the screen. This keeps the
screen area of the other monitor(s) free for your work. You
may alternatively opt for displaying the reports
Unchanged
.
4. Click the
Apply
or
OK
button to enable your
MultiScreen
settings.
Page 33

Fire GL1 Software Utilities 33
M
ODIFYING APPLICATION PROFILES
Using the
Configuration
dialog in the
Display Properties
menu
you can individually configure each application’s settings.
Page 34

34
For some of the most popular applications the optimal
configuration profile is factory-set by default. Select the
application from the list in the
Configuration Profiles
section.
This will add necessary Windows NT registry settings. Click
Apply
and, if prompted, restart Windows NT.
If you experience problems with your application, or if you want
to try to optimize the performance of your system on specific
applications, you may modify the configuration settings.
1. Click
Start > Settings > Control Panel > Display
, or click
with the right mouse button on the Windows desktop and
select
Properties
.
2. In the
Display Properties
menu select the
Configuration
dialog.
Notes:
(1)
The configuration default settings typically require
modification only for the following:
♦
diagnostic purposes
♦
fine-tuning a specific application/system configuration
♦
specific settings recommended by your hardware or software
documentation
♦
tuning your application/system environment for best
performance and memory usage
(2) Only experienced users should modify the configuration
settings.
Page 35

Fire GL1 Software Utilities 35
1. Click the
Add
button in the
Configuration Profiles
section
and enter the new application for which you want to set the
configuration parameters.
2. To modify the configuration settings of a specific application,
for example, HOOPS, select the application from the list in the
Configuration Profiles
section and click the
Modify
button.
3. In the
Settings
section select or clear the following
checkboxes according to your requirements:
Overlay Planes
4-Bit double-buffered
Use 4 bit double-buffered overlay planes in the depth buffers.
The driver exports pixelformats with 4-bit double-buffered
overlay planes for OpenGL applications.
8-Bit single-buffered
Use 8 bits of each 32-bit frame buffer pixel as single-buffered
overlay planes.
Force copy swap
Force blit copy from back to front buffer.
Wait for vertical retrace
Buffer swap 'synched' to vertical retrace. Enable this function
for best picture quality. If you disable ‘Wait for vertical retrace’
you may experience visual artifacts such as tearing. However,
this function may be disabled for performance benchmarking.
4. Click the
Apply
or
OK
button to enable your
Configuration
settings.
Page 36

36
5
R
EMOVING THE
F
IRE
GL1 D
RIVERS
This section describes how to properly remove your graphics card
software from your system should you need to do so.
To install or uninstall the Fire GL1 drivers, you need administrator
rights or you must be logged on as a user with administrator rights
under Windows NT.
Before removing the Diamond Fire GL1 video driver, please close
all open application programs and disable any anti-virus software
that is running on your computer until the driver is removed!
1. From the
Start
menu, click
Start > Programs> Diamond
,
then click
DIAMOND Install/Uninstall
. The
Diamond
Install
dialog appears. Click
Next
.
2. Click
Remove the product
.
Note:
Make sure that only those components are selected that
you want to remove now. (Click
Back
and
Add/Remove
components
to select specific software components for
removal.)
Then click
Next
.
3. Click
Next
to remove the software and shut down your
computer.
After you have removed the software according to the instructions,
you may remove the hardware:
1. Shut down your computer.
2. Remove the computer case as outlined in the hardware
installation instructions.
3. Ground yourself by touching the power supply box.
4. To remove the hardware, simply reverse the hardware
installation procedures.
Page 37

Troubleshooting
37
6
T
ROUBLESHOOTING
Your board is a complex electronic device and can only be
repaired by authorized technical personnel with special equipment.
Do not attempt to change or repair any parts of this product.
Doing so will render your warranty invalid.
C
OMMON PROBLEMS AND SOLUTIONS
If you experience a problem using the Fire GL1, check the
following sections for advice on how to solve your problem.
FAQs
Frequently Asked Questions and their answers may be found at the
web sites of ATI Inc. Go to www.ati.com and select Support.
No image appears on monitor when computer system is
turned on
♦ Make sure that the Fire GL1 is firmly seated and lined up properly
in its AGP or PCI slot, and that the monitor cable is firmly and
correctly connected to the card. For more information, please
refer to
Installing the Hardware
.
♦ Make sure that your computer and monitor are plugged into
electrical outlets and receiving power.
♦ Is the monitor turned on and receiving power?
Page 38

38
Screen image defects appear
Check if your monitor supports the resolution, horizontal (kHz) and
vertical (Hz) refresh rates as required by the graphics card.
Check for your current resolution, refresh rate, and color depth
settings in the
Settings
and
Monitor
dialogs of the
Display
Properties
.
Warning!
Be sure that both video card and monitor
support resolution and refresh rates you select. Incompatible
resolution/refresh rate selection may result in monitor
damage. Refer to your monitor's documentation for
recommended resolutions and refresh rates.
Screen image is off-center, color balance is wrong, or
there is no picture
♦
Try adjusting the brightness, sharpness, contrast, and color
balance controls of your monitor.
♦
Try adjusting the centering and positioning controls of your
monitor to position the picture on the screen.
Note:
The
Monitor Tuning
settings in
Display Properties
>
Adjustment
tune the position of the picture on the screen via
the video signal.
♦
Set the monitor’s RGB inputs (and sync switches, if this option is
available) to 75 Ohms, with the sync set to external.
Operating system warns that the video card is not
configured properly
♦
Check the driver installation and make sure that all software is
correctly loaded corresponding to your operating system and
applications. For more information, please see
Installing
Software
.
♦
Set Windows NT back to ‘Standard VGA’ and re-install the Fire
GL1 drivers.
Page 39

Troubleshooting 39
Checking for address and interrupt conflicts
♦
It is necessary to ensure that the I/O and memory addresses
reserved for the graphics board are not used by other hardware
devices.
♦
The integrated on-board VGA controller of your Fire GL1 uses the
following addresses (hex):
I/O Address
Standard VGA I/O:3B0-3DF
Memory Addresses:
Video RAM: A000-BFFF
Video ROM: C000-C7FF
Note:
You cannot change the addresses of your Fire GL1. In
case of an address conflict, try to modify the I/O address of the
add-on card that causes the conflict.
Resolving Interrupt Conflicts
To support the special graphics processor on the Fire GL1 the system
BIOS should automatically assign a system interrupt to the AGP/PCI
slot where the card is installed. However, there may be problems if
your graphics card does not receive an interrupt or a system interrupt
is used for more than one device. In case of problems try the
following:
♦
Check the system configuration utility of your operating system
for the interrupt assignments.
♦
Inspect your system BIOS setup for an option that says "Assign
IRQ to VGA" or something similar and ensure that this option is
enabled. If you do not have this option and your graphics card
does not receive an interrupt, contact your motherboard
manufacturer for an updated BIOS that has this option.
♦
Some older ISA legacy add-in cards (with jumpers, non-PnP) may
cause a conflict if they are not configured in the ESCD (extended
system configuration data) area of the system BIOS. Please refer
to your computer’s User’s Guide for information on using the ISA
Configuration Utility ICU to add the required legacy card
resources to the system.
Page 40

40
A
T
ECHNICAL
D
ETAILS
♦
F
EATURES AND PERFORMANCE
♦
H
ARDWARE PERFORMANCE
♦
P
IN ASSIGNMENTS
♦
V
IDEO MODES
♦
B
LOCK DIAGRAM
F
EATURES AND PERFORMANCE
Hardware
♦ Design: Single short form factor AGP and PCI versions
♦ AGP ATX/NLX bus, AGP2x version 2.0 compliant, with
sideband addressing
♦ PCI bus 32-bit 33/66 MHz version 2.1 compliant
♦ Graphics Engine: IBM 256-bit Graphics Rasterizer with
integrated
♦ VGA Controller
♦ 2D/3D Raster Engine and Texture Unit
♦ Video Accelerator Pipeline Engine
♦ 2 DMA / BLIT Units
♦ Polygon Setup Processor
♦ 250 MHz / 30-bit Palette DAC, including gamma correction
table
♦ 256-bit memory interface
Page 41

Technical Details
41
♦ 32 MB SGRAM used for unified framebuffer, Z-, Alpha-,
Overlay-, Window ID and Clip/Stencil buffers, and texture
storage
♦ 100 MHz clock on raster engine and frame buffer
♦ 64 KByte BIOS FlashROM, reprogrammable by software
♦ 32-bit RGBα True color 2D and 3D acceleration
♦ TrueColor screen resolutions up to 1920 x 1200, double-
buffered
♦ 24-bit Z- buffer, 4-bit double-buffer, 8-bit single-buffer
overlay
♦ Video engine supports YUV conversion, point and bilinear
scaling
Software
♦ OpenGL 1.2 ICD
♦ Supports Windows NT 4.0
♦ Multiprocessor system support
♦ Multithreaded OpenGL pipeline
♦ Software driver supports up to 4 displays
♦ DDC2B support on all operating systems
♦ Supports Streaming SIMD Extensions (70 New Instructions) in
the new Intel Processors
♦ Customized application settings for individual ISV applications
Page 42

42
Hardware Performance
(As tested on an Intel Xeon 450, 128M RAM, 1280x1024,
TrueColor, 60 Hz.)
♦ 4 Million Polygons/s (25 pixels) sustained
♦ 15 Million antialiased vectors/second sustained
♦ 200 Million Pixels/second fill rate, Gouraud shaded, Z-
buffered, non-Textured
♦ 45 Million Pixels/sec Trilinear Texture fill rate
♦ Viewperf CDRS rate of 116+ on single-processor
♦ systems, and 165+ frames per second on dual
♦ processor workstations
♦ Viewperf ProCDRS
rate of 19+, (190+ CDRS), on Single Intel
Pentium III with Streaming SIMD Extensions
♦ 351 HE 99 WinMarks; 176 BG 99 WinMarks
P
IN ASSIGNMENTS
VGA Output Connector
Pin Function
1
2
3
4
5
6
7
8
9
10
11
12
13
14
15
Red
Green
Blue
not connected
ground (analog)
Red Return (ground)
Green Return (ground)
Blue Return (ground)
+ 5V (fused 750 mA)
ground (sync return)
not connected
SDA (DDC Data)
Horizontal Sync (+)
Vertical Sync (-)
SCL (DDC Clock)
Page 43

Technical Details
43
V
IDEO
M
ODES
All video modes comply with VESA DMT (Discrete Monitor
Timing) or VESA GTF (General Timing Format) standards.
Windows NT
Resolution Color
Bits
αααα Bits
Line Frequency (kHz) Refresh Rate
(Hz)
640 x 480 24 8 31.5, 37.9, 37.5, 43.3 60, 72, 75, 85
800 x 600 24 8 37.9, 48.1, 46.9, 53.7 60, 72, 75, 85
1024 x 768 24 8 48.4, 56.5, 60.0, 68.7 60, 70, 75, 85
1280 x 1024 24 8 64.0, 80.0, 91.1 60, 75, 85
1600 x 1200 24 8 75.0, 81.3, 87.5, 93.8 106.3 60, 65, 70, 75, 85
1792 x 1344 24 8 83.0 60
1920 x 1200 24 8 74.5, 94.0 60, 75
TrueColor - 32 bit (24 color, 8 α)
Note: Due to the limited usefulness of 256 color/8-bit modes for
3D image display (shading, etc.), these modes are not supported for
Windows NT. Most applications support full hardware acceleration
only in TrueColor and HighColor video modes.
Page 44

44
B
LOCK DIAGRAM
AGP2x (PCI) System In te rf ace
OASIS Graphics Engine
Flash
ROM
64KB
Frame buffer
32 MBytes SGRAM
Utility Bus Interface Frame Buffer Interface
System Bus Interface
RGB Out
Sync O ut
DDC2B Ctl
DMA
BLT
Unit
Raster
Engine
Palette
DAC
and I/O
Display
Timing
Generator
Pixel Cache
VGA
Unit
Video
Engine
FAN
Control
Page 45

Glossary
45
B
G
LOSSARY
3D
Three-dimensional
3D-DDI
3D device driver interface, software interface (3D-API) from Microsoft, higher level
3D-APIs like OpenGL and 3DR may be implemented in Windows 95
3DR
3D software interface (3D-API) from Intel, supporting Microsoft's GDI DDI, DCI and
3D-DDI
ADI
AutoDesk Device Interface
AGP
The Accelerated Graphics Port (AGP) is a new technology developed by Intel for
Pentium II based systems. AGP is a dedicated graphics port, separate from the
existing PCI bus. Having a dedicated graphics port does improve overall system
performance; e.g. AGP allows textures used in 3D graphics applications to be
accessed directly from system memory. The rate of AGP 1X information transfer is
twice as fast as PCI transfer rates.
Alpha blending
Creating transparent materials with the help of additional information for each pixel.
Analog
Continuously varying electronic signal to reproduce information. Compare digital.
Analog Display
Monitor that uses variable color control voltages to display a very large number of
colors but requires very few inputs.
ANSI
American National Standards Institute.
Anti-aliasing
Interpolating the colors of neighboring pixels in order to avoid the 'pixel look' of an
image.
API - Application Programmers Interface
An API is a series of software commands used by programmers to implement a
specific set of instructions, such as the creation of 3D graphics, and make those
instructions available to other programs, or to make specific functions of your
operating system, such as Direct3D, available to an application.
Page 46

46
Artifacts
Blurred or "blocky" portions of degraded image quality in a digital video.
ASCII
American Standards Committee on Information Interchange. A standard used by IBM
and compatible computers to represent numbers and characters in binary form.
Bandwidth
Required capacity for the data volume and transmission rate.
BIOS
Stands for Basic Input-Output System. Code in your computer's ROM (Read Only
Memory) that provides the power-on self-test and other operating functions.
Bits per pixel
Number of bits used to represent the color information of a pixel.
Blitter
Fast memory transfer in the graphics board without using the CPU e.g. used for
moving parts of the invisible screen.
BMP (Windows Bitmap)
This format enables Microsoft Windows to display images on devices with similar
capabilities in a consistent way. Save pictures in this format if you wish to continue to
process them later under Windows.
BNC connector
Standardized connector with a bayonet socket, used for connecting a graphics board
to a monitor with separate R(ed), G(reen) and B(lue) inputs.
Booting/Booting Up
Starting the computer. There are two types. Warm booting is accomplished by
simultaneously pressing the CTRL/ALT/DEL keys and can occur only when the
computer is running. A cold boot requires activation of the ON/OFF switch.
Brightness
Brightness of an image is determined by the amount of light emitted by it. No light
(black) therefore means 'no brightness', whereas pure white light means 'maximum
brightness'.
Burst mode
Fastest data transfer mode in which a large burst of pure data is transferred in one
block.
Bus master
PCI bus slots must have bus master capability. This means PCI extension boards may
move data very fast via the PCI bus without using the CPU (similar to Direct
Memory Access).
Bus system
System of parallel data lines to transfer information between individual system
components, especially to expansion boards (e.g. PCI bus).
Page 47

Glossary
47
CGA
IBM Color Graphics Adapter, one of the first color graphics standards. Either
320x200 pixels with four colors or 640x200 pixels with two colors can be displayed.
Chrominance
Portion of a video signal that corresponds to color values and includes information
about hue and saturation. This color component essentially complements the
brightness or luminance component of a color video picture.
Clipping
Limiting the drawing area to any rectangular area by cutting its edges.
Color Display
Type of monitor capable of displaying information in color. It is often called an RGB
(red, green, blue) monitor, referring to the signals needed to drive it.
Contrast
The contrast of an image is the difference between light and dark. A contrastintensive image is one in which contains strong transitions from light to dark. A
contrast-weak image contains transitions that are hardly noticeable.
CPU
Central Processing Unit, which is the main processor chip of a computer, e.g.
Pentium.
D/A converter (DAC)
Converts digital input signal to analog output signal, e.g. image data in the display
memory of the graphics board is converted to video signal for the monitor to
display.
DDC (Display Data Channel)
The VESA Display Data Channel provides a serial data channel between the monitor
and the graphics card - if both, monitor and graphics card support DDC and the
monitor data cable includes the additional DDC wire. DDC support automatically
transfers monitor data (e.g. type, name, max. horizontal frequency, timing definitions)
to the graphics card. The graphics card may also send instruction to the monitor via
the DDC line.
There are different DDC standards: DDC1, DDC2B, and DDC2AB.
Default Mode
Capabilities, resolutions and display mode the system operates with when you start
your computer.
Delta frame
Frame containing only the data that has actually changed since the last frame. Delta
frames are an efficient means of compressing image data. Compare key frame.
Digital
(1) Method of representing sound or other waves as a series of binary numbers. (2)
Tuning method for radios in which the desired freq. is set by digital calculation. (3)
Numeric display of information. Compare analog.
Page 48

48
Digital Display
Also called TTL. A type of monitor that switches signals ON or OFF to determine
display color. Types of digital displays include the IBM Enhanced Color Display or
Monochrome Display.
Digitize
Process of turning an analog signal into digital data.
Digitizer
Input device in the CAD area, used for scanning printed graphics or drawings, i.e.
converting them to digital computer graphics.
Direct3D
3D software interface (3D-API) from Microsoft for Windows 95 and Windows NT.
Uses DirectDraw.
DirectColor
Generic term for TrueColor, RealColor and HiColor. Color information is passed
directly to the D/A converter instead of being translated by a look-up table.
Therefore full color information must be saved for each pixel.
DirectX
Interactive media technologies for Windows 95 and Windows NT. Allows the
development of high-performance interactive applications by extending to the
developers the full performance of the underlying hardware. Includes the
DirectDraw, Direct3D, DirectSound, DirectInput, and DirectPlay APIs.
Dither
Process of representing a color by mixing dots of closely related colors.
DMA
Direct memory access, a method of data transfer where information is transferred
directly between system components without the help of the CPU.
Double buffering
Also called page flipping. The display buffer has double size. The next image can be
drawn in the part of the display buffer that is invisible at first. When it is ready, this
part will be displayed, and in the other part the next image will be prepared. With
this technique animations and games look more realistic than with a simple single
buffer.
DPMS
Display Power Management Signaling; VESA standard which allows energy saving
operation of monitors.
DRAM
Dynamic Random Access Memory, memory for read and write operations which is
non-permanent.
Driver
Part of a software program that interacts with a particular piece of equipment in
your computer system (i.e. video boards, printers, and keyboards). Drivers are often
loaded by your config.sys at system boot.
Page 49

Glossary
49
EEPROM
Electrically erasable programmable read only memory; used like a ROM permanent
memory chip, but can be programmed and erased to replace DIP switches and
jumpers on new graphics boards.
EGA
IBM Enhanced Graphics Adapter, which allows 640 x 350 pixels with 16 colors.
Enhanced Color Display (ECD)
IBM Enhanced Color Display capable of 640 x 350 resolution.
Expansion Board
Device used to expand a computer's capability.
Expansion Slot
Electrical connection within the computer used for the addition of Expansion Boards.
Feature connector
Also called VGA output connector. 26-pin connector for connecting expansion
boards to a graphics board using a flat cable.
Filter
Special effect applied to a video clip or image to alter its appearance. Filters can also
correct problems involving color balance or brightness and contrast.
Fixed Frequency Monitor
Analog monitor which can only sync to a very narrow range of scan frequencies at
certain resolutions and refresh rates.
Fog
Fading effect that depends on an object's distance from the viewer.
Fps
Frames per second. Measurement unit for the frame rate.
Frame
Single video image.
Frame Rate
Number of images shown per time unit. Software videos have a fixed frame rate.
When playing back the actual frame rate achieved can differ to the rate defined in the
video considerably.
Frame size
Width and height of a frame expressed in pixels.
Frequency
Number of samples per second in a sound or video file. The higher the frequency,
the better the quality of the sound or video.
Page 50

50
Gamma Correction
The brightness produced at the face of the display is proportional to the input
voltage raised to the power gamma. This nonlinearity must be compensated to
achieve correct reproduction of the image's brightness. The effect of display gamma
is to darken the midtones relative to the dark and light regions. The gamma
correction adjustment affects the entire screen display. The possible setting range is
0.3 - 4.0. The default setting is 1.0.
Glide ™
Specialized gaming API developed by 3Dfx
GLINT
3D processor from 3Dlabs.
Graphics accelerator
Device the purpose of which is to increase speed in performance-demanding
graphical environments.
Grayscales
Grayscale image consists of different shades of gray (like a black-and-white
photograph). This normally means that 254 different grayscales plus black and white
(= 256) are used.
H-Sync
length of the horizontal synchronization pulse for a monitor, given in microseconds
Hardware Triangle Setup
3D pictures are computed of small triangles for a better 3D look. These triangles are
either generated by software via the CPU or by hardware acceleration for faster
rendering.
Heidi
AutoDesk's Heidi Development Kit helps developing graphics intensive software,
especially the drawing and display portion of the programming, such as render, pan,
zoom, etc.
Hercules Graphics Card (HGC)
Video adapter that provides bit mapped single color graphics.
Hexadecimal Notation
A base-16 numbering system that uses numbers and letters. The hexadecimal
sequence begins: 1 2 3 4 5 6 7 8 9 A B C D E F, then 10, 11 etc.
HiColor
Designates 15 bits per pixel or 16 bpp graphics mode, i.e. 32,768 or 65,536.
Hoops
3D software interface (3D-API) from Ihaca Software.
Page 51

Glossary
51
Horizontal Frequency
Rate at which a monitor displays each scan line, usually measured in kilohertz (kHz).
The value must be set depending on the operating limits of the monitor in order not
to damage it.
Hue
Synonym for color.
I/O Port
Input/Output port. An address used to access a hardware device.
Indexed 16 and 256 Color Images
Indexed color images contain a color table in the file. This table lists all the colors
that could be used in the file. An indexed 16-color image contains a table with 16
color entries (4 bits) whereas for an indexed 256 color image 256 colors are listed
(8 bits).
Other colors can be simulated in a way similar to using grayscales in a black-andwhite image, by simply positioning the pixels in varying densities. The eye then sees
color mixtures that are not actually in the color table.
You can transform images into indexed color images in order to load them into
programs such as Windows Paintbrush, or just to see them on monitors that can
only display 256 or 16 colors.
Interlaced Display
Monitor that refreshes every other scan line (odd or even) every other pass of the
screen. Thus higher graphics resolution is possible, but more flickering occurs than
with non-interlaced monitors which refresh the entire screen (every scan line) every
pass of the screen.
Interrupt Request (IRQ)
Signal used by a device, such as a mouse, to inform the CPU that it is present and
functioning and to trigger certain procedures.
Jumper
Small plastic plug that fits over a pair of pins. When the plug straddles two pins it
makes an electrical connection. The computer makes decisions based on whether
the connection is made or not. A group of jumper pins is called a jumper block.
Kbps
Kilobits per second - a quantity for measuring transmission speeds.
Page 52

52
Line Drawing
This is a hardware function of the graphics processor chip. The CPU supplies only
the starting and ending coordinates of a line. The graphics processor then does the
rest of the work drawing the line.
Luminance
Portion of a video signal corresponding to brightness value - essentially the blackand-white foundation of a color video picture.
MDA
IBM Monochrome Display Adapter.
Monochrome Display
Monitor that displays information in one color only; sometimes called a black &
white display.
Morphing
Special effect in which one shape is gradually transformed into another.
Multi-frequency Monitor
Type of monitor that supports a wide range of horizontal scanning frequencies and
vertical refresh frequencies. This type of monitor accepts inputs from many different
video display adapters.
OpenGL™
3D software interface (3D API) for Windows NT and Windows 95 licensed from
Microsoft and based on Iris GL from Silicon Graphics. The OpenGL gaming sub-set is
part of the OpenGL instructions.
Overlay Planes
Overlay planes can be thought of as a layer on top of the graphics planes where
additional information can be displayed. Since the information in the overlay planes is
separate from the graphics planes, they can be used to increase your rendering
performance. While additional information (like a user-interface menu) in the overlay
plane changes, you do not have to re-render the image in the graphics plane.
Page 53

Glossary
53
Palette
Selection of colors from which to choose. Your board provides as many as 16.7
million simultaneous colors from a palette of 16.7 million. This capability is
sometimes referred to as TrueColor. It is believed that the human eye can discern
no more than 16.7 million colors.
PCI bus
Peripheral Component Interconnect bus - system of parallel data lines to transfer
information between individual system components, especially to expansion boards.
Peripheral Equipment
Auxiliary equipment connected to a computer (e.g. monitor, printer, keyboard, etc.).
Pipelining
Commands from the graphics board to the system memory are queued up and
therefore, all of the available bandwidth on AGP is used.
Pixel
Short for picture element; the smallest field displayed on the monitor; could be
compared to the dots which form images in photos printed in newspapers. Also
called pel.
Pixel clock
Also called pixel frequency. Number of pixels drawn per second in MHz (million
pixels per second). The values are either fixed or freely programmable.
Pixel depth
Also called color depth. Number of bits of color information per pixel. A system
using eight bits per pixel can display 256 colors. A system using 16 bits per pixel can
display 65,536 colors. A system using 24 bits per pixel can display over 16.7 million
colors. Twenty-four-bit color is often called true color because the human eye can
distinguish among approximately six million different colors, or fewer than are
available in a 24-bit color system. 24 bits means 8 bit for each RGB. With 32-bit pixel
depth 8 bits are used in addition for an Alpha Channel.
Polygon Fill
Special hardware (chip) routine used to fill polygons with pixel information.
Primary Display
Monitor which is active when you power on your system.
PS/2 Display Adapter
IBM VGA board for Industry Standard Architecture (AT bus) computers.
Page 54

54
RAM
Random Access Memory - memory that can be read from and written to.
Rasterization
Rendering 3D images to a 2D screen is called rasterization. Real-time 3D graphics
cards take 3D coordinates from the CPU for a given frame of animation and render
them to the screen, calculating perspective, viewpoint, and visibility of objects as well
as rendering surfaces and textures on to surfaces.
RealColor
Normally designates a 15 bits per pixel or 16-bpp graphics mode, i.e. 32,768 or
65,536 colors.
Refresh rate
Vertical refresh rate in Hz indicates how many full images per second are displayed
on the monitor. The higher the refresh rate, the less the display will flicker.
Rendering
Process of displaying an object with shading effects to yield a more natural threedimensional appearance.
Resolution
Number of pixels displayed in horizontal and vertical direction on the monitor. The
higher the resolution, the crisper and sharper the images appear.
RGB8 Color
RGB8 color file types are 3 bit types in which each pixel can have one of 8 colors.
The RGB8 color images are automatically transformed into indexed 16 color images
whereby the 8 colors are retained but space for further 8 colors is created. It is not
possible to transform an existing file into an RGB8 color file type.
RGB Color Model
Monitors use additive mixing of the three basic colors red, green and blue to create
images on the screen with an infinite number of colors. Image data is therefore
processed via data for RGB color combinations. The combinations of the three basic
colors create a color model whose origin is the color black and the opposite value is
the color white.
RGB True Color
RGB stands for red - green - blue. All the colors that are used in this file are created
additively mixing parts of the three basic colors. The parts of the three basic colors
can be varied in 256 steps. If you mix all these colors together a total of 16.7 million
possible color combinations is attainable (3x8 bits = 24 bits, 2 to the power of 24 =
16.7 million). As the human eye can not tell the differences between color hues from
about this level, such an image is termed 'True Color', i.e. 'as in real life'.
ROM
Read Only Memory; memory space in your computer for storing permanent
operating instructions. It cannot be written to.
Page 55

Glossary
55
Saturation
Amount of gray in a color determining the intensity and purity of a color. A color
with a high saturation value is optically very intensive. A color with a low saturation
value appears weak (i.e. with less color content).
Scalability
The existence of independent, high-speed connections between the CPU, graphics
board, and system memory means that applications developers can improve the
functionality and performance of their software by taking more advantage of how
they use all these components in conjunction with each other.
Scaling
Transformation of image data to different sizes.
Shading (Flat, Gouraud, Phong)
Shading or rendering is a way to define the colors on curved surfaces in order to
give an object a natural appearance. To achieve this, the surfaces are subdivided into
many small triangles. The three most important 3-D shading methods differ in the
algorithm used to apply to these triangles:
- Flat shading: In this simplest method each triangle gets one single color, resulting in
a faceted appearance of the surface.
- Gouraud shading: The color shades on a triangle are calculated by interpolating the
vertex colors, resulting in a smooth appearance of the surface.
- Phong shading: The color shades on a triangle are calculated by interpolating the
vertex colors, additionally regarding the normal vector at each triangle (i.e. its
orientation in space).
Single screen
DOS screen and high-resolution graphics screen appear on the same monitor.
Stencil
Special information for each pixel, whether and how it is drawn and redrawn.
Sync
Stable condition which exists when two repetitive events maintain a constant time
relationship; your monitor is in sync with the signals from your board when the
display is correct and stable.
Texture mapping
Wrapping a bitmap around an object, including perspective correction, for example a
wallpaper on a wall or a wood texture on furniture. A video can also be used as
texture map.
TrueColor
Ability to display 16.7 million simultaneous colors (24 or 32 bits per pixel). Color
information saved in display memory is not translated by look-up table, but passed
directly to the D/A converter. Thus full color information must be saved for each
pixel. It is believed that the human eye can discern no more than 16.7 million colors.
See 'palette'.
Page 56

56
V-Sync
Length of the vertical synchronization pulse for a monitor, given in microseconds.
Variable Frequency Display (VFD)
Monitor that is capable of displaying a wide range of resolutions through its ability to
sync to a wide range of horizontal and vertical scan frequencies.
Vertical Frequency
Rate at which the monitor screen is refreshed. Usually measured in hertz (Hz).
VESA
Video Electronics Standard Association - consortium for the standardization of
computer graphics.
VGA
IBM Video Graphics Adapter with a standard resolution of 640 x 480 with 16 colors.
VRAM
Video Random Access Memory - memory chip for fast graphics boards.
YUV Color Palette
The image information of individual frames is comprised of a brightness part and 2
color parts. The color part is calculated by evaluating the difference to the brightness
value. This method was first utilized in television technology.
Z-Buffer
3-D depth information (position in the third dimension) for each pixel.
Zooming
Increased display of an image section.
Page 57

Trademarks
57
C
T
RADEMARKS
Trademarks
Adobe and Acrobat are trademarks of Adobe Systems Incorporated,
which may be registered in certain jurisdictions.
ATI is a registered trademark of ATI Technologies Inc. in Canada,
the United States and/or other countries.
Fire GL is a trademark of ATI Technologies Inc. in Canada, the
United States, and/or other countries.
MS-DOS, Windows, Windows NT, Windows 2000, DirectDraw and
Direct3D are either registered trademarks or trademarks of
Microsoft Corporation in the United States and/or other countries.
Pentium is a registered trademark and AGP (Accelerated Graphics
Port) is a trademark of the Intel Corporation.
IBM® is a registered trademark of International Business Machines
Corporation.
OpenGL is a registered trademark of Silicon Graphics, Inc.
AutoCAD, AutoShade, 3D Studio and HEIDI are registered
trademarks or trademarks of AutoDesk Inc.
All other trademarks, service marks, and / or registered trademarks
are the properties of their respective owners and / or
manufacturers.
Page 58

58
D
EMI C
OMPLIANCE
I
NFORMATION
FCC Compliance Information
FCC - DECLARATION OF CONFORMITY
FOR A CLASS B DIGITAL DEVICE
We, the Responsible Party
ATI Research Inc.- Fire GL Graphics
4 Mount Royal Avenue, Marlborough, MA
01752-1978 USA; Phone: (508) 303-3900
declare that the product Fire GL1 AGP/PCI
complies with Part 15 of the FCC Rules. The compliance with those
standards is confirmed in accreditation certificates.
Operation is subject to the following two conditions:
(1) This device may not cause harmful interference, and
(2) This device must accept any interference received, including
interference that may cause undesired operation.
♦ The use of shielded cables for connection of the monitor to the
graphics card is required to ensure compliance with FCC regulations.
♦ Changes or modifications to this unit not expressly approved by the
party responsible for compliance could void the user's authority to
operate this equipment
Industry Canada Compliance Statement
ICES-003
This class B digital apparatus meets all requirements of the Canadian
Interference-Causing Equipment Regulations.
Cet appareil numérique de la classe B respecte toutes les exigences du
Règlement sur le matériel brouilleur du Canada.
Page 59

EMI Compliance Information
59
CE Compliance Information
EMC Directive 89/336/EEC and Amendments 92/31/EEC and 93/68/EEC,
Class B Digital Device
EN 55022/CISPR 22, Limits and Methods of Measurement of Radio
Interference Characteristics Information Technology Equipment.
EN 50082-1, Generic Immunity Standard for Residential, Commercial and
Light Industrial Products
(EN 61000-4-2:96, EN 61000-4-3:97, EN 61000-4-4:96,
EN 61000-4-6:97)
Directive EMC 89/336/CEE et amendements 92/31/CEE et 93/68/EEC,
dispositif numérique de Classe B
EN 55022/CISPR 22, Limites et méthodes de mesure des caractéristiques
d'interférences radiophoniques, Matériel des technologies de
l'information.
EN 50082-1, Norme sur l'immunité générique pour produits domestiques,
commerciaux et industriels légers.
(EN 61000-4-2:96, EN 61000-4-3:97, EN 61000-4-4:96,
EN 61000-4-6:97)
EMC Richtlinie 89/336/EEC und Änderungen 92/31/EEC und 93/68/EEC,
Digitales Gerät der Klasse B
EN 55022/CISPR 22, Beschränkungen und Verfahren der Messung von
informationstechnischen Ausrüstungen mit Funkstörmerkmalen)
EN 50082-1. Allgemeiner Unempfindlichkeits-Standard für Haushalt- und
kommerzielle Produkte sowie Erzeugnisse der Leichtindustrie
(EN 61000-4-2:96, EN 61000-4-3:97, EN 61000-4-4:96,
EN 61000-4-6:97)
 Loading...