

Page 1

ATI- T V
TV Tuner and Video Input Card for the ATI Multimedia Channel
™
User's Guide
Version 1.1 P/N: 107-70014-11 Rev. a
© Copyright 1996 by ATI Technologie s Inc.
All rights reserved, including those to reproduce this manual or parts thereof, in any form
without the express written permission of ATI T echnologies I nc.
Page 2

Disclaimer
The manufacturer (MFR) reserves the right to make changes to this document and the
products which it describes without notice. The MFR shall not be liable for technical
or editorial errors or omissions made herein; nor for incidental or consequential
damages resulting from the furnishing, performance, or use of this material.
The MFR makes no representation that the interconnection of products in the
manner described herein will not infringe on existi ng or future patent rights, nor do the
descriptions contained herein imply the granting of license to make, use or sell
equipment constructed in accordance with this description.
Features and specifications are subject to change without notice. Trademarks and/or
registered trademarks are the properties of their respective owners:
ATI, ATI-TV, ATI Multimedia Channel — ATI Technologies Inc.;
Pentium, Pentium Pr o — Intel Corporation;
Windows, W indows 95, — M icr osoft Corp.
ii
Page 3

Table of Contents
1. Introduction .............................................................................1-1
Features .............................................................................................. 1-1
What You'll Need ............................................................................... 1-2
2. Installing the ATI-TV Card .....................................................2-1
Instal ling the ATI-TV Card ............................................................... 2-2
Instal ling the AMC Cable .................................................................. 2-2
Connecting the Audio ........................................................................ 2-3
ATI-TV Connectors ........................................................................... 2-4
Instal ling the Software ....................................................................... 2-5
3. Ove rvi ew ... .... .. .. ..... .. ..... .. .... ... .... .. .. ..... .. ..... .. .... ... .... .. .. ..... .. ..... . 3-1
Starting ATI VIDEO PLAYER ......................................................... 3-1
The Task Control Panel ..................................................................... 3- 1
Switching Modes ............................................................................... 3- 2
ATI-TV—The Control Panels ........................................................... 3-2
Controlling the audio volume ....................................................... 3-3
The Display Panel .............................................................................. 3- 3
Sizing the Display panel ............................................................... 3-4
Attaching and Detaching Panels ........................................................ 3-4
Online Help ........................................................................................ 3-5
Setting up ATI-TV ............................................................................. 3-5
4. Playing Media Files ................................................................4-1
Playing a File ..................................................................................... 4-2
Playing Interactive Discs (Video CD 2.0) ......................................... 4-2
5. The TV Tun er . .. .. . .... .. ... .. .. ... .. .. .... .. .. ... .. .. ... .. .. .... . .. .... .. .. ... .. .. ... ..5 -1
Autoscanning for TV Channels ......................................................... 5-2
Zooming and Unzooming. ................................................................. 5-2
Creating a Video Desktop .................................................................. 5-3
Displaying Closed-Captioned text ..................................................... 5-3
Usi n g Hot Words ............................................................................... 5-4
Using Channel Lockout ..................................................................... 5-5
6. Capturing Video and Audio ..................................................6-1
Capturing Still Frames ....................................................................... 6-2
Capt uring Video ................................................................................. 6- 2
Playing Captured Video and Audio ................................................... 6-3
iii
Page 4

7. European Teletext ..................................................................7-1
8. Regulatory Compliance Statement ....................................A-1
9. Troubleshooting ....................................................................B-1
10. Glossary .................................................................... Glossary-1
iv
Page 5
Chapter 1
Introduction
I ntro ductio n
Now you can watch T V, videos, or
games on your computer !
ATI-TV lets you watch up to 125
cable television channels and 70
antenna channels in smooth, fullmotion video on the w hole screen
or in a window.
You can capture still frames and
movie clips, channel surf, or
create your own TV transcripts.
Get real-time information when you
want it. Move the TV window, zoom it to
full-screen, and capture video images.
Featu res
• Television quality video in a window and full screen
• C omposite video and S-Video inputs for VCR, video camera,
laser-disc player, video game consoles, etc.
• Still image and live video capture with a simple mouse click
• C losed captioning (NTSC only) support including transcript
creation and Hot Words that alert you when the ATI-TV is
broadcasting information that you want to watch
• E urop ean Teletext s upport (PAL only)
• M PEG-1 vide o playback for Windows™ 95 and
Windows™ 3.1x, full-screen, at up to 30 frames per second on
most P entium PCI systems or better. Also supports Video CD 2.0
and Karaoke—including dual-channel audi o, CDi, Games, and
reference application titles
1-1
Page 6

Introduction
What You'll Need
• Computer System — Intel or compatible 486/Pentium system,
• Monitor — VG A, supporti ng minimum 640x480 resolution
• ATI graphics accelerator with an AMC (ATI Multimedia
• CD-ROM drive—quad-speed recommended—is required to play
• Operating System — One of:
wit h at l east 4MB of syste m m emor y (8MB of sys tem memory for
Windows 95™).
Channel) connector
If your compu ter system already has an AMC connector, then you
can connect the ATI-TV directly into your motherboard. Please
see your system documentation for more information.
MPEG titles
Windows™ 3.1x, or
Windows™ 95 (recommended)
• Sound card and speakers for audio playback
or
Amplified speakers for audio playback
• Expansion S lot — 16-bit ISA
1-2
Page 7

Installing the ATI-TV Card
Chapter 2
Installing the A TI-TV Card
Stati c electricity can damage s ensitive electronic com ponents.
Discharge your body’s static electric charge by touching a
grounded surface — for e xample, the metal area of the computer
chas sis — before performi ng any har dware procedur e.
The manufacturer assumes no liability for any damage caused by
improper install ation of any components by unauthori z ed service
personnel. If you do not feel comfortable performing th e
instal lati o n, consult a qualified computer technician.
Damage to system components, the accelerator card, and injury
to yourself may result if power i s applied durin g instal lati on.
Important Safety Instructions
• GROUNDING – CAUTION: FOR CONTINUED PROTECTION AGAINST RISK OF
E
LECTRIC SHOCK AND FIRE, THE ATI-TV SHOULD BE INSTALLED ONLY IN
P
ERSONAL COMPUTERS EQUIPPE D WITH A THREE-WIRE GROUNDING PLUG, A
P
LUG HAVING A THIRD (GROUNDING) PIN. If you are unable to insert the plug
into the outlet, contact your electrician to replace your obsolete outlet.
• OUTDOOR ANTENNA GROUNDING – Since an outdoor antenna or cable system
is connected to the product, be sure that the antenna or cable system is grounded
so as to provide some protection against voltage surges and built-up static
charges. Article 810 of the National Electrical Code, ANSI/NFPA 70, provides
information with regard to proper grounding of the mast and supporting
structure, grounding of the lead-in wire to the antenna discharge unit, size of
grounding conductors, location of antenna-discharge unit, connection of
grounding electrodes, and requirements for the grounding electrode.
• POWER LINES – An outside antenna system should not be located in the vicinity
of o verhead power lines or other light or power circuits, or where it can fall into
such power lines or circuits. When installing an outside antenna system,
extreme care should be taken to keep from touching such power lines or circuits
as contact with them may be fatal.
2-1
Page 8
Insta lling the ATI- TV Card
Installing the ATI-TV Card
1. Power-off the computer, then disconnect the power cable.
2. Remove the computer cover. If necessary, consu lt your computer
syste m manual for removal instructions.
Remem ber to discharge your body’s static electric ity by touching the
metal area of the computer chassis.
3. Select an empty ISA expansion slot for the ATI-TV card.
4. With the slot cover removed, grasp the card by the top edge and
carefully seat it f irmly into the slot.
5. Fasten the retaining bracket w ith a screw.
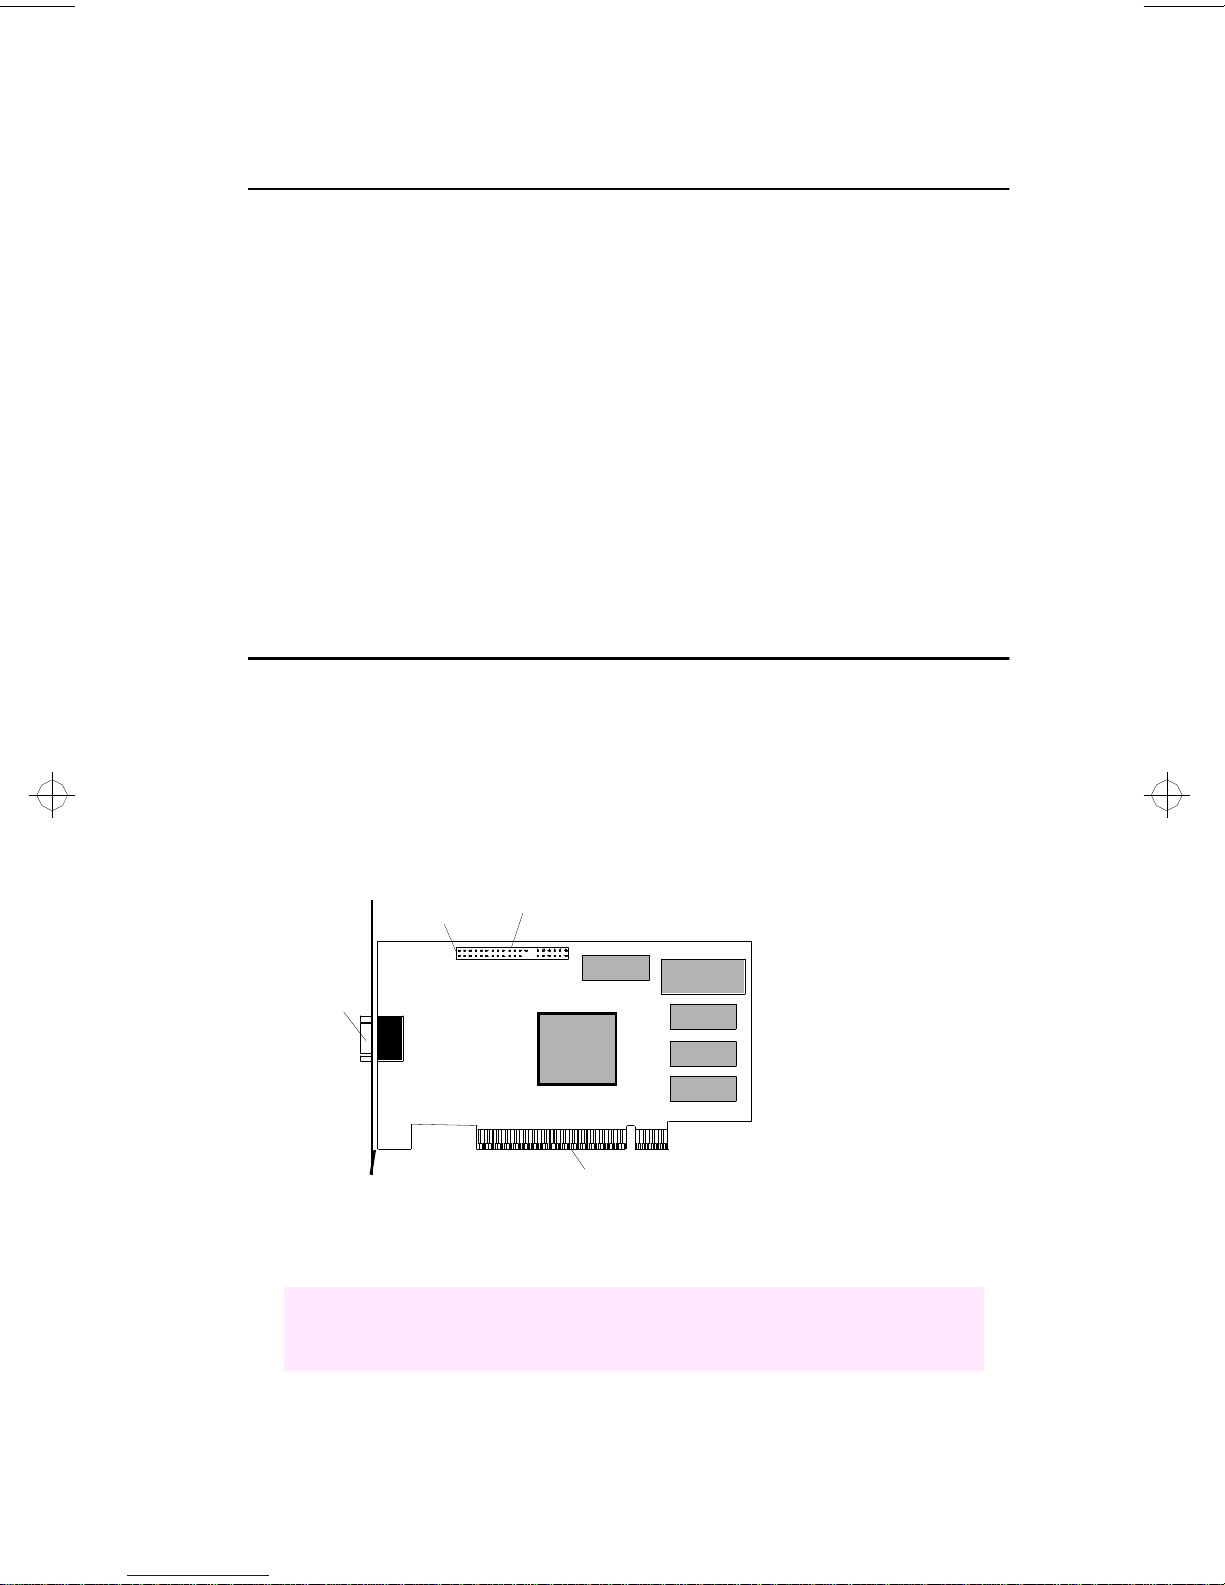
Installing the AMC Cable
1. Locate the AMC Connector on your ATI graphics accelerator. (See
the Diagram below.)
If your computer system already has an AMC connector, then you can
connect the ATI-TV directly into your motherboard. Please see your
system documentation for more information.
Pin 1
Video
Output
Connector
AMC Connector
PCI Connector
Your ATI graphics
accelerator may not
look exactly as shown.
2. Align the red stripe on the ribbon cable from the ATI-TV card with
pin 1 of the AMC Connector.
• The red stripe on the ribbon cable indicates the pin 1 position.
• The ribbon cable must not be longer than 10 inches.
2-2
Page 9
Installing the ATI-TV Card
3. Pressing gently, connect the ribbon cable to the AMC connector on
the ATI graphics accelerator.
4. Re-install the computer cover.
5. Connect your TV cable or video input to the ATI-TV card. For more
inform ati on about th e connector s on the ATI-TV, please see “ATI- TV
Connectors” on page 2-4.
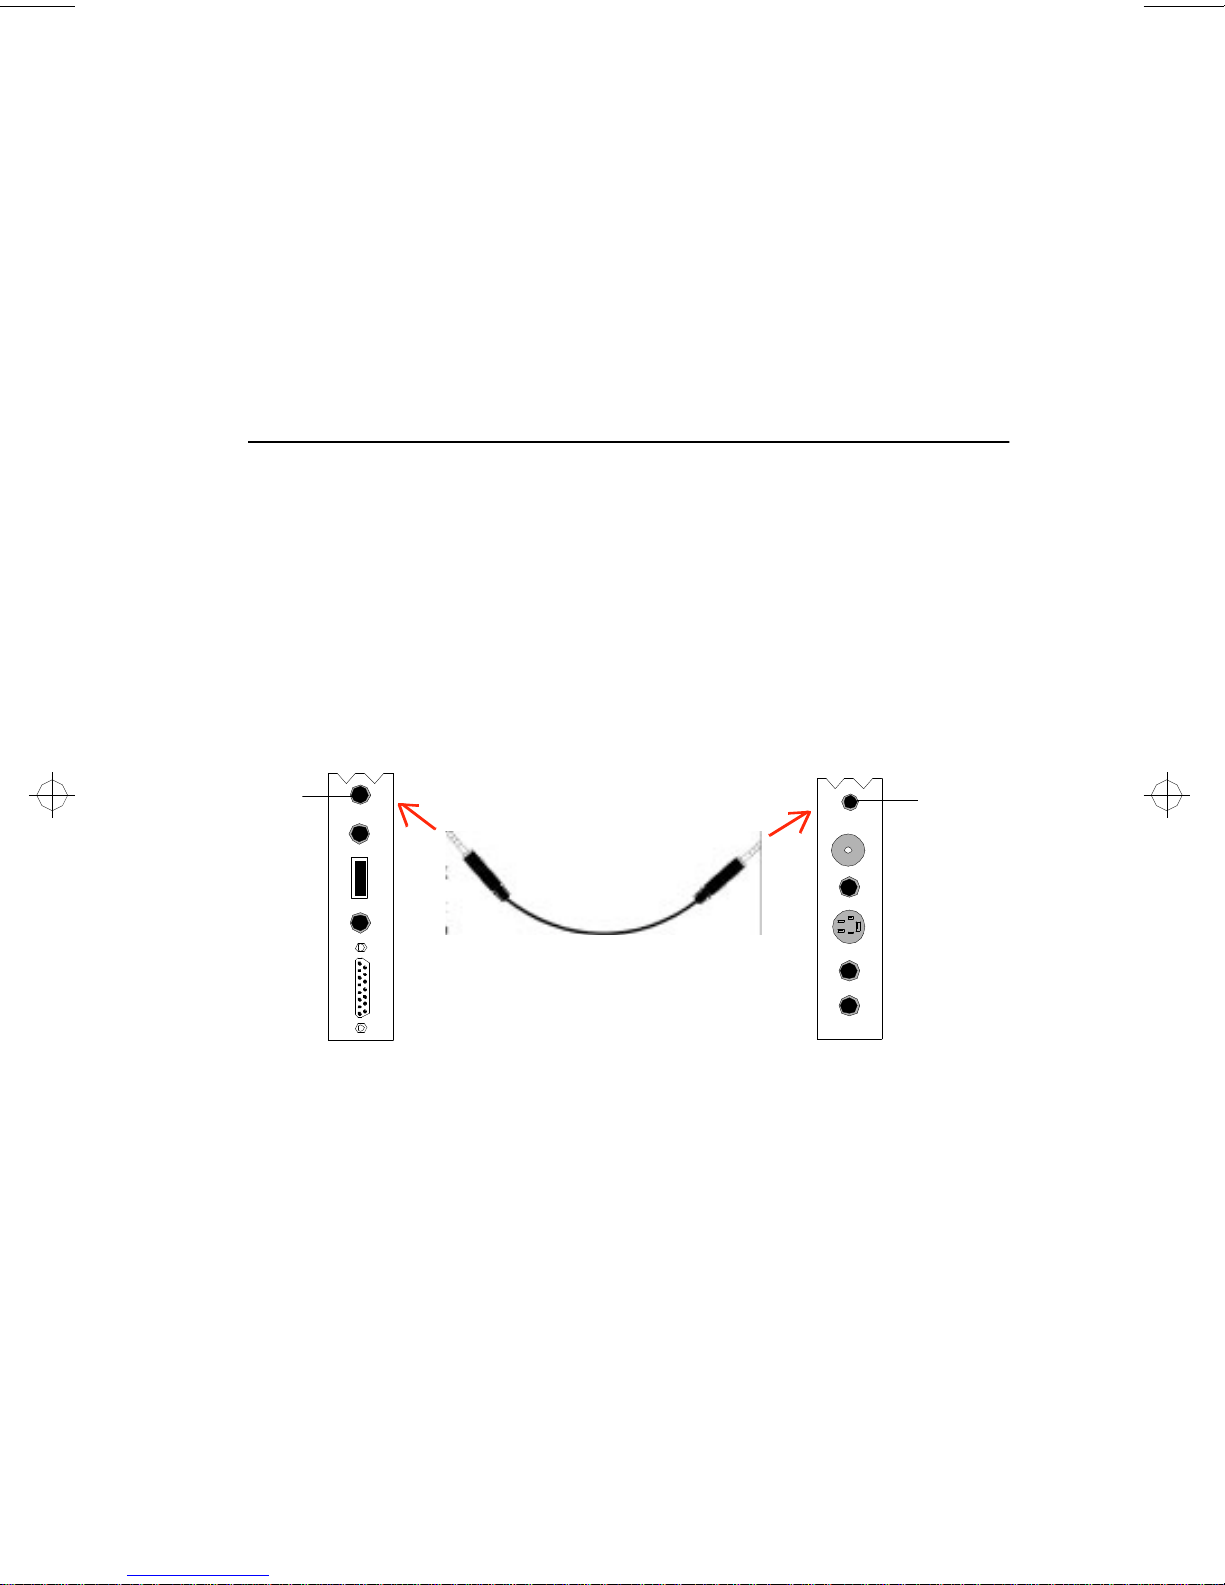
Conn ecting the Audi o
If y ou have a sound card
1. Looking at the back of your computer, locate the audio out connector
on the ATI-TV card.
2. Locate the line in connector on your sound card. If necessary, refer to
the documentation supplied with your sound card.
3. Att ach one end of t he sound cable to t he Audio out on the ATI- T V and
the other end to the Line in on your sound card. (see diagram below)
Line in
Your sound card may
not look exactly as shown.
Sound Card
ATI-TV
Audio
Out
If you have an amplified speaker system
If you have an amplified speaker system, you can simply connect the
speakers to the audio out on the ATI-TV card.
2-3
Page 10
Insta lling the ATI- TV Card
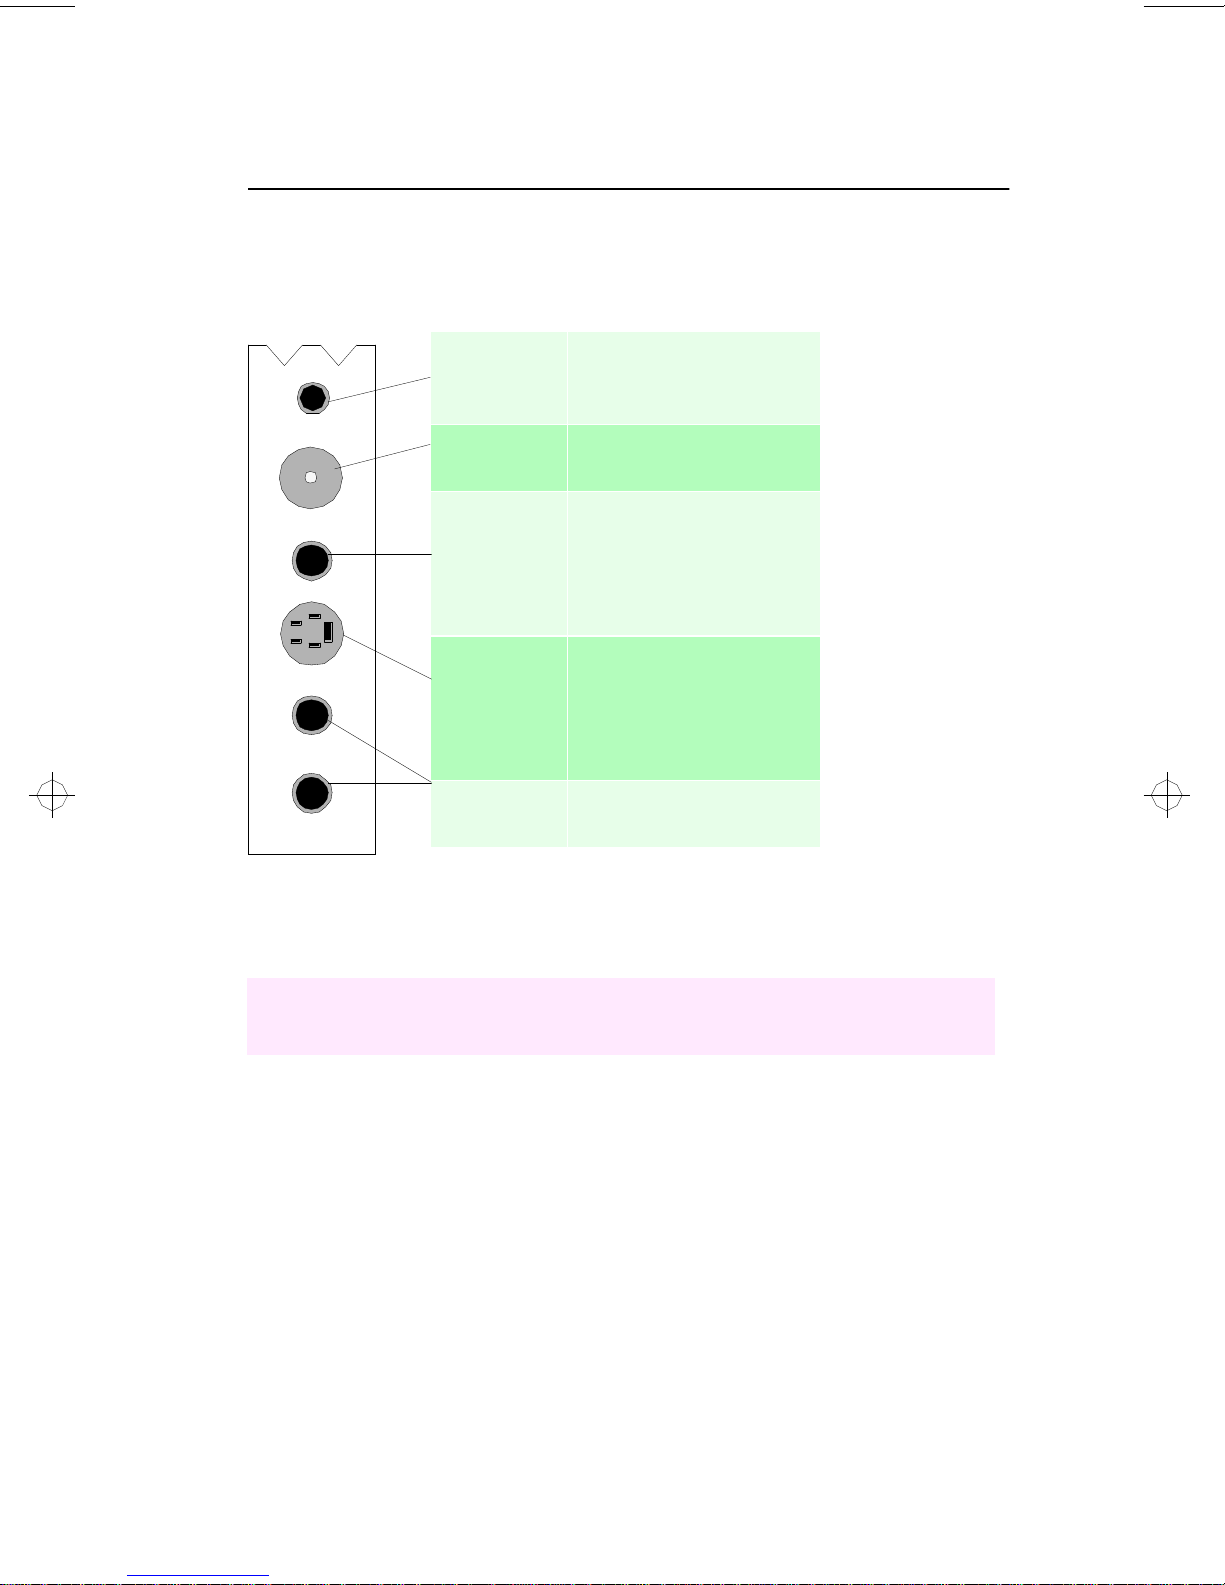
ATI-TV Connectors
The TV Tuner provides stereo audio input, audio output, and three video
input connectors:
For audio output to your
Audio Out
sound card or powered
speakers
CATV
Composite
Video
Input
S-Video
Input
Stereo
Audio Input
For input from cable TV
or antenna.
Use a standard cable
fitted with RCA phono
plugs to attach your
video camera, VCR, or
laser disk player.
For input from S-VHS
sources. The enhanced
connector (with its
7 pins) adds control and
power pins.
For stereo audio input
from external sources.
TIP: If your video source provides Composite video and
S-Video, S-Vid eo will produce better results.
2-4
Page 11

Installing the ATI-TV Card
Installing the Software
Before installing the software, you must have ATI’s mach64 enhanced
graphics driver version 2.2 or greater installed on your system. For more
informat ion about installing enhanced drivers, see the User’s Guide for
your ATI graphics accelerator.
To install the ATI VIDEO PLAYER from CD-ROM
1. Insert the ATI INSTALLATION CD-ROM into your CD-ROM dr ive.
If Windows 95 runs the ATI INSTALLATION CD-ROM automatically,
proceed to step 5.
2. In Windows 95, click Start.
or
In Windows 3.1x, pull-down the File menu in the Program Manager.
3. Select Run.
4. Type the following:
D:\ATISETUP
(If D is not your CD-ROM drive, substitute D with the correct drive
letter.)
5. Click ATI VIDEO PLAYER.
6. Follow the on-screen instructions to complete the installation.
To install the ATI VIDEO PLAYER from diskette
1. Insert the diskette labeled ATI VIDEO PLAYER i nto the disk drive.
2. In Windows 95, click St ar t.
or
In Windows 3.1x, pull-down the File menu in the Program Manager.
3. Select Run.
4. T ype the following:
A:\SETUP
( To in stall fro m drive B, substitute B: for A:)
5. Follow the online help instructions to complete the installation.
2-5
Page 12

Overview
Chapter 3
Start ing ATI VIDEO PL AYER
In Win dow s 9 5
1. Sta r t Windows 95.
2. Click Start.
3. Select Programs.
Overview
4. Select ATI Multimedia.
5. Cli c k t h e ATI V I DEO PL AY ER.
In Win dow s 3 .1x
1. Sta r t Windows .
2. Double-click the ATI DeskTop Program Group.
3. Double- click the ATI VIDEO PLAYER icon.
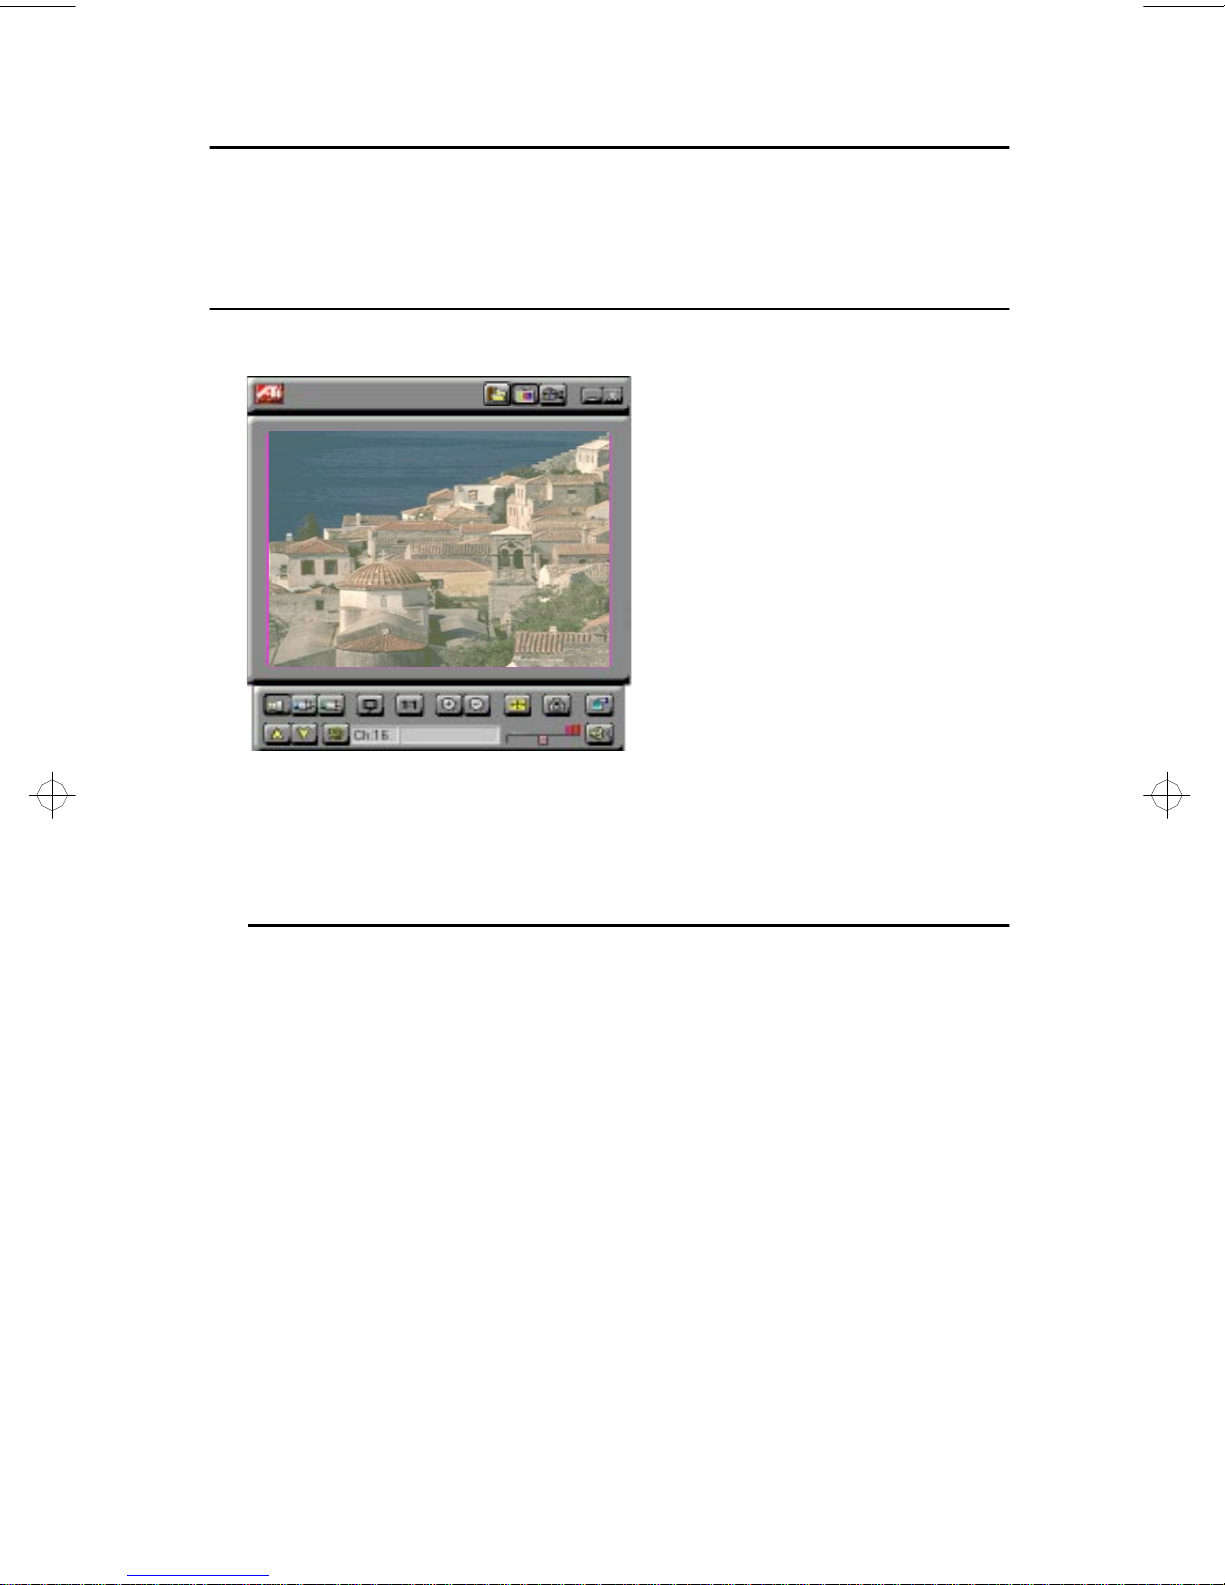
The Task Co ntro l Panel
The Task contr ol panel indicates what mode the player is in and what it’s
doing. (Your Task control panel m ay not look exactly like the
illustr ation—only installed or available features will have controls.)
Media
Playback
CaptureTeletextTV Tuner
Instantly select the function you want – the Task control panel
shows you what’s happening.
ExitMinimize
3-1
Page 13

Overview
Sw itchin g Mo des
Use the Task control panel buttons to switch between Media Playback,
TV, Capture, and Teletext modes.
Media
Playback
TV
Capture
Teletext
Playback MPEG and AVI video
files.
Display live video sources,
such as television programs.
Capture still images,
video sequences, or audio-only.
(Europe only)
Display European teletext.
See Chapter 4
See Chapter 5
See Chapter 6
See Chapter 7
ATI-TV—The Control Panels
When you sel ect a mode in the Task control panel or press a shortcut key,
the Control panel changes to the appropriate control panel f o r that mode.
All modes provide context-sensitive help, see “O nline Help” on page 3-5.
Media
Playback
TV Tuner
Teletext
Capture
3-2
Page 14

Overview
Media
Playback
TV Tuner Press F6
Teletext Press F7
Capture Press F8
Press F5
Contr ol ling the audi o volu me
The TV Tuner panel has a volume contr ol slider. Us e
the mous e to move the sl ider to increase and dec rease
the audio volume.
Mut ing the audio vo lume
The TV Tuner panel has a Mute button that you can click to
temporarily turn off the audio. Clicking the button again or
moving the volume control slider turns off muting.
The Display Panel
Move the Display panel, zoom it to fullscreen, and minimize it as an icon.
The Display panel is the “screen”
where your media plays. It’s a
familiar, TV-styl e display that you
can resize, place on top of other
windows, and position
automatically in one of nine
locations on the screen.
3-3
Page 15

Overview
Sizing the Display panel
You can resize the Display panel using the mouse, the Control panel
buttons, or CTRL key combination:
Increase size of
Display Panel
Decrease size
of Display Panel
Play full-screen CTRL + F
In TV mode, when you play full-screen video, the Playback panel
becomes “thin”, so that you can move it to the top or bottom of your
screen. To show/hide the thin Playback panel, press Alt+Space bar.
You can also use the CTRL key to display these preset sizes:
160x120 pixels. CTRL+1
240x180 pixels. CTRL+2
320x240 pixels. CTRL+3
640x480 pixels. CTRL+4
CTRL + Up Arrow
CTRL + Down Arrow
Toggle between full
screen and current size.
CTRL+F
ALT+F
Attaching and Detaching Panels
You can detach ATI-TV Control panels from the D isplay panel, move
them to any location on your screen, and re-attach them. Panels attached
to the Display panel share the Display panel's snap window to: and
always on top settings (For more informa tion, see Display in “Setting up
ATI-TV” on page 3-5).
When you display closed-captioned text in a w indow, you can attach and
detach the closed-captioned window.
3-4
Page 16

Overview
To detach a panel:
Whil e holding down the Shif t key, click the panel whe re the panel edges
meet, then drag it away.
To attach a panel:
Drag it near the Display panel until its outline changes, then release the
mouse button. The panels will snap back together.
Online Help
Context-Sensitive Help. Context-sensitive help is always available in
each panel. Just press the F1 key.
Bubble Help. Simply move the mouse cursor over a control to see a
description of its purpose. As you become familiar with ATI-TV, you
may want to turn off help — click the Show Bubble Help checkbox in
the Display configuration dialog (For more infor mation, see Display in
“Setting up ATI-TV” on page 3-5).
Setting up ATI-TV
ATI-TV ’s defaul t settings should work well for most uses. You can also
use the Setup dial ogs to fine-t une the settings for your part icul ar purpose s.
When you click the Setup button in the Task control panel, you can
choose a dialog to set up the following (some dialogues only appear in
certain modes):
Sets up the display’s general appearance and functions.
• Adjust panel size.
• Set panel snap-to grid location and always-on-top.
Display
• Turn bubble help on/off.
• T u rn fixed aspect ratio on/off.
• Assign a Hotkey to hide the player.
• R eplace your desktop patt ern with live TV.
3-5
Page 17

Stil l
Capture
Video
TV Tuner
Overview
Controls how still frames are captured. Where
applicable, you can specify where to store them.
• Ca p ture sti ll frames to the clipboard, to a numbered
file (for example, image01.bmp, image02.bmp,
etc.), or to a window.
• Specify printer options for the captured images.
• Ad just color, tint (NTSC only), contrast, and
brightness.
• S elect input connector (TV, composite, or S-Video).
• S elect broadcast standard. (NTSC, PAL, SECAM).
(Feature enabled only on selected boards.)
• Display one field, both fields, or interlaced.
• A utoscan for active channels and add them to a list.
• Add, delete, and name channels in the list.
• Select antenna or cable input and cable standard.
• Use slider to change channel assignments.
• L ock out selected channels.
Closed
Caption
(NTSC
video only)
Hot Words
Capture
Advanced
MPEG
• Display closed captioned text over live video, in its
own window, or not at all.
• Select solid or shaded background for text.
• T ranscribe closed captioned text to a text file.
• E nable/disable Hot Words in the Closed Captioning.
• Add or change Hot Word selection.
• S et Hot Word to star t transcr ibing automatically.
• S elect frame rate.
• Select video format and video compression type.
• C a p ture audio and select audio format.
• Capture to memory or disk.
• Limit capture to pre-set amount of time.
• Pre-allocate maximum file size.
• Select scale in frames or time.
• Update the slider position.
• Play CD automatica lly if present.
If you need additional information about these Setup dialogues, click on
the Help button. If you experience any difficulty setting up or running
ATI-TV, please refer to “Appendi x B, Troubleshooting”.
3-6
Page 18

Playi ng Me di a F iles
Chapter 4
Click the Media
Playback button
in the Task
co ntr ol panel t o
s witch to
playback mode.
Playing Media Files
The Control
panel changes to
Play /
Stop
Full
Screen
Skip
Back
Skip
To End
File
Name
Next
Track
Open
File
Setup
Dialogs
the Playback
panel.
To view the
Playback panel
in Full Screen
Loop
Rewind
Skip
Forward
Previous
Track
Volume
Control
Volume
Mute
mode, press F2.
You can use the Media Playback panel to play the following media files:
• MPEG-1 digital audio and video, including Karaoke—including
dual-channel audio, CDi, Games, and reference application titles
• .AVI video files
4-1
Page 19

Playing Media Files
Playing a File
1. In the Playback panel, click the File Open button.
2. Select a file from the list.
3. Click Add, then click OK.
4. C l ick the Play button.
5. The file plays in the Display panel.
Pl ayi ng I nter act i ve Dis cs ( Vi deo CD 2.0 )
Selection
Play
Menu
Play Return
Selection
Select Audio Track for
Dual-Mode MPEG CD
Play Default
Selection
Setup
Dialogs
When playing
Video CD 2.0
discs, the
Control panel
changes to this
interactive
panel.
4-2
Page 20

The T V Tune r
Chapter 5
The TV Tun er
The TV Tuner displays cable or broadcast te levision and smooth, fullmotion video on the w hole screen or in a window. You can use the TV
Tuner to :
• Watch television on your computer as you work in another
software application.
• Watch a videotape or laser disk movie on your computer.
• Capture, save, and print TV and video images.
• Display and record closed-captioned text.
• Replace your desktop with live TV display.
The ATI-TV accepts a wide range of video inputs — from just about any
device that has a VIDEO OUT connector: TV antenna or cable, VCR,
Video camera, laser disk, and video games.
Click the TV
Tuner butt on in
the Task cont rol
panel to switc h t o
TV mode.
Th e Cont ro l
panel changes to
the TV control
panel (in this
illustration,
CA TV is
selected).
C ATV S-V ideo
Channel
Down
Up /
Composite
Previous
Channel
Channel
Numbe r
Closed
Caption
Channel Name
Unzoom
Enlarge /
Reduce
Display
Full
Screen
Capture
Volume
Control
Setup
Volume
Mute
You can use the Setup button to adjust color,
select the broadcast standard, add and delete
channels, and set closed-caption options (see
Video, Tuner, and Closed Caption in
“Setting up ATI-TV” on page 3-5.)
5-1
Page 21

The TV Tuner
Aut oscan ning for TV Ch annel s
When you click the Auto Scan button in the Tuner setup dialog (see
Tuner in “Setting up ATI-TV” on page 3-5), the TV Tuner scans for all
available channels and stores them. When scanning is complete, you can
type in a name for each channel. Before scanning, use the drop-down list
box to select the broadcast format and the cable standard.
If you want to change channel assignments, you can use the slider that
appears at the top of the dialog. Fo r example, you could assign the actual
channel 5 to the ATI-TV’s channel 2.
• Double-clicking the slider returns the current channel’s
assignment to normal; for example; selecting channel 2 tunes in
channel 2.
• Clicking the Auto Scan button returns all of the channel
assignments to normal.
Zooming and Unzooming.
You can select and
enlarge a portion of the
display by dragging the
mouse across the
Display Panel
To select and e nlarge a po rtion o f the display:
1. Click within the display panel.
2. Hold down the mouse button and draw a recta ng le ar ound t he are a you
want to zoo m
To return your display to normal, click the Unzoom button in
the Control panel.
5-2
Page 22

The T V Tune r
Creating a Video Desktop
• To replace your desktop pattern with live TV display when you
minimize the ATI-TV, click the Setup button. Click the Video
Desktop checkbox in the Display configur ati on dialog (see
Dis play in “Setting up ATI-TV” on page 3-5).
Displayi n g Cl osed-Cap t ion ed text
You can display closed-captioned text that’s broadcast with NTSC
television programming. ATI-TV also displays closed-captioned text in
NTSC videotapes that contain closed-captioned material.
• In full-screen, the text overlays the video, as in standard TV.
• When you play video in a window, you can display the text in a
separate window.
To dis play c losed -cap tion ed text:
Click the Closed Caption button in the TV Tuner panel.
• To display the text overl aid on the video, click the Setup button.
Click the Display over video checkbox in the Closed Caption
configuration dialog (see Closed Caption in “Sett ing u p ATI- TV”
on page 3-5).
To tr an scri b e c l os ed -captioned text:
Click the Create Transcript in File... checkbox in the Closed Caption
configuration dialog (see Closed Caption in “Setting up AT I-TV” on
page 3-5).
5-3
Page 23

The TV Tuner
Us ing Ho t Word s
Have your computer watch TV for you! When you turn on Closed
Capti oning, you can specif y words and phrases that ATI-TV will detec t in
the closed-captioned text. You set Ho t Words to begin transcribing the
text or to maximize the TV Tuner when the Hot Words appear.
You specify words that you want using the Hot Words configuration
dialog. (see Hot Words in “S etting up ATI-TV” on page 3-5).
To select Hot Word s
1. Click on the Setup button in TV Tuner mode.
2. Click on the Hot Words configuration dialog.
3. Type in the Hot Words that you want.
4. Choose the type of match you want:
• Always Takes effect when the Hot Word occurs.
• With Takes effect when the Hot Word occurs, and is
immediately followed by a Second Word
• Without Takes effect when the Hot Word occurs, if it is not
followed by a Second Word.
• Within Takes effect when the Hot Word occurs, if it is within a
definable number of words of a Second Word.
5. Type in a Second Word where required, then click Add.
6. To enable the ATI-TV to maximize from a minimized state, click the
Enable Hot Words box.
7. To enable the Hot Word to trigger transcription, click the Enable
Transcripting on match box.
To enable/disable specific Hot Words
• To enable specific Hot Words, select the Hot Word from the list
and click on the Enable/Disable button
+ appears before enabled Hot Words
- appears before disabled Hot Words
The Closed Caption button in the TV Tuner panel m ust be enabled
for Hot Words to function.
5-4
Page 24

The T V Tune r
Us ing Ch anne l Lockout
Channel Lockout prevents anyone without the correct password from
viewing selected TV channels. The first time you lock out a channel, a
Channel lockout dialog box prompts you for a four character passw ord.
If you forget your password, you will have to uninstall and re-install
your ATI-TV software to view password protected channels.
To lockout a channel:
1. Click on the Setup button in TV Tuner mode.
2. Click on the TV Tuner configuration dialog.
3. Select the channel you want to lockout, and click on the box to the right of
the channel name.
4. Type in a four character password.
5. Retype the password.
The box to the right of the channel name turns into a padlock.
6. Clic k OK.
• The channel up and channel down buttons in the TV Tuner panel
skip locked-out channels. The only way to select a locked-out
channel is to enter the channel name or number, and type the
password when prompted.
• When a password is active, you will be prompted to enter it when
you select the T V Tuner dialog. If you do not enter the password,
the TV Tuner di a log will open, but all controls will be disabled.
This prevents anyone fro m changing tuner settings if they do not
have the correct password.
To un loc k a chann el:
1. Click on the Setup button in TV Tuner mode.
2. Click on the TV Tuner configuration dialog.
3. Type in your four character password.
4. Select the channel you want to unlock, and click on the padlock to the
right of the channel name.
5-5
Page 25

Capturing Video and Audio
Chapter 6
Capturing Video and Audio
Still images. You can capture full-color, 24-bit-per-pixel still i mages
from your camcorder or television, save them on your computer’s hard
disk, and print them. The images are placed on the clipboard, or you can
display them in their own window as “thumbnails” (miniature images).
ATI-TV saves still images as Windows-standard bitmaps (.bmp). It also
supports most industry-standard graphics file formats, so you can insert
the images into reports, presentations, letters, and othe r document s, to add
impact to training applications and presentations.
Full-motion video. You can capture a stream of full-motion video plus
audio from your video source and save it as an .AVI file on your
computer ’s hard di sk. You al so have the opt ion of capt uring onl y audio —
uncheck the Capture Video box in the Capture dialog (see Capture in
“Setting up ATI-TV” on page 3-5.)
Capture
Stream
Play
Captured
File
Capture
Sequence
Capture
Still
You can use the Setup button to
specify capture options, file
names, display options, and file
handling for captured video (see
Capture in “Setting up ATI-TV”
on page 3-5.)
File
Name
File
Cli ck the
Capture button
in the Task
control panel to
s witch to
capture mode.
The Control
panel changes
to the Capture
panel.
6-1
Page 26

Capturing Video and Audio
Capturing Still Frames
For information on setting up capture files, see Still Capture in “Setting
up ATI-TV” on page 3-5.
To captu re still frames:
Click the camera button to capture the current frame.
Reviewing captured imag es
Click the image's thumbnail.
• If the selected image has not been saved, the thumbnail has a red
border.
If it has been saved, the border is green.
• If an unselected image has been saved, its border is grey.
If it has not been saved, there is no border.
You can use the buttons at the top of the still capture window to save the
captured image, delete it, print it, or make it into a desktop pattern.
If you try to delete an unsaved still frame, ATI-TV prompts you to save it
before deleting.
Capt urin g Vid eo
You can capture video in two ways:
• As a stream of video and audio that you save as an .AVI file.
• As a sequence of still frames that you save in an .AVI file.
The quality of the video that you capture depends on the following
conditions:
• speed of your system (CPU)
• amount of system memory (RAM)
• performance of your Hard Disk (HDD)
• size of the video capture window
For inform ati on on sett ing up captur e fil es, see Capture and Advanced in
“Setting up ATI-TV” on page 3-5.
6-2
Page 27

Capturing Video and Audio
To capture a stream of video and audio:
• Click the Record Stream button in the Capture panel.
ATI-TV starts recording video and audio.
To capture a sequence of frames:
• Click the C apture Sequence button in the Capture panel.
ATI-TV starts recording a sequence of frames. Note that audio is
not captured in this mode.
Pl aying Cap tured V ideo an d Au dio
To play captured video and audio:
• Click the Play button in the Capture panel.
ATI-TV plays your captured fi le.
6-3
Page 28

European Tele text
Chapter 7
European Teletext
ATI-TV supports European teletext, including FastText. You can use the
teletext controls to move through major pages and sub-pages, and
randomly select pages.
Click the
Teletext button
in the Task
control panel to
switch to
Teletext mode.
The Control panel changes to the Tele text panel, and Teletext information
is displayed in the Display panel.
Red, green, yellow,
and blue FastText
buttons corresponding
to the colored text.
Go to
Main
Page
Main Page
Go to
Index
Previous
Number
Next Main
Page
Number
Edit Main
Page
Number
Previous
Sub-Page
Number
Edit Sub-
Page
Number
Next Sub-
Page
Number
Go To
Page
Previous /
Next
Channel
Capture
Note: Due to the nature of Teletext, there may be a delay before the
Teletext page requested is viewed on the screen.
To launch enhanced teletext software (Europe only):
If you are using a third-party teletext application, the closed-caption
button in the TV Tuner panel is replaced by a button that you click to
launch your teletext application.
7-1
Page 29

R eg ula t ory Com p li a nc e S tat e men t
Appendix A
Regulatory Compliance Statement
FCC Compliance Information
This device complies with FCC Rules Part 15. Operation is subject to the following two
conditions:
• This device may not cause harmful interference, and
• This device must accept any interference received, including interference that may
cause undesired operation.
This equipment has been tested and found to comply with the limits for a Class B digital
device, pursuant to Part 15 of the FC C Rules. These limits are designed to provide
reasonable protection against harmful interference in a residential installation. This
equipment generates, uses and can radiate radio frequency energy and, if not installed and
used in a ccordance with manufacturer's instructions, may cause harmful interference to radio
communica tions. However, there is no guarantee that interference will not occur in a
particular installation. If this equipment does cause harmful interference to radio or
television reception, which can be determined by turning the equipment off and on, the user
is encouraged to try to correct the interference by one or more of the following measures:
1. Re-orient or relocate the receiving antenna.
2. Increase the separation between the equipment an d receiver.
3. Connect the equipmen t to an outlet on a circuit different from that to which the receiver is
conne cted.
4. Con sult the dealer or an expe r ienced radio/TV tec hnician for help.
• The use of shielded cables for connection of the monitor to the graphics
card is required to ensure compliance with FCC regulations.
• Changes or modifications to this unit not expressly approved by the
party responsible for compliance could void the user's authority to
operate this equipment.
Industry Canada Compliance Statement
Supplementary Television Broadcasting Receiving Apparatus Canada GRR Part II
Appareils supplémentaires de réception de télévision, RGR, Partie II, Canada
A-1
Page 30

Regulatory Compliance Statement
CE Complia n ce Infor matio n (f or Euro pe an Marke t )
EMC Di rective 89/336/EEC and Amendment 92/31/EEC, Class B Digital Device
EN 50081-1, Generic Emissions Standard for Residential, Commercial and Light Industrial
Products
(EN 55022/CISPR 22, Limits and Methods of Measurement of Radio Interference
Characteristics Information Technology Equipment) Warning: This is a Class B product. In
a domestic environment this product m ay cause radio interference in which case the user
may be required to take adequate measures.
EN 50082-1, Generic Immunity Standard for Residential, Co mmercial and Light Industrial
Products
(IEC 801-2, IEC 801-3, IEC 801-4)
Directive EMC 89/336/CEE et amendement 92/31/CEE, dispositif numérique de Classe B
EN 50081-1, Norme sur les émissions génériques pour les produits domestiques,
commerciaux et industriels légers
(EN 55022/CISPR 22, Limites et méthodes de mesure des caractéristiques d'interférences
radiophoniques, Matériel des technologies de l'information) Mise en garde: ceci est un
produit de Classe B. Il risque produire des interférences radiophoniques dans un
environnement domestique auquel cas l'utilisateur peut se voir demandé de prendre des
mesures adéquates.
EN 50082-1, Norme sur l'immunité générique pour produits domestiques, commerciaux et
industriels légers.
(CEI 801-2, CEI 801-3, CEI 801-4)
EMC Ri chtlinie 89/336/EEC und Änderung 92/31/EEC, Digitales Gerät der Klasse B
EN 50081-1, Allgemeiner Emissions-Standard für Haushalt- und kommerzielle Produkte
sowie Erzeugnisse der Leichtindustrie
(EN 55022/CISPR 22, Beschränkungen und Verfahren der Messung von
informationstechnischen Ausrüstungen mit Funkstörmerkmalen)
Warnung: Dies ist ein Erzeugnis der Klasse B. Dieses Erzeugnis kann Funkstörungen im
Wohnbereich verursachen; in diesem Fall können entsprechende Maßnahmen seitens des
Benutzers erforderlich sein.
EN 50082-1. Allgemeiner Unempfindlichkeits-Standard für Haushalt- und kommerzielle
Produkte sowie Erzeugnisse der Leichtindustrie
(IEC 801-2, IEC 801-3, IEC 801-4)
A-2
Page 31

Troubleshooting
Appendix B
Troubleshooting
Because a typical computer system consi sts of many different parts,
difficulties may arise from a combination of items. Check the following
list and find a symptom that’s similar, then try the suggested solution.
Video is unstable.
• Check that you’re using the correct broadcast standard format
(NTSC, PAL, or SECAM) — see Video in “Setting up ATI-TV”
on page 3-5.
• Check the quality of your incoming TV signal on another
receiver; bad reception may be the cause.
Video is in black and white only.
• Check the connectors setting to make sure you’ve selected the
correct input (CATV, Composite, or S-Video) for your video
source device — see Video in “Setting up ATI-TV” on page 3-5.
No video or audio.
• Check tha t the audio and video connectors are securely plugged
into the correct jacks. — see “Setting up ATI-TV” on page 3-5.
• Check that the ATI-TV card is securely seated in its slo t.
• Check the AM C and audio cables to make sure all connect ors are
securely plugged into the correct jacks.
No audio.
• Ensure that another Windows audio program is not muting the
sound.
• Check the mixer line input setting in the audio software provided
with your sound card.
Captured images have jagged edges.
• If you’re capturing One Field (non-interlaced), images may
appear jagged. Click Both Fields in t he Video dialog — see Video
in “Setting up ATI-TV” on page 3-5.
B-1
Page 32

Appendix 1
Glossary
AMC ATI Multimedia Channel. 40-pin connector.
Aspect ratio Relationship of width (x-axis) to height (y-axis).
.AVI Aud io-Video In ter leaved. Microsoft’s sp ecification for
the int egrat ion of digi tal mo tio n video under
Windows
bitmap Representation of characters or graphics by individual
pixels arranged in row and column order. See pixel.
.BMP Bitmap file extension. See bitmap.
brightness Amount of white in an image.
™. See digital video.
CD-ROM Compact Disc Rea d-Only Memory. Essenti ally, the
dat a equivalent of a music CD. CDs hold about 60 0
megabytes of data.
composite
video
compression Process of reducing the size of data files to decrease
contrast Gradation of tone between an image’s highlights,
digital video Video signal represented by computer- reada ble binar y
frame A si ngle, complete picture i n television a nd video. See
frame rate Num ber of v ideo frames displayed per seco nd.
Video signal format that includes the complete visual
waveform, including chromatic (c olor) and luminance
(brightness) picture information, as well as control
signals. See S-video.
storage and computer processing requirements.
midtones, and shadows.
numbers that describe image colors and brightnes s.
NTSC.
Glossary - 1
Page 33

NTSC National Television Systems Committee. North
American and Japanese television technical standards
organization. Frame rate is 30 per second. See frame.
PAL P hase Alt ernate Line . European (exclud ing France)
television standard.
pixel, pel Picture element. Sma lle st addressable area of the
computer screen.
resolution Num ber of pixels that can be displayed on the screen at
one time. For example, 640x480 means 640 pixels
horizontally, and 480 pixels vertically, for a tot al of
307,200. See pixel.
S-video Typ e of video sig nal used in Hi8 and S-VHS videotape
formats. It transmits luminance (brightness) and
chrominance (color) portio ns separately, usin g multiple
wires, avoiding the NTSC encoding proce ss and the
resultant loss of picture quality. Also known as Y-C
video. See composite video, NTSC.
SECAM SEq uen tia l Cou l eur A Memo ire. French color TV
system (also adopted in Rus sia).
tint The amount of color.
VESA Video Electronics Standards Ass ociation.
VFC VESA Feature Connect or . 26-pin connector. See
VES A .
VGA IBM’s Video Graphics Array. Provides 16 colors from
a pa lette of 256, 00 0.
.WAV Waveform audio. Under Windows
™, digital audio
files are normally stored with the file extension .WAV
(waveform audio). See waveform, wavef orm audio.
waveform Visual representation of an audio file, where the
vo lume level of individual sampl es is displayed,
showing th e highs and lows in volu m e over time. Under
Windows
™, digital audio files are normally stored with
the fil e extension .WA V (waveform audio). See
wav ef o rm audio .
waveform
audio
Digiti zed sample of an audio waveform, stored in a
form the PC can understand a nd manipulate. See
waveform.
Glossary - 2
Page 34

Index
A
Always on top 3-5
Aspect ratio
ATI-TV
features
installing
setting up
Task control panel
Audio
capture
format
Audio volume
controlling
muting
Autoscan
Autoscanning for TV channels
3-5
1-1
2-2
3-5
3-1
3-6
3-6
3-3
3-3
3-6
5-2
B
Brightness 3-6
Broadcast standard
Bubble help
3-5
3-6
C
Capture
pre-allocate maximum capture file
size
3-6
to memory or disk
Capturing
playing captured video
still frames
video
sequence of frames
stream
Channel autoscan
Closed-captioned text
6-2
6-2
6-3
3-6
6-3
6-3
3-6
background
display options
displaying
transcribing
Color
3-6
Contrast
Control panel
Capture
Playback
Teletext
TV Tuner
3-6
3-6
5-3
3-6, 5-3
3-6
3-2
3-2
3-2
3-2
D
Display panel 3-3
playing full-screen
sizing
3-4
3-4
E
European teletext
FastText
7-1
F
FastText 7-1
Features
Frame rate
1-1
3-6
H
Help 3-5
Hot Words
5-4
I
Installation
what you’ll need
Installing the ATI-TV card
1-2
2-2
Index-1
Page 35

M
Modes
switching
Mute button
3-2
3-3
P
Panels
attaching and detaching
Playback panel
full-screen
thin
3-4
Playing captured video
3-4
3-4
6-3
R
Regulatory compliance statement A-1
S
Safety instructions 2-2
Setting up ATI-TV
Setup dialogs
Advanced
cap ture to memory or disk
limit capture to preset amount of
time
3-6
pre- allocate maximum capture file
size
3-6
Capture
audio, audio format
frame rate
video format, video compression
3-6
Closed-caption
transcribing
Display
adjust panel size
aspect ratio
bubble help
panel snap-to, on-top status
Still Capture
frame rate
printer options
Tuner
add, delete, name channels
cap ture both fields (interlaced) or
one field (non-interlaced)
3-5
3-6
3-6
3-6
3-6
3-5
3-5
3-5
3-5
3-6
3-6
3-6
3-6
channel auto-scan
Video
broadcast standard
color, tint, contrast, brightness
Snap-to
Still frames
Switching modes
3-5
capturing
size
3-6
6-2
3-6
3-6
3-2
T
Task control panel 3-1
Teletext
FastText
Tint
TV channels
adding, deleting, naming
autoscanning
7-1
3-6
5-2
U
Unzooming 5-2
V
Video
capture
capturing
compression
format
Video compression
Video format
Video input connectors
3-6
6-2
sequence of frames
stream
6-3
3-6
3-6
3-6
3-6
6-3
2-4
W
Wa rn before closing unsaved image
3-6
What you’ll need
1-2
Z
Zooming 5-2
3-6
3-6
Index-2
 Loading...