

Page 1

3D XPRESS ION
User’ s G uide
Version 1.0 CD
© Copyright 1996, by ATI Technologies Inc.
All rights reserved, including those to reproduce this guide or parts thereof, in any form without
the express written permission of ATI Technologies Inc.
Features and specifications are subject to change without notice. Trademarks and/or registered
trademarks are the properties of their respective owners:
ATI, mach64, 3D XPRESSION, 3D RAGE, ATI DeskTop, FlexDesk+, DeskScape, WinSwitch
— ATI Technologies I nc.; AutoCAD, AutoShade, 3D Studio — Autodesk Inc.; MicroStation —
Bentley Systems Inc.; Pentium, Pentium Pro — Intel Corporation;
IBM, PC, VGA, OS/2 — International Business Machines Corp.; Windows 3.1x, Windows95,
Windows NT, Video for Windows — Microsoft Corp.; MultiSync — NEC Technologies Inc.;
VL-Bus, VESA — Video Electronics Standards Association.
i
Page 2

Disclaimer
The manufacturer (MFR) reserves the right to make changes to this
document and the products which it describes without notice. The
MFR shall not be liable for technical or editorial errors or omissions
made herein; nor for incidental or consequential damages resulting
from the furnishing, performance, or use of this material.
The MFR makes no representation that the interconnection of products
in the manner described herein will not infringe on existing or future
patent rights, nor do the descriptions contained herein imply the
granting of license to make, use or sell equipment constructed in
accordance with this description.
The PCI mach64 accelerators have been designed to support the PCI
local bus standards. Some computers use proprietary local bus circuitry
and therefore may not be fully compatible with the MFR’s local bus
cards. Although tested successfully in a wide variety of c omputer
systems, the MFR cannot be held responsible for any incompatibilities
which may occur between this card and the system configuration you
plan to use. We recommend that you check with the dealer or
distributor for your computer system before installing your card.
ii
Page 3

Table of Contents
Getting Started ...............................................................1
What is 3D XPRESSION? ..................................................2
What’s in the Package? .......................................................3
System Requirements ..........................................................3
Using this Guide ..................................................................4
Other Sources of Information ..............................................4
Hardware Installation ....................................................5
Preparing Your Computer ...................................................6
Installing the Hardware .......................................................7
Installing ATI’s Enhanced Drivers ............................. 11
Installing Enhanced Drivers for Windows 95 ...................12
Installing Software MPEG for Windows 95 ...............13
Installing Enhanced Drivers for Windows NT ..................14
Installing Enhanced Drivers for Windows 3.1x ................15
Using Software MPEG with Windows 3.1x ................17
Installing Enhanced Drivers for OS/2 ...............................18
Installing Enhanced Drivers for AutoCAD .......................20
Installing Enhanced Drivers for MicroStation ..................22
Using VESA BIOS Extensions .........................................24
Special Features .... ......................................................25
Adding ATI’s TV Tuner ....................................................26
Adding ATI’s Hardware MPEG ........................................26
Reference .....................................................................27
Running Diagnostics .........................................................28
Troubleshooting Tips .........................................................29
ATI Multimedia Channel ..................................................32
Specifications ....................................................................33
Video Mode Table .............................................................34
Compliance Information ....................................................35
iii
Page 4

iv
Page 5

CHAPTER 1
Getting Started
Welcome to the exciting world of 3D! This new technology
adds a new dimension to your computer experience.
ATI’s 3D XPRESSION brings games to life with stunning
graphics and screaming fast action previously available only on
gaming consoles. Its features will transform your comput er into
a high performance multimedia workstation.
This guide provides all the information you need to install the
3D XPRESSION. En joy the new dimension!
1
IN THIS CHAPTER...
• What is 3D XPRESSION?
• What’s in the Package?
• System Requirements
• Using this Guide
• Other Sources of Information
Page 6

2 Getting Started
What is 3 D XPRESSION?
The 3D XPRESSION is a 3D games and multi media accelerator
card. It uses ATI’s 3D RAGE accelerator chip to provide
advanced 3D support, accelerated 2D graphics, and TV quality
video.
Games and sof tware applications that support the 3D RAGE run
with fluid motion and in brilliant color. Graphics are smooth
and highly detailed.
The 3D XPRESSION’s advanced features support the next
generation of 3D capabilities:
• Mip maps
• Gouraud shading
• Lit and video textures
• Alpha blending and fog effects
• Six levels of texture mapping
• Perspectively correct texture mapping
The 3D XPRESSION is a part of ATI’s legendary mach64
family of graphics accelerators. Your existing 2D games and
applicat ions will snap to l if e with 64-bit accele ration and fast er,
more vibrant colors.
Viewing full-screen, full-motion video is now possible with the
3D XPRESSION’s superior MPEG and video playback. The
TV quality video playback is the best available today.
For future expansion, you can use the ATI Multimedia Channel
to blend the entertainment of your TV with the intelligence of
your PC. ATI’s TV tuner and hardware MPEG player are add-in
cards designed to work with the 3D XPRESSION. (For more
information, see Special Features on page 25.)
Page 7

What’s in the Package?
Your package includes the following hardware, software, and
documentation:
• 3D XPRES S I ON accelerator card
• ATI’s Installation CD-ROM
• User’s Guide
If any components are missing or damaged, please contact your
dealer.
System Requirements
• Computer System — 486/Pentium®/Pentium Pro®, or
compatible systems with PCI Local Bus
Getting Started 3
• Expansion Slot — 32-bit PCI Local Bus
• Operating System — DOS 5.0 or higher, Windows 95®,
Windows 3.1x®, Windows NT®, or OS/2
Software MP EG playback is currently supported in
Windows 95 and Windows 3.1x.
• Monitor — VGA, supporting minimum 640x480 resolution.
A Plug-and-Play monitor which supports VESA’s Display
Channel specifications (DDC1 or DDC2b) is required to
take advantage of the DDC1/DDC2b features.
• Displ ay Drivers — Any standard VGA or VESA drivers
For best performance, install ATI’s mach64 enhanced
drivers that are supplied in this package.
Page 8
4 Getting Started
Using this Guide
The organization of this guide is as follows:
Hardware In stallation contains step by step instructions to
help you place your card in your computer.
Installing ATI’s Enhanced Drivers describes how to
install display driver software.
Special Features explains how you can take advantage of
the extra add-in features.
Reference contains troubleshooting tips and specifications
about your card.
Other Sources of Information
If you need additional help or require information that is not
included in this guide, see the following sources of information:
Readme File
This file contains the latest information about your
3D XPRESSION.
To view the Readme file in DOS
1 Insert ATI’s Installation CD-ROM into the CD-ROM drive.
2 Type D: (If D is not your CD-ROM drive, substitute D with the
corre ct drive letter).
3 Type README.
Online Help
If you require addi tional i nform ation, you can refer to the onli n e
help available under Windows 3.1x and Windows 95 for more
information about using ATI’s mach64 enhanced drivers.
Page 9
CHAPTER 2
Hardware Installation
Insta lling your 3D XPRESSION consists of two easy steps.
• Placing the card in your computer
• Ins tal l ing ATI’ s mac h64 enha nc ed dis pl ay dr i vers
This chapter explains how to place your card in your computer.
5
IN THIS CHAPTER...
• Preparing Your Computer
• Installing the Hardware
.
Page 10

6 Hardware Installation
Discharge your body’s static electric charge by touching
a grounded surface — e.g., the metal surface of the
power supply — before performing any hardware
procedure.
The manufacturer assumes no liability for any damage,
caused directly or indirectly, by improper installation of
any components by unauthorized service personnel. If
you do not feel comfortable performing the installation,
consult a qualified computer technician.
Damage to system components, the a cceler ator card, and
injury to yourse lf may result if power is applied during
insta llation.
Preparing Your Computer
If you are using an operating system other than Windows 95,
you may need to do the following before installing your card :
• If your current system configurat ion uses special drivers that
are not 640x480 VGA, you may encounter conflicts with the
card. We recommend that you first reconfigure your
operating system to use a standard VGA driver before
installing the card. For more informa tion about changing
your operating system configuration, see your operating
system documentation.
Page 11
Installing the Hardware
Now that you have prepared your computer, you are ready to
install your 3D XPRESSION.
To install your 3 D XPRES SION
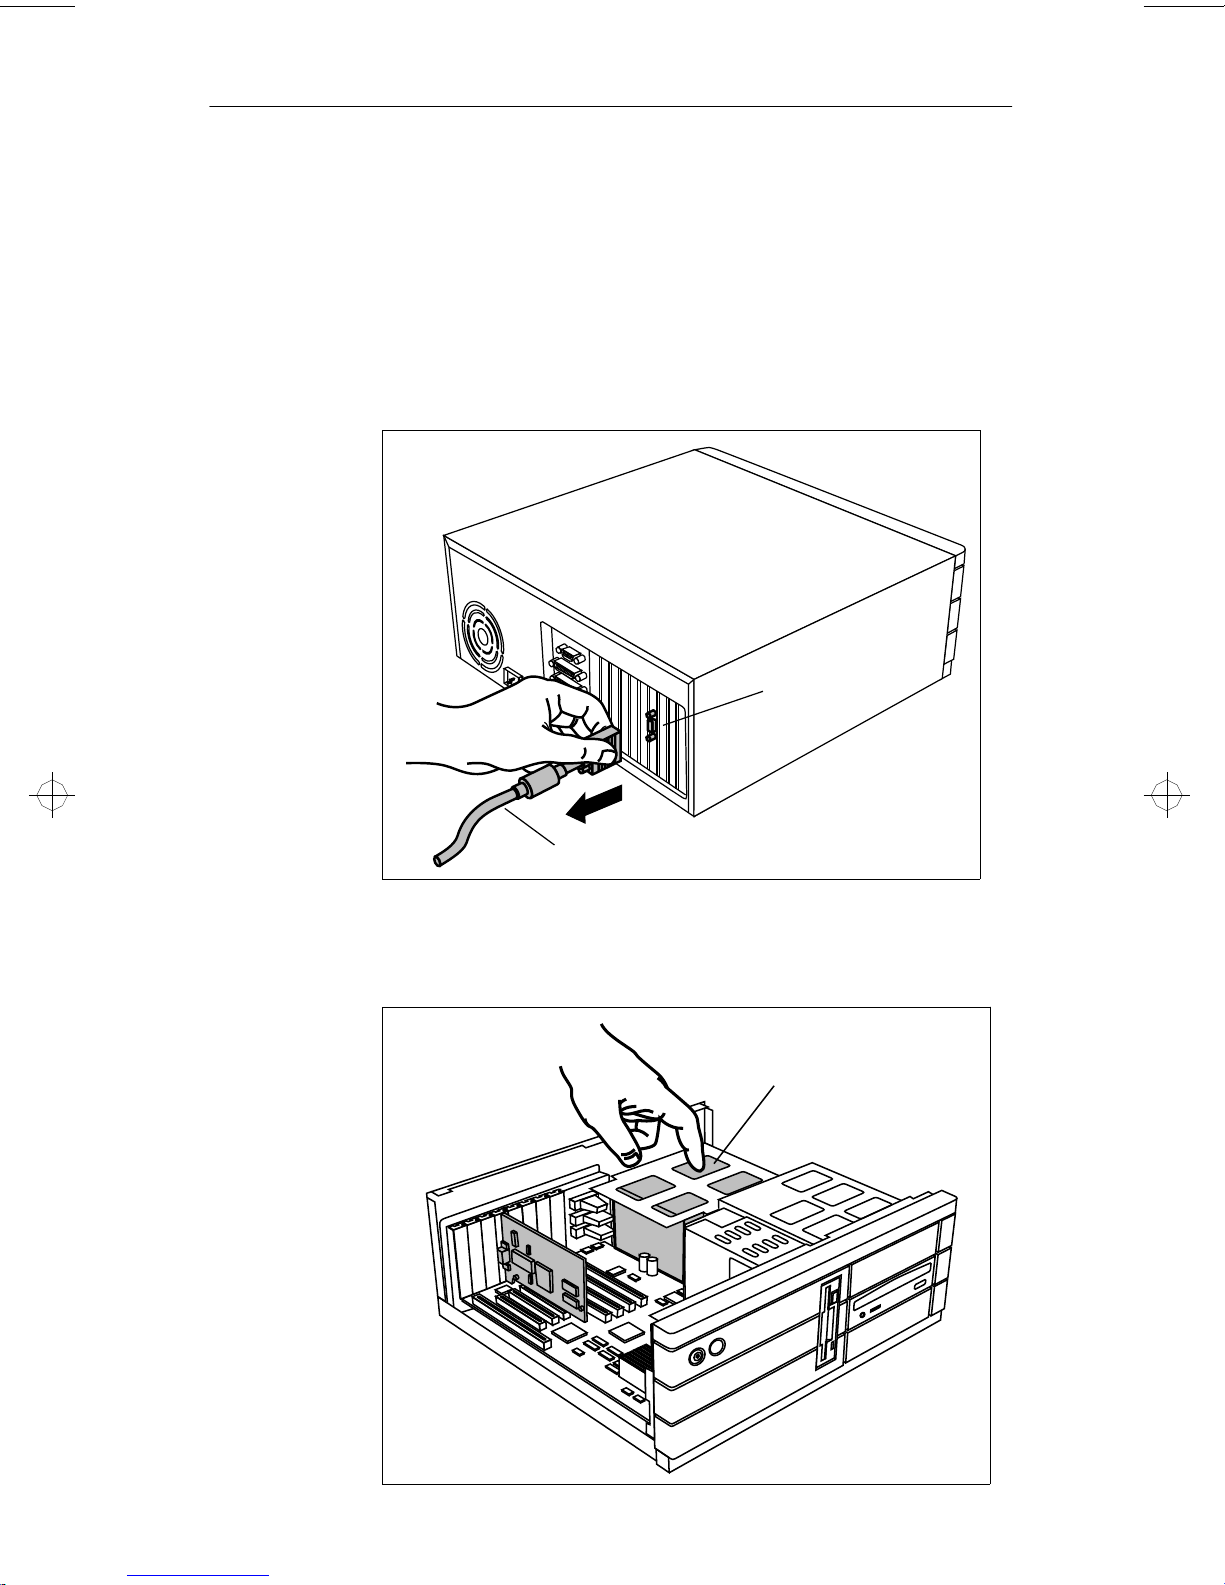
1 Power off the computer and monitor, then disconnect the
monitor cable from the back of your computer.
Hardware Installation 7
Rememb er to
discharge your
body’s static
electricity by
touching the
metal su rface
of the computer
chassis.
VIDEO OUTPUT
CONNECTOR
MONITOR CABLE
2 Re m ov e th e co mp ut e r co ve r. If necessary, consult your
computer system manual about removing the cover.
POWER SUPPLY
Page 12
8 Hardware Installation
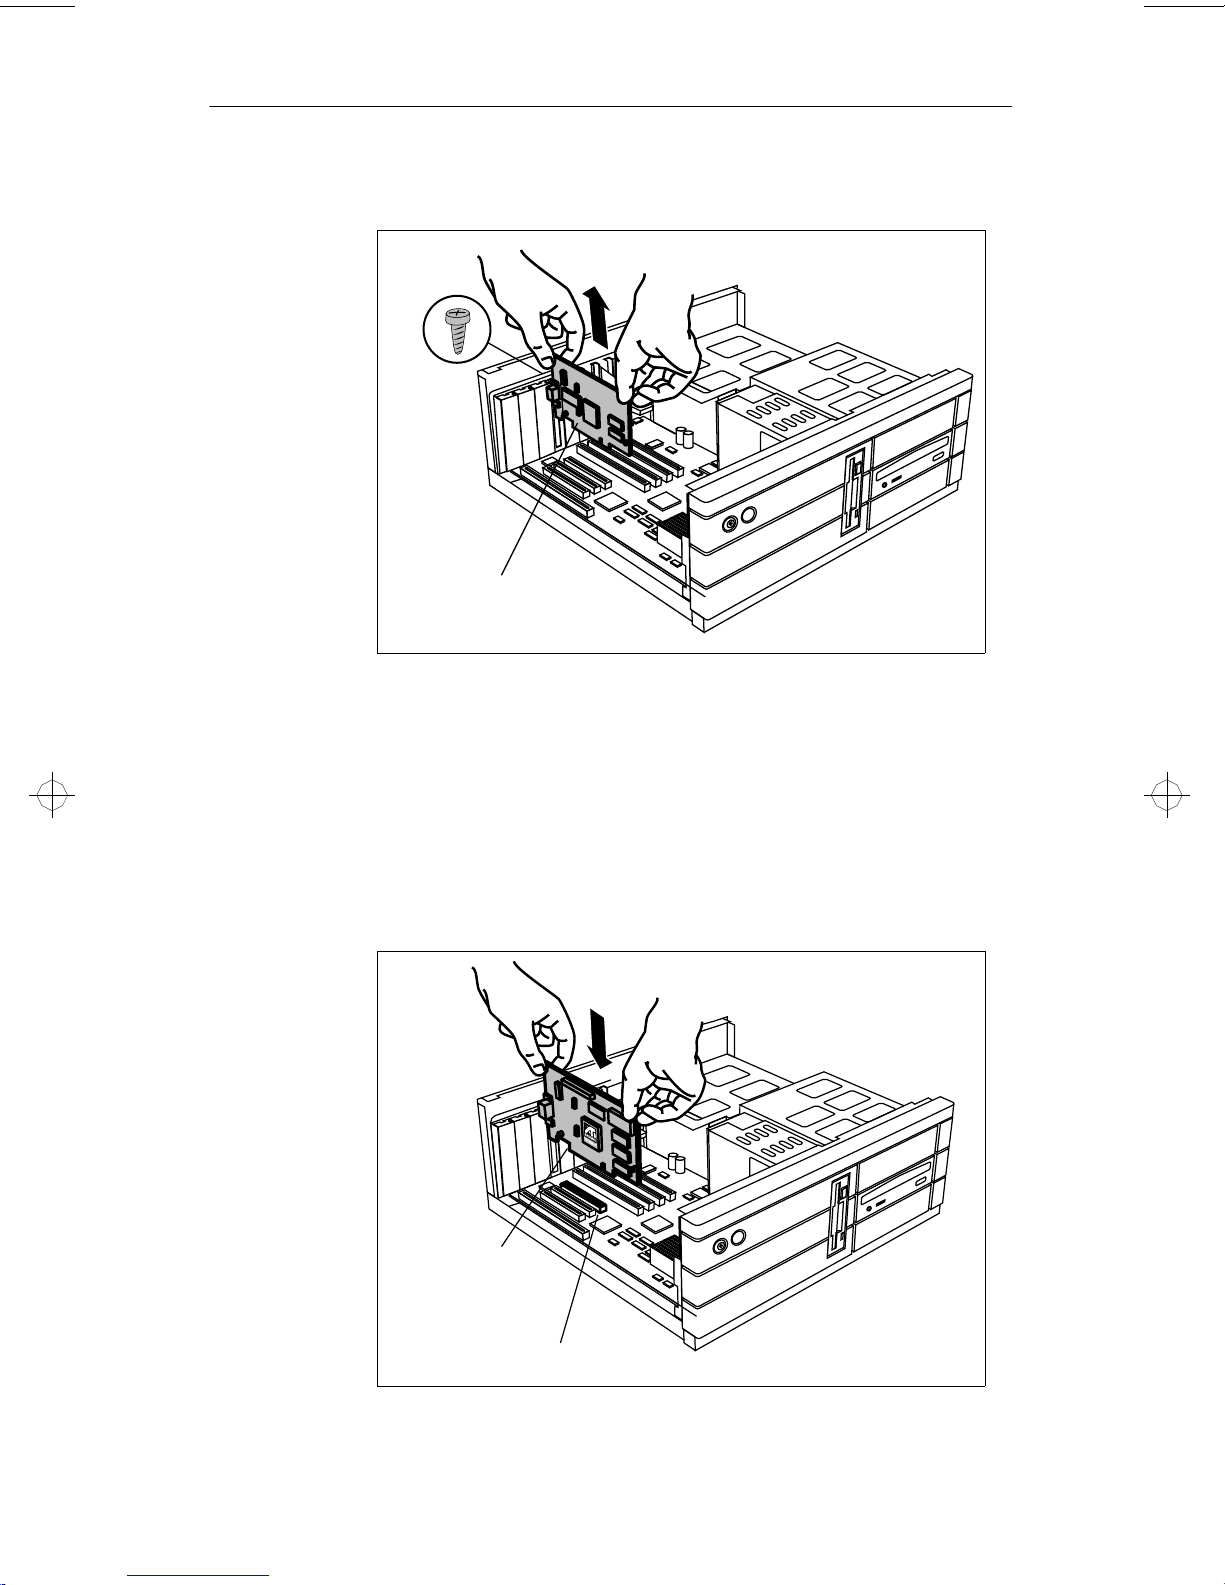
3 If there is an existing graphics card, remove it from your
computer.
If the old
graphics card
sticks, rock it
gently from
end to end.
Remember to
save the screw.
SCREW
OLD GRAPHICS CARD
or
If your computer has any on-board graphics capability, you may
need to disable it on the motherboard. For more information, see
your computer documentation.
4 Align your card with an empty PCI expansion slot and gently
insert it into place. You may need to remove the cover from the
rear of the PCI expansion slot that you selected.
Grasp the
card by the top
edge and
carefully seat i t
firmly into the
PCI slot.
3D XPRESSION
PCI EXPANSION SLOT
Page 13

Hardware Installation 9
5 Replace the screw to fasten the card in place, and replace the
comput er cover.
SCREW
3D XPRESSION
Make sure
your monitor
cable is
securely
fastened.
6 Plug the monitor into your card, then turn on the computer and
monitor.
MONITOR CABLE
You are now ready to proceed to Chapter 3 and install ATI’s
mach64 enhanced drivers.
Page 14

10 Hardw are Installation
Page 15

CHAPTER 3
Installing ATI’s
Enhanced Drivers
Your computer uses programs c all ed graphics drivers to dis play
information on the scre en. ATI’s mach64 enhanced drivers give
you more f eatur es than st andar d VGA dri vers, such as enhanced
speed, resolution, color depth, and graphic utilities.
This chapter explains how you install ATI’s mach64 enhanced
drivers.
11
IN THIS CHAPTER...
• Installing Enhanced Drivers for
Windows 95
Installing Software MPEG for
Windows 95
• Installing Enhanced Drivers for
Windows NT
• Installing Enhanced Drivers for
Windows 3.1x
Using Software MPEG with
Windows 3.1x
• Installing Enhanced Drivers for OS/2
• Installing Enhanced Drivers for
AutoCAD
• Installing Enhanced Drivers for
MicroStation
• Using VESA BIOS Extensions
Page 16

12 Installing ATI’s Enhanced Drivers
Select an enhanced driver from the following list :
• Windows 95, see below
• Windows NT, see page 14
• Windows 3.1x, see page 15
• OS/2, see page 18
• AutoCAD, see page 20
• Mi croStation, see page 22
Installing Enhanced Drivers for
Windows 95
After pl acing your card in the compu ter, Windows 95 will
aut om ati c all y de tect a ch ang e t o you r ha rdwar e conf igurati on and
install a standard VGA display dr iver.
You need to install ATI’s mach64 enhanced driver for
Windows 95 to take advantage of your card’s higher
performance, resolutions, and special features not available
using the standard VGA display driver.
To install the
1 Insert ATI’s Installation CD-ROM i nto your CD-ROM drive.
If W i nd ows 95 runs t he ATI INS T AL LATI ON CD-ROM
automatically, proceed to step 5.
2 Click Start.
3 Select Run.
4 Typ e the fo ll owi ng:
D:\ATISETUP
(If D is not your CD-ROM drive, substitute D with the correct
drive letter.)
5 Click on Display Drivers.
mach64
enhanced driver for Win d ow s 95
6 Follow the online screen instructions to complete the
installa tion.
Page 17

Installing ATI’s Enhanced Drivers 13
Installing Software MPEG for Windows 95
Now that you have installed ATI’s mach64 enhanced
driver for Windows 95, you can install the ATI VIDEO
PLAYER—a software MPEG player.
The ATI VIDEO PLAYER provides full-motion, full-screen
MPEG video playback with excellent color quality.
You must install ATI’s mach64 enhanced driver before
installing the ATI VIDEO PLAYER. For the best playback
quality, the recommended requirement for the ATI VIDEO
PLA YER is a Pentium system.
To install the ATI VIDEO PLAYER for Win d ows 9 5
1 Insert ATI’s Installation CD-ROM into your CD-ROM drive.
If W i nd ows 95 runs t he ATI INS T AL LATI ON CD-ROM
automatically, proceed to step 5.
2 Click Start.
3 Select Run.
4 Typ e the fo ll owi ng:
D:\ATISETUP
(If D is not your CD-ROM drive, substitute D with the correct
drive letter.)
5 Cl ick ATI VIDEO PLAYER.
6 Follow the on-screen instructions to complete the installation.
To open the ATI VIDEO PLAYER for Wind ows 9 5
1 Click Start.
2 Select Programs.
3 Select ATI Multimedia.
4 Cl ick ATI VIDEO PLAYER.
For information about using the controls of the ATI VIDEO
PLA YER, see the online help.
Page 18

14 Installing ATI’s Enhanced Drivers
Installing Enhanced Drivers for
Windows NT
After instal ling your graphics card, Windows NT will default to
standard VGA mode (640 x 480, 16 colors). The procedure
below describes how you install ATI’s mach64 enhanced driver
for Windows NT 3.5, and 3.51.
To i nstall the
1 Boot Windows NT.
2 Doub le - cli ck the Main icon.
3 Double-click th e C ontrol Panel icon.
4 Double-click the Display icon.
5 Click Change Display Type.
6 Cli ck Change.
7 Click Other.
8 Insert ATI’ s Inst all atio n CD-RO M i n to your CD-ROM drive.
mach64
enhanced driver for W indows NT
For Windows NT 3.5, type the following:
D:\NT35 (If D is not your CD-ROM drive, substitute D with th e
correct drive letter), then click OK.
For Windows NT 3.51, type the following:
D:\NT351 (If D is not your CD-ROM drive, substitute D with the
correct drive letter), then click OK.
9 Select ATI Graphics Accelerators.
10 C lick Install.
11 Click Yes to change your system configuration.
12 Click Continue to confirm the full path name.
13 After the files have been copied to your computer, click OK.
14 Reboot Windows NT.
After reboot, the Invalid Display Settings window appears.
15 Click OK.
The Display Settings dialogue box appears.
16 Select a desired display mode. For more detailed information
about changing your display mode, click Help.
Page 19

Installing ATI’s Enhanced Drivers 15
Installing Enhanced Drivers for
Windows 3.1x
To install ATI’s mach64 enhanced drivers for Window 3.1x,
you use the INST ALL program. This program checks the
system for possible conflicts and installs the mach64 enhanced
display driver.
The INSTALL program is a DO S application and cannot be
run inside a Windows DOS box.
To install the
Windows 3.1x
1 Insert ATI’s Installati on CD-ROM into your CD-ROM drive.
2 Pull-down the File menu in the Program Manager.
3 Select Run.
4 Typ e the fo ll owi ng:
D:\ATISETUP
(If D is not your CD-ROM drive, substitute D with the correct
drive letter.)
5 Click on Display Drivers.
6 Follow the online screen instructions to complete the
installa tion.
mach64
enhanced driver for
Page 20

16 Installing ATI’s Enhanced Drivers
The ATI DeskTop
The INSTALL Program automatically creates the ATI Desktop
Program Group when you install the mach64 enhanced driver
for Windows.
For correct resolution and refresh rate operation, you need to
select a monitor using Screen Adjustment. Please refer to the
online help for more information about how to use the ATI
DeskTop.
Your ATI DeskTop includes the following features:
• Flexdesk+ — allows you to change the color depth, screen
size, and desktop size attributes of the driver w ithin
Windows.
• DPMS — allows your DPMS compati ble moni tor to s ave up
to 80% energy and extend monitor life.
• DeskScape —allows you to pan across an off-screen work
space and zoom in for more detail when using smaller
monitors.
• WinSwitch —switches display modes instantly. You can
toggle betw een modes without having to quit W indows.
• Color Correction — enables you to adjust the screen color
to match a printed copy in 256 color mode.
• Scre en Adjustment — enable s you to adjust the screen size,
centering, refresh rate, and monitor configuration within
Windows.
Page 21

Installing ATI’s Enhanced Drivers 17
Using Software MPEG w ith Windows 3. 1x
Now that you have installed ATI’s mach64 enhanced
driver for Windows 3.1x, you can install the ATI VIDEO
PLAYER—a software MPEG player.
The ATI VIDEO PLAYER provides full-motion, full-screen
MPEG video playback with excellent color quality.
You must install ATI’s mach64 enhanced driver before
installing the ATI VIDEO PLAYER. For the best playback
quality, the recommended requirement for the ATI VIDEO
PLA YER is a Pentium system.
To install the ATI VIDEO PLAYER for Win d ows 3.1x
1 I nsert ATI’s Installati o n CD- ROM into your CD-ROM drive.
2 Pull-down the File menu in the Program Manager.
3 Select Run.
4 Typ e the fo ll owi ng:
D:\ATISETUP
(If D is not your CD-ROM drive, substitute D with the correct
drive letter.)
5 Cl ick ATI VIDEO PLAYER.
6 Follow the on-screen instructions to complete the installation.
To open the ATI VIDEO PLAYER in Windows 3.1x
1 Start Windows.
2 Double-click on the ATI DeskTop Program Group.
3 Double-click on the ATI DeskTop icon.
4 Double-click on the ATI VIDEO PLAYER icon.
For information about using the controls of the ATI VIDEO
PLA YER, see the online help.
Page 22

18 Installing ATI’s Enhanced Drivers
Installing Enhanced Dr ivers for OS/2
To install ATI’s mach64 enhanced drivers for OS/2 2.1 or
OS/2 Warp, you use the INSTALL program. This program
checks the system for possible conflicts, sets the monitor type,
and installs the mach64 enhanced display driver.
To run the INSTALL Pr ogram
1 Start OS/2.
2 Check that OS/2 is using a standard VGA driver and no other
applications are running. For more information, see your OS/2
documentation.
3 Double-click the OS/2 System folder.
4 Double-click the Command Prompts folder.
5 Double-click the OS/2 Full Screen object.
6 Insert ATI’ s Inst all atio n CD-RO M i n to your CD-ROM drive.
7 Type D: (If D is not your CD-ROM drive, substitute D wi th the
corre ct drive letter).
8 Type CD UTILITY.
9 Type OS2INST.
10 Sele ct Utilities Installation from the Ma in Menu.
This co pies the utilities onto your hard drive.
11 Press ENTER to select the default destination directory.
12 When prompt ed, l et the INSTALL prog ram make changes to
y our Aut oe xec.ba t f ile .
13 Select QUI CK S ETUP
You need to select QUICK SETUP t o s pec ify a monitor.
Proper monitor selection is necessary for correct resolution
and refresh rate operation.
14 Select your monitor from the list.
or
If you do not see your monitor listed, see Custom Monitor
Configuration on page 31.
After you select a monitor, you are ready to copy the enhanced
driver files.
Page 23

Installing ATI’s Enhanced Drivers 19
To copy the
1 Select Drivers Installation from the Main Menu.
2 Select IBM OS/2 from the list of appl i cations.
mach64
enhanced driver files
Select Read Installation Notes for help and tips.
3 Select Install for the correct version of OS/2.
4 Press ENTER to select the default destination directory.
or
Specify a destination directory for the OS/2 driver files.
5 After the files have been copied, press any key.
6 Press ESC to exit.
You are now ready to install the enhanced driver for OS/2.
To install the
1 In the OS/2 full-screen command prompt, type DSPINSTL.
mach64
enhanced driver for OS/2
2 When the Display Driver Install panel appears, select Primary
Display. Click OK to bring up the driver selection list.
3 Select the latest ATI mach64 enhanced driver version from the
list, and clic k OK.
4 In the Monitor Configuration Selection Utility, select Install
Using Defaults for Monitor Type, then click OK.
5 When the source directory panel appears, choose Change and
specify the location of the mach64 driver. (The default location
is C:\MACH_OS2.)
6 Click SET.
7 Click INSTALL.
8 Type EXIT to close the OS/2 full screen command prompt.
9 Shut down OS/2 .
10 Re-start OS/2. It will default to 640 x 480 in 256 colors. To
change screen resolution and/or color depth, see your OS/2
User’s Guide.
11 Refer to the README.OS2 f ile in the C :\MACH_OS2
director y for mach64 configuration details.
Page 24

20 Installing ATI’s Enhanced Drivers
Installing Enhanced Drivers for AutoCAD
To install the mach64 enhanced driver for AutoCAD R10 386,
R11, R12, or R13, you use the INSTALL program. Before
installing the driver, run AutoCAD to ensure that it is properly
installed on your system.
The INSTALL program is a DO S application and cannot be
run inside a Windows DOS box.
To run the INSTALL pr ogram
1 Note the location of the AutoCAD program files before you
start the INSTALL program. You will need this information
later.
2 Ins e rt ATI’ s Ins tall a tion CD-ROM into your CD-ROM driv e.
3 Type D: (If D is not your CD-ROM drive, substitute D wi th the
corre ct drive letter).
4 Type CD UTILITY.
5 Type INSTALL.
6 Select Utilities Installation from the Main Menu.
This copi es the INSTALL program and utilities onto your
hard drive.
7 Press ENTER to select the default destination directory.
or
Type a new destination directory.
8 When prompted, l et the INSTALL prog ram make changes to
y our Aut oe xec.ba t f ile .
9 Select QUI CK S ETUP
You need to select QUICK SETUP t o s pec ify a monitor.
Proper monitor selection is necessary for correct resolution
and refresh rate operation.
10 Select your monitor from the list.
or
If you do not see your monitor listed, see Custom Monitor
Configuration on page 31.
After you select a monitor, you are ready to install the mach64
enhanced driver for AutoCAD.
Page 25

Installing ATI’s Enhanced Drivers 21
To install the
1 Select Drivers Installation from the Main Menu.
2 From the list of applications, select AutoCAD.
3 Type in the source drive and directory.
mach64
enhanced driver for AutoCAD
When the menu appears, select Read Installation Notes for help
and tips on the installation.
4 Follow the on-screen instructions to install the enhanced driver.
5 When driver installation is completed, press ESC.
Two doc ume nts ca ll ed MANUAL. TXT and READM E.DL D are
cop ied to your Auto CAD Drivers di recto ry. You can read or
print these files using any word processor.
If you are using AutoCAD R10 or R11, run
AD IACAD .BAT to set the necessary driver parameters.
ADIACAD.BAT was created by the INSTALL program for
your convenience. The parameters it sets must be in the
DOS environment before you start AutoC AD.
Tip: If you are already using a batch file to start AutoCAD,
add the contents of ADIACAD to your batc h file.
6 Start Auto CAD and reconf igu re AutoCAD to use t he new
enhanced display list d river. Please re fer t o your Auto CAD
manuals for information on how to select/change a video driver.
Page 26

22 Installing ATI’s Enhanced Drivers
Installing Enhanced Drivers for
MicroStation
To install the mach64 enhanced drivers for MicroStation 4.0 or
5.0, you use the INST ALL program. Before installing the
driver, run MicroStat ion to ensure that it is properly i nstal led on
your system.
The INSTALL program is a DO S application and cannot be
run inside a Windows DOS box.
To run the INSTALL pr ogram
1 Insert ATI’s Installati on CD-ROM into your CD-ROM drive.
2 Type D: (If D is not your CD-ROM drive, substitute D with the
corre ct drive letter).
3 Type CD UTILITY.
4 Type INSTALL.
5 Select Utilities Installation from the Main Menu.
This copi es the INSTALL program and utilities onto your
hard drive.
6 Press ENTER to select the default destination directory.
or
Type a new destination directory.
7 When prompted, l et the INSTALL prog ram make changes to
y our Aut oe xec.ba t f ile .
8 Select QUI CK S ETUP
You need to select QUICK SETUP t o s pec ify a monitor.
Proper monitor selection is necessary for correct resolution
and refresh rate operation.
9 Select your monitor from the list.
or
If you do not see your monitor listed, see Custom Monitor
Configuration on page 31.
After you select a monitor, you are ready to install the mach64
enhanced driver for MicroStation.
Page 27

Installing ATI’s Enhanced Drivers 23
To install the
mach64
enhanced driver for
MicroSt ation
1 Select Drivers Installation from the Main Menu.
2 From the list of applications, select MicroStation.
3 Type the source drive and directory information.
When the menu appears, select Read Installation Notes for help
and t i ps.
4 Follow instructions on the screen to complete the installation.
5 When driver installation is completed, press ESC to exit.
6 A MicroStation driver reference document and an information
fil e call e d README.USD are copie d to the MicroSt ation
Drivers directory on your hard disk. You can read or print these
files using any word processor.
Page 28

24 Installing ATI’s Enhanced Drivers
Using VESA BIOS Extensions
The VESA BIOS Extensions (VBE) feature supports software
using modes compatible wi t h VESA standards.
To ensure that VBE works correctly, you can load a DOS TSR
(terminate-and-stay-resident) program called M64VBE. If your
software and/or games conform to the VBE standard, you
should load M64VBE first.
You must have ATI’s mach64 utilities installed on your
computer to load M64VBE.
To install ATI’s
1 Insert ATI’s Installation CD-ROM i nto your CD-ROM drive.
2 Type D: (If D is not your CD-ROM drive, substitute D with the
mach64
utilities
corre ct drive letter).
3 Type CD UTILITY.
4 Type INSTALL.
5 Select Utilities Installation from the Main Menu.
6 Press ENTER to select the default destination directory.
7 When prompte d, let the INSTALL prog ram make changes to
y our Aut oe xec.ba t f ile .
8 Press ESC to exit the I NSTALL program.
9 Restart your computer.
You are now ready to load M64VBE.
To load M64VBE
1 At the command prompt, type M64VBE.
To remove M64VBE from your system
1 At the command prompt, type M64VBE U.
• For more information, see your DOS documentation for
conditions on unloading TSRs.
Page 29

CHAPTER 4
Special Features
You can take advantage of the special add-in features that your
3D XPRESSION has to offer.
IN THIS CHAPTER...
• Adding ATI’s TV Tuner
25
• Adding ATI’s Hardware MPEG
Page 30

26 Special Features
Addi ng ATI’s T V Tuner
ATI’s TV tuner (sold separately) is an intelligent TV tuner
add-in board that you connect to your card.
ATI’s TV tuner accepts a full range of video/audio input from
just about any video source: TV, antenna/cable, VCR, video
camera, laser-disc, and video games.
You can use ATI’s TV tuner to do the following:
• Watch TV on your computer as you work
• Watch a videotape or laser disk movie on your computer
• Capture, save, and print TV and video images
• Display and record closed-captioned text
ATI’s TV tuner displays cable, broadcast television or
full-motion video on the whole screen or in a window.
Please contact your dealer for availability.
Adding ATI’s Hardware MPEG
ATI’s hardware MPEG (sold separately) is a hardware MPEG
add-in board that you connect to your card. ATI’s hardware
MPEG delivers spectacular performance only possible with
hardware-assisted video playback.
• Full-screen MPEG-1 video decode and playback
• High resolution video all the way to 1280 x 1024 pixels
• Superior image processing scales to any resolution in any
color depth without affecting frame rate
• Easy Plug and Play installation
• Rich 2-channel stereo audio, integrating seaml e ssly with
your existing sound card
Please contact your dealer for availability.
Page 31

CHAPTER 5
Reference
This chapter contains troubleshooting tips and specifications
about your 3D XPRESSION.
27
IN THIS CHAPTER...
• Running Diagnostics
• Troubleshooting Tips
• ATI Multimedia Channel
• Specifications
• Video Mode Table
• Compliance Information
Page 32

28 Reference
Running Diagnostics
You can run diagnostics to test the hardware on your card. All
installed graphics modes can be viewed and tested. You cannot
run the diagnostics program inside a Windows DOS Box.
To run the diagnosti cs program in DOS
1 Insert ATI’s Installati on CD-ROM into your CD-ROM drive.
2 Type D: (If D is not your CD-ROM drive, substitute D with the
corre ct drive letter).
3 Type CD UTILITY.
4 Type M64DIAG.
5 Select Diagnostics.
6 Type the number of times you would like to run the tests.
To run the di a gnostics program in OS/2
1 Start OS/2.
2 Double-click the OS/2 System folder.
3 Double-click the Command Prompts folder.
4 Double-click the OS/2 Full Screen object.
5 Insert ATI’ s Inst all atio n CD-RO M i n to your CD-ROM drive.
6 Type D: (If D is not your CD-ROM drive, substitute D wi th the
corre ct drive letter).
7 Type CD UTILITY.
8 Type OS2DIAG.
9 Select Diagnostics.
10 Type the number of times you would like to run the tests.
Page 33

Troubleshooting Tips
The following troubleshooting tips may help you if you
experience problems. Contact your dealer for more advanced
troubleshooting inform a tion.
Basic Troubleshooting Tips
• Check that the card is seat ed properly in its expansion slot. If
the problem still exists, try a different PCI expansion slot.
• Ensure the monitor cable is securely fastened to the card.
• Make sure that the monitor and computer are plugged in and
receiving power.
• Disable any built -in graphics capabil ities on your mainboard.
For more information, see your computer documentation.
Reference 29
• Make sure that you selected the appropri ate monitor when
you installed your enhanced driver.
Page 34

30 Reference
Windows 95 Troubleshooting Tips
For Windows 95 troubleshooting tips, right-click the ATI icon
in the taskbar and select Troubleshooting.
If you have problems during start-up, load Windows 95 in Safe
Mode.
To load Windows 95 in Safe Mode
1 Turn on your computer.
2 Press the F8 key when Starting Windows 95 appears on the
screen.
3 Select Safe Mode.
• Disable any programs that launch automatically when you
start Windows 95.
• Chec k t hat you have t he correct monitor and display driver
selected in the Display Properties. For more information,
click on Help in the Start menu.
• Check for the existence of memory managers and ensure
they are configured properly.
• R e fer to additional information in the Windows 95
README file located in the WIN95 folder on ATI’s
Installation CD-ROM.
To remove the ATI VIDEO PLAYE R
1 Click Start.
2 Select Settings.
3 Click Control Panel.
4 Do uble -click Add/Rem ove Programs.
5 Select ATI VI DEO PLAYER from the list.
6 Click on Add/Remove...
7 Click OK.
Page 35

Windows NT Tr oubleshooting Tips
• If you are having trouble during start-up, select VGA mode
in the Boot Menu.
• Disable any programs that launch automatically when you
start Windows NT.
• Chec k t hat you have t he correct monitor and display driver
selected.
• Refer to additional information in the README files on the
Windows NT driver disk.
Custom Monitor Configuration
If you are using the INSTALL program to configure your
monitor for AutoCAD, MicroStation, OS/2 or VESA programs
and your monitor is not in the list, you can do one of the
following:
Reference 31
a) If t he specif icat ion in the HELP BOX is compa tible with your
monitor, select the compatible monitor.
b) If your monitor is DDC1 compatible, select D DC1 MONITOR.
c) If your m onitor i s DDC2b c omp atible , sele ct DD C2b MONITOR.
d) If y ou have a VESA Display Inf ormation Format file (VDIF)
from the monitor manufacturer, select READ VDIF. Follow
the on-screen instructions to complete the installation.
If these options are not applicable to your monitor type, then
you must follow the procedure below to manually set up your
monitor.
To run the INSTALL pr ogram
1 Check your monitor’s maximum resolution, and horizontal
and vertical frequencies for each available resolution. These
values should be documented in the monitor’s manual.
2 Ins e rt ATI’ s Inst all atio n C D-ROM i n to your CD-ROM driv e.
3 Type D: (If D is not your CD-ROM drive, substitute D wi th the
corre ct drive letter).
4 Type CD UTILITY.
5 Type INSTALL.
Page 36

32 Reference
To manually set up your monitor
1 Select Quick Setup fro m the Main Menu.
2 Select Custom.
An incorrect Monitor T ype setting may damage your
monitor. Review your monitor specifications before making
a selection from the Monitor Selection Menu.
A scrambled screen indicates your monito r is not capable of
the selected display mode. Immediately press ESC to exit.
If the monit or produces a scrambled display, try a lower
refresh rate. If it is already at the lowest refresh rate, set that
resolution to Not Supported.
3 Pick a resolution, and then a refresh rate.
4 Adjust the size and position of the box outline on the screen, and
press ENTER t o acce pt .
5 Repeat steps 3 and 4 until you are satisfied with the box outline
for all the resolutions.
6 When finished, press ESC and save the settings.
If you have not installed an enhanced driver on your system, see
Ins tal li ng ATI ’s Enhan ce d Dri ver s on page 11.
ATI Multi media Channel
The ATI Multimedia Channel (AMC) connects ATI’s MPEG
decoder, TV tuner, or video capture modules to the
3D XPRESSION card.
While the AMC provides VGA Feature Connector (VFC)
compatibility, it also provides enhanced features for new
multimedia devices including serial control and provision for
audio.
The AMC connector shares the same footprint wi th t h e VFC
but it adds pins for supporting addit ional mu ltimedia modes.
Great caut ion shoul d b e taken when connect ing a ri bbon cable
to the A MC/VFC connector. Some of the pins carry power
and any improper use can result in damage both to the
graphics card and the upgrade board.
Page 37

Specifications
System Requirements — 486/Pentium/Pentium P ro, or
compatible syste ms with PCI Local Bus.
Operating Environments — one of:
• DOS 5.0 or higher, Windows 3.1x, Windows 95, or
Windows NT
• OS/2 2.1 or OS /2 Warp
Video Display Buffer
• 3D XPRESSION — 2MB DRAM
Sync Signals
• Separate horizontal and vertic al sync at TTL levels
Video BIOS
• PCI 2.1 compliant
Reference 33
Video Output Connector
• 15-pin D shell (Female), IBM standard.
AMC Connector
• 2x20 pin hea der. Shares t he same footpr int with the 2x13 pin
VGA Feature Connector, VGA Out only, VESA standard.
Video interrupt (Reserved for future use):
• PCI — system auto-configurable.
Power
• +5V ±5%, @ 1.3A typical.
Ambient Temperature
• Operating — 50° to 122° F (10° to 50° C).
• Storage — 32° to 162° F (0° to 70° C).
Relative Humidity
• Operating — 5% to 90% non-condensing.
• Storage — 0% to 95%.
MTBF
• 120,000 hours.
Page 38

34 Reference
Video Mode Table
Accelerator Mode Table
Display
Screen
Re solu tion
640x480 60 31.4 25.2 √
640x480 72 37.7 31.2 √ √√√√
640x480 75 37.5 31.5 √ √√√√
640x480 90 47.9 39 .9 √
640x480 100 52.9 44.9 √ √√-640x480 120 63.7 55.0 √ √√-800x600 48 int. 33.8 36.0 √
800x600 56 35.1 36.0 √ √√√-
800x600 60 37.8 40.0 √ √√√-
800x600 70 44.5 44.9 √ √√-800x600 72 48.0 50.0 √
800x600 75 46.8 49.5 √ √√-800x600 90 57.0 56.6 √ √ - -800x600 100 62.5 67.5 √
1024x768 43 int. 35.5 44.9 √ √√--
1024x768 60 48.3 65.0 √ √√-1024x768 70 56.4 75.0 √
1024x768 72 58.2 75.0 √ √√-1024x768 75 60.0 78.8 √ √√-1024x768 90 76.2 100 √ √ - -1024x768 100 79.0 110 √
1152x864 43 int. 45.9 65.0 √ √√--
1152x864 47 int. 44.8 65.0 √ √ - --
1152x864 60 54.9 80.0 √
1152x864 70 66.1 100 √ √ - -1152x864 75 75.1 110 √ √ - -1152x864 80 75.1 110 √
1280x1024 43 int. 50.0 80.0 √ √ - -1280x1024 47 int. 50.0 80.0 √ √ - -1280x1024 60 63.9 110 √ √ - -1280x1024 70 74.6 126 √
1280x1024 74 78.8 135 √ √ - -1280x1024 75 79.9 135 √ √ - --
*32 - 24bpp color data is processed using a 32bpp d ata format
‡
Modes subject to ch ange.
Refresh
Rate
(Hz)
‡
3D XPRESSION
Hor.
Scan
(kHz)
Pixel
Clock
(MHz)
Colors (Bits Per Pixel)
2MB Displ ay Memory
4 8 16 24 *32
√√√√
√√√-
√√√-
√√--
√ - --
√√--
√ - --
√ - --
√ - --
√ - --
Page 39

Compli anc e Information
FCC Compliance Information
This device co mplies with FCC Rules Part 15. Operation is subject
to the following two conditions:
• This device may not cause harmful i nterference, and
• This device must accept any interference received, including
interference that may cause undesired operation.
This equipment has been tested and found to comply with the limits for
a Class B digital device, pursuant to Part 15 of the FCC Rules. These
limits are designed to provide reasonable protection against harmful
interference in a residential installation. Thi s equipment generates, uses
and can radiate radio frequency energy and, if not installed and used in
accordance with manufacturer's instructions, may cause harmful
interference to radio communications. However, there is no guarantee
that interference will not occur in a particular installation . If this
equipment does cause harmful interference to radio or television
reception, which can be determined by turning the equipment off and
on, the user is encouraged to try to correct the interference by one or
more of the following measures:
Reference 35
• Re-orient or relocate the receiving antenna.
• Increase the separation between the equipment and receiver.
• Connect the equipment to an outlet on a circuit different from that to
which the receiver is connected.
• Consult the dealer or a n experienced radio/TV technician for he lp.
• The use of shielded cables for connection of the monitor to the
graphic s card is required to ensure compliance with FCC
regulations.
• Changes or modifications to this unit not expressly approved
by the pa rty responsible for compliance could void the user's
authority to operate this equipment.
Industry Canada Compliance St atement
ICES-003 This Class B digital apparatus meets all requirements of the
Canadian Interference-Causing Equipment Regulations.
Cet appareil numérique de la C lasse B Respecte toutes les
exigences du Règlement su r le matérial brouiller du Canada.
Page 40

36 Reference
CE Compliance Informat ion
EMC Directive 89/336/EEC and Amendment 92/31/EEC, Class B
Digital Device
EN 50081-1, Generic Emissions Standard for Residential, Commercial
and Light Industrial Products
(EN 55022/CISPR 22, Limits and Methods of Measurement of Radio
Interference Characteristics Information Technology Equipment)
Warning: This is a Class B product. In a domestic environment this
product may cause radio interference in which case the user may be
required to take adequate measures.
EN 50082-1, Generic Immunity Standard for Residential, Commercial
and Light Industrial Products
(IEC 801-2, IEC 801-3, IEC 801-4)
Directive EMC 89/336/CEE et amendement 92/31/CEE, dispositif
numérique de Classe B
EN 50081-1, Norme sur les émissions génériques pour les produits
domestiques, commerciaux et industriels légers
(EN 55022/CISPR 22, Limites et méthodes de mesure des
caractéristiques d'interférences radiophoniques, Matériel des
technologies de l'information) Mise en garde: ceci est un produit de
Classe B. Il risque produire des interférences radiophoniques dans un
environnement domestique auquel cas l'utilisateur peut se voir
demandé de prendre des mesures adéquates.
EN 50082-1, Norme sur l'immunité générique pour produits
domestiques, commerciaux et industriels légers.
(CEI 801-2, CEI 801-3, CEI 801-4)
EMC Richtlinie 89/336/EEC und Änderung 92/31/EEC, Digitales
Gerät der Klasse B
EN 50081-1, Allgemeiner Emissions-Standard für Haushalt- und
kommerzielle Produkte sowie Erzeugnisse der Leichtindustrie
(EN 55022/CISPR 22, Beschränkungen und Verfahren der Messung
von informationstechnischen Ausrüstungen mit Funkstörmerkmalen)
Warnung: Dies ist ein Erzeugnis der Klasse B. Dieses Erz eugnis kann
Funkstörungen im Wohnbereich verursachen; in diesem Fa ll können
entsprechende Maßnahmen seitens des Benutzers erforderlich sein.
EN 50082-1. Allgemeiner Unempfindlichkeits-Standard für Haushaltund kommerzielle Produkte sowie Erzeugnisse der Leichtindustrie
(IEC 801-2, IEC 801-3, IEC 801-4)
 Loading...