

Page 1

ATI-TV™ W onder
User’ s Guide
The PCI-based
TV Tuner and
Video Capture Card
Page 2

Disclaimer
The manufacturer (MFR) re ser v es the righ t to mak e change s to th is docu m ent an d th e
products which it describes without notic e. The MFR shall no t be liabl e for technic a l
or editorial errors or omissions made herein; nor for incidental or consequent ial
damages resulting from the furnishing, performance, or use of this material.
The MFR makes no representation that the interconnection of products in the manner
described herein will not infringe on existing or future patent rights, nor do the
descriptions co ntained herein imply the gr an tin g of li c en se to ma ke, use or sell
equipment constructe d in accordance with this description.
The PCI accelerators have been designed to support the PCI local bus standards. Some
computers use proprietary local bus circuitry and therefore may not be fully
compatible with the MFR’s local bus cards. Although tested successfully in a wide
variety of computer systems, the MFR cannot be held responsible for any
incompatibilities which may o ccur between this card and th e system conf igura tion you
plan to use. We recommend that you check with the dealer or distributor for your
computer system before installi ng your card.
Version 1.0 P/N 137-70089-10
© Copyright 1999, by ATI Technologies Inc.
All rights reserved, includi ng those to reproduce this guid e or parts thereof, in any form withou t
the express written permissio n of ATI Technologies Inc.
Features and speci fications are subject t o change without notice. Trademarks and/or regis t ered
trademarks are the prop ert i es of their respective owners:
ATI, RAGE
Inc. in the United States, Canada, and/or other countries.
Pentium
United States and/or other countries.
Windows
in the United States and/or other countries.
Voodoo Banshee
and/or other countries.
Riva 128
States and/or other countries.
Virge
and
and/or other countries.
ATI-TV
, and
Celeron
and
WebTV
and
Riva TNT
and
Savage3D
are either registered trad emarks or trademarks of ATI Technologies
are either registered trad emarks or trademarks of Int el Corporation in the
are either registered trademarks or trademarks of Microso ft Corporation
is either a registere d trademark or a trad em ark of 3Dfx in the Unit ed S tates
are either registered trademarks or trademarks of
are either re g is tered trademar ks or trademarks of S3 in the United States
NVIDIA
in the United
ii
Page 3

Contents
Getting Started . . . . . . . . . . . . . . . . . . . . . . . .5
What You'll Need . . . . . . . . . . . . . . . . . . . . . . . . . . . 5
Features. . . . . . . . . . . . . . . . . . . . . . . . . . . . . . . . . . 6
Installing the ATI-TV Wonder Tuner Card . . . . . . . . . . 7
Connecting the Audio . . . . . . . . . . . . . . . . . . . . . . . . . 9
ATI-TV Wonder Connectors . . . . . . . . . . . . . . . . . . . 12
Installing the Software . . . . . . . . . . . . . . . . . . . . . . . 12
Starting the ATI VIDEO PLAYER. . . . . . . . . . . . . . 13
Using the Online Manual . . . . . . . . . . . . . . . . . . . . . 14
Troubleshooting . . . . . . . . . . . . . . . . . . . . . . . . . . . . 15
ATI VIDEO PLAYER Basics . . . . . . . . . . . . . 17
Online Help . . . . . . . . . . . . . . . . . . . . . . . . . . . . . . 17
The Control Panels. . . . . . . . . . . . . . . . . . . . . . . . . . 17
The Task control panel. . . . . . . . . . . . . . . . . . . . . . 18
The Display Panel . . . . . . . . . . . . . . . . . . . . . . . . . 20
Using the TV Tuner. . . . . . . . . . . . . . . . . . . . 22
Setting up the TV tuner . . . . . . . . . . . . . . . . . . . . . 23
Validating TV channels. . . . . . . . . . . . . . . . . . . . . . 23
Zooming and unzooming . . . . . . . . . . . . . . . . . . . . 24
Hot Words. . . . . . . . . . . . . . . . . . . . . . . . . . . . . . . . . 24
Channel Lockout. . . . . . . . . . . . . . . . . . . . . . . . . . . . 26
Program Lockout . . . . . . . . . . . . . . . . . . . . . . . . . . . 27
Video Desktop . . . . . . . . . . . . . . . . . . . . . . . . . . . . . 27
Closed-Captioned Text . . . . . . . . . . . . . . . . . . . . . . . 28
Visual Channel Selection . . . . . . . . . . . . . . . . . . . . . 29
Scheduled Viewing. . . . . . . . . . . . . . . . . . . . . . . . . . 30
Digital VCR. . . . . . . . . . . . . . . . . . . . . . . . . . . . . . . . 31
TV Magazine . . . . . . . . . . . . . . . . . . . . . . . . . . . . . . 32
Secondary Audio Program (SAP). . . . . . . . . . . . . . . 34
iii
Page 4

Capturing Video and Audio. . . . . . . . . . . . . 35
Capturing Still Frames . . . . . . . . . . . . . . . . . . . . . . . 36
Capturing Video . . . . . . . . . . . . . . . . . . . . . . . . . . . . 36
Capturing from your VCR or Camcorder . . . . . . . . . 38
Playing Captured Video and Audio . . . . . . . . . . . . 40
Editing Captured Video and Audio. . . . . . . . . . . . . 40
Playing Audio CDs . . . . . . . . . . . . . . . . . . . . 41
Advanced Setup . . . . . . . . . . . . . . . . . . . . . .43
iv
Page 5
CHAPTER 1
Getting Started
Get real-time information when
you want it. Mo ve the TV windo w,
zoom it to full-screen, and
capture video. images.
Getting Started 5
Now you can watch TV,
videos, or games on
your computer!
A TI -TV W onder let s you
watch up to 125 cable
television channels and
70 antenna channels in
smooth, full-motion
video on the w hole
screen or in a window.
You can capture still
frames and movie clips,
channel surf, create your
own TV transcripts, and
turn your PC into a
digital VCR.
The actual number of stations received will vary depending on the services
Note: Not all channel options are available in all countries.
provided in your area.
What You'll Need
• Computer System — Pentium®, Pentium®II, or Celeron™
processor-based or compatible system, with at least 8MB of
system memory.
• Monitor — VGA, minimum 640x480 resolution.
• Operating System— Windows
• Sound card and speakers certified for Windows
Windows
• Expansion Slot — PCI.
• Graphics Accelerator with overlay support. The following
graphic accelerators work with the ATI-TV Wonder tuner
card (Please check our web site, www.atitech.com, for an
updated list of supported graphic accelerators):
®
98 use.
®
95, or Windows®98.
®
95 and
Page 6

6 Getting Started
• ATI products:
• RAGE, RAGE II, RAGE II+, RAGE IIC, RAGE PRO,
RAGE PRO Turbo, RAGE LT, RAGE LT Pro, RAGE 128
• Other products:
•
NVIDIA
Voodoo™ Banshee, S3 Virge™ DX/VX, S3 Savage3D™
Features
• Television-quality video in a window and full screen with
NOTE
ATI VIDEO
PLAY ER
TV audio is
monaural-
only in
.
Europe
®
dbx
stereo TV audio.
• Composite Video and S-Video inputs for VCR, video
camera, laser-disc player, video game consoles, etc.
• Capture Video and Audio with a simple mouse click.
• Live Motion Video Desktop, using your favorite TV show
as wallpaper.
• Channel Scan through all available stations in seconds.
• Zoom-In to any part of the screen.
• Closed Captioning support (NTSC only), including
Transcript Creation and Hot Words that alert you when the
ATI VIDEO PLAYER software receives information you
want to see.
• Visual Channel Selection — select channels by clicking on
their “thumbnail” images.
• Scheduled Viewing — play particular files and/or wat ch
selected TV channels at times you specify.
• TV Magazine — transcribe closed-captioned broadcasting
and remove advertisements, including pictures and text.
• Channel Lockout and Program Lockout for parental
control.
• Secondary Audio Program.
• Digital VCR — Schedule and record TV shows
to your hard drive.
RIVA™ 128,
RIVA™ TNT, 3Dfx
NVIDIA
Page 7
Installing the ATI-TV Wonder Tuner Card 7
Installing the ATI-TV Wonder Tuner
Card
Please read these important safety instructions before you
proceed with the installation of your ATI-TV Wonder
tuner card.
Static electricity can damage sensitive electronic components.
Discharge your body’s static electric charge by touching a grounded
surface — for example, the metal area of the computer chassis —
The manufacturer assumes no liability for any damage caused by
improper installation of any components by unauthorized service
personnel. If you do not feel comfortable performing the installation,
Damage to system components, the accelerator card, and injury to
before performing any hardware procedure.
consult a qualified computer technician.
yourself may result if power is applied during installation.
Important Safety Instructions
•
ROUNDING
G
ELECTRIC SHOCK AND FIRE, THE
INSTALLED ONLY IN PERSONAL COMPUTERS EQUIPPED WITH A THREE-WIRE
GROUNDING PLUG—A PLUG HAVING A THIRD (GROUNDING) PIN
unable to insert the plug into the outlet, contact your electrician to replace
your obsolete outlet.
•
UTDOOR ANTENNA GROUNDING
O
system is connected to the product, be sure that the antenna or cabl e system
is grounded so as to provide some protection against voltage surges and
built-up static charges. Article 810 of the National Electrical Code,
ANSI/NFPA 70, provides informa tion with re gard t o prope r ground ing of the
mast and supporting s tr uct u re , gr ou nd in g of the lead- i n wi r e to the an te nn a
discharge unit, size of grounding conductors, location of antenna-discharge
unit, connection of ground ing electro des, and re quirements for the groun ding
electrode.
•
OWER LINES
P
vicinity of overhead pow er lin es or oth er lig ht or power circuits, or where it
can fall into such power lines or circuits. When installing an outside antenna
system, extreme care should be taken to keep from touching such power
lines or circuits as contact wi th th em may be fatal.
CAUTION
–
– An outside antenna s ystem should not be located in the
FOR CONTINUED PROTECTION AGAINST RISK OF
:
ATI-TV Wonder
– Since an outdoor antenna or cable
TUNER CARD SHOULD BE
. If you are
Page 8
8 Installing the ATI-TV Wonder Tuner Card
Installing th e
1
Power-off the computer, then disconnect the power cable.
2
Remove the computer cover. If necessary, consult your
computer system manual for removal instr uctions.
Remember to discharge your body’s static electricity by
touching the metal area of the computer chassis.
3
Select an empty PCI expansion slot for the
ATI-TV Wonder tuner card.
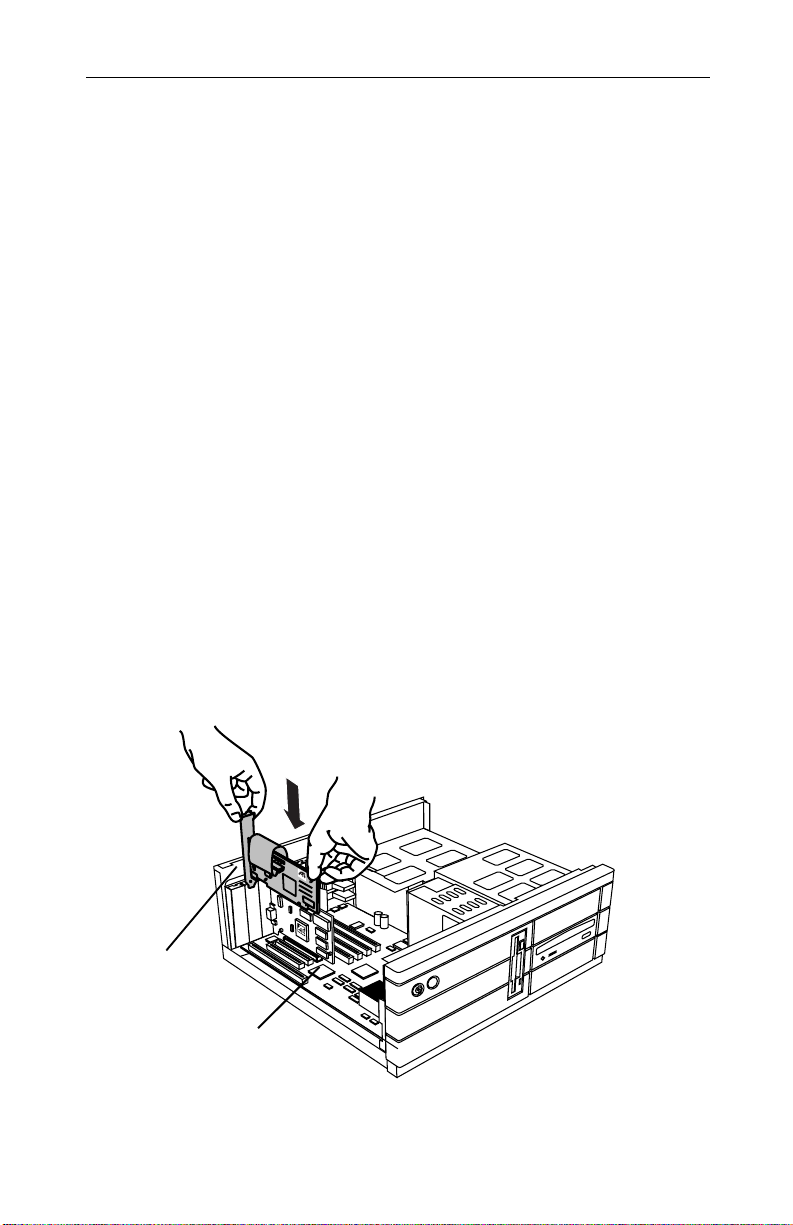
4
With the slot cov er remo v ed, grasp the card by the top edge
and carefully seat it firmly into the slot.
5
Fasten the retaining bracket with a screw.
If you wish to connect the audio for your ATI-TV Wonder
tuner card internally, please see Internal A udio Connection
on page 10 before reassembling your system. Note that ATI
recommends the external audio connection method.
6
Reinstall the computer cover.
7
Connect your TV cable or video input to the
ATI-TV Wonder card. For more information about the
connectors on the ATI-TV Wonder tuner card, please see
ATI-TV Wonder Connectors on page12.
ATI-TV Wonder
tuner card
ATI-TV Wonder
tuner card
PCI expansion slot
Figure 1. Installing the
ATI-TV Wonder
tuner card
Page 9
Connecting the Audio
You may connect the audio portion either externally or
internally. If you do not feel comfortable installing cabling
inside your computer, follow the procedure below. If you wish
to dispense with the external sound connections, please see the
procedure Internal Audi o Connectio n on page 10. Note that ATI
recommends you use the external audio connection method.
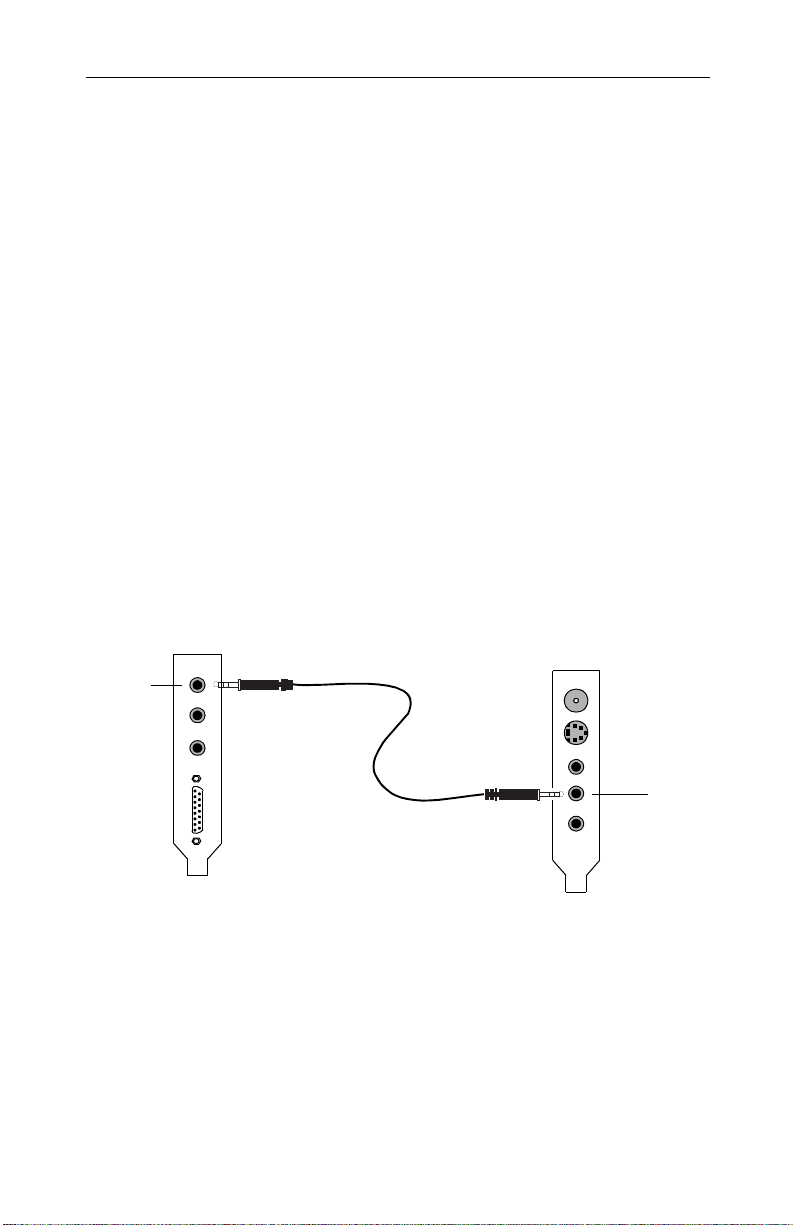
External Audio Connection
1
Looking at the back of your computer, locate the audio out
connector on the ATI-TV Wonder tuner card.
2
Locate the Line-In connector on your sound card. If
necessary, refer to the documentation supplied with your
sound card.
3
Attach one end of the sound cable to the Audio Out on the
ATI-TV Wonder tuner card and the other end to the Line-In
on your sound card.
Connecting the Audio 9
Line-In
LINE IN
MIC IN
SPK/LINE
JOYSTICK
Your sound card may
not look exactly as shown.
CATV
SVIDEO IN
COMP IN
AUD OUT
AUD IN
Sound Card ATI-TV Wonder
Figure 2. Connecting the audio externally
Audio
Out
Page 10

10 Connecting the Audio
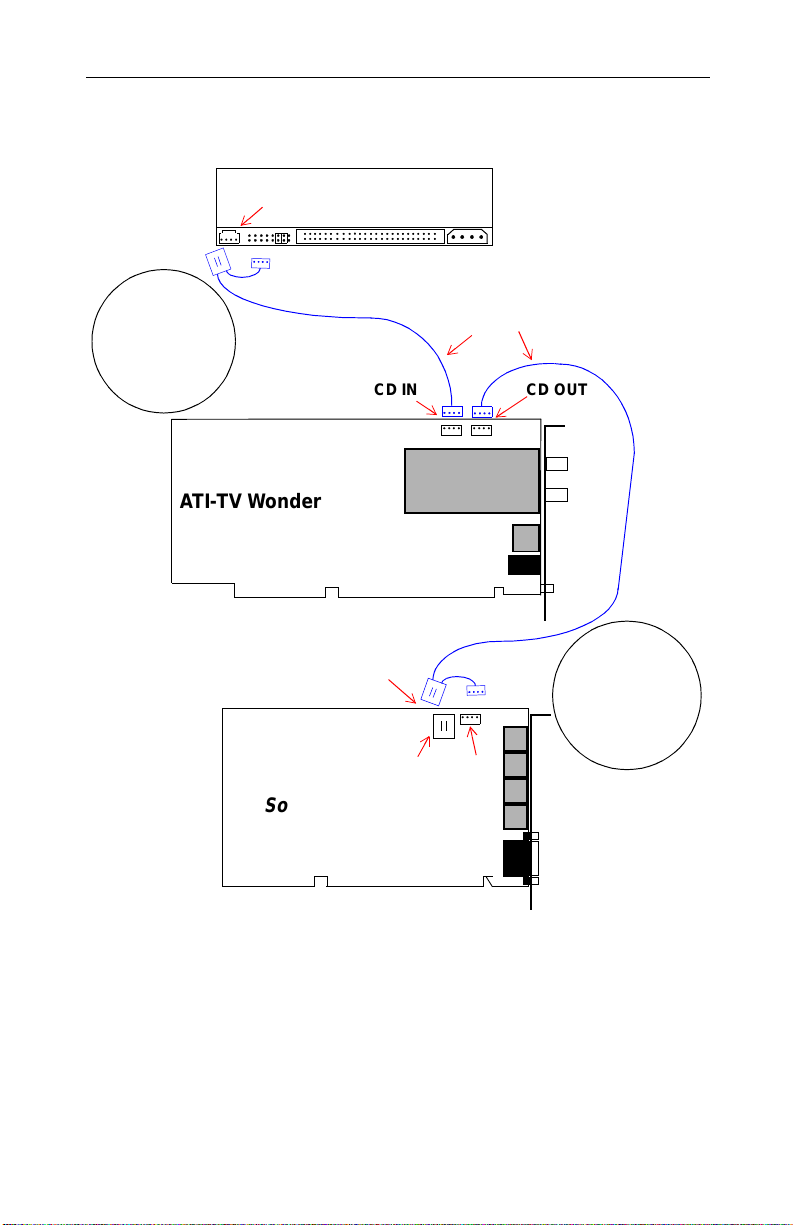
Internal Audio Connection
When connecting cables to the computer, look at the connector and the socket
ATI-TV Wonder
If you encounter difficult y, realign the connector with the socket. Then gently but
Note that ATI recommends the
carefully. The audio cables included with your
tuner card are keyed to fit into the socket in only one way.
DO NOT FORCE THE CONNECTOR INTO THE SOCKET.
firmly slide the connector fully into the socket.
external
audio connection method.
Note: If you already have an external audio connection,
internal audio connection is not necessary.
1
Power off the computer, then disconnect the power cable.
See Figure 2. Connecting the audio internally on page 11.
2
Remove the computer cover. If necessary, consult your
computer system manual for removal instr uctions.
3
Remember to discharge your body’s static electricity by
touching the metal area of the computer chassis.
4
Locate your CD-ROM drive. On the rear of the drive are
several connectors. Match the CD AUDIO OUT connector
to either the black or the white connector on the special
audio cables included with your ATI-TV Wonder tuner
card. Carefully and firmly insert either the black or the
white connector into the CD AUDIO OUT socket.
Remember to use the end of the audio cable with both a
black and a white connector. Connect only ONE (1) of these
plugs to the CD-ROM.
5
Connect the other end of the audio cable (with one white
connector) to the CD IN socket of your new
ATI-TV Wonder tuner card.
6
Use the second audio cable to connect your
ATI-TV Wonder tuner card to your sound card. Gently but
firmly push the single white connector on the cable to the
CD OUT socket on your ATI-TV Wonder tuner card.
7
Locate your sound card. Locate the CD IN socket, typically
located near the top of the board. Determine if the CD IN
socket requires a black or a white connector.
Look carefully at your sound card. The socket should be
labeled CD IN or AUX IN.
8
Gently but firmly insert the appropriate connector (white or
black) into the CD IN socket on your sound card.
9
Replace the computer cover and reconnect the power cable.
Page 11
Connecting the Audio 11
Connect
the black or the
white connector
to your CD-ROM
connect both at
either
drive. Do not
the same time.
ATI-TV Wonder
Tuner Card
CD AUDIO OUT
Black or White
Audio cables in cluded with
A TI-TV Wonder
CD IN CD OUT
(White)
CD IN
Black or White
CD-ROM
tuner card
(White)
The CD IN jack
black or white.
Use the matching
not connect both
at the same time.
will be
either
connector. Do
Sound
Card
Figure 2. Connecting the audio int ernally
Page 12
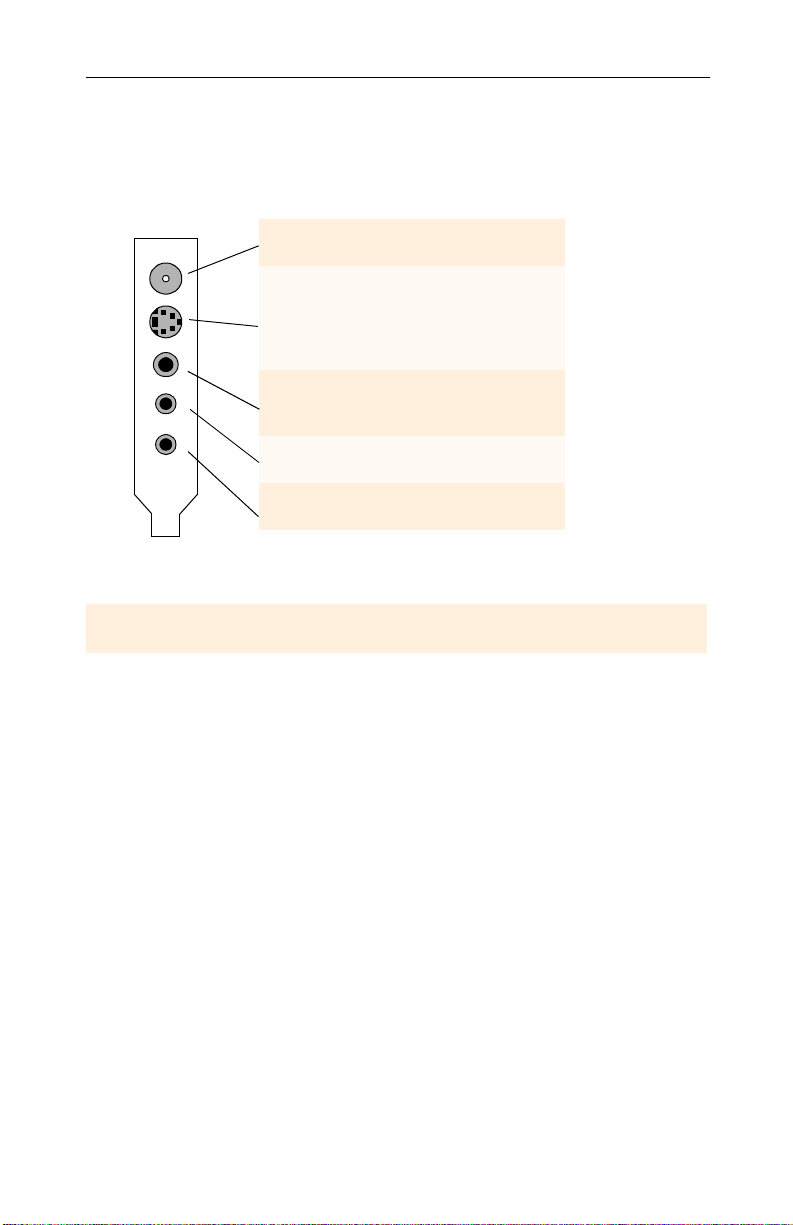
12 ATI-TV Wonder Connectors
ATI-TV Wonder
The TV Tuner provides stereo audio input, audio output, and
three video input connectors:
CATV
SVIDEO IN
COMP IN
AUD OUT
AUD IN
If your video source provides both Composite and S-Video,
CATV
S-Video
Input
Composite
Input
Audio Ou t
Audio
Input
Figure 3. The
S-Video will produce the best results.
Connectors
For input from cable TV
or antenna.
For input from S-VHS
sources. Use the cable
included with your
ATI-TV Wonder
card.
For input from
composite vide o
sources.
For output to your
sound card .
For stereo audio input
from external sources.
ATI-TV Wonder
tuner
connectors
Installing the Software
Your ATI-TV Wonder tuner card works with the ATI Video
Player software included on the installation CD-ROM.
To install the enhanced ATI drivers and the ATI VIDEO
PLAYER for Windows
1
Insert the ATI INSTALLATION C D-ROM into your
CD-ROM drive.
If Windows
®
runs the CD-ROM automatically, proceed to
step 5.
2
Click Start.
3
Select Run.
4
Type the following:
®
95 or Windows® 98
Page 13

Installing the Software 13
D:\ATISETUP
(If D is not your CD-ROM drive, substitute D with the
correct drive letter.)
5
Click on Easy Install to begin the Installation Wizard.
6
Follow the on-screen instructions to complete the
installation.
Starting the ATI VIDEO PLAYER
Windows® 95 or Windows® 98 initial set up
For correct audio performance, your sound card must be
active. Follow these steps to display the Line-In Audio
setting in the Windows
1
Right-click the speaker icon in the Taskbar.
2
Click Open Volume Controls.
3
If the Line-In volume control slider is not visible, click
Options, then click Properties. Select Line-In (or CD
Audio for internal audio connections) and click OK.
®
Volume Control Panel:
4
Adjust the volume setting of the Line-In volume control
slider. If you have connected the audio internally, then
adjust the appropriate slider: “CD Audio” or “AUX IN.”
5
If the Mute checkbox is checked, click it to turn off muting.
6
Close the window to save your settings.
Windows
1
2
3
Alternatively, you may start the ATI Video Player by doing the
following:
1
2
The Online Manual has further information and instruction
regarding the use of the ATI Video Player.
®
95 or Windows® 98 everyd ay use
Start Windows®.
Click Start and select Programs.
Select ATI Multimedia, then select ATI Video Player.
Right-click the ATI icon on your taskbar.
Select ATI Programs, then select ATI Video Player.
Page 14

14 Using the Online Manual
To select the sound card connector for TV audio input
The sound card connector determines which mixer slider is
controlled by the ATI Video Player’s volume control slider.
1
Click the TV button in the Task control panel.
2
Click the Setup button in the TV Tuner control panel.
Line-In
MIDI
CD Audio
Line-In
Wave
3
Click the Video tab.
4
Click the Audio Input list box.
5
Select Line-In from the drop-down list then click OK.
If you have connected the audio internally, then choose
“CD Audio” or “AUX IN”, as appropriate.
Using the Online Manual
The Online Manual provides instructions on using the
ATI Video Player and its features: Contr ol Panel, viewing
media playback, setting the TV Tuner, and capturing video.
To open the Online Manual
1
Insert the ATI INSTALLATION C D-ROM into your
CD-ROM drive.
If Windows
to step 5.
2
Click Start.
3
Select Run.
4
Type the following:
D:\ATISETUP
(If D is not your CD-R OM dri ve, subst itute D with the correct
drive letter .)
5
Click th e Online Manual button. The first time you use the
Online Manual, the installer will install the necessary
components. Click the Online Manual button after this
installation to view the manual.
®
runs the CD-ROM automatically, proceed
Page 15

Troubleshooting
Because a typical computer system consists of many different
parts, difficulties may arise from a combination of items. Check
the following list and find a symptom that’s similar, then try the
suggested solution.
Video is unstable.
• Check that you’ re using the correct broad cast standard format
(NTSC, PAL, or SECAM).
• Check the quality of your incoming TV signal on another
receiver; bad reception may be the cause.
Video is in black and white only.
• Check the connectors setting to make sure you’ve selected
the correct input (CATV, Composite, or S-Video) for your
video source device.
No video or audio.
• Check that the audio and video connectors are securely
plugged into the correct jacks.
Troubleshooting 15
No audio.
• Check that the A T I-TV Wonder tuner card is securely seated
in its PCI slot. If the problem still exists, try a different PCI
expansion slot.
• Make sure that the monitor and computer are plugged in and
receiving power.
• Check that the audio cables are connected properly. (See
Connecting the Audio on page 9)
• Ensure that another Windows
the sound.
• Check the mixer line input setting in the audio software
provided with your sound card.
®
audio program is not muting
Page 16

16 Troubleshooting
No television audio.
• Select the sound card connector for TV audio input:
1
Click the TV button in the Task control panel.
2
Click the Setup button in the TV Tuner control panel.
Line-In
MIDI
CD Audio
Line-In
Wave
3
Click the Video tab.
4
Click the Audio Input list box.
5
Select Line-In from the drop-down list then click OK.
If you have connected the audio internally, then choose
“CD Audio” or “AUX IN”, as appropriate.
Remember: to hear audio from the television, you must
make a connection between your ATI-TV Wonder tuner
card and your sound card. See Connecting the Audio on
page 9.
If you still cannot hear TV audio, check your mixer settings by following
the steps under Windows® 95 or Windows® 98 initial set up on page 13.
Windows
®
95 and Windows® 98 troubleshooting tips.
• Right-click the ATI icon in the taskbar and s e lect
Troubleshooting.
• If you have problems during start-up, start your computer in
Safe Mode.
To load Windo ws
1
Turn on you r comput er.
2
In Windows® 95, press the F8 key when “Starting
®
95/Windows® 98 in Safe Mode
Windows 95” appears on the screen.
In Windows
Windows
®
98, press and hold the Ctrl key until the
®
98 Startup Menu appears, then select the
number for Safe Mode and press Enter.
3
Select Safe Mode.
• Disable any programs that launch automatically when
you start Windows
®
95/Wind ows® 98.
Page 17

CHAPTER 2
ATI VIDEO PLAYER Basics
This chapter explains the basics of how to use the special
features that the ATI Video Pla yer s oftware has to offer.
Because North American and European television use different
broadcast standards, closed-captioning and related features are
available only in North America; Teletext is available only in
Europe, and the ATI Video Player TV audio is monaural-only in
Europe.
Online Help
ATI Player Help. Click the Help button at any time to open the
online help.
17
F1
Context-Sensitive Help. Context-sensitive help is always
available in each panel. Just press the F1 key.
Bubble Help. Simply move the mouse cursor over a control to
see a description of its purpose. As you become familiar with
the ATI Video Player software, you may want to turn off help
— uncheck the Show Bubble Help checkbox in the Display tab
in the ATI Video Player Setup window. (For more information,
see Display in Advanced Setup on page 43).
ATI Desktop Help. For help on the ATI Video Player
software’s graphics features, double-click the ATI icon in the
lower-right corner of your screen.
See Starting the ATI VIDEO PLAYER on page 13 for details on
setting up and using the ATI Video Player.
The Control Panels
When you select a mode in the Task control panel or press a
shortcut key, the Control panel changes to the appropriate
control panel for that mode. All modes provide contex t-sensiti v e
help; see Online Help on page 17.
Page 18

18 The Control Panels
The Task control panel
The Task control panel indicates what mode the player is in and
what it’s doing. (Your Task control panel may n ot look exactly
like the illustration—only installed or available features have
controls.)
Context-sensitive help is always available when you press the
F1 key. All control panels provide bubble help; just point your
mouse at a control to see a pop-up description of its function.
Instantly select the function you want –
the Task control panel shows you what’s happening.
Switching modes
Use the Task control panel buttons to switch between Audio
CD, TV Tuner, and Capture mode.
Audio
CD
TV
Capture
Play standard
audio CDs.
Display live
video source s ,
such as tele vision
programs.
Capture still
images, video
sequences, or
audio-only.
See Playing Audio
CDs on page 41.
See Using the TV
Tuner on page 22.
See Capturing
V ideo and A udio on
page 35.
Page 19

The Control Panels 19
Audio CD
TV Tuner
Capture
You can also use the following shortcut keys to start CD audio,
TV tuner, or capture.
CD Audio Press F4
TV Tuner Press F6
Capture Press F8
Controlling the audio volume
The TV Tuner, Audio CD Player, and Media
Playback panels have a volume control slider.
Use the mouse to move the slider to increase
and decrease audio volume. You can specify
which audio mixer slider to control: click the
setup button , then click the Video tab. Click
the Audio Input list box, and select the input
from the drop-down list.
Muting the audio volume
The TV Tuner, Audio CD Player, and Media
Playback panels have a Mute button that you
can click to temporarily turn off the audio.
Click the button again or move the volume
control slider to cancel muting.
Page 20

20 The Control Panels
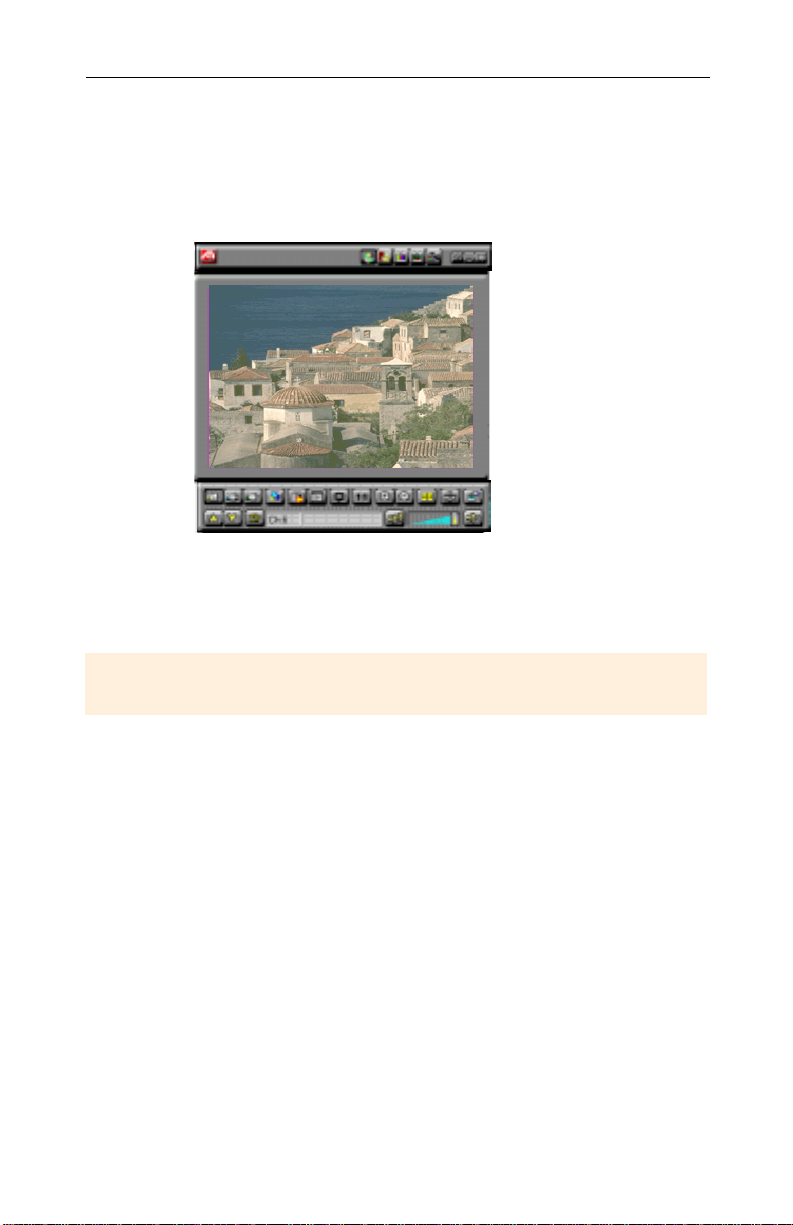
The Display Panel
The Display panel is the “screen”
where your media plays. It’s a
familiar, TV-sty le display that you
can resize, place on top of other
windows, and position
automatically in one of nine
locations on the screen.
The F2 key hides/shows the control
panel, to save desktop space.
Sizing the Display panel
You can resize the Display panel using the mouse, the Control
panel buttons, or
In TV mode, when you play full-screen video, the Playback
panel becomes “thin”. To show/hide the thin Playback panel,
press F2.
You can also use the
CTRL
Increase size of
Display Panel
Decrease size
of Display
Panel
Play full-screen CTRL + F
Move the Display panel, zoom it to
full-screen, and minimize it as an
icon.
key combination:
CTRL + Up Arrow
CTRL + Down
Arrow
key to display these preset sizes:
CTRL
160x120 pixels. CTRL+1
240x180 pixels. CTRL+2
320x240 pixels. CTRL+3
640x480 pixels. CTRL+4
Toggle between full
screen and current size.
CTRL+F
ALT+F
Page 21

Attaching and Detaching Panels
You can detach ATI VIDEO PLAYER control panels from the
Display panel, move them to any location on your screen, and
re-attach them. Panels attached to the Display panel share the
Display panel's snap window to: and always on top settings
(For more information, see Display in Advanced Setup on
page 43).
To detach a panel
While holding do wn the Shif t k ey, click the panel where the
panel edges meet, then drag it away.
To attach a panel
Drag the unattached panel near the Display panel until its
outline changes, then release the mouse button. The panels will
snap back together.
The Setup Window
The Setup window
provides for all the
advanced
functionality of the
ATI Video Player.
Use the Setup
window to change
the options for the
TV tuner, the digital
VCR, and the audio
CD player. You may
access the Setup
window three ways:
The Control Panels 21
Shown is the Display tab of the
TV Tuner Setup window
Opening the Setup Window
• Click on the Setup button
• Right-click on the image in the Display panel and select
Properties.
• When A TI V i deo Player is the active application, press Ctrl-S.
in the active control panel.
Page 22

22 Using the TV Tuner
CHAPTER 3
Using the TV Tuner
The TV Tuner displays cable or broadcast television and
smooth, full-motion video on the whole screen or in a window.
You can use the TV Tuner to:
• Watch television on your computer as you work in another
software application.
• Watch a videotape or laser disk movie on your computer.
• Capture, save, and print TV and video images.
• Display and record closed-captioned text.
• Replace your desktop with live TV display.
The ATI-TV Wonder tuner card with the ATIVideo Player
software accepts a wide range of video inputs: TV antenna or
cable, VCR, Video camera, laser disk, and video games.
Click the TV
Tuner button in
the Task control
panel.
You can us e the Setup window to adjust color, select the
broadcast standard, add and delete channels, and set
closed-caption options (see
Caption
Or press TAB and use the cursor keys to adjust the picture
on-screen, just like a TV.
Advanced Setup on page 43
in
Video, Tuner,
and
.)
Closed
Context-sensitive help is always available when you press the
F1 key. All controls provide bubble-help; move the mouse
cursor over a control to see a pop-up description of its function.
The Control panel
changes to the TV
control panel (in
this illustration,
CATV is selected).
Page 23

Setting up the TV tuner
Perform these simple steps to set up the TV:
Choose antenna or cable
1
Open the Setup window in TV Tuner mode.
Open the Setup window by clickin g on the Setup butt on ,
pressing Ctrl-S, or right-clicking on the Display.
2
Click the TV Tuner tab.
3
From the drop-down list, select the TV broadcast format
(Antenna or Cable) appropriate to the country you are in.
Set up the audio
Using the TV Tuner 23
Line-In
MIDI
CD Audio
Line-In
Wave
Select the sound card connector used for TV audio input:
1
Open the Setup window in TV Tuner mode.
2
Click the Video tab.
3
Click the Audio Input scroll box.
4
Select a sound card connector from the drop-down list.
Scan for available channels
1
Open the Setup window in TV Tuner mode.
2
Click the TV Tuner tab
3
Click the Auto Scan button in the TV Tuner setup dialog.
The TV Tuner scans for all available channels and stores them
when you click the Set button. When scanning is complete, you
can type in a name for each channel.
Validating TV channels
When you click the Auto Scan button in the Tuner setup di al og
(see Tuner in Advanced Setup on page 43), the TV Tuner scans
for all available channels and stores them. When scanning is
complete, you can type in a name for each channel. Before
scanning, use the drop-down list box to select the broadcast
format and the cable standard.
Page 24

24 Hot Words
If you want to change channel assignments, you can use the
slider that appears at the top of the dialog bo x. Fo r example, you
could assign the actual channel 5 to the ATI Video Player
software’s channel 2. Select channel 2 from the list, then drag
the slider left or right until channel 5 appears in the Display
window. Click OK to save your settings.
• Double-clicking the slider returns the current channel’s
assignment to normal ; for ex ample, se lecting ch annel 2 tunes
in channel 2.
• Clicking the Auto Scan button resets the channel
assignments to default and removes all channel naming.
Zooming and unzooming
Select and
enlarge a portion
of the display by
dragging the
mouse across
the Display Panel
To select and enlarge a portion of the display
1
Click within the display panel.
2
Hold down the mouse button and draw a rectangle around the area you want to zoom.
3
To return your display to normal, click the Unzoom button
Hot Words
North
American
feature
Have your computer watch TV for you! When you turn on
Closed Captioning, you can specify words and phrases that the
ATIVideo Player software will detect in the closed-captioned
text. You set Hot Words to begin transcribing the text or to
maximize the TV Tuner when the Hot Words appear.
You specify words using the Hot Words configuration dialog.
(see Hot Words in Advanced Setup on page 43).
in the Control panel.
Page 25

Hot Words 25
To select Hot Words
1
Open the Setup window in TV Tuner mode.
2
Click the Hot Words tab.
3
Click on the New button.
4
Type in the Hot Words that you want.
5
Choose the type of match you want:
• Always takes effect when the Hot Word occurs.
• With takes effect when the Hot W ord occurs, and is
immediately followed by a Second Word.
• Without takes effect when the Hot Word occurs, if it is not
immediately followed by a Second Word.
• Within takes effect when the Hot Word occurs, if it is
within a definable number of words of a Second Word.
6
Type in a Second Word where required.
7
To allow the ATI Video Player to maximize from a
minimized state, click the Enable Hot Words box.
To enable th e Hot Word to trigger transcription, click the
Enable Transcripting on match box.
8
Click New to add more Hot Words, otherwise click OK to save your settings.
To enable/disable specific Hot Words
Select the Hot Word from the list and click the Enable/Disable
button:
+
appears before enabled Hot Words
appears before disabled Hot W ords
-
The Closed Caption button in the TV Tuner panel m ust be
enabled for Hot Words to function.
Page 26

26 Channel Lockout
Channel Lockout
Channel Lockout prev ents any one without the correct password
from viewing selected TV channels. The first time you lock out
a channel, a Channel lockout dialog prompts you for a fourcharacter password.
To lock out a channel
1
NOTE
If you
forget your
password,
you must
uninstall
and
reinstall
your ATI
VIDEO
PLAY ER
software to
view
password-
protected
programs
.
Open the Setup window in TV Tuner mode.
2
Click the TV Tuner tab.
3
Select the channel you want to lock out, and click the box to the right of the channel name.
4
Type in a fourcharacter password, then retype the password.
The box to the right of the channel name turns into a padloc k.
5
Click OK.
• The channel up and channel down buttons in the TV Tuner
panel skip locked-out channels. The only way to select a
locked-out channel is to enter the channel name or number,
and type the password when prompted.
• When a password is active, you will be prompted to enter it
when you select the TV Tuner dialog. If you do not enter the
password, the TV Tuner dialog will open, but all controls will
be disabled; this prevents anyone from changing tuner
settings if they do not have the correct password.
To unlock a channel
1
Open the Setup window in TV Tuner mode.
2
Click the TV Tuner tab.
3
Type in your four-character password.
4
Select the channel you want to unlock, and click the
padlock to the right of the channel name. Click OK.
Page 27

NOTE
If you
forget your
password,
you must
uninstall
and
reinstall
your ATI
VIDEO
PLAY ER
software to
view
password-
protected
programs
Program Lockout 27
Program Lockout
When you use the TV Tuner, Program Lockout lets you block
particular programs at specific times, and set a password to
unlock them. Use the Program Lockout settings to specify
programs, times, and duration.
To lock out a program
1
Open the Setup window in TV Tuner mode.
2
Click the Program Lockout tab.
3
Click New.
4
Enter the
programming
information for the
.
item you wish to
lockout: day of the
week or date, start time, duration, and channel number.
Pull-down menus for each item list the options you may
choose from.
5
Click New to lockout more programs, otherwise click OK to save your set t ings .
6
Type your password in the passwo rd di alog, t hen ret ype th e
password. The Setup window closes and saves your
settings.
Video Desktop
The V ideo Deskto p function allows you to replace your desktop
pattern with live TV display. Once you have enabled Video
Desktop, simply minimize the ATI Video Player to watch TV
on your desktop.
Page 28

28 Closed-Captioned Text
To enable the Video Desktop
1
Open the Setup window in TV Tuner mode.
2
Click the Displays tab.
3
Make sure the Video Desktop checkbox is checked, then click OK.
4
Minimize the ATI Video Player with the minimize button in the Task control panel.
A small ATI Video Player icon appears at the right side of your
Taskbar. Click the icon to display a small control panel that you
can use to change channels and control the volume. Closedcaptioned information is not displaye d . To return the ATI Video
Player to a normal window, click ATI Video Player button (not
the icon) in your taskbar or select it by pressing Alt-Tab.
Closed-Captioned Text
You can display closed-captioned text that is broadcast with
North
American
feature
NTSC television programming. The ATI Video Player also
displays closed-captioned text in NTSC videotapes that contain
closed-captioned material.
• In full-screen, the text overlays the video, as in standard TV.
• When you play video in a window, you can optionally
display the text in a separate window.
To display closed-captioned text
Click the Closed Caption button in the TV Tuner panel.
Click the button a second time to stop sho wi ng Closed
Captioning.
Page 29

Visual Channel Selection 29
To display the text overlaid on the video
1
Open the Setup window in TV Tuner mode.
2
Click the Closed Captioning tab.
3
Click the Display
over video radio
button.
4
Click OK to save your settings and close the Setup window.
To create a closed-c aptioned transcript
1
Open the Setup window in TV Tuner mode.
2
Click the Closed Captioning tab.
3
Check the Create Transcript in File... checkbox.
4
Use the entry window below the checkbox to name your
file. Click the Browse… button to specify where the text
file will be saved.
5
Click OK to save your s ettings and clo se the Setu p window.
6
Click the Closed Caption b utton in the TV Tun er panel to begin.
Visual Channel Selection
You can browse through several TV channels simultaneously,
and select channels by clicking on “thumbnail” images
(miniature representations) of the channels. Each thumbnail
displays the channel number, and is regularly updated.
• If any channel in the selection list is a locked-out channel, a
password is required to access it. If a password is not entered,
only unlocked channels are displayed.
• After an autoscan, all detected channels are included in the
selection list. A magnifying glass appears to the left of the
Page 30

30 Scheduled Viewing
lock-out icon. Click the magnifying glass button to add or
remove the channel from the selection list.
• Most controls are disabled during Visual Channel Selection.
To use Visual Channel Selection
1
Click the magnifying glass button in the TV Tuner control panel.
A grid of thumbn ails appears over your TV display.
2
Click the thumbnail for the channel yo u want to preview.
The channel you clicked becomes “live”, and plays video
and audio for a few seconds.
3
To select a channel for viewing, double-click a thumbnail.
The grid of thumbnails disappears, and the selected
channel appears on your screen.
Scheduled Viewing
Scheduled viewing lets you set up t he ATI Video Player to pl a y
particular files and/or watch selected TV channels at times you
specify.
When you install the ATI Video Player, the Scheduler program
is added to your
Windows Startup file, so
that it runs every time
Windows is started. A
warning is displayed
whenever you click OK
after adding an item to
the scheduled viewing
list.
To use Scheduled Viewing
1
Open the Setup window in TV Tuner mode.
2
Click the Schedule tab.
3
Click New Event.
Page 31

Digital VCR 31
4
Name the event and enter th e program ming information fo r
the item you wish to schedule: day of the week or date, start
time, and duration. Under Do select which action you
would like the A TI V ideo Player to perform: Watch TV, Play
CD, Close Player, or Record TV. Pull-down menus for each
item list the options you may choose from. Different
options are available depending on which action you
specify. See To use the Digital VCR below for step-by-
step instructions on recording TV.
5
Click New Event to schedule more programs, otherwise click OK to save your settings.
• Events whose date (On Month & Day) has passed are not
automatically removed. To re-activate an event, set its
Month & Day to today or later.
•If the ATI Video Player setup dialog is open, or if the About
Help... box is being displayed, the ATI Video Pla yer cannot
process events. I f an e v en t occurs, a war ning no tif ies you that
a particular event was not processed.
• When the ATI Video Pl ayer first runs, if there are any
scheduled events recorded and the scheduler program is not
running, a warning tells you that the scheduled events will
not be processed.
Digital VCR
NOTE
You r
existing
capture
settings
will be
used. See
Capturing
Video and
Audio on
Page 51.
You can use your ATI Video Player software to record a TV
channel at a specified time, for a specified duration.
To use the Digital VCR
1
Open the Setup window in TV Tuner mode.
2
Click the Schedule tab.
3
Click New Event.
4
Name the event, then select Record TV from the Do pull-down list.
5
Specify the day of the week or the date as well as the start
time for the recording. Specify which channel to record.
6
Use the entry window to name your f il e. Click the Browse…
button to specify where the capture file will be saved.
Page 32

32 TV Magazine
7
Enter the number of minutes to record.
8
Click OK and minimize or close the Player.
The Player will begin recording at the specified time.
TV Magazine
North
American
feature
When you use the TV
Tuner , TV Magazine lets
you transcribe closedcaptioned broadcasting,
including pictures and
text. Files are saved in
R TF (Rich T ex t Format),
which preserves
formatting and can be
used in many word
processors.
To use TV Magazine
1
Open the Setup window in TV Tuner mode.
2
Click the TV Magazine tab.
3
Check the Enable TV Magazine checkbox.
4
Specify the settings you would like according to TV
Magazine Settings on page 33.
5
Click the Closed Captioning tab.
6
Check the Create Transcript in File... checkbox.
7
Use the entry window below the checkbox to name your
file. Click the Browse… button to specify where the RTF
file will be saved.
8
Click OK to save your s ettings and clo se the Setu p window.
9
Click the Closed Caption button in the TV Tuner panel to begin recording your TV Magazine.
Page 33

TV Magazine 33
Table 1: TV Magazine Settings
Image Layout
Automatic case
conversion
Black & White
pictures
Picture rate
Remove
advertising
Lets you save transcripts in four different text and
picture layouts.
Converts all characters to upper- or lower-case.
Saves images as black & white only, to conserve
disk space.
Specifies the number of lines of text between each
picture.
Automatically skips commercial advertising when
you display or transcribe closed-captioned text. It
works best with programs that use scrolling
transcripts rather than “text bubbles” to record
closed-captioned text; for example: Talk shows,
News broadcasts, Sports, and Soap operas.
(Depending upon the closed-captioning format,
commercials may occasionally be recorded—a little
experimentation will show you how to get the best
results.)
Page 34

34 Secondary Audio Program (SAP)
Secondary Audio Program (SAP)
The Secondary Audio Program can be used to broadcast, for
NOTES
Not all
television
stations
broadcast
stereo or
SAP
ATI-TV
WONDER
audio is
monaural-
only in
Europe
SAP stereo
is not
availabl e in
Japan.
example, language translations, reading services fo r the visually
impaired, weather forecasts, or information about a show.
To hear the Secondary Audio Program, or to switch from stereo to mono
.
Click the SAP button in the TV Tune r control panel to hear
the Secondary Audio Program.
Click the SAP button again to hear monaural TV from the left
.
channel and the Secondary Audio Program from the right
channel.
Click the SAP button a third time to hear monaural TV. Clicking
the SAP button again returns to stereo audio (the default).
The icon on the SAP button changes to show you which sound
mode you are currently in:
Stereo TV Audio
Secondary Audio Program
Monaural TV Audio—left channel
Secondary Audio Program—right channel
Monaural TV Audio
Page 35

Capturing Video and Audio 35
CHAPTER 4
Capturing Video and Audio
Still images. You can capture full-col or, 24-bit-per-pixel still
images from your camcorder or television, save them on your
computer’s hard disk, and print them. The images are placed on
the clipboard, or you can display them in their own window as
“thumbnails” (miniature images).
The ATI Video Playe r software saves still images as Windowsstandard bitmaps (.bmp). It also supports most industrystandard graphics file formats, so you can insert the images into
reports, presentations, letters, and other documents, to add
impact to training applications and presentations.
Full-motion video. You can use the “Digital VCR” to capture a
stream of full-motion video plus audio from your video source
and save it as an .AVI file on your computer’s hard disk.
Click the Capture
button in the T ask
control panel
.
The Control
panel changes t o
the Digital VCR.
Use the VCR setup dialog to specify recording quality,
recording time, and target drive for captured video. The
status box displays the amount of time available for
recording at the quality setting you specify.
Context-sensitive help is always available
when you press the F1 key.
All controls provide bubble help; move the mouse
cursor over a control to see a popup description
of its function.
Page 36

36 Capturing Still Frames
Capturing Still Frames
To capture still frames
1
Click the camera button to capture the current frame.
2
The still image window opens. You may do the following
by using the buttons at the top of the still capture window:
• Save image
• Delete image
• Print image
• Set curren t desktop pattern to image
3
To captu re more still frames, click on the Display window
to make it the active window, then click the camera button.
To review captured images
Click the image's thumbnail.
• If the selected image has not been saved, the thumbnail has a
red border. If it has been saved, the border is green.
• If an unselected image has been saved, its border is grey. If it
has not been saved, there is no border.
If you try to delete an unsaved still frame, the system prompts
you to save it before deleting. If there are multiple unsaved
frames when you attempt to close the still frame window, the
Delete All button deletes them without displayin g individual
prompts.
For information on setting up capture files, see Still Capture in
Advanced Setup on page 43.
Capturing Video
You can capture video in two ways:
•As a stream of vid eo and audio that you save as an .AVI file.
You also have the option of capturing only audio.
•As a sequence of still frames that you save in an .AVI file.
Page 37

Capturing Video 37
To capture a stream of video and audio
1
Click the Record Video button in the Digital VCR.
The ATI Video Player software starts recording video and
audio.
2
Press SPACE or click the mouse button when you are finished capturing.
3
Name your file and click the Save button to save your recording.
To capture a sequence of frames
NOTE
Audio is
not
captured in
this mode
1
Click the Capture Sequence button in the Digital VCR control panel.
2
.
Click the Capture Frame button in the Capture Sequence
window each time you wish to capture a frame.
3
Click the Finished Capturing button when you are finished.
4
Name your file and click the Save button to save your sequence.
The quality of the video that you capture depends on the
following conditions:
• speed of your system (CPU)
• amount of system memory (RAM)
• performance of your hard disk
• size of the video capture window
• choice of video codec (encoder-decoder):
YUV9
Produces the best quality, but uses the
most memory.
Requires a Pentium 166 or faster, and
VCR 1
dramatically reduces disk space
required.
For information on setting up capture files, see VCR Setup and
Advanced VCR setup in
Advanced Setup on page 43.
Page 38

38 Capturing from your VCR or Camcorder
Capturing from your VCR or Camcorder
Your ATI-TV Wonder tuner card provides you with the ability
to capture audio and v ideo dat a from v ideotap e to di gital for mat
on your PC. This allows you to use your computer as a digital
studio to edit, enhance, and share your videos!
To capture from your VCR or Camcorder
1
Follow the hardware installation instructions on page 12 of
this guide to correctly attach the audio and video cables
between your ATI-TV Wonder tuner card and VCR or
Camcorder.
2
Start your ATI Video Player software.
See Starting the ATI VIDEO PLAYER on page 13.
3
Click the Capture icon in the Task control panel.
4
Click the icon of the input source you intend to capture from (cable, composite or S-Video)
Cable Composite S-Video
5
Verify that the source material is displayed in the preview window.
6
In the Setup menu, under the Video tab you can adjust the
color, tint, brightness, and contrast to the desired level.
Page 39

Capturing from your VCR or Camcorder 39
7
The following settings can be made in the Setup menu, under the VCR tab.
8
elect the
S
recording quality
(note that the higher
the quality, the less
video you will be
able to store on a
given disk).
9
Next, under Record for ___ minutes, enter the number of
minutes you would like to record, OR select Stop when
SPACE is pressed if you want to manually stop recording
or record until your disk is full.
10
Select the drive you wish to record to under Record to drive.
11
If you want to
override the
standard capture
settings and
manually select the
video format, frame
rate, audio format,
or pre-allocate disk
space for capturing,
click the Advanced
button. Change the
settings, then click
the OK button to return to the Setup window.
12
Click OK in the Setup window to accept the changes and exit.
13
Click the Capture Video button to set up for capturing video.
14
Cue your VCR or Camcorder to th e location you would lik e to start recording from.
15
Click OK to start video capture. Please note that you
cannot use your keyboard or mouse while capturing. Also
note that a countdown timer on the ATI Video Player
Page 40

40 Capturing from your VCR or Camcorder
toolbar indicates an estimate of the amount of disk space
you have available for capturing.
16
Press SPACE or click the mouse button when you are finished capturing.
17
Select a file location and name to save your captured file to.
Playing Captured Video and Audio
The ATI Video Player can play your captured audio and video
immediately after you capture the file until you either quit the
application or capture another fi le. You may play your captured
files anytime by using any application that can play .AVI files.
To play captured video and audio
Click the Play button in th e Digital VCR control panel.
The ATI Video Player software plays your captured file.
Editing Captured Video and Audio
The video editing feature lets you mark start and end points in a
captured clip, and save only the portion that you select. The
ATIVideo Player software can edit your captured clips
immediately after you capture the file until you either quit the
application or capture another file. If you would like to edit your
captured file, please do so immediately after capture. Once you
quit the application or capture another file, you will not be able
to access the file using the ATI Video Player software.
Click the Frame
Edit button in the
Digital VCR.
The Digital VCR
changes to the
Editing pa nel.
Press the F1 key for context-sensitive help.
All controls provide bubble help; move the mouse
cursor over a control to see a popup description of
its function.
Page 41

CHAPTER 5
Playing Audio CDs
Click the Audio
CD button in the
Task control
panel.
The Control
panel changes to
the Audio CD
control panel.
Use the Audio CD panel to play stan dard aud io C Ds. Advanced
features such as Random play, Intro play (which plays the first
ten seconds of each track) and Loop play are available.
Playing Audio CDs 41
The Audio CD player has its own display window.
Page 42

42 Playing Audio CDs
To play an audio CD
1
Insert the audio CD into your CD-ROM drive.
2
In the Audio CD panel, click the Setup Dialogs button.
3
Click the Disc Info tab.
4
From the Available Tracks list, add or remove tracks as
desired. Th e Play List displays your current selections.
5
Click OK.
6
In the Audio CD panel, click the Play button.
The Audio CD player uses the Windows
Windows
names, and the play list. You can use the Setup dialog to
enter the name of the artist and the disc.
For more information on using the Audio CD controls and
features, see the online help.
®
®
98 standard INI file to store disc names, track
95 /
Page 43

CHAPTER 6
Advanced Setup
The ATI Video Player software’s default settings should work
well for most uses. You can also use the Setup dialogs to finetune the settings for your particular purposes.
When you open the Setup windo w (by clic king the Setup button
in the Task control panel, right-clicking in the Display panel
and selecting Properties, or pressing Ctrl-S) you can choose a
dialog to set up the following (some dialogs only appear in
certain modes):
Sets up the display’s general appearance and functions .
• Adjust panel size.
• Set panel snap-to grid locatio n and always-on-top.
• Turn bubble help on/off.
Display
• Turn fixed aspect ratio on/off.
• Assign a Hot Key to hide the player.
• Replace your desktop pattern with live TV.
• Adjust the border size of the display window.
• Set the Display window to always appear on top.
43
Still
Capture
Video
Controls how still frames are captured. Where
applicable, you can specify where to store them.
• Capture still frames to the clipboard, to a numbered
file (for ex ample, image01 .bmp, image02 .bmp, etc.) ,
or to a window.
• Specify printer options for the captured images.
• Specify scaling/image size, print options, and color
depth.
• Adjust color , tint (NTSC video only), brigh tness, and
contrast.
• Select input connector (TV, composite, or S-Video).
• Select audio input (Line-In, CD Audio, etc.)
• Select broadcast standard: NTSC, PAL, SECAM
(this feature is enabled only on selected boards).
Page 44

44 Advanced Setup
• Autoscan for active channels and add them to a list.
• Add, delete, and name channels in the list.
TV Tuner
Closed
Captioning
(NTSC
video only)
• Select antenna or cable input and country/location.
• Use slider to change channel assignments.
• Lock out selected channels.
• Display closed captioned text over live video, in its
own window, or not at all.
• Select solid or shaded background for text.
• Transcribe closed captioned text to a text file.
• Select buffer settings for the size and delay.
• Select font used to display closed captioned text.
Hot Words
(NTSC
video only)
Program
Lockout
TV
Magazine
VCR
• Enable/disable Hot Words in the Closed Captioning.
• Add or change Hot Word selection.
• Set Hot Words to start transcribing automatically.
• Set passwords for Program Lockout, Access
Program Lockout page, Access Locked Program,
Access Channel Organizer, Tuner panel Double
Lockout, and Channel Double Lockout.
• Create parameters for locking out a program.
• Specify image layout.
• Convert characters to upper- or lowercase.
• Save images as black & white.
• Specify the number of lines of captioning per p icture.
• Remove advertisements.
• The file is saved with the name and the location
specified in the settings on the Closed Captioning
tab.
• Select recording quality.
• Specify the number of minutes to record.
• Stop when SPACE is pressed.
• Specify the drive to save captured video
Click the Advanced button to override the automatic
setup, and access the full range of capture options.
Page 45

Advanced
VCR Setup
Schedule
If you need additional information about these Setup dialogs,
click the Help button. If you ex perience any di fficulty setting up
or running the ATI-TV Wonder tuner card or the
ATIVideo Player software, please refer to
page 15.
Advanced Setup 45
• Select frame rate.
• Select audio and video format.
• Capture to memory or disk.
• Limit capture to preset amount of time.
• Specify percentage of disk space to leave free.
• Pre-allocate maximum file size.
• List scheduled events.
• Specify schedule times.
• Select file playback, watch TV, or play CD.
• Display in full screen.
• Transcribe closed-captioned text.
• Enter a new event.
• Remove selected events or all events from the
schedule.
T roubleshooting on
 Loading...