

Page 1
H6
Bluetooth Wireless Headset
Page 2

,
Wha t s in th e box .... ..... ..... ..... ..... ..... ..... ..... ..... ..... ..... ..... ..... ..... ..... ..... ..... ..... ..... ..... ..... ....
Contents
Pair t o your Bl uetoo th phon e ..... ..... ..... ..... ..... ..... ..... ..... ..... ..... ..... ..... ..... ..... ..... ..... ..... ...
Cha rging t he batte ry ... ..... ..... ..... ..... ..... ..... ..... ..... ..... ..... ..... ..... ..... ..... ..... ..... ..... ..... ..... ...
Bat tery in forma tion. ..... ..... ..... ..... ..... ..... ..... ..... ..... ..... ..... ..... ..... ..... ..... ..... ..... ..... ..... ..... ...
Turn ing hea dset on / off ... ..... ..... ..... ..... ..... ..... ..... ..... ..... ..... ..... ..... ..... ..... ..... ..... ..... ..... ...
Wear ing you r heads et... ..... ..... ..... ..... ..... ..... ..... ..... ..... ..... ..... ..... ..... ..... ..... ..... ..... ..... ..... ..
Mak ing a cal l ..... ..... ..... ..... ..... ..... ..... ..... ..... ..... ..... ..... ..... ..... ..... ..... ..... ..... ..... ..... ..... ..... ....
End ing a cal l ..... ..... ..... ..... ..... ..... ..... ..... ..... ..... ..... ..... ..... ..... ..... ..... ..... ..... ..... ..... ..... ..... .....
Rej ect an in comin g call .. ..... ..... ..... ..... ..... ..... ..... ..... ..... ..... ..... ..... ..... ..... ..... ..... ..... ..... ....
Ans werin g a call .. ..... ..... ..... ..... ..... ..... ..... ..... ..... ..... ..... ..... ..... ..... ..... ..... ..... ..... ..... ..... ..... ..
Tran sferr ing a cal l ..... ..... ..... ..... ..... ..... ..... ..... ...... ..... ..... ..... ..... ..... ..... ..... ..... ..... ..... ..... .....
Cal l-wait ing ( Three -Way Call ing) .. ..... ..... ..... ..... ..... ..... ..... ..... ..... ..... ..... ..... ..... ..... ..... ....
Volu me cont rol ... ..... ..... ..... ..... ..... . ..... ..... ..... ..... ..... ..... ..... ..... ..... ..... ..... ..... ...... ..... ..... .....
Mut e..... ..... ..... ..... ..... ..... ..... ..... ..... ..... ..... ..... ..... ..... ..... ..... ..... ..... ..... ..... ..... ..... ..... ..... ..... ....
Sum mary of b utton o perat ion ... ..... ..... ..... ..... ..... ..... ..... ..... ..... ..... ..... ..... ..... ..... ..... ..... ..
Saf ety and g enera l inform ation . ..... ..... ..... ..... ..... ..... ..... ..... ..... ..... ..... ..... ..... ..... ..... ..... .
FCC & IC S tatem ent ... ..... ..... ..... ..... ..... ..... ..... ..... ..... ..... ..... ..... ..... ..... ..... ..... ..... ..... ..... ....
EU .. ..... ..... ..... ..... ..... ..... ..... ..... ..... ..... ..... ..... ..... ..... ..... ..... ..... ..... ..... ..... ..... ..... ..... ..... ..... .....
Warr anty .. ..... ..... ..... ..... ..... ..... ..... ..... ..... ..... ..... ..... ..... ..... ..... ..... ..... ..... ..... ..... ..... ..... ..... ...
1
2
4
5
5
6
7
8
8
8
8
8
9
9
10
12
13
13
14
Page 3
,
Wha t s in th e box
1
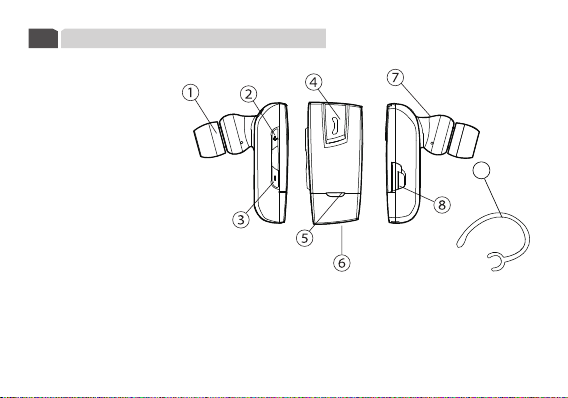
The h eads et cont ains th e following p arts:
1.E ar Gel
2.Vo lume Up B utton
3.Vo lume Do wn Butt on
4.M ulti- funct ion But ton
5.I ndica tor Lig ht
6.M icrop hone
7.S peake r
8.C hargi ng Sock et
9.E ar Hook
Package c ontents lis t:
Ite m Name
A. H 6 Bl uetoot h He adset ..... ..... ..... ..... .1
B. Trav el Char ger... ..... ..... ..... ..... ..... ..... ...1
C. Ch argin g Cable. ..... ..... ..... ..... ..... ..... ...1
D. Us er Manu al... ..... ..... ..... ..... ..... ..... ..... .1
Qua ntity
9
1
Page 4
Pair to your Bluetooth phone
2
Bef ore you us e your he adset t he firs t time, yo u must pa ir the un it with a B lueto oth dev ice e.g.
Blu etoot h mobil e phone. Th is oper ation g uide ba sed on th e Bluet ooth ph one as th e host' s devic e.
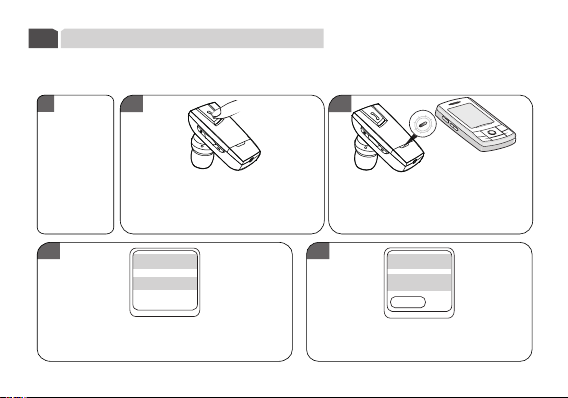
Ple ase refe r to the fo llowi ng step to s et up the p airin g:
1 2 3
Ens ure the
hea dset is o ff.
4
Pres s and hol d the MFB f or 4 seco nds
unt il you se e the Blu e and Red L ED
lig ht flas h alter nately t o enter the
pai ring mo de.
Blue tooth d evice s
H6
Foll owing y our pho ne's in struc tion
gui de, ope rate you r Bluet ooth ph one
to ac tive Bl uetoo th func tion an d
sea rch the h eadse t.
5
Scan r esult s
Ente r Bluet ooth
Pass key
****
Your ph one wil l find th e heads et and sh ow
the d evice n ame on th e screen , selec t the
dev ice nam e and con firm to p airin g.
Ent er PIN cod e as 0000 ( 4 zeros ) and
con firm to c omple te pairi ng.
2
Page 5

NOTE :
l I f the pai ring is s ucces sful, t he head set wil l conne ct to you r phone a utomat icall y, you may
nee d to conf irm the e nquir y.
l W hile th e heads et is pai red wit h the pho ne and co nnect ed, the i ndicat ion lig ht will f lash 2
tim es ever y 5 secon ds. If fa iled or d idn't c onnec t to the ph one, th e blue in dicat or ligh t will
fla sh 1 time e very 3 se conds .
l O nce you p aired t he head set wit h one dev ice or mor e, the He adset w ill aut omati cally
con nect to t he phon e you las t conne cted wh erever y ou turn t he head set on, b ut make s ure
you r phone 's Blue tooth fu ncti on is act ive.
l T he head set is su ppor ts Blue tooth v2 .1+ED R speci ficat ion, th e simpl ified p airin g proce ss
wil l make pa ring yo ur devi ces eas ily, if you r mobil e phone s uppor ts Blu etoot h v2.1+ EDR
spe cific ation , you jus t need tu rn on bot h of them , and add n ew Blue tooth de vice on y our
pho ne, the h eadse t and your p hone wi ll find e ach oth er and co nnect a utoma tical ly.
l T he head set sup port s multi -point t echno logy. I f you need c onnec t the he adset to t he 2
nd
Blu etoot h phone, p lease r epeat t he pair ing ope ratio n steps a bove. Whe n finis h the pai ring,
tur n off the h eadse t and tur n on agai n, the he adset w ill con nect to t he both 2 p hones
aut omati cally.
3
Page 6
Charging the battery
3
Thi s heads et has an i ntern al, non- remov able, re charg eable b atter y. Do not a ttempt t o remov e
the b atter y from th e devic e as you may d amage t he devi ce. Ple ase refe r to the fo llowi ng step to
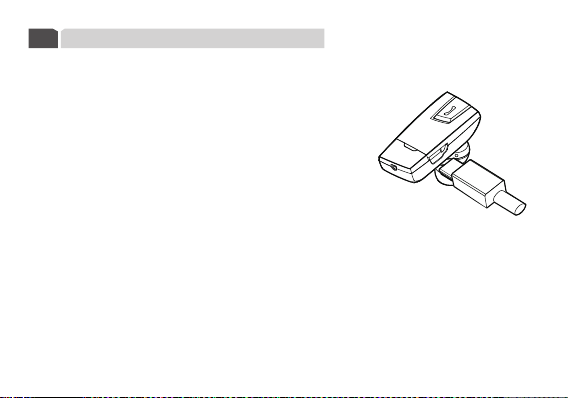
cha rge the b atter y:
1. Co nnect t he char ger to th e correc t outl et.
2. Whe n the cha rger is c onnec ted to he adset , the red in dicat or
lig ht will t urn on du ring ch argin g. If char ging do es not st art,
dis conne ct the ch arger, p lug it in a gain. C hargin g the bat tery
ful ly may ta ke up to 2 ho urs.
3. Whe n the bat tery is f ully ch arged , the red i ndicat or ligh t turn bl ue.
Dis conne ct the ch arger f rom the h eadse t and the wa ll outl et.
NOTE :
l T he full y charg ed batt ery has p ower for u p to 4-6. 5 hours o f talk- time or u p to 120- 150 hou rs
of st andby t ime. How ever, th e talk an d stand by times m ay var y when us ed with d iffere nt
mob ile pho nes or ot her com patib le Blue tooth de vices , usage s ettin gs, usa ge styl es, and
env ironme nts.
l W hen bat tery po wer is lo w, the hea dset wi ll remi nd you by be eps eve ry 20 se conds, a nd the
red i ndica tor ligh t star ts to fla sh.
l Fo r first t ime use , pleas e charg e the hea dset fu lly. If yo u can not s ee the in dicat or ligh t while
cha rging, p lease l eave th e heads et on the c hargin g for a whi le, the n the ind icato r light wi ll
tur n on.
4
Page 7

Bat tery information
4
Your de vice is p owered b y a charg eable b atter y. The full p erfo rmanc e of a new bat tery 's an
ach ieved o nly aft er two or t hree com plete c harge a nd disc harge c ycle. Th e batter y can be
cha rged an d disch arged hu ndred s of time s, but it w ill eve ntual ly wear ou t.
Unp lug the c harge r from the e lect rical p lug and t he devi ce when n ot in use. D o not lea ve a full y
cha rged ba ttery c onnec ted to a ch arger, si nce ove rchar ging may s hort en its li fetime . If left
unu sed, a fu lly cha rged bat tery w ill los e its cha rge over t ime.
If th e heads et woul d be leave u nused f or a long t ime, pl ease ch arge fu lly and t urn off t he head set.
To prev ent over d ischa rge end anger ing the b atter y, you are r ecomm ended t o charge t he
hea dset fu lly eac h month .
Nev er use any o ther ch arger t hat is da maged .
Turning headset on /off
5
*Turn o n the hea dset
If th e heads et is tur ned off, p ress an d hold MF B for 2 sec onds un til you he ar a melo dy from l ow to
hig h, the he adset t urns on , the Blu e indic ator li ght wil l flash 3 t imes at t he same ti me.
*Con nect s to the ph one
1.If y our hea dset ha s finis hed the p airin g opera tion su ccessf ully, w hen the h eadse t is turn ed on,
it wi ll conn ect to th e phone (s) you l ast con necte d autom atical ly, but ma ke sure y our pho ne's
Blu etoot h funct ion is ac tive.
2.Th e heads et supp orts mu lti-p oint an d conne cts to 2 ph ones at t he same t ime. In s ome
ope ratio ns, you ne ed to dis tingu ish the c onnec tion se quenc e, so we app oint th e phone f irst
con necte d as phon e 1, the se cond on e as phon e 2.
5
Page 8

*Turn o ff the he adset
At any w orki ng state a fter th e heads et tur ns on, pre ss and ho ld MFB fo r 4 secon ds, you wi ll hear
a mel ody fro m high to lo w, and the R ed indi cator l ight wi ll flas h 3 times a t the sam e time, t he
hea dset tu rns off.
Not e
l Fo r savin g the pow er, whil e the hea dset di dn't co nnect t o any dev ice over 1 h our,
the h eadse t will tu rn off au tomat icall y.
Wearing your headset
6
The h eadse t can be wor n on eit her the Le ft or Ri ght ear. I f you want t o carr y the hea dset on t he
oth er ear, pl ease ref er to the f ollowi ng figu res to ch ange th e direc tion of t he ear ho ok:
6
Page 9

Mak ing a call
7
* By ph one's ke ypad
At th e stand -by stat e, dial t he numb er on you r phone d irect ly to mak e a call.
* Use Voic e-Di aling
At th e stand -by stat e, pres s the MFB s hortl y, you wil l hear a sh ort to ne from th e heads et, and t he
pho ne will p rompt yo u say the v oice ta g like yo ur frie nd's na me. If th e voice ta g is iden tifie d by
the p hone, t he relat ed numb er will b e dial- out lat er.
Mak e sure wh ether y our mob ile pho ne supp orts vo ice dia ling fu nctio n, and yo u need to s et up
voi ce tags o n your mob ile pho ne firs t. If th e heads et has con nect ed to 2 phon es, dou ble pre ss
the M FB will s tart Voi ce-Di aling o f phone 2 .
* Las t numbe r re-d ialin g
Pres s and hol d Volume D own but ton for 2 se conds , you will h ear 2 sho rt ton es, the l ast num ber
you d ialed w ill be re -dial o ut. If t he head set has c onnec ted to 2 ph ones, pr ess and h old Volum e
Up bu tton for 2 s econd s will st art la st numb er re- diali ng of pho ne 2.
NOTE
l I f the hea dset ha s conne cted to 2 p hones , when on e phone h as acti ve a call , the hea dset
wil l disco nnect t o other p hone te mpera tely, whe n you end t he call t he head set wil l
re- conn ect it au tomat icall y, pleas e make su re your ph one's B lueto oth fun ction w ould no t
be in activ e durin g the cal ling.
7
Page 10

8
End ing a call
Whe n in the ca lling, p ress th e MFB sho rtly w ill end t he call , also you c an end ca ll on you r mobil e.
9
Reject an incoming call
Whe n you rece ive an in comin g call, p ress and h old MFB f or 2 seco nds wil l rejec t the inc oming c all.
Answering a ca ll
10
Whe n you rece ive an in comin g call, p ress the M FB shor tly ca n pick up t he inco ming ca ll; als o you
can p ick up th e call on y our mob ile.
Transferrin g a call
11
Whe n in the ca lling, p ress an d hold Volu me Up but ton for 2 s econd s can tra nsfer th e call fr om head set
to ph one. Rep eat the o perat ion can t ransf er the ca ll betw een the p hone an d heads et each o ther.
Call-waiting (Thre e-Way Call ing)
12
Bef ore usin g Call- waiti ng func tion on y our hea dset, p lease e nsure t hat you r phone s uppor ts the
Han ds-fr ee profi le, and y ou have be en prov ide the s ervi ce by the ne t provi der.
* If th ere is an other i ncomi ng call w hile you a re in the c allin g, pres s MFB sho rtly ca n accep t the
wai ting ca ll and en d curre nt call ing.
* If th ere is an other i ncomi ng call w hile you a re in the c allin g, pres s and hol d MFB for 2 se conds
can a ccept t he waiti ng call a nd hold o n curre nt call ing.
8
Page 11

* Whil e you are in t he call ing and a nothe r call wa s holdi ng on, pr ess MFB s hort ly can en d curren t
cal l and res ume the h oldin g on call ing.
* Whil e you are in t he call ing and a nothe r call wa s holdi ng on, pr ess and h old MFB f or 2 seco nds
can s hift th e curre nt call ing to th e holdi ng on cal ling.
* Whil e you are in t he call ing and a nothe r call wa s holdi ng on, pr ess Volum e Up butt on shor tly ca n
add t he hold ing on ca ll to the c urrent c onver satio n to make a m ultip arty ca ll.
* Whil e you are in t he call ing and a nothe r call wa s holdi ng on, or y ou are in a m ultip arty c allin g,
dou ble pre ss MFB ca n end the c allin g or remov e yours elf from t he mult ipar ty call ing.
Volu me control & Mute func tion
13
Whi le you are i n the cal ling, y ou can ad just th e volume b y press ing vol ume up an d volum e down
but ton or you c an adju st the vo lume on y our mob ile.
Mut e
14
Whi le you are i n the cal ling, P ress and h old the Vo lume Do wn Butto n for 2 sec onds, yo u will
hea r a melod y from low t o high, t hen the h eadse t's MIC w ill be mu ted, an d you wil l hear
rem indfu l melod y every 1 0 secon ds. Rep eat the o perati on your w ill hea r the mel ody fro m
hig h to low, th e mute fun ctio n is canc elled.
9
Page 12

Sum mary of button operation
15
Butt on
Mult ifunc tion
Butt on
Volum e
Up
Volu me
Dow n
ACTI ON
Quic k Press
Doub le Pres s
2 Seco nds
4 Seco nds Turn head set OFF Turn he adset O FF Turn he adset O FF
Quic k Press
2 Seco nds
4 Seco nds
Quic k Press
2 Seco nds
4 Seco nds
Stan dby
(No Ca lls Act ive)
Init iate vo ice dia ling
Init iate Voi ce diali ng
of pho ne 2
_
Incr ease vo lume Incr ease vo lume In creas e volum e
Re- dial la st numb er
of pho ne 2
_ _
Decr ease vo lume Decr ease vo lume De creas e volum e
Re- dial la st numb er
_ _
HEAD SET STATUS
Inco ming Ca ll 1 call A ctive
Answ er inco mingc all End a ca ll
_ _
Reje ct inco ming ca ll
_
_
_
Trans fer the a ctive c allin g
to/f rom pho ne
_
Micr ophon e mute ON / OFF
_
10
Page 13

Butt on
Mult ifunc tion
Butt on
Volum e
Up
Volu me
Dow n
ACTI ON
Quic k Press
Doub le pres s
2 Seco nds
4 Seco nds Turn he adset O FF
Quic k Press
2 Seco nds
4 Seco nds
Quic k Press
2 Seco nds
4 Seco nds
1 Call A ctive ,
1 Inco ming Ca ll
Answ er inco ming ca ll,
end ac tive ca ll
Answ er inco ming ca ll,
hold a ctive c all
Incr ease vo lume
_
_
Decr ease vo lume
_
_
11
HEAD SET STATUS
1 Call A ctive ,
1 Call o n Hold
End ac tive ca ll , retr ieve he ld call
End al l of the ca lls
Shif t Calls
Turn he adset O FF
Add he ld call t o TWC
Trans fer act ive cal ling to /from ph one
_
Decr ease vo lume
_
_
Page 14

Safety and general informatio n
16
1.P lease r ead thi s guide book ca refull y and fol low the i nstru ction s.
2.To av oid any d amage o r malfu nctio n of the de vice do n ot drop device f rom
hig h place s.
3.K eep dev ice away f orm hum idity, w ater an d any oth er liqu id. If th e devic e is
exp osed to w ater, moi sture a nd othe r liqui d , do not op erate i t to avoid a ny
ele ctric al shoc k, exp losio n and dam age to the devi ce or your self.
4.D o not pla ce or kee p this de vice ne ar any heat sources, s uch as, d irect s un ligh t,
rad iator s, stove s or othe r appar atus wh ich prod uce hea t. It may c ause ex plosi on,
deg rade th e perfo rmanc e and/o r reduc e battery lif e.
5.D o not mod ify, rep air or di sasse mble de vice at d iscretion(Esp ecial ly batte ry:
It ma y cause a n explo sion) . Doing t his wil l avoid t he warr anty.
6.D o not pla ce the he avy obj ects on t he devi ce.
7.U se only s uppli ed and ap proved c harge r.
8.R eplac ement o r service mus t be done b y quali fied se rvic e center o r
man ufact urer.
9.U nplug t his dev ice whe n unuse d for long peri ods of ti me or dur ing lig htening
sto rms.
CAUTION: ELEC TRIC SHOC K HAZARD
!
The b atter y used in t his dev ice may p resent a r isk of fi re or che mical b urn
if mi strea ted.
12
Page 15

FCC & IC Stat ement
17
Ope ratio n is subj ect to th e following t wo condi tions :
(1) Th is devi ce may not caus e harmf ul inter fere nce, and
(2) Th is devi ce must a ccept an y inter feren ce received, i nclud ing int erfer ence th at may
cau se unde sired o peration.
Note: Th e man ufa ctu rer i s not r esp ons ibl e for AN Y inte rfere nce, for example RA DIO or TV
int erfer ence, caused by unau thorized mo dific ation s to this e quipm ent.
Suc h modif icati ons cou ld void the user’
EU
18
Thi s produ ct is CE ce rtifi ed acco rding t o the prov ision o f the R&T TE Dir ectiv e (99/5 /EC).
Dec lares t hat thi s product is in c ompli ance wi th the es sential requ ireme nts and o ther
rel evant p rovisi ons of Di recti ve 1999 /5/EC .
Ple ase not e that th is produ ct use s radio f requen cy ban ds not ha rmoni zed wit hin EU.
Wit hin the E U this pro duct i s intend ed to be us ed in Aus tria, B elgiu m, Denm ark, Fi nland ,
Fran ce, Ger many, Gr eece, Ir eland , Italy, L uxemb ourg, The N ether lands , Portu gal, Spain,
Swe den, Un ited Ki ngdom a nd with in EFTA in Ic eland, Norw ay and Sw itzer land.
Blu etoot his a tra demar k owned by the Bluetoo thSIG , Inc.
aut horit y to oper ate the e quipm ent.
s
13
Page 16

Warranty
19
The c ondit ion of th is warr anty an d our responsibilitie s under t his war ranty a re as foll ows:
Warr anty is n on-tr ansfe rable a nd is lim ited to the ori ginal purcha ser onl y.
* You must b e able to p rove the d ate of or igina l purch ase of th e unit wi th a dated recei pt.
* The wa rrant y is not ap plica ble if th e produ ct has be en subj ect to ph ysica l abuse,
imp roper i nstal latio n, modi fication or re pair by u nauth orize d third p arty.
* The re spons ibili ty of sup plier s produ cts sh all be li mited to t he repa ir or rep lacem ent of
the p roduc t at it s s ole dis creti on.
* Spe cific ally ex empt fro m any war ranty a re limi ted-l ife cons umabl e compo nents s ubjec t
to no rmal we ar and te ar such a s batter ies, de corat es and ot her acce ssories.
* Sup plier w ill not t ake any responsibilit y if the fa ilure o f the uni t has resu lted fr om
acc ident , abuse, misuse, or an y unaut horiz ed repa ir, modif icati on or dis assem ble.
* Mod ifica tion an d repai r of the un it shou ld be don e by auth orized and qu alifi ed serv ice
cen ter or ret urned to the ma nufac turer
*Th is warr anty gi ves you sp ecifi c legal r ights , and you m ay also have oth er righ ts whic h
var y under local laws.
,
,
14
Page 17

Made in Ch ina
Page 18

FCC Warning
This device complies with Part 15 of the FCC Rules. Operation is subject to the following two
conditions:
(1) this device may not cause harmful interference, and (2) this device must accept any
interference received, including interference that may cause undesired operation.
NOTE 1: This equipment has been tested and found to comply with the limits for a Class B digital
device, pursuant to part 15 of the FCC Rules. These limits are designed to provide reasonable
protection against harmful interference in a residential installation. This equipment generates, uses
and can radiate radio frequency energy and, if not installed and used in accordance with the
instructions, may cause harmful interference to radio communications. However, there is no
guarantee that interference will not occur in a particular installation. If this equipment does cause
harmful interference to radio or television reception, which can be determined by turning the
equipment off and on, the user is encouraged to try to correct the interference by one or more of
the following measures:
- Reorient or relocate the receiving antenna.
- Increase the separation between the equipment and receiver.
-Connect the equipment into an outlet on a circuit different from that to which the receiver is
connected.
-Consult the dealer or an experienced radio/TV technician for help.
NOTE 2: Any changes or modifications to this unit not expressly approved by the party
responsible for compliance could void the user's authority to operate the equipment.
 Loading...