

Page 1

FireGL™ X1-256p
FireGL™
Z1-128p
User’s Guide
P/N: 137-50004-30
© Copyright 2003, by ATI Technologies Inc.
All rights reserved. Reproduction of this manual, or parts thereof, in any form, without the
express written permission of ATI Technologies Inc. is strictly prohibited.
ATI and all ATI product and product feature names are trademarks and/or registered trademarks
of ATI Technologies Inc. All other company and/or product names are trademarks and/or
registered trademarks of their respective owners. Features, performance and specifications are
subject to change without notice. Product may not be exactly as shown in the diagrams.
FireGL, FIRE GL, HYDRAVISION – ATI Technologies Inc.; Athlon – Advanced Micro
Devices. Inc.; Fire Wire – Apple Computer Inc.; Direct3D, Windows 2000, Windows XP –
Microsoft Corp.; IEEE – The Institute of Electrical and Electronic Engineers, Inc.; AGP
(Accelerated Graphics Port), Celeron, Pentium Pro, Pentium II, Pentium III – Intel Corporation;
VGA – International Business Machines Corp.; OpenGL - Silicon Graphics Inc.; VESA – Video
Electronics Standards Association.
Adobe and Acrobat are trademarks of Adobe Systems Incorporated, which may be registered in
certain jurisdictions.
i
Page 2

Disclaimer
While every precaution has been taken in the preparation of this
document, ATI Technologies Inc. assumes no liability with respect to
the operation or use of ATI hardware, software or other products and
documentation described herein, for any act or omission of ATI
concerning such products or this documentation, for any interruption of
service, loss or interruption of business, loss of anticipatory profits, or
for punitive, incidental or consequential damages in connection with
the furnishing, performance, or use of the ATI hardware, software, or
other products and documentation provided herein.
ATI Technologies Inc. reserves the right to make changes without
further notice to a product or system described herein to improve
reliability, function or design. With respect to ATI products which this
document relates, ATI disclaims all express or implied warranties
regarding such products, including but not limited to, the implied
warranties of merchantability, fitness for a particular purpose, and noninfringement.
Documentation updates
ATI is constantly improving its product and associated documentation.
To maximize the value of your ATI product, you should ensure that you
have the latest documentation. ATI’s documentation contains helpful
installation/configuration tips and other valuable feature information.
ii
Page 3

Contents
Getting Started............................................................... 1
Using this Guide ............................................................................................ 2
Viewing the User's Guide Online...........................................................3
Do you Need a Printout of the Online User's Guide?............................. 3
FireGL Card Features ........................................................................... 4
System Requirements and Tools ................................................................... 6
Quick Installation ..........................................................................................7
Installation Steps .................................................................................... 7
Installing the Hardware and Software ......................... 8
Installing the Hardware ................................................................................. 8
Preparing your Computer ....................................................................... 9
Installing the Card ................................................................................ 13
Connecting the Cables and Completing the Installation...................... 18
Installing the Software................................................................................. 22
Before you Start: Information, Tips, and Hints....................................23
Software Installation for Windows 2000 and Windows XP ................ 24
Using Your FireGL Card.............................................. 26
Using Two Monitors.................................................................................... 28
Using the DualScreen Tab .................................................................. 29
Operating Stereo Glasses............................................................................. 30
Changing the Video Settings....................................................................... 30
How to Switch to the Display Properties?............................................ 30
Setting Resolution, Color Depth and Refresh Rate............................. 31
Adjusting the Monitor Display............................................................. 33
Using Application Profiles and Advanced Functions.................................. 36
Configuring Application Profiles......................................................... 36
Setting Advanced Functions................................................................. 39
See also
HYDRAVISION™ User’s Guide
iii
Page 4

Reference ..................................................................... 41
Removing the FireGL Drivers..................................................................... 41
Troubleshooting...........................................................................................43
Technical Details ......................................................................................... 46
Product Specifications.......................................................................... 46
Pin Assignments................................................................................... 48
Video Modes ........................................................................................50
Customer Care and Warranty Service ......................................................... 52
Compliance Information.............................................................................. 55
iv
Page 5

CHAPTER 1
Getting Started
Your ATI FireGL card is an advanced workstation 3D graphics
accelerator based on a high-bandwidth, parallel pipeline
geometry and rendering architecture. The card delivers
workstation-class performance to designers, engineers and
animators, running the leading OpenGL and DirectX
applications
Features of your FireGL workstation graphics accelerator:
• Real-time photo-realistic rendering and animation
• Stable and reliable software support for Windows® and
Linux® platforms
• Optimized support for the leading workstation applications
• SMARTSHADER™ 2.0 technology for creating complex
visual effects
1
• SMOOTHVISION™ 2.0 technology for advanced full-scene
anti-aliasing
IN THIS CHAPTER...
■ Using this Guide on page 2
■ FireGL Card Features on page 4
■ System Requirements and Tools on
page 6
■ Quick Installation on page 7
Page 6

2 Getting Started
Using this Guide
For your convenience, this online User's Guide comes in
Portable Document Format (PDF). You will need the latest
Adobe® Acrobat® Reader® software available from
www.adobe.com.
Many hyperlinks provide easy access to any information you
may want. To make it useful in a printed format, too, a hyperlinked - table of contents and page numbers are provided.
Since this guide was designed to be used online and printed, the
quality of some images on screen or in print may be affected.
The organization of this guide is as follows:
Installing the Hardware and Software on page 8 provides
instructions for installing your FireGL card, loading the driver
and connecting video output devices to your card.
Using Your FireGL Card on page 26 explains how you can
take advantage of the advanced features of your FireGL card.
Reference on page 41 provides troubleshooting tips and
regulatory compliance information for your card.
HYDRAVISION™ User’s Guide provides information on
using HYDRAVISION, a multi-monitor and desktop
management utility to control multiple display desktops.
Page 7

Getting Started 3
Viewing the User's Guide Online
You can easily read the User's Guide online - important
hypertext links, such as Table of Contents entries, World Wide
Web, and E-mail addresses are active.
Place your mouse cursor over Table of Contents entries or main
headings. If the hand icon changes to a pointing index finger,
simply click and you will move to that place in the document.
Displaying the provided bookmark and thumbnail views may
help you with the orientation and navigation in the User's
Guide. Some E-mail or Web addresses inside this manual may
be active as well. Go directly to a Web, FTP site, or E-mail
program simply by clicking on an active link.
This manual might be displayed with slightly-reduced
magnification in your Reader. If you experience any difficulty
reading certain files online, use the Reader's Zoom To feature
from the Vie w menu and increase the magnification to about
150%. To view details of some screenshot images you may need
to increase magnification.
Do you Need a Printout of the Online User's Guide?
You can also print this User's Guide to access it off-line. The
manual then will look like any standard document with a table
of contents and page numbers.
For printing the User's Guide, a print resolution of 600 dpi or
higher is recommended.
Page 8
4 Getting Started
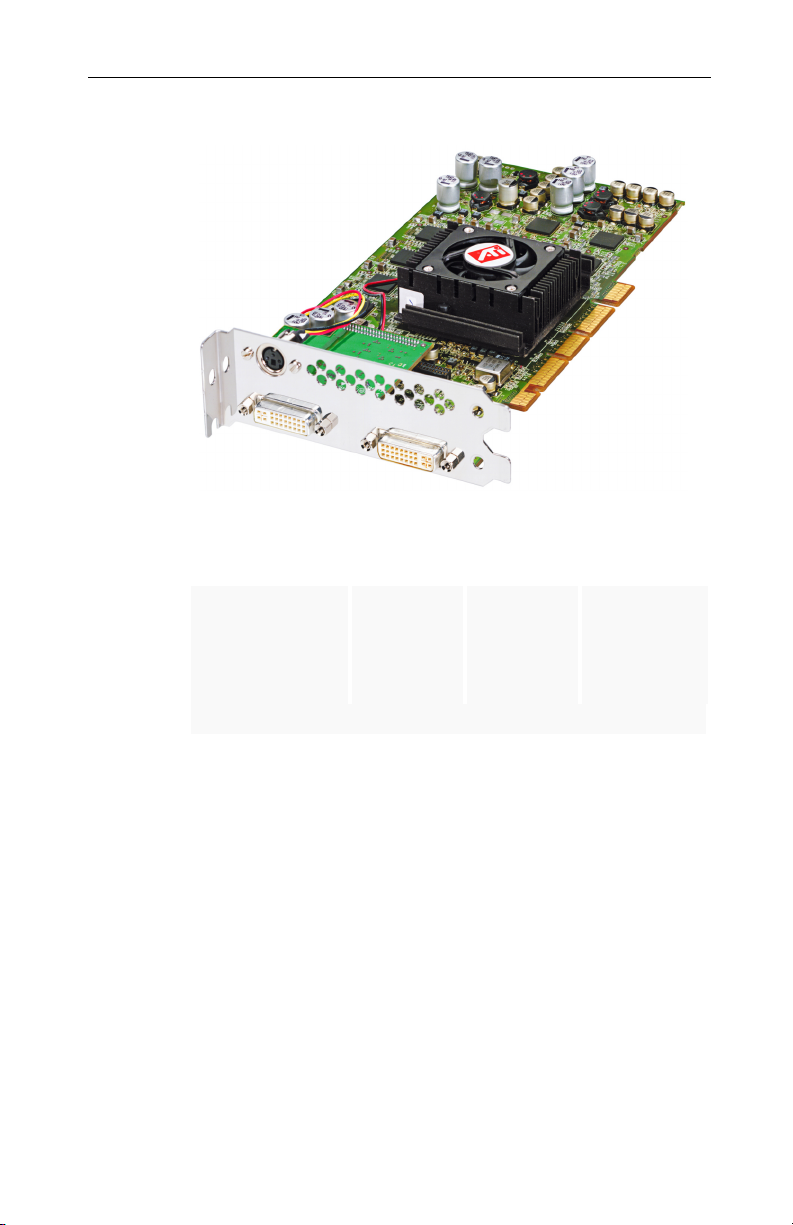
FireGL Card Features
FireGL X1-256p pictured
FireGL VPU
FireGL X1-256p FGL 9700 256 MB 8
FireGL Z1-128p FGL 9500 128 MB 4
VPU: Visual Processing Unit
Video
Memory
Rendering
Pipelines
• Video memory: DDR SDRAM
- unified frame buffer, Z-buffer, texture storage
- 128-bit floating point precision frame buffer for
photo-realistic renderings.
- 256-bit memory interface for fast 3D graphics
• Pixel pipeline architecture provides enhanced rendering
power.
Page 9

Getting Started 5
• Supports AGP 3.0 standard (AGP 4X/8X), providing a two
way high-speed interface between the graphics subsystem
and the workstation
• OpenGL 1.3 with 1.4 extensions
DirectX® 9.0 functionality in OpenGL®
• Full DirectX® 9.0 support
• DDC1/2b/2b+ monitor support on all operating system
platforms
• Support for two analog or digital monitors
High resolutions up to 2048 x 1536, 32-bit
Independent resolutions and refresh rates for any two
connected monitors
9.1 Mpixel, 3840 x 240single-display support
• Quad buffer stereo support
• Application-specific display profile utilities for optimal
performance
• Intel Pentium® 4 Streaming SIMD and AMD Athlon
3Dnow!™ support for Windows 2000, Windows XP and
Linux operating systems.
For more detailed information on features and
i
performance please refer to the section Technical
Details on page 46.
Page 10

6 Getting Started
System Requirements and Tools
Computer
system
Operating
system
Service Pack
Information for
Windows2000
Tools • A screwdriver to remove and reinstall the PC
Monitor • High-resolution MultiSync or multi-frequency
• Intel® Pentium® 3, Pentium® 4, Xeon®
AMD® Athlon® XP/MP/Opteron
or compatible
• 128 MB of system memory
256 MB or more for best performance
• Motherboard with free AGP Pro slot and
correct AGP chipset-driver
Note: The bracket of the FireGL™ card also
covers the expansion slot next to the AGP Pro
slot.
• CD-ROM drive
• Windows®2000 with Service Pack 1
(or higher)
•Windows®XP
• Linux XFree86 4.X.0
You must be running Windows 2000, updated with
Service Pack 1 (or higher) prior to installing the
FireGL drivers.
Service Packs are available from Microsoft's web
page, www.microsoft.com.
cover screws and card mounting screws. See
your PC manual for specific requirements.
• ATI INSTALLATION CD-ROM for your FireGL
card
monitors or other VGA monitors.
• Digital flat-panel (DFP) displays or digital CRT
displays
Page 11

Quick Installation
• Brief instructions on how to get to work with the FireGL card
in the shortest possible time.
• Recommended for experienced users and system
administrators only.
• For more detailed information on installation and operation
of your graphics accelerator, please refer to Chapter 2 and
Chapter 3.
Installation Steps
1 Un-install the drivers and software for your old graphics
card.
2 Disable any on-board graphics solution on the
motherboard.
3 Shut down and disconnect your computer system.
4 Remove the installed (AGP or PCI) VGA card.
5 Install the new FireGL card.
Getting Started 7
6 Reassemble and connect your computer system.
7 Install the FireGL drivers and configuration software from
the ATI INSTALLATION CD-ROM:
- automatic ATISETUP utility or
- Start > Run > X:\ATISETUP.EXE
where X is the drive letter of your CD-ROM drive
Page 12

CHAPTER 2
Installing the
Hardware and Software
IN THIS CHAPTER...
■ Installing the Hardware on
page 8
■ Installing the Software on
page 22
8
Installing the Hardware
The hardware installation includes the following steps:
• Preparing your Computer
• Installing the Card
• Connecting the Cables and Completing the Installation
Page 13
Installing the Hardware and Software 9
Preparing your Computer
Information Before you Start
Do This First! Install the latest AGP chipset driver for your
motherboard.
• Each motherboard requires the installation of a
custom-built virtual GART (AGP) driver. This
chipset driver is required by your FireGL card to
function correctly with your motherboard.
• You must install the correct AGP chipset driver
before installing the FireGL card in your system.
• Contact your supplier or motherboard/chipset
manufacturer to obtain and install the latest AGP
chipset driver for your motherboard.
An incorrect or missing chipset driver can result in
AGP memory not being detected or a black screen
after Windows® starts.
How to determine
what motherboard
chipset is present
on your system
• Right-click My Computer and select Properties.
• Click the Hardware tab and select Device
Manager.
• Scroll to the bottom of the device list. Select
System devices.
• Scroll through the list of System devices until
you find a listing for the AGP controller.
• The chipset manufacturer’s name will appear as
the device name.
Page 14

10 Installing the Hardware and Software
Turn off the power to your system and discharge
your body's static electric charge by touching a
grounded surface (for example, the metal
surface of the power supply) before performing
any hardware procedure.
The manufacturer assumes no liability for any
damage, caused directly or indirectly, by
improper installation of any components by
unauthorized service personnel. If you do not
feel comfortable performing the installation,
consult a qualified computer technician.
Damage to system components, the accelerator
card, and injury to yourself may result if power is
applied during installation.
What do you
need to use your
FireGL card?
System Requirements and Tools
• Motherboard with free AGP Pro slot
Note: The bracket of the FireGL™ card also
covers the expansion slot next to the AGP Pro
slot.
• Correct AGP GART chipset driver installed for
your motherboard.
• 128 MB of system memory
256 MB or more for best performance
• System interrupt (IRQ) which is free. This may
have to be reserved in the computer's BIOS. For
help with this subject, refer to the manual for your
mainboard
• Intel® Pentium® 3, Pentium® 4, Xeon®; AMD®
Athlon® XP/MP, or compatible
• Supported operating system
- Windows® 2000 with Service Pack 1 (or higher)
- Windows® XP
- Linux XFree86 4.X.0
• A screwdriver to remove and reinstall the PC
cover screws and card mounting screws. See
your PC manual for specific requirements.
• ATI INSTALLATION CD-ROM for your FireGL
card.
Page 15

Installing the Hardware and Software 11
What monitors do
you need?
Where are the
drivers?
Are you planning
a multi-monitor
system?
Your FireGL card is configured to be combined with
digital flat-panel (DFP) displays and digital CRT
displays.
Note: Your DFP monitor must have a data cable with
digital-only DVI plug (DVI-D) - but not with integrated
analog/digital DVI plug (DVI-I). Check with your
monitor's documentation.
You can also connect the FireGL card to highresolution MultiSync or multi-frequency monitors or
other VGA monitors.
Notes: (1) You need a Plug-and-Play monitor that
supports VESA's Display Channel specifications
(DDC1 or DDC2) to take advantage of the
DDC1/DDC2b+ features
(2) You can use the full power of the graphics card
only if your monitor supports the horizontal (kHz) and
vertical (Hz) refresh rates as required by the
graphics card. Refer to your monitor's
documentation for recommended refresh rates
• Windows 2000 and Windows XP drivers are
provided on the ATI INSTALLATION CD-ROM.
• Linux drivers and installation instructions are
available for downloading from
www.ati.com/support.
• You may connect two monitors to the FireGL™
card.
• If DDC support is available, the respective
resolution and refresh rate for each monitor is
automatically detected.
• The following multi-monitor and Desktop
Management utilities are provided:
- HYDRAVISION™
- DualScreen
Page 16

12 Installing the Hardware and Software
Replacing an
existing graphics
card
Replacing
integrated
graphics
Illustrations
i
Before you install your FireGL card, we recommend
that you first uninstall the driver for your current
graphics card.
Please refer to the manual or contact your
motherboard manufacturer to determine how to
disable your on-board graphics.
The illustrations provided in this section are for
instructional use only; the card shown may look
different than the one you purchased.
Note the serial number and the part number of your
FireGL card before installing it in your computer. You
need these numbers for the product warranty
registration. You will find the numbers on the product
label on the back of your FireGL card.
Page 17
Installing the Card
To install your graphics accelerator card, follow these steps:
Installing the Hardware and Software 13
1
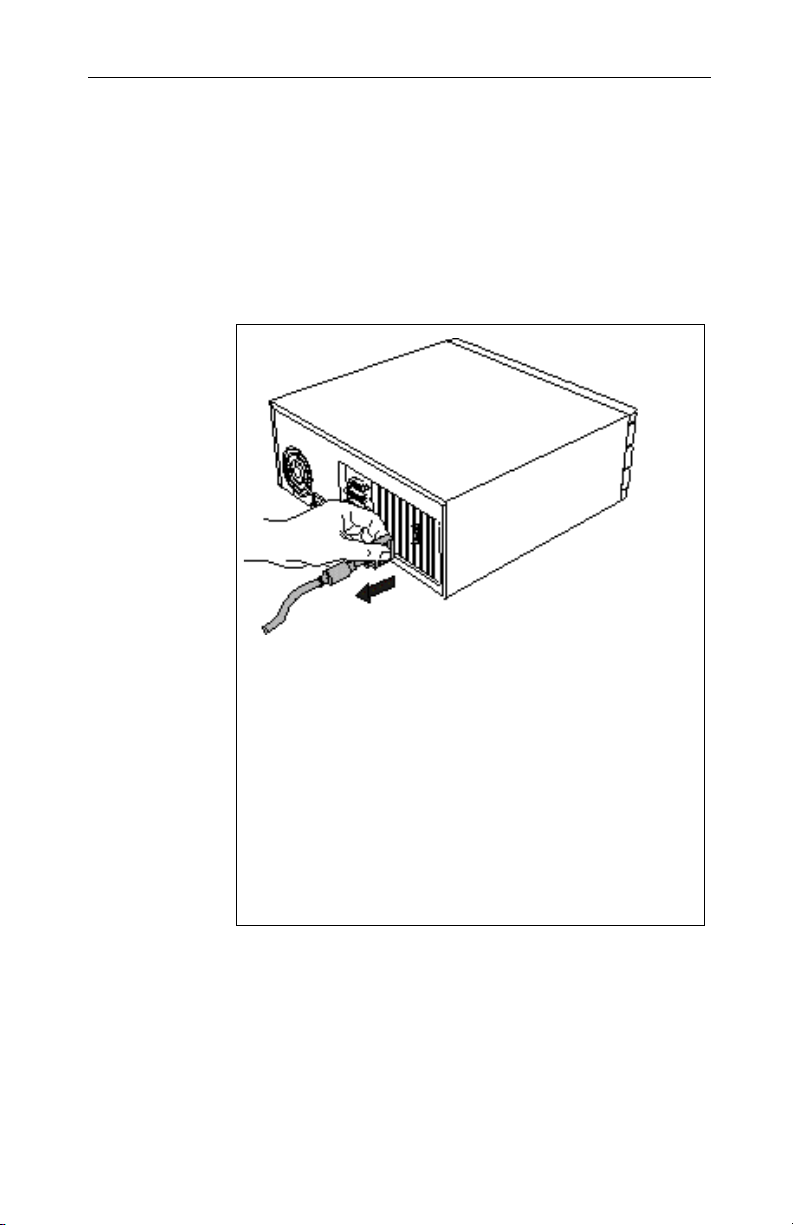
Switch off your computer and all external options
(monitor, printer, and others). Then disconnect all cables
from the back of your computer. Unplug all power cables
from the electrical source.
Note: If you are disconnecting a peripheral from the
computer or are removing a component from the
system board, wait 10 - 20 seconds after
disconnecting the computer from the electrical outlet
before disconnecting the peripheral or removing the
component to avoid possible damage to the system
board. To verify that all power has been disconnected
from the system, make sure that the standby power
light-emitting diode (LED) on the system board has
gone out.
Page 18
14 Installing the Hardware and Software
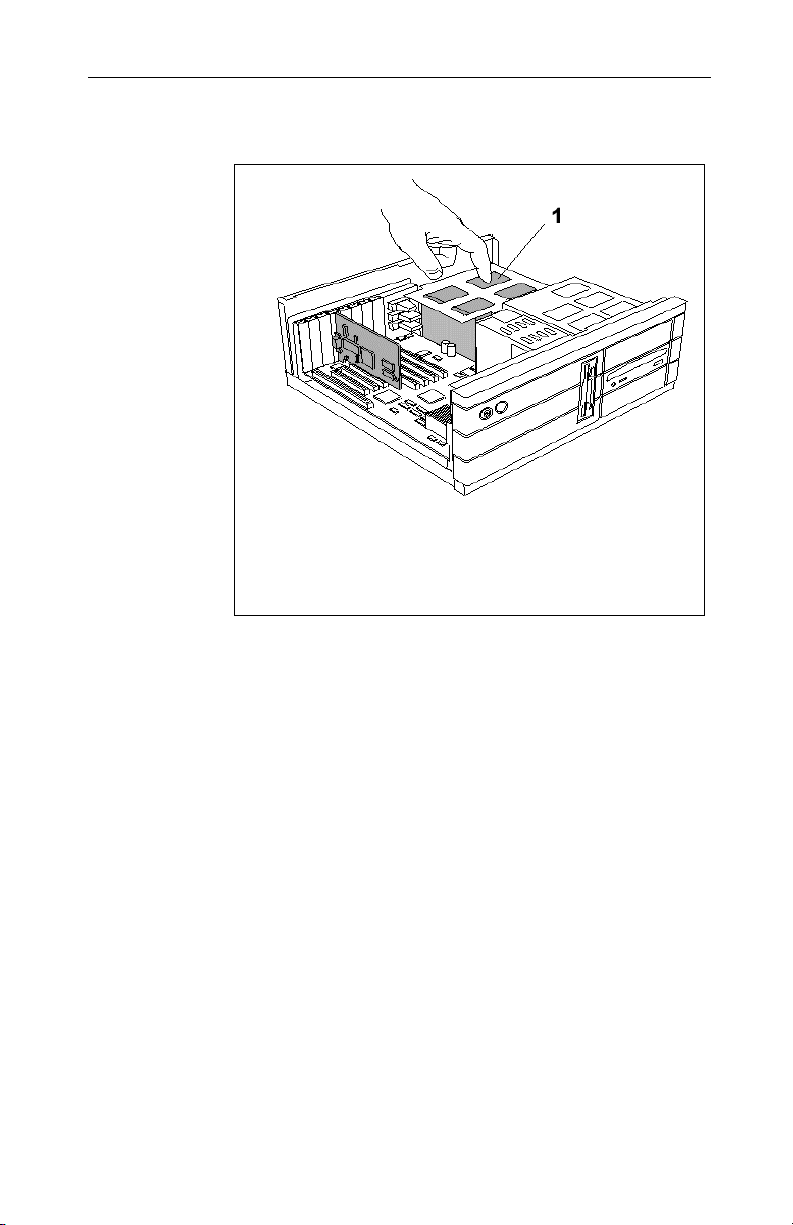
Remove the computer cover. If necessary, consult your
2
computer system manual about removing the cover.
Remember to discharge your body's static electricity
by touching the power supply or the metal surface of
the computer chassis.
1 Power Supply.
Page 19
3
Installing the Hardware and Software 15
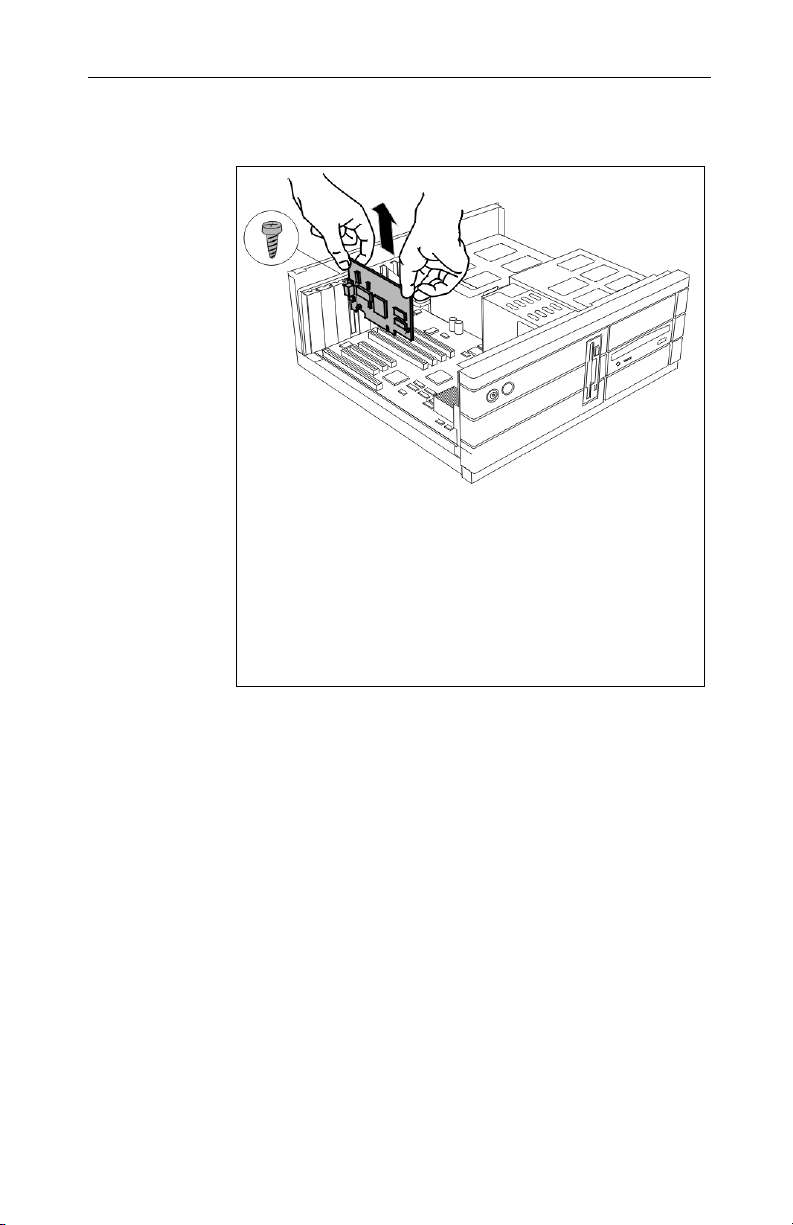
Remove any existing graphics card from your
computer.
• Unscrew the screw attached to your existing
graphics card. Then pull the card straight out.
• If the old graphics card sticks rock it gently from
end to end. Remember to save the screw.
• If your computer has any on-board graphics
capability, you may need to disable it on the
motherboard. Refer to your computer's manual
for more information.
Page 20

16 Installing the Hardware and Software
Insert the card into the AGP slot.
4
Note: The FireGL card fits in an AGP Pro 50 slot.
• Locate the AGP Pro slot. Refer to your computer's manual
for more information.
• If necessary, remove the metal slot cover from the AGP Pro
slot and the adjacent slot. Save the screws to secure the
graphics card later.
• Align the FireGL card with the AGP Pro slot, and
press it in firmly until fully seated.
1 FireGL card
2 AGP Pro 50 expansion slot
AGP cards are designed to fit one way only. Be sure
your card is properly aligned.
Grasp the card by the top edge and carefully seat it into
the AGP slot. Be sure the metal contacts are completely
pushed into the seat.
Page 21

5
Installing the Hardware and Software 17
Replace the screws to fasten the card in place.
• Align the slot in the mounting bracket of the card
with the screw holes in the rear panel of the
computer case.
• Use the screws you removed from the expansion
slot cover or a previously installed graphics card
to secure the card in place.
6
Reassemble your computer.
• Secure ribbon cables and gently push them down and
out of the way before you replace the system cover.
• Replace the computer cover.
• Reconnect any peripheral equipment cables you may
have disconnected.
Page 22

18 Installing the Hardware and Software
Connecting the Cables and Completing the Installation
Connecting the Monitor Cables
You may connect one or two monitors, either DFP/digital CRT
or analog VGA to the FireGL™ card. Use the provided DVI-toVGA adapters to connect monitors with VGA connector.
i
Securely attach the data cable of your first monitor to the DVI
output connector (1) on the card. Attach the cable to the monitor
according to the monitor's instructions. Refer to the
documentation that came with your monitor if you need
additional installation information.
Connect the data cable of your second monitor to the DVI
output connector (2) on the card.
If you connect only one monitor, make sure to
connect it to DVI connector (1) on the card.
Page 23

Installing the Hardware and Software 19
Connecting analog VGA Monitors to DVI connectors
If the data cable connector on your VGA monitor does not fit
into the DVI connector on the card, use the DVI-to-VGA
adapters provided with your FireGL card..
a Monitor cable c VGA connector from monitor
b DVI connector on card d DVI-to-VGA adapter
Setting the Monitor Impedance
If you can switch the impedance values on your monitor, use the
following recommended settings:
• RGB video input: 75 Ohm
• Sync: 2.2 kOhm
Try other 'Sync' settings if you cannot achieve a stable video
image.
If the impedance setting options are 'High' and 'Low' only, try
the setting that provides the most satisfactory monitor display.
Page 24

20 Installing the Hardware and Software
Connecting the Stereo Glasses
You need this information only if you want to use LCD shutter
glasses or other stereo shutter devices.
Please note that stereo glasses and stereo shutter devices are
optional equipment not included in the FireGL™ card package.
Connect your stereo glasses or stereo shutter device to the 3 pin
Mini-DIN stereo sync connector (3) on the card. Connect only
stereo glasses or stereo shutter devices with shielded cable and
ferrite cylinder to the FireGL™ card.
If the connector on your stereo glasses or stereo
shutter device does not fit into the Mini-DIN
i
connector on the card, please contact your
supplier or the manufacturer of the stereo device
for information on how to obtain an adapter cable.
Page 25

Installing the Hardware and Software 21
Start your System
Switch on your monitor before you switch on your computer.
Failing to do so could damage your monitor.
If you have correctly installed the card, operating system
messages will appear on your monitor when the boot procedure
is finished.
Your monitor is running in a basic video mode.
Higher refresh rates are not available at this stage
of the installation. After you have successfully
i
If Your System Does Not Start as it Should
• Verify that the installation instructions were properly
followed.
• Check that the card is properly installed in your system and
connected to your monitor.
installed the FireGL drivers you can use the tabs
in the Display Properties menu to adjust the
video settings and set up a multi-monitor
configuration.
• Refer to the documentation that came with your monitor:
Check your connections to the video and power cables.
Try adjusting the brightness, sharpness, and contrast controls
of your monitor.
• If you have problems during start-up, restart your computer
in Safe Mode.
While starting Windows® 2000 and Windows® XP, press
and hold F8 until you see the Windows® Advanced Options
Menu. Use the arrow keys to select Safe Mode, and press
Enter.
• Check the system configuration utility of your operating
system for the interrupt assignments.
• Please refer to the Troubleshooting section for more
information, if it appears that the card is not performing
optimally.
• Contact ATI’s Customer Care or your local technical support.
Page 26

22 Installing the Hardware and Software
Installing the Software
• Before you Start: Information, Tips, and Hints
• Software Installation for Windows 2000 and Windows XP
You will need to install the FireGL drivers and software in the
following cases:
• After you have installed the card in your system.
• After you have re-installed or upgraded your operating
system.
(1) To install or remove the FireGL drivers, you
need administrator rights or you must be logged on
as a user with administrator rights under Windows
2000 and Windows XP.
(2) Information for Windows 2000:
You must have Microsoft Windows Service Pack 1
i
(or higher) installed prior to installing the FireGL
drivers.
The Service Pack is available from Microsoft’s web
page, www.microsoft.com.
(3) Linux drivers and installation instructions are
available for downloading from
www.ati.com/support.
Page 27

Installing the Hardware and Software 23
Before you Start: Information, Tips, and Hints
Before you install the drivers for your FireGL card, make sure
your monitor cable is properly attached to the card.
Do you need a special driver installation?
The software installation procedure later in this chapter
describes how to install the drivers for your graphics card after
you have installed the new card for the first time and have
rebooted your computer.
This section offers some additional tips if you want or need to
install the graphics card drivers in a special working scenario,
for example, if you have re-installed your operating system, or
if you want to perform a manual installation.
• You can always install the drivers using the ATISETUP
utility on the ATI INSTALLATION CD-ROM.
The ATI SETUP utility will start automatically, if you insert
the ATI INSTALLATION CD-ROM into your CD-ROM
drive after the operating system has started. If your CD-ROM
auto-run is not enabled and/or the ATISETUP utility does
not start automatically:
Click the Start button in the task bar, click Run, and then
select ATISETUP.EXE from the root directory of the ATI
INSTALLATION CD-ROM. Click OK.
• Where are the drivers? When prompted for a driver
installation CD, insert the ATI INSTALLATION CD-ROM
and enter or browse to \drivers.
• You need your operating system installed and running before
you can install the FireGL drivers.
Page 28

24 Installing the Hardware and Software
HYDRAVISION™ Multi-monitor Management
The HYDRAVISION™ multi-monitor and desktop
management software will install automatically with the
Express driver installation of the AT I S ETUP utility. If you do
not want to install HYDRAVISION™ select the Custom
driver installation and clear the HYDRAVISION™ check box.
Driver installation dialog
The installation dialog will display in English if your operating
system’s language is not supported.
Software Installation for Windows 2000 and
Windows XP
1 Start your system. When the Found New Hardware
Wizard comes up, click Cancel. When the System
Settings Change window asks you to restart your
computer, click No.
2 Run the ATISETUP utility. The AT I S E T UP utility will
start automatically, if you insert the ATI INSTALLATION
CD-ROM into your CD-ROM drive after the operating
system has started. If your CD-ROM auto-run is not
enabled and/or the ATISE T U P utility does not start
automatically:
Click the Start button in the task bar, click Run, and then
select ATISETUP.EXE from the root directory of the ATI
INSTALLATION CD-ROM. Click OK.
3 Click Install under Software Install.
4 Click Next.
5 Click Yes to the license agreement.
6 ATI Easy Install starts the Installation Wizard.
Page 29

Installing the Hardware and Software 25
7 Follow the Wizard’s on-screen instructions to complete the
installation.
The Express installation option is recommended. The
HYDRAVISION™ multi-monitor and desktop management
software will automatically be installed, along with the ATI
driver, by selecting this option.
Not all software components are installed using the
Express installation. Custom installation allows you to
select individual software components for installation.
8 When the Setup complete message appears, select Yes,
I want to restart my computer now and click Finish.
9 After Windows 2000/Windows XP reboots, the Found
New Hardware message may display the Digital
Signature Not Found message. Click Yes or Continue
to complete the driver installation.
10 Click Start > Settings > Control Panel > Display >
Settings, or right-click on the Windows desktop, select
Properties and Settings.
11 Set the resolution (Screen area), and color depth that best
suit your requirements and your monitor’s performance.
12 Click the Advanced button and select the Monitor tab.
13 Set the refresh rate for the monitor connected to the FireGL
card in your system.
14 Click OK until you are on the Windows desktop.
Refer to your Windows online help and
i
documentation for further information on using the
Monitor and Settings tabs.
Page 30

CHAPTER 3
Using Your FireGL Card
IN THIS CHAPTER...
■ Using Two Monitors on page 28
■ Operating Stereo Glasses on
page 30
■ Changing the Video Settings on
page 30
■ Using Application Profiles and
Advanced Functions on page 36
As part of its Windows drivers, FireGL installs additional tabs
to your Display Properties control panel. They are named as
follows.
26
Information
Adjustment
DualScreen
Configuration
Advanced Settings
The Information tab displays card-specific hardware and
driver information. This information may be helpful when
contacting Tech Support. Click Display Properties >
Settings > Advanced > Information.
Use the Adjustment tab to adjust the display of the connected
monitor(s)
Page 31

Using Your FireGL Card 27
Use the DualScreen tab to enable the following functions:
• duplicate the display of the primary monitor on the second
monitor
• special video mode for high-resolution monitors
Use the Configuration tab to customize application profiles
for individual application settings.
Use the Advanced Settings tab to enable the following
functions:
• SMOOTHVISION™ for enhanced image quality
• Stereo glasses
• Additional operation modes for DVI monitors
Page 32

28 Using Your FireGL Card
Using Two Monitors
You can set resolutions, refresh rates, and display adjustment
independently for any two connected displays.
For two-monitor configuration settings you need
the following:
i
•Use the Display Properties > Settings tab for the basic
two-monitor configuration settings. Refer to your Windows
online help and documentation for further information on
using the Display Properties > Settings tab.
• Switching to a two-monitor display:
In the Display Properties > Settings tab click the
monitor icon 2.
Select Extend my Windows desktop onto this
monitor. Set Screen resolution and Color quality for
the second monitor.
Click the Apply or OK button to enable your settings.
• Two monitors connected to the card
• Both monitors switched on when you start your
computer
• HYDRAVISION™ multi-monitor and desktop management
software enables you to tailor your two-monitor desktop to
the way you work. For more information on
HYDRAVISION™, refer to the HYDRAVISION™ User’s
Guide located on your ATI INSTALLATION CD-ROM.
• If you want the display of the primary monitor duplicated on
the second monitor, select Clone Mode in the DualScreen
tab.
Options and settings in the Monitor and
Adjustment tabs apply only to the monitor
i
selected in the Display Properties > Settings tab.
Click the corresponding monitor icon before you
click Advanced.
Page 33

Using Your FireGL Card 29
Using the DualScreen Tab
To see the DualScreen tab displayed, you need
the following:
i
• Two monitors connected to the card
• Both monitors switched on when you start your
computer
1 Select the DualScreen tab via Display Properties >
Settings > Advanced > DualScreen.
Refer to the context sensitive online help for more
information on setting up your DualScreen configuration.
2 Select High Resolution Mode to extend the display of a
high-resolution monitor to the full size of the monitor.
Note: The option High Resolution Mode is active only
with a high-resolution monitor (9-million pixel class)
connected.
Page 34

30 Using Your FireGL Card
3 Select Clone Mode if you want the display of the primary
monitor duplicated on the second monitor.
4 Click the Apply or OK button to enable your
DualScreen setting.
Operating Stereo Glasses
For operating LCD shutter glasses or other stereo shutter
devices you need your stereo shutter device connected to the
stereo output connector when you start your computer.
1 Select a refresh rate of 120 MHz in the Display
Properties > Settings tab.
2 Enable Quad Buffer Stereo in the Advanced Settings
tab.
Changing the Video Settings
The tabs in the Display Properties menu allow setting and
adjusting the video settings to best suit your specific
requirements
• Setting Resolution, Color Depth and Refresh Rate
• Adjusting the Monitor Display
How to Switch to the Display Properties?
1 Start Windows.
2 Windows 2000: Click Start > Settings > Control
Panel.
Windows XP: Click Start > Control Panel >
Appearance and Themes.
Page 35

Using Your FireGL Card 31
3 Double-click the Display icon. The Display Properties
window appears.
1 You can also display the Display Properties
window by right-clicking the Windows Desktop
background and then selecting the Properties
i
option from the pop-up menu.
2 Click the Advanced button in the Settings tab
to gain access to the Monitor, Information,
Configuration, Adjustment, DualScreen, and
Advanced Settings tabs.
Setting Resolution, Color Depth and Refresh Rate
1 Select the Settings tab in the Display Properties
window.
2 Color depth: Select a value from the Colors box.
3 Resolution: In the Screen area drag the slider.
4 Refresh Rate: Select the Monitor tab via Display
Properties > Settings > Advanced > Monitor.
Select a refresh rate from the Refresh Frequency list
(Screen refresh rates in Windows XP.)
5 Click Apply
6 To preview the new settings, click OK.
7 To accept the settings, click Yes; otherwise, click No.
8 If the display becomes garbled or unusable, simply wait
and Windows will restore the original settings
Page 36

32 Using Your FireGL Card
.
1 Check the documentation of your monitor(s)
i
and make sure that each monitor supports the
planned resolution and refresh rate and color
depth settings.
Warning! Selecting a resolution or refresh rate
that your monitor does not support can
permanently damage the monitor.
2 Use the Monitor
Settings\ Advanced\ Monitor) to select and
set your specific monitor settings.
3 Use the DualScreen tab (Display Properties\
Settings\ Advanced\ DualScreen) to enable
the following functions:
• duplicate the display of the primary monitor on
the second monitor
• special video mode for high-resolution monitors
4 Use the Adjustment tab (Display Properties\
Settings\ Advanced\ Adjustment) to adapt
the display of the monitors connected to the
FireGL card.
5 Operating stereo glasses: Always select a
refresh rate of 120 Hz. Also, enable Quad
Buffer Stereo in the Advanced Settings tab.
tab (Display Properties\
Page 37

Adjusting the Monitor Display
Using this tab you can adjust the display of the connected
monitor. For more information on adjusting the monitor's
display refer to the context sensitive online help.
Using Your FireGL Card 33
1 Select the Adjustment tab via Display Properties >
Settings > Advanced > Adjustment.
Page 38

34 Using Your FireGL Card
2 Monitor Tuning - available only for VGA monitors
• With the buttons in the Move and Size sections you can tune
the position and size of the monitor's display for the indicated
resolution and refresh rate
1 First use the hardware setting controls on your
monitor, if available, to adjust your display size
or position. Then, if needed, use the software
controls in 'Adjustment - Monitor Tuning.'
Check the documentation of your monitor for
i
• Sync Polarity: If you do not get a satisfactory display with
the default sync polarity setting for the current resolution,
you may try and change the settings.
• Undo: Click this button to undo the last change you made
(when you clicked Apply). If you have made a modification
that causes your screen to go blank or to be unreadable, the
keyboard shortcut for 'Undo' is Alt-U.
information on your monitor's hardware
controls
2 Resizing the display slightly changes the actual
refresh rate. If you operate a fixed-frequency
monitor check the documentation of your
monitor for information on refresh rate
tolerances.
• Default: Click this button to set the Monitor Tuning to the
manufacturer's default settings.
1 Press the ESC key on your keyboard to undo
the changes if your monitor has lost
synchronization. You may also use the
i
keyboard shortcut for 'Undo'- Alt-U.
2 If you change the resolution (in Settings)
and/or the refresh rate (in Monitor), you may
need to re-adjust the monitor's display.
Page 39

Using Your FireGL Card 35
3 Gamma Correction Adjustment: Adjust the monitor's
gamma correction for optimal brightness with the red,
green and blue slider bars.
When these sliders are changed the gamma correction table
modifies each pixel's color value.
The brightness produced at the face of the display is
proportional to the input voltage raised to the power
gamma. This nonlinearity must be compensated to achieve
correct reproduction of the image's brightness. The effect of
display gamma is to darken the midtones relative to the
dark and light regions. The gamma correction adjustment
affects the entire screen display. The possible setting range
is 0.3 - 4.0. The default setting is 1.0.
With Link sliders selected, the three sliders move
together as you drag any individual slider. With the check
box unchecked, you can adjust colors individually by
dragging the applicable slider.
Click the >1< button for each color to set the gamma
correction to the default value of 1.0.
4 Click the Apply or OK button to enable your
Adjustment settings.
Page 40

36 Using Your FireGL Card
Using Application Profiles and Advanced Functions
Use the Configuration tab to customize application profiles
for individual application settings.
Use the Advanced Settings tab to enable the following
functions.
- SMOOTHVISION™ for enhanced image quality
- Stereo glasses
- Additional operation modes for DVI monitors
Configuring Application Profiles
Switching to Configuration
Select Display Properties > Settings > Advanced >
Configuration
The configuration default settings typically require modification
only for the following:
• diagnostic purposes
• fine-tuning a specific application/system configuration
• specific settings recommended by your hardware or software
documentation
• tuning your application/system environment for best
performance and memory usage
Activating a configuration profile
For some of the most popular applications the optimal
configuration profile is factory-set by default. Select the
application from the list in the Configuration Profiles
section. This will add necessary Windows registry settings.
Click Apply and, if prompted, restart Windows.
If you experience problems with your application, or if you
want to try to optimize the performance of your system on
specific applications, you may modify the configuration
settings.
Page 41

Using Your FireGL Card 37
Adding a new application profile
Click the Add button in the Configuration Profiles section
and enter the new application for which you want to set the
configuration parameters.
Modifying the configuration parameters
To change the configuration settings of a specific application,
for example, CATIA, select the application from the list in the
Configuration Profiles section and click the Modify button.
To remove the selected configuration profile completely, click
Delete.
Note: You cannot delete the factory-set configuration profiles.
Page 42

38 Using Your FireGL Card
If you add or modify a configuration profile, select or clear the
checkboxes in the Settings section according to your
requirements.
Default Settings
Enable 8-Bit double-buffered Overlay Planes
Use 8 bits of each 32-bit frame buffer pixel as double-buffered
overlay planes.
Force copy swap
Force blit copy during double-buffer swap from back to front
buffer.
Wait for vertical retrace
Buffer swap 'synched' to the refresh rate of the monitor.
Enabling will lower the frame rate but reduce visual artifacts
such as tearing. Disabling allows your application to run at the
highest possible frame rate, regardless of the monitor’s refresh
rate, which is typically less than the frame rate at which the
application will run.
Enable OpenGL Hardware acceleration
Always enable this setting for hardware acceleration of your
OpenGL application. Disable this setting only if you experience
serious rendering problems. Disabling this setting significantly
reduces the OpenGL performance.
Click the Apply or OK button to enable your Configuration
settings.
Page 43

Setting Advanced Functions
Switching to Advanced Settings
Select Display Properties > Settings > Advanced >
Advanced Settings.
Using Your FireGL Card 39
SMOOTHVISION™
SMOOTHVISION improves image quality by removing jagged
edges (Anti-Aliasing) from 3D images, resulting in smoother,
more natural looking objects.
Anti-aliasing:
Application Preference: This gives OpenGL/Direct 3D
applications the ability to enable anti-aliasing. If an application
does not specify an anti-aliasing-setting, anti-aliasing is
disabled. This option will result in high quality images, with a
negligible reduction in the application’s performance.
Page 44

40 Using Your FireGL Card
Always on: You can apply anti-aliasing using different sample
patterns and sample points such as 2X or 4X. Moving the slider
to the right increases sampling to provide the most realistic 3D
image, at the cost of some 3D performance.
Note: The Always on setting overrides the applications' antialiasing setting.
Reduce DVI frequency on high-resolution displays
Resolves display corruption or no image at high resolutions for example, 1280x1024 at 75Hz - using a digital DVI display.
This setting has no effect when using a DVI-to-VGA adapter.
Alternate DVI operational mode
Use this option if you are experiencing display corruption on
your DVI flat panel monitor.
Enable Quad Buffer Stereo
Select this option to operate stereo glasses. Also, set the refresh
rate to 120 Hz via the Settings tab.
Default
This button allows you to reset the Advanced Settings to the
default values.
Page 45

CHAPTER 4
Reference
IN THIS CHAPTER...
■ Removing the FireGL Drivers
on page 41
■ Troubleshooting on page 43
■ Technical Details on page 46
■ Customer Care and Warranty
Service on page 52
■ Compliance Information on
page 55
Removing the FireGL Drivers
41
This section describes how to properly remove your graphics
card software from your system should you need to do so.
1 Before removing the FireGL video driver, please
close all open application programs and disable
any anti-virus software that is running on your
i
computer until the driver is removed.
2 To install or uninstall the FireGL drivers, you need
administrator rights or you must be logged on as
a user with administrator rights under Windows.
1 Start Windows®.
2 Click Start.
3 Point to (Settings >) Control Panel.
Page 46

42 Reference
4 Click Add/Remove Programs.
5 Select ATI Display Driver from the list of software
6 Click Change/Remove button.
7 Click Yes to remove the ATI Display Driver.
8 Click Yes to restart your computer.
After you have removed the software according to the
instructions, you may remove the hardware.
1 Shut down your computer.
2 Remove the computer case as outlined in the hardware
3 Ground yourself by touching the power supply box.
4 To remove the graphics card, perform the hardware
programs.
The ATI uninstall dialog appears.
installation instructions.
installation procedures in reverse order.
Page 47

Troubleshooting
Your board is a complex electronic device and can only be
repaired by authorized technical personnel with special
equipment. Do not attempt to change or repair any parts of this
product as doing so will void your warranty.
If you experience a problem using the FireGL card, check the
following sections for advice on how to solve your problem.
Reference 43
Technical
Support and
FAQs
No image
appears on
display
Screen image
defects appear
You may find information on Technical Support, as well as
Frequently Asked Questions (FAQ) and their answers at
the web sites of ATI Inc. Go to
www.ati.com and select
CUSTOMER CARE for BUILT BY ATI products.
• Make sure that the FireGL card is firmly seated and
lined up properly in its AGP Pro slot, and that the
monitor cable is firmly and correctly connected to the
card. For more information, please refer to Installing
the Hardware on page 8.
• Make sure that your computer and monitor are
plugged into electrical outlets and receiving power.
• Is the monitor turned on and receiving power?.
• Check if your monitor supports the resolution,
horizontal (kHz) and vertical (Hz) refresh rates as
required by the graphics card.
• Check for your current resolution, refresh rate, and
color depth settings in the Settings and Monitor tabs
of the Display Properties.
Warning! Be sure that both video card and monitor
support resolution and refresh rates you select.
Incompatible resolution/refresh rate selection may result
in monitor damage. Refer to your monitor's
documentation for recommended resolutions and refresh
rates.
Page 48

44 Reference
Screen image
is off-center,
color balance
is wrong, or
there is no
picture
Operating
system warns
that the video
card is not
configured
properly
How to enable
a two-monitor
desktop?
• Try adjusting the brightness, sharpness, contrast, and
color balance controls of your monitor.
• Try adjusting the centering and positioning controls of
your monitor to position the picture on the screen.
Note: The Monitor Tuning settings in Display
Properties > Adjustment tune the position of the
picture on the screen via the video signal.
• Set the monitor's RGB inputs (and sync switches, if
this option is available) to 75 Ohms, with the sync set
to external.
• Using DFP monitors: Make sure that the DVI plug of
your monitor data cable is digital-only (DVI-D) - but
not integrated analog/digital (DVI-I). Refer to your
monitor's documentation and contact your supplier or
the manufacturer of the DFP monitor for information
on how to obtain a suitable data cable plug.
• Check the driver installation and make sure that all
software is correctly loaded corresponding to your
operating system and applications. For more
information, please see Installing the Software.
• Re-install the FireGL drivers. Please refer to Installing
the Software
on page 22.
• You need two monitors connected to the card.
Both monitors must be switched on when you start
your computer.
• Check the Monitor tab of the Display Properties.
How to enable
stereo
glasses?
• You need stereo glasses connected to the card when
you start your computer.
• Select a refresh rate of 120 Hz in the Monitor tab of
the Display Properties.
• Enable the Quad Buffer Stereo option in the
Advanced Settings tab of the Display Properties.
Page 49

Reference 45
Checking for
address and
interrupt
conflicts
Resolving
Interrupt
Conflicts
The card is not
performing
optimally?
• It is necessary to ensure that the I/O and memory
addresses reserved for the graphics board are not
used by other hardware devices.
• The integrated on-board VGA controller of your
FireGL card uses the following addresses (hex):
I/O Address:
Standard VGA I/O: 3B0-3DF
Memory Addresses:
Video RAM: A000-BFFF
Video ROM: C000-C7FF
Note: You cannot change the addresses of your
FireGL card. In case of an address conflict, try to
modify the I/O address of the add-on card that causes
the conflict.
To support the special graphics processor on the FireGL
card the system BIOS should automatically assign a
system interrupt to the AGP slot where the card is
installed. However, there may be problems if your
graphics card does not receive an interrupt or a system
interrupt is used for more than one device. In case of
problems check the system configuration utility of your
operating system for the interrupt assignments.
Check the Information tab of the Display Properties.
The Transfer Mode information must be AGP.
The Transfer Mode is not AGP? (for example, PCI)
• Install the latest chipset driver for the AGP chipset on
your motherboard.
• Contact your supplier or motherboard manufacturer
for further information.
Page 50

46 Reference
Technical Details
Product Specifications
■ Product Specifications on
page 46
■ Pin Assignments on page 48
■ Video Modes on page 50
Operating
environment
System
requirements
Certifications FCC/DOC, ICES-003, CE/DOC,
Dimensions Length: 228.6 mm (9.0 inches)
Power
requirements
Bus System AGP 3.0, AGP Pro 50 connector
Video memory DDR SDRAM, unified frame buffer,
BIOS 64 Kbyte BIOS FlashROM, re-
Digital/analog
converter
Windows® 2000, Windows® XP, Linux
Intel® Pentium® 3, Pentium® 4, Xeon®;
AMD® Athlon® XP/MP/Opteron or
compatible
SMA C-Tick, MIC, BSMI, VCCI
Width: 108.0 mm (4.25 inches)
+ 3.3 Volts DC: 9.4 Amps
+ 5 Volts DC: 0.6 Amps
+ 12 Volts DC: 2.0 Amps maximum
Z-buffer, texture storage
256-bit memory interface
programmable by software, 3.3 V
2x 30-bit Palette DAC
DAC speed: 400 MHz
Page 51

Data width 256 bit - graphics core
256-bit memory interface
Connectors 2x DVI-I output connectors:
analog and digital output, female
1x Stereo output connector:
3-pin MiniDin, female
H/V Sync
output signals
FireGL card
addresses
Separate horizontal and vertical sync at
TTL levels
The FireGL card is 100% IBM VGA
compatible and occupies the same
memory area and specific addresses in
the I/O range. The memory range above
1 MB is automatically assigned through
the PCI BIOS interface
I/O addresses: 3B0 - 3DF
(Standard VGA I/O)
Video RAM: A000-BFFF
Video ROM: C000-C7FF
Reference 47
Page 52

48 Reference
Pin Assignments
DVI Output Connector Pin Function
1
T.M.D.S. Data2-
2
T.M.D.S. Data2+
3
T.M.D.S. Data2/4 Shield
4
T.M.D.S. Data4-
5
T.M.D.S. Data4+
6
DVI: Digital Visual Interface
DDC: Display Data Channel
T.M.D.S: Transition Minimized
Differential Signal
MicroCross Pins:
C1 Analog Red Video Out
C2 Analog Green Video Out
C3 Analog Blue Video Out
C4 Analog Horizontal Sync
C5 Analog Common Ground Return
(Red, Green, Blue Video Out)
DDC Clock
7
DDC Data
8
Analog Vertical Sync
9
T.M.D.S. Data1-
10
T.M.D.S. Data1+
11
T.M.D.S. Data1/3 Shield
12
T.M.D.S. Data3-
13
T.M.D.S. Data3+
14
+ 5V Power
15
ground (for + 5V)
16
Hot Plug Detect
17
T.M.D.S. Data0-
18
T.M.D.S. Data0+
19
T.M.D.S. Data0/5 Shield
20
T.M.D.S. Data5-
21
T.M.D.S. Data5+
22
T.M.D.S. Clock Shield
23
T. M . D . S . C l o c k +
24
T. M . D . S . C l o c k -
Page 53

Reference 49
Stereo Sync Output
Connector
Pin Function
1
+ 5 V DC (fused 750 mA)
2
ground
3
StereoSync
Page 54

50 Reference
Video Modes
All video modes comply with VESA DMT (Discrete Monitor
Timing) or VESA GTF (General Timing Format) standards. The
FireGL card supports HiColor, 16-bit modes and TrueColor, 32bit (24 color, 8 alpha) modes. There is no support for 8-bit
modes.
Analog and digital monitors with 15-pin VGA connector
Resolution Line Rate (kHz) Refresh Rate
(Hz)
640 x 480 31.5, 37.5, 43.3, 50.9 60, 75, 85, 100 16 / 32
800 x 600 37.7, 46.9, 54.1, 63.9 60, 75, 85, 100 16 / 32
1024 x 768 48.4, 60.0, 68.7, 81.4 60, 75, 85, 100 16 / 32
1152 x 864 53.7, 67.5, 77.1, 91.5 60, 75, 85, 100 16 / 32
1280 x 1024
1600 x 1000*
1600 x 1024 63.6, 80.2, 81.3, 91.4 60, 75, 76, 85 16 / 32
1600 x 1200 75.0, 93.8, 106.3 60, 75, 85 16 / 32
1792 x 1344 83.6, 106.3 60, 75 16 / 32
1920x1080** 67.1, 84.6 60, 75 16 / 32
1920 x 1200* 74.5, 94.0 60, 75 16 / 32
2048 x 1536 95.3 60 16 / 32
*: Wide Screen Aspect Ratio Mode (16:10)
**: Wide Screen Aspect Ratio Mode (16:9)
64.0, 78.0, 91.1,
107.0
62.1, 78.3, 89.3,
105.9
60, 75, 85,
100
60, 75, 85,
100
Color Depth
(Bits)
16 / 32
16 / 32
Page 55

Reference 51
Digital Monitors with DVI connector
Resolution Refresh Rate (Hz) Color Depth (Bits)
640 x 480 60, 75 16 / 32
800 x 600 60, 75 16 / 32
1024 x 768 60, 75 16 / 32
1152 x 864 60, 75 16 / 32
1280 x 1024 60, 75 16 / 32
1600 x 1000 60 16 / 32
1600 x 1024 60 16 / 32
1600 x 1200 60 16 / 32
Page 56

52 Reference
Customer Care and Warranty Service
If you require assistance to get the most out of your product, the
following options are available:
• Online: For product information, video drivers, Frequently Asked
Questions and Email support visit:
http://www.ati.com and select C
• FireGL Workstation dedicated support line:
*905-882-2600
Available Monday through Friday, 9:00 AM - 7:00 PM EST.
*Access to Telephone Support is available to workstation users at no
additional cost. (long distance charges may apply). For complete
details please visit:
http://www.ati.com/online/customercare
• Mail:
ATI TECHNOLOGIES INC.
Attention: Customer Service
33 Commerce Valley Drive East
Markham, Ontario
Canada L3T 7N6
ATI Customer Care Product Online Registration
USTOMER CARE.
By registering your ATI product you will be able take advantage of
driver update notification, technical updates, online store specials and
promotions, contests / giveaway announcements and information
specific to your product.
Product Online Registration is available at:
http://www.ati.com/online/registration
Page 57

Warranty Service Information
Online Warranty Support:
Customers can place warranty service requests online using the Online
Warranty Service Request Form. This form is available online at:
http://www.ati.com/online/warrantyform
Please be prepared to enter all required information. Once completed,
the form will be submitted to ATI for processing. After ATI Technical
Support receives your request an RMA (Return Merchandise
Authorization) number will be issued out to you. This must be obtained
before you will be able to submit your defective product to ATI for
repair.
Advanced Parts Replacement Service
FireGL customers have the option of Advanced Parts Replacement to
minimize downtime for design professionals.
For Advanced Parts Replacement service instructions contact one of
our Customer Care Representatives using one of the aforementioned
means.
Warranty Information
Reference 53
Should the product, in ATI’s opinion, malfunction within the warranty
period, ATI will at its discretion repair or replace the product upon
receipt with an equivalent. Any replaced parts become the property of
ATI. This warranty does not apply to the software component of a
product or a product which has been damaged due to accident, misuse,
abuse, improper installation, usage not in accordance with product
specifications and instructions, natural or personal disaster, or
unauthorized alterations, repairs, or modifications.
For a detailed description of the ATI Hardware Warranty Service
Statement visit:
http://www.ati.com/online/warranty/statement
Page 58

54 Reference
Limitations
• All warranties for this product, expressed or implied, will expire
three (3) years* from date of original purchase.
• No warranties for this product, expressed or implied, shall extend to
any person who purchases the product in a used condition.
• The liability of ATI in respect of any defective product will be
limited to the repair or replacement of such product. ATI may use
new or equivalent-to-new replacement parts. Defective product will
be sent in for repair or replacement only.
ATI makes no other representations or warranties as to fitness for a
particular purpose, merchantability or otherwise in respect of the
product. No other representations, warranties or conditions, shall be
implied by statute or otherwise.
In no event shall ATI be responsible or liable for any damages,
including but not limited to the loss of revenue or profit, arising:
• from the use of the product,
• from the loss of use of the product, as a result of any event,
circumstance, action or abuse beyond the control of ATI; whether
such damages be direct, indirect, consequential, special or otherwise
and whether such damages are incurred by the person to whom this
warranty extends or a third party.
*All accompanying cables and accessories are warranted
for 90 days.
Page 59

Compliance Information
FCC Compliance Information
The FireGL family of products complies with FCC Rules art 15.
Operation is subject to the following two conditions
• This device may not cause harmful interference, and
• This device must accept any interference received,
including interference that may cause undesired operation.
This equipment has been tested and found to comply with the limits for
a Class B digital device, pursuant to Part 15 of the FCC Rules. These
limits are designed to provide reasonable protection against harmful
interference in a residential installation. This equipment generates, uses
and can radiate radio frequency energy and, if not installed and used in
accordance with manufacturer's instructions, may cause harmful
interference to radio communications. However, there is no guarantee
that interference will not occur in a particular installation. If this
equipment does cause harmful interference to radio or television
reception, which can be determined by turning the equipment off and
on, the user is encouraged to try to correct the interference by one or
more of the following measures:
• Re-orient or relocate the receiving antenna.
• Increase the separation between the equipment and receiver.
• Connect the equipment to an outlet on a circuit different from that to
which the receiver is connected.
• Consult the dealer or an experienced radio/TV technician for help.
Reference 55
• The use of shielded cables for connection of the monitor
and the stereo glasses to the graphics card is required to
ensure compliance with FCC regulations.
• Changes or modifications to this unit not expressly
approved by the party responsible for compliance could
void the user's authority to operate this equipment.
Industry Canada Compliance Statement
ICES-003 This class B digital apparatus meets all requirements of
the Canadian Interference-Causing Equipment Regulations.
Cet appareil numérique de la classe B respecte toutes les exigences du
Règlement sur le matériel brouilleur du Canada.
Page 60

56 Reference
CE Compliance Information
EMC Directive 89/336/EEC and amendments 91/263/EEC, 92/31/EEC
and 93/68/EEC, Class B Digital Device
EN 55022:1998/CISPR 22 Class B, Limits and Methods of
Measurement of Radio Interference Characteristics Information
Technology Equipment.
EN 55024:1998, Immunity of Information Technology Equipment
(ITE), including
EN 61000-4-2, EN 61000-4-3, EN 61000-4-4, EN 61000-4-5,
EN 61000-4-6, EN 61000-4-11
EN 60950:92 + A1:93 + A2:93 +A3:95 + A4:97
Directive EMC 89/336/CEE et amendements 91/263/CEE, 92/31/CEE
et 93/68/CEE, dispositif numérique de Classe B
EN 55022:1998/CISPR 22 Classe B, Limites et méthodes de mesure
des caractéristiques d'interférences radiophoniques, Matériel des
technologies de l'information.
EN 55024:1998, Norme sur l'immunité de matériel des technologies de
l'information, et comprenant
EN 61000-4-2, EN 61000-4-3, EN 61000-4-4, EN 61000-4-5,
EN 61000-4-6, EN 61000-4-11
EN 60950:92 + A1:93 + A2:93 +A3:95 + A4:97
EMC Richtlinie 89/336/EEC und Änderungen 91/263/EEC,
92/31/EEC und 93/68/EEC, Digitales Gerät der Klasse B
EN 55022:1998/CISPR 22 Klasse B, Beschränkungen und Verfahren
der Messung von informationstechnischen Ausrüstungen mit
Funkstörmerkmalen
EN 55024:1998, Unempfindlichkeits-Standard für
informationstechnische Ausrüstungen, einschliesslich
EN 61000-4-2, EN 61000-4-3, EN 61000-4-4, EN 61000-4-5,
EN 61000-4-6, EN 61000-4-11
EN 60950:92 + A1:93 + A2:93 +A3:95 + A4:97
Page 61

VCCI Class B ITE Compliance Information
Contact for further compliance information
ATI Research Inc.
4 Mount Royal Avenue,
Marlborough, MA
01752-1978
USA
Phone: (508) 303-3900
Reference 57
MIC Certification Information
FireGL X1-256p
Product Name / Model: Fire GL X1
Holder: ATI Technologies Inc.
Date: 2002-12-20
Manufacturer / Country of origin: ATI Technologies Inc. / China
FireGL Z1-128p
Product Name / Model: Fire GL Z1
Holder: ATI Technologies Inc.
Date: 2003-02-14
Manufacturer / Country of origin: ATI Technologies Inc. / China
 Loading...