

Page 1

HDTV WONDER™
Getting S tarted Guide
P/N: 117-70125-00
ATI
Page 2

ii
Copyright © 2004, ATI Technologies Inc. All rights reserved.
ATI and ATI product and product feature names are trademarks an d/or registered trademarks of ATI
Technologies Inc. All other company and/or product names are trademarks and/or registered
trademarks of their respective owners. Features, performance and s pecifications are s ubject to change
without notice, Product may not be exactly as shown in diagrams.
Reproduction of this manual, or parts thereof, in any form, without the expre ss written permission of ATI
Technologies Inc. is strictly prohibited.
Disclaimer
While every precaution has been taken in the preparation of this document, ATI Technologies Inc.
assumes no liability with respect to the operation or use of ATI hardware, software or other products
and documentation described herein, for any act or omission of ATI concerning such products o r this
documentation, for any interruption of service, loss or interruption of business, loss of anticipatory
profits, or for punitive, incidental or consequential damages in connectio n with the furnishing,
performance, or use of the ATI hardware, software, or other products and documentation provided
herein.
ATI Technologies Inc. reserves the right to make changes without further notice to a product or system
described herein to improve reliability, function or design. With respect to ATI products which this
document relates, ATI disclaims all express or implied warranties regarding such products, including
but not limited to, the implied warranties of merchantability, fitness for a particular purpose, and noninfringement.
Product Notices
Dolby Labratories Inc orporated
Manufactured under license from Dolby Laboratories. Dolby and the doub le-D symbol are trademarks
of Dolby Laboratories. Confidential Unpublished Works. Copyright 1 992 - 1997 Dolby Laboratories. All
rights reserved.
Macrovision
Apparatus Claims of U.S. Patent Nos. 4,631,603, 4,577,216, 4,819,098 , and 4,907,093 licensed for
limited viewing uses only.
This product incorporates copyright protection techno lo gy tha t is protected by method claims of certain
U.S. patents and other intellectual property rights owned by Macrovision Corporation and other rights
owners. Use of this copyright protection technology must be authorized by Mac rovision Corporation,
and is intended for home and other limited viewing uses only unless otherwise authorized by
Macrovision Corporation. Reverse engineering or disassembly is prohibited.
Documentation Updates
ATI is constantly improving its product and associated documentation. To maximize the value of your
ATI product, you should ensure that you have the latest documentation. ATI’s documentation contains
helpful installation/configuration tips and other valuable feat ure information.
Page 3

IMPORTANT SAFETY INSTRUCTIONS
L
• Read Instructions - All the safety and operating instructions should be
read before the product is operated.
• Retain Instructions - The safety and operating instructions should be
retained for future reference.
• Heed Warnings - All warnings on the product and the operating
instructions should be adhered to.
• Compatibility - This option card is for use only with IBM AT or
compatible UL Listed personal computers that have Installation
Instructions detailing user installation of card cage accessories.
• Grounding - CAUTION: For Continued Protection Against Risk of
Electric Shock and Fire, This Accessory Should Be Installed Only In
Products Equipped With A Three-wire Grounding Plug, A Plug Having a
third (Grounding) Pin. This plug will only fit into a grounding-type power
outlet. This is a safety feature. If you are unable to insert the plug into
the outlet, contact your electrician to replace the obsolete outlet. Do not
defeat the safety purpose of the grounding-type plug.
• All option card securement pins shall be completely tightened as to
provide continuous bonding between the option card and the PC
chassis.
• Outdoor Antenna Grounding - Since an outdoor antenna or cable
system is connected to the product, be sure that the antenna or cable
system is grounded so as to provide some protection against voltage
surges and built-up static charges. Article 810 of the National Electrical
Code, ANSI/NFPA 70, provides information with regard to proper
grounding of the mast and supporting structure, grounding of the lead-in
wire to the antenna discharge unit, size of grounding conductors,
location of antenna-discharge unit, connection of grounding electrodes,
and requirements for the grounding electrode.
• Lightning - For added protection for this product during a lightning
storm, or when it is left unattended and unused for long periods of time,
unplug it from the wall outlet, and disconnect the antenna or cable
system. This will prevent damage to the product due to lightning and
power-line surges.
• Power Lines - An outside antenna system should not be located in the
vicinity of overhead power lines or other light or power circuits, or where
it can fall into such power lines or circuits.
• When installing an outside antenna system, extreme care should be
taken to keep from touching such power lines or circuits, as contact with
them may be fatal.
• Note to CATV System Installer - This reminder is provided to call the
CATV systems installer’s attention to Section 820-40 of the NEC, which
provides guidelines for proper grounding and, in particular, specifies that
the cable ground shall be connected to the grounding system of the
building, as close to the point of cable entry as practical.
iii
Page 4

iv
Page 5

Table of Contents
Getting Started 1
Before You Start 1
HDTV WONDER™ Features 3
System Requirements 4
Other Sources of Information 4
Installing the HDTV WONDER™Card 5
HDTV WONDER™ External Connectors 7
Attaching the Antenna 8
ATI Input Adapter 9
Installing the Software 10
Starting the ATI Multimedia Center 10
Using Your HDTV WONDER™ 11
Special Features 11
Setting up DTV 12
Feature Menu 14
Keyboard Shortcuts 16
Display Settings 18
Video Settings 20
Channel List 20
Audio Settings 23
Schedule Settings 24
Closed Captioning 24
HOTWORDS™ 26
TV Magazine 28
Zooming and Panning 29
Channel Lockout 30
Parental Control 31
Recording Video 32
TV-ON-DEMAND™ 33
Electronic Program Guide 35
Stills Gallery 36
Troubleshooting 39
Video Problems 39
Loading Windows® in Safe Mode 40
Product Registration 41
Customer Care 41
v
Page 6

vi
Warranty Information 43
Getting Additional Accessories 43
Warranty Information 43
Warranty Service 43
Compliance Information 47
FCC Compliance Information 47
Industry Canada Compliance Statement 47
CE Compliance Information 48
Index 51
Page 7

Before You Start 1
CHAPTER 1: GETTING STARTED
Before You Start
Congratulation on the purchase of your ATI multimedia card. This section
will guide you through the process of gathering information required for
registering your graphics card for warranty and customer service.
Record your card’s serial numbers
The 102 part number (P/N) and the serial number (S/N) printed on the addin card, shown bold and underlined in the illustration below, are required
for registration. Write these numbers down before installing your new ATI
product. These numbers are required for registering your product.
A possible arrangement of the serial number and 102 part number
X Serial number
Y 102 part number
With HDTV WONDER™ you can receive free-to-air digital television
(DTV) broadcasts in all high definition television (HDTV) formats — 480i,
480p, 720p, and 1080i, with 5.1 channel surround sound. You can also
receive up to 125 analog cable television channels and 70 analog antenna
channels in smooth, full-motion video in full-screen or in a window.
HDTV WONDER™ delivers advanced features: TV-ON-DEMAND™,
EAZYLOOK™ (only with supported ATI products), Closed Captioning,
Still Capture, Scheduled Events, Electronic Program Information, Parental
Control, and more.
• Not all channel options are available in all countries. The actual
number of stations received will vary depending on the services
provided in your area.
HDTV Video Benefits. High-definition TV offers significantly more detail
than analog, Standard Definition or Enhanced Definition TV. Highdefinition formats — 720p (1280x760, progressive) or 1080i (1920x1080,
interlaced) — offer a picture better than a DVD.
Page 8

2 Before You Start
HDTV Audio Benefits. Digital television provides digital stereo sound,
and DTV programs can include up to six channels of Dolby® Digital
sound. With Dolby® Digital 5.1 sound, a DTV program can match the
audio quality of high-end DVDs. DTV programs can also offer multiple
audio tracks for commentary with a movie, special audio streams for those
hard of hearing, or different language options.
HDTV Programming Benefits. Broadcasters can fit multiple digital
channels within a signal frequency — stations can play multiple shows or
display alternate content on a secondary (minor) channel. DTV signals also
carry program information that can be used to generate a TV-guide style list
of available programs.
Using HDTV WONDER™, you can capture still frames and movie clips,
create your own TV transcripts, and turn your PC into a digital VCR with
time-shifting capability.
Together with the ATI Multimedia Center, HDTV WONDER™ allows
you to burn your DTV or HDTV content to a DVD or CD. With a few
simple clicks you are on your way to burning an HDTV show on a standard
DVD disc.
Page 9

HDTV WONDER™ Features 3
HDTV WONDER™ Features
DTV Tuner — Watch, pause, and record free-to-air DTV and HDTV on your PC.
Analog TV Tuner — Watch, pause, and record analog TV from an antenna or
cable feed on your PC.
dbx®
5.1 stereo TV audio in North America.
Digital VCR — Schedule and record TV shows to your hard drive.
Video inputs for VCR, video camera, video game consoles, etc.
Video and Audio Capture with a simple mouse click.
Live Motion Video Desktop using your favorite TV show as wallpaper.
Closed Captioning support including Transcript Creation and Hot Words™ that
alert you when the ATI Multimedia Center software receives information you want
to see.
Channel Preview — Scan through available channels in seconds.
Scheduled Viewing — Play particular files and/or watch selected TV channels
at times you specify
TV Listings — The Electronic Program Guide provides an intelligent, free,
integrated program guide.
Channel Lockout and Program Lockout for parental control.
Page 10

4 System Requirements
System Requirements
Computer
System
Monitor VGA, minimum 640x480 resolution.
Operating
System
Audio Sound card and speakers certified for Windows® use.
Expansion Slot PCI.
Graphics Card The following ATI graphics cards support HDTV
1.2GHz Intel® or AMD® processor, or better, with at least
256MB of system memory.
Windows® XP.
WONDER™
• ALL-IN-WONDER 9800 PRO
• ALL-IN-WONDER 9700 PRO
• ALL-IN-WONDER 9600 Series
• RADEON™ 9800 Series
• RADEON™ 9700 Series
• RADEON™ 9600 Series
• RADEON™ 9500 Series
Visit the ATI web site at ati.com for a current list of
supported graphic cards.
Other Sources of Information
If you need additional help or require information that is not included in this
guide, see the following sources:
Online Help
For information on the multimedia features available with your card, click
the Help button in the TV or DTV control panel.
Electronic User’s Guide
Your ATI c ar d comes complete with a User’s Guide in Portable Document
Format (PDF). The User’s Guide describes in detail the features and
functions of your ATI card and the associated software. You will need
Adobe® Reader® software, available from adobe.com.
To open the User’s Guide
1 Insert the ATI INSTALLATION CD-ROM into your CD-ROM
drive.
2 If Windows® runs the CD-ROM automatically, proceed to step 6.
Page 11

Installing the HDTV WONDER™Card 5
3 Click Start > Run.
4 Type the following: D:\ATISETUP
(If D is not your CD-ROM drive, substitute the correct drive letter.)
5 Click OK.
6 Click Documentation.
7 Click User Guides.
ATI Multimedia Center Guide
The online ATI Multimedia Center User’s Guide explains how to use the
special features that the ATI Multimedia Center provides. To open the ATI
Multimedia Center User’s Guide:
1 Insert the ATI Installation CD-ROM into your CD-ROM drive, and
then click User Guide.
The ONLINE Manual opens in Adobe® Acrobat® Reader™.
2 Click User’s Guides, click ATI Multimedia Center Guides, and
then click ATI Multimedia Center.
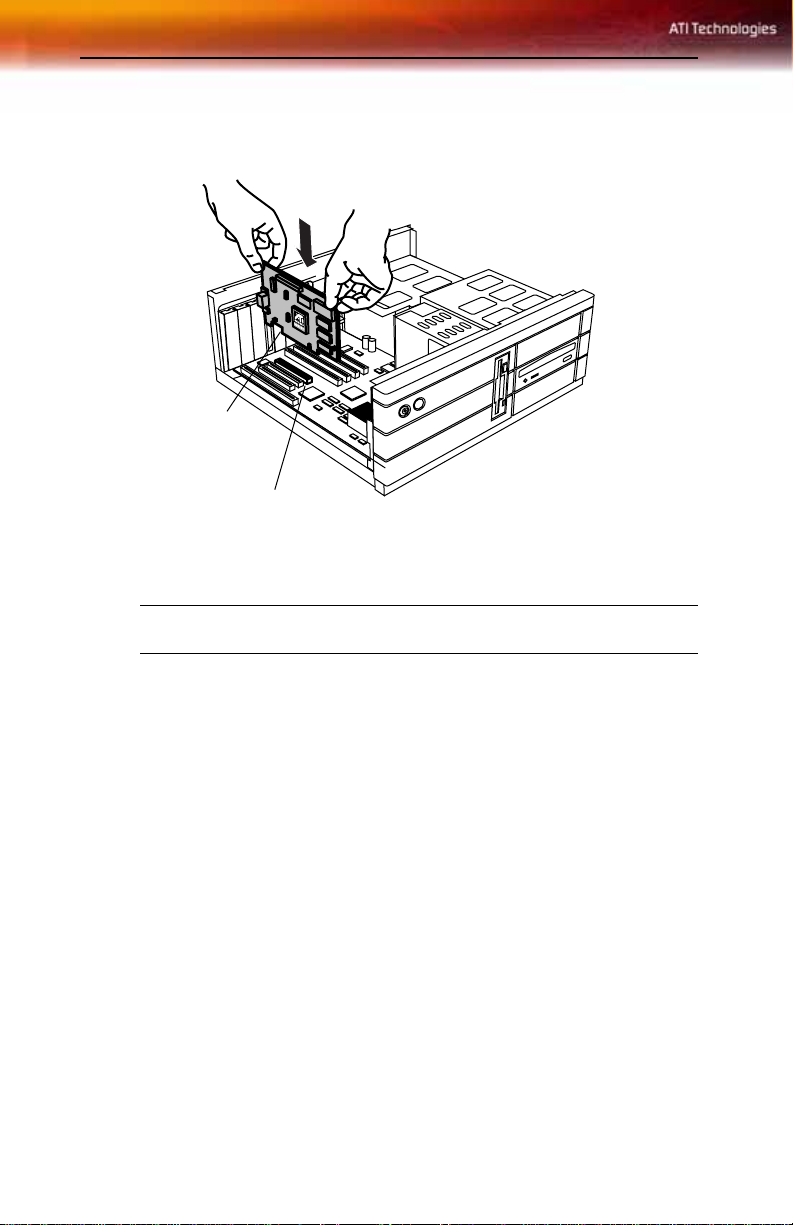
Installing the HDTV WONDER™Card
1 Turn off the computer, and then disconnect the power cable.
2 Remove the computer cover. If necessary, consult your computer
system manual for removal instructions.
Note: Remember to discharge your body’s static electricity by
touching the metal area of the computer chassis.
3 Select an empty PCI expansion slot for the HDTV WONDER™ card.
4 With the slot cover removed, grasp the card by the top edge, carefully
seat it firmly into the slot, and then fasten the retaining bracket with a
screw.
Page 12
6 Installing the HDTV WONDER™Card
5 Replace the computer cover, re-connect the power cable, and then
connect your TV cable or video input to the HDTV WONDER™
card.
X
Y
HDTV WONDER™ card
X
PCI expansion slot
Y
For more information about the connectors on the HDTV
WONDER™ card, see HDTV WONDER™ External Connectors on
page 7.
Page 13
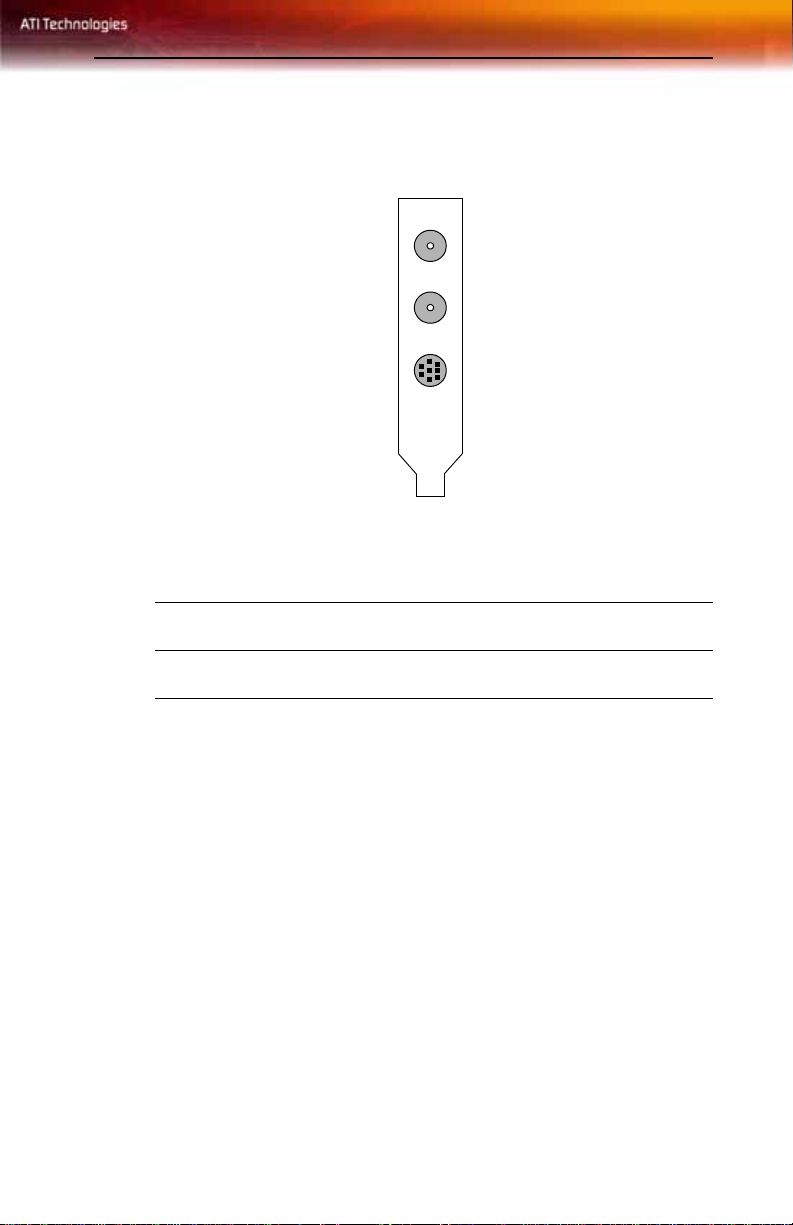
HDTV WONDER™ External Connectors 7
HDTV WONDER™ External Connectors
HDTV WONDER™ provides analog audio/video input.
DTV
X
CATV
Y
Z
VID IN
DTV input from antenna.
X
Analog input from cable or antenna.
Y
Analog input from ATI Input Adapter.
Z
Page 14

8 Attaching the Antenna
Attaching the Antenna
To attach the HDTV indoor antenna included with your HDTV
WONDER™, simply screw one end of the antenna cable into the DTV
connector, and then attach the other end to the antenna.
• Position your antenna as high as possible.
• Place your antenna as close as possible to a window.
• If your cable run is greater than 50 feet (15.2m), or if you are having
problems receiving DTV signals, an amplified antenna (not
included) will help overcome signal loss from long cable runs,
splitters, and junctions.
X
DTV
Z
Y
CATV
VID IN
Indoor HDTV UHF antenna.
X
Antenna cable.
Y
DTV connector on HDTV WONDER™ card.
Z
Page 15
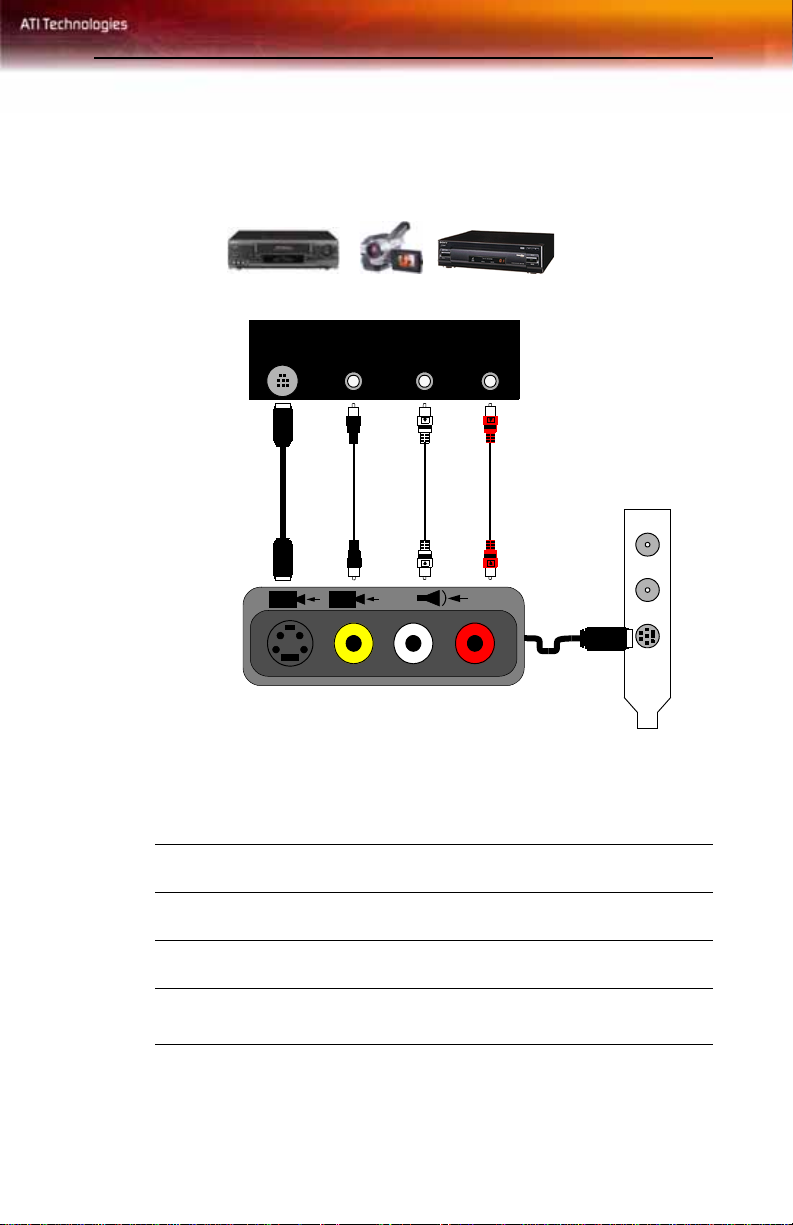
ATI Input Adapter 9
ATI Input Adapter
Use the ATI Input Adapter to connect a VCR, camcorder, or DVD player
to your HDTV WONDER™, as shown.
OUT
COMP.
VIDEO
OUT
L. AUDIO
OUT
R. AUDIO
OUT
\\
SLR
S-VIDEO
X
Y
Z
The audio and video output connectors on your VCR, camcorder, or
X
DVD player will be similar to these. Use composite video out or
S-Video out; S-Video will provide better results.
Cable with S-Video plug at each end.
Y
DTV
CATV
[
VID IN
ATI Input Adapter (enlarged for clarity).
Z
HDTV WONDER™ card.
[
Cables with RCA plugs at each end, available separately from a
\
consumer electronics dealer.
Page 16

10 Installing the Software
Installing the Software
1 Turn on your computer.
Windows Plug and Play will detect your HDTV WONDER™ after
you restart your computer, and will automatically launch the Found
New Hardware Wizard, which guides you to install the software.
2 Insert the ATI Installation CD into your CD drive, and then follow the
Wizard’s prompts to install the HDTV WONDER™ software and the
CATALYST™ software suite.
Starting the ATI Multimedia Center
From LaunchPad
The LaunchPad provides a convenient way to start all your Multimedia
Center features — just click the one you want. LaunchPad opens
automatically when you start your computer, or if you prefer, you can rightclick LaunchPad, and uncheck Load on Startup in the drop-down menu to
disable this feature.
From the Windows taskbar
1 In the Windows taskbar, click Start, and then point at Programs.
2 Point at ATI Multimedia Center, and then select the feature you
want.
The first time you launch DTV, you must complete the Initialization
L
Wizard, which guides you through setting up DTV. After that, the
Wizard will not run unless you want to re-run it.
• For information on the ATI Multimedia Center, refer to the online
ATI Multimedia Center User’s Guide (see page 5 for more
information) and the online help.
Page 17

Special Features 11
CHAPTER 2: USING YOUR HDTV WONDER™
Watch digital or analog television on your computer in smooth, full-motion
video on the whole screen or in a window. HDTV WONDER™ delivers
advanced features: TV-ON-DEMAND™, EAZYLOOK™*, Closed
Captioning, Still Capture, Scheduled Events, Electronic Program
Information, Parental Control, and more.
When you click the ATI logo in the upper left corner of the display
panel, the “About” notice appears. If you have more than one feature
installed, a Task menu displays available and active features. For
information on HDTV WONDER™ controls, see the online help and tool
tips.
Special Features
Additional special features are available for HDTV WONDER™:
• THRUVIEW™*
• EAZYLOOK™*
For complete information on these features, refer to the ATI Multimedia
Center User’s Guide.
To start DTV from LaunchPad
• Click the DTV button in the Launchpad. For information on
LaunchPad, refer to the ATI Multimedia Center User’s Guide.
To start DTV from Windows® taskbar
• In the Windows task bar, click Start, point at Programs, point at
ATI Multimedia Center, and then select DTV.
You can also start HDTV WONDER™ from other Multimedia Center
features installed on your system. Click the ATI logo in the feature’s
control panel or display panel, and then click DTV.
• T o start DTV, click the DTV button in the LaunchPad.
• To start TV, click the TV button in the LaunchPad.
*
Only with supported ATI products.
Page 18

12 Setting up DTV
Setting up DTV
The first time you start DTV, you must complete the Initialization Wizard.
After that, you can launch the Wizard manually in order to change settings.
The Initialization Wizard guides you quickly and easily through setting up
DTV channels, Autoscanning, Parental Control, Sound, and TV-ONDEMAND™ .
Running the Initialization Wizard
1 Click the Setup button , and then click the Display tab.
2 Click the Initialization Wizard button, and then follow the Wizard’s
instructions.
Sizing the display
You can resize the display using the mouse, the Maximize button, or a
CTRL key combination.
• The F2 key hides/shows the control panel, to save desktop space.
To resize the display using the mouse
Drag the display’s border. The display maintains a fixed aspect ratio
(width-to-height) of 4:3 or 16:9 (for High-Definition) to avoid picture
distortion. To change this, see Display Settings on page 18.
To display DTV in full-screen
Press CTRL + F or ALT + F to toggle between full-screen and the current
size, or click the Maximize button. To return to the previous size, press the
Esc key.
Page 19

Setting up DTV 13
To display preset sizes using the CTRL key
Display Size Key Combination
Tiny CTRL + 1
Small CTRL + 2
Medium CTRL + 3
Large CTRL + 4
Full Screen CTRL + F
Native CTRL + 5
Toggle between full screen and current size CTRL + F, ALT + F, Double-click
on video, Esc = Exit full screen
Increase size of display panel CTRL + Up arrow
Decrease size of display panel CTRL + Down arrow
Page 20

14 Feature Menu
Feature Menu
You can access DTV functions by right-clicking on the control panel or the
viewing area of the display panel. This is very useful in full-screen mode.
• The functionality depends upon the skin you choose; this menu is
valid for Modern (the default), Classic, and Tranquility.
Setting Function
Setup Opens the DTV setup page.
Hide Controls /
Show Controls
Hide Controls
and Frame /
Show Controls
and Frame
Always
On Top
THRUVIEW™
Window*
THRUVIEW™
Desktop*
* Only with
supported ATI
products
Video Desktop Minimizing DTV replaces your desktop pattern with the DTV
Minimize DTV Minimizes DTV.
Display Size Indicates the sizes available for the current panel:
Hides / shows the control panel.
Hides / shows the control panel and the frame around the
DTV display.
Displays DTV on top of other applications.
If your computer uses a RADEON™ or later video card,
THRUVIEW™ Desktop and THRUVIEW™ Window are
available:
THRUVIEW™ Window: The current panel appears as a
translucent layer on top of any other windows, allowing you
to work and watch DTV at the same time.
THRUVIEW™ Desktop: The current panel appears fullscreen as a translucent layer on top of all other windows
when minimized.
display. If your video card does not have an overlay, Video
Desktop is not available (overlay is the placement of a fullmotion video window on the display screen).
•Tiny
•Small
•Medium
•Large
• Native The size of the original source video — only
available if your display resolution is greater than the
image resolution.
Page 21

Feature Menu 15
Setting Function
Aspect Ratio Selects the width-to-height ratio for the video window:
Auto
The DTV program determines the aspect ratio; video fills the
screen.
4:3, 16:9
Maintains a fixed-size display with black bars on the sides or
top and bottom of the image.
Non-Fixed
If you choose Non-Fixed, and the aspect ratio of the DTV
program is different from the display, video may appear
elongated or flattened.
Audio Mode Sets the audio mode. For more information, see “Audio
Settings” on page 23.
Closed
Captions
Zoom Selects the zoom ratio (2x, 4x, or 8x) or Unzoom if already
Scheduling Provides options for scheduling, recording, and TV
About Displays the About dialog.
Exit Closes DTV.
Specifies how closed captioned text is displayed. You can
also enable the HOTWORDS (see page 26) and TV
Magazine features (see page 28).
zoomed. For more information, see “Zooming and Panning”
on page 29.
MAGAZINE.
Page 22

16 Keyboard Shortcuts
Keyboard Shortcuts
You can use the following keys to control DTV from your keyboard.
Command Key(s)
Pause Ctrl + B
Play Ctrl + X
Toggle Play / Pause Spacebar
Skip forwards / backwards End / Home
Volume up / down (numeric keypad)
Toggle Mute (numeric keypad) *
Channel up / down Up arrow / Down arrow
Setup Ctrl + S
Toggle closed captions Ctrl + C
Unzoom Alt + Z
Still capture Ctrl + Insert
Size presets (Tiny, Small, Medium, Large, Native) Ctrl + 1 through Ctrl + 5
Toggle full screen Ctrl + F
Exit full screen Esc
Cycle through Size up / down Ctrl + Up arrow/
Parental Control lock / unlock Ctrl + L
Record Ctrl + R
Help F1
- / +
Left arrow / Right arrow
(alphanumeric keypad)
_ / =, - / +
Ctrl + Down arrow
Hide control panel F2
Hide video panels and borders; video panel
snaps to edge
Always on top F4
F3
Page 23

Keyboard Shortcuts 17
Command Key(s)
THRUVIEW™ Window* (Blended Window,
regardless of settings in Display Settings page)
* Only with supported ATI products
THRUVIEW™ Desktop* (Blended Desktop,
regardless of settings in Display Settings page)
* Only with supported ATI products
Video Desktop, regardless of settings in Display
Settings page)
Minimize without Video Desktop or THRUVIEW™ F8
Reverse play (Jog Shuttle) increments to next
lower speed: -2x, -4x, -8x, -16x
Normal play (Jog Shuttle) F10
Forward play (Jog Shuttle) increments to next
lower speed: 2x, 4x, 8x, 16x
Play speed (slow, normal, fast) Alt + F10
Cycle time display format (while recording or in
TV-ON-DEMAND™ )
Exit DTV Alt + F4
About Alt + A
Aspect Ratio Non-Fixed
• Aspect Ratio Auto
• Aspect Ratio 4:3
• Aspect Ratio 16:9
F5
F6
F7
F9
F11
Ctrl + T
Shift + 0
Shift + 1
Shift + 2
Shift + 3
Unzoom Alt + Z
Next Video Property
Previous Video Property
When video on-screen display is visible:
• Increase value for Video Property
• Decrease value for Video Property
• Reset all Video Properties
TAB
Shift + TAB
Left arrow
Right arrow
ENTER
Page 24

18 Display Settings
Display Settings
The Display settings page lets you control how video is displayed in DTV.
To open the Display settings page
Click the Setup button in the DTV control panel, and then click the
Display tab.
Setting Function
Video
Size
Aspect Ratio Select the proportion of the display:
Initialization
Wizard
Size
Select the size for the display panel:
•Tiny
•Small
• Medium
• Large
• Full Screen
• Native (the size of the original source video — only
available if your display resolution is greater than the
image resolution).
Auto
The DTV program determines the aspect ratio; video fills the
screen.
4:3, 16:9
Maintains a fixed-size display with black bars on the sides or
top and bottom of the image.
Non-Fixed
You can set any aspect ratio. If the aspect ratio of the DTV
program is different from the display, video may appear
elongated or flattened.
Launches the Initialization Wizard. For more information,
see “Running the Initialization Wizard” on page 12.
Page 25

Setting Function
Options Always On Top
Display DTV on top of other applications.
Auto hide controls when in full screen
Hide DTV controls when displaying DTV in full screen.
Controls re-appear when you move your mouse.
When Minimized
Choose the behavior when DTV is minimized:
Minimize DTV
DTV becomes an icon on your desktop.
Video Desktop
DTV display replaces your desktop pattern.
THRUVIEW™ Window*
Blended Window: The current panel appears as a
translucent layer on top of any other windows.
Blended Desktop: The current panel appears in full screen
as a translucent layer on top of any other windows.
* Only with supported ATI products
Display Settings 19
Tool
Tips
Show Tool Tip
Show helpful aids for using DTV when you point at a control
with your mouse.
Show Shortcut
Show keyboard shortcuts when you point at a control with
your mouse.
Page 26

20 Video Settings
Video Settings
The Video settings page lets you fine-tune video characteristics.
To open the Video settings page
Click the Setup button in the DTV control panel, and then click the
Picture tab.
Setting Function
Video
Properties
Brightness
Adjusts the amount of white in the image.
Contrast
Adjusts the gradation of tones between light and dark areas.
Saturation
Adjusts the amount of color in the image.
Gamma
Controls the overall brightness of the image.
• Only available if DTV starts with an overlay (the
placement of a full-motion video window on the display
screen).
Channel List
The DTV Channel List dialog lets you autoscan and set up channels. The
large box displays a list of all available channels, and lets you add or
remove channels in your Favorites list and re-order the list.
DTV channels consist of a major and minor channel number — for
L
example, 10-22.
Y ou can enter two-part channel numbers as a single number (for example,
9999) or with a delimiter (for example, 99.99).
You can also enter a major channel number without a minor channel
number — DTV will go to the first available minor channel that matches
the major channel.
Page 27

Channel List 21
To open the Channel List
Click the Setup button in the DTV control panel, and then click the
Channel List tab.
Setting Function
Channel
number
Channel name
Channel Lock
indicator
Favorites List
indicator
Positioning
controls
Signal Strength Indicates the strength of the channel’s signal.
You can edit channel numbers and names from your
keyboard.
Channel locked.
Channel in list.
Move channel up one position
Move channel down one position.
Click the icon for more detailed information on the
current channel.
Autoscanning for DTV channels
Autoscanning searches for all available channels and stores them in the
Channel List.
1 Click the Setup button in the DTV control panel, and then click
the Channel List tab.
2 Click the Autoscan button.
The system scans for all available channels, displays their signal
strength, and stores them in the Channel List.
Autoscan removes all channels in the current list. Channels that are
not currently broadcasting are not added to the list; however, when
new channels are detected, they are automatically added to the list.
Page 28

22 Channel List
When you first start DTV, the DTV Channels Initialization Wizard will
guide you through setting up channel numbering. You can use two-part
channel numbers (the default) or one-part channel numbers.
L
DTV channels consist of a major and minor channel number — for
example, 10.22.
You can enter two-part channel numbers as a single number (for
example, 9999) or with a delimiter (for example, 99.99).
You can also enter a major channel number without a minor channel
number — DTV will go to the first available minor channel that matches
the major channel.
Did Autoscan find no digital TV channels?
Ensure that both ends of the antenna cable are securely attached.
Move the antenna to a different location.
Try a different UHF HDTV antenna — an outdoor UHF antenna may provide
better results.
Page 29

Audio Settings 23
Audio Settings
To open the Audio Settings page
Click the Setup button in the DTV control panel, and then click the
Audio tab.
Setting Function
Multi-channel
Audio Options
Downmix
Options
Language
Preferences
Decode and down-mix to 2 channels
Converts a Dolby® Digital audio stream to PCM (Pulse Code
Modulation — a method of digital encoding), and downmixes it to 2, 4, or 6 speakers.
Pass through to audio device
The audio decoder “passes-through” non-PCM multichannel
audio to an audio device that supports Dolby® Digital input.
• This option is enable only if there is a compatible S/PDIF
audio device on the system, and you enable Pass
through.
Stereo
Play audio in 2-channel stereo.
Dolby® Pro Logic®
Play audio using Dolby Pro Logic.
1st Choice
Enter your first language choice.
2nd Choice
Enter your second language choice.
Page 30

24 Schedule Settings
Schedule Settings
The Scheduler lets you set up DTV to watch or record selected programs
at times you specify. For more information, refer to the ATI Multimedia
Center User’s Guide.
Closed Captioning
You can display closed captioned text over video, like a standard TV, and/
or in a separate window beside the video. When you use the separate
window, you can use the scroll bar to review the last few minutes of text.
You can set the background color, the font, and the font color for the
window.
To display closed-captioned text
Click the Closed Caption button in the DTV control panel. Rightclicking the button opens a menu where you can control the type of
captioning:
• Over video
• In a window
• Display alternate text
• TV Magazine
• HOTWORDS
• Captions when muted.
To close the Closed Captioning window, click the Exit button.
Page 31

Closed Captioning 25
Closed Caption settings
The Closed Caption settings page lets you specify how closed-captioned
text is displayed — over video or in a window — and the background color,
the font, and the font color for the window. You can also set up and enable
the HOTWORDS and TV Magazine features.
To set up closed captioning
Click the Setup button in the DTV control panel, and then click the
Closed Caption tab.
Setting Function
Placement External Window
HOTWORDS Enable
TV
Magazine
Closed
Caption
On Mute
Show
Alternate
Text If
Present
Displays closed-captioned text in its own window. Click
Font... to select the display font.
Video Window
Displays closed-captioned text superimposed on the video.
Click Font to select the display font.
Solid Background
Displays closed-captioned text on a solid background.
Shaded Background
Displays closed-captioned text on a shaded background.
Check to enable HOTWORDS when Closed Captioning is
on. For more information, see “HOTWORDS™” on page 26.
HOTWORDS Setup
Opens the HOTWORDS settings page.
Enable
Activates TV Magazine. For more information, see “TV
Magazine” on page 28.
TV Magazine Setup
Opens the TV Magazine Setup Wizard.
Display closed-captioned text when the audio is muted.
If T1 mode closed-captioned data is present in the caption
stream, checking this box displays a full page of T1 mode,
scrollable, closed-captioned text. If you turn off Closed
Captioning or change channels, the page is hidden.
Page 32

26 HOTWORDS™
HOTWORDS™
Have your computer watch TV for you! When you turn on Closed
Captioning (see page 24 for more information), you can specify words and
phrases that DTV will detect in the closed-captioned text.
You can set HOTWORDS™ to show the matched text, restore DTV, play
a sound, enable TV Magazine, or start recording when the HOTWORDS
appear. You can also have DTV automatically transcribe the text when the
specified words appear.
You can enable HOTWORDS, and then minimize DTV; when the
specified words occur, DTV opens. You specify words using the
HOTWORDS setup button in the Closed Caption settings page.
To set up HOTWORDS
Click the Setup button in the DTV control panel, click Closed Caption,
and then click the HOTWORDS Setup button. The HOTWORDS Setup
Wizard opens.
To enable HOTWORDS, check the Enable box. The HOTWORDS Setup
Wizard will guide you through HOTWORDS setup.
Setting Function
First
Word
Match
Type
Optional
Word
Partial Check this box to open DTV when a part of the First Word
Use the Add and Remove buttons to add and remove words from the list.
Type the first word to be matched.
Choose the type of match you want:
By Itself
Open DTV when the first Hot Word occurs.
Followed by
Open DTV when the first Hot Word occurs, and is
immediately followed by the Optional Word you specify.
Not Followed By
Open DTV when the first Hot Word occurs, if it is not
immediately followed by the Optional Word.
In Sentence With
Open DTV when the first Hot Word occurs, if it is in a
sentence with the Optional Word.
Type the word you want to match with the Hot Word. When
you specify an Optional Word, the system only looks for the
First Word+Optional Word combination.
occurs.
Page 33

Setting Function
HOTWORDS™ 27
Actions to take
when your
HOTWORDS
occur
Recording Enable TV Magazine
Show Matched Text
Displays the text that matches your Hot Word(s).
Restore Player
Opens DTV in its current state.
Beep
Activates TV Magazine (see page 28 for more information).
Enable Digital Video Recorder
Activates the Digital Video Recorder (see page 32 for more
information).
Page 34

28 TV Magazine
TV Magazine
Use TV Magazine to transcribe closed captioned broadcasting, including
pictures and text. You can save files as Rich Text Format (RTF), which
preserves formatting, and can be used in many word processors, plain text
(TXT), or Hypertext Markup Language (HTML). You can use the
Schedule feature to start TV Magazine at dates and times you specify.
L
• TV Magazine is only available in North America.
• When TV Magazine is enabled, it transcribes closed-captioned text
even if the Closed Captioning button is off.
To start TV Magazine
Click the Setup button in the DTV control panel, click the Closed
Caption tab, and then click the TV Magazine Setup button.
To enable TV Magazine, check the Enable box. The first time you use TV
Magazine, the TV Magazine Setup Wizard will guide you through the
setup.
Setting Function
File
Name
File
Format
Options Overwrite files
Type a name for the file.
Select a file format (RTF, TXT, or HTML).
Check to overwrite existing files.
Uncheck to keep existing files.
Remove Advertising
Automatically skips commercial advertising when you
display or transcribe closed captioned text. It works best
with programs that use scrolling transcripts rather than “text
bubbles” to record closed captioned text; for example: talk
shows, news broadcasts, sports, and soap operas.
Depending upon the closed captioning format, commercials
may occasionally be recorded — a little experimentation will
show you how to get the best results.
Case Conversion
Converts all characters to upper or lower case.
Stop
Transcribing
After
Specifies the number of minutes to transcribe.
Page 35

Setting Function
Zooming and Panning 29
Select
Layout
(Note: Images
are not saved
with .TXT files)
No image
No images are saved.
Images on Left
Images are placed on the left, text on the right.
Images on Right
Images are placed on the right, text on the left.
Alternate images
Images and text alternate left and right.
Use black & white pictures
Save images as black & white, to save disk space.
Image Density
• 1/page
• 2/page
• 4/page
Zooming and Panning
You can zoom in on the video in the Display panel to enlarge a selected
portion of the screen, and return your display to normal. You can also pan
(move the image horizontally and vertically) in the zoomed area.
To zoom
Click within the display panel, and then hold down the mouse button and
draw a rectangle around the area you want to zoom.
Or right-click the Unzoom button to open a menu where you can set the
zoom level — Zoom x2, Zoom x4, or Zoom x8.
To pan in the zoomed area
Move your mouse within the zoomed area to pan horizontally or vertically.
To unzoom
Right-click in the display panel to open the Feature menu, point at Zoom,
and then click Unzoom. Or click the Unzoom button in the control panel.
Page 36

30 Channel Lockout
Channel Lockout
Channel Lockout lets you block par ticu l ar programs at specific times, and
set a password to unlock them. Use the Program Lockout page to specify
channel, time, and duration.
L
To set Channel Lockout
• Passwords must be at least four digits long.
• If you forget your password, you must uninstall and reinstall your
Multimedia Center software to view password-protected programs.
1 Click the Setup button in the DTV control panel, and then click
the Channel List tab.
2 Click the channel you want to lock, and then click the Lock field.
3 At the prompt, enter a password of at least four digits, re-e nter it to
confirm, and then click Create New.
The Channel Lockout Wizard guides you through the lockout
procedure.
In the channel list, locked-out channels have a padlock to the right
of the channel name.
A lock icon appears in the control panel when the locked channel
is selected.
Page 37

Parental Control 31
Parental Control
Parental Control lets you restrict access to programs depending on their
content rating.
You can record restricted video, but Parental Control information is
included with the recording — playback will be scrambled unless you enter
the correct password.
L
• Passwords must be at least four digits long.
• If you forget your password, you must uninstall and reinstall your
Multimedia Center software.
To set a Parental Control level
1 Right-click the Parental Control button in the DTV control panel,
and then click Parental Control Configuration.
2 Click the level you want.
The Set Password dialog appears.
3 Enter a password of at least four digits in the upper box, and then
re-type it in the lower box to confirm it.
The following table summarizes the rating levels for Parental Control.
0 For entire audience Not intended for blocking.
1 All Children Designed to be appropriate for all children.
2 Older Children Designed for children aged 7 and above.
3 General Audience Most parents should find this program suitable for
all ages.
4 Parental Guidance
Suggested
Contains material that parents may find
unsuitable for younger children.
5 Parents strongly
cautioned
6 Mature Audiences
Only
Contains some material that many parents would
find unsuitable for children under 14.
Specifically designed to be viewed by adults, and
may be unsuitable for children under 17.
Page 38

32 Recording Video
Recording Video
The Digital Video Recorder provides simple controls and powerful options
for recording video and audio. Use the Digital Video Recorder to record
full-motion video with audio from your HDTV WONDER™.
• Recorded files play only in the File Player.
• T o save recorded video in other formats, you must export it from the
Media Library.
For more information on File Player and the Media Library, refer to the ATI
Multimedia Center User’s Guide
To record a clip of video and audio
Click the Record button in the DTV control panel, or right-click the Record
button, and select a duration from the menu. The Digital Video Recorder
starts recording video and audio to your computer’s hard disk. The rightclick menu also provides One Touch Record settings, which let you set the
duration of the recorded file (see page 34 for more information).
When you click the Record button
If the current program is in progress: The program that you are watching
will be recorded from the beginning, and recording will end when the
program is complete.
• If there is insufficient disk space, a message appears, asking if you
wish to increase the buffer size.
If the current program is in the past: The program will be recorded
instantly.
• If the entire program is not in the buffer, you will be prompted to
cancel or continue.
To play recorded video
There are two ways to play recorded video:
• Select recorded video from the Media Library.
• Right-click the Record button, and then select from Recent
Recordings.
Page 39

TV-ON-DEMAND™ 33
TV-ON-DEMAND™
TV-ON-DEMAND™ lets you pause a live program, return later, and
resume watching where you left off. You can view the show from the
beginning, even after it has started, without waiting until the whole
program is recorded.
You can quickly back up a program, watch the selected portion again, and
fast-forward or skip ahead to the live broadcast. You can also export the
recorded video as an MPEG (.MPG) file or an ATI VCR file.
To start TV-ON-DEMAND
Click the Pause (lower) button in the DTV control panel.
To return to broadcast
Click the Play button .
To skip backwards and forwards in recorded video
Click the left button to skip back; click the right button to skip forwards.
The default settings are: forwards – 10 seconds; backwards – 30 seconds.
You can right-click the button to change the time settings to 1 frame, 10
seconds, 30 seconds, 1 minute, or 2 minutes.
To move within recorded video
Using your mouse, drag the position slider to move forwards or backwards
in delayed video. As you move the slider all the way to the right, the time
display indicates Live.
X
Y
Position slider
X
Jog shuttle — provides fast-forward or fast-rewind for recorded video
Y
Page 40

34 TV-ON-DEMAND™
TV-ON-DEMAND history
When you right-click the Time display in the Recording panel, a Go To
Time menu lists all programs that TV-ON-DEMAND™ has recorded. To
open the program, click its file name.
TV-ON-DEMAND™ uses the Electronic Program Guide (EPG) data to
provide the information. If there is no EPG information, or if the data is
outdated, the history shows the Channel Number instead of Program Name
and Channel Name.
One Touch Record
One Touch Record provides fast recording modes. Right-click the Record
button in the control panel, and then click the recording option that you
want.
Setting Function
One Touch
Record
Settings
Custom duration configuration
Type the number of days, hours, and minutes you wish to
record.
Folder for recorded files
Choose a location for your captured file.
File Name Style
Type a custom name or choose a preset from the list.
Page 41

Electronic Program Guide 35
Electronic Program Guide
The Electronic Program Guide (EPG) provides an intelligent, free,
integrated program guide that lets you view TV listings. It also provides
advanced program information, such as station names and numbers, as well
as program names and details. You can schedule recording and viewing
sessions using the EPG.
Normally, the television broadcast contains Electronic Program Guide
data, which is used to calculate program start and end times. If the data is
unavailable, recording starts from the current time.
To start the Electronic Program Guide
Left-click the TV Listings button in the DTV control panel.
• When you Autoscan, TV Listings provides station names.
• When you change channels, the current program name and the
station name and number are displayed.
Right-click the TV Listings button to display “What is on TV Now!”
and “What is on TV Next!”.
• The On Now panel displays channel number and name, program
name, rating, and duration of the current program.
• The On Next panel displays the same information for the next
program.
Click the arrow button to toggle between the On Now and On Next
panel.
To record the next program, click the Record button in the On Next
panel.
Page 42

36 Stills Gallery
Stills Gallery
The still images you capture from DTV are saved in the Stills Gallery. You
can save images in a variety of graphics formats and sizes. The Stills
Gallery controls let you delete images, hide them, save them as wallpaper,
and print them.
You can check multiple Capture options in the Stills Gallery Setup page.
Still images can be captured to the Stills Gallery, numbered files, clipboard,
and printer, all at the same time.
L
When you click the ATI logo in the upper left corner of the Stills
Gallery, the “About” notice appears. If you have more than one
Multimedia Center feature installed, a Task menu displays available and
active features.
If you close the Stills Gallery without saving, your captured still images
are deleted.
• For information about using the Stills Gallery controls, see the
online help and tool tips.
Page 43

Stills Gallery 37
Stills Gallery settings
Use the Stills Gallery Setup page to define how the Stills Gallery saves and
prints captured images.
To set up the Stills Gallery
Click the Setup button in the DTV control panel, and then click the
Stills Gallery tab.
Setting Function
Capture
Options
Save
Options
Tool
Tips
Always
on top
Print
Options
Capture to Gallery
Captures still images to the Stills Gallery.
Capture to file
Stores captured images in numbered files (pic001.bmp,
pic002.bmp ...) on your hard disk.
Capture to clipboard
Places captured images on the Windows Clipboard.
Capture to printer
Send the captured image to the printer.
Use only 256 colors
Saves captured images as 256-color files, to save disk
space.
Warn if closed without saving
Alerts you if you close DTV or the Stills Gallery without
saving captured images.
Show paths of saved images
Displays the drive, folders, and subfolders that contain
saved images.
Show Tool Tips
Display tool tips for the Stills Gallery controls.
Show Short Cut
Display shortcut keys for the Stills Gallery controls.
Keep the Stills Gallery on top of other applications.
Center image
Print image in center of page.
Image size
• Maximize
Print in full-page format.
• One to one
Print the same size as original.
• Double
Print at twice the original size.
Page 44

38 Stills Gallery
Page 45

Video Problems 39
CHAPTER 3: TROUBLESHOOTING
The Readme file on the ATI installation CD-ROM contains last-minute
information not provided in the User’s Guide. The Readme file can be
found in PM\PMCORE\MAIN.
Because a typical computer system consists of many different parts,
difficulties may arise from a combination of items. If you encounter a
problem, check the following list to find a similar symptom, and then try
the suggested solution.
Video Problems
Video is unstable
• Check that you are using the correct broadcast standard format for
your region.
• Check the quality of your incoming TV signal on another receiver;
bad reception may be the cause.
No video or audio
• Check that the audio and video connectors are securely plugged into
the correct jacks.
• Check that the HDTV WONDER™ tuner card is securely seated in
its PCI slot. If the problem persists, try a different PCI slot.
• Make sure that the monitor and computer are plugged in and
receiving power.
• For HDTV, try relocating the antenna, or use an outdoor antenna
(not included).
More Troubleshooting Tips
• Ensure that the TV cable is securely screwed onto the CATV
connector
• If necessary, disable any built-in graphics capabilities on your
motherboard.
• Ensure your graphics card has overlay support. Visit ati.com for a
current list of supported graphics cards.
Page 46

40 Loading Windows® in Safe Mode
Loading Windows® in Safe Mode
You can start Windows® in Safe mode to diagnose problems. If a symptom
does not reappear when you start in safe mode, you can eliminate the
default settings and minimum device drivers as possible causes. For more
information, refer to Windows® online Help
To load Windows® XP in Safe Mode
1 Click Start, click Shut Down, and then, in the drop-down list, click
Restart.
Or click Start, click Turn Off Computer, and then click Restart.
2 During restart, hold the F8 key to get the Windows Advanced
Options Menu. Select Safe Mode.
In Safe Mode bring up the Device Manager and check for any
duplicate display adapter and monitor entries if you are only using
one graphics card.
Page 47

Customer Care 41
CHAPTER 4: PRODUCT REGISTRATION
This chapter contains helpful information concerning ATI product
registration, customer service, and warranty.
To receive Customer Service you must register your product with ATI
within 30 days of purchase. An Online Product Warranty Registration form
is available at ati.com/online/registration.
Customer Care
For detailed instructions on how to use your ATI product, refer to the
Online User’s Guide included on your ATI installation CD-ROM.
If you require further assistance with your product, the following Customer
Care* options are available:
Online:
For product information, video drivers, Frequ e ntly Asked Questions and
Email support visit: ati.com/online/customercare.
Telephone Support:
U.S and Canada:
English support available Monday to Friday, 9:00 AM - 7:00 PM EST.
Complimentary Customer Care: 905-882-2626
Support available to registered users (International and/or local toll charges
to Canada will apply).
Priority Pay-for-Access: 900-733-2841
ATI Customer First priority access available at $1.25 per minute (subject
to change without notice).
Priority Pay-per-Incident: 877-284-7379
ATI Customer First pay-per-incident access available at $19.95 per
incident (subject to change without notice).
Page 48

42 Customer Care
Europe and Other Regions
English, German, and French support available Monday to Friday 10:30am
- 7:00pm GMT.
International Customer Care: +49-1803- 34 734 5
Support available to registered users (International toll charges to Germany
will apply).
Mail:
ATI TECHNOLOGIES INC.
Attention: Customer Service
1 Commerce Valley Drive East
Markham, Ontario
Canada L3T 7X6
*ATI Customer Care will work to resolve your issue and help you to get
your ATI product up and running. If your issue is not resolved, our
technicians will determine whether the difficulty you are experiencing is
the result of the ATI product, whether your product contains a defect, and
whether your product is under warranty.
• ATI Customer Care is unable to assist with refunds, returns, or
exchange specific inquiries. If resolving the problem being
experienced is critical to your decision to keep the product, it is your
responsibility to ensure that you know and are within the period of
time your reseller will allow for refunds, returns or exchange.
• ATI is not responsible for any expense incurred accessing Customer
Care. It is expected that customers will review the expense
associated with the available support options and will choose the
method that best meets their needs and budget.
• ATI Customer Care reserves the right to limit support options for
products that are not registered or are at End of Life.
Page 49

Getting Additional Accessories 43
CHAPTER 5: WARRANTY INFORMATION
Getting Additional Accessories
Additional and replacement cables, installation CD-ROMs, manuals and
other accessories for ATI products can be purchased from the online ATI
store at ati.com/online/accessories.
Warranty Information
Hardware Warranty Service Statement
ATI Technologies Inc. warrants to the original purchaser of the hardware
that the product is in good working condition, according to its
specifications at the time of shipment, for a period of three years from the
date of original purchase.
Should the product, in ATI’s opinion, malfunction within the warranty
period, ATI will, at its discretion, repair or replace the product upon receipt
with an equivalent. Any replaced parts become the property of ATI. This
warranty does not apply to the software component of the installation,
usage not in accordance with product specifications and instructions,
natural or personal disaster, or unauthorized alterations, repairs, or
modifications.
• Proof of purchase may be required, if doubt exists regarding
warranty eligibility. Late model products are assumed to be under
warranty. ATI accepts ordinals, photocopies and faxes as proof of
purchase when required.
Warranty Service
For warranty service instructions visit: ati.com/online/.warranty or
contact one of our Customer Service Representatives using one of the
aforementioned means.
• Before shipping any unit for repair, obtain an RMA number for
warranty service.
• When shipping your product, pack it securely, show the RMA and
serial number of the product on the outside, and ship prepaid and
insured.
• ATI will not be held liable for damage or loss to the product in
shipment.
Page 50

44 Warranty Service
• Standard warranty service consists of repair upon receipt.
• ATI reserves the right to replace the product with a serviced product
at their sole discretion at any time.
• You are responsible for the cost of shipping the product to ATI. ATI
pays the cost of returning the product to you.
Products which are repaired under warranty are guaranteed for the
remainder of the original warranty period. Repairing or exchanging a
product does not start a new warranty period. If, at the time of repair, a
product is already “out of warranty” or within the last 90 days of the
warranty period, ATI will guarantee the repair for the full 90 days. All other
terms and conditions of the original warranty apply.
Limitations
• This warranty is valid only if the online Product Warranty
Registration form at: ati.com/online/registration
is successfully submitted within 30 days of purchase of said
product.
• All warranties for this product, expressed or implied, will expire
three (3) years* from date of original purchase.
*The REMOTE WONDER™ unit is warranted for 1 year.
The HDTV COMPONENT ADAPTER is warranted for 1 year.
All accompanying cables and accessories are warranted for 90 days.
• No warranties for this product, expressed or implied, shall extend to
any person who purchases the product in a used condition.
• The liability of ATI in respect of any defective product will be
limited to the repair or replacement of such product. ATI may use
new or equivalent-to-new replacement parts. Defective product will
be sent in for repair or replacement only. ATI makes no other
representations or warranties as to fitness for a particular purpose,
merchantability or otherwise in respect of the product. No other
representations, warranties or conditions, shall be implied by statute
or otherwise. In no event shall ATI be responsib le or li able for any
damages, including but not limited to the loss of revenue or profit,
arising:
• From the use of the product, as a result of any event, circumstance,
action or abuse beyond the control of ATI; whether such damages be
direct, indirect, consequential, special or otherwise and whether
such damages are incurred by the person to whom this warranty
extends or a third party
Page 51

Warranty Service 45
• From the loss of use of the product, as a result of any event,
circumstance, action or abuse beyond the control of ATI; whether
such damages be direct, indirect, consequential, special or otherwise
and whether such damages are incurred by the person to whom this
warranty extends or a third party.
• Unauthorized repairs to an ATI board level product will void the
warranty offered by ATI Technologies. ATI reserves the right to
refuse to service any product which has been altered, modified, or
repaired by non-ATI service personnel.
Page 52

46 Warranty Service
Page 53

FCC Compliance Information 47
CHAPTER 6: COMPLIANCE INFORMATION
FCC Compliance Information
This product complies with FCC Rules part 15. Operation is subject to the
following two conditions
• This device may not cause harmful interference, and
• This device must accept any interference received, including interference that
may cause undesired operation.
This equipment has been tested and found to comply with the limit s for a Class B digital device, pursuant
to Part 15 of the FCC Rules. These limits are designed to provide reasonable protec tion against harmful
interference in a residential installation. This equipment generates, uses and can radiate radio frequency
energy and, if not installed and used in acc ordance with manufacturer's instructions, may ca use harmful
interference to radio communications. However, there is no guarantee tha t interference will not occur in
a particular installation. If this equipment does cause harmful interference to radio or television
reception, which can be determined by turning the equipment off and on, the user is encouraged to try
to correct the interference by one or more of the following measures:
• Re-orient or relocate the receiving antenna.
• Increase the separation between the equipment and receiver.
• Connect the equipment to an outlet on a circuit different from that to which the receiver is
connected.
• Consult the dealer or an experienced radio/TV technician for help.
The use of shielded cables for connection of the monitor to the graphics card is
required to ensure compliance with FCC regulations. Changes or modifications to
this unit not expressly approved by the party responsible for compliance could
void the user's authority to operate this equipment.
Industry Canada Compliance Statement
ICES-003 This Class B digital apparatus complies with Canadian ICES-003.
Cet appareil numérique de la Classe B est conforme à la norme NMB-003 du Canada.
For further compliance information:
ATI Research Inc.
4 Mount Royal Ave.
Marlborough, MA
01752-1976
USA
508-303-3900
Page 54

48 CE Compliance Information
CE Compliance Information
EMC Directive 89/336/EEC and amendments 91/263/EEC, 92/31/EEC and 93/68/ EEC, Class B Digital
Device
EN 55022:1998/CISPR 22 Class B, Limits and Methods of Measurement of Radio Interfere nce
Characteristics Information Technology Equipment.
EN 55024:1998, Immunity of Information Technology Equipment (ITE), including
EN 61000-4-2, EN 61000-4-3, EN 61000-4-4, EN 61000-4-5,
EN 61000-4-6, EN 61000-4-11
EN 60950:92 + A1:93 + A2:93 +A3:95 + A4:97
Directive EMC 89/336/CEE et amendements 91/263/CEE, 92/31/CEE et 93/68/CEE, dispositif
numérique de Classe B
EN 55022:1998/CISPR 22 Classe B, Limites et méthodes de mesure des caractéristiques
d'interférences radiophoniques, Matériel des technologies de l'info rmation.
EN 55024:1998, Norme sur l'immunité de matériel des technologies de l'information, et comprenant
EN 61000-4-2, EN 61000-4-3, EN 61000-4-4, EN 61000-4-5,
EN 61000-4-6, EN 61000-4-11
EN 60950:92 + A1:93 + A2:93 +A3:95 + A4:97
EMC Richtlinie 89/336/EEC und Änderungen 91/ 263 /EEC, 9 2/ 31/EEC un d 93 /68/E EC, Digit ales Gerät
der Klasse B
EN 55022:1998/CISPR 22 Klasse B, Beschränkungen und Verfahren der Messung von
informationstechnischen Ausrüstungen mit Funkstörmerkmalen
EN 55024:1998, Unempfindlichkeits-Standard für informationstechnis che Ausrüstungen, einschliesslich
EN 61000-4-2, EN 61000-4-3, EN 61000-4-4, EN 61000-4-5,
EN 61000-4-6, EN 61000-4-11
EN 60950:92 + A1:93 + A2:93 +A3:95 + A4:97
EMC Directive 89/336/EEC and Amendments 92/31/EEC and 93/68/EEC, for Class B Digital Device.
EN 55022:1998/CISPR 22:1997, - Class B - Limits and Methods of Measurement of Radio Dist urbance
Characteristics of Information Technology Equipment.
EN55024:1998/CISPR 22:1997, - Information Techno logy Equipment - Immunity Characteristics - Limits
and Methods of Measurement.
Low Voltage Directive for TV-Tuner-Equipped products
73/23/EEC - The Low Voltage Directive.
EN 60950: 1992+A1+A2+A3+A4 - Safety of Information Technology Equipment.
Page 55

CE Compliance Information 49
L’Information de conformité de la CE
Directive EMC 89/336/CEE et amendement 92/31/CEE et 93/68 /EEC, dispositif numérique de Class e B.
EN 55022:1998/CISPR 22:1997, - Class B - Limites et méthodes de mesure des caractéristiques
d'interférences radiophoniques, Matériel des technologies de l'info rmation.
EN 55024:1998/CISPR 24:1997, Limites et méthodes de mesure des caractéristiques d'immunité,
Matériel des technologies de l'information Equipement de Technologie de l'Information Caractéristiques d'Immunité - Limites et méthodes de mesure.
Directive de Basse Tension pour produits contenir tuner de télévision
73/23/CEE - Directive basse tension.
EN 60950 : 1992+A1+A2+A3+A4 - Sécurité du matériel des technologies de l'information.
CE-befolgungInformationen
EMC Richtlinie 89/336/EEC und Änderungen 92/31/EEC und 93/ 68/EEC, Digitales Gerät der Klas se B.
EN 55022:1998/CISPR 22:1997, - Klasse B - Grenzwerte und Meßverfahren für Funkstörungen von
Einrichtungen der Informationstechnik.
EN 55024:1998/CISPR 24:1997, Einrichtungen der Informationstechnik, Störfestigkeitseigenschaften,
Grenzwerte und Prüfverfahren.
Niederspannung Richtlinie für Produkte Enthalten Fernsehen tuner
73/23/EEC - Niederspannungsrichtlinie.
EN 60950: 1992+A1+A2+A3+A4 - Sicherheit für Einrichtungen der Informationstechnik.
Page 56

50 CE Compliance Information
Page 57

Index
A
Antenna
attaching 8
ATI Multimedia Center
User’s Guide 5
Audio settings 23
Autoscan 21
C
Channel List
Channel Lockout 30
Wizard 30
Closed Captioning 24
Settings 25
Compliance information
CE 48
FCC 47
Industry Canada 47
Low Voltage Directive for TV-tuner-equipped products 48
Customer Care 41
D
Display settings
E
Electronic Program Guide
Electronic User’s Guide 4
F
Feature menu
H
HDTV WONDER Features
HOTWORDS 26
I
Information
Initialization Wizard 12
Input adapter 9
Installing HDTV WONDER
card 5, 7
software 10
K
Keyboard shortcuts
L
LaunchPad
20
18
35
14
3
47
16
10
51
Page 58

52
Loading Windows in safe mode 40
M
Multimedia Center
starting 10
O
One Touch Record
34
Online Help 4
P
Parental Control
31
Product registration 41
Customer Care 41
R
Recording video
32
S
Schedule settings
24
Setting up DTV 12
Sizing display 12
Special features 11
Stills Gallery 36
settings 37
System requirements
HDTV 4
T
Troubleshooting
video problems 39
TV Magazine 28
TV-ON-DEMAND 33
history 34
moving within recorded video, Jog Shuttle 33
skipping backwards and forwards in recorded video 33
starting 33
V
Video settings
20
W
Warranty information
Hardware 43
limitations 44
warranty service 43
43
Wizard
Channel Lockout 30
HOTWORDS 26
Z
Zoom and pan
29
Printed in Canada
 Loading...