

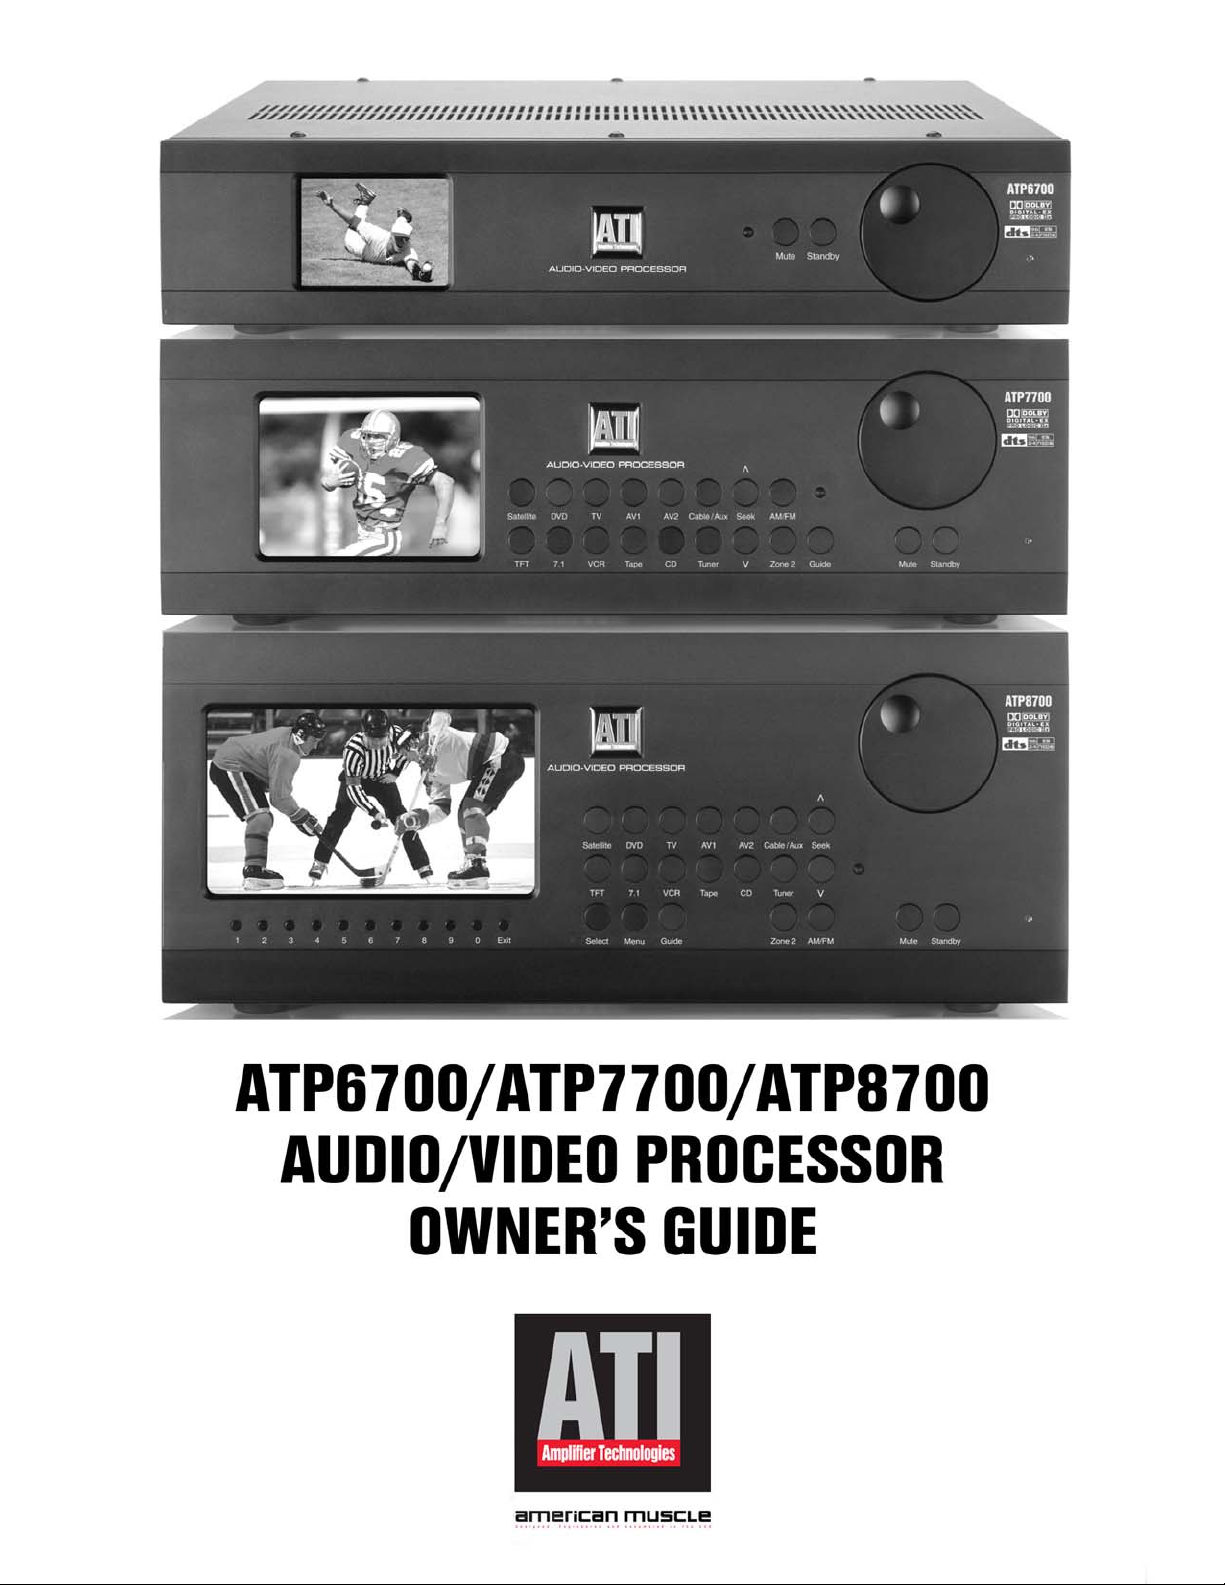
Page 1
Page 2
Please Read First
CAUTION: To reduce the risk of electrical shock, do not
remove the cover (or back). No user serviceable parts inside.
Refer servicing to qualified service personnel.
Safety Instructions
WARNING: TO REDUCE THE RISK OF FIRE OR
ELECTRIC SHOCK, DO NOT EXPOSE THIS UNIT TO
RAIN OR MOISTURE.
ead all the safety and operating instructions before
R
connecting or using this unit.
All warnings on the unit and in this operating manual should
be adhered to.
WARNING: To reduce the risk of fire or electric shock, do
not expose this appliance to rain or moisture.
The lightning flash with arrowhead, within an
equilateral triangle, is intended to alert the
user to the presence of uninsulated “dangerous
voltage” within the product’s enclosure that
may be of sufficient magnitude to constitute a
risk of electrical shock to persons.
The exclamation point within an equilateral
triangle is intended to alert the user to the
presence of important operation maintenance
(servicing) instructions in the literature
accompanying the appliance.
PRECAUTIONS:
Certain precautions must be taken in order to ensure proper
operation of your preamplifier-processor.
1. Never expose the unit to rain or moisture.
2. Never plug an input cable into the A/V PROCESSOR while
the unit is turned on.
3. Never apply the “thumb test” (touching the “hot” lead of
he input cable with your finger) to the tip of the input
t
cable or in
and/or hum may be created and could cause damage to the
loudspeak
he loudspeakers, amplifiers or other related equipment
t
due to improper use of the equipment.
oid r
v
4. A
airflow is necessary to help ensure proper operation.
Do no
5.
materials directly on top of the unit. The heat dissipating
system of the preamplifier depends on free flowing air
ound t
ar
put jack of t
ers. ATI will not be responsible for damage to
estricting the airflow around the unit. Good
ack other system components or any other
t
t s
hassis.
he c
he preamplifier. RF rectification
All operating and use instructions should be followed.
Do not use this unit near water: for example, near a bathtub,
washbowl, kitchen sink, laundry tub, in a wet basement, or
near a swimming pool.
This unit should be installed so that its location or position
does not interfere with its proper ventilation. For example,
it should not be situated on a bed, sofa, rug, or similar surface
that may block the ventilation openings: or placed in a built-in
installation, such as bookcase or cabinet, that may impede
the flow of air through its ventilation openings.
The unit should be situated away from heat sources such as
radiators, heat registers, stoves, or other devices (including
amplifiers) that produce heat.
The unit should be connected to a power-supply outlet only of
the voltage and frequency marked on its rear panel.
The power-supply cord should be routed so that it is not likely to
be walked on or pinched, especially near the plug, convenience
receptacles, or where the cord exits from the unit.
Clean unit onl
The po
he wall outlet when it’
t
e should be taken so that objects do not fall, and liquids
Car
are not spilled, into t
The unit should be serviced by qualified service personnel when:
The pow
.
A
B. Objects have fallen, or liquid has been spilled, into the
unit; or
The unit has been e
C.
D. The unit does not appear to operate normally, or exhibits a
marked change in performance; or
The de
E.
y as recommended in this instruction manual.
wer-supply cord of the unit should be unplugged from
s to be unused for a long period of time.
he enclosure through any openings.
er cord or the plug has been damaged; or
ain, or liquids of any kind; or
xposed t
vice has been dr
o r
opped, or the enclosure damaged.
Page 2
To prevent electric shock, do not use the polarized plug with
eceptacle or other outlet unless the
xtension cor
an e
blades can be full
d, r
y inser
ted t
o pr
ent blade e
v
e
xposure.
Page 3

Table of Contents
Congratulations
A/V Processor Features....................................................... Page 4
A/V Processor Front Panel.................................................. Page 4
A/V Processor Rear Panel................................................... Page 6
Remote Control.................................................................... Page 8
M-FM Tuner Operation...................................................... Page 9
A
Surround Format Information......................................... Page 10
Stereo Listening Modes...................................................... Page 11
Connecting Your A/V Processor....................................... Page 12
Connecting Audio Components .......................................Page 12
Connecting Video Components........................................ Page 14
Video Display Connections ...............................................Page 16
Antenna Connections......................................................... Page 17
Using the AM/FM Tuner .................................................... Page 17
Other Connections .............................................................Page 17
Power Connections.............................................................Page 17
Amplifier Connections.......................................................Page 18
Second Zone Connections ................................................Page 20
Connection Record Chart ................................................. Page 21
System Setup...................................................................... Page 22
On-Screen Message On/Off............................................... Page 22
Speaker Placement............................................................ Page 22
Subwoofer........................................................................... Page 22
Speaker Size Selection ...................................................... Page 23
Speaker Distance ............................................................... Page 23
Compression ...................................................................... Page 24
Input Assignment .............................................................. Page 24
Renaming Video Inputs .................................................... Page 24
Tuner/PAL/NTSC Settings ................................................ Page 24
Bass Trim ............................................................................ Page 25
Channel Level Calibration ............................................... Page 25
DVD Audio Full Range....................................................... Page 25
Reset to Defaults................................................................ Page 25
Operation ........................................................................... Page 26
Multi-Zone Operation ....................................................... Page 26
emote Control Setup & Operation................................ Page 27
R
Using Programmed Codes................................................ Page 28
tup Codes........................................................................ Page 29
Se
e and Maintenance ...................................................... Page 3
Car
Troubleshooting ................................................................ Page 34
ications ..................................................................... Page 35
Specif
anty Terms and Conditions..................................... Page 36
arr
W
Product Warranty Registration
Thank you for purchasing the ATI A/V PROCESSOR. This
A/V PROCESSOR uses the very latest audio processing
technologies along with crystal clear video reproduction.
Its unique design and intuitive controls make it one of the
asiest surround processors to use.
e
We know you are anxious to begin enjoying your new A/V
Processor, but we urge you to read this manual thoroughly
before attempting to make any connections. This could save
time and will answer many of the questions you might have,
thus ensuring maximum performance as well as enjoyability.
You’ll learn how to make your A/V PROCESSOR work with all
of the other components in your system, and how to adjust its
settings for the best possible performance.
If you have any questions about your A/V PROCESSOR, its
installation or operation, please contact us via e-mail at
sales@ati-amp.com or call 818-343-4777.
Unpacking
Your A/V PROCESSOR comes in a carton and packing materials
designed to cushion it from the possible shock and vibration
of shipping. We strongly suggest you save the carton and
packing materials to use if you move, or if the unit ever needs
to be shipped back to us for any reason.
In the unlikely event that the A/V PROCESSOR was damaged
in shipment, be sure to save the carton and all packing
material as evidence for the freight carrier’s inspection.
Should you discover that your unit has been damaged during
shipping, please contact your dealer or ATI immediately and
request the carrier’s name so a written claim can be made.
THE RIGHT TO A CLAIM AGAINST A PUBLIC CARRIER CAN BE
ORFEITED IF THE CARRIER IS NOT NOTIFIED PROMPTLY IN
F
G AND IF THE SHIPPING C
4
WRITIN
ARE NOT AVAILABLE FOR INSPECTION BY THE CARRIER.
AVE ALL PACKING MATERIALS UNTIL THE CLAIM IS SETTLED.
S
CAUTION: NEVER SHIP THIS PRODUCT WITHOUT
THE ORIGINAL BOX AND PACKING.
ARTON & PACKING MATERIALS
Complete and return your Product Warranty Registration
. This will entitle you to warranty coverage
d immediatel
Car
as outlined in the Warranty section at the end of this manual.
PLEASE N
THE A
FEATURES ARE COMMON TO ALL THREE MODELS.
y
TE: THIS USER'S MANU
O
700, A
TP8
TURES EX
FEA
MODEL WILL BE SO N
AL COVERS
700. MOST
700, AND A
TP7
USIVE TO A PARTICULAR
CL
TP6
O
TED.
Accessories
After unpacking the A/V PROCESSOR, please check that the
following accessories are in the box:
h Batter
s Manual
’
ol wit
d
te Contr
emo
■ R
■ AC Power Cord
■ Owner
anty Car
r
ar
■ W
■ AM and FM Antennas (ATP8700 and ATP7700)
ies
Page 3
Page 4

A/V Processor Features
Your new A/V PROCESSOR is built with top-quality
components for state-of-the-art audio performance, and
ffers flexible video processing to meet the needs of any
o
home theater system. No matter what source material you
want to play, the A/V PROCESSOR provides the best
surround-sound processing technology—as well as other
options to heighten your enjoyment of movies and music.
■ Digital Inputs (varies by model)
Each input is assignable, it can be used for any source device.
■ 1 Digital Output
For use with digital recorders or distribution systems.
■ Composite and S-Video Inputs (varies by model)
High-quality video circuitry for connection to video sources.
■ Component Video Switching (varies by model)
Component video switching means you can send high
definition video signals from different sources to this
preamp/processor and select the one you want to watch
without changing inputs on your TV.
■ Multi-room Capability with Zone 2
Video and audio from a source device connected to the
analog audio and video inputs can be routed to a
second room.
■ Three Low-Voltage Triggers
One trigger turns on and off whenever the A/V
ROCESSOR does; this trigger is useful for automatic
P
on/off of compatible power amplifiers (including all ATI
models). A separate trigger can be assigned to activate or
deactivate depending on which input is selected, and is
especially appropriate for use with relay-controlled
products such as projection screens, blinds and lighting
systems. A third trigger is for second-zone operation.
■ AM/FM Tuner (ATP8700 and ATP7700)
This feature is found on very few high-end A/V processors.
■ Balanced Audio Outputs (ATP8700)
Balanced XLR-type outputs for every channel provide the
best audio quality and make the ATP8700 ideal for use
with ATI’s AT3000 and AT2000 Series Pure Balance
amplif
iers as well as professional audio gear.
®
■ 7 Analog Audio Inputs with Bypass Capability
All analog audio inputs may be switched to bypass mode
for pure analog sound, or used with surround-sound
processing.
■ Audiophile-Quality Digital-to-Analog and
Preamplifier Stages
Provide maximum performance for critical music listening.
■ Dolby Digital EX®and Pro Logic IIx®*
Dolby Digital decoding delivers 5.1-channel digital surround
sound from DVD, satellite, cable and digital TV sources.
EX adds an additional rear-surround channel. Pro Logic IIx
converts stereo sound to 5.1, 6.1 or 7.1 channels, and also
converts 5.1 sources to 7.1.
■ DTS®, DTS-ES®and Neo:6®**
The full suite of DTS decoding and processing is available
to provide up to 6.1 channels of sound from virtually any
analog source as well as DTS-encoded programs.
■ 7.1-Channel Analog Input
For connection of multi-channel source devices, such as
Super Audio CD and DVD-Audio players, as well as future
high definition DVD players.
■ RS-232 Port
Allows control through compatible computer products and
keypad systems.
A/V Processor Front Panel
One of the first things you will notice after unpacking the
A/V PROCESSOR is the simplicity of the front panel design.
The ATP's initial design concept was to produce a unit that
was elegant in appearance while not sacrificing any
functionality. The A/V PROCESSOR has achieved that concept.
IMPORTANT NOTE: THE UNIT IS PUT IN
STANDBY MODE BY ACTIVATING THE REAR
PANEL POWER SWITCH. TO ACTIVATE THE
UNIT, A SOURCE MUST BE SELECTED.
1 Front Panel Display
This TFT video screen indicates selected input, assigned
audio input, volume level, mute. The TFT monitor is also
helpful in the initial set up or subsequent changes made to
the menu system.
2 Source Selection Buttons (ATP8700 and ATP7700)
The buttons labeled SAT, CABLE, AV1, AV2, AV3, AUX, DVD,
7.1, VCR, TAPE, CD and TUNER can be used to directly access
the audio and video sources. You can access all sources
directly from these keys. For example, when you press the
DVD key, DVD audio and video signals are selected and
they are then processed and fed to the appropriate outputs
for listening/viewing. Each of these inputs can be assigned
to access whatever sources are connected.
Page 4
Page 5
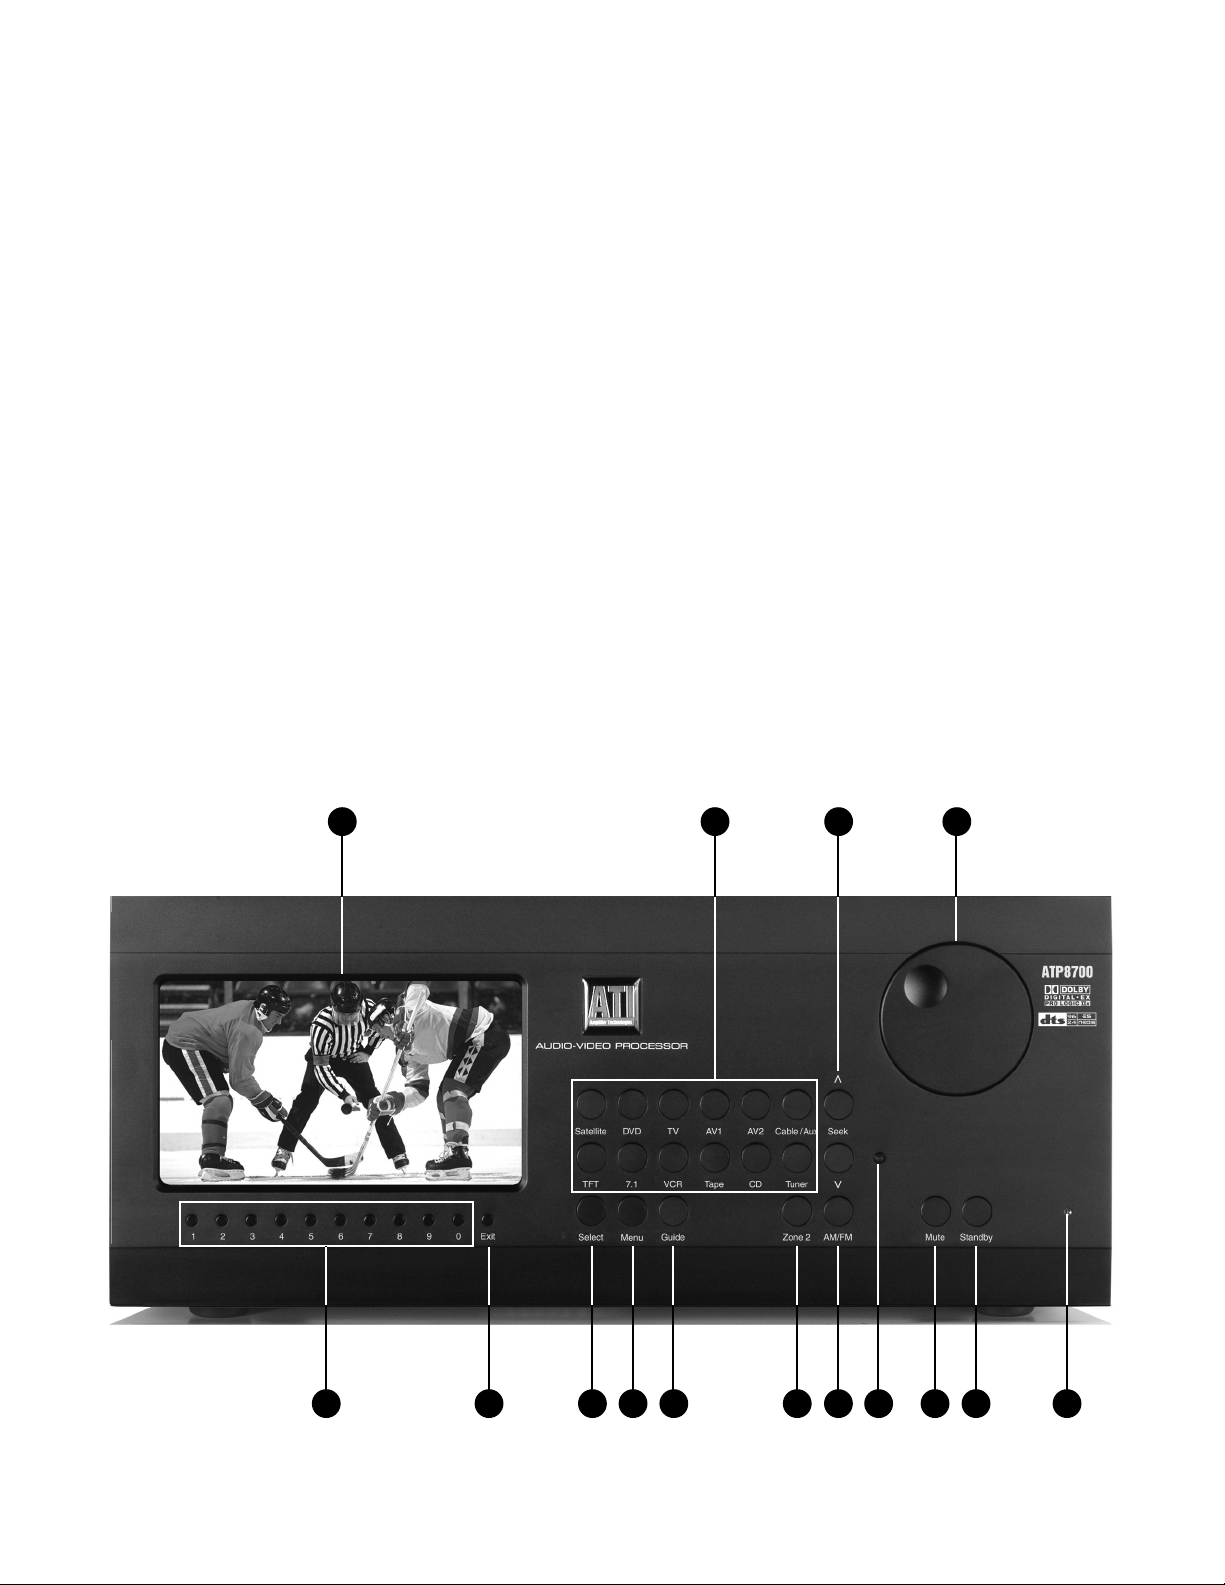
3 Seek ▲ and ▼ Buttons (ATP8700 and ATP7700)
These buttons are used to seek up and down for AM or FM
stations when listening to the tuner.
VOLUME Knob
4
Adjust volume level for main room or second zone.
Numeric Buttons (ATP8700)
5
Press the numeric buttons to select menu features.
6 Exit Button (ATP8700)
This key exits the setup mode without saving the settings.
Use it if you have adjusted the setup menu by accident.
7 Select Button (ATP8700)
This is the enter button in setup mode. You can us it to
access sub-menus or to activate special menu items.
8 Menu Button (ATP8700)
When you press this key, the ATP8700 goes to setup mode.
Use the up/down/left/right keys to navigate the menus.
The ATP8700 escapes from setup mode when you either
select EXIT from t
9 Display Button (ATP8700 and ATP7700)
This button is used to turn the display on and off.
he OSD or press the MENU button again.
10 Zone 2 Button (ATP8700 and ATP7700)
Press the ZONE 2 button. Quickly, while the Zone 2 LED
on the front panel is on, press a source button (DVD for
example), then adjust the volume level. Now don’t touch
nything until the Zone 2 LED goes off. You’ve now set a
a
different source (or the same source if you prefer) AND
volume level for a second zone.
11 AM/FM Button (ATP8700 and ATP7700)
Use this button to select either AM or FM mode.
12 IR Sensor
The IR sensor receives commands from the remote
control. Do not block or cover it. If the unit is inside a
cabinet or behind tinted glass doors you may need to use
an optional external IR sensor.
13 MUTE Button
Mutes the volume. Pushing the button again restores
the sound.
14 STBY Button
When the MAIN PO
ON position, pressing this button turns the unit on.
15 STBY/On Indicator
Glows when the unit is in standby or on mode.
WER switch on the rear panel is in the
2 431
0
9875 6
1
1
1
1
1
4
3
2
1
5
1
Page 5
Page 6

A/V Processor Rear Panel
1 AC Input
Connect the supplied AC power cord here. Do not use
standard IEC type power cords.
MAIN POWER Switch
2
Connects and disconnects the A/V PROCESSOR from AC
power. When this switch is on, the Standby/On indicator
on the front panel illuminates. When it is off, all power is
cut and the front STANDBY/ON switch will not function.
3 Antenna Inputs (ATP8700 and ATP7700)
FM and AM inputs for the built-in AM/FM Stereo tuner.
12 Composite Video Record Outputs
onnect these video jacks to the input of a VCR
C
or DVD recorder, so you can record whatever source is being
played in the main room. If the recorder has an S-Video
input, use that connection instead of composite video.
13 Composite Video Outputs
Connect this output to the composite video input of your
video display. Use this only if the display does not have
S-Video or component video inputs.
14 Component Video Outputs
Use this output to connect to a video display that accepts
component video.
4 Main Zone Trigger Output
This jack provides a 12-volt DC output whenever the
A/V PROCESSOR is switched on. Usually, this jack is used
for automatic turn-on of a compatible amplifier equipped
with a DC trigger input.
5 Zone 2 Trigger Output
This jack provides a 12-volt DC output whenever the
2nd Zone is switched on.
6 12 Volt Trigger Output (ATP8700 and ATP7700)
This jack provides a 12-volt DC output whenever the
A/V PROCESSOR is switched on.
7 IR Input
Connect an external infrared sensor to this inputs. This
allows remote control of the A/V PROCESSOR even
if it is installed in a cabinet with solid doors. It also allows
control of the A/V PROCESSOR from a second room.
8 Balanced XLR Stereo Inputs (ATP8700)
hese inputs to hook up any stereo analog audio
Use t
source with balanced XLR-type connectors.
ideo Inputs
S-V
9
Use these inputs to connect S-Video-equipped devices
h as DVD players, satellite receivers, and S-VHS VCRs.
suc
10 Component Video Inputs
Use these jacks to connect devices with component video
outputs, such as a DVD play
11 Composite Video Inputs
o connect older video devices, such as
puts t
hese in
Use t
a VCR, a cable box or a laserdisc player. If the device and
your video display have S-Video or component video
connections, use t
hose ins
er or a digital TV tuner.
tead.
15 S-Video Output
Connect this output to the S-Video input of your video
display. Use this only if the display does not have a
component video input.
16 7.1-Channel Balanced XLR Outputs (ATP8700)
These 3-pin XLR type output jacks are provided to
interconnect with an amplifier utilizing this type of
connection. Please note the "polarity" diagram on the
rear panel and ensure that this configuration matches
the polarity of the XLR connectors on your amplifier.
The ATI ATP8700 is completely compatible with ATI
"Pure Balance" amplifiers.
17 Coaxial and Optical Digital Audio Inputs
Use these inputs to connect digital audio devices such as
DVD players, CD players, and digital TV tuners. These
inputs are assignable to any video or audio source.
18 RS-232 Port
This connector can be used either for control of the
A/V PROCESSOR by a laptop or touchscreen such as an
AMX or Crestron product.
19 Optical Digital Audio Output
Connect to a CD recorder, MiniDisc recorder, a computer
or any other audio recording device that accepts optical
digital inputs.
20 Zone 2 Aux Audio Input and Audio/Video Output
This is a dedicated input accessible only from the second
zone. Use the variable output or fixed output jacks to feed
stereo analog audio
21 Analog Audio Stereo Tape Input
This input is for analog audio devices, such as cassette
tape decks or CD players.
to an audio system in a second zone.
Page 6
22 Analog Audio Stereo CD Input
This input is for analog audio devices, such as cassette
tape decks or CD players.
Page 7
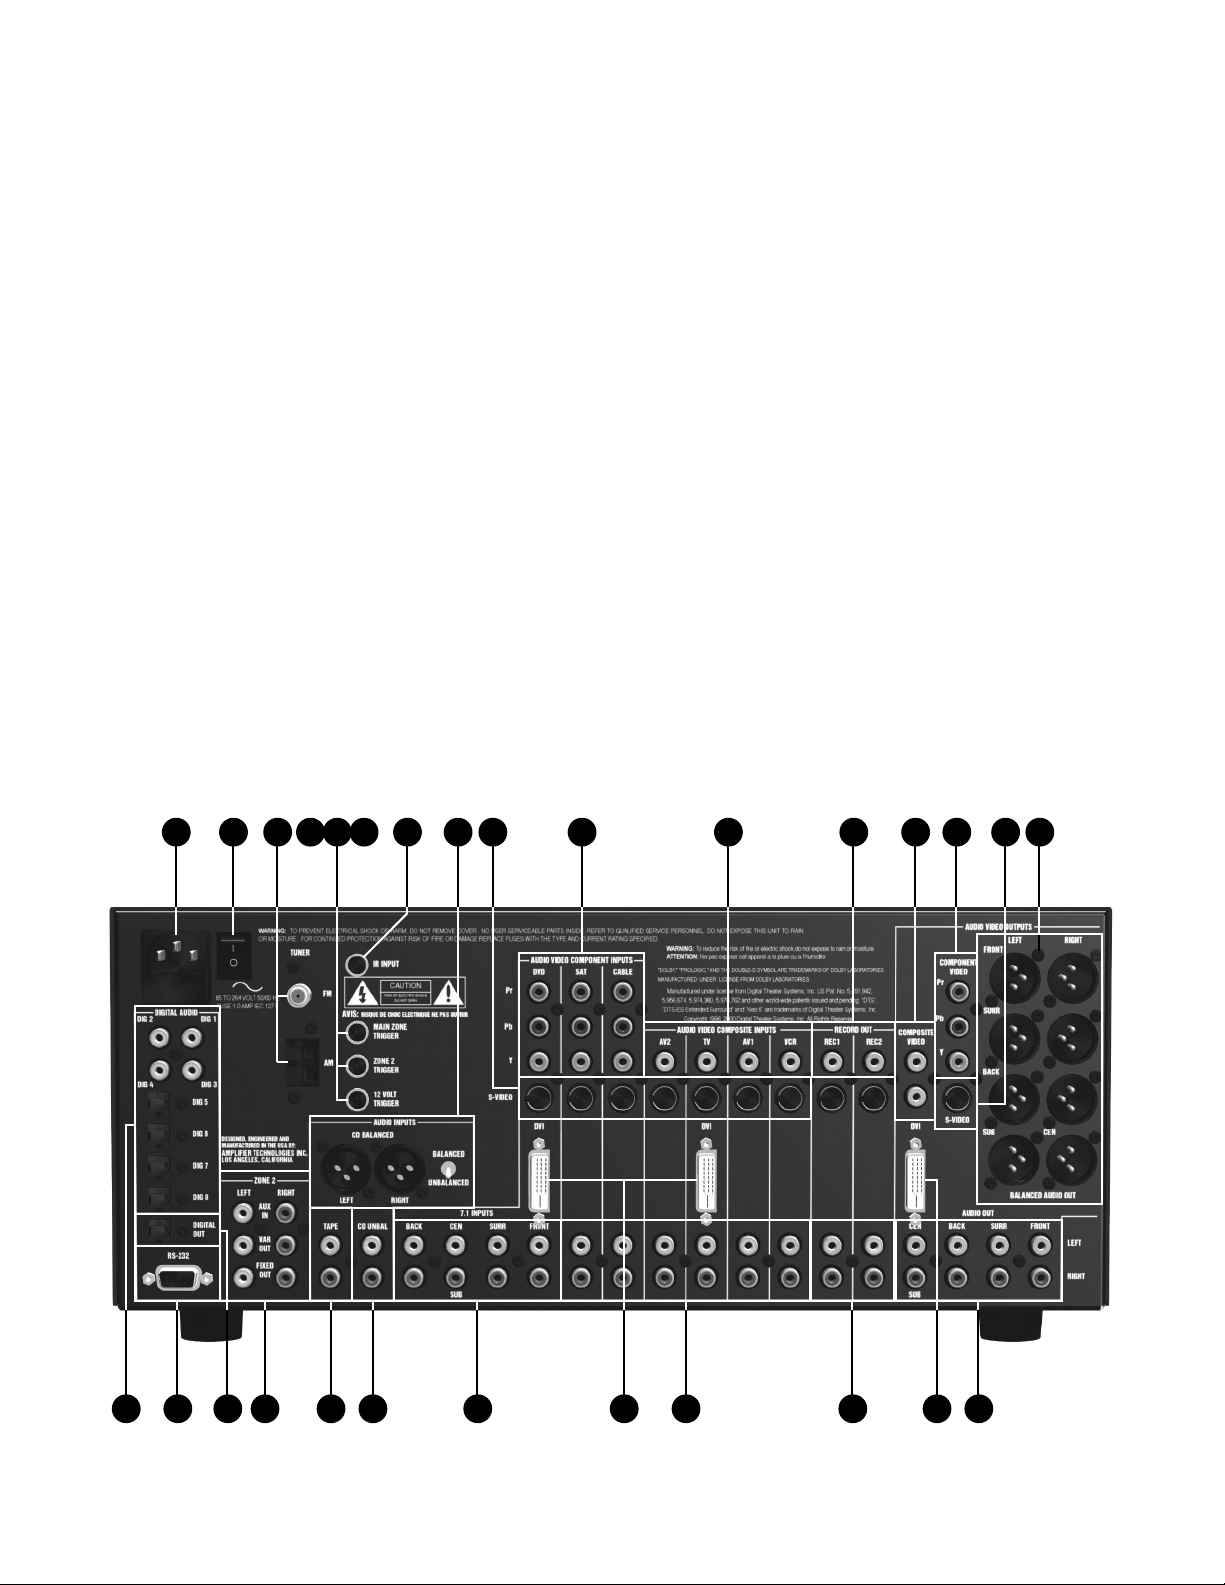
23 7.1-Channel Audio
se this input group to connect a device with analog
U
multi-channel outputs, such as a DVD player, DVD-Audio
or Super Audio CD player.
27 DVI Video Outputs (ATP8700)
hese jacks may be used to connect the ATP8700 to a
T
television with a digital video connection. With an
adapter, you can connect these outputs to HDMI inputs.
24 DVI Video Inputs (ATP8700)
hese jacks may be used to connect the ATP8700 to a
T
source requiring a digital video connection such as a
DVD player, digital cable box or satellite receiver box.
25 Analog Audio Inputs
Use these inputs to connect analog audio from video
devices, such as a VCR, a cable box or a laserdisc player.
26 Analog Audio Record Outputs
Connect these audio jacks to the input of a VCR
or DVD recorder, so you can record whatever source is being
yed in the main room.
pla
28 Preamp Audio Outputs and Subwoofer Output
These outputs carry 7.1-channel audio from the A/V
PROCESSOR to an external amplifier or amplifiers.
Connect the subwoofer output to the input of a powered
subwoofer or to an amplifier that feeds a passive
(non-powered) sub-woofer.
11 14 15 1612 131 2 7 10983 5 64
27 2826252421 22 2317 18 19 20
Page 7
Page 8
1
1 17
2
3
4
18
5
19
6
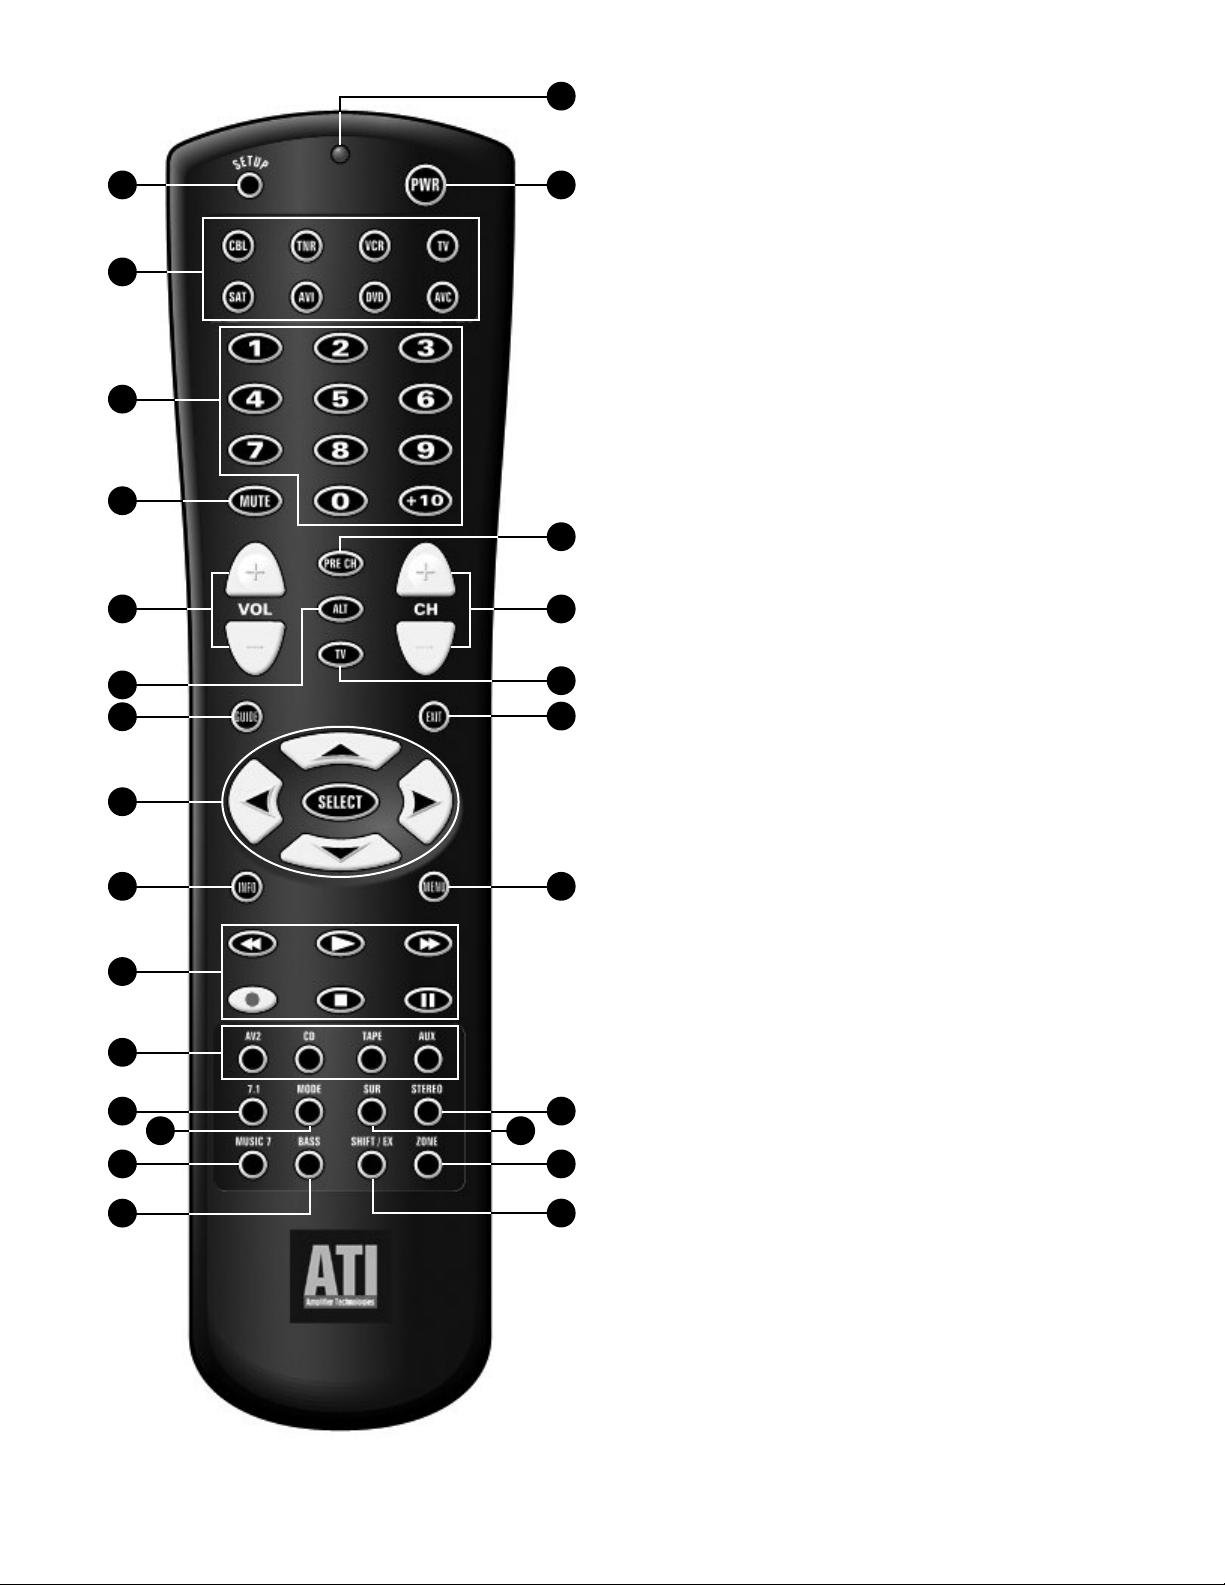
Remote Control
The remote control for the A/V PROCESSOR is a preprogrammed
universal remote that is the primary control system for the
/V PROCESSOR. This remote also controls as many as seven
A
other devices in your system. It contains an extensive library
of IR codes for other devices. Touching any button activates
the remote’s backlighting for five seconds.
1 SETUP Button
Holding down this button for three seconds causes the
remote to enter setup mode. In this mode, you can enter
an entire set of codes for another device to be controlled,
or learn codes directly from another remote.
2 Device Control Selector Buttons
These buttons select the device that the remote will control.
Push the AVC button to control the A/V PROCESSOR.
3 Numerical Keypad Buttons
Use these buttons for control functions requiring you to
enter numbers.
10
11
1
14
15
6
7
8
9
2
3
1
20
21
22
23
24
25
26
4 Mute Button
This button mutes the ATP's sound in the main room. It
does not affect the second zone output unless Zone 2 is
selected. Mute status isshown on the front panel.
5 VOLUME UP and DOWN Buttons
These buttons control the A/V PROCESSOR’s volume in the
main room. They do not affect the second one output.
6 ALT Button
This button selects an alternate mode.
7 GUIDE Button
Activates the status screen displaying the source, input,
volume setting, and audio output type. Pressing the
put Assignment Menu will
he In
yers and other devices,
VD pla
he on-scr
ter
on while in t
een menus of D
he A/V PROCESSOR.
s of t
GUIDE butt
bring up the Rename Menu (after selecting a source).
This allows the user to rename a source device If desired.
8 Cursor Control Buttons
These buttons navigate the ATP's on-screen menus, as well
as t
which the remote is programmed to control. The cursor
up and down buttons are also used to adjust certain
ame
par
Page 8
9 INFO Button
on t
his butt
Use t
you’re watching.
et more information about whatever
o g
Page 9

10 Source Control Buttons
Operate DVD players, CD players, DVRs, VCRs or other
source component features such as play, record, pause,
stop, fast forward, fast reverse.
22 MENU Button
This activates the A/V PROCESSOR’s on-screen menu.
It also serves as enter button for numeric keypad when
controlling other devices.
11 Source Selector Buttons
These buttons select which input is active in the main
oom. The selected source appears on the front panel and
r
the on-screen display.
12 7.1 Button
The 7.1 key selects the 7.1 audio input and DVD video input.
This operates in the same way as the 7.1 button on the
front panel. It gives you instant access to select the 7.1
CHANNEL
changed by using either the remote control handset or the
front panel SOURCE SELECT buttons or by pressing the
7.1 key again.
13 Mode Button
This button toggles between Dolby Surround Pro Logic®II
Music, Dolby Surround Pro Logic®II Movie, DTS Neo:6
Music and DTS Neo:6®Cinema modes.
14 MUSIC 7 Button
This button places the processor into “7.1 Music” mode.
15 BASS Button
This sets the bass trim for the currently selected input.
16 Status LED Indicator
Indicates when the remote control is in Programming or
Learning mode and flashes to indicate success or failure
of these functions.
7 POWER Button
1
Turns off the A/V PROCESSOR. Also turns other components
controlled by the remote on and off.
18 PRE CH Button
Changes back to the previously tuned channel.
INPUT, which is deselected when the source is
23 STEREO Button
This places the A/V PROCESSOR into “Music” mode.
24 SUR Button
This places the A/V PROCESSOR into “Surround” mode.
24 ZONE Button
Activate remote for “Zone 2” function control (i.e. volume,
seek, input source selection, mute and off).
24 SHIFT/EX Button
This key allows you to toggle between AM and FM on the
tuner input (ATP8700 and ATP7700) and toggles between
Dolby EX ON and OFF.
®
AM/FM Tuner Operation
The high quality built-in AM/FM tuner (A
has an auto-tune feature and may be programmed with up to
10 presets. When using presets, it is not necessary to switch
bands manually. You can save AM and FM station presets
randomly. Your presets will not be lost in the event of a
power failure.
To use the the tuner, press the tuner button on the front
panel or on the remote control. Choose the AM or FM band
by pressing the AM/FM toggle button. To auto-tune up or
down the band, momentarily press the seek-up or seek-down
button on the front panel or the CH up or CH down buttons
on the remote control. The tuner will begin to scan and will
k on to the next useable station received. To set a station
loc
as a preset, hold one of the 10 preset buttons on the remote
control until you hear the station mute momentarily. The
station is now saved as that preset number.
TP8700 and ATP7700)
19 CHANNEL UP and DOWN Buttons
Adjusts the AM/FM radio tuning frequency (ATP8700 and
ATP7700). Frequency appears on both the front panel and
on-screen. Also serves as channel selector when
controlling other devices.
20 TV Button
Toggles between NTSC and PAL video system (for OSD only).
21 EXIT Button
This key exits the setup mode and saves the new settings.
Use it if you have adjusted the setup menu by accident.
Page 9
Page 10

Surround Format Information
The A/V PROCESSOR incorporates today’s most advanced
surround-sound technologies, including variants of Dolby
and DTS surround sound. Available processing technologies
include Dolby Digital, Dolby Digital EX, Dolby Pro Logic IIx
ovie and Music modes, DTS, DTS ES-Matrix and ES Discrete,
M
DTS Neo:6, It also offers 5-Channel Stereo and 7-Channel
Stereo modes.
You may note that the A/V PROCESSOR includes fewer
surround-sound modes than many other surround processors,
such as “stadium,” “concert hall,” “jazz club,” etc. This was a
conscious omission on our part—we consider such modes
artificial-sounding and useless. Our customers have told us
they don’t use them, either, and would rather not have to
scroll past them when selecting surround-sound modes.
If you want to hear surround sound from stereo sources, you
will achieve the best results by using Dolby Pro Logic II or
DTS Neo:6.
The table on the next page lists the surround processing
choices available within each mode. Depending on the selected
source (analog or digital) and your loudspeaker configuration,
certain processing options may not appear or operate.
IMPORTANT NOTE:
THE A/V PROCESSOR AUTOMATICALLY SENSES
AND SETS THE SURROUND MODE OF THE
SELECTED SOURCE. ANY DESIRED CHANGES,
FOR EXAMPLE: DOLBY DIGITAL SURROUND TO DTS-ES
MUST BE MADE AT THE SOURCE DEVICE (IF AVAILABLE).
Dolby Digital
This digit
sound Dolby Digital source material includes DVDs, digital TV
br
video g
cable programming, and D-VHS tapes.
Dolby Digital EX
Movie soundtracks encoded with Dolby Digital Surround EX
contain an extra back surround channel, added to the
soundtrack during mixing, whic
listener. This additional channel provides more detailed
imaging behind the listener, enhancing depth, ambience, and
sound localization. One or tw
may be used. A list of movies EX-encoded movies can be
found on the Dolby web site, www.dolby.com.
al audio format provides 5.1-channel surround
oadcasts, many PlayStation 2™ video games, all XBox™
ames, laserdiscs, some satellite-delivered and digital
h places audio behind the
ound speakers
o additional sur
r
Dolby Pro Logic IIx
olby Pro logic IIx is the latest version of Dolby’s Pro Logic
D
technology. Pro Logic II is a substantial improvement over the
original Pro Logic process; Pro Logic IIx is a new 7.1-channel
version of Pro Logic II. It can be employed only when back
surround speakers are connected. Otherwise, the A/V PROCESSOR
will provide only standard Pro Logic II processing.
The Pro Logic IIx Movie mode is intended for Dolby
Surround-encoded movie and TV soundtracks. It also works
well for video games, especially those encoded in Pro Logic II.
Use this mode for VHS tapes, standard TV broadcasts, and
DVDs encoded in Dolby Digital 2.0.
The Pro Logic IIx Music mode converts stereo music into
surround sound. Use it with any stereo music source,
including CDs, FM radio, and MP3 players.
Pro Logic IIx processing can also be applied to 5.1-channel
material, either Dolby Digital or DTS, to create 7.1-channel
sur
round sound.
DTS
This format is similar to Dolby Digital, but uses a higher
sampling rate. In its standard form, DTS provides 5.1-channel
surround sound. It is available on CD, DVD, laserdiscs,
PlayStation 2 video games, and D-VHS tapes. Audio-only DTS
discs may be used with any CD, DVD, or laserdisc player with
a digital audio output, but DVD discs with DTS audio must be
used on players with the “DTS Digital Out” logo.
DTS-ES
DTS-ES is an extension of the original DTS format that adds
an additional back surround channel to a soundtrack. DTS
ES-Matrix titles provide the sixth channel by a matrix process,
while DTS ES-Discrete media delivers a true, discrete back
surround channel. Both DTS ES formats are backward
compatible with the original DTS process, and will deliver a
5.1-channel output when no center or back surround speakers
are available.
The A/V PROCESSOR will automatically sense the availability
of either DTS ES format and automatically switch the
processing mode when required.
DTS Neo:6
This processing mode can create up to six full-bandwidth
channels from any matrix-encoded 2-channel source. It offers
two modes, Cinema and Music. Use the Cinema mode for
movie soundtracks, the Music mode for stereo music.
Page 10
Page 11

Stereo Listening Modes
speakers, and to your subwoofer if one is connected.
The A/V PROCESSOR also offers advanced technology for
stereo listening(available In analog only). Not only does it
offer a stereo mode, it also offers additional modes that
enhance fidelity.
Stereo
This mode routes sound only to your front left and right
D A Display Text Name Description
• • PL IIx MOVIE Pro Logic IIx Movie Use for 7.1-channel surround-sound playback for movies
• • PL IIx MOVIE + Pro Logic IIx Movie + Dolby As above, but used to expand the soundfield when front
DOLBY VS 5-SP WIDE Virtual Surround 5-Speaker Wide left and right speakers are positioned close to TV
• • PL IIx MUSIC Pro Logic IIx Music Use for 7.1-channel surround-sound playback for movies
• • PL II MOVIE Pro Logic II Movie Use for 5.1-channel surround-sound playback for movies
• • PL II MOVIE + Pro Logic II Movie + Dolby As above, but used to expand the soundfield when front
DOLBY VS 5-SP WIDE Virtual Surround 5-Speaker Wide left and right speakers are positioned close to TV
• • PL II MUSIC Pro Logic II Music Use for 5.1-channel surround-sound playback for movies
7-Channel Stereo/5-Channel Stereo
These modes expand the sound from a stereo recording into
all channels of your surround-sound system. Because they
process the sound only minimally, these modes are popular
for piping music through the room for a party–you’ll get
fairly consistent sound all around the room.
or videogames from any 2-channel source
from any 2-channel source
or videogames from any 2-channel source
from any 2-channel source
• • DTS NEO:6 CINEMA DTS Neo:6 Cinema Creates 6.1-channel sound for stereo movie or TV soundtracks
• • DTS NEO:6 MUSIC DTS Neo:6 Music Creates 6.1-channel sound for stereo music
• • 7-CH STEREO 7-Channel Stereo Creates a 7-channel program from any stereo source
• • 5-CH STEREO 5-Channel Stereo Creates a 5-channel program from any stereo source
• DOLBY DIGITAL Dolby Digital 5.1-channel processing for all Dolby Digital-encoded sources
• DOLBY DIGITAL + Dolby Digital + Dolby Virtual As above, but use to expand the soundfield when front left
DOLBY VS 5-SP WIDE Surround 5-Speaker Wide and right speakers are positioned close to TV
• DOLBY DIGITAL EX Dolby Digital EX 6.1-channel processing for Dolby Digital soundtracks encoded
round EX
h Sur
wit
Y DIGITAL + Dolby Digital + Pro Logic IIx Movie 7.1-channel processing for 5.1-channel Dolby Digital
DOLB
•
PL IIx MOVIE movie soundtracks
• DOLBY DIGITAL + Dolby Digital + Pro Logic IIx Music 7.1-channel processing for 5.1-channel Dolby Digital
PL IIx MUSIC music video soundtracks
• DTS DTS 5.1-channel processing for all DTS-encoded sources
• DTS ES-MATRIX DTS 6.1-channel processing 5.1-channel ES-Matrix-encoded DTS sources
• DTS ES-DISCRETE DTS 6.1-channel processing ES-Discrete-encoded DTS sources
• DTS + DOLBY VS DTS + Dolby Virtual Surround Same as standard DTS, but used to expand the soundfield
5-SP WIDE
5-Speaker Wide when front left and right speakers are positioned close to TV
DTS + PL IIx MOVIE DTS + Pro Logic IIx Movie 7.1-channel processing 5.1-channel DTS movie soundtracks
•
DTS + PL IIx MUSIC DTS + Pro Logic IIx Music 7.1-channel processing 5.1-channel DTS music video soundtracks
•
Page 11
Page 12

Connecting Your A/V Processor
Connecting Audio Components
Before proceeding, please observe the following precautions
when connecting devices to your new A/V PROCESSOR.
■ Do not plug the power cord into your A/V PROCESSOR
ntil all other connections have been made.
u
■ Always refer to the instructions that came with the
component that you are connecting for specific
procedures, warnings, and options.
■ For all analog connections, the red input jacks (R)
are used for the right channel, white input jacks (L)
are used for the left channel, and yellow input jacks
(V) are used for the composite video connection.
■ Make sure to insert all plugs and connectors securely.
Improper connections can result in noise, poor
performance, or damage to the equipment.
■ Do not bundle audio/video connection cables with
power cords and speaker cables. This may adversely
affect the picture and sound quality. For example,
run all the power cords down one side of the
cabinet, all the signal cords down the other side,
and the speaker wire down the center.
■ When connecting devices to the digital inputs and
outputs, you may also consider hooking up the
analog connections to and from the components to
ensure that all signals can he employed by the A/V
PROCESSOR (especially if you plan to use the A/V
PROCESSOR ’s second-zone capability).
■ When using an optical input or output jack, always
use a high-quality optical fiber cable.
IMPORTANT NOTE: WE STRONGLY RECOMMEND THAT
BEFORE YOU CONNECT ANY LOUDSPEAKERS TO YOUR
AMPLIFIERS, YOU COMPLETE ALL NEEDED CONNECTIONS
AND SETUP PROCEDURES TO YOUR A/V PROCESSOR AS
OUTLINED BELOW. THIS WILL REDUCE THE CHANCE
T A MISC
THA
PRODUCE AUDIO OUTPUT THAT MIGHT DAMAGE
OUR SPEAKERS OR OTHER COMPONENTS.
Y
Given the wide variety of components that can be used with
your A/V PROCESSOR, there are numerous ways in which
your system can be connected. We strongly suggest that you
ecord how v
r
PROCESSOR, e.g. which type of input (analog, coaxial, S-Video,
etc.) is used. Keep this information for future reference.
y cases, t
In man
a particular device. Use the diagrams on the following pages
as a guideline. The information in this section contains some
e common situations y
he mor
of t
tem. Alw
s
sy
the component you are connecting for more information on
ce com
he sour
t
Page 12
ONNECTION OR O
arious components are connected to the A/V
e will be several possible ways to connect
her
wner’s manual that came with
s consult t
y
a
ponent’s connections.
he o
THER ERR
ou might encounter in your
OR WILL
CD PLAYER OR MUSIC SERVER
Analog Connect the L and R channel outputs on the CD player
or music server to the CD jacks on the A/V PROCESSOR.
igitalIf your CD player or music server has a digital
D
output jack, connect it to one of the coaxial or optical input
jacks, depending on the type of connector used by the CD
player. Later, you will configure the A/V PROCESSOR to use
the specific input that you have chosen. For now, note which
digital input you used on your system chart.
AUDIO RECORDER
A recording device such as a cassette deck, MD recorder, DAT
deck, or CD recorder can be connected to the A/V PROCESSOR
using either or both of the following methods.
Analog Connect the L and R audio outputs on the recorder
(usually marked PLAY) to the TAPE IN jacks on the rear of the
A/V PROCESSOR and connect the L and R audio inputs
(usually marked REC) to the RECORD OUT/TAPE jacks of the
A/V PROCESSOR.
Digital If your recorder has a digital output jack, connect it to
one of the coaxial or optical input jacks on the A/V PROCESSOR,
depending on the type of connector used by the device. Later,
you will configure the A/V PROCESSOR to use the specific
input that you have chosen. For now, note which digital input
you used on your system chart. If your recorder has a digital
input jack, connect it to the optical output (DIGITAL OUT) jack
on the A/V PROCESSOR. The signal from the selected digital
input source of the A/V PROCESSOR will be sent to the recorder.
COMPUTER
Computer audio can be connected to the A/V PROCESSOR in
ariety of ways. You will get the best sound using the digital
a v
audio connections. You can also use your computer to record
sound fr
Analog Using an 1/8-inch stereo miniplug to dual-RCA adapter
cable, connect t
sound card t
PROCESSOR. Likewise, connect the audio input minijack to
the RECORD OUT/TAPE jacks of the A/V PROCESSOR.
IF your computer has a digital audio output jack, you can
connect it to one of the coaxial or optical input jacks on the
A/V PR
the computer. Later, you will configure the A/V PROCESSOR
to use the specific input that you have chosen. For now, note
whic
com
coaxial or optical output jack on the A/V PROCESSOR. The
signal fr
PR
om the other devices connected to the A/V PROCESSOR.
he audio output minijack on the computer’s
he TAPE IN jacks on the rear of the A/V
o t
OCESSOR, depending on t
put you used on your system chart. If your
al in
h digit
puter has a digit
om t
OCESSOR will be sent t
al in
he selected digit
put jac
he type of connect
, connect it t
k
al input source of the A/V
puter
he com
o t
o eit
.
or used by
her the
Page 13

Connecting Audio Components to Your A/V Processor
CD Player
Audio Recording Device
TP8700
A
Page 13
Page 14

Connecting Video Components to Your A/V Processor
DVD Player
Page 14
ATP8700
Video Recording Device
Page 15

Connecting Video Components
Before making connections to any video devices, it will help to
understand how the A/V PROCESSOR routes the video portion
of the signal.
ny signal that appears at the composite video input
■ A
jacks is automatically sent to the composite and
S-Video video output and video record output jacks.
■ Any signal that appears at the S-Video input jacks is
automatically sent to the composite and S-Video
video output and video record output jacks.
■ Any signal that appears at the component video
input jacks is automatically sent to the component
video output jacks only.
■ Any signal that appears at the DVI video input jacks
is automatically sent to the DVI video output jack only
(ATP8700).
NOTE: To provide the greatest flexibility, you should connect a
composite or S-Video cable from all of your video devices to the
A/V PROCESSOR, even if you are already using a component
video. This will allow all of your video sources to be visible
in the second zone, if you are using the A/V PROCESSOR’s
multi-zone capability.
Analog Audio Connect the L and R channel outputs on the
VD player to the DVD analog audio jacks on the rear of the
D
A/V PROCESSOR.
Digital Audio Connect the digital output jack on the DVD
player to one of the coaxial or optical input jacks on the rear
f the A/V PROCESSOR, depending on the type of connector
o
used by the DVD player. Later, you will configure the A/V
PROCESSOR to use the specific digital audio input that you
have chosen. For now, note which digital input you connected
to on your system chart.
Multi-Channel Audio If your DVD player supplies a
multi-channel audio output for DVD-Audio or SACD playback,
connect the six outputs from your player to the 7.1 INPUT jack
set on the rear panel of the A/V PROCESSOR. Use the FRONT
L&R, SURR L&R, CEN and SUB jacks; ignore the jacks labeled
ACK L&R. (These are intended to accommodate 7.1-channel
B
audio technology if it appears in the future.) Be careful to
match the connections–L to L, right surround to SURR R, center to CEN, and so on. If your player includes a built-in Dolby
Digital decoder with 5.1-channel analog audio outputs but no
DVD-A or SACD capability, we suggest that you do not use
them. Use one of the A/V PROCESSOR’s digital audio inputs
instead–you’ll get better sound.
Also, because the A/V PROCESSOR’s on-screen display does
not appear on the component outputs, S-Video, or composite
video connections should be used.
DVD PLAYER
Composite Connect the composite video output from the
DVD player to the DVD composite video input jack on the rear
of the A/V PROCESSOR using an RCA-type video cable.
S-Video If there is an S-Video output on the DVD player, and
ou have an S-Video input on your TV or monitor, connect it to
y
the S-Video DVD input on the rear of the A/V PROCESSOR
using an Scom
possible—unless you can use component or DVI connections,
whic
Component Video If the DVD player has component video
outputs, connect them to the component DVD input jacks on
he rear of the A/V PR
t
DVI/HDMI If the DVD player has a DVI or HDMI video output,
and y
the DVI DVD input jack on the rear of the A/V PROCESSOR
(ATP8700). For HDMI-equipped DVD players, use an
HDMI-t
Video cable. S-Video delivers a better picture than
posite connections and should be used whenev
h deliver better pictures than S-Video.
OCESSOR.
our T
o-D
V/monit
VI adap
or has a DVI or HDMI input, connect it to
ter.
er
Note: You must use the 7.1 INPUTS multi-channel audio input
for SACD and DVD-Audio players in order to hear the
high-resolution sound these players provide. Do not use the
digital audio inputs.
VIDEO RECORDER
A video recording device such as a VCR, PVR (such as TiVo®,
Replay®, DishPlayer®, or similar device) or DVD recorder can be
connected to the A/V PROCESSOR using the following methods.
Com
recording device to the any of the composite video input jacks
on the rear of the A/V PROCESSOR. Connect the recording
vice
de
record output jacks of the A/V PROCESSOR.
ideo
V
S-
connect it to any of the S-Video input jacks on the rear of the
A/V PROCESSOR. Connect the recording devices S-Video input to
y of t
an
S-Video delivers a better picture than composite connections
and should be used whenever possible, unless you can use
ponent or DVI connections.
com
Component Video If the recording device has a component
video output, and y
connect the recording device to one of the component video
input jacks on the rear of the A/V PROCESSOR.
Connect t
posite video input to any of the composite video
s com
’
e is an S-
her
If t
ideo record output jacks on the A/V PROCESSOR.
V
he S-
our T
e
posit
posite video output from the
he com
ideo output on the recording device,
V
V has a com
ponent video input,
Page 15
Page 16

DVI/HDMI If the recording device has a DVI or HDMI video
utput, and your TV/monitor has a DVI or HDMI input,
o
connect it to the second DVI input jack on the rear of the
A/V PROCESSOR (ATP8700). For HDMI-equipped video
recorders, use an HDMI-to-DVI adapter.
nalog AudioConnect the L and R audio outputs on the
A
recorder to any of the audio input jacks on the rear of the A/V
PROCESSOR and connect the L and R inputs of the recorder to
the RECORD OUT audio jacks on the A/V PROCESSOR.
Video Display Connections
A video display device such as a television, a video monitor or
a video projector can be connected to the A/V PROCESSOR
using the following methods.
ain Zone
M
Composite Connect the composite video input from the
display to the composite (yellow) VIDEO MONITOR OUT jack
on the rear of the A/V PROCESSOR.
Digital Audio If your recording device also has a digital
audio output jack, connect it one of the coaxial or optical
input jacks on the rear of the A/V PROCESSOR, depending on
the type of connector used by the device. Later, you will
configure the A/V PROCESSOR to use the specific input that
you have chosen. For now, note which digital input you used on
our system chart. If your recording device also has a digital
y
input jack, connect it to the optical output (DIGITAL OUT) jack
on the rear of the A/V PROCESSOR, depending on the type of
connector used by the device. The signal from the selected digital
input source of the A/V PROCESSOR will be sent to the recorder.
DIGITAL TV TUNER/CABLE BOX/SATELLITE RECEIVER
Composite Connect the composite video output from the TV
tuner/Cable Box/Satellite Receiver to a composite video input
jack on the rear of the A/V PROCESSOR.
S-Video If there is an S-Video output on the TV tuner, and
you have an S-Video input on your TV or monitor, connect it to
an S-Video input jack on the rear of the A/V PROCESSOR.
Analog Audio Connect the L and R channel outputs on the
TV tuner to the analog audio input on the rear of the A/V
PROCESSOR that corresponds to the video input you used.
Digit
tuner to one of the coaxial or optical input jacks on the rear
of the A/V PROCESSOR, depending on the type of connector
y t
used b
to use the specific digital audio input that you have chosen.
For now, note which digital input you connected to on your
tem c
s
sy
he bo
har
x. Later
t.
Connect t
, you will configure the A/V PROCESSOR
udio
al A
al output jack on the TV
he digit
S-Video If there is an S-Video input on the display, connect it
to the S-Video VIDEO MONITOR OUT jack on the rear of the
A/V PROCESSOR.
Component Video If your display has a component video
input, connect it to the component video output jacks on the
rear of the A/V PROCESSOR. You should connect this in
addition to an S-Video or composite video connection.
DVI/HDMI If your video display has a DVI or HDMI video
input, connect it to the DVI output jack on the rear of the
A/V PROCESSOR (ATP8700). If the display has only and HDMI
input, use an HDMI-to-DVI adapter.
Analog Audio If your TV has an internal tuner and offers
an analog audio output for its internal tuner, connect the L&R
channel outputs on the TV to an analog audio input on the
rear of the A/V PROCESSOR.
Digital Audio If your TV tuner has an digital audio output,
connect it to one of the coaxial or optical input jacks on the
rear of the A/V PROCESSOR, depending on the type of
connector used. Note, that with some cable set-top boxes, it is
advisable to make both an analog and digital audio connection.
Later, you will configure the A/V PROCESSOR to use the
ic digital audio input that you have chosen. For now,
specif
note which digital input you used on your system chart.
Component Video If the TV tuner has a component video
V has a com
output, and y
the recording device to one of the component video input
jacks on the rear of the A/V PROCESSOR.
DVI/HDMI If the TV tuner has a DVI or HDMI video output,
and your TV/monitor has a DVI or HDMI input, connect it to
he second D
t
(ATP8700). For HDMI-equipped DVD players, use an
HDMI-to-DVI adapter.
Page 16
our T
put jack on the rear of the A/V PROCESSOR
VI in
ponent video in
put, connect
Page 17

Antenna Connections
Other Connections
The ATP8700 and ATP7700 A/V PROCESSORs have an internal AM/FM tuner with separate external connections for each
radio band.
M Antenna (ATP8700 and ATP7700)
F
Push the coaxial connector onto the connector labeled FM
on the back of the A/V PROCESSOR.
The supplied FM antenna is for indoor use only. For best signal reception you must fully extend the antenna. Experiment
with the antenna’s position to obtain the strongest signal.
You can attach it to a wall or other surface using push pins,
tacks or small nails.
If FM reception is poor with the supplied indoor antenna, we
recommend using an amplified indoor or outdoor antenna.
You can connect a 75-ohm type FM antenna directly to the
A/V PROCESSOR.
AM Antenna
Connect the supplied AM antenna to the push terminals
labeled AM on the rear panel of the A/V PROCESSOR. Start by
pressing in the lever on one of the terminals. Next, insert one
of the antenna wires. Release the lever and repeat the process
with the other lever and the other wire. Experiment with the
antenna’s position to obtain the strongest signal.
Remote Control
The IR jacks allow you to extend the remote control sensor
built into the front of the A/V PROCESSOR so that you may
control the A/V PROCESSOR even when it is installed behind
olid or smoked cabinet doors. This jack allow you to control
s
the A/V PROCESSOR from a second zone (room), and they
also allow the A/V PROCESSOR to relay remote-control codes
to other concealed components. To install a remote sensor
(available from such companies as Niles Audio and Xantech),
connect it to the IR INPUT jack.
DC Trigger
MAIN ZONE TRIGGER is always used to turn on other devices
when the A/V PROCESSOR is powered on, and to turn them
off when you turn off the A/V PROCESSOR. We recommend
this jack with a compatible power amplifier, such as those
available from ATI.
Use a cable tipped at each end with a 1/8-inch (3.5mm) mono
phone plug to connect the A/V PROCESSOR’s MAIN ZONE
TRIGGER jack to the amplifier’s DC Trigger Input jack.
Use a cable tipped at each end with a 1/8-inch (3.5mm) mono
phone plug to connect the A/V PROCESSOR’s 12 VOLT DC
TRIGGER jack to the DC Trigger Input jack on the component
you want to control. You may have to use an adapter, depending
on what type of input jack the other component uses.
Using the AM/FM Tuner
The high quality built-in AM/FM tuner on the ATP8700 and
ATP7700 has an auto-tune feature and may be programmed
with up to 10 presets. When using presets, it is not necessary
to switch bands manually. You can save AM and FM station
presets randomly. Presets will not be lost in the event of a
power failure.
To use the tuner, press the tuner button on the front panel or
on the remote control. Choose the AM or FM band by pressing
o auto-tune up or down the band,
on. T
le butt
te contr
ogg
emo
he r
ol until y
te control. The tuner will begin to scan
ou hear the station mute momentarily.
he AM/FM t
t
momentarily press the seek-up or seek-down button on the
front panel (ATP8700 & ATP7700) or the CH UP or CH DOWN
ons on t
butt
and will lock on to the next useable station received. To set a
station as a preset, hold one of the 10 keypad buttons on the
emo
r
The station is now saved as that preset number.
RS-232 Port
The A/V PROCESSOR’s RS-232 port can be used to control the
A/V PROCESSOR through a computer touchscreen remote.
Note: When making connections to the RS-232 port, be certain
to use a “straight-through” male-to-female serial cable with
DB-9 connect
designed for “null modem” use.
ors on each end. DO NOT use a serial cable
Power Connection
Insert the supplied power cord into the AC input of the rear
panel of the A/V PROCESSOR. Use only the supplied power
titute a s
d—do no
cor
CAUTION: Before you plug the power cord into an AC wall
outle
have been made correctly.
ARNIN
W
PROCESSOR while the other end is plugged into on AC outlet.
Doing so may cause an electric shock. Always connect power
y plugging int
b
y un
b
t subs
m t
ir
t, conf
G:
e
N
plugging fr
hat all connections to the A/V PROCESSOR
er disconnect the power cord from the A/V
v
he AC outlet last and disconnect
o t
om t
tandard IEC type power cord.
irst.
t f
C outle
he A
Page 17
Page 18

Connecting an External Amplifier to Your A/V Processor
ATP8700
Amplifier Connections
IMPORTANT NOTE: BEFORE ATTEMPTING TO MAKE ANY
CONNECTION TO YOUR POWER AMPLIFIER, MAKE SURE
THE AMPLIFIER IS TURNED OFF AND/OR DISCONNECTED
FROM AC POWER. FAILURE TO DO SO CAN RESULT IN SEVERE
DAMAGE TO YOUR AMPLIFIER AND/OR LOUDSPEAKERS.
Before attempting to make any connection to your power
ier, make sure the amplifier is turned off and/or
plif
am
disconnected from AC power. Failure to do so can result in
severe damage to your amplifier and/or loudspeakers.
Main Zone
Use the audio jacks labeled AUDIO VIDEO OUTPUTS to connect
the A/V PROCESSOR to an external power amplifier such as
those from ATI. The A/V PROCESSOR can output up to 7.1
channels of sound (seven main channels and one subwoofer),
even when you are listening to 2-channel stereo material.
The output jacks supplied by the A/V PROCESSOR are: Front
Left and Right, Surround Left and Right, Surround Back Left
and Right, and Subwoofer (SUB) and Center (CEN).
Be sure to verify that the correct outputs are connected to the
appropriate input jacks on your amplifier—for example, Front
Left to Front Left, Surround Back Right to Surround Back
Right, etc. If the inputs on your amplifier are not labeled, it
probably does not matter which of the A/V PROCESSOR’s
output channels is connected to a particular amp channel.
However, you must be sure that the appropriate speaker is
connected to that amp channel.
When a powered subwoofer is used, connect the Subwoofer
output jack to the Line Input jack on your subwoofer (use
either the Left or Right input if your subwoofer has both) and
follow any specific connection and/or configuration
instructions supplied with the subwoofer. If your subwoofer
is a passive speaker (with no built-in amplifier), connect the
subwoofer output jack on the A/V PROCESSOR to the input of
the amplifier used to power the subwoofer, and then connect
the subwoofer speaker itself to the amplifier.
The ATP8700 offers both balanced (XLR) and unbalanced
(RCA) outputs. If your amplifier has balanced inputs, we
recommend you use balanced audio cables between the
ATP8700 and your amplifier. Using balanced cables could result
in a slight reduction in noise, and because XLR connectors
lock into place, they cannot come loose as RCA connectors can.
On the ATP8700, both balanced and unbalanced jacks are
active all of the time, so you can mix them up–for example,
using balanced connections for a high-end stereo amplifier
connected to your front left and right speakers, and
unbalanced connections for all of the other channels.
Page 18
Page 19

xternal
E
Amplifier
Right
Surround
Speaker
Powered
Subwoofer
Right
Front
Speaker
Right
Rear
Speaker
Center
Channel
Speaker
Left
Rear
Speaker
Left
Surround
Speaker
Left
Front
Speaker
Page 19
Page 20

Second Zone Connections
Second Zone Audio
Use the L and R channel ZONE 2 OUT audio jacks to connect
the A/V PROCESSOR to the analog audio inputs of an external
amplifier or other audio component in the second zone.
he “2nd Zone” section has one fixed output, one variable
T
output and one second zone dedicated input that is accessible
only from the “2nd Zone”. The “2nd Zone” has limited access
to which input source may be selected: the dedicated “2nd
one” input along with all signal connected to analog audio
Z
and composite video inputs.
Second Zone Video
Composite Connect the composite video input from the
isplay to the second composite (yellow) VIDEO MONITOR
d
OUT jack on the rear of the A/V PROCESSOR.
Connecting Your A/V Processor to Audio/Video Equipment in a Second Zone
ATP8700
Optional
IR Sensor
To Any Analog
er
igg
r
T
udio In
A
Out to Speakers
puts
Second Zone
To Composite
Video Input
Page 20
Page 21

Connection Record Chart
Use the chart below to keep a record of what types of video
and audio connections you use for each connected device.
Your connections requirements will vary according to your
ideo gear and display’s capabilities. In most cases, only one
v
type of video connection is required.
NOTE: To provide the greatest flexibility, you should connect a
composite or S-Video cable from all of your video devices to the
A/V PROCESSOR, even if you are already using a component
video. This will allow all of your video sources to be visible
in the second zone, if you are using the A/V PROCESSOR’s
multi-zone capability.
Also, because the A/V PROCESSOR’s on-screen display does
ot appear on the component outputs, S-Video, or composite
n
video connections should be used.
If the component you’re connecting has an digital audio
output, connect it to one of the coaxial or optical input jacks
n the rear of the A/V PROCESSOR, depending on the type of
o
connector used. Note, that with some components, it is
advisable to make both an analog and digital audio connection.
When making digital audio connections, use either the coaxial
or optical connection, but not both. Later, you will configure
the A/V PROCESSOR to use the specific digital audio input that
you have chosen. For now, note which digital input you used
on your system chart.
DVD
Device
Surr Mode
Video
Composite ❑
S-Video ❑
Component DVD ❑
Component SAT ❑
Component Cable ❑
DVI 1 ❑
DVI 2 ❑
Audio
Analog ❑
Coaxial 1 ❑
Coaxial 2 ❑
Coaxial 3 ❑
Coaxial 4 ❑
Optical 1 ❑
Optical 2 ❑
Optical 3 ❑
Optical 4 ❑
SAT
Device
Surr Mode
Video
Composite ❑
S-Video ❑
Component DVD ❑
Component SAT ❑
Component Cable ❑
DVI 1 ❑
DVI 2 ❑
Audio
Analog ❑
Coaxial 1 ❑
Coaxial 2 ❑
Coaxial 3 ❑
Coaxial 4 ❑
Optical 1 ❑
Optical 2 ❑
Optical 3 ❑
Optical 4 ❑
CABLE
Device
Surr Mode
Video
Composite ❑
S-Video ❑
Component DVD ❑
Component SAT ❑
Component Cable ❑
DVI 1 ❑
DVI 2 ❑
Audio
Analog ❑
Coaxial 1 ❑
Coaxial 2 ❑
Coaxial 3 ❑
Coaxial 4 ❑
Optical 1 ❑
Optical 2 ❑
Optical 3 ❑
Optical 4 ❑
AV2
Device
Surr Mode
Video
Composite ❑
S-Video ❑
Component DVD ❑
Component SAT ❑
Component Cable ❑
DVI 1 ❑
DVI 2 ❑
Audio
Analog ❑
Coaxial 1 ❑
Coaxial 2 ❑
Coaxial 3 ❑
Coaxial 4 ❑
Optical 1 ❑
Optical 2 ❑
Optical 3 ❑
Optical 4 ❑
TV
Device
Surr Mode
Video
Composite ❑
S-Video ❑
Component DVD ❑
Component SAT ❑
Component Cable ❑
DVI 1 ❑
DVI 2 ❑
Audio
Analog ❑
Coaxial 1 ❑
Coaxial 2 ❑
Coaxial 3 ❑
Coaxial 4 ❑
Optical 1 ❑
Optical 2 ❑
Optical 3 ❑
Optical 4 ❑
AV1
Device
Surr Mode
Video
Composite ❑
S-Video ❑
Component DVD ❑
Component SAT ❑
Component Cable ❑
DVI 1 ❑
DVI 2 ❑
Audio
Analog ❑
Coaxial 1 ❑
Coaxial 2 ❑
Coaxial 3 ❑
Coaxial 4 ❑
Optical 1 ❑
Optical 2 ❑
Optical 3 ❑
Optical 4 ❑
VCR
Device
Surr Mode
Video
Composite ❑
S-Video ❑
Component DVD ❑
Component SAT ❑
Component Cable ❑
DVI 1 ❑
DVI 2 ❑
Audio
Analog ❑
Coaxial 1 ❑
Coaxial 2 ❑
Coaxial 3 ❑
Coaxial 4 ❑
Optical 1 ❑
Optical 2 ❑
Optical 3 ❑
Optical 4 ❑
CD
Device
Surr Mode
Audio
Analog ❑
Coaxial 1 ❑
Coaxial 2 ❑
Coaxial 3 ❑
Coaxial 4 ❑
Balanced XLR ❑
TAPE
Device
Surr Mode
Audio
Analog ❑
RECORD OUT 1
Device
Surr Mode
ideo
V
Composite ❑
ideo
S-V
Audio
Analog ❑
Optical ❑
❑
RECORD OUT 2
Device
Surr Mode
ideo
V
Composite ❑
ideo
S-V
Audio
Analog ❑
Optical ❑
❑
7.1 INPUTS
Device
Surr Mode
ideo
V
Composite ❑
ideo
S-V
Component ❑
DVI ❑
❑
MONITOR OUT
Device
ideo
V
Composite ❑
ideo
S-V
Component ❑
DVI ❑
ZONE 2 OUT
Device
ideo
V
Composite ❑
❑
Audio
ariable Out
V
Fixed Out ❑
❑
Page 21
Page 22

System Setup
IMPORTANT NOTE: YOU MUST PRESS THE AVC BUTTON
NEAR THE TOP IN ORDER TO ACTIVATE THE REMOTE
. Press the MASTER POWER ON/OFF SWITCH on the unit’s
1
rear panel in until it latches. The STBY indicator on the
front panel will glow.
2. Select a button (such as DVD, VCR, or AUX) on the remote
control. The front-panel TFT display will illuminate.
To Initially Set Up the A/V PROCESSOR
1. Press the MENU button on the remote control to display
the Main Menu. The MAIN MENU appears on-screen:
1 QUICK SETUP-SPEAKER SIZE
2 QUICK SETUP-SPEAKER DIST
3 INPUT ASSIGNMENT
4. Tuner and PAL/NTSC Settings
4 PAL/NTSC SETTINGS
These settings are for the FM tuner OS video setting. Press
5 BASS TRIM
the number corresponding to your location for the tuner
6 CALIBRATION
setting. An “X” following the region indicates the current
7 COMPRESSION ON
setting. The “TV Setting” must be made according to your
8 STATUS DISPLAY NO
location. NTSC for North America and PAL for most of Europe.
OFF
9 DVD AUDIO FULLRANGE NO
0 RESET TO DEFAULTS
EXIT
MAIN MENU
On-Screen Message On/Off
ou adjust the volume or select a different input, a
When y
confirming text message appears on the screen of your video
or. You can deactivate this function for specific inputs if
monit
ou wish. The on-screen menu sys
y
when on-screen messages are deactivated.
urn On-screen Messages On and Off:
o T
T
1. From the MAIN MENU, select #8 STATUS DISPLAY.
2. Press SELECT to turn on-screen messages on and off for
hat input. On screen messag
t
the A/V PROCESSOR's TFT monitor.
tem will still function even
es will now be seen only on
Speaker Placement
er placement f
t speak
The bes
depend on its size, fur
acoustical properties of the space (including room size, wall
ings, and various other factors).
er
v
type, co
Page 22
or your particular room will
nishings, seating ar
ement, and t
ang
r
he
Due to the complex nature of these variables, it is impossible
o recommend any one-size-fits-all placement. You may have
t
to experiment with various placement options to determine
the best configuration for your specific situation. Please note
that proper configuration and placement of your speaker
systems is critical for achieving the best possible surround
ound reproduction.
s
Here are some basic recommendations you should consider
when positioning your speakers:
Front Left, Center and Right Speakers
■ These speakers should be placed at the same
relative height from the floor and a similar distance
from any walls. Most speakers sound best when
located with the tweeter at ear height when you’re
seated. Typically, the further away from the walls
he speakers are, the better they will sound.
t
■ Ensure that the speakers are aimed at the listener’s
ears within your chosen seating position.
Surround Left and Right Speakers
■ Place these speakers so that their height is
approximately 1 meter (3 feet) higher than that of
the listener’s ears, if feasible.
■ Place these speakers to the sides of, or slightly
behind, the primary listening position.
Surround back left and back right speakers
These speakers are required for Dolby Digital EX, DTS ES,
Dolby Pro Logic IIx, and 7-Channel Stereo. They are also
desirable—though not required—for DTS Neo:6.
■ Place these speakers behind the listener so that the
angle between each speaker and the listener is
approximately 30 degrees.
■ Place these speakers so that their height is 1 meter
t) higher than that of the listener’s ears.
ee
(3 f
Subwoofer
Subwoofer placement can frequently be a trial-and-error
, as bass ener
air
f
af
room. These standing waves can cause areas with too much
bass, areas with too little bass, and areas in between. You
e t
v
y ha
ma
area to improve the bass response. Be aware that every
surface you place the woofer close to (one wall, the floor, two
alls in a corner) will increase the overall apparent bass in
w
the room. But this can potentially lead to boomy and muddy
sounding bass.
When connecting any speakers, be sure to read the instruction
manual(s) that came with the product and check your power
ier’s instruction manual for proper hook-up of the
plif
am
loudspeaker systems.
gy sets up “standing waves” in most every
o move the subwoofer and/or the prime listening
Page 23

Speaker Size Selection
For maximum audio performance, you must tell the A/V
PROCESSOR what speaker configuration you are using.
In the Speaker Size Menu, you will tell the A/V PROCESSOR
whether or not you have a center speaker, side surround
peakers, back surround speakers, and a subwoofer. You will
s
also tell the unit what size your speakers are, so it knows
whether or not it is safe to route deep bass signals to them.
Generally speaking, a small, bookshelf-type (or smaller)
speaker is considered “small,” and a large, floorstanding
speaker is considered “large.” If you have questions concerning
the proper setting, consult the speaker’s manufacturer.
1
FRONT LARGE
2 CENTER SMALL
3 SURROUND SMALL
4 BACK SMALL
5 SUBWOOFER YES
6 FRONT CROSSOVER 8OH
7 CENTER CROSSOVER 8OHZ
8 SURROUND CROSSOVER 8OHZ
9 BACK CROSSOVER 8OHZ
EXIT
Z
NOTE: The A/V PROCESSOR does not allow some speaker
combination settings in order to avoid errors. You can set the
subwoofer to “no” only if you have large full-range front speakers.
If you have small limited-bass front speakers, the subwoofer
setting will automatically be “yes.” If your front left and right
speakers are set to “small,” your center speaker will automatically
be set to “small.” If you have no side surround speakers, the
back surround channels will automatically be deactivated.
To Set Speaker Size:
1. From MAIN MENU, press #1 QUICK SETUP–SPEAKER SIZE.
2. To set the size of the front left and right speakers, press the
respective number of the speaker and toggle to small or
large using the SELECT button.
3. Once you have set the front speaker size, press another
number to move on to the other speakers, and or to
adjust the size of those speakers.
4. When you have the size set for all of the speakers, press
EXIT on the remote or front panel to save your settings.
To set the Subwoofer Crossover Points:
1. From MAIN MENU, press #1 QUICK SETUP-SPEAKER SIZE,
hen select #s 6-9, one at a time, to adjust crossover values.
t
2. To set the crossover points, use the SELECT button to
oggle between NONE and 200Hz.
t
he crossover point set for all speakers,
When you hav
3.
press EXIT on the remote or front panel to save your settings.
e t
SPEAKER SIZE MENU
Speaker Distance
The purpose of delay adjustment is to make all the sounds from
the different speakers in your system arrive at your ears at
the same time. If a sound appears in two speakers at once but
sound from one arrives at your ears earlier (usually because
you are sitting closer to that speaker), it will diminish the
surround effect. The A/V PROCESSOR automatically calculates
the proper delay based on the distance from your listening
chair to each speaker. All you have to do is measure and write
down the distance to each speaker, then enter these numbers
in the A/V PROCESSOR’s Quick Setup Speaker Distance menu.
To Set the Speaker Distance for Each Channel:
1. From the MAIN MENU, press #2 QUICK SETUP–SPEAKER
DISTANCE.
2. Press the respective number of the speaker you wish to
adjust then toggle from one to 30 feet using the SELECT
button on the remote.
o adjust the rest of the speakers as you did in #2.
Go on t
3.
4. When you have the delay set for all of the speakers in your
system, press EXIT and your settings will be saved.
o optimize the bass performance and power handling of
T
your speaker system, you must tell the A/V PROCESSOR what
subwoofer crossover points to use for the front left/right,
center, side surr
PROCESSOR allows you to set crossover points (ranging from
60 Hz to 200 Hz) for each of these speakers, so that you can
he best sound fidelity even if your system uses different
t t
e
g
types of speakers for front left/right, center, and surround.
Generally speaking, a medium-sized tower speaker works
h a 40 Hz cr
ell wit
w
heater satellite (or L
t
crossover point. Slim, on-wall speakers designed to go with
plasma T
point. Miniatur
high—often demand a crossover point of 150 or 200 Hz.
ound, and bac
Vs tend t
e satellite speak
ossover point. A standard-sized home
CR
ork well with a 100 or 120 Hz crossover
o w
k surround speakers. The A/V
s well with an 80 Hz
k
or
-type) speak
er w
s—measur
er
ing 4 t
o 7 inc
hes
FROM YOUR LISTENING POSITION
1 FRONT LEFT 12 FEET
2 CENTER 11 FEET
3 FRONT RIGHT 12 FEET
4 SURROUND RIGHT 8 FEET
5 BACK RIGHT 6 FEET
BACK LEFT
6
SURROUND LEFT
7
6 FEET
8 FEET
EXIT
CE MENU
SPEAKER DIST
AN
Page 23
Page 24

Compression
The A/V PROCESSOR’s Compression option suppresses the
loud peaks in movie soundtracks and music videos so that
the sound from your system does not disturb others while
allowing the system to play the system loud enough so you can
ear dialogue clearly. Compression can be set to two different
h
levels: ON and OFF. ON provides the greatest effect; use it when
you want to keep the sound peaks at an absolute minimum.
To activate Compression:
1. From the Main Menu select #7 COMPRESSION.
2. Press SELECT to toggle between OFF and ON.
3. Press EXIT on the remote or front
panel to save your settings.
Input Assignment
selector buttons on the remote control, but you can change
he way the names appear on the A/V PROCESSOR’s front
t
panel and on-screen display.
To Rename an Input:
1. From the MAIN MENU, select # 3 INPUT ASSIGNMENT.
he INPUT ASSIGNMENT menu appears.
T
2. Select #s 1-9 to select its respective input connection point.
3. The GUIDE button allows the changing of a source name.
4. Press #1 to change the name
Press #2 to keep the current name
Press #3 to use the default name
5. When changing the name, use the up
to find the letter or number you want. Once you’ve selected
the letter or number, use the forward button to move on
o the next letter or number. Repeat the process for each
t
letter or number in the name.
When finished, press SELECT to continue configuration.
6.
▲ or down▼ button
▼
This section allows you to select between analog or digital for
your source inputs.
To Set the Input Assignments:
1. From the MAIN MENU, select # 3 INPUT ASSIGNMENT.
2. Select #s 1-9 to select its respective input connection point.
3. Use the SELECT button on the remote to select the type and
position of the input you require.
4. Connect that source item to the input on the back panel
that you have selected.
5. Press EXIT on the remote or front panel to save settings.
INPUT AUDIO
1 VCR
ANALOG
2 AV1 ANALOG
3 TV ANALOG
4 AV2 DIG 5
5 CABLE ANALOG
6
SAT
DIG 3
7 DVD DIG 1
CD DIG 2
8
9 TAPE ANALOG
EXIT
INPUT ASSIGNMENT MENU
Renaming Video Inputs
DEFAULT NAME: VCR
CURRENT NAME: VCR
NEW NAME: SATELLITE
A B C D E F G H I J K L M
N O P Q R S T U V W X Y Z
O 1 2 3 4 5 6 7 8 9 `
1 CHANGE NAME
2 KEEP CURRENT NAME
3 USE DEFAULT NAME
EXIT
RENAME ASSIGNMENT MENU
Tuner/PAL/NTSC Settings
o select the proper tuner channel
ou t
s y
This menu allo
separation range as well as the correct video scanning setting
for your video.
To set the proper mode:
VIDEO:
om t
r
. F
1
The PAL/NTSC SETTINGS menu appears.
2. Toggle #3 back and forth to select NTSC for the U.S. or PAL
or Europe.
f
3. Press EXIT on the remote or front panel to save your settings.
w
he MAIN MENU, select #4 PAL/NTSC SETTINGS.
he A/V PR
hough t
Alt
named, y
your video sources–for example, you might rename the AV1
in
Page 24
ou ma
ATELLITE. Of course, you cannot rename the input
o S
put t
OCESSOR’s video inputs are already
eflect the identity of
tter r
o be
ename t
y r
hem t
TUNER:
1. From the Main Menu, select #4 PAL/NTSC SETTINGS.
The PAL/NTSC SETTINGS menu appears..
A or #2 for Europe.
2. Select #1 f
3. Press EXIT on the remote or front panel to save your settings.
or US
Page 25

1
USA X
2 EUROPE
3 TV SETTING NTSC
DAE PRODUCT ID 4508
DAE VERSION NUMBER 1.1
MICRO MODEL ID M6700
MICRO VERSION NUMBER 3.2
EXIT
TUNER/PAL/NTSC MENU
Bass Trim
The A/V PROCESSOR offers traditional bass controls, each
with a range of +/-6 decibels.
To Adjust Bass or Treble:
1. From the MAIN MENU, select #5 BASS TRIM.
The BASS TRIM menu appears.
2. Press VOL UP or Down to set level.
3. Press EXIT on the remote or front panel to save settings.
To Calibrate Channel Levels:
. From the MAIN MENU, press #6 CALIBRATION.
1
The CALIBRATION menu appears:
2. Press #s 1-8 to adjust the speaker’s level.
The blinking channel is the one you can adjust.
3. Press the volume controls on the remote or rotate the
ront panel volume control to raise the level in the channel,
f
or to lower it. It is the goal to set all speakers to 75dB.
4. When you have the level set for all of the channels in your
system, press EXIT to save your settings.
P
1 FRONT LEFT O B
2 CENTER O B
3 FRONT RIGHT O B
4 SURROUND RIGHT O B
5 BACK RIGHT O B
6 BACK LEFT O B
7 SURROUND LEFT O B
P
P
P
P
P
P
P
8 SUBWOOFER O B
EXIT,mnb‘“Æ…Ò][
CALIBRATION MENU
INPUT BASS TRIM
1 VCR O B
2 AV1 O B
3 TV O B
4 AV2 O B
CABLE
5
SAT O B
6
7 DVD O B
8 CD O B
P
P
P
P
P
B
O
P
P
P
P
9 TAPE O B
EXIT,mnb‘“Æ…Ò][
ASS TRIM MENU
B
Channel Level Calibration
ound-sound presentation, all of the channels
oper sur
or pr
F
in your system must be balanced, so that they all play at the
same volume as heard from your favorite listening chair. If
one or tw
ound ef
r
sur
adjust channel levels by ear, we strongly suggest you use a
signal-pr
y good and ine
er
a v
meter for “C” weighting and “slow” response.
r
hannels ar
o c
ects less con
f
e le
essur
e louder than the others, it will make
vincing. Alt
vel (SPL) meter instead. Radio Shack makes
e one, model 33-4050. Se
xpensiv
hough it is possible t
o
he
t t
DVD Audio Full Range
This Setting Applies Only to the 7.1 Analog Input.
To set the DVD Audio Full Range Mode:
1. From the MAIN MENU, select #9 DVD AUDIO FULLRANGE.
2. Use the SELECT button on the remote to toggle back and
th between YES and NO. When YES Is selected, all signals
or
f
present at the input will be sent to the output and be
affected ONLY by the VOLUME control. When NO is selected,
e defined by the SPEAKER SIZE settings.
s ar
ilter
he f
t
Channels set to LARGE will receive a full bandwidth signal
while channels set to SMALL will have limited low frequency
emove the low bass frequencies
s r
esponse. Analog f
r
from the signal and redirect them to the subwoofer.
3. Press EXIT on the remote or front panel to save your settings.
ilter
Reset to Defaults
We recommend not using this feature unless there is trouble
with any of the settings you have made. This is a quick way to
n the unit to "out of box" conditions. This will also be
tur
e
r
used when there are updates to the firmware.
1. Press "0" when in the MAIN MENU.
le between YES and NO by using the SELECT button.
ogg
2. T
PLEASE EXERCISE EXTREME CAUTION.
Page 25
Page 26

Operation
POWER
To Turn the A/V PROCESSOR On:
1. Press the MAIN POWER button on the unit’s rear panel.
he STBY indicator on the front panel will glow.
T
2. Press any source button (such as DVD, CBL or VCR) on
the remote control.
To Turn the A/V PROCESSOR Off:
■ Press the STBY button on the front panel or the PWR button
on the remote. The front panel display will disappear.
SOURCE SELECTION
To Select a Source/Input from the Remote Control:
■ Press one of the source buttons (DVD, CD, VIDEO 1, etc.)
on the remote control. The front-panel display will show
the selected source. The on-screen display will also show
the selected source unless you have set OSD MSG: OFF in
the Configuration Menu for that input.
VOLUME CONTROL
Use this control to adjust the volume level of all speakers in
the main zone.
To Adjust Main Volume Level:
■ Press the VOLUME UP or DOWN buttons on the remote, or
turn the VOLUME knob on the front panel. The volume
level will be indicated on the front-panel display and the
on-screen display (unless you have set OSD MSG: OFF in
the Configuration Menu for the currently used input).
The range of the volume control runs from 0 dB to +99 dB.
G THE VOLUME
MUTIN
his control to turn the sound off momentarily, such as
Use t
upted by a phone call.
when inter
r
Dolby Digital, or DTS) currently being played will be available
or you to select. Seven-channel modes such as Dolby Pro
f
Logic IIx Movie cannot be used unless you have seven
speakers connected.
CHANGING STEREO MODES
The A/V PROCESSOR offers several stereo listening models,
including stereo, 5-channel stereo, and 7-channel stereo.
With stereo material, such as CDs or FM radio, all of these
modes are available. With Dolby Digital and DTS material,
most of these modes will be unavailable.
To Change the Stereo Mode from the Remote:
1. Press the STEREO button. The selected stereo mode will be
shown on the front-panel display, and also on-screen
provided you have set OSD MSG: ON in the Configuration
or the currently used input.
menu f
RECORDING A SOURCE
You can record from any input source connected to the A/V
PROCESSOR when you have an audio or video recorder
properly connected to the appropriate output jacks on the
rear panel of the unit as outlined in the section titled
“Connecting Your A/V PROCESSOR.” You cannot monitor the
output of the recorder through the A/V PROCESSOR while
recording is in progress.
To Record from the Currently Selected Input Source:
1. Prepare your recording device. Follow the recommended
procedure from the recorder manufacturer regarding
settings in order to make a recording.
2. Set the device to the record mode and begin recording. The
source audio signals appear at the RECORD OUT/TAPE and
VIDEO 1 RECORD OUT audio jacks of the A/V PROCESSOR.
ce contains a video signal, the output appears at
he sour
If t
both the S-Video and composite VIDEO 1 RECORD OUT
video jacks. Any digital source selected automatically
appear
s at t
he DIGIT
AL OUT jac
ks.
o Mute the Main Volume:
T
Press the MUTE button on the front panel or the remote
.
1
control. The sound will mute and the word “MUTE” will
appear on the front-panel display. The volume in the
second zone will not be aff
2. Press either MUTE button to restore the volume to its
previous level.
CHANGING THE SURROUND MODE
ound and Mode buttons to change the surround
r
he Sur
Use t
ault selected dur
he def
om t
mode fr
Only the modes that can be used with the signal (stereo,
Page 26
ected.
ing in
put conf
igur
ation.
Note: If you change the input source during recording, you
he signals fr
d t
ecor
will r
from that point on.
om the newly selected input source
Multi-Zone Operation
The A/V PR
stereo sound feed to a second zone or room. Using this
capability, you can, for example, watch a DVD movie in your
home t
your bedroom—even though both the DVD player and the
satellite radio receiver are connected to the A/V PROCESSOR.
ou can also contr
Y
second zone individually.
OCESSOR can pro
heater while lis
ol the volume of the main zone and the
vide an independent video and
o a satellite radio receiver in
tening t
Page 27

You can also use the second-zone video capability to feed a
econd video monitor in the main zone, so, for example, you
s
can keep an eye on a sports event or a news crawl while you
are watching a movie.
Multi-Zone Connection Notes
he A/V PROCESSOR’s multi-zone capability works only with
T
analog audio sources. If you are using a digital audio cable to
connect, say, a DVD player to your A/V PROCESSOR, you
should also connect a pair of analog audio cables from your
DVD player to the DVD analog audio inputs of the A/V
PROCESSOR. The digital audio connection will still work in
the main zone, but you will also be able to use the analog
audio from your DVD player in the second zone.
The multi-zone video capability works only with composite
and S-Video sources. Component and DVI video are not
vailable on the A/V PROCESSOR’s multi-zone output. In the
a
second zone, you will need an amplifier and a pair of speakers
for sound, and a TV if you want to watch video sources. You
can use any sound system with a line-level input, and any
video monitor with a composite video input. You can also use
the audio inputs on the TV in lieu of a separate sound system.
Using Second-Zone Capability:
1. Press the Zone button on the remote to display the Second
Zone settings.
2. Select the analog source device you wish to monitor (CD,
DVD, Tuner)
3. Adjust volume as required.
4. To readjust the volume, you must press Zone and make
adjustment within 10 seconds.
NOTE: Making source selections and volume adjustments
must be performed within 10 seconds after selecting ZONE
or the Zone selection will "time-out". You must then re-select
Zone t
o enact se
ttings.
Remote Control Setup & Operation
The A/V PROCESSOR remote control is preprogrammed with
,000 audio and video components.
te codes f
emo
r
Programming is accomplished by simply punching in a
four-digit code number that matches your equipment.
In addition to the A/V PROCESSOR itself, the remote control
can operate up to seven other audio and video devices in
our home entert
y
■ TVs, Monitors and Video Projectors
■ VCRs and TV/VCR Combination Units
■ Cable Bo
■ Satellite Receivers—DirecTV, Dish Network, Primestar, DBS,
and C-band
udio R
■ A
■ Compact Disc Players and Multi-disc Changers
■ DVD Players and Laserdisc Players
or 1
ainment system. They are listed below:
es and Inter
x
eceivers, Preamplifiers and Surround Processors
net Set-top Boxes
■ Cassette Tape Players, DAT, MiniDisc, Switchers, Lighting,
ome Control Devices and Video Scalers
H
For the Best Performance When Operating Your
Remote Control, Please Follow the Guidelines Below:
■ Remember to point the remote control toward the remote
ontrol sensor on the A/V PROCESSOR, not toward the TV
c
screen. Place the A/V PROCESSOR away from strong light
such as direct sunlight or fluorescent light, which can
prevent proper operation of the remote control.
■ Using another remote control of a similar type or placing
the A/V PROCESSOR near equipment which also uses
infrared control may cause operational interference.
■ Do not put objects on the remote control. The buttons of
the remote control may be pressed by mistake and drain
he batteries.
t
■ Make sure any doors covering the front of the
OCESSOR do not have colored or smoked glass.
A/V PR
Placing the unit behind such doors may prevent proper
remote control operation.
■ If there is any obstacle between the remote control and the
remote control sensor, the remote control will not operate.
The remote control also has many advanced features that can
add ease and enjoyment to the operation of your home
entertainment system. After becoming familiar with the layout
of the buttons on the remote (see pages 8 and 9), follow the
steps below to customize the remote for your particular setup.
BATTERY INSTALLATION
The remote control uses two AA 1.5-volt alkaline batteries
(supplied). Be sure to match the batteries with the + and markings inside the battery compartment during installation.
Note: Do not mix new and old batteries or different kinds off
batteries. To avoid corrosion, remove the batteries if the
te control will not be used for one month or more.
emo
r
Remove dead batteries immediately to avoid damage from
corrosion.
To install batteries in the remote control:
1. On the back of the remote, push the tab and lift off the
.
er
v
y co
batter
2. Insert two new AA alkaline batteries. Match the + and -
marks on the batteries to the + and - marks in the case.
he batter
ess t
Pr
3.
click when the cover is locked.
4. Test the unit by pressing PWR and any mode key (i.e.,
UX, CBL, VCR, etc.). If the batteries are inserted correctly,
A
the LED will blink once.
te: The batter
o
N
normal use. When batteries need replacement, the remote
will blink twice with every key press. Simply replace them
emote control will be restored to its
he r
and t
full functionality, including favorite settings.
y cover back into place. The tab should
ies will usually last about six months under
Page 27
Page 28

Using Preprogrammed Codes
The A/V PROCESSOR remote can be programmed to operate
other audio or video components in your system. The AVC
button is used exclusively for control of the A/V PROCESSOR.
To program the remote to control another device, you must
nter a four-digit code. Codes for a wide variety of devices
e
and brands are provided in the following pages. More than
one setup code number may work with your device. You
should test the functions for each of the code numbers that
work with your device to determine the best one for your
particular unit.
The procedure for setting up the A/V PROCESSOR remote to
control a TV/VCR is different—see Programming TV/VCR
Control below.
NOTE: Some devices, such as CD players and DVD players
that do not have power buttons on their original remote
controls, may not shut off during programming. For these
devices, it may be necessary to first store the setup code
number and then test functions like PLAY, STOP, etc, to
determine if the correct number has been selected.
To Program Using Four-digit Codes:
1. Turn on the device you would like the remote control to
operate, either manually or with its original remote control.
2. Find the four-digit setup code number for your device from
the tables on pages 29 through 33.
3. On the A/V PROCESSOR remote, press the component key
(near the top of the remote) that corresponds to the device
you want to control.
You can choose from CBL, AUX, VCR, TV, SAT, CD, or AMP.
NOTE: The codes for controlling DVD players are
ogrammed into the AUX button.
pr
Press and hold SETUP on the remote until the red LED at
4.
he top of the remote blinks twice, then release SETUP.
t
5. Enter the first four-digit code for your component.
The LED should blink twice. If it does no
teps 3, 4, and 5 abov
s
6. Aim the remote at the component and press PWR once.
The component should turn off. If it does not respond,
epeat steps 3, 4, and 5, trying eac
r
until you find one that works. If it still does not work, try
searching for the code (see Searching For Your Code, below).
epeat the process for other components you wish to
R
.
7
control with the A/V PROCESSOR remote.
OGRAMMIN
PR
The A/V PROCESSOR can control TV/VCR combo units, but
G T
e, using the same code.
V/VCR CONTROL
t, then repeat
h code for your brand
the procedure is somewhat different than entering codes to
ontrol other components. As with other components, you
c
must enter a four-digit code. Codes for many TV/VCR brands
are provided in the following pages. More than one setup
code number may work with your device. You should test the
functions for each of the code numbers that work with your
evice to determine the best one for your particular unit.
d
If you want to control TV functions besides power on/off, you
may need to enter a separate TV code, as described below.
To Program TV/VCR Control:
1. Turn on the TV/VCR, either manually or with its original
remote control, and insert a video cassette.
2. Find the four-digit code for your TV/VCR from the tables
on pages 29 to 33. Your TV/VCR may have a separate TV
code listed. If so, be sure to note both codes.
3. On the A/V PROCESSOR remote, press VCR.
Press and hold SETUP until the red LED blinks twice, then
4.
release SETUP.
5. Enter the first four-digit code for your component. If the
code entry is performed correctly, the LED will blink twice.
If it does not, then repeat steps 3, 4, and 5, using the same
four-digit code.
6. Aim the remote at the TV/VCR and press PWR once. The
TV/VCR should turn off. If it does not respond, repeat
steps 3, 4, and 5, trying each code for your brand until you
find one that works. If it still does not work, try searching
for the code (see Searching For Your Code).
7. If your component has a separate TV code listed, press TV
on the A/V PROCESSOR remote. The LED will blink twice.
8. Enter the four-digit TV code for your TV/VCR combo. If the
code is entered correctly, the LED will blink twice. If it does
not, then repeat steps 7 and 8 using the same four-digit code.
SEARCHING FOR YOUR CODE
vice does not respond to the remote after you have
our de
If y
tried all codes listed for your brand, or if your brand is not
listed at all, try searching for your code.
To Search for a Code for Your Component:
1. On the A/V PROCESSOR remote, press the button near the
te for the type of device you want to control.
emo
he r
op of t
t
You can choose CBL, AUX, VCR, TV, SAT, CD, or AMP.
2. Press and hold SETUP until the red LED on the remote
elease SETUP
s twice, t
blink
3. Enter 991. The LED will blink twice.
4. Aim the remote control at the component and slowly
nate between pressing PWR and the button for the
alter
device you pushed in step 1.
5. Stop when the TV turns off.
ess SETUP once.
Pr
6.
7. To search for the codes of your other components, repeat
the process, using the appropriate button for the new
vice in s
de
hen r
teps 1 and 4.
.
Page 28
Page 29

CHECKING THE CODES
BACKLIGHTING
If you have set up the A/V PROCESSOR remote by searching
for the codes, for future reference, you may wish to find out
which four-digit code is operating your equipment.
o Find the Four-digit Code for a Device:
T
1. On the A/V PROCESSOR remote, press the button near the
top of the remote for the type of device you want to control.
2. Press and hold SETUP until the red LED on the remote
blinks twice, then release SETUP.
3. Enter 990. The LED will blink twice.
4. To view the code for the first digit, press 1. After three
seconds, the LED will blink to indicate the first code
number (i.e., 3 blinks = 3). Count the blinks and write
down the number.
5. Repeat step for each of the other three digits. Press 2 for
he second digit, 3 for the third, and 4 for the fourth.
t
Count the blinks and write down the numbers.
6. To check for the codes of your other components, repeat
steps 1 through 5, but substitute the appropriate key in
step 1 for the new component you are checking.
OPERATION
After you have programmed the remote control for your
equipment, use the following procedures to operate the
components of your home entertainment system:
To Operate a Component That You Have Programmed:
1. On the A/V PROCESSOR remote, press the button near the
top of the remote for the device you want to control
(CBL, AUX, VCR, TV, SAT, CD, or AMP).
2. Aim the remote control at the device and press the POWER
button to turn on the device.
3. Press the buttons that send out the commands you desire.
Pressing any button on the A/V PROCESSOR remote
illuminates all the buttons on the remote control for about
5 seconds. The backlight is extended an additional 5 seconds
with any button press while the backlight is on.
Setup Codes
CABLE CONVERTERS
Manufacturer/Brand Setup Code Number
ABC 0003, 0017
Americast 0899
Bell South 0899
General Instrument 0276, 0476, 0810
GoldStar 0144
Hamlin
Jerrold 0003, 0276, 0476, 0810
Memorex 0000
Motorola 1106
Pace 0237
Panasonic 0107, 0000
Paragon 0000
Philips 0305, 0317
Pioneer 0144, 0533, 0877
Pulsar 0000
Quasar 0000
Regal 0273, 0279
Runco 0000
Samsung 0144
Scientific Atlanta 0017, 0477, 0877
Starcom 0003
Toshiba 0000
Zenith 0000, 0525, 0899
0009, 0273
Note: Some audio/video devices have separate buttons for
POWER ON and POWER OFF. To operate these devices on
ess the corresponding device button to turn
te, pr
emo
he r
t
the equipment ON and press the POWER button to turn the
equipment OFF.
Please try all the functions of this remote control with your
equipment. The most common functions are labeled on the
ever, some of the secondary functions might be
w
te. Ho
emo
r
stored under a button that has a different name from the one
on your original remote control.
SOURCE SELECTION BUTTONS
on (VIDEO 1, DVD, etc.) at the bottom
essing a sour
Pr
of the remote control performs the following functions:
■ If the A/V PROCESSOR is in Standby mode, powers up
he unit.
t
■ Selects that source on the A/V PROCESSOR.
ce butt
Page 29
Page 30

CD PLAYERS
anufacturer/Brand Setup Code Number
M
Aiwa 0157
Burmester 0420
Cal. Audio Labs 0029
Carver 0157, 0179
KK 0000
D
Demon 0003, 0873
Emerson 0305
Fisher 0179
Garrard 0420
Genexxa 0032, 0305
Harman/Kardon 0157, 0173
Hitachi 0032
JVC 0072
enwood 0028, 0190, 0826, 0037, 0626, 0681
K
Krell 0157
LX.
Linn 0157
MCS 0029
MTC 0420
Magnavox 0157, 0305
Marantz 0157, 0626, 0029
Mission 0157
NSM 0157
Onkyo 0101, 0868
Optimus 0032, 0468, 0420, 0179, 0305, 1063,
Panasonic 0029
Parasound 0420
Philips 0157, 0626
Pioneer 0032, 0468, 0305, 1062, 1063
Polk Audio 0157
Proton 0157
QED 0157
Quasar 0029
A 0053, 0032, 1062, 0468, 0305, 0179
C
R
Realistic 0179, 0420
Rotel 0157, 0420
AE
S
Sansui 0157, 0305
Sanyo 0179
tt
Sco
Sears 0305
Sharp 0037, 0861
ood
w
Sher
Sonic Frontiers 0157
Sony 0000, 0490
Soundesign
Tascam 0420
Teac 0420
hnics
ec
T
Victor 0072
Wards 0053, 0157
amaha
Y
0305
0000, 0037, 0145
57
1
0
0305
067
1
45
1
0
0029
0036, 0888
DVD PLAYERS
anufacturer/Brand Setup Code Number
M
Apex 0672
Denon 0490
Fisher 0670
GE 0522
radiente 0651
G
Hitachi 0573, 0664
Hiteker 0672
JVC 0623, 0558
Kenwood 0682, 0534
Konka 0719, 0711, 0720, 0721
Magnavox 0503, 0675
Marantz 0539
Mitsubishi 0521
Onkyo 0503
Optimus 0571
itron 0651
Or
Panasonic 0490, 0677, 0632
Philips 0539, 0503
Pioneer 0571, 0525, 0632
Proscan 0522
RCA 0522, 0571
Samsung 0573
Sharp 0630
Sony 0533
Toshiba 0503
Yamaha 0490, 0545
Zenith 0591, 0503
HOME AUTOMATION
Manufacturer/Brand Setup Code Number
GE 0240
One For All 0167
Radio Shack 0240
Security System 0167
ersal X10 0167
niv
U
X10 0167
TELLITE RECEIVERS
A
S
Manufacturer/Brand Setup Code Number
AlphaStar 0772
16
al
r
Chapar
Echostar 0775, 1005
GE 0566
ument
tr
al Ins
Gener
HTS 0775
Hughes Net. Sys. 0749, 1142, 1749
Philips
Proscan 0392
RCA 0506, 0392, 0143, 0855
adio Shac
R
Samsung 1109
Star Choice 0869
Zenit
k
h
02
0869
76, 1142, 0722, 0724, 0749
0
1
0869
0856
Page 30
Page 31

TELEVISIONS
anufacturer/Brand Setup Code Number
M
AOC 0019, 0030
Admiral 0093, 0463
Aiko 0092
Aiwa 0701
kai 0030
A
Alaron 0179
America Action 0180
Anam 0180
Audiovox 0092, 0180, 0451, 0623
Baysonic 0180
Bclmr 0019
Bell & Howell 0016, 0154
Bradford 0180
Brockwood 0019
Broksonic 0236, 0463
C0180
CX
Candle 0030, 0056
Carnivale 0030
Carver 0054
Celebrity 0000
Cineral 0451, 0092
Citizen 0056, 0030, 0060, 0092
Concerto 0056
Contec 0180
Craig 0180
Crosley 0054
Crown 0180
Curtis Mathes 0060, 0030, 0016, 0047, 0051, 0054,
0056, 0093, 0145, 0154, 0166, 0451,
1147, 1347
Daewoo 0092, 0623, 0019, 0624, 0451
Daytron 0019
Denon 0145
Dumont 0017, 0019
oband
Electr
Emerson 0236, 0180, 0178, 0179, 0463, 0624,
vision
En
Fisher 0154
Fujitsu 0179, 0683
Funai
Futuretech 0180
GE 0047, 1347, 0051, 0178, 0451,
Gibralter 0017, 0019, 0030
GoldStar 0178, 0019, 0030, 0056
adiente 0056, 0053
Gr
Grunpy 0179, 0180
Hallmark 0178
vidson 0179
y Da
le
Har
Harman/Kardon 0054
Harvard 0180
hi 0145, 0056, 0016
ac
Hit
Infinity 0054
0000
0623, 0019, 0154
0030
171, 0179
80, 0
1
0
, 0093
7
4
1
1
Inteq 0017
BL 0054
J
JCB 0000
KEC 0180
KTV 0180, 0030
Kenwood 0030, 0019
onka 0707, 0632, 0628, 0638, 0703
K
LG 0056
LXI 0154, 0047, 0054, 0156, 0178
Logik 0016
Luxman 0056
MGA 0150, 0019, 0030, 0178
MTC 0060, 0030, 0019, 0056
Magnavox 0054, 0030, 0179, 1254
Marantz 0054, 0030
Matsushita 0250
Megatron 0145, 0178
ex 0179, 0463, 0178, 0016, 0056, 0150,
Memor
0154, 0250
Midland 0017, 0047, 0051
Motorola 0093
Multitech 0180
NAD 0156, 0166, 0178
NEC 0030, 0019, 0056
NTC 0092
Nikko 0178, 0030, 0092
Onwa 0180
Optimus 0250, 0166, 0154
Optonica 0093
Orion 0463, 0179, 0236
Panasonic 0051, 0250
Penney 0047, 1347, 0060, 0030, 0178, 0051,
0019, 0056, 0156
Philco 0145, 0019, 0030, 0054, 0463
Philips 0054
Pilot 0019, 0030
166, 0679
Pioneer
Portland 0019, 0092
Princeton 0717
ism
Pr
Proscan 0047
Proton 0178
Pulsar
Quasar 0051, 0250
RCA 0047, 1347, 1147, 0679, 1247, 0019,
RadloShack 0180, 0030, 0178, 0154, 0019,
ealistic 0180, 0154, 0030, 0178, 0019, 0056
R
Runco 0017, 0030
SSS 0019, 0180
po
Sam
Samsung 0060, 0019, 0178, 0030, 0056
Sansei 0451
Sansui
0
1
005
, 0019
7
1
00
, 0090, 0093, 1
1
005
0047, 0056
0030
0463
04
7, 14 47
Page 31
Page 32

Sanyo 0154
cimitsu 0019
S
Scotch 0178
Scott 0236, 0019, 0178, 0179, 0180
Sears 0154, 0056, 0156, 0047, 0054, 0171,
0178, 0179
emivox 0180
S
Setup 0156
Sharp 0093, 0688
Shogun 0019
Signature 0016
Sony 0000
Soundesign 0178, 0179, 0180
Squareview 0171
Starlite 0180
Supreme 0000
Sylvania 0054, 0030
phonic 0171, 0180
Sym
TMK 0056, 0178
TNC 0017
Tandy 0093
Technics 0051, 0250
TechnoAce 0179
Techwood 0051, 0056
Teknika 0016, 0054, 0179, 0180, 0 019, 0092,
0056, 0060, 0150
Telefunken 0056
Toshiba 0156, 0060, 0154, 1256
Vector Research 0030
Victor 0053
Vidikron 0054
Vidtech 0019, 0178
Wards 0054, 0178, 0016, 0019, 0030,
0056, 0179
White Westinghouse 0624, 0623, 0463
Yamaha 0019, 0030
h
Zenit
TV/VCR COMBOS
er/Br
actur
Manuf
American High 0035 (for TV use 0051)
Brocksonic 0002, 0294,
Colt
Curtis Mathis 0035 (for TV use 0051)
Daewoo 0278
son
Emer
Funai 0000
GE 0035 (for TV use 0051), 0060 (for TV
0240
Hitachi 0035 (for TV use 0051), 0000
HQ
Lloyds 0000
MGA 0240
Page 32
0017, 0624, 0016, 0092, 0463
Setup Code Number
and
72
00
79
0002, 029
use 004
0000
4, 04
7), 0048 (for TV use 0093),
Magnavox 0081 (for TV use 0054),
035 (for TV use 0051), 0000
0
Magnin 0240
Memorex 0037, 0162 (for TV use 0250)
Mitsubishi 0048 (for TV use 0093)
Orion 0002, 0294, 0479
anasonic 0035 (for TV use 0051)
P
0162 (for TV use 0250)
Penney 0035 (for TV use 0051), 0240,
0162 (for TV use 0250)
Quasar 0035 (for TV use 0051),
0162 (for TV use 0250)
RCA 0060 (for TV use 0047), 0035 (for TV
use 0051), 0048 (for TV use 0093)
Sansui 0000, 0479
Sanyo 0240
Sharp 0048 (for TV use 0093)
y 0032 (for TV use 0000)
Son
Symphonic 0000
Zenith 000)
VCRs
Manufacturer/Brand Setup Code Number
Admiral 0048, 0209
Adventure 0000
Aiko 0278
Aiwa 0000, 0037
Asha 0240
Audiovox 0037
Beaumark 0240
Bell & Howell 0104
Broksonic 0121, 0184, 0002, 0209, 0479
CCE 0072, 0278
Calix 0037
Canon 0035
Carver 0081
78, 0037
Citizen
Colt 0072
Craig 0037, 0072, 0047, 0240
hes
tis Mat
Cur
Cybernex 0240
Daewoo 0278, 0045
Denon
Dynatech 0000
Electrohome 0037
ophonic
Electr
Emerex 0032
Emerson 0184, 0002, 0209, 0278, 0121, 0479,
Fisher 0047, 0104
Fuji 0033, 0035
Funai
GE 0035, 0060, 0048, 0240
Garrard 0000
ideo
Go V
GoldStar 0037, 0038
02
0035, 0060, 0
0042
7
003
, 0043
0000, 003
0000
0432
7
162
Page 33

Gradiente 0000
I-Q 0047
H
Harley Davidson 0000
Harman/Kardon 0038, 0081
Harwood 0072
Hitachi 0042, 0000
ughes Net. Sys. 0042
H
JVC 0067
KEC 0037, 0278
KLH 0072
Kenwood 0067, 0038
Kodak 0035, 0037
LXI 0037
Lloyd’s 0000
Logik 0072
MEI 0035
MGA 0043, 0240
echnology 0240
MGN T
MTC 0000, 0240
Magnasonic 0278
Magnavox 0035, 0081, 0563, 0000, 0039, 0149
Marantz 0081, 0035
Marta 0037
Matsushita 0035, 0162
Memorex 0104, 0047, 0479, 0000, 0037, 0048,
0035, 0240, 1037, 0039, 0162, 0209,
1162, 1262
Minolta 0042
Mitsubishi 0043, 0048, 0067
Motorola 0035, 0048
Multitech 0000, 0072
NEC 0038, 0067, 0104
Nikko 0037
Noblex 0240
Olympus 0035
Optimus 0162, 1062, 1162, 0048, 1262, 0037,
104, 0432
048, 0
1
Orion 0479, 0002, 0184, 0209
Panasonic 0035, 0162, 1162, 1262, 1362,
062
6, 1
1
06
Penney 0035, 0240, 0037, 0042, 0038
Pentax 0042
62, 1162
1
79
Philco
Philips 0081, 0035, 0618, 1081, 1181
Pilot 0037
Pioneer
Polk Audio 0081
Profitronic 0240
oscan 0060
Pr
Protec 0072
Pulsar 0039
Quasar
RCA 0060
RadioShack 0000, 1037
adix
R
Randex 0037
0035, 0209, 04
7
006
0035, 0
0037
Realistic 0000, 0104, 0047, 0048, 0037, 0035
eplayTV 0614, 0616
R
Runco 0039
STS 0042
Samsung 0045, 0240
Sansui 0479, 0000, 0067, 0209
anyo 0047, 0104, 0240
S
Scott 0184, 0121, 0043, 0045
Sears 0037, 0042, 0000, 0035, 0047, 0104
Semp 0045
Sharp 0048
Shintom 0072
Shogun 0240
Singer 0072
Sony 0033, 0032, 0000, 0035, 0636, 1032
Sylvania 0035, 0081, 0000, 0043
Symphonic 0000
TMK
Teac 0000
Technics 0035, 0162
Teknika 0000, 0035, 0037
Thomas 0000
Tivo 0618, 0636
Toshiba 0045, 0043
Totevision 0037, 0240
Unitech 0240
Vector 0045
Vector Research 0038
Video Concepts 0045
Videosonic 0240
Wards 0035, 0060, 0000, 0047, 0240, 0042,
White Westinghouse 0072, 0278, 0209
XR-1000 0072, 0000, 0035
Yamaha 0038
Zenith 0039, 0000, 0033, 0209, 0479
VIDEO ACCESSORIES
Manufacturer/Brand Setup Code Number
anasonic
P
Pioneer 1010
Sensory Science 1126
p
Shar
0240
0048, 0072, 0081, 0149
20
1
1
10
0
1
Page 33
Page 34

Care and Maintenance
Troubleshooting
CLEANING
When the unit becomes dirty, wipe it with a clean, soft, dry
loth. If necessary, first wipe the surface with a soft cloth
c
slightly dampened with mild soapy water, then with a fresh
cloth dampened with clean water. Wipe dry immediately with
a dry cloth. NEVER use benzene, thinner, alcohol or any other
volatile cleaning agent. Do not use abrasive cleaners, as they
may damage the finish of the metal parts. Avoid spraying
insecticide, waxes, polishing agents, or any aerosol product
near the unit.
WHEN YOU ARE AWAY
If you will not be using your system for an extended period
of time, it is always a good idea to turn the unit off using the
MAIN POWER button on the rear panel of the A/V PROCESSOR.
This will prevent the automatic turn on circuits from
accidentally turning the system on during your absence.
For Future Reference
Model Number_______________________________________
Serial Number_______________________________________
Date of Purcha se_____________________________________
Where Purchased ____________________________________
Your new A/V PROCESSOR is designed to provide years of
trouble-free operation. However, the complexity of today’s
ophisticated home theater systems means that you might
s
encounter an occasional problem with your system involving
the A/V PROCESSOR. Listed below are some of the more
common issues you could encounter.
SYSTEM RESET
In rare cases the A/V PROCESSOR’s internal processor may
freeze or lock-up causing abnormal operation. This is common
to all microprocessor-controlled devices when the unit is subject
to excessive static discharge, AC line noise, or power spikes.
In most cases it is easy to solve this problem by simply
unplugging the A/V PROCESSOR from its AC power source for
about five minutes. After waiting, reconnect the power cord
and turn the unit on. If the unit functions normally, no
further action is needed.
In the event that the unit still does not operate properly,
it may be necessary to manually reset the processor. Note,
however, that when the processor is reset you will lose all
settings including digital audio assignments, surround mode
settings, speaker configurations, tuner presets and any other
memory items. For this reason we strongly recommend that
you record these settings so that it is easy to restore them
after resetting the processor.
Symptom Possible Cause Solution Options
Unit does not turn on when remote No AC Power. Make certain AC power cord is plugged into a live outlet.
or front panel buttons are pressed. Make certain rear panel MAIN POWER switch is ON.
No sound from digital audio source Input not properly selected. Make certain the correct digital input is associated to the source.
No DTS when a DVD is playing Incorrect bitstream output Check the DVD player’s setup menus to make certain
from DVD player. DTS output is selected.
Check the disc menu to make certain DTS is selected
No sound from rear Incorrect speaker configuration. Check Speaker Configuration menu to make certain
surround speakers. that surround speakers are set to “small” or “large”.
Unit does not respond to remote Low remote battery power. Change the batteries.
control commands. Remote set to different device. Press the AVC button to make sure the remote is
Remote sensor is obscured. Make certain the front-panel remote sensor is not
blocked or connect an external remote sensor.
No sound from one or more channels.
Poor connections. Check interconnects to the amplifier and connections
from the amplifier to the speakers.
Incorrect surround mode. Check surround mode to make certain it provides output to
all speakers.
Incorrect speaker configuration. Check Speaker Configuration menu to make certain
all speakers are set to “small” or “large”.
Page 34
Page 35

Specifications
odel ATP8700 ATP7700 ATP6700
M
Input Level 200mVrms 200mVrms 200mVrms
Output Level (Preamp) 3.5 Vrms 3.5 Vrms 3.5 Vrms
Input Impedance 15 k Ohms 15 k Ohms 15 k Ohms
Total Harmonic Distortion (Stereo Source) <0.03% <0.03% <0.03%
Total Harmonic Distortion (7.1 Channel Source) 0.003% 0.003% 0.003%
Frequency Response (Stereo Bypass Mode) (±0.3 dB) 20Hz to 20kHz 20Hz to 20kHz 20Hz to 20kHz
Video Bandwidth (Composite and S-Video) 200 mHz 200 mHz 200 mHz
Video Bandwidth (Component) 270 mHz 270 mHz 270 mHz
Stereo Analog Input Level 2 Vrms 2 Vrms 2 Vrms
Signal-to-Noise Ratio 102 dB CCIR-ARM 102 dB CCIR-ARM 102 dB CCIR-ARM
Digital Audio Inputs 4 Coax, 4 Optical 4 Coax, 2 Optical 4 Coax, 2 Optical
Digital Audio Outputs 1 Optical 1 Optical 1 Optical
Analog Audio Inputs 1 Pair Balanced, 7 RCA Pairs 7 RCA Pairs 7 RCA Pairs
Analog Audio Outputs 4 RCA Pairs 4 RCA Pairs 2 RCA Pairs
All Specifications refer to 1 Vrms and 0 dBf digital or 2 Vrms analog input, except when stated.
7.1-Channel Audio Inputs 1 Set RCA 1 Set RCA 1 Set RCA
7.1-Channel Audio Outputs 1 Set Balanced, 1 Set RCA 1 Set RCA 1 Set RCA
Video Inputs (Composite, S-Video, Component, DVI) 4, 7, 3, 2 4, 7, 3, 0 5, 7, 2, 0
Video Outputs (Composite, S-Video, Component, DVI) 4, 1, 1, 1 4, 1, 1, 0 4, 1, 1, 0
Second Zone Audio Inputs 1 Audio In 1 Audio In 1 Audio In
Second Zone Audio Outputs 1 Variable, 1 Fixed 1 Variable, 1 Fixed 1 Fixed
Triggers Main Zone, Zone 2, 12V Main Zone, Zone 2, 12V Main Zone, Zone 2
AM/FM Tuner Yes Yes No
Voltage Automatic Setting 100 VAC to 240 VAC 100 VAC to 240 VAC 100 VAC to 240 VAC
Power Consumption 50 Watts 50 Watts 50 Watts
Chassis Dimensions (W x H x D) Inches 17 x 7 x 12.5 17 x 5.25 x 12.5 17 x 3.5 x 12.5
Chassis Dimensions (W x H x D) Millimeters 431.8 x 177.8 x 317.5 431.8 x 133.3 x 317.5 431.8 x 88.9 x 317.5
Net Weight (lbs/kg) 20/9.1 18/8.2 15/6.8
Shipping Weight (lbs/kg) 28/12.7 26/11.8 21/9.5
The contents of this manual are Copyright ©2007 by Amplifier Technologies, Inc. and may not be duplicated or reproduced by an
means, whether physical, electronic or otherwise without prior written consent from Amplifier Technologies, Inc.
Specifications are those in effect at the time of printing.
Amplifier Technologies, Inc. reserves the right to change specifications or designs at any time without notice.
Crestron is a registered trademark of Crestron Electronics, Inc.
Dolby Digital is a registered trademark of Dolby Laboratories Licensing Corporation. “Dolby”, the
“Double-D symbol,” “Dolby Digital” and “Pro Logic” are trademarks of Dolby Laboratories Licensing Corporation.
“DTS” and “DTS Digital Surround” are registered trademarks of Digital Theatre Systems, Inc.
Page 35
Page 36

 Loading...