

Page 1

ALL-IN-WONDER™ PRO
Installation and Setup
User’s Guide
Version 4.0 P/N 137-70047-40 Rev. D
© Copyright 1998, by ATI Technologies Inc.
All rights reserved, including those to reproduce this guide or parts thereof, in any form without
the express written permission of ATI Technologies Inc.
Features and specifications are subject to change without notice. Trademarks and/or registered
trademarks are the properties of their respective owners:
ALL-IN-WONDER PRO, RAGE PRO TURBO, RAGE II, ATI-TV – ATITechnologiesInc.;
dbx – dbx Professional Products; Direct3D, NetMeeting, WebTV, Windows3. 1x, Window s95,
Windows98, Windows NT – Microsoft Corp.; Indeo, Intercast, Pentium, Pent ium Pro –
IntelCorporation; OS/2, OS/2 Warp, VGA – International Business Machines Corp. ;
VESA – Video Electronics Standards A ssoc ia tion; WaveTop – WavePhore Inc.;
i
Page 2

Disclaimer
The manufacturer (MFR) reserves the right to make changes to this
document and the products which it describes without notice. The
MFR shall not be liable for technical or editorial errors or omissions
made herein; nor for incidental or consequential damages resulting
from the furnishing, performance, or use of this material.
The MFR makes no re pres enta tio n th at th e in te rc onne c tio n of pro du cts
in the manner described herein will not infringe on existing or future
patent rights, nor do the descriptions contained herein imply the
granting of license t o make, use or sell equipmen t constructed in
accordance with this description.
The PCI accelerators have been designed to support the PCI local bus
standards. Some computers use proprietary local bus circuitry and
therefore may not be fully compatible with the MFR’s local bus cards.
Although tested successfully in a wide variety of computer systems, the
MFR cannot be held responsible for any incompatibilities which may
occur between this card and the system configuration you plan to use.
We recommend that you check with the deal er or distributor for your
computer system before installing your card.
Product Notices
Macrovision Corporation
This device is protected by U.S. Patent numbers 4,631,603,4,577,216,
and 4,819,098 and other intellec tual property rights.
The use of Macrovision’s Copy Protection technology in the device
must be authorized b y M acrovision and is intende d for h ome a nd other
limited pay-pe r-view uses o nly, unless otherwise authorized in writing
by Macrovision. Reverse engineering or disassembly is prohibited.
Dolby* Laboratories, Inc.
Manufactured under License by Dolby Laboratori es. This product
contains one or more programs protecte d under internation a l and U.S.
copyright laws as unpublished works. They are confidential and
proprietary to Dolby Laboratories Licensing Corporation. Their
reproduction or dis c lo s ure , in wh o le or in pa rt, or the prod u ction of
derivative works therefrom without the express permission of Dolby
Laboratories Licensing Corporatio n is prohibited. Copyr ight 1992 1997 by Dolby Laboratories, Inc. All rights reserved.
*
”Dolby” and the double-D symbol are trademarks of Dolby
Laboratories.
ii
Page 3

Table of Contents
Getting Started . . . . . . . . . . . . . . . . . . . . . . . . . . . . . . . 5
Using this Guide............................................................................................6
What is ALL-IN-WONDER PRO?...............................................................7
System Requirements....................................................................................9
Other Sources of Information......................................................................10
Using the online manual.......................................................................10
Installing the Hardware and Software . . . . . . . . . . . 11
Preparing Your Computer .................................................................. ...... ...12
Installing the Hardware ...............................................................................12
Installing ATI’s Enhanced Windows® 95 / Windows® 98 Software ........ 16
Installing Enhanced Drivers and
the ATI VIDEO PLAYER for Windows® 95 / Windows® 98........... 16
Input and Output Adapters ..........................................................................19
Windows® 95 / Windows® 98 Volume Control........................................22
TV reception tips..................................................................................23
Using VESA BIOS Extensions
for DOS Gaming..........................................................................................23
Using Your ALL-IN-WONDER PRO. . . . . . . . . . . . . . 25
Using ATI VIDEO PLAYER......................................................................26
The Task control panel.........................................................................26
Switching modes .................................. ..... ...... .................................. ...27
ALL-IN-WONDER PRO — The Control Panels .......................................28
Controlling the audio volume...............................................................29
Muting the audio volume ........................................... ...... ..... ...............29
The Display Panel........................................................................................29
Sizing the Display panel.......................................................................29
Attaching and Detaching Panels..................................................................30
Online Help.................................................................................................. 31
Playing Media Files.....................................................................................32
Playing interactive discs (Video CD 2.0).............................................33
Playing Audio CDs......................................................................................33
Teletext........................................................................................................ 35
MediaNet..............................................................................................35
Intelligent TV Tuner....................................................................................36
Features ................................................................................................36
Using the TV Tuner.............................................................................. 37
Setting up the TV tuner........................................................................38
Validating TV channels........................................................................39
iii
Page 4

Using Your ALL-IN-WONDER PRO (continued)
Zooming and unzooming .....................................................................39
Hot Words ............................................................................................40
Channel Lockout ..................................................................................41
Program Lockout............................................. ..... ................................42
Video Desktop......................................................................................43
Displaying closed-captioned text.........................................................43
Visual Channel Selection .....................................................................44
Scheduled Viewing...............................................................................45
Digital VCR.......................................................................................... 46
TV Magazine........................................................................................47
Instant Replay.......................................................................................48
Secondary Audio Program (SAP)........................................................ 49
Attaching Your TV to the ALL-IN-WONDER PRO Card......................... 49
Capturing Video and Audio.........................................................................51
Capturing still frames...........................................................................52
Capturing video....................................................................................52
Capturing audio and video from your
VCR or camcorder to your ALL-IN-WONDER..................................53
Playing Captured Video and Audio.............................................................55
Editing Captured Video and Audio.............................................................55
ATI VIDEO PLAYER — Advanced Setup................................................56
For Windows® 98 Users... . . . . . . . . . . . . . . . . . . . . . 59
Multiple Display Support in Windows® 98................................................60
WebTV
Interactive Television..................................................................................62
WaveTop™..................................................................................................62
NetMeeting™ 2.1........................................................................................63
®
for Windows................................................................................61
Tips and Tricks. . . . . . . . . . . . . . . . . . . . . . . . . . . . . . 65
Video Email.................................................................................................66
Stop-Motion Animation............................................................................ ...66
Security Camera ..........................................................................................66
Reference . . . . . . . . . . . . . . . . . . . . . . . . . . . . . . . . . . 67
Running Diagnostics....................................................................................68
Troubleshooting Tips...................................................................................69
Basic troubleshooting tips.................................................................... 69
CD audio connectors............................................................................ 71
Video capture .......................................................................................72
To remove the ATI VIDEO PLAYER................................................. 72
ATI Multimedia Channel (AMC)................................................................74
Specifications................................... .................................. ...... ..... ...... ......... 75
ALL-IN-WONDER PRO Video Mode Table.............................................76
Compliance Information..............................................................................78
iv
Page 5

CHAPTER 1
Getting Started
Welcome to the convergence of your PC, TV and video! This
new technology changes the way you view TV, graphics, and
video on your PC.
The ALL-IN-WONDER PRO is a powerful TV, 2D, & 3D
graphics and video accelerator. Its features will take your PC’s
graphics and video capabilities to the next level.
This guide provides all the information you need to install your
ALL-IN-WONDER PRO.
IN THIS CHAPTER...
Using this Guide
■
What is ALL-IN-WONDER PRO?
■
on page 7
5
on page 6
System Requirements
■
Other Sources of Information
■
page 10
on page 9
on
Page 6

6 Getting Started
Using this Guide
The organization of this guide is as follows:
Installing the Hardware and Software
contains step-by-step instructions to help you place your
card in your computer.
Installing ATI’ s Enhanced Windows® 95 / Windows® 98
Software
and ATI Video Player software.
Using Your ALL-IN-WONDER PRO
how you can take advantage of the adva nced new features of
the ALL-IN-WONDER PRO.
For Windows® 98 Users...
Windows
ALL-IN-WONDER PRO.
Tips and Tricks
ways to use your card—video email, stop-motion animation,
and more.
Reference
specifications about your card.
on page 16 describes how to install display driver
®
98 features available with your
on page 65 presents some exciting new
on page 67 provides troubleshooting tips and
on page 59 describes
on page 11
on page 25 explains
Page 7

What is ALL-IN-WONDER PRO?
The ALL-IN-WONDER PRO delivers high-performance 3D
and 2D graphics. You can play games, watch TV or videos,
listen to audio CDs, explore the Internet, and work in
Windows
ALL-IN-WONDER PRO’s adva nced 3D a cceleration gi v es you
detailed color graphics and 3D features like bi-li near texturing,
alpha blending, and fog effects.
ALL-IN-WONDER PRO also provides powerful 2D graphics
features through the Display Properties pag e s:
Settings
®
95 or Windows® 98 as never before .
Customize your desktop settings such
as desktop size, screen resolution and
color depth, and store various desktop
preferences for easy recall later.
Getting Started 7
Panning
Adjustment
Color
Correction
For comprehensive online information on the above features,
just right-click on your des kto p, cl ic k
you want help for, then click the
Set hotkeys to control panning of the
desktop within a Virtual Desktop.
Adjust the position and size of your
screen, as well as manipulate the
screen refresh rate, frequencies and
synchronization.
Correct color tone differences between
real color values and the way your
monitor di splays them, a nd store
various color correction preferences
for easy recall later.
Help
Properties
button.
, select the tab
Page 8

8 Getting Started
ATI’s 3D RA GE accelerator chips p rovide adv anced 3D s upport
and accelerated 2D graphics. Games and software applications
that support the 3D RAGE — including Direct3D applications
— run with fluid motion and in brilliant color.
GRAPHICS ACCELERATOR CHIP
Gouraud shading
-
ALL-IN
WONDER PRO
(
)
PCI
ATI RAGE PRO
TURBO
✔ ✔
ALL-IN
WONDER PRO
(
AGP
ATI RAGE PRO
TURBO
-
)
Perspective correction
Alpha blending
Mip mapping
Bilinear filtering
Z-buffering
3D triangle setup engine
dbx® TV audio
Accelerated
Graphics Port (AGP)
✔ ✔
✔ ✔
✔ ✔
✔ ✔
✔ ✔
✔ ✔
✔ ✔
✔
ALL-IN-WONDER PRO is a part of ATI’s legendary family of
graphics accelerators. Your existing 2D games and applications
will snap to life with 64-bit acceleration and faster, more vibrant
colors.
You can use ALL-IN-WONDER PRO to connect your
computer to a television. This feature is ideal f or playing games,
giving presentations, watching movies, and browsing the
Internet. (For more information, see Using Your ALL-IN-
WONDER PRO on page 25.)
Page 9

ALL-IN-WONDER PRO also turns your PC into an intelligent
TV with the following features:
•Zoom-in
• Scheduled Viewing
• Channel Scanning
• Video capture
• Closed Captioning with “Hot Words” and
“Look Back” features
• Program transcript recording
• TV magazine
• Instant Replay
• Digital VCR with real-time video compression
®
•dbx
stereo audio TV (
different stereo TV standards, ALL-IN-WONDER
PRO TV audio is monaural-only in Europe.)
System Requirements
Getting Started 9
Note
: because Europe uses
Computer system
Expansion Slot
Operating
System
Monitor
Pentium®/Pentium Pro®,
Pentium II
®,
or compatible systems
with PCI Local Bus or AGP bus
32-bit PCI Local Bus (AGP slot for
AGP variants )
Windows®95 or Windows® 98
Graphics features only are supported
under Windows
(3.51, 4.0), and OS/2
®
3.1x, W i ndo ws NT®
®
(2.1, Warp)
VGA, supporting minimum 640x480
resolution.
A Plug-and-Play monitor
that supports VESA ’ s Display Channel
specifications (DDC1 or DDC2b) is
required to take advantage of the
DDC1/DDC2b features.
Page 10

10 Getting Started
Other Sources of Information
If you need additional help or require information that is not
included in this guide, see the following sources of information:
Readme File
This file contains the latest information about your
ALL-IN-WONDER PRO card.
To view the Readme file in DOS
1
Insert the ATI Installation CD-ROM into your CD-ROM
drive.
2
In an MS-DOS window, type
CD-ROM drive letter).
3
Type
README
.
Online Help
D:
(or substitute your
If you require additional inf ormation, you can refer to the on line
help available under Windows
information about using ATI’s enhanced drivers.
For information on ALL-IN-WONDER PRO’s graphics
features, double-click the ATI icon in the lower-right corner of
your screen.
Using the online manual
Your ALL-IN-WONDER PRO comes with an online manual
that describes the extensive features of your card.
To open the online manual
1
Insert the ATI INSTALLATION CD-ROM into your
CD-ROM drive.
If Windows runs the ATI INSTALLATION CD-ROM
automatically, proceed to step 5.
2
In the Windows® 95 / 98 taskbar, click
3
4
5
Run...
Click
Type the following:
(or substitute your CD-ROM drive letter.)
Click the Online Manual icon.
.
®
95 or Windows® 98 for mo re
Start
D:\ATISETUP
.
Page 11

CHAPTER 2
Installing the Hardware and Software
Installing your card consists of three, easy steps.
• Placing the card in your computer
• Installing ATI’s enhanced display drivers
• Attaching input and output cables and optional TV, VCR,
camcorder, etc.
This chapter explains how to place your card in your computer,
how to install the software, and how to connect the input and
output cables.
11
IN THIS CHAPTER...
Preparing Your Computer
■
page 12
Installing the Hardware
■
page 12
Installing Enhanced Drivers
■
and the AT I VIDEO PLAYE R
for Windows® 95 / Windows®
98
on page 16
Input and Output Adapters
■
page 19
Windows® 95 / Windows® 98
■
Volume Control
Using VESA BIOS Extensions
■
for DOS Gaming
on page 22
on page 23
on
on
on
Page 12

12 Installing the Hardware and Software
Turn off the power to your system, and discharge your
body’s static electric charge by touching a grounded
surface — for example, the metal surface of the power
supply — before performing any hardware procedure.
The manufacturer assumes no liability for any damage,
caused directly or indirectly, by improper installation of
any components by unauthorized service personnel. If
you do not feel comfortable performing the installation,
consult a qualified computer technician.
Damage to system components, the accelerator card, and
injury to yourself may result if power is applied during
installation.
Preparing Your Computer
If you are using an operating system other than Windows®95 or
Windo ws
installing your card:
If your current system conf iguration us es special dri vers that are
not 640x480 VGA, you may encounter conflicts with the card.
W e recommend that you f irst reconf igure you r operating sy stem
to use a
installing the card. For more information about changing your
operating system configuration, see your operating system
documentation.
®
98, you may need to do the following before
VGA
driver sup plied wit h your oper ating sys tem before
Installing the Hardware
Now that you have prepared your computer, you are ready to
install your card. If you are not sure whether your
ALL-IN-WONDER PRO is PCI or AGP, compare the bottom
edge of your card with the following illustration:
PCI
AGP
Page 13
Installing the Hardware and Software 13
To install your card
1
2
Remember
to
discharge
your body’ s
static
electricity
by touching
the metal
surface of
the
computer
chassis.
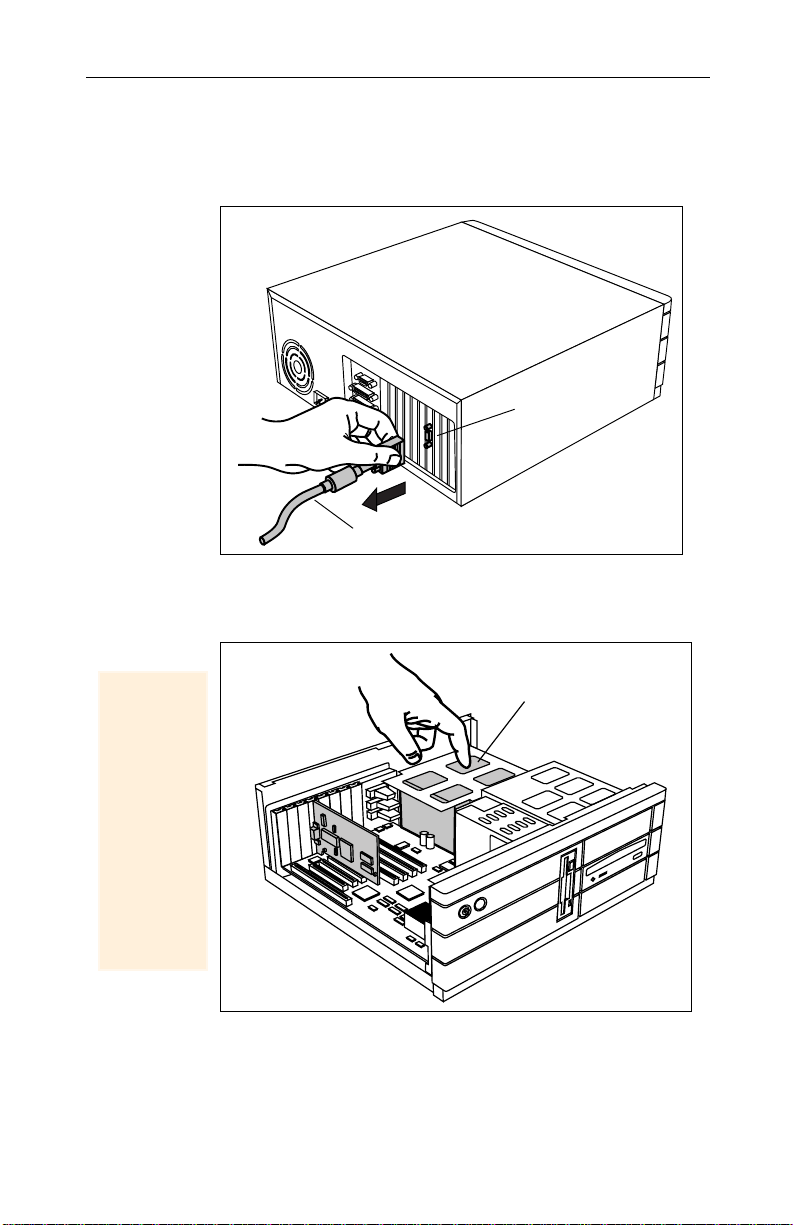
Power-off the computer and monitor
the monitor cable
Remove the computer cover
computer system manual about removing the cover.
from the back of your computer.
VIDEO OUTPUT
CONNECTOR
MONITOR CABLE
. If necessary, consult your
POWER SUPPLY
, then
disconnect
Page 14
14 Installing the Hardware and Software
If you intend to run multiple displays with Windows® 98
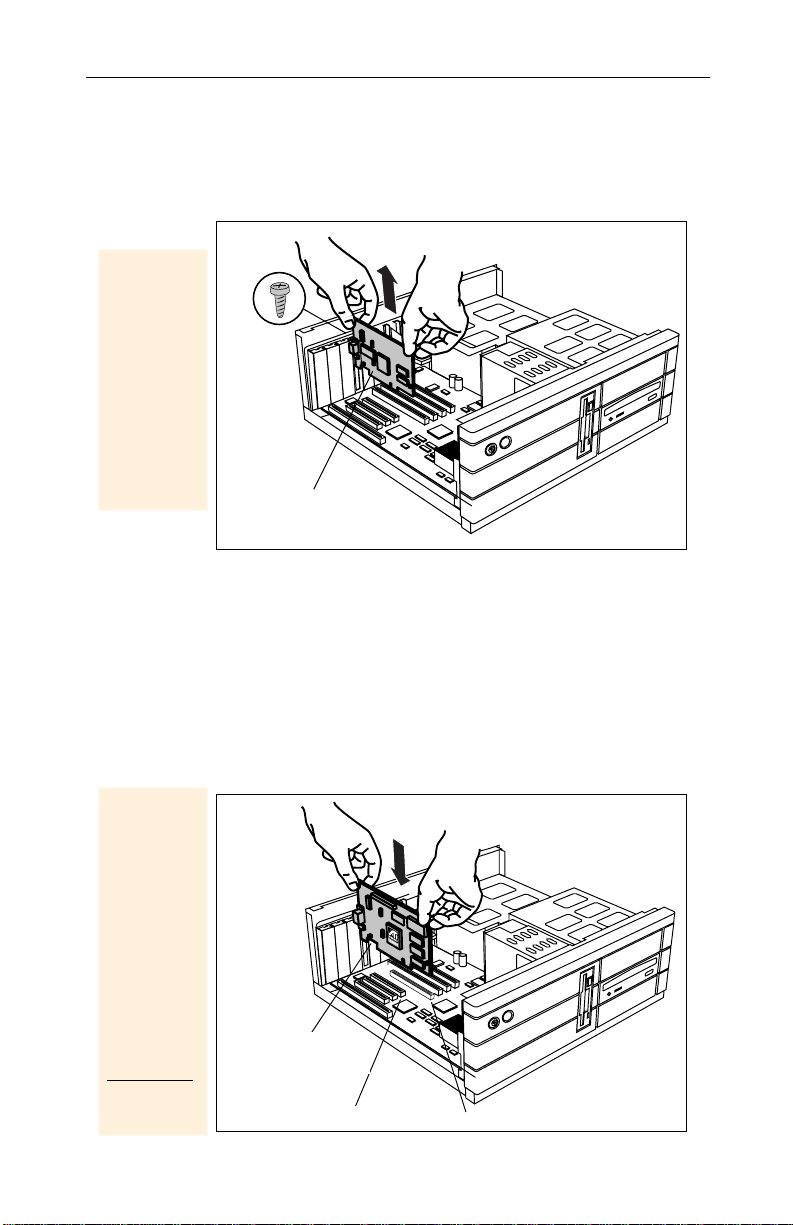
3
If the old
graphics
card sticks,
rock it
gently from
end to end.
Remember
to save the
screw.
(see Multiple Display Support in Windows® 98 on
page 60), proceed to step 4.
existing graphics card
SCREW
OLD GRAPHICS CARD
Otherwise, remove any
from your computer.
4
Grasp the
new card
by the top
edge and
carefully
seat it
firmly into
the correct
slot (PCI or
AGP).
Ensure that
the metal
contacts
are
completely
pushed into
the slot.
Or, if your computer has any
capability
, you may need to
on-board graphics
disable
it on the motherboard.
For more information, see your computer documentation.
If necessary, remove the metal cover from the empty
expansion slot that you select (PCI cards use a PCI slot;
AGP cards use an AGP slot), then
align your new card
with an empty expansion slot, and press it in firmly
until fully seated
ATI 3D GRAPHICS
ALL-IN-WONDER PRO
CARD (PCI OR AGP)
CARD (PCI or AGP)
PCI EXPANSION SLOT
.
AGP EXPANSION SLOT
Page 15
Installing the Hardware and Software 15
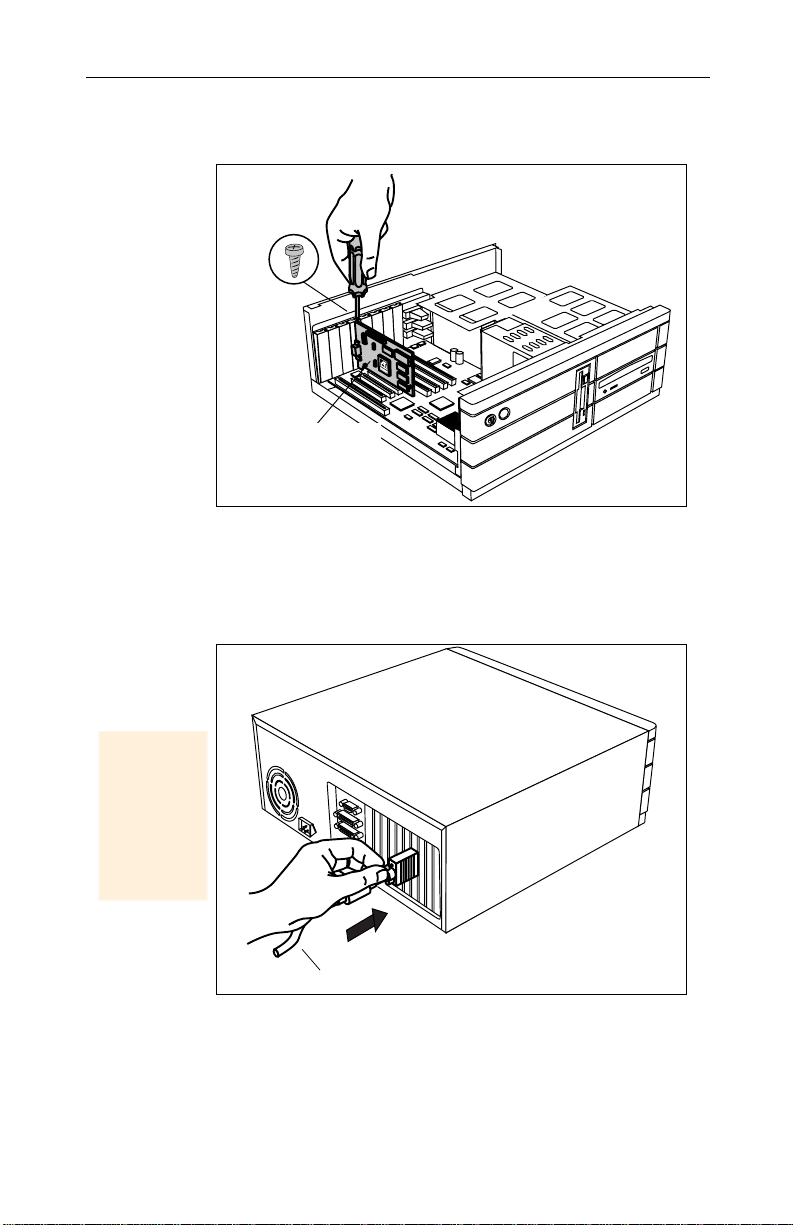
Replace the screw to fasten the card in place
5
the computer cover.
SCREW
ALL-IN-WONDER PRO
ATI 3D GRAPHICS
CARD (PCI or AGP)
Plug the monitor cable into yo ur card
6
multiple displ ays und er Windows
to the appropriate connectors), then
and monitor(s)
CARD
.
, and replace
(if you are running
®
98, connect their cables
turn on the computer
Make sure
your
monitor
cable is
securely
fastened.
MONITOR CABLE
Page 16

16 Installing the Hardware and Software
Installing A TI’s Enhanced
Windows® 95
NOTE
Close all
open ap-
plications
before
installing
your ATI
software.
The ALL-IN-WONDER PRO is designed to function fully
under Windows
other operating systems, it operates as a graphics cards only.
Your computer uses programs called
display information on the screen. ATI’s enhanced drivers give
you enhanced speed, resolution, color depth, graphic utilities,
and 3D features.
Windows® 98 Software
/
®
95 and Windows® 98. When running under
graphics drivers
to
In addition, the ATI VIDEO PLAYER program completes the
functionality of ALL-IN-WONDER PRO.
Installing Enhanced Drivers and the ATI VIDEO PLAYER for Windows® 95 / Windows® 98
WINDOWS®
95
WINDOWS
98
You need to install ATI’s enhanced driver for Windows® 95 or
Windows
performance, resolutions, and special features.
If you are running Windows
computer with your ALL-IN-WONDER PRO card installed,
your system may prompt you to launch a wizard to install the
“Standard PCI Graphics Adapter (VGA)”. Click
®
If you ar e run ning W indo ws
ALL-IN-WONDER PRO card and rebooted your computer,
your system will prompt you to insert the Windows
This is not necessary
®
98 to take advantage of your card’s higher
®
95
, when you first boot your
®
98
, after you hav e installed yo ur
.
CANCEL
®
98 CD.
.
1
Click OK to move to the next instruction.
You will be prompted to locate the Windows
2
Click
CANCEL
.
®
98 CD.
You will now be notified that drivers have not been
installed for your new hardware.
3
Click OK.
Always use the driver provided on the ATI Installation
CD-ROM, or an applicable driver update
.
Page 17

Note
Installing the Hardware and Software 17
Always use the latest version of the ATI Installation
CD-ROM to install ATI display drivers and multimedia
software
the version — a higher number indicates a later version.
All A T I Installation CD-ROMs include a complete set of display
drivers and multimedia software.
Use the
enhanced display driver and the ATI VIDEO PLAYER.
. The last three digits of the CD part number represent
same
ATI Installation CD-ROM to install the ATI
The 5.20 display drivers on your ATI Installation CD-ROM are
the latest and fastest available, but at ATI, we are constantly
improving our products, so check the ATI web site at
http://www.atitech.ca
under
Tech.Support/Driver Updates
for newer , f a ster so ft war e .
T o install the ATI RAGE famil y enhanced driver s
and the A TI VIDEO PLAYER
for Windows
®
95 or Windows®98
From CD:
Insert ATI’s Installation CD-ROM into your CD-ROM
1
drive.
If Windows
®
95 / Windows® 98 runs the ATI
INSTALLATION CD-ROM automatically, proceed to
step 6.
In the Windows taskbar, click
2
Click
3
Type the following:
4
D:\ATISETUP
Run...
.
(If D is not your CD-ROM drive,
Start
.
substitute the correct drive letter.)
Click OK.
5
Click
6
7
Easy Install
Follow the W i zar d’s on-screen instructions to complete the
to begin the installation Wizard.
installation.
For correct resolution and refresh ra te operation, you need
to select a
color palette
display device
. You may also want to change the
from 256 colors (the default) to a higher
number of colors. For instru ctions, refer to ATI’s on-line
help file – simply double-click the ATI icon in the taskbar to
access the on-line help.
Page 18

18 Installing the Hardware and Software
Drivers downloaded from the ATI website:
• Double-click the self-extracting executable file to start the
installation.
Note that the ATI VIDEO PLAYER is downloaded
from the display driver. Always use a
VIDEO PLAYER and display driver
corresponding
.
separately
ATI
N
OTE
To open the ATI VIDEO PLAYER
for Windows
1
In the Windows taskbar, click
2
Point at
3
Point at
4
Click
For information on the ATI VIDEO PLAYER, see the online
help.
Windows will automatically reboot your system
after the drivers are installed.
®
95 or Windows® 98
Start
.
Programs
ATI Multimedia
ATI PLAYER
.
.
.
Page 19
Installing the Hardware and Software 19
d
Input and Output Adapters
NOTE
To hear
audio from
the
television,
you must
make a
connection
between
ALL-IN-
WONDER
PRO and
your sound
card: see
page 21.
For
information
on the CD
audio
connectors,
see
page 71
Your ALL-IN-WONDER PRO card uses input and output
adapters that let you connect audio and video devices to the
card. You can use these adapters to:
• Connect a VCR, laserdisc player, or camcorder, and watch
movies on your PC.
• Connect your camcorder and capture video for use in
presentations, Web pages, or use third-party
videoconferencing software.
• Connect your big-screen TV, and share the PC experience
with a group of people , or pl ay g ames on your big-screen TV.
• Attach a VCR to the video output and record presentations,
games, internet, etc.
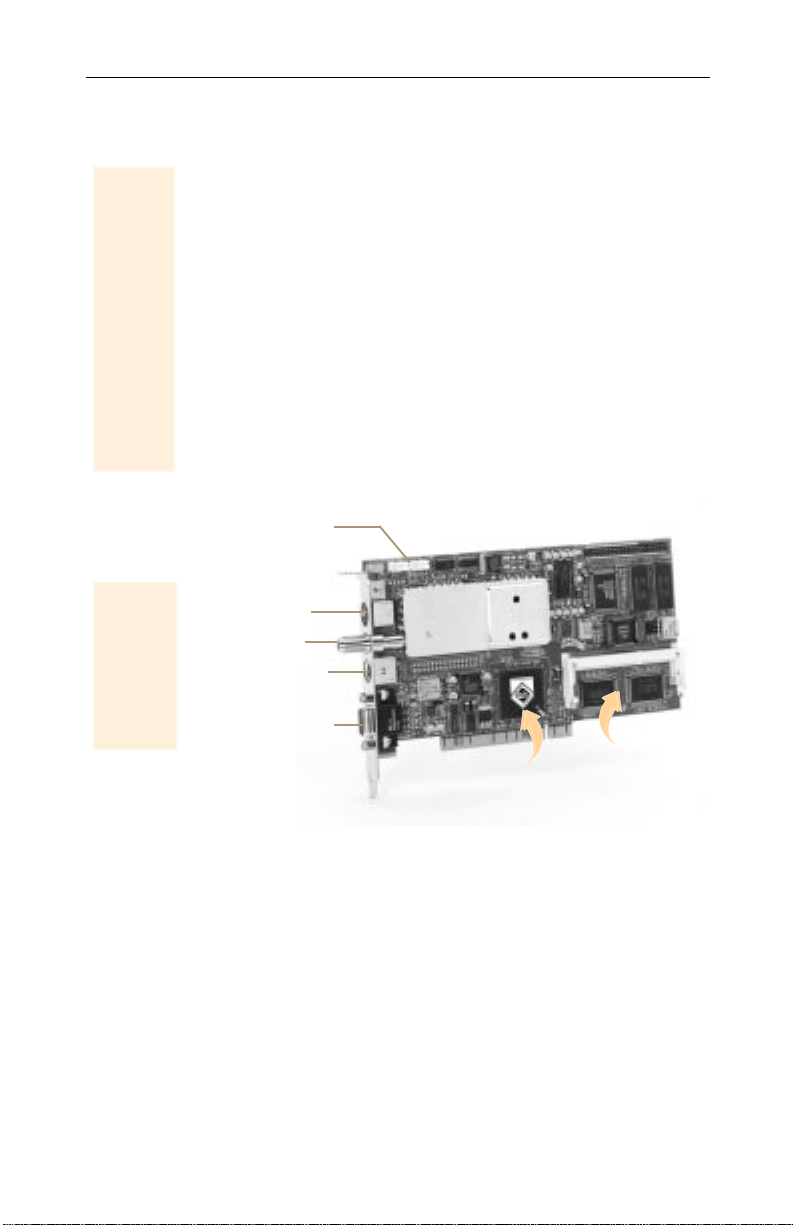
CD audio
CD audio
connectors
connectors
A/V IN
A/V IN
CATV
CATV —
A/V OUT
A/V OUT
monitor
monitor
monitor
connector
connector
ALL-IN-WONDER PRO
SGRAM Memory an
ATI 3D RAGE PRO
Graphics Accelerator
SO-DIMM memory
upgrade socket
Page 20
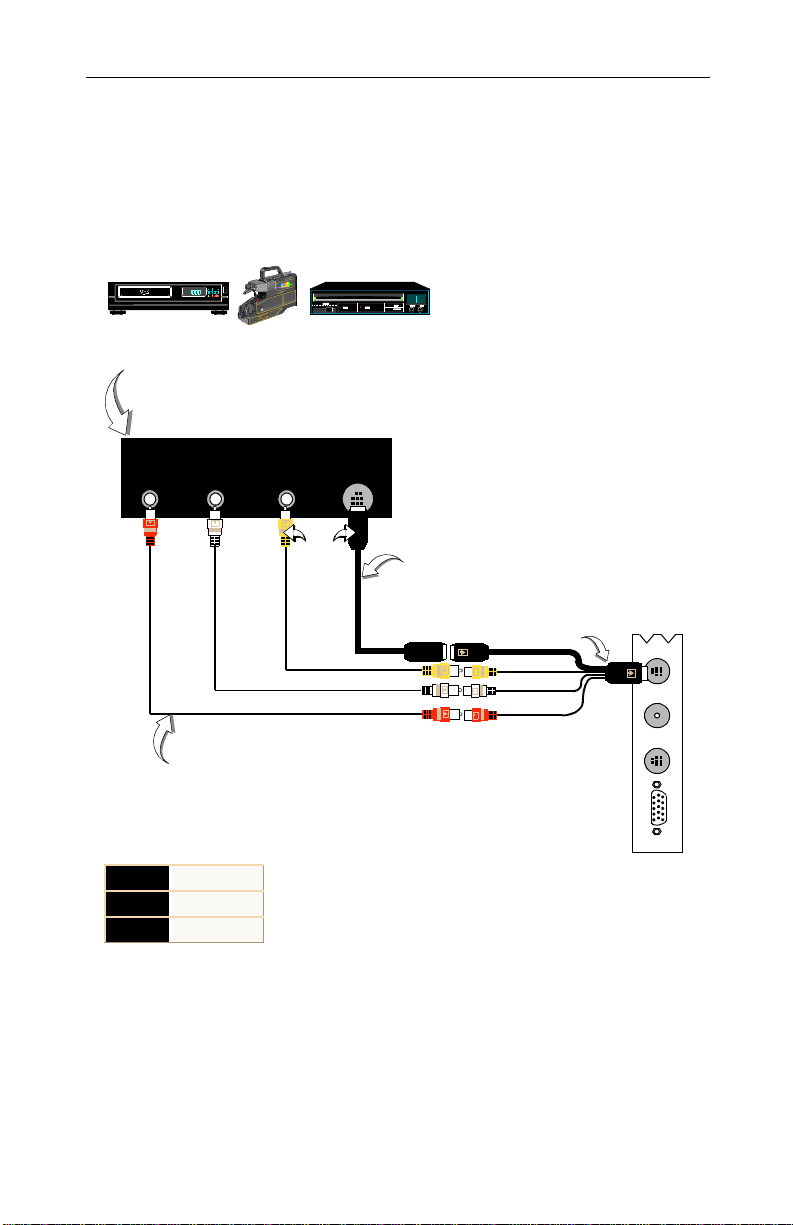
20 Installing the Hardware and Software
To watch movies on your PC or capture
video from your VCR, camcorder, or laserdisc pla yer
Use the 4-headed input adapter to connect a VCR, camcorder,
or laserdisc player to your ALL-IN-WONDER PRO, as shown.
The audio and video
output
connectors on your VCR, camcorder, or
laserdisc player will be similar to these. Use
or
S-VIDEO OUT
R. AUDIO
OUT
L. AUDIO
OUT
Cables with RCA plug at
each end. Your
computer dealer can
supply these.
red
Right audio
white
yellow
Left audio
Video
. S-Video will provide better results.
COMP.
VIDEO
OUT
OR
S-VIDEO
OUT
Cable with S-Video plug
at each end. Your
computer dealer can
supply this.
COMPOSITE VIDEO OUT
4-headed
input adapter
A/V IN
CATV
A/V OUT
ALL-IN-
WONDER
PRO
Page 21
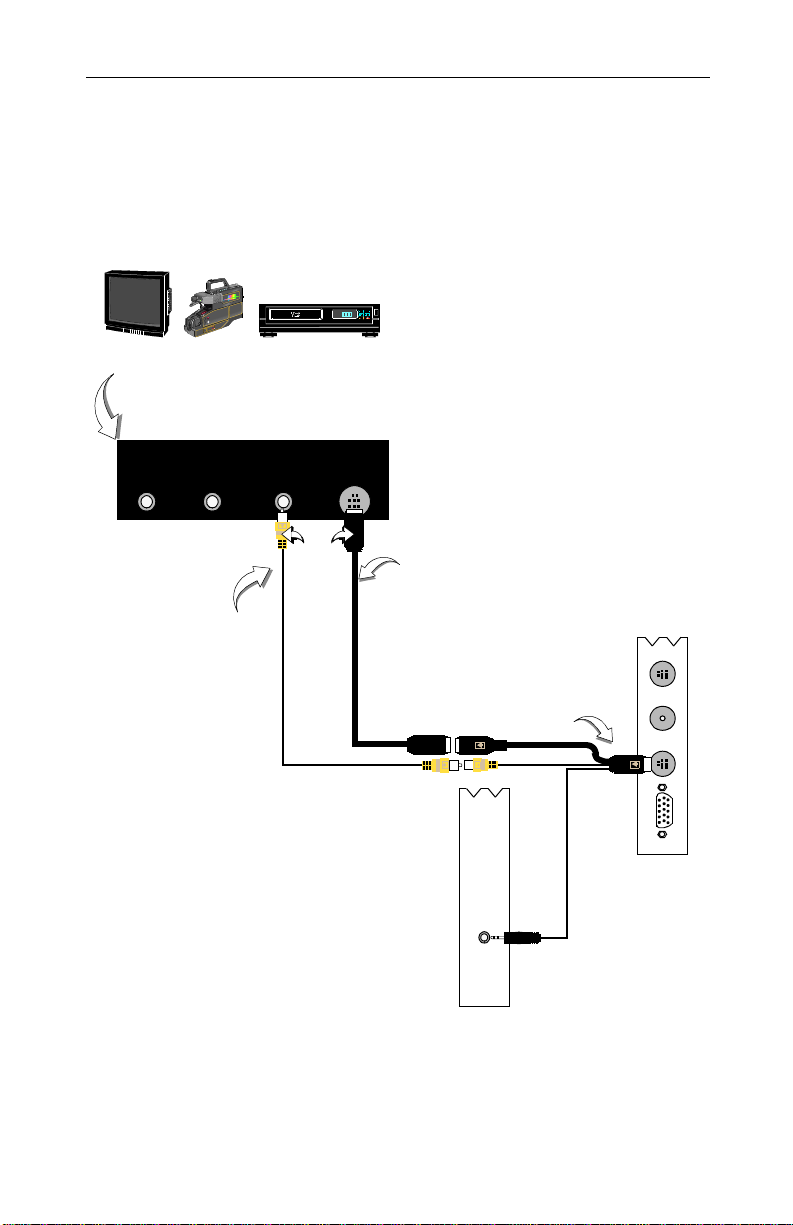
Installing the Hardware and Software 21
To display your PC output on TV
and record your PC output on videotape
Use the 3-headed adapter to connect a TV, camcorder, or VCR
to your ALL-IN-WONDER PRO, as shown.
The audio and video
input
connectors on your TV, camcorder, or
VCR will be similar to these. Use
. S-Video will provide better results.
IN
R. AUDIO
IN
L. AUDIO
IN
Cable with RCA
plug at each end.
Your computer
dealer can supply
this.
COMP.
VIDEO
IN
OR
S-VIDEO
IN
COMPOSITE VIDEO IN
or S-
Cable with S-Video plug at
each end. Your computer
dealer can supply this.
3-headed
output
adapter
SOUND
CARD
VIDEO
A/V IN
CATV
A/V OUT
ALL-IN-
WONDER
PRO
LINE IN
Page 22
22 Installing the Hardware and Software
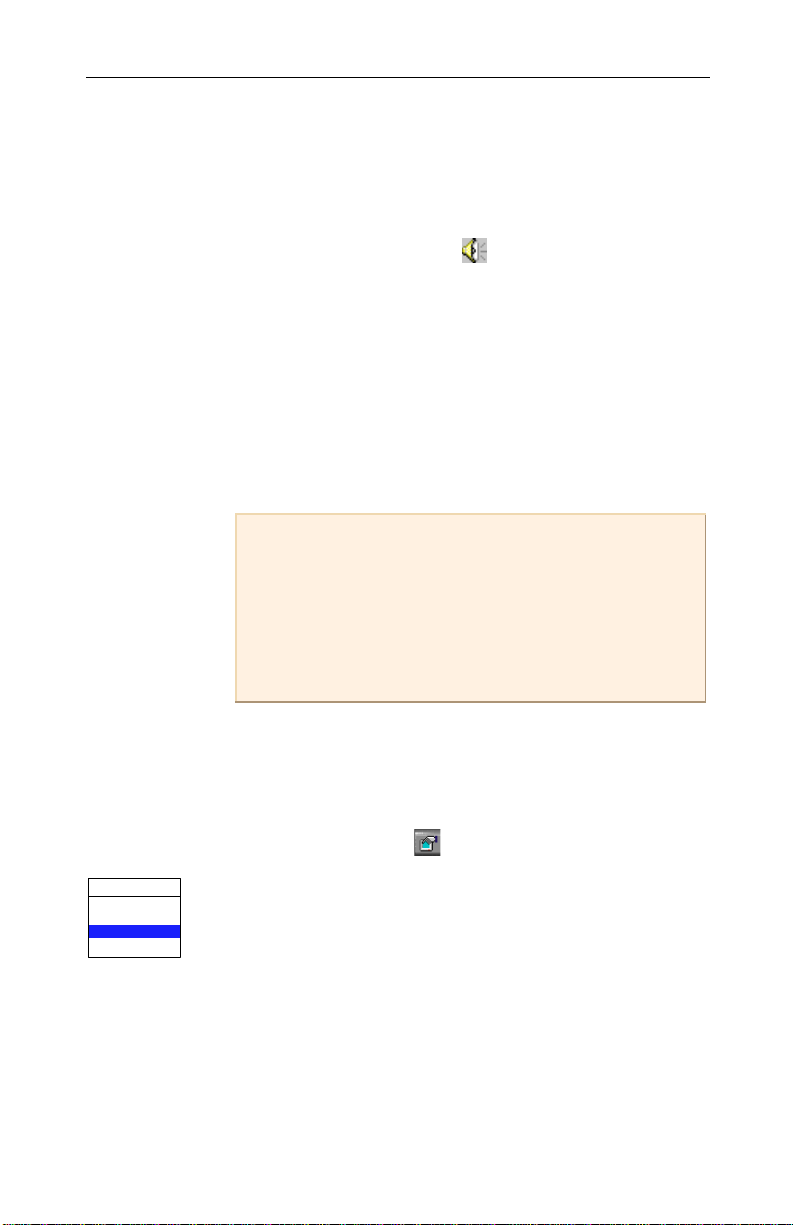
Windows® 95 / Windows® 98 Volume Control
For correct audio performance, your sound card’s line input
must be active. To display the Line Input setting in the
Windows 95
1
Right-click the speaker icon in the Taskbar (usually in
the lower-right corner of your screen).
®
/ Windows® 98 Volume Control panel:
Line-In
MIDI
CD Audio
Line-In
Wave
2
3
4
To select the sound card connector for TV audio input
The sound card connector determines which mixer slider is
controlled by the ATI VIDEO PLAYER’s volume slider.
1
2
3
4
Open Volume Controls
Click
If the Line-In volume slider is not visible, click
.
Mute
Settings
Taskbar
Properties
Line-In
checkbox is checked, click it to cancel
Audio
Video
Audio Input
.
volume control checkbox, then click
, and click
Multimedia
tab, check
.
tab.
then click
Click the
OK
•If the
muting.
If the speaker icon is not in your Taskbar, do the
following:
• In the Windows taskbar, click
• Double-click
•In the
Click the Setup button in the TV Tuner control panel.
Click the
Click the
Select a sound card connector from the drop-down list.
.
Start
Control Panel
.
Show volume control on
list box.
Options
, point to
.
,
Page 23

TV reception tips
Installing the Hardware and Software 23
• In the TV Tuner tab , ensure that you click the
for cable or antenna
• For the best indoor antenna reception, use an
model, and move it as
possible.
.
far away from your monitor
Using VESA BIOS Extensions for DOS Gaming
NOTE
If you do
not play
games
that run
under
DOS, you
can skip
this.
The VESA BIOS Extensions (VBE) feature supports software
using modes compatibl e with VESA sta ndards.
To ensure that VBE works correctly, you can load a DOS TSR
(terminate-and-stay-re sident) pr ogram called M6 4VBE. If your
software and/or games conform to the VBE standard, you
should load M64VBE first.
To install the M64VBE.COM program
1
Restart your computer in MS-DOS mode.
2
Insert ATI’s Installation CD-ROM into your CD-ROM
drive.
3
Type D: (If D is not your CD-ROM drive, substitute the
correct drive letter).
correct setting
amplified
as
4
5
6
7
8
9
10
CD UTILITY
Type
INSTALL
Type
Utilities Installation
Select
Press ENTER to select the default destination directory.
When prompted, let the INSTALL program make changes
to your Autoexec.bat file.
Press ESC to exit the INSTALL program.
Restart your computer.
You are now ready to load M64VBE.
.
.
from the Main Menu.
Page 24

24 Installing the Hardware and Software
To load M64VBE
In MS-DOS mode, at the command prompt, type
To remove M64VBE from your system
1
Restart your computer in MS-DOS mode.
2
At the com mand prom pt, type
For more information, see your DOS documentation for
conditions on unloading TSRs.
M64VBE U
M64VBE.
.
Page 25

CHAPTER 3
Using Your
ALL-IN-WONDER PR O
This chapter explains how to use the special features that your
ALL-IN-WONDER PRO has to offer. Because North
American and European television use different broadcast
standards, closed-captioning and related features are available
only in North America; Teletext is av ailable only in Europe, and
ALL-IN-WONDER PRO TV audio is monaural-only in Europe.
IN THIS CHAPTER...
Using A TI VIDEO PLA YER
■
page 26
Playing Media Files
■
Playing Audio CDs
■
Teletext
■
Intelligent TV Tuner
■
page 36
Attachin g Your TV to the
■
ALL-IN-WONDER PRO Card
on page 49
Capturing Video and Audio
■
page 51
ATI VIDEO PLAYER —
■
Advanced Setup
on page 35
on page 56
25
on
on page 32
on page 33
on
on
Page 26

26 Using Your ALL-IN-WONDER PRO
Using ATI VIDEO PLAYER
In Windows® 95 / Windows® 98
1
In the Windows taskbar, click
2
Point at
3
Point at
4
Click
For information about using the ATI VIDEO PLA YER controls,
see the online help.
Programs
ATI Multimedia
ATI PLAYER
.
.
.
The Task control panel
The Task control panel indicates what mode the pl ayer is in and
what it’s doing. (Your Task control panel may not look exactly
like the illustration—only installed or available features have
controls.)
Context-sensitive help is always available when you press the
F1 key. All control panels provide bubble help; just point your
mouse at a control to see a pop-up description of its function.
Instantly select the function you want –
the Task control panel shows you what’s happening.
Start
.
Page 27

Switching modes
Use the Task control panel buttons to switch between Audio
CD, Media Playback, TV Tuner, Teletext, and Capture mode.
Using Your ALL-IN-WONDER PRO 27
Audio
CD
Media
Playback
TV
Teletext
Capture
Play standard
audio CDs.
Play MPEG and
AVI video files.
Display live video
sources, such as
television
programs.
Display and
navigate European
T eletext, including
FasText.
Capture still
images, video
sequences, or
audio-only.
See
Playing Audio
on page 33.
CDs
See
Playing Media
on page 32.
Files
See
Intelligent TV
on page 36.
Tuner
See Teletext on
page 35.
See
Capturing
Video and Audio
on page 51.
Page 28

28 Using Your ALL-IN-WONDER PRO
ALL-IN-WONDER PRO — The Control Panels
When you select a mode in the Task control panel or press a
shortcut key, the Control panel changes to the appropriate
control panel for that mode. All modes provide contextsensitive help; see
Online Help
Media
Playback
TV Tuner
Teletext
on page 31.
Audio
CD
Capture
You can also use the following shortcut keys to start playback,
TV tuner, capture, CD audio, or Teletext.
CD Audio Press F4
Media
Playback
TV Tuner Press F6
Teletext Press F7
Capture Press F8
Press F5
Page 29

Using Your ALL-IN-WONDER PRO 29
Controlling the audio volume
The TV Tuner, Audio CD Player, and Media Playback
panels have a volume control slider . Use the mouse to mo v e
the slider to increase and decrease audio volume. You can
specify which audio mixer slider to control: click the setup button , then
click the
the drop-down list. For more information, see page 22.
Video
tab. Click the
Audio Input
list box, and select the input fr om
Muting the audio volume
The TV Tuner, Audio CD Player, and Media Playback
panels have a Mute button that you can click to temporarily
turn off the audio. Click the button again or move the
volume control slider to cancel muting.
The Display Panel
The Display panel is the “screen”
where your media plays. It’s a
familiar, TV-style display that you
can resize, place on top of other
windows, and position
automatically in one of nine
locations on the screen.
The F2 key hides/shows the control
panel, to save desktop space.
Sizing the Display panel
You can resize the Display panel using the mouse, the Control
panel buttons, or
Increase size of
Display Panel
Decrease size of
Display Panel
Play full-screen CTRL + F
CTRL
Move the Displa y panel, zo om it to
full-screen, and minimize it as an
icon.
key combination:
CTRL + Up Arrow
CTRL + Down Arrow
Page 30

30 Using Your ALL-IN-WONDER PRO
TV mode
In
panel becomes “thin”. To show/hide the thin Playback panel,
press F2.
, when you play full-screen video, the Playback
You can also use the
160x120 pixels. CTRL+1
240x180 pixels. CTRL+2
320x240 pixels. CTRL+3
640x480 pixels. CTRL+4
Toggle between full
screen and current size.
key to display these preset sizes:
CTRL
CTRL+F
ALT+F
Attaching and Detaching Panels
You can detach ALL-IN-WONDER PRO control panels from
the Display panel, move them to any location on your screen,
and re-attach them. Panels attached to the Display panel share
the Display panel's
settings (For more information, see Display in
PLAY ER — Advanced Set up
To detach a panel
snap window to:
on page 56).
and
always on top
ATI VIDEO
While holding down the Shift key, click
panel edges meet, then
T o attach a panel
Drag
it near the Display panel until its outline changes, then
release
the mouse button. The panels will snap back together .
drag
it away.
the panel where the
Page 31

Online Help
Using Your ALL-IN-WONDER PRO 31
F1
A TI Play er Help
online hel p.
Context-Sensitive Help
available in each panel. Just press the F1 key.
Bubble Help
see a description of its purpose. As you become familiar with
ALL-IN-WONDER PRO, you may want to turn off help —
click the
configuration dialo g (for more infor mat ion, see Display in
Show Bubble Help
VIDEO PLAYER — Advanced Setup
ATI Desktop Help
PRO’s graphics features, double-click the ATI icon in the lowerright corner of your screen.
. Click the Help butto n at an y time to open the
. Context-sensitive help is always
. Simply move the mouse cursor over a control to
checkbox in the
Display
ATI
on page 56).
. For help on your ALL-IN-WONDER
Page 32

32 Using Your ALL-IN-WONDER PRO
Playing Media Files
Click the Media
Playb ack but ton
in the Task
control panel.
The Control
panel changes to
the Playback
panel.
T o view / hide the
Playback panel,
press F2.
You can use the Media Playback panel to play the following
media files:
• MPEG-1 digital audio and video
• MPEG-1 Video CD 2.0 Interactive CDs
Context-sensitive help is always available
when you press the F1 key.
All controls provide bubble help; move the mouse
cursor over a control to see a pop-up description of
its function.
• Karaoke CDs
• .AVI video files
To play a file
1
In the Playback panel, click the File Open button.
2
Select a file from the list.
3
4
Add
Click
, then click OK.
Click the Play button.
The file plays in the Display panel.
For more information on using the Playback panel controls
and features, see the online help.
Page 33

Using Your ALL-IN-WONDER PRO 33
Playing interactive discs (Video CD 2.0)
When playing
Video CD 2.0
discs, the Control
panel changes to
this interactive
panel.
Context-sensitive help is always available
when you press the F1 key.
All controls provide bubble help; move the mouse
cursor over a control to see a pop-up description
of its function.
Playing Audio CDs
Click the Audio
CD button in the
Task control
panel.
The Control
panel changes to
the Audio CD
control panel.
Use the Audio CD pan el to pl ay st an dard au di o CDs . A dvanced
features such as Random play, Intro play (which plays the first
ten seconds of each track) and Loop play are available.
The Audio CD player has its own display window.
Page 34

34 Using Your ALL-IN-WONDER PRO
To play an audio CD
1
Insert the audio CD into your CD-ROM drive.
2
In the Audio CD panel, click the Setup Dialogs button.
3
Click the
Disc Info
tab.
4
From the
desired. T he Play List displays your current selections.
5
Click OK.
6
In the Audio CD panel, click the Play button.
The Audio CD player uses the Windows
Windows
names, and the play list. You can use the Setup dialog to
enter the name of the artist and the disc.
For more information on using the Audio CD controls and
features, see the online help.
Available Tracks
®
98 standard INI file to store disc names, track
list, add or remove tracks as
®
95 /
Page 35

Teletext
European
feature
Click the Teletext
button in the T a sk
control panel
The Control
panel changes t o
the Teletext
panel.
Using Your ALL-IN-WONDER PRO 35
ATI VIDEO PLAYER supports European Teletext, including
FasT ext. Use the Teletext controls to move through major pages
and sub-pages, and randomly select pages. Text is displayed in
the Display panel.
If you are using a thirdparty Teletext
application, the closedcaption button in the
TV Tuner control panel is replaced by a button that launches
your Teletext application.
When you display closed-captioned text in a window, you can
attach and detach the closed-captioned window.
.
Context-sensitive help is always available
when you press the F1 key.
All controls provide bubble help; move the mouse
cursor over a control to see a pop-up description
of its function.
MediaNet
TV-Online from MediaNet is an enhanced teletext program that
can be launched directly from your A TI-TV. After installing the
software, you can launch TV-Online by clicking the teletext
icon in the TV Tuner panel.
Page 36

36 Using Your ALL-IN-WONDER PRO
Intelligent TV Tuner
Now you can watch TV
on your computer!
NOTE
All
channels
may not be
available
in all
countries
.
Features
NOTE
ALL-IN-
WONDER
PRO TV
audio is
only in
Europe
Take
of
98’s
exciting,
new
features:
see
For
98
Users...
-
.
monaural
advantage
Windows
Chapter 4,
Windows
ALL-IN-WONDER
PRO lets you watch up
to 125 cable television
channels and 70 antenna
channels in smooth, fullmotion video on the
whole screen or in a
window.
Capture still frames and
movie clips, channel
surf, and create your
own TV transcripts.
■
Television-quality video in a window and full screen with
dbx® stereo TV audio.
■
Composite Video and S-V i deo inputs
laser-disc player, vi deo game consoles, etc.
■
Capture Video and Audio
■
Live Motion Video Desktop
wallpaper.
■
Channel Scan
■
Zoom-In
■
Closed Captioning
Transcript Creation
ALL-IN-WONDER PRO receives information you want to see.
■
Visual Channel Selection
their “thumbnail” images.
■
Scheduled Viewing
selected TV channels at times you specify.
■
TV Magazine
remove advertisements, including pictures and text.
■
Instant Replay
video, with a 2 to 10 second delay, while you watch TV.
■
Channel Lockout
■
Secondary Audio Program
■
Digital VCR
to your hard drive.
through all available stations in seconds.
to any part of the scr een.
— transcribe close d -captioned broadcasting and
— ALL-IN-WONDER PRO can replay live
— Schedule and record TV shows
Get real-time info rmation when you
want it. Move the TV window, zoom
it to full-screen, and capture video.
for VCR, video came ra,
with a simple mouse click.
, using your favorite TV show as
support (NTSC only), incl uding
Hot Words
and
that alert you when
— select channels by clicking on
— play particular files and/or watc h
Program Lockout
and
for parental control.
.
Page 37

Using the TV Tuner
The TV Tuner displays cable or broadcast television and
smooth, full-motion video on the whole screen or in a window.
You can use the TV Tuner to:
• Watch television on your computer as you work in another
software application.
• Watch a videotape or laser disk movie on your computer.
• Capture, save, and print TV and video images.
• Display and record closed-captioned text.
• Replace your desktop with live TV display.
ALL-IN-WONDER PRO accepts a wide range of video inputs:
TV antenna or cable, VCR, Video camera, laser disk, and video
games.
Click the TV
Tuner button in
the Task control
panel.
The Control
panel changes to
the TV control
panel (in this
illustration, CA TV
is selected).
Using Your ALL-IN-WONDER PRO 37
You can use the
broadcast standard, add and delete channels, and set
closed-caption options (see
Caption
page 56
Or press TAB and use the cursor keys to adjust the picture
on-screen, just like a TV.
Setup
button to adjust color, select the
ATI VIDEO PLAYER — Advanced Setup
in
.)
Video, Tuner,
and
Closed
on
Context-sensitive help is always available
when you press the F1 key.
All controls provide bubble help; move the mouse
cursor over a control to see a pop-up description of
its function.
Page 38

38 Using Your ALL-IN-WONDER PRO
Setting up the TV tuner
Perform these simple steps to set up the TV:
Choose antenna or cable
1
Click the Setup button in TV Tuner mode.
Line-In
MIDI
CD Audio
Line-In
Wave
2
Click the
3
From the list box, select the T V broadcast format ( Antenna,
TV Tuner
tab.
Cable, HRC cable, or IRC cable).
Set up the audio
Select the sound card connector used for TV audio input:
1
Click the Setup button in TV Tuner mode.
2
Click the
3
Click the
4
Select a sound card connector from the drop-down list.
Video
tab.
Audio Input
scroll box.
Scan for available channels
1
Click the Setup button in TV Tuner mode.
2
3
Click the
Click the
TV Tuner
Auto Scan
tab
button in the TV Tuner setup dialog.
The TV Tuner scans for all available channels and stores them
when you click the
Set
button. When scanning is complete, you
can type in a name for each channel.
Page 39

Validating TV channels
Using Your ALL-IN-WONDER PRO 39
When you click the
(see Tuner in
page 56), the TV Tuner scans for all available channels and
stores them. When scanning is complete, you can type in a
name for each channel. Before scanni ng, us e the dr op- down list
box to select the broadcast format and the cable standard.
If you want to change channel assignments, you can use the slider
that appears at the top of th e dialog. F or ex ample, you co uld assign
the ac t u al ch a nn e l 5 t o th e ALL-IN-WONDER PR O’s channe l 2 .
• Double-clicking the slider returns the current channel’s
assignment to normal; for exa mple, s electing ch annel 2 t unes
in channel 2.
• Clicking the
assignments to normal.
ATI VIDEO PLAYER — Advanced Setup
Auto Scan
Zooming and unzooming
Select and
enlarge a portion
of the display by
dragging the
mouse across
the Display Panel
Auto Scan
button in the Tuner setup dialog
button returns all the channel
on
To select and enlarge a portion of the display
1
Click within the display panel.
2
Hold down the mouse button and draw a rectangle around
the area you want to zoom.
T o return your display to normal, click the
in the Control panel.
Unzoom
button
Page 40

40 Using Your ALL-IN-WONDER PRO
Hot W ords
North
American
feature
Have your computer watch TV for you! When you turn on
Closed Captioning, you can specify words and phrases that
ALL-IN-WONDER PRO will detect in the closed-captioned
text. You set Hot Words to begin transcribing the text or to
maximize the TV Tuner when the Hot Words appear.
You specify words using the Hot Words configuration dialog.
(see Hot Words in
on page 56).
To select Hot Words
1
Click the Setup button in TV Tuner mode.
2
Click the
3
Type in the Hot Words that you want.
4
Choose the type of match you want:
Always
With
Without
Within
5
Type in a Second Word where required, then click
ATI VIDEO PLAYER — Advanced Setup
Hot Words
Takes effect when the Hot Word occurs.
Takes effect when the Hot Word occurs,
and is immediately followed by a Second Word.
Takes effect when the Hot Word occurs,if it
is not immediately followed by a Second Word.
Takes effect when the Hot Word occurs,
if it is within a definable number of words
of a Second Word.
tab.
Add
.
6
To allow the ALL-IN-WONDER PRO to maximize from a
minimized state, click the
7
To enable the Hot Word to trigger transcription, click the
Enable Transcripting on match
To enable/disable specific Hot Words
Select the Hot Word from the list and click the Enable/Disable
button
+
appears before enabled Hot Words
appears before disabled Hot Words
-
The Closed Caption button in the TV Tuner panel must be
enabled for Hot Words to function.
Enable Hot Words
box.
box.
Page 41

Channel Lockout
Channel Lockout prevents anyone without the co rrect p assword
from viewing selected TV channels. The firs t time you lock out
a channel, a Channel lockout dialog prompts you for a fourcharacter password.
To lock out a channel
1
NOTE
If you
forget your
password,
you must
uninstall
and
reinstall
your ALL-
IN-
WONDER
PRO
software to
view
password-
protected
programs
.
Click the Setup button in TV Tuner mode.
2
Click the
3
Select the channel you want to lock out, and click the box
to the right of the channel name.
4
Type in a four-character password.
5
Retype the password.
The box to the right of the channel name turns into a
padlock.
6
Click OK.
• The channel up and channel down buttons in the TV
Tuner panel skip locked-out channels. The only way to
select a locked-out channel is to enter the channel name
or number, and type the password when prompted.
Using Your ALL-IN-WONDER PRO 41
TV Tuner
tab.
• When a password is active, you will be prompted to en ter
it when you select the TV Tuner dialog. If you do not
enter the password, the TV Tuner dialog will open, but all
controls will be disabled; this prevents anyone from
changing tuner settings if they do not have the correct
password.
To unlock a channel
1
Click the Setup button in TV Tuner mode.
2
Click the
3
Type in your four-character password.
4
Select the channel you want to unlock, and click the
TV Tuner
tab.
padlock to the right of the channel name.
Page 42

42 Using Your ALL-IN-WONDER PRO
Program Lockout
When you use the TV Tuner, Program Lockout lets you block
particular programs at specific times, and set a password to
unlock them. Use the Program Lockout Dialog to specify
programs, times, and duration.
To lock out a program
1
NOTE
If you
forget your
password,
you must
uninstall
and
reinstall
your ALL-
IN-
WONDER
PRO
software to
view
password-
protected
programs
.
Click the Setup button in TV Tuner mode.
2
Click the
3
Select the program you want to lock out, and click the box
TV Tuner
tab.
to the right of the channel name.
4
Type in a password.
5
Retype the password.
6
Click OK.
Page 43

Video Desktop
To replace your desktop pattern with live TV display
when you minimize the A TI Video Player
1
Click the Setup button .
Using Your ALL-IN-WONDER PRO 43
2
Click the
configuration dial og (see Display in
— Advanced Setup
3
Minimize the Player.
A Player icon appears in the Taskbar. Click the icon to
display a small control panel that you can use to change
channels and control the volume. Closed-captioned
information is not displayed.
Vid eo Desktop
on page 56).
checkbox in the
Displaying closed-captioned text
North
American
feature
You can display closed-captioned text that is broadcast with
NTSC television programming. ALL-IN-WONDER PRO also
displays closed-captioned text in NTSC videotapes that contain
closed-captioned material.
• In full-screen, the text overlays the video, as in standard TV.
• When you play video in a window, you can optionally
display the text in a separate window.
To display closed-captioned text
Click the Closed Caption button in the TV Tuner panel.
Display
ATI VIDEO PLA YER
T o display the text overlaid on the video
1
Click the Setup button .
2
Click the
Caption
Display over video
configuration dialog (see Closed Caption in
checkbox in the
VIDEO PLAYER — Advanced Setup
T o create a closed-captioned transcript
Click the
Closed Caption
Create Transcript in File...
configuration dial og (see Closed Caption in
checkbox in the
ATI VIDEO PLAYER — Advanced Setup
Closed
ATI
on page 56).
on page 56).
Page 44

44 Using Your ALL-IN-WONDER PRO
Visual Channel Selection
You can browse through several TV channels simultaneously,
and select channels by clicking on “thumbnail” images
(miniature representations) of the channels. Each thumbnail
displays the channel number, and is regularly updated to display
the current program.
• If any channel in the selection list is a locked-out channel, a
password is required to access it. If a password is not
entered, only unlocked channels are displayed.
• After an autoscan, all detected channels are included in the
selection list. A magnifying glass appears to the left of the
lock-out icon. Click the magnifying glass bu tton to add or
remove the channel from the selection list.
• Most controls are disabled during Visual Channel Selection.
T o use Visual Channel Selection
1
Click the magnifying glass button in the TV Tuner
control panel.
A grid of thum bnails appears over your TV d i splay.
2
Click the thumbnail for the channel you want to preview.
The channel you clicked becomes “live”, and plays video
and audio for a few seconds.
3
To select a channel for viewing, double-click a thumbnail.
The grid of thumbnails disapp ears, and the selected channe l
appears on your screen.
Page 45

Scheduled Viewing
Scheduled viewing lets you set up the ATI VIDEO PLAYER to
play particular files and/or watch selected TV channels at times
you specify.
When you install the ATI VI DEO PLAYER, the Scheduler
program is added to your Windows Startup file, so that it runs
every time Windows is started. A warning is displayed
whenever you click OK after adding an item to the scheduled
viewing list.
To use Scheduled Viewing
1
Click the Setup button in TV Tuner mode.
Using Your ALL-IN-WONDER PRO 45
2
Click the
3
Fill in the events and times you want to schedule.
• Events whose da te ( On Mon t h & Da y ) has pas se d are n ot
automatically removed. To re-activate an event, set its
Month & Day to today or later.
• If the Player setup dialog is open, or if the About Help...
box is being displayed, the Player cannot pro cess events.
If an event occurs , a war ning notif ies you that a partic ular
event was not processed.
• When the Player first runs, if there are any scheduled
events recor ded and the scheduler program is not runni ng,
a warning tells you that the scheduled events will not be
processed.
Schedule
tab.
Page 46

46 Using Your ALL-IN-WONDER PRO
Digital VCR
NOTE
Your
existing
capture
settings
will be
used. See
Capturing
Video and
Audio on
Page 51.
You can use your ALL-IN-WONDER PRO to record a TV
channel at a specified time, for a specified duration.
1
Click the Setup button in TV Tuner mode.
2
3
Click the
Click
Schedule
tab.
Do: Record TV
, and select the channel you want to
record.
4
Type the date and time for recording.
5
Type the file name and location.
6
Type the number of minutes to record.
7
Click OK and minimize or close the Player.
The Player will pop up at the specified time.
Page 47

TV Magazine
Using Your ALL-IN-WONDER PRO 47
North
American
feature
When you use the TV Tuner, TV Magazine lets you transcribe
closed-captioned broadcasting, including pictures and text.
Files are saved in RTF (Rich Text Format), which preserves
formatting and can be used in many word processors.
To use TV Magazine
1
Click the Setup button in TV Tuner mode.
2
Click the
3
Click
4
Click the settings you want.
Image Layout
Automatic case
conversion
Black & White
pictures
Picture rate
TV Magazine
tab.
Enable TV Magazine
Lets you save transcripts in four text
and picture layouts.
Converts all characters to upper- or
lower-case.
Saves images as black & white only , to
conserve disk space.
Specifies the number of lines of text
between each picture.
in the TV Magazine dialog.
Automatically skips commercial
Remove
advertisements
advertising when you display or
transcribe closed-captioned text. It
works best with programs that use
scrolling transcripts rather than “text
bubbles” to record closed-captioned
text; for example: Talk shows, News
broadcasts, Sports, and Soap operas.
(Depending upon the closedcaptioning format, commercials may
occasionally be recorded—a little
experimentation will show you how to
get the best results.)
Page 48

48 Using Your ALL-IN-WONDER PRO
Instant Replay
Instant Replay lets you rep lay l ive video, with a 2-to-10-second
delay, while you watch TV. You can:
• Pause and restart capture
• Search, pause, and play the captured video
• Copy the current frame to the Windows Clipboard in RGB24
(24-bit color) format.
NOTE
If your
display is
set to
32bpp,
Instant
Replay
may not
work
correctly.
T o start Instant Replay
Click the Start Instant Replay button in the TV Tuner
control panel.
T o display the Instant Replay panel
Click the Show Instant Replay button in the TV Tuner
control panel.
The Instant Replay panel opens b eside the D isplay p anel, and
plays the recorded video with the delay you specify.
Move the delay
slider left to
decrease delay
time to a
minimum of 2
seconds.
Move it right to
increase delay
time to a
maximum of 10
seconds.
To display or hide the Instant Replay panel
Click the Show Instant Replay button in the the TV Tuner
control panel.
Page 49

Using Your ALL-IN-WONDER PRO 49
Secondary Audio Program (SAP)
NOTES
Not all
television
stations
broadcast
stereo or
SAP
ALL-IN-
WONDER
PRO TV
audio is
monaural
only in
Europe
SAP
stereo is
not
available
in Japan.
The Secondary Audio Program can be used to broadcast, for
example, language translations, reading services for the visually
impaired, weather forecasts, or information about a show.
To hear the Secondary Audio Program,
or to switch from stereo to mono
.
Click the SAP button in the TV Tuner control panel to hear
the Secondary Audio Program.
-
Click the SAP button again to hear monaural TV from the left
channel and the Secondary Audio Program from the right
.
channel.
Click the SAP button a third time to hear monaural TV.
Clicking the SAP button again returns to stereo audio (the
default).
Attaching Your TV to the ALL-IN-WONDER PRO Car d
Using your ALL-IN-WONDER PRO card, you can connect a
television set as your computer’s display. You can use your
ALL-IN-WONDER PRO card to do the following:
• View computer output directly on your television in either
NTSC or PAL formats
• Connect using Composite or S-Video output capabilities
• Display images on both the TV and PC monitor
simultaneously
• Provide a big-screen ex perience fo r entertainment PCs that is
ideal for playing games, giving presentations, watching
movies, and browsing the Internet
To connect your graphics card to a television
1
Turn off your computer and your television.
2
Determine if your television has an S-Video connection or
an RCA video-in connection.
Page 50

50 Using Your ALL-IN-WONDER PRO
3
Looking at the back of your computer, locate your graphics
card (see diagram below).
ALL-IN-WONDER PRO Connectors
NOTE
You must
attach a
TV before
enabling
TV output
A/V IN
CATV
A/V OUT
4
Connect the supplied output cable adapter to the A/V OUT
Composite video, S-Video and
audio input adapter connection
Cable or TV antenna input
Composite video, S-Video, and
audio output adapter connection
Graphics connector to monitor
connector on the ALL-IN-WONDER PRO.
5
Using a cable with either S-Video or RCA connectors,
attach one end of the cable to the output cable adapter and
the other to your televisi on .
6
Turn on your computer and your television.
If there is no display , you may need to enable the television
output capability.
detailed cabling di ag rams and audio conn ectio ns
For
Input and Output Adapters on page 19.
T o enable the television display
1
In the Windows taskbar, click
2
Point to
3
Click
4
.
Double-click
5
Click the
Settings
.
Control Panel
Display
Settings
tab.
.
.
Start
, see
.
6
Check the
Television
checkbox to enable the television
display.
For more information about television display, click Help.
Page 51

Using Your ALL-IN-WONDER PRO 51
Capturing Video and Audio
Still images.
images from MPEG movies, your camcorder, or television, save
them on your computer’s hard disk, and print them. The images
are placed on the clipboard, or you can display them in their
own window as “thumbnails” (miniature images).
ALL-IN-WONDER PRO saves still images as Windowsstandard bitmaps (.bmp). It also supports most industrystandard graphics file formats, so you can insert the images into
reports, presentations, letters, and other documents, to add
impact to training applications and presentations.
Full-motion video.
stream of full-motion video plus audio from your video source
and save it as an .AVI file on your computer’s hard disk.
Click the Cap ture
button in the T a sk
control panel
.
You can capture full-color, 24-bit-per-pixel still
You can use the “Digital VCR” to capture a
Use the VCR setup dialog to specify recording quality,
recording time, and target drive for captured video.
The status box displays the amount of time ava ila b le
for recording at the quality setting you specify.
The Control
panel changes t o
the Digital VCR.
Context-sensitive help is always available
when you press the F1 key.
All controls provide bubble help; move the mouse
cursor over a control to see a pop-up description
of its function.
Page 52

52 Using Your ALL-IN-WONDER PRO
Capturing still frames
T o capture still frames
Click the camera button to capture the current frame.
To review captured images
Click the image's thumbnail.
• If the selected image has
red border. If it
has
• If an unselected image
not
has
been saved, there is no border.
You can use the buttons at the top of the still capture window to
save
the captured image,
desktop pattern
.
If you try to delete an unsaved still frame, the system prompts
you to save it before deleting. If there are multiple unsaved
frames, the Delete All button deletes them without displaying
dialogs.
For information on setting up capture files, see Still Capture in
ATI VIDEO PLAYER — Advanced Setup
not
been saved, the thumbnail has a
been saved, the border is green.
has
been saved, its border is grey . If it
delete
it,
print
it, or make it into a
on page 56.
Capturing video
You can capture video in two ways:
•As a
You also have the option of capturing only audio.
•As a
To capture a stream of video and audio
Click the Record Video button in the Digital VCR.
ALL-IN-WONDER PRO starts recording video and audio.
NOTE
Audio is
not
captured
in this
mode
To capture a sequence of frames
Click the Capture Sequence button in the Digital VCR.
Each time you click the Capture Sequence button,
ALL-IN-WONDER PRO records a frame.
.
stream o f video and audi o
sequence of still frames
that you save in an .AVI file.
that you save as an .AVI file.
Page 53

Using Your ALL-IN-WONDER PRO 53
The quality of the video that you capture depends on the
following cond iti o ns:
• speed of your system (CPU)
• amount of system memory (RAM)
• performance of your hard disk
• size of the video capture window
• Video codec (encoder-decoder) used:
YUV9
ATI VCR 1.0
ATI VCR 2.0
For information on setting up capture files, see VCR Setup
Advanced VCR setup in
Setup
on page 56.
Produces the best quality, but uses the
most memory.
Requires a Pentium 166 or faster, and
dramatically reduces disk space required.
Uses on-the-fly compression to achieve up
to 9:1 compression over YUV16, and
requires an MMX or Pentium II class
machine.
ATI VIDEO PLAYER — Advanced
Capturing audio and video from your
VCR or camcorder to your ALL-IN-WONDER PRO
Your ALL-IN-WONDER PRO provides you with the ability to
capture audio and video data from videotape to digital format
on your PC. This allow s you to use your computer as a digital
studio to edit, enhance, and share your videos!
Follow the hardware installation instructions on page 20 of this
guide to correctly attach the audio and video cables between
your ALL-IN-WONDER PRO and VCR or Camcorder.
and
1
Turn your computer on.
2
In the Windows taskbar, click
3
4
5
Point at
Point at
Click
Programs
ATI Multimedia
ATI PLAYER
.
Start
.
.
.
Page 54

54 Using Your ALL-IN-WONDER PRO
6
Click the
7
Click the icon of the input source you intend to capture
from (cable, composite or S-Video)
8
Verify that the source material is displayed in the preview
window.
In the
color, tint, bright ness, and contrast to the desired level.
The following settings can be made in the
under the
9
elect the
S
that the higher the quality, the less video you will be able to
store on a given disk).
10
If you want to override the standard capture settings and
manually select the video format, frame rate, audio format,
or pre-allocate disk space for capturing, click the
Advanced
11
Next, under
minutes you would like to record, OR select
SPACE is pressed
or record until your disk is full.
12
Select the drive you wish to record to under
drive
capture
Setup
VCR
.
icon on the upper toolbar.
menu, under the
tab.
recording quality
setting.
Record for ___ minutes
if you want to manually stop recording
Video
tab you can adjust the
Setup
you would like to use (note
, enter the number of
Stop when
Record to
menu,
13
Click OK to accept the changes, then click OK to exit the
setup menu.
14
Click the
15
Cue your VCR or Camcorder to the location you would like
to start recording from.
16
Click OK to start video capture. Please note that you
cannot use your keyboard or mouse whi le capturing. Also
note that a countdown timer on the Video Player toolbar
indicates an estimate of the amount of disk space you have
available for capturing.
17
Press
finished capturing.
18
Select a file location and name to save your captured file to.
Capture Video
SPACE
or click the mouse button when you are
icon to set up for capturing video.
Page 55

Using Your ALL-IN-WONDER PRO 55
Playing Captured Video and Audio
To play captured video and audio
Click the Play button in the Digital VCR.
ALL-IN-WONDER PRO plays your captured file.
Editing Captured Video and Audio
The video editing feature lets you mark start and end points in a
captured clip, and save only the portion that you select.
Click the F rame
Edit button in the
Digital VCR.
The Digital VCR
changes to the
Editing panel.
Context-sensitive help is always available
when you press the F1 key.
All controls provide bubble help; move the mouse
cursor over a control to see a pop-up description of
its function.
Page 56

56 Using Your ALL-IN-WONDER PRO
ATI VIDEO PLAYER — Advanced Setup
ALL-IN-WONDER PRO’s default settings should work well
for most uses. You can also use the Setup dialogs to fine-tune
the settings for your particular purposes.
When you click the Setup button in the Task control panel,
you can choose a dialog to set up the following (some dialogs
only appear in certain modes):
Sets up the display’s general appearance and functions.
• Adjust panel size.
• Set panel snap-to grid location and always-on-top.
Display
Still
Capture
Video
TV Tuner
Closed
Caption
(NTSC
video only)
• Turn bubble help on/off.
• Turn ixed aspect ratio on/off.
• Assign a Hotkey to hide the player.
• Replace your desktop pattern with live TV.
Controls how still frames are captured. Where
applicable, you can specify where to store them.
• Capture still frames to the clipboard, to a numbered
file (for example, image01.bmp, image02.bmp, etc.),
or to a window.
• Specify printer options for the captured images.
• Specify scaling, image quality and size.
• Adjust color, tint (NTSC video only), contrast, and
brightness.
• Select input connector (TV, composite, or S-Video).
• Select broadcast standard: NTSC, PAL, SECAM
(this feature is enabled only on selected boards).
• Display one field, both fields, or interlaced.
• Autoscan for active channels and add them to a list.
• Add, delete, and name channels in the list.
• Select antenna or cable input and cable standard.
• Use slider to change channel assignments.
• Lock out selected channels.
• Display closed captioned text over live video, in its
own window, or not at all.
• Select solid or shaded background for text.
• Transcribe closed captioned text to a text file.
Page 57

Using Your ALL-IN-WONDER PRO 57
Hot W ords
(NTSC
video only)
VCR Setup
Advanced
VCR Setup
MPEG
Audio CD
• Enable/disable Hot Words in the Closed Captioning.
• Add or change Hot Word selection.
• Set Hot Words to start transcribing automatically.
• Select recording quality.
• Specify the number of minutes to record.
• Stop when SPACE is pressed.
• Specify the drive to save captured video
Click the
automatic setup, and access the full range of Video
for Windows capture options.
• Select frame rate.
• Select audio and video format.
• Capture to memory or disk.
• Limit capture to pre-set amount of time.
• Specify percentage of disk space to leave free.
• Pre-allocate maximum file size.
• Select scale in frames or time.
• Update the slider position.
• Play CD automatically if present.
• Display the disc tracks and the current Play List.
• Add or remove tracks in the Play List.
• Enter the artist’s name and disc title.
Advanced
button to override the
Program
Lockout
TV
Magazine
• Set passwords for Program Lockout, Access
Program Lockout page, Access Locked Program,
Access Channel Organizer, Tuner panel Double
Lockout, and Channel Double Lockout.
• Specify image layout.
• Convert characters to upper- or lower-case.
• Save images as black & white.
• Specify the number of lines of captioning per
picture.
• Remove advertisements.
Page 58

58 Using Your ALL-IN-WONDER PRO
• List scheduled events.
• Specify schedule times.
• Select file playback, watch TV, or play CD.
• Display in full screen.
Scheduled
Viewing
• Transcribe closed-captioned text.
• Disable scheduled events.
• Close the Player.
• Enter a new event.
• Remove selected events or all events from the
schedule.
If you need additional information about these Setup dialogs,
click the Help button. If you experience any difficulty setting
up or running ALL-IN-WONDER PRO, please refer to
Troubleshooting Tips
on page 69.
Page 59

59
CHAPTER 4
For Windows® 98 Users...
Windows® 98 offers many exciting new features for users with
an ALL-IN-WONDER PRO. The fastest way for you to access
these features is to set up your ALL-IN-WONDER PRO with
Windows
Chapter 2 of this Guide, and then upgrade to Windows
Reformatting your hard drive is not necessary.
®
95, following the installation procedures in
IN THIS CHAPTER...
Multiple Display Support in
■
Windows® 98
on page 60
®
98.
WebTV® for Windows
■
Interactive Television
■
WaveTop™
■
NetMeeting™ 2.1
■
on page 62
on page 61
on page 62
on page 63
Page 60

60 For Windows® 98 Users...
Multiple Display Support in Windows® 98
Windows® 98 provides support for us ing mo re than one display
device at a time—you simply install a separ ate PCI or A GP card
for each additional monitor you intend to use. With multiple
displays, you can expand your desktop, run different programs
NOTE
You can
use
multiple
monitors
and
single TV
at the
same time.
on separate displays , even p lay some newer ga mes with
multiple views. Each display can have a different resolution
and color depth!
Windows
primary
a
designated as a
features are only av ailable on the
®
98 automatically designates one graphics card as the
graphics card. Each additional graphics card is
secondary
card. Certain 3D and multimedia
primary
graphics card. If you
are installing more than one graphics card, you need to consider
the following:
• If you install both a
same system, the
secondary
graphics card.
• If you install
PCI and an AGP
AGP
graphics card will become the
two or more PCI
graphics card in the
graphics cards in the same
system, the primary graphics card is typically the one
installed in the PCI slot with the lowest number—this is
typically the PCI slot farthest from the com puter’s ISA slots.
Consult your computer s ys tem manu al for hel p in s electi ng a
slot.
The latest information on installing ATI’s cards and enhanced
drivers for Windows
®
98 is provided in the Readme file on the
ATI Installation CD-ROM.
AGP
card to act
N
OTE
Some motherboards will allow an
primary
as the
graphics card. A motherboard flash
BIOS (for example, ASUS, Intel) may be required
to enable this feature. Check your motherboard
manufacturer’s website for information.
Page 61

WebTV® for Windows
For Windows® 98 Users... 61
NOTE
You must
use the
Windows
98 or ATI
5.20 or
later
display
drivers with
WebTV.
NOTE
WebTV
and the
AT I Video
Player
cannot be
used at
the same
time; you
must close
one before
running
the other.
ALL-IN-WONDER PRO’s advanced TV Tuner capabilities are
a perfect match for Windows
®
98’s new WebTV interface. Use
your Internet connection to instantly download television
program information for current and future shows.
If you do not ha ve an Internet con nection, yo u can do wnload the
same program information over a cable connection! WebTV
puts you in control of your TV scheduling, and allows you to
navigate interactive programming — never miss your favorite
show!
To enjoy WebTV on your ALL-IN-WONDER PRO-equipped
PC, you must use the Windows
®
98 ALL-IN-WONDER PRO
display drivers or 5.20 display drivers. If you do not have
access to the 5.20 or later ATI display drivers, follow the
instructions in To install Windows® 98 CD Drivers for
ALL-IN-WONDER PRO on page 73).
To install WebTV on your Windows
1
In the Windows taskbar, click
2
Point at
3
Double-click the
4
Click the
5
Double-click the
Settings
Windows
, and click
Add/Remove Programs
Setup tab.
Web TV for Windows
®
98 system
Start
.
Control Panel
icon.
item.
.
Ensure that both WaveTop Data Broadcasting and WebTV
for Windows are checked.
6
Click OK, and allow Windows® 98 to install the new
components.
You will want to use the
ATI Video Player
for advanced
features such as Instant Replay on page 48 and Capturing Video
and Audio on page 51, and
WebTV
to access interactive
program guides and interactive web content.
Page 62

62 For Windows® 98 Users...
Interactive Television
Microsoft’ s inclusion of Intel’ s Intercast® software in W indo ws®
98’s WebTV interface marks the convergence of television and
the Internet. Intercast and your ALL-IN-WONDER PRO will
enhance your TV viewing experience by adding dynamic Web
links to regular content. While watching your favorite program,
you will be directed to related text, still pictures, audio, and
video available on the Internet.
The interactive TV component can only be installed after
WebTV is properly installed on your system:
•From the Windows
D:\drivers\webtv\intercst\iit22020.exe
• When the Intercast installation is complete, restart your
computer.
To access Interactive TV, click the ‘i’ symbol that appears when
WebTV is tuned to a channel that is transmitting interactive TV
content.
®
98 CD, run
.
WaveTop
Windows® 98 answers the call of users without an Internet
connection and those frustrated by slow and expensive
connections. WaveTop delivers “Best of the Web” content to
your computer by encoding digital data with standard television
signals through your cable or antenna connection to your
ALL-IN-WONDER PRO.
NOTE
You must
use the
Windows
98 or ATI
5.20 or
later
display
drivers with
WaveTop.
Currently, WaveTo p br oadcasts news, magazine articles, sports
scores, stock quotes, and software through PBS’s extensive
North American broadcast system. WaveTop inquires into your
areas of interest and your ALL-IN-WONDER PR O accum ulates
up-to-date information that you can access through a Windows
Explorer interface. Now you can get all the information you
want without paying Internet connection fees!
To install WaveTop, follow the WebTV installation instructions
on page 61. The W e bT V Set up Wizard is launched when you reboot your computer. Allow WaveTop to search through your
available channels for a local PBS broadcaster, and follow the
wizard to select your areas of interest.
™
Windows® 95
users can download WaveTop from
www.wavetop.net
®
.
Page 63

NetMeeting™ 2.1
Windows® 98’s NetMeeting 2.1 provides a single interface for
multipoint data conferencing and coll abo rat i on on virt uall y an y
Windows-based application, in addition to high quality
videoconf erencing over a LAN or the Internet. All you need is
a digital camera that supports composite or S-Video out. Plug it
into your ALL-IN-WONDER PRO’s video input port, and
you’ll be ready to use your computer as an Internet videophone!
To set up Microsoft NetMeeting on your computer
For Windows® 98 Users... 63
NOTE
You must
use the
Windows
98 or ATI
5.20 or
later
display
drivers with
Net-
Meeting.
1
In the Windows taskbar, click
2
Point at
and click
Programs
, then point at
Microsoft NetMeeting
Start
.
Internet Explorer
.
The NetMeeting install wizard will guide you through
several simple steps, and ask you which capture driver you
would like to use. Select the driver labeled
VfW MM 16-bit WDM capture driver
.
,
Page 64

64 For Windows® 98 Users...
Page 65

CHAPTER 5
Tips and Tricks
This chapter suggests some exciting new ways to use your
ALL-IN-WONDER PRO. You will need to attach a video
camera to your ALL-IN-WONDER PRO, following the
instructions on page 20. Many camcorders and digital cameras
have composite or S-Video outputs that will provide a real-time
image on your television.
IN THIS CHAPTER...
Vid eo Email
■
65
on page 66
Stop-Motion Animation
■
Security Camera
■
on page 66
on page 66
Page 66

66 Tips and Tricks
Video Email
See
Capturing
Video and
Audio on
page 51.
Use your ALL-IN-WONDER PRO to capture a video clip,
which you then attach to an email message for your family and
friends.
Because video files can be very large, you should use a small
capture size – 240x160 or smaller – and the ALL-IN-WONDER
PRO’s video compression features to reduce the file size (see
page 53 for information on compressing video files).
Indeo 3.2
•
4.1
or
are popular compression codecs (encoderdecoders) that can dramatically reduce the file size while
maintaining good quality. Any Windows 95 / Windows 98
system will play Indeo 3.2.
• If you use the
ATI VCR 1.0
video on-the-fly , you mus t ensure that the recei ving computer
can play these files back.
Stop-Motion Animation
See
Capturing
video on
page 52.
Using the
series of still shots and save them as an .AVI movie. You can
use this feature to easily produce a “claymation” or other workin-progress type of movie.
capture a sequence of frames
2.0
or
codec to compress your
feature, you can take a
Security Camera
See
Capturing
video on
page 52
and ATI
VIDEO
PLAYER Advanced
Setup on
page 56.
Your ALL-IN-WONDER PRO provides an ideal w ay to captur e
video for an extremely long period of time—no more worries
about your security camera running out of tape! Simply set
your ALL-IN-WONDER PRO to a lower video capture frame
rate, and capture many high quality still images automatically,
for days at a time.
suggested settings
codec
Size
Frame rate
ATI VCR 2.0
320x240
1 frame per second
Page 67

CHAPTER 6
Reference
This chapter contains troubleshooting tips and s pecifications fo r
your ALL-IN-WONDER PRO.
IN THIS CHAPTER...
Running Diagnostics
■
page 68
Troubleshooting Tips
■
page 69
AT I Multimedia Channel
■
(AMC)
on page 74
67
on
on
ALL-IN-WONDER PRO
■
Video Mode Table
page 76
Compliance Information
■
page 78
on
on
Page 68

68 Reference
Running Diagnostics
NOTE
Y ou cannot
run the
diagnostics
program
inside a
Windows
MS-DOS
box.
You can run diagnostics to test the hardware on your card. All
installed graphics modes can be viewed and tested.
To copy and run the diagnostics program in MS-DOS
1
Start your computer in MS-DOS mode.
2
Insert the ATI Installation CD-ROM into the CD-ROM
drive.
3
At the MS-DOS prompt, type the following:
XCOPY D:\UTILITY\M64DIAG.EXE c:\mach 64\ /Y
(If D is not your CD-ROM drive, substitute the correct
drive letter.)
If you have not installed the ATI VIDEO PLAYER, you will
need to use the DOS Make Directory command (MD) to
create the
mach64
directory.
This copies the M64DIAG.EXE program to your hard disk.
4
5
6
7
8
CD C:\MACH64
Type
Type
Press
Select
M64DIAG
Enter
to run the program.
Diagnostics
.
.
.
Type the numbe r of times you would like t o run the tests.
Page 69

Troubleshooting Tips
The following troubleshooting tips may help you if you
experience problems. Contact your dealer for more advanced
troubleshooting information.
Basic troubleshooting tips
Reference 69
• Check that the
If the problem still exists, try a different PCI expansion slot.
• Ensure that the
card.
• Make sure that the
receiving power
and
• For Windows
graphics capabilities
information, see your computer documentation.
• Make sure that you selected the
you installed your enhanced driver.
• If you use an indoor antenna, you will get the best results
with an
monitor
• Make sure that your
Windows® 95 / Windows® 98 Volume Control on page 22).
card is seated properly
monitor cable is securely fastened
monitor and computer are plugged in
.
®
95 / Windows® 98,
on your mother board. For more
amplified
as possible, to avoid interference.
model. Place it as
audio card’s line input is active
disable any buil t-i n
appropriate monitor
far away from the PC
in its expansion slot.
to the
when
(see
Page 70

70 Reference
Windows® 95 / Windows® 98 troubleshooting tips
For Windows® 95 / Windows® 98 troubleshooting tips, rightclick the ATI icon in the taskbar, and select
If you have problems during start-up, start your computer in
Safe Mode.
Troubleshooting
.
To load Windows
1
Turn on your computer.
2
In Windows® 95
®
95 / Windows® 98 in Safe Mode
, press the F8 key when Starting Windo ws
95 appears on the screen.
In Windows
Windows 98 Startup Menu appears, then
number for Safe Mode
3
Select
®
98
Safe Mode
, press and hold the
, and press
Enter
.
CTRL
select the
.
key until the
• Disable any programs that launch automatically when
you start Windows
®
95 / Windows® 98.
• Check that you have the correct monitor and display
driver selected in the Display Properties. For more
information, click Help in the Start menu.
• Check for the existence of memory managers and ensure
they are configured properly.
• Refer to additional information in the Windows
Windows
®
98 README file located in the root directory
on the ATI Installation CD-ROM.
If you don’t hear audio
, make sure that your audio
card’s line input is active (see Windows® 95 /
Windows® 98 Volume Control on page 22).
®
95 /
Page 71

CD Audio Connectors
The following illustration shows the CD audio connectors on
your ALL-IN-WONDER PRO card.
Reference 71
CD OUT
pins 2 and 4 (see the
connectors,
following table)
This table lists
the pin
assignments f or
the CD audio
connectors on
your ALL-INWONDER PRO
card.
CD AUDIO IN
(see your sound card
manual)
J1 J2
CD
OUT CD IN
ALL-IN-WONDER
ALL-IN WONDER PRO
ALL-IN-WONDER
PRO
J2 CD IN Pin 1 - GND
J2 CD IN Pin 2 - LEFT IN
J2 CD IN Pin 3 - GND
J2 CD IN Pin 4 - RIGHT IN
J1 CD OUT Pin 1 - GND
J1 CD OUT Pin 2 - LEFT OUT
J1 CD OUT Pin 3 - GND
J1 CD OUT Pin 4 - RIGHT OUT
connectors
SOUND
CARD
SIGNAL PIN
Page 72

72 Reference
Video Capture
If you have trouble capturing video, check the JU1 jumper on
your ALL-IN-WONDER PRO card , to make sure that it is in the
ENA position.
To use the
PRO, ensure that the JU1 jumper (labeled INT) is set to the
ENA
Place the jumper
on the two
leftmost pins
video capture
position on your card.
ALL-IN WONDER PRO Card
features of ALL-IN-WONDER
ALL-IN-WONDER
ENA DIS
INT
VGA
To Remove the ATI VIDEO PLAYER
1
In the Windows taskbar, click
2
3
Point to
Click
Settings
.
Control Panel
Start
.
.
4
Double-click
5
Select
6
Click
7
Click OK.
Add/Remove Programs
ATI VIDEO PLAYER
Add/Remove...
.
from the list.
Page 73

Reference 73
To install Windows® 98
CD Drivers for ALL-IN-WONDER PRO
Please
note that
these
drivers will
not operate
with the
ATI VIDEO
PLAYER.
In the Windows taskbar, click
1
2
Point at
3
Double-click the
4
Click the
5
Double-click
6
Click your ATI card (it should be labeled
ATI 3D RAGE PRO).
7
Click
8
Click the
9
Click the
10
Click
11
Click
then click
12
Click
13
The driver should be listed as
Next
14
Click
Settings
Properties
Next
Display a list of all drivers in a specific location
ALL-IN-WONDER PRO (atir3)
.
Finish
N
OTE
, and click
System
Device Manager
Display Adapters
.
Driver
tab.
Update driver…
(to search for a new driver)
Next
.
, and allow Windows to re-boot your system.
Windows will automatically reboot your system
after the drivers are installed.
Start
Control Panel
icon.
tab.
box.
c:\windows\dxati.inf
.
.
.
,
, then click
Next
.
. Click
Page 74

74 Reference
ATI Multimedia Channel (AMC)
While the AMC provides VGA Feature Connector (VFC)
compatibility, it also provides enhanced features for new
multimedia devices including serial control and provision for
audio.
For more inform ation on ATI’s AMC products, vi sit our webs ite
www.atitech.ca
at
The AMC connector shares the same footprint with the VFC
but it adds pins for supporting additional multimedia modes.
Great caution should be taken when connecting a ribbon cable
to the AMC/VFC connector. Some of the pins carry power
and any improper use can result in damage both to the
graphics card and the upgrade board.
.
Japanese Users ...
Please note that Secondary Audio Program (SAP) stereo
support is not available in Japan.
Page 75

Specifications
System Requirements — Pentium/Pentium Pro, or compatible
systems with PCI Local Bus.
Operating
Environment
Reference 75
Windows®95 or Windows® 98
Only graphics fe atures are supported
under DOS 5.0 or higher, Windows
3.1x, Windows NT, OS/2 2.1 or OS/2
Warp.
Video
Display Buffer
Sync Signals
Vid eo BIOS
Video Output
Connector
AMC
Connector
Video
Interrupt
(Reserved for
future use)
Power
Ambient
Temperature
8MB non-upgradable,
synchronous RAM.
Separate horizontal and vertical sync
at TTL levels.
PCI 2.1 compliant.
15-pin D shell (Female),
IBM standard.
2x20 pin header. Shares the same
footprint with the 2x13 pin VGA
Feature Connector, VGA Out only,
VESA standard.
PCI — system auto-configurable,
jumper-settable
(default is OFF).
+5V ±5%, @ 1.3A typical.
Operating — 50° to 122° F
•
(10° to 50° C).
Storage — 32° to 162° F
•
(0° to 70° C).
Relative
Humidity
MTBF
Operating — 5% to 90%
•
non-condensing.
Storage — 0% to 95%
•
120,000 hours.
Page 76

76 Reference
ALL-IN-WONDER PRO Video Mode Table
ALL-IN-WONDER PRO Video Modes
Display
Screen
Resolution
Refresh
Rate
(Hz)
Hor.
Scan
(kHz)
Pixel
Clock
(MHz)
640x480 60 31.5 25.1 • • • •
640x480 72 37.4 32.0 • • • •
640x480 75 37.5 31.5 • • • •
640x480 85 43.3 36.0 • • • •
640x480 90 48.0 39.9 • • • •
640x480 100 52.9 44.9 • • • •
640x480 120 63.7 55.0 • • • •
640x480 160 84.1 70.0 • • • •
640x480 200 100.2 81.0 • • • •
800x600 48 33.8 36.0 • • • •
800x600 56 35.2 36.0 • • • •
800x600 60 37.8 39.9 • • • •
800x600 70 44.5 44.9 • • • •
800x600 72 48.0 50.0 • • • •
800x600 75 46.9 49.5 • • • •
800x600 85 53.7 56.2 • • • •
800x600 90 57.1 56.6 • • • •
800x600 100 62.5 67.5 • • • •
800x600 120 76.0 81.0 • • • •
800x600 160 99.6 106.0 • • • •
800x600 200 125.9 135.0 • • • •
1024x768 43 35.5 44.9 • • • •
1024x768 60 48.4 65.0 • • • •
1024x768 70 56.5 75.0 • • • •
1024x768 72 58.2 75.0 • • • •
1024x768 75 60.0 78.8 • • • •
1024x768 85 68.7 94.5 • • • •
1024x768 90 76.2 100.0 • • • •
1024x768 100 79.0 110.0 • • • •
1024x768 120 96.7 130.0 • • • •
1024x768 140 113.3 157.5 • • • •
Colors (Bits Per
Pixel)
8 MB
8 16 24 *32
Page 77

Reference 77
ALL-IN-WONDER PRO Video Modes
Display
Screen
Resolution
Refresh
Rate
(Hz)
Hor.
Scan
(kHz)
Pixel
Clock
(MHz)
1024x768 150 120.6 160.0 • • •
1152x864 43 45.9 65.0 • • • •
1152x864 47 44.9 65.0 • • • •
1152x864 60 54.9 80.0 • • • •
1152x864 70 66.1 100.0 • • • •
1152x864 75 75.1 110.0 • • • •
1152x864 80 76.4 110.0 • • • •
1152x864 85 77.1 121.5 • • • •
1152x864 100 90.2 135.0 • • • •
1152x864 120 108.7 172.0 • • •
1280x1024 43 50.0 80.0 • • • •
1280x1024 47 50.0 80.0 • • • •
1280x1024 60 64.0 110.0 • • • •
1280x1024 70 74.6 126.0 • • • •
1280x1024 74 77.9 135.0 • • • •
1280x1024 75 80.0 135.0 • • • •
1280x1024 85 91.2 157.5 • • • •
1280x1024 90 96.2 160.0 • • • •
1280x1024 100 106.4 172.0 • • •
1600x1200 52 68.0 135.0 • • • •
1600x1200 58 75.0 135.0 • • • •
1600x1200 60 76.2 156.0 • • • •
1600x1200 72 89.7 194.4 • • •
1600x1200 75 93.8 202.0 • • •
1600x1200 85 106.2 229.5 • •
*32 - 24bpp color data
is processed using a
32bpp data format.
Colors (Bits Per
Pixel)
8 MB
8 16 24 *32
Page 78

78 Reference
Compliance Information
FCC Compliance Information
ALL-IN-WONDER PRO complies with FCC Rules Part 15.
Operation is subject to the following two conditions:
• This device ma y not cause harmful interference, and
• This device must accept any interference received, including
interference that may cause undesired operati on.
This equipment has been tested and foun d to comply with the limi ts for
a Class B digital device, pursuant to Part 15 of the FCC Rules. These
limits are designed to provide reasonable protection against harmful
interference in a residential installatio n. This equipment genera tes, uses
and can radiate radio frequency energy and, if not installed and used in
accordance with manu facturer's instruction s , may cause harmful
interference to radio communicati ons. However, there is no guarantee
that interference will not occur in a particular installation. If this
equipment does cause harmful interference to radio or television
reception, which can be dete rmined by turning the equipment off and
on, the user is encouraged to try to correct the interference b y one or
more of the following measures:
• Re-orient or re locate the receiving antenna.
• Increase the separation be tween the equipment and receiver.
• Connect the equipment to an outlet on a circuit dif ferent fro m that to
which the receiver is connected.
• Consult the dealer or an experienced radio/TV technician for help.
• The use of shielded cables for connection of the monitor to the
graphics card is required to ensure co mpliance with FCC
regulations.
• Changes or modifi cations to t his unit not ex pressly approv ed by
the party responsible for compliance could void the user's
authority to operate this equipment.
Industry Canada Compliance Statement
ICES-003 This Class B digital apparatus meets all requirements of the
Canadian Interference-Causing Equipment Regulations.
Cet appareil numérique de la Classe B Respecte toutes les
exigences du Règ le men t su r l e mat éri al b rou ille r du Canada.
Page 79

Reference 79
CE Compliance Information
EMC Directive 89/336/EEC and Amendment 92/31/EEC, Class B
Digital Device
EN 50081-1, Generic Emissions Standard for Residential, Commercial
and Light Industrial Products
(EN 55022/CISPR 22, Limits and Methods of Measurement of Radio
Interference Characteristics Information Technology Equipment)
Warning: This is a Class B product. In a domestic environment this
product may cause radio interference in which case the user may be
required to take adequate measures.
EN 50082-1, Generic Immunity Standard for Residential, Commercial
and Light Industrial Products
(IEC 801-2, IEC 801-3, IEC 801-4)
Directive EMC 89/336/CEE et amendement 92/31/CEE, dispositif
numérique de Classe B
EN 50081-1, Norme sur les émissions génériques pour les produits
domestiques, commerciaux et i ndustriels légers
(EN 55022/CISPR 22, Limites et méthodes de mesure des
caractéristiques d'interférences radiophoniques, Matériel des
technologies de l'information)
Classe B. Il risque produire des interférences radiophoniques dans un
environnement domestique auquel cas l'utilisateur peut se voir
demandé de prendre des mesures adéquates.
EN 50082-1, Norme sur l'immunité générique pour produits
domestiques, commerciaux et i ndustriels légers.
(CEI 801-2, CEI 801-3, CEI 801-4)
Mise en garde: ceci est un produit de
EMC Richtlinie 89/336/EEC und Änderung 92/31/EEC, Digitales
Gerät der Klasse B
EN 50081-1, Allge m e ine r Emissions-Stand a rd f ür Ha u s ha lt- und
kommerzielle Produkte sowie Erzeugnisse der Leichtindustrie
(EN 55022/CISPR 22, Beschränkungen und Verfahren der Messung
von informationstechnischen Ausrüstungen mit Funkstörmerkmalen)
Warnung: Dies ist ein Erzeugnis der Klasse B. Dieses Erzeugnis kann
Funkstörungen im Wohnbereich verur s achen; in diesem Fall können
entsprechende Maßnahm en seitens des Benutzers erforder lich sein.
EN 50082-1. Allge m e ine r Un e mp f indlichkei ts- Sta n da rd f ür H au s halt-
und kommerzielle Produkte sowie Erzeugnisse der Lei chtindustrie
(IEC 801-2, IEC 801-3, IEC 801-4)
Page 80

80 Reference
Page 81

Index
A
AGP 12
ALL-IN-WONDER PRO
compliance information 78
specifications 75
video mode table 76
AMC 74
ATI Multimedia Channel (AMC) 74
ATI VIDEO PLAYER
advanced setup 56
attaching and detaching panels 30
audio volume 29
control panels 28
display panel 29
MediaNet 35
online help 31
opening in Windows 95/98 18
playing audio CDs 33
playing interactive discs (Video CD
2.0) 33
setting up 56
switching modes 27
Teletext 35
TV Tuner 36
uninstalling 72
using 26
ATI website 74
Audio CDs 33
Audio volume
controlling and muting 29
C
Capturing still frames 52
Capturing video 20, 52
codec 53
Capturing video and audio 51
CD audio connectors 71
Channel Lockout 41
Closed-capt ioned text
displaying 43
transcribing 43
Codec 53
Composite video 20
Control panels 28
D
Diagnostics
running 68
Digital VCR 46, 51
Display panel 29
sizing 29
Displaying PC output on TV 21
DOS gaming
using VESA BIOS extensions for
23
Drivers 16, 17
downloaded from ATI website 18
on ATI Installation CD-ROM 17
E
Editing captured video and audio 55
F
FasText 35
H
Hot Words 40
I
Input and output adapters 19
displaying P C output on TV and
recording on videotape 21
watching movies on your PC a nd
capturing video 20
Installing the hardware and
software 11
input and output adapters 19
installing ATI’s enhanced
Windows 95/98 software 16
Index - 1
Page 82

I
installing enhanced drivers and the
ATI VIDEO PLAYER for
Windows 95/98 16
installing the ATI RAGE family
enhanced drivers and ATI
VIDEO PLAYER for Windows
95/98 17
installing the hardware 12
preparing your computer 12
Instant Replay 48
Interactive discs (Video CD 2.0) 33
Interactive television 62
Intercast 62
M
MediaNet 35
Multiple display support in
Windows 98 60
N
NetMeeting 2.1 63
O
Online manual 10
P
PCI 12
PCI and AGP graphics cards 60
Playing captured video and audio 55
Primary and secondary graphics
cards 60
Program Lockout 42
R
Readme file 10
Recording PC output on videotape
21
Refresh Rates 76
S
Scanning for TV channels 39
Scheduled Viewing 45
Secondary Audio Program
stereo unavailable in Japan 74
Secondary Audio Program (SAP) 49
S
Security camera 66
Setting up ATI VIDEO PLAYER 56
Sound card connector
selecting for TV audio input 22
Specifications 75
Still frames
capturing 52
Stop-motion animation 66
S-Video 20
System requirements 9
T
Teletext 35
MediaNet 35
Tips and Tricks
security camera 66
stop-motion animation 66
video email 66
Transcribing closed-captioned text
43
Troubleshooting tips 69
CD audio connectors 71
video capture 72
Windows 95/98 70
TV
attaching to ALL-IN-WONDER
PRO 49
displaying P C output on 21
reception tips 23
selecting sound card connector for
TV audio input 22
TV Magazine 47
TV Tuner 36
capturing video and audio 51
Channel Lockout 41
Digital VCR 46
displaying closed-captioned text 43
Hot Words 40
Instant Repla y 48
Program Lockout 42
scanning for channels 39
Scheduled Viewing 45
Index - 2
Page 83

T
Secondary Audio Program (SAP)
49
setting up 38
TV Magazine 47
using 37
Video Deskto p 43
Visual Channel Selection 44
zooming and unzoom i ng 39
V
VESA BIOS extensions for DOS
gaming 23
VGA Feature Connector (VFC) 74
Video
capturing 52
Video compressors 66
Video Desktop 43
Video email 66
video compressors 66
Video mode table 76
Visual Channel Selection 44
Volume control 22
W
Watching movies on your PC 20
Watching movies on your PC and
capturing video 20
WaveTop 62
WebTV for Windows 61
Windows 95
WaveTop 62
Windows 95/98 volume control 22
Windows 98
installing Windows 98 CD drivers
for ALL-IN-WONDER PRO 73
interactive television 62
multiple display support 60
NetMeeting 2.1 63
primary and secondary graphics
cards 60
WaveTop
Windows 95 62
WebTV 61
Z
Zooming and unzooming TV display
39
Index - 3
 Loading...