

Page 1

ALL-IN-W ONDER® 9600 PRO
Installation and Setup User’s Guide
P/N: 137-70446-10
Copyright © 2003, ATI Technologies Inc. All rights reserved.
ATI and all ATI product and product feature names are trademarks and/or registered
trademarks of ATI Technologies Inc. All other company and/or product names are
trademarks and/or registered trademarks of their respective owners. Features,
performance and specifications are subject to change without notice. Product may not
be exactly as shown in the diagrams.
Reproduction of this manual, or parts thereof, in any form, without the express written
permission of ATI Technologies Inc. is strictly prohibited.
i
Page 2

Disclaimer
While every precaution has been taken in the preparation of this
document, ATI Technologies Inc. assumes no liability with respect to
the operation or use of ATI hardware, software or other products and
documentation described herein, for any act or omission of ATI
concerning such products or this documentation, for any interruption of
service, loss or interruption of business, loss of anticipatory prof its, or
for punitive, incidental or consequential damages in connection with
the furnishing, performance, or use of the ATI hardware, software, or
other products and documentation provided herein.
ATI Technologies Inc. reserves the right to make changes without
further notice to a product or system described herein to improve
reliability, function or design. With respect to ATI products which this
document relates, ATI disclaims all express or implied warranties
regarding such products, including but not limited to, the implied
warranties of merchantability, fitness for a particular purpose, and noninfringement.
Product Notices
Dolby* Laboratories, Inc.
Manufactured under license from Dolby Laboratories. Confidential
Unpublished W orks. (c) 1992- 1997 Dolby Laboratories, Inc. All rights
reserved.
Macrovision
Apparatus Claims of U.S. Patent Nos. 4,631,603, 4,577,216,
4,819,098, and 4,907,093 licensed for limited viewing uses only.
This product incorporates copyright protection technology that is
protected by method claims of certain U.S. patents and other
intellectual property rights owned by Macrovision Corporation and
other rights owners. Use of this copyright protection technology must
be authorized by Macrovision Corp oration, and is intended for home
and other limited viewing uses only unless otherwise authorized by
Macrovision Corporation. Reverse engineering or disassembly is
prohibited.
Documentation updates
ATI is constantly improving its product and associated documentation.
T o maximize the value of your ATI product, you should ensure that you
have the latest documentation. ATI’s documentation contains helpful
installation/configuration tips and other valuable feature information.
ii
Page 3

IMPORTANT SAFETY INSTRUCTIONS
• Read Instructions - All the safety and operating instructions should be
read before the product is operated.
• Retain Instructions - The safety and operating instructions should be
retained for future reference.
• Heed Warnings - All warnings on the product and the operating
instructions should be adhered to.
• Compatibility - This option card is for use only with IBM AT or
compatible UL Listed personal computers that have Installation
Instructions detailing user installation of card cage accessories.
• Grounding - CAUTION: For Continued Protection Against Risk of
Electric Shock and Fire, This Accessory Should Be Installed Only In
Products Equipped With A Three-wire Grounding Plug, A Plug Having a
third (Grounding) Pin. This plug will only fit into a grounding-type power
outlet. This is a safety feature. If you are unable to insert the plug into
the outlet, contact your electrician to replace the obsolete outlet. Do not
defeat the safety purpose of the grounding-type plug.
• All option card securement pins shall be completely tightened as to
provide continuous bonding between the option card and the PC
chassis.
• Outdoor Antenna Grounding - Since an outdoor antenna or cable
system is connected to the product, be sure that the antenna or cable
system is grounded so as to provide some protection against voltage
surges and built-up static charges. Article 810 of the National Electrical
Code, ANSI/NFPA 70, provides information with regard to proper
grounding of the mast and supporting structure, grounding of the lead-in
wire to the antenna discharge unit, size of grounding conductors,
location of antenna-discharge unit, connection of grounding electrodes,
and requirements for the grounding electrode.
• Lightning - For added protection for this product during a lightning
storm, or when it is left unattended and unused for long periods of time,
unplug it from the wall outlet, and disconnect the antenna or cable
system. This will prevent damage to the product due to lightning and
power-line surges.
• Power Lines - An outside antenna system should not be located in the
vicinity of overhead power lines or other light or power circuits, or where
it can fall into such power lines or circuits.
• When installing an outside antenna system, extreme care should be
taken to keep from touching such power lines or circuits, as contact with
them may be fatal.
• Note to CATV System Installer - This reminder is provided to call the
CATV systems installer’s attention to Section 820-40 of the NEC, which
provides guidelines for proper grounding and, in particular, specifies that
the cable ground shall be connected to the grounding system of the
building, as close to the point of cable entry as practical.
iii
Page 4

iv
Page 5

Table of Contents
Getting Started............................................................... 1
What is the ALL-IN-WONDER family?....................................................... 1
System Requirements....................................................................................3
Other Sources of Information........................................................................ 4
Online Help ............................................................................................4
ATI Multimedia Center Guide ............................................................... 4
Getting Additional Accessories..............................................................4
Warranty Information.................................................................................... 5
Product Warranty Registration .............................................................. 5
Customer Service ......................... ... ......................................................5
Hardware Warranty Service Statement.................................................. 6
Warranty Service............................................... .....................................6
Limitations..............................................................................................7
Installing the Hardware and Software ......................... 9
Do This First!................................................................................................. 9
Uninstalling Old Graphics Card Software................................................... 10
Installing Your ALL-IN-WONDER Card................................................... 11
Windows New Hardware Found..........................................................13
Installing the CATALYST
Troubleshooting Tips...................................................................................15
Multiple Display Support ...................................................... ..................... 15
Increasing the number of colors...........................................................16
Starting the ATI Multimedia Center .......................................................... .17
Input and Output Adapters .......................................................................... 18
Selecting the sound card connector for TV audio input....................... 21
Windows Volume Control....................................................................22
™ Software Suite......................................13
v
Page 6

Using Your ALL-IN-WONDER.....................................23
Connecting Your PC to a Video Source...................................................... 23
Attaching a TV to Your Card......................................................................24
Using SCART connectors for European televisions ............................26
Using and adjusting TV Out................................................................. 27
Starting Windows® with television display enabled ...........................27
Using a monitor vs. using the television display..................................27
Adjusting the monitor display..............................................................28
TV reception tips.................................................................................. 28
Viewing text on television.................................................................... 28
Reducing edge distortion......................................................................29
Changing display configurations.......................................................... 30
Using games and applications..............................................................30
MULTVIEW™............................................................................................ 31
MULTVIEW audio requirements ........................................................32
EAZYLOOK™............................................................................................ 32
ATI HDTV Component Video Adapter (Optional) ..................................3 3
HDTV Requirements............................................................................ 33
Setting up your ATI HDTV Component Video Adapter .................... 34
Installing your ATI HDTV Component Video Adapter ......................34
Using your HDTV Component Video Adapter....................................37
Windows Control Panel Settings.......................................................... 37
Troubleshooting tips ...................................................................................39
Reference..................................................................... 41
Troubleshooting...........................................................................................41
Basic troubleshooting tips....................................................................42
Troubleshooting tips............................................................................. 43
Audio and Video Troubleshooting.............................................................. 44
Audio problems ................................................................................... 44
Video problems ... ...............................................................................46
CD Audio Connectors ................................................................................. 49
Internal Audio/Video Input Header.............................................................50
To Remove the ATI Multimedia Center...................................................... 51
To Remove the ALL-IN-WONDER Drivers .............................................. 51
Compliance Information..............................................................................5 2
FCC Compliance Information..............................................................52
Industry Canada Compliance Statement ..............................................53
CE Compliance Information .......................... ......................................53
L’Information de conformité de la CE.................................................54
CE-befolgungInformationen ................................................................54
Index............................................................................. 55
vi
Page 7

CHAPTER 1
Getting Started
Welcome to the convergence of your PC, TV and video! This
new technology changes the way you view TV, graphics, and
video on your PC.
The ALL-IN-WONDER family of cards are powerful TV
tuners, DVD players, Personal Video Recorders, and 2D & 3D
graphics and video accelerators. Their features will take your
PC’s graphics and video capabilities to the next level.
This guide provides all the information you need to install your
ALL-IN-WONDER card.
What is the ALL-IN-WONDER family?
The ALL-IN-WONDER family of cards deliver highperformance 3D and 2D graphics, as well as advanced
multimedia features. Play games, watch TV or videos, listen to
audio CDs, explore the Internet, and work in Windows
never before.
TV-ON-DEMAND
experience. Using an attached video camera, the
ALL-IN-WONDER family provides time-lapse video recording
and motion-triggered video recording, which can be used for
security applications. Your card’s advanced video recording
and editing features also give you Video CD and DVD
authoring capability.
™
and TV Listings enhance your television
1
®
as
Page 8

2 Getting Started
You can use your ALL-IN-WONDER to connect your computer
to a television. This feature is ideal for playing games, giving
presentations, watching movies, and browsing the Internet. (For
more information, see Attaching a TV to Your Card on page 24.)
The ALL-IN-WONDER also turns your PC into an intelligent
TV with the following features:
• TV-ON-DEMAND™
•THRUVIEW™
•MULTVIEW™
• Zoom-in
• Scheduled Viewing
• Channel Scanning
• Video recording
• Closed Captioning with Hot Words™
• Program transcript recording (North America only)
•TV MAGAZINE
• Personal Video Recorder with real-time video compression
• Interactive Program Guide (in selected countries)
• AC-3 Digital Audio playback supporting Dolby
surround sound
• REMOTE WONDER™ USB RF remote control
®
5.1
Page 9

System Requirements
• Pentium® 4 / III / Celeron™,
AMD® K6/Athlon®, or compatible , with AGP 8X/4X
bus slot.
• 128MB of system memory.
• Installation software requires CD-ROM or DVD
Computer
system
Expansion
Slot
Operating
System
Monitor
drive.
• DVD playback requires DVD drive.
• Sound card supported by Windows
line input.
• Interactive Program Guide requires internet
connection (North America only).
• REMOTE WONDER receiver requires available
USB port.
AGP 8X/4X.
Windows® 98/SE*, Windows® Me, Windows® 2000,
Windows
*
98/SE.
VGA, supporting minimum 640x480 resolution. A
Plug-and-Play monitor that supports VESA’s Display
Channel specifications (DDC1 or DDC2b) is required
to take advantage of the DDC1/DDC2b features.
HYDRAVISION™ technolog y supports DVI or CRT
monitor and television.
®
The Windows® Me driver installs on Windows®
XP.
Getting Started 3
®
with available
Page 10

4 Getting Started
Other Sources of Information
If you need additional help or require information that is not
included in this guide, see the following sources:
Online Help
If you require additional information, you can refer to the online
help available under Windows
Edition, Windows
information about using ATI’s enhanced drivers.
For information on your card’s graphics features, double-click
the ATI icon in the lower-right corner of your screen.
®
2000, or Windows® XP for more
A TI Multimedia Center Guide
The online ATI Multimedia Center User’s Guide explains how
to use the special features that the ATI Multimedia Center
provides. To open the ATI Multimedia Center User’s Guide:
1 Insert the ATI Installation CD-ROM into your CD-ROM
drive, then click User Guide.
The Online Manual opens in Adobe
2 Click User’s Guides, click ATI Multimedia Center
Guides, then click ATI Multimedia Center.
Getting Additional Accessories
Additional and replacement cables, installation CD-ROMs,
manuals, and other accessories for ATI products can be
purchased from the online ATI store at
http://www.ati.com/online/accessories.
®
98, Windows® Millennium
®
Acrobat® Reader™
Page 11

Warranty Inf ormation
Getting Started 5
Product W arranty Registration
To receive Customer Service, you must register your product
with ATI. Online Product Warranty Registration is available at
http://www.ati.com/online/registration.
Customer Service
For detailed instructions on how to use your ATI product, refer
to the Online User’s Guide included on your ATI Installation
CD-ROM. If you require further assistance with your product,
use one of the following options:
Online:
For product information, video drivers, Frequently Asked
Questions and Email support, visit:
http://www.ati.com and select Customer Service for Built By
ATI products.
Telephone:
Available Monday to Friday, 9:00 AM - 7:00 PM EST.
905-882-2626
*
Access to T elephone Support is av ailable to registered users at
*
no additional cost for the first 30 days from the date of purchase
(long distance charges may apply). For complete details, please
visit: http://www.ati.com/online/customercare.
Mail:
ATI TECHNOLOGIES INC.
Attention: Customer Service
33 Commerce Valley Drive East
Markham, Ontario
Canada L3T 7N6E
Page 12

6 Getting Started
Hardware W arranty Service Statement
Should the product, in ATI’s opinion, malfunction within the
warranty period, ATI will at its discretion repair or replace the
product upon receipt with an equivalent. Any replaced parts
become the property of ATI. This warranty does not apply to the
software component of a product or a product which has been
damaged due to accident, misuse, abuse, improper installation,
usage not in accordance with product specifications and
instructions, natural or personal disaster, or unauthorized
alterations, repairs, or modifications.
For a detailed description of the ATI Hardware Warranty
Service Statement visit:
http://www.ati.com/online/warranty/statement.
Warranty Service
For warranty service instructions visit:
http://www.ati.com/online/warranty or contact one of our
Customer Service Representatives using one of the
aforementioned means.
• Before shipping any unit for repair, obtain an RMA number
for warranty service.
• When shipping your product, pack it securely, show the
RMA and serial number of the product on the outside, and
ship prepaid and insured.
• ATI will not be held liable for damage or loss to the product
in shipment.
Page 13

Limitations
Getting Started 7
• This warranty is valid only if the online Product Warranty
Registration form at
http://www.ati.com/online/registration
is successfully submitted within 30 days of purchase of said
product.
• All warranties for this product, when purchased as a retail
product, expressed or implied, will expire three (3) years
from date of original purchase.
The ATI REMO TE WONDER unit is warr anted for 1 year.
*
All accompanying cables and accessories are warranted
for 90 days.
• No warranties for this product, expressed or implied, shall
extend to any person who purchases the product in a used
condition.
• The liability of ATI in respect of any defective product will
be limited to the repair or replacement of such product. ATI
may use new or equivalent-to-new replacement parts.
Defective product will be sent in for repair or replacement
only.
*
ATI makes no other representations or warranties as to fitness
for a particular purpose, merchantability or otherwise in respect
of the product. No other representations, warranties or
conditions shall be implied by statute or otherwise.
In no event shall ATI be responsible or liable for any damages,
including but not limited to the loss of revenue or profit, arising:
• from the use of the product,
• from the loss of use of the product, as a result of any event,
circumstance, action or abuse beyond the control of ATI;
whether such damages be direct, indirect, consequential,
special or otherwise and whether such damages are incurred
by the person to whom this warranty extends or a third party.
Page 14

8 Getting Started
Page 15

Installing the Hardware and Software 9
CHAPTER 2
Installing the Hard ware and Software
Do This First
To ensure a successful installation of your ALL-IN-WONDER,
you MUST install AG P Drivers for non-Intel Chipset Based
Motherboards BEFORE replacing your current graphics card.
Several AGP motherboard manufacturers use non-Intel AGP
chipsets. Chipsets include those made by Acer Laboratories
(ALI), Silicon Integrated Systems (SIS), and VIA Technologies,
Inc. Each non-Intel chipset requires the installation of a custom
Virtual GART (AGP) Driver. This driver is required by your
new ATI card to function correctly with your motherboard. It is
very important that the correct AGP driver be installed before
installing an AGP video card in your system.
i
T o determine what motherboar d chipset
is present on your system:
1 Right-click My Computer, then click Properties.
2 Click the (Hardware tab in Windows
XP) Device Manager tab, then scroll to the bottom of the
device list.
!
An incorrect or missing GART driver can result in
AGP memory not being detected or a black screen
after Windows
®
loads.
®
2000 or Windows®
3 Click System Devices, then scroll through the list of
System Devices until you find a listing for the AGP
controller. The chipset manufacturer’s name will appear as
the device name.
Page 16

10 Installing the Hardware and Software
Once you have determined the chipset manufacturer for your
motherboard, obtain and then install the latest AGP drivers
from:
VIA Technologies http://www.viaarena.com
Acer Laboratories (ALI) http://www.ali.com.tw
Silicon Integrated Systems (SIS) http://www.sis.com
Advanced Micro Devices (AMD) http://www.amd.com
General Motherboard/chipset information
http://www.motherboards.org
More information on this topic can be found at
http://www.ati.com/support/faq/agpchipsetdrivers.html
Uninstalling Old Graphics Card Software
To ensure successful installation of your ALL-IN-WONDER
card, you must uninstall the graphic drivers for the existing
graphics card before removing it from your computer.
T o uninstall old graphics driver s
With your current graphics card still in your computer:
1 Close all applications that are currently running.
2 Click Start, Settings, Control Panel, then select
Add/Remove Programs.
3 Select your current graphic drivers, then click
Add/Remove…
*The Wizard will help you remove your current display
drivers.
Restart your system after the drivers have been removed.
*If the previously-installed graphics card has any
additional software installed, they may also need to
i
be removed at this point. (For example, DVD Player,
Multimedia applications, etc.)
Page 17
Installing the Hardware and Software 11
Installing Your ALL-IN-W ONDER Card
You are now ready to install your card.
1 Power - off the computer and monitor.
2 Disconnect the monitor cable from the back of your
computer, and disconnect all other connectors from the
back of your old video card.
3 Remove the computer cover. If necessary, consult your
computer’s manual for help in removing the cover.
Discharge your body’s static electricity by touching
the metal surface of the computer chassis.
Page 18

12 Installing the Hardware and Software
4 Remove any existing graphics card from your computer.
If your computer has an on-board graphics capability, you
may need to disable it on the motherboard. For more
information, see your computer documentation or contact
the manufacturer.
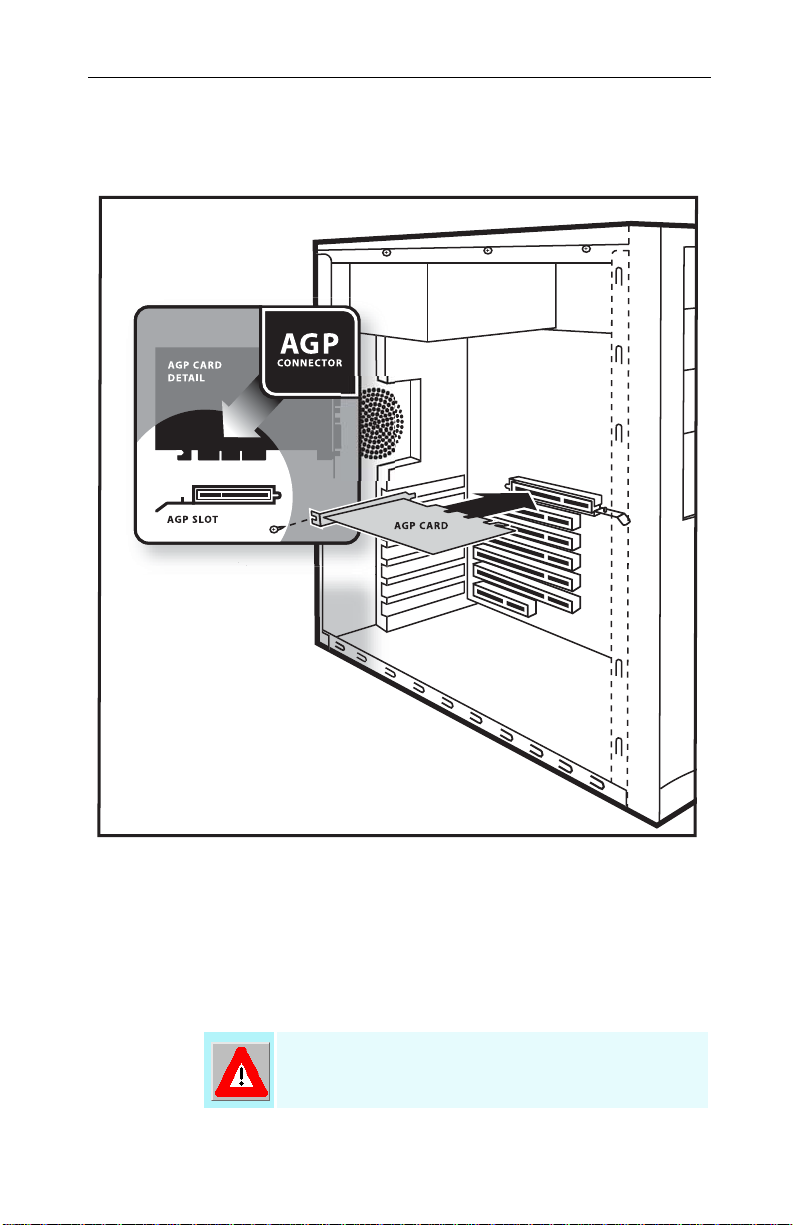
5 After locating the AGP slot, and if necessary, removing the
metal cover, align your ALL-IN-WONDER card with the
AGP slot, and press it in firmly until the card is fully seated.
6 Replace the screw to fasten the card in place, and replace
the computer cover.
7 Plug the monitor cable into your card.
8 Turn on the computer and monitor.
Page 19

Installing the Hardware and Software 13
Windows New Hard ware Found
Windows may start the Add New Hardware Wizard to install
the Standard VGA Driver. To correctly install your new
hardware:
If you are using Windows 2000 or Windows XP, Cancel the
Wizard and proceed to Installing the CATALYST™ Software
Suite on page 13.
•If the Add New Hardware Wizard does not appear, proceed
to Installing the CATALYST™ Software Suite on page 1 3.
•If the Add New Hardware Wizard does appear:
1 Click Next to allow Windows to search for the Standard
VGA or Standard PCI Graphics Adapter.
If prompted for the Windows CD-ROM, insert it into your
CD-ROM drive.
2 Type the following: D:\operating system name (for
example, D:\WinME).
If D is not your CD-ROM drive, substitute the corr ect drive
letter.
3 Click OK, click Finish to close the Wizard, then restart
your computer.
Installing the CA TAL YST™ Software Suite
ATI’s CATALYST software suite provides the ultimate software
required to enjoy the full power of your ALL-IN-WONDER
card. The C AT A LYST software suite comprises four, distinct
software elements:
• Display driver
• Multimedia Center
• HYDRAVISION (not included in the Express Install)
• Remote Wonder Software
T o ensure you install the latest software, use the ATI Installation
CD-ROM that shipped with your ALL-IN-WONDER card.
Page 20

14 Installing the Hardware and Software
T o install th e CAT ALYST software suite
1 Insert the ATI INSTALLATION CD-ROM into your
CD-ROM drive.
If Windows runs the CD-ROM automatically, proceed to
step 6.
2 Click Start, then click Run.
3 Type the following: D:\ATISETUP
(If D is not your CD-ROM drive, substitute D with the
correct drive letter.)
4 Click OK, then click Install under Software Install.
5 Click Next, then click Yes to the license agreement.
6 Click ATI Easy Install to begin the Installation Wizard.
7 Follo w the Wizard’s on-screen instructions to complete the
installation, then restart your computer
The Express installation option is recommended. The
multimedia components will automatically be installed
along with the ATI graphics driver.
Custom installation allows you to select individual
software components for installation.
The ATI REMOTE WONDER II™ software is
automatically installed with the CATALYST software
suite. See the ATI REMOTE WONDER Installation
Guide for installation instructions.
Page 21

Installing the Hardware and Software 15
T r oubleshooting Tips
• Check that the card is seated properly in the correct slot.
• Ensure the display cable is securely fastened to the card’s display
connector.
• Make sure that the monitor and computer are plugged in and receiving
power.
• If necessary, disab le an y built-in graphics capabilities on your
motherboard. For more information, consult your computer’s manual or
contact the manufacturer. (NOTE: Some manufacturers do not allow the
built-in graphics to be disabled or to become the secondary display.)
• Make sure you selected the appropriate display device and graphics card
when you installed the ATI driver.
• For more troubleshooting tips, right-click the ATI icon in the taskbar and
select Troubleshooting.
• If you have problems during bootup, start your computer in Safe Mode.
Press and hold the CTRL key until the Microsoft Windows Startup Menu
appears on the screen. Then select the number for Safe Mode, and press
Enter. (You can also use F8 to bring up the Microsoft Windows Startup
Menu.) In Safe Mode, bring up the Device Manager and check for
duplicate display adapter and monitor entries if you are only using one
graphics card.
• For more assistance, use the Troubleshooting Guide located in the
Windows Help or contact your computer manufacturer.
Multiple Display Support
If you use multiple monitors, the ALL-IN-WONDER card must
be the primary graphics card. Normally, the system BIOS
determines whether the AGP or PCI card will be the primary .
For PCI cards, the system normally assigns priority to the card
slots in order of their appearance. Please read the Readme file
on the ATI Installation CD for the latest information regarding
Multiple Display Support.
Page 22

16 Installing the Hardware and Software
Increasing the number of colors
1 Right-click on a clear area of your desktop, then click
Properties.
2 Click Settings.
If you are using multiple monitors, click the monitor icon
whose color depth you want to change. If you click a
secondary monitor and Extend my Windows desktop onto
this monitor is not checked, you cannot change that
monitor’s settings. Each monitor has its own color
settings.
3 In the Colors box, select High Color (16 bit), True Color
(24 bit) or True Color (32 bit).
Your type of monitor and video adapter determine the
maximum number of colors.
The ALL-IN-WONDER card’s advanced, DirectX 9 and
OpenGL 3D acceleration gives you detailed color graphics and
3D features like multi-texturing, alpha blending, and fog effects.
ALL-IN-WONDER also provides powerful 2D graphics
features through the Display Properties pages:
Settings
Adjustment
Color
Correction
Customize your desktop settings such
as desktop size, screen resolution and
color depth, and store various desktop
preferences for easy recall later.
Adjust the position and size of your
screen, as well as manipulate the
screen refresh rate, frequencies and
synchronization.
Correct color tone differences between
real color values and the way your
monitor displays them, and store
various color correction preferences for
easy recall later.
Page 23

Installing the Hardware and Software 17
The ALL-IN-WONDER display drivers on your ATI
Installation CD-ROM are the latest and fastest available, but at
ATI, we are constantly improving our products, so check the
ATI web site at http://www.ati.com for newer software.
• Under CUSTOMER SERVICE, click find a drive r, and
follow the prompts.
Drivers downloaded from the ATI website:
• Double-click the self-extracting executable file to start the
installation.
Windows will automatically reboot your system after
i
the drivers are installed.
Starting the A TI Multimedia Center
From LaunchPad.
The LaunchPad
provides a convenient way to start all your Multimedia Center
features — just click the one you want. LaunchPad opens
automatically when you start your computer, or if you prefer,
you can right-click LaunchPad, and uncheck Load on Startup
in the drop-down menu to disable this feature.
From Windows taskbar.
1 In the Windows taskbar, click Start, then point at
Programs .
2 Point at ATI Multimedia Center , then select
CD Audio, DVD, File Player, LaunchPad, Library, TV,
Video CD, FM Radio, or Configuration.
The first time you launch TV, you must complete the
Initialization Wizard, which guides you through
i
setting up TV. After that, the Wizard will not run
unless you want to re-run it.
For information on the ATI Multimedia Center, see the
online help.
Page 24

18 Installing the Hardware and Software
Input and Output Adapters
Your ALL-IN-WONDER card uses input and output adapters
that let you connect audio and video devices to the card — TV,
VCR, laserdisc player, or camcorder.
To hear sound when you use your ALL-IN-WONDER
card’s TV f eature, ensure that the ALL-IN-W ONDER
card’s output cable is connected to the line-in
i
connector of your sound card: see page 20. For
information on the CD audio connectors see page 49.
ALL-IN-WONDER Card Connectors
1
FM
2
TV
3
A/V Out
1
2
3
4
ALL-IN-WONDER
ALL-IN-WONDER
4
A/V In
For proper FM reception, connect an FM antenna to the FM connector
on your ALL-IN-WONDER card. If your cable service provides an FM
signal, you can use a splitter to connect the cable to the FM and TV
connectors.
Page 25

Installing the Hardware and Software 19
T o watch mo vies on your PC or record video
from your VCR, camcord er , or laserdisc play er
Use the ATI input adapter to connect a VCR, camcorder, or
laserdisc player to your ALL-IN-WONDER card, as shown.
The audio and video output connectors on your VCR, camcorder, or
laserdisc player will be similar to these. Use composite video out or
S-video out. S-Video will provide better results.
Cable with
S-Video plug
at each end.
OUT
COMP.
VIDEO
OUT
L. AUDIO
OUT
R. AUDIO
OUT
S-VIDEO
OR
SLR
ATI Input Adapter
(Enlarged)
Cables with RCA
plugs at each end,
available separately
from a consumer
electronics dealer.
FM
TV
A/V OUT
A/V IN
ALL-IN-WONDER
Page 26

20 Installing the Hardware and Software
T o displa y your PC output on TV
and record your PC output on videotape
Use the ATI output adapter to connect a TV, camcorder, or VCR
to your ALL-IN-WONDER card, as shown.
The audio and video input connectors on your TV , camcorder, or VCR will
be similar to these. Use COMPOSITE VIDEO IN or S-VIDEO IN. S-Video will
provide better results.
R. AUDIO
IN
L. AUDIO
IN
COMP.
VIDEO
IN
S-VIDEO
IN
To use your TV as a display, you
must enable TV Out. See Using
and adjusting TV Out on page 27.
OR
Cable with S-Video
plug at each end
Connect
the audio
output to
your
speakers or
to your TV,
camcorder,
VCR, or
stereo.
Cable with
RCA plug
at each
end,
available
separately
from a
consumer
electronics
dealer
To record audio on your stereo VCR or to hear
audio through your TV speakers, use a stereo
cable with two RCA plugs at one end, and a mini
stereo phone plug at the other, available
separately from a consumer electronics dealer.
S/PDIF connection
Dolby Digital AC-3 Amplifier
Cable with RCA plugs,
available from a consumer
electronics dealer
SOUND
CARD
LINE OUT
LINE IN
LINE IN
must be
connected
ATI
output
adapter
T o primary
display
S
/
P
D
I
F
WONDER
VGA 1
VGA 2
To secondary
display (or ATI
Component
Video Adapter
see page 36).
FM
TV
A/V OUT
A/V IN
ALL-IN-
–
Page 27

Installing the Hardware and Software 21
Selecting the sound card connector for TV audio input
The sound card connector determines which mixer slider is
controlled by the ATI Multimedia Center’s volume slider.
1 Click the Setup button in the TV Player control panel,
then click the Display tab.
2 Click the Initialization Wizard butt on, then click the Next
button twice.
3 In the Typical Audio Connections page, check I have
connected the cable to confirm that you have connected
your ALL-IN-WONDER card’s audio output cable to your
sound card’s Line-In connector.
4 Click Next to open the TV Sound Initialization Wizard.
5 Click the audio input that matches the connection between
your ALL-IN-WONDER card and your sound card.
(Line-In is the standard audio input when the
ALL-IN-WONDER card’s audio output cable is connected
to the sound card’s Line-In connector.) If you are not sure
how it is connected, click each source (CD Audio, Line-In,
etc.), and listen for the sound.
6 Click the Next button until you reach the End of
Initialization Wizard page, then click the Finish button.
Ensure that the ALL-IN-WONDER card’s audio
output cable is connected to your sound card’s
i
Line-In connector.
Page 28

22 Installing the Hardware and Software
Windows Volume Control
For correct audio performance, your sound card’s line input
must be active. To display the Line Input setting in the
Windows Volume Control panel:
1 Right-click the speaker icon in the Taskbar (usually in
the lower-right corner of your screen), then click Open
Volume Controls.
2 If the Line-In volume slider is not visible, click Options,
then click Properties.
3 Click the Line-In volume control checkbox, then click
OK. If the Mute checkbox is checked, click it to cancel
muting.
If the speaker icon is not in your Taskbar, do the
following:
• In the Windows taskbar, click Start, point to Settings,
then click Control Panel.
• Double-click Sounds and Multimedia.
•In Sound Volume, check Show volume control on
T askbar.
Page 29

CHAPTER 3
Using Your ALL-IN-WONDER
For comprehensive information on your ALL-IN-WONDER
card’s multimedia features, please see the online ATI
Multimedia Center User’s Guide on the Installation CD.
To open the ATI Multimedia Center User’s Guide:
1 Insert the ATI Installation CD-ROM into your CD-ROM
drive, then click User Guide.
The Online Manual opens in Adobe
2 Click User’s Guides, click ATI Multimedia Center
Guides, then click ATI Multimedia Center.
For correct operation of your card’s multimedia features, the
ALL-IN-WONDER 9600 PRO card must be your computer’s
primary graphics card. For more information, see Multiple
Display Support on page 15.
®
Acrobat® Reader™
23
Connecting Your PC to a Video Sour ce
T o connect your computer to a VCR or camcorder ,
attach a connector cable from the VCR or
camcorder to the ATI Input/Output Adapter. Most
VCRs and camcorders have a Composite video
output, also referred to as a phono jack or RCA
output. For detailed instructions, see Input and
Output Adapters on page 18.
Many VCRs and camcorders have another video
output called S-Video, which provides a higher
quality display than Composite video.
Composite
Video
S-Video
Page 30

24 Using Your ALL-IN-WONDER
T o connect a VCR or camcorder to
your ALL-IN-WONDER
1 Turn off your computer and your VCR or camcorder.
2 Ensure that your graphics card is installed correctly.
3 Determine if your VCR or camcorder has an S-Video or
Composite video connection.
4 Looking at the back of your computer, locate your graphics
card. Using the ATI Input/Output Adapter, attach one end
of the cable to your graphics card and the other to your
VCR or camcorder.
5 Turn on your computer and your VCR or camcorder.
Attaching a TV to Your Card
Using your ALL-IN-WONDER card’s Composite or S-Video
output, you can connect a television set as your computer’s
display. You can use your card to view computer output directly
on your television. Depending upon your television, you can
choose NTSC or PAL formats. Y ou can display images on both
the TV and VGA monitor simultaneously.
The ALL-IN-WONDER provides a big-screen experience for
entertainment PCs that is ideal for playing games, giving
presentations, watching movies, browsing the Internet, and
recording videotapes of your computer’s display.
DVI digital flat panel and television display cannot be
used simultaneously. If you are recording a
i
videotape, you will need a television monitor to view
while you record.
Page 31

Using Your ALL-IN-WONDER 25
T o connect your graphics car d to a television
• You must attach a TV before enabling TV output
• In order to record audio on your VCR or hear audio through
your TV speakers, you must connect the audio cables (see
page 20).
• If your television has cable input only, which is the case for
older units, you can connect your graphics card to your
television using your VCR or an RF modulator (available at
most consumer electronics dealers) that accepts audio input.
Connect the ALL-IN-WONDER card’s audio output to the
RF modulator’s audio input.
1 Turn off your computer and your television.
2 Determine if your television has an S-Video connection or
an RCA video-in connection.
3 Looking at the back of your computer, locate your graphics
card.
4 Connect the supplied output cable adapter to the A/V OUT
connector on the card (see Input and Output Adapters on
page 18).
5 Using a cable with either S-Video or RCA connectors,
attach one end of the cable to the output cable adapter and
the other to your television.
6 Turn on your computer and your television.
If there is no display, you may need to enable the television
output capability; see Using and adjusting TV Out on
page 27. For detailed cabling diagrams and audio
connections, see Input and Output Adapters on page 18.
If you have a television connected to your VCR, you can use
the television as your computer’s display. For information
about connecting a television to your VCR, see the
documentation that came with your VCR.
If you have a television connected to a VCR that is
connected to the ALL-IN-WONDER card’s A/V OUT,
and you use the television as your computer’ s display,
i
copy-protected DVD movies may appear alternately
bright and dim.
Page 32

26 Using Your ALL-IN-WONDER
IMPORT ANT INFORMATION
for European Customers
Some PC monitors in Europe cannot be used simultaneously with
television display. When you enable television display in Europe,
the refresh rate for the monitor and television is set to 50Hz. Some
monitors may not support this refresh rate and could be damaged.
• Please check the documentation supplied with your monitor to
see if your monitor supports a refresh rate of 50Hz.
If your monitor does not support 50 Hz (or if you are not
sure), then turn off your monitor before turning on your
computer when using your television as a display.
For information on disabling television display, see To enable and
disable the television displa y on page 27.
Some televisions in Europe may use an SCART connection. If you
use SCART, please read Using SCART connectors for European
televisions on page 26 before attempting to connect your PC to
your television.
Using SCART connectors for Eur opean televisions
(Right = Red)
Audio In
(Left = White)
Connect to
TV or VCR
Connect to
audio source
Cable 1
SCART
Connector
Cable 2
Video In (Yellow)
Connect to
graphics card
Using an SCART connector with a Composite cable
The SCART connector supports only the Composite video
format, which is the most common type. The above illustration
shows how to connect to an SCART connector using a
Composite cable.
If your television supports S-Video input, you should use an
S-Video cable (av ailable in most consumer electronics stores) to
view your PC on a television. An S-Video connection provides
a higher quality display than Composite video.
Page 33

Using Your ALL-IN-WONDER 27
Using and adjusting TV Out
T o enable and disable the television display
1 Click Start, point to Settings, then click Control Panel.
2 Double-click Display, then click the Settings tab.
3 Click the Advanced button, then click the Displays
tab.
Windows
the Advanced tab.
®
98 users: click the Advanced button, then click
4 Click the green enable/disable button next to the word
“TV” to enable/disable television disp lay.
5 Click OK or Apply to save the changes you have made.
For information about how to use television display and the
ATI Displays Properties page, click the Help button.
Starting Windows® with television display enabled
The television screen may become scrambled temporarily
during the initial Windows logo display. This is only a
temporary effect, and your television screen will be restored
within a few seconds.
During start up, your TV Out graphics card will go through a
sequence of mode settings, during which your television display
will remain blank. This process takes only a few seconds, and
helps program the television display.
Using a monitor vs. using the television display
Using your television for your computer’s display is ideal for
playing games, giving presentations, watching movies, and
browsing the Internet. The display on your monitor may change
or look squashed. This occurs because the display adjusts to fit
the dimensions of your television. To correct the monitor’s
display, use the controls on the monitor to adjust the display size
and position.
Page 34

28 Using Your ALL-IN-WONDER
Older monitors and large, speciality monitors may not work
with television display enabled. If you experience problems
when television display is enabled, disable television display to
restore your monitor’s display.
Adjusting the monitor display
The size of the display on your monitor may be smaller and not
perfectly centered when you have television display enabled.
These effects are caused by the changes required to provide a
proper display on the television.
Use the controls available on the Adjustments tab on the
Monitor Properties page (click the Monitor button on the ATI
Displays page) to adjust the display on your monitor only.
Click the Television button to adjust the television display only.
TV reception tips
• In the TV Tuner tab, ensure that you click the correct setting
for cable or antenna.
• For the best indoor antenna reception, use an amplified
model, and move it as far away from your monitor as
possible.
• If you experience problems with cable input, a signal
amplifier may improve reception.
Viewing text on tele vision
Due to the different technology used in the manufacturing of
televisions and PC monitors, standard PC text may be
unreadable on your television. You can compensate for this by
using larger fonts.
T o use larger display fonts
1 Click Start, point to Settings, then click Control Panel.
2 Double-click Display, for Windows XP, click the
Appearance tab. For Windows ME, or Windows 2000,
click the Settings tab, then click the Advanced button.
Page 35

3 In the General tab’s Font Size box, select the size you
want your displayed fonts to be.
4 To customize the size of displayed fonts, select Custom or
Other.
5 Click the OK button, then click the OK button in the
Display Properties dialog.
6 Restart your computer.
Reducing edge distortion
When using a television for your PC’s display, you may see
some edge distortion on the left and right side of your television
screen. This effect depends on your television and the PC
application you are running. To reduce edge distortion, you can
increase the horizontal size.
T o increase the ho rizontal size
1 Click Start, point to Settings, then click Control Panel.
2 Double-click Display, then click the Settings tab.
Using Your ALL-IN-WONDER 29
3 Click the Advanced button, then click the Displays
tab.
Windows
the Displays tab.
®
98 users: click the Advanced button, then click
4 Click the TV button, then click the Adjustments tab.
5 Click the plus (+) button under Horizontal Screen to
increase the horizontal size of the television display.
6 Click OK or Apply to save the changes you have made.
You can also reduce edge distortion by increasing the TV’s
contrast.
Page 36

30 Using Your ALL-IN-WONDER
T o increase the TV contrast
1 Click Start, point to Settings, then click Control Panel.
2 Double-click Display, then click the Settings tab.
3 Click the Advanced button, then click the Displays
tab.
Windows
the Advanced tab.
®
98 users click the Advanced button, then click
4 Click the TV button, then drag the Contrast slider to the
right to increase the contrast.
5 Click OK or Apply to save the changes you have made.
Changing display configurations
If you move your computer to a place where you are using
television display only, make sure that you have the television
display feature enabled first; see To enable and disable the
television display on page 27.
Using games and applications
Some older games and applications may program the graphics
card directly to run under a specific display mode. This may
cause your television display to turn off automatically or
become scrambled (the PC monitor will not be affected). Your
television display will be restored once you exit the game or if
you restart your system.
Page 37

Using Your ALL-IN-WONDER 31
MUL TVIEW
If you have an ALL-IN-WONDER series card and an
ATI TV WONDER PCI card installed in the same system,
MULTVIEW lets you watch a different channel in a secondary
video window. You can record video from your
ALL-IN-WONDER while you watch another channel on the
TV WONDER. The secondary window can be in the following
locations:
Picture in Picture (PiP). When the main video window is in
full-screen, the MUL TVIEW PiP video window is embedded in
the main window. It can be positioned in the top/bottom lef t or
top/bottom right of the main window.
Picture outside Picture (PoP). If you use only one monitor,
the main and MULTVIEW video windows can be displayed in
separate windows. If you use dual monitors, you can drag the
MULTVIEW window to the secondary monitor. MULTVIEW
can be displayed in a window or full-screen in the secondary
monitor.
i
™
The first time you start TV, the MULTVIEW Initialization
Wizard will guide you through setting up the
MULTVIEW window location and the MUL TVIEW tuner
audio connection.
MULTVIEW controls include channel up/down, Mute/unmute,
audio, swap channel, volume slider, and channel status. When
MUL TVIEW is in focus, you can also type a channel number or
name to change channels.
T o enable MULTVIEW
In the MULTVIEW Initialization Wizard, click Enable
MULTVIEW.
T o open and close MULTVIEW
1 Right-click the control panel or the video panel.
2 In the Feature menu, click MULTVIEW, then click Show.
To close MULTVIEW, click the Close button .
• Or right-click the control panel or the video panel, and in
the Feature menu, click MULTVIEW, then click Show.
Page 38

32 Using Your ALL-IN-WONDER
T o change the location of the MUL TVIEW windo w
When the main video window is in full screen, right-click the
control panel or the video panel, click MULTVIEW, click
Location, then click the position you want: Top-Left,
Top-Right, Bottom-Right, or Bottom-Left.
You can manually change the embedded window's size and
location when the MULTVIEW borders are visible.
Autohiding MULTVIEW window contr ols and border s
The MULTVIEW window borders disappear after a few
seconds of mouse inactivity on the MULTVIEW window.
When you move your mouse over the MUL TVIEW windo w , the
border re-appears.
Only one video window can be can be in control. When the
embedded MUL TVIEW windo w is in focus, its borders are red;
when it is not in focus, its borders are black. For example when
the borders are red, a REMOTE WONDER channel-change
command will change the MULTVIEW channel.
MUL TVIEW audio requirements
If you have one audio card or an integrated audio chip, you must
connect one audio path internally (CD-In, for example) and the
other externally (Line-In, for example).
If you have two audio cards or one audio card and an integrated
audio chip, you can connect both audio paths internally,
externally, or one internally and the other externally.
EAZYLOOK
Designed to work with the REMOTE WONDER (see page 14)
in full-screen mode, EAZYLOOK displays large, on-screen
information about remote control functions when you watch TV ,
DVD, or File Player. It also provides assistance when you use
the Library or navigate in TV Listings.
™
Page 39

Using Your ALL-IN-WONDER 33
ATI HDTV Component Video Adapter (Optional)
The HDTV Component Video Adapter is for use in
North America only, and is available from the online
i
ATI store at http://www.ati.com/online/accessories.
The optional Component Video Adapter lets you view computer
output directly on your High Definition Television or other
component input device. Provide a big-screen experience for
your PC that is ideal for playing games, giving presentations,
watching movies, and browsing the Internet.
The ATI Output adapter (see page 20) allows you to connect a
standard TV using a Composite Video or S-Video cable. The
ATI HDTV Component Video Adapter can be attached to the
second VGA connector, to attach an HDTV or other component
input device, using component video cables.
You must use the VGA2 connector to
FM
TV
connect an HDTV.
A/V OUT
ATI Output Adapter HDTV
A/V IN
VGA 2
ATI Component
Video Adapter
HDTV Requirements
A CRT monitor is required to install the ATI HDTV
Monitor
Television HDTVs or SDTVs that accept component input.
Warranty
The ATI HDTV Component Video Output Adapter is warranted
for one year. Accompanying product accessories are warranted
for 90 days.
Component Video Adapter, and to run DOS
applications.
Page 40

34 Using Your ALL-IN-WONDER
For information on your video card’s graphics features, doubleclick the ATI icon in the lower-right corner of your screen, or go
to www.ati.com.
HDTV Kit contents
• ATI HDTV Component Video Adapter
• Installation CD
• Installation and Setup User’s Guide
Setting up your ATI HDTV Component Video Adapter
Setting up the ATI HDTV Component Video Adapter consists
of two, easy steps.
• Installing the software — page 34
• Connecting the Adapter — page 34
Installing your ATI HDTV Component Video Adapter
You must have a CRT monitor attached to your
computer before installi n g th e ATI HDTV.
For proper operation of your ATI Component Video
Adapter, ATI display drivers must be correctly
i
installed.
The HDTV Adapter must be plugged into the VGA2
connector (see page 20).
For “Po wered by ATI” products:
1 Insert the ATI Installation CD that came with your HDTV
Component Video Adapter Kit into your CD-ROM drive.
If Windows runs the CD automatically, cancel the
installation.
2 In Windows Explorer or My Computer, double-click the
CD icon, then search for AIB_DRV.
3 When Windows finds AIB_DRV, double-click it, follow the
on-screen prompts, and then go to Step 5, below.
Page 41

Using Your ALL-IN-WONDER 35
For “Built by ATI” products
1 Insert the ATI Installation CD that came with your HDTV
Component Video Adapter Kit into your CD-ROM drive.
If Windows runs the CD automatically, go to step 4.
2 Click Start, click Run, and then type the following:
D:\Setup
(If D is not your CD-ROM drive, substitute the correct
drive letter.)
3 Click OK, follow the on-screen prompts, and then shut
down your computer.
4 Plug the ATI HDTV Component Video Adapter into the
A/V Out connector on your ALL-IN-WONDER card.
Digital flat panel displays use the VGA-to-YPbPr adapter.
5 Using the appropriate cables, connect the ATI HDTV
Component Video Adapter’ s outputs to your HDTV’ s video
inputs.
Page 42

36 Using Your ALL-IN-WONDER
CRT / Analog Flat Panel Monitor
To sound card
LINE IN
S/PDIF
connector
with RCA
Input and output cable
lengths should not exceed
Dolby Digital AC-3 Amplifier
50 feet (15m).
Y=Green
Pb= Blue
Pr = Red
For complete cabling
instructions, see page 20.
consumer
electronics
S
/
P
D
I
F
Cables
plugs,
available
from a
dealer
ATI
Output
Adapter
A/V OUT
A/V IN
ALL-IN-
WONDER
VGA 1
T o primary
display
VGA 2
HDTV Video Inputs
FM
TV
You must use the
VGA2 connector to
attach an HDTV
ATI Component
Video Adapter
PrPbY
6 Turn on your component input device, and set it to YPbPr
input. See your HDTV or component input device manual
for further instructions.
7 Turn on your PC.
Page 43

Using Your ALL-IN-WONDER 37
Your TV will not display anything until Windows starts.
This may take several minutes.
Using your HDTV Component Video Adapter
Use the HDTV Component Video Adapter to watch DVD
movies and play video games on your High Definition
T elevision.
Copy-protected DVDs restrict playback to 480i and
i
480p modes.
For maximum performance when you watch DVD movies or
play computer games on your HDTV, you should find the mode
and screen resolution that provide the best result on your TV,
and use those settings exclusively.
Windows Control P anel Settings
Use the Windows Control Panel settings to choose the
resolution and HDTV display mode.
T o change settings using the Windo ws Contr ol Panel
1 Click the Windows Start button, point at Settings, then
click Control Panel.
2 Double-click the Display icon, click the Settings tab, and
use the Screen Area slider to select the resolution you
want.
Note: If the resolution you select is not related to a timing,
the system will reduce the resolution to the closest
supported timing.
3 Click the Advanced... button, then click the Displays tab.
4 Click the YPbPr tab.
The HDTV settings page opens.
5 Check the modes you want in the Custom Settings buttons,
then click OK.
6 Click the Advanced... button,
Page 44

38 Using Your ALL-IN-WONDER
7 Click the Adapter tab, then click the List All Modes...
button.
List All Modes is only available in Windows 2000 and
Windows XP. It is not available in Windows 98 / 98SE, or
Windows ME.
8 Click 640 x 480.
9 For Interlaced mode, click 30Hz or 60Hz.
YPbPr is only available with the 30Hz or 60HZ settings.
Windows XP does not enable 640 x 480 screen
resolution by default. To set 640 x 480 resolution,
right-click your desktop, click Properties, click the
Settings tab, click the Advanced button, click the
i
Adapter tab, click List all modes, then select
640 x 480.
• 60Hz = Progressive
• 30Hz = Interlaced
The following tips may help if you experience problems. Please
contact your dealer for more advanced troubleshooting
information.
Page 45

T r oubleshooting tips
Problem Possible Solution
Using Your ALL-IN-WONDER 39
The colors on my
TV display are not
correct
There is no display
on my TV
DVDs will not play
in 720p or 1080i
modes
I can’t see the
entire display
The display is tilted Consult your HDTV user’ s manual.
My CRT display is
green
Ensure that the connections between the
Component Video Adapter and your HDTV are
correct (Y=Green, Pb=Blue, Pr=Red). See the
illustration on page 36.
Your TV will not display anything until Windows
starts; this may take several minutes.
• Set your TV to YPbPr input.
• Ensure that the HDTV Component Video Adapter
is properly connected, then restart your computer.
• Ensure that the drivers in the ATI HDTV
Component Video Adapter Kit have been installed.
Copy-protected DVDs restrict playback to 480i and
480p modes.
If your component input device supports it, try 720p
mode.
Your system is in component output mode. Restart
your computer with the CRT monitor connected.
Page 46

40 Using Your ALL-IN-WONDER
Page 47

CHAPTER 4
Reference
This chapter contains troubleshooting tips for your
ALL-IN-WONDER card.
T r oubleshooting
The following troubleshooting tips may help if you experience
problems. ATI’s documentation contains helpful
installation/configuration tips and other valuable feature
information. Please contact your dealer for more advanced
troubleshooting information.
41
Page 48

42 Reference
Basic troubleshooting tips
Problem Possible Solution
No video • Check that the card is seated properly in its expansion
slot. If the problem still exists, try a different expansion
slot.
• Ensure that the monitor cable is securely fastened to
the card.
• Make sure that the monitor and computer are plugged
in and receiving power.
• If necessary , disable any built-in graphics capabilities on
your mother board. For more information, consult your
computer’s manual or manufacturer. (Note: some
manufacturers do not allow the built-in graphics to be
disabled or to become the secondary display.)
• Make sure that you selected the appropriate monitor
when you installed your enhanced driver.
Poor T V
reception
• If you use an indoor antenna, you will get the best
results with an amplified model. Place it as far away
from the PC monitor as possible, to avoid interference.
• Splitting the cable or antenna input can reduce the
signal quality . F or the best reception, connect the cable
or antenna directly to your card.
No sound • Make sure that your audio card’s line input is active (see
Windows Volume Control on page 22).
• Ensure that you have connected the audio cable from
your ALL-IN-WONDER card to the LINE IN connector
on your sound card.
• Re-run the Sound Initialization Wizard:
1. Click the setup button.
2. Click the Display tab .
3. Click the Initialization Wizard button.
4. Click Next> twice, and check the Audio Input setting.
Page 49

T roub leshooting tips
For troubleshooting tips, right-click the ATI icon in the taskbar,
and select Troubleshooting.
If you have problems during start-up, start your computer in
Safe Mode.
To load Windows® in Safe Mode
1 Turn on your computer.
2 Press and hold the CTRL key until the Windows Startup
Menu appears, then select the number for Safe Mode, and
press Enter (on some computers, you can press F8 instead
of CTRL to display the Windows
Mode, open the Device Manager and check for duplicate
display adapter and monitor entries if you are using only
one graphics card.
• Disable any programs that start automatically when you
start Window s
• Check that you have the correct monitor and display
driver selected in the Displa y Properties. For more
information, click Help in the Start menu.
Reference 43
®
Startup Menu). In Safe
®
.
• Check for the existence of memory managers and ensure
they are configured properly.
• Refer to additional information in the Windows
®
README file located in the root directory on the A TI
Installation CD-ROM.
• For technical assistance, refer to your technical support
documentation or contact your vendor.
Page 50

44 Reference
Audio and Video Troubleshooting
Audio prob lems ...
Problem Possible Solution
No Sound Check your speakers:
If you have external speakers, ensure that they are
powered-on (POWER indicator light is on) and connected
to the LINE-OUT or SPEAKER OUT connectors on your
sound card.
Connect the Line-In connector to your sound card first.
See the illustration on page 20,
Still no
sound?
Play a WAV sound:
1 Click Start, point at Settings, select Control Panel,
then double-click Sounds.
2In the Events area, Click Asterisk, then click a WAV
file in the Sound area.
3 Click the Play button to preview the sound.
If you still do not hear any sound, open the Volume
Control:
Click Start, point at Programs, point at Accessories,
point at Entertainment, then select Volume Control.
Or, right-click the speaker icon (usually in the lowerright corner of your screen), then click Open Volume
Controls.
If the speaker icon is not in your Taskbar, do the f ollo wing:
In the Windows Taskbar, click Start, point to Settings,
click Contr ol Pa nel, then doub le-clic k Multimedia. In the
Audio tab, check Show volume control on the
Taskbar.
• Ensure that the Volume Control and the Wave channel
are not muted or set very low.
When you hear sound from your speakers, you know the y
are working.
If you still experience audio problems, check the audio
connections to your ALL-IN-WONDER card.
Page 51

Reference 45
Problem Possible Solution
No sound from TVEnsure that the audio connection between your
ALL-IN-WONDER card and your sound card is correct.
For instructions, see Input and Output Adapters on
page 18.
Can’t record
sound
Can’t record
sound when
recording from
a videotape
No sound on
the videotape
when
outputting to a
VCR
Check the record mixer settings:
1 Click Start, point at Programs, point at Accessories,
point at Entertainment, then select Volume Control.
Or, right-click the speaker icon (usually in the lowerright corner of your screen), then click Open Volume
Controls.
2In the Volume Control menu, click Options, click
Properties, click Recording, then click OK. The
Recording Control opens.
3 Ensure that Line-In (or the Audio input you selected in
the TV Sound Initialization Wizard — see page 21) is
checked, then click to close the dialog.
Connect the VCR audio output to your PC:
Left and right audio output from your VCR must be
connected to your ALL-IN-WONDER card (note that
S-Video does not provide an audio connection). For
instructions, see Input and Output Adapters on page 18.
Connect your PC audio to the VCR:
Left and right audio output from your VCR must be
connected to your ALL-IN-WONDER card (note that
S-Video does not provide an audio connection). For
instructions, see Input and Output Adapters on page 18.
Page 52

46 Reference
Video problems ...
Problem Possible Solution
Video is
unstable or
only blac k and
white
There is no
video or audio
Video
recording
stops
unexpectedly
Check that you are using the correct broadcast standard
format:
• For proper operation, you must specify your country in
the TV Channels Initialization Wizard.
• Check the quality of your incoming TV signal on another
receiver; bad reception may be the cause.
• T ry connecting your tuner directly to the cable TV or
antenna source. Too many splitters in the cable will
degrade the signal.
• Ensure that your cable or antenna is connected.
• In the TV Video Settings page, ensure that the video
connector is set to the correct source.
• Check that the audio and video connectors are securely
plugged into the correct jacks.
• Check that your video card is securely seated in its slot.
Please refer to the user guide for the card location.
• Video files are typically very large; ensure that you have
sufficient disk space.
• Ensure that you are recording to the correct hard disk
— click the Disk Space Settings button in the
Personal Video Recorder settings page.
• The maximum file size for the FAT 32 file system is 4
Gigabytes. You can reduce the file size by reducing the
frame size of the recording in Personal Video Recorder
settings. MPEG files are usually much smaller than AVI
files.
• Disable screen savers while recording.
• Disable Power management while recording.
Page 53

Problem Possible Solution
Reference 47
Dropped
frames during
video
recording
Dropped frames during video recording indicates that
some part of the system is not fast enough to keep up
with the recording. Recording video is a very demanding
task for even the most powerful system. To achieve the
best results, you must dedicate the PC to recording, and
ensure that nothing else is active during recording.
• Defragment your hard drive
• A large, dedicated disk is recomme nded if you plan to
do much video recording
• Ensure that DMA is enabled for your hard drive, to
improve disk access speed and free up the system CPU
• Close all other running tasks, including those in the
System Tray — clock, popup reminders, virus scanners,
etc.
• Close and exit from any Task Scheduler
• Do not log on to your network
• Do not connect USB devices while recording
• Do not open or close CD-ROM trays while recording
• Do not move the mouse while recording
MPEG recording requires a very fast CPU to encode
the video.
• Select I Frame Only in the Personal Video Recorder tab
in Setup
• Reduce the frame size of the recording
A VI recor ding creates very large file very quickly, and
requires a fast hard disk system.
Try a lower frame size, for example, 320x240. If you do
not drop frames using 320x240 frame size, but frame
drops do occur at larger frame sizes, your hard disk may
not be fast enough.
Page 54

48 Reference
Problem Possible Solution
Recorded
video has
horizontal
lines
(“combing”)
• If you are recording to AVI format, reduce the line count
in the Frame Size . For example, change the frame size
from 480x480 to 480x240.
In the Personal Video Recorder Settings page, click the
Set Custom... button, then click the Edit... button,
choose your AVI preset, then edit the frame size.
• If you are recording in MPEG format, ensure that
Deinterlacing is checked.
In the Personal Video Recorder Settings page, click the
Set Custom... button, then click the Edit... button,
choose your MPEG preset, then check Deinterlacing.
Page 55

CD Audio Connectors
The following illustration shows the optional, internal CD audio
connectors on your ALL-IN-WONDER 9600 PRO card.
Reference 49
The CD connectors
are provided for
internal audio
connection. The
internal audio
cabling (not
included) must
match your sound
card.
This table lists
the pin
assignments for
the CD audio
connectors.
CD AUDIO IN connectors
(see your sound card
manual)
SOUND
CARD
CD OUT
connectors, pins 2
and 4 (see the
following table)
ALL-IN-WONDER
ALL-IN WONDER 9600 PRO
ALL-IN-
WONDER
Pin Signal
9600 PRO Card
J1 Pin 1 - GND CD OUT
J1 Pin 2 - LEFT OUT CD OUT
J1 Pin 3 - GND CD OUT
J1 Pin 4 - RIGHT OUT CD OUT
Page 56

50 Reference
Internal Audio/Video Input Header
The following illustration shows the optional, internal
audio/video input header connectors on some
ALL-IN-WONDER cards.
18
Internal
Audio/Video
Input Header
(optional)
ALL-IN-WONDER
ALL-IN WONDER 9600 PRO
This table lists
the pin
assignments for
the internal
audio/video input
header.
Pin Signal
1 CVBS / Y in
2 Video Ground
3 Luma / Pr in
4 Video Ground
5 Chroma / Pb in
6 Audio Left in
7 Audio Ground
8 Audio Right in
Page 57

Reference 51
T o Remo ve the ATI Multimedia Center
1 In the Windows
then click Control Panel.
®
taskbar, click Start, poin t to Settings,
2 Double-click Add/Remove Programs.
Windows 98 users: click the Install/Uninstall tab.
3 Select ATI Multimedia Center from the list.
4 Click the Change/Remove button.
Windows 98 users: click the Add/Remove button
5 Click Yes to remove the ATI Multimedia Center, then click
Yes to restart your computer.
T o Remo ve the ALL-IN-WONDER Drivers
1 In the Windows
then click Control Panel.
2 Double-click Add/Remove Programs, then click the
Install/Uninstall tab.
3 Select ATI Display Driver from the list.
4 Click the Change/Remove button.
Windows 98 users: click the Add/Remove button.
5 Click Yes to remove the ALL-IN-WONDER 9600 PRO
card driver, then click Yes to restart your computer.
®
taskbar, click Start, poin t to Settings,
Page 58

52 Reference
Compliance Information
FCC Compliance Information
The ALL-IN-WONDER cards comply with FCC Rules Part
15. Operation is subject to the following two conditions
• This device may not cause harmful interference, and
• This device must accept any interference received,
including interference that may cause undesired operation.
This equipment has been tested and found to comply with the limits for
a Class B digital device, pursuant to Part 15 of the FCC Rules. These
limits are designed to provide reasonable protection against harmful
interference in a residential installati on. This equipment ge nerates, uses
and can radiate radio frequency energy and, if not installed and used in
accordance with manufacturer's instructions, may cause harmful
interference to radio communications. However, there is no guarantee
that interference will not occur in a particular installation. If this
equipment does cause harmful interference to radio or television
reception, which can be determined by turning the equipment off and
on, the user is encouraged to try to correct the interference by one or
more of the following measures:
• Re-orient or relocate the receiving antenna.
• Increase the separation between the equipment and receiver.
• Connect the equipment to an outlet on a circuit different from that to
which the receiver is connected.
• Consult the dealer or an experienced radio/TV technician for help.
• The use of shielded cables for connection of the monitor to
the graphics card is required to ensure compliance with
FCC regulations.
• Changes or modifications to this unit not expressly
approved by the party responsible for compliance could
void the user's authority to operate this equipment.
Page 59

Industry Canada Compliance Statement
ICES-003 This Class B digital apparatus complies with
Canadian ICES-003.
Cet appareil numérique de la Classe B est conforme à la norme
NMB-003 du Canada.
For further compliance information:
ATI Research Inc.
4 Mount Royal Ave.
Marlborough, MA
01752-1976
USA
508-303-3900
CE Compliance Information
EMC Directive 89/336/EEC and Amendments 92/31/EEC and
93/68/EEC, for Class B Digital Device.
EN 55022:1998/CISPR 22:1997, - Class B - Limits and
Methods of Measurement of Radio Disturbance Characteristics
of Information Technology Equipment.
Reference 53
EN55024:1998/CISPR 22:1997, - Information Technology
Equipment - Immunity Characteristics - Limits and Methods of
Measurement.
Low V oltage Directive for
TV -Tuner-Equipped products
73/23/EEC - The Low Voltage Directive.
EN 60950: 2000-08 - Safety of Information Technology
Equipment.
Page 60

54 Reference
L’Information de conformité de la CE
Directive EMC 89/336/CEE et amendement 92/31/CEE et
93/68/EEC, dispositif numérique de Classe B.
EN 55022:1998/CISPR 22:1997, - Class B - Limites et
méthodes de mesure des caractéristiques d'interférences
radiophoniques, Matériel des technologies de l'information.
EN 55024:1998/CISPR 24:1997, Limites et méthodes de
mesure des caractéristiques d'immunité, Matériel des
technologies de l'information Equipement de Technologie de
l'Information - Caractéristiques d'Immunité - Limites et
méthodes de mesure.
Directive de Basse Tension
pour produits contenir tuner de télévision
73/23/CEE - Directive basse tension.
EN 60950 : 2000-08 - Sécurité du matériel des technologies de
l'information.
CE-befolgungInformationen
EMC Richtlinie 89/336/EEC und Änderungen 92/31/EEC und
93/68/EEC, Digitales Gerät der Klasse B.
EN 55022:1998/CISPR 22:1997, - Klasse B - Grenzwerte und
Meßverfahren für Funkstörungen von Einrichtungen der
Informationstechnik.
EN 55024:1998/CISPR 24:1997, Einrichtungen der
Informationstechnik, Störfestigkeitseigenschaften, Grenzwerte
und Prüfverfahren.
Niederspannung Richtlinie
für Produkte Enthalten Fernsehen tuner
73/23/EEC - Niederspannungsrichtlinie.
EN 60950: 2000-08 - Sicherheit für Einrichtungen der
Informationstechnik.
Page 61

Index
A
Adapters
input and output
ATI Multimedia Center
uninstalling
User’s Guide
Audio connectors
49
CD
Audio troubleshooting
C
CATALYST software suite
installing
CD audio connectors
Color depth
increasing
Colors
increasing number of
Compliance information
CE
53
Industry Canada
Low Voltage Directive for TV-
tuner-equipped products
Composite video
Control panel settings
D
Displaying PC output on TV 20
Drivers
downloaded from ATI website
removing
18
51
4
44
13
49
16
16
53
53
19
37
51
17
E
EAZYLOOK 32
G
GART driver 9
H
HDTV
Component Video Adapter
(optional)
requirements
HYDRAVISION
I
Input and output adapters 18
displaying PC output on TV and
recording on videotape
watching movies on your PC and
recording video
Installing the hardware and
software
input and output adapters
Installing your card
Internal audio/video input header
L
LaunchPad 17
M
Monitor
adjusting display
using a monitor vs. TV display
Multimedia Center
starting
Multiple display support 15
MULTVIEW
audio requirements
Picture in Picture, Picture outside
Picture
TV WONDER 31
33
33
3
20
19
9
18
11
28
17
31
32
31
50
27
55
Page 62

O
Online Help 4
P
Picture in Picture 31
Picture outside Picture
R
Recording PC output on videotape
20
Recording Video
Removing drivers
S
Safe Mode
Loading Windows in
SCART connectors
Setting up your HDTV Component
Video Adapter
Sound card connector
selecting for TV audio input
Special Multimedia Center features
EAZYLOOK
S-Video
System requirements
T
Troubleshooting 43
audio and video
basic
Troubleshooting tips
TV
attaching to your card
changing display configurations 30
displaying PC output on
MULTVIEW
34
19
42
31
19
51
43
26
21
32
3
44
15, 41
24
20
31
reception tips
reducing edge distortion
selecting sound card connector for
TV audio input
using games and applications
viewing text on 28
TV Out
enabling, using, adjusting
TV WONDER
U
Uninstalling old graphics card
software
Using your HDTV Component
Video Adapter
V
Video
composite video, S-Video, S-VHS
23
Video troubleshooting
Volume control
W
Warranty
customer service
hardware
HDTV Component Video Output
Adapter
limitations
registration
service
Watching movies on your PC and
recording video
Windows volume control
Windows XP
28
29
21
30
27
31
10
37
44
22
5
6
33
7
5
6
19
22
38
56
 Loading...