

Page 1

QUICK START GUIDE
https://www.motomanuals.net/
Page 2

https://www.motomanuals.net/
Page 3

https://www.motomanuals.net/
Page 4

INDEX
https://www.motomanuals.net/
Page 5

02KNOW YOUR SCOOTER
20ON THE ROAD
36CHARGING
42SCOOTER SHUTDOWN
46CARING FOR YOUR SCOOTER
https://www.motomanuals.net/
Page 6

https://www.motomanuals.net/
Page 7

Ather 450X® has been crafted with
obsessive attention to detail. Each and
every part is designed to make the urban,
stop-and-go trac more bearable.
But before you get on the easy, comfy ride,
here’s all the important stu you need to
read about.
This quick start guide will tell you all about
the features and components of the Ather
450X, the Ather® app, the battery pack and
the Ather Dot™.
This guide helps you get going, the
moment you receive your Ather 450X keys.
For the detailed information on using the
scooter, please scan through the full user
manual uploaded online.
https://www.motomanuals.net/
Page 8

THE TWO BIG WORDS
WARNING indicates something that could
hurt you or others.
The other one is
something that could harm your scooter.
CAUTION, it indicates
https://www.motomanuals.net/
Page 9

WARNING
FIRST AND FOREMOST
Read this through and through before your very first ride. So many
things are new. Once you understand all the controls and features,
you’ll be ready to take your scooter on the road.
MAINTENANCE IS A MUST
Regular inspections and maintenance, along with good ride
handling skills are a must for a great experience. Following
these simple rules will make sure that the warranty stays intact.
NO TINKERING
We know you wouldn’t mess around with the high voltage
components like the battery pack, motor etc. Still, we need to
put it in black and white, that they should be serviced only by
the Ather technicians.
https://www.motomanuals.net/
Page 10

KNOW YOUR ATHER
SCOOTER, CLOSELY.
https://www.motomanuals.net/
Page 11

https://www.motomanuals.net/
Page 12
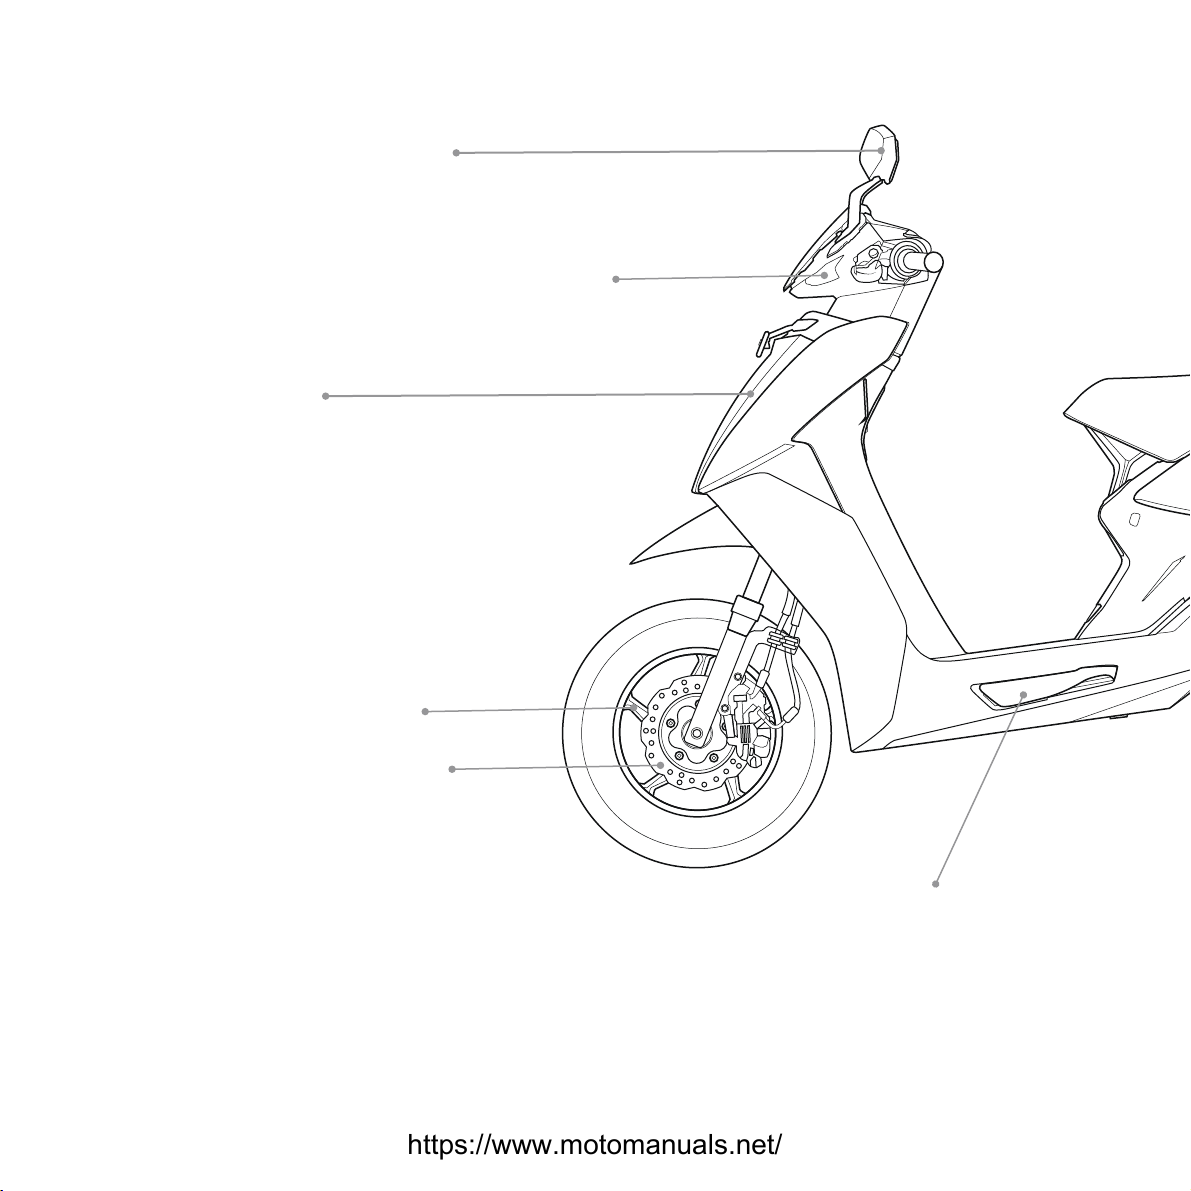
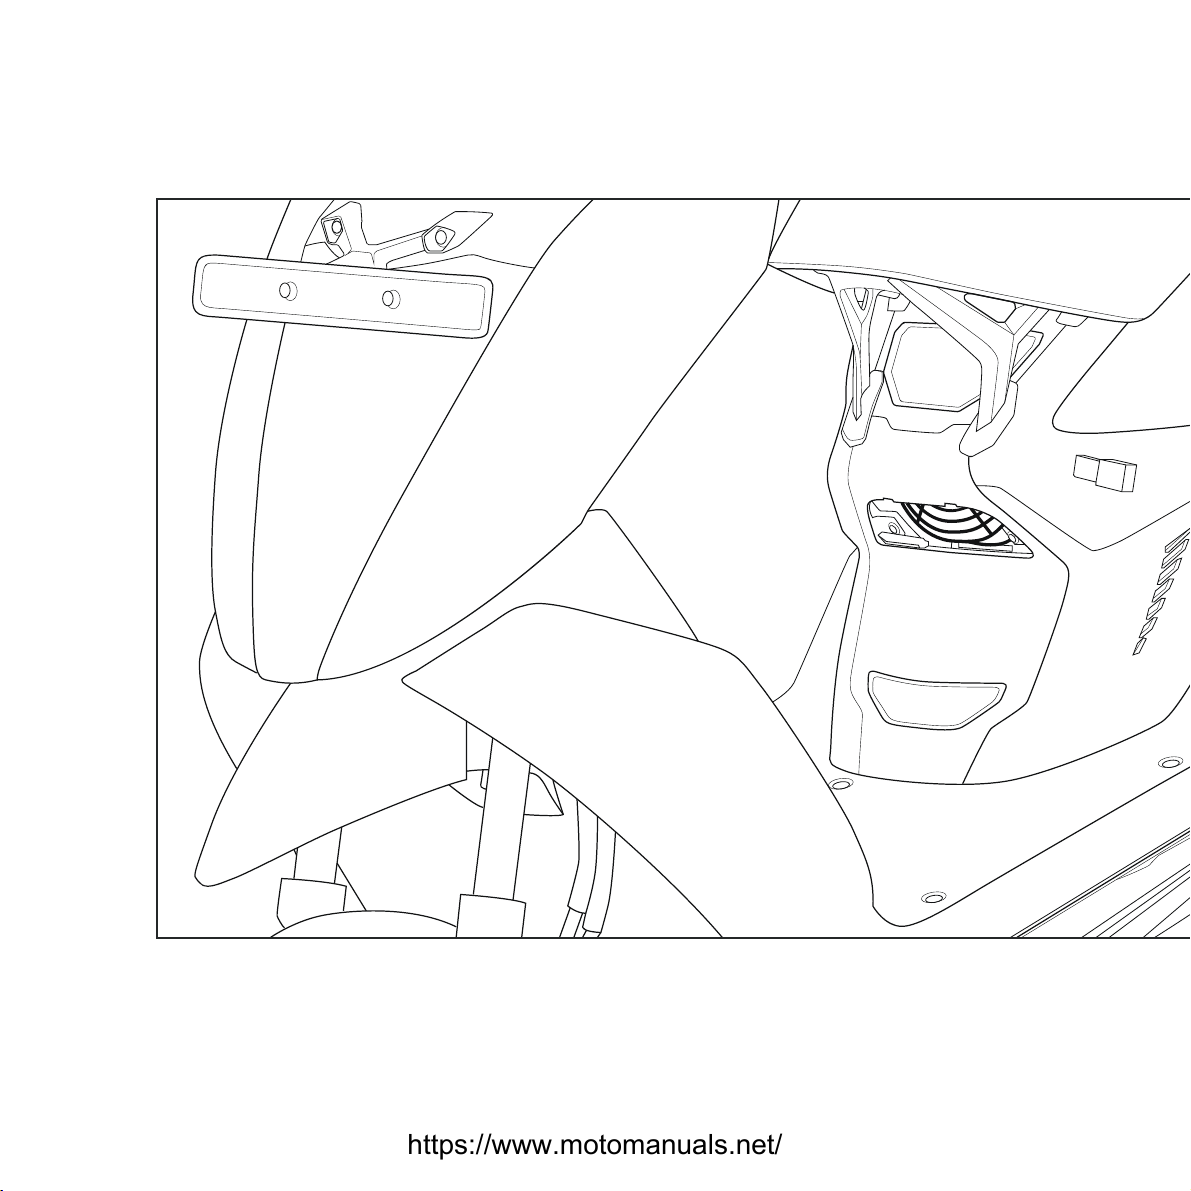
Rear view mirror
Head lamp
Alloy wheels
Integrated
indicator lamps
Front disc brake
Side stand
with sensor
https://www.motomanuals.net/
Page 13
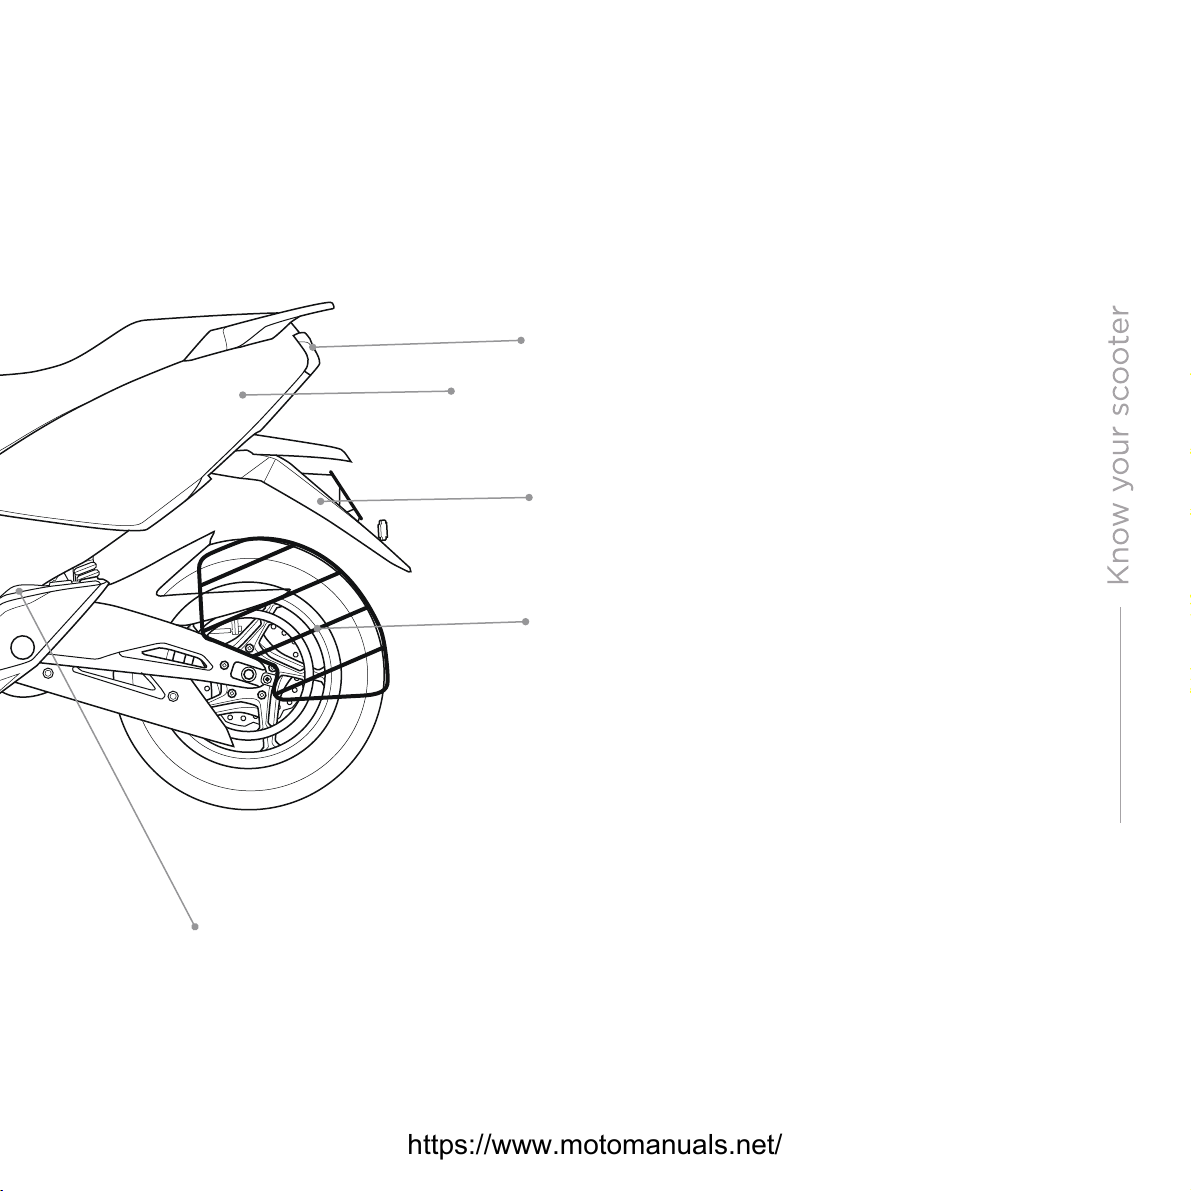
Tail lamp
Rear side panel
Rear fender
Number plate mount
Saree gaurd
2
Pillion footrest
LEFT SIDE VIEW
https://www.motomanuals.net/
Page 14
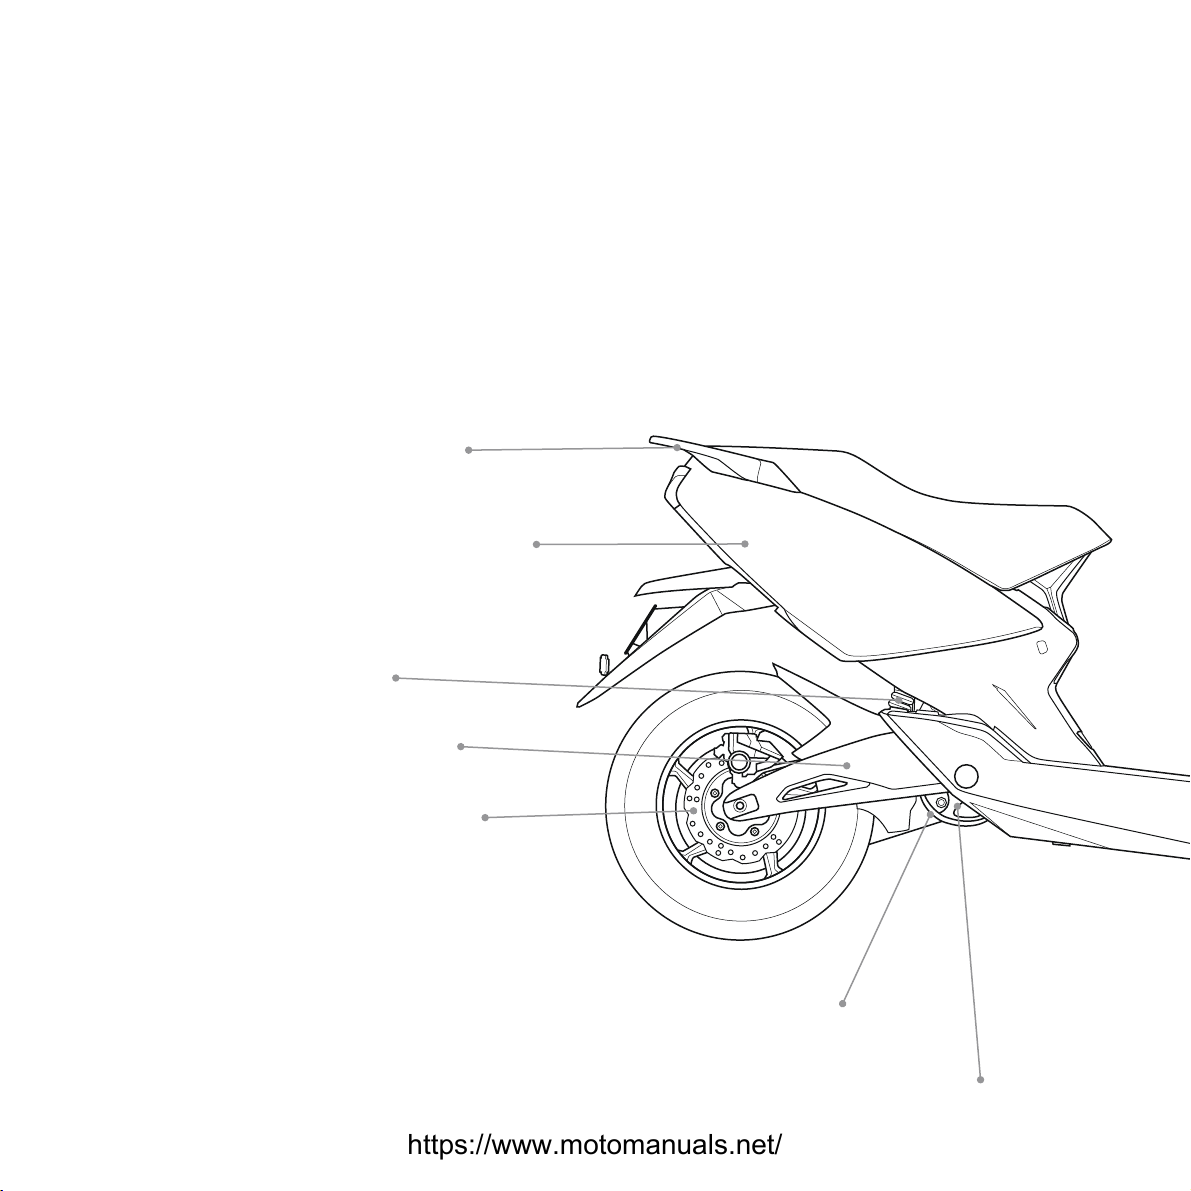
Pillion grabrail
Rear side panel
Rear suspension
Swing arm
Rear disc brake
Drive belt
https://www.motomanuals.net/
Pulley
Page 15
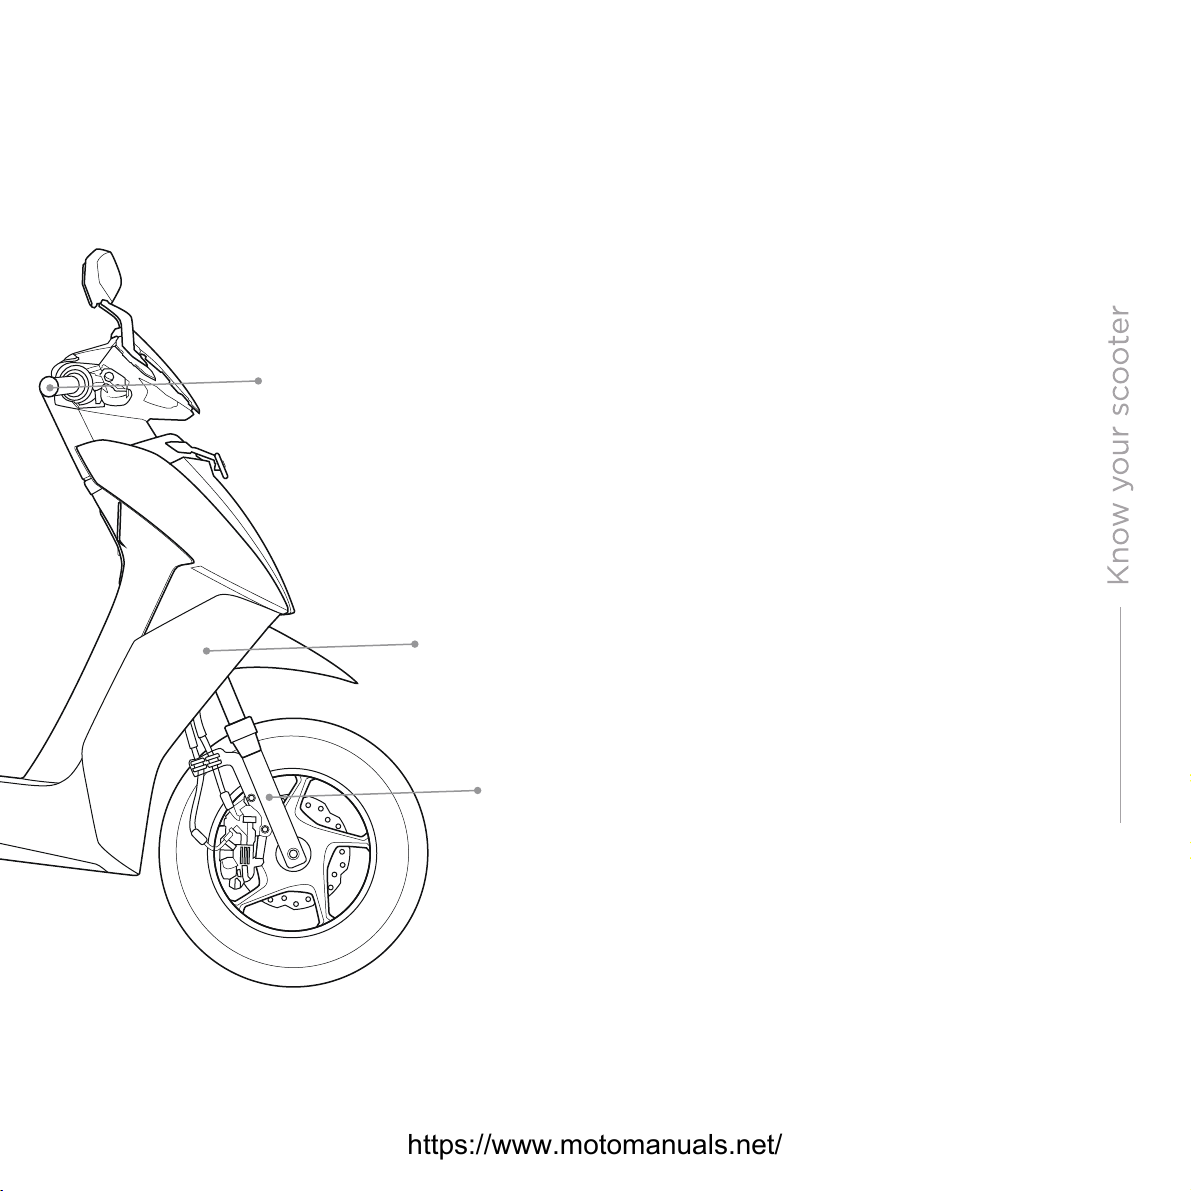
Accelerator grip
Floating panel
RIGHT SIDE VIEW
Front fork suspension
https://www.motomanuals.net/
4
Page 16
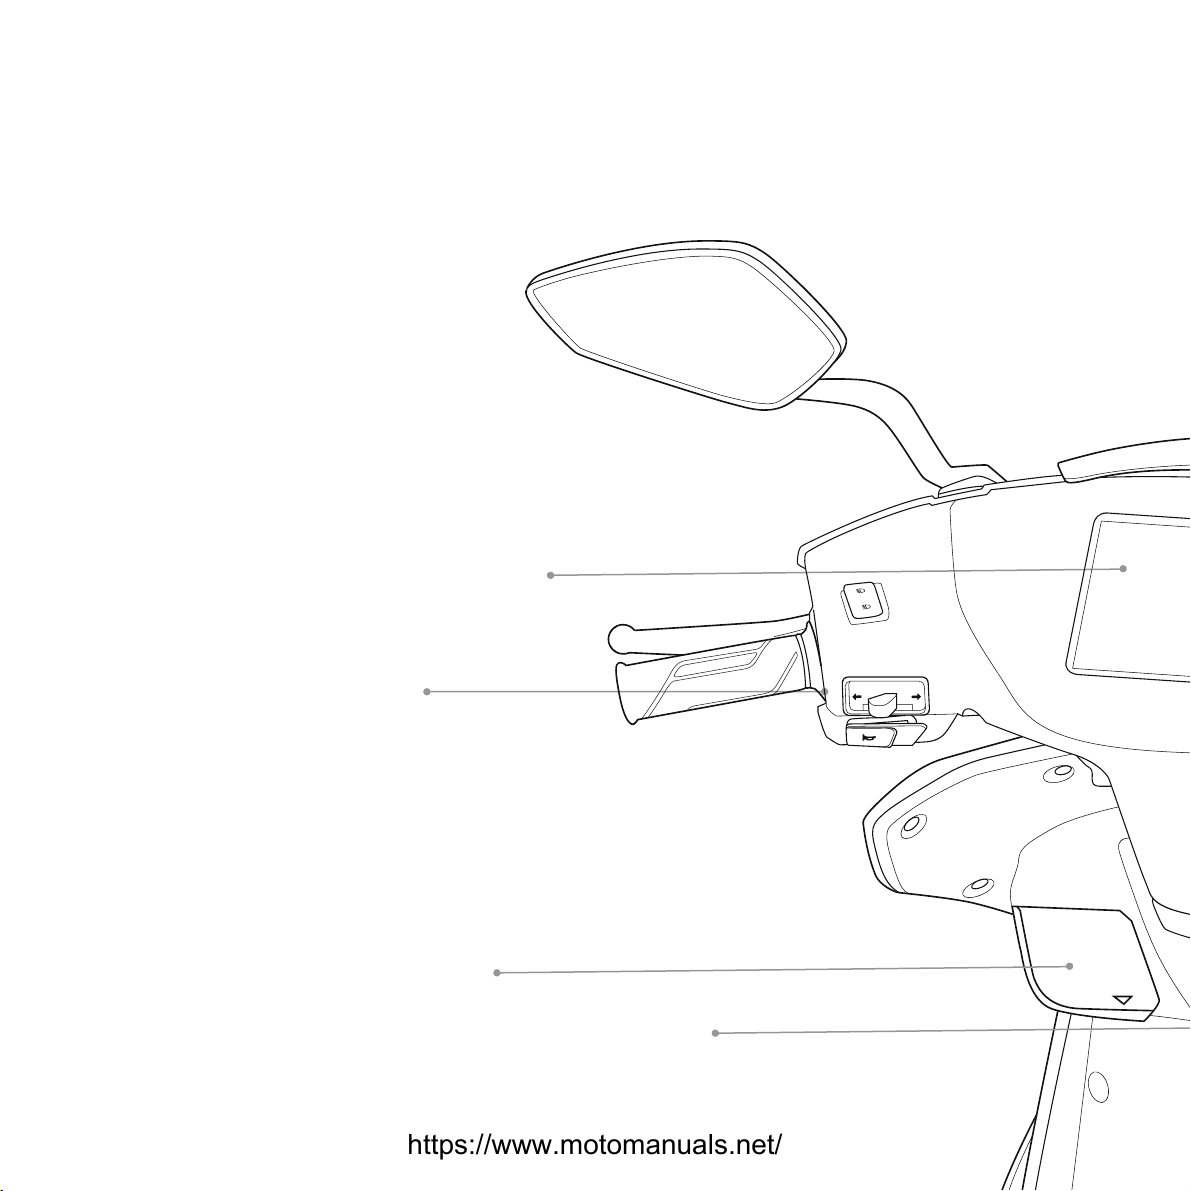
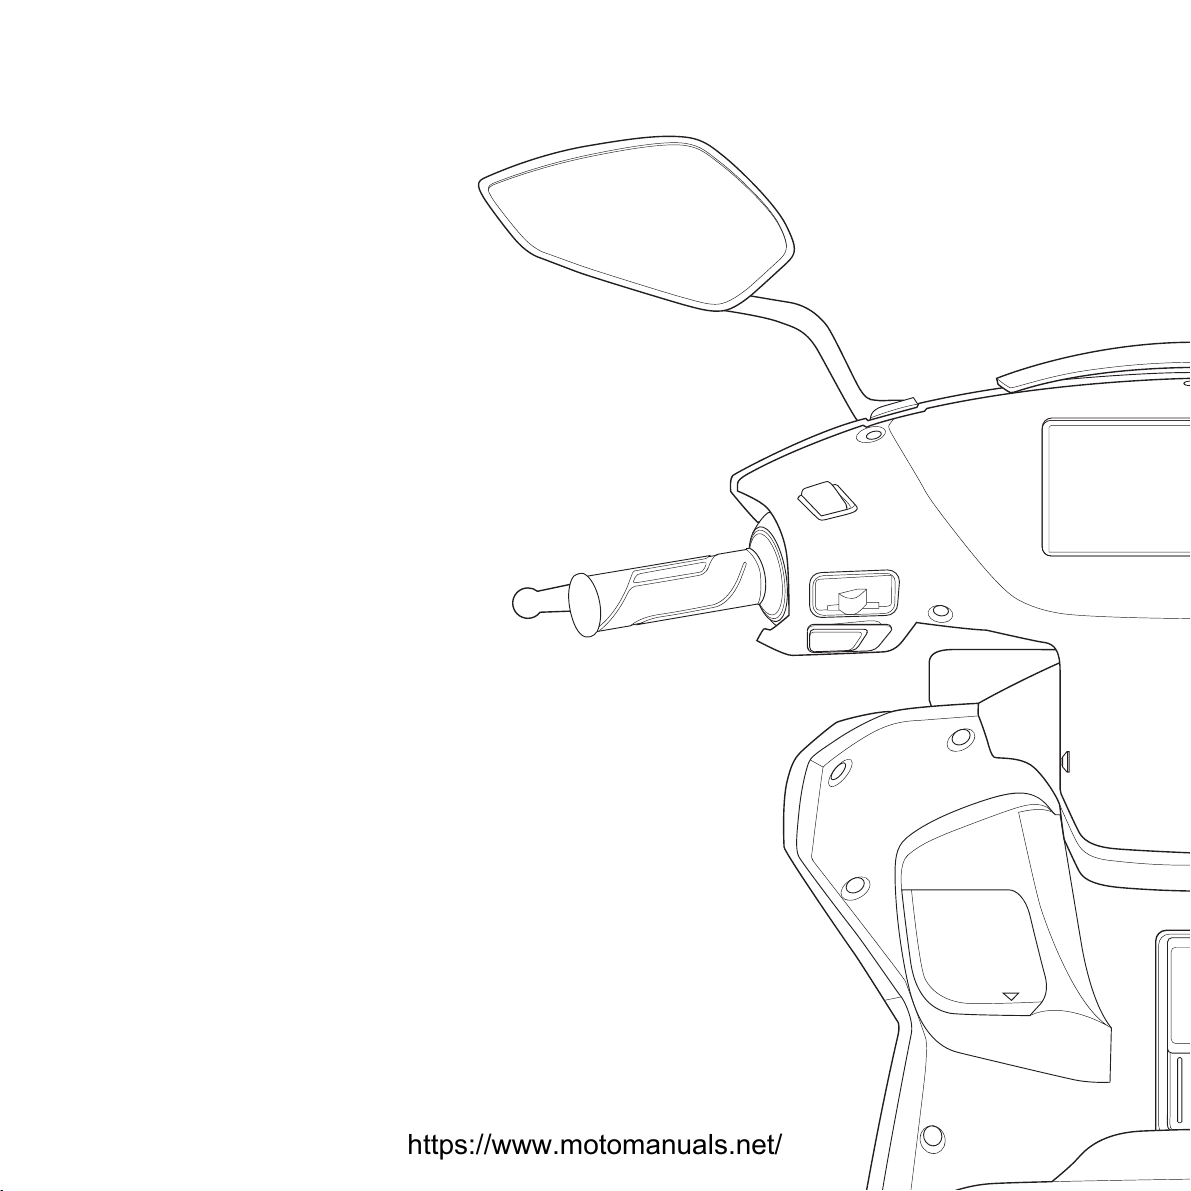
Touchscreen dashboard
LHS grip
& switchgear
Charging port
Luggage hook
https://www.motomanuals.net/
Page 17
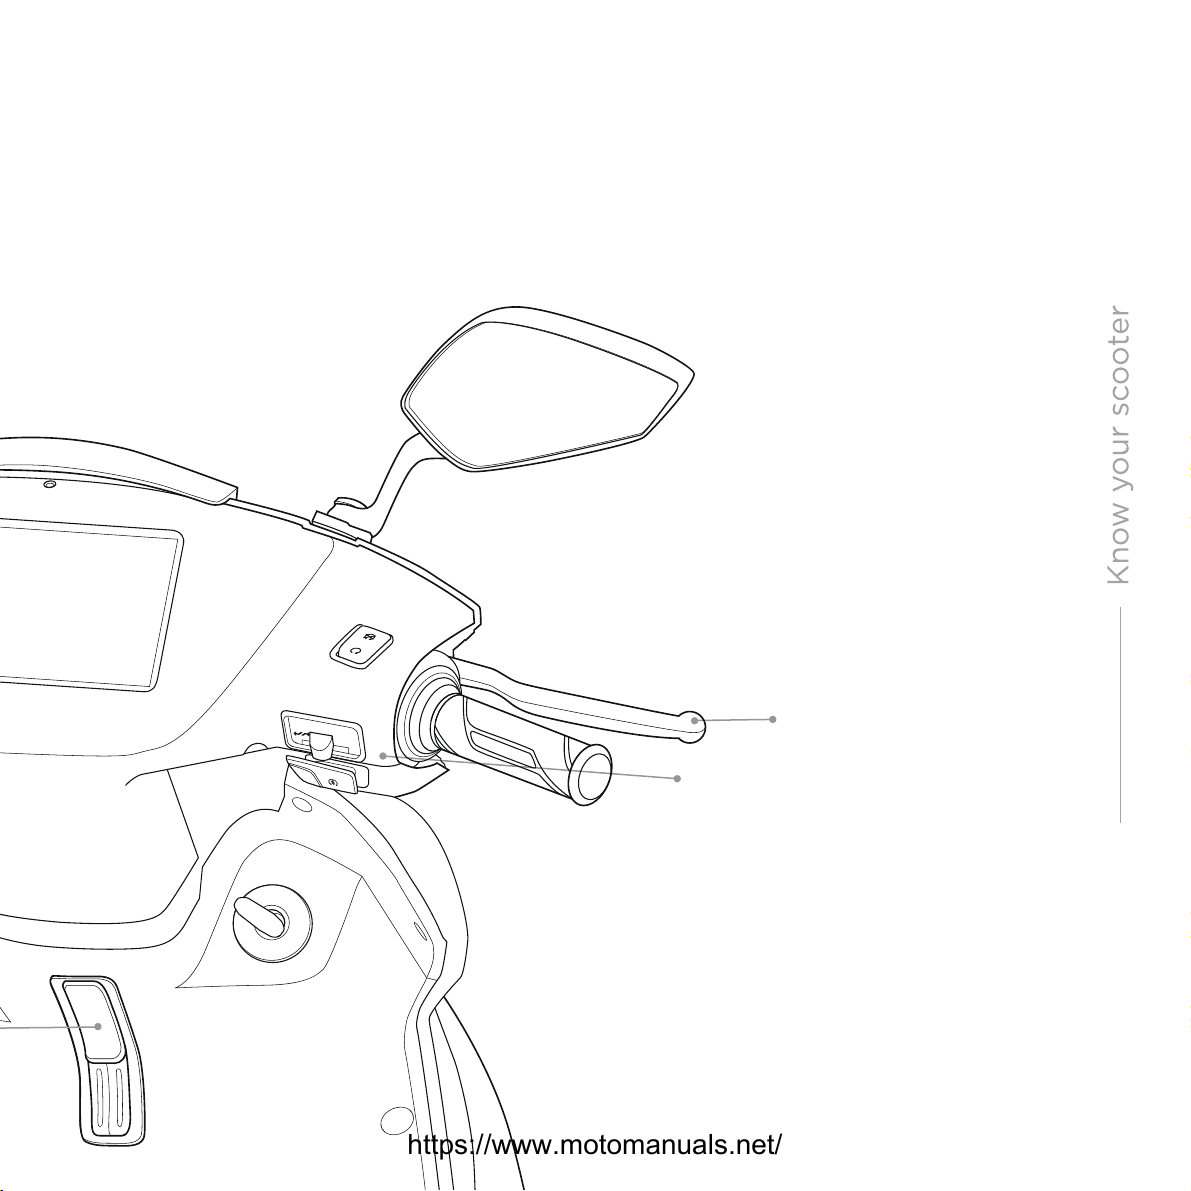
DASHBOARD
& SWITCHGEAR
RHS grip/Accelerator
& switchgear
https://www.motomanuals.net/
Front brake lever
6
Page 18
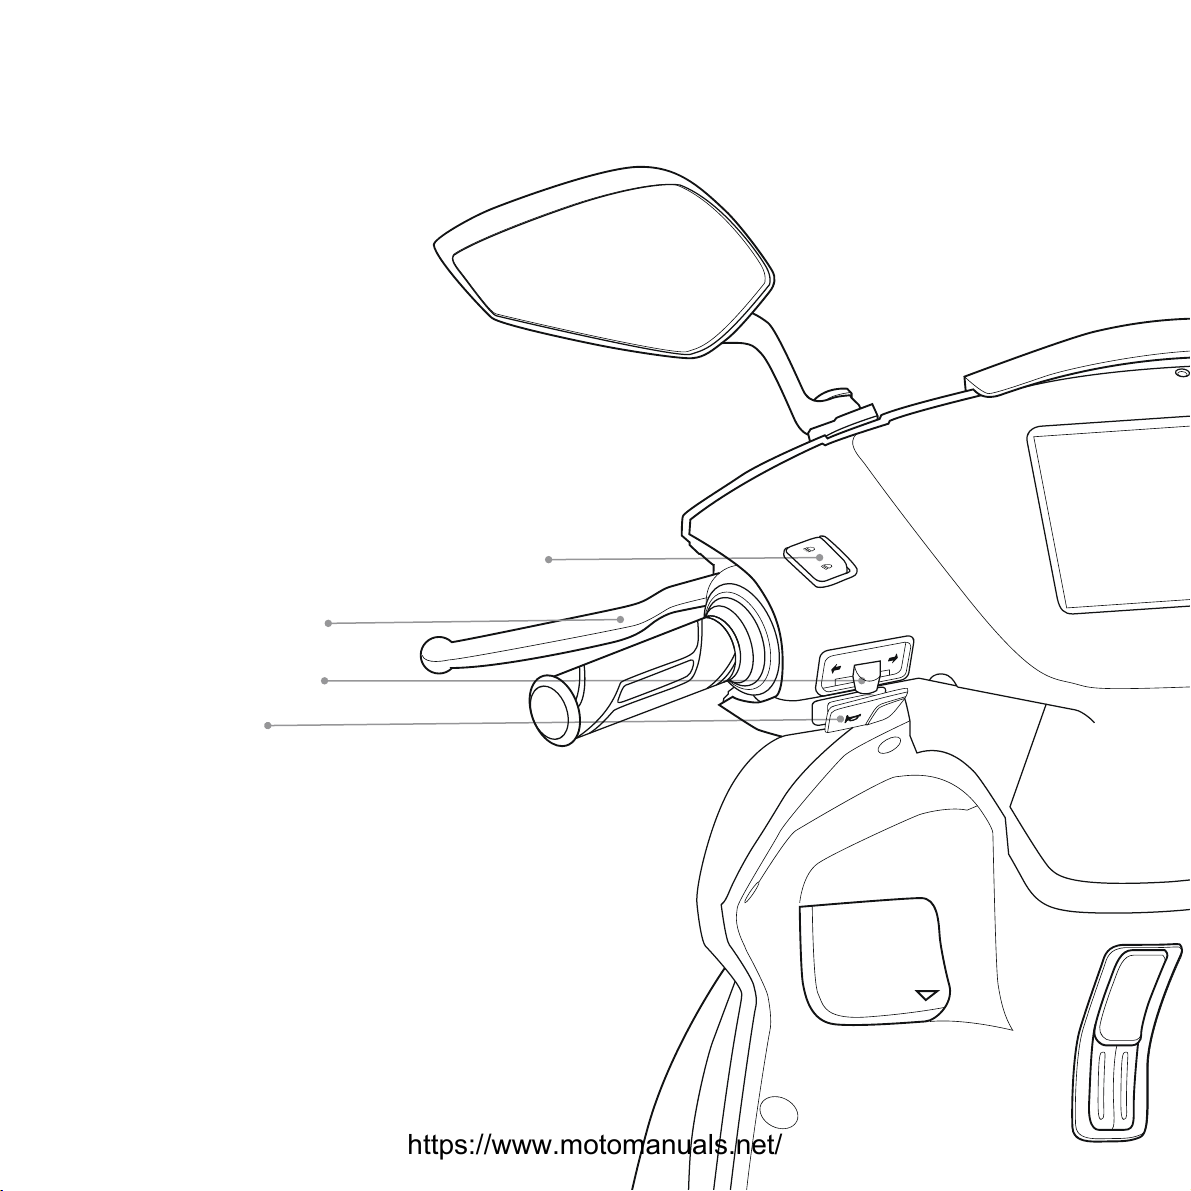
Combined
braking system
Turning indicator
Horn
Headlight high/low
beam switch
https://www.motomanuals.net/
Page 19
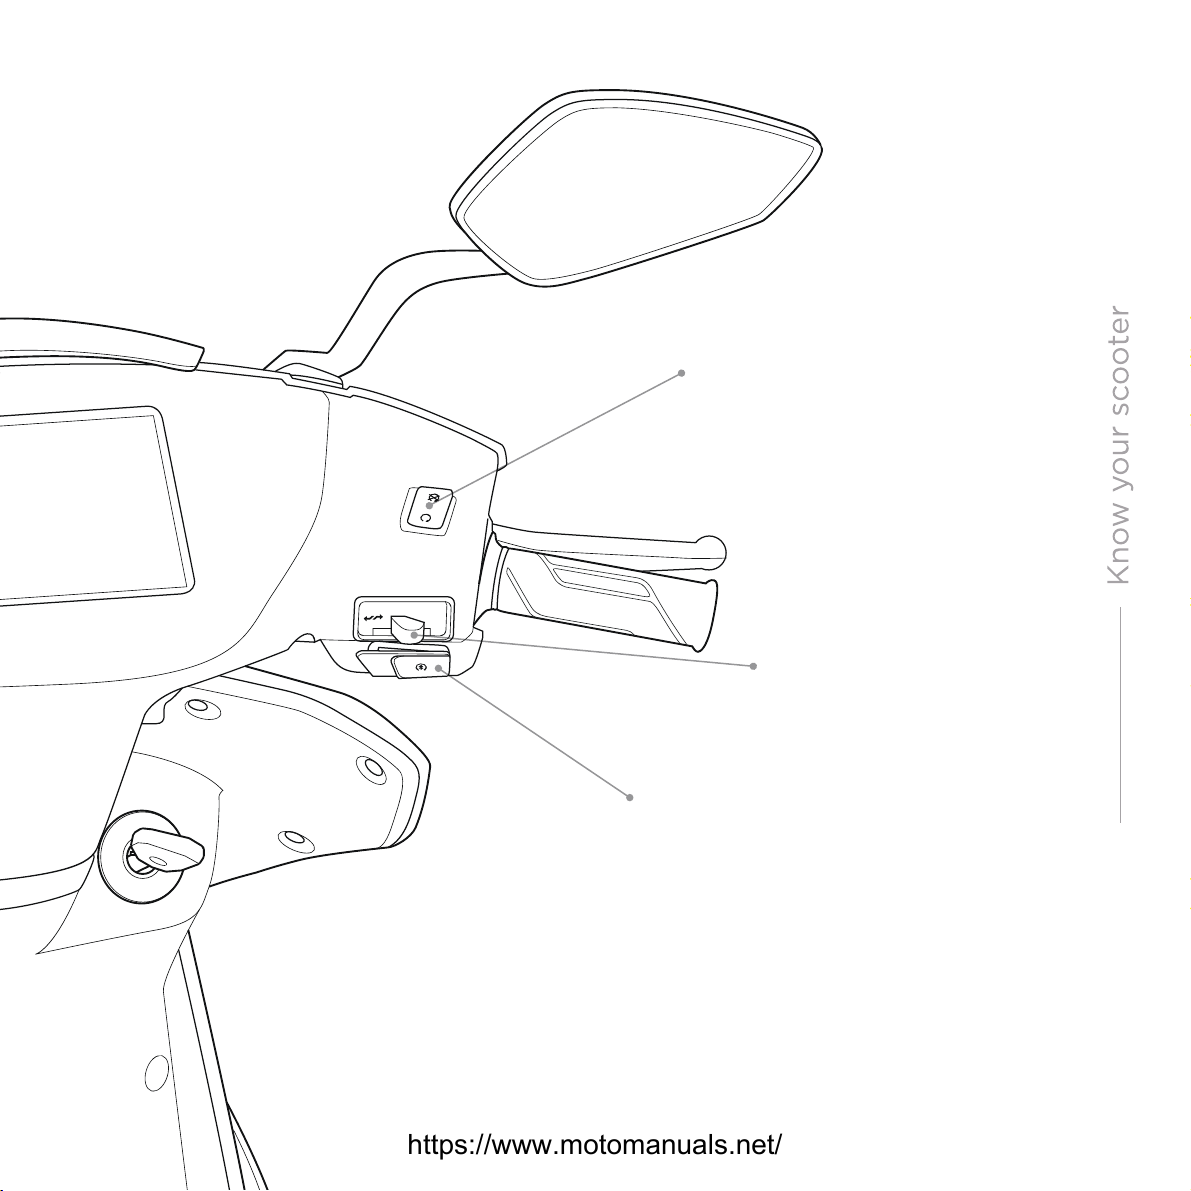
Kill switch
Toggle switch
Motor starter
8
DASHBOARD
& SWITCHGEAR
https://www.motomanuals.net/
Page 20

Switch-gear Left Hand Side
HORN
Press this switch when need be, to use the horn.
TURNING INDICATOR
Toggle this switch left/right to switch ON the indicator lights.
The indicator lights switches OFF on their own once the turn
is complete. Press in the center to cancel indicator manually.
HIGH BEAM SWITCH
This switch can be used to switch to the high beam headlight.
Avoid using this as the default mode to avoid inconvenience
to fellow riders on the road.
COMBINED BRAKING SYSTEM
The lever on the left hand side should be used to activate
the Combined Braking System i.e.: to apply brakes to both
the wheels.
https://www.motomanuals.net/
Page 21

Switch-gear Right Hand Side
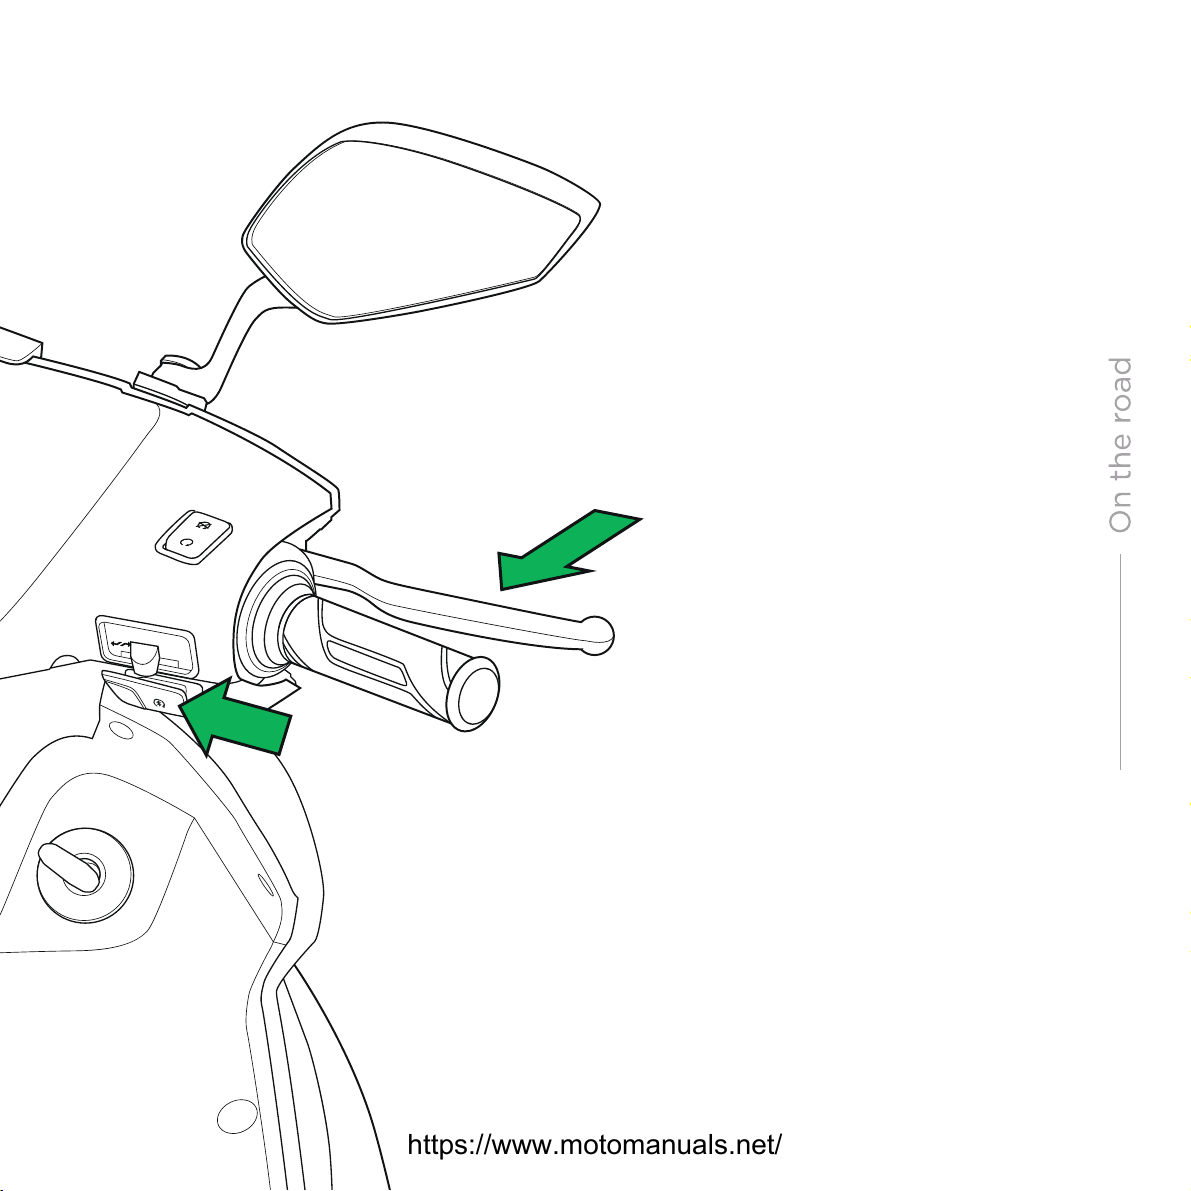
MOTOR STARTER
Initiates the motor, to kick-start the scooter.
Other functions
Accept location suggestions while
navigating:
When a location pops up on the screen,
press the switch to accept the location.
Otherwise, the location gets rejected
and the pop-up will disappear
automatically after 3 mins.
Change the direction while using the Park
Assist Mode. Press once to go in reverse,
press again to move forward.
TOGGLE SWITCH
When the key is on, toggle left or right to
switch between the riding modes displayed
on the screen. It can be used to change the
mode while riding as well, and to do so
throttle has to be at 0.
KILL SWITCH
This disables the motor controller, helps
you be extra-sure that the motor is OFF
when you have to stop at a signal or pull
over to say hi to someone.
RHS ACCELERATOR GRIP
Use it to control the acceleration &
speed of the scooter. Additionally, it can
be used to activate regenerative braking
by twisting in the reverse direction.
FRONT BRAKE LEVER
The lever on the right hand side
actuates the front brake to control the
speed of the scooter.
10
https://www.motomanuals.net/
Page 22
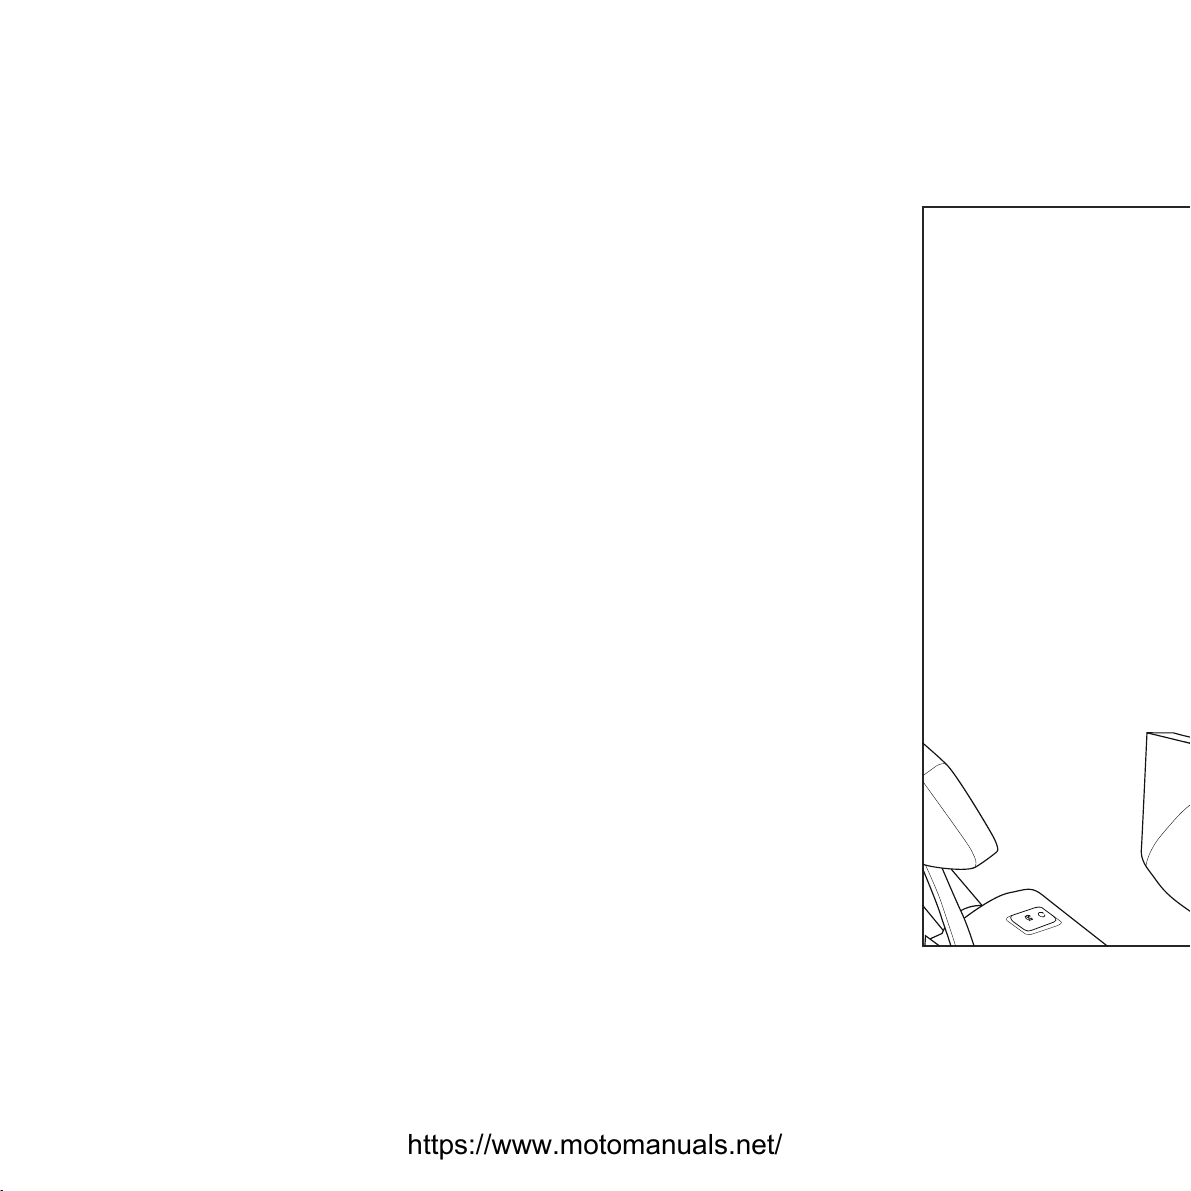
UNDERSEAT STORAGE
The under-seat storage has been smartly designed to
accommodate a full sized helmet and has got cubby
holes to store copies of scooter documents & cleaning
cloth. The under-seat storage has an under-seat LED
strip lamp as well, so that you don’t have to struggle to
find your things even in the darker parking spaces.
You can stu-in things up to 15 kgs and a volume of 22L.
CAUTION
Do not overfill the under-seat storage. A simple check the seat should close eortlessly when you drop it down.
If it requires to be pressed to be shut, it means it’s
over-packed, and there is a high possibility that it can
lead to seat damage.
CAUTION
The storage box is built to be rain-proof. But the water
can seep through if pressure jet wash is used to clean
the scooter. So, do remember to empty the under-seat
storage before bathing your scooter.
Always store the portable charger in it's cover to keep it
protected from any water leaks.
https://www.motomanuals.net/
Page 23
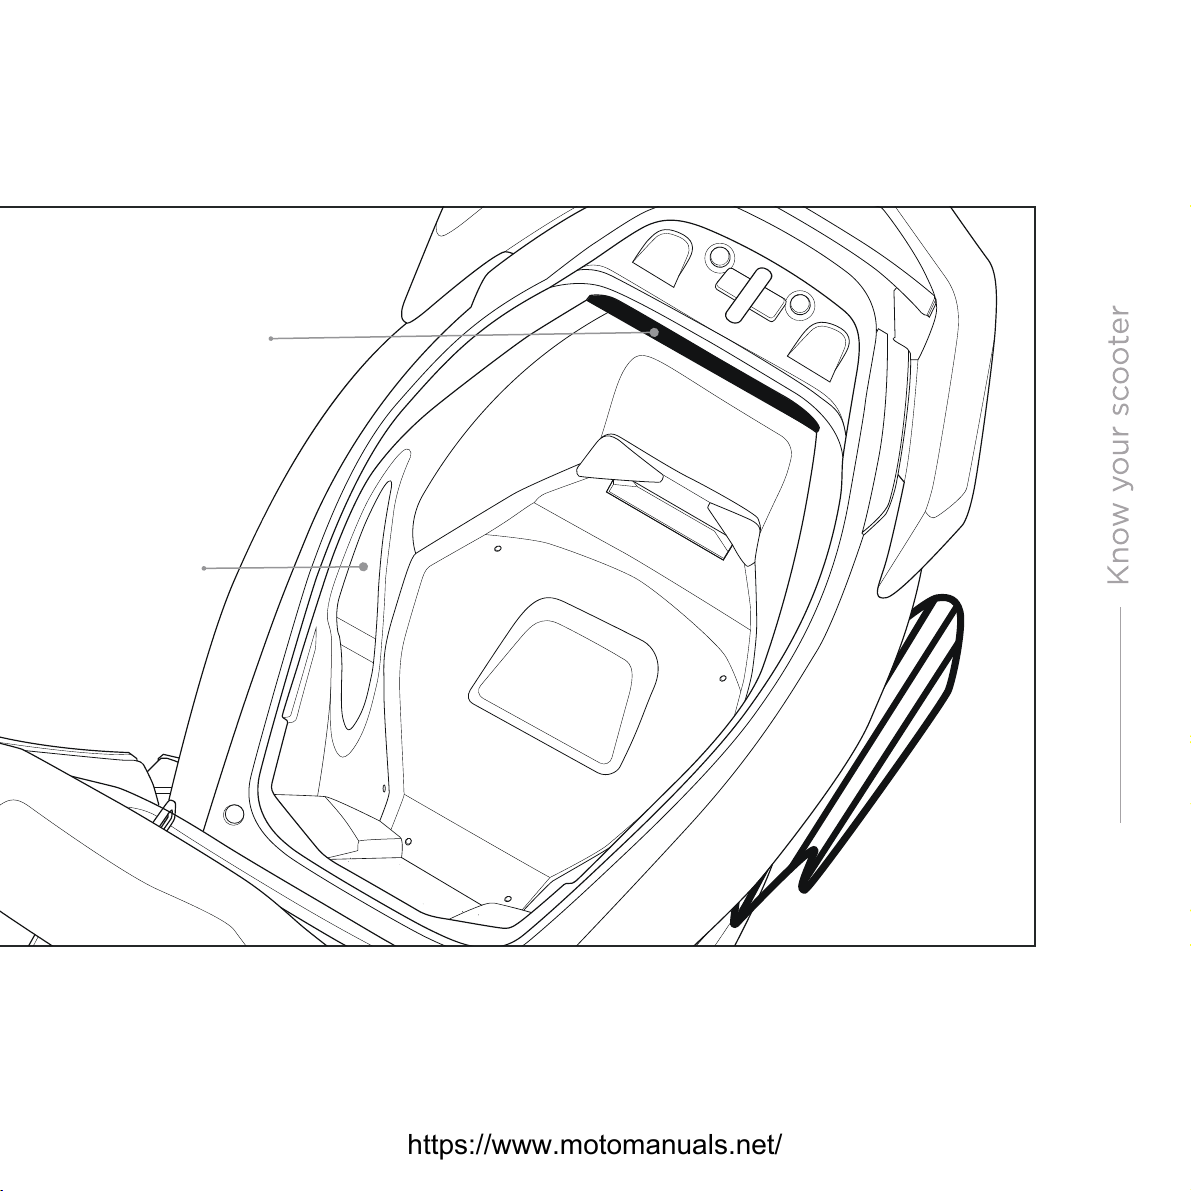
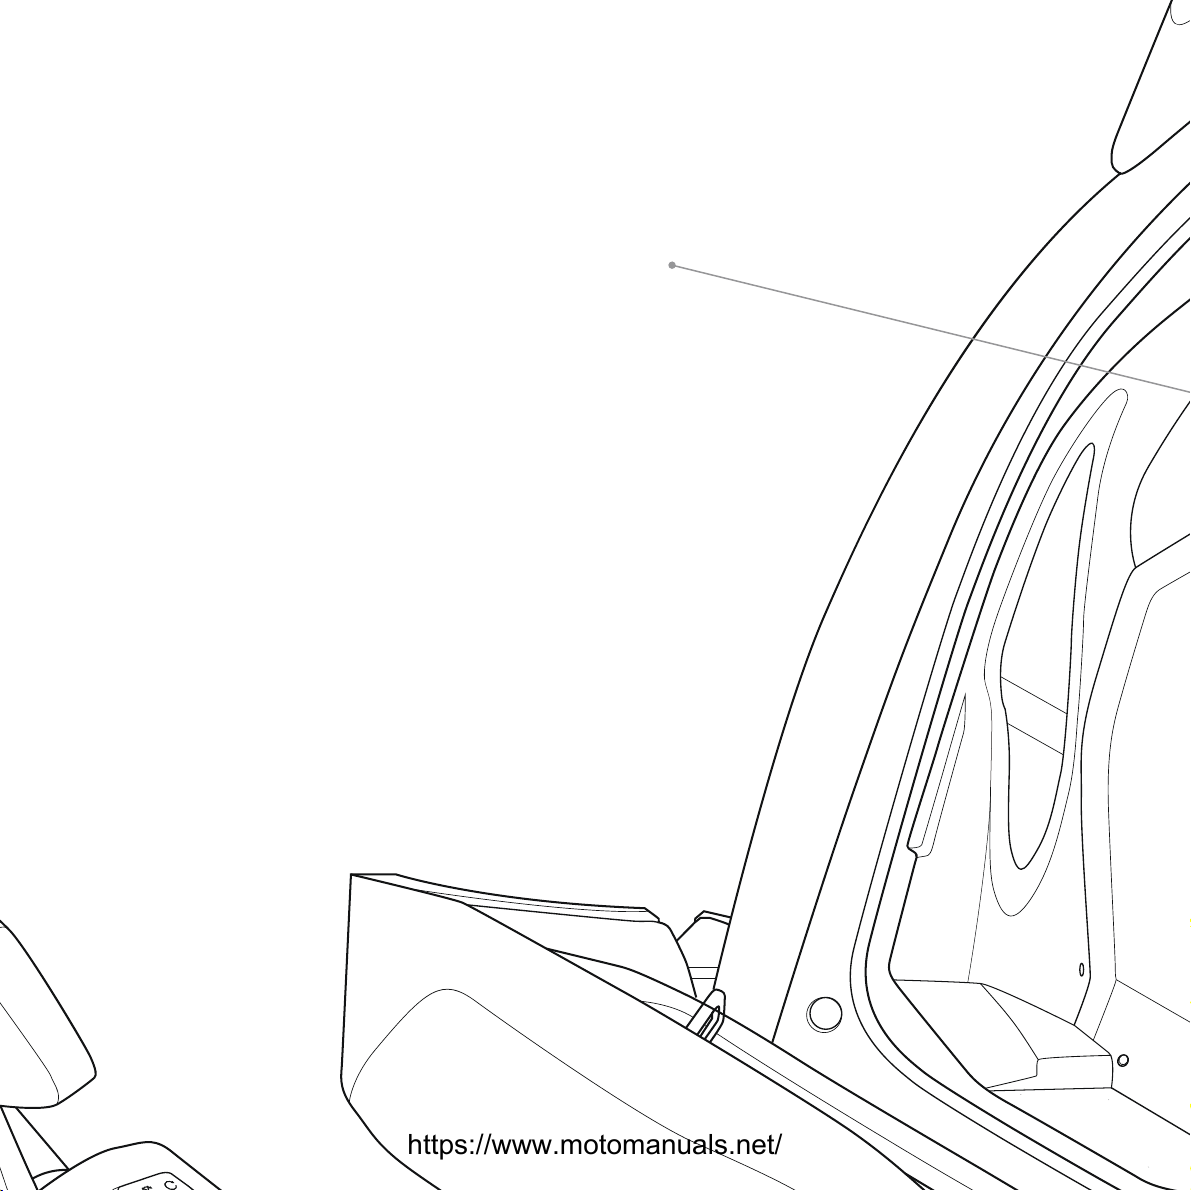
LED
Cubby
hole
12
https://www.motomanuals.net/
Page 24
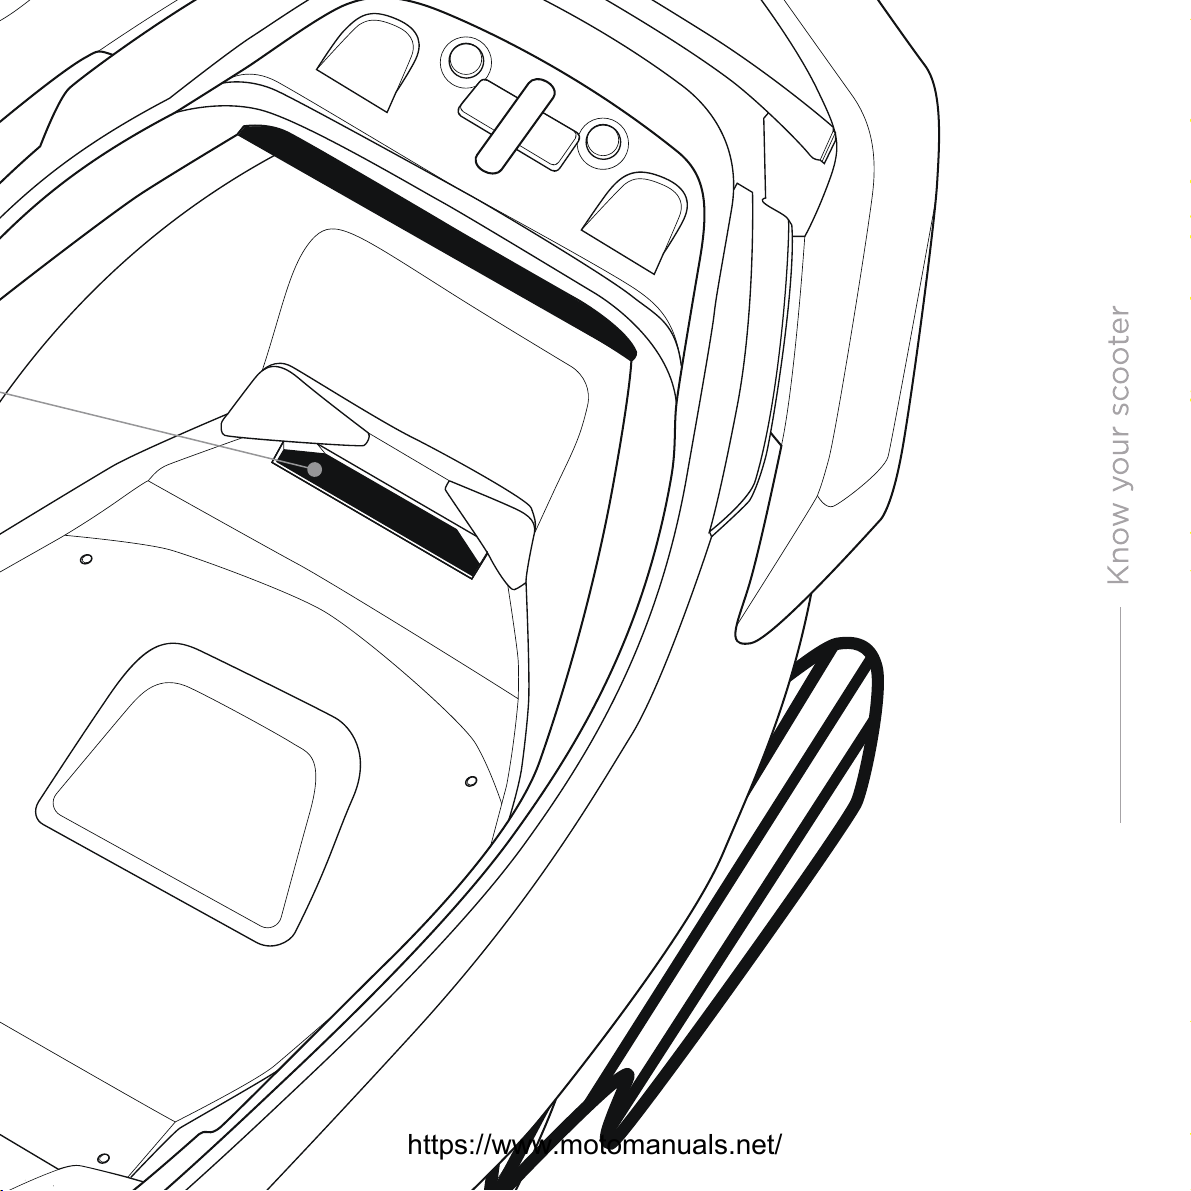
Scooter Identification Number
(VIN) / Chassis Number
The VIN is engraved on the chassis
of your scooter. Each scooter has a unique
VIN. You can access the VIN of your scooter
by removing the rubber grommet located
in the underseat storage.
It’s a 17 digit number in the following
format: MYH XXXXXXXXXXXXXX
https://www.motomanuals.net/
Page 25
https://www.motomanuals.net/
14
Page 26
https://www.motomanuals.net/
Page 27
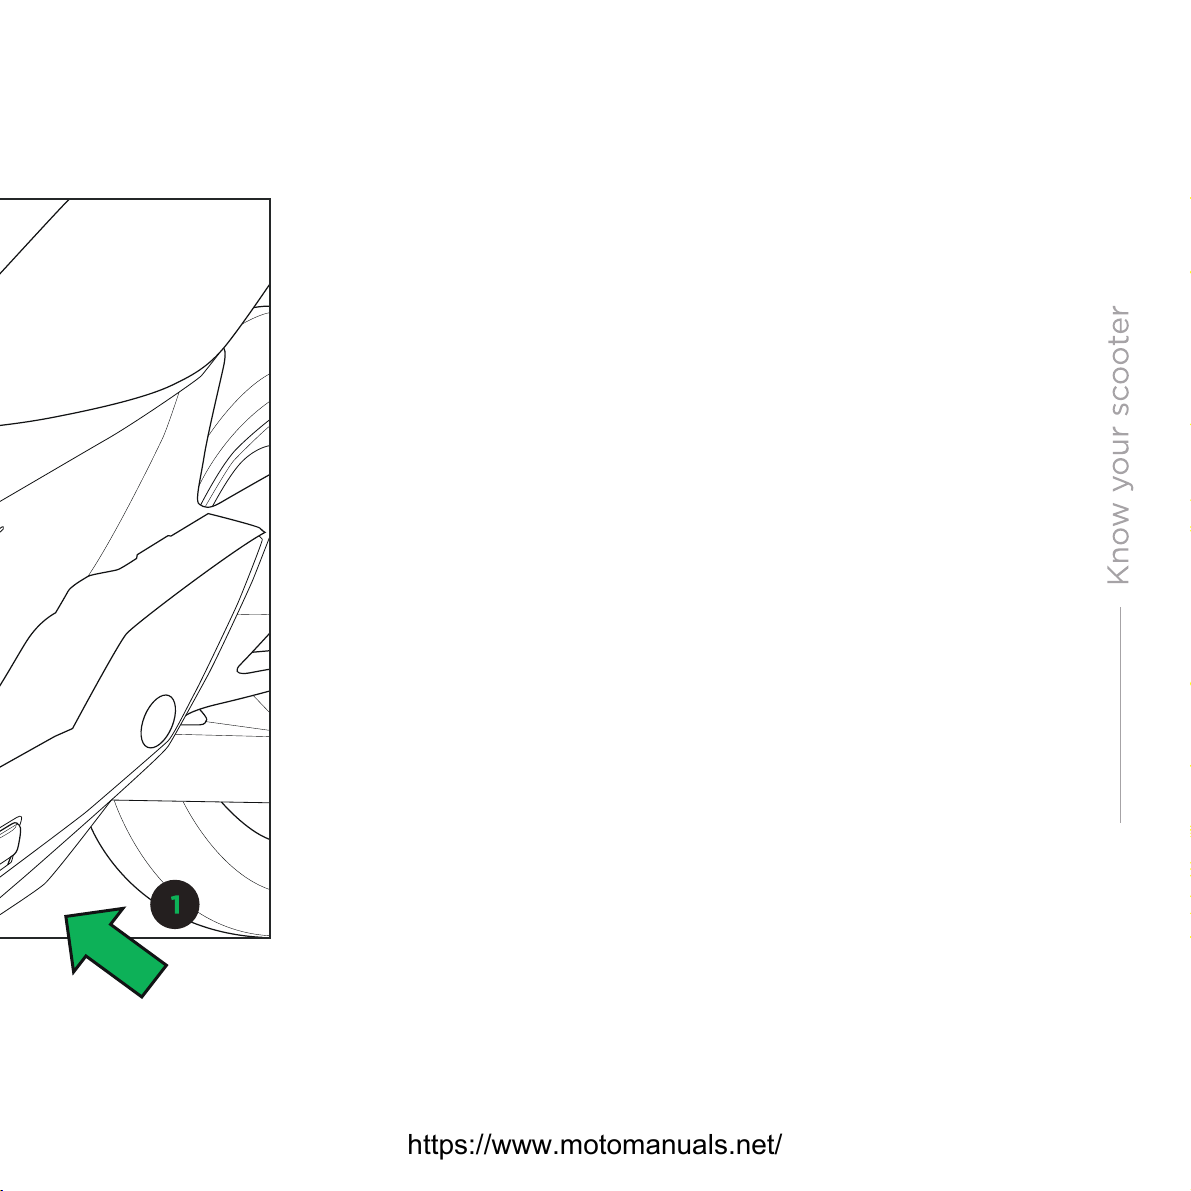
1 MOTOR SERIAL NUMBER
The motor serial number can be spotted at the
bottom of the scooter, on the motor.
KEY CODE NUMBER
Scooter Keycode is mentioned on the key
SOFTWARE VERSION NUMBER
The software version number and any available
updates are displayed on tapping the ‘OTA updates’
section in the Settings menu.
16
https://www.motomanuals.net/
Page 28

Ather App
Download the ‘Ather’ app from Google Play Store or Apple App
store.
Use the login credentials of your Ather Portal account to login
into the app.
The app syncs with the scooter only when both your phone and
the scooter are in a good network zone. The app displays the
time of last sync.
ACCESS OTA UPDATES
An orange notification appears on the ‘Menu’ icon when OTA
update is available for installation.
Go to the 450X dashboard menu to know about the software
version number that the scooter is currently running on. Tap on
General Settings to see if a new update is available.
Tap to install.
OTA updates get downloaded automatically onto your scooter
when pushed by Ather servers while you are riding or charging
the scooter.
https://www.motomanuals.net/
Page 29
INSTALLING AN OTA UPDATE
Make sure that your scooter is charged over 40% and it is
recommended that the scooter is connected to the charger
to start the installation.
You can start installing by choosing ‘Update Now’ and
then following the instructions on the dashboard.
Alternatively, you can choose to do it at a later time.
Default installation time - 3 AM (this is only if the charge
conditions mentioned above are met.)
Please note, you will not be able to use your scooter
while the update is being installed.
CHARGING AT ATHER GRID POINTS
To locate an Ather Grid® public charging point, go to
the app or Navigation Screen where you’d be able to
locate the points live on the Ather Grid.
https://www.motomanuals.net/
18
Page 30

TIME TO GET
ON THE ROAD
https://www.motomanuals.net/
Page 31

https://www.motomanuals.net/
Page 32

Just Before You Get
on the Scooter
THE CHECKLIST
Tyre pressure & condition
Drive belt (No slacking : Refer to the full online
user manual)
Charge status
Peripherals: Horn, Headlights, Pilot Lamps,
Indicators and Tail Lights.
Touchscreen intactness
Rear view mirror position
Smooth functioning of the handlebar
(twist & turn to check if it is normal)
Perfectly working brakes
Recommended tyre pressure
Single Rider: 30 PSI Front & 28 PSI Back
With a Pillion: 30 PSI Front & 32 PSI Back
https://www.motomanuals.net/
Page 33

Things to Keep in Mind
THE MOTOR IS THE STRONG SILENT TYPE
So silent, you won’t even realise it’s running. It makes no sound.
So, always keep an eye on the dashboard for the Motor OFF/ON
indicator, and use the kill switch, whenever at a signal. So that
you and everyone around is safe, just in case of any unintended
twist of the accelerator.
THE BRAKES ARE SUPER RESPONSIVE
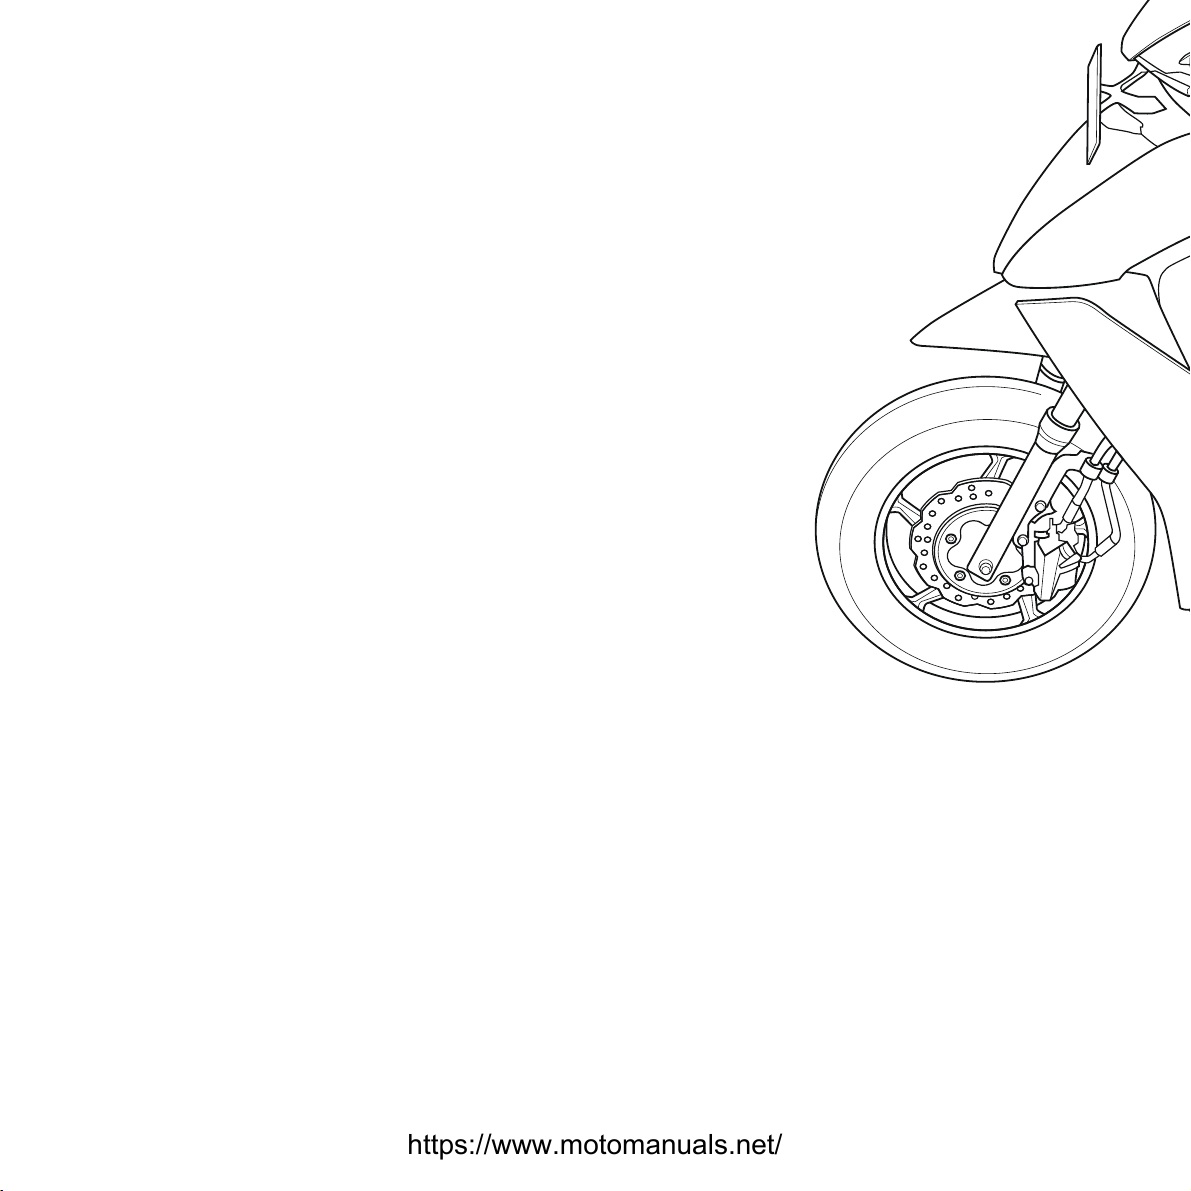
Both the wheels have disc brakes, which are pretty responsive.
So press the brakes gently, till you get used to them.
HYPER QUICK MOTOR
Electric motors have a higher torque, which means that the
acceleration is quick and sudden. Take it easy on the accelerator,
till you get a hang of it.
NEW THINGS NEED UNDERSTANDING
The reverse is something new. Though the speed is 2 km/hr, it’s
just better to be extra careful while you reverse, making sure that
nobody gets hurt.
22
https://www.motomanuals.net/
Page 34

Safety and Operating Tips
As a precaution appropriate safety gear, including a helmet that
comforms to prescribed standards, eye protection gear, riding boots
and gloves should be worn while riding.
Do not consume alcohol or any kind of drugs that aect your reflexes,
before or while you are operating your electric scooter.
Do not overload the floorboard. It can handle up to 30 kgs of weight,
and it’s always better to distribute the weight on the floorboard for a
better ride handling.
If you have been riding in the rain, wait for about 15 mins before
plugging in the scooter to the Ather charger or wipe o the water on
the port using a soft dry cloth.
Never permit a guest to ride your electric scooter without proper
instructions and licences as per applicable state laws.
Any alteration or modifications to the scooter is strictly unadvisable.
This may cause unsafe scooter conditions.
https://www.motomanuals.net/
Page 35

Precautions for
a Safe Electric Ride
In case of an accident do not touch wiring connectors or the
components connected to the wiring
It’s highly unlikely, but incase the battery catches fire, extinguish
the flame by flooding it with a lot of water. A water hose should be
used, and the person doing this must maintain at least a couple of
metres away from the scooter. Make sure the scooter is not
plugged into the charging point. If it is, switch OFF the main power
supply immediately to cut o the electricity flow
Once the fire is exhausted, keep flooding the battery with water
every 30 minutes for up to 2 hours. Check on it after regular
intervals for a few hours to be extra sure that fire doesn’t re-ignite.
A high voltage
electronic device
24
CAUTION
Never lift the scooter by pulling the handlebar.
WARNING
In case of fire, please call customer support to let us know
and we will provide any assistance required.
https://www.motomanuals.net/
Page 36
Turning the Scooter on &
Riding
1 UNLOCK THE HANDLEBAR
Insert the key in the keyhole that’s located
under the handlebar, on the right hand side.
Turn the key clockwise, and it’s unlocked.
https://www.motomanuals.net/
Page 37
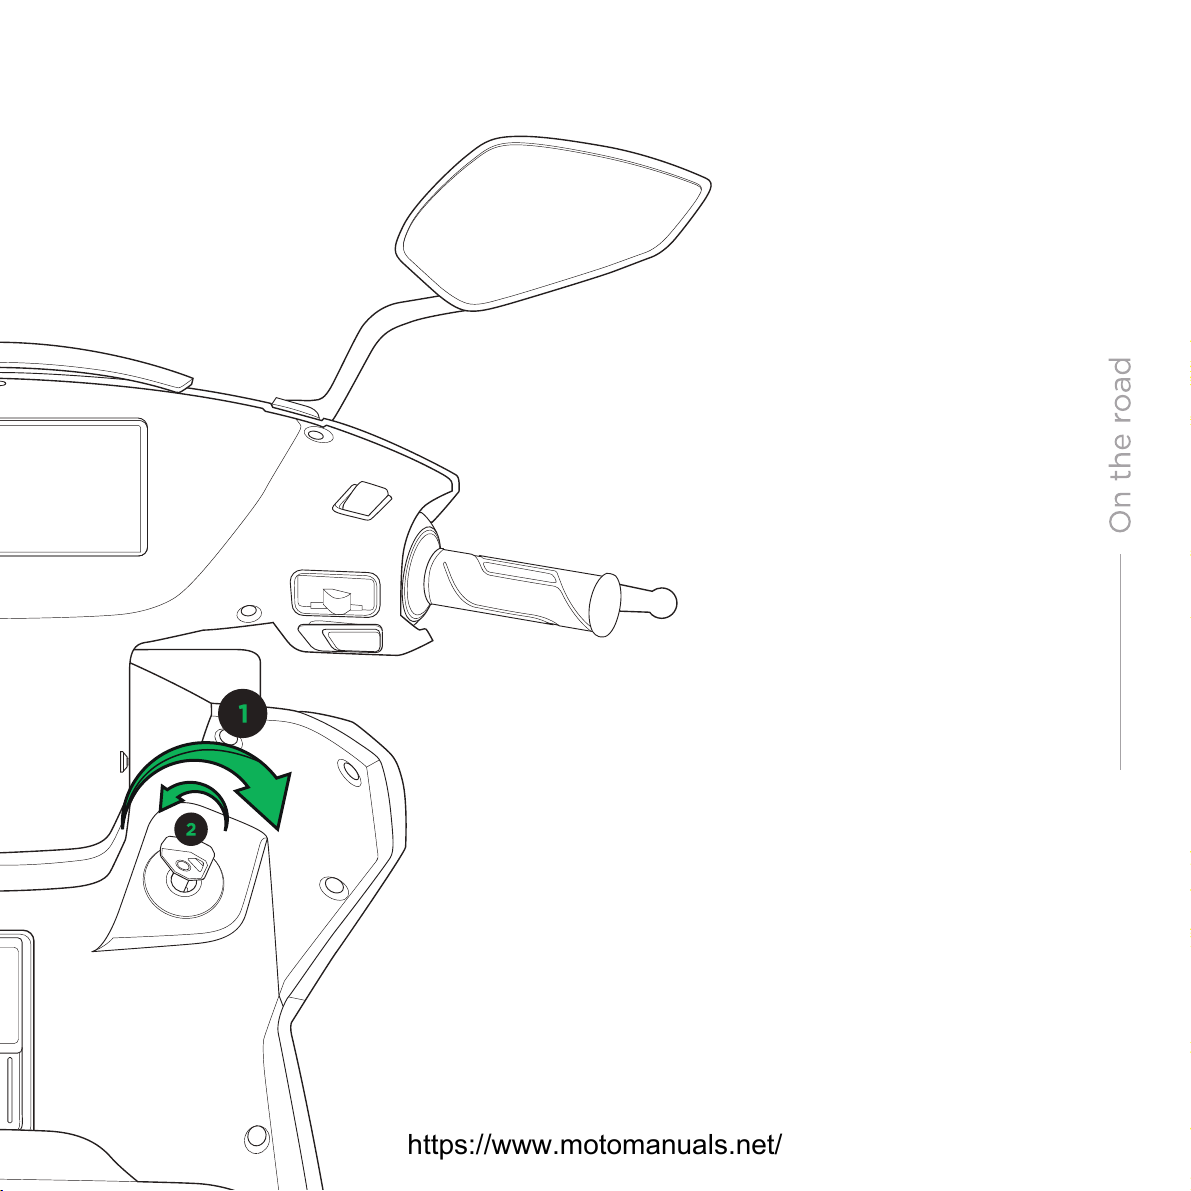
2 OPEN THE UNDERSEAT STORAGE
Once the handlebar is unlocked, turn the key
anti-clockwise to open the underseat storage.
Take your helmet out, wear it, simply drop the
seat to lock it. Check the seat lock once, just to
be doubly sure.
Now you are all set for the ride!
https://www.motomanuals.net/
26
Page 38
https://www.motomanuals.net/
Page 39
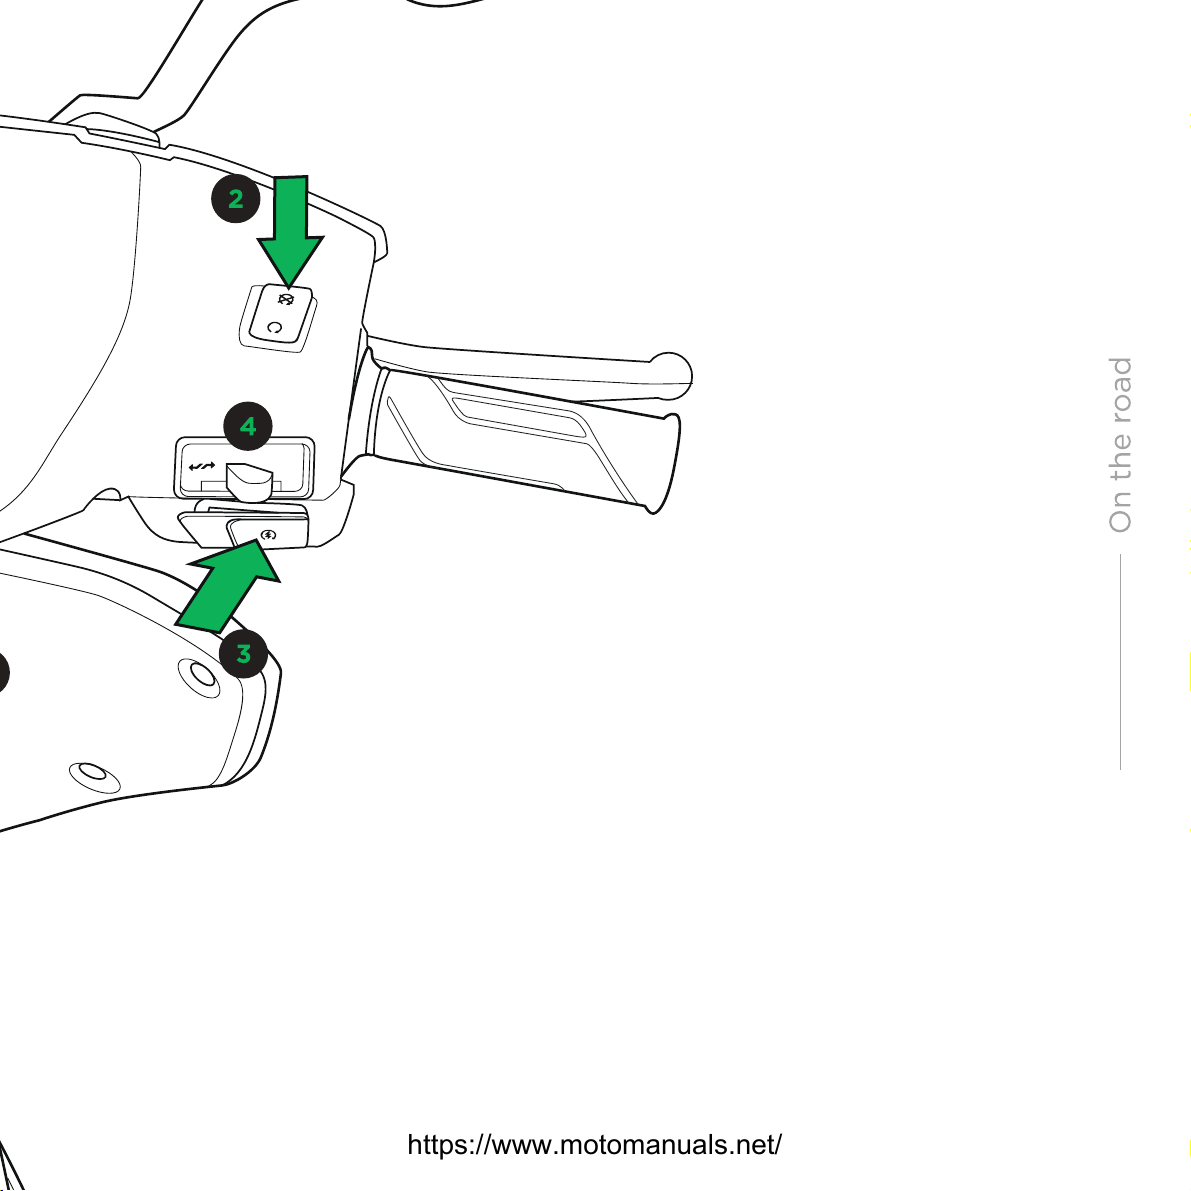
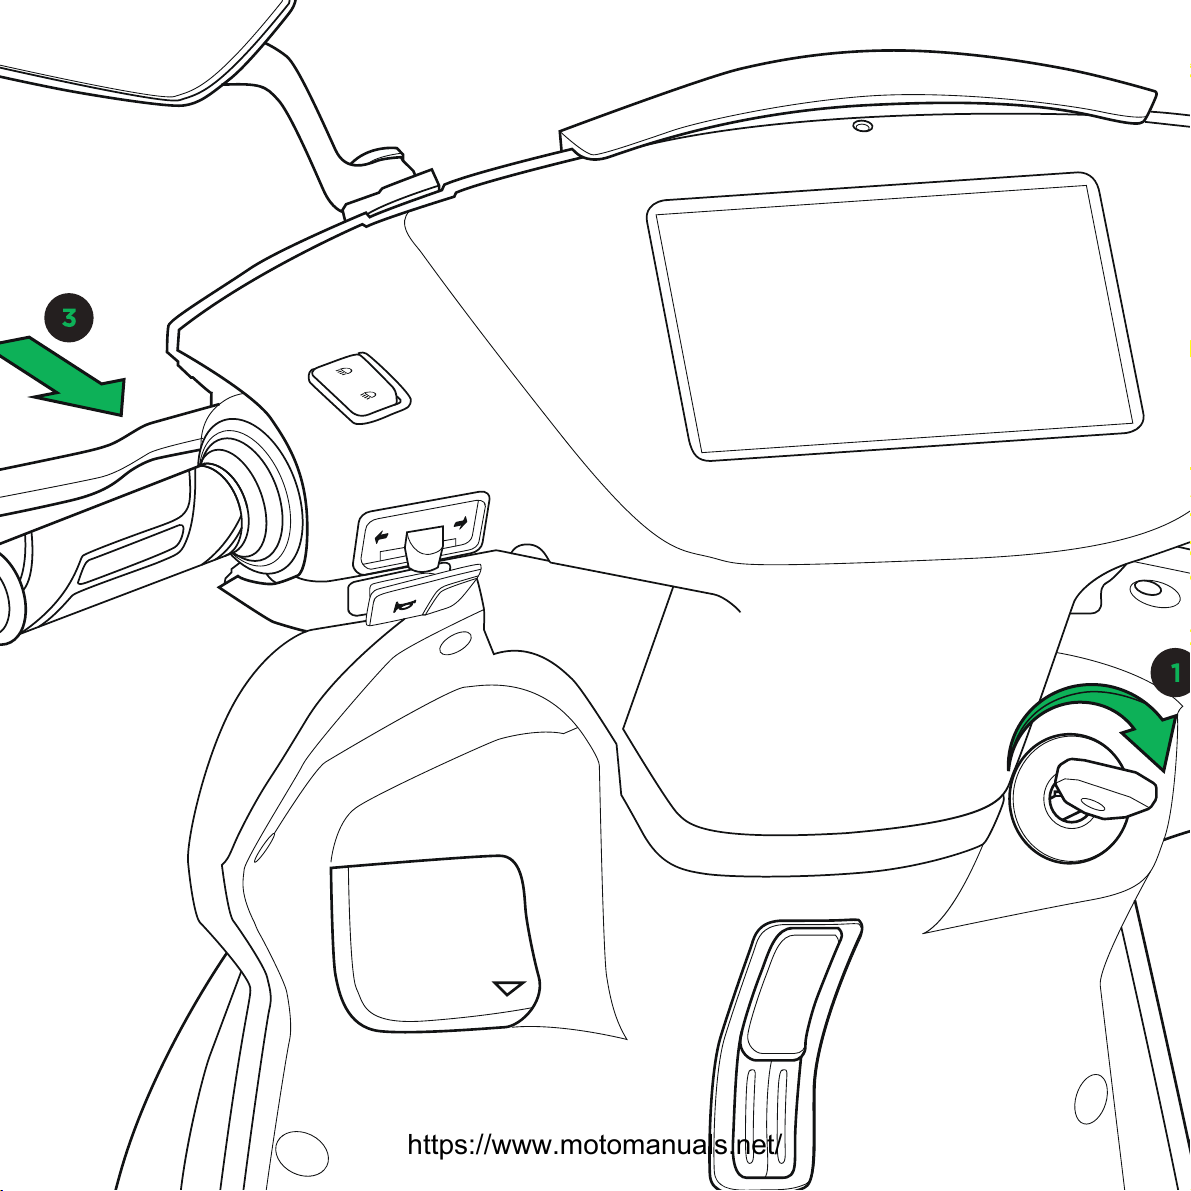
1 SWITCH ON THE DISPLAY
Once the key is turned ON, it will activate the
touchscreen display, showing the current time,
motor status and available range. You can choose
the ride mode here -Eco / Ride / Sport / Warp
2 DISENGAGE THE KILL SWITCH
If the kill switch is engaged,
the motor will not switch on.
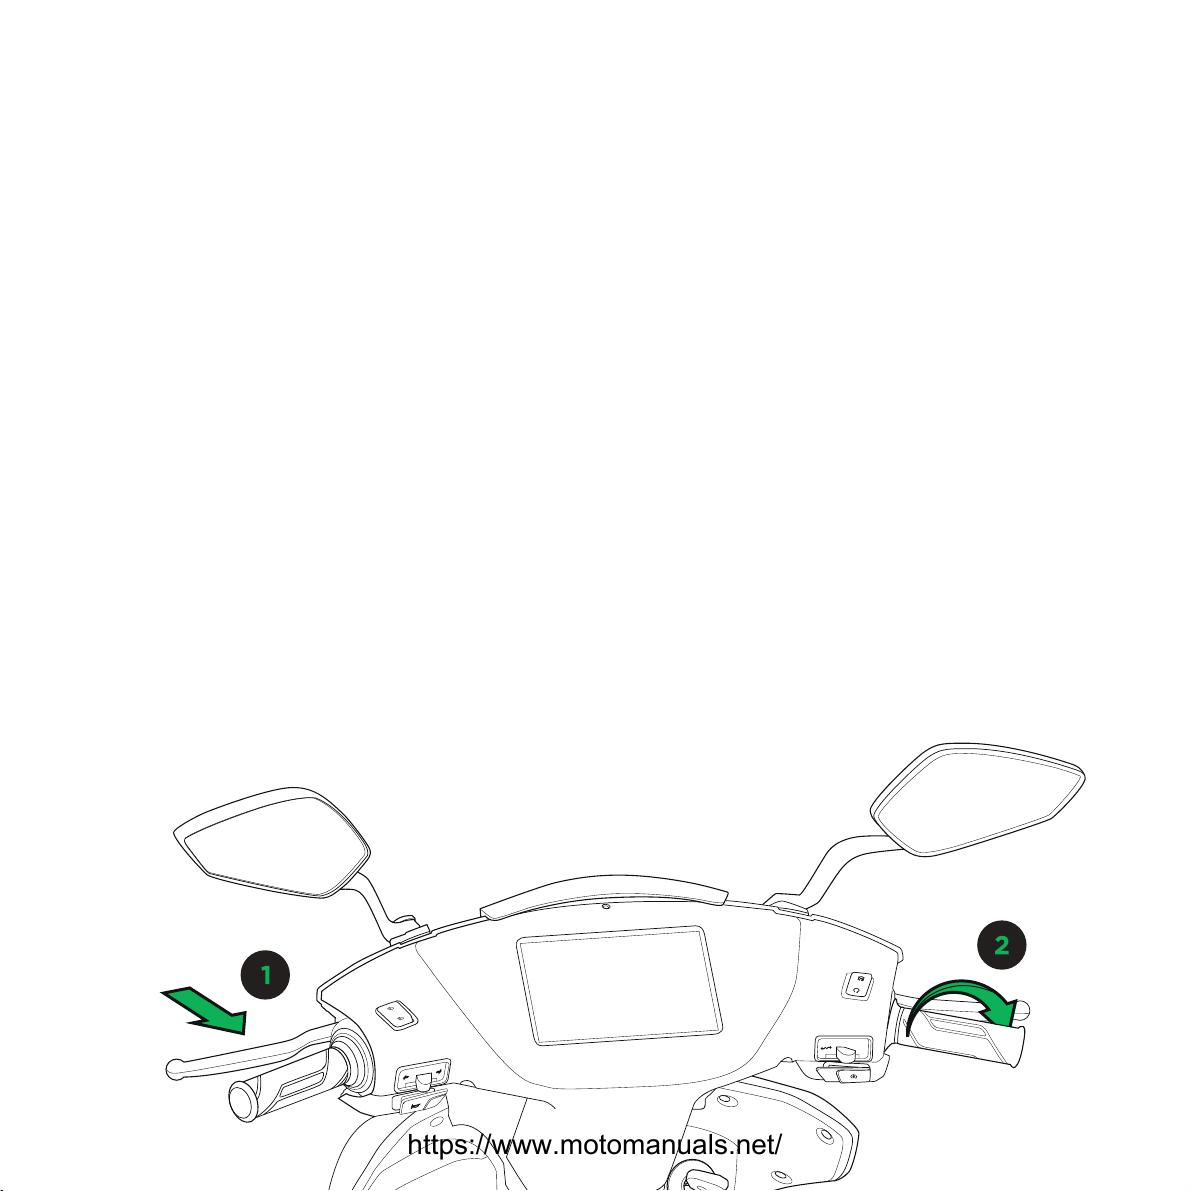
3 ACTIVATE THE MOTOR
Press the brake lever (either one) and the motor
start switch on the right hand side of handlebar.
‘Motor ON’ notification will flash on the dashboard.
4 TOGGLE TO CHANGE RIDING MODE
WARNING
Scooter makes no significant sound when the motor is ON
28
https://www.motomanuals.net/
Page 40
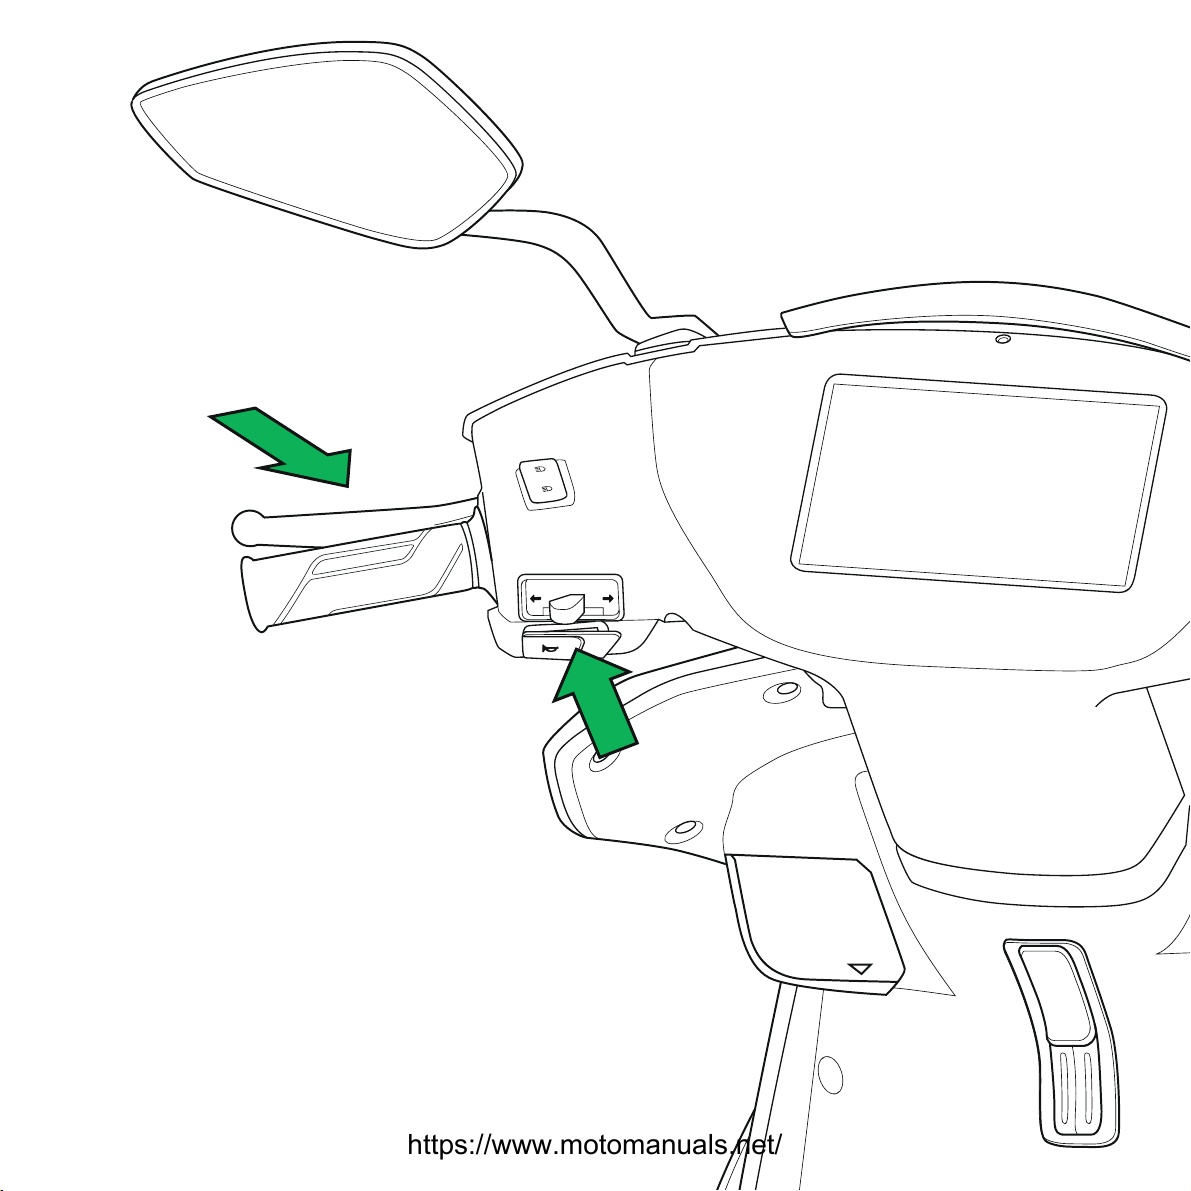
Brake (L)
Indicator cancel
SWIPE RIGHT - PARK ASSIST
Select the Park Assist Mode using the dashboard &
choose the direction - Reverse/Forward using the
Motor Starter while the motor is ON and the scooter
is stationary. You can slowly turn/twist the accelerator
(RHS handlebar) anticlockwise to get going.
https://www.motomanuals.net/
Page 41
Start
Brake (R)
30
O-screen Park Assist combination
Brake(L/R) + Indicator Cancel + Start
WARNING
Kick back the side stand, before you start riding. For
your safety, the motor gets activated only when the
side stand is disengaged.
https://www.motomanuals.net/
Page 42
While on the Ride
MAINTAINING SPEED
Turn the accelerator grip and use the brakes
to maintain the speed. Never use the
combination of accelerator and brake,
at the same time.
1 SLOWING DOWN & BRAKING
Bring the accelerator grip back to the Zero
position. You can use the Combined braking
system or apply both brakes simultaneously.
Bring the scooter to a halt. Use the kill switch
to turn the motor OFF, incase you plan to
stop for some time.
CAUTION
In wet weather, it takes longer to slow down
or come to a halt. Start braking a little earlier
than you would in dry conditions, especially
when going around corners and turning.
https://www.motomanuals.net/
WARNING
An unintended acceleration can cause
injury to you or others on the road. Use
the motor kill switch at any trac stop.
Page 43

REGENERATIVE BRAKING
Regenerative braking recovers the scooter’s kinetic
energy and converts it to be stored in the battery.
To activate charge levels should be below 80% and
speed needs to be over 20 kmph
2 HOW TO ACTIVATE IT?
Press the brake levers or turn the accelerator
grip away from yourself. Algorithms dictate the
amount of regen, depending on the state of the
battery and speed of the scooter.
REGEN DISABLED
Regen is disabled when the charge status is
higher (higher the range, lesser the regen) or
when the battery temperature is high.
CAUTION
Scooter can’t be brought to a halt using regenerative
braking as it gets activated only above 20 kmph.
CAUTION
The scooter may be forced to Eco Mode when the
battery charge is too low.
WARNING
Incase of errors or glitches, the performance of
the scooter might be restricted to ensure rider’s
safety. If this happens, please contact customer
support immediately.
https://www.motomanuals.net/
32
Page 44
Turning the Scooter O &
Parking
STOPPING YOUR SCOOTER
Bring the accelerator grip back to the zero
position. Use the kill switch to turn OFF the
motor. Turn the key switch back to the
LOCK position and remove the key.
If the guide me home lights feature is ON,
the headlight will switch OFF automatically
in about 15 secs.
CAUTION
The key should be removed anytime the
scooter is left unattended. You don’t want
somebody stealing it.
PARKING
Use your left foot, and push the side stand
away from the scooter to open it up. Use
the side stand when not using the scooter,
just saying.
Also, always try and park the 450X on
leveled and firm ground.
https://www.motomanuals.net/
CAUTION
Park your 450X under shade
wherever possible. Continuous,
long term exposure to sunlight
can cause discoularation of the
display screen. Less exposure to
heat is good for the battery life
and the health of the display.
Page 45
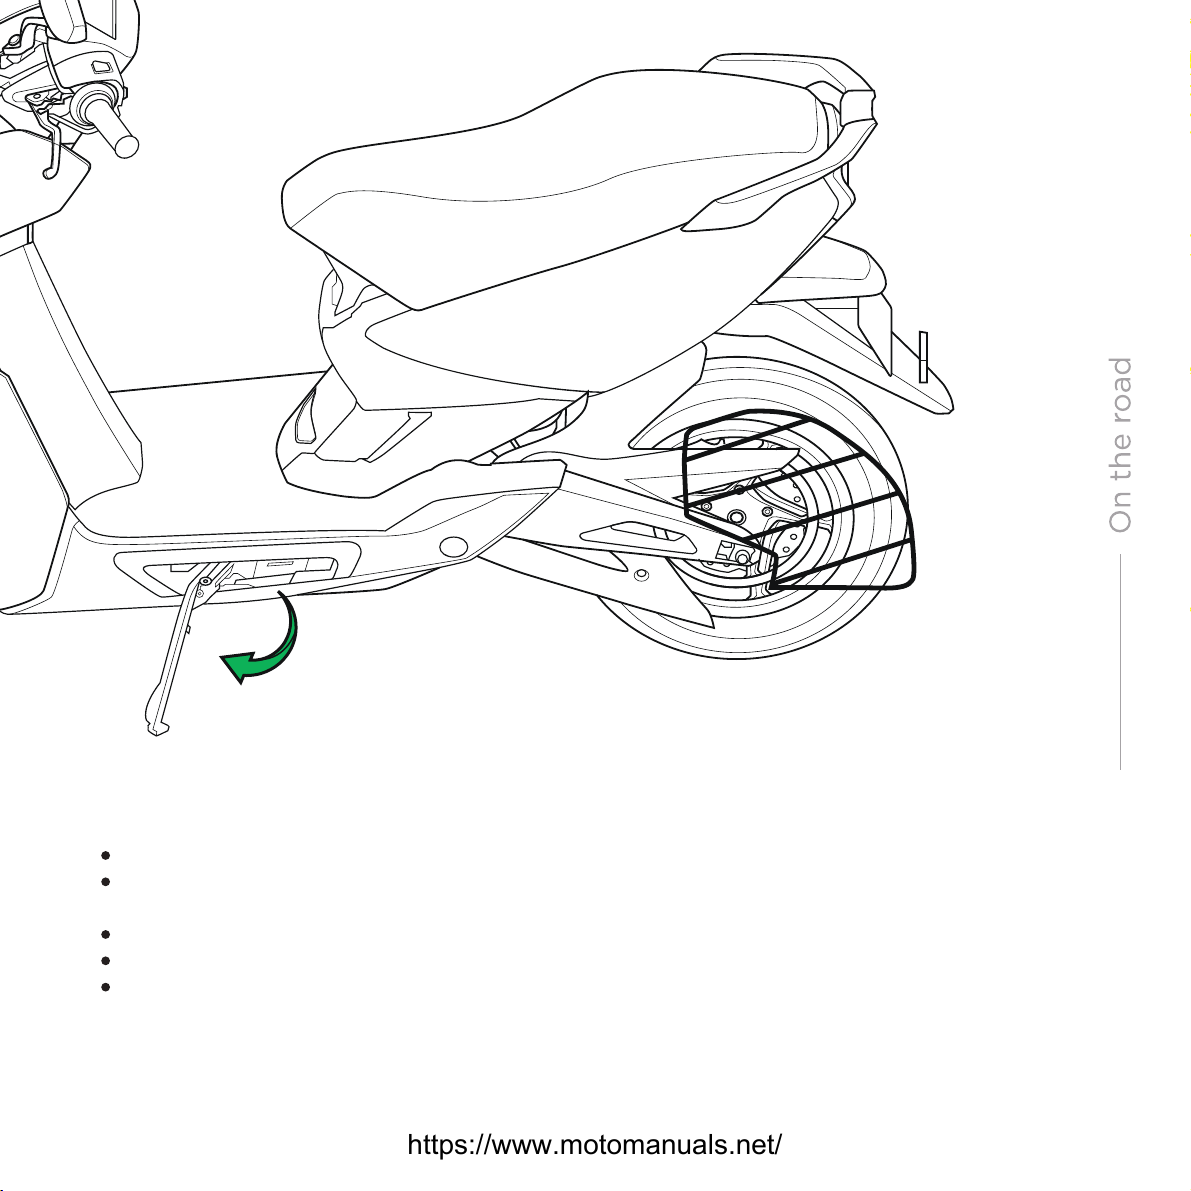
WARNING
Always use the kill switch if the scooter is on the side stand
Using the side-stand, during a halt doesn't kill the motor. This will be
indicated on the dashboard when you engage the side stand.
Do not sit on the scooter when parked on the side stand
Do not move the scooter when it’s on the side stand
Always ensure the side stand is completely opened up, while parking
https://www.motomanuals.net/
34
Page 46

CHARGE IT UP
https://www.motomanuals.net/
Page 47

https://www.motomanuals.net/
Page 48
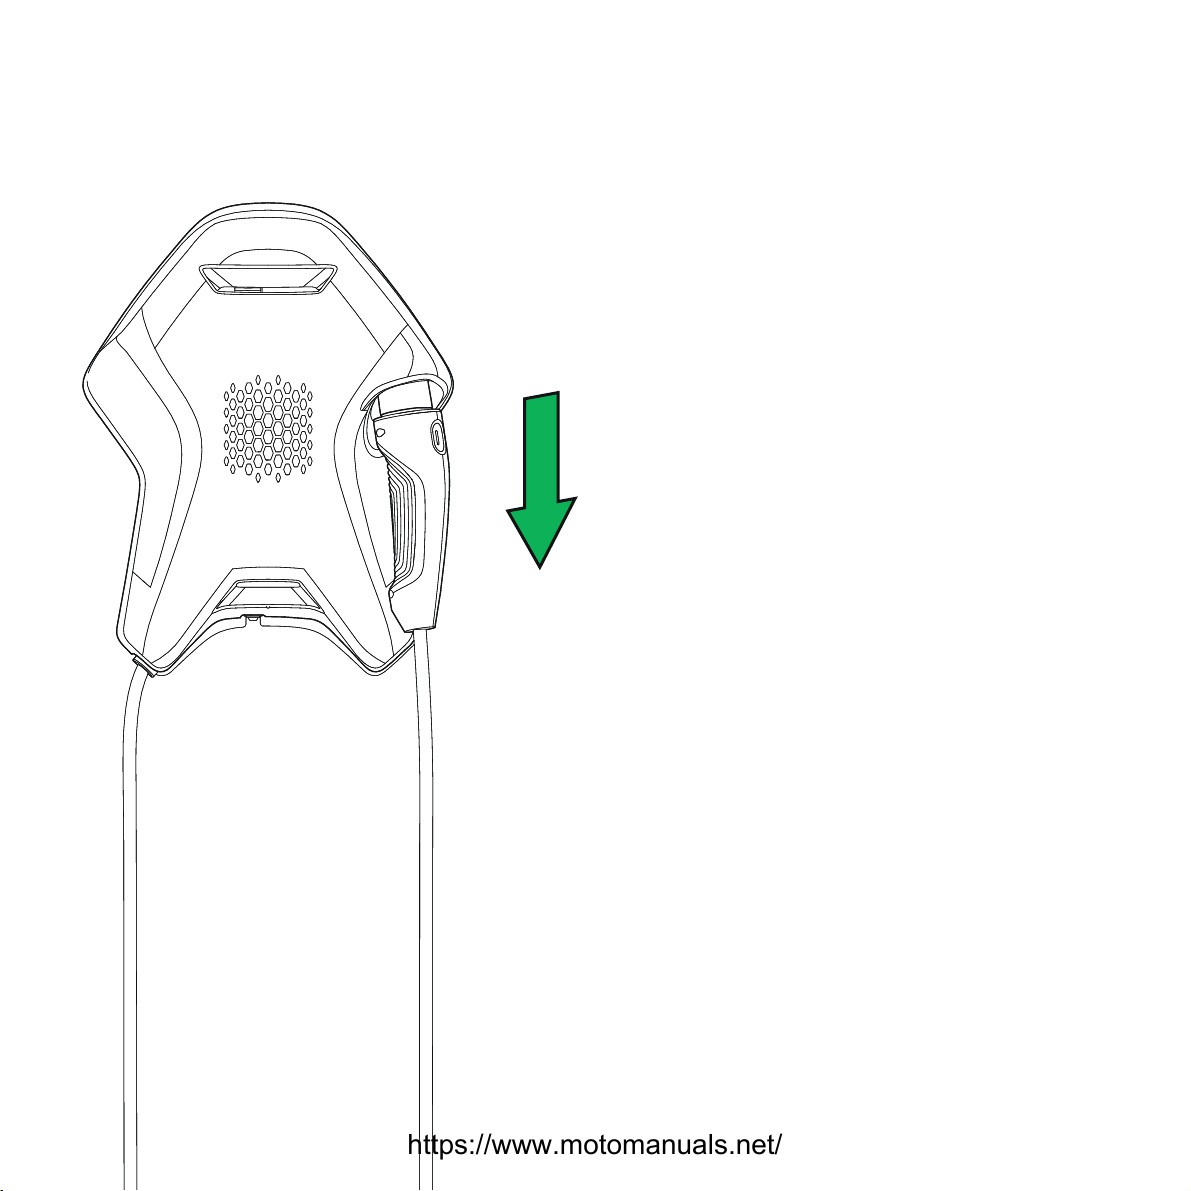
Pull down
the Connector
Using the Ather Dot™
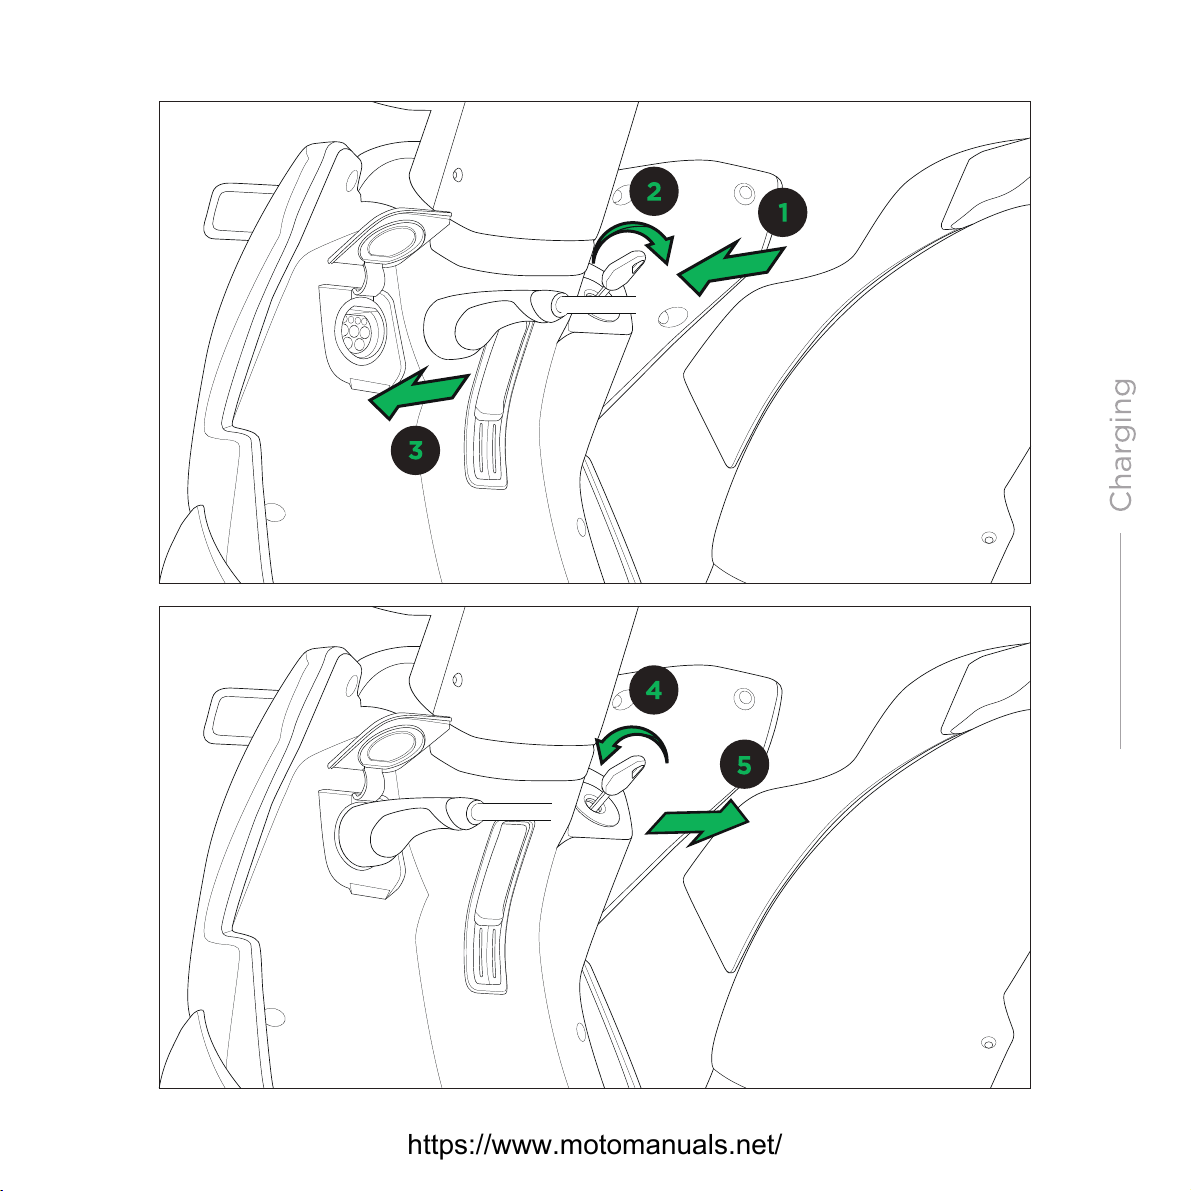
PLUGGING IT IN
Turn the key to the ON position.
Gently pull down the connector from the holder,
open the charging port flap on the scooter and
plug it in. Key should be in the OFF position for
the scooter to start charging automatically.
https://www.motomanuals.net/
Page 49
https://www.motomanuals.net/
38
Page 50
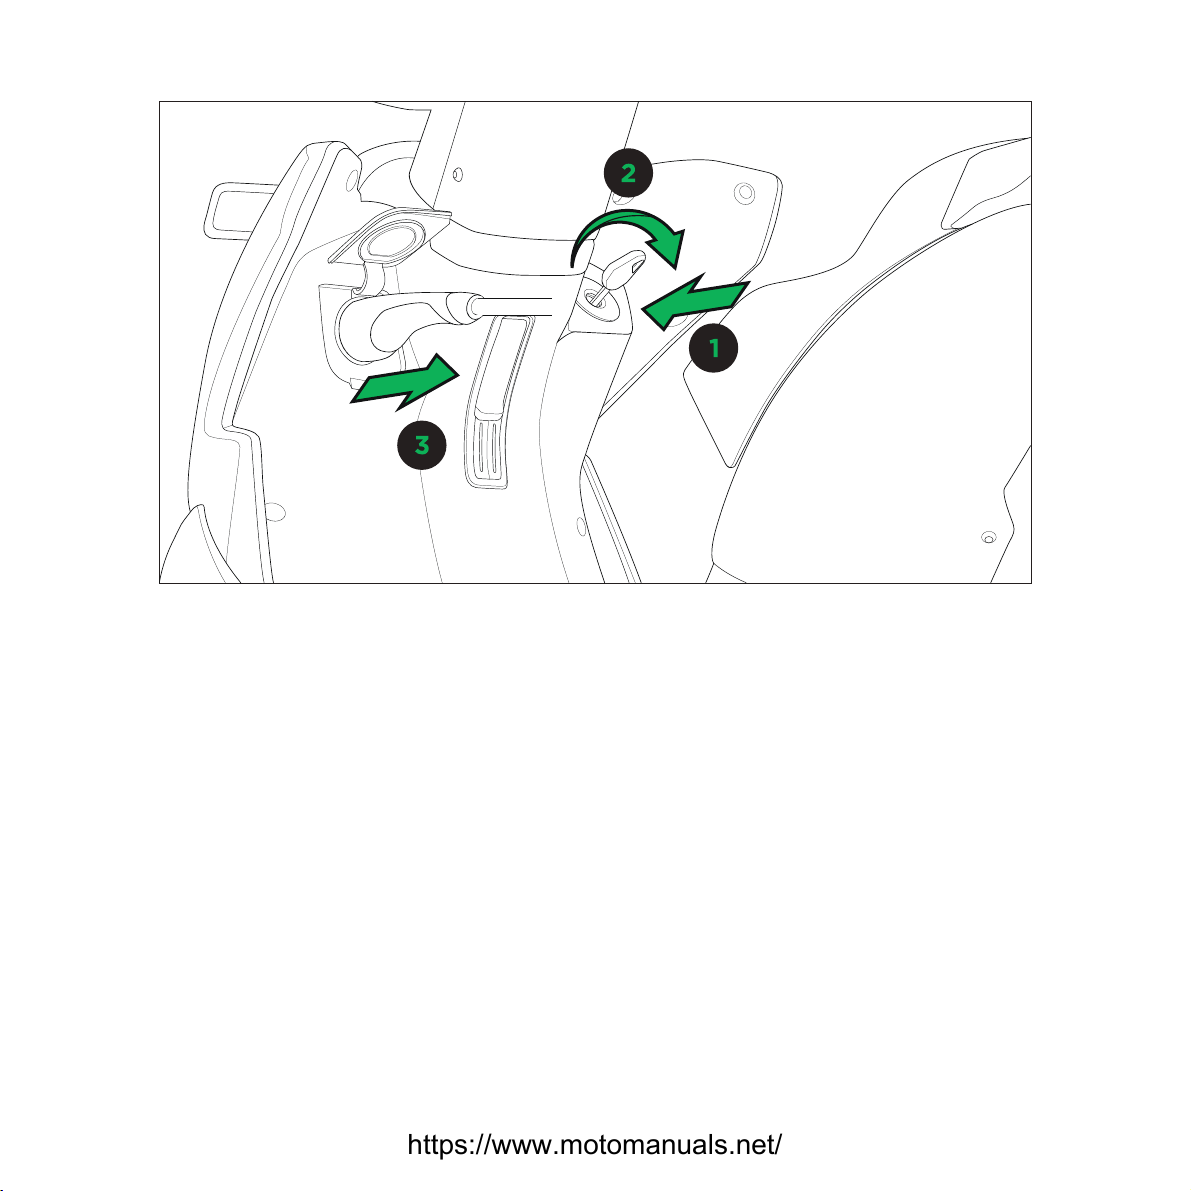
UN-PLUGGING IT
To plug out the cable, turn the key to the ON
position, it will unlock the connector.
Keep the key in the ON position, wait for
5 seconds, then remove the charging
connector, and put it back in the holder
on the Ather Dot.
Remember to close the charging port flap on
the scooter.
CAUTION
Do not leave the connector on the ground.
There’s a risk of damage through dust and
water ingress, hence something to be cautious
about.
You can check the charge on the scooter and
charging status using your phone app, by
tapping on the touch screen dashboard while
it’s charging.
https://www.motomanuals.net/
Do not try to forcefully pull the connector out,
try turning the key to OFF and back
to ON and try again, it should come out
eortlessly.
Page 51

WHAT DOES THE LED SAY?
The charger speaks to you. The changing state of the
LED light communicates to you about how it’s doing.
Every colour tells you something:
Solid amber light - Charger software is being
updated over-the-air (OTA)
Solid green light
When not connected to the scooter - Charger is
healthy and is available for charging
When connected to the scooter -Charging is done
Blinking green light - Charging in progress
Solid red light - Fault in the charger. Please contact
customer support
No light - No power
Using the Ather Charging
Cable
CAUTION
Plug in the 3 pin connector of the charging cable
into the 5A socket. Plug in the other end of the
cable to the scooter’s charging port. Turn the
key to OFF position & pull out the scooter key.
To plug out, keep the key in the ON position, wait
for 5 seconds, then remove the charging
connector and close the charging port flap.
Remove the key once your scooter is
connected to charger/disconnected
from the charging cable.
Do not turn the key ON and pull out the
connector, at the same time. Hold on for
5 seconds to pull the connector out.
Do not attempt to remove the connector
while your scooter is charging, you run the
risk of damaging the connector or the
scooter.
Note: If you don’t see any
light (when there is power
in your premises), press
Reset Button on PRCD
(Portable residual-current
device). If the charger still
remains non-functional,
contact customer support.
40
https://www.motomanuals.net/
Page 52

SCOOTER SHUTDOWN
https://www.motomanuals.net/
Page 53

https://www.motomanuals.net/
Page 54

FIVE-DAY HIBERNATION
When the scooter is not in use (unplugged and
the key is turned OFF), the electronics consume
negligible amount of power. The power pack
drains extremely slowly. But, if you don’t ride for
around 25 days or so, it’s advisable to charge it
for a few hours before you head out.
CAUTION
Do not keep your scooter parked in a hot area,
it will aect the life of the battery.
CAUTION
Do not keep your scooter parked near transformers
or other high electromagnetic emission devices.
https://www.motomanuals.net/
Page 55

HOW TO SHUTDOWN?
Go to Settings, on the screen and select the
‘Shutdown’ option from the menu.
CAUTION
Charge your scooter every 100 days. It’s a must,
even if the scooter is in Shutdown Mode, to avoid
permanent damage to the Battery pack.
https://www.motomanuals.net/
44
Page 56

CARING FOR
YOUR SCOOTER
https://www.motomanuals.net/
Page 57

https://www.motomanuals.net/
Page 58

Things to Keep in Mind
WHEN NOT IN USE
If you are not using your scooter for more than 5 days, make sure you
leave it in Shutdown Mode to keep the battery healthy and improve
it’s life.
QUICK CLEAN-UP
Regular cleaning of the vents avoid the risk of damage caused due to
insucient ventilation, choking and insulation of the heat dissipation
components. So keep the motor and battery vents spick and span.
EXTEND YOUR BATTERY LIFE
Avoid draining battery to zero, that maintains the health of the
battery. The less you fast charge, the better it will be for the health of
the battery. The battery is capable of fast charge but to improve the
it’s life, maximise home charging, and use fast charging at public
locations, only when in dire need. Shut down your scooter at night
after charging, for a better battery life.
PULLING AND PUSHING
Turn the motor OFF using the kill switch, when pulling the scooter
back or pushing the scooter on a decline.
CAUTION
Do not try to hold the scooter at a place using partial
acceleration, while on a slant. In all likelihood, it will
damage the motor.
https://www.motomanuals.net/
Page 59

Troubleshooting
If there is a technical issue or you are facing a confusion or if you have any
query, call us up.
+91 7676 811 777
Just in case this number is unreachable, check for the updated number on
www.atherenergy.com or the Ather app.
BIG BOLD CAUTION
Do not attempt to service the scooter on your own or at an
unauthorized service center. While the scooter belongs to you
and you may do as you please, we built the scooter and know it
inside-out, it’s advisable you let us take the lead and service the
scooter for you.
DISCLAIMER
Ather Energy Private Limited (‘’Ather’’) takes reasonable care to ensure the
accuracy of the information contained herein, but it shall not be
responsible for any inadvertent errors or omissions that may appear in this
document. All trademarks are the property of their respective owners.
The use of Ather 450X electric scooter ("Ather 450X") shall be governed by
the terms and conditions of the agreement entered between you and
Ather during purchase (’’Agreement’’). Ather makes no warranties of
merchantability and/or fitness for a particular purpose, in relation to the
accuracy, reliability or contents of this document. You acknowledge that
any usage of Ather 450X in contravention with this document may render
the warranty void. Ather reserves the right to update this document and/or
discontinue Ather 450X at any time without notice.
48
https://www.motomanuals.net/
Page 60

https://www.motomanuals.net/
Page 61

https://www.motomanuals.net/
Page 62

https://www.motomanuals.net/
 Loading...