

Page 1
Safety and Precautions
2.Turn on the power switch
User Manual
AE988/AE988D/AE970/AE970D
Soldering Station
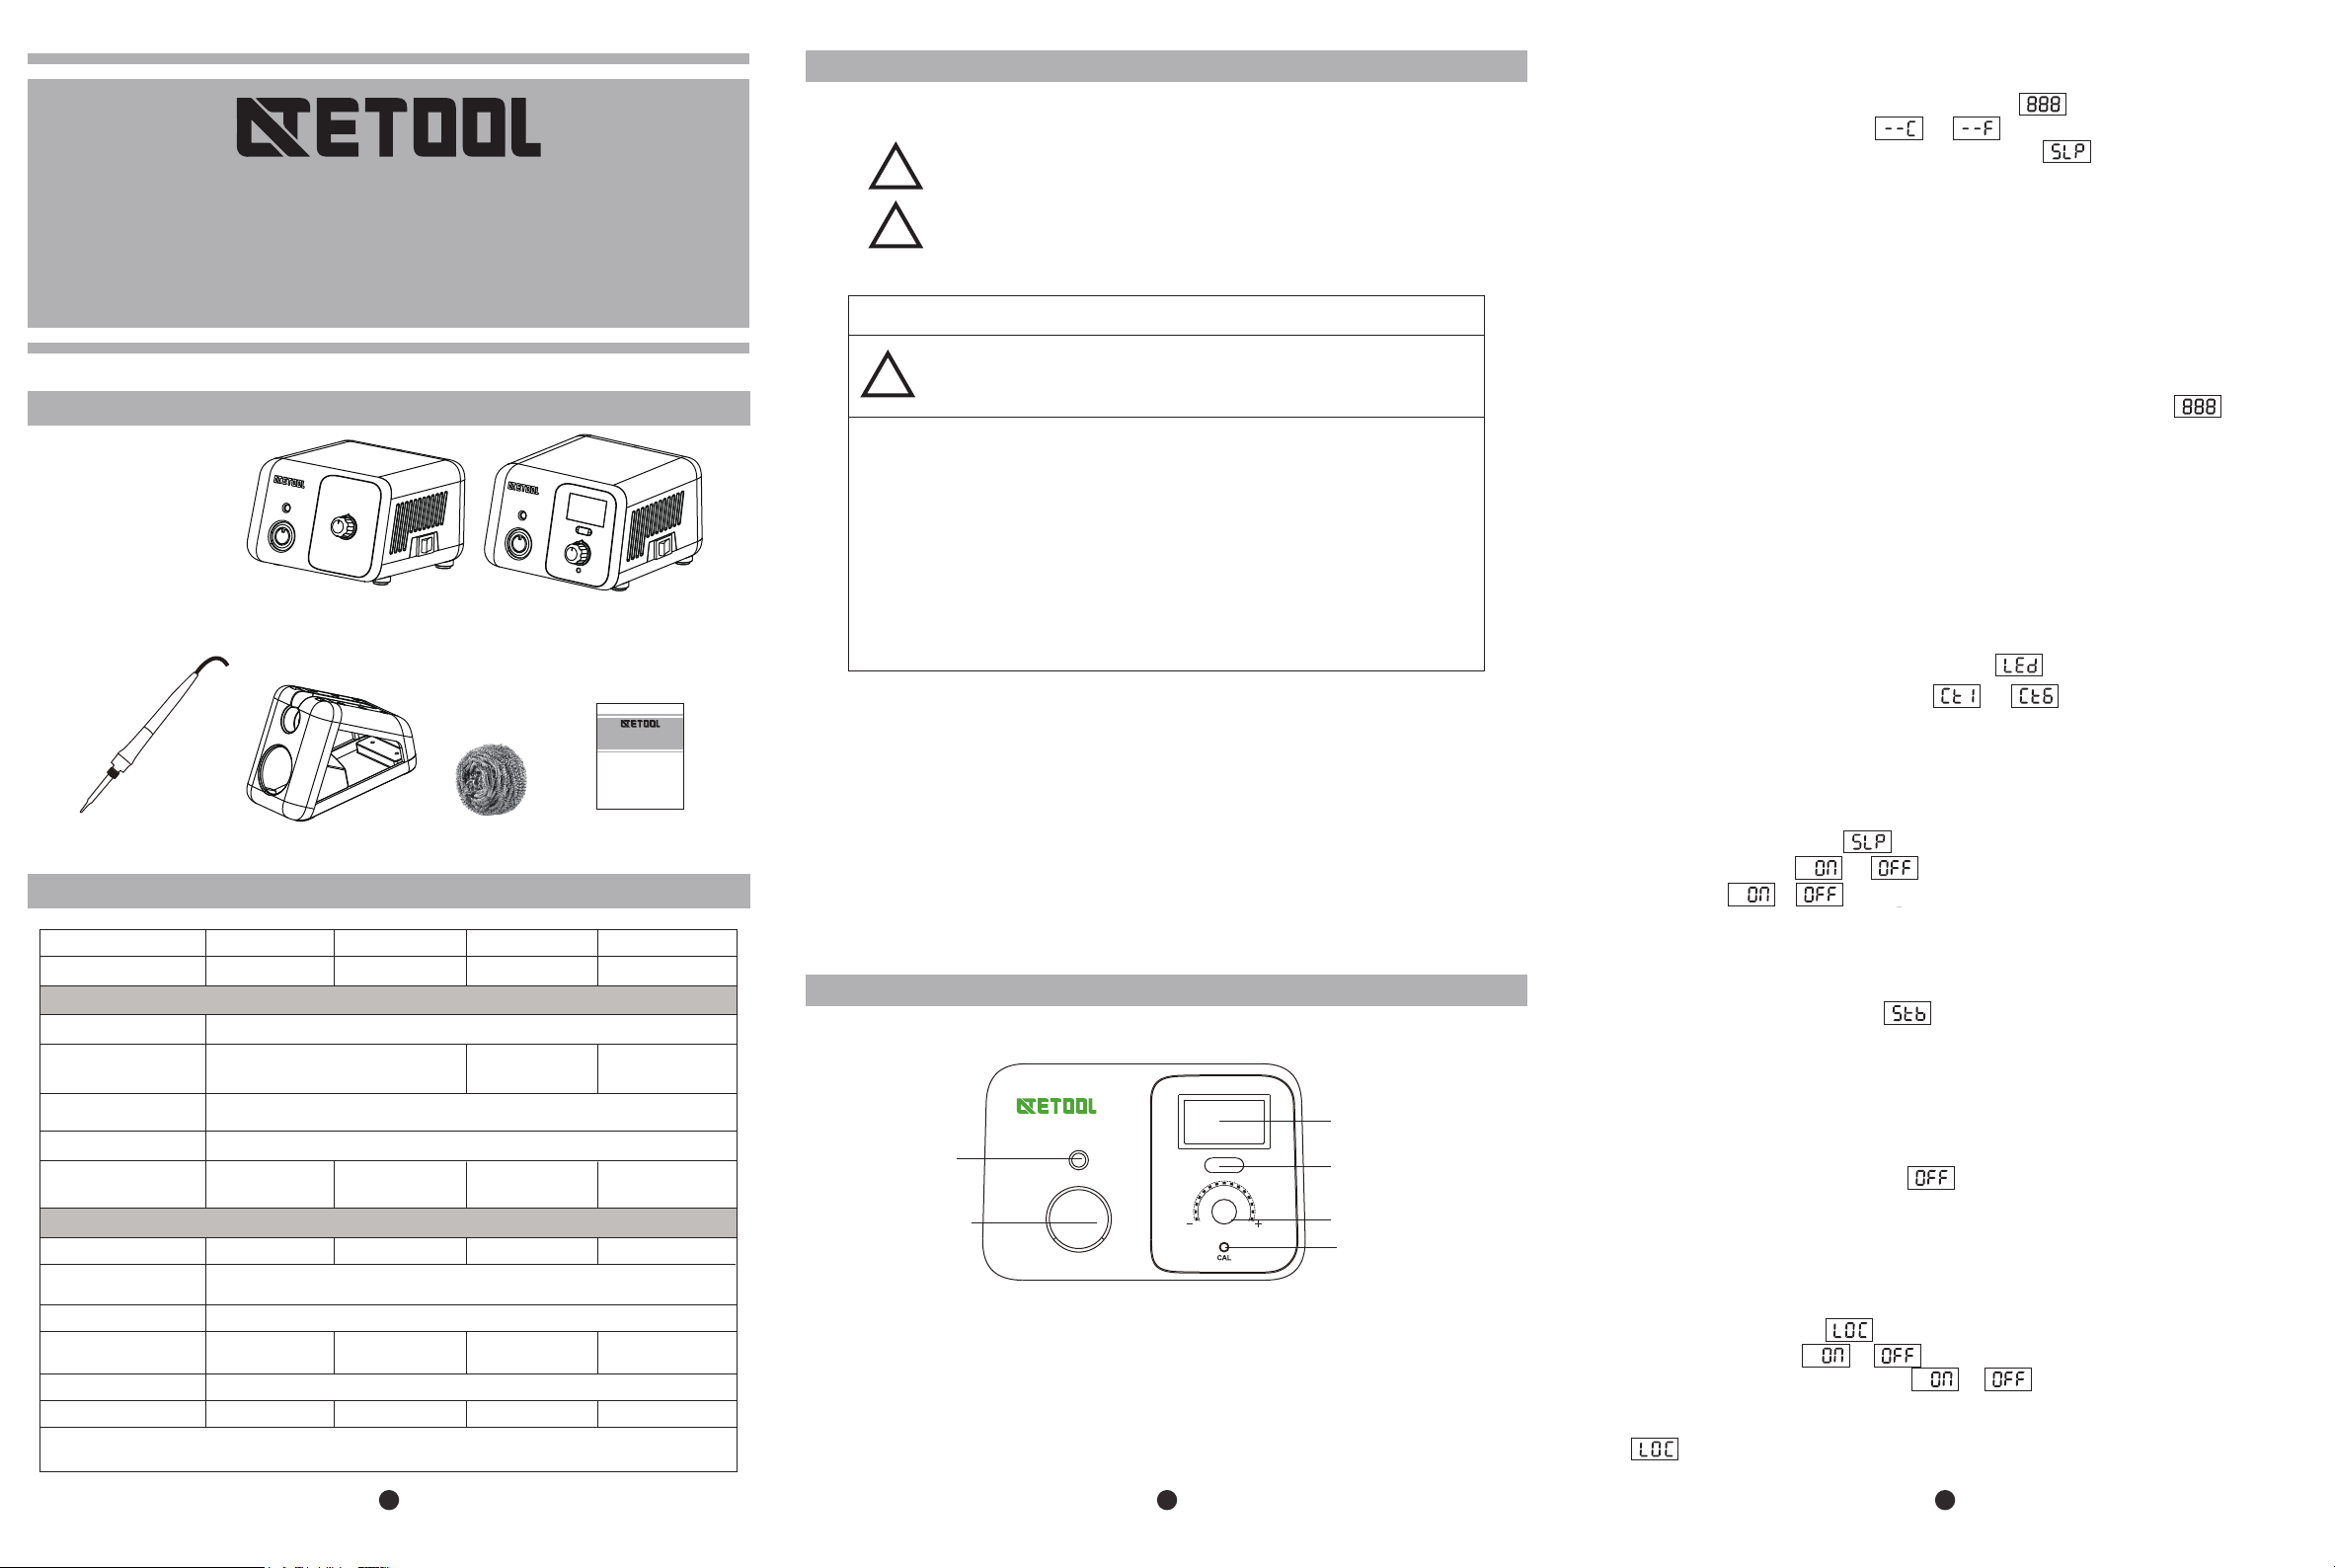
Packing List
Main unit: 1pc
Handle: 1pc
Iron stand: 1pc
User manual: 1pc
Brass wool: 1pc
Main unit(AE988/AE970) Main unit(AE988D/AE970D)
使用说明书
AE988/AE988D/AE970/AE970D 电焊台
Iron standHandle Brass wool User manual
Product Specification
Model No.
Total Power
Output voltage
Temperature
range
Temperature
stability
Dimension
weight(power cable
excluded)
Power consumption
Tip to ground
impedance
Tip to ground voltage
Heating element
Cable length
Weight
Note: specifications and appearance are subject to change for product improvement without prior
notice
AE988 AE970
70W
200-480℃(392-896℉)
1.32kg 1.32kg 1.33kg 1.334kg
PTC ceramic
heater
79g 79g
80W
Main Unit
25VAC
±1℃( ±1.8℉){〉200℃(400℉)}
148x120x85mm
Handle
<2Ω
<2mV
Integrated tip
1.2m
68g
AE988D
70W
50-500℃
(122-932℉)
65W75W 75W65W
PTC ceramic
heater
AE970D
80W
150-550℃
(302-1022℉)
Integrated tip
68g
The precautions in this manual are divided into the following [warning] and [attention].
Please fully understand the content.
Warning: misuse may cause death or serious injury to the user
!
Note: misuse may cause injury to users or substantial damage to objects involved
!
For your own safety, please strictly abide by the following precautions
Warning
When power is on, the temperature of the soldering iron tip might reach to
50 ~ 550 ℃ (120 ~ 1022℉).
!
Misuse may cause burns and fire, please strictly observe the following precautions:
● Do not touch the soldering iron tip or the metal part around it while using
● Do not use it around combustibles
● Inform the people around of the potential risk caused by high temperature
● Turn the power off when not in use
● Before replacing parts or tip, turn off the power and wait till the iron tip cools down
● Do not use this product if you are inexperienced or have no sufficient necessary knowledge
without the guidance of related qualified personnel
● Please keep it out of reach of children
● If the power cord is damaged, please ask the manufacturer or its service agent or similar qualified
personnel to repair it, so as to avoid personal injury or damage to product
Please strictly observe the following precautions, otherwise it may cause injuries or death
● Do not use this product for works other than soldering
● Do not hit the handle hard for removing the tin on the iron tip
● Do not modify this product
● When replace parts, must use original ATETOOL parts
● Do not soak the product in water or use it with wet hands
● Unplug it properly after using
● Smoke will be emitted during soldering, please use it in open space
● Do not engage in other dangerous acts with this product
Using Method(AE988D/AE970D)
1.Operation and display instructions
LED segment
Indicator
Socket
Panel display:
LED segment: digital display
Indicator: indicates the statement of heater (light on/off means power on/off)
Function key: function operation
Knob: to adjust temperature
Calibration hole: for calibrate the temperature
Function key
Knob
Calibration hole
After switching on, indicator lights up and LED segment displays for 1 second, now power is on.
And then it displays the temperature unit or for 1 second, so you know which unit is used
right now. If the standby function is enabled in this soldering station, will be displayed for 1 second
to show standby function is available. Then displays the set temperature for 1.5 seconds, and finally displays
the real time temperature. When the temperature is stable, indicator will flash.
Note: when not in use, please put the soldering iron on the holder. If it won’t be used for a while, please cut off
the power supply.
3.After use
After use, please clean the soldering iron tip and apply new solder on it.
4.Temperature unit conversion
First press function key, in the meanwhile switch on the power, till LED segment displays , release
the function key, now the temperature unit changes. If it was Fahrenheit, now switch to Celsius, and vice versa.
5.Temperature adjustment
Temperature range
AE988D:50-500℃(122-932℉)
AE970D:150-550℃(302-1022℉, note: as LED segment shows only 3 digits, 1022 will be displayed as A22,
“A” represents digit “10”)
Temperature adjusted by knob.
6.Screen brightness setting
1) Press and hold the function key till the the screen displays , to enter the brightness setting.
2) Show the current digital display brightness level - .
3) Adjust the brightness level through the knob: gear 1-6.
4) Press the function key or wait for 10s to automatically save to complete the setting.
7.Standby and sleep functions
Standby function on and off:
1)Press and hold the function key till display on LED segment to enter the standby function on/off setting:
2)Display the current setting or
3)Adjust by knob: or to turn on/off the standby and sleep function.
4)Press the function key or wait for 10s to automatically save to complete the setting.
Standby function
1)When standby function is turned on, the soldering station will enter standby mode after not in use for 10 minutes.
2)In standby mode, LED segment displays and temperature drops to 250 ℃ (482 ℉).
3)When any operation is detected, such as using the soldering iron, adjusting knob or pressing the function key,
it will return to the work mode.
4)When in standby mode, if no further operation is detected for 10 minutes, it will enter sleep mode.
Sleep function:
1)That short press the function key or long time in standby mode can make it enter sleep mode:
2)When entering sleep mode, screen displays and heating is turn off.
3)Press the function key to return to normal heating work mode.
8.Temperature locking function:
Temperature locking function on and off:
1)Turning the knob to adjust the temperature to be set.
2)Long press the function key till is displayed.
3)Now LEd segment displays or
4)Turn the knob to set the locking function to be or
5)Press the function key or wait for 10s to automatically save to complete the setting.
6)When the temperature is locked, adjusting the knob does not change the setting temperature, it will display
for 1 second to show that the current temperature is locked.
.
.
1
2 3
Page 2
9.Temperature calibration
1) Adjust the set temperature to 350 ℃ (662 ℉) by knob and wait for 2 minutes to stabilize the temperature.
2) Use a thermometer to measure the temperature of the soldering iron tip.
3) Use a cross screwdriver to adjust the calibration hole to make the displayed temperature value equal to the
measured value. For example, if the measured value is 345 ℃, adjust calibration hole to reduce display
temperature 350 to 345, make the display temperature match the measured value.
4) Press the function key to complete calibration.
Soldering iron tip maintenance
1. Set the temperature to 250 ℃ (480 ℉).
2. After the temperature is stable, clean the soldering iron tip with a brass wool and check its condition.
3. If black oxide is attached to it, please apply new solder (including flux) and wipe it repeatedly with a brass wool
until it’s clean, then apply some new solder.
4. If the soldering iron tip has been deformed, perforated or worn out, please replace it with a new one.
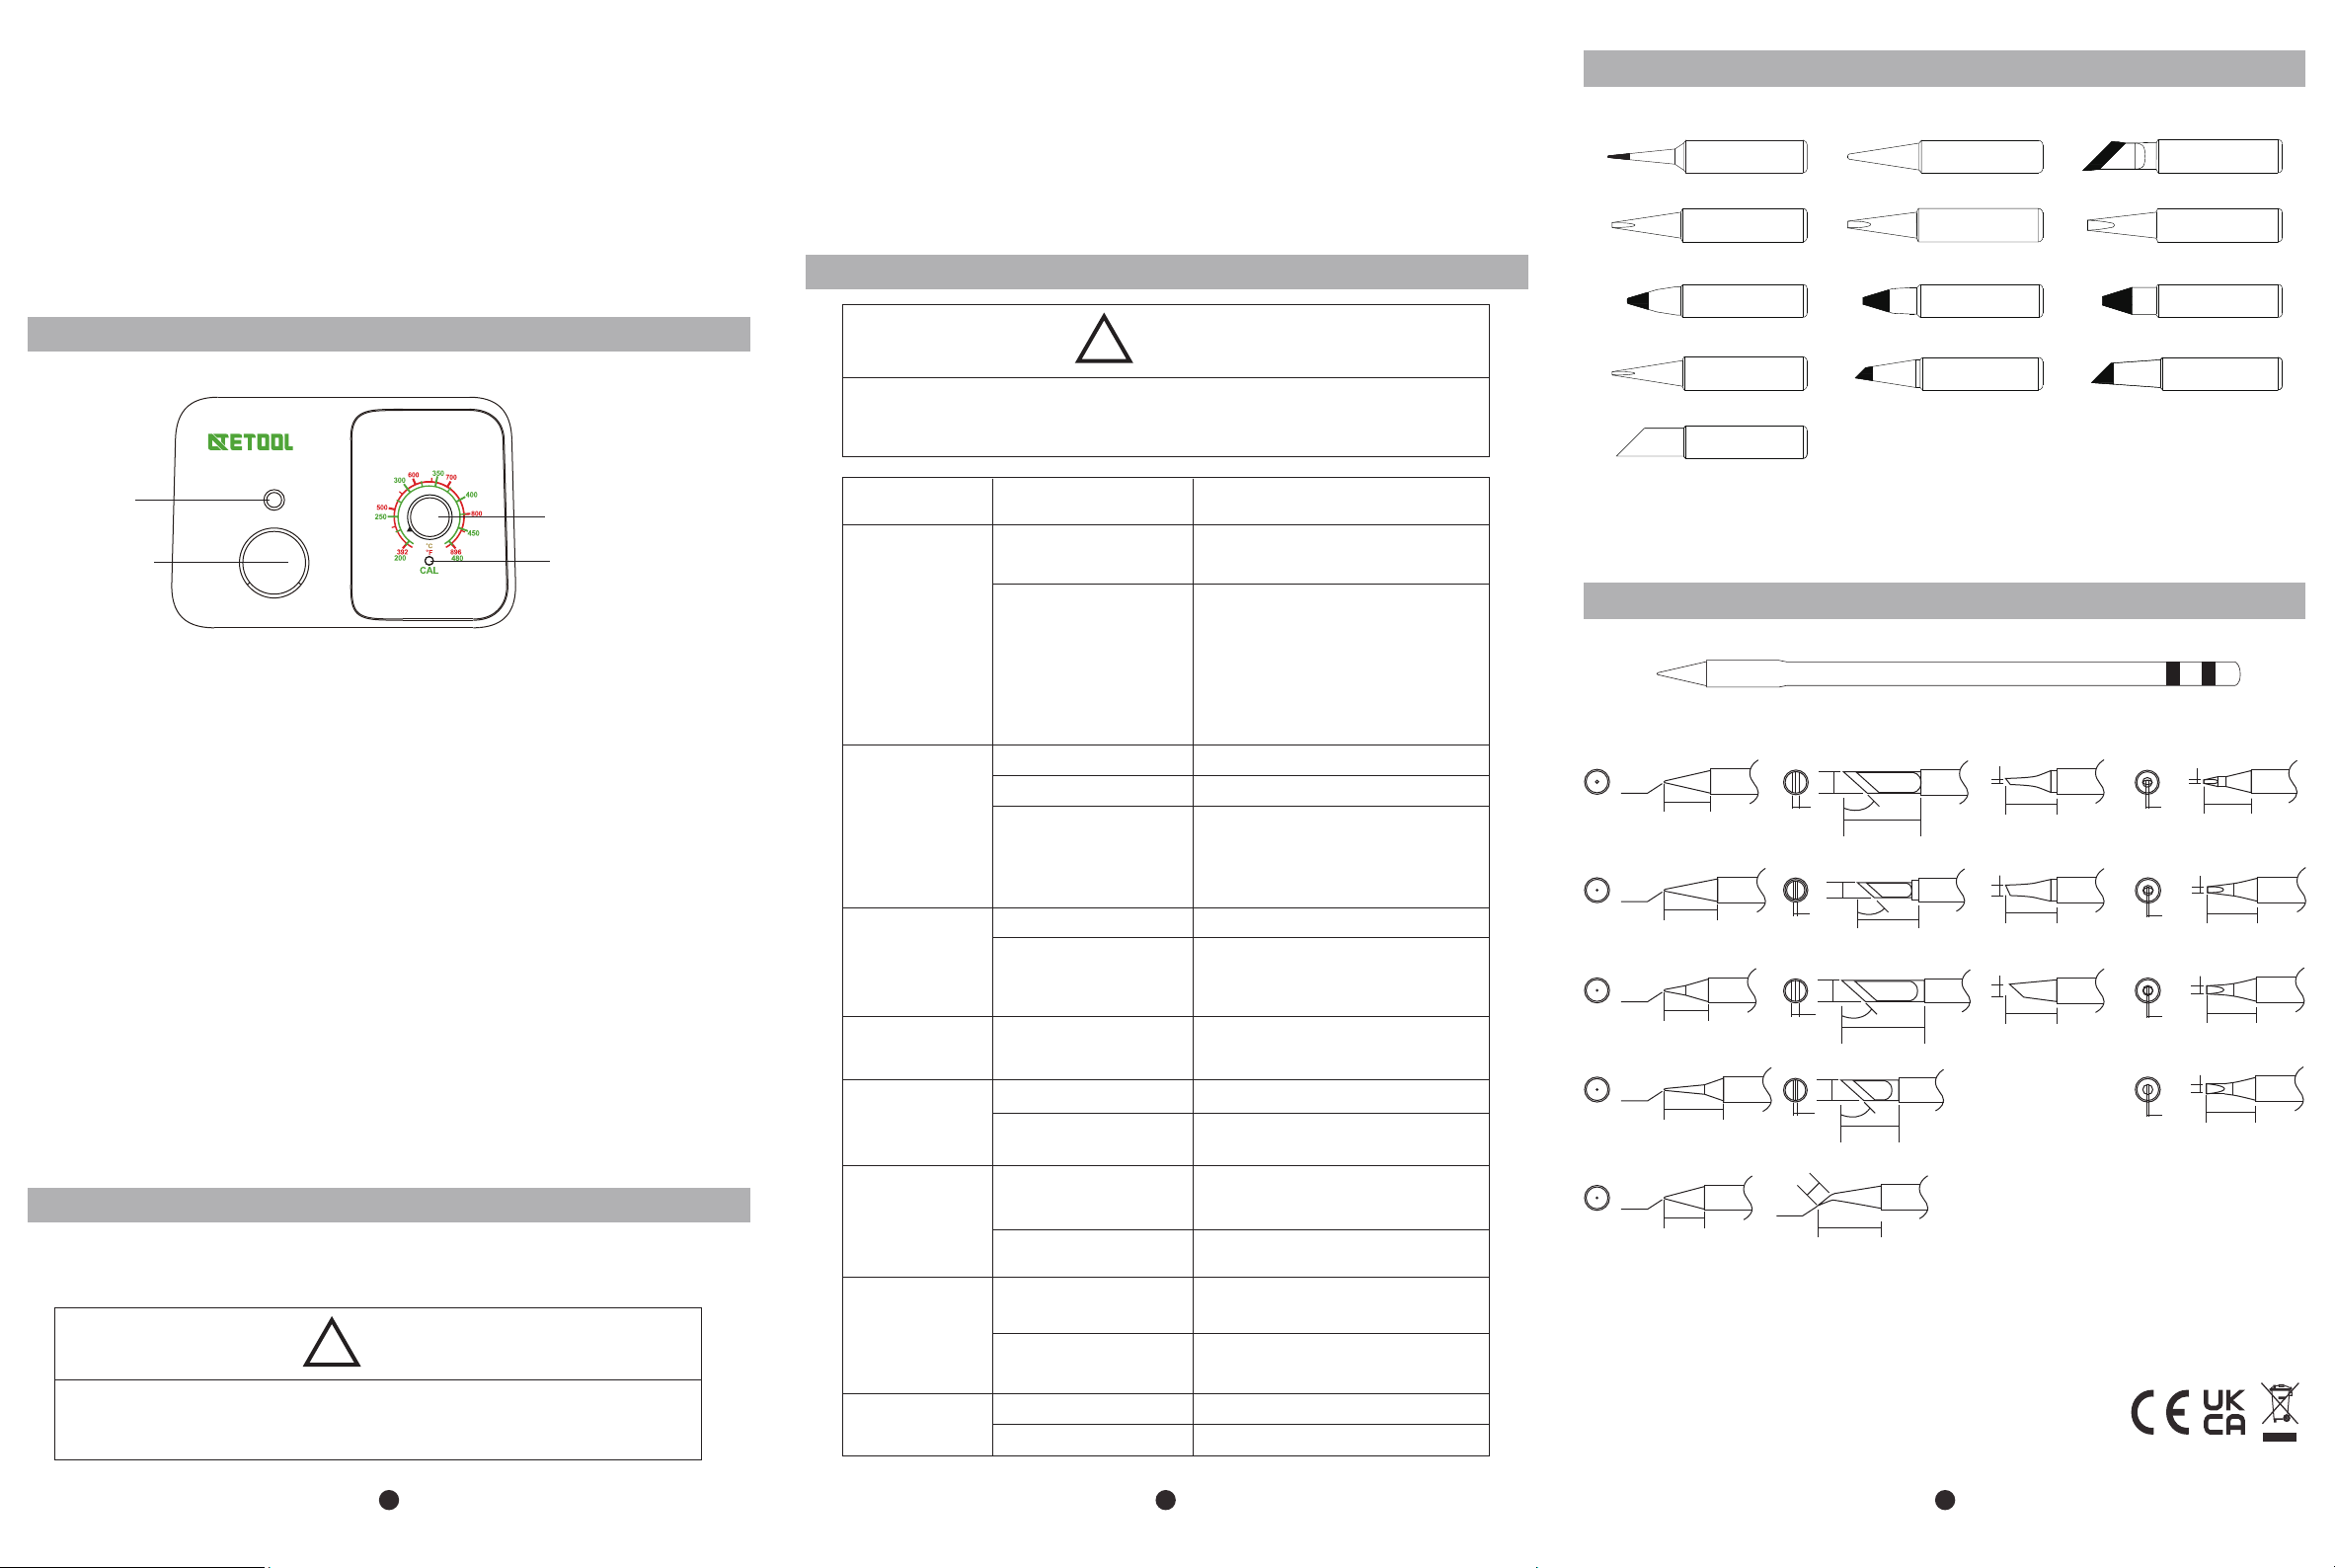
T900M series soldering tips(AE988/AE988D)
900M-T-I 900M-T-B 900M-T-K
Using Method(AE988/AE970)
1.Operation and display instructions
Indicator
Knob
socket
Calibration hole
Indicator: indicate the power state(light on/off means power on/off)
Knob: adjust the temperature
Calibration hole: for calibrate the temperature
2.Switch on the power
After the power is on, indicator lights up, and the soldering station starts heating up according to the set
temperature. After the temperature is stable, indicator flashes.
Note: when not in use, please put the soldering iron on the holder. If it won’t used for a while, please cut off the
power supply.
3.Temperature adjustment
Temperature range: AE988/AE970:200-480℃(392-896℉).
Temperature adjusted by knob.
4.Temperature calibration
1) Adjust the set temperature to 350 ℃ (662 ℉) by knob and wait for 2 minutes to stabilize the temperature.
2) Use a thermometer to measure the temperature of the soldering iron tip.
3) Use a cross screwdriver to adjust calibration hole to make the measured value equal to set temperaure.
For example, if measured value is 345℃, adjust calibration hole to increase it to 350, make the measured
value match set temperature.
4) Temperature calibration completed.
Maintenance
In order to make this product durable, please maintain it regularly. The lifespan of this product depends on the
used temperature, quality of solder wire and soldering paste, frequency of use etc. Please repair and maintain
it according to specific use conditions.
Warning
!
Please pay close attention when the soldering station is in use at high temperature, cut off the power
and unplug the power cord after use.
4 5
Troubleshooting Guide
Warning
!
● When checking or replacing parts, be sure to pull out the power plug to prevent electric shock
● If the power cable is damage, it must be sent to the manufacturer, agency store or maintenance
personnel with the same qualification for repair to avoid accidents
Failure
phenomenon
Not working after
power is on
The display shows "S-E"
The display shows "H-E"
Iron tip heating is on
and off
The solder won’t get on
the iron tip
Iron tip temperature is
too low
The iron tip won’t fit
The actual temperature
can’t reach
Examination Dealing method
Check whether the power
cord is good, or plug falls off
Is the fuse OK
Whether the handle cable is well
connected with main unit
Whether the wire connecting to
handle is broken
Whether the heater is damaged
(the resistance of the blue lead wire
shall be less than 100 Ω at room
temperature).
Whether the wire connecting to
handle is broken
Whether the heater is damaged
(the resistance of the red lead wire
shall be less than 100 Ω at room
temperature)
Whether the wire connecting to
handle is broken
Check whether the temperature of
the iron tip is too high
Check whether there is oxide on
the tip
Check whether there is oxide on
the tip
Whether the temperature is proper
Whether there is oxide inside tip, or
soldering iron tip expands
Not original tip or not same type tip
Is the temperature adjusted correctly
Haven’t done temperature calibration
for a long time
Connect the power supply well
Figure out the cause of fuse damage:
1. Short circuit inside the station.
2. Inside the handle, the spring might meets the
heating element.
3. Check whether the pin of heating element is
twisted or short circuited.
Even if the cause is unknown, please replace the
fuse. If the fuse get burnt out again, please return
the handle with the main unit for maintenance.
Reconnected
If so please replace it with a new handle
If damaged, replace the heater
If so please replace it with a new handle
If damaged, replace the heater
If so please replace it with a new handle
Adjust to the proper temperature
Clean the oxide with a brass wool
Clean the oxide with a brass wool
Adjust to the proper temperature
Change the tip and heater
use original factory tip or same type tips
Adjust the set temperature again
Re-calibrate temperature accordingly
900M-T-1.2D 900M-T-1.6D 900M-T-2.4D
900M-T-3.2D 900M-T-4.6D 900M-T-6.5D
900M-T-0.8C
900M-T-3C 900M-T-5C
900M-T-6.4C
(More soldering tips information please contact us)
T80 series soldering tips(AE970/AE970D)
T80-B2
1
2
3
6
R0.2
4.7
2
45°
15
T80-K
3
45°
1.2
4.7
2.4
4.7
1.5
3.5
11
T80-KU
45°
17
T80-KF
45°
11
T80-KL
12
T80-J02
R0.5
10
T80-B2
R0.2
12
T80-BL
R0.2
9.5
T80-I
R0.15
13.5
T80-ILS
R0.2
7.5
T80-B
(More soldering tips information please contact us)
Shenzhen ATETOOL Co., Ltd.
Address:F5, 1-2 #, Tongfuyu, Aiqun Road, Shiyan Street, Bao'an District, Shenzhen,
518132,P.R.China
Tel : (0755) 23408674 - 802
Support:(0755) 23408704 - 818
URL: www.atten.com.cn( in Chinese )
www.atten.com(in English)
11.5
T80-BC1
11.5
T80-BC2
10
T80-BC3
0.5
0.5
0.5
0.5
0.8
9.5
T80-D08
1.2
10
T80-D12
1.6
10
T80-D16
2.4
10
T80-D24
MADE IN CHINA
CBN300123(A)
 Loading...