

ATEN Technology IOGEAR GWAV8141KTX Users Manual
Contents
Caution for Safety
Caution for Safety 4.....................................
Introduction
Product Introduction
Major Feature
Package Contents
Package Contents 7.....................................
Operation Control & Function
Transmitter Front
Transmitter Rear
Receiver Front
Receiver Rear
Remote Control
Installation
Transmitter / Receiver Installation
IR Flasher Installation
LAN Installtion
PLC Installation
...................................
........................................
.....................................
......................................
.......................................
........................................
......................................
..........................
...................................
.......................................
.......................................
English
6
6
8
8
9
9
10
11
13
14
15
Product Specication
Specication
Video Format Supported
Audio Format Supported
Change WiFi Frequency
Factory Reset
Software upgrade
........................................
................................
................................
.................................
........................................
.....................................
Q & A
Q & A 20.............................................
16
17
18
18
18
19
3
Caution for Safety
Please read this user’s manual carefully before using the product.
English
If there is any strange sound, smoke or odor, pull the cable o immediately.
(It may cause re or electric shock)
Do not disassemble.
(It may cause re or electric shock.)
Do not put any sharpen object into the venting hole of the product.
(It may cause re or electric shock.)
Ensure to plug the product rmly.
(It may cause overheating or re if it plugs unstably.)
Ensure not to use the damaged cable.
( It may cause re or electric shock.)
Keep the product away from heaters or stoves.
(It may cause a re.)
Keep the battery of remote control out of reach of children.
Do not place the production on a bed, sofa or inside a closet that is not good for
ventilation.
(It may cause overheating or re.)
Do not use the product in close distance from the inammatory substance or combustible
spray.
(It may cause re.)
4
Caution for Safety
Always wipe the product o with soft fabric, not water mop.
(Water may come inside the product through the venting hole, and it may cause
electric shock.)
Keep clean the power plug and the outlet.
(Dirt may cause a short circuit and re.)
Keep the product out of reach of children.
Don’t unplug the power cord with a wet hand.
(It may cause electric shock.)
The heat and humidity may cause the damage to the remote control.
English
Unplug the power cord if you don’t use the product for a long time.
(Dirt may cause heat, re or electric shock.)
Ensure not to be damaged to the power cord.
(Damaged power cord may cause re or electric shock.)
5

English
Introduction
■
Product Introduction
itrio, using WiFi wireless solution, is the device for sending 1920x1080 Full HD video sources to other
location in your house. Once you connect Full HD video sources such as Set top box, Blu-ray player,
Multi media player, DVD player or PC to the transmitter and connect the display device to the receiver,
you can enjoy wirelessly Full HD video anywhere in your house.
itrio uses IEEE802.11n draft 2.0 standard WiFi technology for wireless connection. In case the wireless
connection is interfered, you can use PLC (power line communication) modem without additional
cable installation. You can also enjoy itrio through a LAN cable connection via LAN port.
■
Major Feature
●
1080p60 Full HD encoding/decoding with H.264 Baseline Prole (Level 4.2)
●
Low latency
- Latency of encoding-decoding in 1080p60 HD: Within 30ms
●
Supports both digital(HDMI) and analog(RGB, Component, D-Sup) video/audio
●
Supports Wireless or Wireline
- IEEE 802.11n 5 GHz WiFi
- Power line communication (PLC) modem
- LAN connection
●
Internal Antenna (Supporting MIMO)
●
HDMI-v1.3 (HDCP-v1.1) compliant.
●
Supports both DTV & VESA standards
- DTV : 1920x1080i60/p60, 1280x720p60, 720x480i60/p60
- VESA : WSXGA+(1680x1050), SXGA(1280x1024), WXGA(1280x800), XGA(1024x768),
SVGA(800x600), VGA(640x480)
6
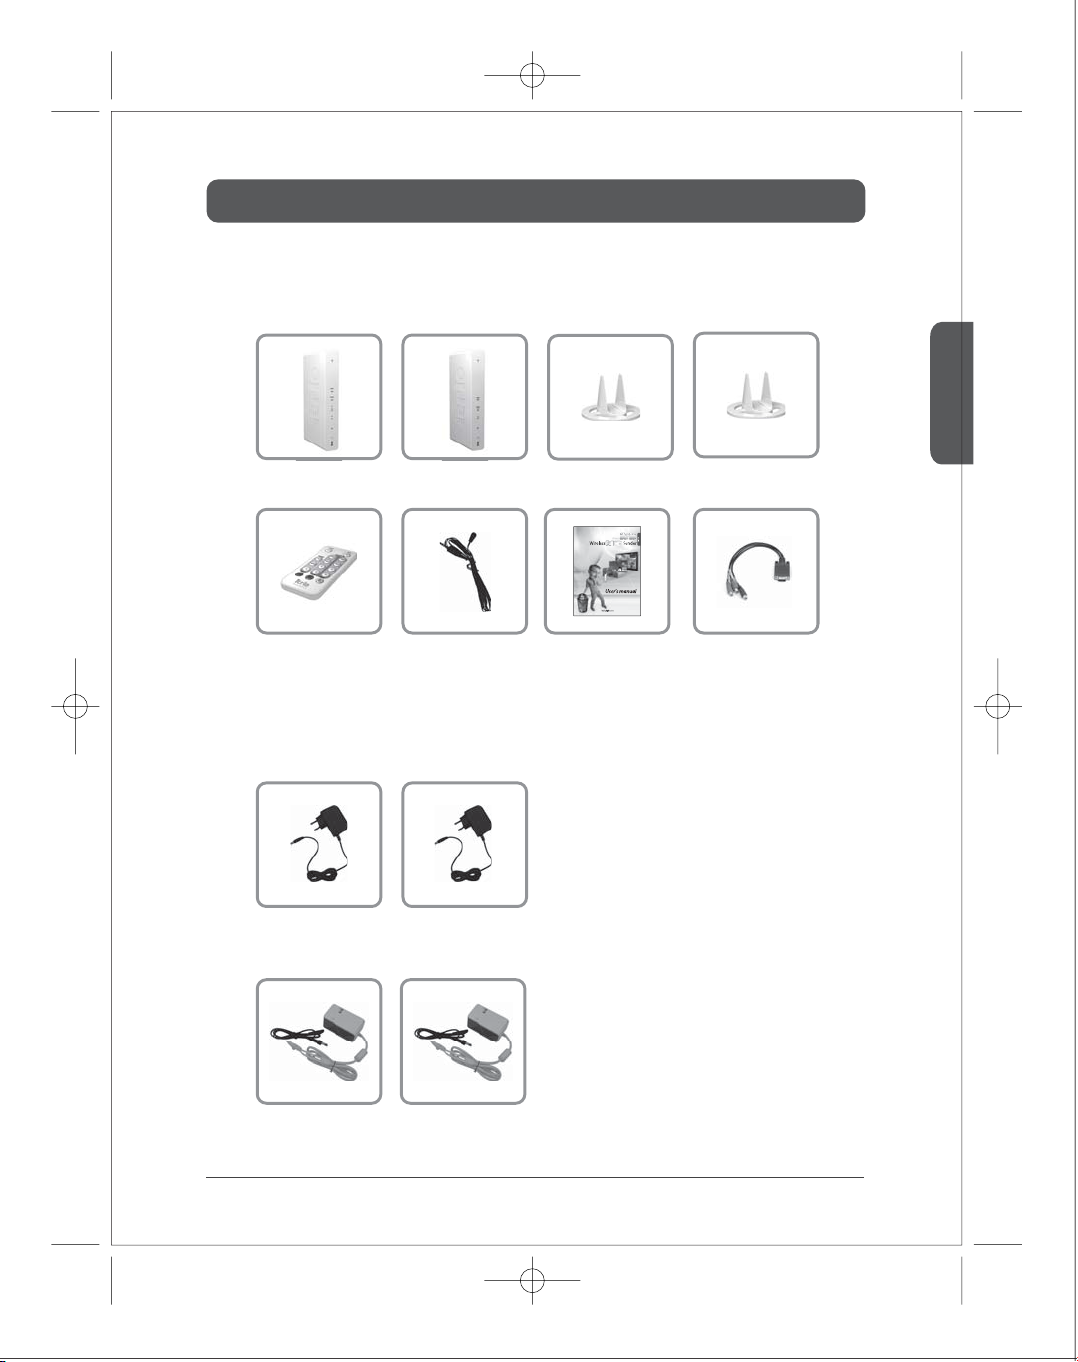
Package Contents
Before you use the product, check the following components are all present.
※
■
Components
Transmitter Receiver Stand1 Stand2
English
Remote Control
■
Adapter by model
- HD-W100 / HD-L100
Adapter1 Adapter2
- HD-P100
PLC1 PLC2
IR-Flasher
User’s Manual D-Sub
to component adaptor
7

Operation Control & Function
■
Transmitter Front
English
■
Transmitter Rear
Description
○
Blink : System booting or establishing link between the transmitter and the receiver.
○
1
Power/Link LED
1
2
HDMI1
3
2
3
4
5
6
7
HDMI2
4
PC
AV
5
6
IR window
Power and
7
Source Button
Quick Blink : Software upgrading or wireless/LAN mode switching.
○
On : Finish of link establishment is completed between the transmitter and the
receiver.
It will be on when the HDMI1 port is selected for the video input.
If the cable is not connected or video signal is not fed into properly, LED will blink.
It will be on when the HDMI2 port is selected for the video input.
If the cable is not connected or video signal is not fed into properly, LED will blink.
It will be on when the PC-IN port is selected for the video input.
If the cable is not connected or video signal is not fed into properly, LED will blink.
It will be on when the AV-IN port (composite or SCART) is selected for the video
input.
IR receiving window from remote control.
○
Press it shortly to turn the power on.
○
When power on,
--Press shortly : Press to select the video input source. Each press the power
button will cycle through the available video input "HDMI1
AV →HDMI1" in sequence.
→
Press longer : Press and hold more than 3 seconds to turn the power o.
Description
1
2
3
4
5
HDMI1-IN
1
HDMI2-IN
2
3
AV-IN
4
IR-OUT
5
PC AUDIO-IN
PC-IN
6
6
7
LAN
7
8
8
DC
HDMI 1 input port (correspond to ‘HDMI1’ on the remote control)
HDMI 2 input port (correspond to ‘HDMI2’ on the remote control)
Composite or SCART input port (correspond to ‘AV’ on remote control)
Connect IR Flasher to control external devices which are connected to the
transmitter.
Stereo Audio input port
Support component input through component gender.
It will be used for the following feature
○
Connection to PLC modem
○
Direct connection to LAN cable
○
Connection to PC for the system conguration setting
Power input port
Function
Function
MHMI2→ PC
→
8
 Loading...