

Aten VS482-AT-E Quick Start Guide
p
Hardware Review
A
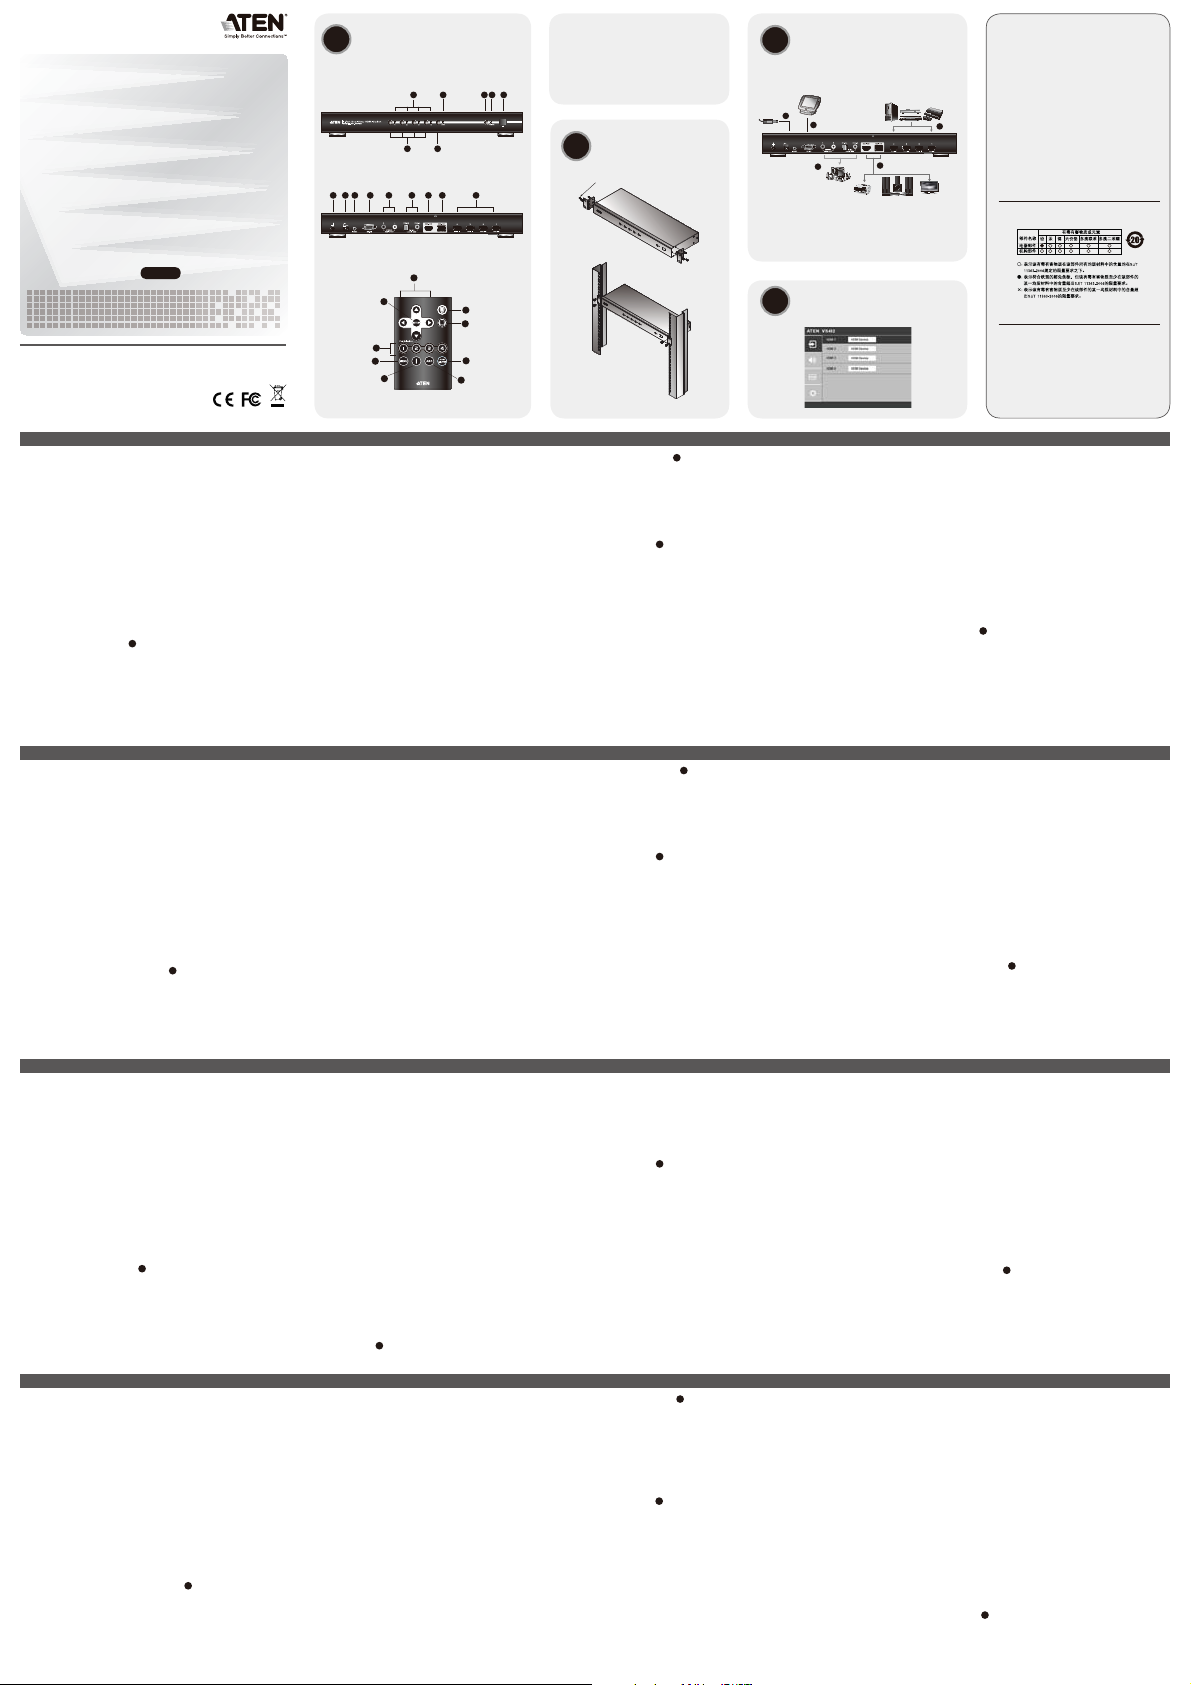
Front View
Rear View
1 4 5 6 7 8 92 3
1
6 7
2 3 4 5
Package Contents
1 VS482 4-Port Dual View HDMI Switch
1 IR Remote Control Unit
1 Power Adapter
1 User Instructions
1 Mounting Kit
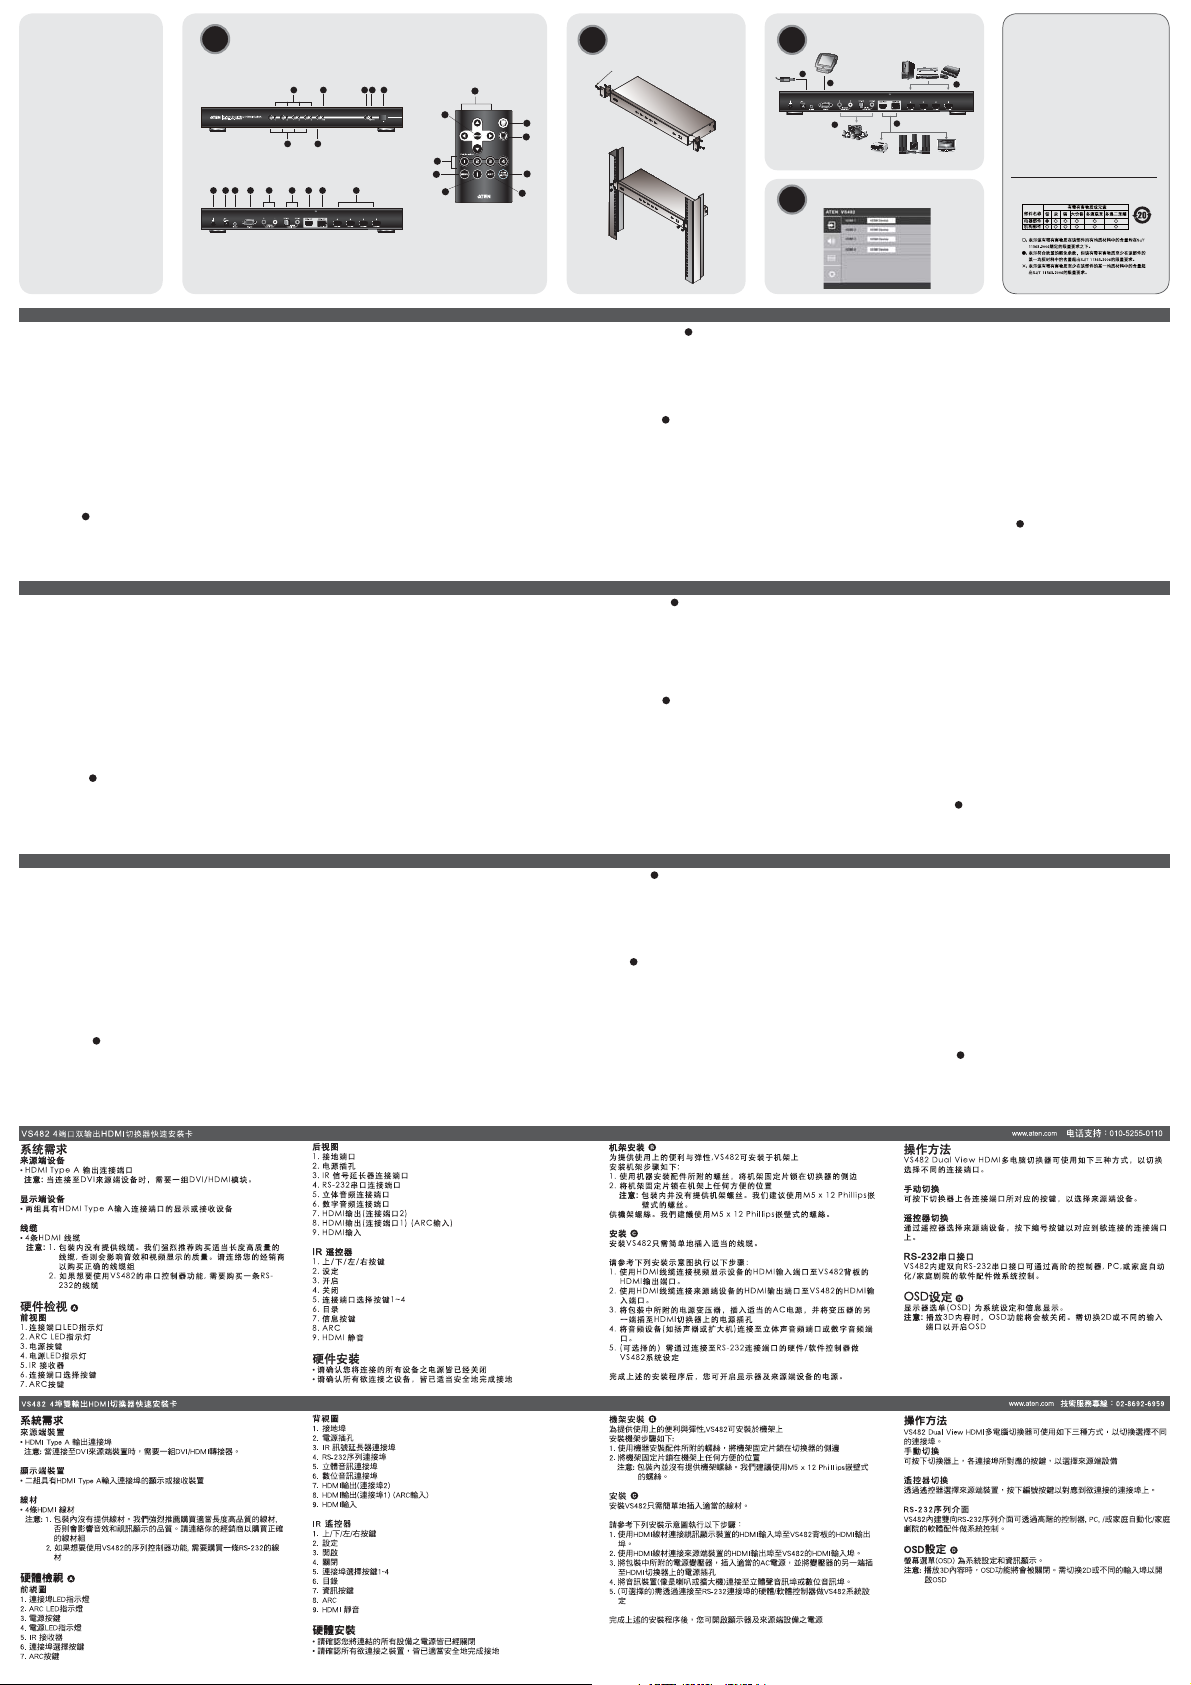
Rack Mounting
B
Phillips hex head
M3x8
C
Installation
3
5
Multi-channel Audio
Hardware / Software
Controller
4
HDMI
Source Devices
1
or or
ut Device
HDMI Out
Online Registration
International:
http://support.aten.com
North America:
http://www.aten-usa.com/product_
registration
Technical Phone Support
2
International:
886-2-86926959
North America:
1-888-999-ATEN Ext: 4988
United Kingdom:
44-8-4481-58923
The following contains information that relates to China:
4-Port Dual View HDMI Switch
VS482
Quick Start Guide
© Copyright 2011 ATEN® International Co., Ltd.
ATEN and the ATEN logo are trademarks of ATEN International Co., Ltd. All rights reserved. All other
trademarks are the property of their respective owners.
This product is RoHS compliant.
Part No. PAPE-1223-690G Printing Date: 10/2011
VS482 4-Port Dual View HDMI Switch Quick Start Guide
Requirements
Source Device
• HDMI Type A output connector(s)
Note: A DVI/HDMI adapter is required when connecting a DVI source
device.
Display Device
• Up to 2 display devices or receivers with an HDMI Type A input connector
Cables
• 4 HDMI cables
Note: 1. No cables are included in this package. We strongly recommend
that you purchase high-quality cables of appropriate length since
this will affect the quality of the audio and video display. Contact
your dealer to purchase the correct cable sets.
2. If you wish to utilize the VS482’s high-end serial controller
function, you will also need to purchase an appropriate RS-232
cable.
Hardware Review A
Front View
1. Port LEDs
2. ARC LED
3. Power Pushbutton
4. Power LED
5. IR Receiver
6. Port Selection Pushbuttons
7. ARC button
Commutateur HDMI double vue à 4 ports VS482 – Guide de mise en route rapide
Configuration minimale
Périphérique source
• Connecteur(s) de sortie HDMI de type A
Remarque : Un adaptateur DVI/HDMI est nécessaire lors de la connexion
à un périphérique source DVI.
Périphérique d’affichage
• Jusqu’à 2 périphériques d’affichage ou récepteurs équipés d’un
connecteur d’entrée HDMI de type A
Câbles
• 4 câbles HDMI
Remarque : 1. aucun câble n’est fourni avec le produit. Il est vivement
conseillé d'acheter des câbles de haute qualité d'une
longueur appropriée afin d'éviter que la qualité audio et
vidéo n'en soit affectée. Contactez votre distributeur pour
vous procurer les jeux de câbles corrects.
2. Si vous souhaitez utiliser la fonction de contrôleur série
haut de gamme du VS482, vous devrez aussi acheter un
câble RS-232 approprié.
Description de l’appareil A
Vue avant
1. Voyants des ports
2. Voyant ARC
3. Bouton d’alimentation
4. Voyant d’alimentation
5. Récepteur infrarouge
6. Boutons de sélection de port
7. Bouton ARC
VS482 Dual-View-HDMI-Switch mit 4 Ports Kurzanleitung
Voraussetzungen
Signalquelle
• HDMI Typ A-Ausgang bzw. -Ausgänge
Hinweis: Zum Anschluss einer DVI-Signalquelle ist ein DVI/HDMI-Adapter
erforderlich.
Anzeigegerät
• Maximal 2 Anzeigegeräte oder Receiver mit HDMI-Typ-A-Eingang
Kabel
• 4 HDMI-Kabel
Hinweis: 1. Im Lieferumfang sind keine Kabel enthalten. Wir empfehlen
Ihnen, nur hochwertige Kabel geeigneter Länge zu kaufen,
da diese Auswirkungen auf die Ton- und Bildqualität haben.
Wenden Sie sich dazu an Ihren Fachhändler.
2. Um die serielle Controller-Funktion des VS482 nutzen zu
können, benötigen Sie außerdem ein separates RS-232Kabel.
Hardwareübersicht A
Vorderseitige Ansicht
1. Port-LEDs
2. ARC-LED-Anzeige
3. Ein-/Aus-Schalter
4. LED-Betriebsanzeige
5. Infrarot-Empfänger
6. Portauswahl (Drucktasten)
7. Taste ARC
VS482 Conmutador HDMI Dual View de 4 puertos Guía rápida
Requisitos
Dispositivo fuente
• Conector(es) de salida HDMI de tipo A
Nota: La conexión a una fuente DVI requiere un adaptador DVI/HDMI.
Dispositivo de visualización
• Hasta 2 dispositivos de visualización o receptores con entrada HDMI de
tipo A
Cables
• 4 cables HDMI
Nota: 1. Los cables no vienen incluidos en el paquete. Le recomendamos
que compre cables de alta calidad y de una longitud adecuada,
dado que el cable tiene una influencia significativa sobre la
calidad de imagen. Póngase en contacto con su distribuidor para
adquirir los juegos de cables apropiados.
2. Si desea emplear la controladora serie de altas prestaciones del
VS482, también tendrá que adquirir un cable RS-232 adecuado.
Presentación del hardware A
Vista frontal
1. Indicadores LED de los puertos
2. Indicador LED ARC
3. Botón de encendido/apagado
4. Indicador LED de alimentación
5. Receptor de infrarrojos
6. Botones de selección de puerto
7. Botón ARC
IR Remote Control
Rear View
1. Grounding Terminal
2. Power Jack
3. IR Extender Port
4. RS-232 Serial Port
5. Stereo Audio Ports
6. Digital Audio Ports
7. HDMI Out (port 2)
8. HDMI Out (port 1) (ARC In)
9. HDMI In
IR Remote Control
1. Up / Down / Left / Right Buttons
2. Setup
3. On
4. Off
5. Port Selection Buttons 1~4
6. Menu
7. Info button
8. ARC
9. HDMI Mute
Hardware Installation
• Make sure that the power to all devices connected to the installation are
turned off.
• Make sure that all devices you will be installing are properly grounded.
Vue arrière
1. Prise de terre
2. Prise d’alimentation
3. Port de rallonge infrarouge
4. Port série RS-232
5. Ports audio stéréo
6. Ports audio numériques
7. Sortie HDMI (port 2)
8. Sortie HDMI (port 1) (Entrée ARC)
9. Entrée HDMI
Télécommande infrarouge
1. Boutons haut / bas / gauche / droite
2. Setup (Configuration)
3. Marche
4. Arrêt
5. Boutons de sélection de port 1 à 4
6. Menu
7. Bouton info
8. ARC
9. Sourdine HDMI
Installation du matériel
• Vérifiez que tous les périphériques connectés à l’installation sont éteints.
• Vérifiez que tous les périphériques que vous allez installer sont
correctement mis à la terre.
Rückseitige Ansicht
1. Erdungsanschluss
2. Stromeingangsbuchse
3. Port für Infrarot-Empfänger
4. Serieller RS-232-Port
5. Stereo-Audioports
6. Digitale Audioports
7. HDMI-Ausgang (Port 2)
8. HDMI-Ausgang (Port 1) (ARC-Eingang)
9. HDMI-Eingang
Infrarot-Fernbedienung
1. Tasten Auf / Ab / Links / Rechts
2. Einrichten
3. Ein
4. Aus
5. Portauswahltasten 1 bis 4
6. Menü
7. Info-Taste
8. ARC
9. HDMI-Stummschaltung
Hardware installieren
• Stellen Sie sicher, dass alle anzuschließenden Geräte ausgeschaltet sind.
• Stellen Sie sicher, dass alle anzuschließenden Geräte ordnungsgemäß
geerdet sind.
Rack-Montage
Um mehr Flexibilität und Komfort zu bieten, kann der VS482 im Rack
eingebaut werden.
Vista posterior
1. Toma de tierra
2. Entrada de alimentación
3. Puerto para extensión de infrarrojos
4. Puerto serie RS-232
5. Puertos de audio estéreo
6. Puertos de audio digitales
7. Salida HDMI (puerto 2)
8. Salida HDMI (puerto 1) (entrada ARC)
9. Entrada HDMI
Mando a distancia por infrarrojos
1. Botones Arriba / Abajo / Izquierda / Derecha
2. Configurar
3. Encender
4. Apagar
5. Botones de selección del puerto 1 al 4
6. Menú
7. Botón Info
8. ARC
9. Silenciar HDMI
Instalar el hardware
• Apague todos los equipos que vaya a conectar.
• Asegúrese de que todos los equipos que vaya a instalar tengan una toma
de tierra adecuada.
1
2
5
6
7
3
4
9
8
B
OSD Setting
D
Rack Mounting
For convenience and flexibility, the VS482 can be mounted on system racks.
To rack mount a unit do the following:
1. Using the screws provided in the Rack Mount Kit, screw the mounting
2. Screw the bracket into any convenient location on the rack.
Installation C
Installation of the VS482 is simply a matter of plugging in the appropriate
cables.
To install the switch, refer to the installation diagram as you perform the
following steps:
1. Use an HDMI cable to connect the HDMI input port on the video display
2. Use HDMI cables to connect the HDMI output ports on the source
3. Plug the provided power adapter into an appropriate AC power source;
4. Connect your audio devices (such as speakers or AVRs) to the Stereo
5. (Optional) To edit the VS482 system settings through the RS-232 port,
This completes the basic installation of the VS482 4-Port Dual View HDMI
Switch. You may now power on the display and source devices.
Montage sur bâti
Pour un plus grand confort, le commutateur VS482 peut être monté sur bâti.
Pour monter une console sur bâti, procédez comme suit :
1. Vissez le support de montage sur bâti sur le côté de l'appareil à l'aide des
2. Vissez le support au bâti à n’importe quel endroit vous semblant adapté.
Installation C
L’installation du VS482 se résume simplement à connecter les câbles
appropriés.
Pour installer le commutateur, reportez-vous au schéma d'installation pour
effectuer les étapes suivantes :
1. Utilisez un câble HDMI pour relier le port d’entrée HDMI du périphérique
2. Utilisez des câbles HDMI pour relier les ports de sortie HDMI du ou des
3. Branchez une extrémité de l’adaptateur secteur fourni sur une prise de
4. Connectez vos périphériques audio (enceintes ou récepteur audio-vidéo)
5. (Facultatif) Pour modifier les réglages du système VS482 par le biais du
L'installation de base du commutateur du commutateur HDMI double vue
à 4 ports VS482 est alors terminée. Vous pouvez à présent allumer les
périphériques d'affichage et les périphériques sources.
Um ein Gerät im Rack einzubauen, gehen Sie folgendermaßen vor:
1. Verwenden Sie die mitgelieferten Schrauben, um den Montagewinkel auf
2. Verschrauben Sie den Winkel mit einem freien und geeignet gelegenen
Installation C
Die Installation des VS482 ist mit ein paar wenigen Kabelanschlüssen
erledigt.
Für die Durchführung der folgenden Installationsschritte für den Switch,
siehe das Installationsdiagramm:
1. Verbinden Sie die HDMI-Eingangsbuchse am Video-Anzeigegerät mit
2. Verbinden Sie die HDMI-Ausgänge der Signalquelle(n) mit den HDMI-
3. Schließen Sie das mitgelieferte Netzteil an eine stromführende Steckdose
4. Schließen Sie Ihre Audiogeräte (z.B. Lautsprecher oder Verstärker) an
5. (Optional) Um die Systemeinstellungen des VS482 über den RS-232-
Damit ist die Installation des Dual-View-HDMI-Switches mit 4 Ports
VS482 abgeschlossen. Jetzt können Sie die Anzeigegeräte und die
Grafiksignalquellen einschalten.
Montaje en rack
Para un mayor confort y más flexibilidad, el VS482 puede montarse en un
rack.
Para montar un equipo en el rack, haga lo siguiente:
1. Atornille como se indica en el siguiente diagrama la escuadra de montaje
2. Atornille la escuadra en una posición deseada del rack.
Instalación C
La instalación del VS482 es tan sencilla como conectar unos cables.
Para instalar el conmutador, véase el diagrama de instalación cuando vaya
a efectuar los pasos listados a continuación:
1. Conecte el puerto de entrada HDMI del dispositivo de visualización al
2. Conecte los puertos de salida HDMI de los dispositivos fuente a los
3. Conecte un extremo del adaptador de alimentación incluido a una toma
4. Conecte sus dispositivos de audio (p.ej. unos altavoces o un amplificador)
5. (Opcional) Para ajustar la configuración de sistema del VS482 a través
B
bracket into the side of the unit as show in the diagram
Note: These screws are not provided. We recommend that you use M5 x
12 Phillips Type I cross, recessed type screws.
device to the HDMI output port on the rear of the VS482.
device(s) to the HDMI input ports on the VS482.
plug the power adapter cable into the Power Jack on the VS482.
Audio Ports or Digital Audio Ports.
connect the hardware / software controller here.
B
vis fournies, comme indiqué sur le schéma.
Remarque : les vis ne sont pas fournies. Il est conseillé d'utiliser 12 vis
M5 à empreinte cruciforme Phillips de type 1.
d’affichage au port de sortie HDMI situé à l’arrière du commutateur
VS482.
périphériques source aux ports d’entrée HDMI du commutateur VS482.
courant adaptée et l’autre extrémité sur la prise d’alimentation du VS482.
aux ports audio stéréo ou aux ports audio numériques.
port RS-232, connectez ici le contrôleur matériel/logiciel.
die Geräteseite zu schrauben (siehe das Diagramm).
Einschub am Rack.
Hinweis: Die Schrauben sind nicht im Lieferumfang enthalten. Wir
empfehlen die Verwendung von Kreuzschlitzschrauben des
Typs M5 x 12 mit versenktem Kopf.
dem HDMI-Ausgang an der Rückseite des VS482. Verwenden Sie dazu
ein HDMI-Kabel.
Eingängen am VS482. Verwenden Sie dazu je ein HDMI-Kabel.
an, und verbinden Sie das Kabel des Netzteils mit dem VS482.
die Stereo- oder Digitalausgänge an.
Port einstellen zu können, schließen Sie hier den Hardware-/SoftwareController an.
B
en el lateral de la unidad con los tornillos incluidos.
Nota: los tornillos necesarios no vienen incluidos con la unidad. Le
recomendamos que utilice tornillos empotrados de estrella / cruz
M5 x 12 de tipo I.
puerto de salida HDMI en la parte posterior del VS482. Para ello, utilice
un cable HDMI.
puertos de entrada HDMI del VS482. Para ello, utilice cables HDMI.
eléctrica y el otro extremo a la entrada de corriente del VS482.
a las salidas de audio estéreo o a las salidas de audio digitales.
del puerto RS-232, conecte la controladora de hardware/software aquí.
All information, documentation, and specifications contained
in this media are subject to change without prior notification
by the manufacturer. Please visit our website to find the
most up to date version.
Operation
The 4-Port Dual View HDMI Switch offers easy and flexible source device
selection with either the front panel pushbuttons, with the remote control, or
through the RS-232 serial interface.
Manual Selection
To select a source device, press the pushbutton that corresponds to the port
to which it is connected.
Remote Control Selection
To select a source device with the remote control, press the number button
that corresponds to the port to which it is connected.
RS-232 Serial Interface
The VS482’s built-in bi-directional RS-232 serial interface allows system
control through a high-end controller, PC, and/or home automation / home
theater software package.
OSD Setting D
On-Screen Display (OSD) for system configuration settings and information
display
Note: The OSD function is disabled while 3D content is being displayed.
Switch to 2D content or a different input port to enable the OSD.
Fonctionnement
Le commutateur HDMI double port à 4 ports permet de sélectionner
rapidement et simplement le périphérique source désiré à l’aide des
boutons du panneau avant, de la télécommande ou de l’interface série RS-
232.
Sélection manuelle
Pour sélectionner manuellement un périphérique source, appuyez sur le
bouton correspondant au port auquel il est connecté.
Sélection par télécommande
Pour sélectionner un périphérique source à l’aide de la télécommande,
appuyez sur la touche numérique correspondant au port auquel il est
connecté.
Interface série RS-232
L’interface série RS-232 bidirectionnelle intégrée au VS482 permet le
contrôle du système par un contrôleur haut de gamme, un PC et/ou un
logiciel de domotique ou de home cinéma.
Réglage par OSD
L’OSD (affichage à l’écran) sert à pour l’affichage des paramètres de
configuration du système et d’autres informations
Remarque : La fonction OSD est désactivée lorsqu’un contenu 3D est
affiché. Passez en 2D ou basculez sur un autre port d’entrée
pour activer l’OSD.
Bedienung
Der Dual-View-HDMI-Switch mit 4 Ports bietet eine einfache Auswahl der
gewünschten Signalquelle über die vorderseitigen Drucktasten, über die
Fernbedienung oder über die serielle RS-232-Schnittstelle.
Manuelle Auswahl
Um eine Signalquelle auszuwählen, drücken Sie den Drucktaster, der den
Port des angeschlossenen Gerätes darstellt.
Auswahl per Fernbedienung
Um eine Signalquelle über die Fernbedienung auszuwählen, drücken Sie
die Zifferntaste mit der Nummer, die den Port des angeschlossenen Gerätes
darstellt.
Serieller RS-232-Port
Über die bidirektionale RS-232-Schnittstelle des VS482 ist die
Systemsteuerung über einen hochwertigen Controller, PC oder über eine
Hausautomatisierungs- bzw. Heimkinosoftware möglich.
OSD-Einstellung
Bildschirmmenü (OSD) zur Systemkonfiguration und Informationsanzeige
Hinweis: Während 3D-Inhalte wiedergegeben werden, bleibt das
Bildschirmmenü deaktiviert. Um das OSD-Bildschirmmenü
verwenden zu können, müssen Sie zunächst auf 2D oder einen
anderen Eingangsport umschalten.
La instalación básica del conmutador HDMI Dual View de 4 puertos VS482
ha concluido. A continuación podrá encender el monitor y los dispositivos
fuente de señal.
Funcionamiento
El conmutador HDMI Dual View de 4 puertos VS482 permite seleccionar
simple y rápidamente el dispositivo fuente mediante los botones del panel
frontal, el mando a distancia o la interfaz serie RS-232.
Selección manual
Para seleccionar un dispositivo fuente, pulse el botón que corresponde al
puerto donde tiene conectado el dispositivo en cuestión.
Selección a través del mando a distancia
Para seleccionar un dispositivo fuente con el mando a distancia, pulse
la tecla numérica que corresponde al número del puerto donde tiene
conectado el dispositivo en cuestión.
Interfaz serie RS-232
La interfaz serie RS-232 bidireccional incorporada del VS482 permite
controlar el sistema a través de una controladora de altas prestaciones, el
PC y/o un software de control de domótica / cine en casa.
Ajustes OSD
Menú en pantalla (OSD) para configurar el sistema y mostrar información
Nota: El menú en pantalla queda deshabilitado cuando se representan
contenidos en 3D. Para poder acceder al menú en pantalla, cambie
al modo 2D o a otro puerto de entrada diferente.
D
D
D
www.aten.com
www.aten.com
www.aten.com
www.aten.com
Package Contents
p
1 VS482 4-Port Dual View
HDMI Switch
1 IR Remote Control Unit
1 Power Adapter
1 User Instructions
1 Mounting Kit
Hardware Review
A
Front View
Rear View
1 4 5 6 7 8 92 3
1
6 7
2 3 4 5
IR Remote Control
1
2
5
6
7
Online Registration
Rack Mounting
Phillips hex head
M3x8
3
4
9
8
CB
3
Multi-channel Audio
D
Installation
Hardware / Software
Controller
5
4
OSD Setting
HDMI
Source Devices
1
or or
ut Device
HDMI Out
2
International:
http://support.aten.com
North America:
http://www.aten-usa.com/product_
registration
Technical Phone Support
International:
886-2-86926959
North America:
1-888-999-ATEN Ext: 4988
United Kingdom:
44-8-4481-58923
The following contains information that relates to China:
Switch HDMI a 4 porte Dual View VS482 – Guida rapida
Requisiti
Dispositivo sorgente
• Connettore/i d’uscita HDMI tipo A
Nota: In caso di collegamento a un dispositivo sorgente DVI è necessario
un adattatore DVI/HDMI.
Dispositivo di visualizzazione
• Fino a 2 dispositivi di visualizzazione o ricevitori con un connettore in
entrata HDMI tipo A
Cavi
• 4 cavi HDMI
Nota: 1. I cavi non sono inclusi nella confezione. Si consiglia di acquistare
cavi di alta qualità e di lunghezza appropriata, in quanto ciò
infl uisce sulla qualità audio e video. Contattare il proprio
rivenditore per acquistare i cavi più appropriati.
2. Nel caso in cui si intendesse utilizzare la funzione avanzata di
controller seriale del VS482, è necessario acquistare un cavo
RS-232 appropriato.
Hardware A
Vista anteriore
1. LED delle porte
2. LED ARC
3. Interruttore d'alimentazione
4. LED d’alimentazione
5. Ricevitore ad infrarossi
VS482 4
ɝĘɈɇɥȢɫɇȣȹɗɬȤ
システム要件
ソースデバイス
HDMIタイプA出力コネクター
•
注意:DVIソースデバイスに接続する際にはDVI/HDMIアダプターが必要です。
表示出力装置
HDMIタイプA入力コネクターと搭載した最大2台のディスプレイまたはレシー
•
バー
ケーブル
HDMIケーブル4本
•
注意:1.ケーブルは製品パッケージに同梱されていません。オーディオ/ビデ
オ信号の質はケーブルの質や長さに左右されますので、高品質で適切
な長さのケーブルの購入を推奨します。製品に適したケーブルの購入
については、弊社販売店までお問い合わせください。
2.VS482のハイエンドシリアルコントローラー機能を使用する場合は、
製品に適したRS-232が別途必要になります。
製品各部名称A
フロントパネル
1.ポートLED
2.ARCLED
3.電源ボタン
4.電源LED
5.IRレシーバー
6.ポート選択ボタン
VS482 4ዅቼ ࿑ ๊ HDMI ༺၁ᆳ ൏ གྷၵ ၦ
٫ěӶ
ⓗ◯#⫰ㆣ
• KGPL#W|sh#D#⹆ᣏ#⾎ᇏ㇚+v,
⢗ᴇ=#GYL#∶⍎#⡏⼂ᨦ#⚚൚#⎆#GYL2KGPL#♞Ꮋ㇚ಪ#㗮✾㘓፲ᎎ1
ᡟ◯㡗᭓⪿#⫰ㆣ
• KGPL#W|sh#D#⠯ᣏ#⾎ᇏ㇚⛪#⸆Ꭺ#5Ꭺ⠂#ᖾ⍎㖶ᢲ⠞#⡏⼂#ᚺጾ#⋂⎊#
㉋⪿⅟
• 7#KGPL#⾪⠞Ế
⢗ᴇ=#41#ᶢ#ถ⇛㔲♺ጾ#⾪⠞Ế⠞#㒖㘒ᓂ♞#⠲⩪#◴⍟፲ᎎ1#⛎ᖾ⛎#Ჹ#Ữᖾ
⛎#ᖾ⍎㖶ᢲ⠞⠂#㛾⩲♺#⚫㙏⟮#⦮#⋂#⠲⟦ᱪᤆ#◶᪈⟪#⠞⠂#ඊ
㔲⩲#⾪⠞Ế#ถᨦ#ึ⡏㘓፲ᎎ1#㎺⠺⛪#Ⅻ⠂㘞#◶᪈⟪#⾪⠞Ế#
⇢㍢ᨦ#ถ㘂⎗⎆⛎1#
# 51#YV7;5⠂#ඊຳ#⎆ᩖ♦#⣆♞#ፏ⟮#⠞❓㘂ඊ⠺#㘆ᎎᬞ/#UV0565#
⾪⠞Ế#ถᨦ#ึ⡏㘓፲ᎎ1#
ˀڅؗ#Σҕ#A#
⭏ᶿ
41#㒖㍢#OHG
51#DUF#OHG
61#⢮❺#⇊ㆇ#ᴮ㍦
71#⢮❺#OHG
81#LU#⋂⎊
91#㒖㍢#⇊ㆇ#ᴮ㍦
:1#DUF#ᴮ㍦
HDMI
ȹȤɃɁýȯȤɃȯȹȿĘɈȬȤɉ
6. Pulsanti di selezione della porta
7. Pulsante ARC
Vista posteriore
1. Terminale di messa a terra
2. Presa d’alimentazione
3. Porta dell’estensore IR
4. Porta seriale RS-232
5. Porte audio stereo
6. Porte audio digitale
7. Uscita HDMI (porta 2)
8. Uscita HDMI (porta 1) (entrata ARC)
9. Entrata HDMI
Telecomando a infrarossi
1. Pulsanti Su/Giù/Sinistra/Destra
2. Impostazione
3. On
4. Off
5. Pulsanti di selezione della porta 1-4
6. Menu
7. Pulsante Info
8. ARC
9. Mute HDMI
Installazione dell’hardware
• Accertarsi che tutti i dispositivi che si desidera collegare siano spenti.
• Assicurarsi che tutti i dispositivi dell’installazione siano dotati di adeguata
messa a terra.
7.ARCボタン
リアパネル
1.グランドターミナル
2.電源ジャック
3.IRエクステンダーポート
4.RS-232シリアルポート
5.ステレオオーディオポート
6.デジタルオーディオポート
7.HDMI出力(ポート2)
8.HDMI出力(ポート1)(ARC入力)
9.HDMI入力
IRリモコン
1.上/下/左/右ボタン
2.セットアップ
3.On
4.Off
5.ポート選択ボタン1~4
6.メニュー
7.情報ボタン
8.ARC
9.HDMIミュート
ハードウェアのセットアップ
お使いのシステムで接続されているすべてのデバイスの電源がOFFになってい
•
ることを確認してください。
セットアップするデバイスが適切に接地されていることを確認してください。
•
㨏ᶿ
41#⢻⩪#㇚Ტᆺ
51#⢮❺#⡗
61#LU#⚚⡏#㒖㍢
71#UV0565#⎆ᩖ♦#㒖㍢
81#⍎ㇶᢲ⛎#⛎ᖾ⛎#㒖㍢
91#ᖾ⩪㇢#⛎ᖾ⛎#㒖㍢
:1#KGPL#⹆ᣏ#+㒖㍢#5,
;1#KGPL#⹆ᣏ#+㒖㍢#4,#+DUF#⠯ᣏ,
<1#KGPL#⠯ᣏ
LU#᳷㘃#㈳㘃ᮯ
41#➮#2#◮ᡂ#2#⤶#2#❚#ᴮ㍦
51#⇵♯
61#Rq
71#Rii
81#㒖㍢#⇊ㆇ#ᴮ㍦#47
91#ጞ
:1#⠢㒖#ᴮ㍦
;1#DUF
<1#KGPL#⟶∶ച
ˀڅؗ#Ԡ߾
• ⇎⼂㘂#⢮#᳂ᖆ⎆#᭒ᖊ#⡏Ữ⠂#⢮❺⠞#Ⳓ᎒ᓂ♞#⠲ጾ⩪#㛿⠢㘂⎗⎆⛎1
• ᭒ᖊ#⡏Ữ⠂#⢮❺⠞#⢫⢲㠲#⢻⩪ᓂ♞#⠲ጾ⩪#㛿⠢㘂⎗⎆⛎1#ᚺ㘆#YJD#⾎
ᇏ㇚♺#ᅂ⅖ᨦ#ඊ⢿⎆ㅎ#⢮♺#YJD#㒖㍢#ᅂ⅖#⚚൚#⦦ᵪ⠂#⢻⩪ᨦ#◲⢮
㘂ശ#ඊ⢿㘂⎗⎆⛎1#
Montaggio in rack
Per una maggiore comodità e fl essibilità, il VS482 può essere montato in
rack.
Per montare in rack il dispositivo, procedere come segue:
1. Utilizzando le viti fornite con il kit di montaggio in rack, avvitare le staffe a
lato del dispositivo come illustrato in fi gura.
2. Avvitare i supporti per il montaggio sul rack.
Nota: Le viti per il montaggio in rack non vengono fornite. Si consiglia di
Installazione C
L’installazione del VS482 si limita al collegamento dei cavi.
Per installare lo switch, fare riferimento all’illustrazione sull’installazione
mentre si eseguono i seguenti passaggi:
1. Usare un cavo HDMI per collegare la porta in entrata HDMI del
dispositivo video alla porta in uscita HDMI sul retro del VS482.
2. Usare i cavi HDMI per collegare le porte in uscita HDMI del/dei
dispositivo/i sorgente alle porte in entrata HDMI del VS482.
3. Inserire la spina dell’alimentatore in dotazione in una presa di corrente
CA, quindi inserire il cavo dell’alimentatore nella presa d’alimentazione
del VS482.
4. Collegare i dispositivi audio (come altoparlanti o AVR alle porte audio
stereo o a quelle audio digitale.
5. (Opzionale) Per modifi care le impostazioni di sistema del VS482 tramite
porta RS-232, collegare qui il controller hardware/software.
Così facendo, l’installazione base dello switch HDMI VS482 a 4 porte Dual
ラックマウントB
VS482はシステムラックにマウントすることで、便利で柔軟にお使いいただけ
ます。
製品をラックにマウントする場合は、下記の手順に従って操作してください。
1.ラックマウントキットに同梱されているネジを使って、下図のようにマウン
ト用ブラケットを製品側面に取り付けてください。
2.手順1で取り付けたマウント用ブラケットを、システムラックの使いやすい場
所に取り付けてください。
注意:ラックに固定する際に使用するネジは製品に同梱されていません。お
セットアップC
VS482のセットアップに必要となる作業は、ケーブルを適切に接続するだけで
す。
本製品をセットアップする場合は、接続図を参考にしながら、下記の手順に従
って作業を行ってください。
1.ビデオ出力デバイスのHDMI入力ポートとVS482リアパネルにあるHDMI出
力ポートをHDMIケーブルで接続してください。
2.ソースデバイスのHDMI出力ポートとVS482のHDMI入力ポートをHDMIケ
ーブルで接続してください。
3.製品同梱の電源アダプターをAC電源に接続し、このアダプターのコード部
分をVS482の電源ジャックに接続してください。
4.お使いのオーディオデバイス(スピーカーやAVRなど)を、ステレオオーディ
オポートまたはデジタルオーディオポートに接続してください。
5.(オプション)VS482のシステム設定をRS-232ポート経由で編集する場合
は、ここにハードウェア/ソフトウェアコントローラーを接続してください。
#ᴓ⧿㙐#B#
㑢ᩖ㘂ඊ#⟊⚚㘂ശ#YV7;5ᨦ#⎆⍎㈆#ᡃ♺#⡏ⳓ㘊#⋂#⠲⍟፲ᎎ1
ᡃ#ᩲ❞㎯⟮#㘂ᣎᬞ#◮ᡂ⠂#ᅞ❓⟮#Ⳣඊ㘂⎗⎆⛎=
41#㘒ྂ#⣆ඟᓂጾ#ᡃ#ᩲ❞㍢#ㅎ㍢♺#ᅂ⅖ᨦ#⠞❓㘞#◮ᡂ⠂#ถ⇛ᑮⵂᢦ#⡏⼂#
⻋ᬞ♺#ᩲ❞㎯#Ặᡂㅡ⟮#ඊ⢿㘓፲ᎎ1#
51#ᡃ⠂#⢫Ꭳ㘆#➮⼂♺#Ặᡂㅡ⟮#ᅂ⅖ᤆ#ඊ⢿㘓፲ᎎ1#
⢗ᴇ=#ᅂ⅖ጾ#⣆ඟᓂ⩪#◴⍟፲ᎎ1#P8#{#45#Skloolsv#W|sh#L#furvv/#
⑯ㆣ#C#
YV7;5#⇎⼂ጾ#ಮ᎒㘂ശ#⾪⠞Ế⟮#◶᪈⟪#➮⼂♺#⚚൚㘂ጾ#ഭ⠯፲ᎎ1#
⇎⼂#ถ⇛ᑮ⛪#◮ᡂ⠂#᎒൮♺#ᗚᠦ#⍎➮⼂ᨦ#⇎⼂㘂⎗⎆⛎=
41#KGPL#⾪⠞Ế⟮#⅖❓㘞#YV7;5#ᕡᬞ⠂#KGPL#⹆ᣏ#㒖㍢♺#Ữᖾ⛎#ᖾ⍎㖶
ᢲ⠞#⡏⼂⠂#KGPL#⠯ᣏ#㒖㍢ᨦ#⚚൚㘓፲ᎎ1
51#KGPL#⾪⠞Ế⟮#⅖❓㘞#YV7;5#KGPL#⠯ᣏ#㒖㍢♺#∶⍎#⡏⼂⠂#KGPL#⹆
ᣏ#㒖㍢ᨦ#⚚൚㘓፲ᎎ1
61#◶᪈⟪#DF#⢮❺#∶⍎♺#⣆ඟᓆ#⢮❺#♞Ꮋ㇚ᨦ#⚚൚㘓፲ᎎ1>#YV7;5#⢮❺#
⡗♺#⢮❺#♞Ꮋ㇚ᨦ#⚚൚㘓፲ᎎ1#
71#⍎ㇶᢲ⛎#⛎ᖾ⛎#㒖㍢#ᚺጾ#ᖾ⩪㇢#⛎ᖾ⛎#㒖㍢♺#⅖❓⠺⠂#⛎ᖾ⛎#⡏⼂
+⍎㗦⾎#ᚺጾ#DYUᖛ,
81#+⇊ㆇ#⅖㘗,#UV0565#㒖㍢ᨦ#㉟㘞#YV7;5#⎆⍎㈆#⇎⢿⟮#ᵪ൧㘂ᣎᬞ#㘂
ᖆ➒♞#2#∶㖮㍢➒♞#⾒㍢ᤎᢖᨦ#⠞#ඝ♺#⚚൚㘓፲ᎎ1#
YV7;5#7㒖㍢#ᕪ♦#ẚ#KGPL#⍎➮⼂⠂#ᶢ#⇎⼂ಪ#⛮ᓂ♲⍟፲ᎎ1#⠞⣆#
ᖾ⍎㖶ᢲ⠞#Ჹ#∶⍎#⡏⼂⠂#⢮❺⟮#⿆⎗⎆⛎1
B
utilizzare M5 x 12 viti a croce.
使いのラックに適したネジを別途ご用意ください。
uhfhvvhg#w|sh#ᅂ⅖#ถᨦ#ึ⡏㘓፲ᎎ1#
View è completata. A questo punto è possibile accendere lo schermo e i
dispositivi sorgente.
Funzionamento
Lo switch HDMI a 4 porte Dual View VS482 consente una facile e fl essibile
selezione del dispositivo sorgente tramite i pulsanti anteriori, il telecomando
o l’interfaccia seriale RS-232.
Selezione manuale
Per selezionare un dispositivo sorgente, premere il pulsante corrispondente
alla porta a cui è collegato il dispositivo.
Selezione da telecomando
Per selezionare un dispositivo sorgente tramite telecomando, premere il
pulsante numerato corrispondente alla porta a cui è collegato il dispositivo.
Interfaccia seriale RS-232
L'interfaccia RS-232 bidirezionale incorporata nel VS482 consente di
controllare il sistema tramite un sofi sticato controller, PC, e/o pacchetto
software per la domotica/home theater.
Impostazione OSD
OSD (On-Screen Display, visualizzazione a schermo) per le impostazioni di
confi gurazione del sistema e visualizzazione di informazioni.
Nota: La funzione OSD è disabilitata durante la visualizzazione di contenuti
3D. Passare ai contenuti 2D o a una diversa porta di entrata per
abilitare l’OSD.
www.aten.com
以上で4ポートデュアルディスプレイHDMIスイッチVS482の基本セットアップ
は完了ですので、ディスプレイやソースデバイスに電源を入れることができま
す。
操作方法
本製品は、フロントパネルのプッシュボタン操作やリモコン操作、またRS-232
シリアルインターフェースを介して、簡単かつ柔軟にソースデバイスを選択す
ることができます。
マニュアル選択
ソースデバイスを選択する場合は、このソースデバイスが接続されたポートに
対応したプッシュボタンを押してください。
リモコンによる選択
リモコンでソースデバイスを選択する場合は、このデバイスが接続しているポ
ートに対応した番号のボタンを押してください。
RS-232シリアルインターフェース
VS482内蔵の双方向RS-232シリアルインターフェースを使うことで、ハイエ
ンドコントローラー、PCやホームオートメーション/ホームシアターソフトウ
ェアパッケージを介してシステムを制御することができます。
D
OSD設定
システム設定や情報表示にはオンスクリーンディスプレイ(OSD)がご利用いた
だけます。
注意:3Dコンテンツの表示中はOSD機能が無効になります。OSDを有効にす
る場合は、2Dコンテンツか、別の入力ポートに切り替えてください。
ʚۀ
7㒖㍢#ᕪ♦#ẚ#KGPL#⍎➮⼂ጾ#⣆㔲#☈ᬞ⠂#⇊ㆇ#ᴮ㍦ඦ#ᩖ᭒㍢#⣆♞/#UV0
565#⎆ᩖ♦#⠢㇚㑂⠞⍎ᨦ#㉟㘆#㑢ᩖ㘂ඊ#⟊⚚㘂ശ#∶⍎⡏⼂ᨦ#⇊ㆇ㘊#⋂#
⠲⍟፲ᎎ1
╣ᜤ#⑫㐨
∶⍎#⡏⼂ᨦ#⇊ㆇ㘂ᣎᬞ#⚚൚ᓂ♞#⠲ጾ#㘞Ꭳ#㒖㍢⠂#⇊ㆇ#ᴮ㍦⟮#ኮ᨞⎗⎆
⛎1
᳷㘃#㈳㘃ᮯ#⑫㐨
ᩖ᭒㍢#⾒㍢ᤎ⟮#㉟㘞#∶⍎#⡏⼂ᨦ#⇊ㆇ㘂ᣎᬞ#⚚൚ᓂ♞#⠲ጾ#㒖㍢⠂#㘞Ꭳ#
⋕⠺#ᴮ㍦⟮#ኮ᨞⎗⎆⛎1#
UV0565#☧᳷⤇#⫃㑻㛣⪿◯
YV7;5⠂#ᅞ⡏ᓆ#☻᳓㙏#UV0565#⎆ᩖ♦#⠢㇚㑂⠞⍎ጾ#㘂⠞#♾ᖆ#⾒㍢ᤎᢖ
ᨦ#㉟㘞#⎆⍎㈆⟮#⣆♞㘊#⋂#⠲⟦ᬚ/#SF#ᚺጾ#㛲#⛎㉊⠞∂/#㛲#⎆♞㇚#∶
㖮㍢➒♞#㏒ㅎ⩪⛪#㛢㜂㘓፲ᎎ1
RVG#Ԡۧ#
⛒#⍎ㄖᩚ#ᖾ⍎㖶ᢲ⠞#+Rq0Vfuhhq#Glvsod|>#RVG,♺⇆ጾ#⎆⍎㈆#⇎⢿#Ჹ#
⢿ᶞᨦ#㔆⎆㘓፲ᎎ1#
⢗ᴇ=#RVG#ፏ⟪#6G#⾒ㇺ⻊ಪ#ᖾ⍎㖶ᢲ⠞#ᓂጾ#ᒃ◲♺ጾ#⠻ᒃ㘂⩪#◴⍟
፲ᎎ1#5G#⾒ㇺ⻊#ᚺጾ#RVGಪ#ಪፏ㘆#ᎎᨢ#⠯ᣏ#㒖㍢ᤆ#ᵪ൧㘂⎗⎆
⛎1#
D
ȵɝĘɈǗඔڝǨٕă)6/+1+34/3+36//
www.aten.com
D
www.aten.com
Phone: 02-467-6789
 Loading...