

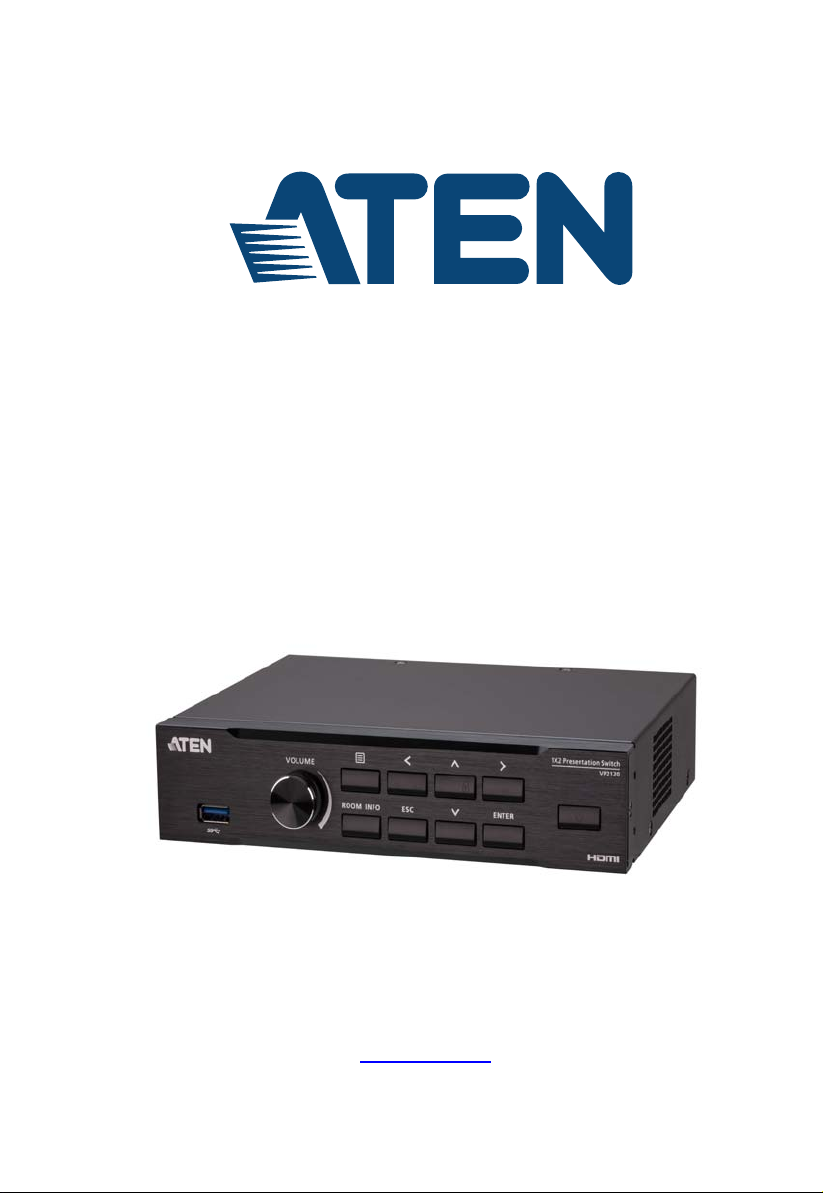
Seamles s Presentation Switch w i th Quad View
Multistreaming
VP2120 User Manual
www.aten.com

VP2120 User Manual
EMC Information
FEDERAL COMMUNICATIONS COMMISSION INTERFERENCE
STATEMENT: This equipment has been tested and found to comply with the
limits for a Class A digital device, pursuant to Part 15 of the FCC Rules. These
limits are designed to provide reasonable protection against harmful
interference when the equipment is operated in a commercial environment. This
equipment generates, uses, and can radiate radio frequency energy and, if not
installed and used in accordance with the instruction manual, may cause
harmful interference to radio communications. Operation of this equipment in a
residential area is likely to cause harmful interference in which case the user will
be required to correct the interference at his own expense.
FCC Caution: Any changes or modifications not expressly approved by the
party responsible for compliance could void the user's authority to operate this
equipment.
Warning: Operation of this equipment in a residential environment could cause
radio interference.
This device complies with Part 15 of the FCC Rules. Operation is subject to the
following two conditions:
(1) this device may not cause harmful interference, and
(2) this device must accept any interference received, including interference
that may cause undesired operation.
RoHS
This product is RoHS compliant.
ii
VP2120 User Manual
User Information
Online Registration
Be sure to register your product at our online support center:
International http://eservice.aten.com
Telephone Support
For telephone support, call this number:
International 886-2-8692-6959
China 86-400-810-0-810
Japan 81-3-5615-5811
Korea 82-2-467-6789
North America 1-888-999-ATEN ext 4988
1- 949- 428-1111
User Notice
All information, documentation, and specifications contained in this manual are
subject to change without prior notification by the manufacturer. The
manufacturer makes no representations or warranties, either expressed or
implied, with respect to the contents hereof and specifically disclaims any
warranties as to merchantability or fitness for any particular purpose. Any of the
manufacturer's software described in this manual is sold or licensed as is.
Should the programs prove defective following their purchase, the buyer (and
not the manufacturer, its distributor, or its dealer), assumes the entire cost of all
necessary servicing, repair and any incidental or consequential damages
resulting from any defect in the software.
The manufacturer of this system is not responsible for any radio and/or TV
interference caused by unauthorized modifications to this device. It is the
responsibility of the user to correct such interference.
The manufacturer is not responsible for any damage incurred in the operation
of this system if the correct operational voltage setting was not selected prior to
operation. PLEASE VERIFY THAT THE VOLTAGE SETTING IS CORRECT
BEFORE USE.
iii

VP2120 User Manual
Package Contents
1 VP2120 Seamless Presentation Switch with Quad View Multistreaming
1 IR Receiver
1 IR Remote Control
1 Power Adapter
1 User Instructions
Note: Make sure that all of the items are present and in good order. If anything
is missing or was damaged in shipping, please contact your dealer for
further assistance.
iv

VP2120 User Manual
Table of Contents
EMC Information. . . . . . . . . . . . . . . . . . . . . . . . . . . . . . . . . . . . . . . . . . . . . ii
RoHS . . . . . . . . . . . . . . . . . . . . . . . . . . . . . . . . . . . . . . . . . . . . . . . . . . . . . ii
User Information . . . . . . . . . . . . . . . . . . . . . . . . . . . . . . . . . . . . . . . . . . . .iii
Online Registration . . . . . . . . . . . . . . . . . . . . . . . . . . . . . . . . . . . . . . . .iii
Telephone Support . . . . . . . . . . . . . . . . . . . . . . . . . . . . . . . . . . . . . . . .iii
User Notice . . . . . . . . . . . . . . . . . . . . . . . . . . . . . . . . . . . . . . . . . . . . .iii
Package Contents . . . . . . . . . . . . . . . . . . . . . . . . . . . . . . . . . . . . . . . . . . .iv
About this Manual . . . . . . . . . . . . . . . . . . . . . . . . . . . . . . . . . . . . . . . . . .viii
Conventions . . . . . . . . . . . . . . . . . . . . . . . . . . . . . . . . . . . . . . . . . . . . . . . .ix
Product Information . . . . . . . . . . . . . . . . . . . . . . . . . . . . . . . . . . . . . . . . . .ix
1. Introduction
Overview. . . . . . . . . . . . . . . . . . . . . . . . . . . . . . . . . . . . . . . . . . . . . . . . . . . 1
Features . . . . . . . . . . . . . . . . . . . . . . . . . . . . . . . . . . . . . . . . . . . . . . . . . . . 2
Planning the Installation . . . . . . . . . . . . . . . . . . . . . . . . . . . . . . . . . . . . . . . 4
Required Equipment . . . . . . . . . . . . . . . . . . . . . . . . . . . . . . . . . . . . . . . 4
Optional Equipment and Accessories . . . . . . . . . . . . . . . . . . . . . . . . . . 4
Equipment . . . . . . . . . . . . . . . . . . . . . . . . . . . . . . . . . . . . . . . . . . . . 4
Accessories . . . . . . . . . . . . . . . . . . . . . . . . . . . . . . . . . . . . . . . . . . . 4
2. Hardware Setup
Components . . . . . . . . . . . . . . . . . . . . . . . . . . . . . . . . . . . . . . . . . . . . . . . . 5
VP2120 Front View . . . . . . . . . . . . . . . . . . . . . . . . . . . . . . . . . . . . . . . . 5
VP2120 Rear View . . . . . . . . . . . . . . . . . . . . . . . . . . . . . . . . . . . . . . . . 6
IR Remote Control . . . . . . . . . . . . . . . . . . . . . . . . . . . . . . . . . . . . . . . . 7
LED Display . . . . . . . . . . . . . . . . . . . . . . . . . . . . . . . . . . . . . . . . . . . . . 8
Mounting . . . . . . . . . . . . . . . . . . . . . . . . . . . . . . . . . . . . . . . . . . . . . . . . . . 9
Rack Mount. . . . . . . . . . . . . . . . . . . . . . . . . . . . . . . . . . . . . . . . . . . . . . 9
Under Desk Mount . . . . . . . . . . . . . . . . . . . . . . . . . . . . . . . . . . . . . . . 10
Installation . . . . . . . . . . . . . . . . . . . . . . . . . . . . . . . . . . . . . . . . . . . . . . . . 11
3. Local Operation
Overview. . . . . . . . . . . . . . . . . . . . . . . . . . . . . . . . . . . . . . . . . . . . . . . . . . 13
Operation Considerations . . . . . . . . . . . . . . . . . . . . . . . . . . . . . . . . . . 13
Displaying the Room Info . . . . . . . . . . . . . . . . . . . . . . . . . . . . . . . . . . . . . 14
The OSD . . . . . . . . . . . . . . . . . . . . . . . . . . . . . . . . . . . . . . . . . . . . . . . . . 15
Switching the Sources . . . . . . . . . . . . . . . . . . . . . . . . . . . . . . . . . . . . . . . 17
Display Settings and Behavior . . . . . . . . . . . . . . . . . . . . . . . . . . . . . . . . . 19
Display Mode . . . . . . . . . . . . . . . . . . . . . . . . . . . . . . . . . . . . . . . . . . . 19
Multiview Display for Streamed-in Sources. . . . . . . . . . . . . . . . . . . . . 20
Streaming Out a Display . . . . . . . . . . . . . . . . . . . . . . . . . . . . . . . . . . . . . 22
Overview . . . . . . . . . . . . . . . . . . . . . . . . . . . . . . . . . . . . . . . . . . . . . . 22
Using the IR Remote Control . . . . . . . . . . . . . . . . . . . . . . . . . . . . 22
v

VP2120 User Manual
Using the OSD . . . . . . . . . . . . . . . . . . . . . . . . . . . . . . . . . . . . . . .23
Getting Screen Captures . . . . . . . . . . . . . . . . . . . . . . . . . . . . . . . . . . . . . 24
Whiteboard . . . . . . . . . . . . . . . . . . . . . . . . . . . . . . . . . . . . . . . . . . . . . . . .25
Using the IR Remote Control . . . . . . . . . . . . . . . . . . . . . . . . . . . . . . .25
Using the OSD . . . . . . . . . . . . . . . . . . . . . . . . . . . . . . . . . . . . . . . . . . 26
Viewing Event Logs . . . . . . . . . . . . . . . . . . . . . . . . . . . . . . . . . . . . . . . . . 27
Locking the Front Panel . . . . . . . . . . . . . . . . . . . . . . . . . . . . . . . . . . . . . .28
System Settings . . . . . . . . . . . . . . . . . . . . . . . . . . . . . . . . . . . . . . . . . . . . 28
4. Remote Operation
Overview . . . . . . . . . . . . . . . . . . . . . . . . . . . . . . . . . . . . . . . . . . . . . . . . . . 33
The VP2120’s IP Address . . . . . . . . . . . . . . . . . . . . . . . . . . . . . . . . . .33
Account Types and Privileges . . . . . . . . . . . . . . . . . . . . . . . . . . . . . . .34
Supported Web Browsers . . . . . . . . . . . . . . . . . . . . . . . . . . . . . . . . . . 34
The Administrator Account . . . . . . . . . . . . . . . . . . . . . . . . . . . . . . . . . . . .35
Logging in as Administrator. . . . . . . . . . . . . . . . . . . . . . . . . . . . . . . . . 35
The Administrator Screen . . . . . . . . . . . . . . . . . . . . . . . . . . . . . . . . . .37
Configuration View . . . . . . . . . . . . . . . . . . . . . . . . . . . . . . . . . . . . . . .37
Presentation View . . . . . . . . . . . . . . . . . . . . . . . . . . . . . . . . . . . . . . . . 38
Sharing a Screen or an Application Window . . . . . . . . . . . . . . . . . . . 40
Whiteboard . . . . . . . . . . . . . . . . . . . . . . . . . . . . . . . . . . . . . . . . . . . . .42
How to Insert Text . . . . . . . . . . . . . . . . . . . . . . . . . . . . . . . . . . . . .43
Control Panel. . . . . . . . . . . . . . . . . . . . . . . . . . . . . . . . . . . . . . . . . . . .44
Video . . . . . . . . . . . . . . . . . . . . . . . . . . . . . . . . . . . . . . . . . . . . . . .45
Audio . . . . . . . . . . . . . . . . . . . . . . . . . . . . . . . . . . . . . . . . . . . . . . .47
Settings . . . . . . . . . . . . . . . . . . . . . . . . . . . . . . . . . . . . . . . . . . . . .48
System Configuration . . . . . . . . . . . . . . . . . . . . . . . . . . . . . . . . . . 50
General Settings . . . . . . . . . . . . . . . . . . . . . . . . . . . . . . . . . . . . . .50
Audio Settings . . . . . . . . . . . . . . . . . . . . . . . . . . . . . . . . . . . . . . . .53
Display Settings. . . . . . . . . . . . . . . . . . . . . . . . . . . . . . . . . . . . . . .54
Maintenance . . . . . . . . . . . . . . . . . . . . . . . . . . . . . . . . . . . . . . . . .56
Network Settings . . . . . . . . . . . . . . . . . . . . . . . . . . . . . . . . . . . . . .58
The Participant Account . . . . . . . . . . . . . . . . . . . . . . . . . . . . . . . . . . . . . . 59
Joining a Meeting as Participant via Web Interface . . . . . . . . . . . . . . 59
The Participant Screen . . . . . . . . . . . . . . . . . . . . . . . . . . . . . . . . .60
Joining a Meeting as Participant via App . . . . . . . . . . . . . . . . . . . . . .62
iOS. . . . . . . . . . . . . . . . . . . . . . . . . . . . . . . . . . . . . . . . . . . . . . . . . 63
Android . . . . . . . . . . . . . . . . . . . . . . . . . . . . . . . . . . . . . . . . . . . . .66
Appendix
Safety Instructions. . . . . . . . . . . . . . . . . . . . . . . . . . . . . . . . . . . . . . . . . . .69
General . . . . . . . . . . . . . . . . . . . . . . . . . . . . . . . . . . . . . . . . . . . . . . . .69
Rack Mounting . . . . . . . . . . . . . . . . . . . . . . . . . . . . . . . . . . . . . . . . . .71
Technical Support . . . . . . . . . . . . . . . . . . . . . . . . . . . . . . . . . . . . . . . . . .72
International . . . . . . . . . . . . . . . . . . . . . . . . . . . . . . . . . . . . . . . . . . . .72
North America . . . . . . . . . . . . . . . . . . . . . . . . . . . . . . . . . . . . . . . . . . 72
vi

VP2120 User Manual
Specifications . . . . . . . . . . . . . . . . . . . . . . . . . . . . . . . . . . . . . . . . . . . . . . 73
Limited Warranty . . . . . . . . . . . . . . . . . . . . . . . . . . . . . . . . . . . . . . . . . . . 75
vii

VP2120 User Manual
About this Manual
This user manual is provided to help you get the most from the VP2120 unit. It
covers all aspects of installation, configuration, and operation. An overview of
the information found in the manual is provided below.
Chapter 1, Introduction introduces you to the VP2120. Its purpose, features,
benefits, and installation considerations are described.
Chapter 2, Hardware Setup introduces the hardware components of the
VP2120 and provides information on how to quickly and safely set up the unit.
Chapter 3, Local Operation provides information on operation of the VP2120
using the panel pushbuttons and IR remote control.
Chapter 4, Remote Operation provides details on remote tasks such as joining
online meetings and system configuration via the web interface and the ATEN
Video Presentation Control App.
An Appendix provides a list of safety instructions and precautions, contact
information for ATEN technical support, product specifications, and other
technical information.
Note:
Read this manual thoroughly and follow the installation and operation
procedures carefully to prevent any damage to the unit or any connected
devices.
ATEN regularly updates its product documentation for new features and
fixes. For an up-to-date VP2120 documentation, visit
http://www.aten.com/global/en/
viii
Conventions
This manual uses the following conventions:
Monospaced Indicates text that you should key in.
[ ] Indicates keys you should press. For example, [Enter] means to
press the Enter key. If keys need to be chorded, they appear
together in the same bracket with a plus sign between them:
[Ctrl+Alt].
1. Numbered lists represent procedures with sequential steps.
♦ Bullet lists provide information, but do not involve sequential steps.
→ Indicates selecting the option (on a menu or dialog box, for
example), that comes next. For example, Start
open the Start menu, and then select Run.
Indicates critical information.
Product Information
VP2120 User Manual
→
Run means to
For information about all ATEN products and how they can help you connect
without limits, visit ATEN on the Web or contact an ATEN Authorized Reseller.
Visit ATEN on the Web for a list of locations and telephone numbers:
International http://www.aten.com
North America http://www.aten-usa.com
ix

VP2120 User Manual
This Page Intentionally Left Blank
x

Chapter 1
Introduction
Overview
The VP2120 is a Seamless Presentation Switch that integrates video matrix
switch, quad-view multistreaming, audio DSP, and idea-sharing platform into
one compact device. With the seamless switching between streamed-in
sources, the online idea exchanging features, and the network capability that
enables the wireless connection for mobile devices, the VP2120 and ATEN
Video Presentation Control App empower wireless BYOD collaboration anytime
when a short catch-up, quick meeting, instant brainstorm, stand-up, or ad hoc
call is needed.
Designed for flexible and spontaneous team collaboration, the VP2120 along
with ATEN Video Presentation Control App facilitates BYOD meetings with the
straightforward user interface that give users quick and easy access to any onthe-fly meetings. Joining an online meeting is easy and secure. Participants can
just bring their own devices and use the private QR code or room code, or auto
scan the local network to get available room list to log in, even when they’re not
physically in the same area. The VP2120 allows bi-directional content
streaming of up to 4 participants simultaneously. With the built-in multi-view
mode, the streamed sources can be displayed on the same screen, which the
layout dynamically adjusts to suit the number of sources available. Participants
can also focus a streaming input to display full screen or view the go-live screen
together for synchronization. Moreover, the built-in audio DSP allows remote
participants to broadcast to meeting members using their own devices, with the
sound mixed with the program audio.
The VP2120 along with ATEN Video Presentation Control App also features
more advanced online idea-sharing functions: Whiteboard allows real-time
annotation for idea exchange and synchronization; Chat Room feature
enhances interaction between participants; File Sharing enables further data
sharing and follow-up
future tracking. This Collaborative presentation solution facilitates any forms of
small-group discussion that gives an immediate boost to team work.
and meeting process can be screen captured for
1

Chapter 1. Introduction
Features
Brilliant AV Routing
One HDMI input and dual HDMI outputs plus 4 bi-directional streaming with
matrix display support
Seamless Switching between streamed-in sources for fast idea exchange
Audio DSP - Mix Mic input, HDMI input, and the last streaming input for
HDMI or audio output
HDMI audio de-embedding support
Launch a Quick Meeting Anytime
Launches wireless BYOD collaboration via Web GUI and Mobile App in a
swift and agile way
Offers quick and easy access to log in a quick meeting via multiple
methods:
Start auto scan and select a room number from the list
Scan the QR code shown on the VP2120 OSD
Load a pre-saved QR code
Input the IP address and Room code shown on the OSD
Seamless BYOD Collaboration
Multiple control method via front-panel pushbuttons, web GUI, OSD, IR
remote, and mobile App
Streaming in – view up to 4 streamed-in contents simultaneously for realtime synchronization
Streaming out – allows log-in participants to view the Go-live contents on
personal devices
Multi-view with Auto layout – dynamically adjusts the layout to suit the
number of streamed-in sources available
Whiteboard allows real-time annotation for idea exchange and
synchronization
Chat room feature enhances text interaction and information sharing
Screen capture records the meeting process for future tracking
File sharing enables further data sharing and follow-up
2

VP2120 User Manual
High-definition Video with Optimum Output
Superior video quality up to 1920 x 1080 with single streaming input and
854 x 480 with four streaming inputs
EDID Expert™ – automatically selects the optimum EDID settings for
smooth power-up, high-quality display, and the best video resolution across
connected devices
HDMI (1080p); CEC (Consumer Electronics Control); HDCP 1.4 compliant
3

Chapter 1. Introduction
Planning the Installation
Required Equipment
Prepare the following equipment before installing the VP2120 unit.
Source devices
1 source device equipped with an HDMI port
Note: The VP2120 supports Mac or PCs that are Windows, Linux, or Unix-
based.
1 HDMI cable for connecting the source devices to the VP2120
Display devices
1 or 2 display devices equipped with an HDMI connector (e.g. a monitor
or a projector)
1 or 2 cables for connecting the display devices to the VP2120
For information on the number of equipped ports for each connection interface,
see Specifications, page 75.
Optional Equipment and Accessories
Equipment
Prepare the following equipment as required.
1 Microphone
1 Speaker
1 RJ-45 cable to connect the VP2120 to a network switch to allow for
streaming over IP and access to the VP2120’s web interface
1 to 4 wireless device to connect with the VP2120 for presentation viewing
and sharing.
Accessories
Optionally purchase the following for your VP2120.
Rack Mount Kit
Under Desk Mount Kit
For more information about mounting, see Mounting, page 9.
4
Components
1. Please review the safety information regarding the placement of
this device in Safety Instructions, page 71.
2. Do not power on the VP2120 until all the necessary hardware is
connected.
6
1 2
5
3 4
4
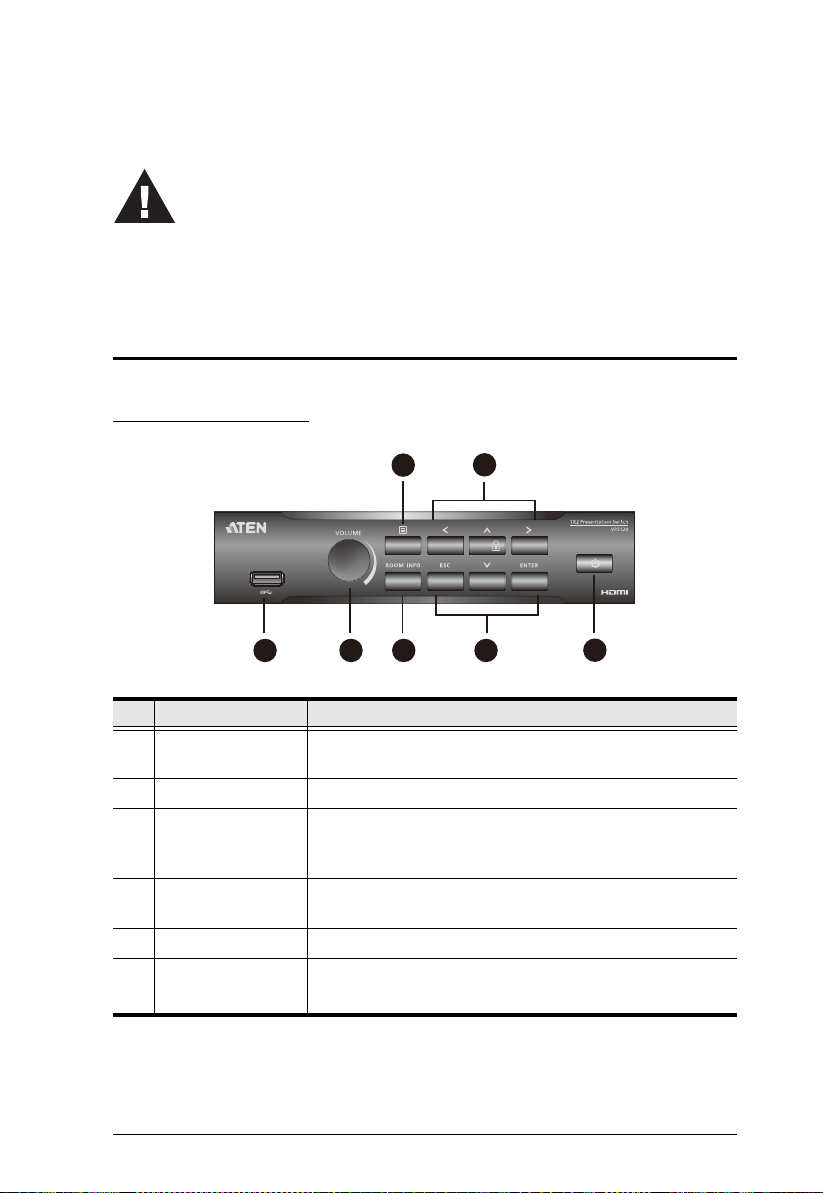
VP2120 Front View
Chapter 2
Hardware Setup
No. Component Description
1 USB Type-A Port
(3.0)
2 Volume Control Turn to adjust the volume or press the knob to mute.
3 Room Info
Pushbutton
4 Navigation
Pushbuttons
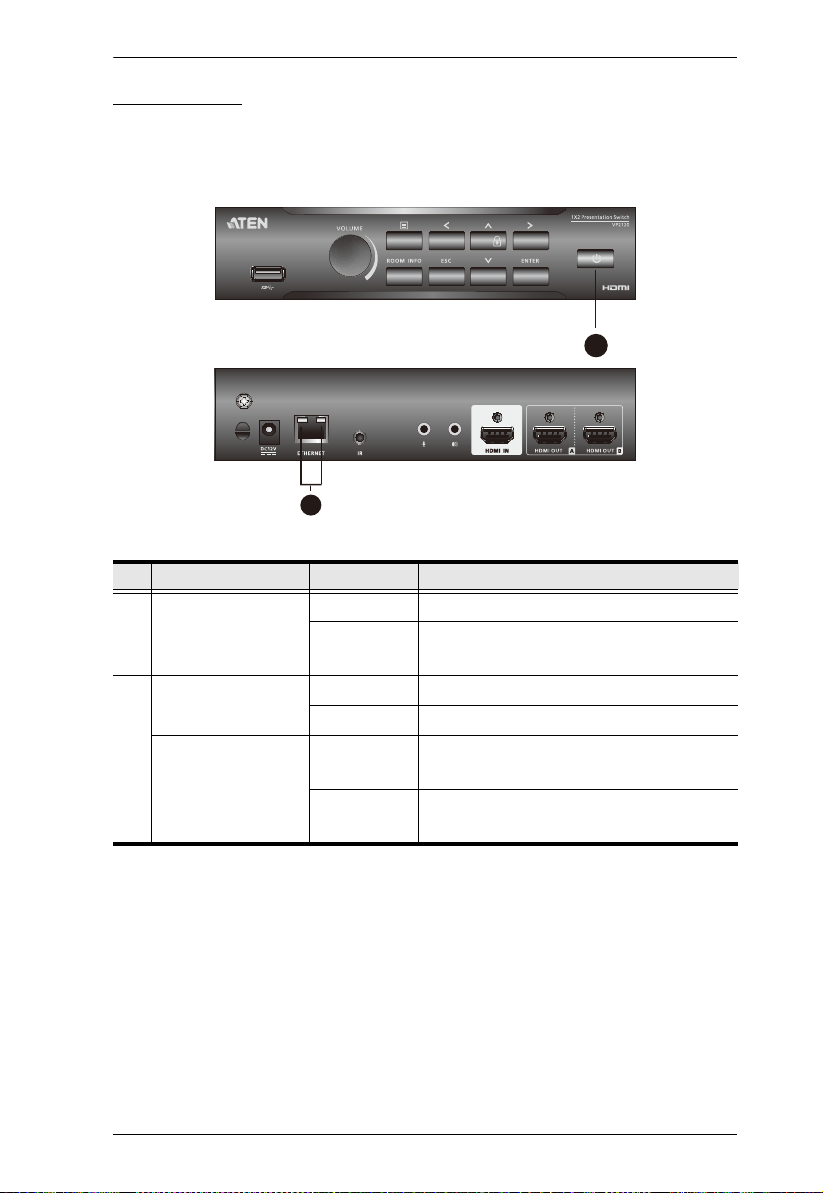
5 Power Pushbutton Press to turn on the VP2120 unit.
6 Menu Pushbutton Press to display the OSD on display A.
Receives a USB 3.0 device such as an external storage.
Press to display the room information such as room name,
IP address of the web interface, room code, and QR code
to access the meeting.
Press to navigate and configure the system settings via the
OSD.
Note: OSD can only be displayed on display A.
5
Chapter 2. Hardware Setup
9
1 2 3 4 5 6 7 8
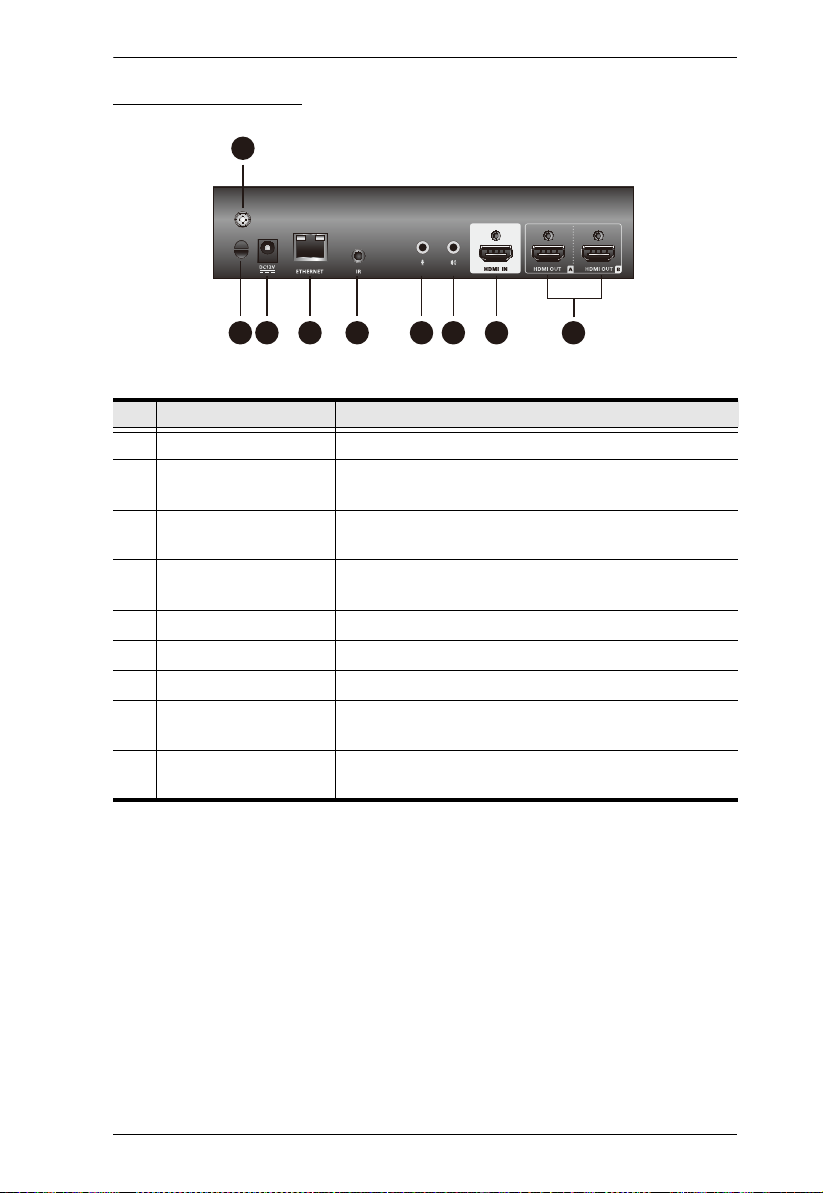
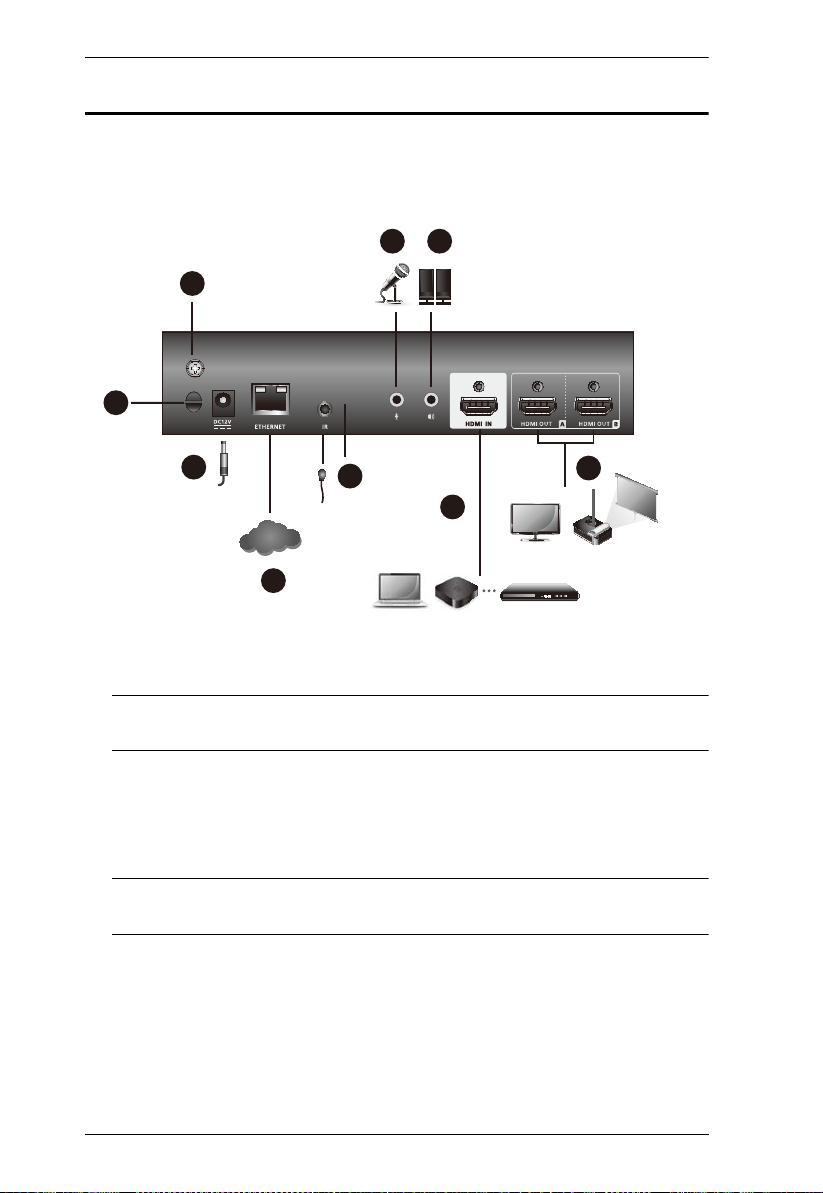
VP2120 Rear View
No. Component Description
1 Cable Tie Slot Receives a cable tie to hold the power cable in place.
2 Power Jack Receives a power adapter to supply power to the
VP2120.
3 Ethernet Port Connects to a network switch via an RJ-45 cable to
4 IR Receiver Port Connects to an IR receiver to receive IR signals from
5 Mic In Connects to a microphone.
6 Stereo Audio Out Connects to a speaker.
7 HDMI In Port Connects to an HDMI source device via HDMI cable.
8 HDMI Out Ports Connect to display devices equipped with an HDMI
9 Grounding Terminal Grounds the VP2120 to prevent damages from power
allow streaming of audio and video data over IP.
the IR remote control.
port.
surge or static electricity.
6
VP2120 User Manual
4
3
2
1
5
6
8
7
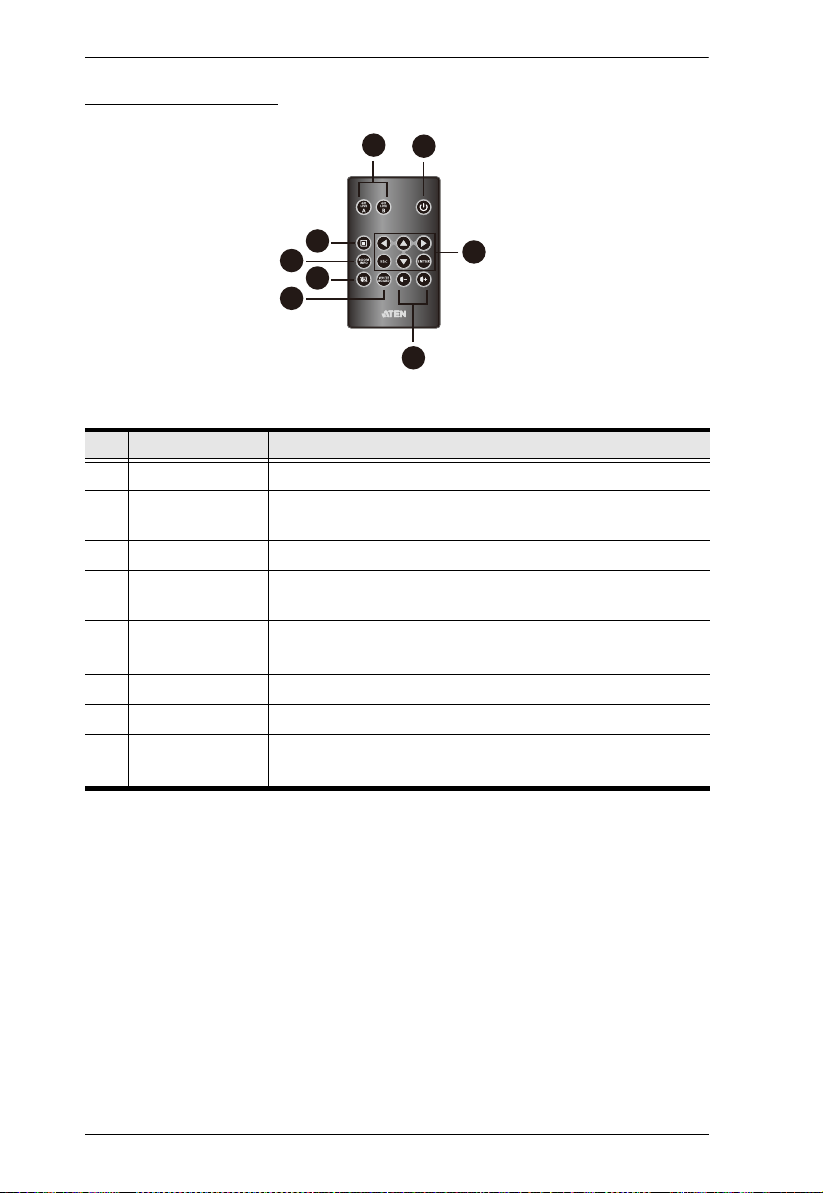
IR Remote Control
No. Buttons Description
1 On/Off Turns the VP2120 on or off.
2 Navigation Navigates in the OSD, selects or unselects options, or leaves
3 Volume Control Adjusts the volume up and down.
4 Go Live Select to stream out display between display A or display B
5 Menu Displays the OSD on display A.
6 Room Info Displays room information.
7 Mute Mutes all displays and speakers.
8 Whiteboard Displays the whiteboard on display A.
a current screen in the OSD.
via the Ethernet.
Note: The OSD can only be displayed on display A.
Note: Whiteboard can only be displayed on display A.
7
Chapter 2. Hardware Setup
1
2
LED Display
You can find the unit’s LEDs as illustrated below. See the table below for details
on LED indication.
No. LED Indication Description
1 Power Lights green The unit is powered and switched ON.
Lights orange The unit is connected to power, but is
currently OFF.
2ACT
(Left LED)
Link
(Right LED)
Lights orange Data is being transmitted at 100 Mpbs.
Lights green Data is being transmitted at 1 Gpbs.
Lights green LAN is connected and no data is being
transmitted.
Blinks green LAN is connected and data is being
transmitted.
8
VP2120 User Manual
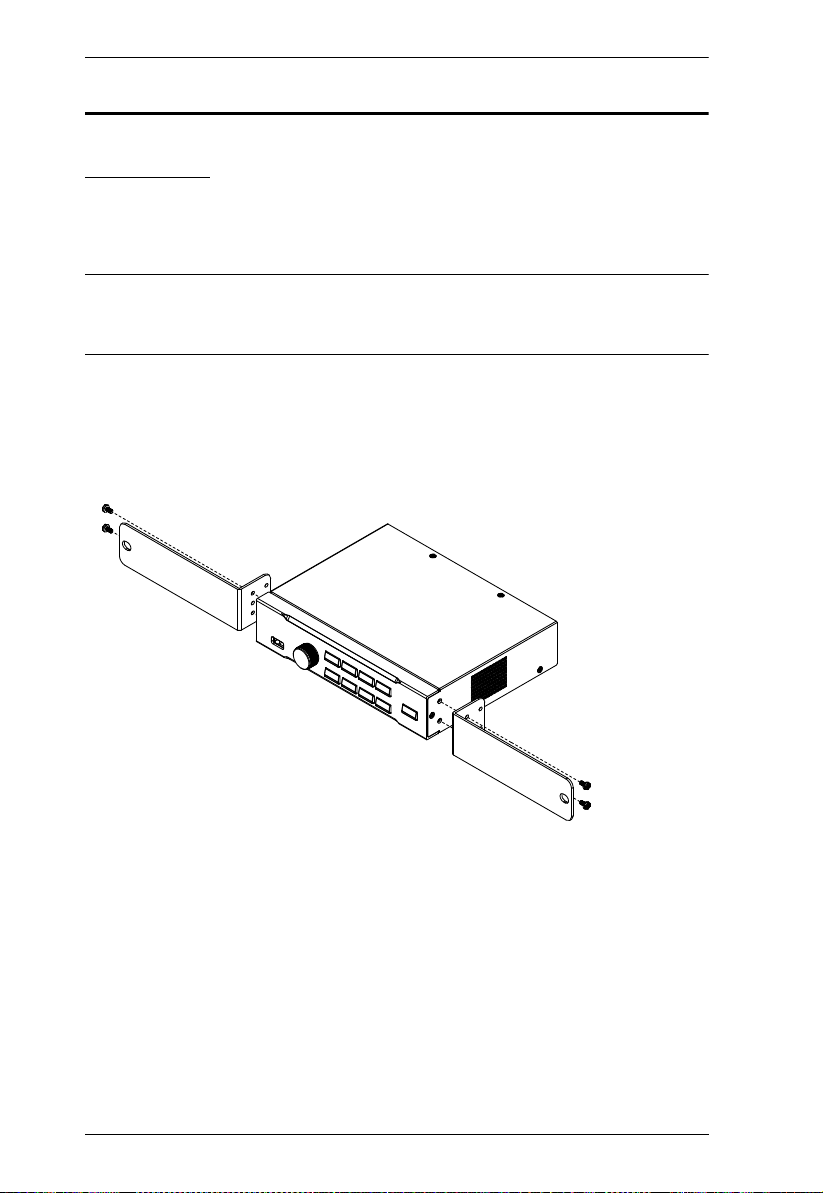
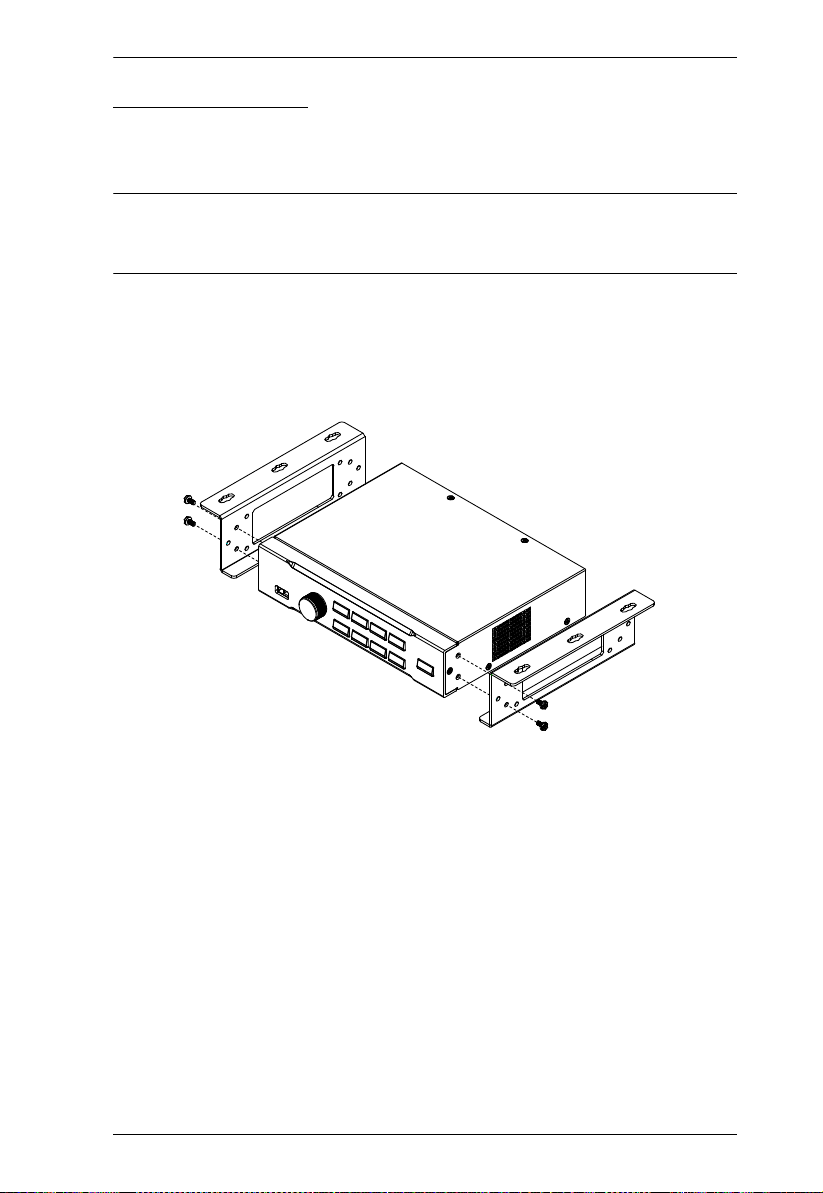
M3 Phillips Hex Head
Mounting
Rack Mount
The VP2120 can be mounted on a 19” (1U) system rack. To conveniently
access the front-panel pushbuttons for local configuration and operation, mount
the unit at the front of the rack so that the front panel faces outward.
Note: The Rack Mount Kit required for this installation is not included in the
package. For more information on purchasing this accessory, please
visit the product web page.
1. Use the 4 M3 Phillips hex head screws supplied with the mounting kit to
secure the rack mounting brackets onto the unit.
2. Position the unit in the front of the rack and align the holes in the mounting
brackets with the holes in the rack.
3. Screw the mounting brackets to the rack.
9
Chapter 2. Hardware Setup
M3 Phillips Hex Head
Under Desk Mount
You can also mount the VP2120 under a desk using the under-desk mounting
kit.
Note: The mounting kit required for this installation is not included in the
package. For more information on purchasing this accessory, please
visit the product web page.
1. Use 4 M3 Phillips hex head screws supplied with the mounting kit to secure
the mounting brackets onto the unit.
2. Position the unit to a spot under the desk where you can easily access the
front-panel pushbuttons, and then secure the racks to the desk with selfprepared screws.
10
VP2120 User Manual
Joufsofu0
MBO
B
1
8
7
6
5 4
2
3
C
9
Installation
Follow the steps below to safely install sources, displays, and other equipment
to the VP2120.
1. Use a grounding wire to ground the unit by connecting one end to the
grounding terminal, and the other end to a suitable grounded object.
Note: Do not omit this step. Proper grounding helps prevent damage to the
unit from surges or static electricity.
2. Use an HDMI cable to connect an HDMI source to the HDMI In Port.
11
3. Use an HDMI cable to connect the unit to at least one HDMI-enabled
display.
Note: Because the OSD only shows on display A, make sure to connect the
display to HDMI Out Port A if you are only using one display.
4. (Optional) Connect an active speaker to the Stereo Audio Out Port.
5. (Optional) Connect a microphone to the MIC In Port.
6. (Optional) To control the VP2120 using an IR remote control, connect the
supplied IR Receiver to the IR Receiver Port.

Chapter 2. Hardware Setup
7. (Optional) To allow access to the web interface, use an Ethernet cable to
connect the Ethernet Port to a network switch.
8. Plug the power adapter to the Power Jack.
9. (Optional) Use the Cable Tie Slot and a cable tie to hold the power cable in
place.
10. Press the Power Pushbutton to power on the VP2120.
11. Power on all the connected devices.
12

Chapter 3
Local Operation
Overview
This chapter provides detailed information on the features of the VP2120’s onscreen display (OSD), and how to locally operate the unit using the front-panel
pushbuttons and the IR remote control. You can perform the following tasks
through the OSD:
Switch display sources
Change the display behavior, resolution, or aspect ratio settings
Stream out (go live) the displayed content (display A or B) via network
connection
Configure the VP2120
Make screen captures
View logs of user actions in the OSD and the web interface
Use whiteboard to communicate with meeting participants in real-time
Operation Considerations
The IR remote control and the VP2120’s front panel offer the same
operation capability. Use either method as required.
Note:
In this manual, “buttons” is used to refer to the buttons on the IR
remote control, and “pushbuttons” is used to refer to the front-panel
pushbuttons
Use the IR remote control within the effective range (6 m), and that there is
a clear line-of-sight between the remote control unit and the IR receiver
connected to the VP2120.
When using the ATEN Video Presentation Control App, make sure your
mobile device is connected to the same network environment where the
VP2120 is installed.
.
13
Chapter 3. Local Operation
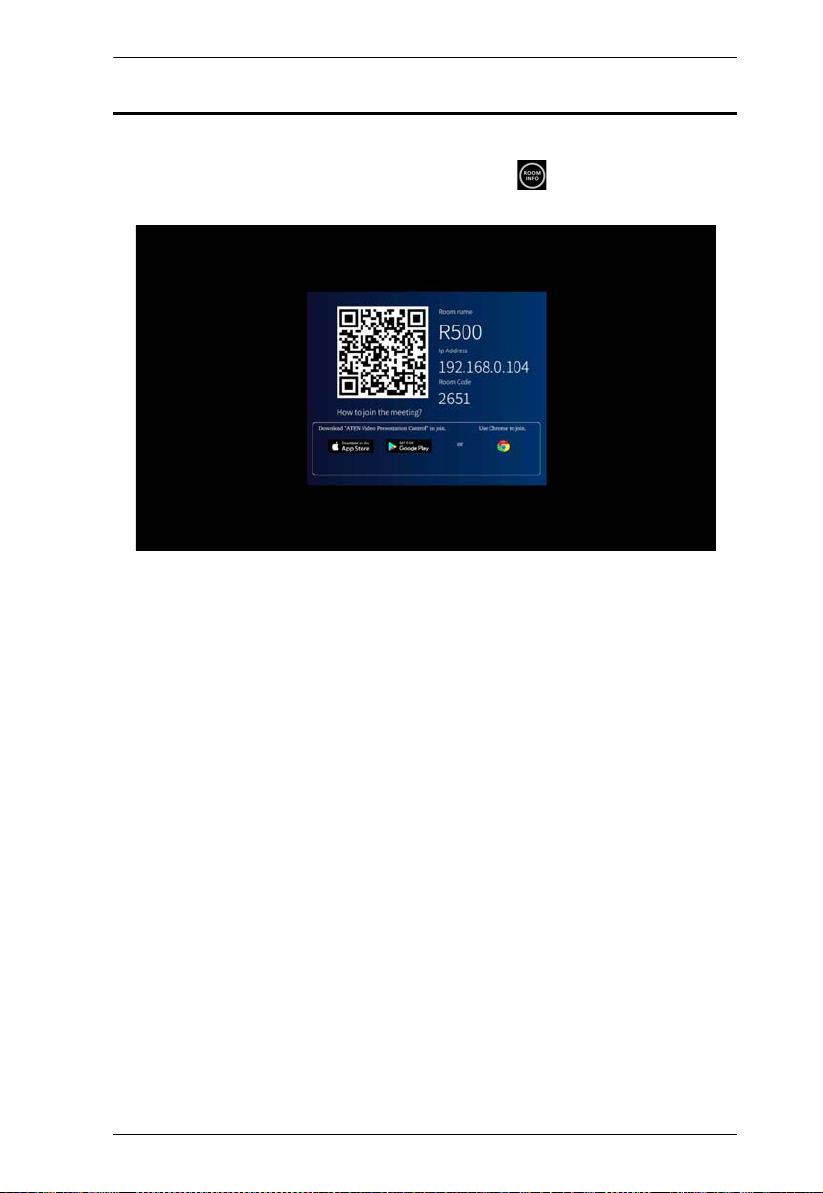
Displaying the Room Info
To display meeting information such as the room code, IP address for the web
interface, and QR code to join the meeting, use the Room Info pushbutton/
button.
14
 Loading...