


9 x 2 4K Presentation Matrix Switch
VP1920 User Manual
www.aten.com
VP1920 User Manual
EMC Information
FEDERAL COMMUNICATIONS COMMISSION INTERFERENCE
STATEMENT: This equipment has been tested and found to comply with the
limits for a Class A digital device, pursuant to Part 15 of the FCC Rules. These
limits are designed to provide reasonable protection against harmful
interference when the equipment is operated in a commercial environment. This
equipment generates, uses, and can radiate radio frequency energy and, if not
installed and used in accordance with the instruction manual, may cause
harmful interference to radio communications. Operation of this equipment in a
residential area is likely to cause harmful interference in which case the user will
be required to correct the interference at his own expense.
FCC Caution: Any changes or modifications not expressly approved by the
party responsible for compliance could void the user's authority to operate this
equipment.
Warning: Operation of this equipment in a residential environment could cause
radio interference.
This device complies with Part 15 of the FCC Rules. O peration is subject to the
following two conditions:
(1) this device may not cause harmful interference, and
(2) this device must accept any interference received, including interference
that may cause undesired operation.
Achtung: Der Gebrauch dieses Geräts in Wohnumgebung kann
Funkstörungen verursachen.
KCC Statement:
RoHS
This product is RoHS compliant.
© Copyright 2021 ATEN® International Co., Ltd.
ATEN and the ATEN logo are registered trademarks of ATEN International Co., Ltd. All rights reserved.
All other brand names and trademarks are the registered property of their respective owners. The
terms HDMI, HDMI High-Definition Multimedia Interface, and the HDMI Logo are trademarks or
registered trademarks of HDMI Licensing Administrator, Inc.
ii
Manual Date: 2021-01-06

VP1920 User Manual
User Information
Online Registration
Be sure to register your product at our online support center:
International http://eservice.aten.com
Telephone Support
For telephone support, call this number:
International 886-2-8692-6959
China 86-400-810-0-810
Japan 81-3-5615-5811
Korea 82-2-467-6789
North America 1-888-999-ATEN ext 4988
1- 949-428-1111
User Notice
All information, documentation, and specifications contained in this manual are
subject to change without prior notification by the manufacturer. The
manufacturer makes no representations or warranties, either expressed or
implied, with respect to the contents hereof and specifically disclaims any
warranties as to merchantability or fitness for any particular purpose. Any of the
manufacturer's software described in this manual is sold or licensed as is.
Should the programs prove defective following their purchase, the buyer (and
not the manufacturer, its distributor, or its dealer), assumes the entire cost of all
necessary servicing, repair and any incidental or consequential damages
resulting from any defect in the software.
The manufacturer of this system is not responsible for any radio and/or TV
interference caused by unauthorized modifications to this device. It is the
responsibility of the user to correct such interference.
The manufacturer is not responsible for any damage incurred in the operation
of this system if the correct operational voltage setting was not selected prior to
operation. PLEASE VERIFY THAT THE VOLTAGE SETTING IS CORRECT
BEFORE USE.
iii

VP1920 User Manual
Package Contents
1 VP1920 9 x 2 4K Presentation Matrix Switch
1 Power Cord
1 IR Receiver
1 IR Remote Control
1 User Instructions
Note:
Ma k e sure th a t all of t h e items are prese nt and in g ood order. If anything
is missing or was damaged in shipping, please contact your dealer for
further assistance.
iv

VP1920 User Manual
Table of Contents
EMC Information. . . . . . . . . . . . . . . . . . . . . . . . . . . . . . . . . . . . . . . . . . . . . ii
RoHS . . . . . . . . . . . . . . . . . . . . . . . . . . . . . . . . . . . . . . . . . . . . . . . . . . . . . ii
User Information . . . . . . . . . . . . . . . . . . . . . . . . . . . . . . . . . . . . . . . . . . . . iii
Package Contents . . . . . . . . . . . . . . . . . . . . . . . . . . . . . . . . . . . . . . . . . . .iv
About this Manual . . . . . . . . . . . . . . . . . . . . . . . . . . . . . . . . . . . . . . . . . . vii
Conventions . . . . . . . . . . . . . . . . . . . . . . . . . . . . . . . . . . . . . . . . . . . . . . . viii
Product Information . . . . . . . . . . . . . . . . . . . . . . . . . . . . . . . . . . . . . . . . . viii
1. Introduction
Overview. . . . . . . . . . . . . . . . . . . . . . . . . . . . . . . . . . . . . . . . . . . . . . . . . . . 1
Benefits . . . . . . . . . . . . . . . . . . . . . . . . . . . . . . . . . . . . . . . . . . . . . . . . . . . 2
Features . . . . . . . . . . . . . . . . . . . . . . . . . . . . . . . . . . . . . . . . . . . . . . . . . . . 3
Planning the Installation . . . . . . . . . . . . . . . . . . . . . . . . . . . . . . . . . . . . . . . 5
Required Equipment . . . . . . . . . . . . . . . . . . . . . . . . . . . . . . . . . . . . . . . 5
Optional Equipment. . . . . . . . . . . . . . . . . . . . . . . . . . . . . . . . . . . . . . . . 5
2. Hardware Setup
Components . . . . . . . . . . . . . . . . . . . . . . . . . . . . . . . . . . . . . . . . . . . . . . . . 7
VP1920 Front View . . . . . . . . . . . . . . . . . . . . . . . . . . . . . . . . . . . . . . . . 7
VP1920 Rear View . . . . . . . . . . . . . . . . . . . . . . . . . . . . . . . . . . . . . . . . 9
IR Remote Control . . . . . . . . . . . . . . . . . . . . . . . . . . . . . . . . . . . . . . . 11
LED Indicators . . . . . . . . . . . . . . . . . . . . . . . . . . . . . . . . . . . . . . . . . . 13
Rack Mounting . . . . . . . . . . . . . . . . . . . . . . . . . . . . . . . . . . . . . . . . . . . . . 14
Installation . . . . . . . . . . . . . . . . . . . . . . . . . . . . . . . . . . . . . . . . . . . . . . . . 15
3. Operation
Overview. . . . . . . . . . . . . . . . . . . . . . . . . . . . . . . . . . . . . . . . . . . . . . . . . . 17
Operation Considerations . . . . . . . . . . . . . . . . . . . . . . . . . . . . . . . . . . 17
Switching the Display Source . . . . . . . . . . . . . . . . . . . . . . . . . . . . . . . . . . 17
Auto Switching . . . . . . . . . . . . . . . . . . . . . . . . . . . . . . . . . . . . . . . . . . 17
Manual Switching . . . . . . . . . . . . . . . . . . . . . . . . . . . . . . . . . . . . . . . . 18
Changing the Source for Mirror Mode. . . . . . . . . . . . . . . . . . . . . . . . . 18
Display Modes . . . . . . . . . . . . . . . . . . . . . . . . . . . . . . . . . . . . . . . . . . . . . 19
Understanding Display Modes . . . . . . . . . . . . . . . . . . . . . . . . . . . . . . 19
Setting the Display Mode . . . . . . . . . . . . . . . . . . . . . . . . . . . . . . . . . . 19
Operating PCs/Laptops/Tablets . . . . . . . . . . . . . . . . . . . . . . . . . . . . . . . . 20
Hardware Setup . . . . . . . . . . . . . . . . . . . . . . . . . . . . . . . . . . . . . . . . . 20
Operation . . . . . . . . . . . . . . . . . . . . . . . . . . . . . . . . . . . . . . . . . . . . . . 20
Locking the Panel Pushbuttons . . . . . . . . . . . . . . . . . . . . . . . . . . . . . . . . 21
Manual Lock . . . . . . . . . . . . . . . . . . . . . . . . . . . . . . . . . . . . . . . . . . . . 21
Automatic Lock . . . . . . . . . . . . . . . . . . . . . . . . . . . . . . . . . . . . . . . . . . 21
Firmware Upgrades . . . . . . . . . . . . . . . . . . . . . . . . . . . . . . . . . . . . . . . . . 22
System Settings . . . . . . . . . . . . . . . . . . . . . . . . . . . . . . . . . . . . . . . . . . . . 23
v

VP1920 User Manual
General Settings . . . . . . . . . . . . . . . . . . . . . . . . . . . . . . . . . . . . . . . . .23
USB . . . . . . . . . . . . . . . . . . . . . . . . . . . . . . . . . . . . . . . . . . . . . . . . . .24
Audio . . . . . . . . . . . . . . . . . . . . . . . . . . . . . . . . . . . . . . . . . . . . . . . . . . 25
Source . . . . . . . . . . . . . . . . . . . . . . . . . . . . . . . . . . . . . . . . . . . . . . . . . 26
Maintenance . . . . . . . . . . . . . . . . . . . . . . . . . . . . . . . . . . . . . . . . . . . . 28
Exiting the OSD. . . . . . . . . . . . . . . . . . . . . . . . . . . . . . . . . . . . . . . . . . 28
4. RS-232 Serial Commands
Overview . . . . . . . . . . . . . . . . . . . . . . . . . . . . . . . . . . . . . . . . . . . . . . . . . . 29
Setup. . . . . . . . . . . . . . . . . . . . . . . . . . . . . . . . . . . . . . . . . . . . . . . . . . . . . 29
Command Guidelines . . . . . . . . . . . . . . . . . . . . . . . . . . . . . . . . . . . . . . . . 30
Commands . . . . . . . . . . . . . . . . . . . . . . . . . . . . . . . . . . . . . . . . . . . . . . . .31
System Firmware Version Command . . . . . . . . . . . . . . . . . . . . . . . . . 31
Read Command . . . . . . . . . . . . . . . . . . . . . . . . . . . . . . . . . . . . . . . . .31
Source Switching Command. . . . . . . . . . . . . . . . . . . . . . . . . . . . . . . .31
Auto Switching Command. . . . . . . . . . . . . . . . . . . . . . . . . . . . . . . . . .32
Enabling/Disabling Display Command . . . . . . . . . . . . . . . . . . . . . . . .33
Display Mode Command. . . . . . . . . . . . . . . . . . . . . . . . . . . . . . . . . . . 33
EDID Mode Command . . . . . . . . . . . . . . . . . . . . . . . . . . . . . . . . . . . .34
HDCP Authentication Command. . . . . . . . . . . . . . . . . . . . . . . . . . . . .34
CEC Status Command . . . . . . . . . . . . . . . . . . . . . . . . . . . . . . . . . . . .34
Mute Command . . . . . . . . . . . . . . . . . . . . . . . . . . . . . . . . . . . . . . . . .35
Baud Rate Command . . . . . . . . . . . . . . . . . . . . . . . . . . . . . . . . . . . . .35
Standby Mode Command . . . . . . . . . . . . . . . . . . . . . . . . . . . . . . . . . . 35
Restoring Default Command. . . . . . . . . . . . . . . . . . . . . . . . . . . . . . . .35
Firmware Upgrade Command. . . . . . . . . . . . . . . . . . . . . . . . . . . . . . .35
Appendix
Safety Instructions. . . . . . . . . . . . . . . . . . . . . . . . . . . . . . . . . . . . . . . . . . .37
General . . . . . . . . . . . . . . . . . . . . . . . . . . . . . . . . . . . . . . . . . . . . . . . . 37
Rack Mounting . . . . . . . . . . . . . . . . . . . . . . . . . . . . . . . . . . . . . . . . . . 39
Technical Support . . . . . . . . . . . . . . . . . . . . . . . . . . . . . . . . . . . . . . . . . . 40
Specifications . . . . . . . . . . . . . . . . . . . . . . . . . . . . . . . . . . . . . . . . . . . . . . 41
Limited Warranty . . . . . . . . . . . . . . . . . . . . . . . . . . . . . . . . . . . . . . . . . . .43
vi

VP1920 User Manual
About this Manual
This user manual is provided to help you get the most from the VP1920 unit. It
covers all aspects of installation, configuration, and operation. An overview of
the information found in the manual is provided below.
Chapter 1, Introduction introduces you to the VP1920. Its purpose, features,
and installation considerations are described.
Chapter 2, Hardware Setup describes the hardware components of the
VP1920 and the supplied IR remote control, and details the steps that are
necessary to quickly and safely set up the VP1920.
Chapter 3, Operation provides details on panel operations and system settings.
Appendix provides a list of safety instructions and precautions, contact
information for ATEN technical support, product specifications, and other
technical information.
Note:
Read this manual thoroughly and follow the installation and operation
procedures carefully to prevent any damage to the unit or any connected
devices.
ATEN regularly updates its product documentation for new features and
fixes. For an up-to-date VP1920 documentation, visit
http://www.aten.com/global/en/
vii

VP1920 User Manual
Conventions
This manual uses the following conventions:
Monospaced Indicates text that you should key in.
[ ] Indicates keys you should press. For example, [Enter] means to
press the Enter key. If keys need to be chorded, they appear
together in the same bracket with a plus sign between them:
[Ctrl+Alt].
1. Numbered lists represent procedures with sequential steps.
♦ Bullet lists provide information, but do not involve sequential steps.
→ Indicates selecting the option (on a menu or dialog box, for
example), that comes next. For example, Start
open the Start menu, and then select Run.
Indicates critical information.
Product Information
→
Run means to
For information about all ATEN products and how they can help you connect
without limits, visit ATEN on the Web or contact an ATEN Authorized Reseller.
Visit ATEN on the Web for a list of locations and telephone numbers:
International http://www.aten.com
North America http://www.aten-usa.com
viii

Chapter 1
Introduction
Overview
The ATEN VP1920 is a 3-in-1 presentation switch integrating a video matrix
switching, audio processing, and analog-to-digital conversion. With nine inputs
to two 4K outputs, it is designed to boost the efficiency and impact of
professional presentations.
With streamlined control from front-panel pushbuttons, IR remote controller,
OSD, and RS-232, the VP1920 reduces not only system device count, but also
lowers operation complexity. It is suitable for all small-to-medium sized
corporate and education presentation environments, such as meeting rooms,
classrooms, training rooms, or any other presentation setting, such as in
exhibition centers or hotels.
1

Chapter 1. Introduction
Benefits
Fast Multi-format Audio-video Switching
The VP1920 allows for fast switching among 6 HDMI and 3 combo inputs
(HDMI/VGA, HDMI/DisplayPort, HDMI/Component/Composite) to 2 HDMI
outputs and supports Coaxial, Toslink, Stereo audio outputs.
USB Control Routing for PCs and Touch Panels
The VP1920 integrates PC and touch panel controls with other devices into one
system with its USB ports. This allows for independent switching of USB
peripheral ports and keyboard/mouse control to a designated computer source.
Selectable Matrix, Mirror, and PIP* Modes
Three different display modes meet the needs of various events or presentation
styles.
Note: The PIP mode supports resolutions up to 1080p.
Source Preview
The previous function allows you to quickly identify and switch to your target
content. No more guessing which port connects to which content source.
2

VP1920 User Manual
Features
Multi-format AV Switching with Simplicity
Supports 9 multi-format inputs and 2 HDMI outputs:
3 combo inputs (HDMI/VGA, HDMI/DisplayPort, HDMI/AV/YPbPr)
3 HDMI inputs
2 HDMI outputs
VGA port supports universal analog input formats (RGBHV/RGBs/YCbCr/
YPbPr)
Embed/de-embed audio-HDMI/DisplayPort audio signals can be extracted
to digital/analog audio signals; stereo/composite/component audio can be
embedded to digital audio signals
High-definition Video with Optimum Output
Superior video quality up to 4K @ 60 Hz (4:2:0) or 4K @ 30 Hz
(4:4:4)(HDMI/DP)
EDID ExpertTM – automatically selects the optimum EDID settings for
smooth power-up, high-quality display and the best video resolution across
connected devices
HDMI (3D, Deep Color, 4K); HDCP 1.4 compliant
Versatile, Streamlined Operation
Multiple control via front-panel pushbuttons, RS-232, OSD, and IR remote
control
Source preview – quickly identify and switch to the target content
Selectable display modes (Matrix, Mirror, or PiP) for fast switching among
sources
Auto switching – automatically switches to a new source as soon as it is
detected
Supports stand-by mode for power saving and fast waking up
3

Chapter 1. Introduction
Extended Flexibility for USB Peripherals
USB ports enable keyboard/mouse or touch panel control over the
connected computers
Control focus for keyboard/mouse and USB peripherals can be individually
switched to a designated computer source
4

VP1920 User Manual
Planning the Installation
Required Equipment
Prepare the following before installing the VP1920 unit:
Source devices
This can be PCs and/or HDMI source devices such as blue-ray player,
VCR Player, or TV Box etc.
Appropriate cables that connect your source devices to the VP1920
Display devices
HDMI cables that connect your display devices to the VP1920
Optional Equipment
Optionally prepare the following:
USB drives to serve as external storage
A set of keyboard and mouse for accessing computers connected as
Source 1 and 2
A software or hardware controller to configure the settings of the VP1920
using RS-232 interface
For information on the number of equipped ports for each connection interface,
see Specifications, page 41.
5

Chapter 1. Introduction
This Page Intentionally Left Blank
6
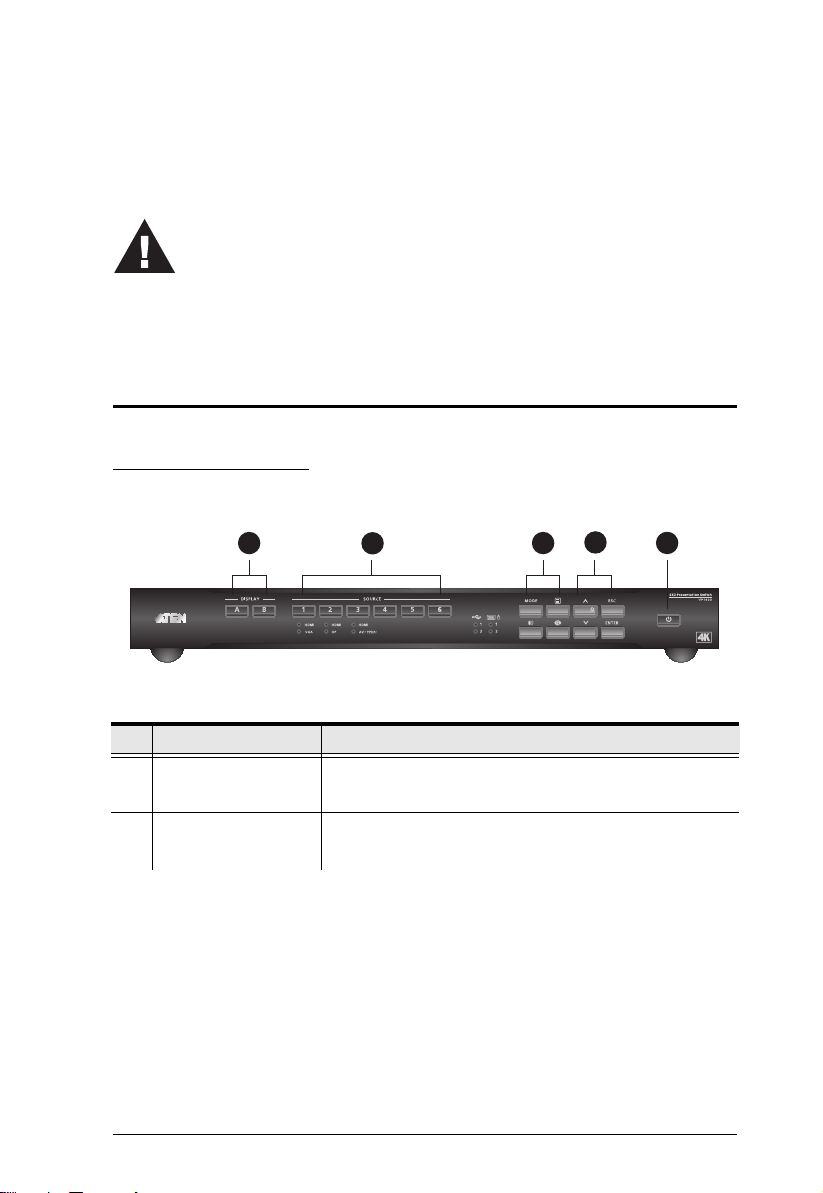
Components
1. Please review the safety information regarding the placement of this
device in Safety Instructions, page 37.
2. Do not power on the VP1920 until all the necessary hardware is
connected.
6
1
2
3
5
4
VP1920 Front View
Chapter 2
Hardware Setup
No. Component Description
1 Display Selection
Pushbuttons
2 Source Selection
Pushbuttons
Press a display pushbutton to focus a display.
Press a source pushbutton to designate a source
for a focused display.
7

Chapter 2. Hardware Setup
No. Component Description
3Function
Pushbuttons
settings. For more details about display modes,
see Setting the Display Mode, page 19.
:
Opens the OSD of system settings for the
VP1920. For more details about system
settings, see System Settings, page 23.
Press the pushbutton twice to close the
OSD.
: Opens the OSD of display mode
4 Navigation
Pushbuttons
5 Standby
Pushbutton
Press the pushbutton to enable the standby mode.
Press again to wake the unit.
: Opens the OSD for setting the source of
local audio output.
: Activates a preview of the current display
mode. For more details, see Changing the
Source for Mirror Mode, page 18.
:
Navigate up and down the OSD.
Press to lock or unlock the panel
pushbuttons. You can also set the VP1920
to automatically lock the panel pushbuttons.
For more information, see Locking the
Panel Pushbuttons, page 21.
: Goes to the next level of settings in
the OSD or selects a setting.
: Returns to the previous level of the
OSD.
8
 Loading...