

Aten VE066-AT User Manual
OR
ATEN VanCryst
™
VE066
Mini Cat 5 DVI Extender
User Guide
Package Contents
1 VE066T Mini Cat 5 DVI Extender Transmitter
1 VE066R Mini Cat 5 DVI Extender Receiver
1 User Instructions
Hardware Review (VE066T/VE066R)
A
1
This device complies with Part 15 of the FCC Rules. Operation is subject to the following two
conditions: (1) this device may not cause harmful interference, and (2) this device must accept
Installation
B
OR
1
1
2
2
2
Cat 5e Cable
3
3
any interference received, including interference that may cause undesired operation.
FCC Information
This equipment has been tested and found to comply with the limits for a Class B digital device,
pursuant to Part 15 of the FCC Rules. These limits are designed to provide reasonable protection
against harmful interference in a residential installation. This equipment generates, uses and can
radiate radio frequency energy, and if not installed and used in accordance with the instruction
manual, may cause interference to radio communications. However, there is no guarantee
that interference will not occur in a particular installation. If this equipment does cause harmful
interference to radio or television reception, which can be determined by turning the equipment
off and on, the user is encouraged to try to correct the interference by one or more of the
following measures:
• Reorient or relocate the receiving antenna;
• Increase the separation between the equipment and receiver;
• Connect the equipment into an outlet on a circuit different from that which the receiver is
connected;
• Consult the dealer/an experienced radio/television technician for help.
Important Notice
Considering environmental protection, ATEN does not provide a fully printed user manual for this product. If
the information contained in the Quick Start Guide is not enough for you to confi gure and operate your product,
please visit our website www.aten.com, and download the full user manual.
© Copyright 2014 ATEN® International Co., Ltd.
ATEN and the ATEN logo are trademarks of ATEN International Co., Ltd. All rights reserved. All
other trademarks are the property of their respective owners.
This product is RoHS compliant.
Part No. PAPE-1285-X02G Printing Date: 05/2014
VE066 Mini Cat 5 DVI Extender User Guide
Requirements
Source Device
The following equipment must be installed on the computer or source device that acts at
the source of DVI content:
• DVI-D / DVI-I Female connector
Display Device
A display device with a DVI-D / DVI-I Female connector
Cables
• Cat 5e (or higher) cable
Note: Transmission distance is up to 20 m.
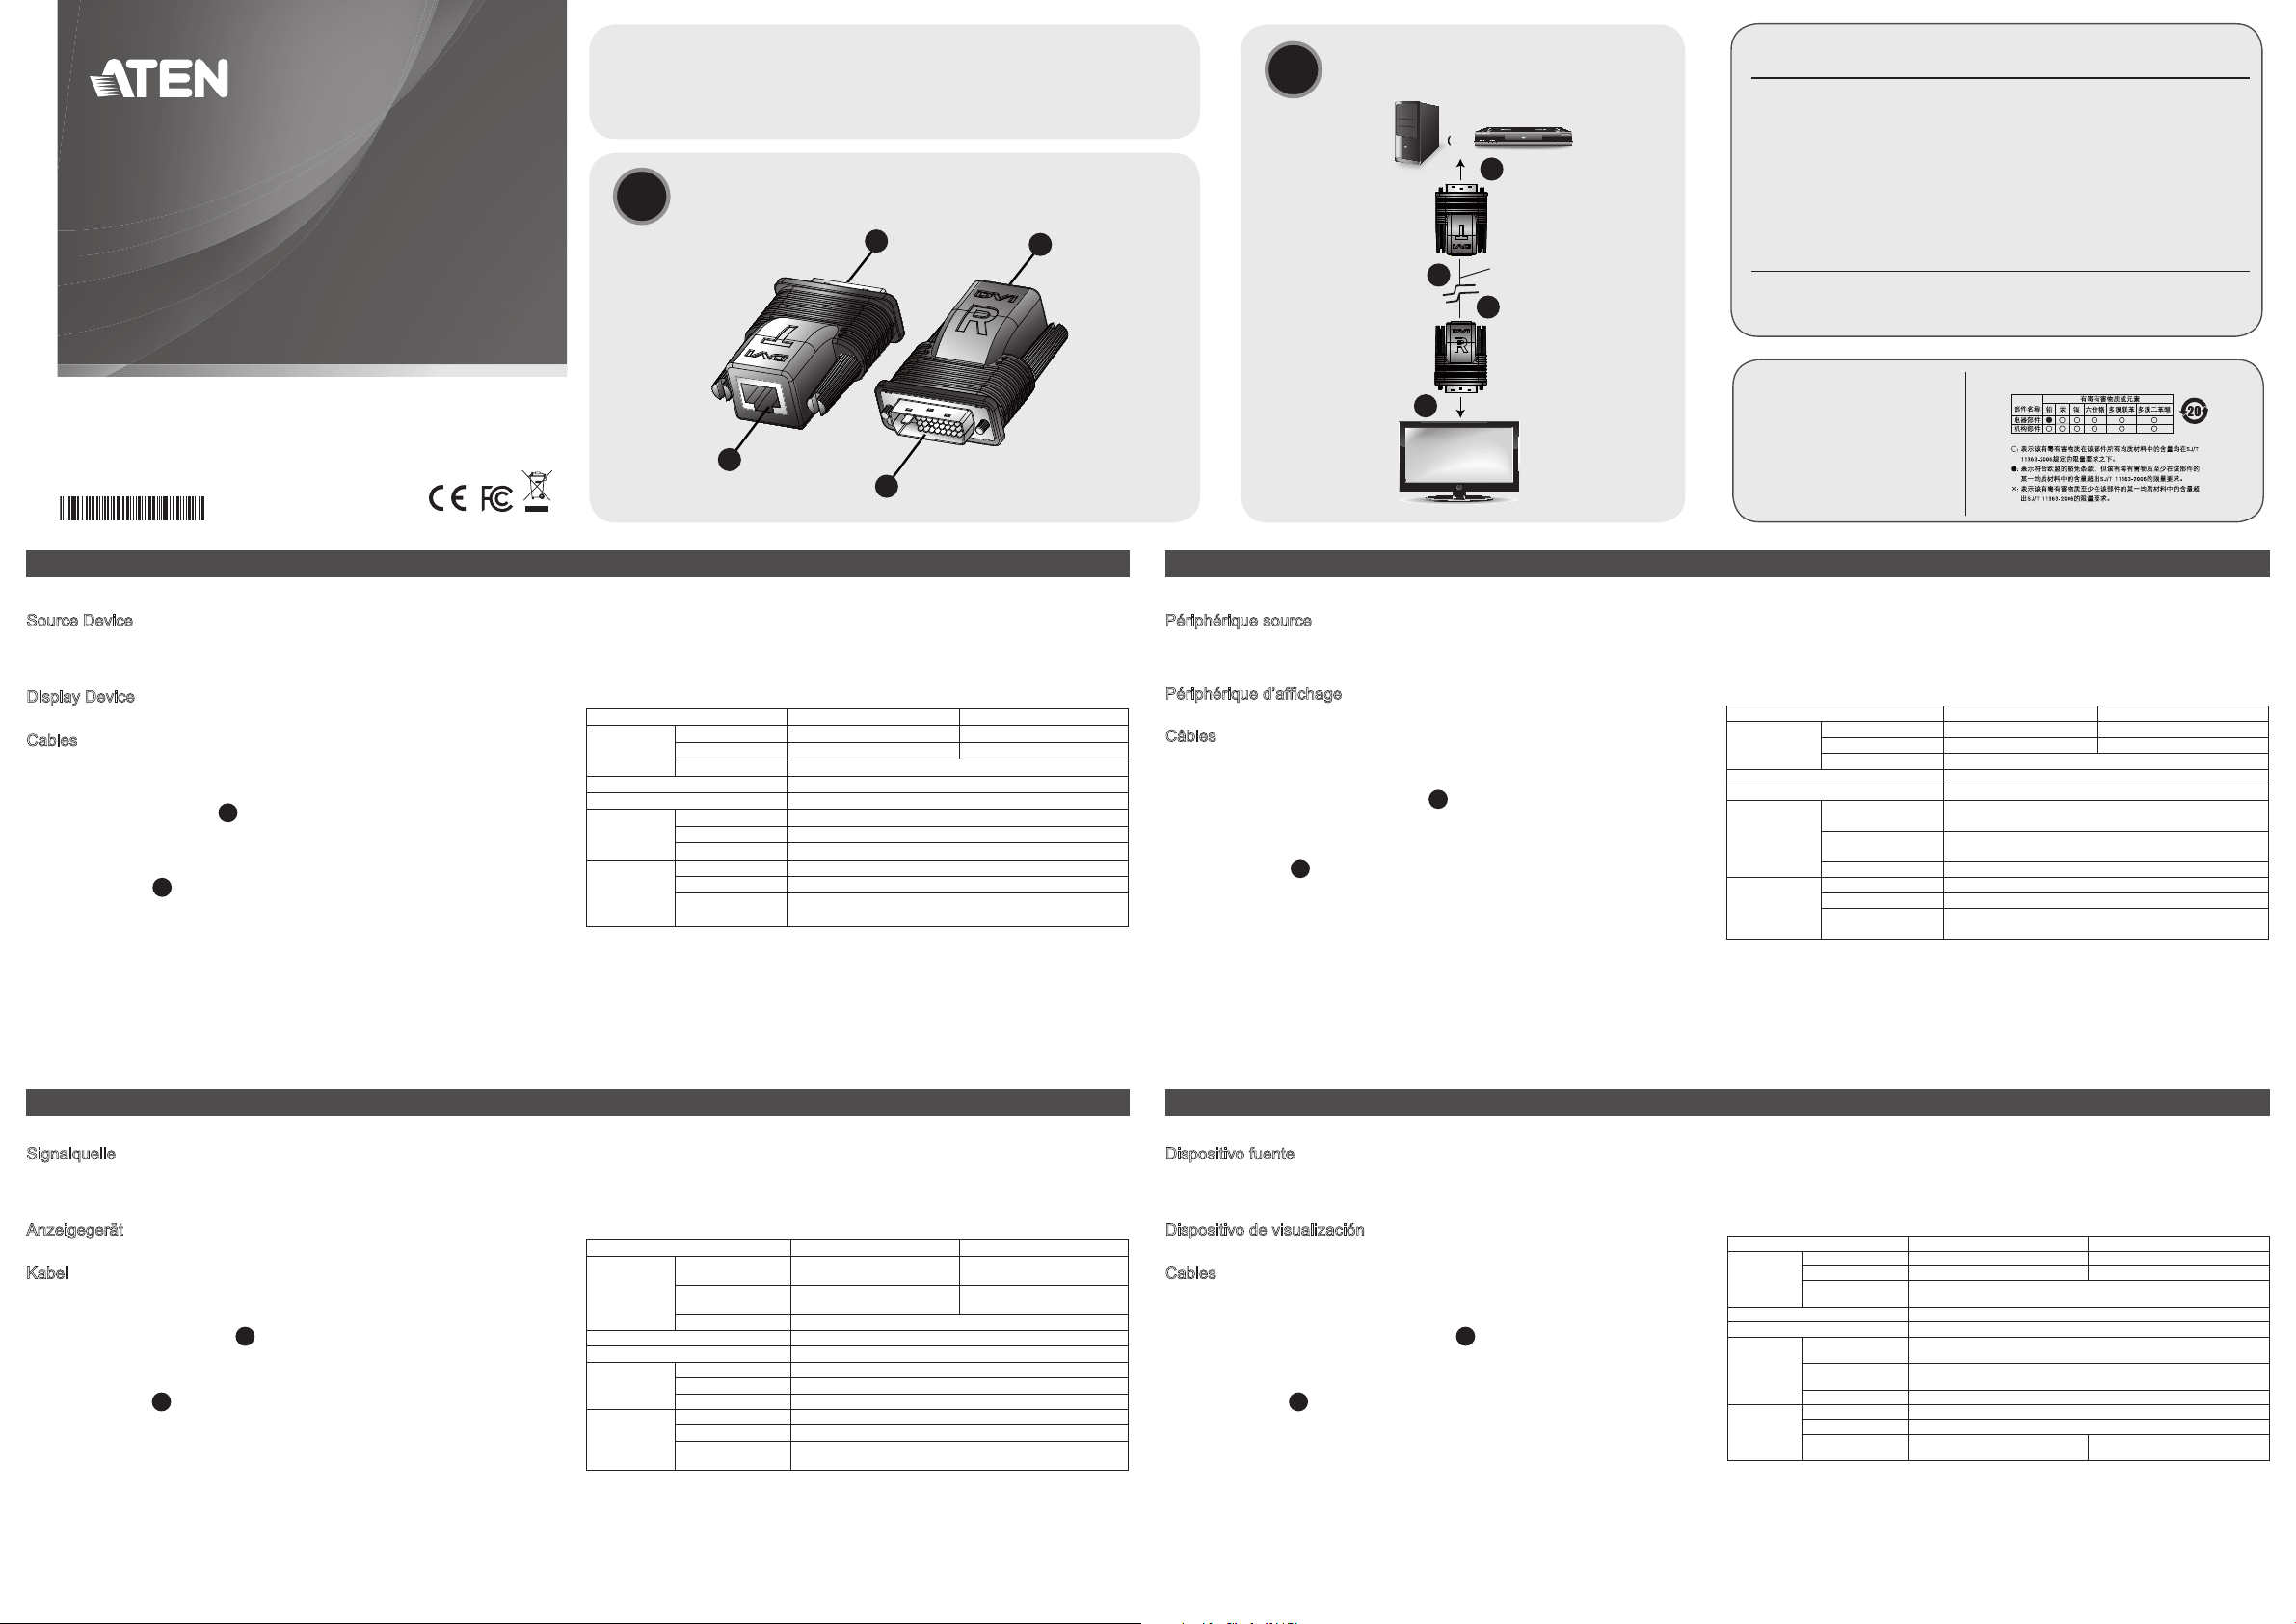
A
Hardware Review
1. DVI-D Male Connector (VE066T/VE066R)
2. RJ-45 Female Connector (VE066T/VE066R)
Installation
To use the VE066 Mini Cat 5 DVI Extender to extend your DVI display using Cat 5e (or
higher) cabling, do the following:
1. Connect the DVI-D Male connector on VE066T (transmitter) to the DVI-I / DVI-D female
output port on your DVI source device.
2. Connect one end of the Cat 5e (or higher) cable to the RJ-45 port on the VE066T. *
(transmitter)
3. Connect the other end of the Cat 5e (or higher) cable to the RJ-45 port on the
VE066R** (receiver).
4. Connect the DVI-D Male connector on the VE066R to the DVI-I / DVI-D female input
port on your DVI display device.
B
2
1
www.aten.com
5. Power on your source and display devices.
* VE066T Mini Cat 5 DVI Extender transmitter needs to connect to transmitting device
(source).
** VE066R Mini Cat 5 DVI Extender receiver needs to connect to receiving device
(display).
Specifi cations
Function VE066T VE066R
Connectors
Video Resolution* up to 1920 x 1200
Transmission Distance
Environment
Physical
Properties
Using different display devices will result in varying results. For best results, we
*
recommend using high quality cables.
** The transmission distance may be shorter if HDCP video content is played.
DVI In 1 x DVI-D Male (Gold) N/A
DVI Out N/A 1 x DVI-D Male (Gold)
Unit to Unit 1 x RJ-45 Female
**
Operating Temp. 0-50°C
Storage Temp. -20-60°C
Humidity 0-80% RH, Non-condensing
Housing Plastic
Weight 47g
Dimensions
(L x W x H)
20 m
5.66 x 4.07 x 2.15 cm
4
4
Guide de l’utilisateur – Prolongateur DVI VE066 Mini Cat 5
Confi guration minimale
Périphérique source
L’équipement suivant doit être installé sur l’ordinateur ou le périphérique utilisé comme
source de contenu DVI :
• Connecteur femelle DVI-D / DVI-I
Périphérique d’affi chage
Un périphérique d’affi chage compatible avec un connecteur femelle DVI-D / DVI-I
Câbles
• Câble de cat. 5e (ou supérieur)
Remarque: La distance de transmission est de 20 m.
A
Description de l’appareil
1. Connecteur mâle DVI-D (VE066T/VE066R)
2. Connecteur femelle RJ-45 (VE066T/VE066R)
B
Installation
Pour utiliser le prolongateur DVI VE066 Mini Cat 5 afi n d’étendre la portée de votre
affi chage DVI à l’aide d’un câblage de catégorie 5 e (ou supérieur), procédez comme suit:
1. Branchez le connecteur mâle DVI-D du transmetteur VE066T sur le port de sortie
femelle DVI-I / DVI-D de votre périphérique DVI source.
2. Branchez une extrémité du câble de Cat 5e (ou supérieur) sur le port RJ-45 du
transmetteur VE066T.*
3. Branchez l’autre extrémité du câble de Cat 5e (ou supérieur) sur le port RJ-45 du
récepteur VE066R.**
4. Branchez le connecteur mâle DVI-D du récepteur VE066R sur le port d’entrée femelle
DVI-I / DVI-D de votre périphérique DVI d’affi chage.
Online Registration
http://eservice.aten.com
Technical Phone Support
International:
886-2-86926959
North America:
1-888-999-ATEN Ext: 4988
United Kingdom:
44-8-4481-58923
5. Allumez les périphériques d'affi chage et source.
* Le transmetteur VE066T Mini Cat 5 du prolongateur DVI doit être connecté au
périphérique de transmission (source).
** Le récepteur VE066R Mini Cat 5 du prolongateur DVI doit être connecté au
périphérique de réception (affi chage).
The following contains information that relates to China:
www.aten.com
Caractéristiques techniques
Fonction VE066T VE066R
Connecteurs
Résolution vidéo* 1920 x 1200
Distance de transmission ** 20 m
Environnement
Propriétés
physiques
* L’utilisation de différents périphériques d’affi chage génère des résultats différents. Pour
de meilleurs résultats, il est recommandé d’utiliser des câbles de qualité supérieure.
** La distance de transmission est susceptible d’être raccourcie lors de la lecture de
contenus vidéo HDCP.
Entrée DVI 1 x DVI-D mâle (Or) N/D
Sortie DVI N/D 1 x DVI-D mâle (Or)
Port d’unité à unité 1 prise RJ-45 femelle
Température de
fonctionnement
Température de
stockage
Humidité Humidité relative de 0 à 80 %, sans condensation
Boîtier Plastique
Poids 47 g
Dimensions
(Long x Larg x Haut)
0 à 50 °C
-20 à 60 °C
5,66 x 4,07 x 2,15 cm
VE066 Mini-Kat- 5-DVI-Grafi kverlängerung Kurzanleitung
Voraussetzungen
Signalquelle
Auf den Signalquellen oder Computern, die das DVI-Signal senden, muss mindestens
Folgendes installiert sein:
• DVI-D- / DVI-I-Buchse (Weiblein)
Anzeigegerät
Anzeigegerät mit DVI-D- / DVI-I-Buchse (Weiblein)
Kabel
• Kat-5e-Kabel (oder besser)
Hinweis: Die Reichweite beträgt 20 m.
A
Hardwareübersicht
1. DVI-D- / DVI-I-Buchse (Männlein) (VE066T/VE066R)
2. RJ-45-Buchse (Weiblein) (VE066T/VE066R)
B
Installation
Um den Kabelweg zu Ihrem DVI-Bildschirm mit der VE066 Mini-Kat 5-DVIGrafi kverlängerung über ein Kat. 5e-Kabel zu erweitern, gehen Sie folgendermaßen vor:
1. Verbinden Sie den DVI-D-Anschluss (Männlein) am VE066T (Sender) mit dem DVI-I- /
DVI-D-Anschluss (Weiblein) Ihrer DVI-Signalquelle.
2. Verbinden Sie das eine Ende eines Kat. 5e-Kabels (oder besser) mit der RJ-45 Buchse
am VE066T (Sender)*.
3. Verbinden Sie das andere Ende des Kat. 5e-Kabels (oder besser) mit der RJ-45
Buchse am VE066R (Empfänger)**.
4. Verbinden Sie den DVI-D-Anschluss (Männlein) am VE066R mit dem DVI-I- / DVI-D-
Anschluss (Weiblein) Ihres DVI-Anzeigegerätes.
www.aten.com
5. Schalten Sie die Signalquelle und die Anzeigegeräte ein.
* Der Sender VE066T der Mini-Kat 5-DVI-Grafi kverlängerung muss mit dem sendenden
Gerät (Signalquelle) verbunden werden.
** Der Empfänger VE066R der Mini-Kat 5-DVI-Grafi kverlängerung muss mit dem
Empfangsgerät (Bildschirm) verbunden werden.
Technische Daten
Funktion VE066T VE066R
DVI-Eingang
Anschlüsse
Grafi kaufl ösung* 1920 x 1200
Übertragungsweg ** 20 m
Umgebung
Physische
Eigenschaften
* Unterschiedliche Anzeigegeräte liefern unterschiedliche Ergebnisse. Für optimale
Ergebnisse sollten Sie hochwertige Kabel erwerben.
** Bei der Übertragung von HDCP-Signalen kann die Reichweite geringer ausfallen.
DVI-Ausgang --
Gerät an Gerät 1 x RJ-45 Weiblein
Betriebstemperatur 0–50°C
Lagertemperatur -20–60°C
Feuchtigkeit 0 -80% rel. Luftfeuchte, nicht kondensierend
Gehäuse Kunststoff
Gewicht 47 g
Abmessungen
(L x B x H)
1 x DVI-D Männlein
(vergoldet)
5,66 x 4,07 x 2,15 cm
--
1 x DVI-D Männlein
(vergoldet)
VE066 Alargador gráfi co DVI Mini para cables de Cat. 5 Guía rápida
Requisitos
Dispositivo fuente
En los dispositivos fuente de señal DVI u ordenadores que se conectan al equipo debe
estar instalado lo siguiente:
• Conector DVI-D / DVI-I hembra
Dispositivo de visualización
Un dispositivo de visualización con conector DVI-D / DVI-I hembra
Cables
• Cable de Cat. 5e (o mejor)
Nota: La distancia de transmisión es de 20 m.
A
Presentación del hardware
1. Conector DVI-D macho (VE066T/VE066R)
2. Conector RJ-45 hembra (VE066T/VE066R)
B
Instalación
Para emplear el alargador gráfi co DVI Mini para cables de Cat. 5 VE066 y así ampliar
la distancia hasta su pantalla DVI con cable de Cat. 5e, proceda como se indica a
continuación:
1. Enchufe el conector DVI-D (macho) del VE066T (transmisor) en la salida DVI-I / DVI-D
(hembra) de su dispositivo fuente DVI.
2. Conecte un extremo del cable de Cat. 5e (o mejor) al puerto RJ-45 del VE066T
(transmisor)*.
3. Conecte el otro extremo del cable de Cat. 5e (o mejor) al puerto RJ-45 del VE066R
(receptor)**.
4. Enchufe el conector DVI-D (macho) del VE066R en la salida DVI-I / DVI-D (hembra) de
su dispositivo de visualización DVI.
www.aten.com
5. Encienda los dispositivos de visualización y fuente.
* El transmisor DVI Mini para cables de Cat. 5 VE066T ha de conectarse al equipo
transmisor (fuente).
** El receptor DVI Mini para cables de Cat. 5 VE066T ha de conectarse al equipo
receptor (pantalla).
Especifi caciones
Función VE066T VE066R
Entrada DVI 1 x DVI-D (macho) dorado --
Conectores
Resolución gráfi ca* 1920 x 1200
Distancia de transmisión **20 m
Entorno
Propiedades
físicas
* La calidad de imagen varía con los equipos de visualización empleados. Para obtener
los mejores resultados, le recomendamos que adquiera cables alta calidad.
** La distancia de transmisión puede ser menor al visualizar contenidos HDCP.
Salida DVI -- 1 x DVI-D (macho) dorado
Puerto de unidad a
unidad
Temperatura de
funcionamiento
Temperatura de
almacenamiento
Humedad 0 a 80% de HR, sin condensar
Carcasa Plástico
Peso 47 g
Dimensiones
(L x An x Al)
5,66 x 4,07 x 2,15 cm 5,66 x 4,07 x 2,15 cm
1 conectores RJ-45 hembra
0 a 50 °C
-20 a 60 °C
Package Contents
1 VE066T Mini Cat 5 DVI Extender Transmitter
1 VE066R Mini Cat 5 DVI Extender Receiver
1 User Instructions
Hardware Review (VE066T/VE066R)
A
1
2
1
Estensore DVI VE066 Mini Cat 5 - Guida dell’utente
Requisiti
Dispositivo sorgente
Sul computer sorgente del contenuto DVI, o su quello che opera come tale, deve essere
installato il seguente dispositivo:
• Connettore femmina DVI-D/DVI-I
Dispositivo di visualizzazione
Un dispositivo di visualizzazione dotato di connettore femmina DVI-D/DVI-I
Cavi
• Cavo Cat5e (o superiore)
Nota: la distanza di trasmissione è di 20 m.
A
Hardware
1. Connettore maschio DVI-D (VE066/VE066R)
2. Connettore femmina RJ-45 (VE066/VE066R)
Installazionev
Per utilizzare l’estensore DVI VE066 Mini Cat 5 per portare il segnale DVI a distanza
tramite cavi Cat 5e (o superiore), procedere come segue:
1. Collegare il connettore maschio DVI-D del VE066T (trasmittore) al connettore femmina
DVI-I/DVI-D in uscita del dispositivo sorgente DVI.
2. Connettere un’estremità del cavo Cat 5e (o superiore) alla porta RJ-45 del VE066T
(trasmittore).*
3. Connettere l’altra estremità del cavo Cat 5e (o superiore) alla porta RJ-45 del VE066R
(ricevitore).**
4. Collegare il connettore maschio DVI-D del VE066R (ricevitore) al connettore femmina
DVI-I/DVI-D del dispositivo di visualizzazione DVI.
B
2
Installation
B
OR
1
1
2
2
4
4
5. Accendere il dispositivo sorgente e quelli di visualizzazione.
* Il trasmettitore dell’estensore DVI VE066T Mini Cat 5 deve essere connesso al
dispositivo sorgente di trasmissione.
** Il ricevitore dell’estensore DVI VE066R Mini Cat 5 deve essere connesso al dispositivo
sorgente di ricezione (schermo).
Cat 5e Cable
3
3
www.aten.com
Specifi che
Funzione VE066T VE066R
Connettori
Risoluzione video* 1920 x 1200
Distanza di trasmissione ** 20 m
Condizioni
ambientali
Proprietà
fi siche
* L’impiego di diversi dispositivi di visualizzazione comporta risultati diversi. Per ottenere i
migliori risultati si consiglia di utilizzare cavi di alta qualità.
** La distanza di trasmissione potrebbe essere inferiore in caso di riproduzione di contenuti
video HDCP.
Ingresso DVI 1 x DVI-D Maschio (oro) N/D
Uscita DVI N/D 1 x DVI-D maschio (oro)
Da unità a unità 1 RJ-45 femmina
Temperatura operativa 0-50˚C
Temperatura di
conservazione
Umidità 0-80% RH, senza condensa
Case Plastica
Peso 47g
Dimensioni
(lungh. x largh.x alt.)
-20-60˚C
5,66 x 4,07 x 2,15 cm
VE066 미니 Cat 5 DVI 연장기 사용자 가이드
하드웨어 요구 사항
소스 장치
다음 장치들은 컴퓨터 혹은 DVI 소스 영상을 전송하는 장치에 설치되어 있어야 합니다.
• DVI-D / DVI-I 커넥터(암)
디스플레이 장치
DVI-D / DVI-I 커넥터(암)가 있는 디스플레이 장치
케이블
• Cat 5e (혹은 그 이상) 케이블
주의: 1080p의 전송 거리는 20 m.
A
하드웨어 리뷰
1.DVI-D 커넥터(수) (VE066T/VE066R)
2. RJ-45 커넥터(암) (VE066T/VE066R)
B
설치
Cat 5e(혹은 그 이상) 케이블을 사용하여 사용자의 DVI 화면을 장거리로 전송하기 위한
VE066 미니 Cat 5 DVI 연장기를 사용하려면 다음을 수행하십시오.
1. VE066T (송신기)의 DVI-D 커넥터(수)를 사용자의 DVI 소스 장치에 있는 DVI-D /
DVI-I 출력 포트 (암)에 연결하십시오.
2. Cat 5e(혹은 그 이상) 케이블의 끝을 VE066T (송신기)의 RJ-45 포트에 연결하십시오. *
3. Cat 5e(혹은 그 이상) 케이블의 다른 한쪽 끝을 VE066R(수신기)의 RJ-45 포트에 연결
하십시오. **
4. VE066R에 있는 DVI-D 커넥터(수)를 사용자의 DVI 디스플레이 장치에 있는 DVI-D /
DVI-I 입력 포트 (암)에 연결하십시오.
5. 사용자의 소스 및 디스플레이 장치 전원을 켜십시오.
www.a ten.com Phone: 02 -467- 6789
* VE066T 미니 Cat 5 DVI 연장기 송신기는 송신 장치(소스)에 연결해야 합니다.
** VE066R 미니 Cat 5 DVI 연장기 수신기는 수신 장치(디스플레이)에 연결해야 합니다.
사양
기능 VE066T VE066R
커넥터
비디오 해상도* 1920 x 1200
전송 거리 ** 20 m
환경
외관
여러 디스플레이 장치를 사용하면 다양한 출력이 나타날 수 있습니다. 최적의 출력을 위
*
해 고품질 케이블을 사용할 것을 권장합니다.
** HDCP 비디오 화면이 재생되는 경우 전송 거리가 짧아질 수 있습니다.
DVI 입력 1 x DVI-D 수 (Gold) N/A
DVI 출력 N/A 1 x DVI-D 수 (Gold)
유닛간 연결 1 x RJ-45 암
동작 온도 0-50°C
보관 온도 -20-60°C
습도 0-80% RH, Non-condensing
재질 플라스틱
무게 47g
크기
(L x W x H)
5.66 x 4.07 x 2.15 cm
VE066ミニCat5DVIエクステンダーユーザーガイド
システム要件
ソースデバイス
DVIコンテンツの出力元となるコンピューターやデバイスには以下のハードウェア環境が
必要です。
•
DVI-D/DVI-Iメスコネクター
表示装置
DVI-D/DVI-Iメスコネクターを搭載している表示装置
ケーブル
•
カテゴリ5e以上に対応したLANケーブル
注意:延長距離は、解像度20m。
A
製品外観
1.DVI-Dオスコネクター(VE066T/VE066R)
2.RJ-45メスコネクター(VE066T/VE066R)
セットアップ
VE066を使ってカテゴリ5e以上に対応したLANケーブルでDVIデバイスのコンテンツを
延長する場合は、以下の手順でセットアップしてください。
1.VE066T(トランスミッター)のDVI-Dオスコネクターと、お使いのDVIデバイスの
DVI-I/DVI-Dメス出力ポートを接続してください。
2.カテゴリ5e以上に対応したLANケーブルのコネクターをVE066T(トランスミッター)
のRJ-45ポートに接続してください。*
3.カテゴリ5e以上に対応したLANケーブルのもう片方のコネクターをVE066R(レシー
バー)のRJ-45ポートに接続してください。**
4.VE066RのDVI-Dオスコネクターと、お使いのDVI対応表示装置のDVI-I/DVI-Dメ
ス入力ポートを接続してください。
B
www.aten.com
5.DVIデバイスと表示装置に電源を入れてください。
*
VE066TミニCat5DVIエクステンダートランスミッターは伝送装置(ソース)に接続し
てください。
**
VE066RミニCat5DVIエクステンダーレシーバーは受信装置(ディスプレイ)に接続
してください。
サポートお問合せ窓口:+81-3-5615-5811
製品仕様
機能 VE066T VE066R
コネクター
ビデオ解像度* 1920x1200
延長距離 **20m
動作環境
外観規格
*
出力結果は使用する表示装置によって異なります。最適な状態でお使いいただくため
に、高品質のケーブルの使用を推奨します。
**
HDCPによって保護されたコンテンツを再生した場合は、この仕様における延長距離
を保証できない場合がございます。
DVI入力 −
DVI出力 −
ユニット間接続
動作温度
保管温度
湿度 0-80%RH結露なきこと
ケース プラスチック
重量 47g
サイズ 5.66x4.07x2.15cm
 Loading...