

Page 1
VB100
3
2
1
1
2
4
1
2
3
VGA Booster
Quick Start Guide
Simply Better Connections
© Copyright 2013 ATEN® International Co., Ltd.
ATEN and the ATEN logo are trademarks of ATEN International Co., Ltd. All rights reserved.
All other trademarks are the property of their respective owners.
This product is RoHS compliant.
Part No. PAPE-1223-870G Printing Date: 01/2013
Package Contents
1 VB100 VGA Booster
1 Power Adapter
1 User Instructions
Hardware Review
A
Front View Rear View
Hardware Installation
B
Important Notice
Co nside ring en vi ro nme ntal prot ec ti on,
ATEN does not provide a fully printed user
manual for thi s p roduct. If the information
contai ned in the Qui ck Start Guide is not
enoug h for you to confi gure and opera te
your product, pl ease vis it our website
www.a ten. com, and download the ful l
user manual.
Online Registration
http://eservice.aten.com
Technical Phone Support
International:
886-2-86926959
North America:
1-888-999-ATEN Ext: 4988
United Kingdom:
44-8-4481-58923
All information, documentation, and
specications contained in this package
are subject to change without prior
notication by the manufacturer.
VB100 VGA Booster Quick Start Guide Guía de inicio rápido del amplicador VGA VB100
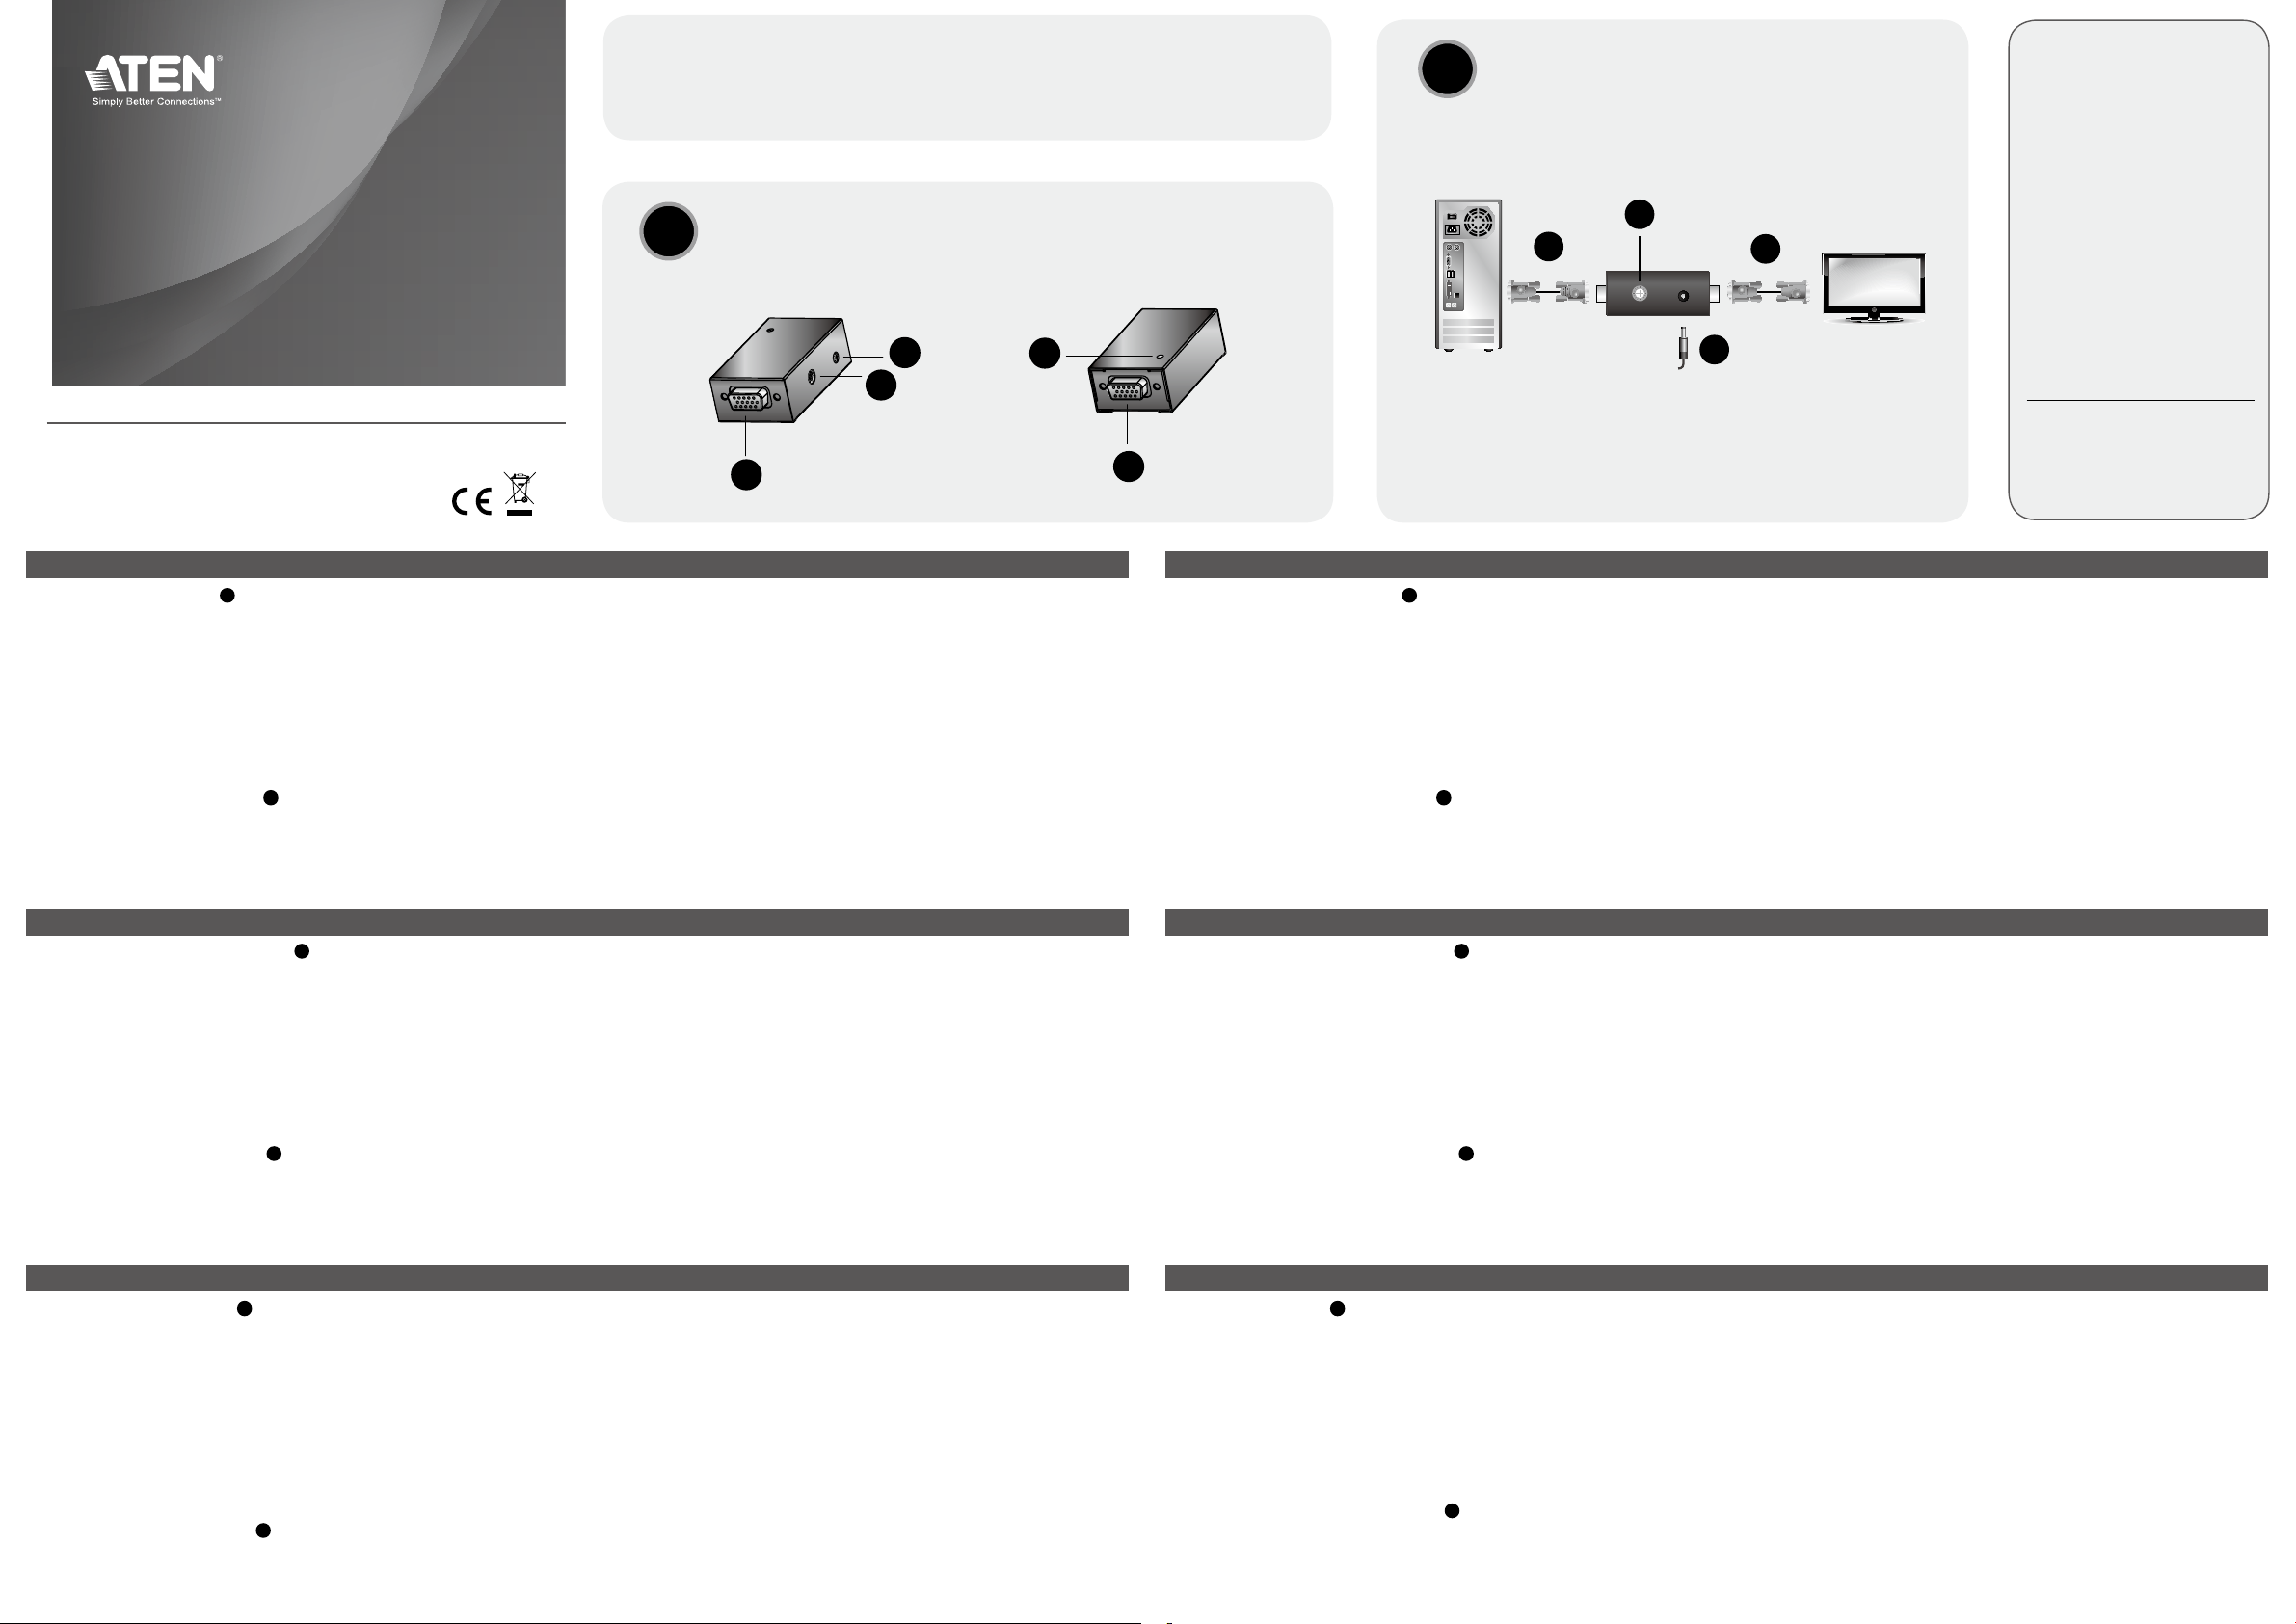
Hardware Review A
Front View
1. Video In
2. Gain/ Compensation Knob
3. Power Jack
Rear View
1. Power LED
2. Video Out
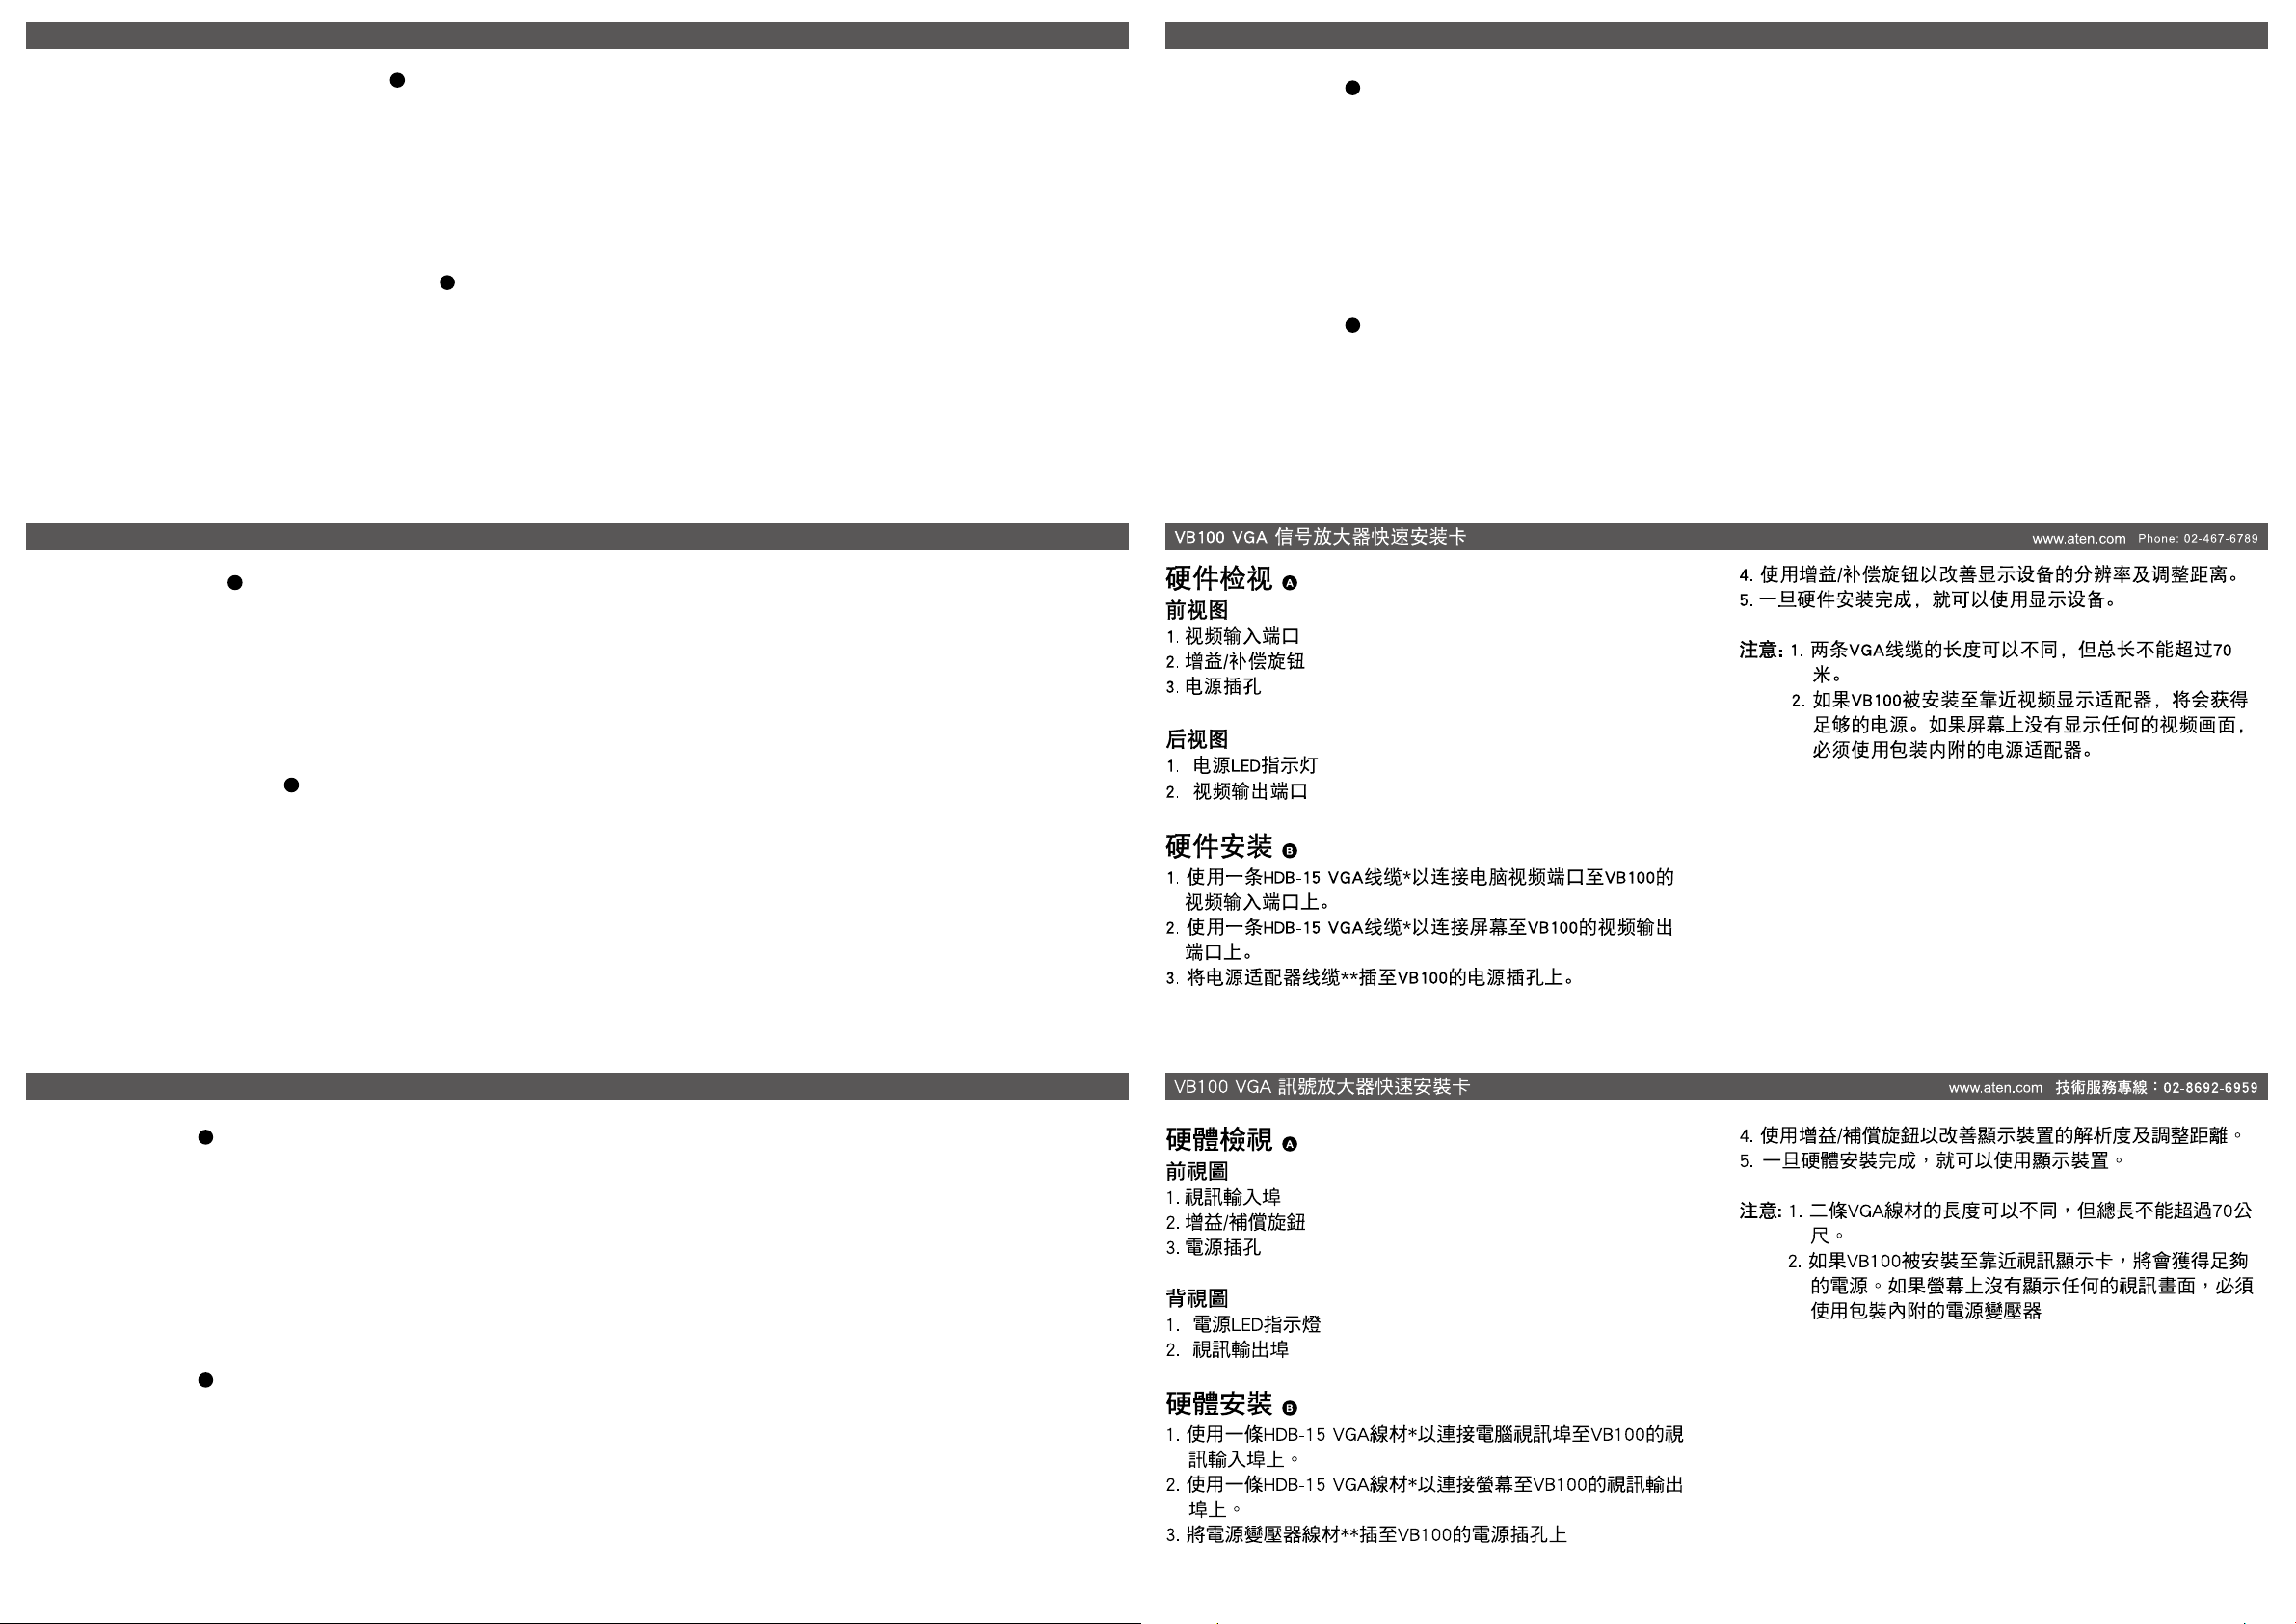
Hardware Installation B
1. Use a HDB-15 VGA cable* to connect the computer’s video port to
the video input port on the VB100.
2. Use a HDB-15 VGA cable* to connect the monitor to the VB100’s
video output port.
Guide de démarrage rapide du booster VGA VB100 Guida rapida VB100 VGA Booster
Présentation du matériel A
Vue de face
1. Entrée vidéo
2. Bouton Gain/Compensation
3. Fiche d’alimentation
Vue de dos
1. DEL d’alimentation
2. Sortie vidéo
Installation matérielle B
1. Utilisez un câble* VGA HDB-15 pour connecter le port vidéo de
l’ordinateur au port d’entrée vidéo du VB100.
2. Utilisez un câble* VGA HDB-15 pour connecter le moniteur au port
de sortie vidéo du VB100.
3. Plug the power adapter* that came with the VB100 into an AC power
source, then plug the power adapter cable into the Power Jack.
4. Use the Gain/Compensation knob to improve the display quality,
adjusting for distance.
5. Once the hardware installation is complete, the display is ready for
use.
Note: 1. The length of each of the two VGA cables can vary, but the
maximum distance of the two VGA cables combined can not
exceed 70 meters.
2. The VB100 can obtain power from the VGA source if it is
installed close enough for the video card to provide sufcient
power. If the there is no video image on the monitor, you must
use the power adapter included with this package.
3. Branchez le câble** de l’adaptateur secteur dans la prise
d’alimentation du VB100.
4. Utilisez le bouton Gain/Compensation pour améliorer la qualité de
l’afchage, en réglant en fonction de la distance.
5. Une fois l’installation matérielle terminée, l’écran est prêt à être
utilisé.
Remarque : 1. La longueur de chacun des deux câbles VGA peut
varier, mais la distance maximale des deux câbles VGA
combinés ne doit pas dépasser 70 mètres.
2. Le VB100 peut être alimenté à partir de la source VGA
s’il est installé sufsamment près de la carte vidéo et
qu’elle peut fournir assez de puissance. Si aucune
image vidéo n’apparait sur le moniteur, vous devez
utiliser l’adaptateur secteur fourni dans le paquet.
www.aten.com www.aten.com
Análisis del hardware A
Vista frontal
1. Entrada de vídeo
2. Selector de ganancia/compensación
3. Clavija de alimentación
Vista posterior
1. LED de alimentación
2. Salida de vídeo
Instalación del hardware B
1. Utilice un cable* VGA HDB-15 para conectar el puerto de vídeo del
equipo al puerto de entrada de vídeo del VB100.
2. Utilice un cable* VGA HDB-15 para conectar el monitor al puerto de
salida de vídeo del VB100.
www.aten.com www.aten.com
Informazioni sull'hardware A
Vista anteriore
1. Ingresso video
2. Manopola Guadagno/Compensazione
3. Connettore d'alimentazione
Veduta posteriore
1. LED d’alimentazione
2. Uscita video
Installazione dell'hardware B
1. Usare un cavo VGA HDB-15* per collegare la porta video del
computer alla porta ingresso video di VB100.
2. Usare un cavo VGA HDB-15* per collegare il monitor alla porta uscita
video di VB100.
3. Conecte el cable** del adaptador de alimentación al conector de
alimentación del VB100.
4. Utilice el selector de ganancia/compensación para mejorar la calidad
de la pantalla mediante el ajuste de distancia.
5. Una vez nalizada la instalación del hardware, podrá utilizar la
pantalla.
Nota: 1. Puede variar la longitud de cada uno de los dos cables VGA,
pero la distancia máxima de los dos cables VGA combinados
no puede superar los 70 metros.
2. El VB100 puede obtener alimentación de la fuente de VGA si
se instala lo sucientemente cerca como para que la tarjeta
de vídeo pueda proporcionar energía suciente. Si no se ve
ninguna imagen de vídeo en la pantalla, deberá utilizar el
adaptador de alimentación con este paquete.
3. Collegare il cavo adattatore d’alimentazione** al connettore
d’alimentazione di VB100.
4. Usare la manopola Guadagno/Compensazione per migliorare la
qualità di visualizzazione, eseguendo la regolazione per la distanza.
5. Al termine dell'installazione, il display è pronto per l'uso.
Nota: 1. La lunghezza di ciascuno dei due cavi VGA può variare, ma
la lunghezza massima dei due cavi VGA combinati non può
superare i 70 metri.
2. VB100 può essere alimentato dall’origine VGA, se è installata
abbastanza vicino perché la scheda video riesca a fornire
energia sufciente. Se sul monitor non è visualizzata alcuna
immagine video, è necessario usare l'adattatore di corrente
fornito in dotazione.
VGA-Verstärker VB100 – Schnellstartanleitung Краткое руководство по использованию VB100 VGA Booster
Hardwareübersicht A
Frontansicht
1. Videoeingang
2. Verstärkung/Kompensation-Knopf
3. Netzanschluss
Rückansicht
1. Betriebs-LED
2. Videoausgang
Hardwareinstallation B
1. Verbinden Sie den Videoanschluss des Computers über ein HDB-15VGA-Kabel* mit dem Videoeingang am VB100.
2. Verbinden Sie den Monitor über ein HDB-15-VGA-Kabel* mit dem
Videoausgang des VB100.
3. Schließen Sie das Netzteilkabel** am Netzanschluss des VB100 an.
4. Steigern Sie die Anzeigequalität mit dem Verstärkung/KompensationKnopf durch Anpassen an die Entfernung.
5. Sobald die Hardwareinstallation abgeschlossen ist, ist das
Anzeigegerät einsatzbereit.
Hinweis: 1. Die Länge der beiden VGA-Kabel kann variieren; die
maximale Entfernung der beiden VGA-Kabel kann jedoch
kombiniert 70 Meter nicht überschreiten.
2. Der VB100 kann über die VGA-Quelle mit Strom versorgt
werden, sofern er so nah installiert ist, dass die Videokarte
genügend Strom liefert. Falls kein Videobild am Monitor
angezeigt wird, müssen Sie das mitgelieferte Netzteil
verwenden.
www.aten.com www.aten.com
Оборудование A
Вид спереди
1. Вход видео
2. Усиление/компенсация
3. Разъем подключения питания
Вид сзади
1. Индикатор питания
2. Выход видео
Установка оборудования B
1. С помощью VGA-кабеля HDB-15* подключите видеопорт
компьютера к входному видеоразъему устройства VB100.
2. С помощью VGA-кабеля HDB-15* подключите монитор к
выходному разъему устройства VB100.
3. Подключите кабель адаптера питания** в гнездо питания
устройства VB100.
4. С помощью регулятора усиления/компенсации отрегулируйте
качество изображения в соответствии с расстоянием.
5. После установки оборудования дисплей готов к эксплуатации.
Примечание. 1. Длина VGA-кабелей может различаться, однако,
максимальная длина обоих кабелей VGA не
должна превышать 70 метров.
2. Устройство VB100 может получать питание
от источника VGA, если оно установлено
достаточно близко для обеспечения видеокартой
соответствующего напряжения питания. Если
на мониторе не отображается изображение,
используйте адаптер питания из комплекта
поставки.
Page 2
Посібник для швидкого початку експлуатації для підсилювача VB100 VGA
www.aten.com
VB100 VGA 부스터 빠른 시작 가이드
www.aten.com
電話支持:
010-5255-0110
Огляд апаратного забезпечення A
Вигляд спереду
1. Вхід відео
2. Ручка посилення/Компенсації
3. Гніздо живлення
Вигляд ззаду
1. Світлодіод живлення
2. Вихід відео
Інсталяція апаратного забезпечення B
1. Кабелем* HDB-15 VGA підключіть порт відео на комп’ютері до
входу відео на VB100.
2. Кабелем* HDB-15 VGA cable підключіть монітор до порту виходу
відео VB100.
3. Увімкніть кабель адаптера живлення** до гнізда живлення на
VB100.
4. Ручкою посилення/компенсації покращуйте якість дисплею,
регулюючи її стосовно відстані.
5. Коли інстальовано апаратні засоби, дисплей готовий до
використання.
GuiadeConsultaRápidadoAmplificadorVGAVB100
A
Vista do hardware
Vista frontal
1. Entrada de vídeo
2. Ajuste de Ganho/Compensação
3. Ficha de alimentação
Vista posterior
1. LED de Alimentação
2. Saída de vídeo
Примітка: 1. Довжина двох кабелів VGA може не співпадати,
проте сумма довжин двох кабелів VGA не повинна
перевищувати 70 метрів.
2. VB100 може отримувати живлення з джерела
VGA, якщо він інстальований достатньо близько
до відеокарти. Якщо на моніторі нема відео, слід
використати адаптер живлення, який входить до цього
комплекту.
www.aten.com
Nota: 1. O comprimento dos dois cabos VGA pode variar, mas a
distância máxima dos dois cabos em conjunto não poderá
exceder 70 metros.
2. O VB100 pode ser alimentado através da fonte VGA, caso
seja instalado suficientemente próximo da placa de vídeo,
para que esta forneça energia. Se o monitor não apresentar
imagens, deverá utilizar o transformador incluído nesta
embalagem.
하드웨어 리뷰 A
전면
1. 비디오 입력
2. 게인 / 보상 노브
3. 전원 잭
후면
1. 전원 ED
2. 비디오 출력
하드웨어 설치 B
1. HDB-15 VGA 케이블* 을 이용하여 컴퓨터의 비디오 포트를
VB100의 입력 포트에 연결합니다.
2. HDB-15 VGA 케이블*을 이용하여 VB100의 비디오 입력
포트에 모니터를 연결합니다.
3. 전원 어댑터 케이블**을 VB100의 전원잭에 연결합니다.
4. 게인/보상 노브를 이용하여 거리에 따른 조정과 디스플레이
품질을 개선합니다.
5. 하드웨어 설치가 완성되면 디스플레이는 사용준비를 마칩니다.
알림: 1. VGA 케이블의 두 개의 길이가 다를 수 있습니다. 하지만
2개의 VGA 케이블의 길이는 최대한 70미터를 초과하지
않습니다.
2. 비디오 카드가 충분한 전원을 공급할 수 있게 설치되어
있는 경우, VB100 는 VGA 소스로부터 전원을 공급받을
수 있습니다. 만약 모니터에 이미지가 안보이면 이
패키지에 포함되어 있는 전원 어댑터를 이용하세요.
Instalação do hardware B
1. Utilize um cabo VGA HDB-15* para ligar a porta de vídeo do
computador à porta de entrada de vídeo do VB100.
2. Utilize um cabo VGA HDB-15* para ligar o monitor à porta de saída
de vídeo do VB100.
3. Ligue o cabo do transformador** à ficha de alimentação do VB100.
4. Utilize o ajuste de Ganho/Compensação para melhorar a qualidade
da imagem, ajustando a distância.
5. Após a instalação do hardware, o monitor estará pronto a ser
utilizado.
VB100VGAブースター クイックスタートガイド
製品各部名称A
フロントパネル
1.ビデオ入力ポート
2.ゲイン/補正ツマミ
3.電源ジャック
リアパネル
1.電源LED
2.ビデオ出力ポート
セットアップB
1. コンピューターのビデオポートとVB100のビデオ入力ポートを
Dsub-15ピンVGAケーブル*で接続してください。
2. モニターとVB100のビデオ出力ポートをD-sub15ピンVGAケ
ーブル*で接続してください。
3. 電源アダプターのケーブル部分**をVB100の電源ジャックに接
続してください。
www.aten.com
サポートお問合せ窓口:+81-3-5615-5811
4. ゲイン/補正ツマミを使って、延長距離に合うように表示画質を
調節してください。
5. ハードウェアのセットアップが完了すると、ディスプレイが使
用できるようになります。
注意:1.使用するVGAケーブル2本の長さはそれぞれ異なっていて
も構いませんが、両方の長さの合計が70mを超えないよ
うにしてください。
2.VB100がVGAソースの近くにセットアップされ、ビデオ
カードに十分な電源がある場合は、このソースから給電さ
れます。モニターに正しく映らない場合は、製品に同梱さ
れている電源アダプターを必ず使用してください。
 Loading...