

ATEN VanCryst VS481A Quick Start Manual
B
Installation Diagram
VS481A 4-Port HDMI Switch Quick Start Guide
Commutateur HDMI VS481
A
à 4 ports – Guide de mise en route rapide
VS481
A
4-Port-HDMI-Switch Kurzanleitung
Conmutador HDMI de 4 puertos VS481
A
Guía rápida
www.aten.com
www.aten.com
www.aten.com
www.aten.com
A
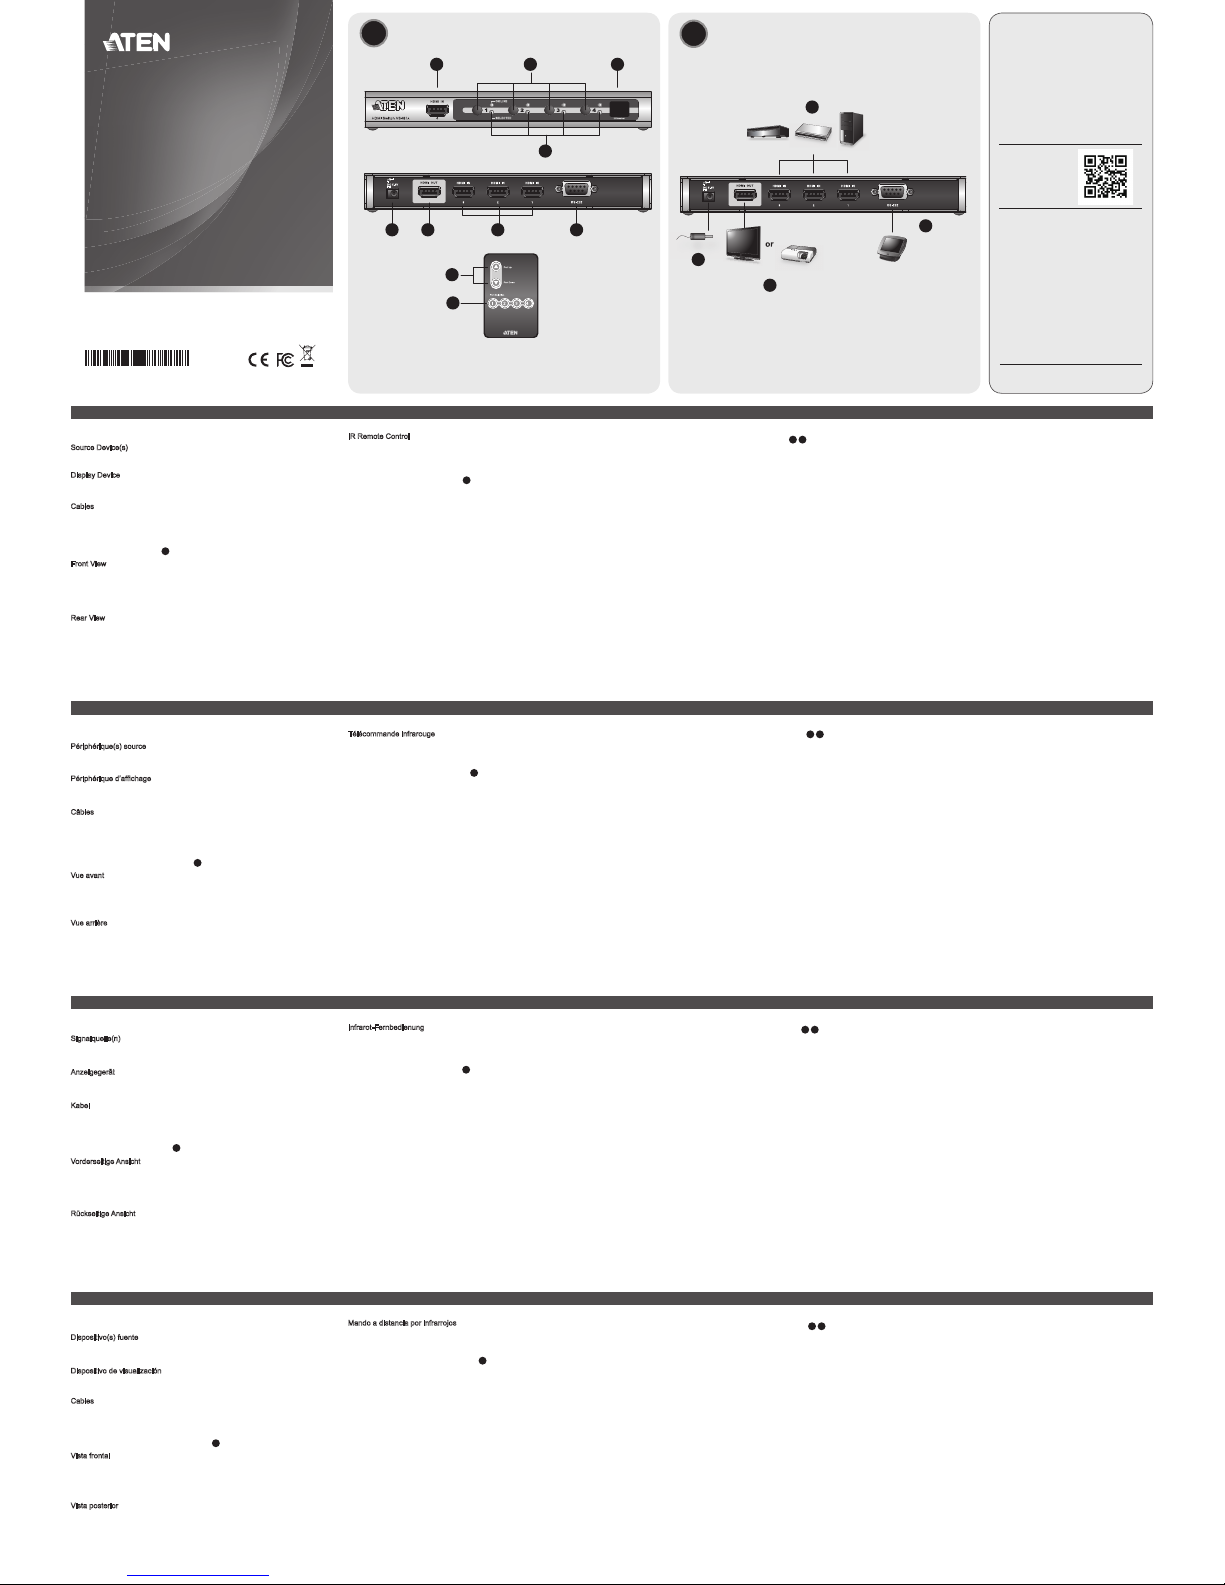
Hardware Review
Requirements
Source Device(s)
• HDMI Type A output connector(s)
Display Device
• A display device or receiver with an HDMI Type A input connector
Cables
• 4 HDMI cables
Note: Not all cables are included in this package.
Hardware review
A
Front View
1. HDMI In
2. Port Selection Pushbuttons
3. IR Receiver
4. Port LEDs
Rear View
1. Power Jack
2. HDMI Out
3. HDMI In
4. RS-232 Serial Port
IR Remote Control
1. Port Up / Port Down Buttons
2. Port Selection Buttons
Hardware Installation
B
• Ensure that all equipment to be connected is powered off.
• Make sure that all devices you will be connecting up are properly grounded.
1. Use an HDMI cable to connect the HDMI input port on the video display device to the HDMI output
port on the rear of the VS481
A
.
2. Use HDMI cables to connect the HDMI output ports on the source device(s) to the HDMI input
ports on the VS481A. Three HDMI input ports are located on the rear of the switch; the fourth
HDMI port is located on the front of the switch.
3. Plug the provided power adapter into an appropriate AC power source; plug the power adapter
cable into the Power Jack on the VS481A.
This completes the basic installation of the VS481A HDMI Switch. You may now power on the display
and source devices.
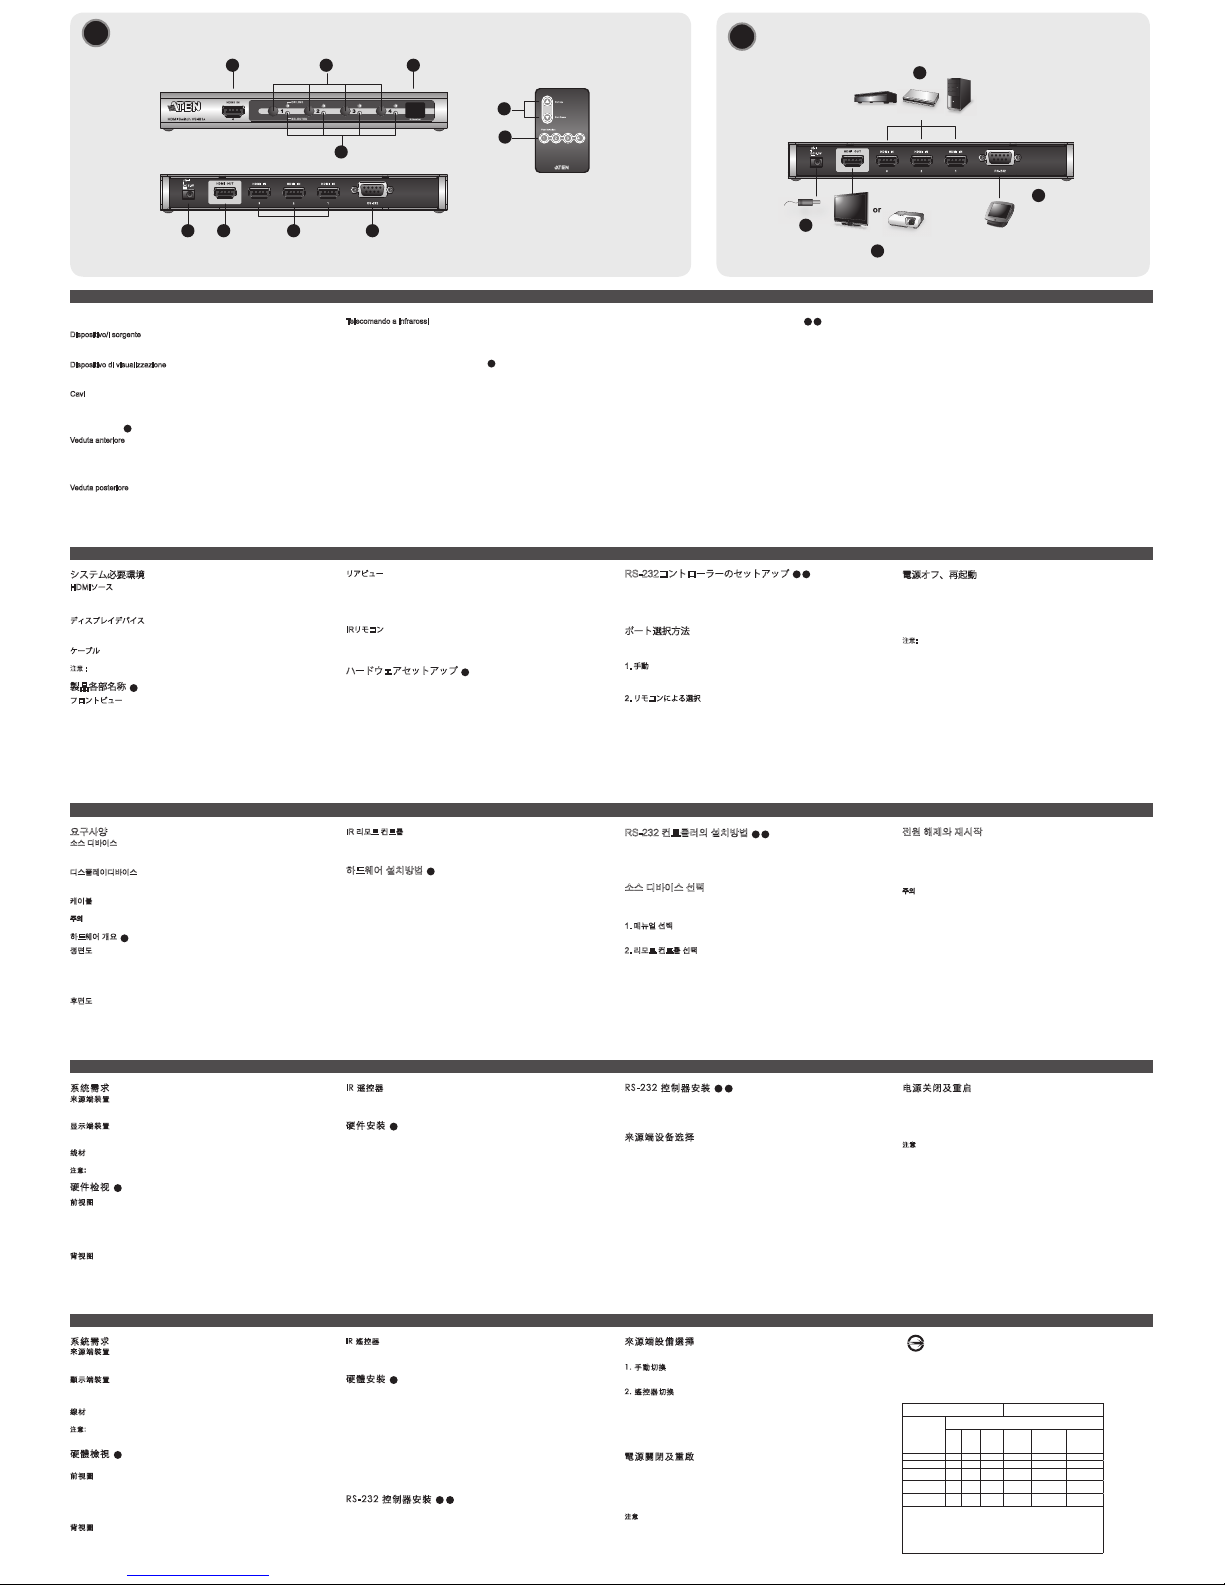
Installing the RS-232 Controller
B 4
In order to use the RS-232 serial interface to attach a high-end controller (such as a PC) to the
VS481
A
, use a serial cable such as a modem cable. The end connecting to the VS481A should have
a 9-pin male connector. Connect this to the serial interface on the rear of the VS481A.
Source Device Selection
The VS481A HDMI Switch offers easy and fl exible source device selection with either the front panel
pushbuttons, with the remote control, or through the RS-232 serial interface.
1. Manual Selection
To select a source device, press the Port Selection button that corresponds to the port it is
connected to.
2. Remote Control Selection
To select a source device with a remote control, press the number button that corresponds
to the port it is connected to.
Alternatively, you may also cycle through the available source devices by pushing the Port Up and
Port Down buttons on the remote control unit.
• Use the Port Up button to select the next available port in ascending order (from left to right
on the front view panel).
• Use the Port Down button to select the next available port in descending order (from right to
left on the front view panel).
Powering Off and Restarting
If you power off the VS481A, follows these steps before powering it on again:
1. Power off the attached devices.
2. Unplug the power adapter cable from the VS481A.
3. Wait 10 seconds, and then plug the power adapter cable back in.
4. After the VS481A is powered on, power on the attached devices.
Note: Whenever the VS481A is powered on, it automatically selects Port 1.
Confi guration requise
Périphérique(s) source
• Connecteur(s) de sortie HDMI de type A
Périphérique d’affi chage
• 1 périphérique d’affi chage ou récepteur équipé d’un connecteur d’entrée HDMI de type A
Câbles
• 4 câbles HDMI
Remarque : certains câbles mentionnés ne sont pas fournis avec le produit.
Description du matériel
A
Vue avant
1. Entrée HDMI
2. Boutons de sélection du port
3. Récepteur infrarouge
4. Voyants des ports
Vue arrière
1. Prise d’alimentation
2. Sortie HDMI
3. Entrée HDMI
4. Port série RS-232
Télécommande infrarouge
1. Boutons de sélection du port (Port Up / Port Down)
2. Boutons de sélection du port par numéro
Installation du matériel
B
• Vérifi ez que tous les appareils à connecter sont éteints.
• Assurez-vous que tous les appareils à connecter sont correctement reliés à la terre.
1. Utilisez un câble HDMI pour relier le port d’entrée HDMI du périphérique d’affi chage au port de
sortie HDMI situé à l’arrière du commutateur VS481
A
.
2. Utilisez des câbles HDMI pour relier les ports de sortie HDMI du ou des périphériques source aux
ports d’entrée HDMI du commutateur VS481A. Trois des quatre ports d’entrée HDMI se trouvent à l’
arrière du commutateur. Le quatrième se trouve à l’avant du commutateur.
3. Branchez une extrémité de l’adaptateur secteur fourni sur une prise de courant adaptée, et l’
autre extrémité sur la prise d’alimentation du commutateur VS481
A
.
L’installation de base du commutateur HDMI VS481
A
est terminée. Vous pouvez à présent allumer
les périphériques d’affi chage et source.
Confi guration de l’interface RS-232
B 4
Pour utiliser l’interface série RS-232 pour la connexion d’un contrôleur haut de gamme (ordinateur,
par exemple) au VS481
A
, utilisez un câble série, tel qu’un câble de modem. L’extrémité du câble à
relier au VS481
A
doit être équipée d’un connecteur mâle à 9 broches. Connectez-la à l’interface série
située à l’arrière du VS481
A
.
Sélection du périphérique source
Le commutateur HDMI VS481A permet de sélectionner rapidement et simplement le périphérique
source désiré à l’aide des boutons du panneau avant, de la télécommande ou de l’interface série RS-
232.
1. Sélection manuelle
Pour sélectionner manuellement un périphérique source, appuyez sur le bouton de
sélection du port correspondant au port auquel il est connecté.
2. Sélection à l’aide de la télécommande
Pour sélectionner un périphérique source à l’aide de la télécommande, appuyez sur la
touche numérique correspondant au numéro de port auquel il est connecté.
Vous pouvez également faire défi ler les périphériques source disponibles en appuyant sur les
boutons Port Up et Port Down de la télécommande.
• Utilisez le bouton Port Up pour sélectionner le port suivant disponible dans un ordre
croissant (de gauche à droite sur le panneau avant).
• Utilisez le bouton Port Down pour sélectionner le port suivant disponible dans un ordre
décroissant (de droite à gauche sur le panneau avant).
Arrêt et redémarrage du commutateur
Si vous éteignez le VS481A, procédez comme suit avant de le redémarrer :
1. Éteignez les périphériques auxquels il est relié.
2. Débranchez le câble de l’adaptateur secteur du VS481
A
.
3. Patientez 10 secondes, puis rebranchez le câble de l’adaptateur secteur.
4. Une fois le VS481
A
allumé, vous pouvez rallumer les périphériques auxquels il est relié.
Remarque : lorsque le VS481
A
est allumé, le port 1 est automatiquement sélectionné.
Voraussetzungen
Signalquelle(n)
• HDMI Typ A-Ausgang bzw. -Ausgänge
Anzeigegerät
• Anzeigegerät oder Receiver mit HDMI-Typ-A-Eingang
Kabel
• 4 HDMI-Kabel
Hinweis: Nicht alle Kabel sind im Lieferumfang enthalten.
Hardwareübersicht
A
Vorderseitige Ansicht
1. HDMI-Eingang
2. Portauswahl (Drucktasten)
3. Infrarot-Empfänger
4. Port-LEDs
Rückseitige Ansicht
1. Stromeingangsbuchse
2. HDMI-Ausgang
3. HDMI-Eingang
4. Serieller RS-232-Port
Infrarot-Fernbedienung
1. Tasten Port auf / Port ab
2. Portauswahltasten
Hardware installieren
B
• Schalten Sie alle anzuschließenden Geräte aus.
• Stellen Sie sicher, dass alle anzuschließenden Geräte ordnungsgemäß geerdet sind.
1. Verbinden Sie die HDMI-Eingangsbuchse am Video-Anzeigegerät mit dem HDMI-Ausgang an der
Rückseite des VS481
A
. Verwenden Sie dazu ein HDMI-Kabel.
2. Verbinden Sie die HDMI-Ausgänge der Signalquelle(n) mit den HDMI-Eingängen am VS481
A
.
Verwenden Sie dazu je ein HDMI-Kabel. Drei der HDMI-Eingänge befi nden sich auf der Rückseite
des Switches. Der vierte HDMI-Port befi ndet sich auf der Vorderseite am switch.
3. Schließen Sie das mitgelieferte Netzteil an eine stromführende Steckdose an, und verbinden Sie
das Kabel des Netzteils mit dem VS481
A
.
Damit ist die Installation des HDMI-Switches VS481
A
abgeschlossen. An dieser Stelle können Sie die
Anzeigegeräte und die Grafi ksignalquellen einschalten.
RS-232-Steuereinheit anschließen
B 4
Um die serielle RS-232-Schnittstelle mit einer Hochleistungs-Steuereinheit (z.B. einem PC) für den
VS481
A
einzusetzen, verwenden Sie ein serielles Kabel (z.B. ein Modemkabel). Das eine Ende des
Kabels sollte einen 9-poligen Stecker (Männlein) besitzen. Verbinden Sie diesen mit der seriellen
Schnittstelle auf der Rückseite des VS481
A
.
Signalquelle auswählen
Der HDMI-Switch VS481A bietet eine einfache Auswahl der gewünschten Signalquelle über die
vorderseitigen Drucktasten, über die Fernbedienung oder über die serielle RS-232-Schnittstelle.
1. Manuelle Auswahl
Um eine Signalquelle auszuwählen, drücken Sie den Auswahlschalter, der den Port des
angeschlossenen Gerätes darstellt.
2. Auswahl per Fernbedienung
Um eine Signalquelle über die Fernbedienung auszuwählen, drücken Sie die Zifferntaste
mit der Nummer, die den Port den angeschlossenen Gerätes darstellt.
Alternativ dazu können Sie die Taste Port auf/ab auf der Fernbedienung drücken, um zyklisch
zwischen den Signalquellen umzuschalten.
• Drücken Sie die Taste „Port auf“, um auf den nächsten verfügbaren Port umzuschalten (von
links nach rechts am vorderseitigen Bedienfeld).
• Drücken Sie die Taste „Port ab“, um auf den vorigen verfügbaren Port umzuschalten (von
rechts nach links am vorderseitigen Bedienfeld).
Ausschalten und neu starten
Wenn Sie den VS481A ausgeschaltet haben, gehen Sie folgendermaßen vor, um ihn wieder
einzuschalten:
1. Schalten Sie alle angeschlossenen Geräte aus.
2. Ziehen Sie das Kabel des Netzteils vom VS481
A
ab.
3. Warten Sie 10 Sekunden, und schließen Sie das Kabel des Netzteils wieder an.
4. Nachdem der VS481
A
eingeschaltet wurde, können Sie die angeschlossenen Geräte
einschalten.
Hinweis: Nachdem Sie den VS481
A
eingeschaltet haben, ist automatisch Port 1 ausgewählt.
Requisitos
Dispositivo(s) fuente
• Conector(es) de salida HDMI de tipo A
Dispositivo de visualización
• Un dispositivo de visualización o un receptor con entrada HDMI de tipo A
Cables
• 4 cables HDMI
Nota: no todos los cables vienen incluidos en el paquete.
Presentación del hardware
A
Vista frontal
1. Entrada HDMI
2. Botones de selección de puerto
3. Receptor de infrarrojos
4. Indicadores LED de los puertos
Vista posterior
1. Entrada de alimentación
2. Salida HDMI
3. Entrada HDMI
4. Puerto serie RS-232
Mando a distancia por infrarrojos
1. Botones de selección de puerto (Port Up / Port Down)
2. Botones de selección de puerto por número
Instalación del hardware
B
• A pague todos los equipos que vaya a conectar.
• Asegúrese de que todos los equipos que vaya a instalar tengan una toma de tierra adecuada.
1. Conecte el puerto de entrada HDMI del dispositivo de visualización al puerto de salida HDMI en la
parte posterior del VS481
A
. Para ello, utilice un cable HDMI.
2. Conecte los puertos de salida HDMI de los dispositivos fuente a los puertos de
entrada HDMI del VS481A. Para ello, utilice cables HDMI. Tres de los cuatro puertos
de entrada HDMI se encuentran en la parte posterior del conmutador ; el cuarto se
encuentra en el panel frontal del conmutador.
3. Conecte un extremo del adaptador de alimentación incluido a una toma eléctrica y el otro
extremo a la entrada de corriente del conmutador VS481
A
.
La instalación básica del conmutador HDMI VS481
A
ha concluido. A continuación podrá encender el
monitor y los dispositivos fuente de señal.
Confi guración de la interfaz RS-232
B 4
Para utilizar la interfaz serie RS-232 para la conexión de una controladora de altas prestaciones (por
ej. un ordenador) al VS481
A
, use un cable serie, como un cable de módem. El extremo del cable
que se conecta al VS481
A
debe disponer de un conector macho de 9 patillas. Conéctelo a la interfaz
serie en la parte posterior del VS481
A
.
Selección de un dispositivo fuente
El conmutador HDMI VS481A permite seleccionar simple y rápidamente el dispositivo fuente
mediante los botones del panel frontal, el mando a distancia o la interfaz serie RS-232.
1. Selección manual
Para seleccionar manualmente un dispositivo fuente, pulse el conmutador del panel frontal
que corresponde al puerto donde tiene conectado el dispositivo en cuestión.
2. Selección mediante el mando a distancia
Para seleccionar un dispositivo fuente con el mando a distancia, pulse la tecla numérica
que corresponde al número del puerto donde tiene conectado el dispositivo en cuestión.
También puede pulsar los botones Port Up y Port Down del mando a distancia para alternar
cíclicamente entre las diferentes fuentes de señal.
• Pulse el botón Port Up para seleccionar el siguiente puerto disponible en orden creciente
(de izquierda a derecha en el panel frontal).
• Pulse el botón Port Down para seleccionar el siguiente puerto disponible en orden
decreciente (de derecha a izquierda en el panel frontal).
Apagado y reinicio del conmutador
Si apaga el VS481A, siga estos pasos antes de volver a encenderlo:
1. Apague todos los dispositivos conectados.
2. Desconecte el cable del adaptador de alimentación del VS481
A
.
3. Espere 10 segundos y vuelva a conectar el adaptador de alimentación.
4. Una vez que el VS481
A
se haya iniciado, encienda los dispositivos conectados.
Nota: cuando el VS481
A
está encendido, el puerto 1 queda automáticamente seleccionado.
Front View
Rear View
Package Contents
1 VS481A HDMI Switch
1 Standard HDMI Cable
1 Remote Control Unit
1 Power Adapter
1 User Manual
1 Quick Start Guide
1 2 3
4
1
2
Power Adapter
IR Remote Control
HDTV (HDMI)
Projector
DVD Player Set-top Box
Computer
Hardware / Software Controller
1 2 3 4
2
3
1
4
© Copyright 2018 ATEN® International Co., Ltd.
ATEN and the ATEN logo are trademarks of ATEN International Co., Ltd. All rights reserved. All
other trademarks are the property of their respective owners.
Part No. PAPE-1223-361G Printing Date: 11/2018
4-Port HDMI Switch
Quick Start Guide
VS481A
ATEN VanCryst
™
Support and Documentation Notice
All information, documentation, fi rmware,
software utilities, and specifi cations
contained in this package are subject to
change without prior notifi cation by
the manufacturer.
To reduce the environmental impact of our
products, ATEN documentation and software
can be found online at
http://www.aten.com/download/
Technical Support
www.aten.com/support
EMC Information
FEDERAL COMMUNICATIONS COMMISSION INTERFERENCE STATEMENT:
This equipment has been tested and found to comply with the limits for
a Class B digital service, pursuant to Part 15 of the FCC rules. These limits
are designed to provide reasonable protection against harmful interference
in a residential installation. Any changes or modifi cations made to this
equipment may void the user s authority to operate this equipment. This
equipment generates, uses, and can radiate radio frequency energy. If not
installed and used in accordance with the instructions, may cause harmful
interference to radio communications. However, there is no guarantee that
interference will not occur in a particular installation. If this equipment does
cause harmful interference to radio or television reception, which can be
determined by turning the equipment off and on, the user is encouraged to
try to correct the interference by one or more of the following measures:
- Reorient or relocate the receiving antenna;
- Increase the separation between the equipment and receiver;
- Connect the equipment into an outlet on a circuit different from
that to which the receiver is connected;
- Consult the dealer/an experienced radio/television technician for help.
FCC Caution: Any changes or modifi cations not expressly approved by the
party responsible for compliance could void the user's authority to operate
this equipment.
This device complies with Part 15 of the FCC Rules. Operation is subject
to the following two conditions: (1) this device may not cause harmful
interference, and (2) this device must accept any interference received,
including interference that may cause undesired operation.
Scan for
more information
이 기기는 가정용(B급) 전자파적합기기로서 주로 가정에
서 사용하는 것을 목적으로 하며, 모든 지역에서 사용할
수 있습니다.
www.aten.com
技術服務專線:+886-2-8692-6959
VS481
A
4-Port HDMI Switch – Guida rapida
VS481A 4-포트HDMI 스위치 빠른 사용 가이드
VS
481A 4
-
ポート
HDMI
スイッチ クイックスタ ートガイド
VS481A 4端口HDMI 切换器快速安装卡
VS481
A
4埠HDMI 切換器快速安裝卡
www.aten.com
www.aten.com
サポートお問合せ窓口:+81-3-5615-5811
www.aten.com Phone: +82-2-467-6789
www.aten.com
电话支持:
+86-400-810-0-810
系統需求
來源端裝置
•
HDMI Type A 輸出連接埠
顯示端裝置
•
配備一組HDMI Type A輸入連接埠的顯示或接收裝置
線材
•
4條HDMI 線材
注意: 本產品包裝內並無包含所有線材
硬體檢視
A
前視圖
1. HDMI 輸入連接埠
2. 連接埠選擇按鍵
3. IR 接收器
4. 連接埠LED指示燈
背視圖
1. 電源插孔
2. HDMI 輸出連接埠
3. HDMI 輸入連接埠
4. RS-232 序列連接埠
IR 遙控器
1. 下一埠(Port Up) / 前一埠(Port Down)按鍵
2. 連接埠選擇按鍵
硬體安裝
B
•
請確認所有連接的設備之電源,皆已關閉
•
請確認所有欲連接之裝置,皆已適當安全地完成接地
1. 使用HDMI線材,連接顯示設備上的HDMI輸入連接埠,至VS481
A
背板上的
HDMI輸出連接埠。
2. 使用HDMI線材,連接視訊來源端設備上的HDMI輸出連接埠,至切換器背板
上的HDMI輸入連接埠。本產品於切換器的背板上提供三個 HDMI 輸入連接
埠;而第四個 HDMI輸入連接埠則位於切換器的前板。
3. 將包裝中所附的電源變壓器,插入適當的AC電源,並將變壓器的另一端插至
HDMI切換器上的電源插孔。
完成上述的安裝程序後,您可開啟顯示器及來源端設備之電源。
RS-232 控制器安裝
B 4
本產品提供一個RS-232序列連接介面,以方便連接高階控制器(如個人電腦)至本
產品;您需使用一條序列線材,如數據機的連接線,其連接VS481A的一端,必須
為9針腳的連接頭(公),以便於接續VS481A背板上的序列介面。
來源端設備選擇
VS481A HDMI切換器可使用如下兩種方式,以切換選擇不同的連接埠。
1. 手動切換
可按下切換器上各連接埠所對應的選擇按鍵,以選擇來源端設備。
2. 遙控器切換
可透過遙控器上相對應於各連接埠號碼的按鍵,以切換選擇來源端。
另外,您亦可使用遙控器,以”Port Up”及”Port Down”的切換方式,以選
擇欲使用的來源端設備。
•
使用Port Up按鍵以依序選擇下一個可用的連接埠(前板上從左至右)。
•
使用Port Down按鍵以依序選擇前一個可用的連接埠(前板上從右至左)。
電源關閉及重啟
如果您欲關閉VS481A的電源,於再次重啟電源前,請依照如下步驟:
1. 關閉所有已接續的裝置之電源。
2. 將VS481A上的電源變壓器拔除。
3. 等待十秒後,再將電源變壓器插回。
4. VS481A電源開啟後,開啟所有接續裝置之電源。
注意: 無論您何時開啟VS481A HDMI切換器,該切換器將自動選擇至第一
連接埠。
D33866
RoHS
警告使用者: 此為甲類資訊技術設備,
於居住環境中使用時,可能會造成射頻
擾動,在此種情況下,使用者會被要求
採取某些適當的對策。
- 最大額定電壓: DC 5.3V, 0.94A
- 最大操作環境溫度: 50˚C
專業級影音類產品
設備名稱: 4埠 HDMI 影音切換器
Equipment name
型號 (型式
) : VS481A
Type designation (Type)
單元
Unit
限用物質及其化學符號
Restricted substances and its chemical symbols
鉛
Lead
(Pb)
汞
Mercury
(Hg)
鎘
Cadmium
(Cd)
六價鉻
Hexavalent
chromium
(Cr
+6
)
多溴聯苯
Polybrominated
biphenyls
(PBB)
多溴二苯醚
Polybrominated
diphenyl ethers
(PBDE)
電纜線
Cable
- ○ ○ ○ ○ ○
印刷電路部件
PCBA
- ○ ○ ○ ○ ○
塑膠/其他部件
Plastic /Others parts
○ ○ ○ ○ ○ ○
金屬部件
Metal parts
- ○ ○ ○ ○ ○
遙控器
Remote Control
- ○ ○ ○ ○ ○
備考
1. "超出0.1 wt %"及"超出0.01 wt %"
係指限用物質之百分比含量超出百分比含量基準值。
Note 1: "Exceeding 0.1 wt %" and "exceeding 0.01 wt %" indicate that the percentage content
of the restricted substance exceeds the reference percentage value of presence condition.
備考
2. "○"
係指該項限用物質之百分比含量未超出百分比含量基準值。
Note 2: "○" indicates that the percentage content of the restricted substance does not exceed
the percentage of reference value of presence.
備考
3. "-"
係指該項限用物質為排除項目。
Note 3: The "-" indicates that the restricted substance corresponds to the exemption.
製造商:宏正自動科技股份有限公司
地址:新北市汐止區大同路二段 125號三樓
系统需求
来源端装置
•
HDMI Type A 输出连接口
显示端装置
•
配备一组HDMI Type A输入连接口的显示或接收装置
线材
• 4条HDMI 线材
注意 本产品包装内并无包含所有线材
硬件检视
A
前视图
1. HDMI 输入连接口
2. 连接口选择按键
3. IR 接收器
4. 连接口LED指示灯
背视图
1. 电源插孔
2. HDMI 输出连接口
3. HDMI 输入连接口
4. RS-232 串口连接口
IR 遥控器
1. 下一端口(Port Up) / 前一端口(Port Down)按键
2. 连接口选择按键
硬件安装
B
•
请确认所有连接的设备之电源,皆已关闭
•
请确认所有欲连接之装置,皆已适当安全地完成接地
1. 使用HDMI线材,连接显示设备上的HDMI输入连接口,至VS481
A
背板上的
HDMI输出连接口。
2. 使用HDMI线材,连接视频来源端设备上的HDMI输出连接口,至切换器背板上
的HDMI输入连接口。本产品于切换器的背板上提供三个HDMI输入连接口;而
第四个HDMI输入连接口则位于切换器的前板。
3. 将包装中所附的电源适配器,插入适当的AC电源,并将适配器的另一端插至
HDMI切换器上的电源插孔。
完成上述的安装程序后,您可开启显示器及来源端设备之电源。
RS-232 控制器安装
B 4
本产品提供一個RS-232串口连接口,以方便连接高阶控制器(如个人电脑)至本产
品;您需使用一條串口线材,如调制解调器的连接线,其连接VS481A的一端,必
须为9针脚的连接头(公),以便于接续VS481
A
背板上的串口接口
来源端设备选择
VS481A HDMI切换器可使用如下两种方式,以切换选择不同的连接口。
1. 手动切换
可按下切换器上,各连接口所对应的选择按键,以选择来源端设备。
2. 遥控器切换
可通过遥控器上,相对应于各连接口号码的按键,以切换选择来源端。
另外,您亦可使用遥控器,以”Port Up”及”Port Down”的切换方式,以
选择欲使用的来源端设备。
•
使用Port Up按键以依序选择下一个可用的连接口(前板上从左至右)。
•
使用Port Down按键以依序选择前一个可用的连接口(前板上从右至左)。
电源关闭及重启
如果您欲关闭VS481A的电源,于再次重启电源前,请依照如下步骤:
1. 关闭所有已接续的装置之电源。
2. 将VS481
A
上的电源适配器拔除。
3. 等待十秒后,再将电源适配器插回。
4. VS481A电源开启后,开启所有接续装置之电源。
注意: 无论您何时开启VS481A HDMI切换器,该切换器将自动选择至第一
连接口。
Requisiti
Dispositivo/i sorgente
• Connettore/I d’uscita HDMI tipo A
Dispositivo di visualizzazione
• Un dispositivo di visualizzazione o un ricevitore con un connettore d’entrata HDMI tipo A
Cavi
• 4 cavi HDMI
Nota: Non tutti i cavi sono inclusi nella confezione.
Hardware
A
Veduta anteriore
1. Entrata HDMI
2. Pulsanti di selezione della porta
3. Ricevitore ad infrarossi
4. LED della porta
Veduta posteriore
1. Presa d’alimentazione
2. Uscita HDMI
3. Entrata HDMI
4. Porta seriale RS-232
Telecomando a infrarossi
1. Pulsanti Porta Su/Porta Giù
2. Pulsanti di selezione della porta
Installazione dell’hardware
B
• Accertarsi che tutti i dispositivi da collegare siano spenti.
• Assicurarsi che tutti i dispositivi da collegare siano dotati di adeguata messa a terra
1. Usare un cavo HDMI per collegare la porta in entrata HDMI del dispositivo video alla porta
in uscita HDMI sul retro del VS481
A
.
2. Usare i cavi HDMI per collegare le porte in uscita HDMI del/dei dispositivo/i sorgente alle
porte in entrata HDMI del VS481
A
. Tre porte in entrata HDMI si trovano sul retro dell’
interruttore, mentre le quarta è situata sul lato anteriore.
3. Inserire la spina dell’alimentatore in dotazione in una presa di corrente CA, quindi inserire il
cavo dell’alimentatore nella presa d’alimentazione del VS481
A
.
Così facendo, l’installazione base dell’interruttore VS481
A
è completata. A questo punto è possibile
accendere lo schermo e i dispositivi sorgente.
Installazione del controller RS-232
B 4
Per collegare un controller sofi sticato (come un PC) al VS481
A
tramite l’interfaccia seriale RS-232,
utilizzare un cavo seriale come quello di un modem. L’estremità da collegare al VS481
A
dovrà essere
dotata di un connettore maschio a 9 pin. Collegare tale estremità all’interfaccia seriale sul retro del
VS481
A
.
Selezione del dispositivo sorgente
Il VS481A HDMI Switch consente una facile e fl essibile selezione del dispositivo sorgente tramite i
pulsanti anteriori, il telecomando o l’interfaccia RS-232.
1. Selezione manuale
Per selezionare un dispositivo sorgente, premere e l’interruttore di selezione della porta
corrispondente alla porta a cui è collegato il dispositivo.
2. Selezione da telecomando
Per selezionare un dispositivo sorgente tramite telecomando, premere il pulsante numerato
corrispondente alla porta a cui è collegato il dispositivo.
In alternativa, è possibile spostarsi circolarmente fra i dispositivi sorgente disponibili premendo i
pulsanti Porta su/Porta giù sul telecomando.
• Utilizzare il pulsante Porta Su per selezionare la porta disponibile in ordine crescente (da
sinistra a destra sul pannello anteriore).
• Utilizzare il pulsante Porta Giù per selezionare la porta disponibile in ordine decrescente (da
destra a sinistra sul pannello anteriore).
Spegnimento e riavvio
Se si spegne il VS481A, seguire queste indicazioni prima di riaccenderlo:
1. Spegnere i dispositivi collegati.
2. Scollegare il cavo dell’alimentatore dal VS481
A
.
3. Attendere dieci secondi e ricollegare il cavo dell’alimentatore.
4. Una volta acceso il VS481
A
, accendere i dispositivi collegati.
Nota: Quando il VS481
A
viene acceso, viene selezionata automaticamente la porta 1.
요구사양
소스 디바이스
•
HDMI 타입 A output 커넥터
디스플레이디바이스
• 디스플레이
디바이스 또는 HDMI 타입 A input 커넥터를 가진 리시버
케이블
•
4 HDMI 케이블
: 일부 케이블은 본 패키지에 포함되지 않습니다.
하드웨어 개요
A
정면도
1. HDMI In
2.
포트선택 누름버튼
3. IR 리시버
4. 포트 LED
후면도
1. 전원 잭
2. HDMI Out
3. HDMI IN
4. RS-232
시리얼 포트
IR 리모트 컨트롤
1. 포트 Up / 포트 Down 버튼
2. 포트선택 버튼
하드웨어 설치방법
B
• 모든
장비의 전원이 꺼진 것을 확인하여 주십시오.
• 모든
디바이스가 바르게 접지되어 있는지 확인하여 주십시오.
1. HDMI
케이블을 사용하여 비디오 디스플레이 디바이스의 HDMI input 포트와
VS481
A
후면의 HDMI output 포트를 연결하십시오.
2. HDMI
케이블을 사용하여 소스 디바이스의 HDMI output 포트와 VS481A 의
HDMI input 포트를 연결하십시오. 세 개의 HDMI input 포트가 스위치의 후면
에 위치하고 있으며 네번째 HDMI 포트는 스위치의 정면에 위치합니다.
3.
제공된 전원 아답터를 해당 AC 전원 소스에 연결한 후 전원 아답터 케이블을
VS481
A
의전원 잭에 연결하십시오.
이것으로 VS481
A
HDMI 스위치의 기본 설치가 완료됩니다. 디스플레이와 소스
디바이스의 전원을 연결하십시오.
RS-232 컨트롤러의 설치방법
B 4
RS-232 시리얼 인터페이스로 하이엔드 컨트롤러(PC 등)와 VS481
A
를 연결할 경우
시리얼 케이블(모뎀 케이블 등)을 연결하여 이용하십시오. VS481A의 연결끝부분에는
9-pin
수 커넥터로 되어있으며, 이것을 VS481A의 후면에 위치한 시리얼 인터페이스에
연결하십시오.
소스 디바이스 선택
VS481A HDMI 스위치는 보다 쉽고 유용한 소스 디바이스 선택을 위하여 정면 패널의
누름 버튼, 리모트 컨트롤, RS-232 시리얼 인터페이스를 제공합니다.
1. 매뉴얼 선택
소스 디바이스의 선택을 위하여 포트선택 버튼을 눌러 해당 포트를 선택하십시오.
2. 리모트 컨트롤 선택
소스 디바이스의 선택을 위하여 리모트 컨트롤을 사용하여 숫자 버튼을 눌러 해
당 포트를 선택하십시오.
또한 소스 디바이스 선택을 리모트 컨트롤의 포트 Up, 포트 Down 버튼으로
조정합니다.
• 포트
Up 버튼은 연결순서의 다음포트(정면 패널의 왼쪽에서 오른쪽순)로 이동하
게 합니다.
• 포트
Down 버튼은 연결순서의 다음포트(정면 패널의 오른쪽에서 왼쪽순)로 이동
하게 합니다.
전원 해제와 재시작
VS481A 의 전원을 해제할 경우 다음 절차에 따라 해제한 후 재시작 하십시오.
1.
연결된 디바이스의 전원을 해제합니다.
2. VS481
A
의 전원 아답터 케이블을 연결해제 하십시오.
3.
약 10초 후, 전원 아답터 케이블을 다시 연결하십시오.
4. VS481
A
의 전원이 연결된 후, . 연결된 디바이스의 전원을 켭니다.
주의:
VS481A 의 전원이 켜진 경우, 자동적으로 포트 1이 선택됩니다.
システム必要環境
HDMIソース
• HDMI タイプA 出力可能なデバイス
ディスプレイデバイス
• HDMI表示可能なディスプレイまたはHDMI入力対応のAV機器
ケーブル
• HDMIケーブル ×4
注意 : ケーブルは同梱されていません。
製品各部名称
A
フロントビュー
1. HDMI入力
2. ポート選択プッシュボタン
3. IRレシーバ
4. ポートLED
リアビュー
1. 電源ジャック
2. HDMI出力
3. HDMI入力
4. RS-232 シリアルポート
IRリモコン
1. Port Up/Port Downボタン
2. ポート選択ボタン
ハードウェアセットアップ
B
• 接続する全ての製品の電源をオフにしてください。
• コンピュータやデバイスへのダメージを避けるために、接続されているすべての
デバイスが正しくアースされているか確認してください。
1. HDMIケーブルを使用して、ビデオディスプレイ装置のHDMI入力ポートとVS481
A
のリアパネルにあるHDMI出力ポートを接続してください。
2. HDMIケーブルを使用して、HDMIソースとなるデバイスのHDMI出力ポートと
VS481
A
のHDMI入力ポートを接続してください。ポート1~3のHDMI入力ポート
は、スイッチのリア部分にあります。ポート4のHDMI入力ポートは、スイッチの
フロント部分にあります。
3. 同梱の電源コードをスイッチの電源ソケットに接続してから、AC電源コンセント
に接続してください。
以上でセットアップが完了です。ディスプレイおよび接続したデバイスの電源をオン
にしてください。
RS-232コントローラーのセットアップ
B 4
VS481
A
にハイエンドコントローラー(PC等)を接続するためにRS-232シリアルイン
ターフェースを使用する場合、モデムケーブル等のシリアルケーブルを使用します。
シリアルケーブルは、
9ピンのオスコネクタが必要です。これをVS481
A
リア部分の
シリアルインターフェースに接続します。
ポート選択方法
VS481A HDMIスイッチは、フロントパネルのプッシュボタン、リモコン、RS-232
シリアルインターフェースからフレキシブルにデバイス選択をすることが可能です。
1. 手動
デバイスを選択するには、切り替えたいポートのポート選択ボタンを押して
下さい。
2. リモコンによる選択
リモコンでデバイスを選択するには、切り替えたいポートのポート番号を押して
ください。
また、リモコンのPort Up及びPort Downボタンを押しても、同様にデバイスを選択
することができます。
• Port Upボタンは、フロントビューパネルの左から右へ(ポート1→2→3→4の
順番で) 接続されている次のポートを選択します。
• Port Downボタンは、フロントビューパネルの右から左へ(ポート4→3→2→1の
順番で) 接続されている次のポートを選択します。
電源オフ、再起動
VS481
A
の電源をオフにした場合には、再度電源をオンにする前に以下のステップを
踏んでください:
1. 接続したデバイスの電源をオフにしてください。
2. VS481
A
から電源アダプタケーブルを抜いてください。
3. 10秒程度待ってから、再び電源アダプタケーブルを挿してください。
4. VS481
A
の電源を入れてから、接続デバイスの電源を入れてください。
注意: VS481
A
HDMI スイッチの電源がオンになると、自動的にポート1が選択され
ます。
A
Hardware Review
B
Installation Diagram
Power Adapter
HDTV (HDMI)
Projector
DVD Player Set-top Box
Computer
Hardware / Software Controller
2
3
1
Front View
Rear View
Package Contents
1 VS481A HDMI Switch
1 Standard HDMI Cable
1 Remote Control Unit
1 Power Adapter
1 User Manual
1 Quick Start Guide
1 2 3
4
1
2
IR Remote Control
1 2 3 4
4
 Loading...