

ATEN VanCryst VC160A User Manual

VC160A VGA to DVI Converter User Guide
Guide l’utilisateur du convertisseur VGA-DVI VC160A
VC160A VGA-auf-DVI-Konverter Benutzerhandbuch
VC160A Convertidor VGA a DVI Manual del usuario
Requirements
Device(s)
• A PC/Laptop equipped with a VGA card
• A Mac equipped with a DVI graphic card*
• A DVI enabled display device
*Note: A DVI to VGA Converter for Mac is required.
Cables
• VGA cable
• DVI cable
Note: The cables are not included in this package.
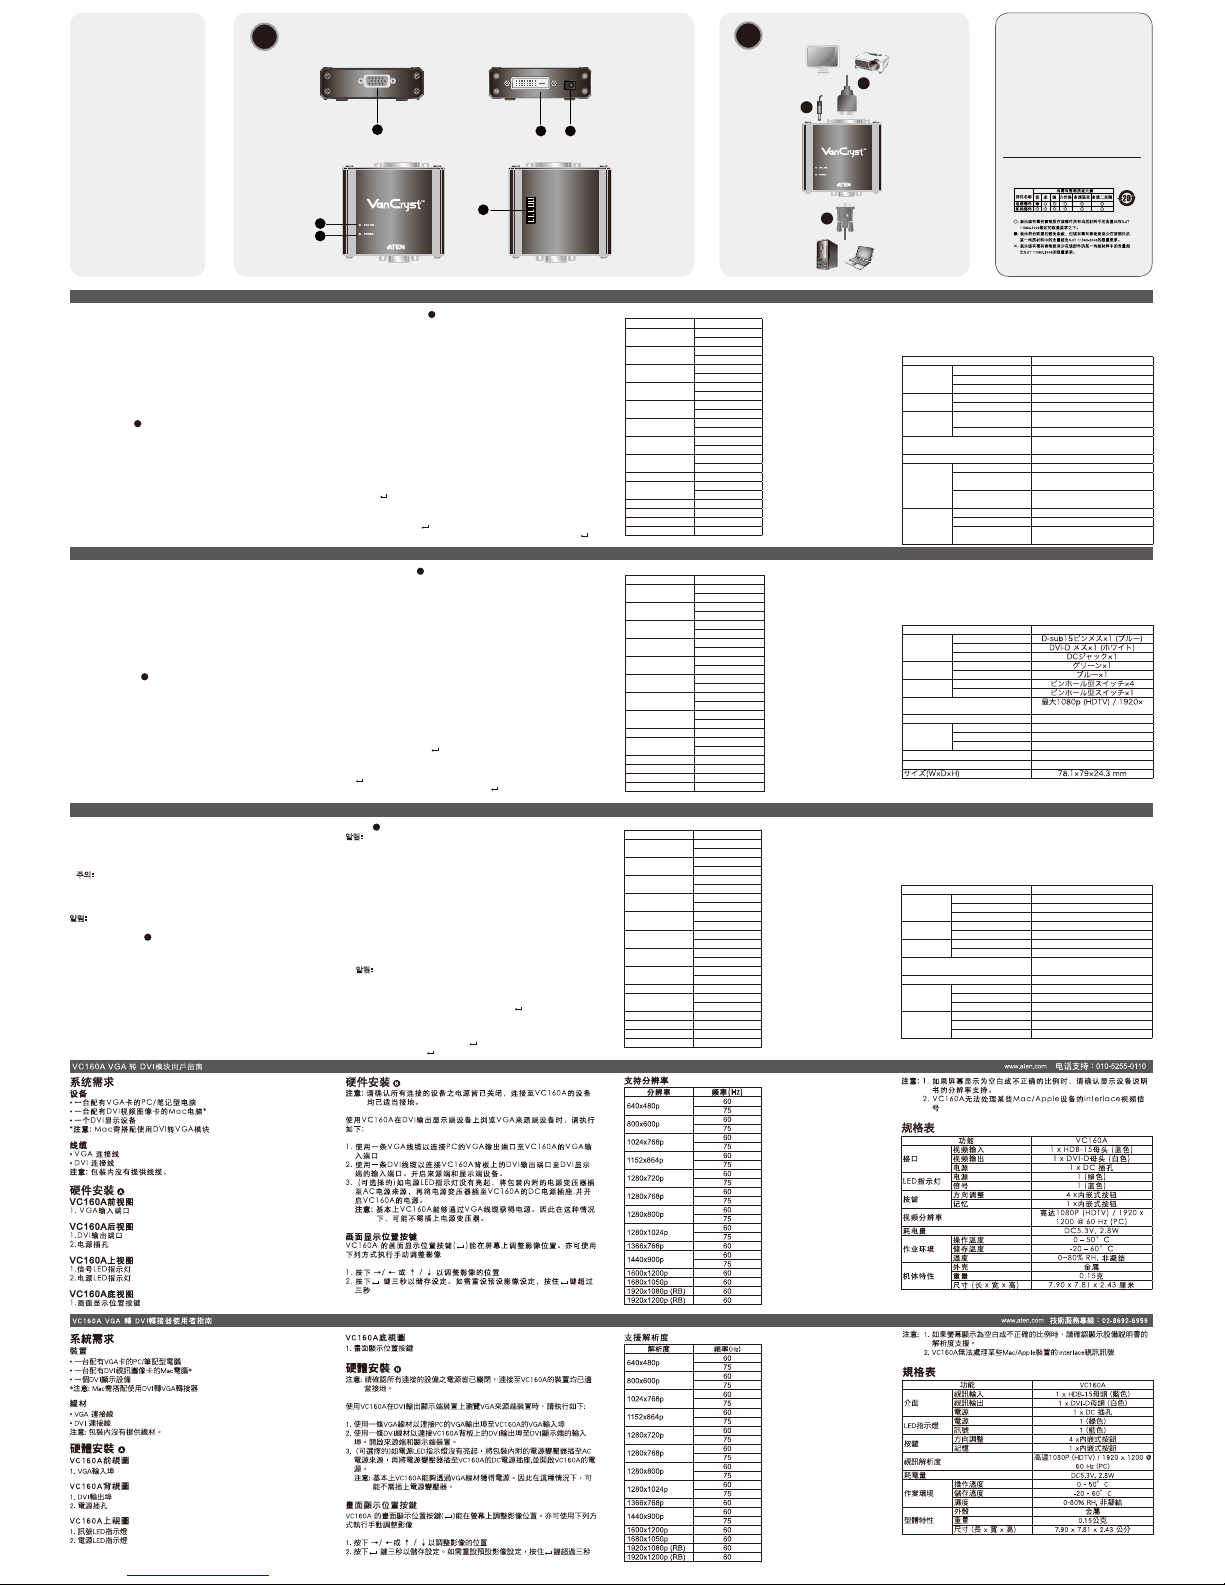
Hardware Review A
VC160A Front view
1. VGA IN Port
VC160A Rear view
1. DVI OUT Port
2. Power jack
VC160A Top view
1. Online LED
2. Power LED
VC160A Bottom view
1. Screen Position Buttons
Voraussetzungen
Gerät(e)
• Ein PC/Laptop mit VGA-Grafi kkarte
• Macintosh-Computer mit DVI-Grafi kkarte*
• Ein DVI-kompatibles Anzeigegerät
* Hinweis: Hierzu benötigen Sie einen DVI-auf-VGA-Konverter für
Macintosh
Kabel
• VGA-Kabel
• DVI-Kabel
Hinweis: Die Kabel sind nicht im Lieferumfang enthalten.
Hardwareübersicht A
VC160A Vorderseitige Ansicht
1. VGA-Eingang
VC160A Rückseitige Ansicht
1. DVI-Ausgang
2. Stromeingangsbuchse
VC160A Draufsicht
1. Online-LED
2. LED-Betriebsanzeige
VC160A Unterseite
1. Bildpositionstasten
Requisitos
Dispositivo(s)
• un PC/portátil con tarjeta VGA
• Un Macintosh con tarjeta gráfi ca DVI*
• un dispositivo de visualización DVI
*Nota: Se requiere un convertidor DVI a VGA para Macintosh.
Cables
• Cable VGA
• Cable DVI
Nota: Los cables no están incluidos en el paquete.
Presentación del hardware A
VC160A Vista frontal
1. Puerto de entrada VGA
VC160A Vista posterior
1. Salida DVI
2. Entrada de alimentación
VC160A Vista superior
1. Indicador LED en línea
2. Indicador LED de alimentación
VC160A Vista inferior
1. Botones de posición de imagen
Confi guration minimale
Périphérique(s)
• Un ordinateur de bureau ou ordinateur portable avec carte VGA
• Un ordinateur Mac équipé d’une carte graphique DVI*
• Un périphérique d'affi chage DVI
*Remarque : un convertisseur DVI-VGA pour Mac est nécessaire.
Câbles
• Câble VGA
• Câble DVI
Remarque :
Les câbles ne sont pas fournis avec le produit.
Description de l’appareil A
Vue avant du VC160A
1. Port d'entrée VGA
Vue arrière du VC160A
1. Port de sortie DVI
2. Prise d’alimentation
Vue supérieure du VC160A
1. Voyant en ligne
2. Voyant d’alimentation
Vue inférieure du VC160A
1. Touches de réglage de position à l’écran
Installation B
Note: Ensure that all devices are powered off and properly grounded before
connecting them to the VC160A.
To use the VC160A to view VGA source data in a DVI output display, do the
following:
1. Use a VGA cable to connect the VGA output connectors on the PC to the
VGA input connector on the VC160A.
2. Use a DVI cable to connect the DVI output connector on the rear of the
VC160A to the input connector on the DVI display. Power on your source
and display device.
3. (Optional) If the power LED does not light up, plug the provided power
adapter into an AC power source appropriate for the device. Then power
on the VC160A.
Note: The VC160A is able to power on via the VGA cable. In this case,
plugging in the power adapter may not be necessary.
Screen Position Buttons
The VC160A VGA to DVI Converter has Screen Position Buttons ( ) to
adjust the image position on the screen. You can manually fi x the image by
doing the following:
1. Press the →/← or ↑ / ↓ accordingly to adjust the position of the image.
2. Press
within 3 seconds to save this setting. To restore the default
image setting, press and hold down for more than 3 seconds.
Installation B
Hinweis: Schalten Sie alle Geräte aus, und sorgen Sie für eine
ordnungsgemäße Erdung, bevor Sie sie mit dem VC160A
verbinden.
Um mit dem VC160A VGA-Bildsignale auf einem DVI-Anzeigegerät
darzustellen, gehen Sie folgendermaßen vor:
1. Verbinden Sie den VGA-Ausgang am PC mit dem VGA-Eingang des
VC160A. Verwenden Sie dazu ein VGA-Kabel.
2. Verbinden Sie den DVI-Ausgang an der Rückseite des VC160A mit dem
DVI-Eingang am Anzeigegerät. Verwenden Sie dazu ein DVI-Kabel.
Schalten Sie die Signalquelle und das Anzeigegerät ein.
3. (Optional) Falls die Betriebsanzeige nicht leuchten sollte, müssen
Sie den VC160A über das Netzteil speisen. Schließen Sie das
mitgelieferte Netzteil an eine Steckdose und sein Stromkabel an die
Stromeingangsbuchse des VC160A an.
Hinweis: Normalerweise wird der VC160A über das VGA-Kabel mit
Strom versorgt. In diesem Fall müssen Sie das Netzteil nicht
anschließen.
Bildpositionstasten
Der VGA-auf-DVI-Konverter VC160A besitzt Bildpositionstasten ( ) zur
Einstellung der Bildposition am Bildschirm. Sie können das Bild manuell
folgendermaßen einstellen:
1. Drücken Sie die Tasten →/ ← bzw. ↑ / ↓ , um die Bildposition einzustellen.
2. Drücken Sie innerhalb von 3 Sekunden die Taste
, um die Einstellung
zu speichern. Um die werksseitig voreingestellten Bildparameter
wiederherzustellen, halten Sie die Taste
3 Sekunden lang gedrückt.
Instalación B
Nota: Apague todos los dispositivos y verifi que que están debidamente
conectados a tierra antes de conectarlos al VC160A.
Para visualizar las señales VGA en un dispositivo de salida DVI con ayuda
del VC160A, proceda como se indica a continuación:
1. Use un cable VGA para enchufar la salida VGA del PC al conector de
entrada VGA del VC160A.
2. Enchufe el conector de salida DVI en la parte posterior del VC160A a la
entrada DVI de la pantalla. Para ello, utilice un cable DVI. Encienda el
dispositivo de visualización y fuente.
3. (Opcional) Si el indicador LED de alimentación no se enciende, conecte
el adaptador de alimentación al VC160A. Conecte el adaptador de
alimentación incluido a una toma eléctrica y su cable de alimentación a la
entrada de corriente continua del VC160A.
Nota: Normalmente, el VC160A se alimenta a través del cable VGA.
En este caso no será necesario conectar el adaptador de
alimentación.
Botones de posición de imagen
El convertidor VGA a DVI VC160A lleva botones de posición de imagen (
) para ajustar la posición de la imagen en la pantalla. Para ajustar la imagen
manualmente, proceda como se indica a continuación:
1. Pulse →/ ← o ↑ / ↓ para ajustar la posición de la imagen.
2. Dentro de los próximos 3 segundos, pulse la tecla para guardar los
ajustes. Para restablecer los parámetros predeterminados de la imagen,
mantenga pulsada la tecla durante más de 3 segundos.
Installation B
Remarque : Vérifi ez que tous les périphériques sont éteints et correctement
mis à la terre avant de les connecter au VC160A.
Pour utiliser le VC160A pour visualiser des données provenant d’une source
VGA sur un périphérique de sortie DVI, procédez comme suit :
1. Utilisez un câble VGA pour relier les connecteurs de sortie VGA de
l'ordinateur au connecteur d'entrée VGA du convertisseur VC160A.
2. Utilisez un câble DVI pour connecter le connecteur de sortie DVI situé
à l’arrière du VC160A au connecteur d’entrée situé sur le périphérique
d’affi chage DVI. Allumez les périphériques d'affi chage et source.
3. (Facultatif) Si le voyant d’alimentation ne s’allume pas, alimentez le
VC160A à l’aide de l’adaptateur secteur. Branchez l'adaptateur secteur
fourni sur une source d'alimentation secteur adaptée au périphérique.
Branchez le câble de l'adaptateur secteur sur la prise jack d'alimentation
CC du VC160A.
Remarque : Le VC160A peut être alimenté par le biais du câble VGA.
Dans ce cas, il peut ne pas être nécessaire d’utiliser
l'adaptateur secteur.
Touches de réglage de position à l’écran
Le convertisseur VGA-DVI VC160A possède des touches de réglage de
position à l’écran (
) qui permettent d’ajuster la position de l’image à l’écran.
Vous pouvez réparer l’image manuellement en procédant comme suit :
1. Appuyez sur →/ ← ou ↑ / ↓ pour ajuster la position de l’image.
2. Appuyez sur la touche dans les 3 secondes qui suivent pour
enregistrer le réglage. Pour restaurer le réglage par défaut, appuyez sur
la touche
et maintenez-la enfoncée pendant plus de 3 secondes.
Supported Resolutions
Resolution Frequency (Hz)
640x480p
60
75
800x600p
60
75
1024x768p
60
75
1152x864p
60
75
1280x720p
60
75
1280x768p
60
75
1280x800p
60
75
1280x1024p
60
75
1366x768p 60
1440x900p
60
75
1600x1200p 60
1680x1050p 60
1920x1080p (RB) 60
1920x1200p (RB) 60
Note: 1. If the display is blank or showing an incorrect screen ratio, check
your display’s manual for supported resolutions.
Unterstützte Aufl ösungen
Aufl ösung Frequenz (Hz)
640x480p
60
75
800x600p
60
75
1024x768p
60
75
1152x864p
60
75
1280x720p
60
75
1280x768p
60
75
1280x800p
60
75
1280x1024p
60
75
1366x768p 60
1440x900p
60
75
1600x1200p 60
1680x1050p 60
1920x1080p (RB) 60
1920x1200p (RB) 60
Hinweis: 1. Falls das Bild gar nicht oder mit einem falschen Seitenverhältnis
angezeigt werden sollte, sehen Sie in der Bedienungsanleitung
Resoluciones admitidas
Resolución Frecuencia (Hz)
640x480p
60
75
800x600p
60
75
1024x768p
60
75
1152x864p
60
75
1280x720p
60
75
1280x768p
60
75
1280x800p
60
75
1280x1024p
60
75
1366x768p 60
1440x900p
60
75
1600x1200p 60
1680x1050p 60
1920x1080p (RB) 60
1920x1200p (RB) 60
Nota: 1. Si la pantalla se queda en blanco o si la relación de aspecto de la
Résolutions prises en charge
Résolution Fréquence (Hz)
640x480p
60
75
800x600p
60
75
1024x768p
60
75
1152x864p
60
75
1280x720p
60
75
1280x768p
60
75
1280x800p
60
75
1280x1024p
60
75
1366x768p 60
1440x900p
60
75
1600x1200p 60
1680x1050p 60
1920x1080p (RB) 60
1920x1200p (RB) 60
Remarque : 1. Si rien ne s’affi chage sur l’écran ou si le format d’affi chage
est incorrect, consultez le mode d’emploi de votre
2. Some Mac/Apple devices have interlaced video signal that the
VC160A is unable to process.
Specifi cations
Function VC160A
Connectors
Video In 1 x HDB-15 Female (Blue)
Video Out 1 x DVI-D Female (White)
Power 1 x DC Jack
LEDs
Power 1 (Green)
Online 1 (Blue)
Switches
Direction
Adjustment
4 x Semi-recessed Pushbuttons
Memory 1 x Semi-recessed Pushbutton
Video
Up to 1080P (HDTV) / 1920 x 1200 @
60 Hz (PC)
Power Consumption DC5.3V, 2.8W
Environment
Operating Temp. 0–50°C
Storage Temp. -20–60°C
Humidity 0~80% RH, Non-condensing
Physical
Properties
Housing Metal
Weight 0.15 kg
Dimensions
(L x W x H)
7.90 x 7.81 x 2.43 cm
zu Ihrem Bildschirm nach, welche Aufl ösungen unterstützt
werden.
2. Einige Apple/Macintosh-Geräte senden ein Grafi ksignal mit
Zeilensprungverfahren („interlaced“), das der VC160A nicht
unterstützt.
Technische Daten
Funktion VC160A
Anschlüsse
Grafi keingänge 1 x HDB-15 Weiblein (blau)
Grafi kausgänge 1 x DVI-D Weiblein (weiß)
Stromversorgung 1 x Stromeingangsbuchse
LED-Anzeigen
Betrieb 1 (grün)
Online 1 (blau)
Schalter
Positionseinstellung 4 x halbverdeckte Drucktasten
Speicher 1 x halbverdeckter Drucktaster
Grafi k
Bis zu 1080P (HDTV) / 1920 x 1200
bei 60 Hz (PC)
Stromverbrauch 5,3 V=, 2,8 W
Umgebung
Betriebstemperatur 0-50 °C
Lagertemperatur -20-60 °C
Feuchtigkeit
0 - 80% rel. Luftfeuchte, nicht
kondensierend
Physische
Eigenschaften
Gehäuse Metall
Gewicht 0,15 kg
Abmessungen
(L x B x H)
7,90 x 7,81 x 2,43 cm
imagen resulta ser incorrecta, consulte también el manual de su
pantalla para conocer las resoluciones compatibles.
2. Algunos dispositivos de Apple/Macintosh emiten una señal gráfi ca
entrelazada que no es compatible con el VC160A.
Especifi caciones
Función VC160A
Conectores
Entrada de señal
gráfi ca
1 conector HDB-15 hembra (azul)
Salida de señal gráfi ca 1 conector DVI-D hembra (blanco)
Alimentación 1 toma de c.c.
Indicadores
LED
Alimentación 1 (verde)
En línea 1 (azul)
Interruptores
Ajuste de ubicación 4 pulsadores semiescondidos
Memoria 1 pulsador semiescondido
Señal gráfi ca
Hasta 1080P (HDTV) / 1920 x 1200
a 60 Hz (PC)
Consumo 5,3 V de c.c., 2,8 W
Entorno
Temperatura de
funcionamiento
0 a 50 °C
Temperatura de
almacenamiento
-20 a 60 °C
Humedad 0 a 80% HR, sin condensar
Propiedades
físicas
Carcasa Metálica
Peso 0,15 kg
Dimensiones
(L x An x Al)
7,90 x 7,81 x 2,43 cm
périphérique d’affi chage pour connaître les résolutions qu’il
prend en charge.
2. Certains périphériques Mac/Apple présentent des signaux
vidéo entrelacés que le convertisseur VC160A est incapable
de traiter.
Caractéristiques techniques
Fonction VC160A
Connecteurs
Entrée vidéo 1 connecteur HDB-15 femelle (bleu)
Sortie vidéo 1 connecteur DVI-D femelle (blanche)
Alimentation 1 prise d’alimentation CC
Voyants
Alimentation 1 voyant (vert)
En ligne 1 voyant (bleu)
Commutateurs
Réglage du
positionnement
4 boutons-poussoirs semi-encastrés
Mémoire 1 bouton-poussoir semi-encastré
Vidéo
Jusqu’à 1080P (télévision HD) / 1920
x 1200 à 60 Hz (PC).
Consommation électrique 5,3 V c.c., 2,8 W
Environnement
Température de
fonctionnement
0 à 50 °C
Température de
stockage
-20 à 60 °C
Humidité HR de 0 à 80 %, sans condensation
Propriétés
physiques
Boîtier Métallique
Poids 0,15 kg
Dimensions (Long
x Larg x Haut)
7,90 x 7,81 x 2,43 cm
Hardware Installation
B
VC160A Front view VC160A Rear view
VC160A Top view VC160A Bottom view
Package Contents
1 VC160A VGA to DVI Converter
1 Power Adapter
1 User Instructions
User Guide
VGA to DVI Converter
© Copyright 2012 ATEN® International Co., Ltd.
ATEN and the ATEN logo are trademarks of ATEN International Co., Ltd. All rights reserved. All other
trademarks are the property of their respective owners.
This product is RoHS compliant.
Part No. PAPE-1285-360G Printing Date: 12/2012
VC160A
The following contains information that relates to China:
Online Registration
International:
http://support.aten.com
North America:
http://www.aten-usa.com/product_registration
Technical Phone Support
International:
886-2-86926959
North America:
1-888-999-ATEN Ext: 4988
United Kingdom:
44-8-4481-58923
FCC Information
This equipment has been tested and found to comply with
the limits f or a Class A digital device, pursua nt to Part 15
of the FCC R ules. Thes e limits are d esigned t o provide
reasonabl e prote ction a gainst harmful interfere nce in a
residenti al insta llation. This e quipment generates, uses
and can radiate radio frequency energy, and if not installed
and used in accordance with the instruction manual, may
cause interfe rence to rad io com municati ons. H owever,
there is no guarantee t hat interference will not occur in a
particular installation. If this equipment does cause harmful
interference to radio or television reception, which ca n be
determined by turning the equipment off and on, the user
is encouraged to try t o correct the interference by one or
more of the following measures:
• Reorient or relocate the receiving antenna;
• Increase the separation between the equipment and
receiver;
• Connect the equipment into an outlet on a circuit different
from that which the receiver is connected;
• Consult the dealer/an experienced radio/television
technician for help.
All information, documentation, and specifi cations contained
in this media are subject to change without prior notifi cation
by the manufacturer. Please visit our website to fi nd the
most up to date version.
1
1
or
or
VGA to DVI Converter VC160A
1
2
3
1 2
VGA to DVI Converter VC160A
1
2
www.aten.com
www.aten.com
www.aten.com
www.aten.com
Hardware Review
A
サポートお問合せ窓口:+81-3-5615-5811
Convertitore VGA-DVI VC160A - Guida dell’utente
VC
160
A VGA→DVI
コンバーター ユーザーガイド
VC160A VGA to DVI 컨버터 사용자 가이드
Hardware Installation
B
Package Contents
1 VC160A VGA to DVI
Converter
1 Power Adapter
1 User Instructions
Hardware Review
A
The following contains information that relates to China:
Online Registration
International:
http://support.aten.com
North America:
http://www.aten-usa.com/product_registration
Technical Phone Support
International:
886-2-86926959
North America:
1-888-999-ATEN Ext: 4988
United Kingdom:
44-8-4481-58923
VC160A Front view VC160A Rear view
VC160A Top view VC160A Bottom view
1
1
or
or
VGA to DVI Converter VC160A
1
2
3
1 2
VGA to DVI Converter VC160A
1
2
Requisiti
Dispositivo/i
• Un PC/portatile con scheda VGA
• Un Mac dotato di scheda grafi ca DVI*
• Un dispositivo di visualizzazione DVI
*Nota: è necessario un adattatore DVI-VGA per Mac.
Cavi
• Cavo VGA
• Cavo DVI
Nota: I cavi non sono inclusi nella confezione.
Hardware A
VC160A Veduta anteriore
1. Porta d’ingresso VGA
VC160A Veduta posteriore
1. Porta uscita DVI
2. Presa d’alimentazione
VC160A Veduta dall’alto
1. LED online
2. LED d’alimentazione
VC160A Veduta inferiore
1. Pulsanti della posizione dello schermo
요구 사항
장비(s)
• VGA 카드가 내장된 PC/노트북
• DVI 그래픽 카드를 갖춘 MAC 장치
• DVI를 지원하는 디스플레이 장비
*
주의: MAC 사용자를 위한 DVI to VGA 커버터
케이블
• VGA 케이블
• DVI 케이블
알림: 케이블은 본 구성품에 포함되지 않습니다.
하드웨어 리뷰 A
VC160A 전면부
1. VGA 입력 포트
VC160A 후면부
1. DVI 출력 포트
2. 전원 잭
VC160A 상단부
1. 온라인 LED
2. 전원 LED
VC160A 하단부
1. 스크린 위치 버튼
システム要件
デバイス
•
VGAカードを搭載したPC/ノートパソコン
•
DVIグラフィックカード*を搭載したMac
•
DVI対応の出力装置
*注意:Mac用のDVI→VGAコンバーターが必要です。
ケーブル
•
VGAケーブル
•
DVIケーブル
注意:これらのケーブルは製品パッケージには同梱されていません。
製品各部名称A
VC160Aフロントパネル
1.VGA入力ポート
VC160Aリアパネル
1.DVI出力ポート
2.電源ジャック
VC160A上面
1.オンラインLED
2.電源LED
VC160A底面
1.画面表示位置調整ボタン
Installazione B
Nota: Accertarsi che tutti i dispositivi siano spenti e dotati di adeguata
messa a terra prima di collegarli al VC160A.
Per utilizzare il VC160A per visualizzare i dati della sorgente VGA su un
dispositivo di visualizzazione DVI, procedere come segue:
1. Utilizzare un cavo VGA per collegare i connettori d’uscita VGA sul PC al
connettore d’ingresso VGA del VC160A.
2. Usare un cavo DVI per collegare il connettore d’uscita DVI sul retro del
VC160A al connettore d'ingresso DVI del dispositivo video. Accendere il
dispositivo sorgente e quello di visualizzazione.
3. (Opzionale) Nel caso in cui non si illuminasse il LED d’alimentazione,
alimentare il VC160A tramite l’alimentatore. Inserire l’alimentatore
fornito in dotazione in una sorgente di alimentazione CA corretta per
il dispositivo, inserire lo spinotto del cavo di alimentazione nel jack di
alimentazione CC del VC160A.
Nota: il VC160A è alimentabile tramite il cavo VGA. In questo caso,
potrebbe non essere necessario collegare l’alimentatore.
Pulsanti della posizione dello schermo
Il convertitore VGA-DVI VC160A ha dei pulsanti della posizione dello
schermo ( ) per regolare la posizione dell’immagine sullo schermo. È
possibile regolare manualmente l’immagine come segue:
1. Premere a seconda →/ ← o ↑ / ↓ per regolare la posizione dell’immagine.
2. Premere il pulsante entro 3 secondi per salvare l’impostazione. Per
ripristinare l’impostazione predefi nita dell’immagine, tenere premuto
per oltre 3 secondi.
설치
B
알림: VC160A에 연결하기 전에 모든 장치의 전원이 차단되어 있는지, 접지
가 바르게 되어 있는지 확인하십시오.
DVI 출력 디스플레이에서 VGA 소스 데이터를 보기 위해 VC160A를 사용하
려면 아래의 내용을 참고하십시오. :
1. PC의 VGA 출력 커넥터와 VC160A의 VGA 입력 커넥터를 연결하려면
VGA 케이블을 사용합니다.
2. DVI 디스플레이의 입력 커넥터와 VC160A 뒷면의 DVI 출력 커넥터를 연
결하려면 DVI 케이블을 사용합니다. 소스 장치 및 디스플레이 장치의 전
원을 켜십시오.
3. (옵션) 전원 LED에 불이 들어오지 않으면, VC160A의 전원 어댑터를 사
용해 전원을 공급합니다. 제공된 전원 어댑터를 장치에 맞는 AC 전원 소
스에 연결합니다. - 전원 어댑터 케이블을 VC160A의 DC 전원 잭에 연
결합니다.
알림: VC160A는 VGA 케이블을 통해 전원을 공급할 수 있습니다. 이런
경우, 전원 어댑터를 연결할 필요가 없습니다.
스크린 위치 버튼
VC160A VGA to DVI 컨버터의 스크린 위치 버튼 (
)으로 스크린 상의 이
미지 위치를 조정할 수 있습니다. 아래와 같이 수동으로 조정하십시오.
1. 이미지 위치에 따라 알맞게 →/ ← 또는 ↑ / ↓ 를 누르십시오.
2. 이 설정을 저장하려면 3초 이내에
를 누릅니다. 기본 이미지 설정을
복구하려면 3초 이상
를 누른 상태를 유지합니다.
セットアップB
注意:VC160Aに接続する前に、すべてのデバイスで電源が切られており、
本体が適切に設置されていることをご確認ください。
VC160Aを使ってVGAソースデータをDVIディスプレイに出力してお楽
しみいただく場合は、下記の手順に従ってセットアップを行ってください。
1.PCのVGA出力コネクターとVC160AのVGA入力コネクターを、VGA
ケーブルで接続してください。
2.VC160Aリア側にあるDVI出力コネクターとDVIディスプレイの入力コ
ネクターをDVIケーブルで接続したら、ソースデバイスとディスプレイに
それぞれ電源を入れてください。
3.(オプション)電源LEDが点灯していない場合は、電源アダプターを使
ってVC160Aに給電してください。製品仕様に適したAC電源に製品同
梱の電源アダプターを接続し、この電源アダプターのケーブル部分を
VC160AのDC電源ジャック部分に接続してください。
注意:VC160AはVGAケーブルからも給電することができます。この場合
は、電源アダプターを必ずしも接続しなければならないという訳で
はありません。
画面表示位置調整ボタン
VC160AVGA→DVIコンバーターには、画面の出力表示位置を調節できる
画面表示位置調整ボタン( )があります。出力位置は下記の方法に従って
手動で調節することができます。
1.出力イメージの調整方向に応じて
→/ ←
または
↑ / ↓
を押してください。
2. を押して3秒以内に指を離すと、この設定を保存します。デフォルト
のイメージ設定をリストアする場合は、 ボタンを3秒以上長押しして
ください。
Risoluzioni supportate
Risoluzione Frequenza (Hz)
640x480p
60
75
800x600p
60
75
1024x768p
60
75
1152x864p
60
75
1280x720p
60
75
1280x768p
60
75
1280x800p
60
75
1280x1024p
60
75
1366x768p 60
1440x900p
60
75
1600x1200p 60
1680x1050p 60
1920x1080p (RB) 60
1920x1200p (RB) 60
Nota: 1. se lo schermo è vuoto o con un rapporto errato, consultare il
지원되는 해상도
해상도 주파수 (Hz)
640x480p
60
75
800x600p
60
75
1024x768p
60
75
1152x864p
60
75
1280x720p
60
75
1280x768p
60
75
1280x800p
60
75
1280x1024p
60
75
1366x768p 60
1440x900p
60
75
1600x1200p 60
1680x1050p 60
1920x1080p (RB) 60
1920x1200p (RB) 60
対応解像度
解像度 周波数(Hz)
640x480p
60
75
800x600p
60
75
1024x768p
60
75
1152x864p
60
75
1280x720p
60
75
1280x768p
60
75
1280x800p
60
75
1280x1024p
60
75
1366x768p 60
1440x900p
60
75
1600x1200p 60
1680x1050p 60
1920x1080p (RB) 60
1920x1200p (RB) 60
manuale del dispositivo di visualizzazione in merito alle risoluzioni
supportate.
2. Alcuni dispositivi Mac/Apple hanno un segnale video interlacciato
che il VC160A non è in grado di elaborare.
Specifi che
Funzione VC160A
Connettori
Ingresso video 1 connettore femmina HDB-15 (blu)
Uscita video 1 x femmina DVI-D (bianco)
Alimentazione 1 connettore CC
LED
Alimentazione 1 (verde)
Online 1 (blu)
Interruttori
Regolazione di
direzione
4 x pulsanti leggermente incassati
Memoria 1 x pulsante leggermente incassato
Video
Fino a 1080P (HDTV) / 1920 x 1200
@ 60 Hz (PC)
Consumo elettrico CC5,3V, 2,8W
Condizioni
ambientali
Temperatura operativa 0-50˚C
Temperatura di
conservazione
-20-60˚C
Umidità
umidità relativa 0~80%, senza
condensa
Proprietà
fi siche
Case Metallo
Peso 0,15 kg
Dimensioni
(lungh. x largh.x alt.)
7,90 x 7,81 x 2,43 cm
알림:
1. 공백으로 뜨거나 잘못된 화면 비율이 나타날 때는 디스플레이의 지원되
는 해상도를 확인하십시오.
2. MAC/Apple 장치 중 인터레이싱 비디오 (비월 주사 방식 비디오)의 경
우, VC160A 정상적으로 작동되지 않을 수 있습니다.
제품사양
기 능 VC160A
커넥터
비디오 입력 1 x HDB-15 Female (Blue)
비디오 출력 1 x DVI-D Female (White)
전원 1 x DC Jack
LED
전원 1 (Green)
온라인 1 (Blue)
스위치
방향 조절 4 x Semi-recessed 선택 버튼
메모리 1 x Semi-recessed 선택 버튼
비디오
최대 1080P (HDTV) / 1920 x
1200 @ 60 Hz (PC)
전력 소비 DC5.3V, 2.8W
제품환경
동작온도 0-50°C
보관온도 -20-60°C
습도 비응축 상태에서 0~80% RH
제품외관
재질 금속
무게 0.15 kg
크기 (L x W x H) 7.90 x 7.81 x 2.43 cm
注意:1.スプレイがブランクになったり、正しくない画面比率で表示され
たりする場合は、お使いのディスプレイのマニュアルに記載され
ている対応解像度をご確認ください。
2.一部のMac/Appleデバイスでは、VC160Aが処理できないインタ
ーレースビデオ信号を使用していることがあります。
製品仕様
機能 VC160A
コネクター
ビデオ入力
ビデオ出力
電源
LED
電源
オンライン
スイッチ
ディスプレイ表示調整
メモリー
解像度
1200@60Hz(PC)
消費電力 DC5.3V、2.8W
動作環境
操作温度 0〜50℃
保管温度 -20〜60℃
湿度 0~80%RH、結露なきこと
ケース メタル
重量 150g
www.aten.com
www.aten.com
www.aten.com
Phone: 02-467-6789
 Loading...