

Aten UC9020 User's Manual

UC9020 StreamLIVE™ HD
Multi-Channel AV Mixer
User Manual
www.aten.com
StreamLIVE™ HD User Manual
EMC Information
FEDERAL COMMUNICATIONS COMMISSION INTERFERENCE
STATEMENT: This equipment has been tested and found to comply with the
limits for a Class A digital device, pursuant to Part 15 of the FCC Rules. These
limits are designed to provide reasonable protection against harmful
interference when the equipment is operated in a commercial environment.
This equipment generates, uses, and can radiate radio frequency energy and, if
not installed and used in accordance with the instruction manual, may cause
harmful interference to radio communications. Operation of this equipment in
a residential area is likely to cause harmful interference in which case the user
will be required to correct the interference at his own expense.
The device complies with Part 15 of the FCC Rules. Operation is subject to the
following two conditions: (1) this device may not cause harmful interference,
and (2) this device must accept any interference received, including
interference that may cause undesired operation.
FCC Caution: Any changes or modifications not expressly approved by the
party responsible for compliance could void the user's authority to operate this
equipment.
Warning: Operation of this equipment in a residential environment could
cause radio interference.
Achtung: Der Gebrauch dieses Geräts in Wohnumgebung kann
Funkstörungen verursachen.
KCC Statement
RoHS
This product is RoHS compliant.
ii
StreamLIVE™ HD User Manual
User Information
Online Registration
Be sure to register your product at our online support center:
International http://eservice.aten.com
Telephone Support
For telephone support, call this number:
International 886-2-8692-6959
China 86-400-810-0-810
Japan 81-3-5615-5811
Korea 82-2-467-6789
North America 1-888-999-ATEN ext 4988
1- 949-4 28-1111
User Notice
All information, documentation, and specifications contained in this manual are
subject to change without prior notification by the manufacturer. The
manufacturer makes no representations or warranties, either expressed or
implied, with respect to the contents hereof and specifically disclaims any
warranties as to merchantability or fitness for any particular purpose. Any of the
manufacturer's software described in this manual is sold or licensed as is.
Should the programs prove defective following their purchase, the buyer (and
not the manufacturer, its distributor, or its dealer), assumes the entire cost of all
necessary servicing, repair and any incidental or consequential damages
resulting from any defect in the software.
The manufacturer of this system is not responsible for any radio and/or TV
interference caused by unauthorized modifications to this device. It is the
responsibility of the user to correct such interference.
The manufacturer is not responsible for any damage incurred in the operation
of this system if the correct operational voltage setting was not selected prior to
operation. PLEASE VERIFY THAT THE VOLTAGE SETTING IS CORRECT
BEFORE USE.
iii

StreamLIVE™ HD User Manual
Package Contents
1 UC9020 StreamLIVE™ HD Multi-Channel AV Mixer
1 USB Type-C to USB Type-A Custom-Made Cable
(parts no.: LIN6-09B1-C11G)
1 USB Type-A to USB Type-A Cable
(parts no.: LIN5-04U1-U1HG)
1 AC Power Cord
1 User Instructions
Note: Make sure that all of the components are present and in good order. If
anything is missing or was damaged in shipping, contact your dealer.
iv

StreamLIVE™ HD User Manual
Table of Contents
EMC Information . . . . . . . . . . . . . . . . . . . . . . . . . . . . . . . . . . . . . . . . . . . . . ii
RoHS. . . . . . . . . . . . . . . . . . . . . . . . . . . . . . . . . . . . . . . . . . . . . . . . . . . . . . ii
User Information . . . . . . . . . . . . . . . . . . . . . . . . . . . . . . . . . . . . . . . . . . . . .iii
Package Contents . . . . . . . . . . . . . . . . . . . . . . . . . . . . . . . . . . . . . . . . . . iv
About this Manual . . . . . . . . . . . . . . . . . . . . . . . . . . . . . . . . . . . . . . . . . . vii
Conventions . . . . . . . . . . . . . . . . . . . . . . . . . . . . . . . . . . . . . . . . . . . . . . .viii
Product Information. . . . . . . . . . . . . . . . . . . . . . . . . . . . . . . . . . . . . . . . . .viii
1. Introduction
Overview . . . . . . . . . . . . . . . . . . . . . . . . . . . . . . . . . . . . . . . . . . . . . . . . . . .1
Features . . . . . . . . . . . . . . . . . . . . . . . . . . . . . . . . . . . . . . . . . . . . . . . . . . . 2
Requirements . . . . . . . . . . . . . . . . . . . . . . . . . . . . . . . . . . . . . . . . . . . . . . .2
Components . . . . . . . . . . . . . . . . . . . . . . . . . . . . . . . . . . . . . . . . . . . . . . . .4
Top View . . . . . . . . . . . . . . . . . . . . . . . . . . . . . . . . . . . . . . . . . . . . . . . .4
Rear View . . . . . . . . . . . . . . . . . . . . . . . . . . . . . . . . . . . . . . . . . . . . . . .6
Side View . . . . . . . . . . . . . . . . . . . . . . . . . . . . . . . . . . . . . . . . . . . . . . .7
2. Hardware Setup
Connecting the StreamLIVE™ HD Unit . . . . . . . . . . . . . . . . . . . . . . . . . . .9
Connecting iPad . . . . . . . . . . . . . . . . . . . . . . . . . . . . . . . . . . . . . . . . .11
Lightning Connector on iPad . . . . . . . . . . . . . . . . . . . . . . . . . . . . .11
USB-C Connector on iPad. . . . . . . . . . . . . . . . . . . . . . . . . . . . . . .11
3. ATEN OnAir App & Side Menu
ATEN OnAir Application . . . . . . . . . . . . . . . . . . . . . . . . . . . . . . . . . . . . . .13
Page Components . . . . . . . . . . . . . . . . . . . . . . . . . . . . . . . . . . . . . . . . . .15
Side Menu . . . . . . . . . . . . . . . . . . . . . . . . . . . . . . . . . . . . . . . . . . . . . . . . 16
Current Project . . . . . . . . . . . . . . . . . . . . . . . . . . . . . . . . . . . . . . . . . .16
Create Project . . . . . . . . . . . . . . . . . . . . . . . . . . . . . . . . . . . . . . . . . .17
Copy as New Project . . . . . . . . . . . . . . . . . . . . . . . . . . . . . . . . . . . . .18
Open Project . . . . . . . . . . . . . . . . . . . . . . . . . . . . . . . . . . . . . . . . . . .19
About . . . . . . . . . . . . . . . . . . . . . . . . . . . . . . . . . . . . . . . . . . . . . . . . .20
All Projects . . . . . . . . . . . . . . . . . . . . . . . . . . . . . . . . . . . . . . . . . . . . .21
Tutorial . . . . . . . . . . . . . . . . . . . . . . . . . . . . . . . . . . . . . . . . . . . . . . . .22
Self-diagnostic. . . . . . . . . . . . . . . . . . . . . . . . . . . . . . . . . . . . . . . . . . . 22
4. ATEN OnAir App & Video Mixer
Video Mixer . . . . . . . . . . . . . . . . . . . . . . . . . . . . . . . . . . . . . . . . . . . . . . . .23
Scene Editor . . . . . . . . . . . . . . . . . . . . . . . . . . . . . . . . . . . . . . . . . . . . . . .26
Resize/Crop Tool . . . . . . . . . . . . . . . . . . . . . . . . . . . . . . . . . . . . . . . .28
Resize . . . . . . . . . . . . . . . . . . . . . . . . . . . . . . . . . . . . . . . . . . . . . .28
Crop (Media Only) . . . . . . . . . . . . . . . . . . . . . . . . . . . . . . . . . . . . .29
Add/Edit Text Overlay . . . . . . . . . . . . . . . . . . . . . . . . . . . . . . . . . . . . 30
v

StreamLIVE™ HD User Manual
Re-order the Overlays . . . . . . . . . . . . . . . . . . . . . . . . . . . . . . . . . . . . 31
5. ATEN OnAir App & Audio Mixer
Audio Mixer. . . . . . . . . . . . . . . . . . . . . . . . . . . . . . . . . . . . . . . . . . . . . . . . 33
6. ATEN OnAir App & Settings
Settings. . . . . . . . . . . . . . . . . . . . . . . . . . . . . . . . . . . . . . . . . . . . . . . . . . . 35
Live-streaming on Facebook & Youtube. . . . . . . . . . . . . . . . . . . . . . . . . . 38
Logging into Youtube Account for Live-streaming . . . . . . . . . . . . . . . 38
Logging into Facebook Account for Live-streaming . . . . . . . . . . . . . . 40
Example Live-stream URL and Stream Key (Facebook) . . . . . . . . . . 45
Example Live-stream URL and Stream Key (Youtube). . . . . . . . . . . . 45
Recording Live-stream Video (External Storage) . . . . . . . . . . . . . . . . 46
External Storage Settings . . . . . . . . . . . . . . . . . . . . . . . . . . . . . . . 46
Video Information for Live-stream Recording . . . . . . . . . . . . . . . . 47
7. Quick Live-Stream Setup
Setup . . . . . . . . . . . . . . . . . . . . . . . . . . . . . . . . . . . . . . . . . . . . . . . . . . . . 49
During the Live-Stream / Live-Stream Recording . . . . . . . . . . . . . . . 52
Quick Mode . . . . . . . . . . . . . . . . . . . . . . . . . . . . . . . . . . . . . . . . . . 52
8. Firmware Upgrade
Download Requirements . . . . . . . . . . . . . . . . . . . . . . . . . . . . . . . . . . . . . 55
Preparing the Firmware . . . . . . . . . . . . . . . . . . . . . . . . . . . . . . . . . . . . . . 55
Upgrading the Unit . . . . . . . . . . . . . . . . . . . . . . . . . . . . . . . . . . . . . . . . . . 56
Upgrade Assessment Fail. . . . . . . . . . . . . . . . . . . . . . . . . . . . . . . . . . 57
Upgrade Fail . . . . . . . . . . . . . . . . . . . . . . . . . . . . . . . . . . . . . . . . . . . . 57
Appendix
Safety Instructions . . . . . . . . . . . . . . . . . . . . . . . . . . . . . . . . . . . . . . . . . . 59
General . . . . . . . . . . . . . . . . . . . . . . . . . . . . . . . . . . . . . . . . . . . . . . . . 59
Technical Support . . . . . . . . . . . . . . . . . . . . . . . . . . . . . . . . . . . . . . . . . . 61
Specifications . . . . . . . . . . . . . . . . . . . . . . . . . . . . . . . . . . . . . . . . . . . . . . 62
Live-Streaming Information. . . . . . . . . . . . . . . . . . . . . . . . . . . . . . . . . . . . 64
Create a Live Stream with Youtube . . . . . . . . . . . . . . . . . . . . . . . . . . 64
What is CDN Service? . . . . . . . . . . . . . . . . . . . . . . . . . . . . . . . . . . . . 64
RTMP/RTMPS and RTSP Protocols. . . . . . . . . . . . . . . . . . . . . . . . . . 64
Other ways to input image overlays . . . . . . . . . . . . . . . . . . . . . . . . . . 65
Limited Warranty . . . . . . . . . . . . . . . . . . . . . . . . . . . . . . . . . . . . . . . . . . . 66
vi

StreamLIVE™ HD User Manual
About this Manual
This user manual is provided to help you get the most from the UC9020 unit. It
covers all aspects of installation, configuration, and operation. An overview of
the information found in the manual is provided below.
Chapter 1, Introduction introduces you to the Multi-Channel AV Mixer. Its
purpose, features, installation considerations, and panel components are
presented and described.
Chapter 2, Hardware Setup describes the steps that are necessary to quickly
and safely set up your installation.
Chapter 3, ATEN OnAir App & Side Menu explains the functions in the OnAir
App and its side menu.
Chapter 4, ATEN OnAir App & Video Mixer explains the functions in the Video
Mixer deck in the OnAir App, including scene editing, media resizing/cropping
and text and image overlays.
Chapter 5, ATEN OnAir App & Audio Mixer explains the functions in the
Audio Mixer deck in the OnAir App.
Chapter 6, ATEN OnAir App & Settings explains the settings you can
configure for the collaborations between the unit and the OnAir App.
Chapter 7, Quick Live-Stream Setup describes how to quickly setup your
system to help you start live-streaming.
Chapter 8, Firmware Upgrade describes the firmware upgrade procedure and
how the volume mixer LED behaves during the firmware upgrade.
An Appendix provides a list of safety instructions and precautions, ATEN
technical support information, product specifications, and other technical
information.
Note:
Read this manual thoroughly and follow the installation and operation
procedures carefully to prevent any damage to the unit or any connected
devices.
ATEN regularly updates its product documentation for new features and
fixes. For an up-to-date UC9020 documentation, visit http://www.aten.com/
global/en/
vii
StreamLIVE™ HD User Manual
Conventions
This manual uses the following conventions:
Monospaced Indicates text that you should key in.
[ ] Indicates keys you should press. For example, [Enter] means to
press the Enter key. If keys need to be chorded, they appear
together in the same bracket with a plus sign between them:
[Ctrl+Alt].
1. Numbered lists represent procedures with sequential steps.
♦ Bullet lists provide information, but do not involve sequential steps.
→ Indicates selecting the option (on a menu or dialog box, for
example), that comes next. For example, Start
open the Start menu, and then select Run.
Indicates critical information.
Product Information
→
Run means to
For information about all ATEN products and how they can help you connect
without limits, visit ATEN on the Web or contact an ATEN Authorized Reseller.
Visit ATEN on the Web for a list of locations and telephone numbers:
International http://www.aten.com
North America http://www.aten-usa.com
viii

Chapter 1
Introduction
Overview
The StreamLIVE™ HD is a portable, all-in-one, multi-channel audio/video
mixer device that integrates a 1080p video capture, video switch, stream
broadcaster, video converter, video splitter, and audio mixer into one compact
box to eliminate the hassle of working with different AV equipment. The
StreamLIVE™ HD makes HDMI video sources broadcast for higher quality
live stream to CDN platforms such as YouTube Live, Facebook and Twitch.
For added convenience, the StreamLIVE™ HD provides an intuitive app,
making it easy to monitor, edit image layouts, and adjust PIP settings. The
StreamLIVE™ HD is PC and software-free, and with its well-designed control
panel, it makes livestreaming operations smooth and effortlessly. You can even
preview video and monitor audio levels before going live with your web
broadcast! To get started, simply connect video/audio sources, and an Ethernet
with an ATEN app-installed iPad, and you are ready to roll.
Whether you're capturing, editing or streaming, the StreamLIVE™ HD with its
ergonomic and practical design, it is flexible enough to fit all independent live
streaming broadcasting environments. With a rich feature set, the
StreamLIVE™ HD addresses the challenges that independent live streaming
broadcasters encounter and provides an easy-to-use solution.
1

StreamLIVE™ HD User Manual
Features
All-in-one design to simplify streaming workflow – Integrates 1080p
video capture, video switch, streaming encoder, video converter, video
splitter, and audio mixer
Professional-quality live streaming to global audiences by any CDN
platform, with a low entry threshold, even entry-level users can quickly
get started
PC-free and software-free with plug-n-roll capability
Intuitive app for preview and program monitoring, change video layout in
Full Screen/PBP/PIP settings, adding image and subtitles overlays, and
smooth scenes transitions for a professional finish
Storyboard-like management – preset up to 8 scenes for later while
streaming and during performances to reduce the need to interact with
hardware
Compact mixer control panel – Switching & mix between multiple video
& audio sources with the help of easily identifiable luminous keys
Fanless and optimized thermal air flow system for quiet operation
Multitask designed handle-stand to enhance portability and ergonmic
comfort angle
Requirements
Ethernet connection
The following iPad with iOS 11 or later
iPad Pro (1st gen, 12.9”)
iPad Pro (1st gen, 9.7”)
iPad Pro (2nd gen, 12.9”)
iPad Pro (2nd gen, 10.5”)
iPad Pro (3rd gen, 12.9” or later)
iPad Pro (3rd gen, 11” or later)
iPad (5th gen or later)
iPad Air (3rd gen or later)
iPad Mini (5th gen or later)
2

Chapter 1. Introduction
USB Storage Device (for live-stream video recording)
USB 3.x compatible flash drive or mobile drive (HDD / SSD)
At least 32GB of free space
3
StreamLIVE™ HD User Manual
Components
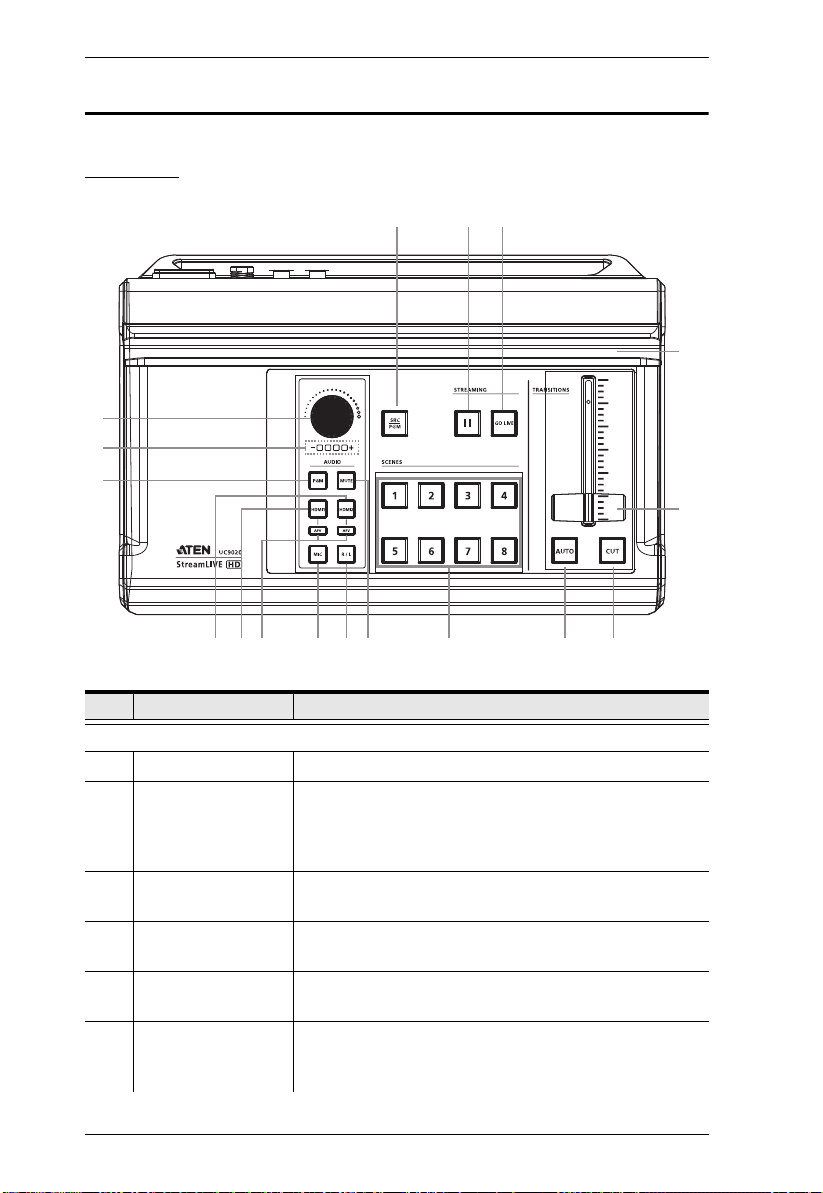
Top View
15
16
17
1
2
3
4
5
6
No. Component Description
Audio Section (Controls the audio settings of the system)
1 Audio Level Control Controls the volume of the selected audio source.
2 Volume Meter LEDs The LED reflects the controlled volume.
3 PGM Switches to the PGM audio source.
4 HDMI 2 audio
source
5 HDMI 1 audio
source
6 AFV Audio-Follows-Video: Pressing the AFV button will light
During firmware upgrade, the LED behavior is changed.
Refer to Upgrading the Unit on page 56 for the LED
behavior during firmware upgrade.
The button will light up when switched to this source.
Switches to the HDMI 2 audio source.
The button will light up when switched to this source.
Switches to the HDMI 1 audio source.
The button will light up when switched to this source.
up. If the video source is selected, the source’s audio will
also be played.
9
7
8
10 11
12
14
13
4

Chapter 1. Introduction
No. Component Description
7 MIC Switches to the MIC audio source.
The button will light up when switched to this source.
8 L/R Switches to the RCA Line In audio source.
The button will light up when switched to this source.
9 Mute Mutes/unmutes the audio the system is currently tuned
into.
When muting source 1 or 2, AFV will also be turned off.
Video Section (controls the video settings of the system)
10 Scenes Selector Selects the current stream (PGM) scene and the preview
(PRV) scene.
Greenly lit button indicates PRV Preview.
Redly lit button indicates PGM Preview.
Transition Control Section (switches the current stream (PGM) scene to the preview
(PRV) stream and vice versa)
11 Auto (transition) Pressing the Auto button will begin the transition after a
specified time (0.3-3.0 seconds).
Go to the Setting Deck and refer to page 37 on how to
modify this specified time.
Press and hold for 3 seconds to enter Quick Mode. Refer
to Quick Mode on page 52 for more information.
12 Cut (transition) The transition happens immediately when you press the
Cut button.
Press and hold for 3 seconds to enter Quick Mode. Refer
to Quick Mode on page 52 for more information.
13 T-Bar (transition) Slide the T-Bar to start the transition. The scene
transition speed depends on how fast you slide the bar.
Sliding the T-bar all the way to one end will complete the
transition.
You can create different effects by sliding it slowly, quickly
or even hold it half way.
14 iPad Stand Allows the iPad to sit in.
15 SRC / PGM View
Selector
Pressing the button will switch video source between
HDMI source 1, HDMI source 2 and PGM.
16 Pause Stream Press this button to pause streaming.
17 GoLive Press this button to start streaming and/or recording.
Press again to stop.
5
StreamLIVE™ HD User Manual
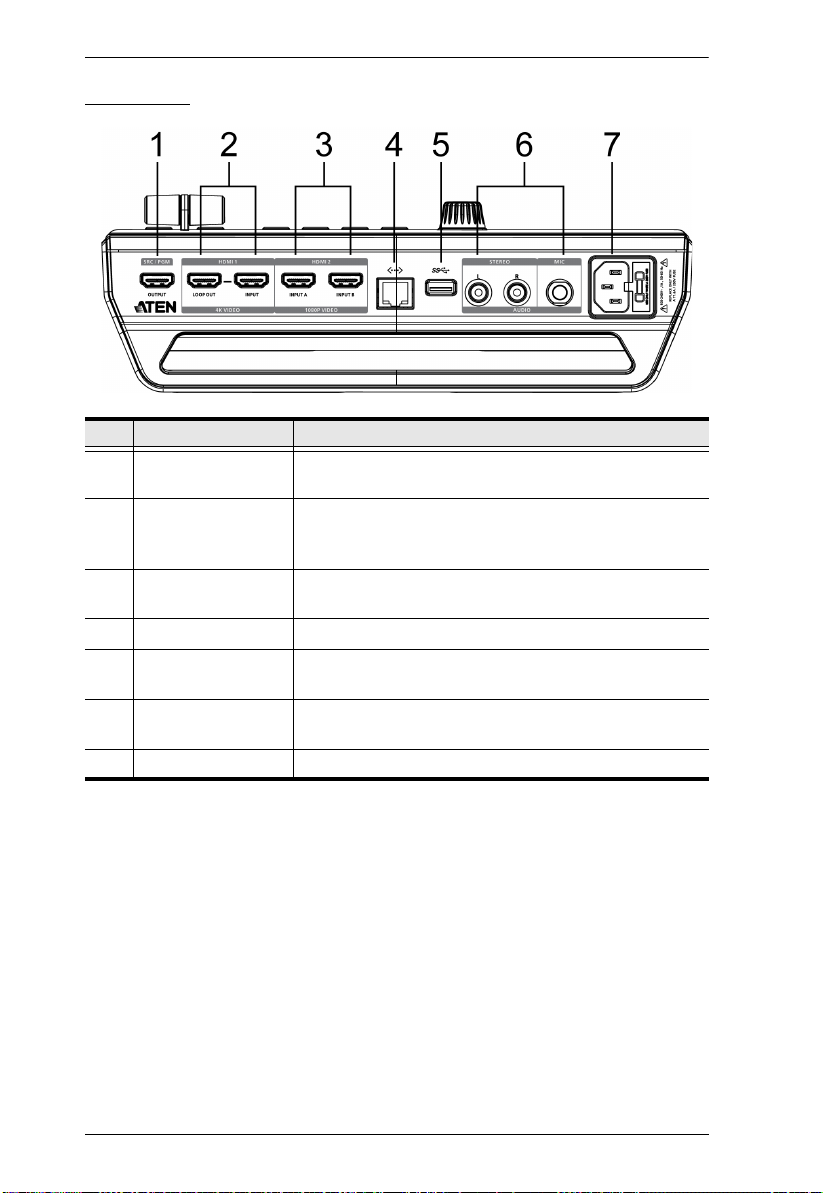
Rear View
No. Component Description
1 SRC / PGM Output
Port
2 4K HDMI Loop Out
Port / 4K HDMI Input
Port
3 1080P Video Input
Port
4 Ethernet Port For Internet connection.
5 USB 3.2 Gen1 Type-
A P ort
6 RCA Line In Port /
MIC In Port
7 AC Power Socket Powers the unit.
Programmed (PGM) Video output.
An HDMI 1 Input source and an HDMI 1 Loop Out.
HDMI 2 Input that can take Video Input A or B. To select
A or B, go to Media on page 27.
For firmware upgrade and livestream recording.
Connect MIC or audio sources for additional audio
effects.
6
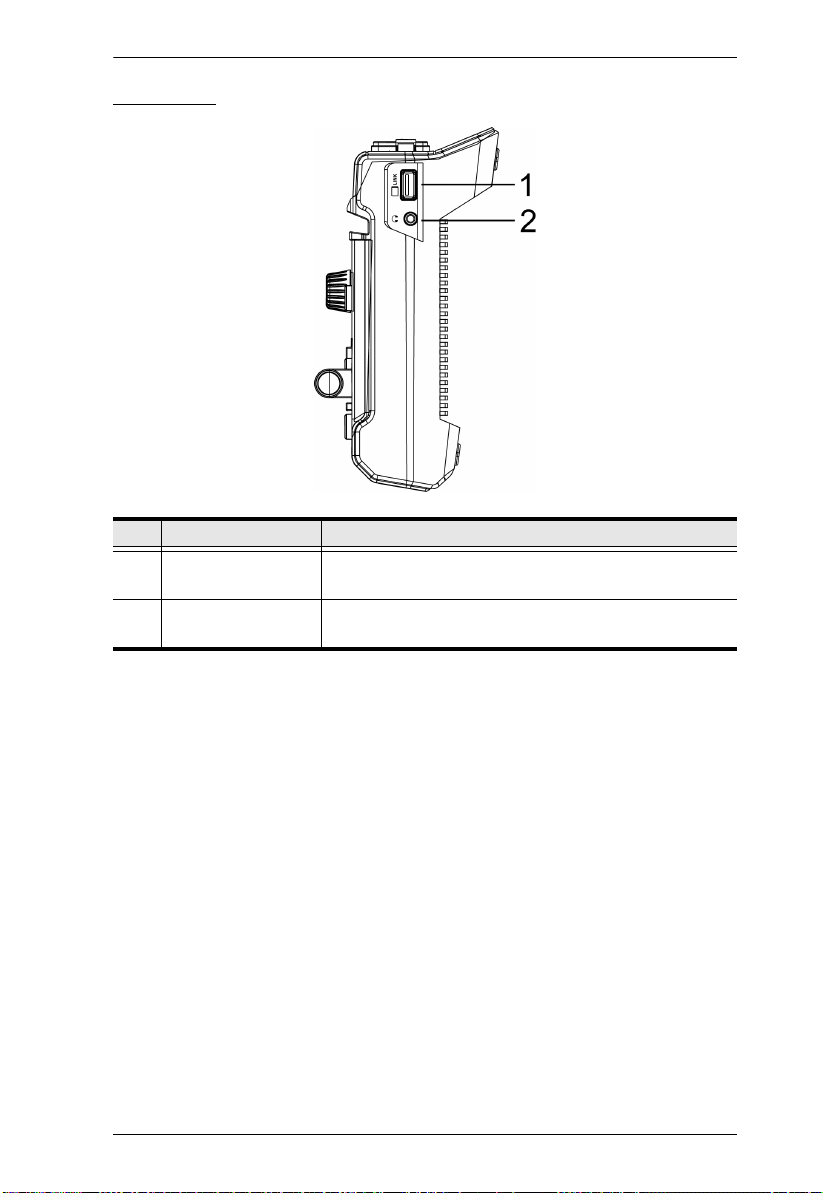
Side View
No. Component Description
1 iPad Link Port (Data
only)
2 3.5mm Audio
Monitor Jack
Connects to the iPad for ATEN OnAir app.
Sound output for the preview scene (the greenly lit
scene).
Chapter 1. Introduction
7

StreamLIVE™ HD User Manual
This Page Intentionally Left Blank
8
Chapter 2
Please review the safety information regarding the placement
of this device in Safety Instructions, page 59.
Hardware Setup
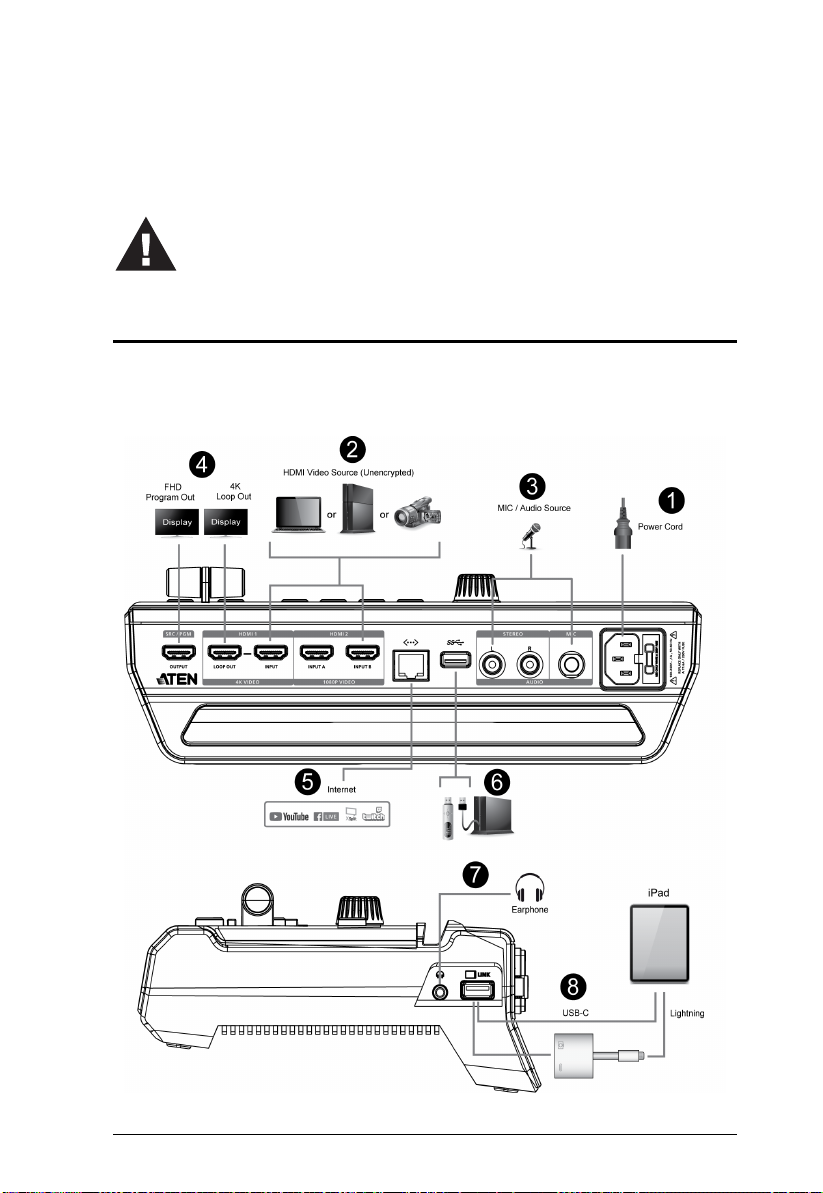
Connecting the StreamLIVE™ HD Unit
Follow the steps below to connect the StreamLIVE™ HD to an HDMI source
and the host.
9
StreamLIVE™ HD User Manual
1. Power on the unit by connecting the power cord. Wait for the boot-up
luminous (scene keys) sequence.
2. Connect the HDMI sources (e.g. PC, gaming console or video recorder)
3. Connect a microphone or any other audio sources.
4. (Optional) Connect the HDMI Output cable if necessary:
a) Connect the HDMI display to the SRC/PGM Output Port.
b) Connect the HDMI display to the Loop Out Port.
5. Connect an Ethernet cable for Internet connection
2
.
6. (Optional) If you wish to firmware upgrade or record your live-stream,
connect a USB storage device and refer respectively to Firmware Upgrade
on page 55 or Recording Live-stream Video (External Storage) on page 46
for more information.
7. (Optional) Connect an earphone to receive sound output for the preview
scene.
8. Connect your iPad to the iPad Link Port. Refer to Connecting iPad on
page 11 for more information.
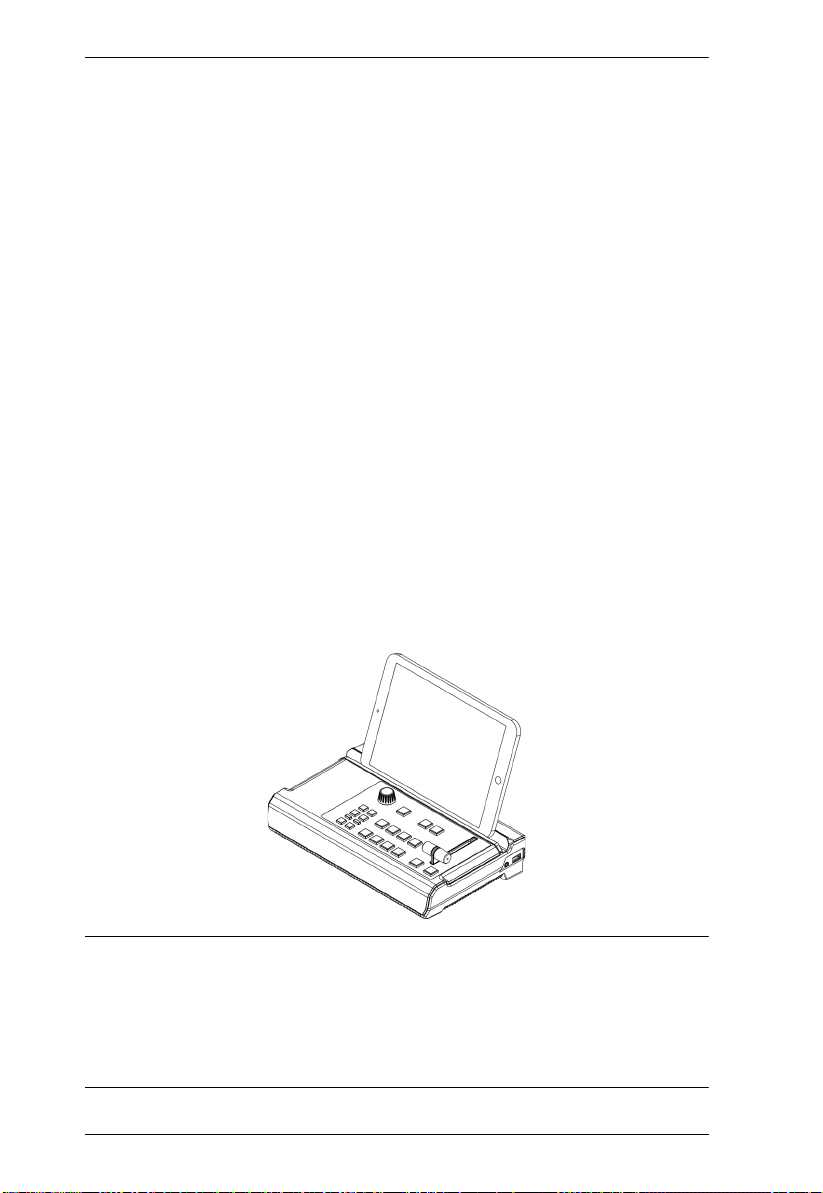
9. (Optional) Place your iPad onto the iPad stand as shown in the diagram
3
below
.
1
.
Note: 1. The HDMI sources must be unencrypted.
2. Use the connected iPad to configure further network settings for livestreaming.
3. iPad placed on the unit is recommended for viewing only. Hand
holding your iPad is still recommended for control.
10
Chapter 2. Hardware Setup
Connecting iPad
Lightning Connector on iPad
For iPads having lightning connectors, simply connect the Apple Lightning
USB 3 Adapter (not included, may need additional purchase) and the USB-A
to USB-A cable serially between the StreamLIVE™ HD and your iPad.
If you wish to have the charging function, connect your lightning charging
cable to the Apple Lightning to USB 3 Adapter.
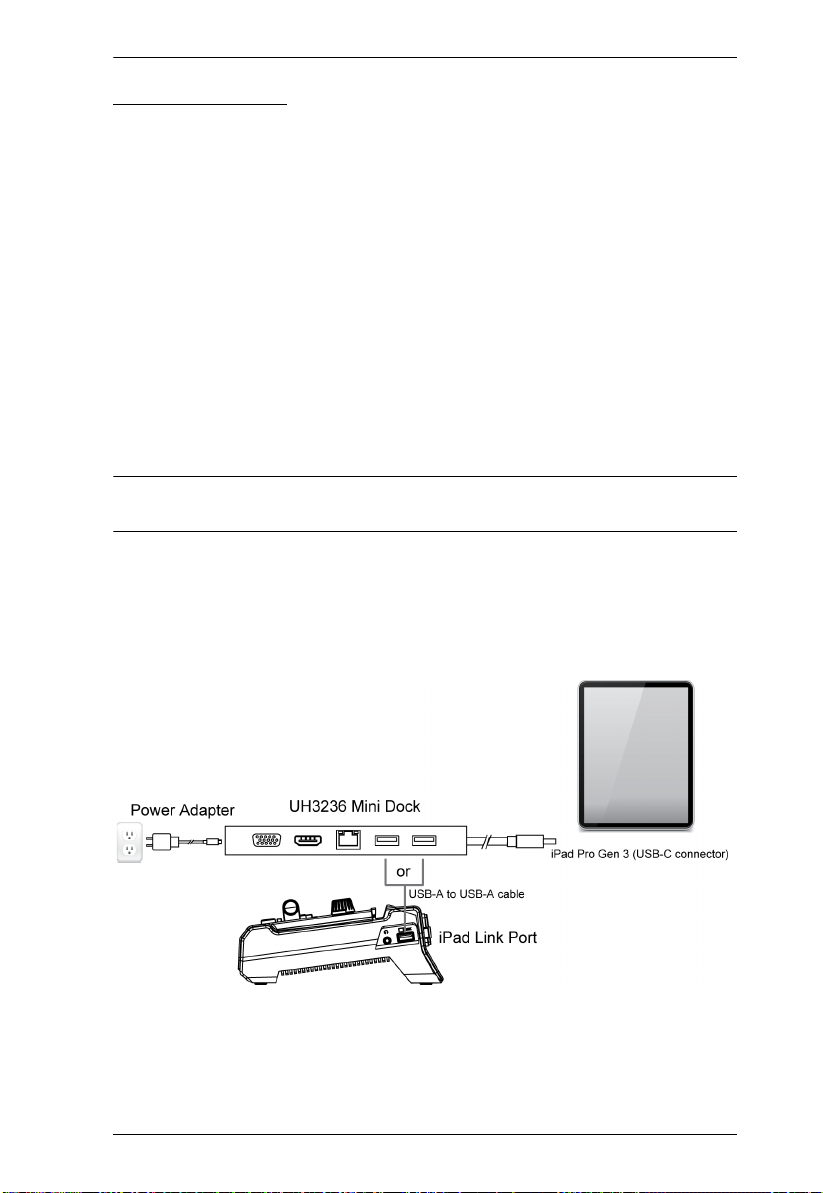
USB-C Connector on iPad
For iPads having USB-C connectors (e.g. iPad Pro Gen 3), simply connect the
USB-A to USB-C cable included in the package between your iPad and the
StreamLIVE™ HD.
Note: The USB-A to USB-C cable included in the package is custom-made
for this setup, a general USB-A to USB-C cable will not work.
If you wish to have the charging function, connect an Aten UH3236 mini dock
(available for purchase separately) between the iPad and the StreamLIVE™
HD, and connect a USB-C power adapter (60W or above) to the UH3236.
An example is shown:
11

StreamLIVE™ HD User Manual
This Page Intentionally Left Blank
12
Chapter 3
ATEN OnAir App & Side Menu
ATEN OnAir Application
ATEN OnAir app acts as the central controller for UC9020. The app’s design
is a control panel where you can monitor program results, edit scenes, setup
video and audio stream settings, stream recording settings, etc.
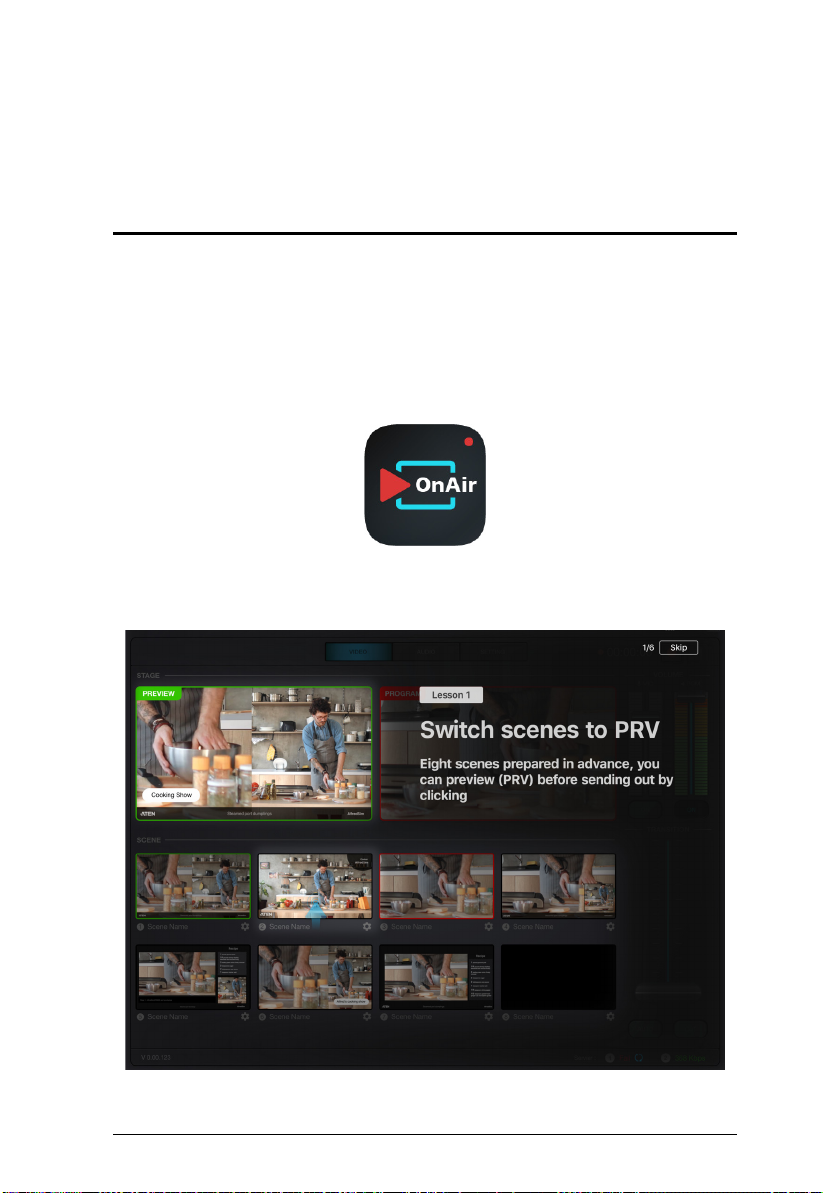
Download the ATEN OnAir app from App Store and install it on your iPad.
The icon looks like the one below:
Tap to open the ATEN OnAir application and the tutorial will start for the first
time you open it.
13
StreamLIVE™ HD User Manual
Follow the on-screen instruction as it guides you through the basics of using
the ATEN OnAir app with UC9020.
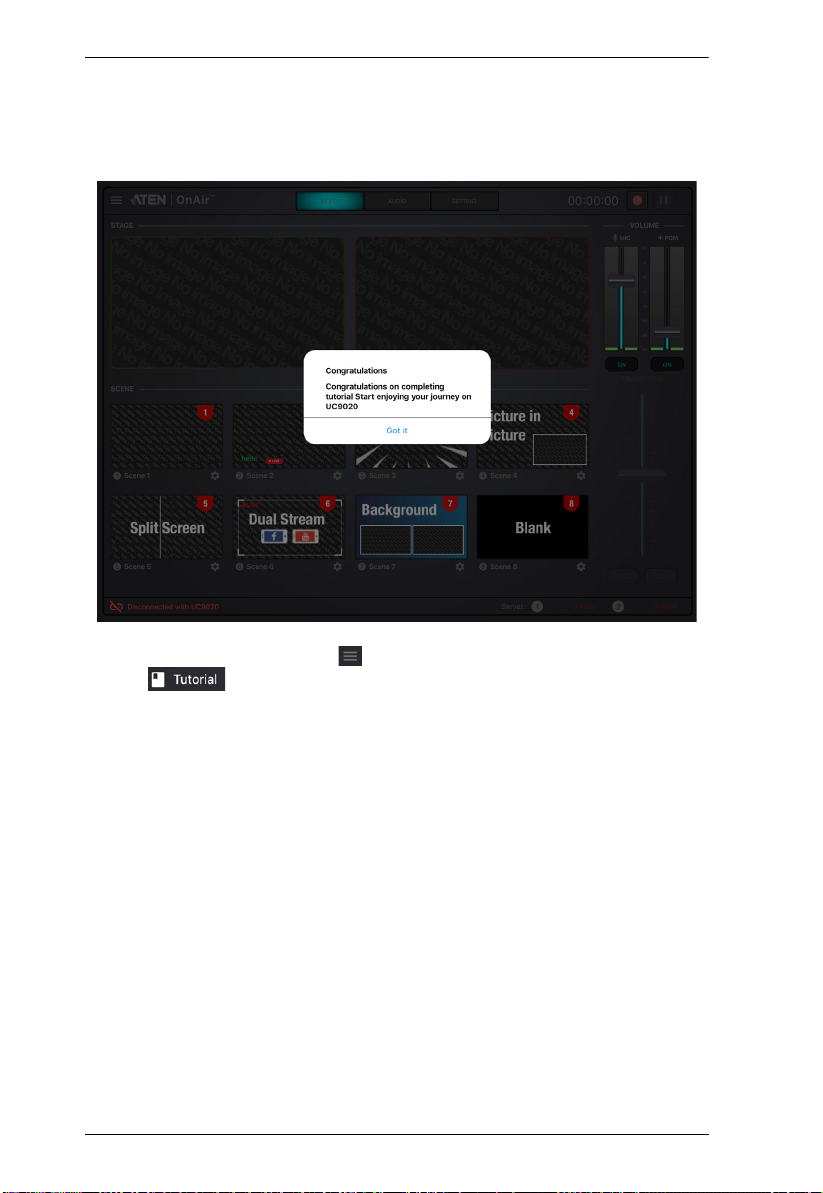
When finished, a message will be shown:
To run the tutorial again, tap the icon on the top left corner for t he side men u
and tap .
14
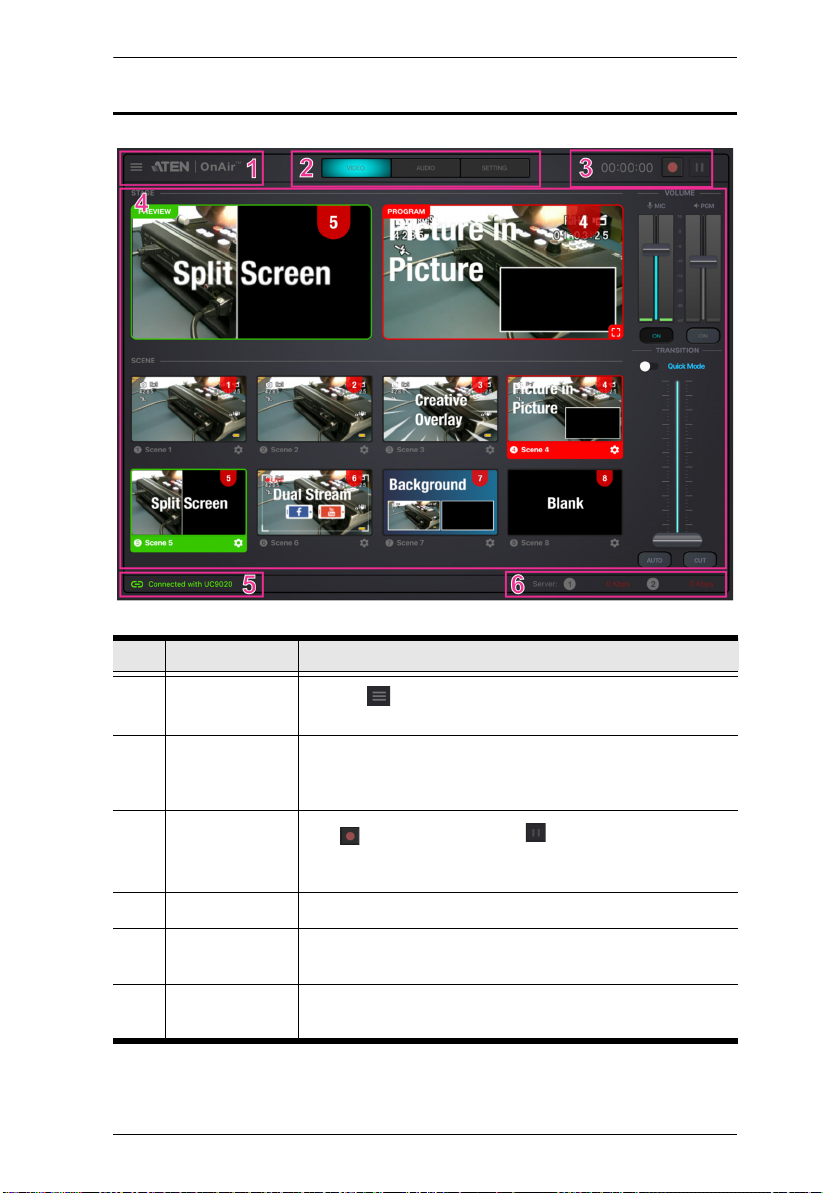
Page Components
Chapter 3. ATEN OnAir App & Side Menu
No. Component Description
1 Side Menu
2 Deck Selector Tap to select the desired configuration deck.
3 GoLive
4 Deck Content The content depends on the selected deck.
5 iPad Link
Status
6 Network Traffic
Status
Tap the icon for the side menu. Refer to Side Menu on
page 16 for more details.
Three decks are available: Video Mixer, Audio Mixer and
Setting.
Tap to start streaming. Tap to pause streaming. The
timer on the left shows how long you have been streaming
for.
Displays the link status between your iPad and the
StreamLIVE™ HD.
Displays the network traffic status.
15
 Loading...