


UC3022
CAMLIVE™ PRO Dual HDMI to
USB-C UVC Video Capture
User Manual
CAMLIVE™ PRO User Manual
Compliance Statements
FEDERAL COMMUNICATIONS COMMISSION INTERFERENCE
STATEMENT
This equipment has been tested and found to comply with the limits for a Class
B digital service, pursuant to Part 15 of the FCC rules. These limits are designed
to provide reasonable protection against harmful interference in a residential
installation. Any changes or modifications made to this equipment may void the
user’s authority to operate this equipment. This equipment generates, uses, and
can radiate radio frequency energy. If not installed and used in accordance with
the instructions, may cause harmful interference to radio communications.
However, there is no guarantee that interference will not occur in a particular
installation. If this equipment does cause harmful interference to radio or
television reception, which can be determined by turning the equipment off and
on, the user is encouraged to try to correct the interference by one or more of
the following measures:
Reorient or relocate the receiving antenna.
Increase the separation between the equipment and receiver.
Connect the equipment into an outlet on a circuit different from that to
which the receiver is connected.
Consult the dealer or an experienced radio/TV technician for help.
The device complies with Part 15 of the FCC Rules. Operation is subject to the
following two conditions: (1) this device may not cause harmful interference,
and (2) this device must accept any interference received, including
interference that may cause undesired operation.
FCC Caution: Any changes or modifications not expressly approved by the
party responsible for compliance could void the user's authority to operate this
equipment.
KCC Statement
Industry Canada Statement
This Class B digital apparatus complies with Canadian ICES-003.
ii

CAMLIVE™ PRO User Manual
HDMI Trademark Statement
The terms HDMI, HDMI High-Definition Multimedia Interface, and the HDMI
Logo are trademarks or registered trademarks of HDMI Licensing Administrator,
Inc.
RoHS
This product is RoHS compliant.
The frequnecy and maximum EIRP Power in EU are listed as below
2402MHz~2480MHz:0.32dBm
You are cautioned that changes or modifi cations not expressly approved by the
part responsible for compliance could void the user’s authority to operate the
equipment.
FCC RF Radiation Exposure Statement:
1. This Transmitter must not be co-located or operating in conjunction with
any other antenna or transmitter.
2. This equipment complies with FCC RF radiation exposure limits set forth
for an uncontrolled environment. This equipment should be installed and
operated with a minimum distance of 20 centimeters between the radiator
and your body.
Radiation Exposure Statement: This equipment complies with IC radiation
exposure limits established for an uncontrolled environment. This equipment
must be installed and operated with a minimum distance of 20 cm between the
radiation source and your body.
Declaration d'exposition aux radiations: Cet equipement est conforme aux
limites d'exposition aux rayonnements IC etablies pour un environnement non
controle. Cet equipement doit etre installe et utilise avec un minimum de 20 cm
de distance entre la source de rayonnement et votre corps.
This equipment should be installed and operated with a minimum distance of 20
cm between the radiator and your body.
Dieses Gerät sollte mit einem Mindestabstand von 20 cm zwischen dem Kühler
und Ihrem Körper installiert und betrieben werden.
iii
CAMLIVE™ PRO User Manual
警告使用者:
根據 NCC 低功率電波輻射性電機管理辦法規定:
第十二條 經型式認證合格之低功率射頻電機,非經許可,公司、 商號
或使用者均不得擅自變更頻率、加大功率或變更原設計之特性及功能。
第十四條 低功率射頻電機之使用不得影響飛航安全及干擾合法通信;
經發現有干擾現象時,應立即停用,並改善至無干擾時方得繼續使用。
前項合法通信,指依電信法規定作業之無線電通信。低功率射頻電機須
忍受合法通信或工業、科學及醫療用電波輻射性電機設備之干擾。
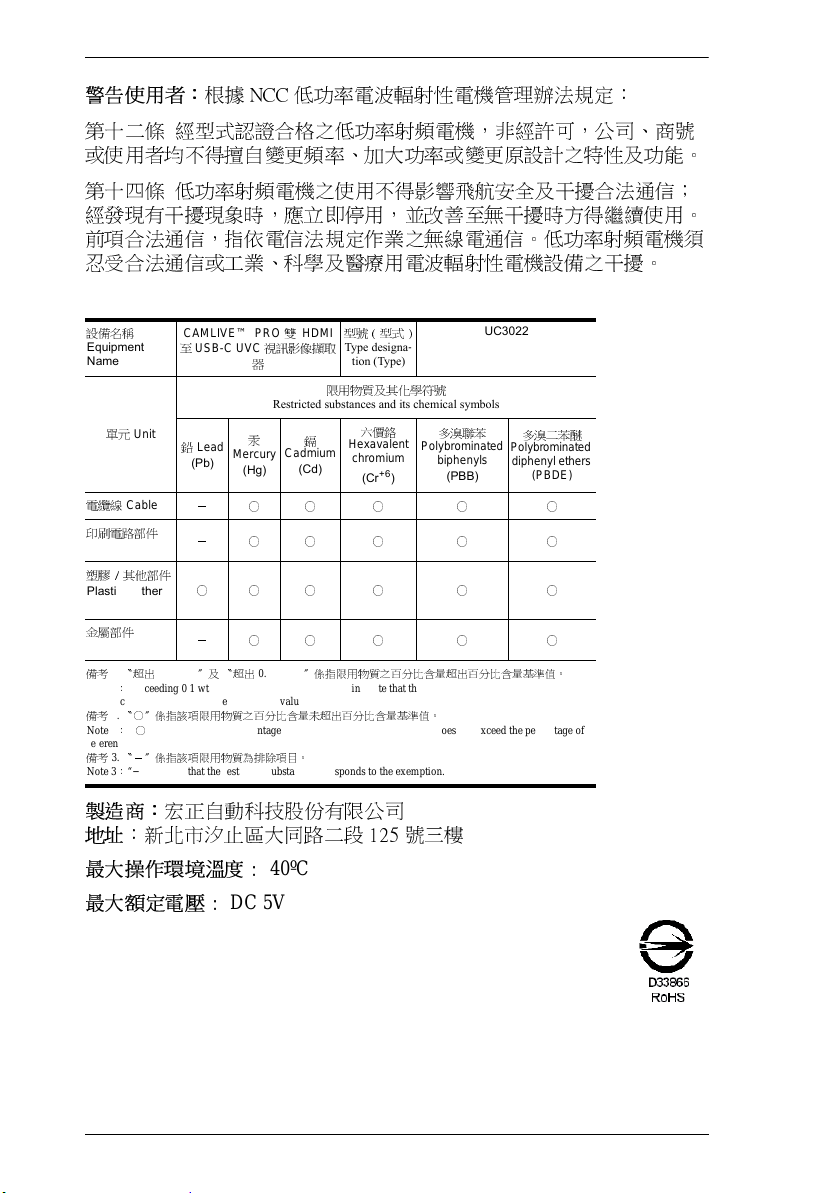
多溴聯苯
biphenyls
(PBB)
UC3022
多溴二苯醚
Polybrominated
diphenyl ethers
(PBDE)
設備名稱
Equipment
Name
單元
電纜線
Cable
印刷電路部件
PCBA
塑膠 / 其他部件
Plastic / Other
parts
金屬部件
parts
備考1.〝超出
Note 1:“Exceeding 0.1 wt %” and “exceeding 0.01 wt %” indicate that the percentage content of the restricted
substance exceeds the reference percentage value of presence condition.
備考2.〝○〞係指該項限用物質之百分比含量未超出百分比含量基準值。
Note 2:“○” indicates that the percentage content of the restric ted substance does not exceed the percentage of
reference value of presence.
備考3.〝-〞係指該項限用物質為排除項目。
Note 3:“−” indicates that the restricted substance corr esponds to the exemption.
CAMLIVE™ PRO 雙 HDMI
至
USB-C UVC
Unit
鉛
Lead
(Pb)
-○ ○ ○ ○ ○
-○ ○ ○ ○ ○
○○ ○ ○ ○ ○
Metal
-○ ○ ○ ○ ○
0.1 wt %
〞及 〝超出
型號 (型式)
視訊影像擷取
器
Restricted substances and its chemical symbols
汞
Mercury
(Hg)
0.01 wt %
Type designa-
tion (Type)
限用物質及其化學符號
六價鉻
鎘
Cadmium
Hexavalent
chromium
(Cd)
(Cr+6)
〞係指限用物質之百分比含量超出百分比含量基準值。
Polybrominated
製造商:
地址
最大操作環境溫度 :
最大額定電壓 :
宏正自動科技股份有限公司
:新北市汐止區大同路二段 125 號三樓
40ºC
DC 5V
iv

CAMLIVE™ PRO User Manual
About this Manual
This user manual is provided to help you get the most from the CAMLIVE™
PRO unit. It covers all aspects of installation, configuration, and operation. An
overview of the information found in the manual is provided below.
Chapter 1, Introduction introduces you to the Dual HDMI to USB-C UVC Video
Capture. Its purpose, features, installation considerations, and panel
components are presented and described.
Chapter 2, Hardware Setup describes the steps that are necessary to quickly
and safely set up your installation.
Chapter 3, Livestream / Record Setup expla ins how to fi nd CAM LIVE on your
system and presents how to setup video and audio source using an example
live-stream/record software/platform.
Chapter 4, Aten OnAir Lite App explains how to download and configure the
CAMLIVE™ PRO’s OnAir Lite App.
Chapter 5, The Firmware Upgrade Utility explains how to download the
CAMLIVE™ PRO’s firmware and upgrade the device using the utility.
An Appendix provides a list of safety instructions and precautions, contact
information for ATEN technical support, product specifications, and other
technical information.
Note:
Read this manual thoroughly and follow the installation and operation
procedures carefully to prevent any damage to the unit or any connected
devices.
ATEN regularly updates its product documentation for new features and
fixes. For an up-to-date CAMLIVE™ PRO documentation, visit http://
www.aten.com/global/en/
v

CAMLIVE™ PRO User Manual
Package Contents
1 UC3022 CAMLIVE™ PRO Dual HDMI to USB-C UVC Video Capture
1 USB Type-B to USB Type-C cable
1 USB Type-B to USB Type-A cable
1 power adapter
1 camera mount adapter kit
1 user instructions
*When using the CAMLIVE™ PRO, if you are only detecting MJPG
video, please disconnect the USB Type-B to USB Type-C cable that you
connected with the host. Flip the USB-C connector around and
reconnect it to the host. Please refer to Using the USB Cables on
page 22 for more details.
Note: Make sure that all of the components are present and in good
order. If anything is missing or was damaged in shipping, contact
your dealer.
vi

CAMLIVE™ PRO User Manual
User Information
Online Registration
Be sure to register your product at our online support center:
International http://eservice.aten.com
Telephone Support
For telephone support, call this number:
International 886-2-8692-6959
China 86-400-810-0-810
Japan 81-3-5615-5811
Korea 82-2-467-6789
North America 1-888-999-ATEN ext 4988
1- 949-428 -1111
User Notice
All information, documentation, and specifications contained in this manual are
subject to change without prior notification by the manufacturer. The
manufacturer makes no representations or warranties, either expressed or
implied, with respect to the contents hereof and specifically disclaims any
warranties as to merchantability or fitness for any particular purpose. Any of the
manufacturer's software described in this manual is sold or licensed as is.
Should the programs prove defective following their purchase, the buyer (and
not the manufacturer, its distributor, or its dealer), assumes the entire cost of all
necessary servicing, repair and any incidental or consequential damages
resulting from any defect in the software.
The manufacturer of this system is not responsible for any radio and/or TV
interference caused by unauthorized modifications to this device. It is the
responsibility of the user to correct such interference.
The manufacturer is not responsible for any damage incurred in the operation
of this system if the correct operational voltage setting was not selected prior to
operation. PLEASE VERIFY THAT THE VOLTAGE SETTING IS CORRECT
BEFORE USE.
vii

CAMLIVE™ PRO User Manual
Conventions
This manual uses the following conventions:
Monospaced Indicates text that you should key in.
[ ] Indicates keys you should press. For example, [Enter] means to
press the Enter key. If keys need to be chorded, they appear
together in the same bracket with a plus sign between them:
[Ctrl+Alt].
1. Numbered lists represent procedures with sequential steps.
♦ Bullet lists provide information, but do not involve sequential steps.
> Indicates selecting the option (on a menu or dialog box, for
example), that comes next. For example, Start
open the Start menu, and then select Run.
Indicates critical information.
Product Information
>
Run means to
For information about all ATEN products and how they can help you connect
without limits, visit ATEN on the Web or contact an ATEN Authorized Reseller.
Visit ATEN on the Web for a list of locations and telephone numbers:
International http://www.aten.com
North America http://www.aten-usa.com
viii

CAMLIVE™ PRO User Manual
Table of Contents
Compliance Statements . . . . . . . . . . . . . . . . . . . . . . . . . . . . . . . . . . . . . . . ii
About this Manual . . . . . . . . . . . . . . . . . . . . . . . . . . . . . . . . . . . . . . . . . . . v
Package Contents . . . . . . . . . . . . . . . . . . . . . . . . . . . . . . . . . . . . . . . . . . vi
User Information . . . . . . . . . . . . . . . . . . . . . . . . . . . . . . . . . . . . . . . . . . . . vii
Online Registration . . . . . . . . . . . . . . . . . . . . . . . . . . . . . . . . . . . . . . . vii
Telephone Support . . . . . . . . . . . . . . . . . . . . . . . . . . . . . . . . . . . . . . . vii
User Notice . . . . . . . . . . . . . . . . . . . . . . . . . . . . . . . . . . . . . . . . . . . . . vii
Conventions . . . . . . . . . . . . . . . . . . . . . . . . . . . . . . . . . . . . . . . . . . . . . . .viii
Product Information. . . . . . . . . . . . . . . . . . . . . . . . . . . . . . . . . . . . . . . . . .viii
1. Introduction
Overview . . . . . . . . . . . . . . . . . . . . . . . . . . . . . . . . . . . . . . . . . . . . . . . . . . . 1
Features . . . . . . . . . . . . . . . . . . . . . . . . . . . . . . . . . . . . . . . . . . . . . . . . . . .2
Planning the Installation . . . . . . . . . . . . . . . . . . . . . . . . . . . . . . . . . . . . . . . 2
Requirements . . . . . . . . . . . . . . . . . . . . . . . . . . . . . . . . . . . . . . . . . . . .2
Supported Operating System and Requirements . . . . . . . . . . . . . . . . . . . 3
Components . . . . . . . . . . . . . . . . . . . . . . . . . . . . . . . . . . . . . . . . . . . . . . . .4
Front View . . . . . . . . . . . . . . . . . . . . . . . . . . . . . . . . . . . . . . . . . . . . . . . 4
Rear View . . . . . . . . . . . . . . . . . . . . . . . . . . . . . . . . . . . . . . . . . . . . . . .6
2. Hardware Setup
Mounting the Camera Mount Adapter. . . . . . . . . . . . . . . . . . . . . . . . . . . . .7
Optional Rack Mounting . . . . . . . . . . . . . . . . . . . . . . . . . . . . . . . . . . . . . . . 7
Connecting the CAMLIVE™ PRO Unit . . . . . . . . . . . . . . . . . . . . . . . . . . . 8
Aten OnAir Lite App Installation . . . . . . . . . . . . . . . . . . . . . . . . . . . . . . . .10
Phone Tray . . . . . . . . . . . . . . . . . . . . . . . . . . . . . . . . . . . . . . . . . . . . . . . .10
Software . . . . . . . . . . . . . . . . . . . . . . . . . . . . . . . . . . . . . . . . . . . . . . . . . . 11
PC . . . . . . . . . . . . . . . . . . . . . . . . . . . . . . . . . . . . . . . . . . . . . . . . . . . .11
Android Smartphone . . . . . . . . . . . . . . . . . . . . . . . . . . . . . . . . . . . . . . 11
3. Livestream / Record Setup
Livestream / Record Platform . . . . . . . . . . . . . . . . . . . . . . . . . . . . . . . . . .13
Discovering CAMLIVE on your System. . . . . . . . . . . . . . . . . . . . . . . . . . .13
Mac Operating System . . . . . . . . . . . . . . . . . . . . . . . . . . . . . . . . . . . .13
Windows Operating System . . . . . . . . . . . . . . . . . . . . . . . . . . . . . . . .16
Video and Audio Setup . . . . . . . . . . . . . . . . . . . . . . . . . . . . . . . . . . . . . .18
Using the USB Cables . . . . . . . . . . . . . . . . . . . . . . . . . . . . . . . . . . . . . . .22
HDCP Switching . . . . . . . . . . . . . . . . . . . . . . . . . . . . . . . . . . . . . . . . . . . . 23
Resetting the CAMLIVE™ PRO . . . . . . . . . . . . . . . . . . . . . . . . . . . . . . .24
4. Aten OnAir Lite App
ATEN OnAir Lite Application. . . . . . . . . . . . . . . . . . . . . . . . . . . . . . . . . . . 25
Supported Systems. . . . . . . . . . . . . . . . . . . . . . . . . . . . . . . . . . . . . . . 25
ix

CAMLIVE™ PRO User Manual
Installing the CAMLIVE™ PRO . . . . . . . . . . . . . . . . . . . . . . . . . . . . . 25
Connecting the CAMLIVE™ PRO on your Mobile Device . . . . . . . . 26
Disconnecting the CAMLIVE™ PRO from your Mobile Device . . . . . 27
Page Components . . . . . . . . . . . . . . . . . . . . . . . . . . . . . . . . . . . . . . . . . . 28
Project Settings . . . . . . . . . . . . . . . . . . . . . . . . . . . . . . . . . . . . . . . . . 29
System Information Tab . . . . . . . . . . . . . . . . . . . . . . . . . . . . . . . . . . . 29
Video Mixer . . . . . . . . . . . . . . . . . . . . . . . . . . . . . . . . . . . . . . . . . . . . . . . 30
Scene Editor . . . . . . . . . . . . . . . . . . . . . . . . . . . . . . . . . . . . . . . . . . . . 32
Overlay Button. . . . . . . . . . . . . . . . . . . . . . . . . . . . . . . . . . . . . . . . 33
Switching Video Source . . . . . . . . . . . . . . . . . . . . . . . . . . . . . . . . 33
Reset Button . . . . . . . . . . . . . . . . . . . . . . . . . . . . . . . . . . . . . . . . . 34
Resize/Crop Tool . . . . . . . . . . . . . . . . . . . . . . . . . . . . . . . . . . . . . . . . 34
Resize . . . . . . . . . . . . . . . . . . . . . . . . . . . . . . . . . . . . . . . . . . . . . . 34
Crop. . . . . . . . . . . . . . . . . . . . . . . . . . . . . . . . . . . . . . . . . . . . . . . . 35
Remote Deck . . . . . . . . . . . . . . . . . . . . . . . . . . . . . . . . . . . . . . . . . . . 37
Mapping Hotkey with Corresponding Softwares (OBS). . . . . . . . . 37
Audio Mixer . . . . . . . . . . . . . . . . . . . . . . . . . . . . . . . . . . . . . . . . . . . . . . . 40
Settings Panel . . . . . . . . . . . . . . . . . . . . . . . . . . . . . . . . . . . . . . . . . . . . . 43
Chroma Key . . . . . . . . . . . . . . . . . . . . . . . . . . . . . . . . . . . . . . . . . . . . 43
Auto Switch . . . . . . . . . . . . . . . . . . . . . . . . . . . . . . . . . . . . . . . . . . . . 45
More Settings . . . . . . . . . . . . . . . . . . . . . . . . . . . . . . . . . . . . . . . . 46
Advanced . . . . . . . . . . . . . . . . . . . . . . . . . . . . . . . . . . . . . . . . . . . . . . 46
Resetting the CAMLIVE™ PRO. . . . . . . . . . . . . . . . . . . . . . . . . . 47
ATEN OnAir Lite App Factory Default Settings . . . . . . . . . . . . . . . . . . . . 48
5. The Firmware Upgrade Utility
Overview. . . . . . . . . . . . . . . . . . . . . . . . . . . . . . . . . . . . . . . . . . . . . . . . . . 51
Downloading the Firmware Upgrade Package . . . . . . . . . . . . . . . . . . 51
Preparation . . . . . . . . . . . . . . . . . . . . . . . . . . . . . . . . . . . . . . . . . . . . . . . . 52
Starting the Upgrade . . . . . . . . . . . . . . . . . . . . . . . . . . . . . . . . . . . . . . . . 53
Upgrade Succeeded. . . . . . . . . . . . . . . . . . . . . . . . . . . . . . . . . . . . . . . . . 55
Upgrade Failed . . . . . . . . . . . . . . . . . . . . . . . . . . . . . . . . . . . . . . . . . . . . . 56
Appendix
Safety Instructions . . . . . . . . . . . . . . . . . . . . . . . . . . . . . . . . . . . . . . . . . . 57
General . . . . . . . . . . . . . . . . . . . . . . . . . . . . . . . . . . . . . . . . . . . . . . . . 57
Technical Support . . . . . . . . . . . . . . . . . . . . . . . . . . . . . . . . . . . . . . . . . . 59
International . . . . . . . . . . . . . . . . . . . . . . . . . . . . . . . . . . . . . . . . . . . . 59
North America . . . . . . . . . . . . . . . . . . . . . . . . . . . . . . . . . . . . . . . . . . 59
Specifications . . . . . . . . . . . . . . . . . . . . . . . . . . . . . . . . . . . . . . . . . . . . . . 60
Limited Warranty . . . . . . . . . . . . . . . . . . . . . . . . . . . . . . . . . . . . . . . . . . . 62
x

Chapter 1
Introduction
Overview
The CAMLIVE™ PRO is designed to easily capture and mix the two connected
4K video sources in FHD format for livestream purpose with outstanding video
effects and remarkable image quality. This video capture device combines
video capture, encoding, and 2-channel video mixing and switching from HDMI
source and professional line-level audio device. It helps livestreaming become
unique and stand out from thousands of CDN videos. The CAMLIVE™ PRO
supports easy switch between multiple connected sources and combine them
for a rich information delivery in steaming. In addition, it automatically converts
the sources to clean-looking USB video format in 720P or 1080P, which is sent
to your laptop/smartphone via USB.
Easy to use – the CAMLIVE™ PRO provides an intuitive ATEN OnAir Lite App.
This App places everything you need to customize your video stream right at
your fingertips. Combine, crop, and scale video to make outstanding PnP
layouts. Preset up to 8 custom scenes and manage audio sources with the
intuitive touch panel interface for a superior pro-level finish. Open up a world of
possibilities by using the chroma keying. You can make it look like you are
anywhere by changing the background for eye-popping effects.
Providing smooth video streaming workflow for dual camera or single operator
setups, the CAMLIVE™ PRO allows any streamer to broadcast over internet
for higher quality livestream to major streaming services or remote conferencing
service such as YouTube Live, Facebook, OBS, Microsoft Teams, Microsoft
Mixer, Zoom, CameraFi, and Twitch. It enables eye-popping, high-quality one
stop programming streaming broadcasting capability with PC and Mac platform.
Whether you're capturing, editing or streaming, the CAMLIVE™ PRO is flexible
enough to fit all independent livestreaming broadcasting environments. This
micro device packs several features in one such as and its lightweight design
makes it possible to fit in any case and bring it to any live event. With just the
CAMLIVE™ PRO, companion app, and your laptop / smartphone, you have all
the devices you need to present engaging livestreaming that will rival the most
advanced streamers on social media and provides an easy-to-use solution.
1

CAMLIVE™ PRO User Manual
Features
Mix and capture two unencrypted 4K live videos at 1080P UVC format on
PC or mobile device via USB 3.x interface with seamless transition
Intuitive Android/iOS App control – set up your camera gear and direct your
show from anywhere
Supports real-time HDMI program video preview
Easily identifiable chroma keys – can make the video look like you are
anywhere by changing the background
Provides audio mixer with additional dual analog audio inputs
Supports protected video (encrypted) switching mode for regular event
usage
Compatible with USB & Thunderbolt 3 (USB Type-C)
Planning the Installation
Requirements
Prepare the following before installing the CAMLIVE™ PRO unit:
2 HDMI source devices
1 HDMI display
1 XLR audio source
1 RCA audio source
1 mobile device (Android / iOS)
2

Chapter 1. Introduction
Supported Operating System and Requirements
Operating System Minimum Hardware Requirement
Windows 7 with Win7_driver installed CPU: Intel® i3 Dual Core 2.8Ghz or higher
Windows 10 or above
OS X 10.13 or later
Android 5.0.1 or later with UVC support Android smartphone with UVC and USB-C
Note: For Windows 7 users, please download and install the Win7_driver from
on our website. To download the driver, see Downloading the Firmware
Upgrade Package, page 51.
RAM: 4GB or more
One USB-C Interface or USB-A Interface
Interface
3
CAMLIVE™ PRO User Manual
4
1
2
3
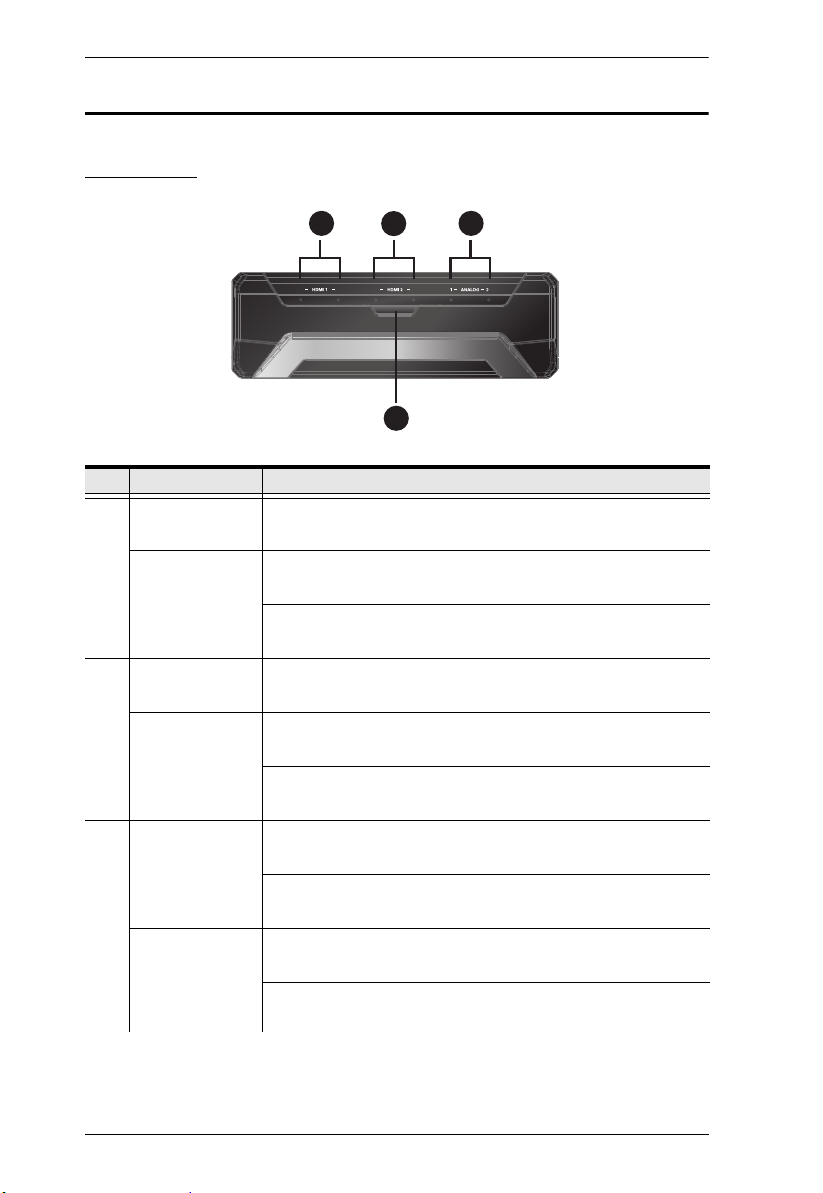
Components
Front View
No. Component Description
HDMI 1 video
status LED
1
HDMI 1 audio
status LED
HDMI 2 video
status LED
2
HDMI 2 audio
status LED
Analog 1 audio
Status LEDs
3
Analog 2 audio
status LEDs
The LED lights green to indicate the HDMI 1 video source
connection is in effect.
The LED lights green to indicate the HDMI 1 audio source
connection is in effect.
The LED lights orange to indicate the HDMI 1 audio source
connection is muted.
The LED lights green to indicate the HDMI 2 video source
connection is in effect.
The LED lights green to indicate the HDMI 2 audio source
connection is in effect.
The LED lights orange to indicate the HDMI 2 audio source
connection is muted.
The LED lights green to indicate the Analog 1 (RCA) audio
source connection is in effect.
The LED lights orange to indicate the Analog 1 (RCA) audio
source connection is muted.
The LED lights green to indicate the Analog 2 (XLR) audio
source connection is in effect.
The LED lights orange to indicate the Analog 2 (XLR) audio
source connection is muted.
4

Chapter 1. Introduction
No. Component Description
4 Bluetooth link
pushbutton
Note:
All the LEDs blink at the same time to indicate that the firmware upgrade is in
progress.
The HDMI 1 video status LED and the HDMI 2 video status LED blink once every
0.5 seconds for 3 seconds when you disconnect the Bluetooth connection.
Press to quickly switch between scene 1 and scene 2.
Press and hold 3 seconds to disconnect the Bluetooth
connection between CAMLIVE™ PRO and your mobile
device.
Press and hold the Bluetooth link pushbutton, and power on
the CAMLIVE™ PRO to perform a firmware upgrade. See
Preparation, page 52.
Press and hold the Bluetooth link pushbutton, power on the
CAMLIVE™ PRO, and wait for 10 seconds to reset the unit.
See Resetting the CAMLIVE™ PRO, page 24.
5
CAMLIVE™ PRO User Manual
4
1
2
3
7
8 9
5
6
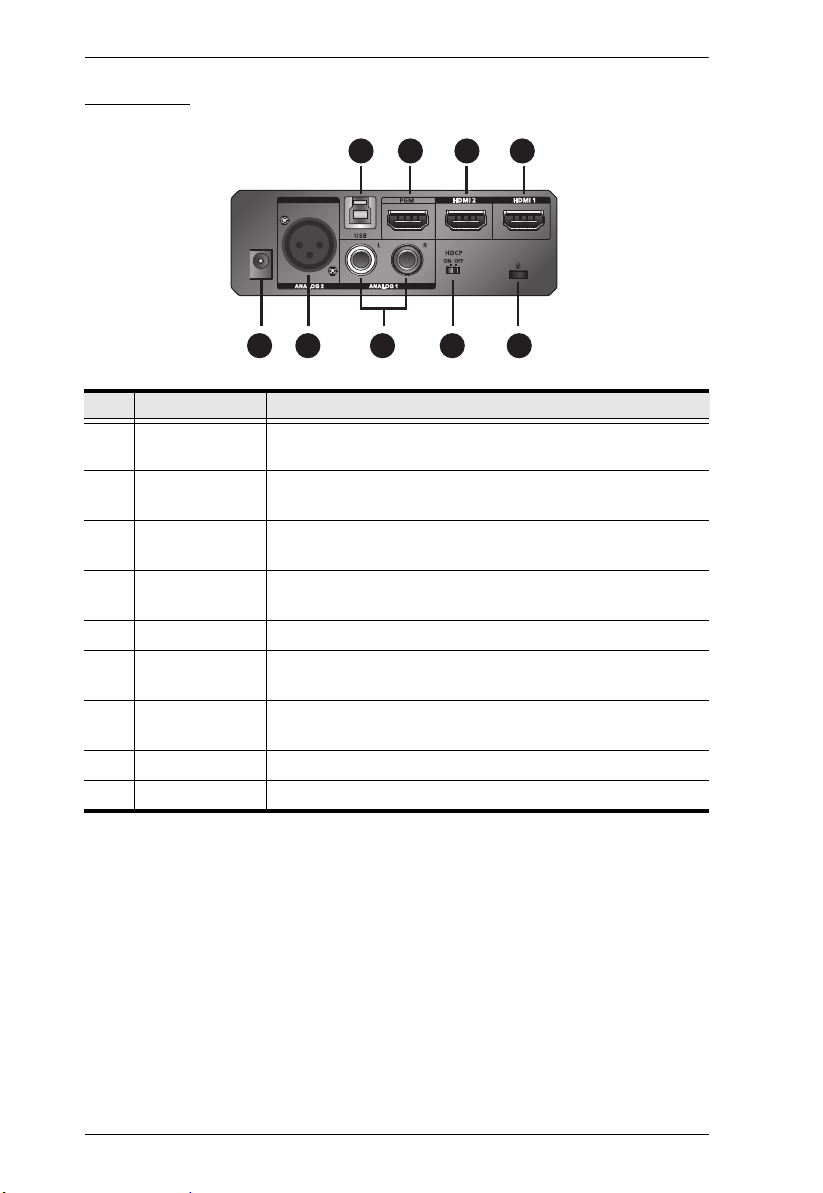
Rear View
No. Component Description
1 USB Type-B
UVC output port
2 HDMI program
output port
3 HDMI 2 input
port
4 HDMI 1 input
port
5 power jack The power adapter plugs here.
6 Analog 2 input
port
7 Analog 1 input
port (L/R)
8 HDCP switch Switch to display HDCP protected content.
9 Kensington Lock Kensington security slot plugs here.
Connects to a host.
Connects to an HDMI-enabled display for programmed
(PGM) video output.
Connects to an HDMI input.
Note: This port supports interlaced HDMI video input.
Connects to an HDMI input.
Connects XLR audio source here.
Connects RCA audio source here.
6
Chapter 2
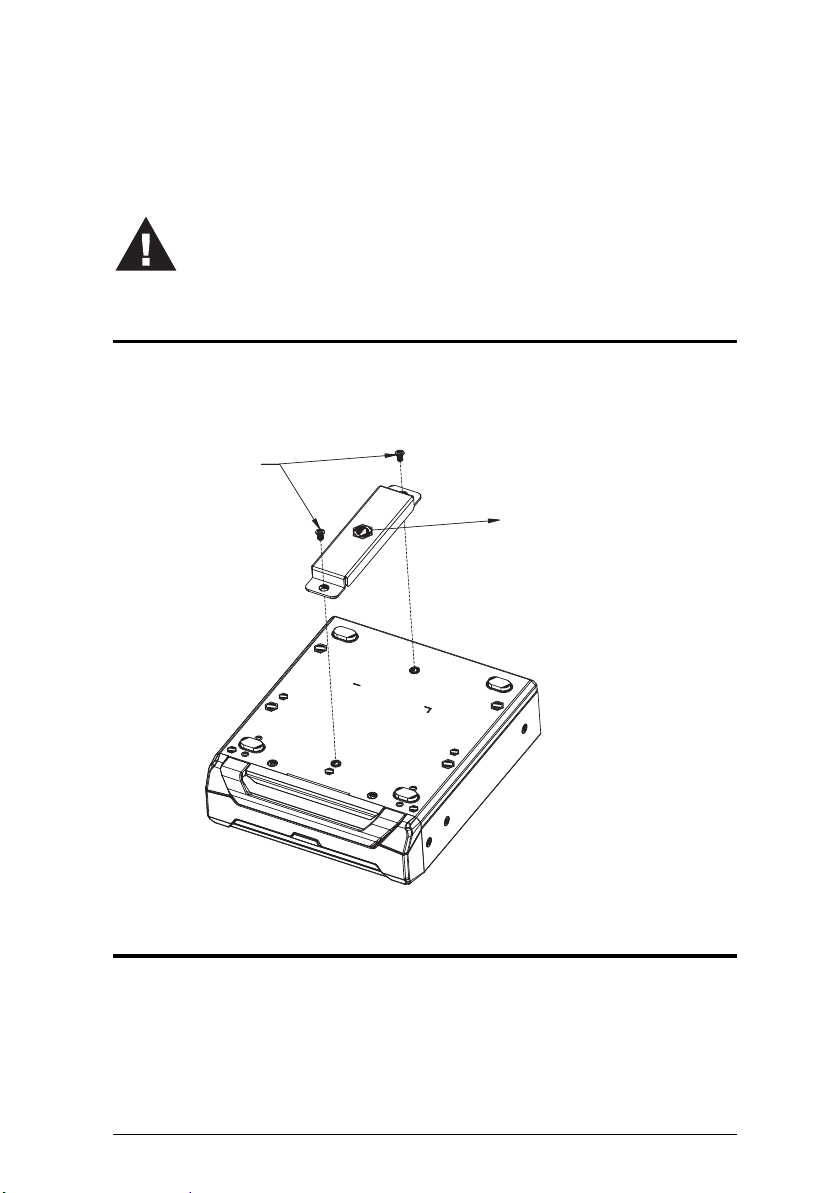
Please review the safety information regarding the placement
of this device in Safety Instructions, page 57.
M3 x 5
1/4” Tripod Mount Thread
Hardware Setup
Mounting the Camera Mount Adapter
To mount the camera mount adapter, screw the camera mount adapter on the
bottom of the CAMLIVE™ PRO with the screws provided in the camera mount
adapter kit.
Optional Rack Mounting
For convenience and flexibility, the CAMLIVE™ PRO is compatible with the
Teranex Mini Rack Shelf.
7
CAMLIVE™ PRO User Manual
4
1
2
3
9
5
6
8
Install App
or or
HDMI Source
(unencrypted)
HDMI Display
Power Adapter
Laptop & Mobile
Devices
7
Audio Sources
or
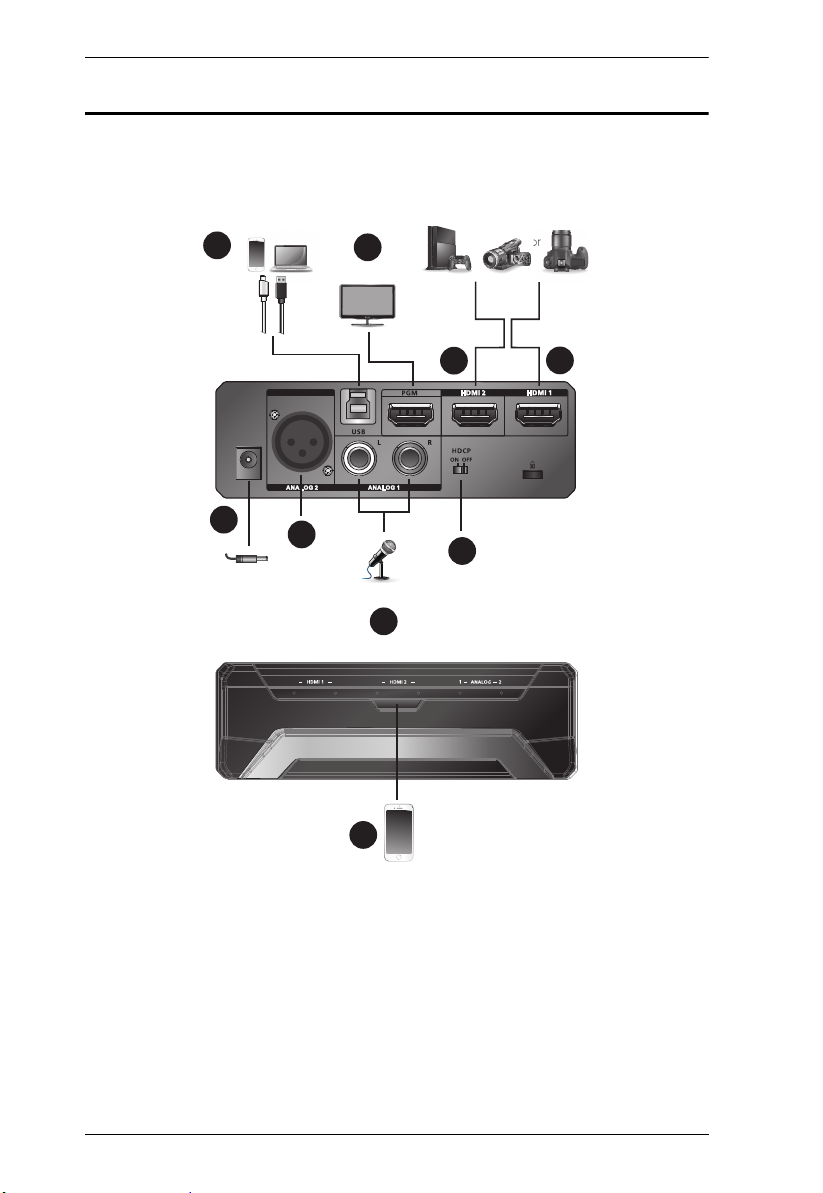
Connecting the CAMLIVE™ PRO Unit
Follow the steps below to connect the CAMLIVE™ PRO.
1. Plug the power adapter cable into the power jack.
2. Connect your first HDMI source device to the HDMI 1 input port.*
3. Connect your second HDMI source device to the HDMI 2 input port.*
4. Connect the HDMI program output port to an HDMI-enabled display using
an HDMI cable (not included) to display your pre-programmed HDMI
content.
5. If your laptop only has a USB-A interface, connect the USB Type-B to USB
Type-A cable (included) to your laptop. Or, if your Android mobile device /
8
Chapter 2. Hardware Setup
Android iOS
laptop only has a USB Type-C interface, connect the USB Type-B to USB
Type-C cable (included) to your Android mobile device / laptop respectively.
6. Connect your XLR audio source to the Analog 2 input port.
7. Connect your RCA audio source to the Analog 1 input port.
8. Open the ATEN OnAir Lite app to pair up the CAMLIVE™ PRO with your
app installed mobile device. For more information, see Aten OnAir Lite App,
page 25.
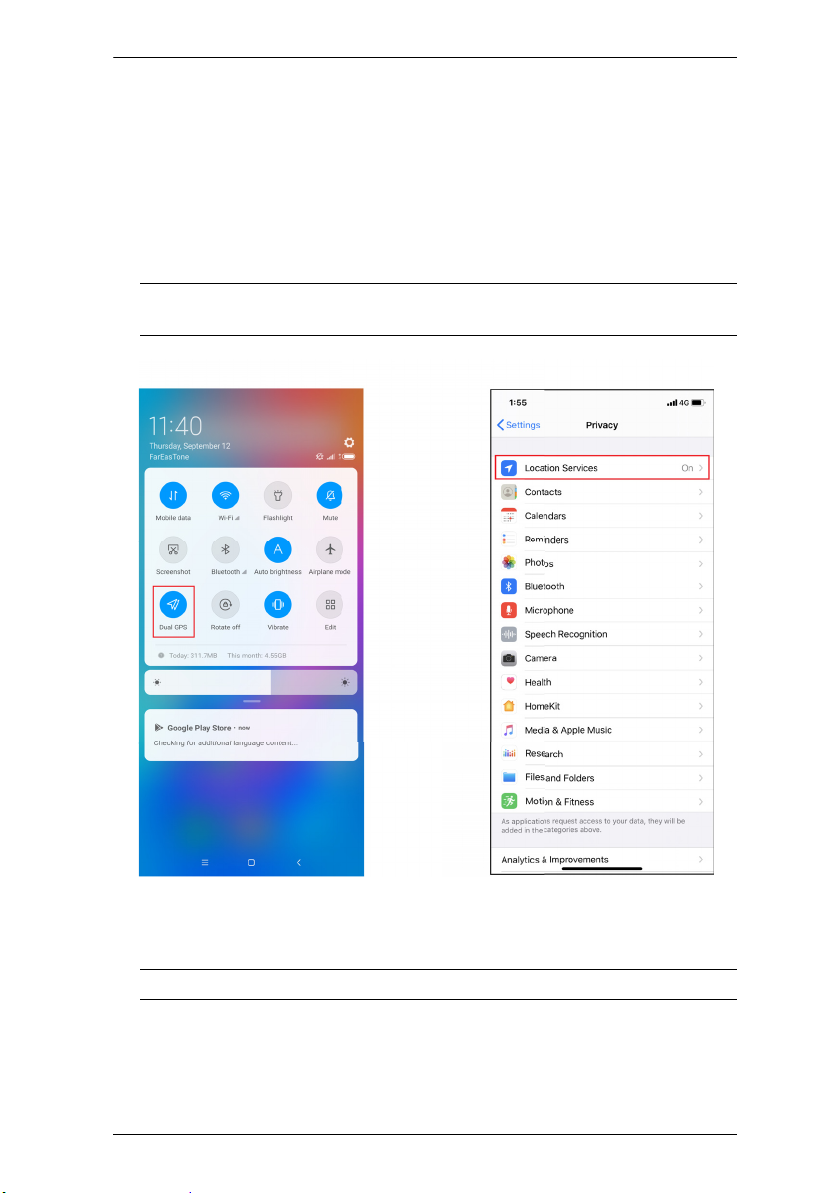
Note: Please make sure to enable the GPS function before you begin to
use the ATEN OnAir Lite app.
9. (Optional) For video switching, to display the HDCP protected content to
the connected HDMI display (without video capture), please put the HDCP
switch to ON.
Note: * The CAMLIVE™ PRO cannot capture HDCP protected content.
9
CAMLIVE™ PRO User Manual
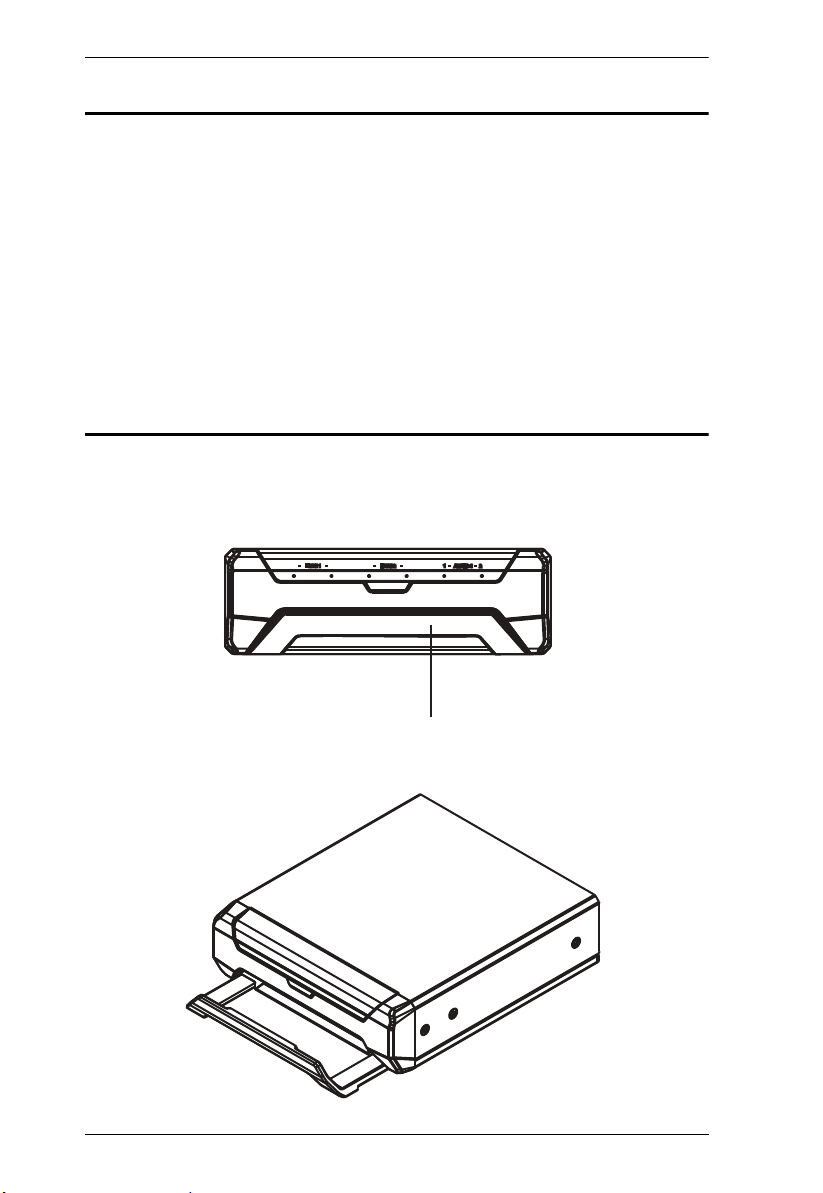
Phone Tray
Aten OnAir Lite App Installation
Download and install the ATEN OnAir Lite app from the Play Store to your
Android mobile device. This app is designed for the UC3022 to manage and edit
the program results. The ATEN OnAir Lite app includes the following power
features.
Storyboard-like management
Scenes editor
Audio sensing switch
Chroma keyin management
Audio mixer management
Phone Tray
A phone tray is available for the mobile device to sit in. To use the phone tray
for your mobile device, follow the steps below.
1. Simply slide the phone tray out from the CAMLIVE™ PRO.
2. Place your mobile device on it.
10

Chapter 2. Hardware Setup
Software
To enable CAMLIVE™ PRO, please download and install a suitable video
recording or live streaming software for your requirement.
PC
Below lists some examples of supported video recording / live streaming
software for PC.
All trademarks are property of their respective owners.
OBS: https://obsproject.com
Xsplit: https://www.xsplit.com
https://www.youtube.com
https://www.facebook.com
https://www.zoom.com
https://www.skype.com
https://www.microsoft.com/en-us/microsoft-365
Android Smartphone
Below is an example of supported video recording / live streaming for Android
smartphone.
All trademarks are property of their respective owners.
http://www.camerafi.com/supported-devices/
A general reference of how to go about using CAMLIVE™ PRO is described in
the next chapter.
11

CAMLIVE™ PRO User Manual
This Page Intentionally Left Blank
12

Chapter 3
Livestream / Record Setup
Livestream / Record Platform
Below lists a few of the available live-streaming or recording software/platforms:
OBS: https://obsproject.com
Xsplit: https://www.xsplit.com
https://www.youtube.com
https://www.facebook.com
https://www.zoom.com
https://www.skype.com
https://www.microsoft.com/en-us/microsoft-365
All trademarks are property of their respective owners.
Discovering CAMLIVE on your Syste
CAMLIVE™ PRO is a plug-and-play device, please make sure your system is
able to discover it. After connecting CAMLIVE™ PRO as shown in Connecting
the CAMLIVE™ PRO Unit on page 8, refer to the examples below on how your
system may discover CAMLIVE™ PRO.
m
Mac Operating System
1. On the desktop, click to select “Go” followed by “Utilities”.
13

CAMLIVE™ PRO User Manual
2. On the “Utilities” window, double-click “System Information” to bring up
the system window.
3. Go to the USB page by clicking “USB” under “Hardware”.
14

Chapter 3. Livestream / Record Setup
4. Under “USB 3.0 Bus”, you should see an “UVC UAC Device”. This
indicates that your system has successfully discovered CAMLIVE™ PRO.
Go to the next section for an example of how to setup both video and audio for
live-streaming and recording using CAMLIVE™ PRO.
15

CAMLIVE™ PRO User Manual
Windows Operating System
This is an example used in a Windows 10 Operating System.
1. On a Windows 10 desktop, go to Control Panel and select System.
2. The System window appears, select Device Manager.
16

Chapter 3. Livestream / Record Setup
3. The Device Manager window appears. Click on Cameras and Sound,
video and game controllers.
4. You should see an “USB Video Device” in the Camera list, and an “USB
Audio Device” in the Sound, video and game controllers list. This indicates
that your system has successfully discovered CAMLIVE™ PRO.
17

CAMLIVE™ PRO User Manual
Video and Audio Setup
After your system discovers CAMLIVE™ PRO, choose your livestream/record
platform. You will need to setup the video and audio source coming from
CAMLIVE™ PRO.
Follow the steps below to setup your video and audio sources (separately).
Note: OBS software is the example used in the setup steps below.
1. On your system, open the OBS software.
18

Chapter 3. Livestream / Record Setup
2. Locate and click the “+” button on the bottom of the “Sources” pane
(outlined in red in the picture below) to open the add source menu:
3. Select “Video Capture Device” or “Audio Capture Device.
19

CAMLIVE™ PRO User Manual
4. A pop-up window will be shown for you to name the video/audio source.
Click the “OK” button to continue.
It is recommended that “Make source visible” is checked.
5. On the properties page, click the drop-down menu named “Device” to
select CAMLIVE™ PRO’s video/audio source. Both the video and audio
sources of CAMLIVE™ PRO have the name “HDMI to U3 capture”.
After selecting the video source, the image from CAMLIVE™ PRO should
be displayed as shown below.
20

Chapter 3. Livestream / Record Setup
Click the “OK” button to continue.
6. For successful setup, the sources will be shown in the “Source” panel.
Setup of video and audio sources are complete, you can now start livestreaming/video recording.
Detailed configuration of your live-streaming/video recording software/platform
is not within the scope of this user manual, please refer to the software/
platform’s instruction guides/manual.
21

CAMLIVE™ PRO User Manual
Using the USB Cables
When connecting CAMLIVE™ PRO on a PC with a USB2.0 interface, it will
automatically set the provided compressed video quality to the MJPEG
compression mode to fit the data bandwidth. For better video quality, we
strongly recommend to connect CAMLIVE™ PRO to a USB3.1 Gen1 interface.
To make sure the result match your media output you wish to capture, please
check the detected video format from your capture software first.
Capture device custom setting page examples displaying USB 3.1-RAW and
USB2.0-MJPEG on OBS software are shown below:
USB2.0 mode with MJPEG video format only
USB3.1 mode with RAW (YUY2) and MJPEG video formats
22

Chapter 3. Livestream / Record Setup
HDCP Switch
If you find that the captured media only has MJPEG format, simply flip the USB
Type-B to USB Type-C cable connector connected to the CAMLIVE™ PRO as
shown in the diagram below:
HDCP Switching
To display HDCP protected content via the HDMI program output port using an
HDMI cable, switch the HDCP switch to ON. The default is OFF.
Note: 1. The CAMLIVE™ PRO cannot capture HDCP protected content.
2. UVC / UAC become unavailable when the HDCP Switch is switched
to ON.
HDCP
OFF 720p, 1080p
ON 720p, 1080p,
PGM HDMI
Output
Resolution
2160p @ 30Hz
USB Video
Output Mode
PC 720p, 1080p MJPEG or YUY2
phone 720p, 1080p MJPEG
N/A N/A
UVC Video Output Format
23

CAMLIVE™ PRO User Manual
Bluetooth Link Pushbutton
Resetting the CAMLIVE™ PRO
To reset the CAMLIVE™ PRO to its default settings, do the following:
1. Press and hold the Bluetooth link pushbutton.
2. Plug the power adapter cable into the power jack to power on the
CAMLIVE™ PRO. Wait for 10 seconds before you release the Bluetooth
link pushbutton.
3. The front panel LEDs blink together once every 0.1 seconds and the
CAMLIVE™ PRO resets itself back to default settings.
24

Chapter 4
Aten OnAir Lite App
ATEN OnAir Lite Application
ATEN OnAir Lite app acts as the central controller for CAMLIVE™ PRO. The
app’s design is a control panel where you can monitor program results, edit
scenes, setup video and audio settings, etc. Download the ATEN OnAir Lite app
from the App Store or Google Play and install it on your mobile device.
Note: 1. The maximum operating hour for the ATEN OnAir Lite app is 4 hours.
2. Please make sure to enable the GPS function before you begin to use
the ATEN OnAir Lite app.
Supported Systems
The ATEN OnAir Lite app supports the following mobile operating systems:
Mobile Operating System Supported Versions
Android version 5 or later
iOS version 10 or later
Installing the CAMLIVE™ PRO
1. Install the CAMLIVE™ PRO App on a mobile device.
a) From the mobile device, tap the App Store or Google Play
icon.
b) In the search box, type “CAMLIVE™ PRO”.
c) Tap CAMLIVE™ PRO and install the app.
2. From the mobile device, tap the CAMLIVE™ PRO icon .
3. Follow the on-screen instructions.
25

CAMLIVE™ PRO User Manual
Connecting the CAMLIVE™ PRO on your Mobile Device
CAMLIVE™ PRO is a plug-and-play device, after connecting CAMLIVE™
PRO as shown in Connecting the CAMLIVE™ PRO Unit on page 8. Open the
On Air Lite App, it automatically searches for the CAMLIVE™ PRO, and press
Connect.
26

Chapter 4. Aten OnAir Lite App
When you have connected to the CAMLIVE™ PRO successfully, the screen
below appears.
When your mobile device is out of range, a warning message below appears.
To connect back to the CAMLIVE™ PRO, press Searching for device and
follow the on-screen instructions as explained in page 26.
To enter Offline Mode, press Offline Mode. In Offline Mode, you are able to
configure the CAMLIVE™ PRO, but the configuration will not take effect until
the device is connected back to the ATEN OnAir Lite app.
Disconnecting the CAMLIVE™ PRO from your Mobile Device
To disconnect the CAMLIVE™ PRO, press the System Information icon, and
select Disconnect. See Project Settings, page 29.
To connect another mobile device to the CAMLIVE™ PRO, press the Bluetooth
Link Pushbutton for 3 seconds. HDMI1 and HDMI 2 LEDs blink together once
every 0.5 seconds for 3 seconds.
27

CAMLIVE™ PRO User Manual
Page Components
No. Component Description
1Project
Settings
2 Deck Selector Tap to select the desired configuration deck.
3System
Information
4 Deck Content The content depends on the selected deck.
Tap to change project name, open, import, or export
projects, and run the tutorial.
Three decks are available: Video Mixer, Audio Mixer, and
Settings.
Tap to see or upgrade the current software version, and
firmware version information, or disconnect with the
device. See Project Settings, page 29.
28

Chapter 4. Aten OnAir Lite App
Project Settings
To modify your project name, open, import, or export a project, and run the
tutorial, tap .
System Information Tab
To browse or upgrade the current software and firmware version, or disconnect
with the device, tab from the ATEN OnAir Lite App screen.
Note: To automatically upgrade the software and firmware to the latest version,
it is required to manually to upgrade the software and firmware version
to v1.1.105. See The Firmware Upgrade Utility, page 51.
29

CAMLIVE™ PRO User Manual
Video Mixer
The Video Mixer deck page allows you to adjust effect on your video, scene
selection and editing, and transition control.
The components of the page is shown below:
No. Component Description
1 Scene
2 Scene
30
Selector
Editor
8 scenes are shown here.
Blue outline scene = HDMI 1.
e.g.
Orange outline scene = HDMI 2.
e.g.
Tap a scene to put the scene into the PRV Preview section.
To put the scene in PRV Preview to PGM Preview, use the
Transition Control (explained below).
You can configure each individual scenes by tapping this icon.
Refer to on page 31 on how to edit each scene.

Chapter 4. Aten OnAir Lite App
No. Component Description
3 Enlarge Tap to enlarge the scene selector.
4 Transition
Control
5Effect
Control
Controls the switching for the current stream (PGM).
To switch,
1. Tap the Cut button; or
2. Select a specified time between 1s, 2s, and 3s transition,
and tap the Fade button.
Using the Cut button
The transition happens immediately when you tap the Cut
button.
Using the Fade button
Tapping the Fade button will begin the transition after a
specified time (1, 2, and 3 seconds).
Tap to enable the chroma key effect to the HDMI
display connected on the HDMI Program Output Port. See
Chroma Key, page 43 for more details.
Tap to switch display content for the HDMI
display connected on the HDMI Program Output Port to follow
the input audio source. See Auto Switch, page 45.
Tap to bring a blank background to the HDMI
display connected on the HDMI Program Output Port.
6 Remote
Deck
Tap to create hotkeys for theCAMLIVE™ PRO to work with
video recording and live streaming softwares on your PC.
31

CAMLIVE™ PRO User Manual
Scene Editor
To edit a scene, follow the steps below.
1. Select a scene from the scene selector.
2. Tap the button from the Video Mixer page.
An example of a PIP2 is used and shown below:
No. Component Description
1 Return Button Tap to return to the Video Mixer page
2 Scene Name This region displays the scene name. Tap to edit the scene
3 Overlay Button Tap to switch between main display and overlay display.
4 Switch Video
Source (DualView)
5 Reset Button Tab to reset the current scene.
6 HDMI 2
Display and
Resize Tool
7 HDMI 1
Display and
Resize Tool
32
name.
You can also resize and crop the overlay scene.
Druing dual-view, tap this button to switch video source
position between HDMI 1 and HDMI 2. You can also resize
and crop the switched source.
Displays the HDMI 2 content with resize / crop tool.
To resize the HDMI 2 content, see Resize, page 34.
To crop the HDMI 2 content, see Crop, page 35.
Displays the HDMI 1 content with resize / crop tool.
To resize the HDMI 1 content, see Resize, page 34.
To crop the HDMI 1 content, see Crop, page 35.

Chapter 4. Aten OnAir Lite App
No. Component Description
8 Layout
Selection
Tap to select a preferred layout. You can also resize the
dual-view.
Overlay Button
To view the overly display from a dual-view scene, tap from the Scene
Editor page.
Switching Video Source
To switch the video source position between HDMI 1 and HDMI 2, tap from
the Scene Editor page.
33

CAMLIVE™ PRO User Manual
Reset Button
To reset or undo any changes made to the selected scene, tap from
the Scene Editor page. A warning message appears, click OK.
Resize/Crop Tool
This section describes how to resize or crop HDMI 1 and HDMI 2 of the scene
layout.
Resize
To resize HDMI 1 and HDMI 2 display content, select a scene and t ap
button from the Video Mixer page. A resize tool will be visible on the HDMI
1 and HDMI 2 displays in the scene editor page. An example of a PIP2 is used
and shown below:
Tap and hold to drag the resize tool to resize the displays.
34

Chapter 4. Aten OnAir Lite App
Crop
To crop HDMI 1 and HDMI 2 display content, select a scene and tap
button from the Video Mixer page. A crop tool will be visible on the HDMI 1
and HDMI 2 displays in the scene editor page. An example of a PIP2 is used
and shown below:
To crop the display content, follow the steps below.
1. Tap the crop tool button and the screen below appears.
35

CAMLIVE™ PRO User Manual
2. Tap the enlarge button to crop the display content. The screen below
appears.
3. Tap and hold to drag the cropping tool point to adjust the cropping
area. Tap and hold to relocate the cropping area.
4. When completed, tap Done.
36

Chapter 4. Aten OnAir Lite App
or
Remote Deck
The Remote Deck allows user to set a hotkey combination to work with the
softwares installed on your host. Remember to connect the USB cable to the
host.
Note:
1. For hotkeys to work on the software, make sure the corresponding
software is opened and operable, and the software itself must support
hotkey features.
2. Make sure the hotkeys combination you configured is matched to the
corresponding software’s hotkey values.
Mapping Hotkey with Corresponding Softwares (OBS)
To create a hotkey for the corresponding software, follow the steps below.
1. Tap from the Video Mixer deck page.
2. From the Hotkey Mapping page, tap .
37

CAMLIVE™ PRO User Manual
3. From the hotkey settings page, you can name the hotkey mapping, select a
hotkey combination, select a scene, and choose a color. After
configuration, click Save.
4. Now the hotkey mapping appears on the Hotkey Mapping page. Tap on it to
activate the hotkey on OBS. Make sure the OBS is opened and operable
on your host.
38

Chapter 4. Aten OnAir Lite App
5. To edit a hoteky, long press the hotkey to enter hotkey settings page.
6. Tap to exit the Hotkey Mapping page.
39

CAMLIVE™ PRO User Manual
Audio Mixer
The components of the Audio Mixer deck page is shown below:
No. Component Description
1 Audio Level
Control
Slide the volume slider to control the volume of each audio
source.
40

Chapter 4. Aten OnAir Lite App
No. Component Description
2 Audio Control Tap to select and adjust audio control. For the LEDs status
indication, see Front View, page 4.
HDMI1 and HDMI2:
Tap to select an audio control for HDMI 1 and HDMI 2
between AFV, ON, and MUTE.
AFV (Audio-Follow-Video): Broadcasting the source’s
video and audio at the same time.
ON: The audio is turned on (unmuted).
MUTE: The audio is turned off (muted).
ANALOG 1:
Tap to select an audio control for ANALOG 1 between ON,
and MUTE.
ON: The audio is turned on (unmuted).
MUTE: The audio is turned off (muted).
ANALOG 2:
Tap to select an audio control and adjust MIC Gain settings
for ANALOG 2 between ON, and MUTE.
ON: The audio is turned on (unmuted).
MUTE: The audio is turned off (muted).
Gain: Select the threshold between 0dB, +6dB, +12dB,
+18dB, +24dB, and +30dB.
Type: Select between Mono and Stereo.
41

CAMLIVE™ PRO User Manual
No. Component Description
PGM:
Tap to select an audio control and adjust compressor
settings for PGM between ON, and MUTE.
ON: The audio is turned on (unmuted).
MUTE: The audio is turned off (muted).
Compressor: Tap to enable or disable the compressor
function and drag the dial to adjust the threshold. The
default setting is disable.
The Compressor looks like this
when it is disabled.
The Compressor looks like this
when it is enabled.
3L/R Balance
Control
4 PGM Level
Control
42
Tap and hold to drag and control which side of the sound
source is to be more emphasized.
Slide the volume slider to control the volume of PGM.

Chapter 4. Aten OnAir Lite App
Settings Panel
The Settings deck page is shown below:
Chroma Key
Chroma key allows user to composite two HDMI sources based on a color
range, it usually goes hand-in-hand with a green screen. Our ATEN OnAir Lite
App removes the color screen background and fill in the area with the HDMI
sources.
43

CAMLIVE™ PRO User Manual
No. Component Description
1 CHROMA KEY Turns on or off the Chroma Key effect and selects a color
background for the HDMI input source to be fully
transparent.
2 Target Input
Selects a target input for the Chroma Key.
3 Color Range Adjust the color range for the colored background.
4 Threshold Adjust the threshold for the colored background.
44

Chapter 4. Aten OnAir Lite App
Auto Switch
Auto switch allows user to switch the HDMI display content connected on the
HDMI Program Output Port to automatically follow with the input audio source.
You can select a scene for each audio input source for the auto switch.
Note: See Scene Selector, page 30 for more details.
No. Component Description
1 HDMI 1 Selects a scene for the HDMI 1.
2 HDMI 2 Selects a scene for the HDMI 2.
3 ANALOG 1 Selects a scene for the ANALOG 1.
4 ANALOG 2 Selects a scene for the ANALOG 2.
45

CAMLIVE™ PRO User Manual
More Settings
Tap on the to adjust the audio sensitivity and duration.
Advanced
No. Component Description
1 Resolution Selects a resolution for the HDMI display content when the
2 Frame Rate Selects a frame rate for the HDMI display content when the
3 USB Video
Output
4 Border Sets a video border for the HDMI display content.
46
HDCP is turned on.
Note: 4K resolution is not supported when the HDCP is
turned off, see HDCP Switching, page 23 for details.
HDCP is turned on.
Selects a USB video output between Phone and PC.

Chapter 4. Aten OnAir Lite App
Resetting the CAMLIVE™ PRO
To re set the CA MLIVE™ P RO back to the factory set tings, tap .
A warning message appears, click OK.
47

CAMLIVE™ PRO User Manual
ATEN OnAir Lite App Factory Default Settings
The OnAir Lite App factory default settings are as follows:
Deck Component Setting Default
Video Layout Name 1 ch1
2ch2
3PIP1
4PIP2
5PBPFH
6PBPFV
7PBP1
8POP
Transition Effect Cut
Duration 0.3 seconds
Audio HDMI 1 Volume AFV, 0dB
HDMI 2 Volume AFV, 0dB
ANALOG 1
(RCA)
ANALOG 2
(XLR)
PGM Volume On, 0dB
Volume On, 0dB
Volume On, 0dB
Gain 0dB
Type Mono
Compressor Off, 0dB
48

Chapter 4. Aten OnAir Lite App
Settings CHROMA
KEY
AUTO
SWITCH
ADVANCED Resolution 1080p (HDCP On)
Target Input HDMI 1
Select Color 130 / 130 / 130
Color Range 50
Threshold 50
HDMI 1 X
HDMI 2 X
Analog 1 X
Aanalog 2 X
Sensitivity 50
Duration 1
Frame Rate 60
Border Off
USB Video Output PC
49

CAMLIVE™ PRO User Manual
This Page Intentionally Left Blank
50

Chapter 5
The Firmware Upgrade Utility
Overview
The purpose of the Firmware Upgrade Utility is to provide an easy process for
users to upgrade the CAMLIVE™ PRO unit to either support PC video capture,
or Android smartphone video capture capability.
As new firmware versions become available, new firmware upgrade packages
are posted on our website. Check the website regularly to find the latest
information and packages.
Downloading the Firmware Upgrade Package
To download the firmware upgrade package:
1. On our Website, go to Support Center - Download and choose the device
model, or from the CAMLIVE™ PRO product page, click on the Support
and Downloads tab, and go to Software & Drivers. A list of available
firmware upgrade packages appears.
2. Choose the firmware upgrade package that you wish to install (usually the
most recent) and download it to your computer.
Note: For Windows 7 users, please download and install the Win7_driver
from on our website after the upgrade is successful. See Starting the
Upgrade, page 53.
51

CAMLIVE™ PRO User Manual
Bluetooth Link Pushbutton
or
Preparation
To prepare for the firmware upgrade, do the following:
1. Press and hold the Bluetooth link pushbutton.
2. Plug the power adapter cable into the power jack to power on the
CAMLIVE™ PRO. The front panel LEDs blink together once every 0.5
seconds to indicate Firmware Upgrade Mode is in effect.
3. Connect the USB-B UVC Output Port to the host. If your laptop only has a
USB Type-A interface, connect the (included) USB Type-B to USB Type-A
adapter between the host and the USB-B UVC output port.
52

Chapter 5. The Firmware Upgrade Utility
Starting the Upgrade
To upgrade the CAMLIVE™ PRO, follow the steps below:
1. Run the downloaded Firmware Upgrade Package file – either by double
clicking the file icon, or by opening a command line and entering the full
path to it.
The Firmware Upgrade Utility Welcome screen appears:
Note: The screens shown in this section are for reference only. The
wording and layout of the actual screens put up by the Firmware
Upgrade Utility may vary slightly from these examples.
2. Read the License Agreement (enable the I Agree radio button).
53

CAMLIVE™ PRO User Manual
3. Click Next to continue. The Firmware Upgrade Utility main screen appears:
The Utility inspects your installation. All the devices capable of being
upgraded by the package are listed in the Device List panel.
4. Click Next to perform the upgrade.
If you enabled Check Firmware Version, the Utility compares the device’s
firmware level with that of the upgrade files. If it finds that the device’s
version is higher than the upgrade version, it brings up a dialog box
54

Chapter 5. The Firmware Upgrade Utility
informing you of the situation and gives you the option to Continue or
Cancel.
If you didn’t enable Check Firmware Version, the Utility installs the upgrade
files without checking whether they are a higher level, or not.
As the Upgrade proceeds, status messages appear in the Status Messages
panel, and the progress toward completion is shown on the Progress bar.
Upgrade Succeeded
After the upgrade has completed, a screen appears to inform you that the
procedure was successful:
Click Finish to close the Firmware Upgrade Utility.
After a successful completion, the CAMLIVE™ PRO exit Firmware Upgrade
Mode, and resets itself.
Note: For Windows 7 users, please download and install the Win7_driver from
on our website after the upgrade is successful. To download the driver,
see Downloading the Firmware Upgrade Package, page 51.
55

CAMLIVE™ PRO User Manual
Upgrade Failed
If the Upgrade Succeeded screen doesn’t appear, it means that the upgrade
failed to complete successfully, in which case you should do the following:
1. Power off the CAMLIVE™ PRO by removing the power jack.
2. Invoke Firmware Upgrade Mode by holding down the Bluetooth Link
Pushbutton on the front panel (see HDMI 2 audio status LED, page 4), and
power on the CAMLIVE™ PRO. The front LEDs flash together.
3. Do the firmware upgrade procedure again.
56

Appendix
Safety Instructions
General
This product is for indoor use only.
Read all of these instructions. Save them for future reference.
Follow all warnings and instructions marked on the device.
Do not place the device on any unstable surface (cart, stand, table, etc.). If
the device falls, serious damage will result.
Do not use the device near water.
Do not place the device near, or over, radiators or heat registers.
The device cabinet is provided with slots and openings to allow for
adequate ventilation. To ensure reliable operation, and to protect against
overheating, these openings must never be blocked or covered.
The device should never be placed on a soft surface (bed, sofa, rug, etc.) as
this will block its ventilation openings. Likewise, the device should not be
placed in a built in enclosure unless adequate ventilation has been provided.
Never spill liquid of any kind on the device.
Unplug the device from the wall outlet before cleaning. Do not use liquid or
aerosol cleaners. Use a damp cloth for cleaning.
The device should be operated from the type of power source indicated on
the marking label. If you are not sure of the type of power available, consult
your dealer or local power company.
To prevent damage to your installation it is important that all devices are
properly grounded.
Do not allow anything to rest on the power cord or cables. Route the power
cord and cables so that they cannot be stepped on or tripped over.
Position system cables and power cables carefully; Be sure that nothing
rests on any cables.
Never push objects of any kind into or through cabinet slots. They may
touch dangerous voltage points or short out parts resulting in a risk of fire or
electrical shock.
Do not attempt to service the device yourself. Refer all servicing to qualified
service personnel.
If the following conditions occur, unplug the device from the wall outlet and
bring it to qualified service personnel for repair.
57

CAMLIVE™ PRO User Manual
The power cord or plug has become damaged or frayed.
Liquid has been spilled into the device.
The device has been exposed to rain or water.
The device has been dropped, or the cabinet has been damaged.
The device exhibits a distinct change in performance, indicating a need
for service.
The device does not operate normally when the operating instructions
are followed.
Only adjust those controls that are covered in the operating instructions.
Improper adjustment of other controls may result in damage that will
require extensive work by a qualified technician to repair.
58

Appendix
Technical Support
International
For online technical support – including troubleshooting, documentation,
and software updates: http://support.aten.com
For telephone support, see
North America
Email Support support@aten-usa.com
Online Technical
Support
Telephone Support 1-888-999-ATEN ext 4988
When you contact us, please have the following information ready beforehand:
Product model number, serial number, and date of purchase
Your computer configuration, including operating system, revision level,
expansion cards, and software
Any error messages displayed at the time the error occurred
The sequence of operations that led up to the error
Any other information you feel may be of help
Troubleshooting
Documentation
Software Updates
Telephone Support, page vii:
http://www.aten-usa.com/support
1-949-428-1111
59

CAMLIVE™ PRO User Manual
Specifications
Function CAMLIVE™ PRO
Connectors
Video In 2 x HDMI Type A Female (Black)
USB Port USB 3.2 Gen1 Type-B Male (Blue)
Note: USB-B to USB-C and USB-B to USB-A
cables included in the package.
Video Output 1 x HDMI Type A Female (PGM Video, Black)
Audio Inputs 1 x Balanced Analog Audio via XLR Connectors
1 x Unbalanced Audio via RCA Connectors
Video Resolution
Video Input (HDMI support) 720p50, 720p60, 1080p24, 1080p25, 1080p30,
PGM Video Output (HDMI
support)
Audio Sampling 16-bit PCM audio, 44.1KHz and 48KHz
UVC Output Uncompressed 720p60, 1080p60 UVC Video
Environmental
Operating Temperature 0 - 40 ºC
Storage Temperature -20 – 60 ºC
Humidity 0 - 80% RH, Non-Condensing
1080p50, 1080p60, 2160p24, 2160p25,
2160p30
UVC Capture Enabled:
720p50, 720p60, 1080p24, 1080p25, 1080p30,
1080p50, 1080p60 (HDCP disabled)
UVC Capture Disabled:
720p50, 720p60, 1080p24, 1080p25, 1080p30,
1080p50, 1080p60, 2160p24, 2160p25,
2160p30 (HDCP enabled)
Stream with UAC Audio
(Uncompressed video stream is only available
on USB3.1 connection)
60

Function CAMLIVE™ PRO
Appendix
Minimum Hardware
Requirement
Connection Bluetooth Low Energy (BLE) Technology
OS Support Windows 7 or above
Physical Properties
Housing Metal
PC/Mac:
CPU: Intel® i3 Dual Core 2.8Ghz or higher
RAM: 4GB or more
One USB-C Interface or USB-A Interface
Smartphone*:
Android smartphone with UVC and USB-C
Interface
Note: For detail UVC compatible device list,
please review the following link of third part App.
http://www.camerafi.com/supported-devices/
Mac OS X 10.13 or later
Android 5.0.1 or later with UVC support
Note: For Windows 7 users, please download
and install the Win7_driver from on our website.
To download the driver, see Downloading the
Firmware Upgrade Package, page 51.
Weight 0.68 kg (1.50 lb)
Dimensions (L x W x H) 13.00 x 15.18 x 4.25 cm (5.12 x 5.98 x 1.67 in)
61

CAMLIVE™ PRO User Manual
Limited Warranty
ATEN warrants its hardware in the country of purchase against flaws in
materials and workmanship for a Warranty Period of two [2] years (warranty
period may vary in certain regions/countries) commencing on the date of
original purchase. This warranty period includes the LCD panel of ATEN LCD
KVM switches. Select products are warranted for an additional year (see A+
Warranty for further details). Cables and accessories are not covered by the
Standard Warranty.
What is covered by the Limited Hardware Warranty
ATEN will provide a repair service, without charge, during the Warranty Period.
If a product is detective, ATEN will, at its discretion, have the option to (1) repair
said product with new or repaired components, or (2) replace the entire product
with an identical product or with a similar product which fulfills the same function
as the defective product. Replaced products assume the warranty of the original
product for the remaining period or a period of 90 days, whichever is longer.
When the products or components are replaced, the replacing articles shall
become customer property and the replaced articles shall become the property
of ATEN.
To learn more about our warranty policies, please visit our website:
http://www.aten.com/global/en/legal/policies/warranty-policy/
© Copyright 2021 ATEN® International Co., Ltd.
ATEN and the ATEN logo are registered trademarks of ATEN International Co., Ltd. All rights reserved.
All other brand names and trademarks are the registered property of their respective owners.
62
Released: 2021-03-26
 Loading...