

Page 1
User Manual
UC-2000 / UC-2000L
Read this guide thoroughly and follow the installation and operation procedures carefully in order to prevent any damage to the units and/or any devices that connect to them.
This package contains:
w 1 UC-2000 or UC-2000L USB Docking Station
w 1 USB Cable
w 1 Driver
w 1 Power Adapter
w 1 User Manual
If anything is damaged or missing, contact your dealer.
© Copyright 2000 ATEN International Co., Ltd.
Manual Part No. PAPE-1185-100
Printed in Taiwan 09/2000
2001-06-08
Page 2

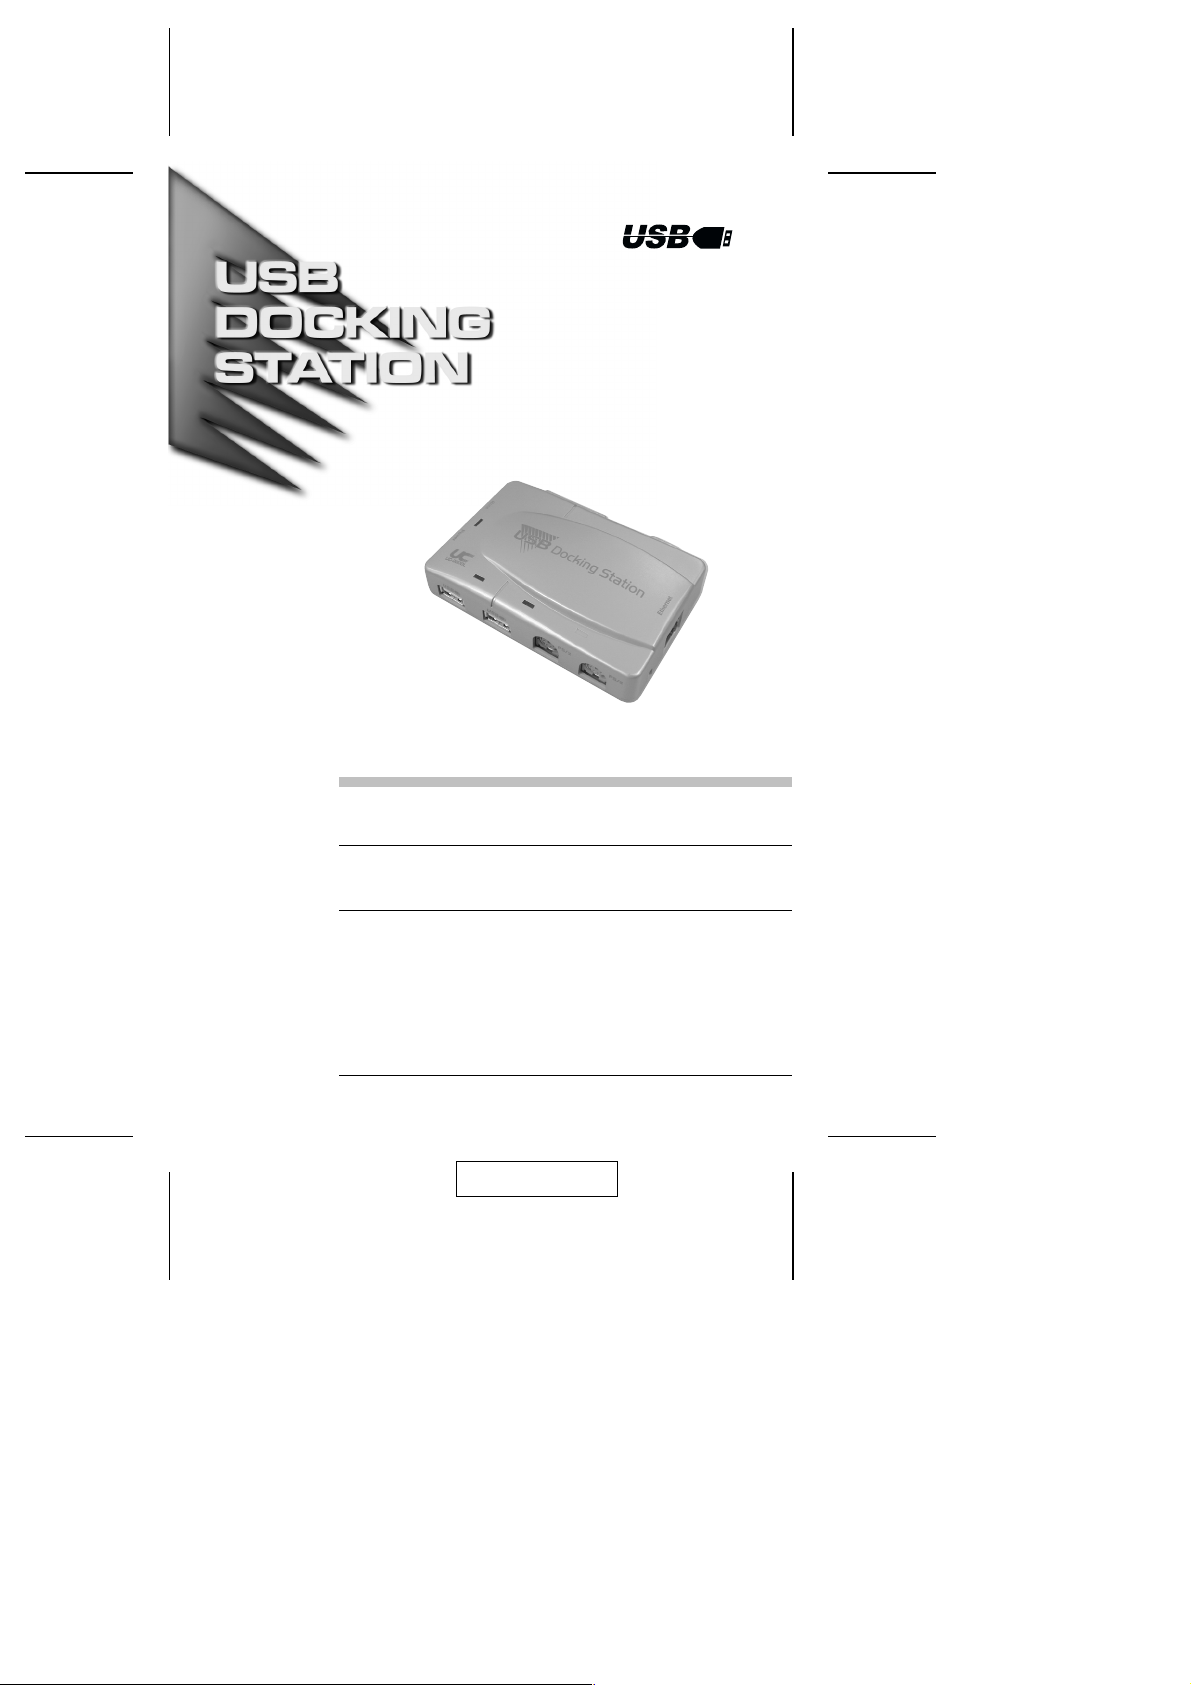
Overview
The UC-2000 and UC-2000L USB Docking Stations are port replicators
that allow you to connect standard desktop peripherals (keyboard, mouse,
modem, printer, scanner, etc.), to virtually any notebook by means of a
single USB connection.
In addition to ports for two USB peripheral devices, the UC-2000 and
UC-2000L incorporate traditional serial, parallel, mouse, and keyboard
ports so you don’t have to lose any of your current peripheral investments.
The UC-2000L also contains an ethernet port for convenient networking.
By combining the functionality of using full-sized desktop PC peripherals
with the convenience of using a portable notebook as your primary
computer, your notebook can now be your office PC.
Just connect all your peripherals to the UC-2000 or UC-2000L; make one
simple USB cable connection to your notebook; and you have all the
convenience of a desktop computer at your fingertips. When it’s time to
get on the road, simply unplug the one USB cable and you are ready to
travel.
To accomodate all of your peripheral connectivity needs, you can daisy
chain USB hubs and USB devices to the UC-2000 or UC-2000L. Easy
USB plug and play installation makes adding new USB hardware a breeze.
Complex installation routines are eliminated, IRQ conflicts are a thing of
the past, and there is no more hassle trying to keep things synchronized
between your notebook and office PCs.
- 1 -
2001-06-08
Page 3

Features
Fully USB 1.1 Compliant
w
Up to 12 Mbps USB Data Transfer Rate
w
Multiple Port Connections:
w
w USB Port: Printers, digital cameras, scanners, stroage devices,
keyboards, mice, joysticks, and all other USB devices
w Serial Port (DB-9): PDA cradles, external modems, and other se-
rial interface devices
w Parallel Port (DB-25): Parallel printers, parallel port drives, and
other parallel port devices
w PS/2 Port: Keyboards, mice
w RJ-45 Socket: Ethernet connector*
USB Plug and Play
w
Keyboard and Mouse Wakeup Function
w
Integrated 10Base-T Ethernet Support*
w
LEDs to Indicate Power Status, USB Port Status, as well as Network
w
Power/Link and Tx/Rx*
* Networking features are for the UC-2000L only
w
System Requirements
Windows 98 or 2000
w
USB Host Controller installed on the system
w
- 2 -
2001-06-08
Page 4
Introduction
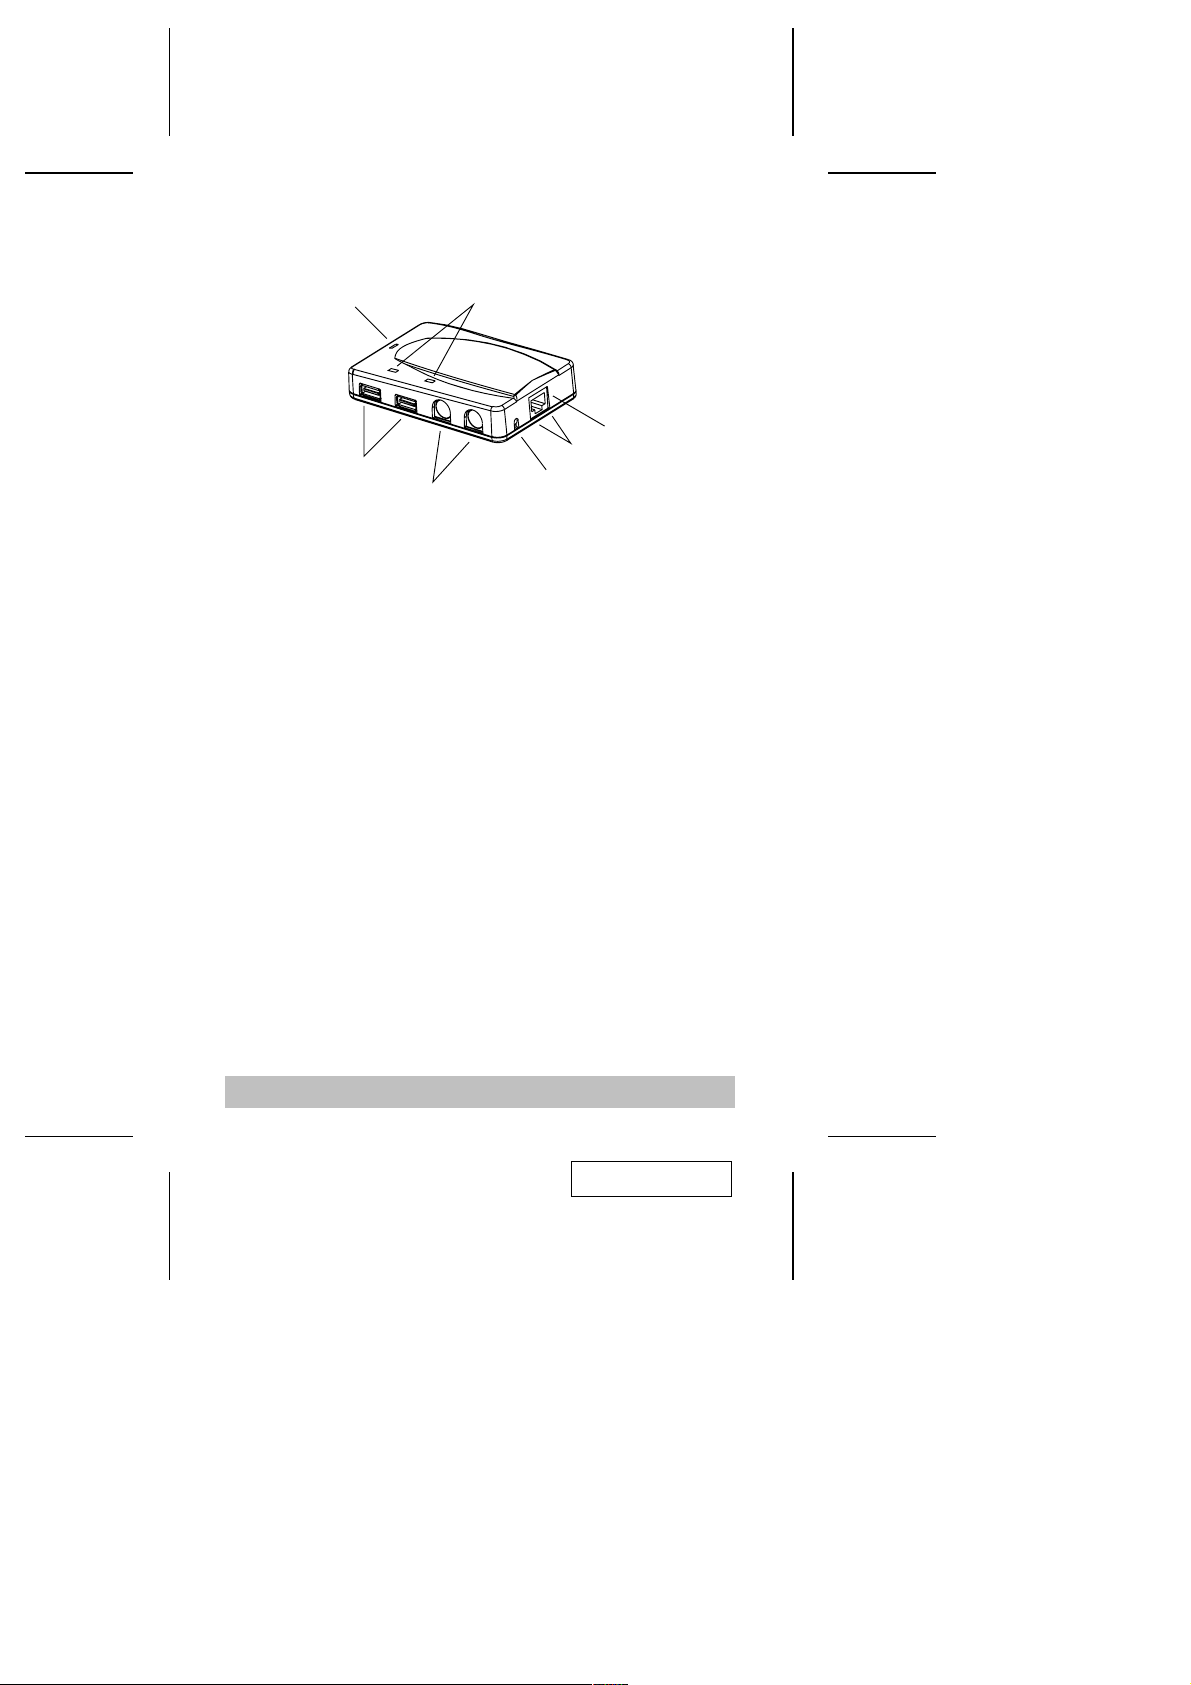
Front View
1
3
1. Power LED
Lights Orange to indicate that the UC-2000 / UC-2000L is receiving
power from the Power Adapter.
2. USB Port LEDs
These LEDs light GREEN to indicate that a USB peripheral is
connected to the corresponding port and is receiving power at the
correct current level.If an overcurrent condition between the port
and the peripheral device occurs, the LED goes out.
3. USB Type A (Downstream) Ports
The cables from any USB peripheral (keyboard, mouse, printer,
scanner, modem, etc.), plug into either port.
4. PS/2 Ports
Cables from a PS/2 Keyboard and PS/2 Mouse can plug in here.
5. Wake Up Button
If the notebook’s keyboard or mouse is in "sleep" or suspend mode,
pressing this button will wake it up.
6. Ethernet LEDs (UC-2000L only)
The ORANGE LED lights to indicate that a connection to the server
has been established.
The GREEN LED indicates TX/RX status.
7. RJ-45 Socket (UC-2000L only)
The Ethernet cable plugs in here
2
7
6
5
4
- 3 -
2001-06-08
Page 5

Rear View
1
2
1. Serial Port
The cable that connects to a serial device (printer, modem, etc.),
plugs in here.
2. Parallel Port
The cable that connects to a parallel device (printer, external drive,
etc.), plugs in here.
3. USB Type B (Upstream) Port
The cable that connects to the notebook plugs in here.
4. Power Jack
The cable from the Power Adapter plugs in here.
4
3
- 4 -
2001-06-08
Page 6

Installation
Driver Installation
With your computer booted up, do the following:
1. Plug the power adapter that came with this package into an AC
source; plug the power adapter cable into the UC-2000 /
UC-2000L’s power jack.
2. Plug the B end of the USB cable that came with this package into
the UC-2000 / UC-2000L’s USB Type B (Upstream) port, located on
the left side of the unit.
3. Plug the A end of the USB cable that came with this package into
the computer’s USB port.
- 5 -
2001-06-08
Page 7

4. Windows detects the unit’s presence and starts the Add New
Hardware Wizard to install the necessary drivers:
a) Click Next to start the installation procedure.
b) In the dialog box that comes up, accept the default choice,
Search for the best drivers for your device; Click Next to continue.
c) In the dialog box that comes up, choose Specify a Location; put
the driver disk in the disk drive; Click Browse...; Select the drive
that contains the driver disk; Select the UC-2000 / UC-2000L
folder; Select the Win2000 or Win98 folder (depending on the
version of Windows you are running); Click OK.
d) You are now back at the Add New Hardware Wizard dialog box;
Windows informs you that the driver has been found; Click Next
to continue; the driver is now copied to your hard disk.
Note: Have your Windows installation CD handy for when
Windows prompts you for it.
e) After the driver file has been copied to the hard disk, a dialog box
appears to tell you that the installation has finished. Click Finish.
Windows now finishes up the installation.
f) When asked if you want to restart your computer, Click Yes.
5. When Windows comes back up, the Add New Hardware Wizard
appears. The Wizard takes you through the installation procedure
several times to install the necessary drivers for the various
interface ports. It is basically the same each time, simply repeat
steps 4a to 4f for each driver.
- 6 -
2001-06-08
Page 8

Uninstalling the Driver
If you should ever need to uninstall the driver files, simply do the following:
1. Put the driver disk in the disk drive.
2. Open Windows Explorer and navigate down the driver disk to the
folder that you installed the driver files from (the Win98 folder).
3. Click unistall.exe.
Hardware Installation
Refer to the example diagrams on the next page as you follow these step
by step instructions:
1. Boot up your notebook.
2. Plug the cables from your peripherals into the appropriate ports on
the UC-2000 / UC-2000L.
3. Plug the B Connector end of the USB cable (supplied with this
package) into the USB Type B (Upstream) Port; plug the A
Connector end of the USB cable into the notebook’s USB port.
4. Windows will recognize the UC-2000 / UC-2000L and install the
necessary USB hardware drivers to handle the attached peripherals.
5. When Windows is done, and you have rebooted, you can use all the
attached peripherals with your notebook.
- 7-
2001-06-08
Page 9

LAN Cable
Power Adapter
Cable
USB Cable
- 8 -
2001-06-08
Page 10

Appendix
Specifications
Function Specification
Power Consumption AC 5V; 540m A
Port Replicators Serial 1 DB-9 Male
Parallel 1 DB-25 Female
PS/2 1 x 6 pin mini-DIN Female - Keyboard
USB 1 Type B (Upstream)
*Etherenet 1 RJ-45 Receptacle (10Base-T
LEDs Power 1
USB 2
Etherent 1 Link
USB Cable Length 1.8 m (6’)
Temperature Operating 50
Storage -20
Humidity 0 -80% RH, Noncondensing
Housing Plastic
Weight 150 g
Dimensions (L x W x H) 111.5 x 72 x 27.9 mm
*Ethernet specifications are for the UC-2000L only.
Troubleshooting
Note: If you are experiencing problems, first make sure that there are
no problems with the cables, and that they are all properly
connected.
1 x 6 pin mini-DIN Female - Mouse
2 Type A (Downstream)
1 Tx/Rx
0
- 400C
0
-600C
Symptom Possible Cause Action
Unit Operates Erratically
Static electricity may
cause the unit to operate
erratically.
Reset the unit by unplugging the Upstream
cable from the PC’s USB port, and then
reinserting it.
- 9 -
2001-06-08
Page 11

Radio & TV Interference Statement
WARNING!!! This equipment generates, uses and can radiate radio
frequency energy and, if not installed and used in accordance with the
instruction manual, may cause interference to radio communi cations. This
equipment has been tested and found to comply with the limits for a Cl ass
B computing device pursuant to Subpart J of Part 15 of FCC Rules, which
are designed to provide reasonable protection against such interference
when operated in a commercial environment. Operation of this equipment
in a residential area is likely to cause interference, in which case the user
at his own expense will be required to take whatever measures may be
required to correct the interference.
Limited Warranty
IN NO EVENT SHALL THE DIRECT VENDOR’S LIABILITY EX CEED THE
PRICE PAID FOR THE PRODUCT FROM THE DIRECT, INDIRECT,
SPECIAL, INCIDENTAL OR CONSEQUENTIAL DAMAGES
RESULTING FROM THE USE OF THE PRODUCT, DISK OR ITS
DOCUMENTATION.
The direct vendor makes no warranty or representation, expressed,
implied, or statutory with respect to the contents or use of this
documentation, and specially disclaims its quality, performance,
merchantability, or fitness for any particular purpose.
The direct vendor also reserves the right to revise or update the device or
documentation without obligation to notify any individual or entity of such
revisions, or update. For further inquires please contact your di rect vendor.
- 10 -
2001-06-08
 Loading...