

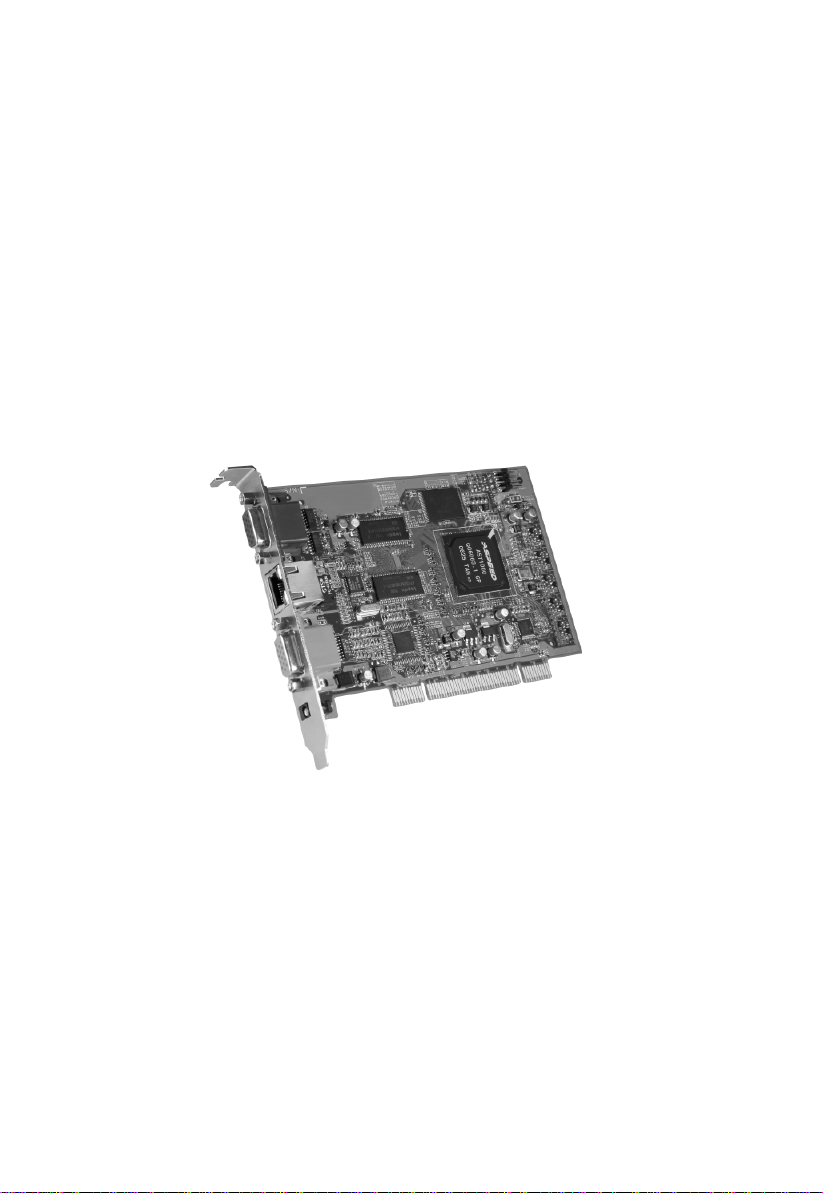
Remote Management PCI Card
IP8000
User Manual
www.aten.com

IP8000 User Manual
FCC Information
This is an FCC Class A product. In a domestic environment this product may
cause radio interference in which case the user may be required to take
adequate measures.
This equipment has been tested and found to comply with the limits for a Class
A digital device, pursuant to Part 15 of the FCC Rules. These limits are
designed to provide reasonable protection against harmful interference when
the equipment is operated in a commercial environment. This equipment
generates, uses and can radiate radio frequency energy and, if not installed and
used in accordance with the instruction manual, may cause harmful
interference to radio communications. Operation of this equipment in a
residential area is likely to cause harmful interference in which case the user
will be required to correct the interference at his own expense.
RoHS
This product is RoHS compliant.
SJ/T 11364-2006
The following contains information that relates to China.
ii

IP8000 User Manual
User Information
Online Registration
Be sure to register your product at our online support center:
International http://support.aten.com
North America ATEN TECH http://www.aten-usa.com/product_registration
ATEN NJ http://support.aten.com
Telephone Support
For telephone support, call this number:
International 886-2-8692-6959
North America ATEN TECH 1-888-999-ATEN
ATEN NJ 1-732-356-1703
User Notice
All information, documentation, and specifications contained in this manual
are subject to change without prior notification by the manufacturer. The
manufacturer makes no representations or warranties, either expressed or
implied, with respect to the contents hereof and specifically disclaims any
warranties as to merchantability or fitness for any particular purpose. Any of
the manufacturer's software described in this manual is sold or licensed as is.
Should the programs prove defective following their purchase, the buyer (and
not the manufacturer, its distributor, or its dealer), assumes the entire cost of all
necessary servicing, repair and any incidental or consequential damages
resulting from any defect in the software.
The manufacturer of this system is not responsible for any radio and/or TV
interference caused by unauthorized modifications to this device. It is the
responsibility of the user to correct such interference.
The manufacturer is not responsible for any damage incurred in the operation
of this system if the correct operational voltage setting was not selected prior
to operation. PLEASE VERIFY THAT THE VOLTAGE SETTING IS
CORRECT BEFORE USE.
iii

IP8000 User Manual
A
Package Contents
The IP8000 package consists of:
1 IP8000 Remote Management PCI Card
1 Custom KVM Cable Set
1 Feature Cable
1 Power Adapter
1 Software CD
1 User Manual*
1 Quick Start Guide
Check to make sure that all the components are present and that nothing got
damaged in shipping. If you encounter a problem, contact your dealer.
Read this manual thoroughly and follow the installation and operation
procedures carefully to prevent any damage to the unit, and/or any of the
devices connected to it.
* Features may have been added to the IP8000 since this manual was printed.
Please visit our website to download the most up-t o-date version of the
manual.
© Copyright 2007 ATEN® International Co., Ltd.
Manual Part No. PAPE-0279-100G
Printing Date: 12/2007
P/N: IP8000 ATFW Series
TEN and the ATEN logo are registered tr ademarks of ATEN International Co. , Ltd. All rights reserved.
All other brand names and trademarks are the registered property of their respective owners.
iv

IP8000 User Manual
Contents
FCC Information . . . . . . . . . . . . . . . . . . . . . . . . . . . . . . . . . . . . . . . . . . . . .ii
RoHS. . . . . . . . . . . . . . . . . . . . . . . . . . . . . . . . . . . . . . . . . . . . . . . . . . . . . . ii
SJ/T 11364-2006. . . . . . . . . . . . . . . . . . . . . . . . . . . . . . . . . . . . . . . . . . . . .ii
User Information . . . . . . . . . . . . . . . . . . . . . . . . . . . . . . . . . . . . . . . . . . . . .iii
Online Registration . . . . . . . . . . . . . . . . . . . . . . . . . . . . . . . . . . . . . . . .iii
Telephone Support . . . . . . . . . . . . . . . . . . . . . . . . . . . . . . . . . . . . . . . .iii
User Notice . . . . . . . . . . . . . . . . . . . . . . . . . . . . . . . . . . . . . . . . . . . . . .iii
Package Contents. . . . . . . . . . . . . . . . . . . . . . . . . . . . . . . . . . . . . . . . . . . iv
About this Manual . . . . . . . . . . . . . . . . . . . . . . . . . . . . . . . . . . . . . . . . . . . ix
Conventions . . . . . . . . . . . . . . . . . . . . . . . . . . . . . . . . . . . . . . . . . . . . . . . .x
Product Information. . . . . . . . . . . . . . . . . . . . . . . . . . . . . . . . . . . . . . . . . . .x
1. Introduction
Overview. . . . . . . . . . . . . . . . . . . . . . . . . . . . . . . . . . . . . . . . . . . . . . . . . . .1
Features . . . . . . . . . . . . . . . . . . . . . . . . . . . . . . . . . . . . . . . . . . . . . . . . . . .2
System Requirements. . . . . . . . . . . . . . . . . . . . . . . . . . . . . . . . . . . . . . . . .3
General . . . . . . . . . . . . . . . . . . . . . . . . . . . . . . . . . . . . . . . . . . . . . . . . .3
Video. . . . . . . . . . . . . . . . . . . . . . . . . . . . . . . . . . . . . . . . . . . . . . . . . . .3
Cables. . . . . . . . . . . . . . . . . . . . . . . . . . . . . . . . . . . . . . . . . . . . . . . . . .4
Operating Systems . . . . . . . . . . . . . . . . . . . . . . . . . . . . . . . . . . . . . . . .4
Virtual Media Support . . . . . . . . . . . . . . . . . . . . . . . . . . . . . . . . . . . . . .4
IP8000 Layout Diagram . . . . . . . . . . . . . . . . . . . . . . . . . . . . . . . . . . . . . . .5
2. Hardware Setup
Before You Begin . . . . . . . . . . . . . . . . . . . . . . . . . . . . . . . . . . . . . . . . . . . .7
Basic Installation. . . . . . . . . . . . . . . . . . . . . . . . . . . . . . . . . . . . . . . . . . . . .7
Feature Cable Installation. . . . . . . . . . . . . . . . . . . . . . . . . . . . . . . . . . . . . .9
3. Browser Login
Logging In . . . . . . . . . . . . . . . . . . . . . . . . . . . . . . . . . . . . . . . . . . . . . . . . .11
Screen Elements. . . . . . . . . . . . . . . . . . . . . . . . . . . . . . . . . . . . . . . . . . . .14
Utility Icons . . . . . . . . . . . . . . . . . . . . . . . . . . . . . . . . . . . . . . . . . . . . .15
Administration Icons . . . . . . . . . . . . . . . . . . . . . . . . . . . . . . . . . . . . . .15
Remote Console Preview . . . . . . . . . . . . . . . . . . . . . . . . . . . . . . . . . .16
4. Administration
Introduction . . . . . . . . . . . . . . . . . . . . . . . . . . . . . . . . . . . . . . . . . . . . . . . .17
General . . . . . . . . . . . . . . . . . . . . . . . . . . . . . . . . . . . . . . . . . . . . . . . . . . .18
Network. . . . . . . . . . . . . . . . . . . . . . . . . . . . . . . . . . . . . . . . . . . . . . . . . . .19
Access Ports . . . . . . . . . . . . . . . . . . . . . . . . . . . . . . . . . . . . . . . . . . . .19
IP Address. . . . . . . . . . . . . . . . . . . . . . . . . . . . . . . . . . . . . . . . . . . . . .20
DNS Server . . . . . . . . . . . . . . . . . . . . . . . . . . . . . . . . . . . . . . . . . . . . .20
Finishing Up . . . . . . . . . . . . . . . . . . . . . . . . . . . . . . . . . . . . . . . . . . . .20
v

IP8000 User Manual
Security. . . . . . . . . . . . . . . . . . . . . . . . . . . . . . . . . . . . . . . . . . . . . . . . . . . 21
Overview. . . . . . . . . . . . . . . . . . . . . . . . . . . . . . . . . . . . . . . . . . . . . . .21
Filtering . . . . . . . . . . . . . . . . . . . . . . . . . . . . . . . . . . . . . . . . . . . . . . . .22
IP Filtering. . . . . . . . . . . . . . . . . . . . . . . . . . . . . . . . . . . . . . . . . . .22
MAC Filtering. . . . . . . . . . . . . . . . . . . . . . . . . . . . . . . . . . . . . . . . .23
ANMS . . . . . . . . . . . . . . . . . . . . . . . . . . . . . . . . . . . . . . . . . . . . . . . . . . . .24
RADIUS Settings. . . . . . . . . . . . . . . . . . . . . . . . . . . . . . . . . . . . . . . . .24
RADIUS Examples . . . . . . . . . . . . . . . . . . . . . . . . . . . . . . . . . . . .25
CC Management Settings. . . . . . . . . . . . . . . . . . . . . . . . . . . . . . . . . . 26
Log Server Settings. . . . . . . . . . . . . . . . . . . . . . . . . . . . . . . . . . . . . . .26
User Management . . . . . . . . . . . . . . . . . . . . . . . . . . . . . . . . . . . . . . . . . .27
Customization. . . . . . . . . . . . . . . . . . . . . . . . . . . . . . . . . . . . . . . . . . . . . .29
Firmware . . . . . . . . . . . . . . . . . . . . . . . . . . . . . . . . . . . . . . . . . . . . . . . . . . 31
5. The Windows Client
Starting Up . . . . . . . . . . . . . . . . . . . . . . . . . . . . . . . . . . . . . . . . . . . . . . . .33
Navigation. . . . . . . . . . . . . . . . . . . . . . . . . . . . . . . . . . . . . . . . . . . . . . . . .34
The Windows Client Control Panel. . . . . . . . . . . . . . . . . . . . . . . . . . . . . . 35
Hotkey Setup. . . . . . . . . . . . . . . . . . . . . . . . . . . . . . . . . . . . . . . . . . . .37
Configuring the Hotkeys . . . . . . . . . . . . . . . . . . . . . . . . . . . . . . . .38
Video Settings. . . . . . . . . . . . . . . . . . . . . . . . . . . . . . . . . . . . . . . . . . . 39
Virtual Media. . . . . . . . . . . . . . . . . . . . . . . . . . . . . . . . . . . . . . . . . . . .40
Message Board. . . . . . . . . . . . . . . . . . . . . . . . . . . . . . . . . . . . . . . . . .42
The Button Bar . . . . . . . . . . . . . . . . . . . . . . . . . . . . . . . . . . . . . . . . . .43
Compose Panel. . . . . . . . . . . . . . . . . . . . . . . . . . . . . . . . . . . . . . . . . .43
Message Display Panel. . . . . . . . . . . . . . . . . . . . . . . . . . . . . . . . . . . .43
User List Panel . . . . . . . . . . . . . . . . . . . . . . . . . . . . . . . . . . . . . . . . . .44
6. The Java Applet
Introduction. . . . . . . . . . . . . . . . . . . . . . . . . . . . . . . . . . . . . . . . . . . . . . . . 45
Navigation. . . . . . . . . . . . . . . . . . . . . . . . . . . . . . . . . . . . . . . . . . . . . . . . .46
The Java Applet Control Panel. . . . . . . . . . . . . . . . . . . . . . . . . . . . . . . . .46
Hotkey Setup. . . . . . . . . . . . . . . . . . . . . . . . . . . . . . . . . . . . . . . . . . . .48
Configuring the Hotkeys . . . . . . . . . . . . . . . . . . . . . . . . . . . . . . . .49
Video Settings. . . . . . . . . . . . . . . . . . . . . . . . . . . . . . . . . . . . . . . . . . . 50
Message Board. . . . . . . . . . . . . . . . . . . . . . . . . . . . . . . . . . . . . . . . . .51
Ctrl+Alt+Del. . . . . . . . . . . . . . . . . . . . . . . . . . . . . . . . . . . . . . . . . . . . .53
Exit . . . . . . . . . . . . . . . . . . . . . . . . . . . . . . . . . . . . . . . . . . . . . . . . . . .53
Lock LEDs. . . . . . . . . . . . . . . . . . . . . . . . . . . . . . . . . . . . . . . . . . . . . .53
7. The Log File
The Log File Screen . . . . . . . . . . . . . . . . . . . . . . . . . . . . . . . . . . . . . . . . .55
vi

IP8000 User Manual
8. The Log Server
Introduction . . . . . . . . . . . . . . . . . . . . . . . . . . . . . . . . . . . . . . . . . . . . . . . .57
Installation. . . . . . . . . . . . . . . . . . . . . . . . . . . . . . . . . . . . . . . . . . . . . . . . .57
Installation. . . . . . . . . . . . . . . . . . . . . . . . . . . . . . . . . . . . . . . . . . . . . .57
Starting Up . . . . . . . . . . . . . . . . . . . . . . . . . . . . . . . . . . . . . . . . . . . . . . . .58
The Menu Bar . . . . . . . . . . . . . . . . . . . . . . . . . . . . . . . . . . . . . . . . . . . . . .59
Configure. . . . . . . . . . . . . . . . . . . . . . . . . . . . . . . . . . . . . . . . . . . . . . .59
Events . . . . . . . . . . . . . . . . . . . . . . . . . . . . . . . . . . . . . . . . . . . . . . . . .60
Search . . . . . . . . . . . . . . . . . . . . . . . . . . . . . . . . . . . . . . . . . . . . . .60
Maintenance . . . . . . . . . . . . . . . . . . . . . . . . . . . . . . . . . . . . . . . . .61
Options . . . . . . . . . . . . . . . . . . . . . . . . . . . . . . . . . . . . . . . . . . . . . . . .62
Help. . . . . . . . . . . . . . . . . . . . . . . . . . . . . . . . . . . . . . . . . . . . . . . . . . .62
The Log Server Main Screen . . . . . . . . . . . . . . . . . . . . . . . . . . . . . . . . . .63
Overview . . . . . . . . . . . . . . . . . . . . . . . . . . . . . . . . . . . . . . . . . . . . . . .63
The List Panel . . . . . . . . . . . . . . . . . . . . . . . . . . . . . . . . . . . . . . . . . . .64
The Tick Panel . . . . . . . . . . . . . . . . . . . . . . . . . . . . . . . . . . . . . . . . . .64
9. AP Operation
Introduction . . . . . . . . . . . . . . . . . . . . . . . . . . . . . . . . . . . . . . . . . . . . . . . .65
The AP Windows Client . . . . . . . . . . . . . . . . . . . . . . . . . . . . . . . . . . . . . . 65
Installation. . . . . . . . . . . . . . . . . . . . . . . . . . . . . . . . . . . . . . . . . . . . . .65
Starting Up . . . . . . . . . . . . . . . . . . . . . . . . . . . . . . . . . . . . . . . . . . . . .66
The Windows Client Connection Screen. . . . . . . . . . . . . . . . . . . . . . .67
Logging In . . . . . . . . . . . . . . . . . . . . . . . . . . . . . . . . . . . . . . . . . . . . . .68
The Administrator Utility . . . . . . . . . . . . . . . . . . . . . . . . . . . . . . . . . . .70
General . . . . . . . . . . . . . . . . . . . . . . . . . . . . . . . . . . . . . . . . . . . . .70
Network . . . . . . . . . . . . . . . . . . . . . . . . . . . . . . . . . . . . . . . . . . . . .71
Security . . . . . . . . . . . . . . . . . . . . . . . . . . . . . . . . . . . . . . . . . . . . .72
ANMS . . . . . . . . . . . . . . . . . . . . . . . . . . . . . . . . . . . . . . . . . . . . . .73
User Management. . . . . . . . . . . . . . . . . . . . . . . . . . . . . . . . . . . . .74
Customization . . . . . . . . . . . . . . . . . . . . . . . . . . . . . . . . . . . . . . . .75
Upgrading the Firmware . . . . . . . . . . . . . . . . . . . . . . . . . . . . . . . . . . .76
The AP Java Client . . . . . . . . . . . . . . . . . . . . . . . . . . . . . . . . . . . . . . . . . .77
Starting Up . . . . . . . . . . . . . . . . . . . . . . . . . . . . . . . . . . . . . . . . . . . . .77
The Java Client Connection Screen . . . . . . . . . . . . . . . . . . . . . . . . . .78
Logging In . . . . . . . . . . . . . . . . . . . . . . . . . . . . . . . . . . . . . . . . . . . . . .78
Appendix
Safety Instructions. . . . . . . . . . . . . . . . . . . . . . . . . . . . . . . . . . . . . . . . . . .79
General . . . . . . . . . . . . . . . . . . . . . . . . . . . . . . . . . . . . . . . . . . . . . . . .79
Technical Support. . . . . . . . . . . . . . . . . . . . . . . . . . . . . . . . . . . . . . . . . . .81
International. . . . . . . . . . . . . . . . . . . . . . . . . . . . . . . . . . . . . . . . . . . . .81
North America . . . . . . . . . . . . . . . . . . . . . . . . . . . . . . . . . . . . . . . . . . .81
Specifications . . . . . . . . . . . . . . . . . . . . . . . . . . . . . . . . . . . . . . . . . . . . . .82
vii

IP8000 User Manual
IP Address Determination. . . . . . . . . . . . . . . . . . . . . . . . . . . . . . . . . . . . .83
Resetting Your Computer Address . . . . . . . . . . . . . . . . . . . . . . . . . . . 83
The Windows Client . . . . . . . . . . . . . . . . . . . . . . . . . . . . . . . . . . . . . .84
Administrator Login Failure. . . . . . . . . . . . . . . . . . . . . . . . . . . . . . . . . . . .85
Troubleshooting . . . . . . . . . . . . . . . . . . . . . . . . . . . . . . . . . . . . . . . . . . . .86
Overview. . . . . . . . . . . . . . . . . . . . . . . . . . . . . . . . . . . . . . . . . . . . . . .86
The Windows Client . . . . . . . . . . . . . . . . . . . . . . . . . . . . . . . . . . . . . .86
The Java Client. . . . . . . . . . . . . . . . . . . . . . . . . . . . . . . . . . . . . . . . . . 87
The Log Server . . . . . . . . . . . . . . . . . . . . . . . . . . . . . . . . . . . . . . . . . .87
Sun Systems. . . . . . . . . . . . . . . . . . . . . . . . . . . . . . . . . . . . . . . . . . . . 88
Additional Mouse Synchronization Procedures . . . . . . . . . . . . . . . . . . . . 89
Windows:. . . . . . . . . . . . . . . . . . . . . . . . . . . . . . . . . . . . . . . . . . . . . . .89
Sun / Linux . . . . . . . . . . . . . . . . . . . . . . . . . . . . . . . . . . . . . . . . . . . . .90
Trusted Certificates. . . . . . . . . . . . . . . . . . . . . . . . . . . . . . . . . . . . . . . . . . 91
Overview. . . . . . . . . . . . . . . . . . . . . . . . . . . . . . . . . . . . . . . . . . . . . . .91
Installing the Certificate. . . . . . . . . . . . . . . . . . . . . . . . . . . . . . . . . . . .92
Certificate Trusted. . . . . . . . . . . . . . . . . . . . . . . . . . . . . . . . . . . . . . . .93
About SPHD Connectors . . . . . . . . . . . . . . . . . . . . . . . . . . . . . . . . . . . . .94
Limited Warranty. . . . . . . . . . . . . . . . . . . . . . . . . . . . . . . . . . . . . . . . . . . . 94
viii

IP8000 User Manual
About this Manual
This User Manual is provided to help you get the most from your IP8000. It
covers all aspects of installation, configuration and operation. An overview of
the information found in the manual is provided below.
Chapter 1, Introduction, introduces you to the IP8000. Its purpose,
features and benefits are presented, and its components are described.
Chapter 2, Hardware Setup, provides step-by-step instructions for
connecting up your installation.
Chapter 3, Browser Login, describes how to log into the IP8000 with a
browser, and explains the functions of the icons and buttons that appear on the
opening web page.
Chapter 4, Administration, explains the administrative procedures that are
employed to configure the IP8000’s working environment.
Chapter 5, The Windows Client, explains how to connect to the IP8000
with the browser-based Windows Client software, and describes how to use the
OSD to access and control the server that the card is installed in.
Chapter 6, The Java Applet, describes how to connect to the IP8000 with
the Java Applet software, and explains how to use the OSD to access and
control the server that the card is installed in.
Chapter 7, The Log File, shows how to use the log file utility to view the
events that take place on the IP8000.
Chapter 8, The Log Server, explains how to install, configure, and use, the
Log Server
Chapter 9, AP Operation, describes how to configure and operate the
IP8000 using the stand-alone Windows and Java AP programs, instead of the
browser.
An Appendix, at the end of the manual provides technical and
troubleshooting information.
ix

IP8000 User Manual
Conventions
This manual uses the following conventions:
Monospaced Indicates text that you should key in.
[ ] Indicates keys you should press. For example, [Enter] means to
press the Enter key. If keys need to be chorded, they appear
together in the same bracket with a plus sign between them:
[Ctrl+Alt].
1. Numbered lists represent procedures with sequential steps.
♦ Bullet lists provide information, but do not involve sequential steps.
→ Indicates selecting the option (on a menu or dialog box, for
example), that comes next. For example, Start
open the Start menu, and then select Run.
Indicates critical information.
Product Information
→ Run means to
For information about all ATEN products and how they can help you connect
without limits, visit ATEN on the Web or contact an ATEN Authorized
Reseller. Visit ATEN on the Web for a list of locations and telephone numbers:
International http://www.aten.com
North America ATEN TECH http://www.aten-usa.com
ATEN NJ http://www.aten.com
x

Chapter 1
Introduction
Overview
The IP8000 is a PCI card implementation of a control unit that provides “overIP” access and control of the server it is installed in. In addition to local console
operation, the IP8000 allows multi-platform access and control of the server
from remote locations using a standard Internet browser or with a stand-alone
Windows-based application.
The IP8000 installs in any available PCI slot, then connects to the Internet, an
Intranet, LAN, or WAN using industry standard Category 5 cable. Because the
IP8000 uses TCP/IP for its communications protocol, the server it is connected
to can be accessed from any computer on the Net - whether that computer is
located down the hall, down the street, or half-way around the world.
For ease of operation, a user-friendly Windows GUI Client and a Java Applet
are available in browser-based versions. A stand-alone Windows application
version is provided, as well. Inclusion of the Java applet ensures that the
IP8000 is platform independent, and is able to work with all operating systems.
Operators at remote locations connect to the IP8000 via its IP address. Once a
connection has been established and authorization granted, remote users can
exchange keyboard, video and mouse signals with the server just as if they
were physically present and working on the equipment directly.
Administrator utilities are provided to configure the system; limit access from
remote computers; manage users; and maintain the system with firmware and
software module updates. In addition, a Log Server records all the events that
take place on the IP8000 for the administrator to analyze.
System administrators can handle a multitude of tasks with ease - from
installing and running GUI applications, to BIOS level troubleshooting, routine
monitoring, maintenance, system administration, rebooting and even prebooting functions.
Your IP8000 investment is protected by a Firmware Upgrade Utility. You can
stay current with the latest functionality improvements by downloading
firmware update files from our website as they become available, and then
using the utility to quickly and conveniently perform the upgrade.
1

IP8000 User Manual
Features
Standard PCI-sized card provides over-IP access and control of a remote
server from anywhere in the world
Virtual media via USB 2.0 data transmission
Remote power control and reset support
Up to 64 user accounts – Up to 32 concurrent user logins for single-bus
sharing
Message board feature allows logged in users to communicate with each
other, and allows a user to take exclusive control of the KVM functions
External authentication support: RADIUS
Web-based Windows and Java implementations allow the server to be
controlled from any browser.
Windows GUI and Java client software for non-browser access – the Java
client works with practically all operating systems
Supports TCP/IP, HTTP, HTTPS, UDP, DHCP, SSL, ARP, DNS, ICMP,
CHAP
Supports 10Base-T, 100Base-T
Superior video resolution: up to 1600 x 1200 @ 60Hz; 24-bit color depth
for remote sessions
Bandwidth optimization via grayscale and video quality setting
Advanced security features include password protection and advanced
encryption technologies
Secure 128-bit SSL encryption
Enable/disable browser operation
Three level authentication: Multi- Administrators, Users, Viewers
Event logging
Remote firmware upgrading
Host-side OS support: Windows 2000/2003/XP/NT; Redhat 7.1 and
above; FreeBSD, Novell
2

1. Introduction
System Requirements
General
For best results we recommend that the computers used to access the
IP8000 control unit have at least a P III 1 GHz processor, and that the
screen resolution is set to 1024 x 768.
Browsers must support 128-bit SSL data encryption.
For best results we recommend that the internet connection speed be at
least 128 kbps.
For the browser-based Java Applet and AP Java Client, you must have
Sun's Java Runtime Environment (JRE) 6, Update 3, or higher.
For the Log Server, you must have the Microsoft Jet OLEDB 4.0 or higher
driver installed.
Video
Only non-interlaced video signals at the following resolutions and refresh
rates are supported:
Resolution Refresh Rates
640 x 480 60, 72, 75, 85, 90, 100, 120
720 x 400 70, 75
800 x 600 56, 60, 72, 75, 85, 90, 100, 120
1024 x 768 60, 70, 75, 85, 90, 100
1152 x 864 60, 70, 75, 85
1280 x 1024 60, 70, 75
1600 x 1200 60
3

IP8000 User Manual
Cables
T wo cable sets are provided with this package: a KVM cable set to link the
IP8000 to a server; and a feature cable to link the IP8000 to the mainboard
power control header.
Note: Only cable sets specifically designed to work with the IP8000 may
be used for the above purposes.
Cat 5 or higher cable should be used to connect the IP8000 to the LAN,
WAN, or Internet.
Operating Systems
Supported operating systems are shown in the table, below:
OS Version
Windows 2000 and higher
Linux RedHat 7.1 and higher
SuSE 8.2 and higher
Mandriva (Mandrake) 9.0 and higher
UNIX AIX 4.3 and higher
FreeBSD 4.2 and higher
Novell Netware 5.0 and higher
Virtual Media Support
USB CDROM Drives
USB Floppy Drives
USB Flash Drives
IDE CDROM Drives
Image Files
4
1. Introduction
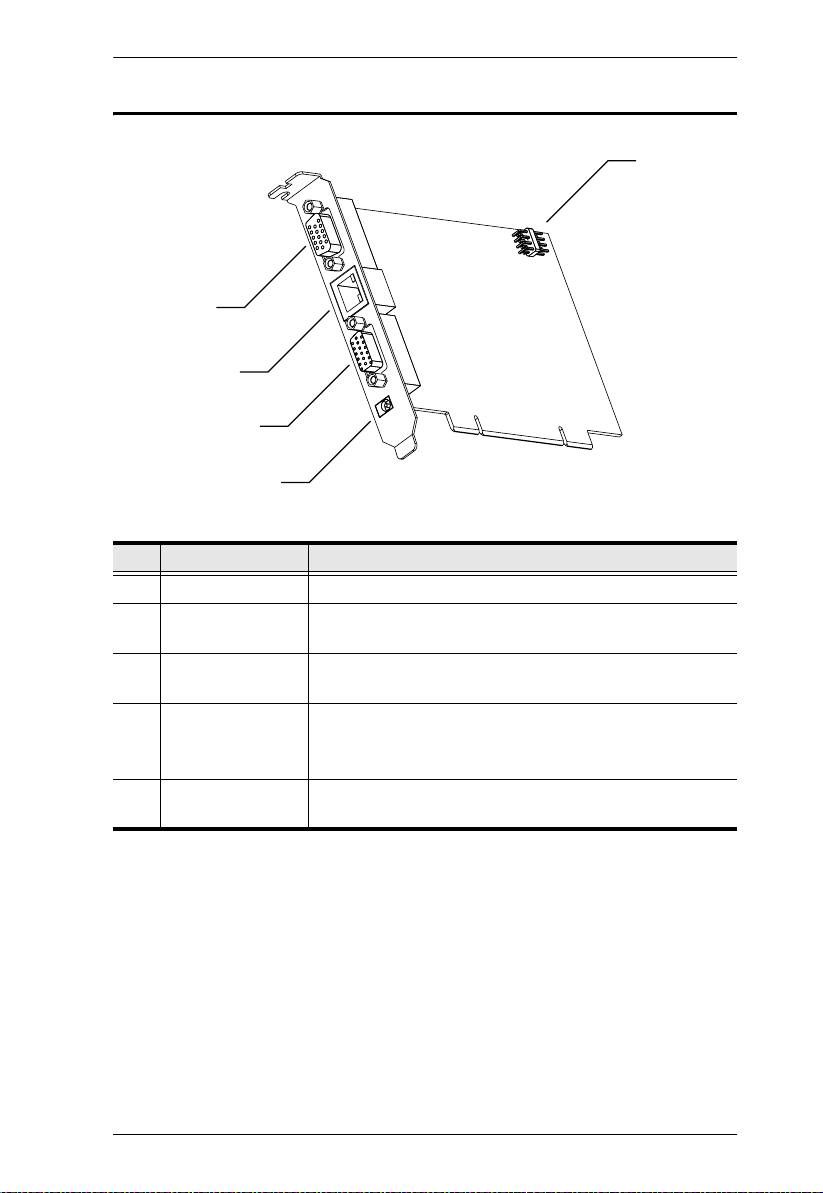
IP8000 Layout Diagram
5
1
2
3
4
No. Component Description
1. Monitor Port The video cable from your monitor plugs in here
2. LAN Port The cable that connects to the WAN, LAN, Intranet, or
Internet plugs in here.
3. KVM Port The Custom KVM cable that links the card to your server’s
4. Power Jack The power adapter cable plugs in here.
5 Feature Cable
Connector
Video and USB ports plugs in here.
Note: Use of the power adapter is optional. If it is not used,
however, you will be unable to perform a remote Power On.
The feature cable plugs in here. See Feature Cable
Installation, page 9 for details.
5

IP8000 User Manual
This Page Intentionally Left Blank
6

Before You Begin
1. Make sure that the power to any device that you connect to the
installation has been turned off. You must unplug the power
cords of any computers that have the Keyboard Power On
function.
2. Avoid Electrostatic Discharge (ESD). Keep your IP8000 card in
its antistatic bag until it is ready to be installed. Avoid contact
with any component or connector on any adapter card, printed
circuit board, or memory module. Handle these components by
the mounting bracket.
3. Perform all unpacking and installation procedures on a ground
connected antistatic mat. Wear an antistatic wristband grounded
at the same point as the antistatic mat. You can also use a sheet
of conductive aluminum foil grounded through a one megaohm
resistor instead of the antistatic mat. Similarly, a strip of
conductive aluminum foil wrapped around the wrist and
grounded through a one megaohm resistor serves the same
purpose as a wristband.
Chapter 2
Hardware Setup
Basic Installation
After installing the IP8000 into any available PCI slot on the server’s
mainboard, refer to the installation diagram below (the diagram numbers
correspond to the step numbers), and do the following:
1. Plug the local monitor cable into the IP8000's video port.
2. Plug the local keyboard and mouse into the server’s keyboard and mouse
ports.
Note: The installation diagram depicts a PS/2 Mouse and Keyboard. If you
use USB mice and keyboards, plug them into USB ports.
7
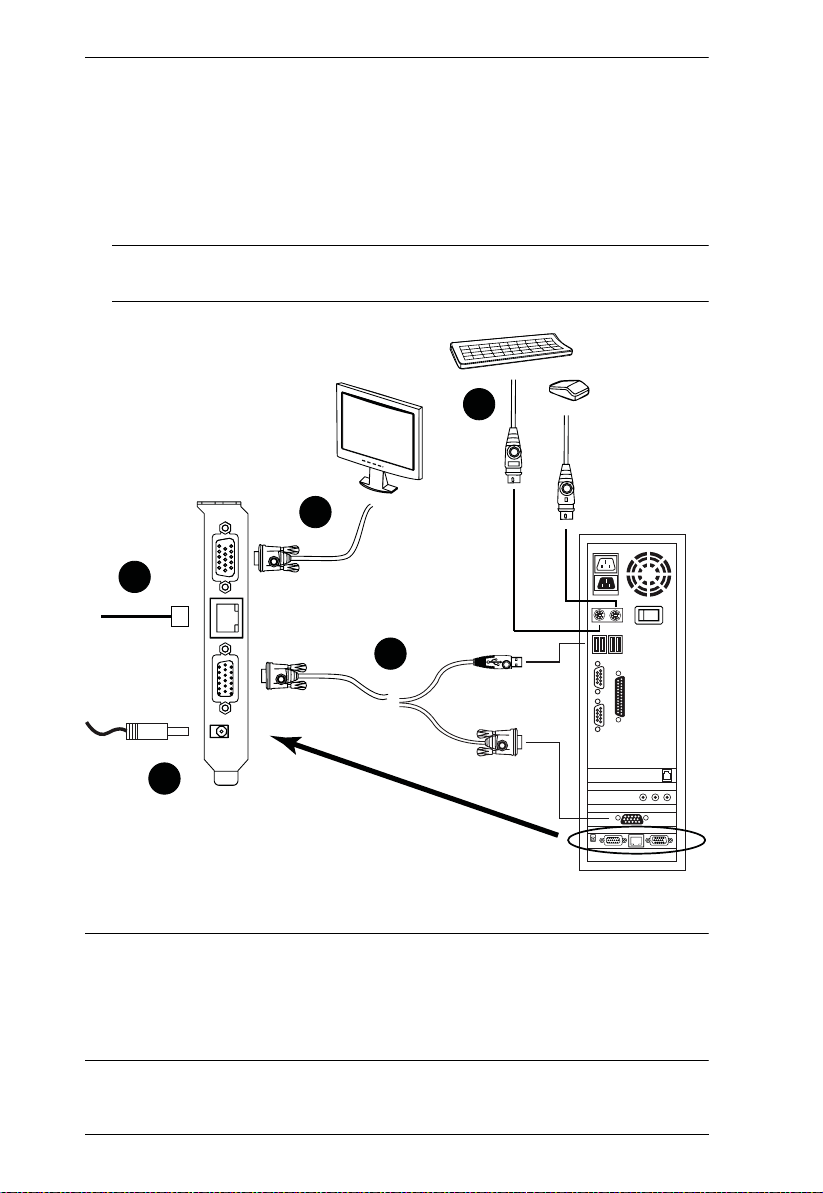
IP8000 User Manual
3. Use the KVM Cable provided with this package to connect the IP8000's
KVM port to the server’s video port and USB port.
4. Plug the LAN or WAN cable into the IP8000's LAN port.
5. Plug the power adapter cable into the IP8000's power jack, then pl ug the
power adapter into an AC power source.
Note: Use of a power adapter is optional. If a power adapter isn’t used,
however, you will not be able to perform a remote Power On.
2
1
4
3
5
Note: Although the IP8000 plugs into a server’s PCI slot, it has its own
environment and operates independently of the server it resides on –
using its I/O ports to link to the server it controls. It can even link to
(with steps 2 and 3), and control, a server other than the one it actually
resides on.
8
2. Hardware Setup
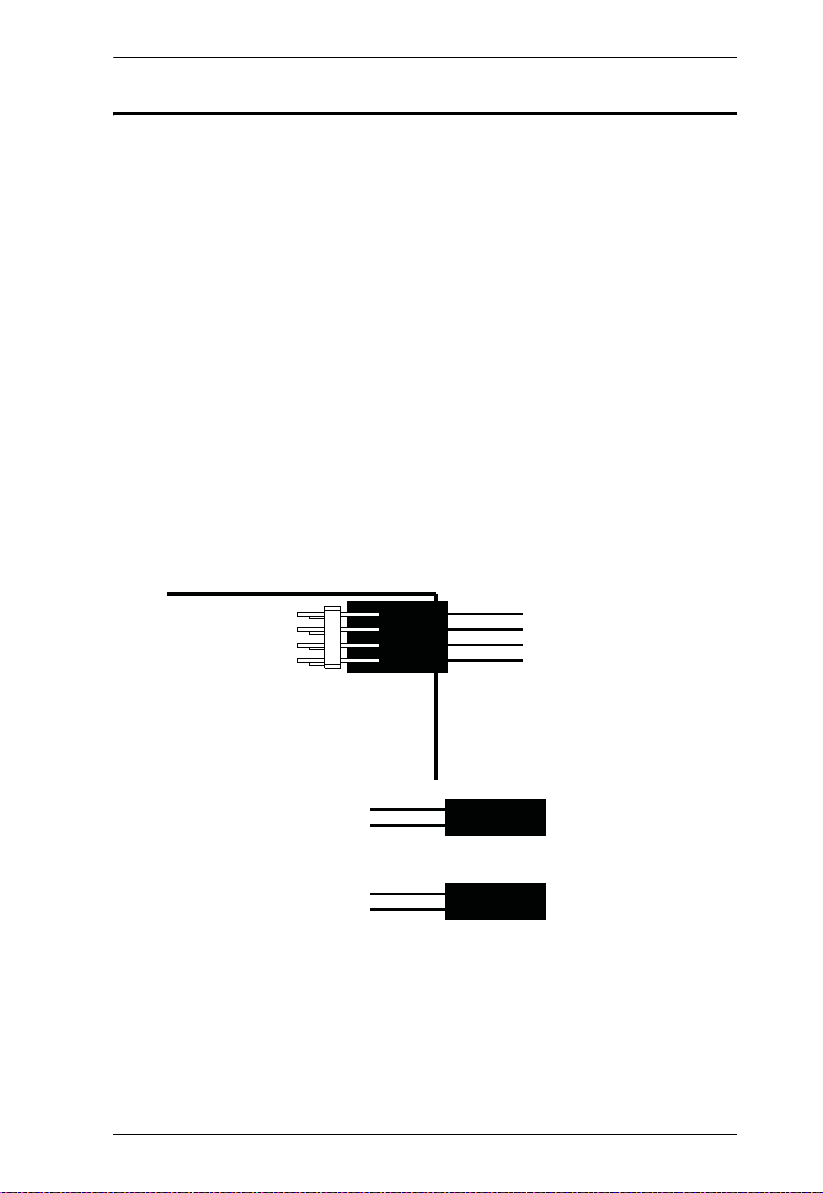
Feature Cable Installation
The feature cable provides the ability to perform remote power on/off and reset
operations. The cable plugs into a header block located at the upper right of the
card. The block contains two rows of pins. The upper row comprises pins 1, 3,
5, and 7; the lower row comprises pins 2, 4, 6, and 8. To install the feature
cable, do the following:
1. Plug the feature cable’s large connector (the one containing all 4 wires)
into to the lower row of pins (pins 2–8) with the white wire at the top; the
orange wire at the bottom.
2. Unplug the leads from the computer mainboard’s Reset pin header. (These
are the ones coming from the computer case’s Reset switch).
3. Plug the feature cable connector containing the white and blue wires into
the mainboard’s Reset pin header.
4. Unplug the leads from the computer mainboard’s Power pin header.
(These are the ones coming from the computer case’s Power switch).
5. Plug the feature cable connector containing the white and orange wires
into the computer mainboard’s Power header.
2
4
6
8
W
B
W
O
White
Blue
White
Orange
To Mainboard
Reset Header
To Mainboard
Power Header
(Continues on next page.)
9

IP8000 User Manual
(Continued from previous page.)
6. Plug the leads from computer case’s Reset switch into pins 1–3 (on the
upper row) of the IP8000’s feature cable pin header.
7. Plug the leads from the computer case’s Power switch into pins 5–7 (on
the upper row) of the IP8000’s feature cable pin header.
1
3
5
7
From Case
Reset Switch
From Case
Power Switch
Note: It is not necessary to pay attention to the plug alignment (i.e., which
wire is aligned with which pin) when you plug the leads from the feature
cable into the mainboard headers, or when you plug the leads from the
case into the feature cable header.
10

Chapter 3
Browser Login
The IP8000 can be accessed either from an internet type browser, or via
stand-alone Windows and Java applications. The next several chapters
describe browser-based operations. Stand-alone AP operation is discussed in
Chapter 9.
Logging In
To operate the IP8000 from an Internet browser, begin by logging in:
1. Open your browser and specify the IP address of the IP8000 you want to
access in the browser's URL location bar.
Note: 1. For security purposes, a login string may have been set by the
administrator. If so, you must include a forward slash and the
login string along with the IP address when you log in. For
example:
192.168.0.100/ip8k
If you don't know the IP address and login string, ask your
Administrator.
2. If you are the administrator, and are logging in for the first time,
the various ways to determine the IP8000's IP address are
described in the Appendix on page 83.
(Continues on next page.)
11
IP8000 User Manual
(Continued from previous page.)
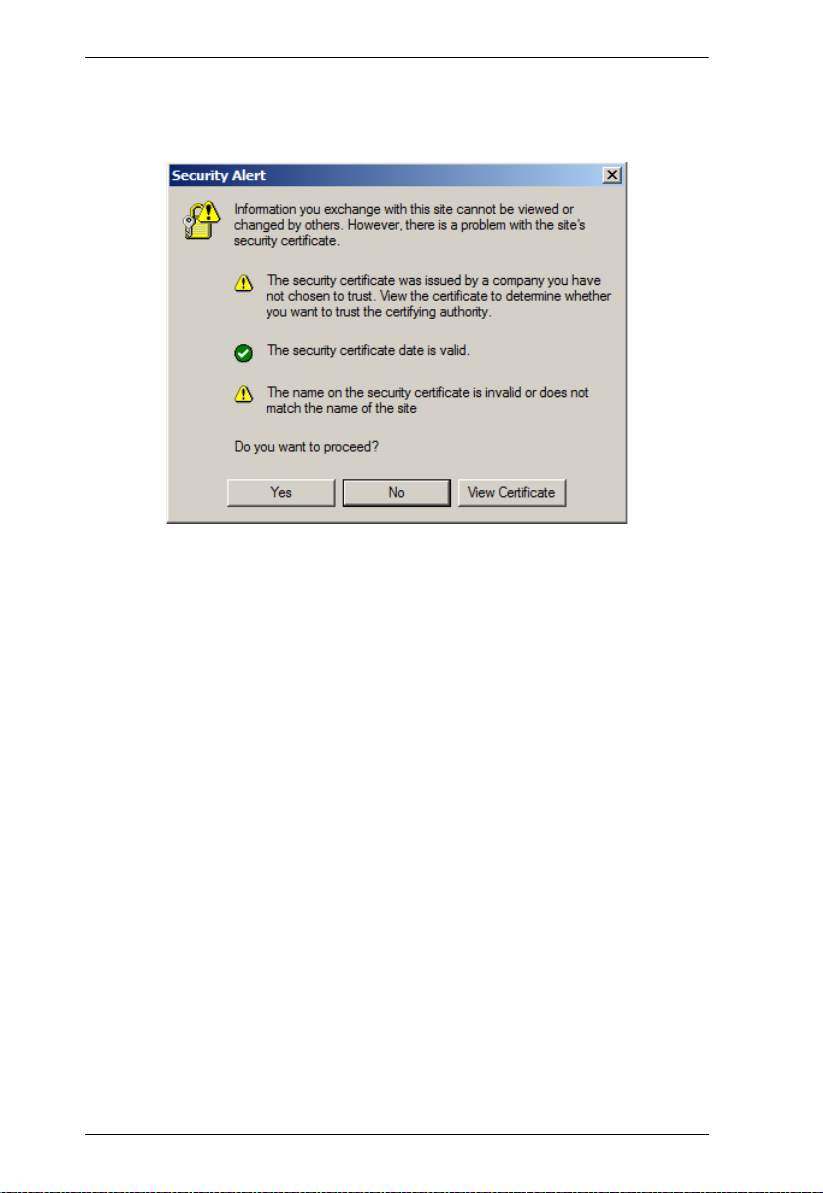
2. A Security Alert dialog box appears.
Accept the certificate – it can be trusted. (See Trusted Certificates,
page 91, for details.) If a second certificate appears, accept it as well.
12
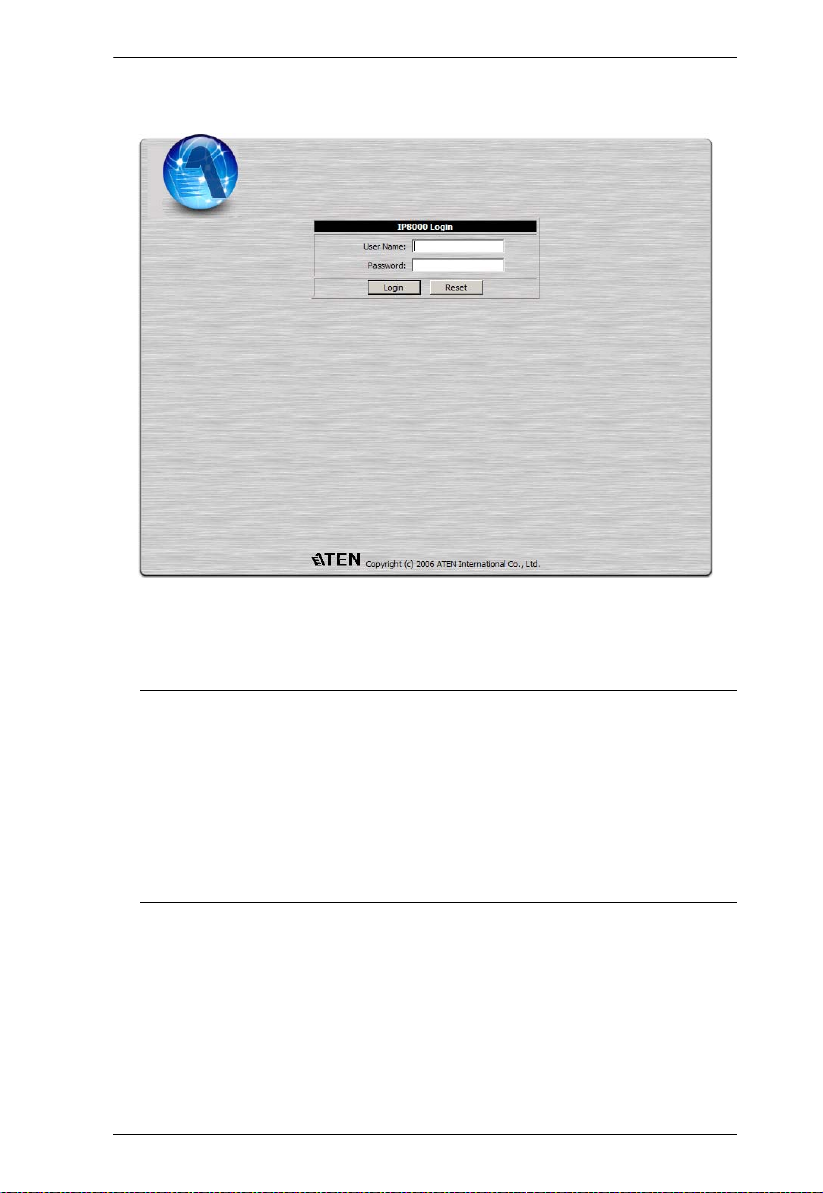
The IP8000 login page appears:
Chapter 3. Browser Login
3. Provide a valid Username and Password (set by the IP8000 administrator),
then Click Login to continue.
Note: 1. If you are the administrator, and are logging in for the first time,
use the default Username: administrator; and the default
Password: password. For security purposes, we strongly
recommend you remove these and give yourself a unique
Username and Password (see User Management, page 27).
2. If you supplied an invalid login, the login entry boxes will
become blank. Log in again being careful to specify a valid
Username and Password.
13
IP8000 User Manual
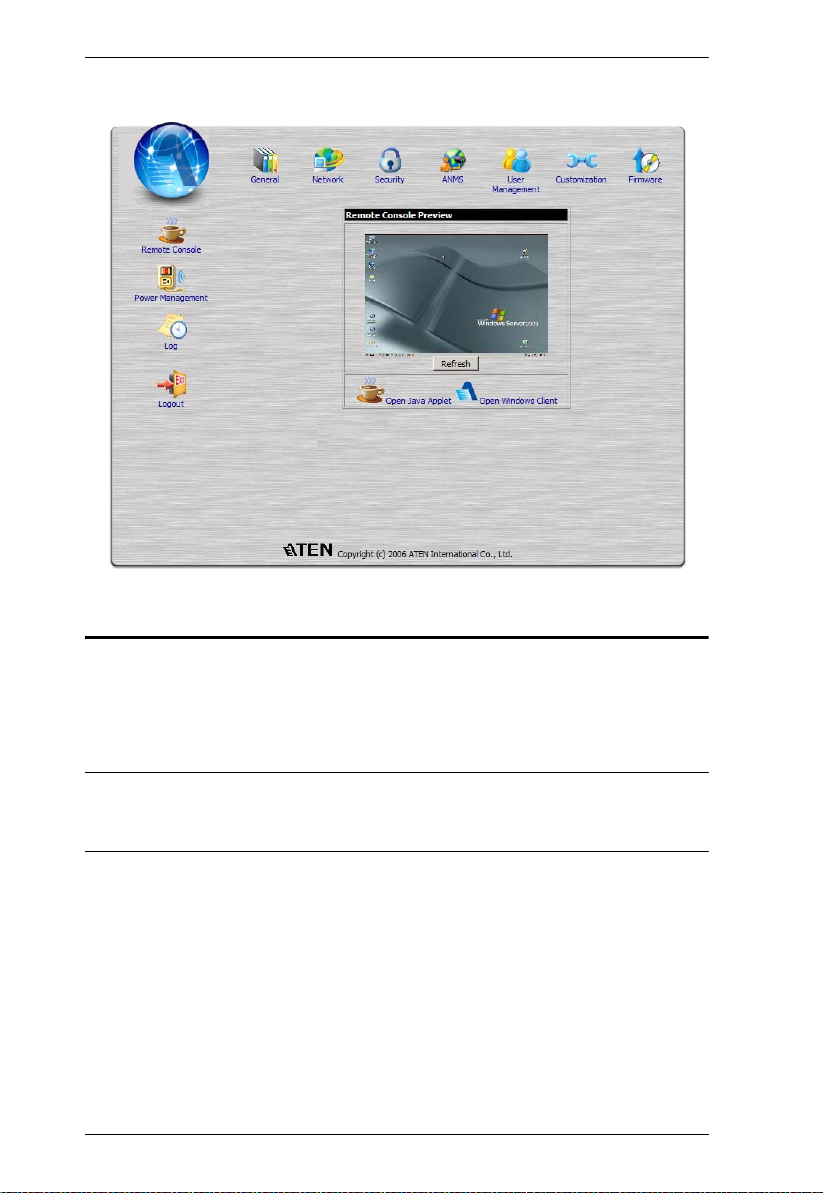
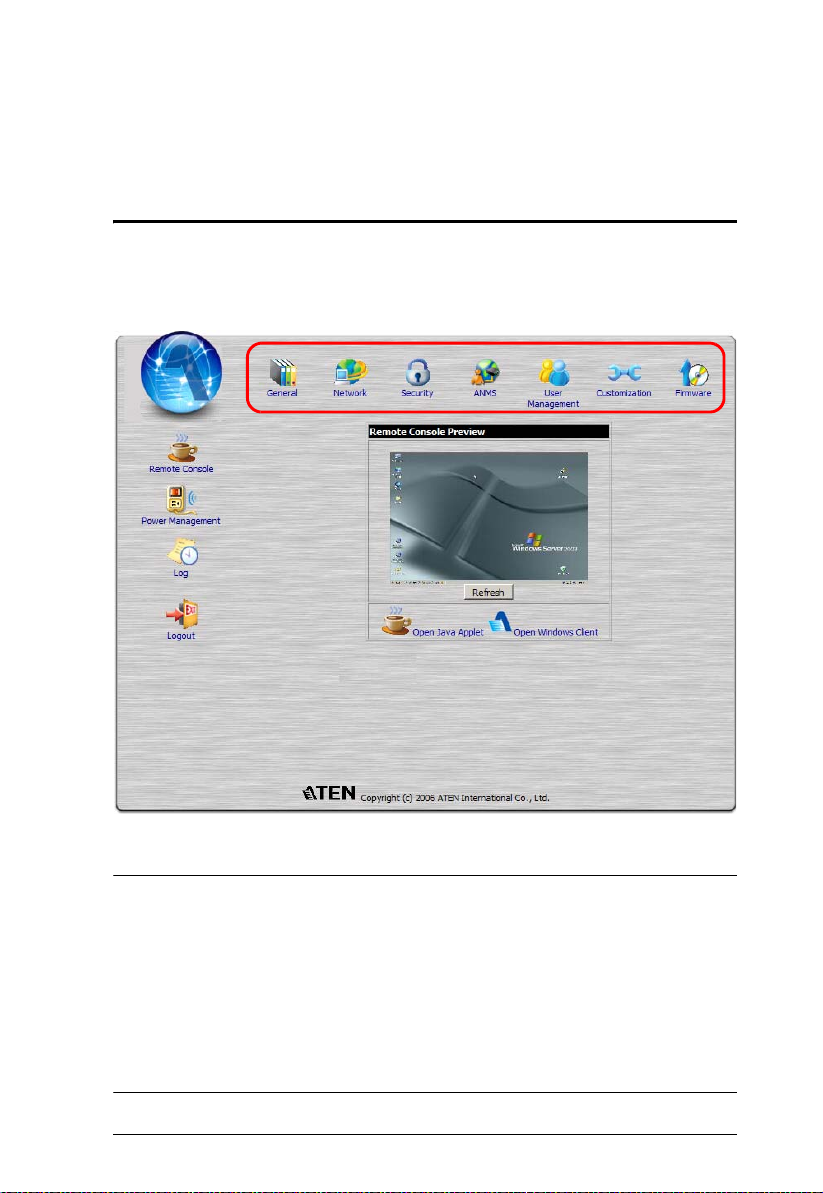
After you have successfully logged in, the IP8000 Main Screen appears:
Screen Elements
The Main Screen consists of Utility icons arranged vertically down the left
side; Administration icons arranged across the top; and a Remote Console
Preview with icons to launch the Java Applet and Windows Client displayed in
the center.
Note: If a user doesn’t have permission to perform a particular activity, the
icon for that activity doesn’t appear. See User Management, page 27,
for permission details.
(Continues on next page.)
14
Chapter 3. Browser Login
(Continued from previous page.)
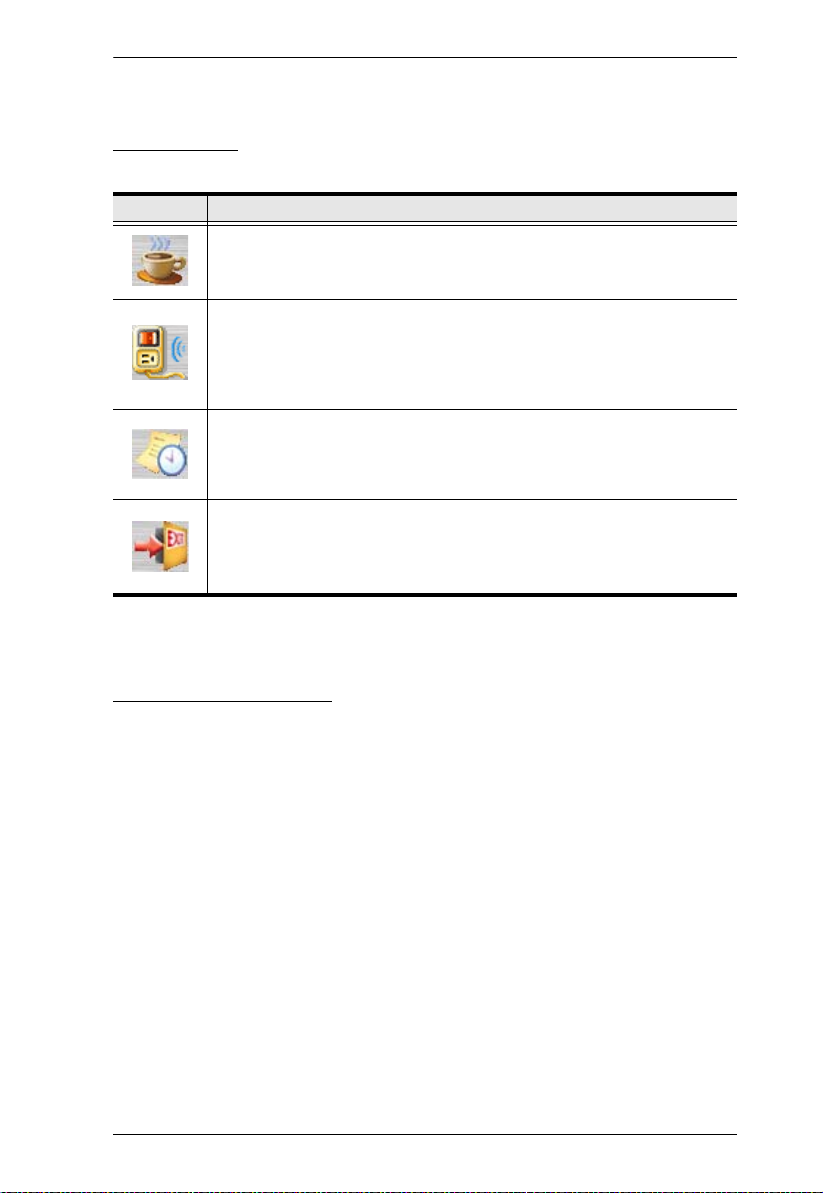
Utility Icons
The icons arranged down the left side perform the following functions:
Icon Purpose
Remote Console: Clicking this icon closes whatever is displayed on the
Main Screen, and brings back the Remote Console Preview.
Power Management: If the feature cable has been properly installed
(see Feature Cable Installation, page 9), and you have the proper
permission (see User Management, page 27), clicking this icon will bring
up an interface that allows you to Power On, Power Off, or Reset the
remote server.
Log: All the events that take place on the IP8000 are recorded in a log
file. If you have the proper permission (see User Management, page 27),
clicking this icon displays the contents of the log file. See Chapter 7, The
Log File, for further details.
Logout: Click this icon to log out and end your IP8000 session.
It is important to log out when you end your session. Otherwise, you must
wait until the timeout setting has expired before the IP8000 can be
accessed again. (See Timeout, page 29.)
Administration Icons
The icons arranged across the top of the page are linked to the administration
utilities, which are used to configure the IP8000. The ability to make
configuration changes depends on the permissions associated with a user’s
login information (see User Management, page 27). The administrative
functions are discussed in Chapter 4.
15
IP8000 User Manual
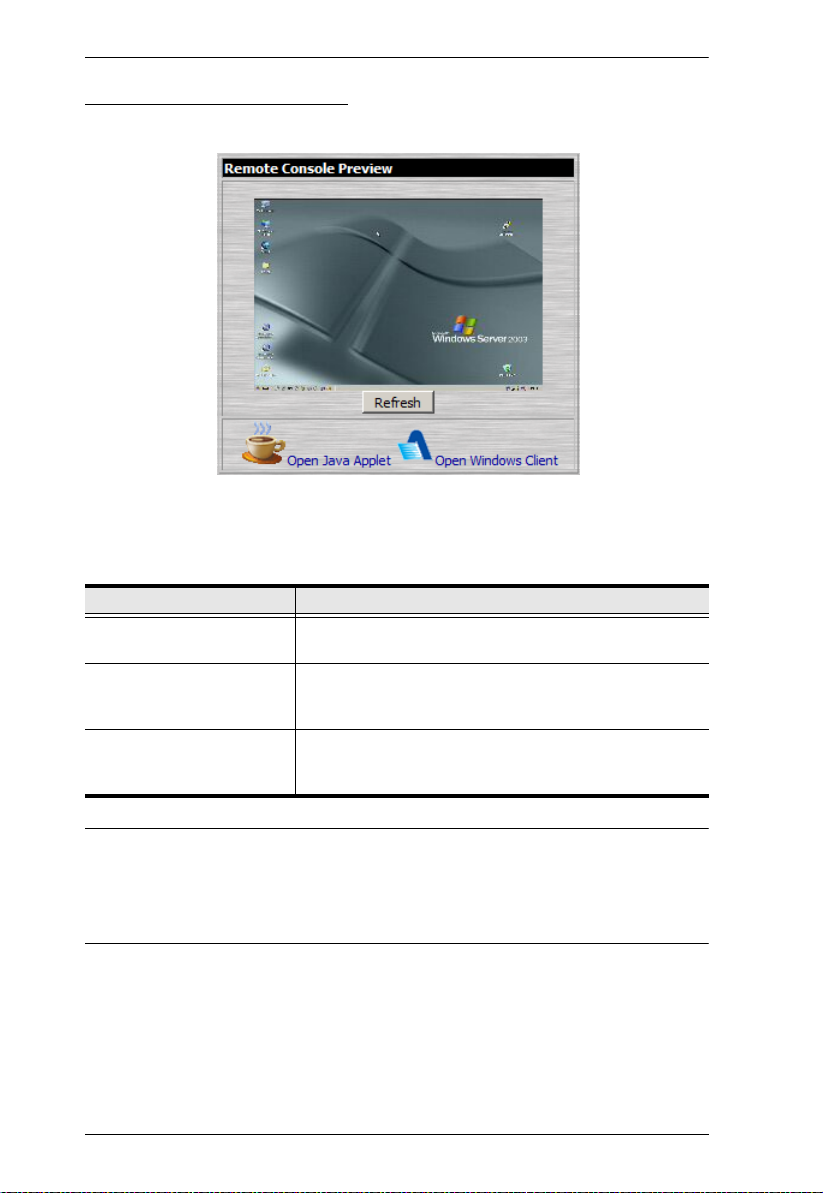
Remote Console Preview
The main portion of the screen shows a snapshot of the remote display.
The active elements of the Remote Console Preview are described in the
following table:
Element Action
Refresh Clicking Refresh updates the snapshot of the remote
Open Java Applet If you are on a platform other than Windows, clicking
Open Windows Client If you are running Windows, clicking Open Windows
display.
Open Java Applet uses a Java applet to open the remote
server’s display on your desktop.
Client uses a Windows plugin to open the remote
server’s display on your desktop.
Note: 1. If a user doesn’t have permission to open the Java Applet, the icon to
launch the applet does not appear.
2. If a user doesn’t have permission to open the Windows Client, the
icon to launch the client does not appear.
IP8000 operation using the Java applet is discussed in Chapter 6; IP8000
operation using the Windows client is discussed in Chapter 5.
16
Chapter 4
Administration
Introduction
The administration utilities, represented by the icons located across the top of
the IP8000 web page, are used to configure the IP8000’s operating
environment.
This chapter discusses each of them in turn.
Note: 1. As you make your configuration changes in each dialog box, click
Apply to save them.
2. Some configuration changes only take effect after an IP8000 reset.
For those changes, a check is automatically put in the Reset on Exit
box (see Customization, page 29). To have the changes take effect,
log out and then log back in again.
3. If you don't have Configuration privileges (see User Management,
page 27), the Administration configuration dialogs are not available.
17
IP8000 User Manual
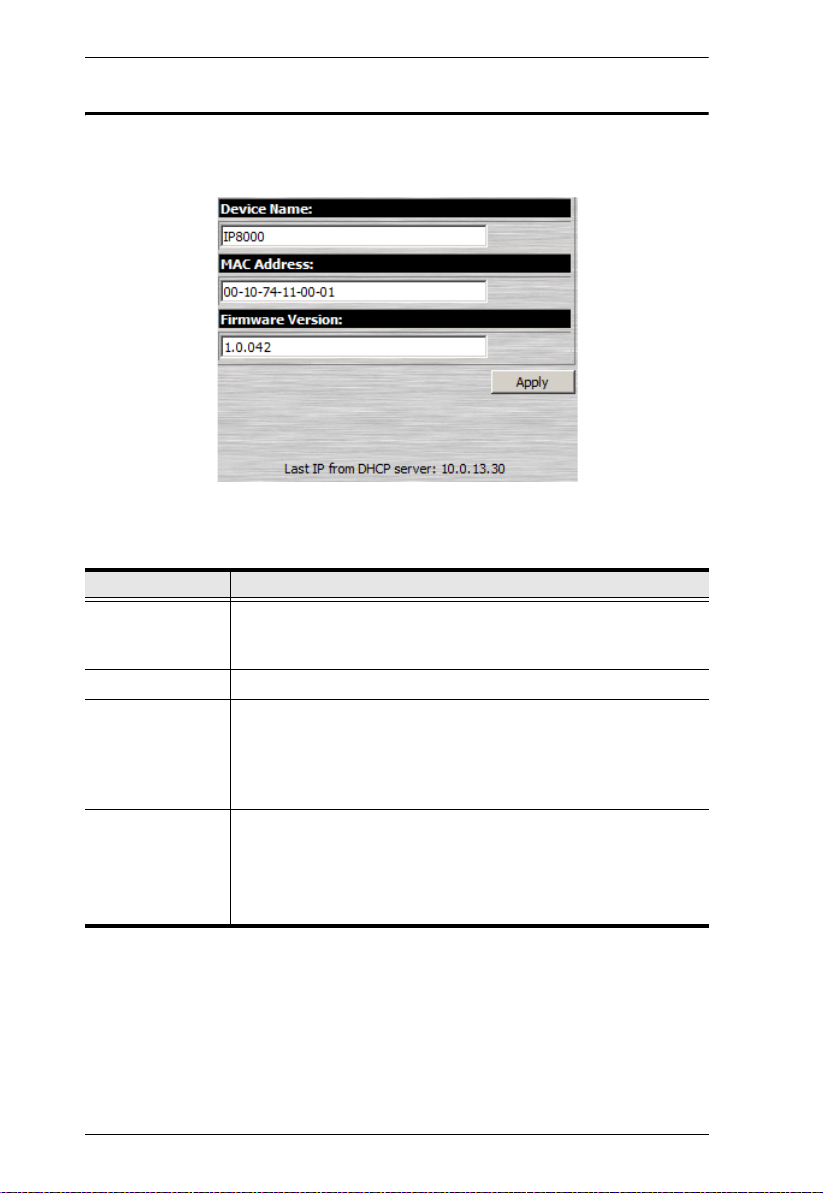
General
The General page is the first of the Administration pages, and provides
information about the IP8000's status.
An explanation of each of the screen items is given in the table below:
Item Explanation
Device Name: To make it easier to manage installations that have more than one
IP8000, each one can be given a name. To assign a name for the
IP8000, key in one of your choosing here (16 characters max.).
MAC Address: The IP8000's MAC Address displays here.
Firmware Version: Indicates the IP8000's current firmware version level. New
Last IP from
DHCP Server
versions of the IP8000's firmware can be downloaded from our
website as they become available (see Firmware, page 31). You
can reference this number to see if there are newer versions
available on the website.
If the IP8000 is on a network that uses DHCP assigned IP
addresses, this item is a convenient way of ascertaining what its
IP address is, in order to inform the Users which IP to use when
they log in.
Note: If the switch has a fixed IP address, this item doesn’t appear.
18
Chapter 4. Administration
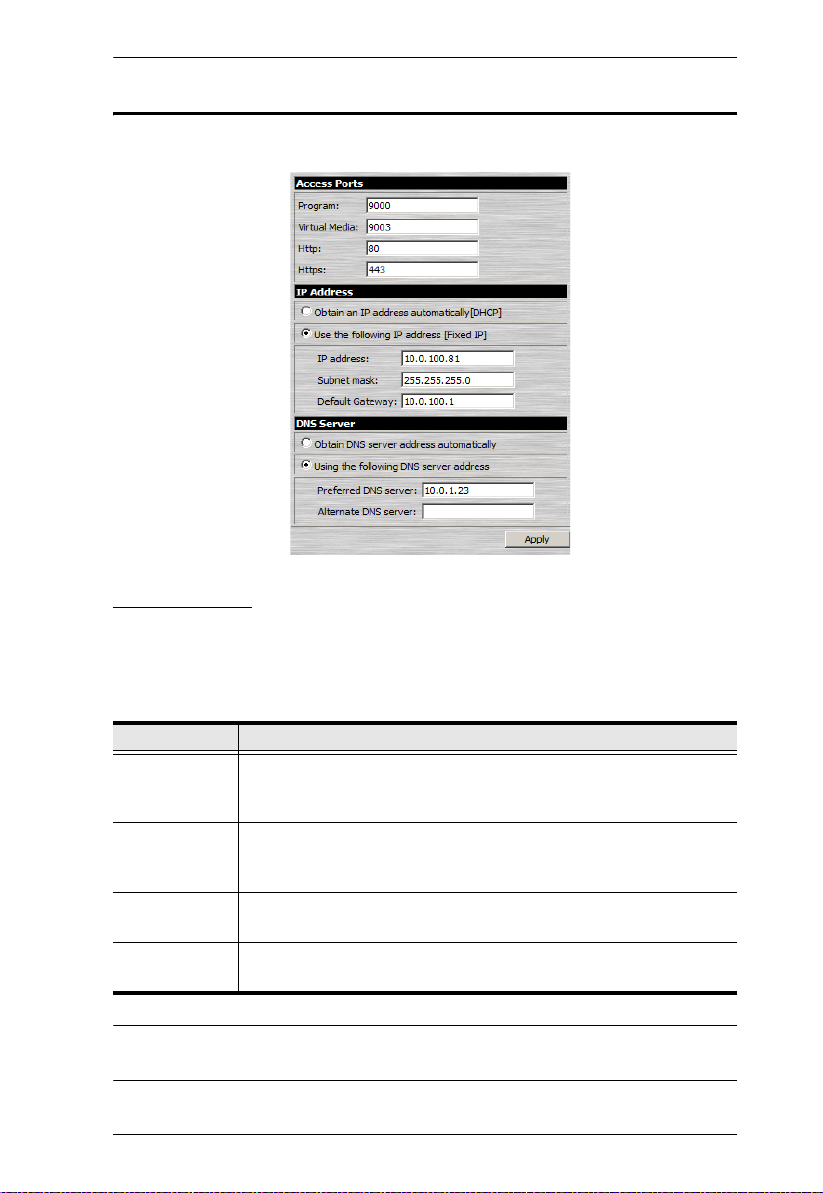
Network
The Network dialog is used to specify the IP8000's network environment.
Access Ports
If a firewall is being used, the Administrator can specify the port numbers that
the firewall will allow. Users must specify the port number as part of the IP
address If an invalid port number (or no port number) is specified, the IP8000
will not be found. An explanation of the fields is given in the table below:
Field Explanation
Program: This is the port number used for keyboard, mouse, video, and
message data transfers. Valid entries are from 1024–65535. The
default is 9000.
Virtual Media: This is the port number used for data transfer using the IP8000’s
virtual media feature. Valid entries are from 1024–65535. The default
is 9003.
HTTP: The port number for a browser login. V alid entries are from 1–65535.
The default is 80.
HTTPs: The port number for a secure browser login. Valid entries are from
1–65535. The default is 443.
Note: The access ports cannot have the same value. You must set a different
value for each one.
19

IP8000 User Manual
IP Address
The IP8000 can either have its IP address assigned dynamically at bootup
(DHCP), or it can be given a fixed IP address.
For dynamic IP address assignment, select the Obtain an IP address
automatically, radio button.
Note: If the IP8000 is on a network that uses DHCP to assign network
addresses, and you need to ascertain its IP address, see IP Address
Determination, page 83, for information.
To specify a fixed IP address, select the Set IP address manually, radio
button and fill in the IP address.
DNS Server
The IP8000 can either have its DNS server address assigned automatically, or
a fixed address can be specified.
For automatic address assignment, select the Obtain DNS server address
automatically, radio button.
To specify a fixed address, select the Use the following DNS server
address, radio button and fill in the required information.
Note: Specifying the Primary DNS Server address is required; the
Alternate DNS Server address is optional.
Finishing Up
After making any network changes, be sure Reset on exit on the Customization
page (see Customization, page 29) has been enabled (there is a check in the
checkbox), before logging out. This allows network changes to take effect
without having to power the IP8000 off and on.
20
 Loading...