

Page 1
ATD-7563
UNIVERSAL STRUT SPRING COMPRESSOR
Operation and Safety Instructions
CAUTION:
Carefully read through this entire operator’s manual before using your tool.
Pay close attention to the Rules for safety operation, warnings, and cautions.
If you use your tool properly and only for what it is intended for, you will enjoy
years of safe, reliable service.
SAVE THIS MANUAL FOR FUTURE REFERENCE
Section Page
• General safety rules -------------------------------------------------- 2
• Operating Instructions ----------------------------------------------- 3 - 4
• Replacement parts----------------------------------------------------- 5
‐1‐
Page 2

General Safety Rules
WARNING: When using this tool, basic safety precautions should always be followed to reduce the
risk of personal injury and damage to equipment. Read all warnings and instructions before using
this tool .
• Always wear ANSI approved safety goggles and ear protection when working with tools and
equipment.
• Observe work area conditions. Keep work are a clean. C luttered areas invite injuries. Do n ot use
tool in damp or wet locations. Don't expose tool to rain. Keep work area well lighted.
• Keep children away from work area. Do not let them handle tool.
• When not in use, tool must be stored in a dry location to inhibit rust. Always lock up tool and
keep it out of the reach of children.
• Do not force tool. It will do t he job bet ter and m ore saf ely at t he rate f or which it was int ended.
Do not use inappropriate attachments in an attempt to exceed the tool capacity.
• Use the right tool for the job. Do not modify this tool and do not use this tool for a purpose for
which it was not intended.
• Dress properly. Do not wear loose clothing or jewelry as they can be caught in moving parts.
Non-skid footwear is recommended when working. Wear restrictive hair covering to contain
long hair.
• Do not overreach. Keep proper footing and balance at all times. Do not reach over or across
running tool.
• Maintain tool with care. Follow instructions for lubricating and changing accessories. Inspect
tool periodically and, if damaged, have them repaired by an authorized technician or replaced.
• Do not operate any tool when you are tired or under the influence of alcohol or drugs. Read
warning labels on prescriptions to determine if your judgment or reflexes are impaired while
taking drugs. If there is any doubt, do not operate the tool.
• Ch eck for dam aged parts. B efore usin g any tool , any part th at appears to be damag ed should
be carefully checked to determine that it will operate properly and perform its intended function.
Any part that is damaged should be properly repaired or replaced.
• When servicing, use only identical replacement parts. Use of any other parts will void the
warranty. Only use accessories intended for use with this tool.
• Maintenance. For your safety, service and maintenance should be performed regularly by a
qualified technician.
NOTE: The warnings and cautions discussed in this instruction manual cannot cover all possible
conditions and situations that may occur. It must be understood by the operator that common sense
and caution are factors which cannot be built into this product, but must be supplied by the operator.
‐2‐
Page 3

Operating Instructions
Removal
Important: Keep the actuating screw well lubricated.
1. Refer to the vehicle service manual, and follow the manufacturer's recommended procedure to
remove the Macpherson strut assembly from the vehicle.
2. Once removed, clamp the strut assembly in a vise.
3. Mark the coil spring in relation to the lower strut platform and top mo unt. This w ill a id in the co rre ct
positioning for installation.
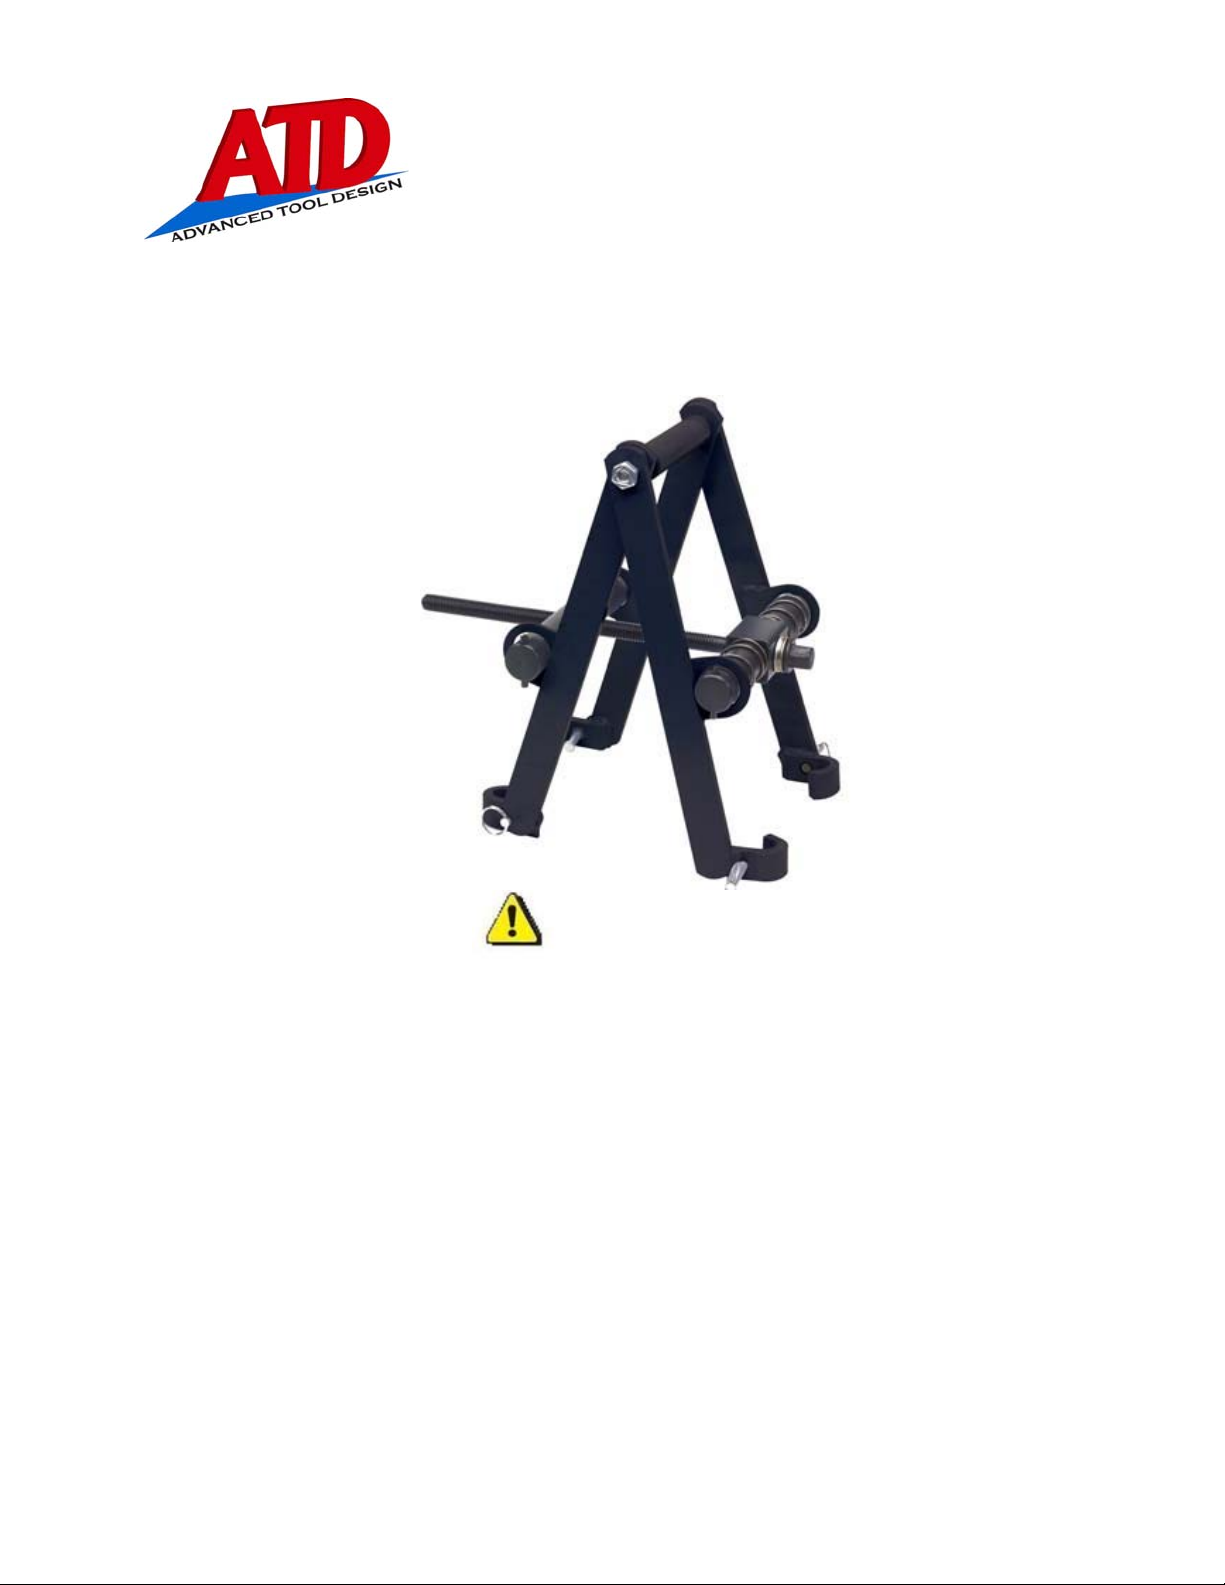
4. Place two hooks around the coil as close to the top of the spring as possible.
Note: The 3/4" hex on the forcing screw should be up. Place the other two hooks as close to the
bottom of the spring as possible. Push in the four retaining pins. (See Figure 1.)
5. Using an impact wrench or ratchet with a 3/4" socket on the actuating screw, compress the spring
only until it is loose in the spring mount.
WARNING: DO NOT EXCEED 30 FT. LBS. OF TORQUE ON THE ACTUATING SCREW.
Compressing the spring too far will cause premature tool failure that can result in severe
personal injury. Compress the spring only until it is loose in the spring mount.
6. Remove the piston rod nut. Carefully store the tool and spring assembly in a place where it cannot
roll off a bench or be dropped.
7. Remove th e old strut. Compare the old strut with the new one to be sure you are installing t he
correct strut. Dispose of the old strut.
‐3‐
Page 4

Spring Replacement
1. Place the tool and spring assembly on a workbench. Using a ratchet or impact wrench, SLOWLY
AND CAREFULLY decompress the spring.
2. Remove the old spring from the strut tool. Install the new spring in the tool so that a maximum
number of coils can be grabbed by the tool without interfering with the spring tip placement in the
mounting plates.
3. Compress the spring, and follow the instructions for Installation that follow.
Installation
1. Position the compressed spring assembly back in place. Align the lower spring tip in its receptacle
in the lower platform.
2. Replace the top mount.
3. Attach the piston rod nut, and torque it to the specifications listed in the vehicle service manual.
4. Check the alignment of both spring coil tips to the mounting platforms. Decompress the spring.
5. Refer to the vehicle service manual, and follow the manufacturer's recommended procedure to
reinstall the Macpherson strut assembly.
‐4‐
Page 5

‐5‐
 Loading...