

Page 1

ATD-10802
4.8V CORDLESS SCREWDRIVER W/PISTOL
GRIP & 100 BITS
Introduction
For correct usage, read these instructions carefully and keep in a safe place for future
reference.
GENERAL SAFETY RULES
Failure to follow all instruction liste d blew, may result in electric shock, fire and/or serious
personal injury.
Work Area
1. To prevent accidents, keep your work area clean and well lit.
2. Do not operate power tools in explosive atmospheres, such as in the presence of flammable
liquids, gases, or dust. Power tools create sparks, which could ignite dust or fumes.
3. Keep bystanders, children and visitors away while opera ting a power tool. Distractions can
cause you to lose control.
Electrical Safety
1. Never carry the tool by the power cord and keep the cable away from heat, oil, sharp edges,
or moving parts. If the power cord is damaged, replace it immediately to prevent the risk of
fire.
2. The battery must only be recharged with the charger included. A charger that may be
suitable for one type of battery may create a risk of fire when used with another battery.
Personal Safety
1. Stay alert and use extreme caution when operating a power tool. Do not use any tool while
tired or under the influence of drugs, alcohol, or medication. A moment of carelessness while
operating any power tool can result in serious personal injury.
2. To reduce the risk of injury, never wear loose fitting clothing or je welry when operating the
tool and keep your hands from the moving parts. If you have long hair keep it tied back.
3. To avoid accidental start up make sure the safety switch is in the locked position before
inserting the battery.
Page 2
4. To maintain full control of the tool, do not overreach and keep your weight evenly balanced
over both feet.
5. Always use suitable safety equipment including eye protection, dust mask, non-slip safety
shoes, and ear protection.
Tool Use and Care
1. Use clamps to secure and support the work piece to stable platform. Holding the work piece
by hand or against your body is unstable and may lead to lose of control.
2. Only use the tool for the purpose for which it was intended and never use force.
3. If the ON/OFF switch is faulty do not use the tool and take it to your local repair facility for
repair.
4. When not in use store the tool out of reach of children.
5. Check th e tool regularly for signs of damage and if repair is needed take it to your local
repair facility.
6. Use only accessories that are recommended by the manufacturer for your mod el.
Accessories that may be suitable for one tool may create a risk of injury whe n us ed on
another tool.
Service
1. Tool service must be performed by your repair facility. Service or maintenance performed by
an unqualified person could result in a risk of injury.
2. When servicing a tool, use only identical replacement parts. Follow instructions in the
maintenance section of this manual. Use of unauthorized parts or failure to follow
maintenance instructions may result in electric shock or injury.
SPECIFIC SAFETY RULES
1. Keep hands clear of moving parts.
2. Do not touch moving parts. Allow the power tool accessories (bits and sockets etc) to cool
before touching them. They can become extremely hot during use and can burn your skin.
3. Always wear protective safety glasses when operating power tools and a face mask when
the environment is dusty.
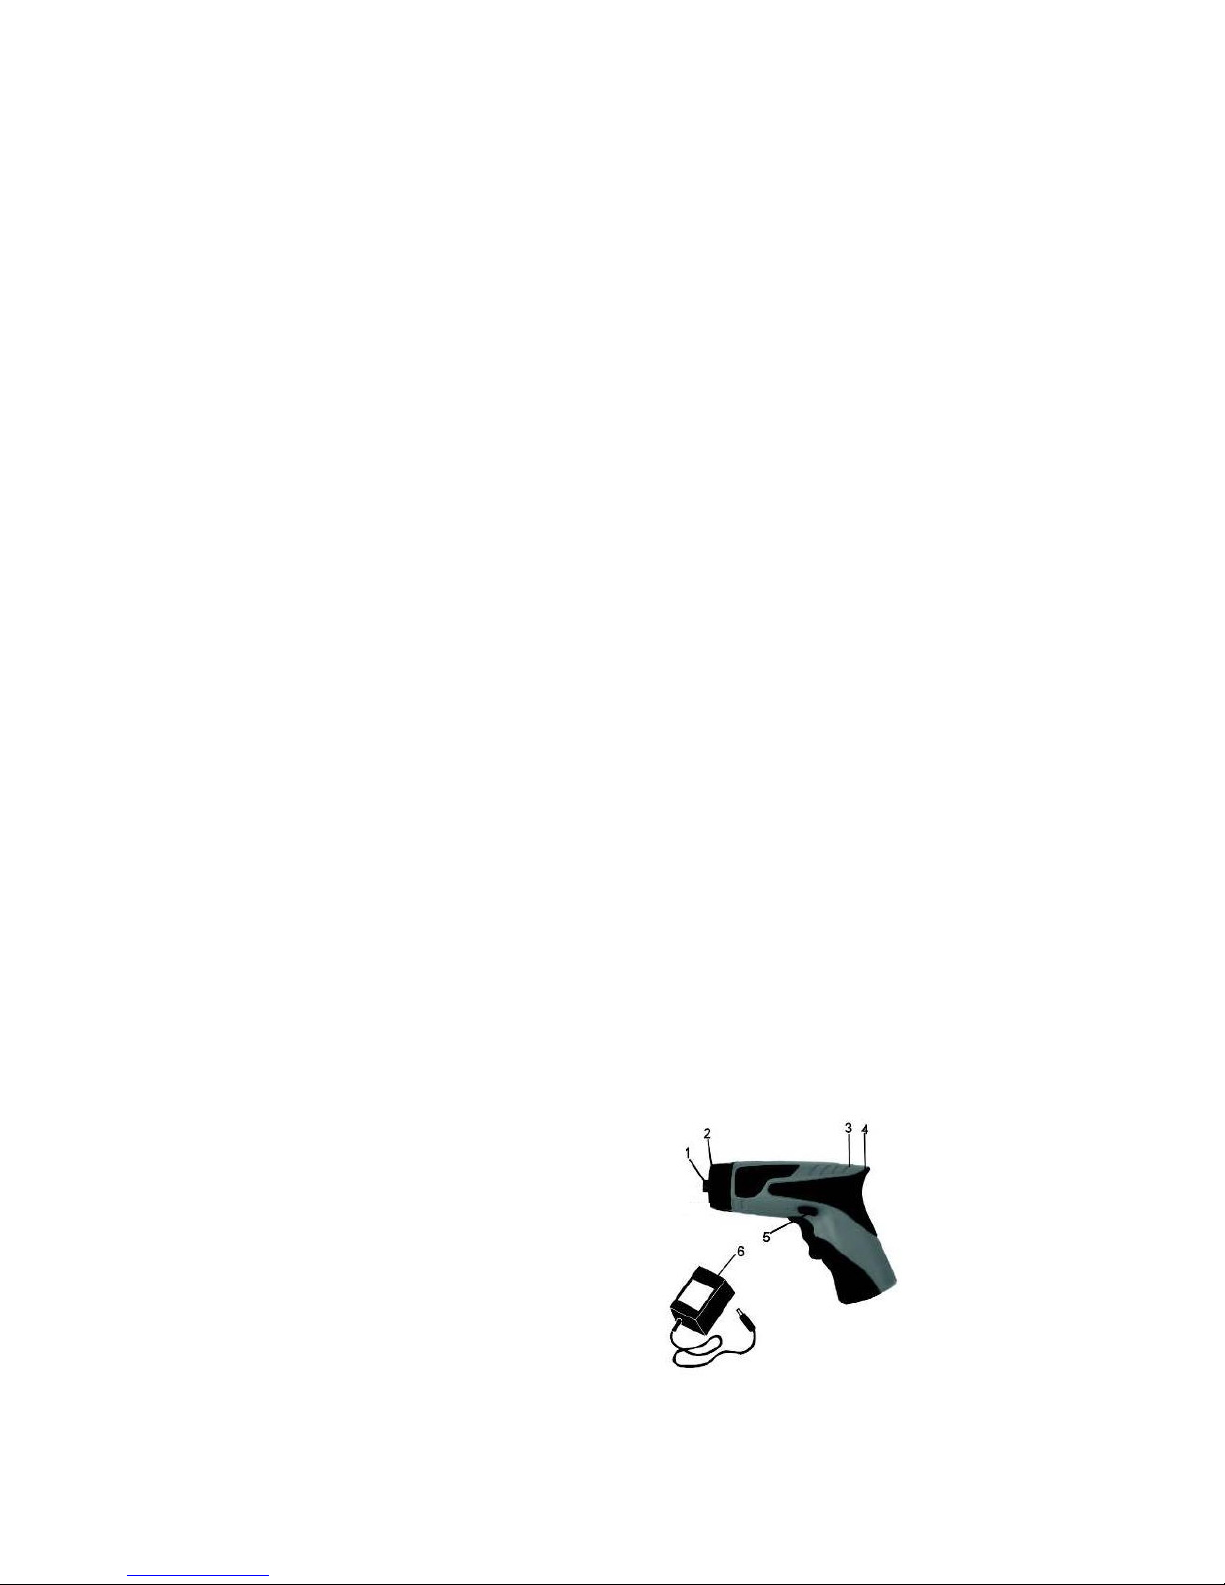
Controls and Components:
Pistol Driver:
1. Keyless chuck
2. Worklight
3. LED Battery indicator lights
4. LED Battery level indicator button
5. Forward/Reverse switch
Accessories:
6. AC adaptor
Page 3

Charging the battery:
1. Place the tool on a clean dry surface within 3 feet (1 meter) of a plug point.
2. Insert AC adaptor into the charging port located on the back of the unit.
3. Plug the AC adapt or into the power supply.
4. Allow 5 to 7 hours for the battery to fully charge.
5. When the battery has fully charged disconnect the charger from the power supply.
6. The LED battery level indicator tells you the amount of charge that you have on the battery.
7. When all 3 lights (RED, YELLOW and GREEN) are illuminated, the battery is functioning at
full capacity.
8. When 2 lights (YELLOW and RED) are illuminated, this indicates that the battery capacity is
beginning to diminish.
9. When only 1 light (RED light) is illuminated, this indicates that the battery capacity is low and
the unit needs to be charged.
Operation:
1. Hold the tool firmly with both bands and insert the bit until it snaps into place.
2. Start the tool by squeezing the Forward/Reverse trigger switch. Press the top of the switch
to turn the screw FORWARD. Press the bottom of the switch to REVERSE the screw.
3. To turn the worklight on, slide the worklight ON/OFF switch forward to the ON ( ) position.
Slide the switch back to the (
) position to turn the light OFF.
Screwdriver does not work?
· Press the LED battery level indicator and make sure that the unit is fully charged.
Maintenance:
·Use only mild soap and a damp cloth to clean the tool.
·Do not allow any liquids to get inside the tool.
·Do not immerse any part of the tool in liquids.
SPECIFICATIONS:
Voltage 4.8 Volts (DC)
Torque 3.8N.m
Speed (No load) 180min
AC Adaptor 1pc
Input 120Volts/60Hz
Output 6Volts (DC)/300mA
Charging Time 5 to 7 hours (max.10hours)
Page 4

 Loading...