

Page 1

R3(s)IP Phone User Manual
Version: 1.0
2015-05-25
Page 2

R3(S) IP Phone User Manual
ATCOM TECHNOLOGY CO., LIMITED www.atcom.cn2
Content
Contact ATCOM ............................................................................. 5
1、Overview of R3(s) ...................................................................... 6
1.1、Interface ............................................................................ 7
1.2、Hardware ............................................................................. 7
1.3、Software ............................................................................. 7
1.4、Network .............................................................................. 8
1.5、Management and Maintenance ........................................................... 8
1.6、Protocol ............................................................................. 8
1.7、Compliant and Certified Standard ..................................................... 9
1.8、Packing list ......................................................................... 9
1.9、Installation ........................................................................ 10
2、Keypad of IP Phone .................................................................... 14
2.1Describe of the buttons and Screen .................................................... 14
2.2 Line keys LED ........................................................................ 16
2.3 Status Indicator ..................................................................... 16
2.4 Momery keys LED ...................................................................... 16
2.5 LCD screen icons ..................................................................... 16
3、Call Function ......................................................................... 18
3.1、Answer the calls .................................................................... 18
3.2、Make Calls .......................................................................... 19
3.3、Pre-dial ............................................................................ 20
3.4、Multiple line dial-up ............................................................... 20
3.5、Call Hold ........................................................................... 21
Page 3

R3(S) IP Phone User Manual
ATCOM TECHNOLOGY CO., LIMITED www.atcom.cn3
3.6、Call Transfer ....................................................................... 21
3.7、Mute calls .......................................................................... 22
3.8、3-Way Conference .................................................................... 23
3.9、Hang up the phone ................................................................... 23
3.10、Voicemail .......................................................................... 24
4、Keypad and GUI ........................................................................ 24
4.1、Starting ............................................................................ 24
4.2、Standby ............................................................................. 25
4.3、Configuration ....................................................................... 27
4.3.1、Status info ................................................................... 28
4.3.2、Call Features ................................................................. 30
4.3.3、Directory ..................................................................... 46
4.3.4、History ....................................................................... 52
4.3.5、Message ....................................................................... 55
4.3.6、Settings ...................................................................... 57
4.3.7、Display ....................................................................... 73
5、Advanced Feature ...................................................................... 75
5.1、Codecs .............................................................................. 75
5.2、Capture and Upgrading ............................................................... 75
5.3、Auto Upgrade ........................................................................ 76
5.4、Export & Import configuration file .................................................. 78
5.4.1、Export configuration file ..................................................... 79
5.4.2、Import configuration file ..................................................... 80
5.5、Export System log ................................................................... 80
Page 4

R3(S) IP Phone User Manual
ATCOM TECHNOLOGY CO., LIMITED www.atcom.cn4
5.6、Dial plan ........................................................................... 80
5.6.1、Replace Rule .................................................................. 81
5.6.2、Dial-now ...................................................................... 82
5.6.3、Area Code ..................................................................... 84
5.6.4、Block Out ..................................................................... 84
6、FAQ ................................................................................... 86
6.1、How to reset to factory ............................................................. 86
6.2、Upgrade the firmware on safe mode ................................................... 87
6.3、How to make IP Peer to Peer call .................................................... 87
7、Troubleshooting ....................................................................... 88
7.1、The phone is failed to register to SIP server ....................................... 88
7.2、The phone is failed to gain IP address .............................................. 88
7.3、Only one party can hear from another on calling ..................................... 88
8、Abbreviation .......................................................................... 89
Page 5

R3(S) IP Phone User Manual
ATCOM TECHNOLOGY CO., LIMITED www.atcom.cn5
Contact ATCOM
Overview of ATCOM
ATCOM is the leading VoIP hardware manufacturer in global market. We have been keeping
innovating with customer’s needs oriented , working with partners to establish a total solution
for SMB VoIP with IP phone , IP PBX and Asterisk cards.
With over 10 years’ experience of R&D , manufacturing and service in network and VoIP
filed;mission of creating the biggest value for IP terminals , we commit ourselves in supplying
the competitive IP phone and other terminals for IP PBX , softswitch , IMS , NGN providers and
carriers; supplying the competitive total VoIP solution for SMB market. We keep improving the
customer’s experience and creating the bigger value with our reliable products. Until now, our
VoIP products have been available in 100+ countries and used by millions of end users.
Contact Sales
Address
Area C, A2F , Block 3 ,Huangguan Technology Park , #21
Tairan 9th Rd, Chegongmiao , Futian District , Shenzhen China
Tel
+ (86) 755
-
83018618
-
8806
Fax
+ (86) 755
-
83018319
E-
mail
sales@atcomemail.com
Contact Technical Support
Tel
+ (86) 755
-
83018618
-
8008
E-
mail
Support@atcomemail.com
Website Address:http://www.atcom.cn/
Download Center: http://www.atcom.cn/download.html
Page 6
R3(S) IP Phone User Manual
ATCOM TECHNOLOGY CO., LIMITED www.atcom.cn6
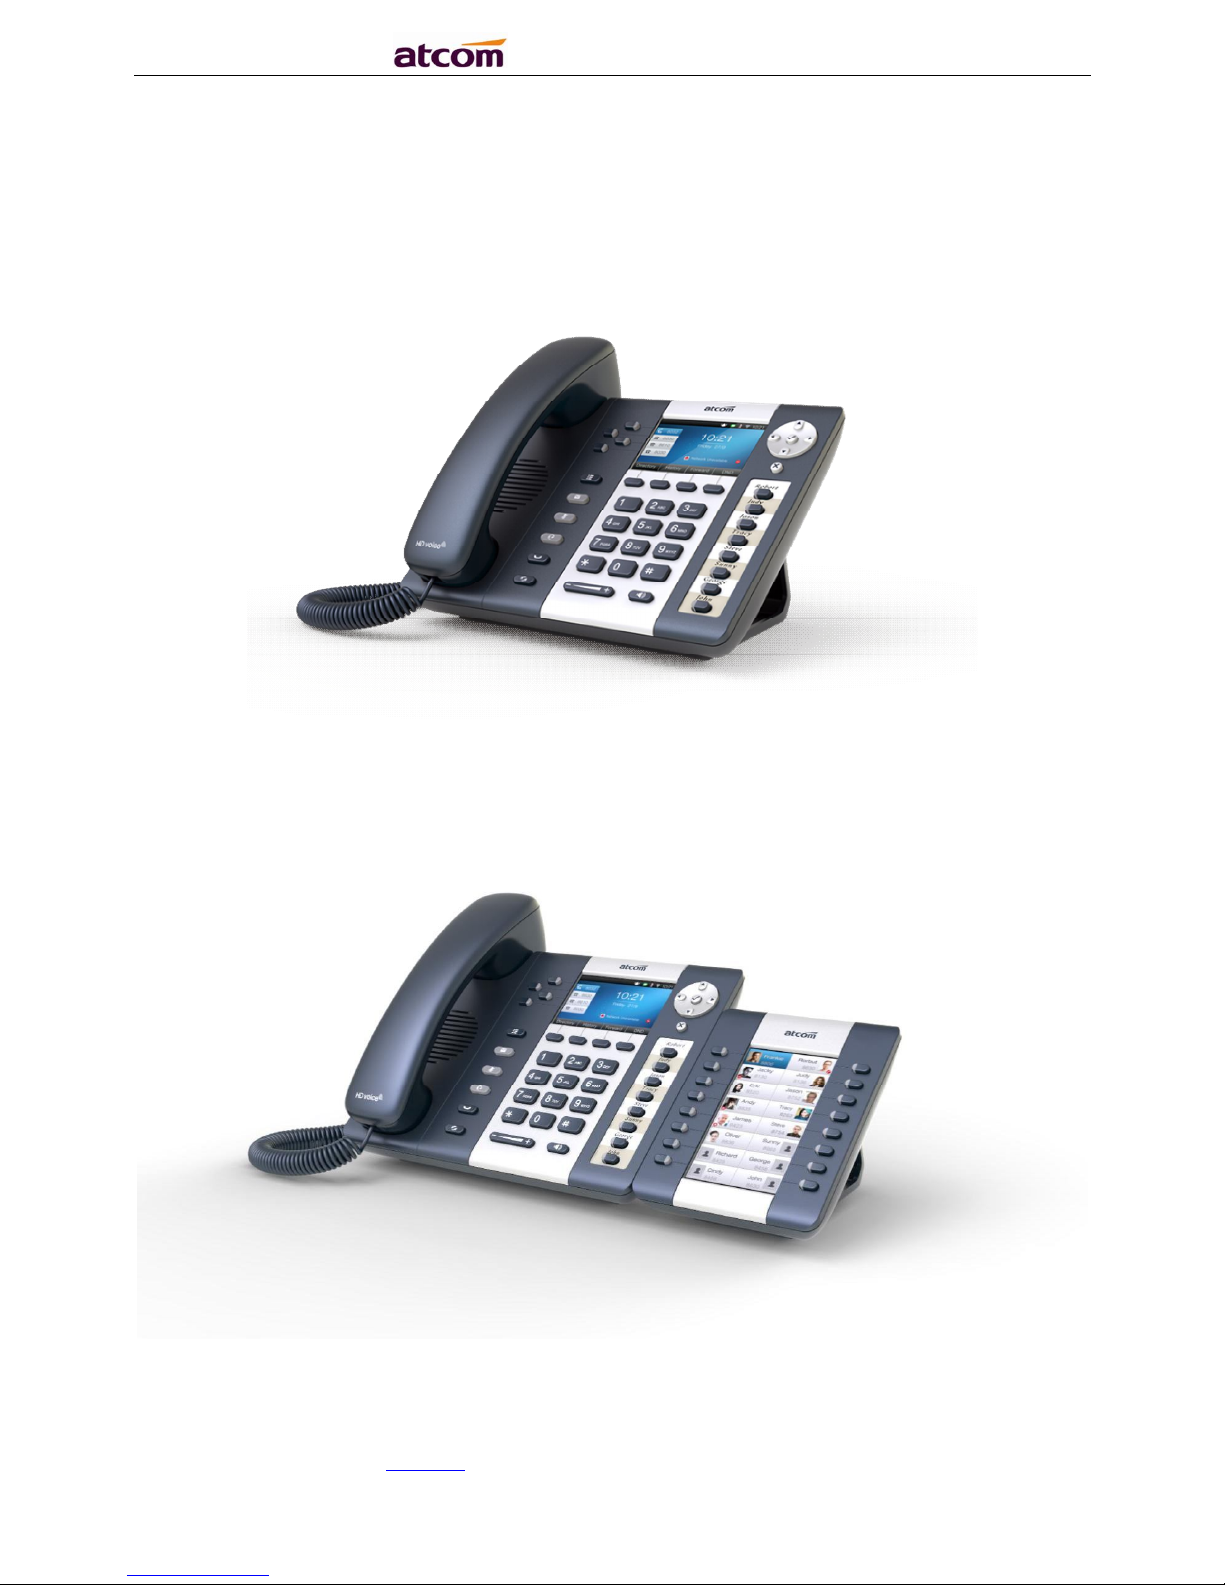
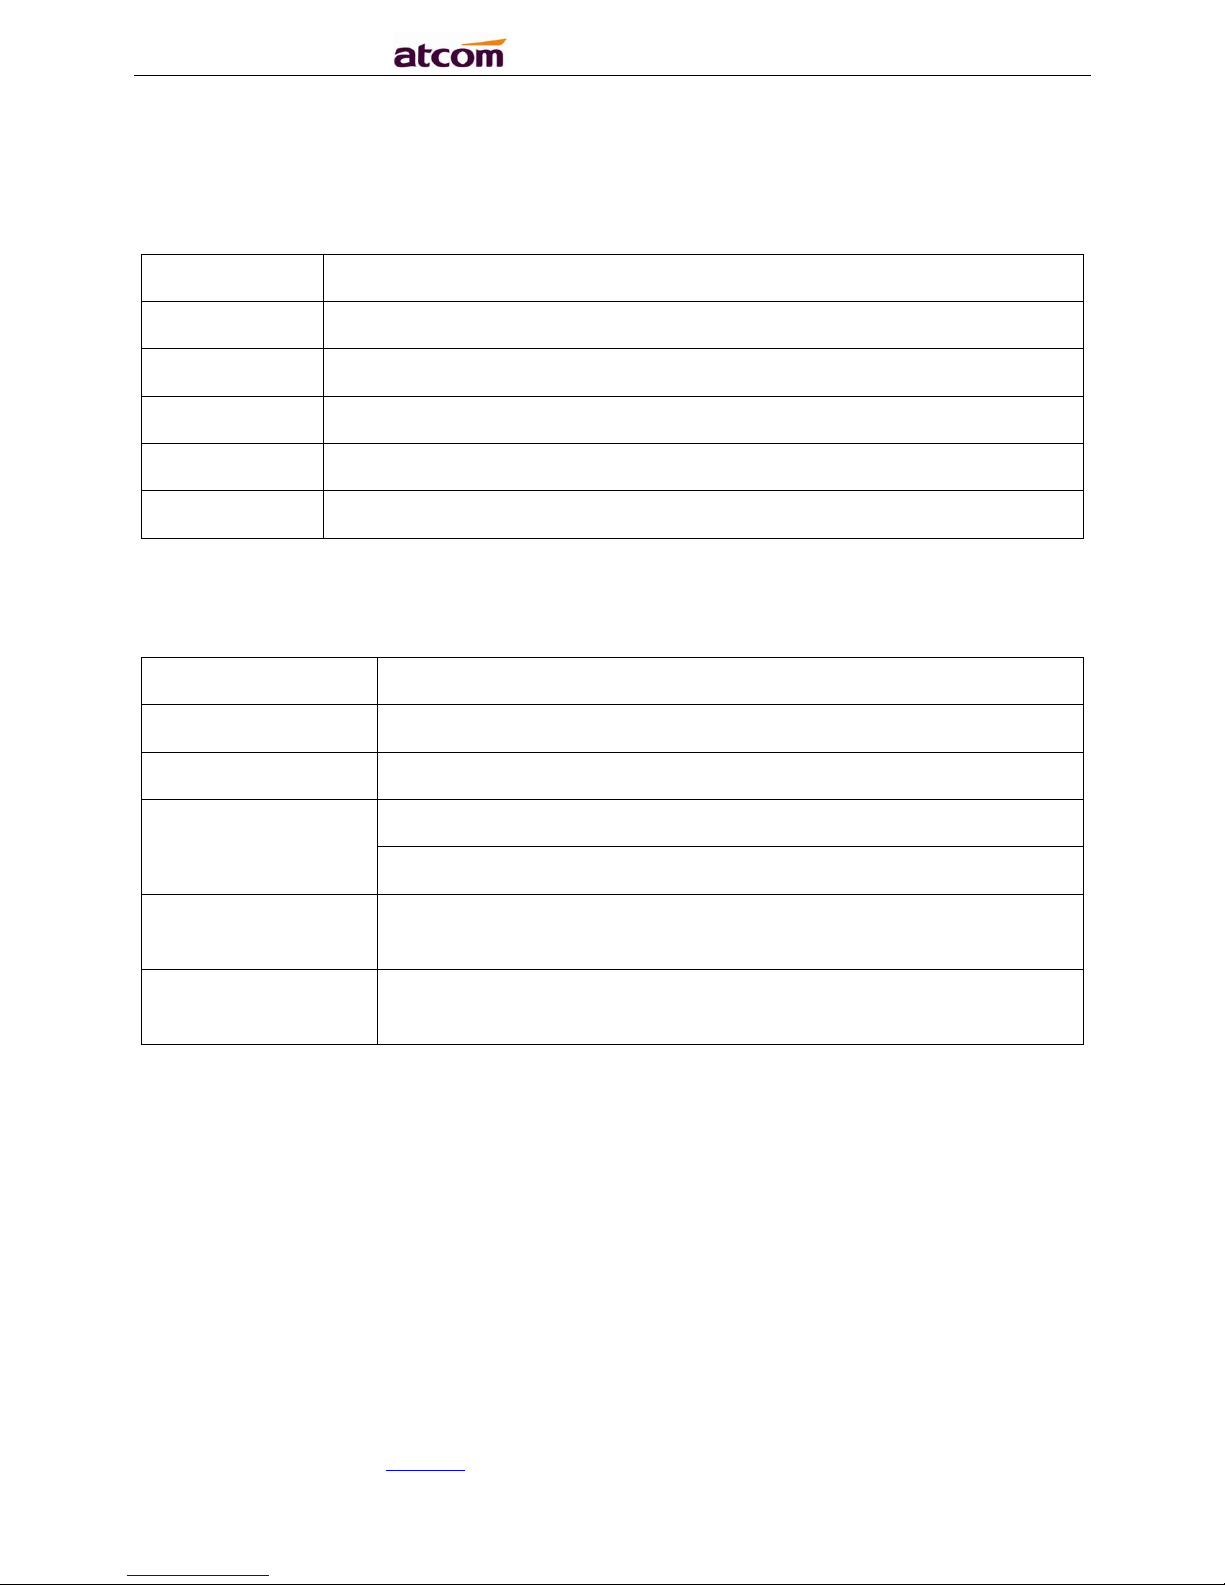
1、Overview of R3(s)
R3(s)
R3(s)with Rainbow ET
Page 7
R3(S) IP Phone User Manual
ATCOM TECHNOLOGY CO., LIMITED www.atcom.cn7
1.1、Interface
Power Input
DC 5V
-
2000mA or PoE
LAN Port
RJ45
PC
Port
RJ45
EXPAN Port
RJ45
Headset Jack
RJ9
Handset Jack
RJ9
1.2、Hardware
LCD
461*278 4.3
” TFT
FLASH
64M RAM
64M
CPU
R3 262MHz Dual
-
Core
R3s 393MHz Dual
-
Core
LED Indicator
1 Status Light , 4 line indicators, 8 BLF indicators, 1 voicemail
indicator, 1 headset indicator, 1 mute indicator
Rainbow ET
Expansion Module
44 programmable keys on each Rainbow ET.
1.3、Software
Sip 2.0 (RFC3261) and other related SIP RFCs
4 SIP lines registration
STUN
Jitter Buffer, VAD,CNG
G.711A/u, G722, G.723, G.726-16, G.726-24, G.726-32, G.726-40, G.729, Lin16-16, iLBC
Echo Cancellation
SIP Domain name, Authentication and Backup SIP Server
DTMF(Inband, RFC2833, SIP INFO)
Page 8

R3(S) IP Phone User Manual
ATCOM TECHNOLOGY CO., LIMITED www.atcom.cn8
Call transfer, Call forward, 3-way conference, Call hold, Call back
DND(Do Not Disturb), Auto answer, Blacklists, Block Call-ID, Block Anonymous call, Dial
plan, IP call
Phone book with 200 records, 200 answered calls, 200 missed calls, 200 dialed calls
Auto update via HTTP, FTP, TFTP, PNP
Syslog
SNTP,NTP
Customized Ringtone
Daylight Saving time
VLAN, VPN
WEB access with different login level
Multi-language:English, Chinese, Farsi, French, German, Hebrew, Italian, Portuguese,
Russian, Spanish, Turkish
1.4、Network
LAN/PC:Support Bridge mode
Support VLAN
Support L2TP VPN
Support DHCP、STATIC、PPPoE
Primary/SecondaryDNS Server
Support QoS
Web access via HTTP&HTTPS
1.5、Management and Maintenance
Support safe mode and firmware updating under safe mode
Support different level user management
Configuration via web , keyboard
Support multi-language
Firmware and configuration file auto provision
Support system log
1.6、Protocol
IEEE 802.3 /802.3 u 10 Base T / 100Base TX
PPPoE: PPP over Ethernet
Page 9
R3(S) IP Phone User Manual
ATCOM TECHNOLOGY CO., LIMITED www.atcom.cn9
DHCP: Dynamic Host Configuration Protocol
SIP RFC3261, RFC3262, RFC3263, RFC3264, RFC3265, RFC2543, RFC3489, RFC3842,
RFC3515, RFC2976, RFC3428, RFC2327, RFC2782, RFC1889
TCP/IP: Transfer Control Protocol/Internet Protocol
RTP: Real-time Transport Protocol
RTCP:RTP Control Protocol
DNS: Domain Name Server
TFTP: Trivial File Transfer Protocol
HTTP:Hypertext Transfer Protocol
FTP:File Transfer Protocol
1.7、Compliant and Certified Standard
CE: AGC01180140201E2,AGC01180140202E2
Comply with ROHS in EU
Comply with ROHS in China
Operation temperature: lower than 60° C
Storage temperature: lower than 60° C
Humidity: 10 to 90% no dew
1.8、Packing list
Mod
el R3(s)
Telephone
1Unit
Handset
1Unit
Handset cable
1Unit
Stand bracket
1Unit
Power adapter
Optional
Network Cable
1 unit
,
1.5 meters
CD (User m
anu
al) 1
Unit
Rainbow ET
Optional
Page 10
R3(S) IP Phone User Manual
ATCOM TECHNOLOGY CO., LIMITED www.atcom.cn10
Headset
Optional
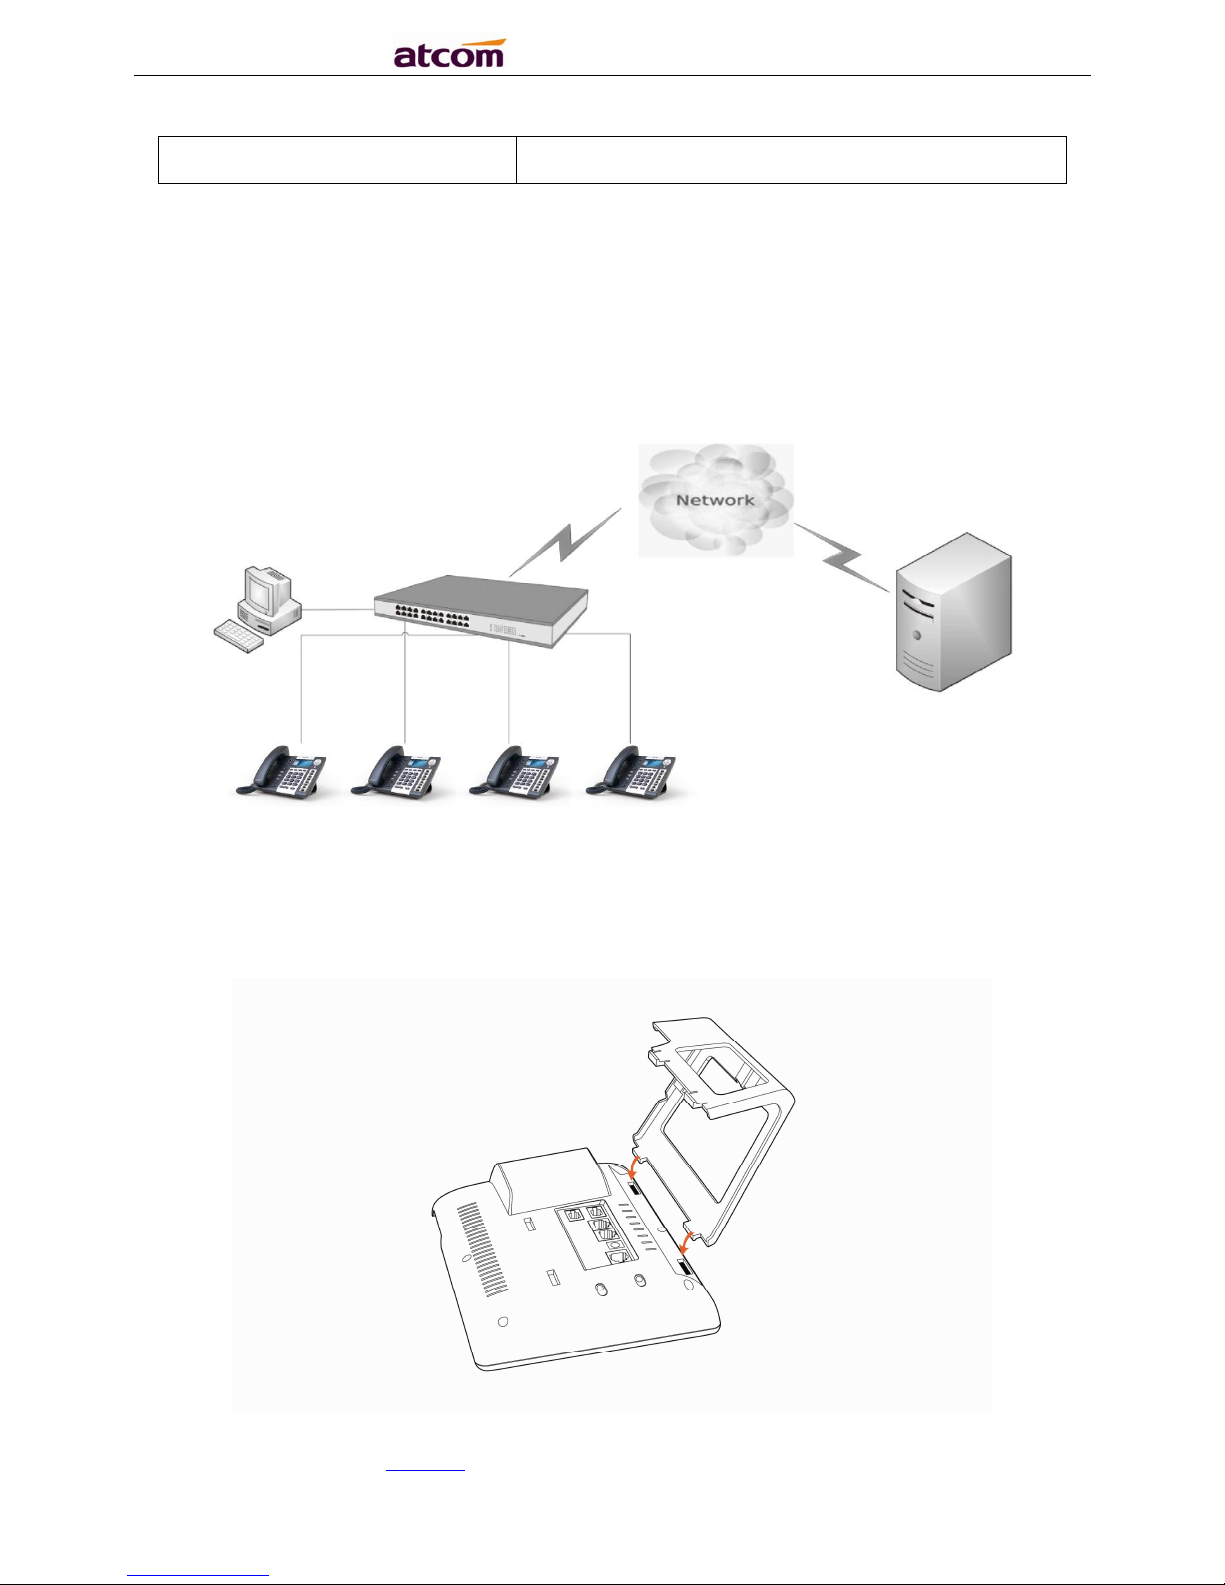
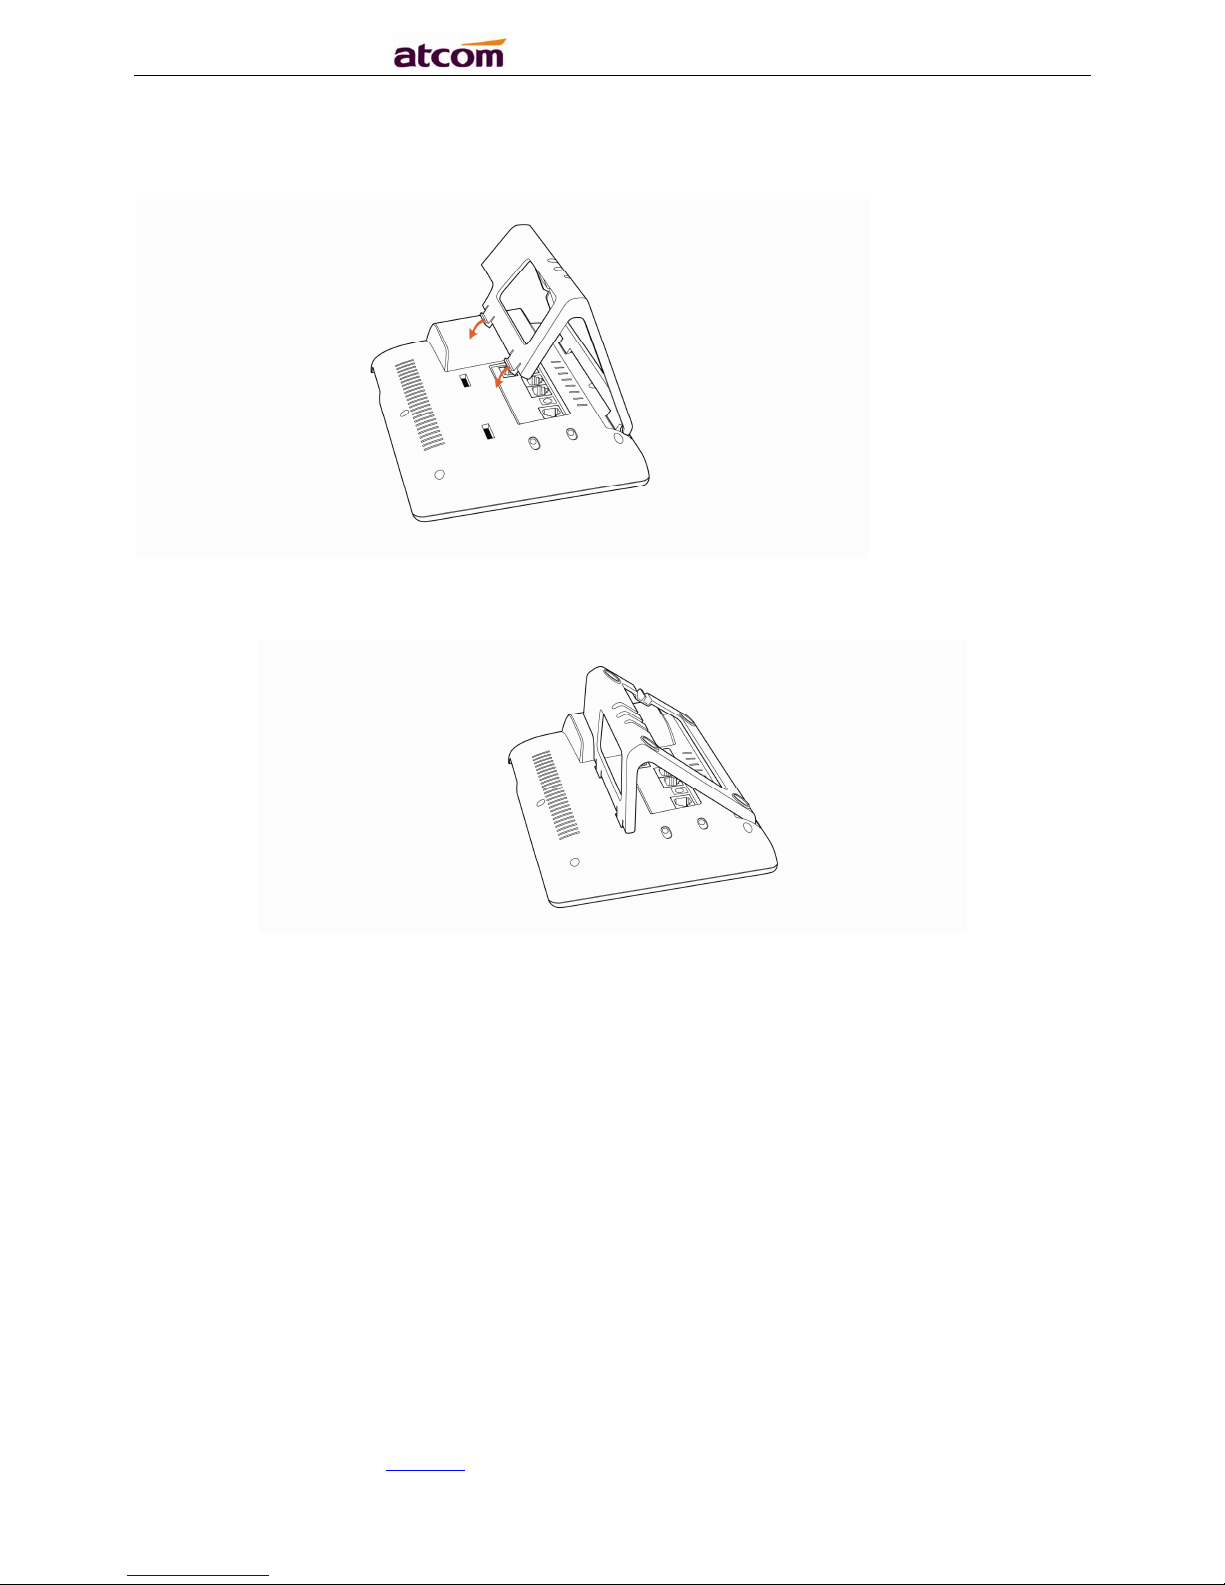
1.9、Installation
R3(s) is able to be connected with network via LAN port. Under the Bridge mode, other devices
(Laptop, IP phone) is able to access network via the PC port of R3(S).
1、Stand bracket installation instruction
A. Put the bottom side of the IP phone upside and press one-side joints of stand bracket
into the slot, please refer the picture as below:
Page 11
R3(S) IP Phone User Manual
ATCOM TECHNOLOGY CO., LIMITED www.atcom.cn11
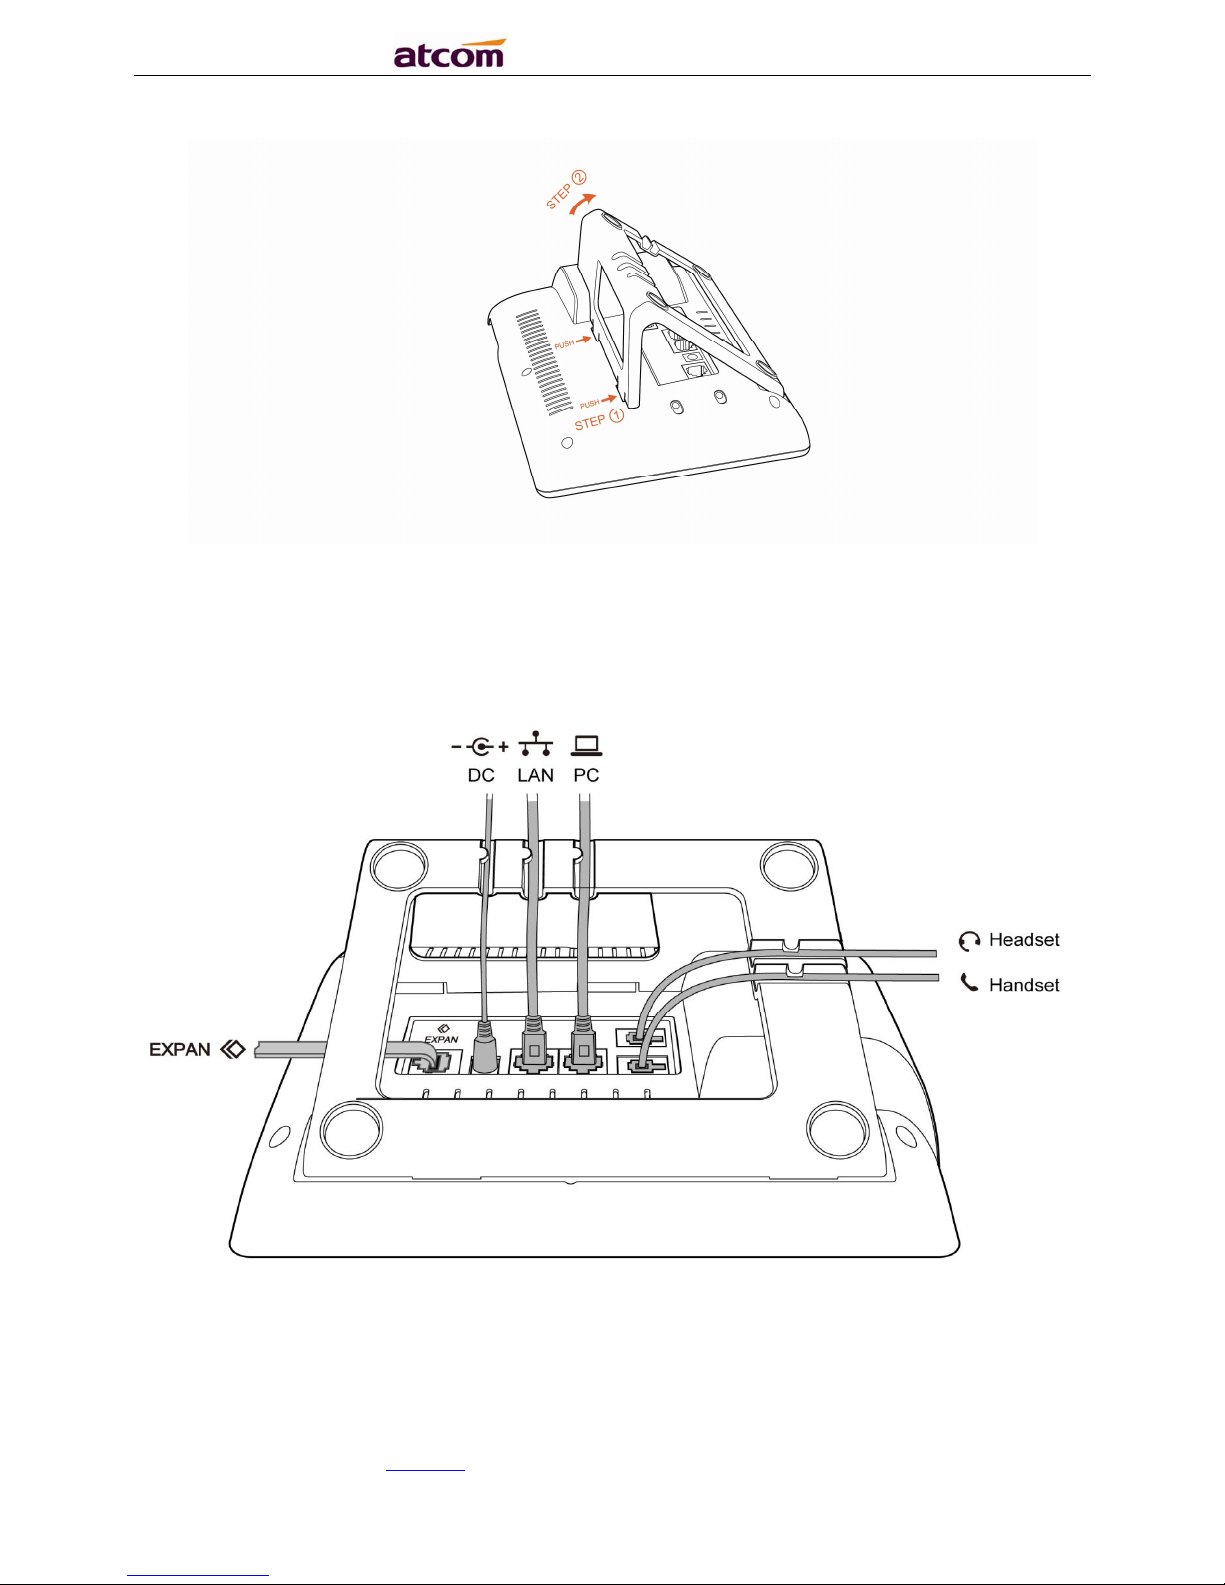
B. Press the other side joints into the slot according to the direction of the arrow:
C. It is the right picture after fixing the stand bracket below:
D. Disassemble the stand bracket:
Push the spring joint of stand and pull the stand according to the direction of the arrow. When
the joints are pulled out of the slot, you can take off the stand bracket
Page 12
R3(S) IP Phone User Manual
ATCOM TECHNOLOGY CO., LIMITED www.atcom.cn12
2、Wiring instruction
Plug in the power adapter, cable and handset or headset to the corresponding ports as below
picture and press them to the slots on the stand bracket.
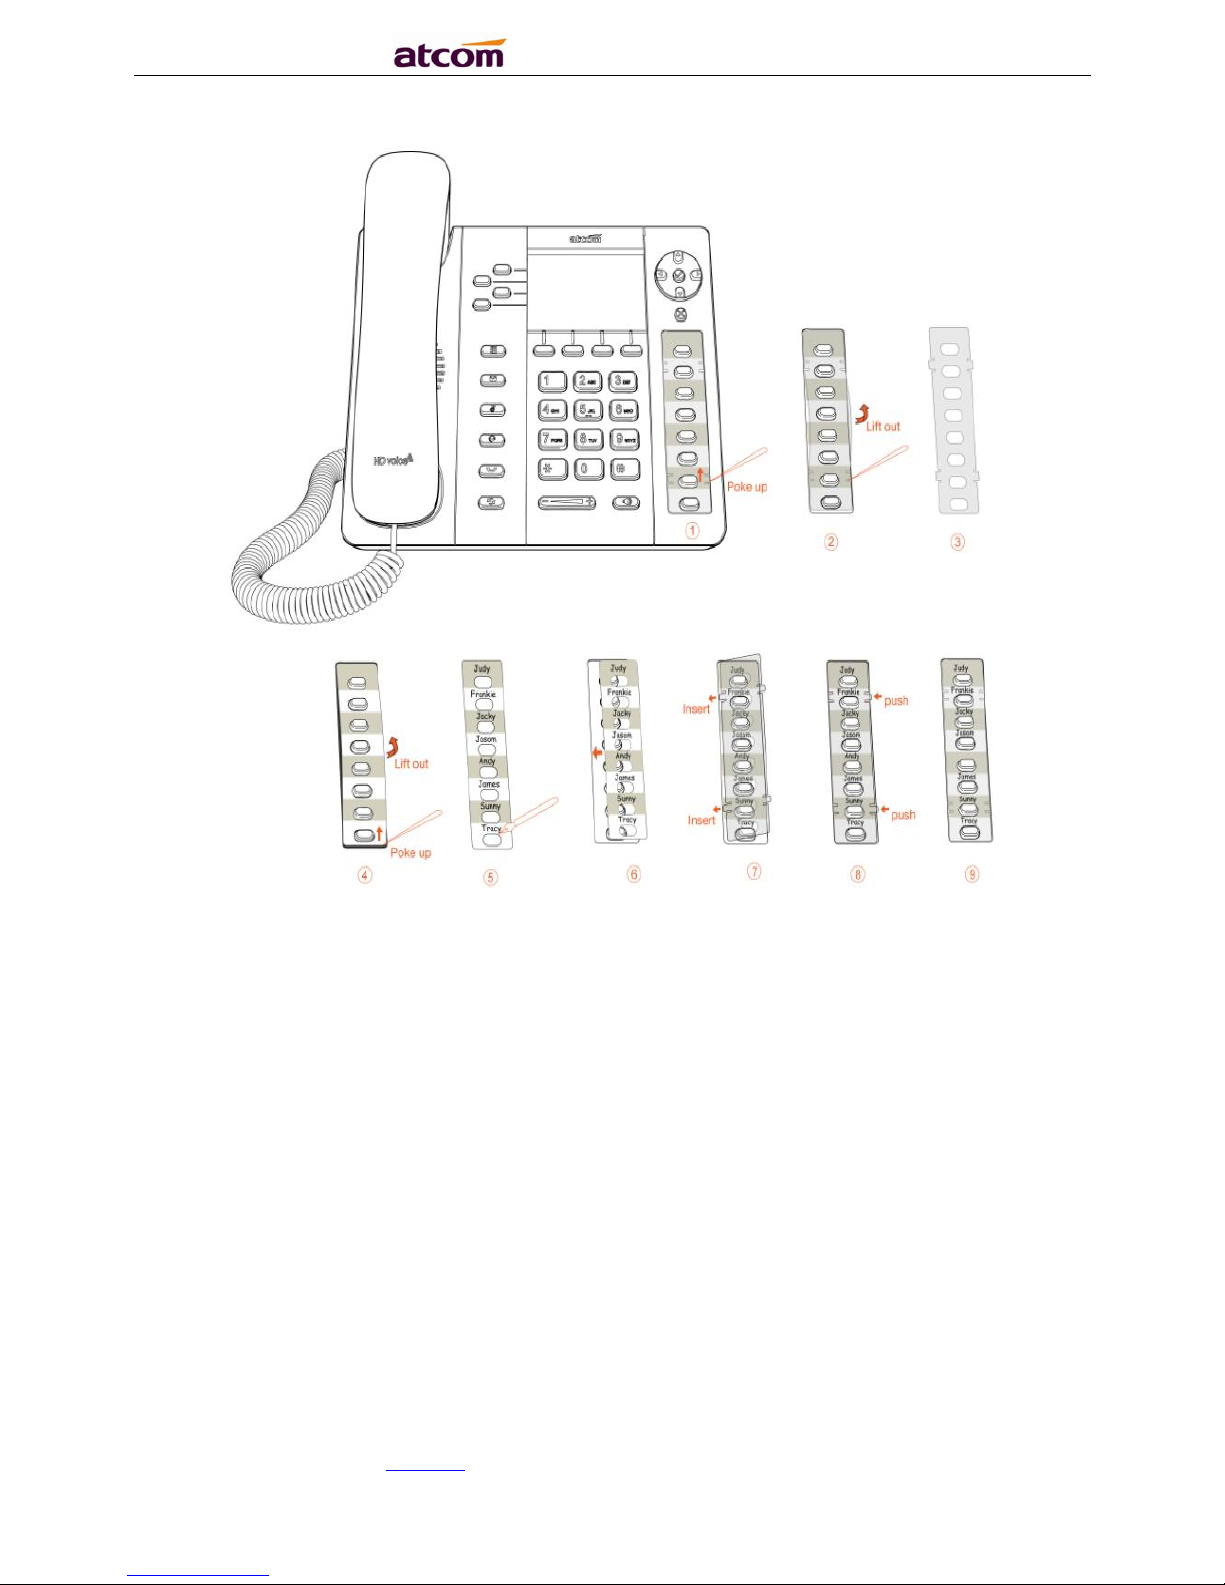
Programmable keys’ paster using instruction
Page 13
R3(S) IP Phone User Manual
ATCOM TECHNOLOGY CO., LIMITED www.atcom.cn13
Step1. Use needle or some other tools to insert into the hole of the plastic sheet, hog the
plastic sheet.
Step2. Lift out the plastic sheet
Step3. Take off the plastic sheet
Step4. Use needle or some other tools to insert into the edge of the paster, hog and lift out the
paster
Step5. Write down the identification of each programmable key on the paster after taking off
the paster
Step6. Put back the paster
Step7. Insert the plastic sheet into the slot
Step8. Push the other side of the plastic sheet into the other slot
Page 14
R3(S) IP Phone User Manual
ATCOM TECHNOLOGY CO., LIMITED www.atcom.cn14
2、Keypad of IP Phone
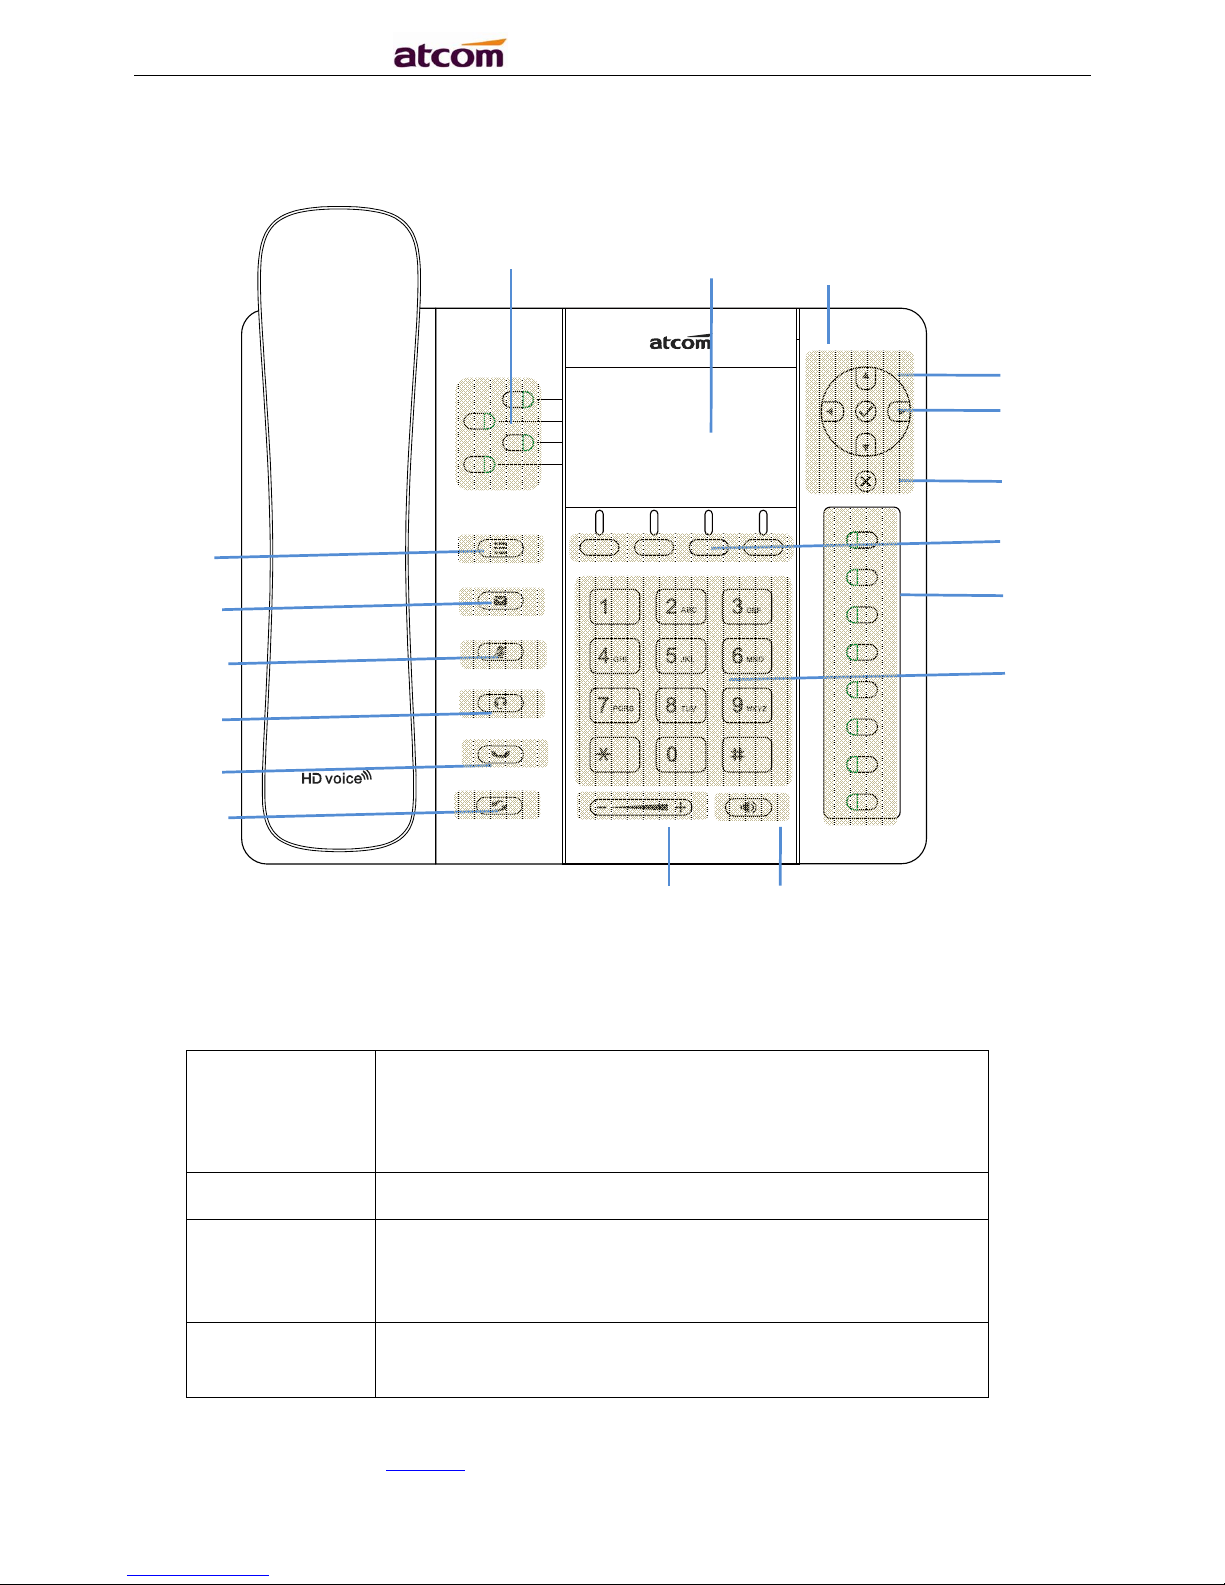
2.1Describe of the buttons and Screen
Soft Keys
Press to select a function which displayed at the softkey
zone of screen
Display all optional functions at the last line of LCD screen
Status Indicator
Indicates
the phone’
s status
. LCD Screen
All information such as date, time, phone number,
incoming caller’s ID(if available),line/call status, extension
numbers and the soft key features are displayed on it.
Line Key
Show extension status and choose corresponding line.
Long hold the line key will enter the editor interface.
Line key
LCD Status
Navigation
OK
Cancel
Soft Key
Memory Key
Dial pad
Menu
Voice Mail
Mute
Headset
Hold
Redial
Page 15
R3(S) IP Phone User Manual
ATCOM TECHNOLOGY CO., LIMITED www.atcom.cn15
Dial pad
Entering numbers or characters.
Memory
Keys
All the memory keys can be defined as BLF key, intercom,
DTMF etc. Long hold the programmable key will enter the
editor interface if the programmable key has been already
defined as the BLF/Speeddial/Intercom/Key event as pick
up, call park, DTMF etc. Short hold the programmable key
will enter the editor interface immediately if the
programmable has not been defined.
Navigation keys
Allow users to navigate(left, right, up, down). Press
can enter “Directory”. Press can enter “History”.
Confirm users’ operation
and show status when R3 is idle.
Cancel users’ operation.
Enter
menu
setti
ngs.
Adjust the volume (speaker/handset/headset/ring).
Volume level will be displayed on LCD when pressing
volume key.
Pick up and hung up
under
the speaker mode
.
Mute the mic in a conversation by pressing the Mute
button; this prevents the person on the active call from
hearing what you or someone else in the room is saying.
If the call is muted, the mute LED is lighted in red.
To un-mute, press the Mute button again.
Pick up and hung up under headset mode. The LED button
will be lighted when talking in headset mode.
Check the Voicemail status. The LED button will be lighted
when there is a new message. Long hold will enter the
editor interface to configure the voicemail number.
Hold the current call.
Redial the last
dialed number.
Page 16
R3(S) IP Phone User Manual
ATCOM TECHNOLOGY CO., LIMITED www.atcom.cn16
2.2 Line keys LED
LED Status
Description
Off The line is idle or disabled for register
Blink
in green
at 120ms off,
12
0ms on
The line has incoming call
Green
The line is talking
Blink in red at 600ms off, 600ms on
The line is held
Table1Line keys LED Status and Description
2.3 Status Indicator
LED Status
Description
On R3 is
being
start
ed Off R3 is standby
Blink in red at
120ms
on
, 120ms o
ff There is incoming call
Table2 Status Indicator LED Status and Description
2.4 Momery keys LED
LED Status
Description
Off The monitored account is unregistered
Green
The monitored account is idle
Red The monitored account
is talking
Fast
blink in red
The monitored account is ringing
Table3 Programmable keys LED Status and Description
When powering on, all LEDs will be lighted once.
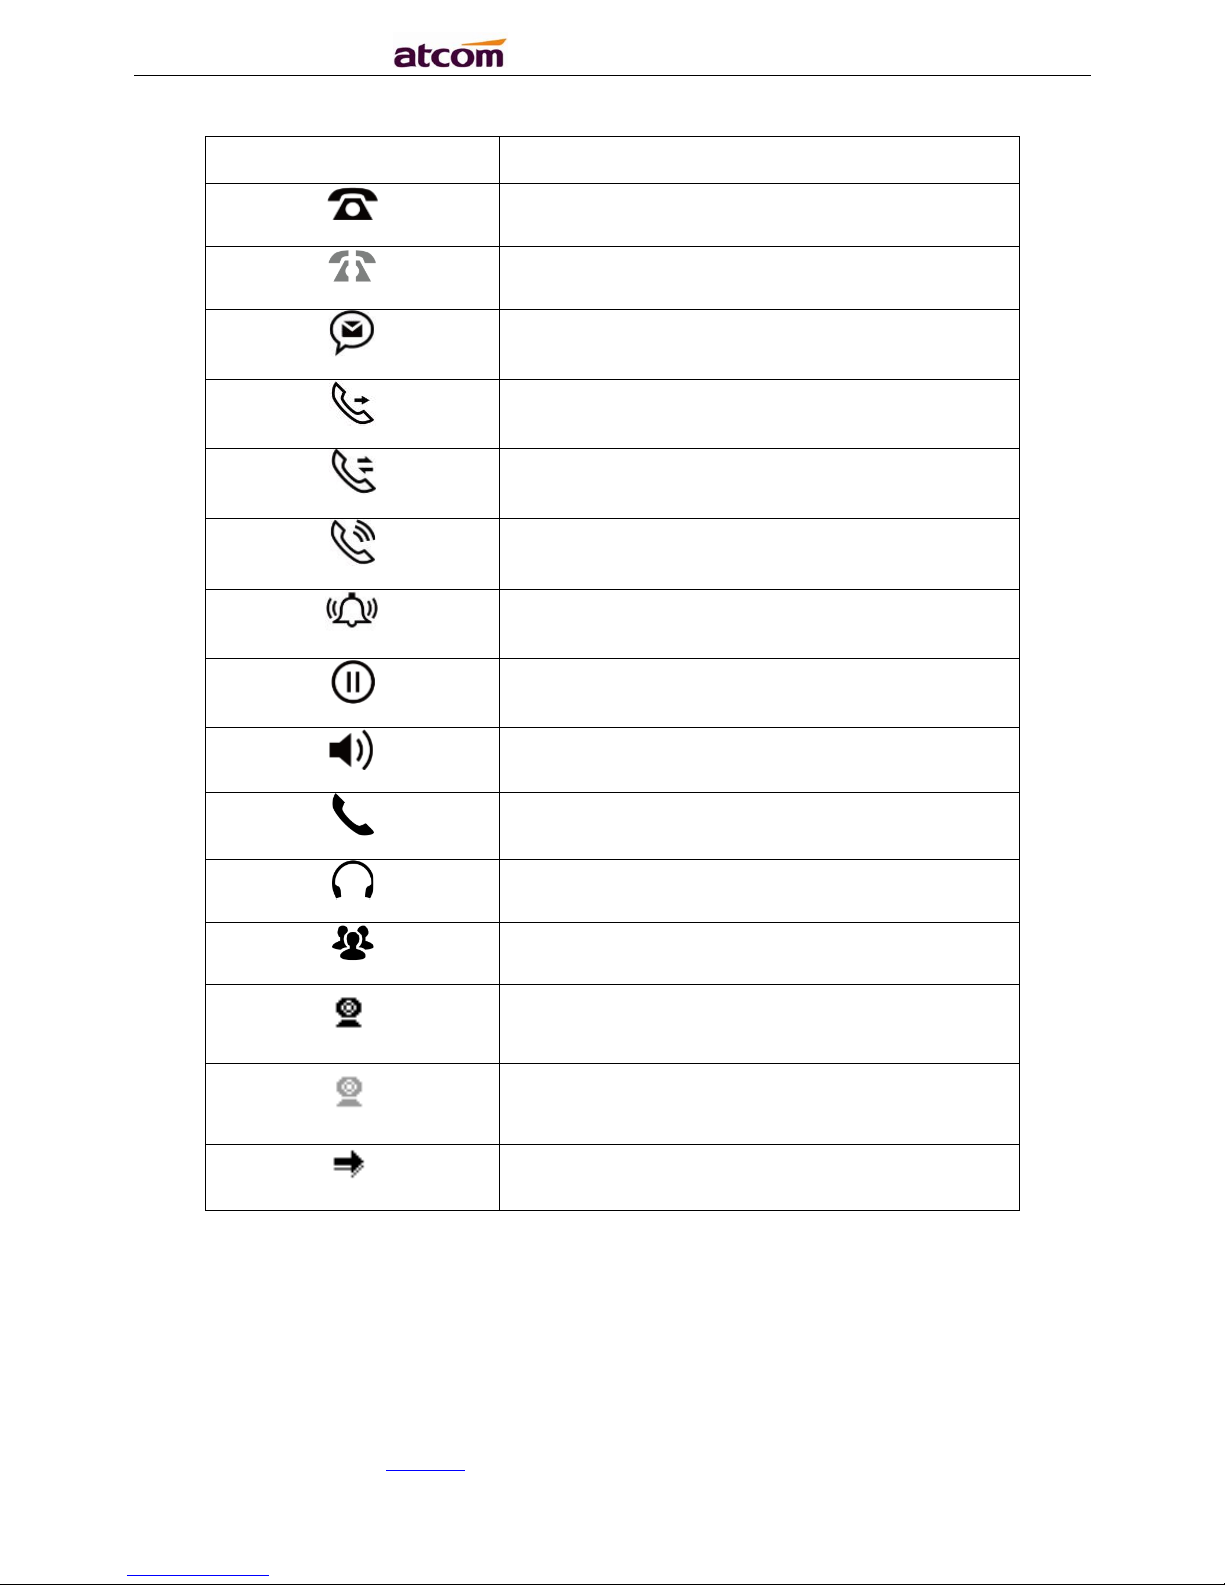
2.5 LCD screen icons
Page 17
R3(S) IP Phone User Manual
ATCOM TECHNOLOGY CO., LIMITED www.atcom.cn17
Icon
Description
The extension is registered
The extension is unregistered
There is a new voice mail
R3 is dialing
R3 is talking
R3 i
s calling
There is an incoming call
The call is held
R3 is in speaker mode
R3 is in handset mode
R3 is in headset mode
R3 is in conference
The line key is used as the BLF key and the BLF
monitored number is registered
The line key is used as the BLF key and the BLF
monitored number is unregistered
The line key is used as SpeedDial key
Table4 LED Screen Icons Description
Page 18
R3(S) IP Phone User Manual
ATCOM TECHNOLOGY CO., LIMITED www.atcom.cn18
3、Call Function
3.1、Answer the calls
When there is an incoming call, phone will remind user with ringing. There are 3 ways to
answer the call:
A. Answer by handset
Pick up the handset and talk with the caller. If you want to hang up, just put back the handset.
When you are talking with the handset and want to switch to speaker or headset mode, please
press key or key, and then put down the handset.
B. Answer by speaker
Press key and talk with callers by built-in Micro-phone and Speaker. If you want to
hang up, please press key again. Switch calling or talking into handset mode by
lifting the handset under speaker mode. Press key will switch calling or talking into
headset mode.
C. Answer by headset
Keep your microphone connected with the RJ9 headset jack, when there is an incoming call,
press and talk with the caller. If you want to hang up, please press again.
Pressing can change calling or talking into speaker mode, and lifting the handset
switches to handset mode.
Page 19

R3(S) IP Phone User Manual
ATCOM TECHNOLOGY CO., LIMITED www.atcom.cn19
3.2、Make Calls
A. Use the handset
Pickup the handset, the LCD will show the current lines (user is able to switch from line1 to
line4 by pressing the line key beside the LCD). Press soft key "Send" to dial the number.
When you hear the tones of “du~~du~~” and the phone number your dialed is being
displayed on the LCD, the phone at the side of being called should be ringing. If the called
party answers this calling, the call is established and the calling timer is started immediately.
B. Use the speaker
Press key, the LCD will show the current lines (user is able to switch from line1 to
line4 by pressing the line key beside the LCD). Input the phone number and press soft key
"Send" to dial the number. When caller hear the tones of “du~~du~~” and the phone number
your dialed is being displayed on the LCD, the phone at the side of being called should be
ringing. If the called party answers this calling, the call is established and the calling timer is
started immediately.
C. Use the headset
Press Key, the LCD will show the current lines (user is able to switch from line1 to
line4 by pressing the line key beside the LCD). Input the phone number and press soft key
"Send" to dial the number. When caller hear the tones of “du~~du~~” and the phone number
your dialed is being displayed on the LCD, the phone at the side of being called should be
ringing. If the called party answers this calling, the call is established and the calling timer is
started immediately.
D. Dial from phone book
1. Press key to enter the menu and choose “Directory” option. Press "Enter" soft
key and then find the contact person by navigation keys. When the certain contact person
is highlighted, press "Dial" or just pick up the handset to call this number.
2. Pick up the handset, press "Directory" soft key, then find the contact person and press
"Dial" soft key.
Page 20
R3(S) IP Phone User Manual
ATCOM TECHNOLOGY CO., LIMITED www.atcom.cn20
3. Pick up the handset, press and enter “Directory”, then find the contact person and
press “Dial” soft key.
E. Dial from call history
1. Press key to enter the menu and choose “History” option, then select one of call
history entry, and press "Dial" soft key or pickup the handset to call this number.
2. Pickup the handset, press "History” soft key, then select one of call history entry, and
press "Dial" soft key to call this number.
3. Pickup the handset, press and enter “Call History” ,then select one of call history
entry, and press "Dial" soft key to call this number.
3.3、Pre-dial
It’s a method to dial a phone number immediacy at standby mode.
The method is as below:
A、Dial-up the phone number at standby mode
B、Press soft key "Dial" or Pick up the handset or Press or to send out the
number.
3.4、 Multiple line dial-up
R3(s) supports 4 SIP lines. That means user can register 4 different sip accounts simultaneity.
User is able to choose line1, line2, line 3 or line 4 by pressing corresponding line key. Line1 or
the 1st Line registered successfully under idle is the priority to pick up the calls.
R3(s) maximum supports 24 concurrent calls, that means24 calls can be setup on each of
single line, but the total number of concurrent calls on all lines can not more than 24. When
there is an incoming call to another line, LCD will show the incoming phone number and line
LED will be blinking in green. User is able to press the corresponding line key or press soft key
Page 21

R3(S) IP Phone User Manual
ATCOM TECHNOLOGY CO., LIMITED www.atcom.cn21
"Hold" the current line on which you’re talking then press “Answer” to receive the incoming
call from another line.
Pick up a new incoming call while on calling: When a new incoming call happened on the being
occupied line, press the key or to check details of the new incoming call, and press
the soft key “Answer” on GUI to pick up the new call. The current calling will be hold after the
new call picked up. When a new incoming call happened on another idle line, the source phone
number of new incoming call will be displayed on the Screen and the LED of corresponding line
key will be fast blinking (Green), Press the corresponding line key to pick up the new call, Or
Press the soft key “Hold” to hold the current call and then press “Answer” key to pick up the
new call.
Make a new call while on calling: To make a new call on a being occupied line, Press the key
“Hold”, then input the destination phone number and press the key “Dial”, or Press the soft
key “New”, then input the destination phone number and press the key “Dial”. To make a new
call on an idle line, press the corresponding line key, input the destination phone number and
press the key “Dial”.
3.5、Call Hold
The current calling will be hold by pressing soft key “Hold” or ,and the held call will
be resumed after pressing soft key “Resume” or or the corresponding line key. Even
on 3-way conference calling, the conference will be held after pressing “Hold” key, and be
resumed to 3-way conference after pressing “Hold” Key again. Remember the conversation is
still on hold without being ended even if hung up under the status of hold.
3.6、Call Transfer
1. Attended call transfer
The attended transfer allows user to call a third-party before transferring the calling.
Page 22

R3(S) IP Phone User Manual
ATCOM TECHNOLOGY CO., LIMITED www.atcom.cn22
While calling, press the "Transfer" soft key to hold the current call and dial the target number
you want to transfer to on the activated line and press “Send” soft key to call that number.
After the target party answers the call, press "Transfer" soft key again to complete the
transfer.
If the target number has been setup in the current BLF list, and you have already finished the
necessary setup on Webpage of R3(s), there is an easier way to complete the attend transfer.
While calling, press the corresponding BLF key of the target numberand then press the
"Transfer" soft key, the attend transfer will be achieved.
Setup BLF list with attend transfer functions on Webpage:
“Phone”→”Features”→”Transfer Settings”→”Transfer Mode via DSS Key (Attend
Transfer”
2. Blind call transfer
The blind transfer allows user to transfer a call without speaking to the third party. On the user
side, the call will be ended as soon as the target phone number is dialed.
Operating steps: Press “Transfer” soft key to get more option, then press “Blind” soft key,
input the transfer target number and press “Send” soft key.
If the target number has been setup in the current BLF list, and you have already finished the
necessary setup on Webpage of R3(s), there is an easier way to complete the Blind transfer.
While calling, press the corresponding BLF key of the target number, the blind transfer will be
achieved.
Setup BLF list with blind transfer functions on Webpage:
“Phone”→”Features”→”Transfer Settings”→”Transfer Mode via DSS Key (Blind
Transfer”
3.7、Mute calls
Page 23

R3(S) IP Phone User Manual
ATCOM TECHNOLOGY CO., LIMITED www.atcom.cn23
The input audio will be not transmitted to peer phone after pressing key, and the
phone will be muted even switched among different modes of speaker, handset and headset.
To un-mute, just press key again.
3.8、3-Way Conference
1. While on calling, press the soft key “Conf”, input the 3rd party’s phone number and then
press the softkey “Dial” or press the soft key “Conf” and press the corresponding BLF key
to invite the 3rd party to join a conference call.
2. After the third party answers the call, pressing "Conf" key again to establish the 3-way
conference
3. The initiator of 3-way conference can press the soft key "Hold" to hold the conversation
with other two parties, and press “Resume” to back to 3-way conference.
4. If the initiator hangs up the call or press the soft key “End Conf”, the conference will be
ended and the calling between the other two parties will be hung up as well.
5. The initiator of 3-way conference can press the soft key "Split" to separate the conference
call, and the calling between initiator and the other two parties are still active but under the
status of Call hold.
3.9、Hang up the phone
1. Softkey hang up
While on calling, press the softkey “End Call” to hang up.
2. Handset hang up
Put back the handset at handset mode, the current calling will be hung up.
3. Speaker hang up
Press key at speaker model, the current calling will be hung up.
4. Headset Hang up
Page 24

R3(S) IP Phone User Manual
ATCOM TECHNOLOGY CO., LIMITED www.atcom.cn24
Press key at headset model, the current calling will be hung up.
5. Hang up one line call
Press the hook to hang up the current calling when 2 calls happened simultaneously.
3.10、Voicemail
R3(s) has a key for entering voicemail box and indicating new voicemail. Press
key to enter the menu to configure voicemail number if you have never configured it
previously. Otherwise, the voicemail number will be called after pressing it.
4、Keypad and GUI
4.1、Starting
All lights will be on (Red) at the moment when the phone powered on, and then light off in the
following One second. And then the phone turns to standby status in about 50 seconds.
Page 25
R3(S) IP Phone User Manual
ATCOM TECHNOLOGY CO., LIMITED www.atcom.cn25
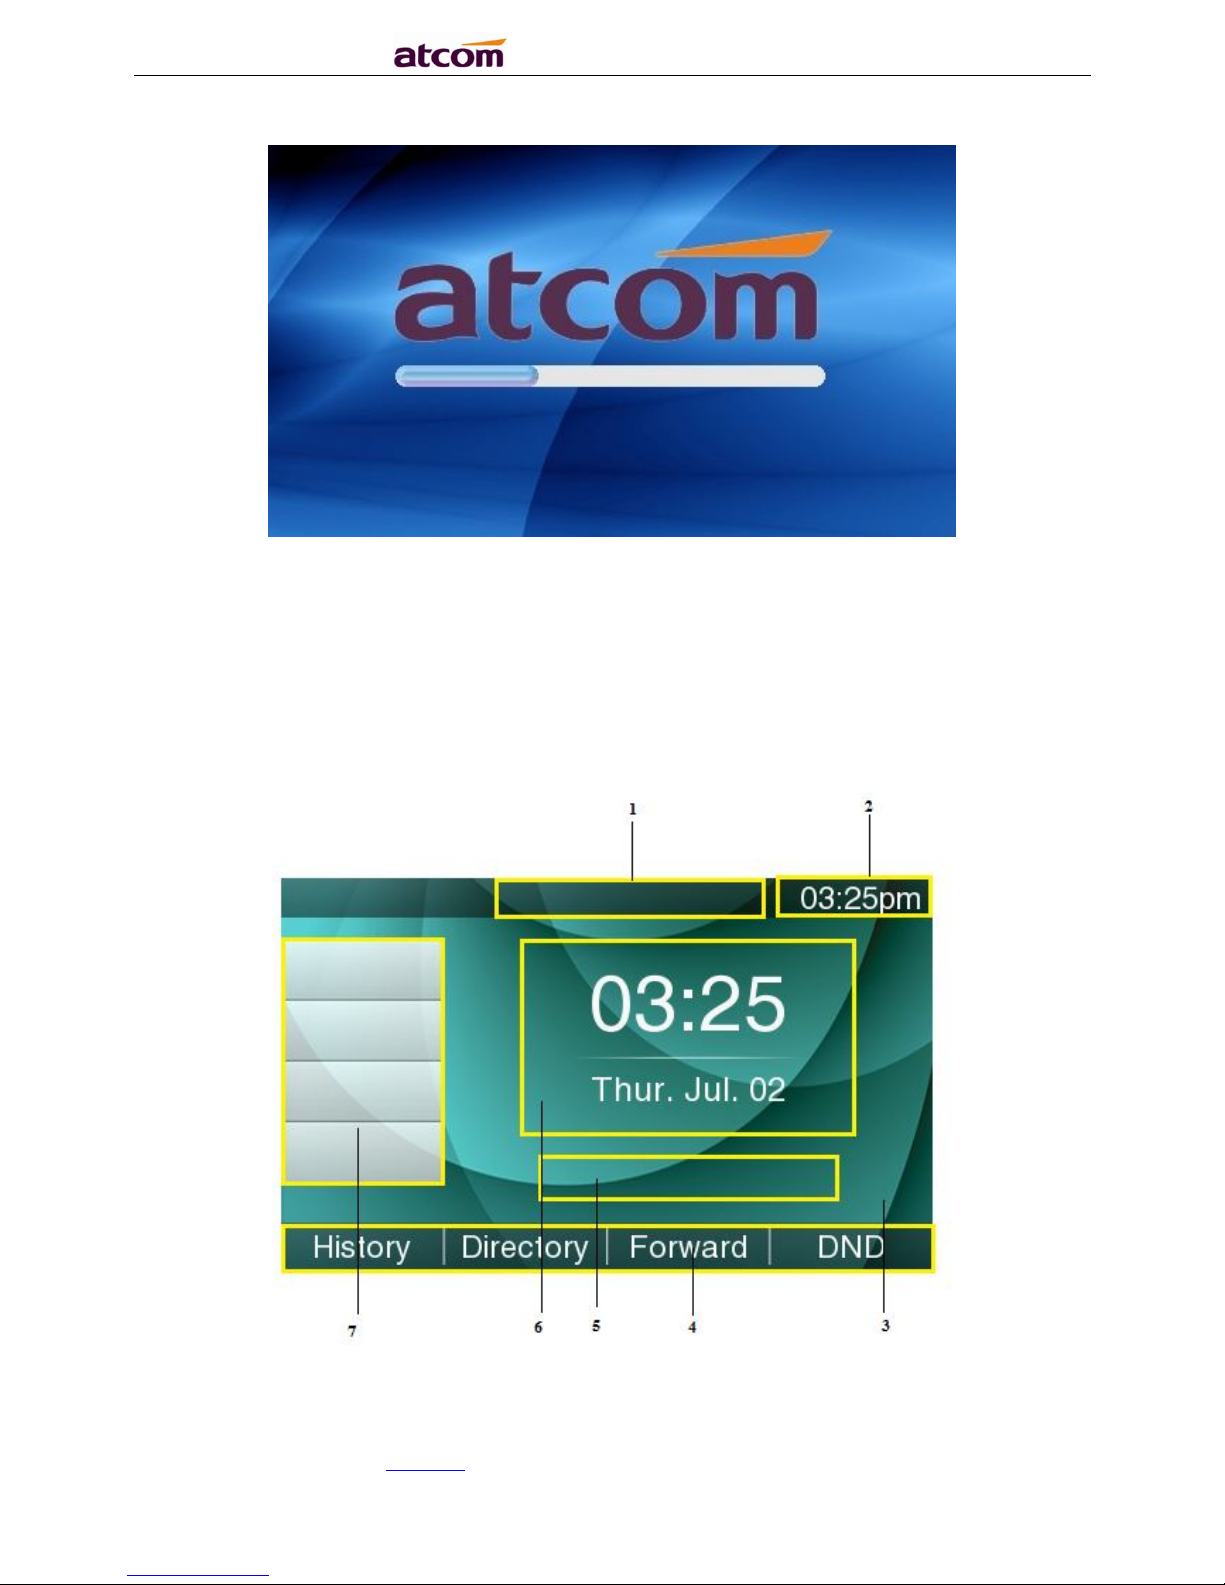
4.2、Standby
Page 26
R3(S) IP Phone User Manual
ATCOM TECHNOLOGY CO., LIMITED www.atcom.cn26
Area Item
Descripti
on 1 Status: to indicate the call status
2
Time
3
Background
4
Softkey
:
”
History
”,”
Directory
”,”
Forward
”,”
DND
” 5 Indication info
:
DND (on)
、
Missed calls, Call Forward
(on) and
Network Status (unavailable).
6 Time, Date
7
Programmable keys (Line Keys in
default)
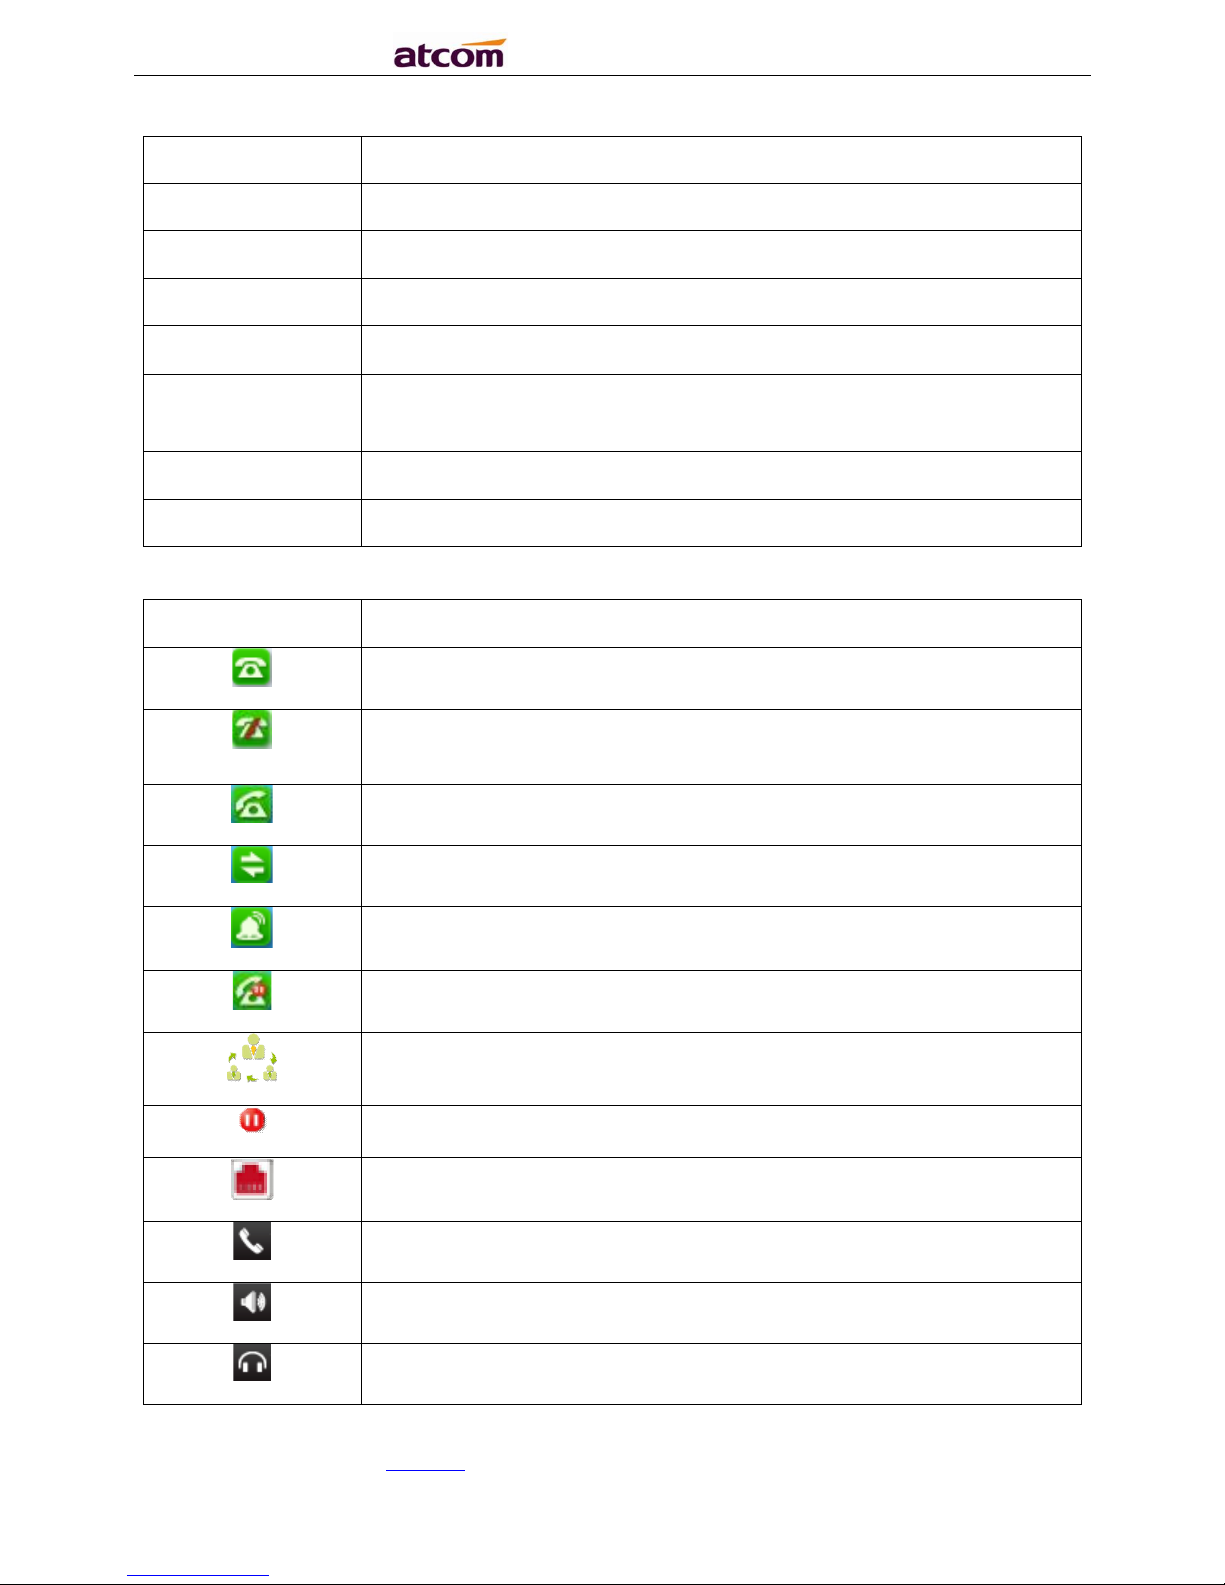
Icon on Standby UI
Icon
Description
The account is registered successfully, and displayed in the Area 7.
The account is not registered successfully, and displayed in the Area
7.
The line is being
occupied
for dialing, and displayed in t
he Area 7.
The line is on calling, and displayed in the Area 7.
New incoming call
, and displayed in the Area 7.
Call hold
, and displayed in the Area 7.
3-way conference calling, and displayed in the calling UI
.
Call being hold,
and displayed
in the calling UI.
Unavailable Network,
and displayed in the Area
5. Calling via handset,
and displayed in the Area
1. Calling via
Speaker
, and displayed in the Area 1.
Calling via
headset
, and displayed in the Area 1.
Page 27
R3(S) IP Phone User Manual
ATCOM TECHNOLOGY CO., LIMITED www.atcom.cn27
Call Forward is activated,and displayed in the Area 1.
New Voicemail,
and displayed in the Area 1.
Volume turn to be “0”,and displayed in the Area 1.
Auto-Answer is activated,and displayed in the Area 1.
DND is activated, and displayed in the Area 1.
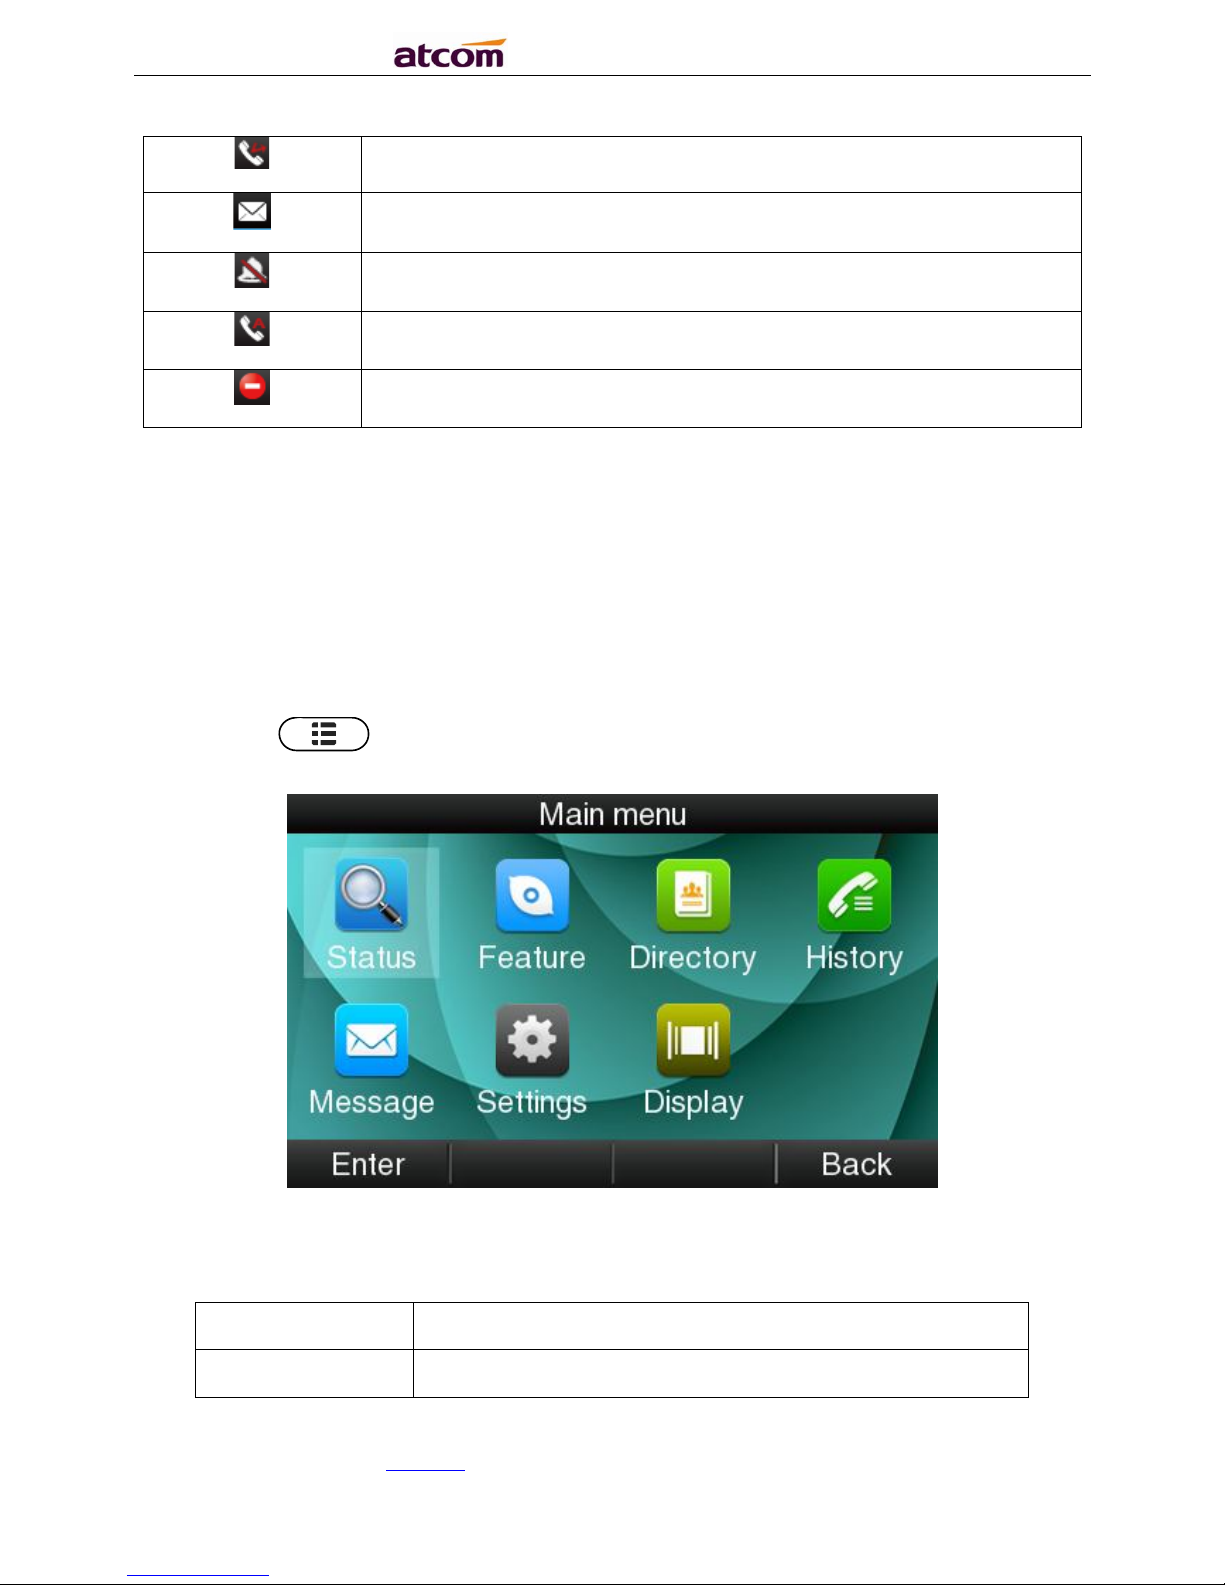
4.3、Configuration
Press the key to enter the Main Menu:
Move the cursor via navigation key and press the softkey “Enter” or input the corresponding
Number key Select the item of Main Menu:
Number Key
“1”
Enter
“
Status
” Number Key
“2”
Enter
“
Feature
”
Page 28

R3(S) IP Phone User Manual
ATCOM TECHNOLOGY CO., LIMITED www.atcom.cn28
Number Ke
y “3” Enter
“
Directory
” Number Key
“4”
Enter
“
History
” Number Key
“5”
Enter
“
Message
” Number Key
“6”
Enter
“
Settings
” Number Key
“7”
Enter
“
Display
”
4.3.1、Status info
It’s able to check the status info via LCD Display or Web.
And the basic status and details status will be optional displayed on LCD display
1. Basic Status——IP address、MAC address、Firmware version。
2. Details Status——Network info、Production info and Account info in details.
Basic Status
You’re able to check the basic status in both ways as below:
1. Press the key on standby.
2. Press the key and select the “Status” of Main Menu.
Page 29

R3(S) IP Phone User Manual
ATCOM TECHNOLOGY CO., LIMITED www.atcom.cn29
Details Status
Select “More” and then press the softkey “Enter” to check details info.
Press the softkey “Enter” to check status info, and “Back” to return the Basis Status page.
Check the Status info via Web
1. Check the IP address of IP phone;
2. Type the IP address on a web browser;
Page 30

R3(S) IP Phone User Manual
ATCOM TECHNOLOGY CO., LIMITED www.atcom.cn30
3. Input the username and password, the default user and password for Administrator is
(admin, admin), for general user is (user, user), and then press “Enter”.
4. By default, the Status info will be displayed.
4.3.2、Call Features
In this part, we will introduce the following content:
Call Forward
Call Waiting
Auto Answer
Programmable keys
Key as send
Hotline
Anonymous Calls
Call Forward
“Call Forward” includes ”Always Forward “,” Busy Forward”, “No Answer Forward”.
“Always Forward” has the highest priority, and “Busy Forward” has the same priority as “No
Answer Forward”, that means once the function of “Always Forward” is activated, other call
forward features will be unavailable.
Any type of Call forward feature is activated, the Icon will be indicated on the LCD Display,
and the soft key “Forward”(at the bottom line of LCD display) will turn to be “-Forward”.
Always Forward
Page 31

R3(S) IP Phone User Manual
ATCOM TECHNOLOGY CO., LIMITED www.atcom.cn31
All incoming calls will be forwarded to target phone number once the “Always Forward”
activated, setup this feature as follow:
Item
Operation
Description
Always
Press the key 、 or the
soft key “Switch” to setup
Switch on or Switch off the feature.
“Enable” mean this feature is
enabled,“Disable” mean this feature
is disabled.
F
orward to
The Number key, “*”key, and
“#”are permitted to be input.
Setup the target phone number which
all incoming calls transferred to
On Code
The Number key, “*” key, and
“#”are permitted to be input.
The feature code to enable all incoming
calls forward, the phone will send the
feature code directly to open all
incoming calls forward
Off Code
The Number key, “*” key, and
“#”are permitted to be input.
The feature code to disable all incoming
calls forward, the phone will send the
feature code directly to close all
incoming calls forward
Busy Forward
It means the phone is busy once the phone is not at standby mode. Setup this feature as
below:
Page 32

R3(S) IP Phone User Manual
ATCOM TECHNOLOGY CO., LIMITED www.atcom.cn32
Item
Operation
Description
Busy
Press the key 、 or
softkey “Switch” to setup
Switch on or Switch off the feature.
“Enable” mean this feature is enabled,
“Disable” mean this feature is disabled.
Forward to
The Number key, “*”key,
and “#”are permitted to be
input.
Setup the target phone number which all
incoming calls transferred to
On Code
The Number key, “*”key,
and “#”are permitted to be
input.
The feature code to enable busy calls
forward, the phone will send the feature
code directly to open busy call forward
Off Code
The Number key, “*”key,
and “#”are permitted to be
input.
The feature code to disable busy calls
forward, the phone will send the feature
code directly to close busy call forward
No Answer Forward
All incoming calls will be forwarded after time out, once the feature of “NoAnswer Forward” is
activated. Setup this feature as below,
Page 33

R3(S) IP Phone User Manual
ATCOM TECHNOLOGY CO., LIMITED www.atcom.cn33
Item
Operation
Description
No Answer
Press the key 、 or
softkey “Switch” to setup
Switch on or Switch off the feature.
“On” mean this feature is
activated,”Off” mean this feature is
unactivated .
Forward to
The Number key, “*”key, and
“#”are permitted to be input.
Setup the target phone number which
all incoming calls transferred to
After Ring
Time
Press the key 、 or
softkey “Switch”to setup
Setup timer for no answer status. All
incoming calls will be forwarded after
time out once Call forward when no
answer activated.
On Code
The Number key, “*”key, and
“#”are permitted to be input.
The feature code to enable no answer
call forward, the phone will send the
feature code directly to open all
incoming calls forward
Off Code
The Number key, “*”key, and
“#”are permitted to be input.
The feature code to disable all incoming
calls forward, the phone will send the
feature code directly to close all
incoming calls forward
Setup Call Forward Via Web
Set Call Forward via web:Phone→Features→Forward.
Page 34

R3(S) IP Phone User Manual
ATCOM TECHNOLOGY CO., LIMITED www.atcom.cn34
Call Waiting
The feature of “Call Waiting” is available by default. If switch off this feature, whatever
multiple SIP accounts had been registered successfully, only one single active calling is
permitted (for example Dialing, Ringing, Calling, Holding).
Page 35

R3(S) IP Phone User Manual
ATCOM TECHNOLOGY CO., LIMITED www.atcom.cn35
Item
Operation
Description
Call Waiting
Press the key 、
or softkey “Switch” to
setup
Switch on or Switch off the feature.
“Enable” mean this feature is
enabled, “Disable” mean this feature
is disabled.
Call Waiting Tone
Press the key 、
or softkey “Switch” to
setup
Switch on or Switch off the prompt
playing. “Enable” mean this feature is
enabled,“Disable” mean this feature
is disabled .
Setup call waiting via web:”Phone” → “Feature”→ “General information”→ “Call
Waiting”.
Setup call waiting Tone via web: “Phone”→ “Feature”→ “Audio Settings”→ “Call
Waiting Tone”.
Auto Answer
The feature of “Auto Answer” is switched off by default. All incoming calls will be answered
automatically when the phone is standby once “Auto Answer” is activated. “Auto Answer” when
the phone is under “on Calling” status.
The Icon will be indicated once “Auto Answer” is available。
Page 36

R3(S) IP Phone User Manual
ATCOM TECHNOLOGY CO., LIMITED www.atcom.cn36
Setup “Auto Answer” via Web:“Phone”→ “Feature”→ “General information”→ “Auto
Answer”
Programmable Keys
The programmable keys include Line keys, Memory keys (aside the BLF LCD Display).
Programmable feature keys and Soft key on Standby UI.
Press the programmable key for 2 seconds, you’re able to modify the feature of each
programmable key.
All programmable keys has been classfied as “N/A”, “Line Key”, “BLF”, “Key event”, “Speed
dial”,”Intercom”
And the “Key Event” has been classfied as “Conference”, “Hold”, “DND”, ”Redial”,"Call return”,
“Pickup”, ”Call Park”, ”DTMF”, “Directory”.
Comment:
N/A
N/A means this key is not permitted to be set as a programmable key.
Line key
Display the account information, press it for making a call, answering incoming calls, call hold
and resume.
Page 37

R3(S) IP Phone User Manual
ATCOM TECHNOLOGY CO., LIMITED www.atcom.cn37
Item
Description
Account ID
To display the account ID, press the soft key “Switch” or 、
to modify, the optional value is Account 1 to 4.
Account name
Display the account name of each account ID, non-modifiable.
SIP Server
The SIP server of each Account ID, non-modifiable. If not set any
value for some account ID, the account name will be null.
BLF
Indicate the status of monitored account. Once set the BLF key with Pickup feature, user is
able to answer the incoming call to the monitored account by pressing the corresponding BLF
key. If the monitored account is idle, press the corresponding BLF key for speed dial.
Item
Description
Account ID
To display the account ID, press the soft key “Switch” or 、
to modify, the optional value is Account 1 to 4.
Label
To
identify
this key on LED
,
for example
“BLF”
Value
The phone number will be monitored by this key. For example, if user
want to monitor the phone number (6070), please set “6070” here.
Extension
This code must be set for pickup, and this code provide by Server. If
the code is not matched by Server, the feature of pickup will not work.
Page 38

R3(S) IP Phone User Manual
ATCOM TECHNOLOGY CO., LIMITED www.atcom.cn38
Conference
The 3-way conference will be setup by pressing the key “Conf” while on calling. For more info,
please refer to Chapter 3.8。
The configuration item Label is a name to identify the key on LED, can be set as “conference”.
Hold
The same feature as the key .For more info, please refer to Chapter 3.5.
The configuration item Label is a name to identify the key on LED, can be set as “hold”.
DND
Press this key will switch on or switch off the feature of “DND”.
The configuration item Label is a name to identify the key on LED, can be set as “DND”.
Redial
The same feature as the key .
The configuration item Label is a name to identify the key on LED, can be set as “redial”.
Call return
Automatically dial the latest phone number in history.
The configuration item Label is a name to identify the key on LED, can be set as “return”.
Call Pickup
Press this key to pick up if new incoming call to the monitored phone number.
Page 39

R3(S) IP Phone User Manual
ATCOM TECHNOLOGY CO., LIMITED www.atcom.cn39
Item
Description
Account ID
To display the account ID, press the soft key “Switch” or 、 to
modify, the optional value is Account 1 to 4.
Label
To identify
this key on LED, for example
“pickup
” Value
Th
e phone number monitored for pickup
Reminding:This code must be set for pickup, and this code can be set via Web only.
Set the Pickup code as follow:
Set the pickup code for one single Account: Account→Advanced→Select an account to be
configured→Directed Call Pickup Code.
Set the pickup code for all Accounts:Phone→Features→Call Pickup→Direct Call Pickup、
Direct Call Pickup Code(Direct Call Pickup should be set as Enable).
Call Park
Press this key while on calling, the phone will dial the specified phone number, user will
receive a code on the phone prompt, and then press the soft key “Transfer”, the current calling
will be parked successfully. At this moment, user is able to continue the parked calling with
any other phones which registered on the same SIP server by dialing the code which user
have received.
Page 40

R3(S) IP Phone User Manual
ATCOM TECHNOLOGY CO., LIMITED www.atcom.cn40
Item
Description
Account ID
To specify an account to park the call, press the soft key “Switch” or
、 to modify, the optional value is Account 1 to 4.
Label
To identify this key on LED, for example as
“park
”.
Value
The code for pickup the parked
call and it is provided by SIP server.
DTMF
Press this key while on calling, the phone will send the configured “Value” automatically.
Page 41

R3(S) IP Phone User Manual
ATCOM TECHNOLOGY CO., LIMITED www.atcom.cn41
Item
Description
Label
To identify this key on LED, for example
“
DTMF
”.
Value
The value sent to remote end while on calling.
Directory
Press this key to access Directory.
The configuration item Label is a name to identify the key on LED, can be set as “phonebook”.
Speed Dial
Press this key while standby state, the specified target phone number will be dial from the
specified account.
Item
Description
Account ID
To display the account ID, press the soft key “Switch” or 、
to modify, the optional value is Account 1 to 4.
Label
To identify this key on LED, for example
“
speed
dial”
Value
The target phone number for speed dial
Page 42

R3(S) IP Phone User Manual
ATCOM TECHNOLOGY CO., LIMITED www.atcom.cn42
Intercom
Press this key when the phone is idle, the phone will dial the specified “Value”, and the remote
end will answer the call automatically.
Note: This feature is supported by specified servers only.
Item
Description
Account ID
To display the account ID, press the soft key “Switch” or 、
to modify, the optional value is Account 1 to 4.
La
bel To identify this key on LED, for example
“intercom
”.
Value
The target phone number for Intercom
The programmable key configured via web included Memory Key, Line Key, Programmable
Feature Key, and Feature key of expansion module.
Page 43

R3(S) IP Phone User Manual
ATCOM TECHNOLOGY CO., LIMITED www.atcom.cn43
Key as Send
The key “Key as Send” has the same function as the soft key “Dial”.
Reminding: This key is not available while pre-dial. It’s the only way to press the soft key
“Dial” or pickup the handset to finish pre-dial.
The default value is “#”, and it could be set as “*”. If set the value as “disable”, it means the
function “Key as Send” is forbidden.
Set “Key as Send” via web :Phone→Features→General Information→Key As Send.
Hotline
Once “Hotline” has been set, the phone will automatically dial the hotline via the 1st available
line if the phone stay in the standby status exceed the specified waiting time and there is no
input (or input something and then all deleted).
Page 44

R3(S) IP Phone User Manual
ATCOM TECHNOLOGY CO., LIMITED www.atcom.cn44
Item
Description
Hotline
Set up the hotline number, the value is null by default.
Hotline timeout
Set up the timeout for hotline activation
,
4 seconds by default.
Set hotline via web: Phone→Features→General Information→Hotline.
Set Hotline Time-out(secs) via web: Phone→Features→General Information→Hotline
Time-out(secs).
Anonymous Call
This function includes making anonymous calls and blocking all anonymous calls.
If switch on the feature “Anonymous call”, all outgoing calls will be displayed as anonymous
call in the remote end.
If switch on the feature “Rejection”, all incoming anonymous calls will be blocked automatically.
Page 45

R3(S) IP Phone User Manual
ATCOM TECHNOLOGY CO., LIMITED www.atcom.cn45
Item
Operation
Description
Accounts
press the soft key “Switch” or
、 to modify,
Select the Account for anonymous
call.
Anonymous
Call
press the soft key “Switch” or
、 to modify,
Switch on/off the feature of making
anonymous calls.
Call
On Code
The Number key, “*”key, and
“#”are permitted to be input.
Set the feature code to turning on
anonymous call, the phone enables
anonymous call by sending the
feature code to the server
Call Off Code
The Number key, “*”key, and
“#”are permitted to be input.
Set the feature code to turning off
anonymous call, the phone disables
anonymous call by sending the
feature code to the server
Rejection
press the soft key “Switch” or
、 to modify
Switch on/off the feature of
blocking anonymous calls.
Reject On
Code
The Number key, “*”key, and
“#”are permitted to be input.
Set the feature code to turning on
anonymous call rejection, the
phone enables anonymous call
rejection by sending the feature
code to the server
Reject Off
Code
The Number key, “*”key, and
“#”are permitted to be input.
Set the feature code to turning off
anonymous call rejection, the
phone disables anonymous call
Page 46

R3(S) IP Phone User Manual
ATCOM TECHNOLOGY CO., LIMITED www.atcom.cn46
rejection by sending the feature
code to the server
Set Anonymous Call via web:Account→Basic→Select the Account→Anonymous Call.
Set Anonymous Call Rejection via web:Account→Basic→Select the Account→Anonymous
Call Rejection.
4.3.3、Directory
The content of Directory includes local phonebook and blacklist. Enter Directory as follow,
1. Press the soft key “Directory” when the phone is standby
2. Press the navigation key
3. Press the menu key , and then select “Directory”
Configure the “Directory” via Web:
Page 47

R3(S) IP Phone User Manual
ATCOM TECHNOLOGY CO., LIMITED www.atcom.cn47
All operations on Directory via Web will be not active until click “Save”. When too much item
existed in the Directory, it will be an easy way to search by keyword about name, Office
Number, Mobile Number or other Number. The exactly matched item will be listed, otherwise
you will be prompted “Not find the specified contact”.
There is a newer feature when you edit connect or blacklist, it could be upload defined photo, it
will be display on the directory and RainbowET
Page 48

R3(S) IP Phone User Manual
ATCOM TECHNOLOGY CO., LIMITED www.atcom.cn48
Local phonebook
Name and phone number are permitted to be saved into the local phonebook, and up to 400
items. It’s able to add new contact, edit or delete exist contact or dial, also move the item to
blacklist.
Make calls from directory
Path to set on the phone: →Directory→Local Contacts→Select the record→Dial。
If only one phone number saved with the selected contact person, the phone number will be
dialed while calling the contact person.
If multiple phone numbers saved with the selected contact person, user must select one of the
phone numbers for dialing while calling the contact person.
Page 49

R3(S) IP Phone User Manual
ATCOM TECHNOLOGY CO., LIMITED www.atcom.cn49
Add new contact
Path to add new contact on the phone:Press →Directory→Local Contacts→Add.
Item
Operation
Description
Name
Input by number keys,
“*”or “#”key, change the
input-method via pressing
the soft key “abc”
It’s used to identify different phone
numbers. Any reduplicated names are not
permitted in the directory.
Office
Input by number keys,
You can save three numbers at most.
Page 50

R3(S) IP Phone User Manual
ATCOM TECHNOLOGY CO., LIMITED www.atcom.cn50
Mobile
“*”or “#”key, change the
input-method via pressing
the soft key “abc”
While calling a contact person in directory,
the phone will redirect to the page that to
select one number to dial when multiple
numbers are saved for one contact record
Other
Account
Press the key 、
or the soft key
“Switch”to modify the
account ID.
It’s used to bundle each item with the
corresponding account, and the optional
value is “Auto” or “Account 1”to “Account
4”. “Auto” means the 1st available
account will be selected.
Ring
Press the key 、
or the soft key
“Switch” to modify the
account ID.
It’s used to bundle each item with the
corresponding ringtone, and the optional
value is “Auto” or “Ringtone 1”to
“Ringtone 10”. “Auto” means the default
ringtone will be played if new incoming
call happened, otherwise the selected
ringtone will be played.
Photo
Only for preview. It’s
available for modification
via Web only.
To identify a contact item by a specified
image.
Add new contact via web:Contacts →Contacts →Input messages→Add→Save.
Edit the contact
User must re-edit the contact item while updating one item of local phonebook.
Path to edit the contact on the phone:Press →Directory→Local Contacts→Select
the item to edit→Option→Edit→OK.
Page 51

R3(S) IP Phone User Manual
ATCOM TECHNOLOGY CO., LIMITED www.atcom.cn51
Edit the contact item via Web: Contacts→Contacts→click on the item to edit→modify
Option→Click “Edit”→Click “Save”.
Delete the contact
Path to delete the contact on the phone:Press →Directory→Local Contacts→
Select the item to delete→Option→Delete→OK.
Press the soft key “Cancel” at the Warning UI to stop deleting.
Delete the contact item via web: Contacts→ Contacts→Select the item to delete→Click on
“Delete”→Click on “Save”.
Page 52

R3(S) IP Phone User Manual
ATCOM TECHNOLOGY CO., LIMITED www.atcom.cn52
Move to blacklist
Path to move to blacklist on the phone:Press →Directory→Local Contacts→Select
the item to move→Option →Move to Blacklist →OK→ OK.
Press the soft key “Cancel” at the Warning UI to stop this operation.
Move the contact item to blacklist via web :Contacts→ Contacts→Select the item to move
to blacklist→Click on “Move to black List”→Click on “Save”。
Blacklist
The purpose of blacklist’s feature is to block the phone number inside blacklist to call the host
phone number, but it’s available for the hosted phone number to call any phone number in the
black list.
The most operation of blacklist is the same as local phonebook except for the feature “Move to
Contacts”, it means moving an item of blacklist to local phonebook to resume the phone
number to dial the host phone number normally.
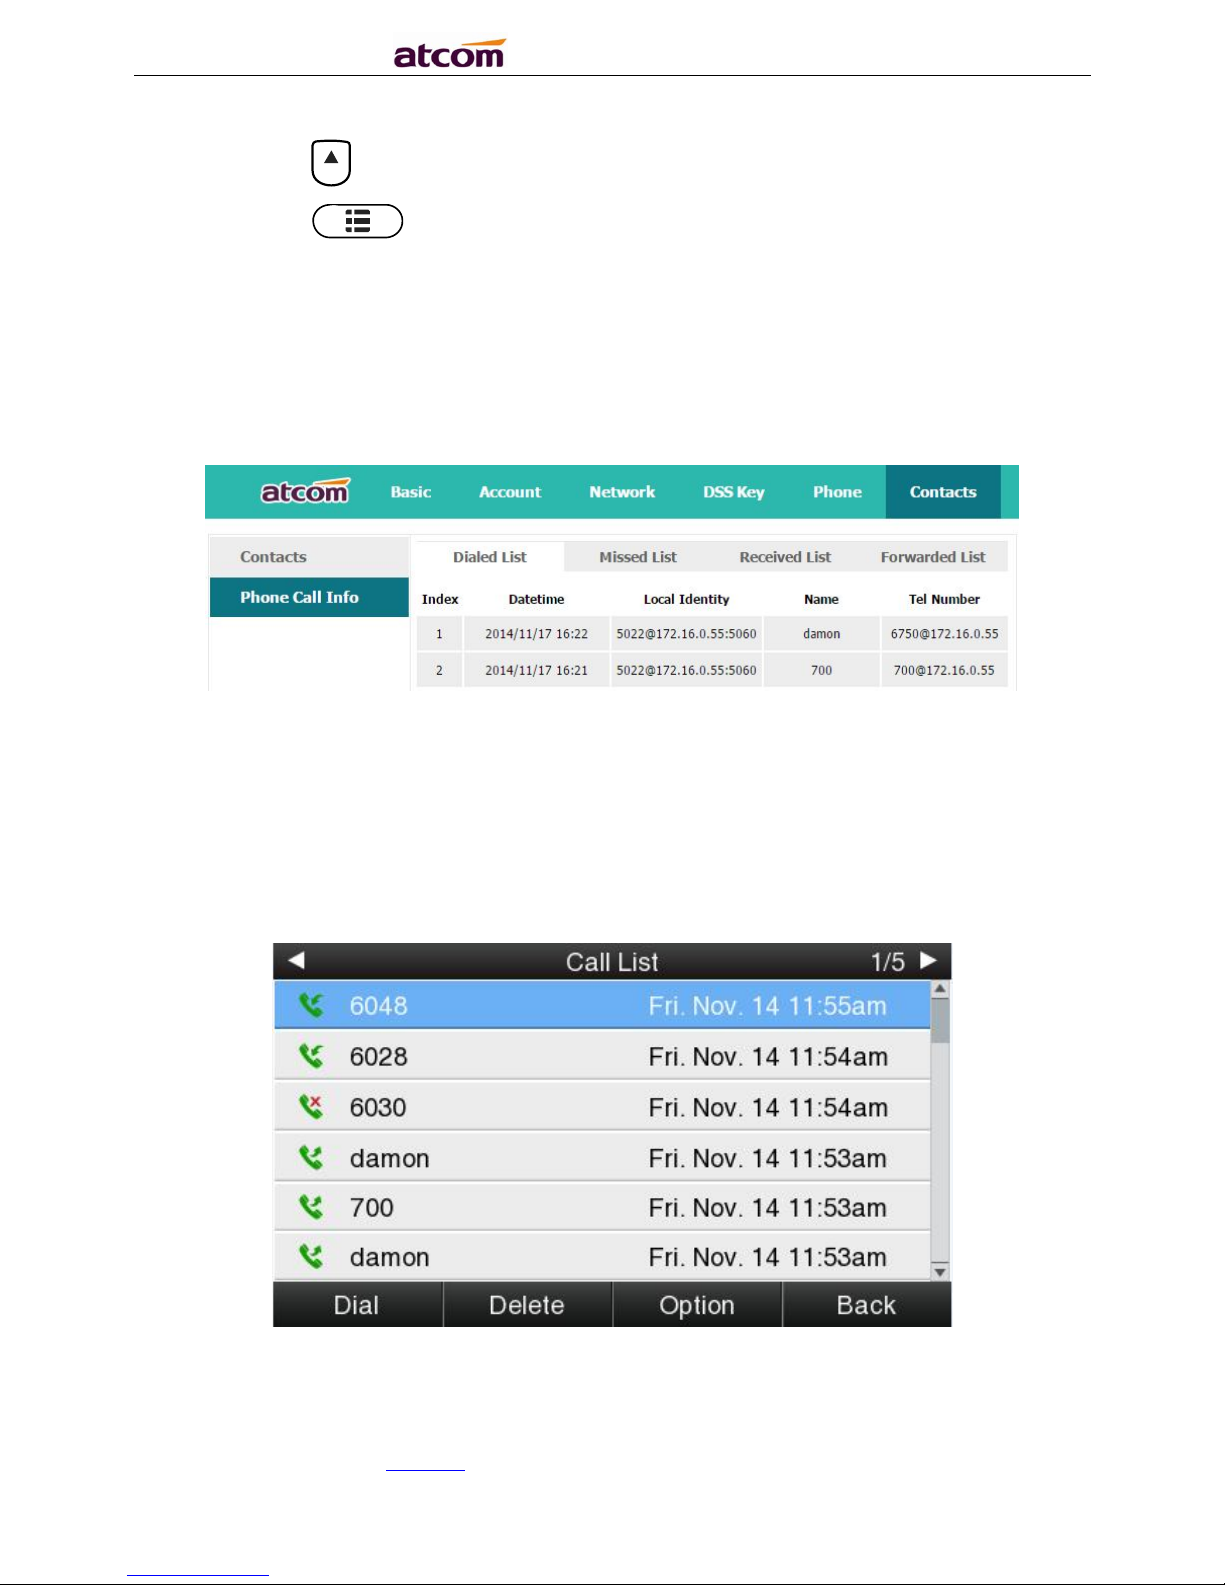
4.3.4、History
It includes the dialed, answered, missed and transferred items, maximum 400 items.
User is able to review or delete any item of the history on the phone. And enter “History” in
below ways:
Page 53
R3(S) IP Phone User Manual
ATCOM TECHNOLOGY CO., LIMITED www.atcom.cn53
1. Press the key
2. Press the key , then select “History”
3. Press the soft key “History” while phone is under standby status
When any operations above is done, details info of all recent history will be listed on LCD
display, include the type of each item, the name of contact person, date and time.
Also, user is able to check the detail info of call history via Web, but only review operation is
allowed while accessing via web.
Make calls from history
Path to make calls from history on the phone:Enter history UI→Select the item to dial→
Dial.
Page 54

R3(S) IP Phone User Manual
ATCOM TECHNOLOGY CO., LIMITED www.atcom.cn54
Delete one item from history
Path to delete one item from history on the phone:Enter history UI→Select the item to
delete→Delete.
Check the details of history
Path to check the detail history on the phone:Enter history UI→Select the item to check
→Option→Detail→Press or “OK”.
Add to Contact
1. Enter “Call History”→Select the target item→Option→add to Contact→Press the
key or soft key “Confirm”.
At this moment an “edit” page will be popped up.
Page 55

R3(S) IP Phone User Manual
ATCOM TECHNOLOGY CO., LIMITED www.atcom.cn55
The item of “Office”, “Mobile” and “Other” are able to be switched over between “Old Number”
and current number. If the being operated item had been saved already in the directory, “Old
Number” will be the previous value, otherwise “Old Number” will be null. The UI page of “Add
to Blacklist” is the same as above.
2. Modify the contact name, phone number and ringtone.
3. Press the key or soft key “Saved” to save the modification, press the key
or soft key”Cancel”to Cancel the modification.
Add to Blacklist
For more info about this operation, please refer to Add to Contact.
Delete all History’s records
Path to delete all history’s records on the phone:Enter History UI→Option→Delete all→
Press or “OK”.
4.3.5、Message
Page 56

R3(S) IP Phone User Manual
ATCOM TECHNOLOGY CO., LIMITED www.atcom.cn56
User will benefit from the feature of voicemail when they’re not available to answer an
incoming call or missed some incoming calls. However this feature must be supported by
Server. Voicemail must be set up before using it.
Set the voicemail via Web: Account→Basic→Select an account to configure→Voice Mail.
Sometimes the voicemail push can’t be reached in time, because the configuration problem
with Server, you must configure some related parameter via Web to make the phone
automatically send its request to Server for getting voicemail info.
Set “Subscribe for MWI” via web: Account→Advanced→Subscribe for MWI.
Set “MWI Subscription Period(secs)” via web:Account→Advanced→MWI Subscription
Period(secs).
Set Voice Mail
There is 3 different methods to set up the voicemail,
1. Press the key after factory set
2. Press the key for a while
3. Press the key →Select “Message”→Setup Voicemail
Page 57

R3(S) IP Phone User Manual
ATCOM TECHNOLOGY CO., LIMITED www.atcom.cn57
Check the voicemail
User is able to check voicemail in below ways:
1. Setup voicemail number→Press the key
2. Press the key →Select “Message”→”New Voicemail”
Select the account with “N new N old mail”, and press the soft key “Connect”, the
corresponding voicemail will be connected.
Select the account with “Unregistered”, and press the soft key”Connect”, the setting page of
Voicemail will be popped up.
4.3.6、Settings
Basic settings and Advanced settings will be introduces in this part,
Basic settings:
Language
Time & Date
Time & Date Format
Ringtones
Headset Memory Mode
Page 58

R3(S) IP Phone User Manual
ATCOM TECHNOLOGY CO., LIMITED www.atcom.cn58
Advanced settings:
Accounts
Set Password
Network
Reset to factory
Basic Settings
Language
R3(s)supports multiple language,to modify the language, please press the key →
Setting→Basic setting→Language→Select the target language and press the soft key
“Save”.
Set language via web:There is a drop-down box at the top left corner of webpage,choice one
kind of language and click, the language will take effect immediately.
Page 59

R3(S) IP Phone User Manual
ATCOM TECHNOLOGY CO., LIMITED www.atcom.cn59
Time &Date
Time & Date will be displayed at the standby page of R3(s),and these info will be related with
all process of IP phone. “Time & Date” can be gained by NTP Server automatically or set
manually.
NTP Setting
Path to set on the phone:Press →Settings→Basic Settings→Time & Date→NTP
Settings.
Item
Operation
Description
Time Zone
Press the key 、 or soft
key “Switch”to modify it.
Select the correct Time
Zone for the IP phone.
NTP Server
Key in the IP address of domain
name by the number keys, “*”, “#”
Specify the NTP Server
Secondary NTP
Server
Key in the IP address of domain
name by the number keys, “*”, “#”
Specify the secondary NTP
Server
Daylight-Saving
Time
Press the key 、 or soft
Optional: “Off”,”Auto” or
“Manual”. And”Manual”
mean user must set this
Page 60

R3(S) IP Phone User Manual
ATCOM TECHNOLOGY CO., LIMITED www.atcom.cn60
key”Switch
” to modify it.
via web.
Set NTP via Web:Phone→Preference.
Item
Operation
Description
Time Zone
Click drop-down box to
select
Set a time zone matches condition
Primary NTP
Server
Manual input
The primary NTP server that provide
time and date
Secondary NTP
Server
Manual input
The secondary NTP server that provide
time and date
Update
Interval(secs)
Manual input
The interval that the phone gains time
and date from NTP server
D
aylight
Click drop-down box to
A switch to control the status that
Page 61

R3(S) IP Phone User Manual
ATCOM TECHNOLOGY CO., LIMITED www.atcom.cn61
select
whether to enable the daylight or not
Fixed Type
Radio content
Daylight fixed type, only the specified
items are configurable
Start Month
Click drop-down box to
select
The month that the daylight rule begins
taking effect
Start Date
Manual input
The day that the daylight rule begins
taking effect
Start Hour of Day
Manual input
The hour of day that the daylight rule
begins taking effect
Start Day of Week
Click drop-down box to
select
The day of week that the daylight rule
begins taking effect
Start Week of
Month
Click drop-down box to
select
The week of month that the daylight
rule begins taking effect
Stop Month
Click drop-down box to
select
The month that the daylight rule stops
taking effect
Stop Date
Manual input
The day that the daylight rule stops
taking effect
Stop Hour of Day
Manual input
The hour of day that the daylight rule
stops taking effect
Stop Day of Week
Click drop-down box to
select
The day of week that the daylight rule
stops taking effect
Stop Week of
Month
Click drop-down box to
select
The week of month that the daylight
rule stops taking effect
Offset(minutes)
Manual input
The offset time that daylight rule takes
effect
Manual Settings
Path to set on the phone:Press →Settings→Basic Settings→Time & Date→
Manual Settings.
Page 62

R3(S) IP Phone User Manual
ATCOM TECHNOLOGY CO., LIMITED www.atcom.cn62
Item
Operation
Description
Year
Key in “Year” with the
number key, “*”and “#”
Date info
Month
Key in “Month” with the
number key, “*”and “#”
Day
Key in “Day” with the
number key, “*”and “#”
Hour
Key in “Hour” with the
number key, “*”and “#”
Time info
Minute
Key in “Minute” with the
number key, “*”and “#”
Second
Key in “Second” with the
number key, “*”and “#”
Set the Time & Date manually via web:Phone→Preference.
Item
Operation
Description
Manual Time
Click the drop-down box
to select
A switch to control the status whether
to enable the manual time or not
Page 63

R3(S) IP Phone User Manual
ATCOM TECHNOLOGY CO., LIMITED www.atcom.cn63
Date
Manual input, click
“Generated Date” to
gains date from the
computer
S
et date manually
Time
Manual input, click
“Generated Time” to
gains time from the
computer
S
et time manually
Time&Date Format
Path to set on the phone:Press →Settings→Basic Settings→Time & Date Format.
Item
Optional
Example of result
Clock
12 hour
03:30pm
24 hour
15:30
Date
WWW MMM DD
Tuesday
Oct.16
DD-
MMM
-YY 16–
Oct.
-14
YYYY
-MM-DD
2014
-10-16
DD/MM/YYYY
16/10/2014
MM/DD/YY
10/16/14
Page 64

R3(S) IP Phone User Manual
ATCOM TECHNOLOGY CO., LIMITED www.atcom.cn64
DD MMM YYYY
16,Oct.,2014
WWW DD MMM
Tuesday,16,Oct.
Set the Time &Date Format via Web:Phone→Preference
Ringtones
10 different ringtones have been provided by R3(s) for selection. Path to set on the phone:
Press the key →Settings→Basic Settings→Ringtones。
For the selected ringtone,there is a dot inside the circle. Press the key 、 to select
other ringtone for playing.
Set ringtones via Web:Account→Basic→Ring tones.
Headset Memory Mode
Headset memory mode can be used to control the default device to make or answer calls. This
function is disabled by default, which means the phone will communicate with others by hand-
free when pre-dial or making calls from history or directory, and so is the situation that
pressing “Answer” soft key to accept an incoming call. Once this function is enabled, the phone
Page 65

R3(S) IP Phone User Manual
ATCOM TECHNOLOGY CO., LIMITED www.atcom.cn65
will make or answer calls by headset.Long press can change the status of the
“Headset Memory Mode”.
This function can be configured on the phone only: Press →Settings→Basic
Settings→Headset Memory Mode.
Advanced Settings
Password will be requested while accessing the page of “Advanced Settings”. This password
isthe same as theuser’s(“admin”) to access.
Accounts
Up to 4 accounts supported by R3(s), path to set the account info on phone:Press
→Settings→Advanced Settings→Input password→Accounts.
Page 66

R3(S) IP Phone User Manual
ATCOM TECHNOLOGY CO., LIMITED www.atcom.cn66
Status
Description
Empty
The account has not been configured yet
Registered
The account has been registered already
Register Failed
The
account is register failed
Disabled
The account is disabled
Select the account and press the soft key “Enter”to access the page of account setting.
Item
Description
Activation
The status of account
,
the default is
”
Enable
”,if set this as
“Disable”,the account will be forbidden.
Page 67

R3(S) IP Phone User Manual
ATCOM TECHNOLOGY CO., LIMITED www.atcom.cn67
Lable
It will
show
on the phone, can skip this item
Display Name
Parameter that in the SIP, if the SIP Server is supportable, this name
will show on the phone of callee
Register Name
The register ID, supplied by SIP Server, ca
n skip this item
User Name
Account ID
Password
Password for account
SIP Server
The address that accounts needed to register from
Outbound
Status
The status of Outbound Server, “off” by default
Outbound Proxy
IP address of Outbound Agency
Stun Status
The status of Stun Server,
“
off”
by default
Stun Server
IP address of Stun Server
Configure account via web:Account→Basic
Set Password
Page 68

R3(S) IP Phone User Manual
ATCOM TECHNOLOGY CO., LIMITED www.atcom.cn68
The password for Advanced Settings also is used for Web access as the role “admin”.Path to
set password on phone: Press →Settings→Advanced Settings→Input password→
Set Password.
Item
Description
Current PWD
The current password for web access as the role of “admin”, it’s
“admin” by default.
New PWD
To set the new password,
blank is acceptable.
Confirm PWD
Input t
he new password again, to confirm the new password.
Set password via Web:Phone→Security.
Page 69

R3(S) IP Phone User Manual
ATCOM TECHNOLOGY CO., LIMITED www.atcom.cn69
Network
Path to set network parameters on phone:Press →Settings→Advanced Settings→
Input the password→Network.
LAN Port
Connect the phone with local network via LAN port, to gain IP address in 3 ways: DHCP, Static,
PPPoE.Set the LAN port via Web:Network→ Basic.
DHCP
The phone gains IP address via DHCP by default.
STATIC IP
If the phone gains IP address via Static IP, user must input the IP address info manually.
Page 70

R3(S) IP Phone User Manual
ATCOM TECHNOLOGY CO., LIMITED www.atcom.cn70
PPPO E
If the phone gains IP address via PPPoE, user must input username/password of PPPoE, and
PPPoE server or ISP support will be requested in this way.
PC Port
Only bridge mode support by PC port.
VLAN
The feature of VLAN must be supported by network switch, and by default this feature it’s not
activated on R3(s).
Page 71

R3(S) IP Phone User Manual
ATCOM TECHNOLOGY CO., LIMITED www.atcom.cn71
Set the VLAN via Web:Network →Advanced→VLAN.
Webserver Type
Webserver type include HTTP and HTTPS, different access port will be required by different
access type, user is able to confirm the port info at the webpage, HTTP & HTTPS are both
permitted by default.
Set Webserver type via Web:Network→Advanced→WebServer→Type.
VPN
Page 72

R3(S) IP Phone User Manual
ATCOM TECHNOLOGY CO., LIMITED www.atcom.cn72
R3(s) support the feature of VPN, and this feature must be supported by VPN Server.
Set the VPN via Web:Network →Advanced→VPN.
Reset to factory
Once reset to factory, all parameter settings will back to the factory default value, and all
configuration will be cleared, users must be careful on this.
Reset to factory via Web:Phone→Upgrade→Reset to Factory.
Page 73

R3(S) IP Phone User Manual
ATCOM TECHNOLOGY CO., LIMITED www.atcom.cn73
4.3.7、Display
For more convenient, users are able to change wallpaper and backlight of the main LCD
display and the BLF LCD display.
Wallpaper
There are 5 different default pictures and you can upload defined pictures by via web, then
press the soft key “Switch” or the key 、 for modification
Set up wallpaper via web : Phone→ Preference → Wallpaper
Page 74

R3(S) IP Phone User Manual
ATCOM TECHNOLOGY CO., LIMITED www.atcom.cn74
Backlight
Backlight is the brightnessof LCD, also it has been defined as 9 different grades. The number
“9” means the lightest.
Page 75

R3(S) IP Phone User Manual
ATCOM TECHNOLOGY CO., LIMITED www.atcom.cn75
To adjust thebrightness of LCD expansion module, it must be connected with the hosted phone.
Otherwise the host phone will indicated “No expansion module”.
5、Advanced Feature
5.1、Codecs
R3(s) support multiple codecs, users can select the codes via Web.
means to enable the item of “Disabled Codes”, means to disable the item of
“EnabledCodes”;click the button or to sort all enabled codes, the top item has the
highest priority.
Note:Multiple different items of G723,iLBC should not activated simultaneously.
5.2、Capture and Upgrading
Page 76

R3(S) IP Phone User Manual
ATCOM TECHNOLOGY CO., LIMITED www.atcom.cn76
Click the button “ Start” to start the capture and click the button “Stop” to end the capture.
Then click the button “export” to download the capture file.
Before upgrading the firmware of phone, users are suggested to check the version of current
firmware. Click the button “Choose file”to select the target local file and click “Upgrade” to
process upgrading, this will cost a couple of minutes. And after reboot, the phone will be
upgraded successfully.
5.3、Auto Upgrade
Page 77

R3(S) IP Phone User Manual
ATCOM TECHNOLOGY CO., LIMITED www.atcom.cn77
User is able to configure the phone to upgrade automatically.
Item
Description
Provisioning
Server
The address to save control file for auto upgrading, it can filled by http
、
https、tftp server、ftp server,for example,
tftp://192.168.1.111/upgrade_control_file.xml
User Name
The username to access the file server
Password
The password to access the file server
AES Key
If the configuration file has been encrypted, the AES key will be used to
decrypt for auto-upgrading
Check New Config
If set this parameter as “On”, the phone will do some check for
upgrading, and it will upgrade automatically once the conditions are met
Repeatedly
If set this parameter as “On”, the phone will do some check for
upgrading after “Interval(minutes)”,and it will upgrade automatically
once the conditions are met
Page 78

R3(S) IP Phone User Manual
ATCOM TECHNOLOGY CO., LIMITED www.atcom.cn78
Interval(minutes)
This parameter is configurable once the Repeatedly is
“On” Weekly
If set this parameter as “On”, the phone will do the check for upgrading
at a certain time in every week
Time
The time range that the phone do the check for upgrading every week,
and it’s configurable once the Repeatedly is “On”
Day of week
The day of week that the phone do the check for upgrading every week,
and it’s configurable once the Repeatedly is “On”
The sample of control file:
--------------------------------------------------------------------------------------------
<?xml version="1.0"?>
<AUTOUPDATE Model="R3">
<Config URL="http://www.atcom.com.cn/temp/$MAC.tar.gz"/>
<PhoneBook URL="tftp://192.168.1.190/phonebook.xml"/>
<Firmware MD5="cadfadfaqeqedadfadfa"
URL="http://www.atcom.com.cn/temp/R3-V1.5.1.fw"/>
</AUTOUPDATE>
-------------------------------------------------------------------------------------------$MAC.tar.gz refers to the specified files that named as the phones’ MAC address,the phone
will find the tar.gz file which named as its MAC addressautomatically once a phone uses this
control file to upgrade the Config file at the specified location, for example, a R3(s)’s MAC
address is EA:F5:GA:54:4D:DR, the corresponding control file should name as
EAF5GA544DDR.tar.gz。
MD5is the property of a file, and it’s always used for integrity checking, you can get it by using
specified software. When upgrade the Firmware, the phone will compare the firmware’s MD5
with the specified MD5, and it will refuse to upgrade if them are not the same.
5.4、Export & Import configuration file
Page 79

R3(S) IP Phone User Manual
ATCOM TECHNOLOGY CO., LIMITED www.atcom.cn79
If user wants to set the same configuration on multiple phones, there is an easy way that
export the configuration file from one phone and then import this file into other phones. This
operation can be completed via Web only.
Note:This operation is available for the same models only.
5.4.1、Export configuration file
There is two ways to export the configuration files,
Don’t check the “Export User Data” and click “Export” directly, it will export the template of
the configuration file;
Check the “Export User Data” and then click “Export”, it will export a configuration file that
carries with user’s configured data.
To modify the exported configuration file, you should to decompress it until you get a file
names as configuration.
The content of configuration file listed as below,
Page 80

R3(S) IP Phone User Manual
ATCOM TECHNOLOGY CO., LIMITED www.atcom.cn80
5.4.2、Import configuration file
Click the button “Choose file” to select the target file for importing, and then click the button
“Import”. The phone will be rebooted a couple of minutes later, and import successfully.
Note:If some part of the configuration file has been modified manually, it must be re-
compressed as the format of “tar.gz”, it should be compress by linux.
5.5、Export System log
When the phone doesn’t working well, System log is the best assistant tools for trouble
shooting, all operation details has been recorded. This operation is available via Web only.
Item
Description
Log Location
You can import the system log to local PC or send to remote
Server.
Server Name
User must fill the address of server if you choose to export the system
log to remote server.
Log Level
It defines thedetail of system log as 5 different levels, Fatal, Error,
Warning, Info, and Debug. The Debug level is the most detailed.
5.6、Dial plan
Page 81

R3(S) IP Phone User Manual
ATCOM TECHNOLOGY CO., LIMITED www.atcom.cn81
The customized Dial Plan are available on R3(s), for example , the rule of replacement,
Instant Calling, Area code, Restriction of Outbound.
Before customizing the dial plan, user must learn the basic grammar as below,
. R
epre
sent a
character or multiple ones
,
e.g.,
“6.” can match
“66”,”678”,”6plus” and so on
x R
epresent one character, e.g.,
“6x” can match
“61”,”62”, “ 6s”
and so on
[]
Represent a character in one range, e.g., “ 83[0-5]18618”can
matche”83018618”,”83488618” and so on
()
Represent the combination of characters, e.g., “([1-9])([2-7])3” can match
“923”,”153”,”773” and so on
$
Add a number after the character “$” to define the location of the characters,
e.g., use the prefix “ 8([1-3])(.)” to replace “7$2”, the phone will call “7837”
after dialing out “82837”
Note:Any operations (add, modify or delete) on the current dial plan will be not effective until
click “Save”.
5.6.1、Replace Rule
Dial plan “Replace Rule” means to replace a batch of complicated character string by some
simple characters, to make a speed dial.
Item
Description
Sample
Page 82

R3(S) IP Phone User Manual
ATCOM TECHNOLOGY CO., LIMITED www.atcom.cn82
Number
The string works as replacer, not null
Set Numberas
“6”,
Set Replace as”6032”,
Set Account as “1,3,4”.
It means when dial 6, the
phone will dial 6032 via
the 1st available line in
account 1,3,and 4
automatically
Replace
The string that to be replaced, not null
Account
The account to apply this dial plan,
blank or 1 to 4 is valid. Number 1 to 4
means account 1 to 4. If you want to
apply this rule to account 1、3 and
4,just type in 1,3,4; And if keep it as
blank, it means applying this dial plan to
all accounts
Add
Multiply replace rules can be configured
in one phone, after one replace dial plan
configured, click this button to add a
new one
Edit
The existed replace dial plans are
editable. The specified dial plan should
be selected until it is covered with
orange and the input fields “Number”
and “Replace” shows the details
correctly. After modifying, click button
“Edit” to make it to be effect
Delete
Delete one added or saved replace dial
plan or multiple ones, click the frame
after the specified replace dial plan
before delete it, and then click button
“Delete”
Save
Any alteration won’t take effect until the
button “Save” is clicked.
5.6.2、Dial-now
Dial plan “Dial-now” permits the corresponding phone to be dialed instantly without pressing
the soft key “Dial”, once the input has been matched. It works like a hotline.
Page 83

R3(S) IP Phone User Manual
ATCOM TECHNOLOGY CO., LIMITED www.atcom.cn83
Iten
Description
Sample
Dial
-
now Rule
The string to be dialed out automatically by
the phone
Set “Dial-now Rule”
as 6xxx, keep
“Account” as null
It means the phone
will use the 1st
available account to
call 6033 after “Dialnow Time-out”
seconds when
inputting four figures
begin with 6
Note:Dial-now rule
is different with
hotline. The Dial-now
rule will take effect
when input numbers
matches the dial
plan, and hotline
takes effect in
situation that the
phone is in dialing
state
Account
The account to apply this dial plan, blank
or 1 to 4 is valid. Number 1 to 4 means
account 1 to 4. If you want to apply this
rule to account 1、3 and 4,just type in
1,3,4; And if keep it as blank, it means
applying this dial plan to all accounts
Add
Multiply dial-now rules can be configured in
one phone, after one dial-now dial plan
configured, click this button to add a new
one
Edit
The existed dial-now dial plans are
editable. The specified dial plan should be
selected until it is covered with orange and
the input fields “Number” and “Dial-now”
shows the details correctly. After
modifying, click button “Edit” to make it to
be effect
Delete
Delete one added or saved dial-now dial
plan or multiple ones, click the frame after
the specified dial-now dial plan before
delete it, and then click button “Delete”
Save
Any alteration won’t take effect until the
button “Save” is clicked.
Set “Dial-now Time-out” via web: Phone→Features→General Information→Dial-now
Time-out (secs).
Page 84

R3(S) IP Phone User Manual
ATCOM TECHNOLOGY CO., LIMITED www.atcom.cn84
5.6.3、Area Code
Dial plan “Area Code” has been defined to identify each different area. To call a phone number
of other areas, user must add the area code to be in front of the phone number. For
convenience, area code has been recommended to be configured while frequently dialing to
that type of phone number.
Item
Description
Sample
Code
The area code dialed before the
number
Set “Code
” as “0086577
”,
Set “Account” as “4”,
Set “Minimum length” as
“5”.
It means when dialing
83018618 with the 4
th
account, the phone will dial
0086577 before it.
Note:If the length of
the number input in the
dial UI is not between
minimum length and the
maximum length, area
code will not take effect
Minimum length
The minimum length of the number
input to active the area code dial plan
Maximum length
The maximum length of the number
input to active the area code dial plan
Account
The account to apply this dial plan,
blank or 1 to 4 is valid. Number 1 to 4
means account 1 to 4. If you want to
apply this rule to account 1、3 and
4,just type in 1,3,4;And if keep it as
blank, it means applying this dial plan
to all accounts
Confirm
Apply this dial plan
Cancel
Recover all input fields to the state
that saved at latest time
5.6.4、Block Out
Page 85

R3(S) IP Phone User Manual
ATCOM TECHNOLOGY CO., LIMITED www.atcom.cn85
Dial plan “Block out” is used to prohibit the phone number outgoing call from some accounts.
Iten
Description
Sample
Block Out Number
The number that
prohibited
Set “Block Out Number
1”as”10086”
Set “Account” as “2,4”
It means the phone will
enter the “Call End” UI
when dial “10086” with
account 2 and 4
Accounot
The account to apply this dial plan,
blank or 1 to 4 is valid. Number 1 to 4
means account 1 to 4. If you want to
apply this rule to account 1、3 and
4,just type in 1,3,4;And if keep it as
blank, it means applying this dial plan
to all accounts
Confirm
Apply this dial plan
Cancel
Recover all input fields to the state
that saved at latest time
Page 86

R3(S) IP Phone User Manual
ATCOM TECHNOLOGY CO., LIMITED www.atcom.cn86
6、FAQ
6.1、How to reset to factory
There are 3 methods for factory reset:
1. Factory reset via phone:
a) Press the key
b) Select “Settings”, then press the soft key “Enter”
c) Select “Advanced Settings”,then press the soft key “Enter”
d) Input the access password, then press the soft key “Enter”
e) Select “Reset to factory”,then press the soft key “Enter”
f) Press the soft key “OK”,then the phone will be reboot and resumed to factory default
settings
2. Factory reset via Web:
a) Key in the IP address of phone with a browser,
b) Access the webpage of phone as the role of “admin”, username/password is
admin/admin.
c) Select “Phone”
d) Select “Upgrade”
e) Click the button “Reset to Factory”
f) Click the button “OK”
3. Factory reset during starting:
a) Hold the key “*” and “#” while power on for 5 seconds
b) The phone will be reboot and resumed to factory default setting
Page 87

R3(S) IP Phone User Manual
ATCOM TECHNOLOGY CO., LIMITED www.atcom.cn87
6.2、Upgrade the firmware on safe mode
If the phone can’t be started successfully, user is able to upgrade the firmware on post mode,
a) Setup a TFTP Server and set the PC’s IP address as “192.168.1.200”
b) Copy the firmware file we supplied to the root menu of TFTP Server, modify the file’s name
as R3.tar.gz and decompress it, then modify the corresponding file’s name :
uImage rename Rainbow3.kn, rootfs.nand rename Rainbow3.fs, Rainbow3-
v1.8.2.22501.app rename Rainbow3.fw, logo_data rename Rainbow3.lg
c) Ensure the TFTP Server and phone are connected to the same network switch and both
reachable
d) Long Press the key “*” and “1” to upgrade the kernel file, long Press the key “*” and “2” to
upgrade the firmware file, long Press the key “*” and “3” to upgrade the App file, long
Press the key “*” and “4” to upgrade the logo file, and then plug in power until upgrade
word displayed on LCD
e) The phone will start downloading file from TFTP server
f) After downloading completed, the phone will be automatically upgraded
g) After upgrading completed, the phone will be started with the factory default settings
6.3、How to make IP Peer to Peer call
To make a IP peer to peer call, user should press “*”to input “.” that in the IP address. For
example, to dial “192.168.1.100”, just need input “192.168.1.100”.
Page 88

R3(S) IP Phone User Manual
ATCOM TECHNOLOGY CO., LIMITED www.atcom.cn88
7、Troubleshooting
7.1、The phone is failed to register to SIP server
1. First of all, check the IP address. If the LAN port is DHCP, please ensure the DHCP server
has been enabled.
2. Check the network gateway
3. Check the DNS
4. Make sure the input account matched the one provided by Service Provider
5. Make sure SIP Server has been enabled already
6. Make sure the Port of SIP Server, it’s 5060 by default
7. If the pbx account is public IP, please check the RPort and Stun
8. If the pbx account is public IP, please check the keep alive
7.2、The phone is failed to gain IP address
1. Make sure the network cable has been plugged into the LAN port
2. Make sure the network cable or port of network switch are working fine,
3. Make sure the DHCP server has been enabled, and there are available IP address
4. Try to set the LAN port as Statics IP
7.3、Only one party can hear from another on calling
1. Try to make a IP peer to peer call, to make sure the mic and speaker are working fine
2. Enable STUN via Web
3. Set the address of STUN Server, for example stun.sipgate.com
4. Present this operation above
Page 89

R3(S) IP Phone User Manual
ATCOM TECHNOLOGY CO., LIMITED www.atcom.cn89
5. Try to make a normal call again
8、Abbreviation
DND:Do Not Disturb
CFWD:Call Forward
Blind:Blind Transfer
Conf:Conference
Num:Number
SIP:Session Initiate Protocol
RTP:Real-time Transport Protocol
SDP:Session Description Protocol
VPN:Virtual Private Network
VLAN:Virtual Local Area Network
QoS:Quality of Service
Syslog:System log
UDP:User Data Protocol
TCP:Transmission Control Protocol
TLS:Transport Layer Security Protocol
BLF:Busy Lamp Field
DNS:Domain Name System
SRTP:Secure Real-time Transport Protocol
NTP:Network Time Protocol
VAD:Voice Activity Detection
CNG:Comfort Noise Generator
 Loading...