

Page 1

CT1X IP Phone User Manual
Version: 2.0
2017-03-20
Page 2

CT1X IP Phone User Manual
ATCOM TECHNOLOGY CO., LIMITE
www.atcom.cn
2
Content
Contact ATCOM
................................................................................................................................................................
5
1.Overview of CT1X
.......................................................................................................................................................
6
1.1.Interface
.............................................................................................................................................................
7
1.2.Hardware
............................................................................................................................................................
7
1.3.Software
.............................................................................................................................................................
7
1.4.Network
..............................................................................................................................................................
8
1.5.Management and Maintenance
.................................................................................................................
8
1.6.Protocol
...............................................................................................................................................................
8
1.7.Compliant and Certified Standard
...........................................................................................................
9
1.8.Packing list
........................................................................................................................................................
9
1.9.Installation
........................................................................................................................................................
9
2.Keypad and GUI
.......................................................................................................................................................
19
2.1.Keypad
.............................................................................................................................................................
19
2.2.Starting
............................................................................................................................................................
19
2.3.Standby
............................................................................................................................................................
20
2.4.Configuration
.................................................................................................................................................
20
3.Call Function
...............................................................................................................................................................
19
3.1.Answer the calls
...........................................................................................................................................
20
3.2.Make Calls
.......................................................................................................................................................
21
3.3.Pre-dial
.............................................................................................................................................................
21
3.4.Mutiple line dial-up
......................................................................................................................................
22
3.5.Call Hold
...........................................................................................................................................................
22
3.6.Call Transfer
...................................................................................................................................................
11
Page 3

CT1X IP Phone User Manual
ATCOM TECHNOLOGY CO., LIMITE
www.atcom.cn
3
3.7.Mute calls
........................................................................................................................................................
11
3.8.3-Way Confereces
........................................................................................................................................
14
3.3.Hang up the phone
......................................................................................................................................
15
3.10.Voicemail
.......................................................................................................................................................
16
4.Call Feature
................................................................................................................................................................
17
4.1.Call Forward
...................................................................................................................................................
30
4.2.Call Waitting
...................................................................................................................................................
34
4.3.Auto Answer
...................................................................................................................................................
48
4.4.DSS Keys
.........................................................................................................................................................
43
4.5.Key as send
....................................................................................................................................................
45
4.6.Hotline
..............................................................................................................................................................
64
4.7.Anonymous Call
............................................................................................................................................
64
4.8.Contacts
...........................................................................................................................................................
64
4.9.History
..............................................................................................................................................................
64
4.10.Message
.........................................................................................................................................................
64
4.11.Settings
.........................................................................................................................................................
64
4.12.Display
...........................................................................................................................................................
64
5.Advanced Feature
....................................................................................................................................................
64
5.1.Codecs
..............................................................................................................................................................
64
5.2.Capture and Upgrading
.............................................................................................................................
65
5.3.Auto Provision
...............................................................................................................................................
66
5.4.Export & Import configuration file
........................................................................................................
68
5.4.1.Export configuration file
................................................................................................................
74
5.4.2.Import configuration file
...............................................................................................................
75
5.5.Export System log
.......................................................................................................................................
75
Page 4

CT1X IP Phone User Manual
ATCOM TECHNOLOGY CO., LIMITE
www.atcom.cn
4
5.6.Dial plan
...........................................................................................................................................................
76
5.6.1.Replace Rule
......................................................................................................................................
77
5.6.2.Dial-now
...............................................................................................................................................
78
5.6.3.Area Code
............................................................................................................................................
79
5.6.4.Block Out
.............................................................................................................................................
80
6.FAQ
................................................................................................................................................................................
82
6.1.How to reset to factory
..............................................................................................................................
82
6.2.Upgrade the firmware on safe mode
...................................................................................................
83
6.3.How to make IP Peer to Peer call
..........................................................................................................
76
7.Troubleshooting
........................................................................................................................................................
78
7.1.The phone is failed to register to SIP server
....................................................................................
78
7.2.The phone is failed to gain IP address
................................................................................................
78
7.3.Only one party can hear from another on calling
...........................................................................
85
8.Abbreviation
...............................................................................................................................................................
79
9.FCC Caution
................................................................................................................................................................
80
Page 5

CT1X IP Phone User Manual
ATCOM TECHNOLOGY CO., LIMITE
www.atcom.cn
5
Contact ATCOM
Overview of ATCOM
ATCOM is the leading VoIP hardware manufacturer in global market. We have been keeping
innovating with customer’s needs oriented , working with partners to establish a total solution
for SMB VoIP with IP phone , IP PBX and Asterisk cards.
With over 10 years’ experience of R&D , manufacturing and service in network and VoIP filed;
mission of creating the biggest value for IP terminals , we commit ourselves in supplying the
competitive IP phone and other terminals for IP PBX , soft switch , IMS , NGN providers and
carriers; supplying the competitive total VoIP solution for SMB market. We keep improving the
customer’s experience and creating the bigger value with our reliable products. Until now, our
VoIP products have been available in 100+ countries and used by millions of end users.
Contact Sales
Address
Area C, A2F , Block 3 ,Huangguan Technology Park , #21
Tairan 9th Rd, Chegongmiao , Futian District , Shenzhen China
Tel
+ (86) 755-83018618-8806
Fax
+ (86) 755-83018319
E-mail
sales@atcom.com.cn
Contact Technical Support
Tel
+ (86) 755-83018618-8003
E-mail
Support@atcom.com.cn
Website Address
:
http://www.atcom.cn/
Download Center
:
http://www.atcom.cn/download.html
Page 6

CT1X IP Phone User Manual
ATCOM TECHNOLOGY CO., LIMITE
www.atcom.cn
6
1. Overview of CT1X
CT1X
Type
POE
Power adapter
CT10
No
Necessary
CT11
Yes
Optional accessory
Page 7

CT1X IP Phone User Manual
ATCOM TECHNOLOGY CO., LIMITE
www.atcom.cn
7
1.1. Interface
Power Input
DC 5V-1000mA or POE
LAN Port
RJ45
PC Port
RJ45
Headset Jack
RJ9
1.2. Hardware
LCD
132*52
CPU
400MHz Dual-Core
LED Indicator
1 Status Light
1.3. Software
Sip 2.0 (RFC3261) and other related SIP RFCs
1 SIP line registration
STUN
Jitter Buffer, VAD,CNG
G711A, G711U, G722, G726-16, G726-24, G726-32, G726-40, G729, L16, iLBC_13_3,
iLBC_15_2
Echo Cancellation
SIP Domain name, Authentication and Backup SIP Server
DTMF(RFC2833, Inband, SIP INFO)
Call transfer, Call forward, 3-way conference, Call hold, Call back
DND(Do Not Disturb), Auto answer, Blacklists, Block Call-ID, Block Anonymous call, Dial
plan, IP call
Phone book with 400 contacts and 200 blacklists
Call History with 400 records include answered calls, missed calls, dialed calls and forward
calls
Auto update via HTTP, HTTPS, FTP, TFTP, DHCP, RPS and PNP
Syslog
SNTP,NTP
Customized Ringtone
Daylight Saving time
VLAN, OpenVPN, Span to PC port, QoS
802.1X, LLDP
Page 8

CT1X IP Phone User Manual
ATCOM TECHNOLOGY CO., LIMITE
www.atcom.cn
8
Enterprise WIFI
WEB access with different login level
Soft button: soft button *4
Redundancy SIP server
Multi-language: English, French, Hebrew, Russian, Spanish, Chinese, Persian, Polish,
Portuguese, Turkish, German, Italian
1.4. Network
LAN/PC: Support Bridge mode
Support VLAN
Support Open VPN
Support DHCP, STATIC IP
Primary/Secondary DNS Server
Support QoS
Support LLDP
Support 802.1X
Support Span pc port
Support Enterprise WIFI
Web access via HTTP&HTTPS
1.5. Management and Maintenance
Support firmware updating under safe mode
Support different level user management
Configuration via web , keyboard
Support multi-language
Firmware and configuration file auto provision
Support system log
1.6. Protocol
IEEE 802.3 /802.3 u 10 Base T / 100Base TX
DHCP: Dynamic Host Configuration Protocol
SIP RFC3261, RFC3262, RFC3263, RFC3264, RFC3265, RFC2543, RFC3489, RFC3842,
RFC3515, RFC2976, RFC3428, RFC2327, RFC2782, RFC1889
TCP/IP: Transfer Control Protocol/Internet Protocol
RTP: Real-time Transport Protocol
RTCP:RTP Control Protocol
DNS: Domain Name Server
TFTP: Trivial File Transfer Protocol
Page 9
CT1X IP Phone User Manual
ATCOM TECHNOLOGY CO., LIMITE
www.atcom.cn
9
HTTP:Hypertext Transfer Protocol
FTP:File Transfer Protocol
1.7. Compliant and Certified Standard
CE: AGC01180140201E2,AGC01180140202E2
Comply with ROHS in EU
Comply with ROHS in China
Operation temperature: lower than 60° C
Storage temperature: lower than 60° C
Humidity: 10 to 90% no dew
1.8. Packing list
Model
CT1X
Telephone
1 Unit
Headset
1 Unit
Headset cable
1 Unit
Power adapter
Optional for CT10
Standard for CT11
Network Cable
1 Unit,1.5 meters
Quickstart Guide
1 Unit
1.9. Installation
1.Power on
1. Plug in the power jack with DC 5V/1000mA or POE
2. All led will be lighted once and then turn off
3. After absolute boot up, login led will be lighted in red and come into standby mode.
Page 10
CT1X IP Phone User Manual
ATCOM TECHNOLOGY CO., LIMITE
www.atcom.cn
10
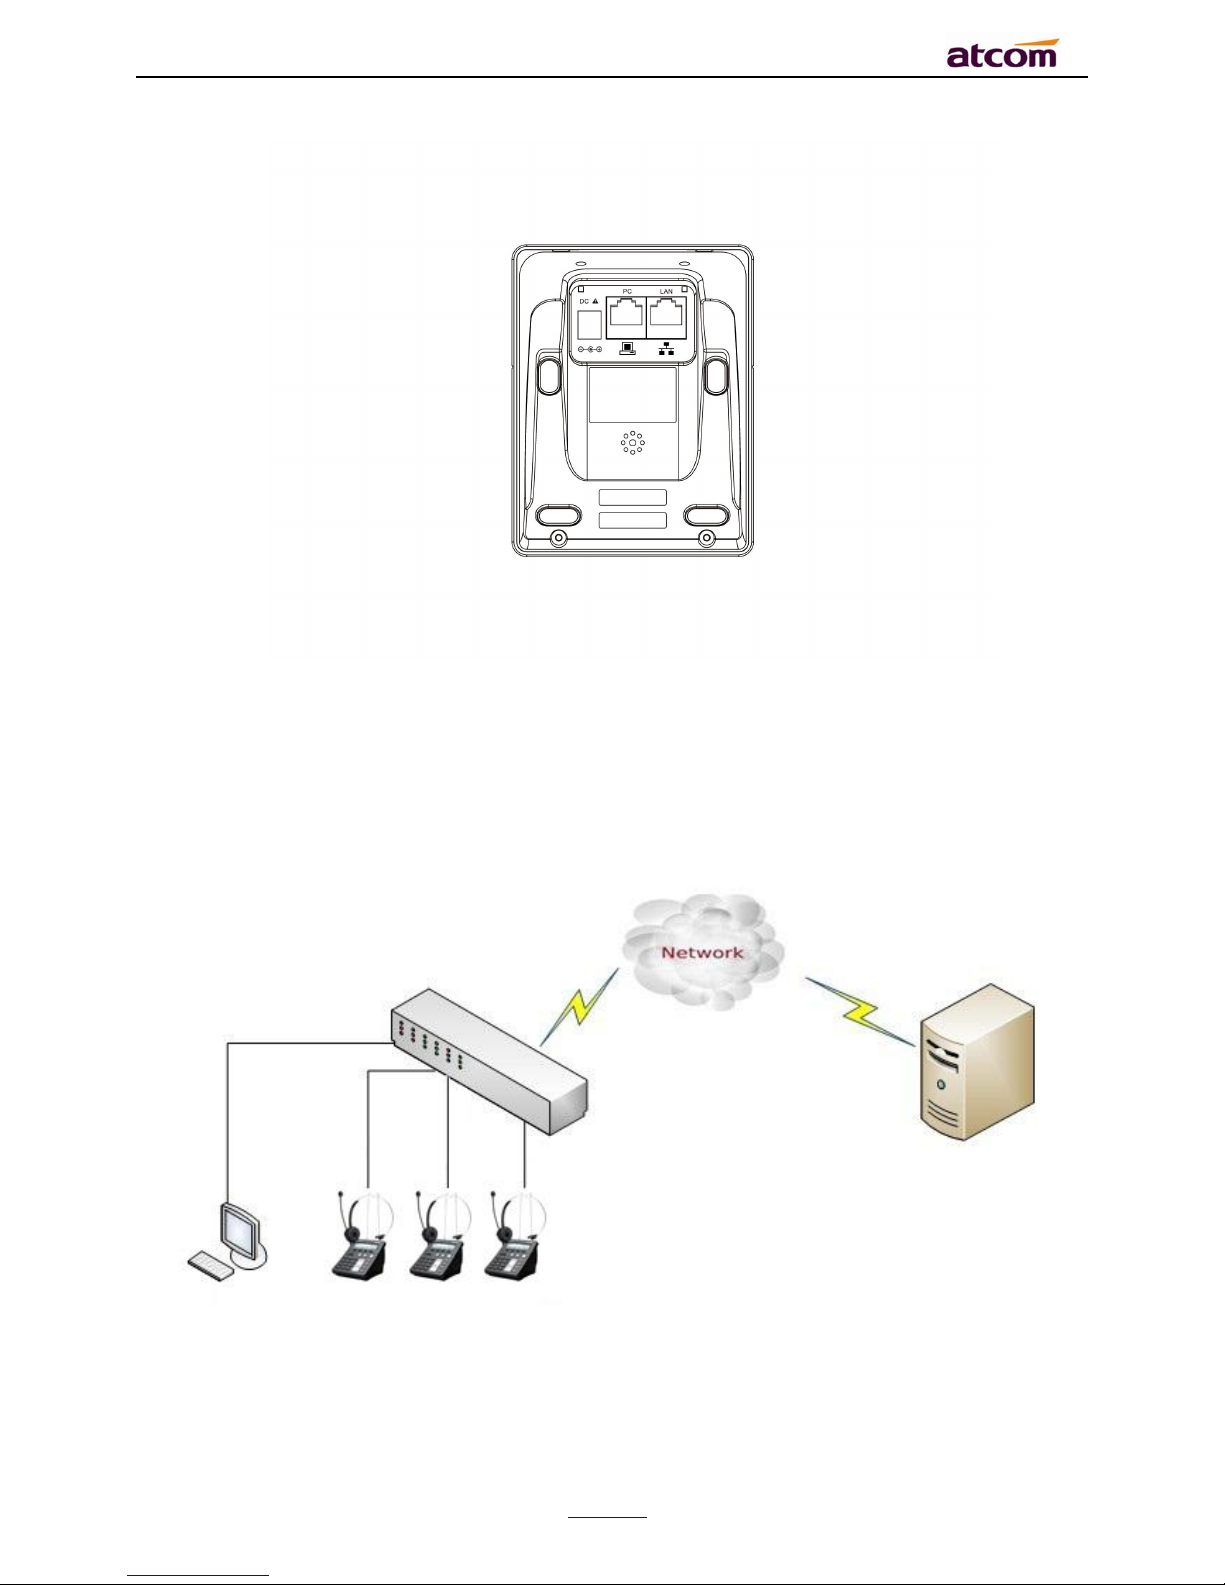
2.Connect to network
CT1X is able to be connected with network via LAN port. Under the Bridge mode, other devices
(Laptop, IP phone) is able to access network via the PC port of CT1X.
Page 11
CT1X IP Phone User Manual
ATCOM TECHNOLOGY CO., LIMITE
www.atcom.cn
11
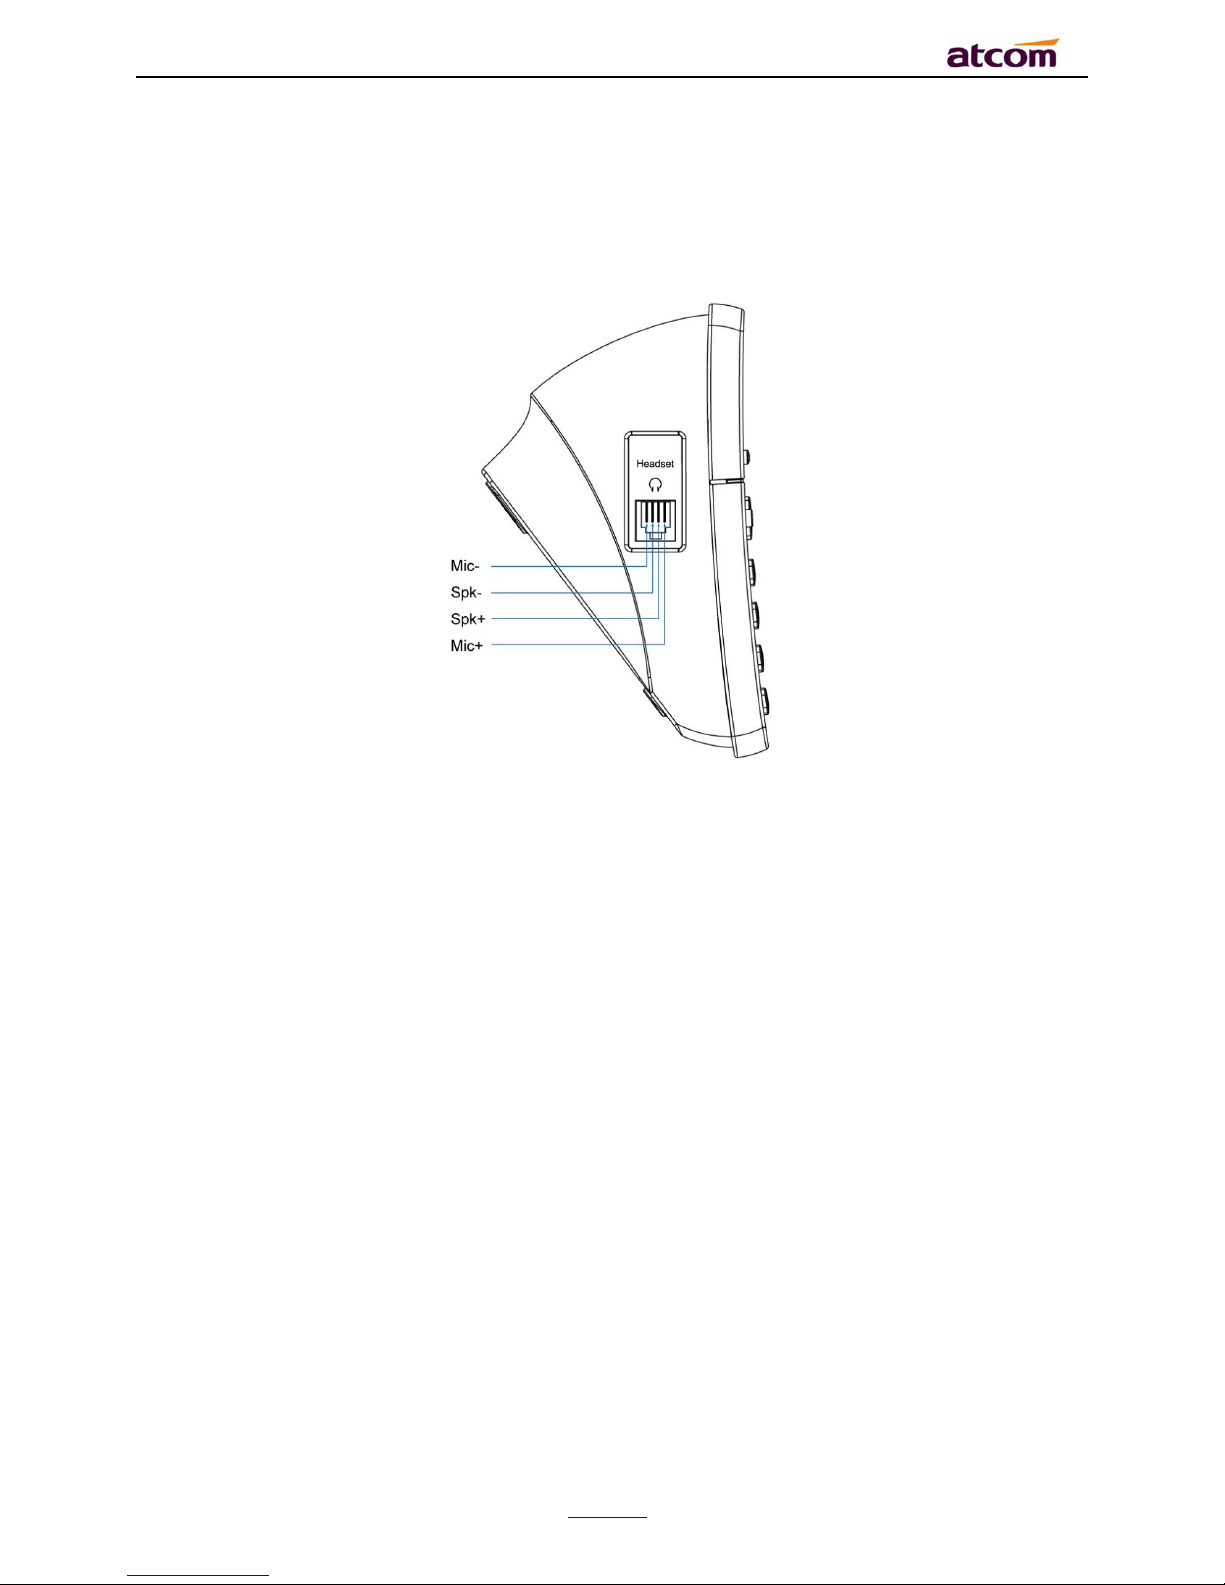
3.Connect to Headset
Connect the RJ-9 headset to the headset jack on the left side of the phone. The pin sequence
of RJ9 port on the phone is like following picture:
2. Keypad and GUI
2.1. Keypad
Page 12

CT1X IP Phone User Manual
ATCOM TECHNOLOGY CO., LIMITE
www.atcom.cn
12
Description of the keys and Screen:
Page 13

CT1X IP Phone User Manual
ATCOM TECHNOLOGY CO., LIMITE
www.atcom.cn
13
Indicator Status
1. Login indicator
LED Status
Frequency
Description
Red /Flash
500ms on/500ms off
LAN Disconnected
Red-SIP Unregistered
OFF-SIP Registered
2. Mute indicator
Soft buttons
Press to select an feature shown in the soft button features
LCD Screen
Display screen for the phone: It shows the date, time, phone
number, incoming caller’s ID(if available),line/call status,
extension numbers and the soft button features.
Navigation button
1. Move cursor up and down when pressed in menu reviewing.
2. Adjust output volume when pressed in talking state
3. Adjust ringer volume when pressed in idle state.
1~9,*#
For entering numbers, letters or characters
Programmable
Key
Function key can be defined as BLF, Speed dial key, CFWD, Hold,
Xfer, ConF, DND, Redial, Voicemail.
Menu
Enter Keypad menu settings
Mute button
Mute/un-mute mic-phone in talking state
Headset button
Pick up phone to make outgoing calls or answer incoming calls.
MWI
Message waiting indicator/ Ringing indicator
Login button
1. Press to enter login interface to input SIP account username
and password to register to sip server.
2. Press in login-ed state to input SIP account password to logout.
Page 14

CT1X IP Phone User Manual
ATCOM TECHNOLOGY CO., LIMITE
www.atcom.cn
14
LED Status
Frequency
Description
Red-Mute
OFF-Unmute
3. Voicemail indicator
LED Status
Frequency
Description
Red/Flash
500ms on/500ms off
New message
Red/Flash
250ms on/250ms off
Call ringing
Red-Normal working
OFF-No new message
4. Call indicator
LED Status
Frequency
Description
Red-In a conversation
Red/Flash
500ms on/500ms off
On-hold
OFF-Idle state
When boot up, all indicators will be lighted once.
When phone is stand by, all the indicators are off, WMI indicator will be lighted when the
phone is working.
When updating firmware, all indicators will be flash in frequence 1s on/ 1s off.
2.2. Starting
When start on the phone, it turns to standby status in about 50 seconds.
Page 15
CT1X IP Phone User Manual
ATCOM TECHNOLOGY CO., LIMITE
www.atcom.cn
15
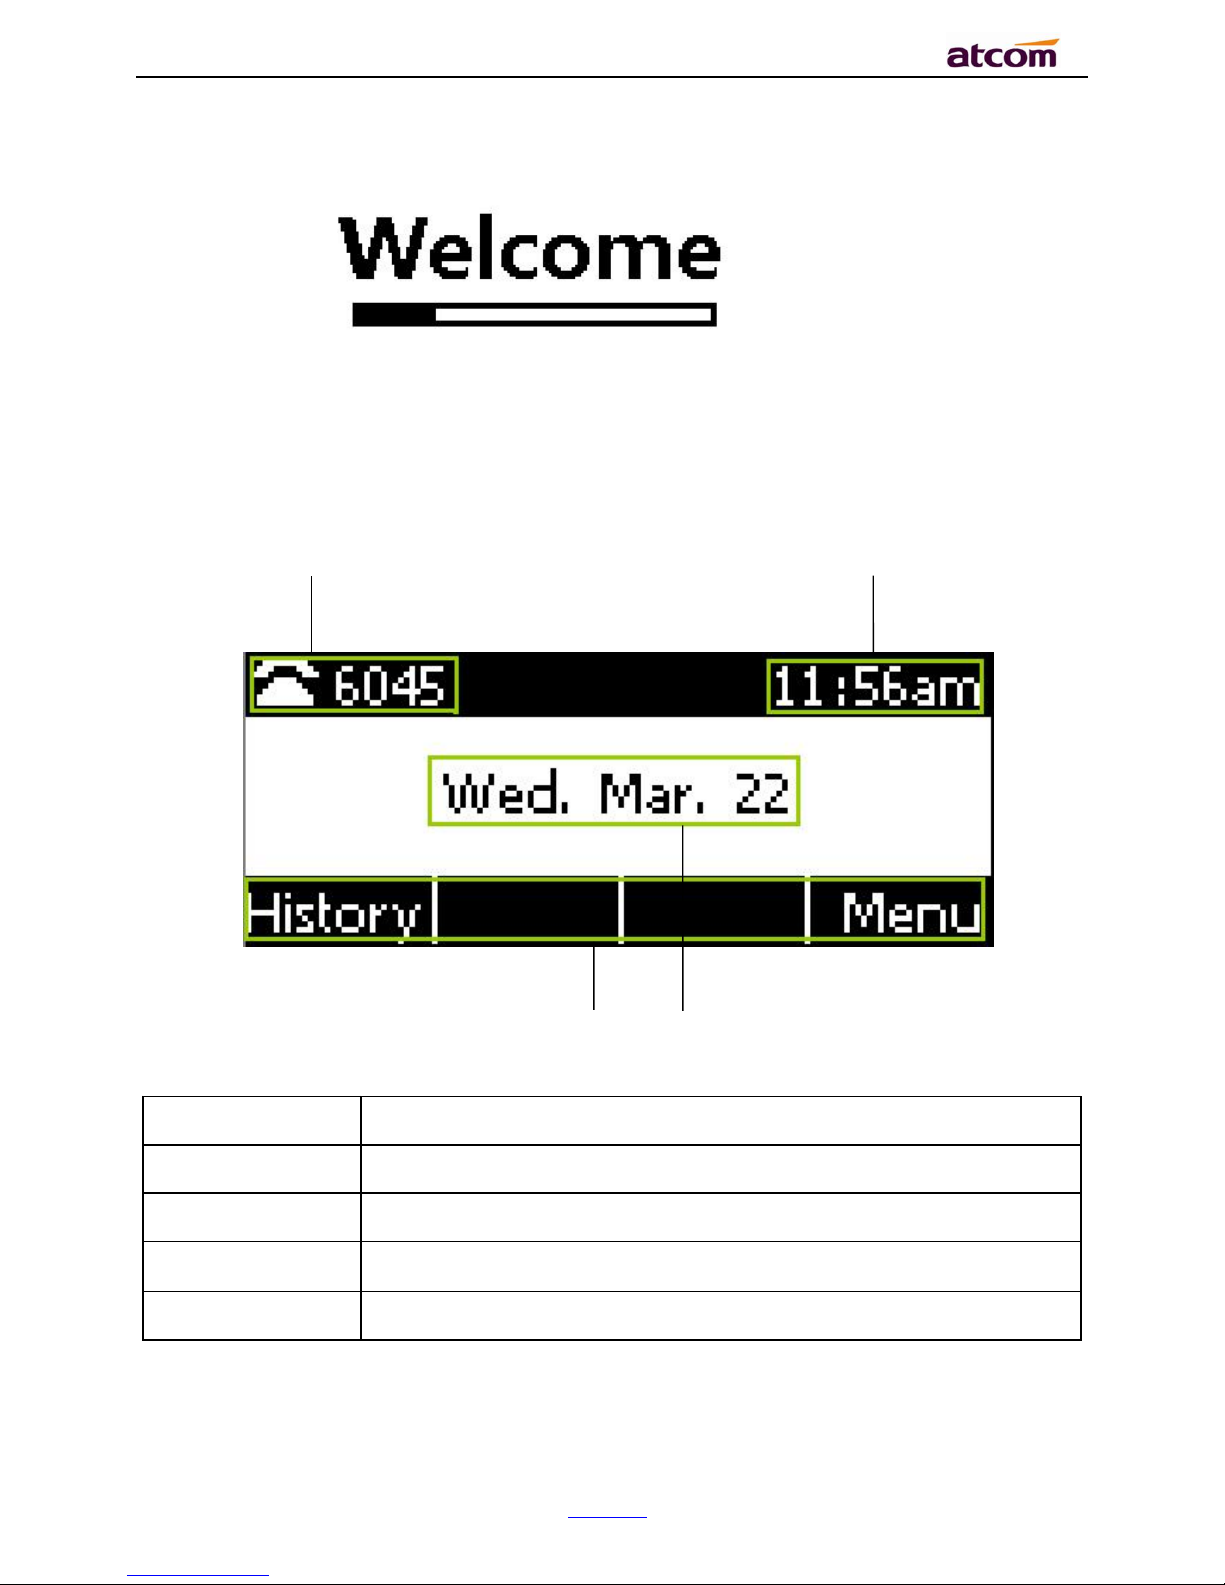
2.3. Standby
1 2
3 4
Area Item
Description
1
Status: to indicate the call status
2
Time
3
Softkey:”History”, “Menu”
4
Date
Page 16
CT1X IP Phone User Manual
ATCOM TECHNOLOGY CO., LIMITE
www.atcom.cn
16
Icon on Standby UI
Icon
Description
The account is registered successfully.
The account is not registered successfully.
The line is being occupied for dialing.
New incoming call
Call hold.
Unavailable Network.
Calling via headset.
Call Forward is activated.
New Voicemail.
Auto-Answer is activated.
DND is activated
2.4. Configuration
Press the “Menu” key to enter the Main Menu:
Page 17

CT1X IP Phone User Manual
ATCOM TECHNOLOGY CO., LIMITE
www.atcom.cn
17
Move the navigation key and press the softkey “Enter” or input the corresponding Number key
Select the item of Main Menu:
Number Key“1”
Enter “Status”
Number Key“2”
Enter “Feature”
Number Key“3”
Enter “Directory”
Number Key“4”
Enter “History”
Number Key“5”
Enter “Message”
Number Key“6”
Enter “Settings”
Number Key“7”
Enter “Display”
2.4.1. Status info
It’s able to check the status info via LCD Display or Web.
And the basic status and details status will be optional displayed on LCD display
1. Basic Status——IP address.MAC address. Firmware version。
2. Details Status——Network info. Production info and Account info in details.
Basic Status
You’re able to check the basic status as below:
1. Press the “Menu” key and select the “Status” of Main Menu.
2. Move the navigation key, the status display the Model, IP, MAC, Firmware, More
Page 18
CT1X IP Phone User Manual
ATCOM TECHNOLOGY CO., LIMITE
www.atcom.cn
18
Details Status
Select “More” and then press the softkey “Enter” to check details info, and move the
navigation key to check more.
Press the softkey “Enter” to check status info, and “Back” to return the Basis Status page.
Check the Status info via Web
1. Check the IP address of IP phone;
2. Type the IP address on a web browser;
3. Input the username and password, the default user and password for Administrator is
(admin, admin), for general user is (user, user), and then press “Enter”.
4. By default, the Status info will be displayed.
Page 19

CT1X IP Phone User Manual
ATCOM TECHNOLOGY CO., LIMITE
www.atcom.cn
19
3. Call Function
3.1. Answer the calls
When there is an incoming call, phone will remind user with ringing. There are 2 ways to
answer the call:
A. Answer by headset
Keep your microphone connected with the RJ9 headset jack, when there is an incoming call,
press and talk with the caller. If you want to hang up, please press again.
B. Answer by softkey
When there is an incoming call, please press the first soft button to answer it.
3.2. Make Calls
A. Use the headset
Press Key, input the phone number and press soft key "Send" to dial the number.
When caller hear the tones of “du~~du~~” and the phone number your dialed is being
displayed on the LCD, the phone at the side of being called should be ringing. If the called
party answers this calling, the call is established and the calling timer is started immediately.
B. Dial from phone book
1. Press “Menu” key to enter the menu and choose “Contact” option. Press "Enter" soft key
and then find the contact person by navigation keys. When the certain contact person is
highlighted, press "Dial" or just pick up the handset to call this number.
2. Pick up the headset, press "Contact" soft key, then find the contact person and press
"Dial" soft key.
C. Dial from call history
Page 20

CT1X IP Phone User Manual
ATCOM TECHNOLOGY CO., LIMITE
www.atcom.cn
20
1. Press “Menu” key to enter the menu and choose “History” option, then select one of call
history entry, and press "Dial" soft key or pickup the handset to call this number.
2. Pickup the headset, press "History” soft key, then select one of call history entry, and
press "Dial" soft key to call this number.
3.3. Pre-dial
It’s a method to dial a phone number immediacy at standby mode.
The method is as below:
A. Dial-up the phone number at standby mode
B. Press soft key "Dial" or Press to send out the number.
3.4. Multiple line dial-up
CT1X supports up to 8 concurrent calls. If there is a new incoming call when you’re talking on
CT1X, the new incoming call will be displayed on LCD and status indicator LED will be fast
blinking. User can press soft key "Hold" then press “Answer” to receive the new incoming call.
3.5. Call Hold
The current calling will be hold by pressing soft key “Hold” ,and the held call will be resumed
after pressing soft key “Resume”. Even on 3-way conference calling, the conference will be
held after pressing “Hold” key, and be resumed to 3-way conference after pressing “Hold”
Key again. Remember the conversation is still on hold without being ended even if hung up
under the status of hold.
3.6. Call Transfer
1. Attended call transfer
The attended transfer allows user to call a third-party before transferring the calling.
Page 21

CT1X IP Phone User Manual
ATCOM TECHNOLOGY CO., LIMITE
www.atcom.cn
21
While calling, press the "Transfer" soft key to hold the current call and dial the target number
you want to transfer to on the activated line and press “Send” soft key to call that number.
After the target party answers the call, press "Transfer" soft key again to complete the
transfer.
If the target number has been setup in the current BLF list, and you have already finished the
necessary setup on Webpage of CT1X, there is an easier way to complete the attend transfer.
While calling, press the corresponding BLF key of the target number and then press the
"Transfer" soft key, the attend transfer will be achieved.
2. Blind call transfer
The blind transfer allows user to transfer a call without speaking to the third party. On the user
side, the call will be ended as soon as the target phone number is dialed.
Operating steps: Press “Xfer” soft key to get the transfer status, then press “Bxfer” soft key,
input the transfer target number and press “Send” soft key.
If the target number has been setup in the current BLF list, and you have already finished the
necessary setup on Webpage of CT1X, there is an easier way to complete the Blind transfer.
While calling, press the corresponding BLF key of the target number, the blind transfer will be
achieved.
3.7. Mute calls
The input audio will be not transmitted to peer phone after pressing key, To un-mute,
just press key again.
3.8. 3-Way Conference
1. While on calling, press the soft key “Conf”, input the 3rdparty’s phone number and then
press the softkey “Dial” or press the soft key “Conf” and press the corresponding BLF key
to invite the 3rdparty to join a conference call.
Page 22

CT1X IP Phone User Manual
ATCOM TECHNOLOGY CO., LIMITE
www.atcom.cn
22
2. After the third party answers the call, pressing "Conf" key again to establish the 3-way
conference
3. The initiator of 3-way conference can press the soft key "Hold" to hold the conversation
with other two parties, and press “Resume” to back to 3-way conference.
4. If the initiator hangs up the call or press the soft key “End Conf”, the conference will be
ended and the calling between the other two parties will be hung up as well.
5. The initiator of 3-way conference can press the soft key "Split" to separate the conference
call, and the calling between initiator and the other two parties are still active but under the
status of Call hold.
6. After split the 3-way conference, press the soft key “More” and then press the softkey
“Join” to resume the 3-way conference or press the softkey “Conf“ to setup a new 3-way
conference call.
3.9. Hang up the phone
1. Softkey hang up
While on calling, press the softkey “End Call” to hang up.
2. Headset Hang up
Press key at headset model, the current calling will be hung up.
3.10. Voicemail
Press “Menu” key to enter the menu to configure voicemail number if you have never
configured it previously. Otherwise, the voicemail number will be called after pressing it.
4.Call Features
In this part, we will introduce the following content:
Page 23

CT1X IP Phone User Manual
ATCOM TECHNOLOGY CO., LIMITE
www.atcom.cn
23
Call Forward
Call Waiting
Auto Answer
DSS Keys
Key as send
Hotline
Anonymous Calls
4.1. Call Forward
“Call Forward” includes “Always Forward”, “Busy Forward”, “No Answer Forward”.
“Always Forward” has the highest priority, and “Busy Forward” has the same priority as “No
Answer Forward”, that means once the function of “Always Forward” is activated, other call
forward features will be unavailable.
Any type of Call forward feature is activated, the Icon will be indicated on the LCD Display.
4.1.1. Always Forward
All incoming calls will be forwarded to target phone number once the “Always Forward”
activated, setup this feature as follow and please move the navigation to check more:
Page 24

CT1X IP Phone User Manual
ATCOM TECHNOLOGY CO., LIMITE
www.atcom.cn
24
Item
Operation
Description
Always
Press the soft key “Switch” to
setup
Switch on or Switch off the feature.
“Enable”mean this feature is
enabled,“Disable”mean this feature
is disabled.
Forward to
The Number key, “*”key, and
“#”are permitted to be input.
Setup the target phone number which
all incoming calls transferred to
On Code
The Number key, “*” key, and
“#”are permitted to be input.
The feature code to enable all incoming
calls forward, the phone will send the
feature code directly to open all
incoming calls forward
Off Code
The Number key, “*” key, and
“#”are permitted to be input.
The feature code to disable all incoming
calls forward, the phone will send the
feature code to close all incoming calls
forward directly
4.1.2. Busy Forward
It means the phone is busy once the phone is not at standby mode. Setup this feature as
below:
Item
Operation
Description
Busy
Press the softkey “Switch”
to setup
Switch on or Switch off the feature.
“Enable”mean this feature is enabled,
“Disable”mean this feature is disabled.
Forward to
The Number key, “*”key,
and “#”are permitted to
Setup the target phone number which all
incoming calls transferred to
Page 25
CT1X IP Phone User Manual
ATCOM TECHNOLOGY CO., LIMITE
www.atcom.cn
25
be input.
On Code
The Number key, “*”key,
and “#”are permitted to
be input.
The feature code to enable busy calls
forward, the phone will send the feature
code directly to open busy call forward
Off Code
The Number key, “*”key,
and “#”are permitted to
be input.
The feature code to disable busy calls
forward, the phone will send the feature
code directly to close busy call forward
4.1.3. No Answer Forward
All incoming calls will be forwarded after time out, once the feature of “No Answer Forward” is
activated. Setup this feature as below, and please move the navigation key to check more:
Item
Operation
Description
No Answer
Press the softkey “Switch” to
setup
Switch on or Switch off the feature.
“On”mean this feature is activated,
“Off”mean this feature is
unactivated .
Forward to
The Number key, “*”key,
and “#”are permitted to be
input.
Setup the target phone number which
all incoming calls transferred to
After Ring
Time
Press the key . or
softkey “Switch” to setup
Setup timer for no answer status. All
incoming calls will be forwarded after
time out once Call forward when no
answer activated.
On Code
The Number key, “*”key,
and “#”are permitted to be
The feature code to enable no answer
call forward, the phone will send the
feature code directly to open all
Page 26

CT1X IP Phone User Manual
ATCOM TECHNOLOGY CO., LIMITE
www.atcom.cn
26
input.
incoming calls forward
Off Code
The Number key, “*”key,
and “#”are permitted to be
input.
The feature code to disable all incoming
calls forward, the phone will send the
feature code directly to close all
incoming calls forward
4.1.4. Setup Call Forward Via Web
Set Call Forward via web: Phone→Features→Forward.
4.2. Call Waiting
The feature of “Call Waiting” is available by default. If switch off this feature, whatever
multiple SIP accounts had been registered successfully, only one single active calling is
permitted (for example Dialing, Ringing, Calling, Holding).
Page 27

CT1X IP Phone User Manual
ATCOM TECHNOLOGY CO., LIMITE
www.atcom.cn
27
Item
Operation
Description
Call Waiting
Press the key . or
softkey “Switch” to setup
Switch on or Switch off the feature.
“Enable”mean this feature is
enabled,“Disable”mean this feature
is disabled.
Call Waiting Tone
Press the key . or
softkey “Switch” to setup
Switch on or Switch off the prompt
playing. “Enable”mean this feature is
enabled,“Disable”mean this feature
is disabled .
Setup call waiting via web:“Phone”→ “Feature”→ “General information”→ “Call
Waiting”.
Setup call waiting Tone via web: “Phone”→ “Feature”→ “Audio Settings”→ “Call
Waiting Tone”.
4.3. Auto Answer
The feature of “Auto Answer” is switched off by default. All incoming calls will be answered
automatically when the phone is standby once “Auto Answer” is activated. “Auto Answer” when
the phone is under “on Calling” status.
Please move the navigation key to check more:
Page 28

CT1X IP Phone User Manual
ATCOM TECHNOLOGY CO., LIMITE
www.atcom.cn
28
The Icon will be indicated once “Auto Answer” is available。
Setup “Auto Answer” via Web:“Phone”→ “Feature”→ “General information”→ “Auto
Answer”
4.4. DSS Keys
The programmable keys include Programmable feature keys and Soft key on Standby UI.
N/A
N/A means this key is not permitted to be set as a programmable key and use the default
feature.
Conference
The 3-way conference will be setup by pressing the key “Conf” while on calling. For more info,
please refer to Chapter 2.8。
The configuration item Label is a name to identify the key on LED, can be set as “conference”.
Hold
The same feature as the key .For more info, please refer to Chapter 2.5.
The configuration item Label is a name to identify the key on LED, can be set as “hold”.
DND
Press this key will switch on or switch off the feature of “DND”.
Page 29

CT1X IP Phone User Manual
ATCOM TECHNOLOGY CO., LIMITE
www.atcom.cn
29
The configuration item Label is a name to identify the key on LED, can be set as “DND”.
Redial
The same feature as the key .
The configuration item Label is a name to identify the key on LED, can be set as “redial”.
Call return
Automatically dial the latest phone number in history.
The configuration item Label is a name to identify the key on LED, can be set as “return”.
Call Pickup
Press this key to pick up if new incoming call to the monitored phone number.
Item
Description
Value
The phone number monitored for pickup
Label
A1X cannot definition label
Reminding:This code must be set for pickup, and this code can be set via Web only.
Set the Pickup code as follow:
Set the pickup code for one single Account: Account→Advanced→Select an account to be
configured→Directed Call Pickup Code.
Set the pickup code for all Accounts:Phone→Features→Call Pickup→Direct Call Pickup.
Direct Call Pickup Code(Direct Call Pickup should be set as Enable).
Call Park
Press this key while on calling, the phone will dial the specified phone number, user will
receive a code on the phone prompt, and then press the soft key “Transfer”, the current calling
will be parked successfully. At this moment, user is able to continue the parked calling with
any other phones which registered on the same SIP server by dialing the code which user
have received.
Page 30

CT1X IP Phone User Manual
ATCOM TECHNOLOGY CO., LIMITE
www.atcom.cn
30
Item
Description
Value
The code for pickup the parked call and it is provided by SIP server.
Label
A1X cannot definition label
DTMF
Press this key while on calling, the phone will send the configured “Value” automatically.
Item
Description
Value
The value sent to remote end while on calling.
Label
A1X cannot definition label
Directory
Press this key to access Directory.
Speed Dial
Press this key while standby state, the specified target phone number will be dial from the
specified account.
Item
Description
Value
The target phone number for speed dial
Label
A1X cannot definition label
Intercom
Press this key when the phone is idle, the phone will dial the specified “Value”, and there mote
end will answer the call automatically.
Note: This feature is supported by specified servers only.
Page 31

CT1X IP Phone User Manual
ATCOM TECHNOLOGY CO., LIMITE
www.atcom.cn
31
Item
Description
Value
The target phone number for Intercom
Label
A1X cannot definition label
4.5. Key as Send
The key “Key as Send” has the same function as the soft key “Dial”.
Reminding: This key is not available while pre-dial. It’s the only way to press the soft key
“Dial” or pickup the handset to finish pre-dial.
The default value is “#”, and it could be set as “*”. If set the value as “disable”, it means the
function “Key as Send” is forbidden.
Set “Key as Send” via web :Phone→Features→General Information→Key As Send.
Page 32

CT1X IP Phone User Manual
ATCOM TECHNOLOGY CO., LIMITE
www.atcom.cn
32
4.6. Hotline
Once “Hotline” has been set, the phone will automatically dial the hotline via the 1st available
line if the phone stay in the standby status exceed the specified waiting time and there is no
input (or input something and then all deleted).
Item
Description
Hotline
Set up the hotline number, the value is null by default.
Hotline timeout
Set up the timeout for hotline activation,4 seconds by default.
Set hotline via web: Phone→Features→General Information→Hotline.
Set Hotline Time-out(secs) via web: Phone→Features→General Information→Hotline
Time-out(secs).
4.7. Anonymous Call
This function includes making anonymous calls and blocking all anonymous calls.
If switch on the feature “Anonymous call”, all outgoing calls will be displayed as anonymous
call in the remote end.
If switch on the feature “Rejection”, all incoming anonymous calls will be blocked automatically.
please move the navigation key to check more:
Page 33
CT1X IP Phone User Manual
ATCOM TECHNOLOGY CO., LIMITE
www.atcom.cn
33
Item
Operation
Description
Accounts
press the soft key “Switch” or
. to modify,
Select the Account for anonymous
call.
Anonymous
Call
press the soft key “Switch” or
. to modify,
Switch on/off the feature of making
anonymous calls.
Call On Code
The Number key, “*”key, and
“#”are permitted to be input.
Set the feature code to turning on
anonymous call, the phone enables
anonymous call by sending the
feature code to the server
Call Off Code
The Number key, “*”key, and
“#”are permitted to be input.
Set the feature code to turning off
anonymous call, the phone disables
anonymous call by sending the
feature code to the server
Rejection
press the soft key “Switch” or
. to modify
Switch on/off the feature of
blocking anonymous calls.
Reject On
Code
The Number key, “*”key, and
“#”are permitted to be input.
Set the feature code to turning on
anonymous call rejection, the
phone enables anonymous call
rejection by sending the feature
code to the server
Reject Off
Code
The Number key, “*”key, and
“#”are permitted to be input.
Set the feature code to turning off
anonymous call rejection, the
phone disables anonymous call
rejection by sending the feature
code to the server
Page 34

CT1X IP Phone User Manual
ATCOM TECHNOLOGY CO., LIMITE
www.atcom.cn
34
Set Anonymous Call via web:Account→Basic→Select the Account→Anonymous Call.
Set Anonymous Call Rejection via web:Account→Basic→Select the Account→Anonymous
Call Rejection.
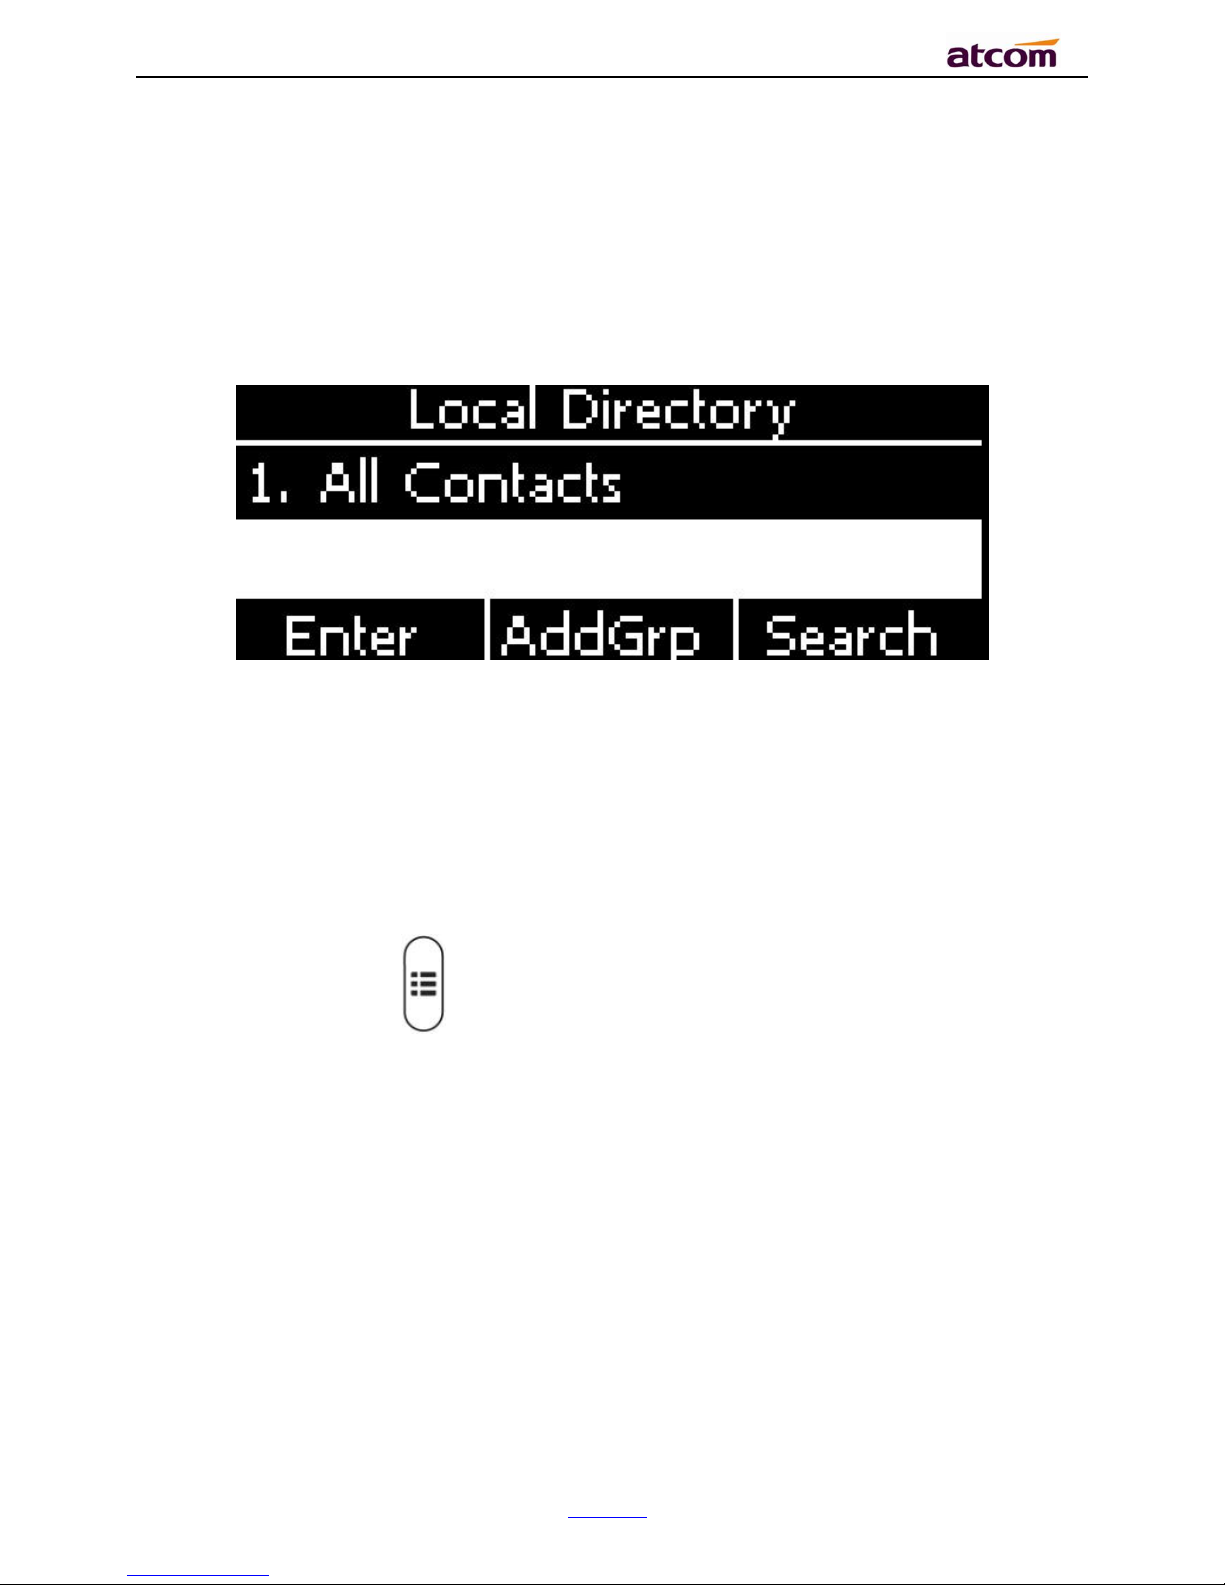
4.8. Contacts
The content of Directory includes local phonebook and blacklist. Enter Directory as follow,
1. Press the soft key “Contacts” when the phone is standby
2. Press the navigation key
3. Press the menu key , and then select “Contacts”
Configure the “Contacts” via Web:
Page 35
CT1X IP Phone User Manual
ATCOM TECHNOLOGY CO., LIMITE
www.atcom.cn
35
All operations on Directory via Web will be not active until click “Save”. When too much item
existed in the Directory, it will be an easy way to search by keyword about name, Office
Number, Mobile Number or other Number. The exactly matched item will be listed, otherwise
you will be prompted “Not find the specified contact”.
4.8.1. Local Contacts
Name and phone number are permitted to be saved into the local phonebook, and up to 400
items. It’s able to add new group, new contact, edit or delete exist contact or dial, also move
the item to blacklist.
4.8.2. Make calls from directory
Path to set on the phone: →Contacts→Local Contacts→All contact-> Select the
record→Dial。
If only one phone number saved with the selected contact person, the phone number will be
dialed while calling the contact person.
If multiple phone numbers saved with the selected contact person, user must select one of the
phone numbers for dialing while calling the contact person.
4.8.3. Add new contact
Page 36

CT1X IP Phone User Manual
ATCOM TECHNOLOGY CO., LIMITE
www.atcom.cn
36
Path to add new contact on the phone:Press →Contacts→Local Contacts→All contact
→Add.
Item
Operation
Description
Name
Input by number
keys,”*”or “#”key, change
the input-method via
pressing the soft key “abc”
It’s used to identify different phone
numbers. Any reduplicated names are not
permitted in the contacts.
Office
Input by number keys, “*”
or “#”key, change the
input-method via pressing
the soft key “abc”
You can save three numbers at most.
While calling a contact person in contacts,
the phone will redirect to the page that to
select one number to dial when multiple
numbers are saved for one contact record
Mobile
Other
Ring
Press the key . or
the soft key “Switch” to
modify the account ID.
It’s used to bundle each item with the
corresponding ringtone, and the optional
value is “Auto” or “Ringtone 1”to
“Ringtone 10”. “Auto” means the default
ringtone will be played if new incoming
call happened, otherwise the selected
ringtone will be played.
Add new contact via web:Contacts→ Contacts→Input messages→Add→Save.
4.8.4. Edit the contact
User must re-edit the contact item while updating one item of local phonebook.
Page 37
CT1X IP Phone User Manual
ATCOM TECHNOLOGY CO., LIMITE
www.atcom.cn
37
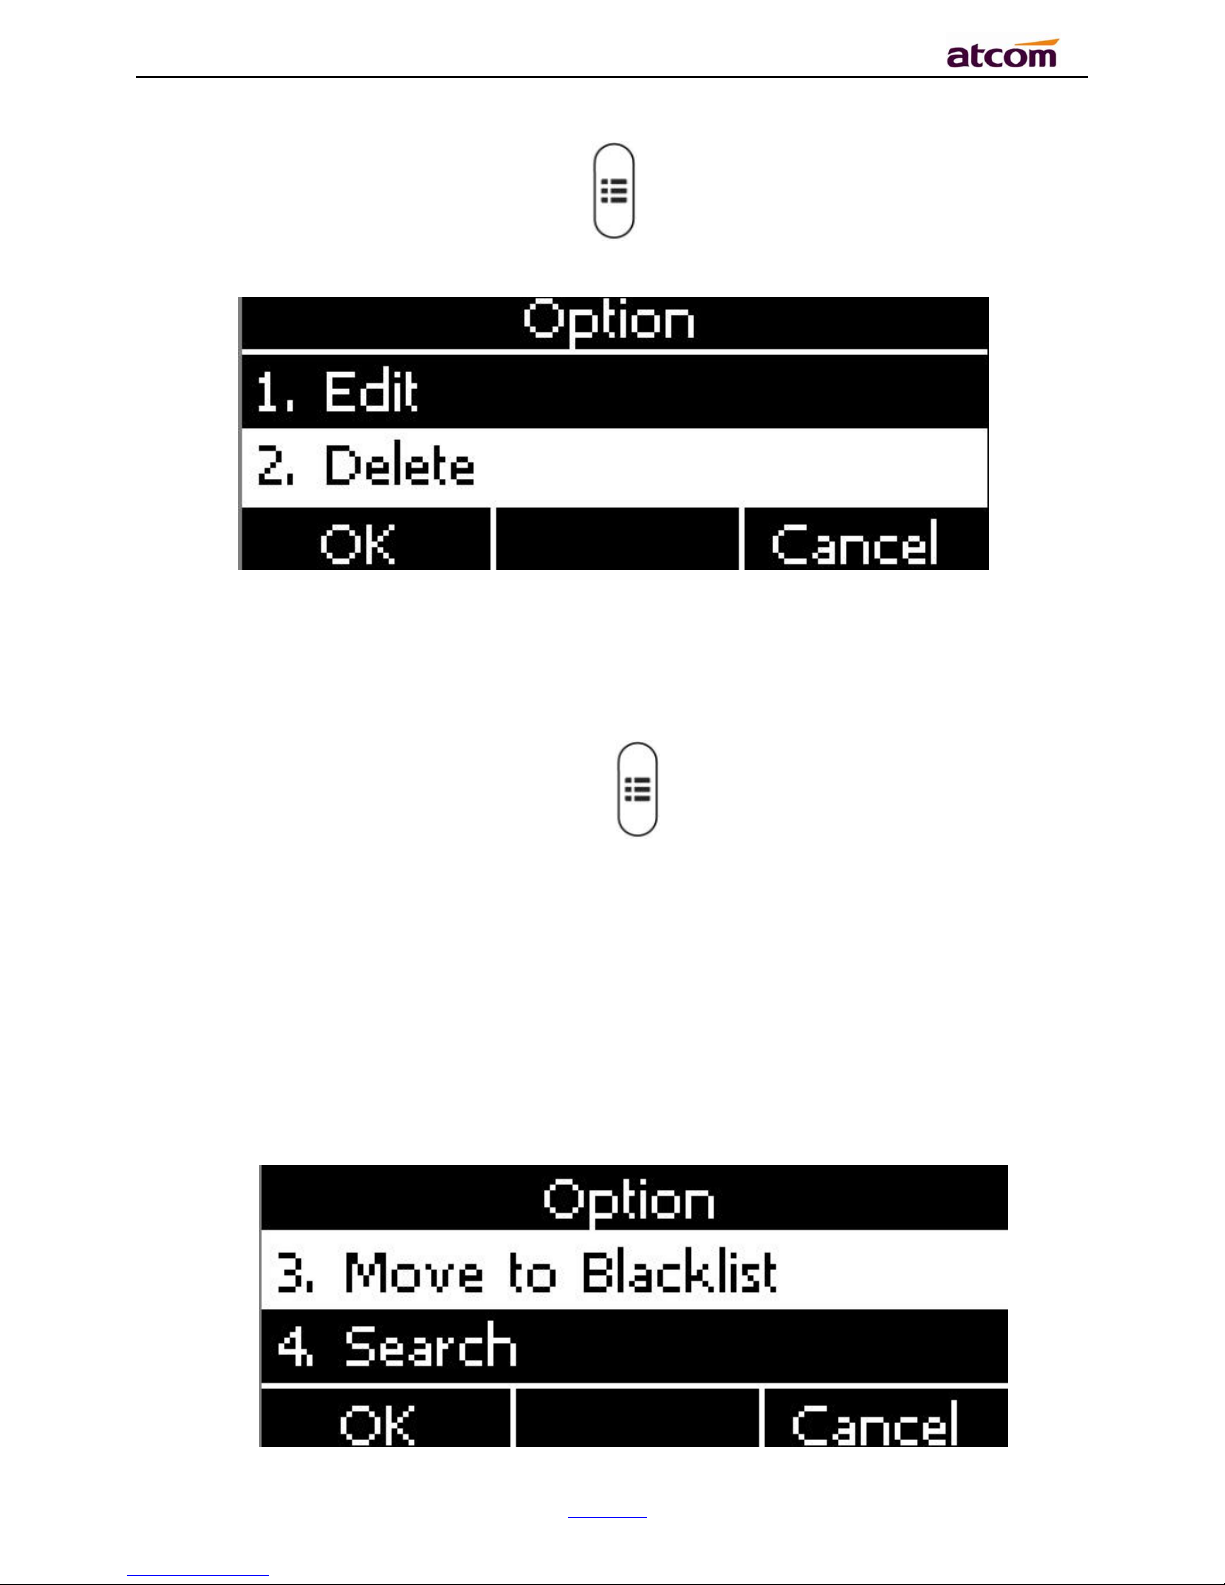
Path to edit the contact on the phone:Press →Contacts→Local Contacts→All contacts
→ Select the item to edit→Option→Edit→OK.
Edit the contact item via Web: Contacts→ Contacts→click on the item to edit→modify
messages→Click “Edit”→Click “Save”.
4.8.5. Delete the contact
Path to delete the contact on the phone:Press →Contacts→Local Contacts→All
contacts→Select the item to delete→Option→Delete→ OK→OK.
Press the soft key “Cancel” at the Warning UI to stop deleting.
Delete the contact item via web: Contacts→ Contacts→Select the item to delete→Click on
“Delete”→Click on “Save”.
4.8.6. Move to blacklist
Page 38

CT1X IP Phone User Manual
ATCOM TECHNOLOGY CO., LIMITE
www.atcom.cn
38
Path to move to blacklist on the phone:Press →Contacts→Local Contacts→All
contacts→Select the item to move→Option →Move to Blacklist → OK→OK.
Press the soft key “Cancel” at the Warning UI to stop this operation.
Move the contact item to blacklist via web :Contacts→ Contacts→Select the item to move
to blacklist→Click on “Move to black List”→Click on “Save”。
Blacklist
The purpose of blacklist’s feature is to block the phone number inside blacklist to call the host
phone number, but it’s available for the hosted phone number to call any phone number in the
black list.
The most operation of blacklist is the same as local phonebook except for the feature “Move to
Contacts”, it means moving an item of blacklist to local phonebook to resume the phone
number to dial the host phone number normally.
Remote phonebook
Page 39
CT1X IP Phone User Manual
ATCOM TECHNOLOGY CO., LIMITE
www.atcom.cn
39
1. Remote URL: Set a remote phonebook download path. Support the TFTP,FTP,HTTP and
HTTPs server.
2. Display name: Set a display name on the phone.
3. Search Remote Phonebook name: Select “Yes” or “No” to enable or disable search remote
phonebook name.
4. Search Flash Time: Set the search flash time. Defauts to 120.
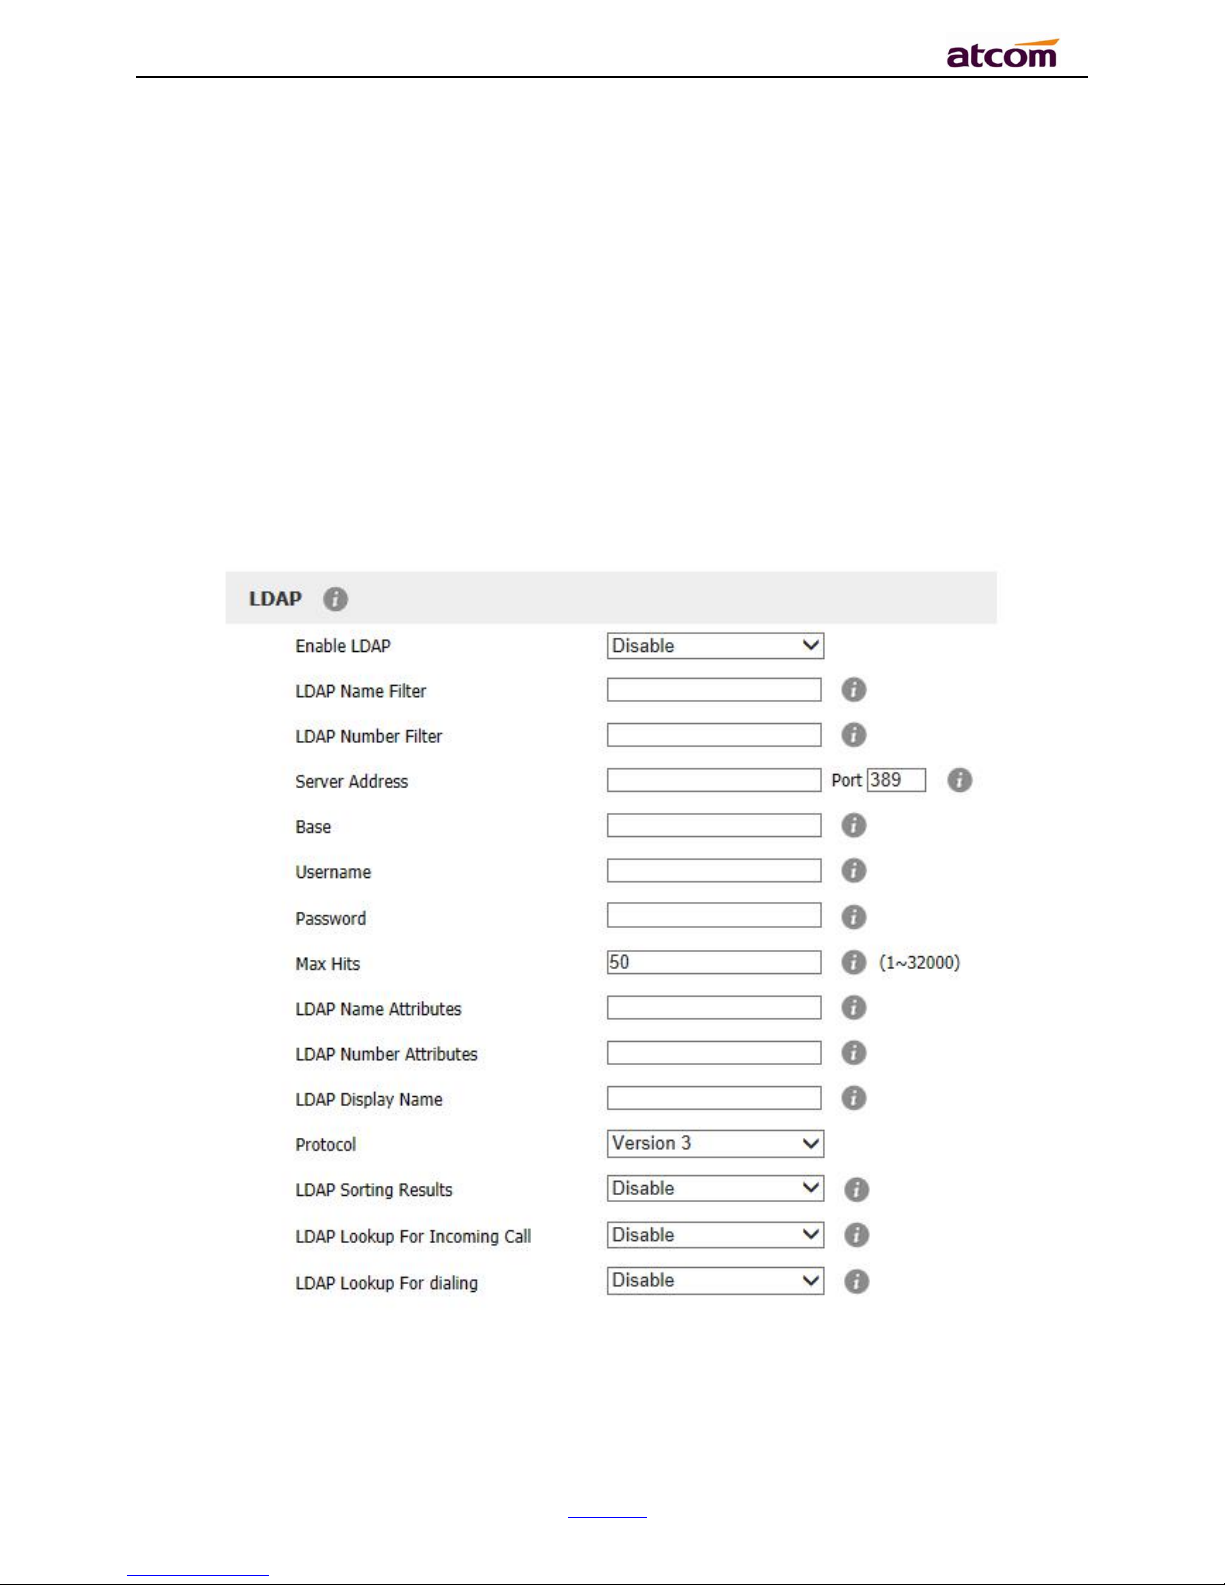
LDAP
1. Enable LDAP: Select “Yes” or “No” to enable or disable LDAP.
2. LDAP Name Filter: Set the name of the LDAP search attributes.
Page 40

CT1X IP Phone User Manual
ATCOM TECHNOLOGY CO., LIMITE
www.atcom.cn
40
3. LDAP Number Filter: Set the number of the LDAP search attributes.
4. Server Address: Set the LDAP server domain name or IP address.
5. Port: Set the LDAP server port number. Default to 389.
6. Base: Set the LDAP search base.
7. Username: Set the LDAP server username.
8. Password: Set the LDAP server password.
9. Max Hits(1~32000): Set the maximum number of search results from the LDAP server.
10. LDAP Name Attributes: Set the name of the attributes returned from the server.
11. LDAP Number Attributes: Set the number of the attributes returned from the server.
12. LDAP Display Name: The contact record the name of the displayed on the LCD.
13. Protocol: Set the phone to support LDAP protocol version. Defauts to version 3.
14. LDAP Sorting Results: Set the phone to sort the search results.
15. LDAP Lookup For Incoming Call: Set the phone for LDAP search when incoming call.
16. LDAP Lookup For dialing: Set the phone for LDAP search when dialing,
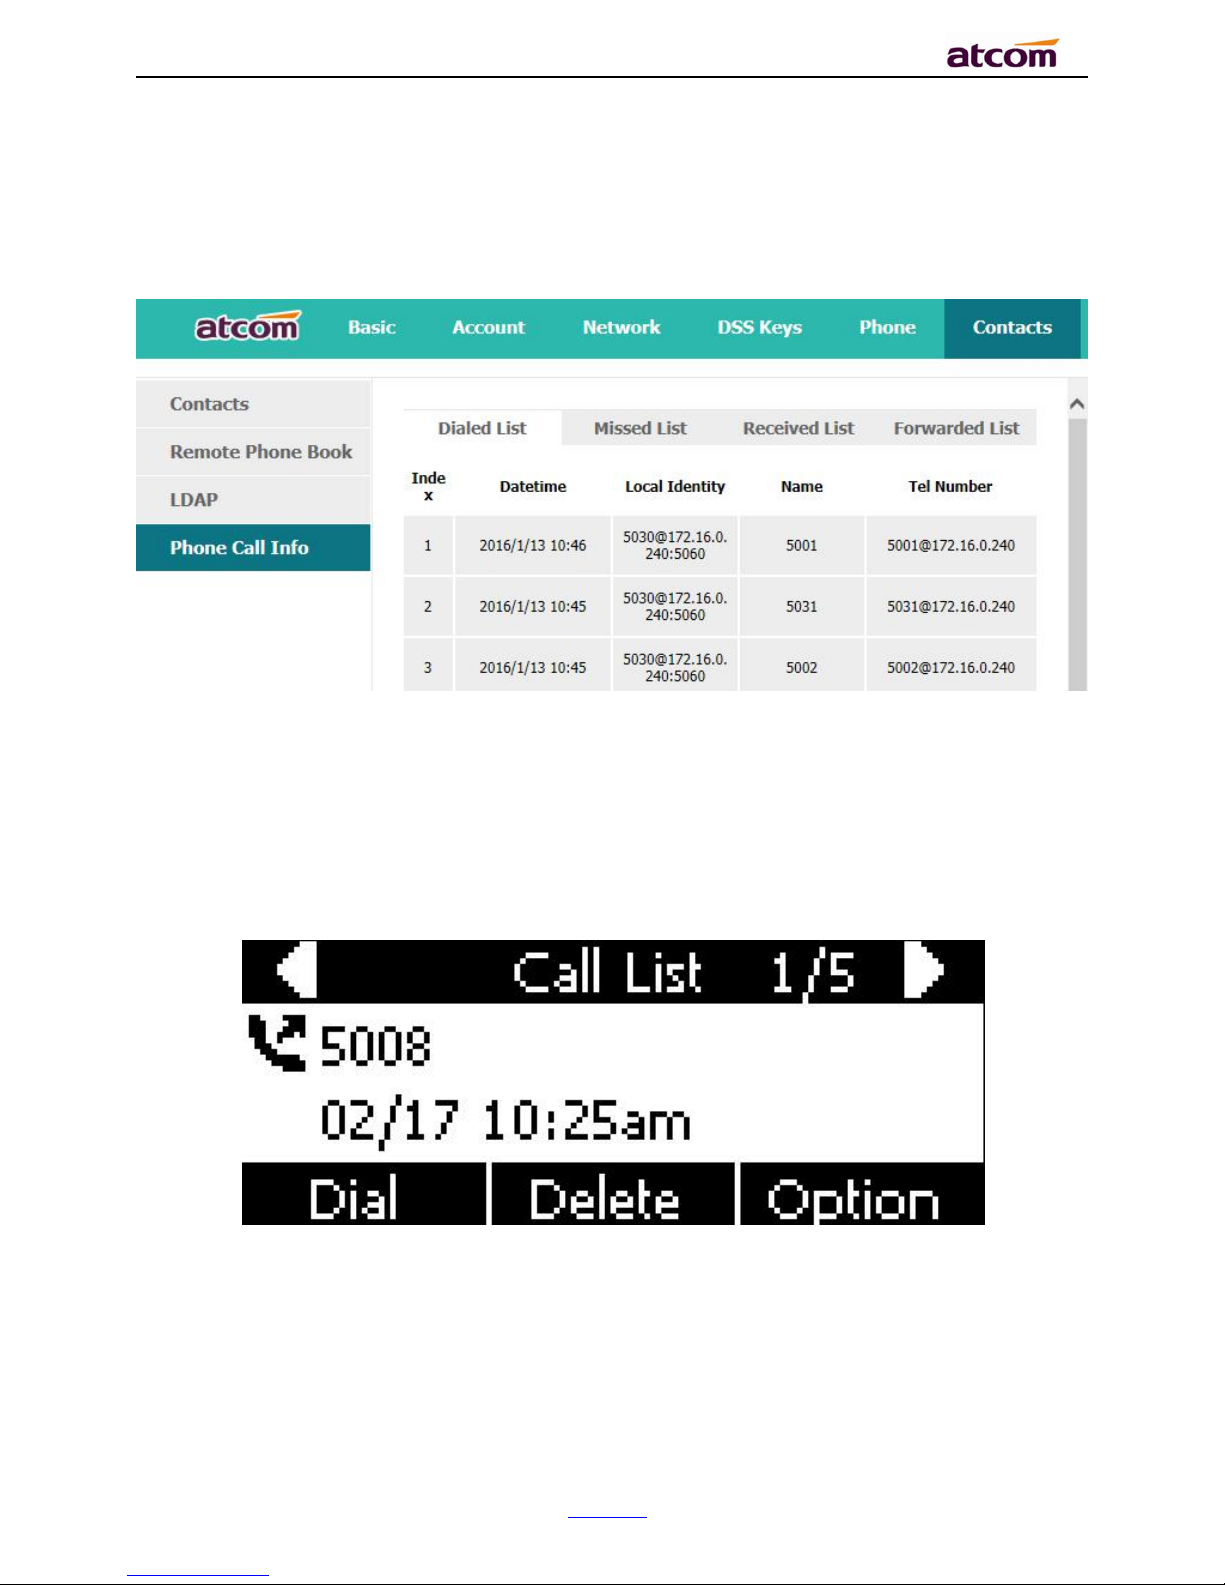
4.9. History
It includes the dialed, answered, missed and transferred items, maximum 400 items.
User is able to review or delete any item of the history on the phone. And enter “History” in
below ways:
1. Press the key
2. Press the key , then select “History”
3. Press the soft key “History” while phone is under standby status
Page 41
CT1X IP Phone User Manual
ATCOM TECHNOLOGY CO., LIMITE
www.atcom.cn
41
When any operations above is done, details info of all recent history will be listed on LCD
display, include the type of each item, the name of contact person, date and time.
Also, user is able to check the detail info of call history via Web, but only review operation is
allowed while accessing via web.
Make calls from history
Path to make calls from history on the phone:Enter history UI→Select the item to dial→
Dial.
Delete one item from history
Path to delete one item from history on the phone:Enter history UI→Select the item to
delete→Delete.
Page 42

CT1X IP Phone User Manual
ATCOM TECHNOLOGY CO., LIMITE
www.atcom.cn
42
Check the details of history
Path to check the details of history on the phone:Enter history UI→Select the item to
check→Option→Detail→Press or “OK”.
Add to Contact
1. Enter “Call History”→Select the target item→Option→add to Contact→Press the
key or soft key “Confirm”.
At this moment an “edit” page will be popped up.
please move the navigation key to check more
The item of “Office”, “Mobile” and “Other” are able to be switched over between “Old Number”
and current number. If the being operated item had been saved already in the contacts, “Old
Number” will be the previous value, otherwise “Old Number” will be null. The UI page of “Add
to Blacklist” is the same as above.
Page 43

CT1X IP Phone User Manual
ATCOM TECHNOLOGY CO., LIMITE
www.atcom.cn
43
2. Modify the contact name, phone number and ringtone.
3. Press the key or soft key “Saved” to save the modification, press the key
or soft key“Cancel”to Cancel the modification.
Add to Blacklist
For more info about this operation, please refer to Add to Contact.
Delete all History’s records
Path to delete all history’s records on the phone:Enter History UI→Option→Delete all→
Press or “OK”.
4.10. Message
User will benefit from the feature of voicemail when they’re not available to answer an
incoming call or missed some incoming calls. However this feature must be supported by
Server. Voicemail must be set up before using it.
Set the voicemail via Web: Account→Basic→Select an account to configure→Voice Mail.
Sometimes the voicemail push can’t be reached in time, because the configuration problem
with Server, you must configure some related parameter via Web to make the phone
automatically send its request to Server for getting voicemail info.
Set “Subscribe for MWI” via web: Account→Advanced→Subscribe for MWI.
Set “MWI Subscription Period(secs)” via web:Account→Advanced→MWI Subscription
Period(secs).
Set Voice Mail
There are 3 different methods to set up the voicemail,
Page 44

CT1X IP Phone User Manual
ATCOM TECHNOLOGY CO., LIMITE
www.atcom.cn
44
1. Press the key after factory set
2. Press the key for a while
3. Press the key →Select “Message”→Setup Voicemail
View Voice Mail
User is able to check voicemail in below ways:
1. Setup voicemail number→Press the key
2. Press the key →Select “Message”→“View Voicemail”
Select the account with “N new N old mail”, and press the soft key “Connect”, the
corresponding voicemail will be connected.
Page 45

CT1X IP Phone User Manual
ATCOM TECHNOLOGY CO., LIMITE
www.atcom.cn
45
Select the account with “Unregistered”, and press the soft key “Connect”, the setting page of
Voicemail will be popped up.
4.11. Settings
Basic settings and Advanced settings will be introduces in this part,
Basic Settings
1. Language
CT1Xsupports multiple language, to modify the language, please press the key →Setting
→Basic setting→Language→Select the target language and press the soft key “Save”.
Set language via web:There is a drop-down box at the top left corner of webpage,choice one
kind of language and click, the language will take effect immediately.
Page 46

CT1X IP Phone User Manual
ATCOM TECHNOLOGY CO., LIMITE
www.atcom.cn
46
2. Time &Date
Time & Date will be displayed at the standby page of CT1X,and these info will be related with
all process of IP phone. “Time & Date” can be gained by NTP Server automatically or set
manually.
NTP Setting
Path to set on the phone:Press →Settings→Basic Settings→Time & Date→NTP
Settings.
Please move the navigation key to check more:
Page 47

CT1X IP Phone User Manual
ATCOM TECHNOLOGY CO., LIMITE
www.atcom.cn
47
Item
Operation
Description
Time Zone
Press the key . or soft
key “Switch” to modify it.
Select the correct Time
Zone for the IP phone.
NTP Server
Key in the IP address of domain
name by the number keys,”*”,”#”
Specify the NTP Server
Secondary NTP
Server
Key in the IP address of domain
name by the number keys,”*”,”#”
Specify the standby NTP
Server
Daylight-Saving
Time
Press the key . or soft
key “Switch” to modify it.
Optional: “Off”, “Auto” or
“Manual”. And “Manual”
mean user must set this
via web.
Set NTP via Web:Phone→Preference.
Page 48

CT1X IP Phone User Manual
ATCOM TECHNOLOGY CO., LIMITE
www.atcom.cn
48
Item
Operation
Description
Time Zone
Click drop-down box to
select
Set a time zone matches condition
Primary NTP
Server
Manual input
The primary NTP server that provide
time and date
Secondary NTP
Server
Manual input
The secondary NTP server that provide
time and date
Update
Interval(secs)
Manual input
The interval that the phone gains time
and date from NTP server
Daylight
Click drop-down box to
select
A switch to control the status that
whether to enable the daylight or not
Fixed Type
Radio content
Daylight fixed type, only the specified
items are configurable
Start Month
Click drop-down box to
select
The month that the daylight rule begins
taking effect
Start Date
Manual input
The day that the daylight rule begins
taking effect
Start Hour of Day
Manual input
The hour of day that the daylight rule
begins taking effect
Start Day of Week
Click drop-down box to
select
The day of week that the daylight rule
begins taking effect
Start Week of
Month
Click drop-down box to
select
The week of month that the daylight
rule begins taking effect
Stop Month
Click drop-down box to
select
The month that the daylight rule stops
taking effect
Stop Date
Manual input
The day that the daylight rule stops
taking effect
Stop Hour of Day
Manual input
The hour of day that the daylight rule
stops taking effect
Stop Day of Week
Click drop-down box to
select
The day of week that the daylight rule
stops taking effect
Stop Week of
Month
Click drop-down box to
select
The week of month that the daylight
rule stops taking effect
Page 49

CT1X IP Phone User Manual
ATCOM TECHNOLOGY CO., LIMITE
www.atcom.cn
49
Offset(minutes)
Manual input
The offset time that daylight rule takes
effect
Manual Settings
Path to set on the phone:Press →Settings→Basic Settings→Time & Date→Manual
Settings.
Please move the navigation key to check more:
Item
Operation
Description
Year
Key in “Year” with the
number key, “*”and “#”
Date info
Month
Key in “Month” with the
number key, “*”and “#”
Day
Key in “Day” with the
number key, “*”and “#”
Hour
Key in “Hour” with the
number key, “*”and “#”
Time info
Minute
Key in “Minute” with the
number key, “*”and “#”
Second
Key in “Second” with the
number key, “*”and “#”
Set the Time & Date manually via web:Phone→Preference.
Page 50
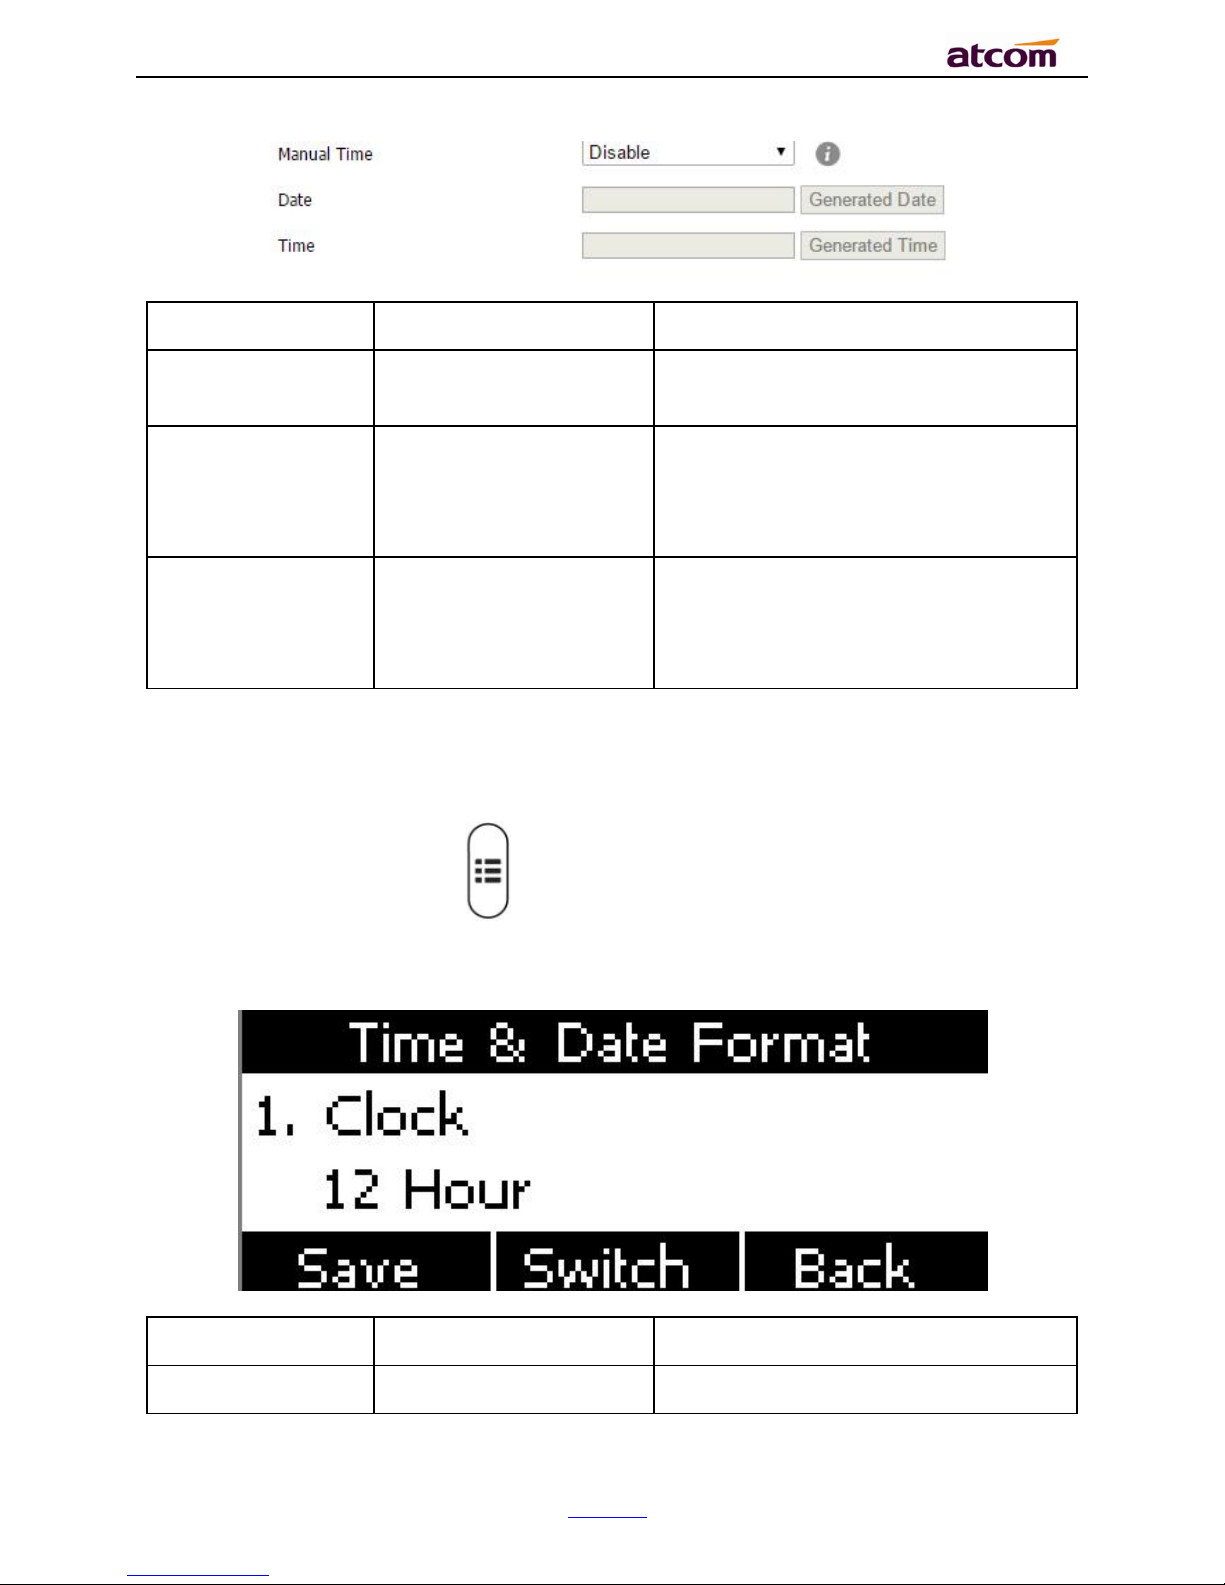
CT1X IP Phone User Manual
ATCOM TECHNOLOGY CO., LIMITE
www.atcom.cn
50
Item
Operation
Description
Manual Time
Click the drop-down box
to select
A switch to control the status whether
to enable the manual time or not
Date
Manual input, click
“Generated Date” to
gains date from the
computer
Set date manually
Time
Manual input, click
“Generated Time” to
gains time from the
computer
Set time manually
3. Time &Date Format
Path to set on the phone:Press →Settings→Basic Settings→Time & Date Format.
please move the navigation key to check more:
Item
Optional
Example of result
Clock
12 hour
03:30pm
Page 51
CT1X IP Phone User Manual
ATCOM TECHNOLOGY CO., LIMITE
www.atcom.cn
51
24 hour
15:30
Date
WWW MMM DD
TuesdayOct.16
DD-MMM-YY
16–Oct.-16
YYYY-MM-DD
2016-10-16
DD/MM/YYYY
16/10/2016
MM/DD/YY
10/16/16
DD MMM YYYY
16,Oct.,2016
WWW DD MMM
Tuesday,17,Oct.
Set the Time &Date Format via Web:Phone→Preference
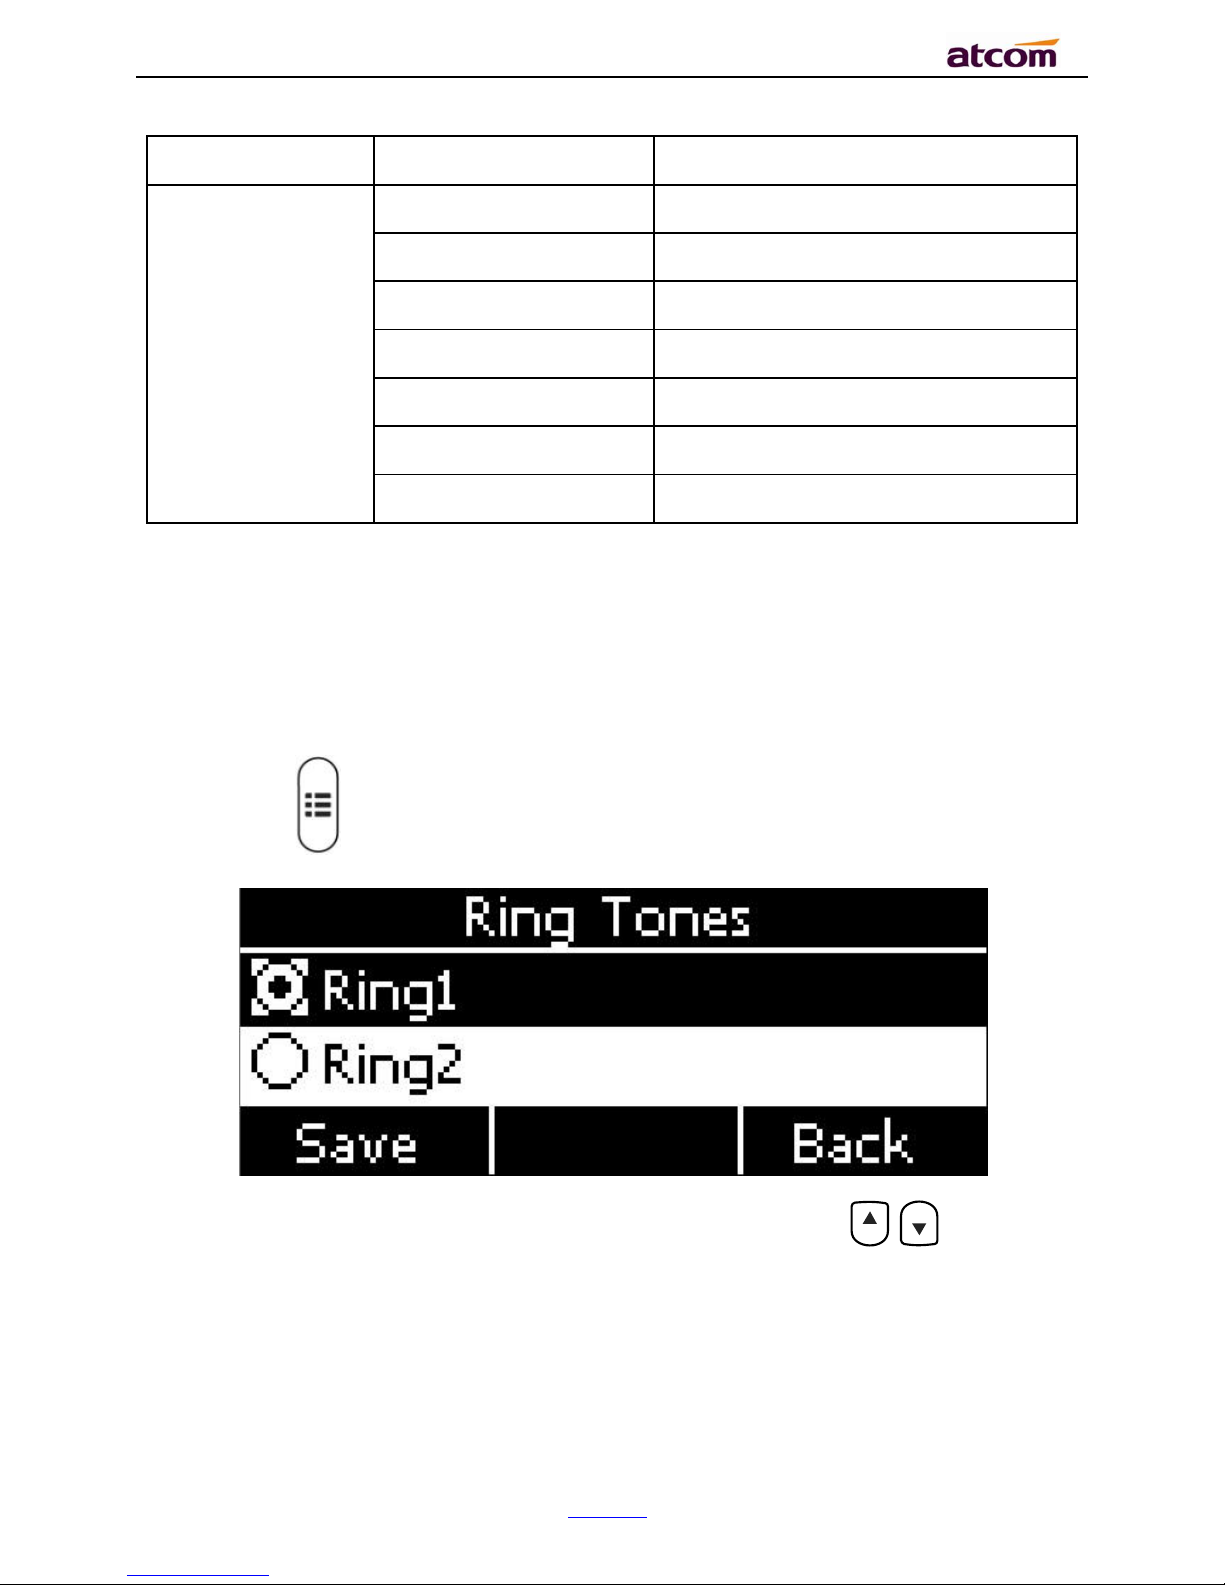
4. Rin gtones
10 different ringtones have been provided by CT1X for selection. Path to set on the phone:
Press the key →Settings→Basic Settings→Ringtones。
For the selected ringtone,there is a dot inside the circle. Press the key . to select
other ringtone for playing.
Set ringtones via Web:Account→Basic→Ring tones.
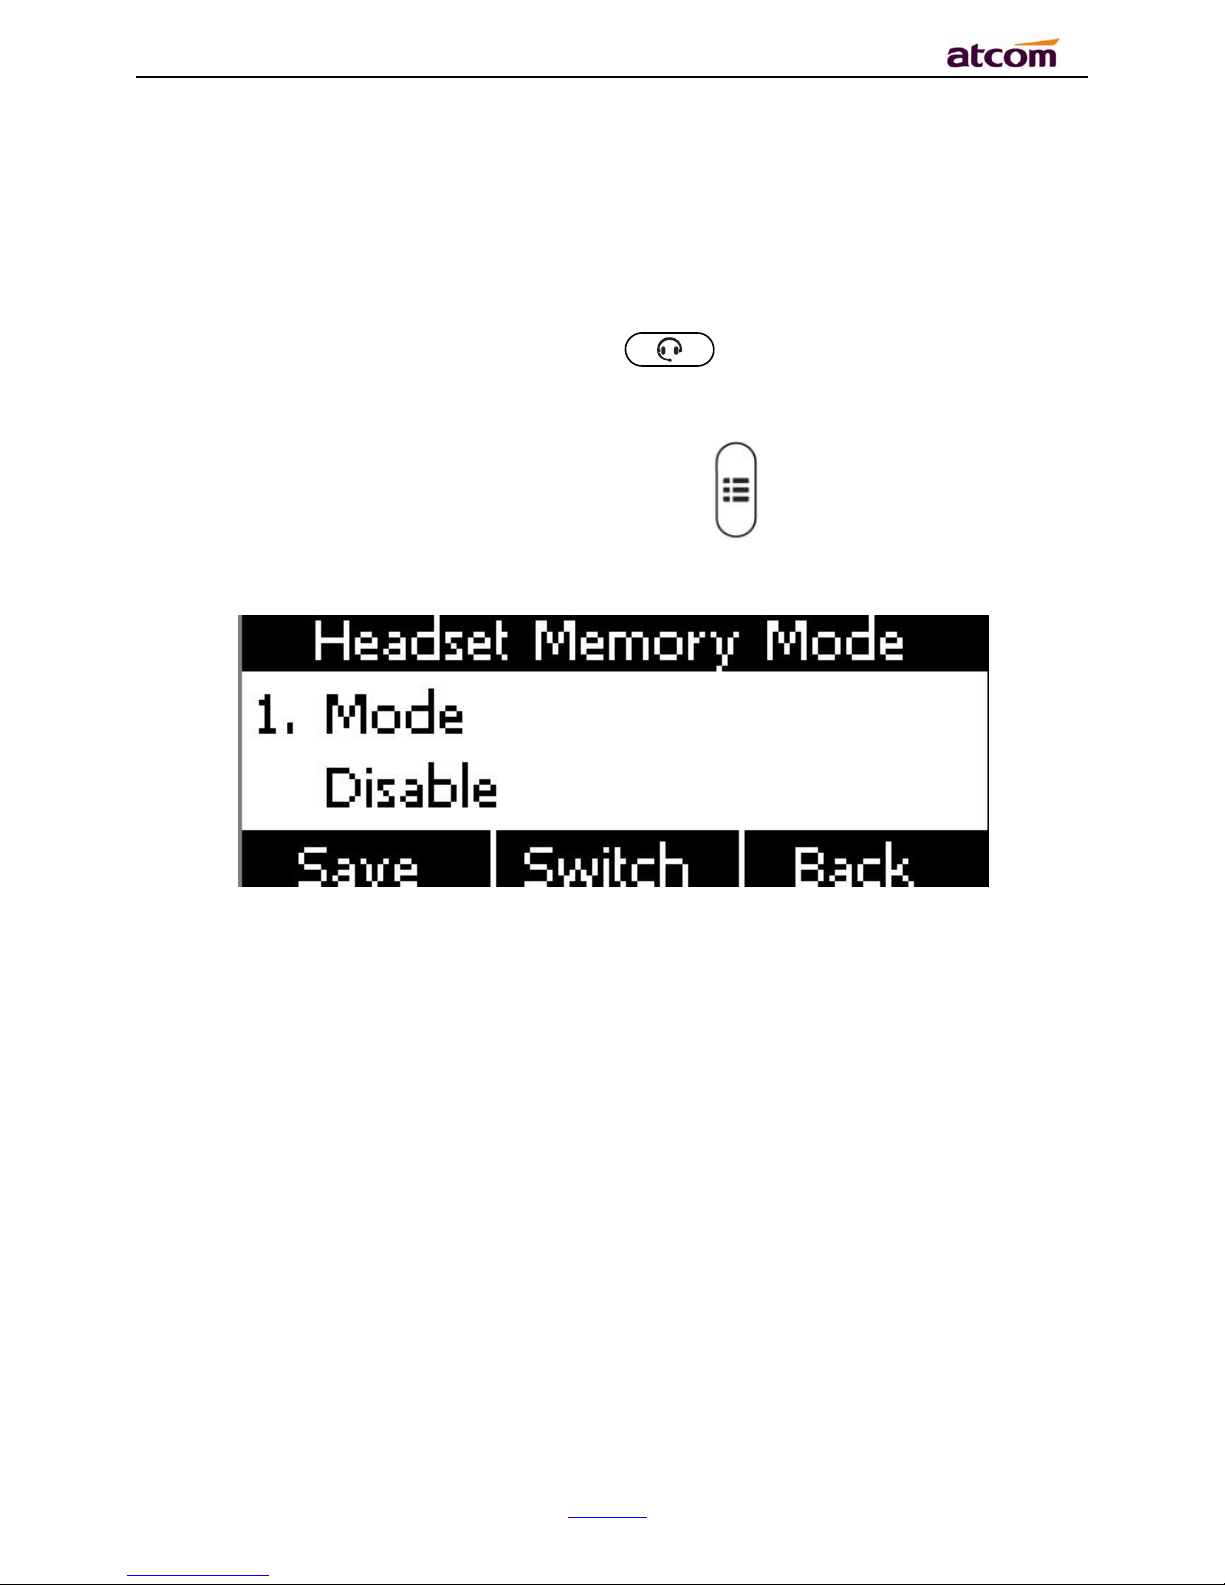
5. Hea dset Memory Mode
Page 52
CT1X IP Phone User Manual
ATCOM TECHNOLOGY CO., LIMITE
www.atcom.cn
52
Headset memory mode can be used to control the default device to make or answer calls. This
function is disabled by default, which means the phone will communicate with others by hand-
free when pre-dial or making calls from history or contacts, and so is the situation that
pressing “Answer” soft key to accept an incoming call. Once this function is enabled, the phone
will make or answer calls by headset. Long press can change the status of the
“Headset Memory Mode”.
This function can be configured on the phone only: Press →Settings→Basic Settings→
Headset Memory Mode.
6. Phone Unlock PIN
Phone Unlock PIN: Unlock the phone locked conditions.
please move the navigation key to check more and press the cancel key to back the function,
Page 53

CT1X IP Phone User Manual
ATCOM TECHNOLOGY CO., LIMITE
www.atcom.cn
53
Item
Operation
Description
Current PIN
Manual input
Input the phone current PIN
New PIN
Manual input
Set the new PIN
Confirm PIN
Manual input
Confirm the new PIN
Advanced Settings
Password will be requested while accessing the page of “Advanced Settings”. This password is
the same as the user’s(“admin”) to access.
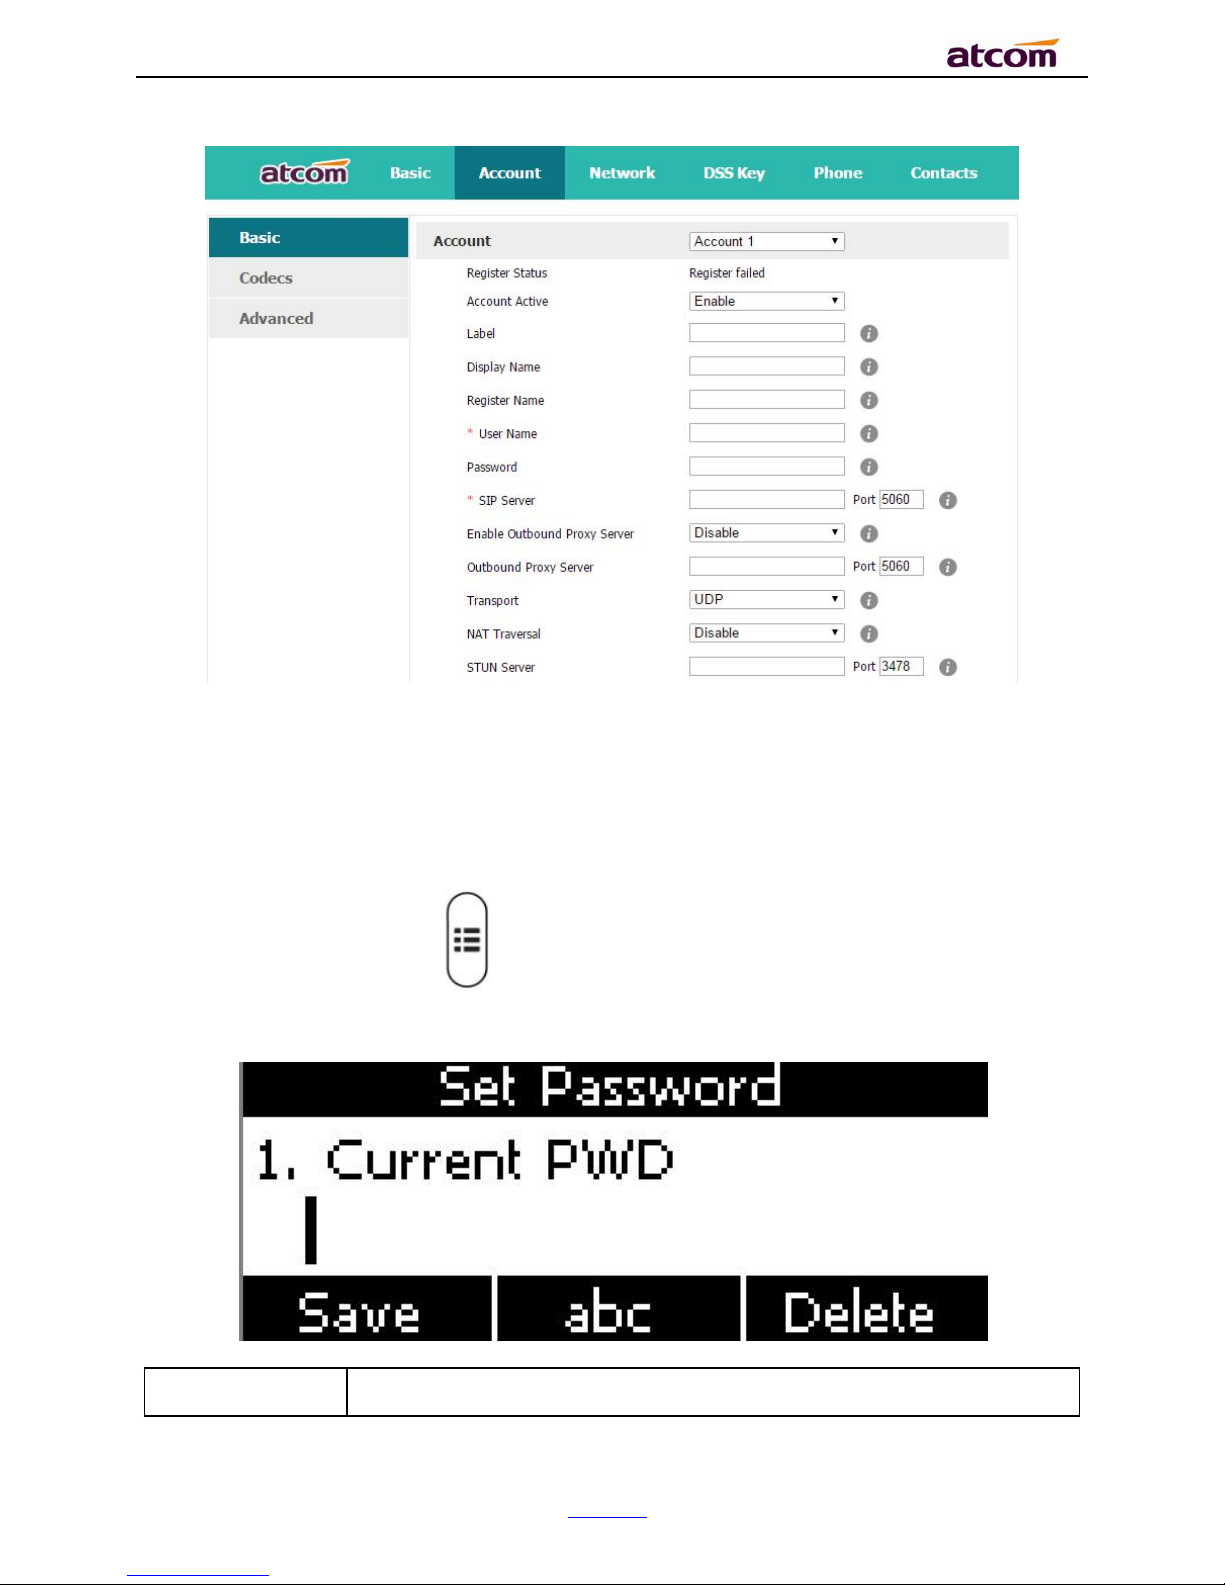
1. Account
path to set the account info on phone:Press →Settings→Advanced Settings→Input
password→Accounts.
Page 54

CT1X IP Phone User Manual
ATCOM TECHNOLOGY CO., LIMITE
www.atcom.cn
54
Item
Description
Activation
The status of account,the default is “Enable”,if set this as “Disable”,
the account will be forbidden.
Label
It will show on the phone, can skip this item
Display Name
Parameter that in the SIP, if the SIP Server is supportable, this name
will show on the phone of called
Register Name
The register ID, supplied by SIP Server, can skip this item
User Name
Account ID
Password
Password for account
SIP Server
The address that accounts needed to register from
Outbound
Status
The status of Outbound Server, “off” by default
Outbound Proxy
IP address of Outbound Agency
Stun Status
The status of Stun Server, “off” by default
Stun Server
IP address of Stun Server
Configure account via web:Account→Basic
Page 55
CT1X IP Phone User Manual
ATCOM TECHNOLOGY CO., LIMITE
www.atcom.cn
55
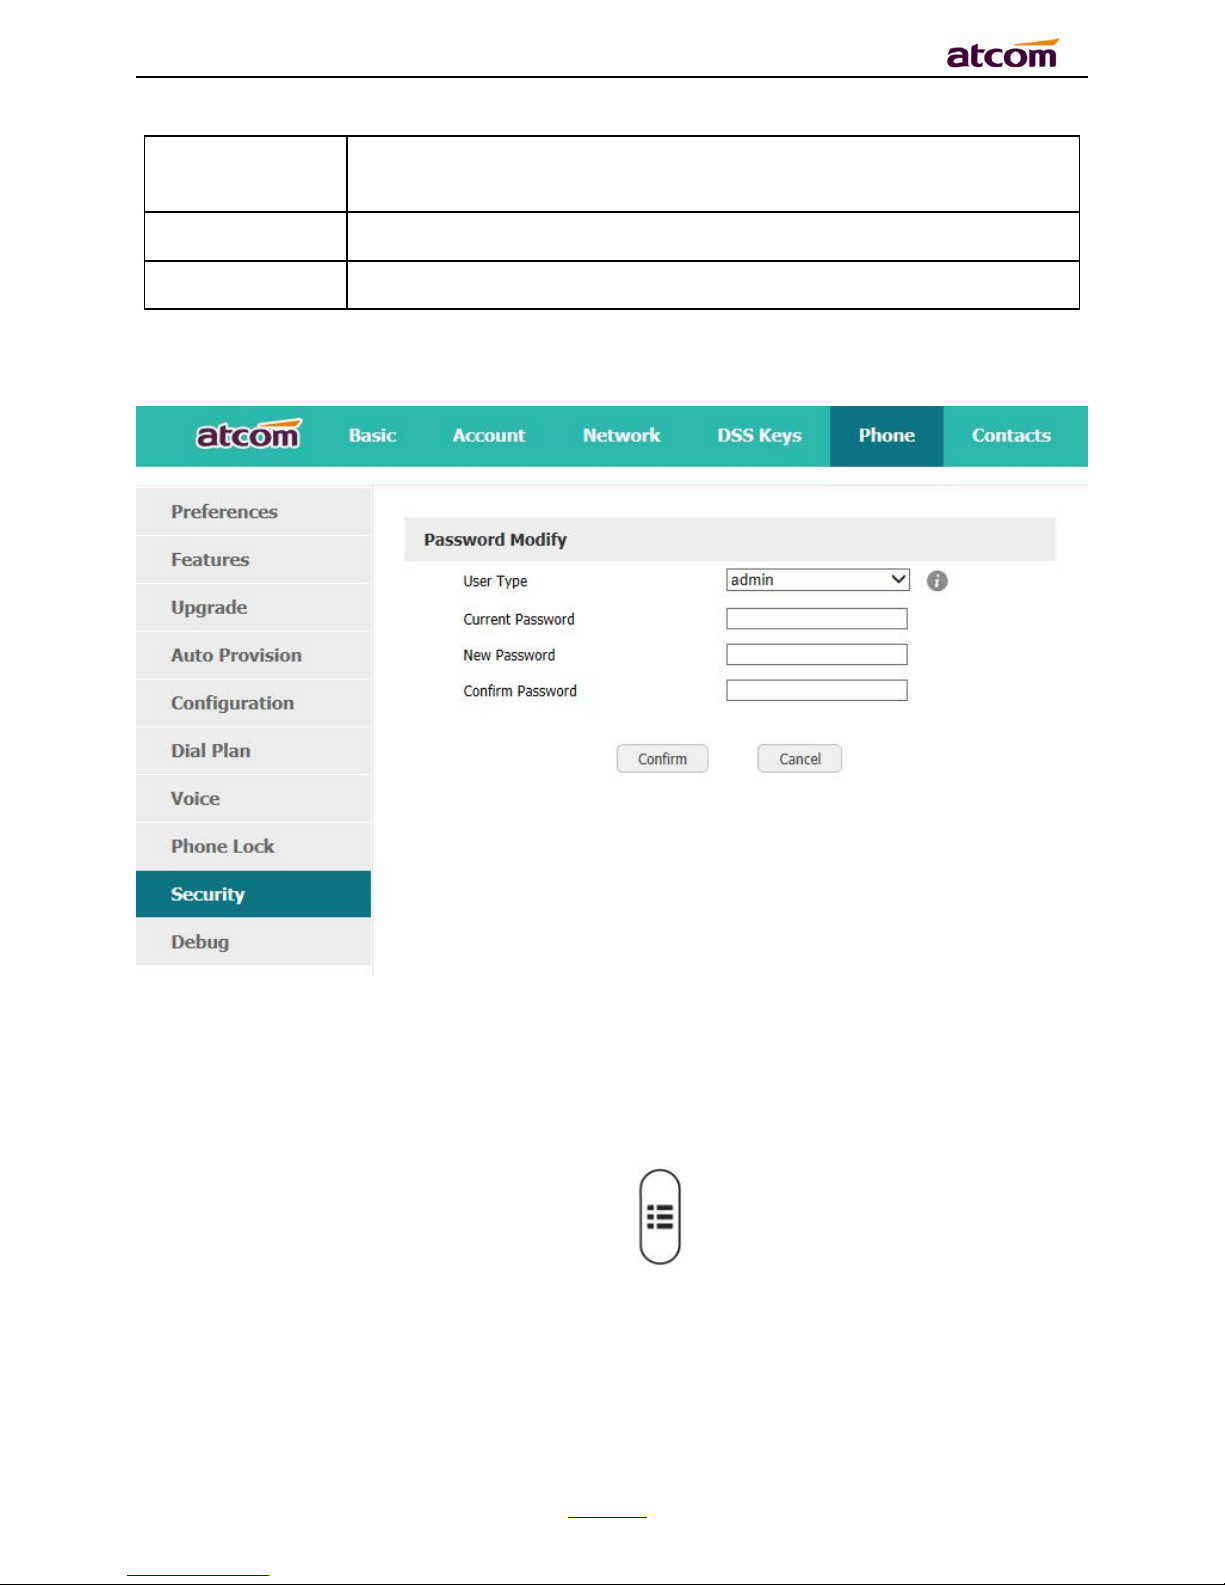
2. Set Password
The password for Advanced Settings also is used for Web access as the role “admin”. Path to
set password on phone: Press →Settings→Advanced Settings→Input password→Set
Password.
Item
Description
Page 56
CT1X IP Phone User Manual
ATCOM TECHNOLOGY CO., LIMITE
www.atcom.cn
56
Current PWD
The current password for web access as the role of “admin”, it’s
“admin” by default.
New PWD
To set the new password, blank is acceptable.
Confirm PWD
Input the new password again, to confirm the new password.
Set password via Web:Phone→Security.
3. Network
Path to set network parameters on phone: Press →Settings→Advanced Settings→
Input the password→Network.
please move the navigation key to check more:
Page 57

CT1X IP Phone User Manual
ATCOM TECHNOLOGY CO., LIMITE
www.atcom.cn
57
LAN Port
Connect the phone with local network via LAN port, to gain IP address in 3 ways: DHCP, Static.
Set the LAN port via Web:Network→ Basic.
DHCP
The phone gains IP address via DHCP and Static DNS by default.
STATIC IP
If the phone gains IP address via Static IP, user must input the IP address info manually.
PC Port
Only bridge mode support by PC port.
VLAN
The feature of VLAN must be supported by network switch, and by default this feature it’s not
activated.
Set the VLAN via Web:Network →Advanced→VLAN.
Webserver Type
Page 58

CT1X IP Phone User Manual
ATCOM TECHNOLOGY CO., LIMITE
www.atcom.cn
58
Webserver type include HTTP and HTTPS, different access port will be required by different
access type, user is able to confirm the port info at the webpage, HTTP & HTTPS are both
permitted by default.
Set Webserver type via Web:Network→Advanced→WebServer→Type.
VPN
CT1X support the feature of Open VPN, and this feature must be supported by VPN Server.
Set the VPN via Web:Network →Advanced→VPN.
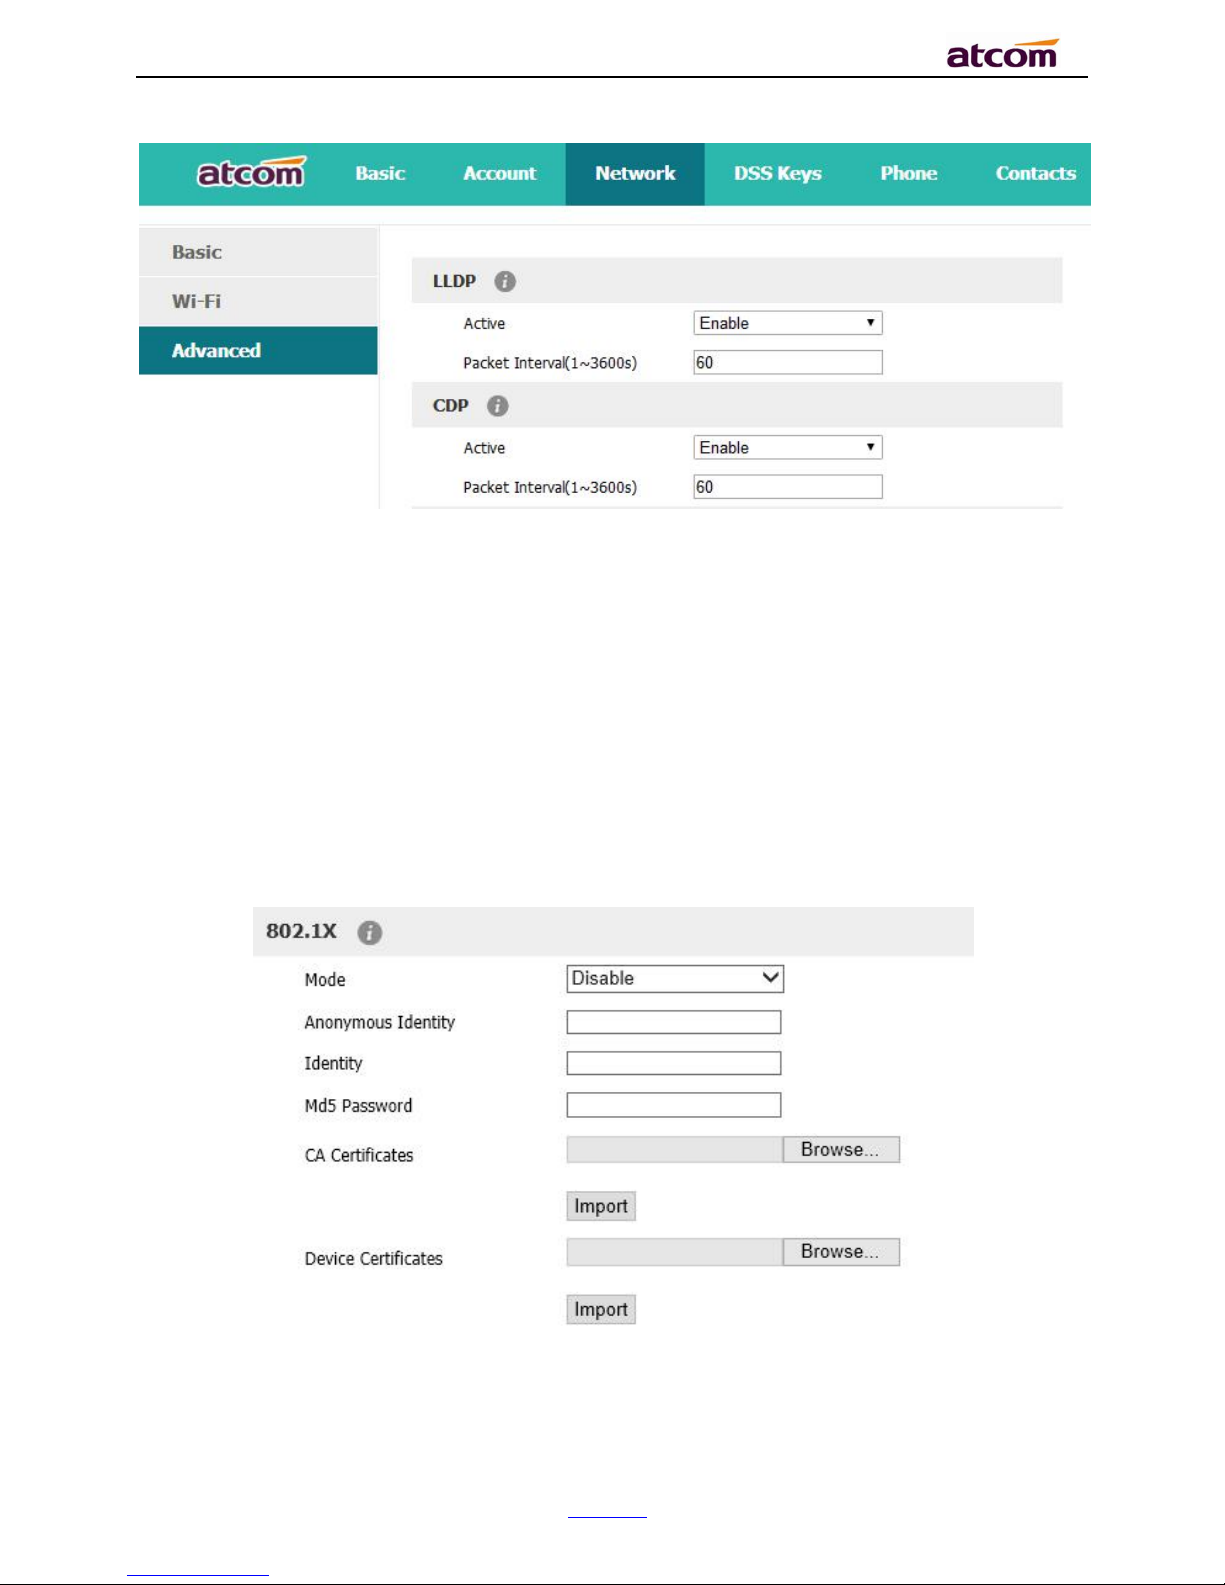
LLDP
CT1X supports LLDP, and enable in default. If the phone is connected to a switch and using
LLDP, the switch would notifies IP phone of VLAN information.
Set the LLDP via Web:Network →Advanced→LLDP
Page 59
CT1X IP Phone User Manual
ATCOM TECHNOLOGY CO., LIMITE
www.atcom.cn
59
802.1X
IEEE 802.1X authentication is an IEEE standard for Port-based Network Access Control(PNAC),
part of the IEEE 802.1 group of networking protocols. It offers an authentication mechanism
for devices to connect to a LAN or WLAN.
It supports protocol EAP-MD5, EAP-TLS, EAP-PEAP/MSCHAPv2, EAP-TTLS/EAP-MSCHAPv2,EAP-
PEAP/GTC and EAP-TTLS/EAP-GTC for 802.1X authentication.
Set the 802.1X via the webpage: Network →Advanced→802.1X
4. Keypad Lock
Page 60

CT1X IP Phone User Manual
ATCOM TECHNOLOGY CO., LIMITE
www.atcom.cn
60
It support enable or disable the keypad lock feature, if enable, the default password is 123:
Please move the navigation key to check more
Keypad lock via webpage: phone→Phone lock
1. Keypad Lock Enable: select “Yes” or “No” to enable or disable keypad lock
2. Keypad Lock Type: Menu key/Function keys/All keys/Answer call only.
3. Phone Unlock PIN(0~15 Digit):set the phone unlock PIN. Range: 0~15 digit.
4. Phone Lock Time Out(0~3600s): set the phone lock time out. Range: 0~3600s
5. Emergency :set emergency number. Default to 110.120.119 and 911.
Page 61

CT1X IP Phone User Manual
ATCOM TECHNOLOGY CO., LIMITE
www.atcom.cn
61
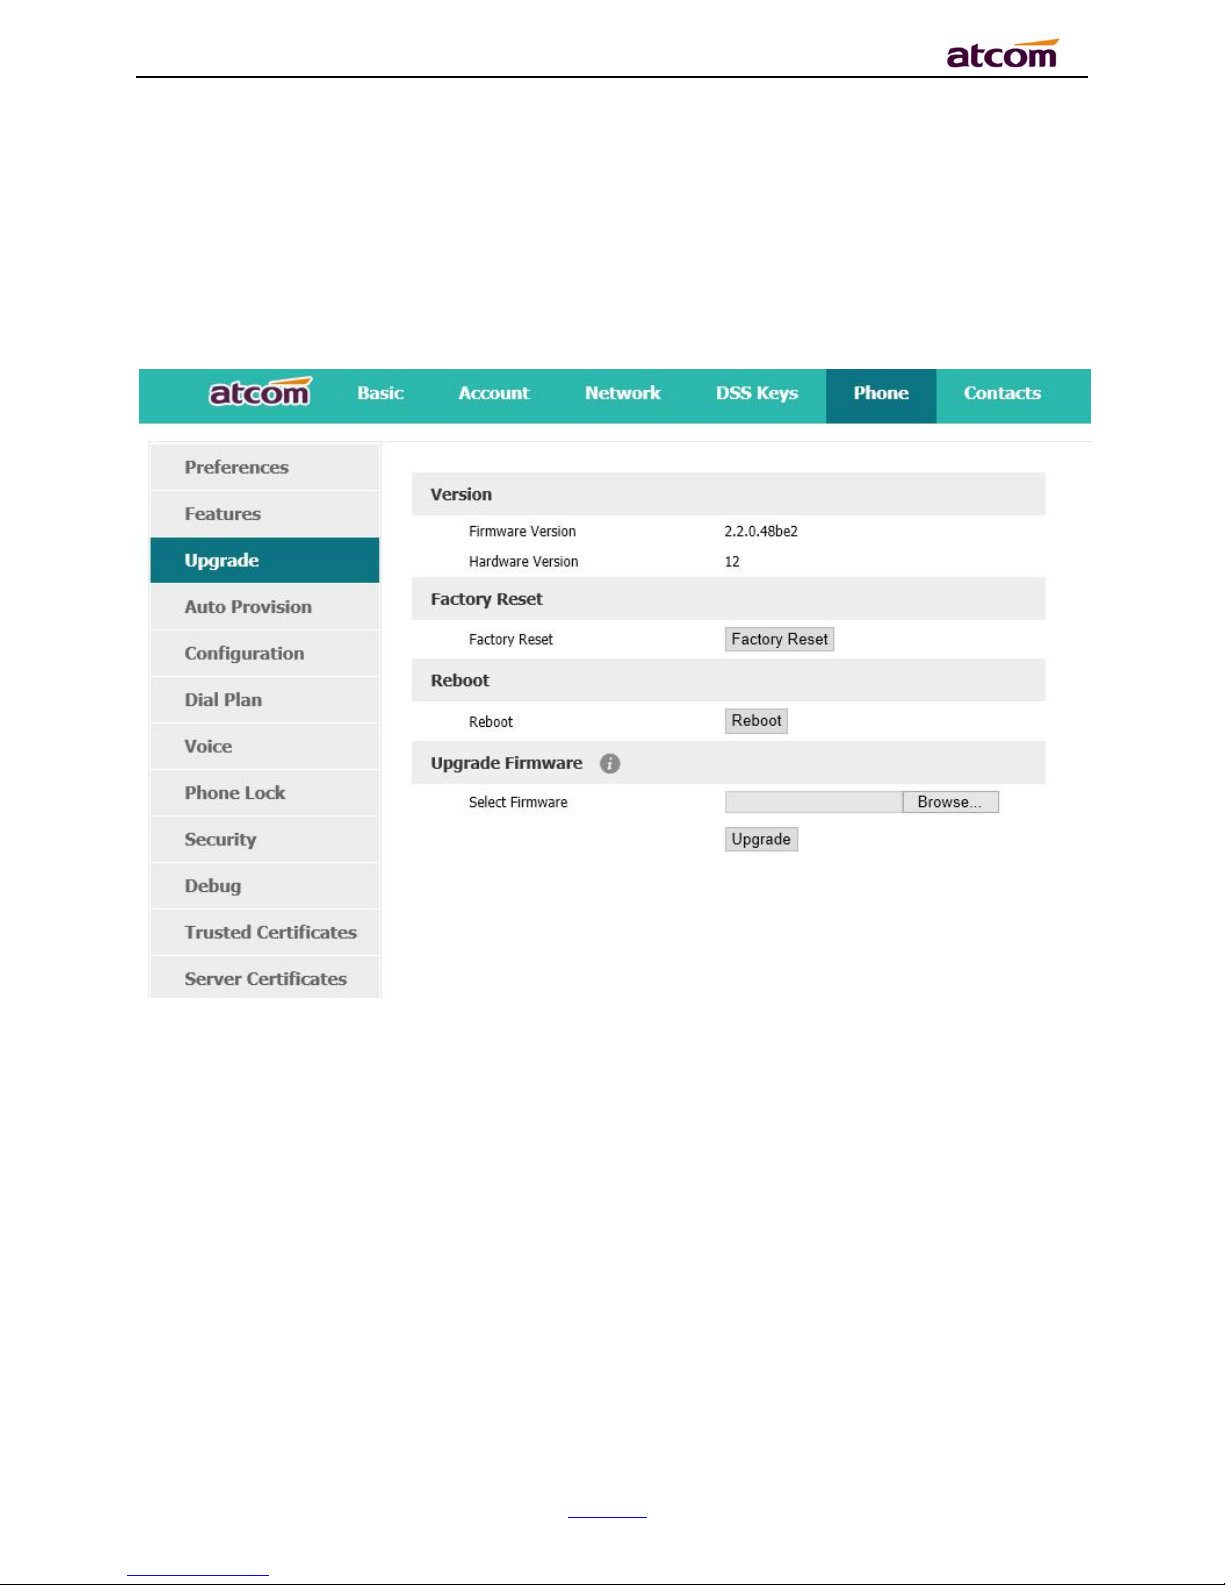
5. Reboot
After the restart, the phone will back to standby interface.
Reboot via webpage: Phone→Upgrade→Reboot
6. Reset to factory
Page 62

CT1X IP Phone User Manual
ATCOM TECHNOLOGY CO., LIMITE
www.atcom.cn
62
Once reset to factory, all parameter settings will back to the factory default value, and all
configure will be cleared, users must be careful on this.
Reset Option: Full Reset, Config Reset and UserData Reset.
Reset to factory via Web:Phone→Upgrade→Reset to Factory.
Page 63

CT1X IP Phone User Manual
ATCOM TECHNOLOGY CO., LIMITE
www.atcom.cn
63
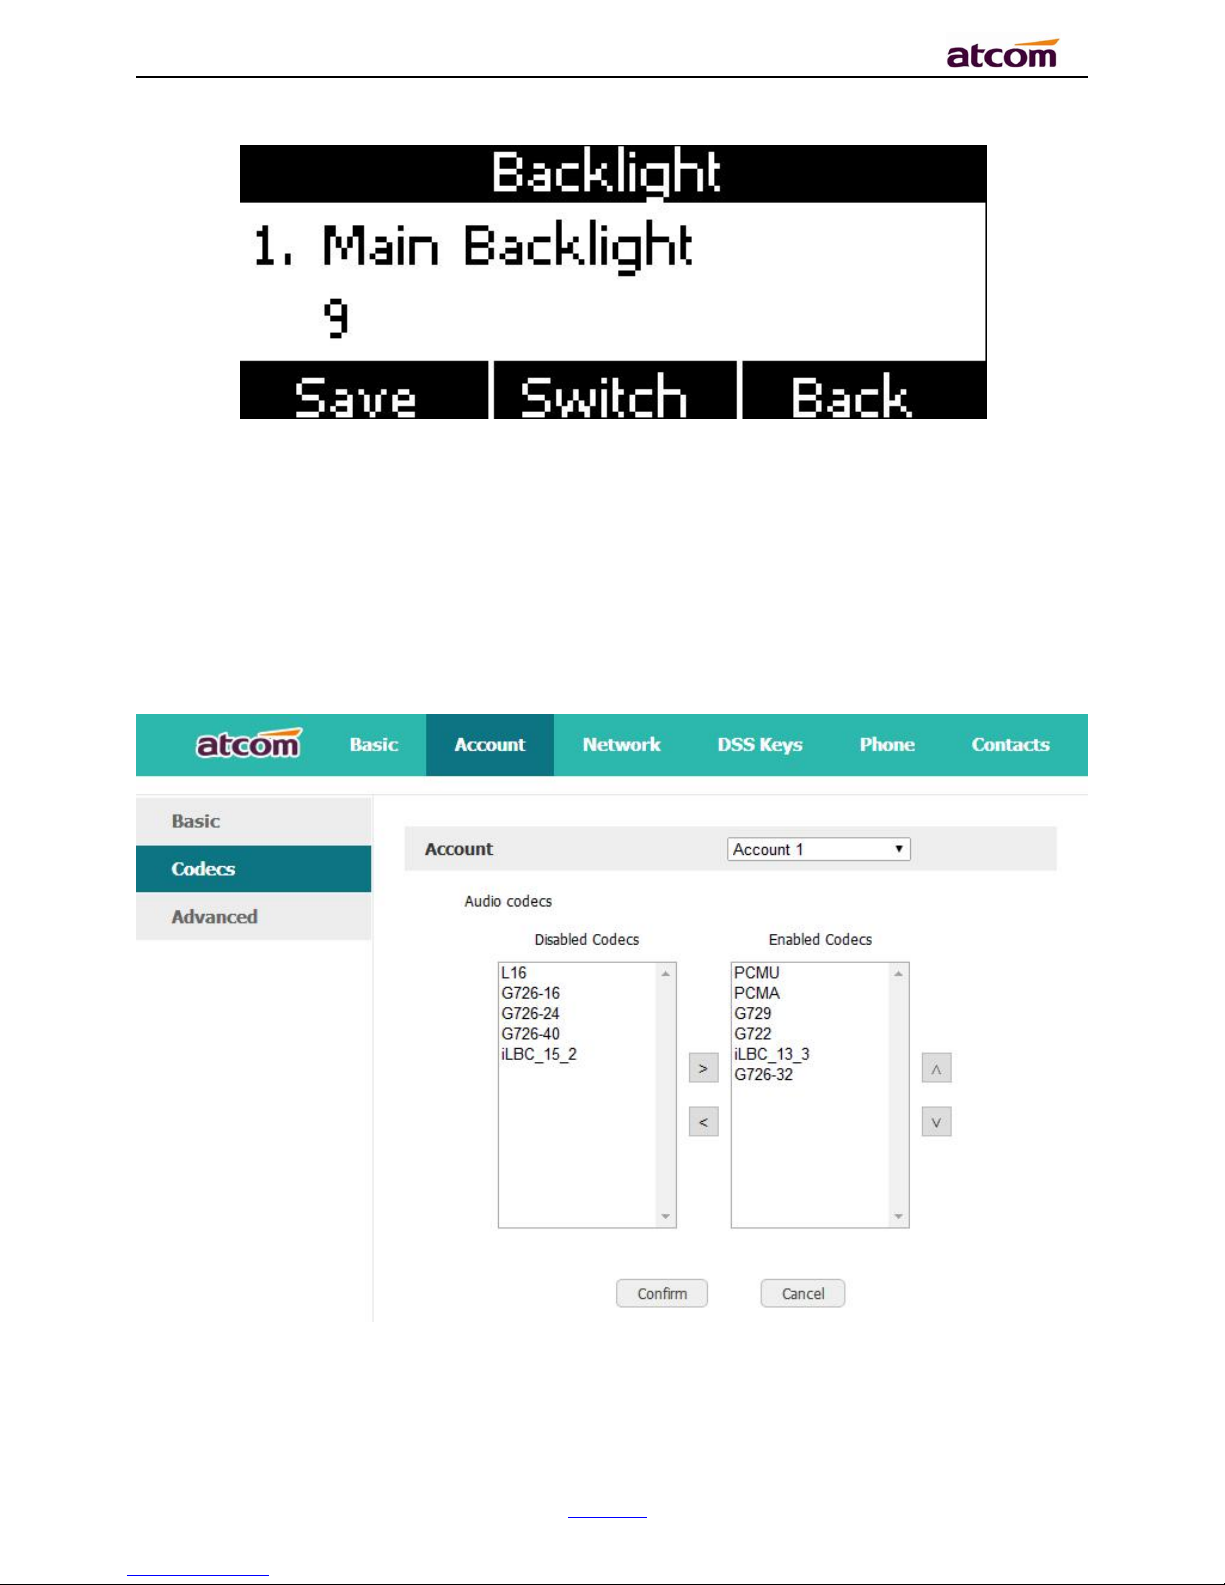
4.12. Display
For more convenient, users are able to adjust the contrast grade and backlight of the main
LCD display.
Slave Contrast
There are 9 different contrast grades for options, press the soft key “Switch” or the
key . for modification,8 is the default value.
.
Backlight
Backlight is the brightness of LCD, also it has been defined as 9 different grades. The number
“9” means the lightest.
Page 64
CT1X IP Phone User Manual
ATCOM TECHNOLOGY CO., LIMITE
www.atcom.cn
64
5. Advanced Feature
5.1. Codecs
CT1X support multiple codecs, users can select the codes via Web.
Page 65

CT1X IP Phone User Manual
ATCOM TECHNOLOGY CO., LIMITE
www.atcom.cn
65
means to enable the item of “Disabled Codes”;
means to disable the item of “Enabled Codes”;
Click the button or to sort all enabled codes, the top item has the highest priority.
Note:Multiple different items of G726,iLBC should not activated simultaneously.
5.2. Capture and Upgrading
Capture package:
It would record the phone current info.
Via webpage: phone→Debug→PCAP Feature
Page 66
CT1X IP Phone User Manual
ATCOM TECHNOLOGY CO., LIMITE
www.atcom.cn
66
Click the button “Start” to start the capture and click the button “Stop” to end the capture.
Then click the button “export” to download the capture file.
Upgrade firmware:
Via webpage: phone→ Upgrade→ Upgrade Firmware
Before upgrading the firmware of phone, users are suggested to check the version of current
firmware. Click the button “Choose file” to select the target local file and click “Upgrade” to
process upgrading, this will cost a couple of minutes. And after reboot, the phone will be
upgraded successfully.
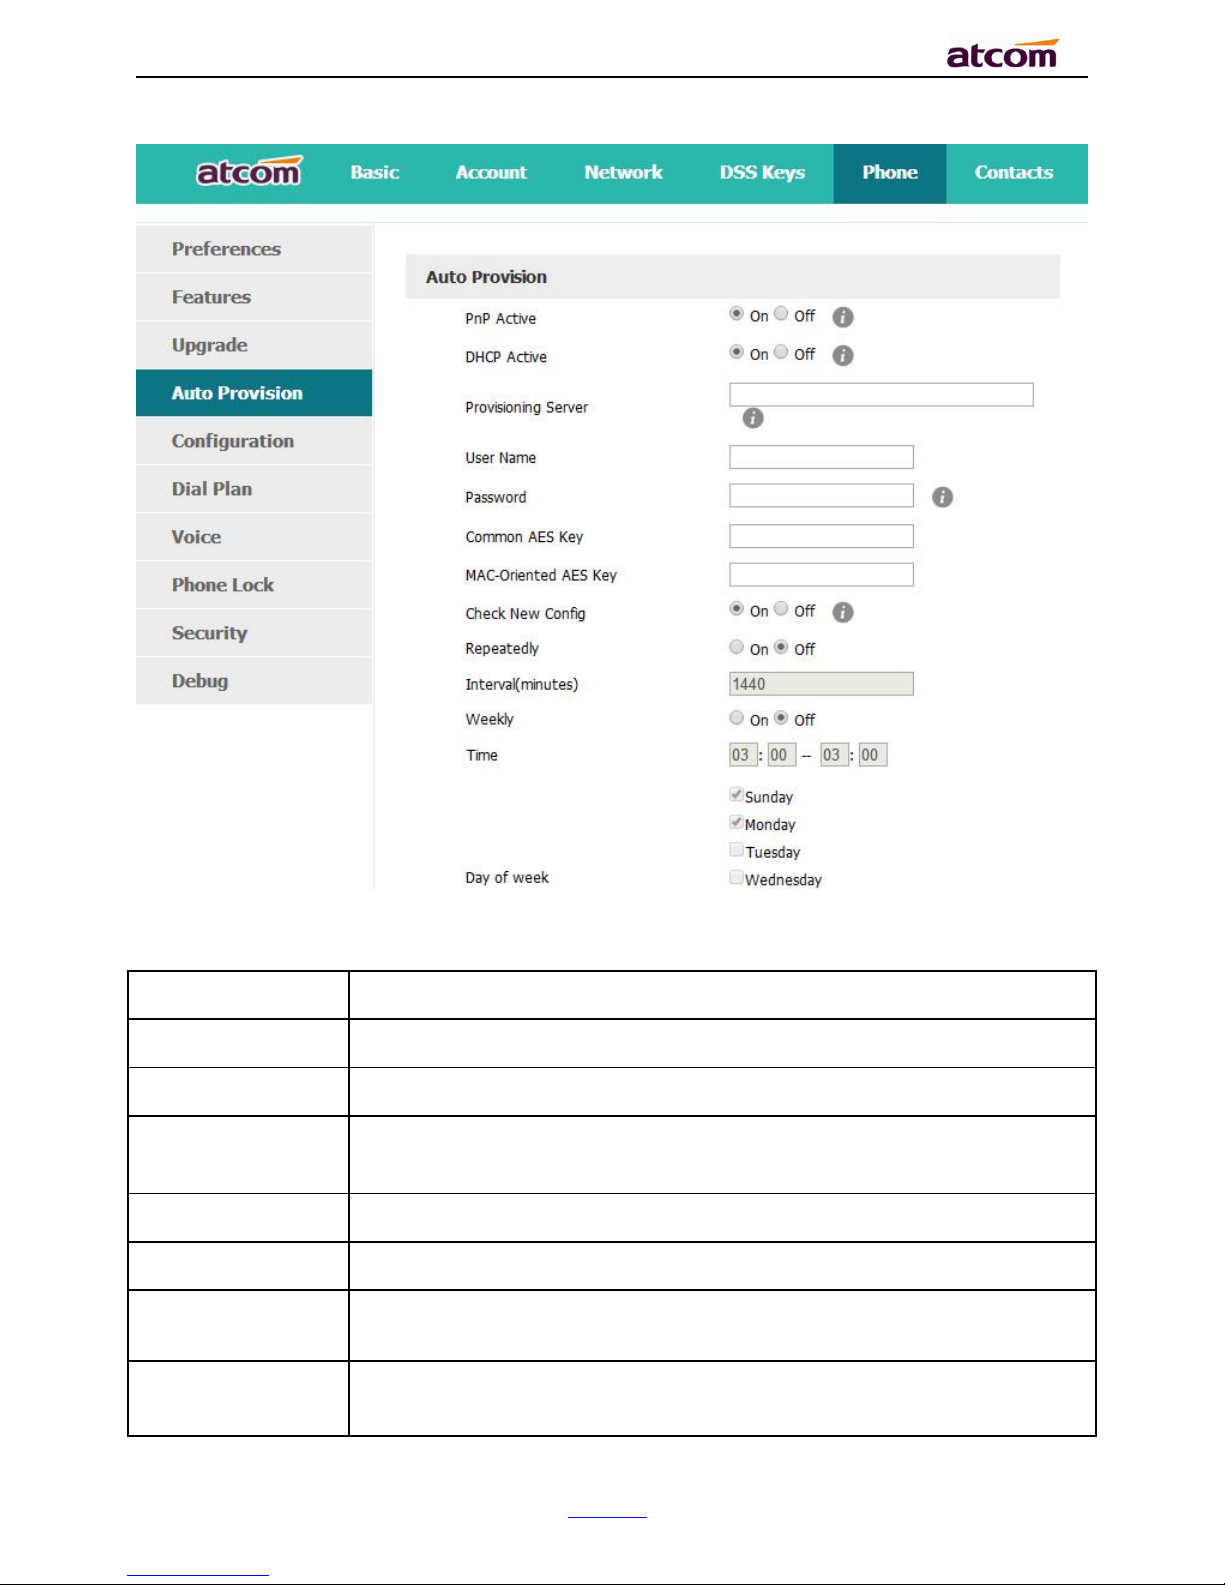
5.3. Auto Provision
User is able to configure the phone to upgrade automatically.
Page 67
CT1X IP Phone User Manual
ATCOM TECHNOLOGY CO., LIMITE
www.atcom.cn
67
Item
Description
PnP Active
Select “On” or “Off” to enable or disable PNP automatic updates
DHCP Active
Select “On” or “Off” to enable or disable DHCP option automatic updates
Provisioning
Server
The address to save control file for auto upgrading, it can filled by http,
https, tftp and ftp server,for example, tftp://192.168.1.111
User Name
The username to access the file server
Password
The password to access the file server
Common AES Key
Configures the plaintext AES key for decrypting the Common CFG file
MAC-oriented AES
KEY
Configures the plaintext AES key for decrypting the MAC-oriented CFG
file
Page 68

CT1X IP Phone User Manual
ATCOM TECHNOLOGY CO., LIMITE
www.atcom.cn
68
Check New Config
If set this parameter as “On”, the phone will do some check for
upgrading, and it will upgrade automatically once the conditions are met
Repeatedly
If set this parameter as “On”, the phone will do some check for
upgrading after “Interval(minutes)”,and it will upgrade automatically
once the conditions are met
Interval(minutes)
This parameter is configurable once the Repeatedly is “On”
Weekly
If set this parameter as “On”, the phone will do the check for upgrading
at a certain time in every week
Time
The time range that the phone do the check for upgrading every week,
and it’s configurable once the Repeatedly is “On”
Day of week
The day of week that the phone do the check for upgrading every week,
and it’s configurable once the Repeatedly is “On”
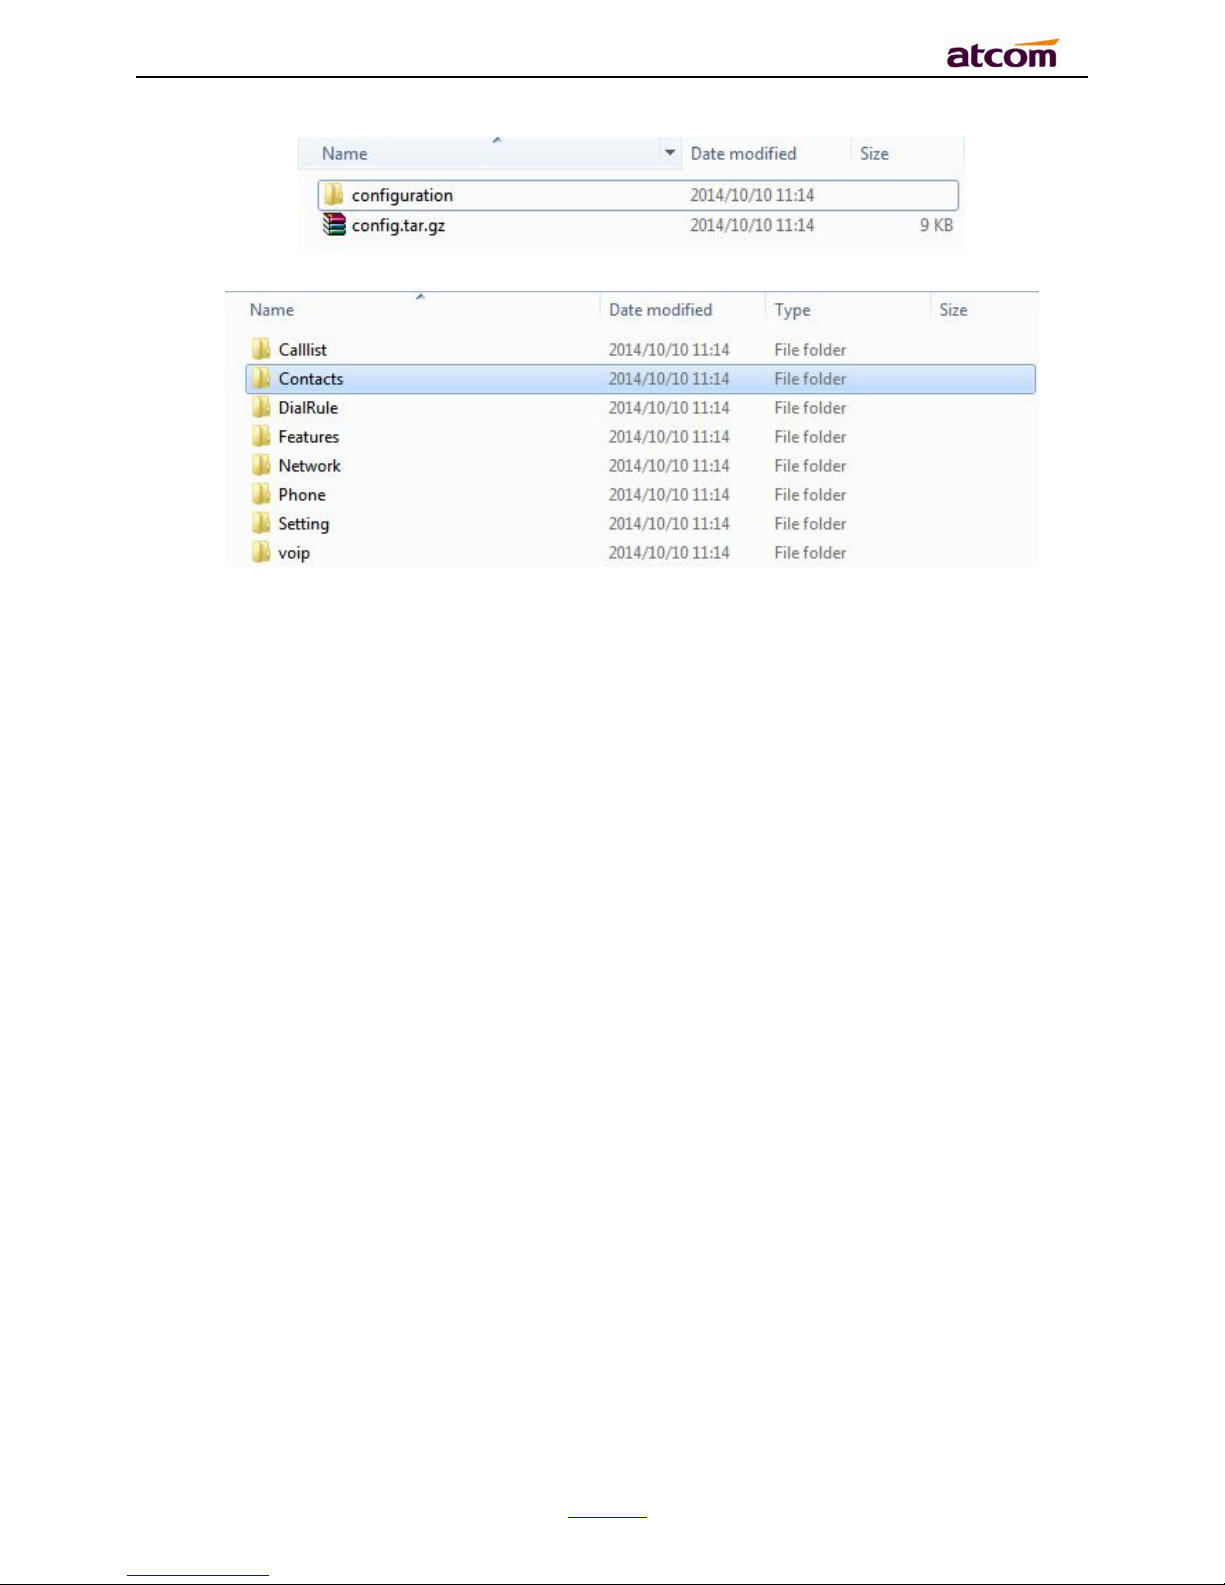
5.4. Export & Import configuration file
If user wants to set the same configuration on multiple phones, there is an easy way that
export the configuration file from one phone and then import this file into other phones. This
operation can be completed via Web only.
5.4.1. Export configuration file
There is two ways to export the configuration files,
Don’t check the “Export User Data” and click “Export” directly, it will export the template of
the configuration file;
Check the “Export User Data” and then click “Export”, it will export a configuration file that
carries with user’s configured data.
To modify the exported configuration file, you should to decompress it until you get a file
names as configuration.
Page 69
CT1X IP Phone User Manual
ATCOM TECHNOLOGY CO., LIMITE
www.atcom.cn
69
The content of configuration file listed as below,
5.4.2. Import configuration file
Click the button “Choose file” to select the target file for importing, and then click the button
“Import”. The phone will be rebooted a couple of minutes later, and import successfully.
Note:If some part of the configuration file has been modified manually, it must be re-
compressed as the format of “tar.gz” in Linux
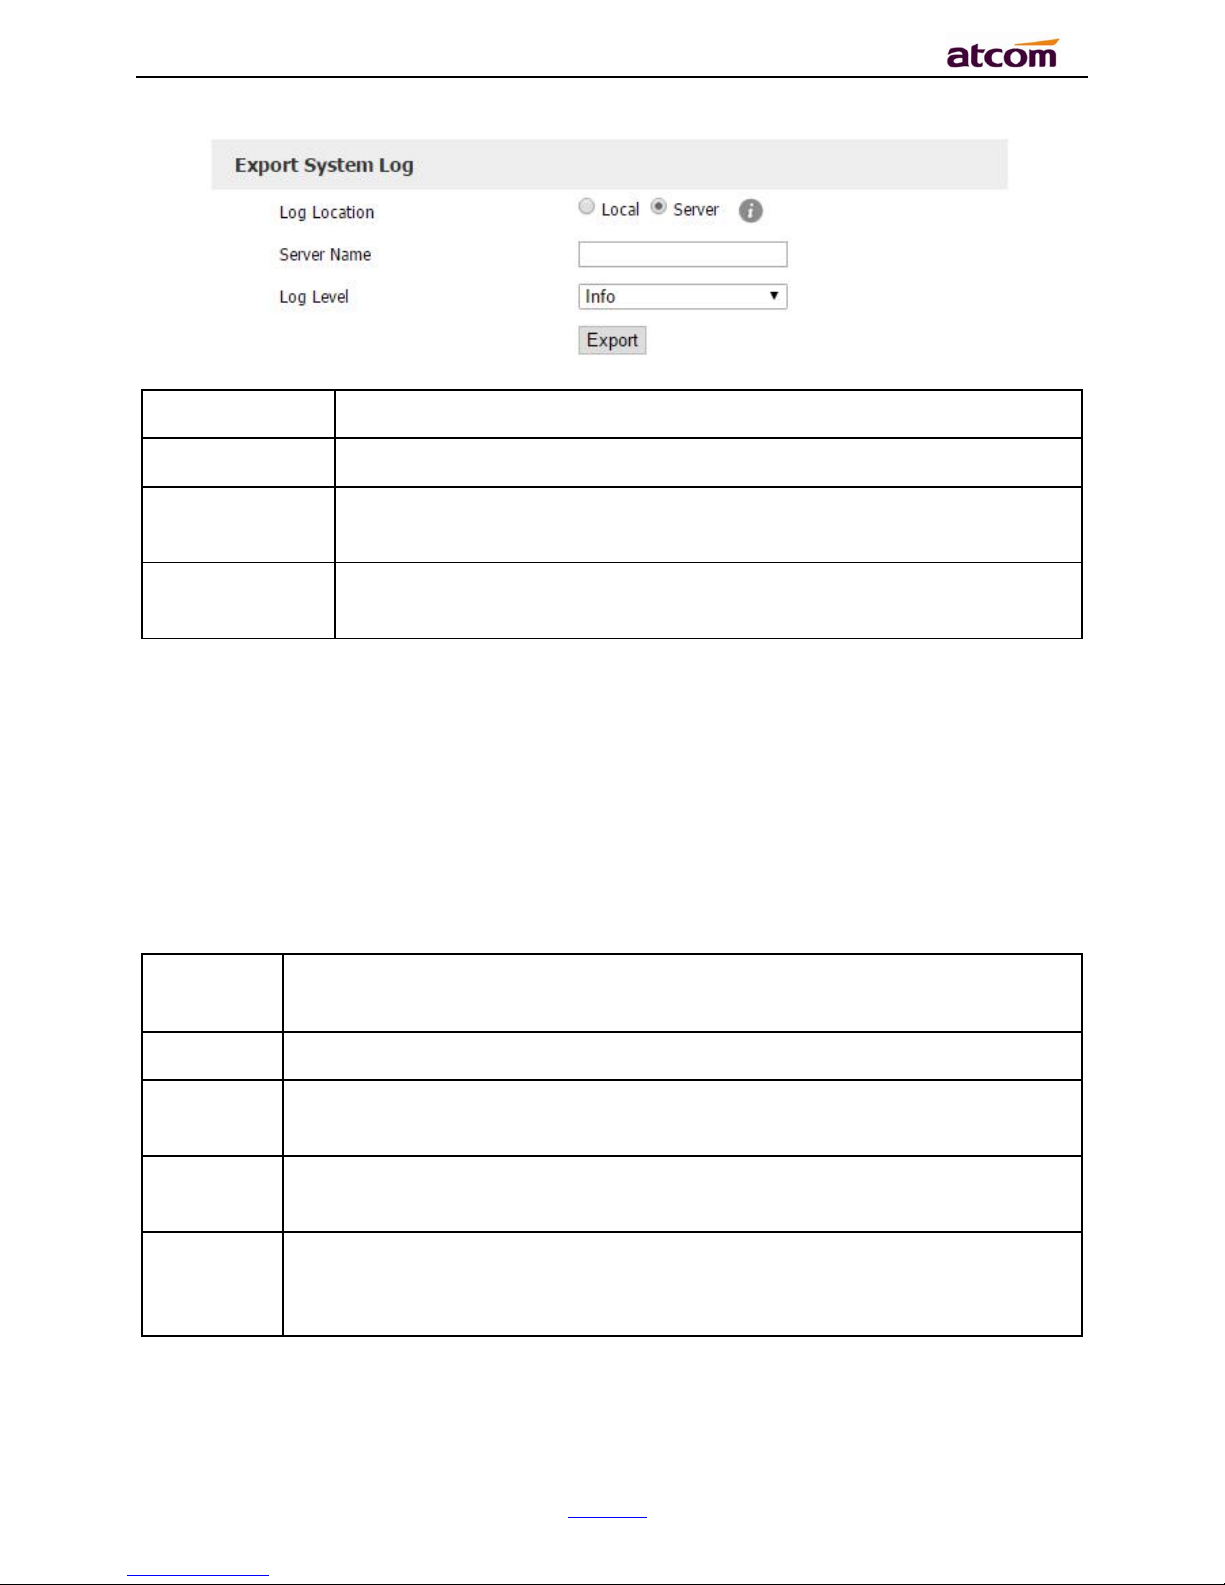
5.5. Export System log
When the phone doesn’t working well, System log is the best assistant tools for
troubleshooting, all operation details has been recorded. This operation is available via Web
only.
Page 70
CT1X IP Phone User Manual
ATCOM TECHNOLOGY CO., LIMITE
www.atcom.cn
70
Item
Description
Log Location
You can import the system log to local PC or remote Server.
Server Name
User must fill the address of server if you choose to export the system
log to remote server.
Log Level
It defines the detail of system log as 5 different levels, Fatal, Error,
Warning, Info, and Debug. The Debug level is the most detailed.
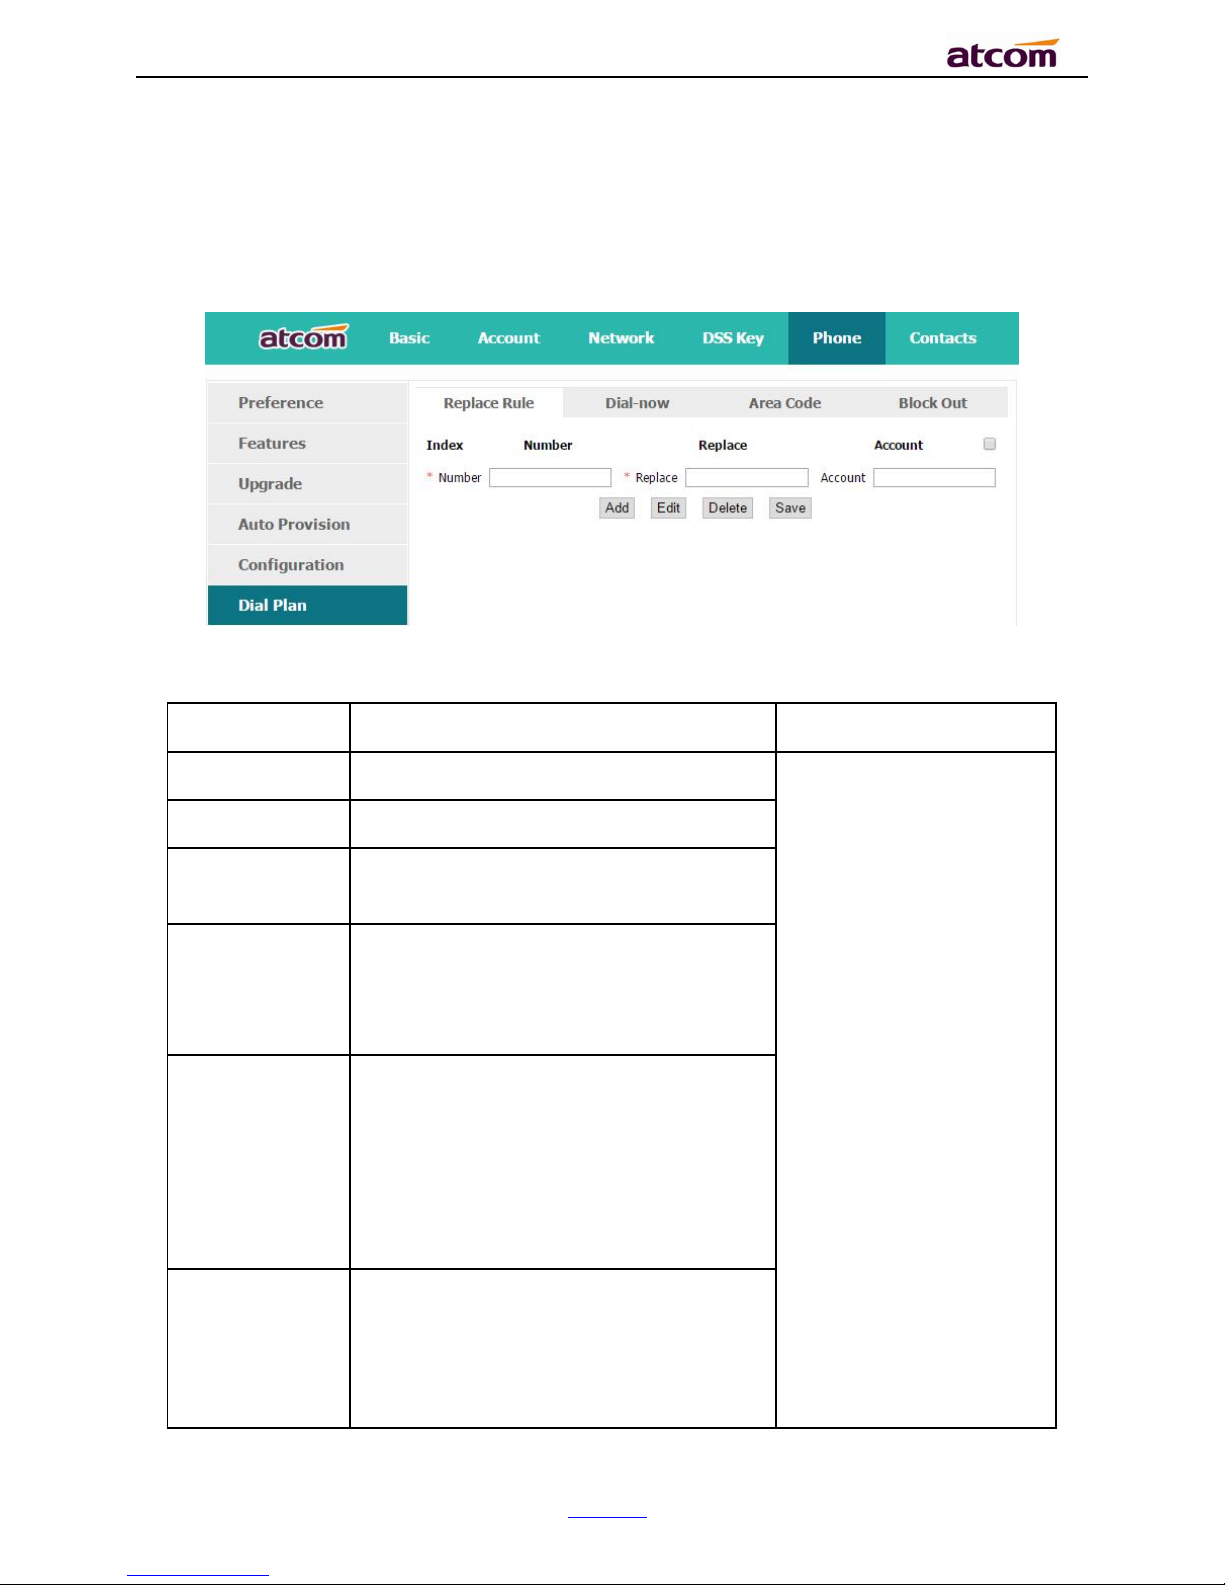
5.6. Dial plan
The customized Dial Plan are available , for example , the rule of replacement, Instant Calling,
Area code, Restriction of Outbound.
Before customizing the dial plan, user must learn the basic grammar as below,
.
Represent a character or multiple ones,e.g., “6.” can match
“66”,“678”,“6plus” and so on
x
Represent one character, e.g., “6x” can match “61”,“62”, “ 6s” and so on
[]
Represent a character in one range, e.g., “ 83[0-5]18618”can
matche“83018618”,“83488618” and so on
()
Represent the combination of characters, e.g., “([1-9])([2-7])3” can match
“923”,“153”,“773” and so on
$
Add a number after the character “$” to define the location of the characters,
e.g., use the prefix “ 8([1-3])(.)” to replace “7$2”, the phone will call “7837”
after dialing out “82837”
Note:Any operations (add, modify or delete) on the current dial plan will be not effective until
click “Save”.
Page 71
CT1X IP Phone User Manual
ATCOM TECHNOLOGY CO., LIMITE
www.atcom.cn
71
5.6.1. Replace Rule
Dial plan “Replace Rule” means to replace a batch of complicated character string by some
simple characters, to make a speed dial.
Item
Description
Sample
Number
The string works as replacer, not null
Set Number as “6”,
Set Replace as“6032”,
Set Account as “1”.
It means when dial 6, the
phone will dial 6032.
Replace
The string that to be replaced, not null
Account
The account to apply this dial plan,
blank or 1 is valid.
Add
Multiply replace rules can be configured
in one phone, after one replace dial plan
configured, click this button to add a
new one
Edit
The existed replace dial plans are
editable. The specified dial plan should
be selected until it is covered with
orange and the input fields “Number”
and “Replace” shows the details
correctly. After modifying, click button
“Edit” to make it to be effect
Delete
Delete one added or saved replace dial
plan or multiple ones, click the frame
after the specified replace dial plan
before delete it, and then click button
“Delete”
Page 72
CT1X IP Phone User Manual
ATCOM TECHNOLOGY CO., LIMITE
www.atcom.cn
72
Save
Any alteration won’t take effect until the
button “Save” is clicked.
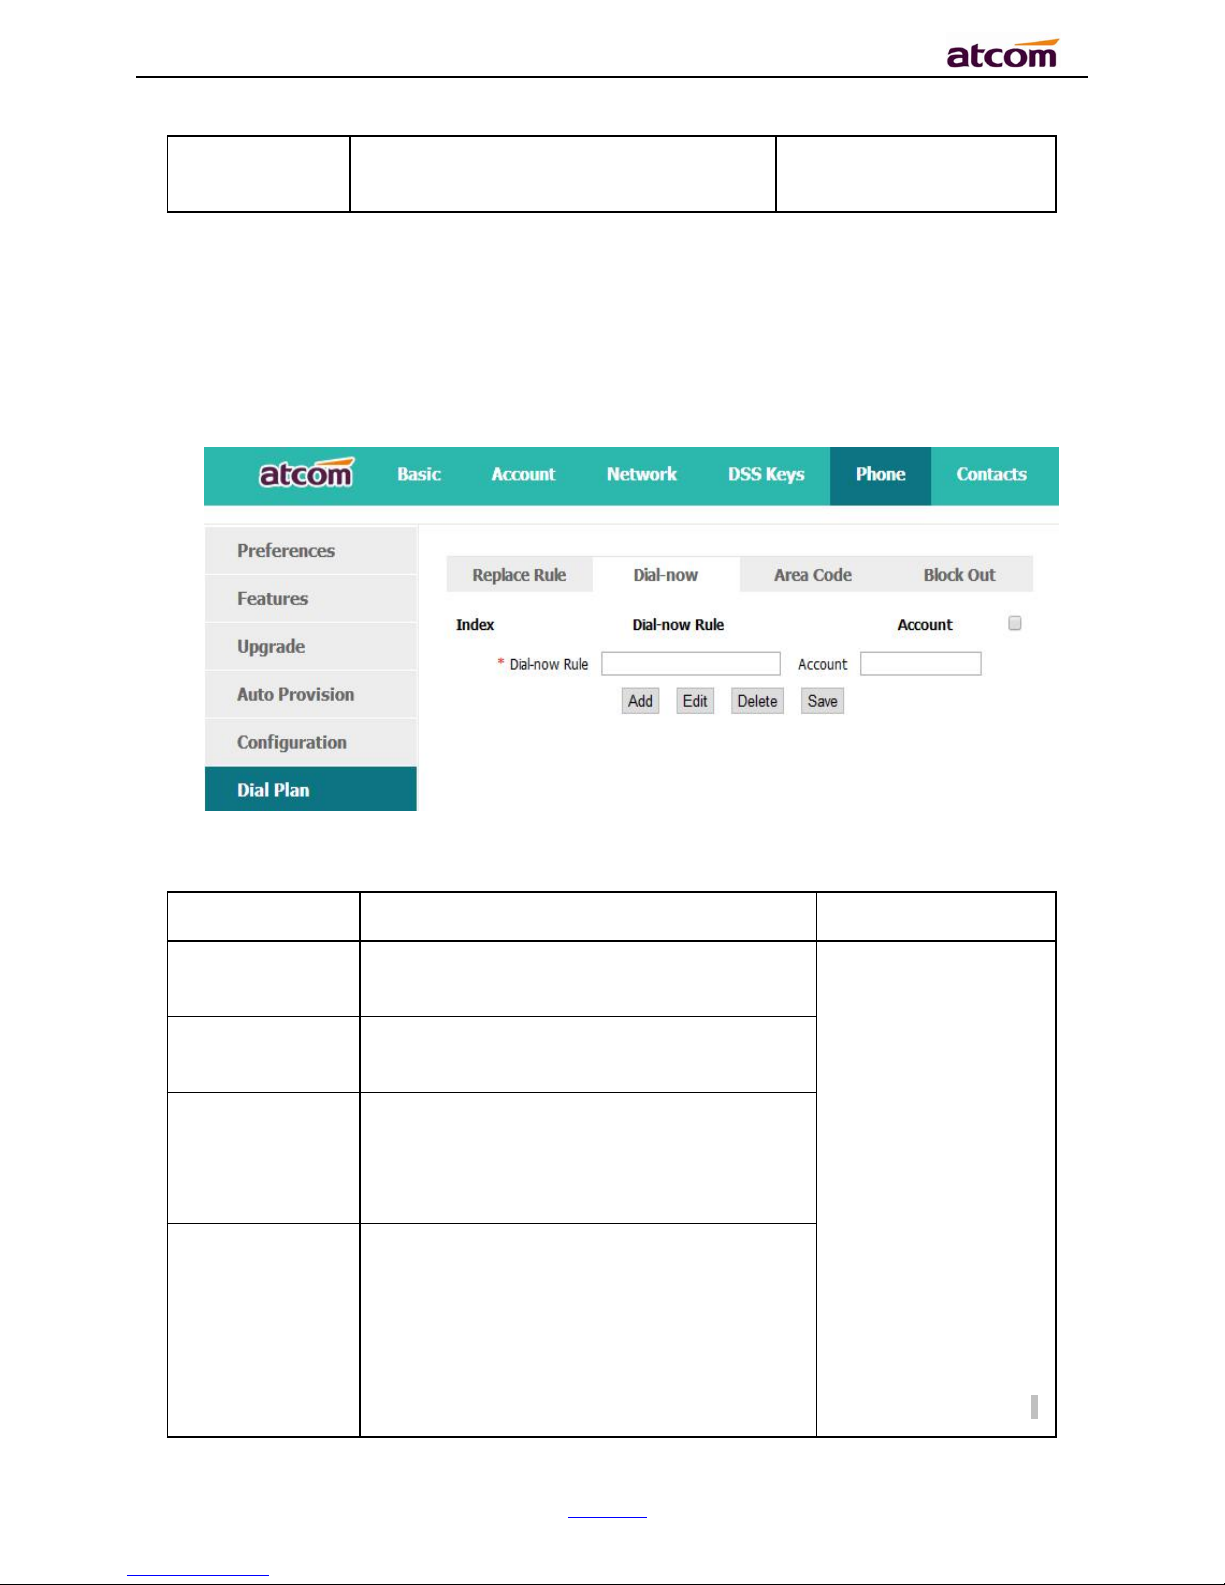
5.6.2. Dial-now
Dial plan “Dial-now” permits the corresponding phone to be dialed instantly without pressing
the soft key “Dial”, once the input has been matched. It works like a hotline.
Item
Description
Sample
Dial-now Rule
The string to be dialed out automatically by
the phone
Set “Dial-now Rule”
as 6xxx, keep
“Account” as null
It means the phone
will use the 1st
available account to
call 6033 after “Dialnow Time-out”
seconds when
inputting four figures
begin with 6
Note:Dial-now rule
is different with
hotline. The Dial-now
rule will take effect
when input numbers
Account
The account to apply this dial plan, blank
or 1 is valid.
Add
Multiply dial-now rules can be configured in
one phone, after one dial-now dial plan
configured, click this button to add a new
one
Edit
The existed dial-now dial plans are
editable. The specified dial plan should be
selected until it is covered with orange and
the input fields “Number” and “Dial-now”
shows the details correctly. After
modifying, click button “Edit” to make it to
be effect
Page 73

CT1X IP Phone User Manual
ATCOM TECHNOLOGY CO., LIMITE
www.atcom.cn
73
matches the dial
plan, and hotline
takes effect in
situation that the
phone is in dialing
state
Delete
Delete one added or saved dial-now dial
plan or multiple ones, click the frame after
the specified dial-now dial plan before
delete it, and then click button “Delete”
Save
Any alteration won’t take effect until the
button “Save” is clicked.
Set “Dial-now Time-out” via web: Phone→Features→General Information→Dial-now
Time-out (secs).
5.6.3. Area Code
Dial plan “Area Code” has been defined to identify each different area. To call a phone number
of other areas, user must add the area code to be in front of the phone number. For
convenience, area code has been recommended to be configured while frequently dialing to
that type of phone number.
Item
Description
Sample
Code
The area code dialed before the
number
Set “Code” as “0086577”,
Set “Minimum length” as
“5”.
It means when dialing
83018618 with the 5
th
account, the phone will dial
0086577 before it.
Note:If the length of the
Minimum length
The minimum length of the number
input to active the area code dial plan
Maximum length
The maximum length of the number
input to active the area code dial plan
Account
The account to apply this dial plan,
blank or 1 is valid.
Page 74

CT1X IP Phone User Manual
ATCOM TECHNOLOGY CO., LIMITE
www.atcom.cn
74
number input in the dial UI
is not between minimum
length and the maximum
length, area code will not
take effect
Confirm
Apply this dial plan
Cancel
Recover all input fields to the state
that saved at latest time
5.6.4. Block Out
Dial plan “Block out” is used to prohibit the phone number outgoing call from some accounts.
Item
Description
Sample
Block Out Number
The number that prohibited
Set “Block Out Number
1”as“10086”
It means the phone will
enter the “Call End” UI
when dial “10086”
Account
The account to apply this dial plan,
blank or 1
Confirm
Apply this dial plan
Cancel
Recover all input fields to the state
that saved at latest time
Page 75

CT1X IP Phone User Manual
ATCOM TECHNOLOGY CO., LIMITE
www.atcom.cn
75
6. FAQ
6.1. How to reset to factory
There are 3 methods for factory reset:
1. Factory reset via phone:
a) Press the key
b) Select “Settings”, then press the soft key “Enter”
c) Select “Advanced Settings”,then press the soft key “Enter”
d) Input the access password, then press the soft key “Enter”
e) Select “Reset to factory”,then press the soft key “Enter”
f) Press the soft key “OK”,then the phone will be reboot and resumed to factory default
settings
2. Factory reset via Web:
a) Key in the IP address of phone with a browser,
b) Access the webpage of phone as the role of “admin”, username/password is
admin/admin.
c) Select “Phone”
d) Select “Upgrade”
e) Click the button “Reset to Factory”
f) Click the button “OK”
3. Factory reset during starting:
a) Hold the key “*” and “#” while power on for 5 seconds
b) The phone will be reboot and resumed to factory default setting
Page 76

CT1X IP Phone User Manual
ATCOM TECHNOLOGY CO., LIMITE
www.atcom.cn
76
6.2. Upgrade the firmware on safe mode
If the phone can’t be started successfully, user is able to upgrade the firmware on post mode,
a) Setup a TFTP Server and set the PC’s IP address as “192.168.1.200”
b) Copy the kernel file we supplied to the root menu of TFTP Server
c) Ensure the TFTP Server and phone are connected to the same network switch and both
reachable
d) Long Press the key “*” and “1” to upgrade the kernel file, and then plug in power until
upgrading information displayed on LCD
e) The phone will start downloading file from TFTP server
f) After downloading completed, the phone will be automatically upgraded
g) After upgrading completed, the phone will be started with the factory default settings
6.3. How to make IP Peer to Peer call
1. Press it in dialing status
2. To make a IP peer to peer call
Using press“*”to choose “.” that in the IP address. For example, to dial “192.168.1.100”,
just need input “192”, “*”,“168”, “*”,“1”, “*”,”100”.
3. Disable the IP call feature
Via webpage modify the make IP call feature:
Phone→Feature →Accept SIP Trust Server Only, press “Enable”.
Page 77

CT1X IP Phone User Manual
ATCOM TECHNOLOGY CO., LIMITE
www.atcom.cn
77
Page 78

CT1X IP Phone User Manual
ATCOM TECHNOLOGY CO., LIMITE
www.atcom.cn
78
7. Troubleshooting
7.1. The phone is failed to register to SIP server
1. First of all, check the IP address. If the LAN port is DHCP, please ensure the DHCP server
has been enabled.
2. Check the network gateway
3. Check the DNS
4. Make sure the input account matched the one provided by Service Provider
5. Make sure SIP Server has been enabled already
6. Make sure the Port of SIP Server, it’s 5060 by default
7.2. The phone is failed to gain IP address
1. Make sure the network cable has been plugged into the LAN port
2. Make sure the network cable or port of network switch are working fine,
3. Make sure the DHCP server has been enabled, and there are available IP address
4. Try to set the LAN port as Statics IP
7.3. Only one party can hear from another on calling
1. Try to make a IP peer to peer call, to make sure the mic and speaker are working fine
2. Enable STUN via Web
3. Set the address of STUN Server, for example stun.sipgate.com
4. Present this operation above and the phone will be reboot
5. Try to make a normal call again
Page 79

CT1X IP Phone User Manual
ATCOM TECHNOLOGY CO., LIMITE
www.atcom.cn
79
8. Abbreviation
DND:Do Not Disturb
CFWD:Call Forward
Bxfer:Blind Transfer
Conf:Conference
Num:Number
SIP:Session Initiate Protocol
RTP:Real-time Transport Protocol
SDP:Session Description Protocol
VPN:Virtual Private Network
VLAN:Virtual Local Area Network
QoS:Quality of Service
Syslog:System log
UDP:User Data Protocol
TCP:Transmission Control Protocol
TLS:Transport Layer Security Protocol
BLF:Busy Lamp Field
DNS:Domain Name System
SRTP:Secure Real-time Transport Protocol
NTP:Network Time Protocol
VAD:Voice Activity Detection
CNG:Comfort Noise Generator
Page 80

CT1X IP Phone User Manual
ATCOM TECHNOLOGY CO., LIMITE
www.atcom.cn
80
9. FCC Caution
Any Changes or modifications not expressly approved by the party responsible for
compliance could void the user’s authority to operate the equipment.
The devices complies with part 15 of the FCC Rules. Operation is subject to the following
two conditions: (1) The device may not cause harmful interference, (2) the device must
accept any interference received, including interference that may cause undesired
operation.
Note: This equipment has been tested and found to comply with the limits for a Class B
digital device, Pursuant to part 15 of the FCC Rules. These limits are designed to provide
reasonable protection, uses and can radiate radio frequency energy, and if not installed
and used in accordance with the instructions, may cause harmful interference to radio
communication. However, there is no guarantee that interference will not occur in a
particular installation. If this equipment dose cause harmful interference to radio or
reception, which can be determined by turning the equipment off and on, the user is
encouraged to try to correct the interference by one or more of the following measures:
Reorient or relocate the receiving antenna.
Increase the separation between the equipment and receiver.
Connect the equipment into an outlet on a circuit different from that to which the
receiver is connected.
Consult the dealer or an experienced radio/TV technician for help.
 Loading...