

Page 1

Printed in KOREA
Page 2
Page 3

Contents
1
Introduction
Getting Started
What’s in the Box?
Charging the Battery
Home Screen
The Keyboard
Navigation Keys
The Main Menu
Turning the AT100 On and Off
Sending a Test Message
Setting Up Your AT100
Message Signature
My Info
Password
Edit My Info
Review My Info
5
6
6
7
8
10
11
12
13
14
15
15
16
16
17
19
Contents
Page 4

02
Setting the Time and Date
Set Private Time
Setting Alerts
Alert Reminders
Setting Audio Features
Volume Control
Key Click
Quiet Mode
Adjusting the Screen Display
Contrast
Display Timeout
Font
Font Size
Quick Text
Custom Replies
The AT100 Address Book
Adding a New Contact
Adding a New Group
Review Contacts and Groups.
Deleting Contacts or Groups
Editing Contacts
Editing Groups
Messages
Composing and Sending a New Message
19
21
22
23
25
25
25
26
26
27
27
28
28
29
30
32
32
34
37
38
39
40
41
41
Page 5

30
Specifying an Address Not in Your Address Book
Custom Text Composing Options
Special Characters
Multiple Choice Responses (MCR)
Using Quick Text
Choosing an Address Before Composing Your Message
Receiving a New Message
Replying to a Message
Managing Your Messages
Mailbox
Inbox
Inbox Message Options
Forward an Inbox message
Moving an Inbox Message to a Folder
Outbox
Outbox Message Options
Resending a Failed Message
Forwarding an Outbox message
Moving an Outbox Message to a Folder
Deleting Groups of Messages from the Inbox or Outbox
News/Info Inbox
News/Info Inbox Options
Folders
Naming Folders
Reading Messages in Folders
Folder Message Options
43
44
44
45
46
47
48
49
50
50
51
52
53
54
55
56
57
58
59
60
61
61
62
62
63
64
Page 6

04
Deleting Messages from a Folder
Features
Alarm
Schedule and Calendar
Play a Game
Device
Power Off
Battery Level Check
Memory Check
About Your AT100
IMPORTANT SAFETY INSTRUCTIONS
FCC Compliance
Limited Warranty
64
66
66
69
70
72
72
73
74
75
76
78
79
Page 7
Introduction
50
Introduction
Congratulations on your purchase of the ATCOM Wireless
AT100 2Way messaging device.
Your new AT100, with its ability to originate, receive and
respond to text messages, will quickly become a vital tool
for your business and personal communications.
This booklet contains operating instructions for your new device.
Whether you’re a new or experienced 2Way user, these
useful instructions will get you up and running quickly.
Page 8
Getting Started
06
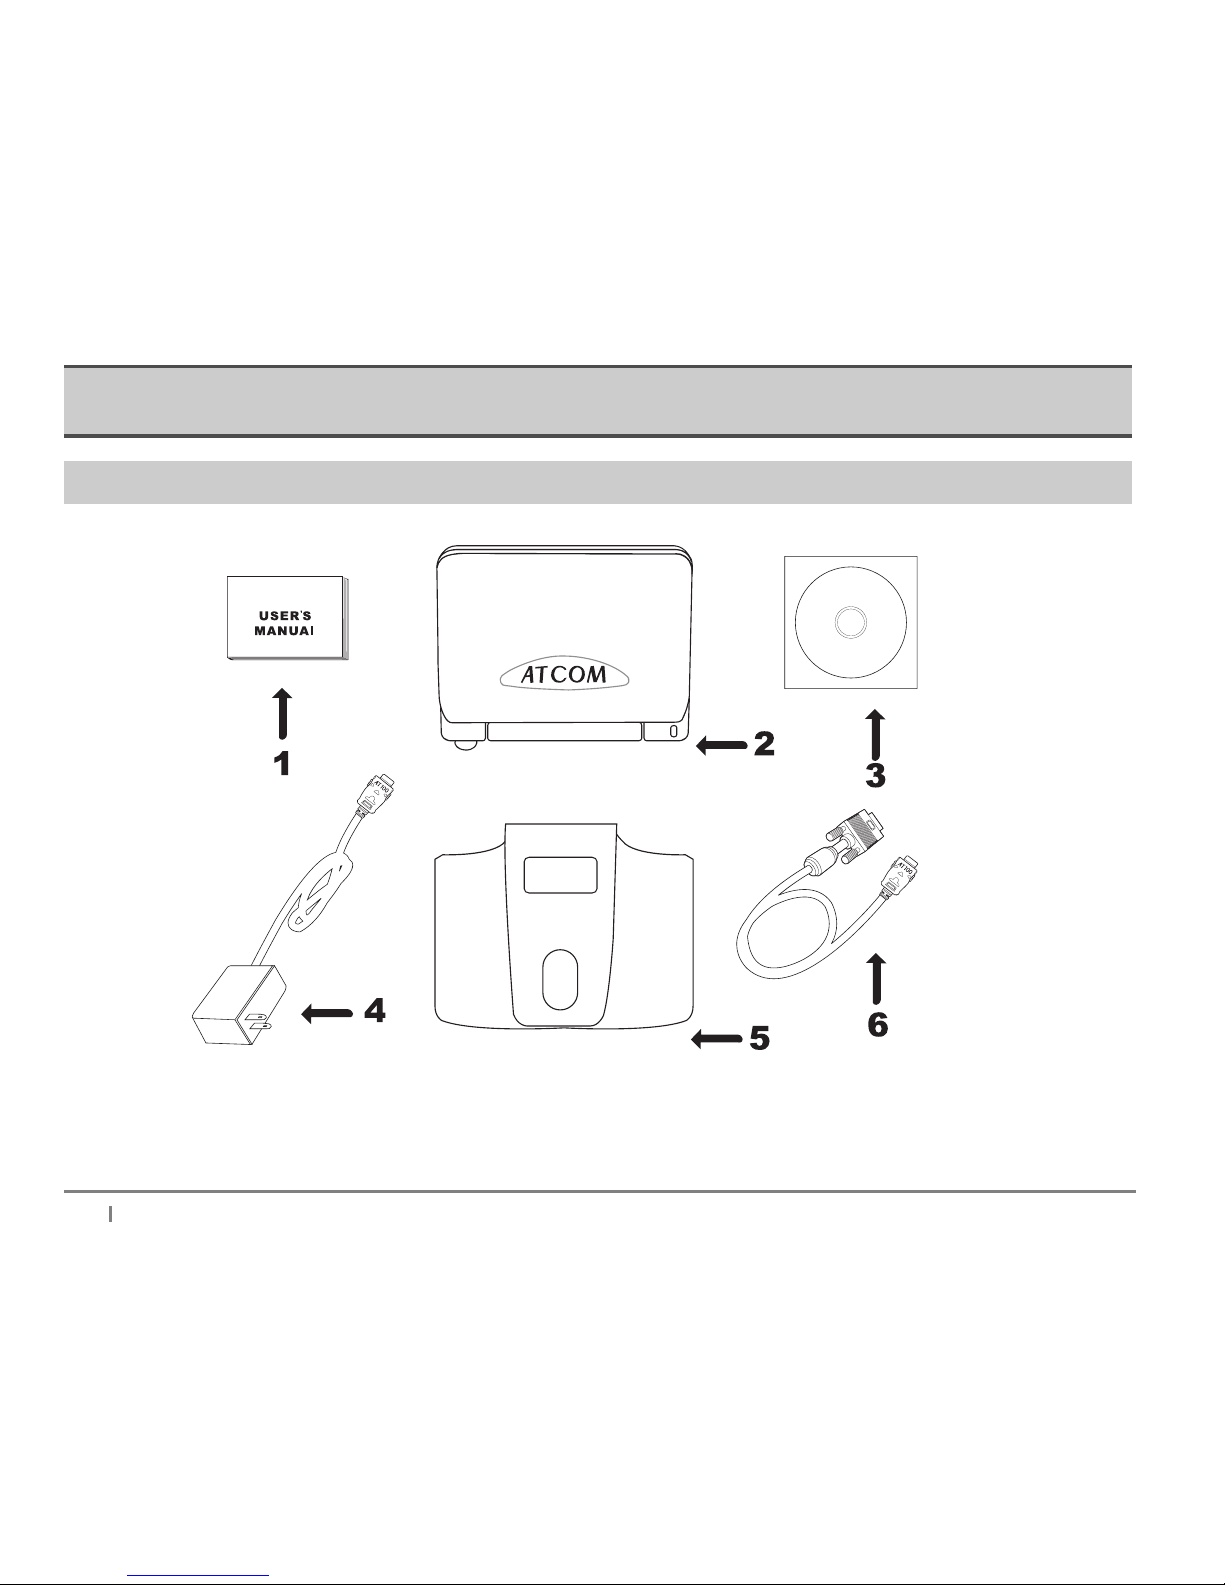
What’s in the Box?
1.User’s Manual 2.Device 3.CD-ROM 4.Charger 5.Holster 6.RS232 Cable, PC Backup
※
Note : Backup Data Cable & PC Backup CD-ROM are optional
Page 9
Getting Started
70
Charging the Battery
The device operates with a rechargeable lithium ion battery, included in your shipment.
The expected life span of the battery is about one (1) year, and we recommend replacing
the battery after a year s use. Fully charging a battery takes approximately 2 hours.
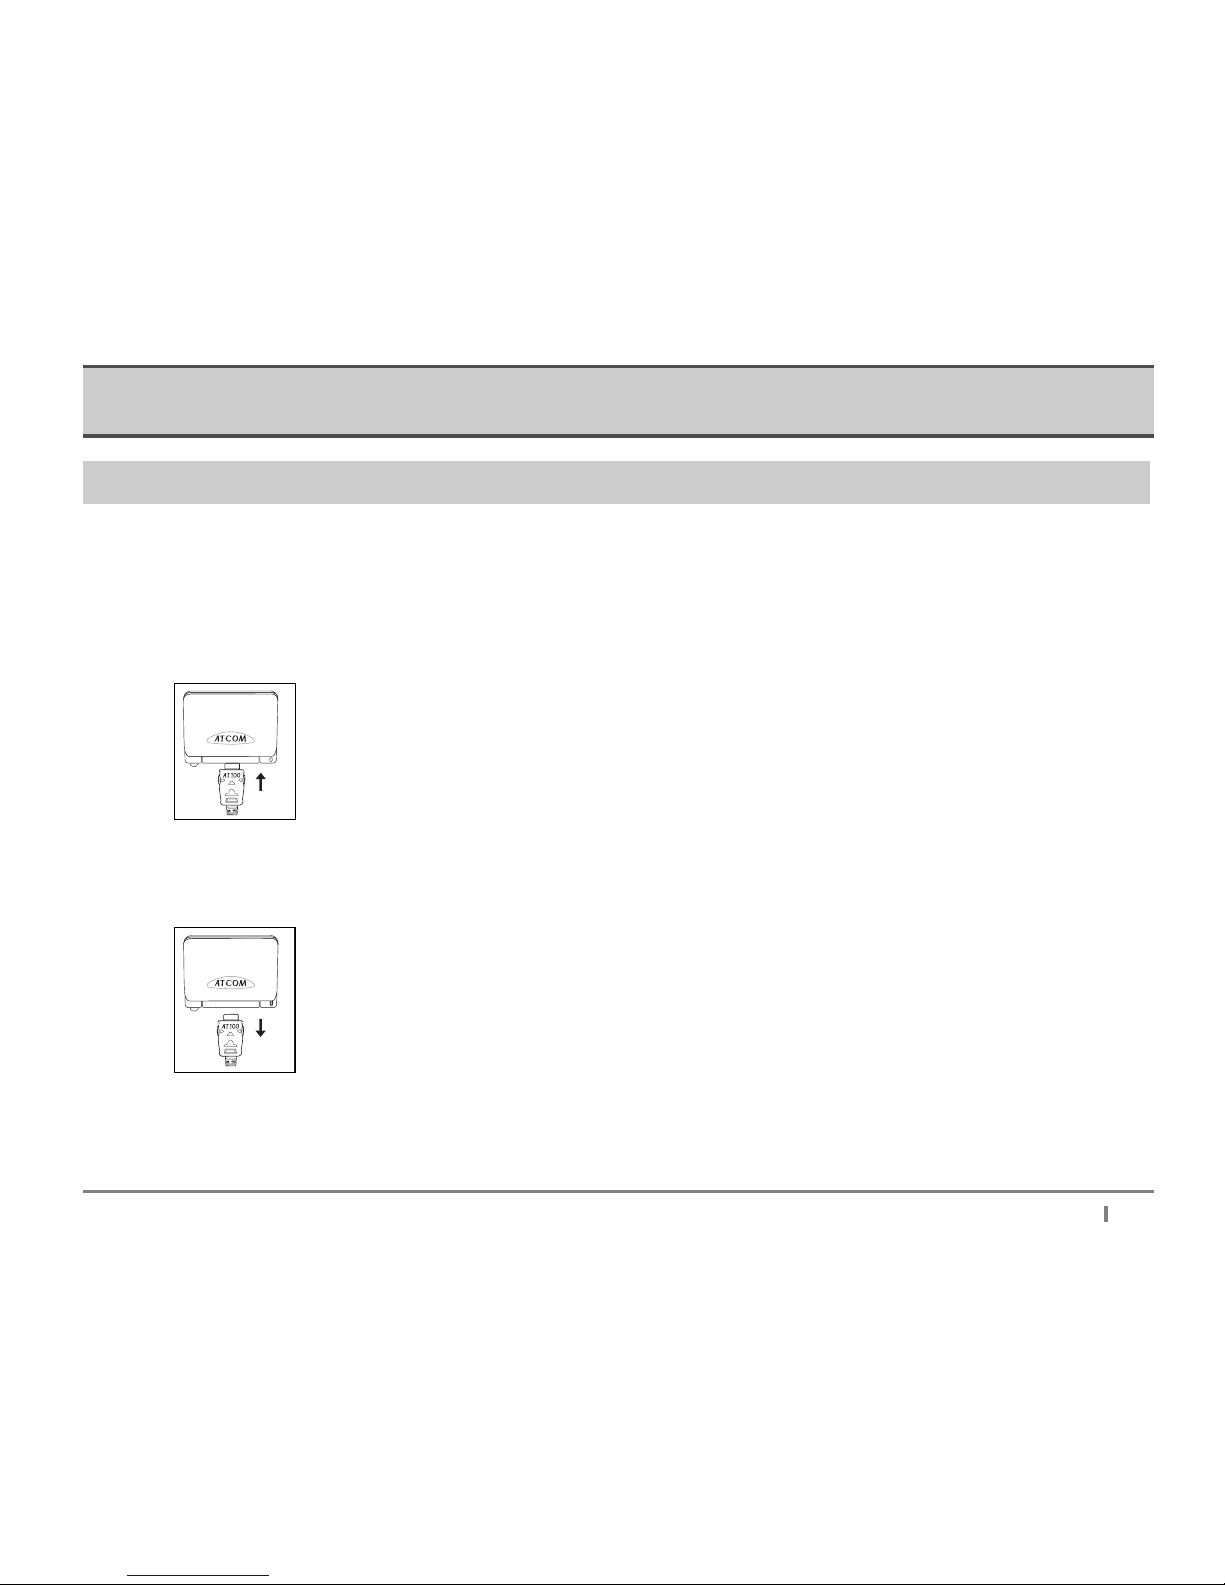
Plug the charger into the device as shown, with the > symbol facing up. Use only the charger supplied with the
device.
While charging, the LED light on the device will be red. The light will turn yellow when the device is fully charged.
A full charge will take approximately 2 hours.
Disconnect the charger from the device by pushing both gray keys on the charger connection and pulling, as
shown.
PC Data Cable and CD
The optional PC Data Cable and CD can be used to back up and import/ export messages and addresses from your
AT100 to your personal computer. The CD contains the AT100 backup software used to store or back up the data.
Page 10
Getting Started
08
Main Menu
Time
Service
Status
Alarm
Transmitter Status
Alert Type
Battery
Date
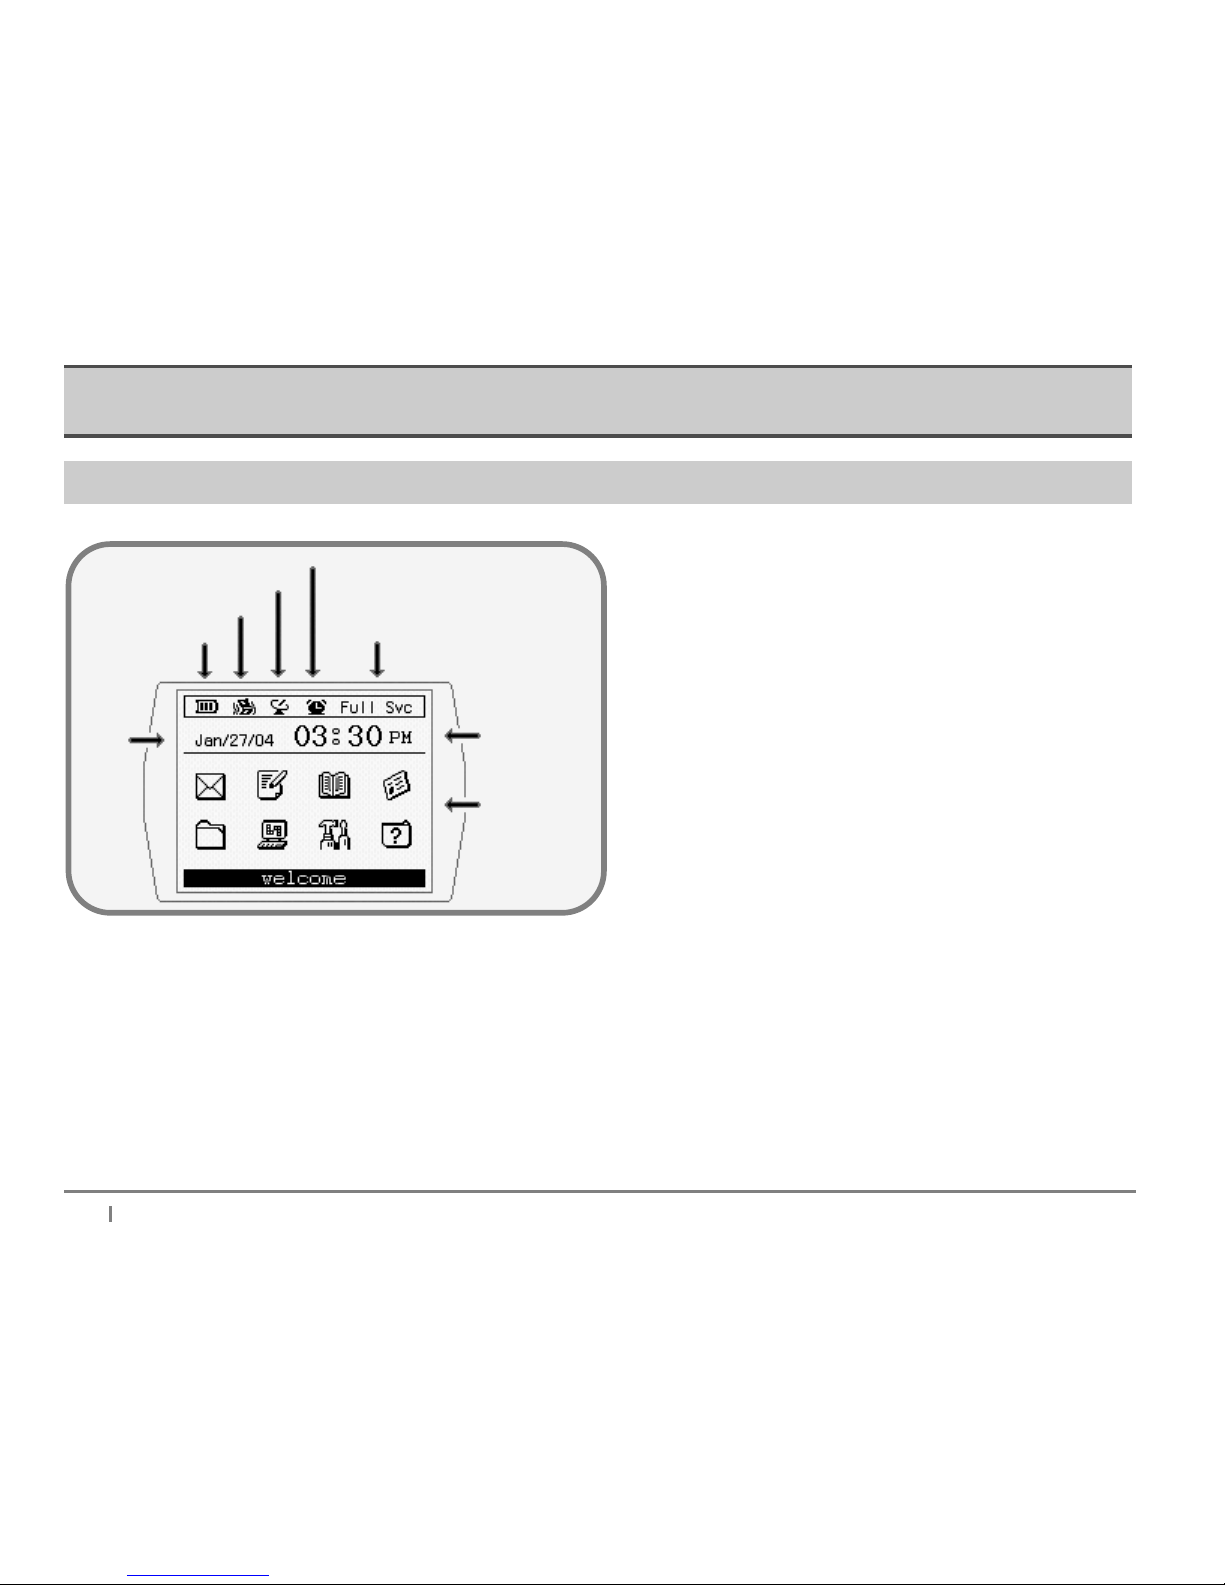
Home Screen
" Time "
Time and Date
Set the date and time, and the time format (12 or 24-hours) Customize folder.
Service Status
Service Status indicates the system status depending on signal strength or the system status e.g. Storing, Basic,
Full Service, and Roaming..
Page 11

Getting Started
90
Status Icons
Four different kinds of status icons appear with the following indicators:
- Alert Type
This icon will display the type of alert set: Tone, Vibration, Vibration+Bell (tone), No Alert (silent).
- Battery
This icon displays the battery strength. If the Battery is fully charged, three bars display.
- Alarm
The Alarm icon displays when an alarm is set and enabled.
- Transmitter Status
You can turn the transmitter on or off in the Customize menu.
Page 12
Getting Started
10
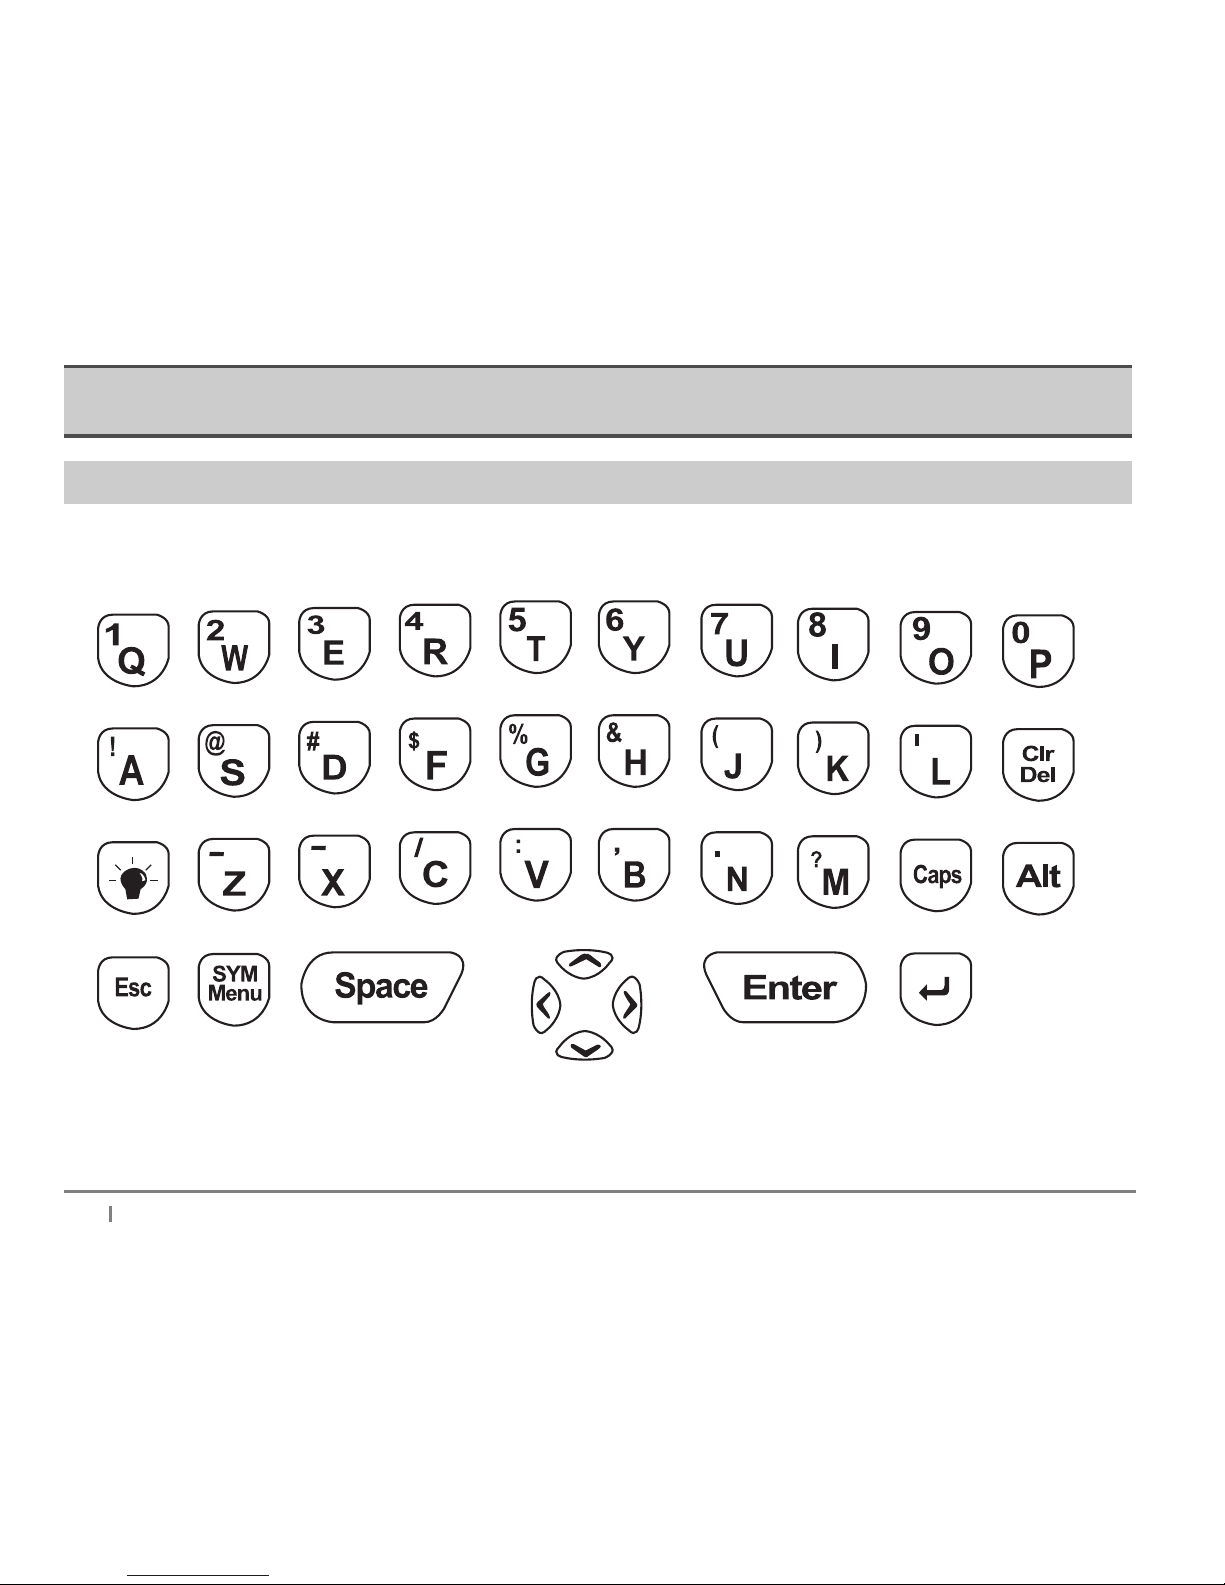
The Keyboard
The AT100 QWERTY keypad layout is similar to a PC keyboard.
Page 13
Getting Started
11
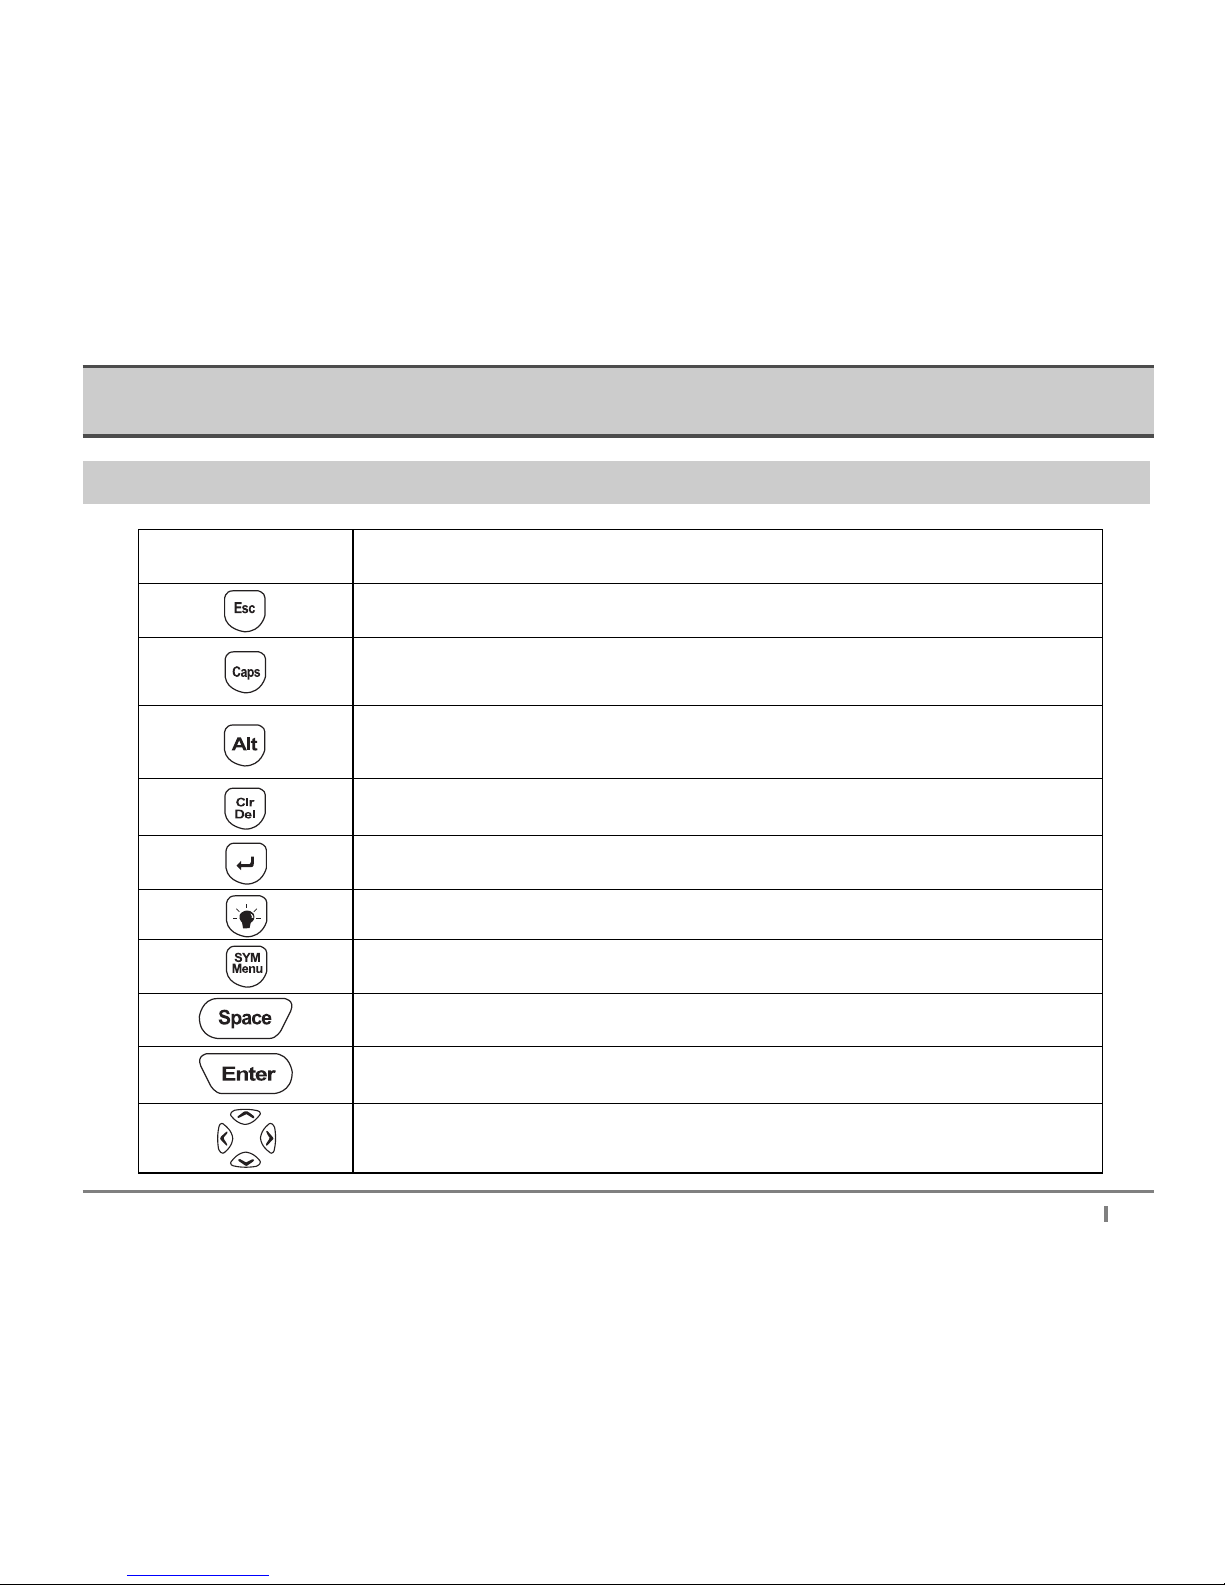
Key Usage
Navigation Keys
Return to previous menu
Save info when composing message or adding address
Press once to CAPITALIZE letters
Press twice to lock CAPITALS
Press again to revert to lower case letters
Press once to use yellow, alternate keyboard characters
Press twice to lock alternate characters
Press again to revert to regular characters
Delete characters to left of cursor
Clr clears all characters on an input screen
During composition : line return
In Address Book : select current address
Backlight on or off
During Composition, access Custom Text, including special characters,
multiple choice responses and Quick Text entries.
During composition : add a space
In " Alert Type " menu : preview selected alert
Select highlighted entry Move to next menu
Power on : Press and hold
Move the cursor up, down, left, or right
Set values (e.g., time and date) using up and down.
Page 14
Getting Started
12
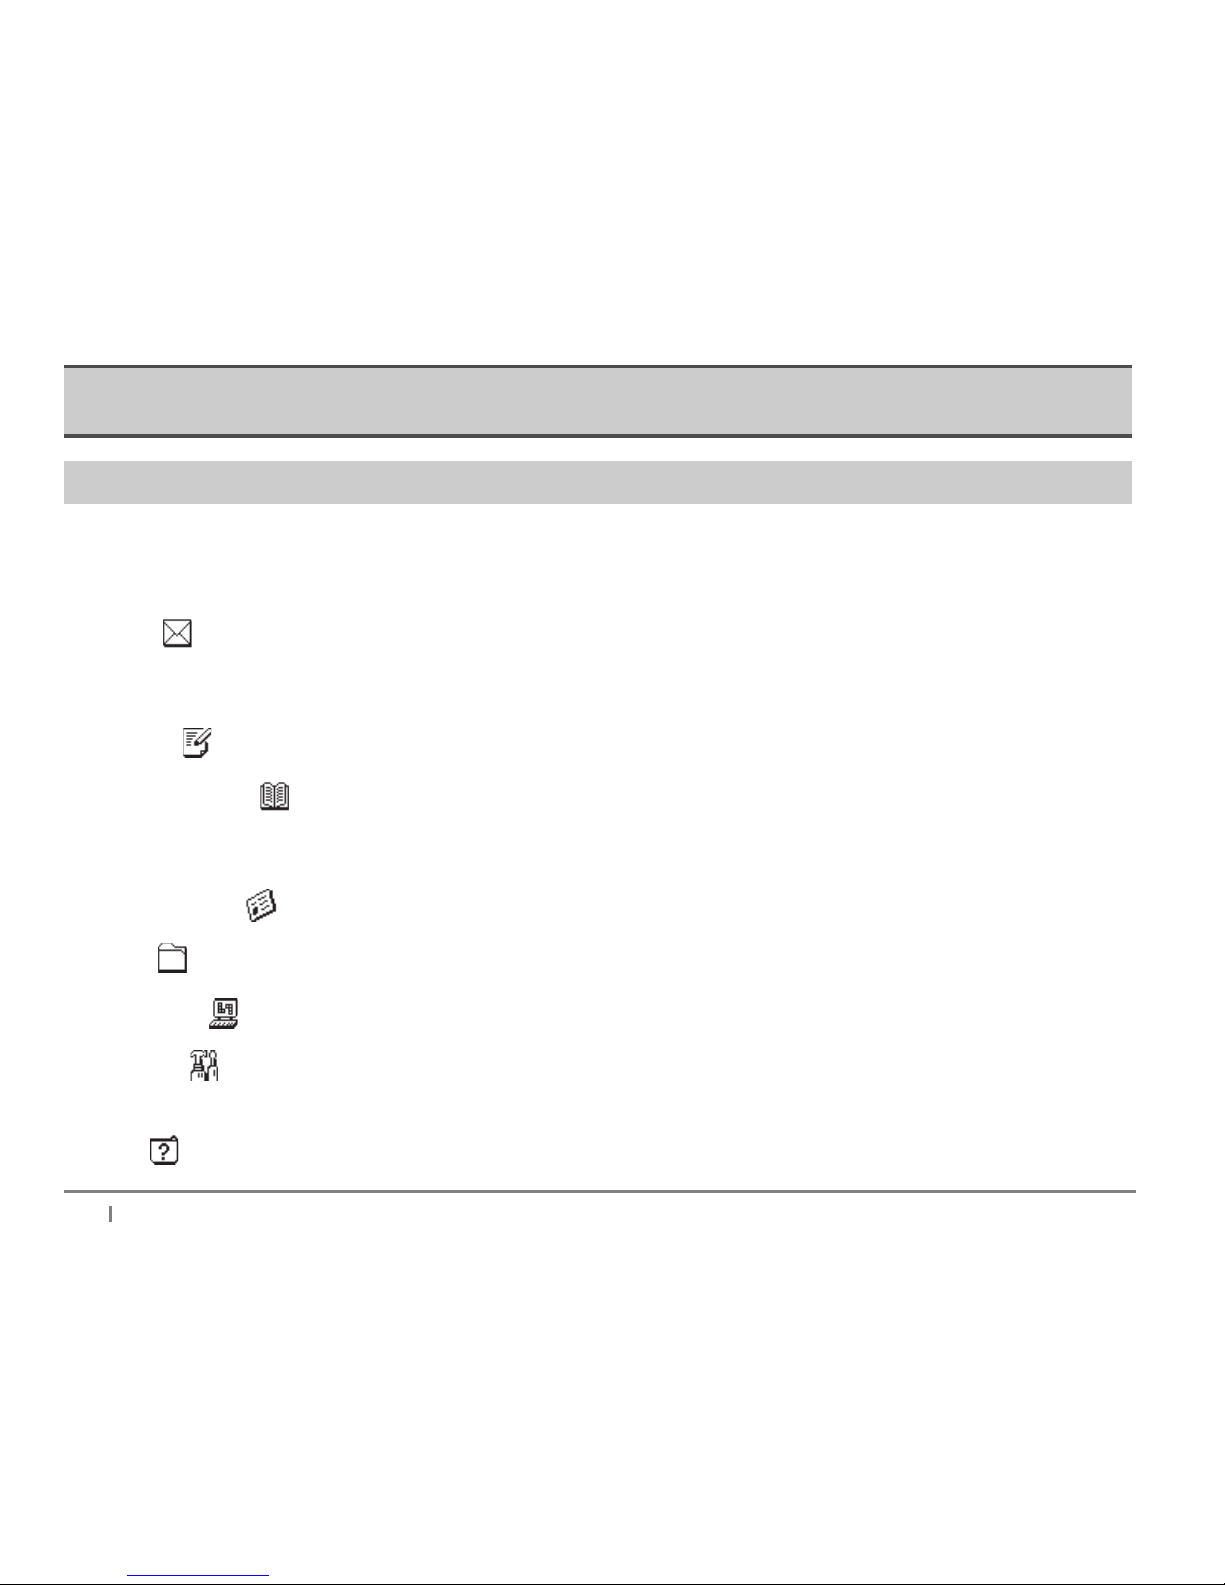
The Mailbox folder stores messages in one of three folders: Inbox (received messages), Outbox
(sent messages), and Drafts (messages composed, but not sent). While reading messages, you
can edit, reply, and forward messages to two-way pagers or email addresses.
Write a message easily using the QWERTY keypad or quick text function.
The Address Book stores up to 250 contacts and groups. Groups can contain up to 20
individual contacts. Each contact entry has thirteen (13) fields to store detailed
information, and you can quickly search for contacts alphabetically.
News and information messages can be stored in individual folders by subject.
Save your important messages in one of three folders.
The Applications folder contains the Alarm, Schedule, and Game.
Use the features in the Customize folder to set and change device settings, including
alerts, display, quick text and your automatic message signature.
The device folder contains battery and memory status, and the Power Off option.
The Main Menu
Thank you for choosing ATCOM Wireless ReFLEX Two Way Messaging Device, AT 100. The device is designed for
user’s convenience in sending or receiving a message through device or internet.
Please note the following brief description for Main Menu;
Mailbox ( )
Compose ( )
Addresses Book ( )
News/Info Inbox ( )
Folders ( )
Applications ( )
Customize ( )
Device ( )
Page 15
Getting Started
13
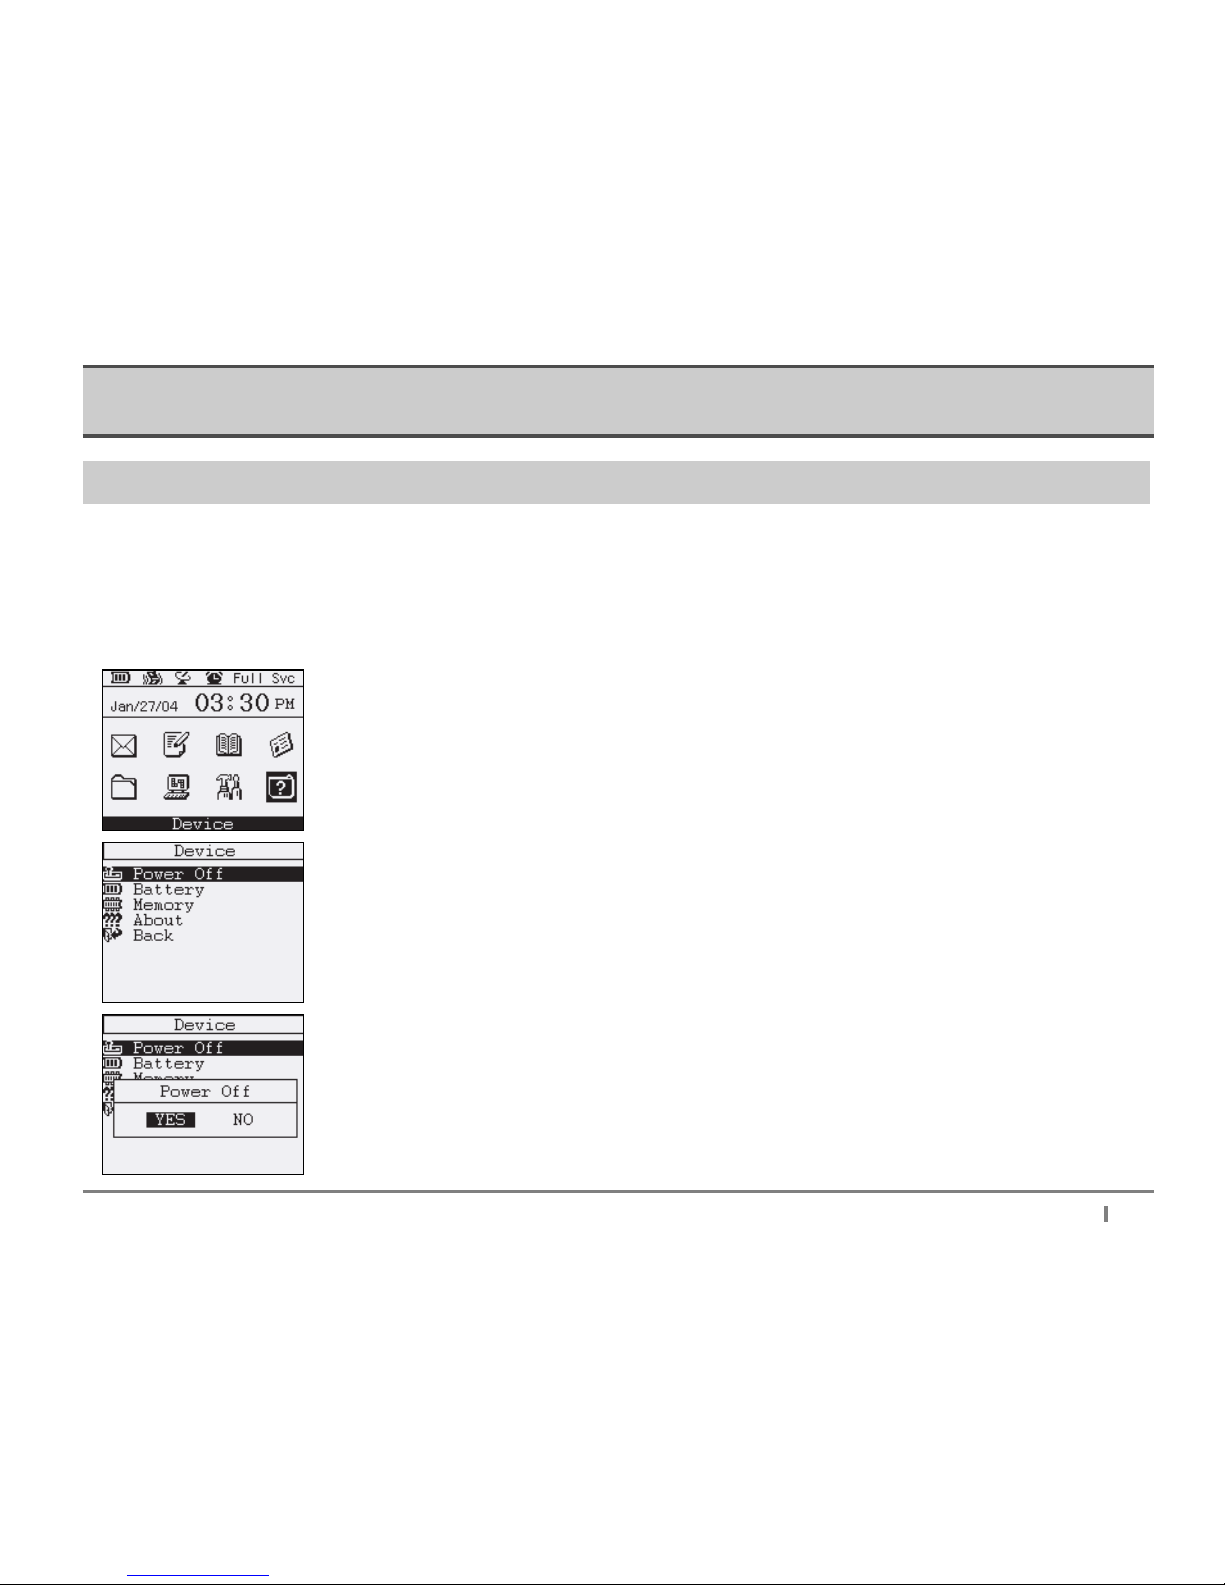
Turning the AT100 On and Off
Turning the AT100 On
Turn the device on by opening the flip and pressing the " Enter " key for 2 to 3 seconds.
Turning the AT100 Off
From the main menu, press the " D " key move the cursor to the Device folder and press Enter.
From the options that display, select Power Off , and press " Enter " .
Select " YES " and press " Enter ".
Page 16
Getting Started
14
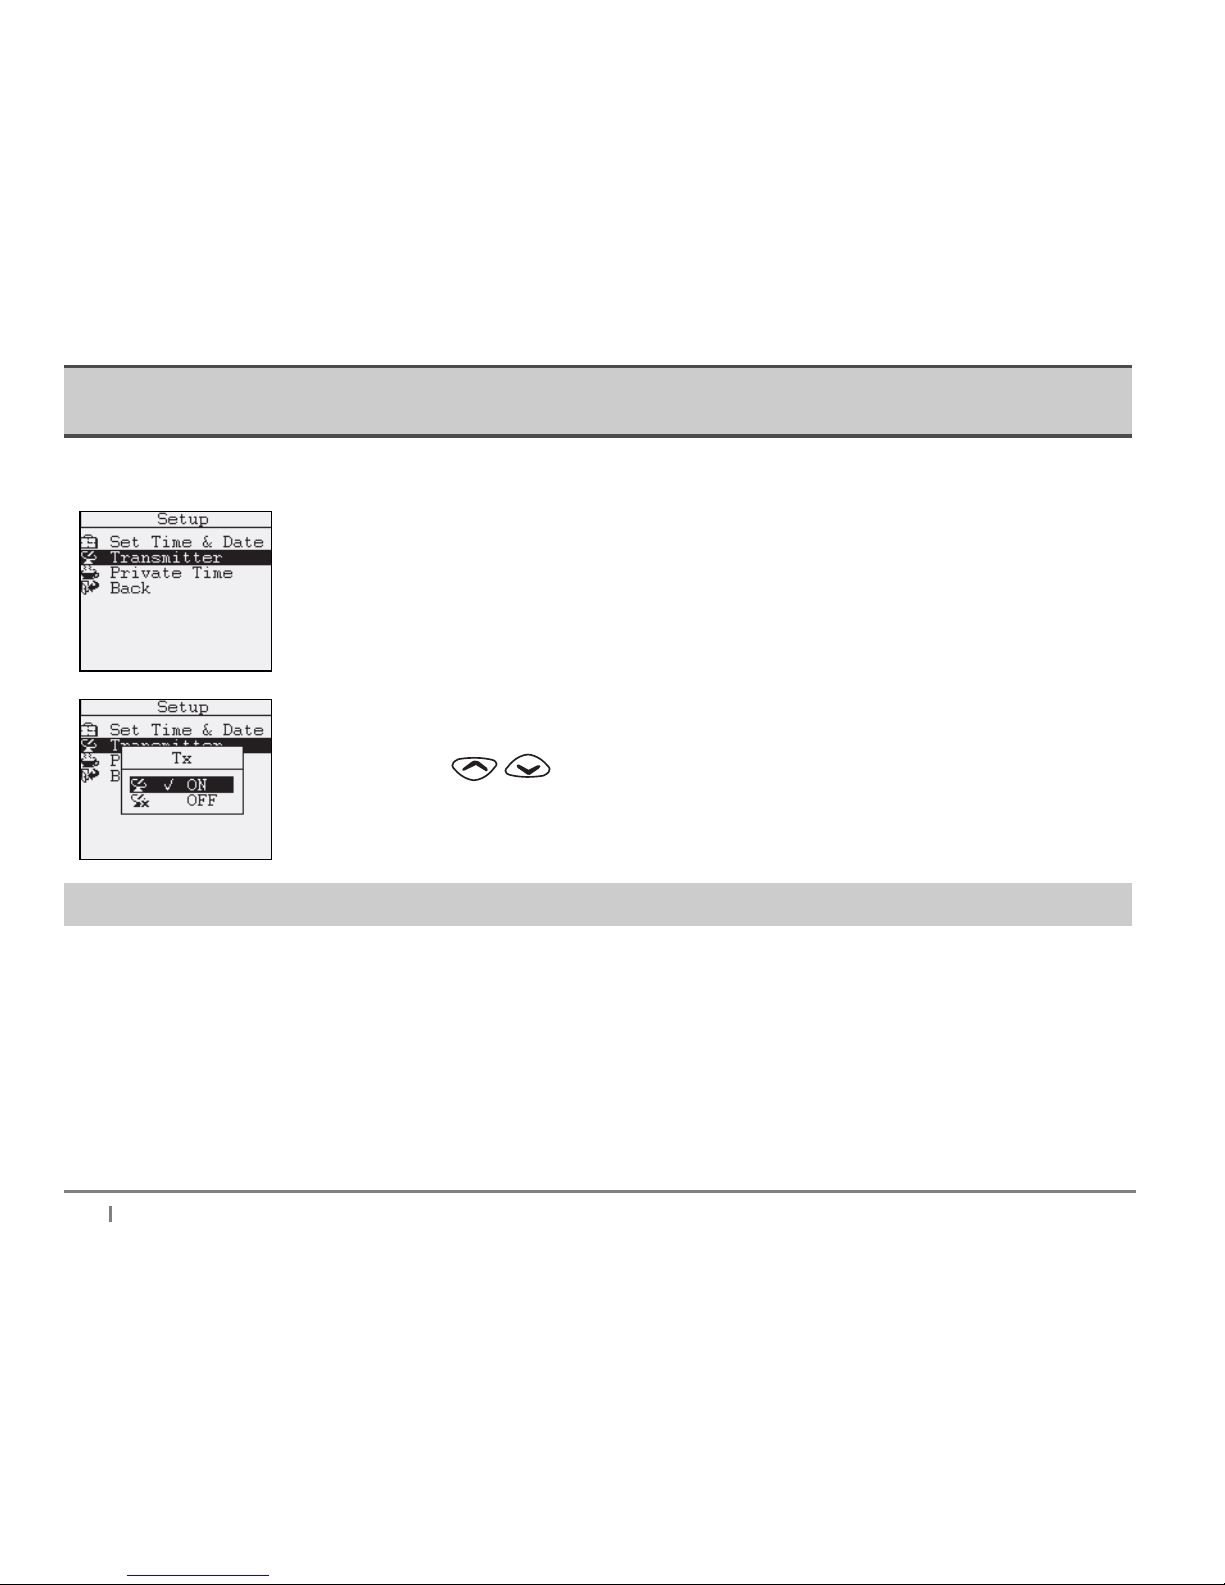
Turning the Transmitter On and Off
From the main menu, select the Customize icon. In the menu that follows, choose Setup and
then Transmitter.
In the pop up window that displays, select " ON " or " OFF " using the up and down
navigation keys ( ). Press " Enter " to save your settings.
Sending a Test Message
After charging the battery and turning your AT100 on, it’s a good idea to send yourself a test message to make sure
the device is working properly. Following the service instructions from your service provider, send a test message to
the device using the provider’s website, telephone messaging features, or your Internet email. While you’re waiting
to receive the message, review the "Reading Messages " section in this booklet for instructions on reading a
message.
Page 17
Setting Up Your AT100
15
Setting Up Your AT100
This section contains instructions for setting the date and time, setting your automatic message signature, setting up alerts and
alarms, and other features found in the Customize menu options.
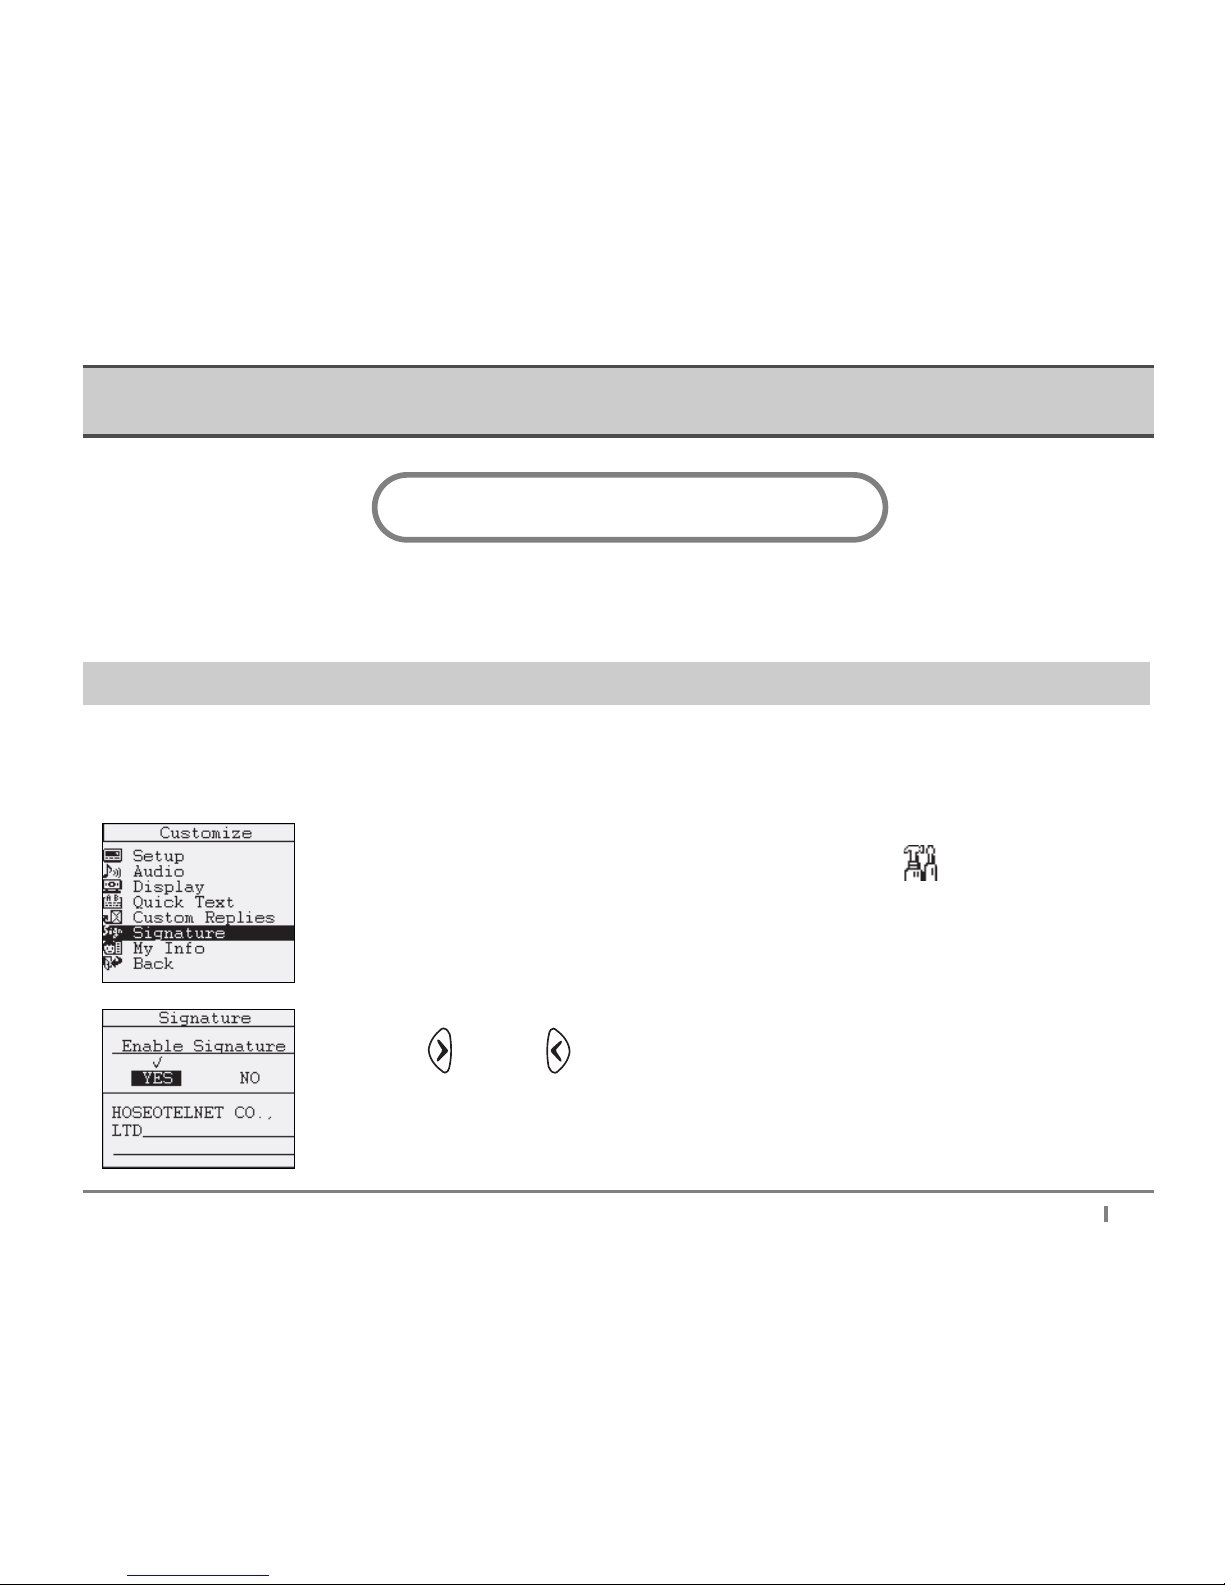
Message Signature
The AT100 can automatically add your signature to your outbound messages and replies. Your signature can contain your name,
your name and wireless number, or other information you want to add to your messages to identify yourself.
To set or change your automatic signature, open the Customize folder [ ] in the main menu.
Select Signature from the menu that displays and press Enter.
Use the right and left navigation keys to choose ON or OFF and press Enter to make
your selection. Type your signature and then press Enter to save.
Page 18
Setting Up Your AT100
16
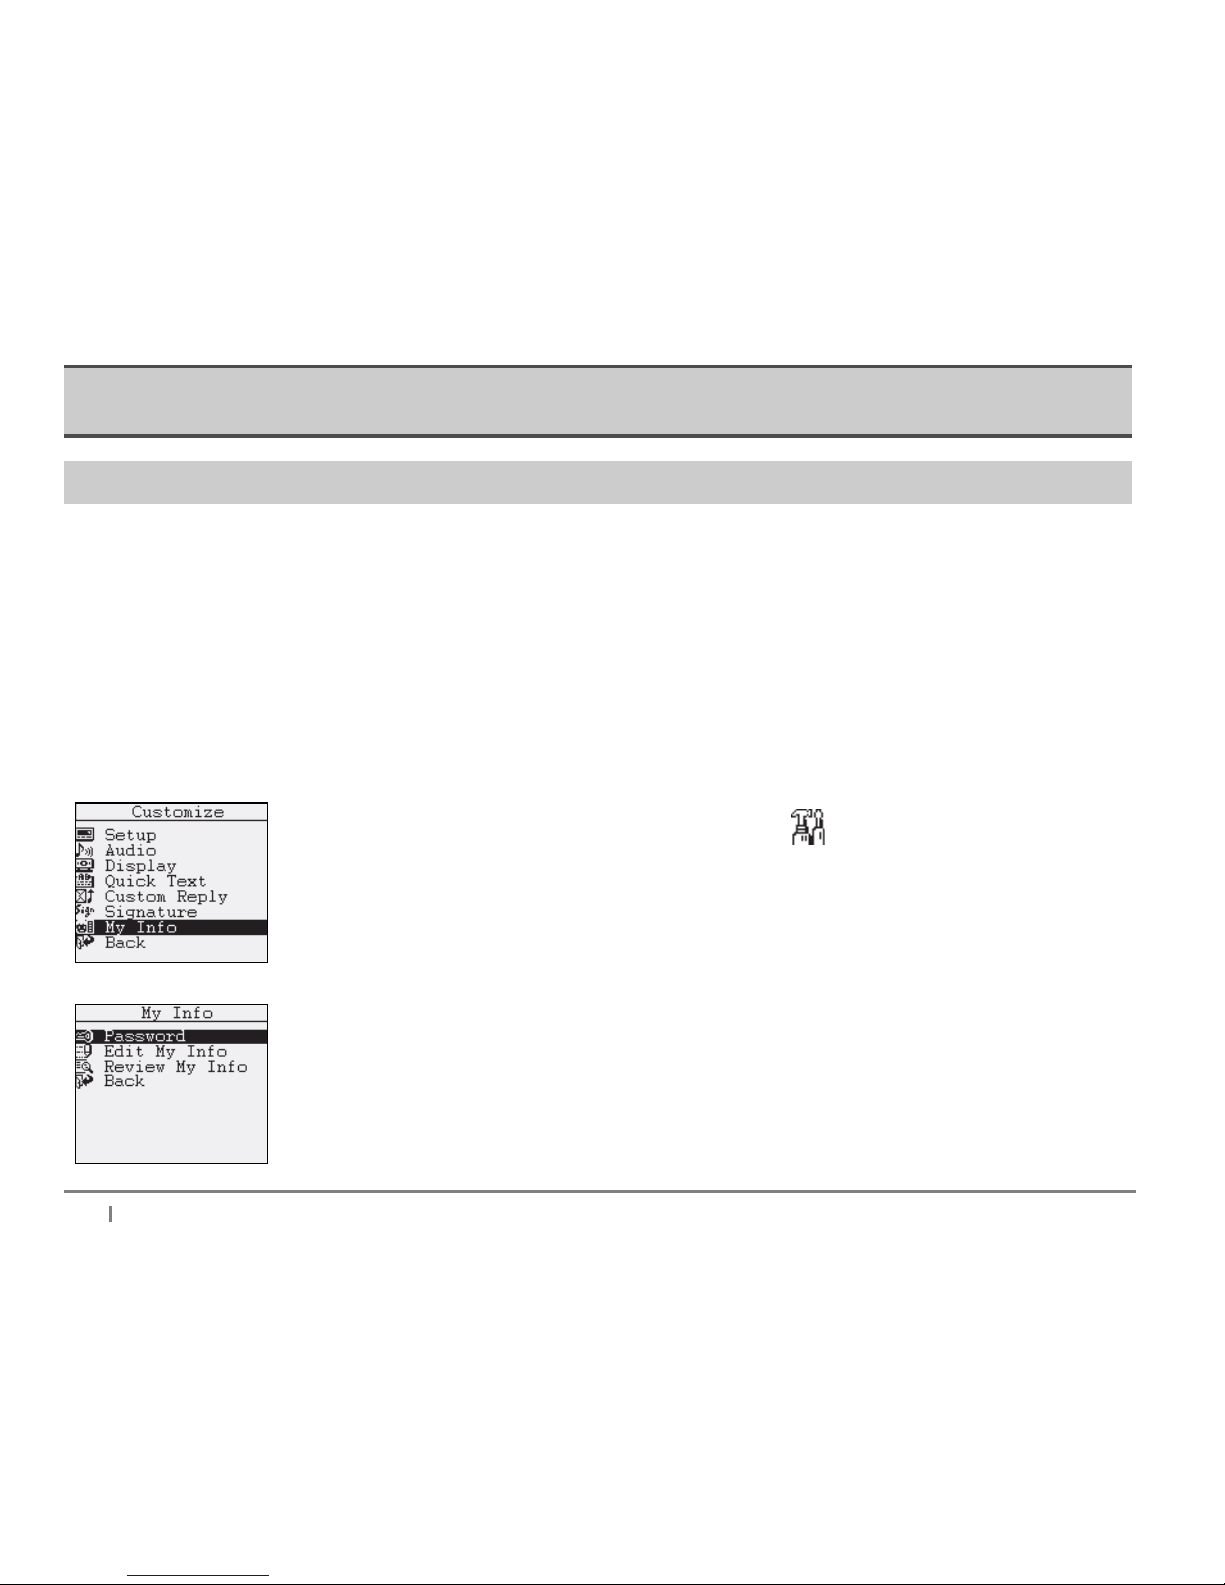
My Info
My Info options include adding password protection for your device, and storing your personal information.
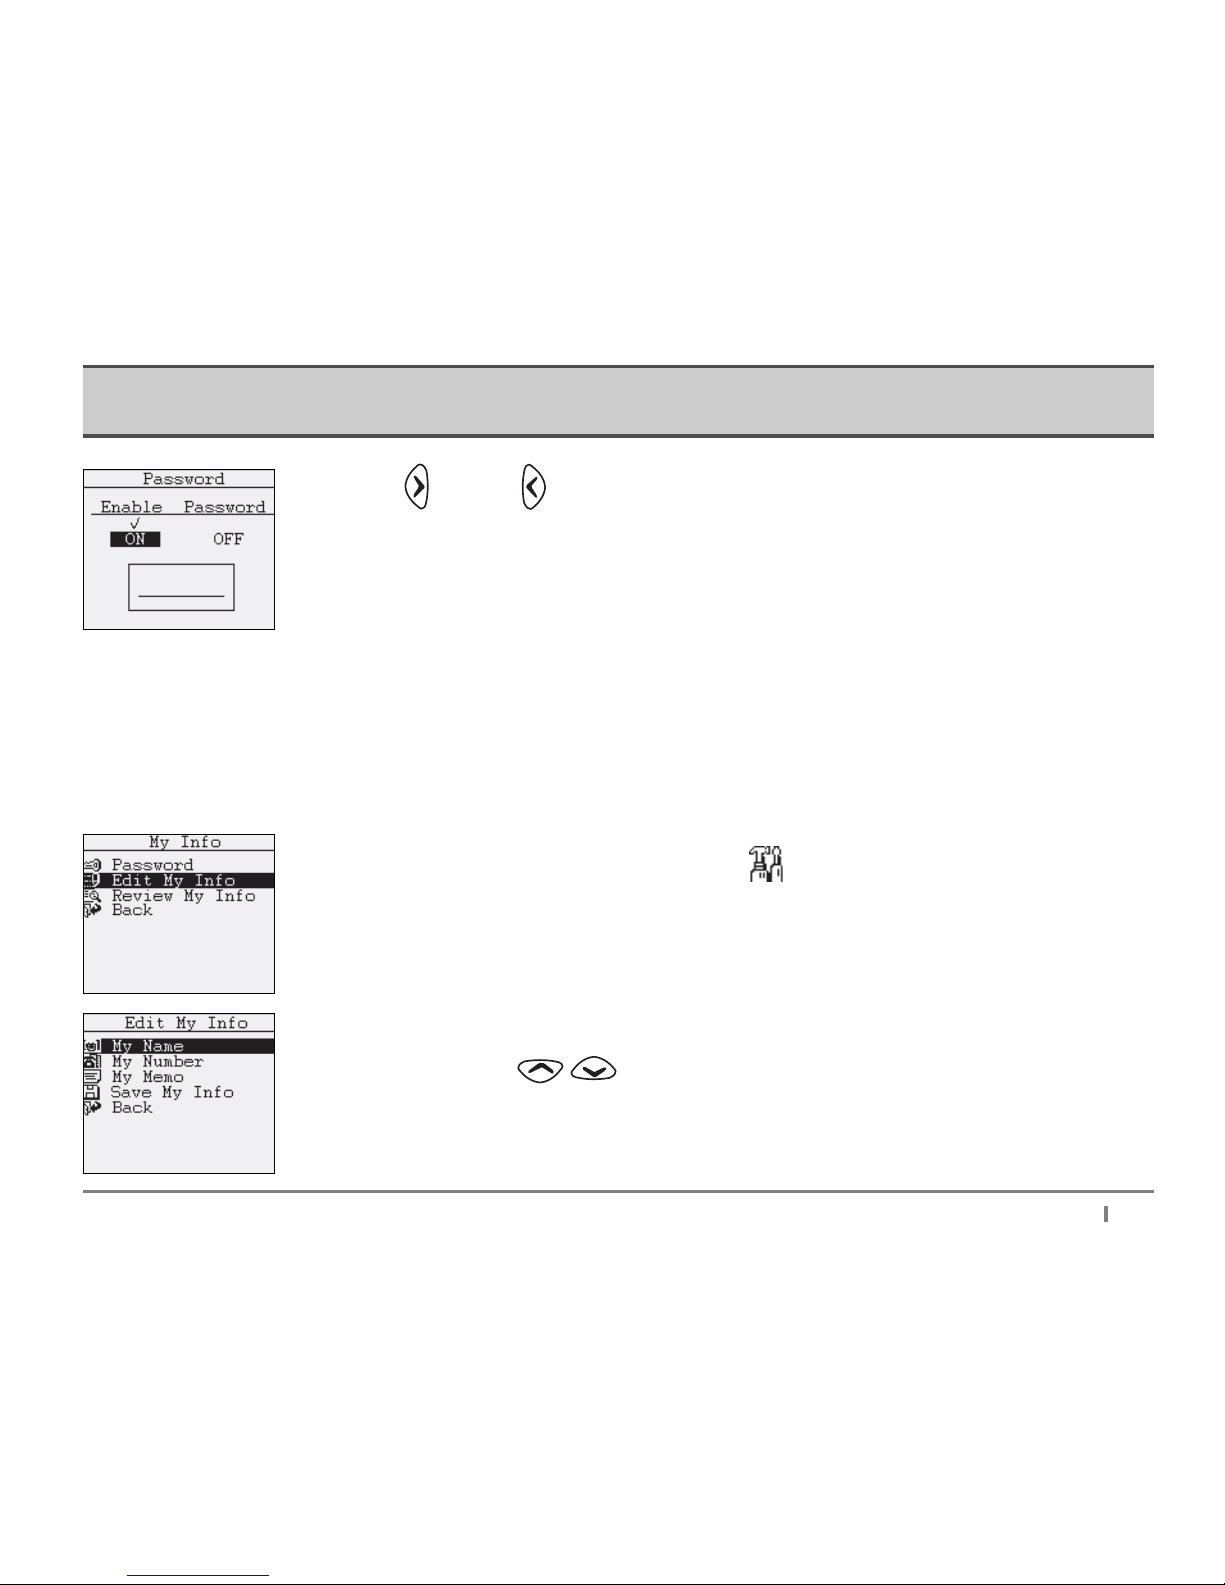
Password
Add a password to your device to prevent access to your messages and the information stored on the device. Once you set up and
enable a password, you will need to enter it each time you use the device. Also, the password will need to be re-entered if the device
is idle for more than five (5) seconds. If an incorrect password is entered, your owner’s information (also entered in "My Info ") will
appear, facilitating return of your device if it has been misplaced or stolen.
To set or change your password, open the Customize folder [ ] in the main menu. Select My
Info
from the menu that displays and press " Enter ".
Select Password from the menu and press " Enter ".
Page 19
Setting Up Your AT100
17
Use the right and left navigation keys to choose " ON " or " OFF " and press Enter
to make your selection. Type your password and then press Enter to save.
Edit My Info
The options found under My Info include your name, contact number and a memo. This information can be especially useful in
facilitating your unit s return in the event it is lost or stolen. If you set a password (see above) and an incorrect password is typed, the
information entered here will appear on the screen.
To set or change My Info, open the Customize folder [ ] in the main menu. Select My Info from
the menu that displays and press Enter, then select Edit My Info and press Enter again.
Three options appear on the following menu: My Name, My Number, and My Memo. Use the up
and down navigation keys ( ) to select an option.
Page 20
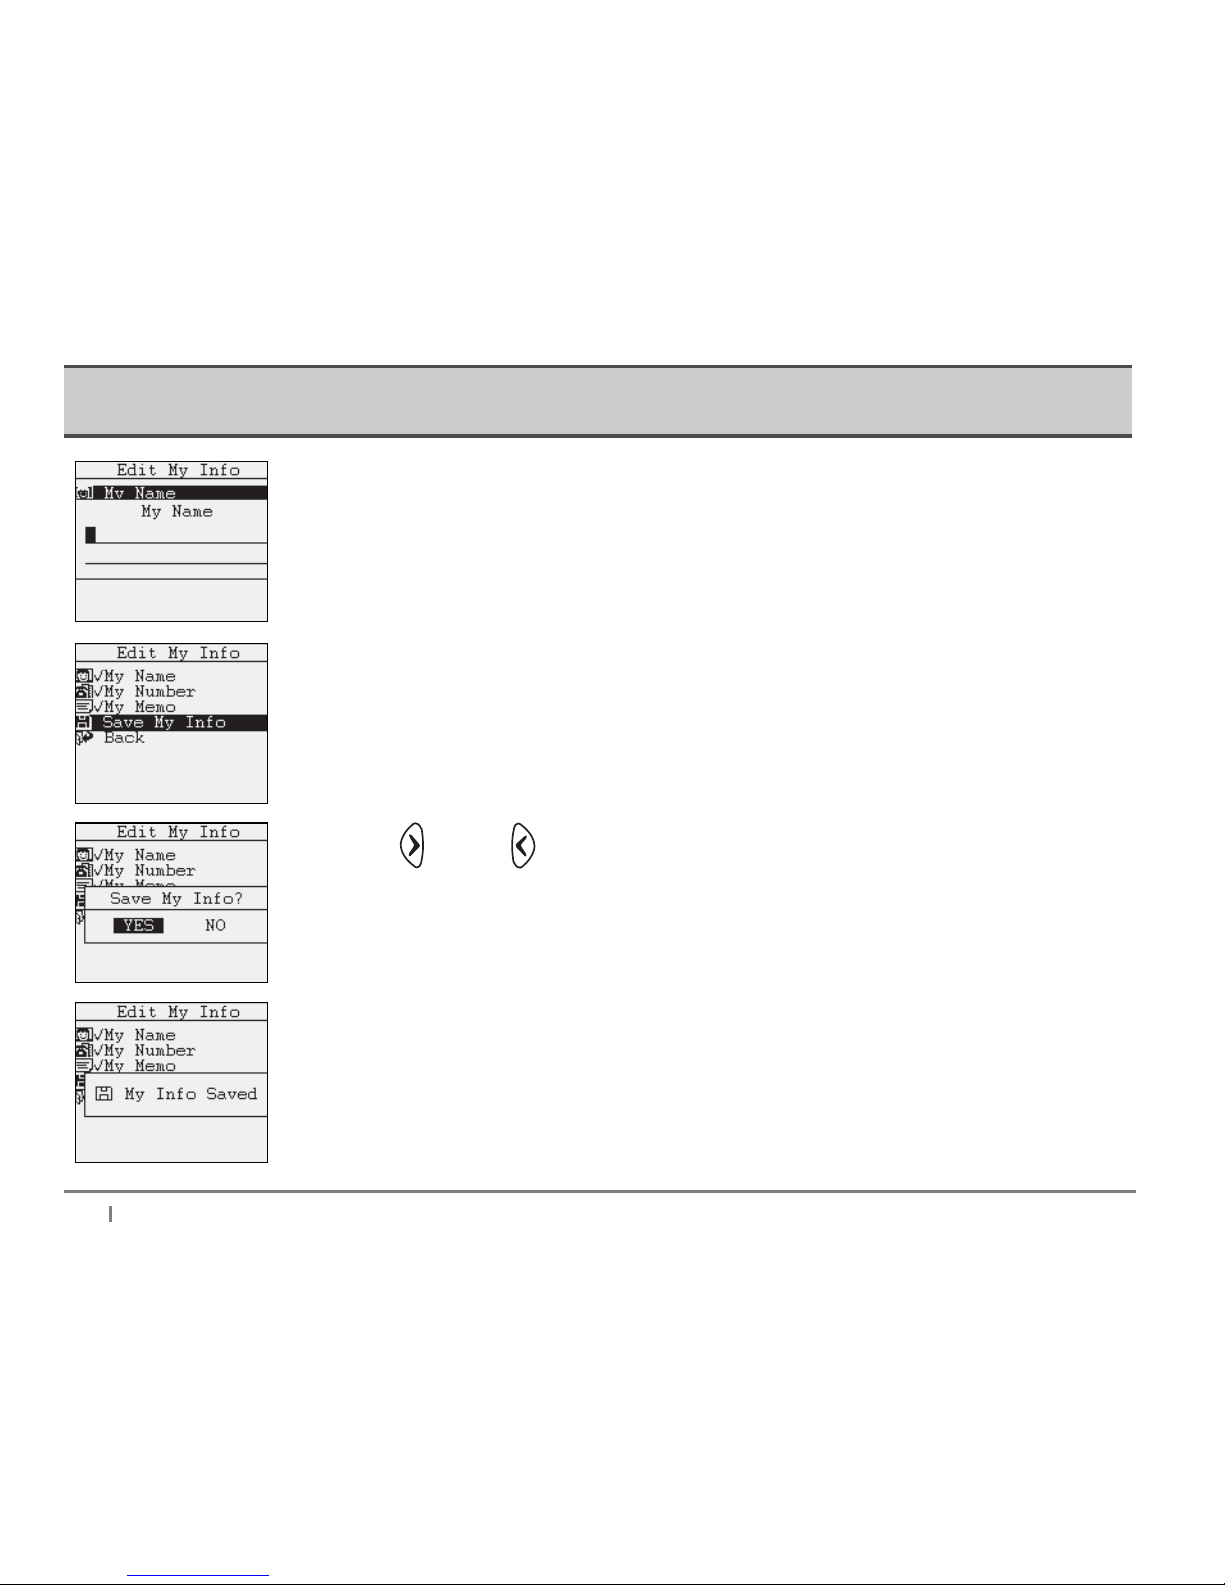
Enter your personal information. Press " Enter " to save.
After entering or editing your personal information, select Save My Info from the menu, and press "
Enter " to save all of your information in the device.
Use the right and left navigation keys to choose "YES " or " NO " and press "Enter ".
If you select YES , the screen displays " My Info Saved " for a moment and you will be returned to the "
Edit My Info " menu.
Setting Up Your AT100
18
Page 21
Setting Up Your AT100
19
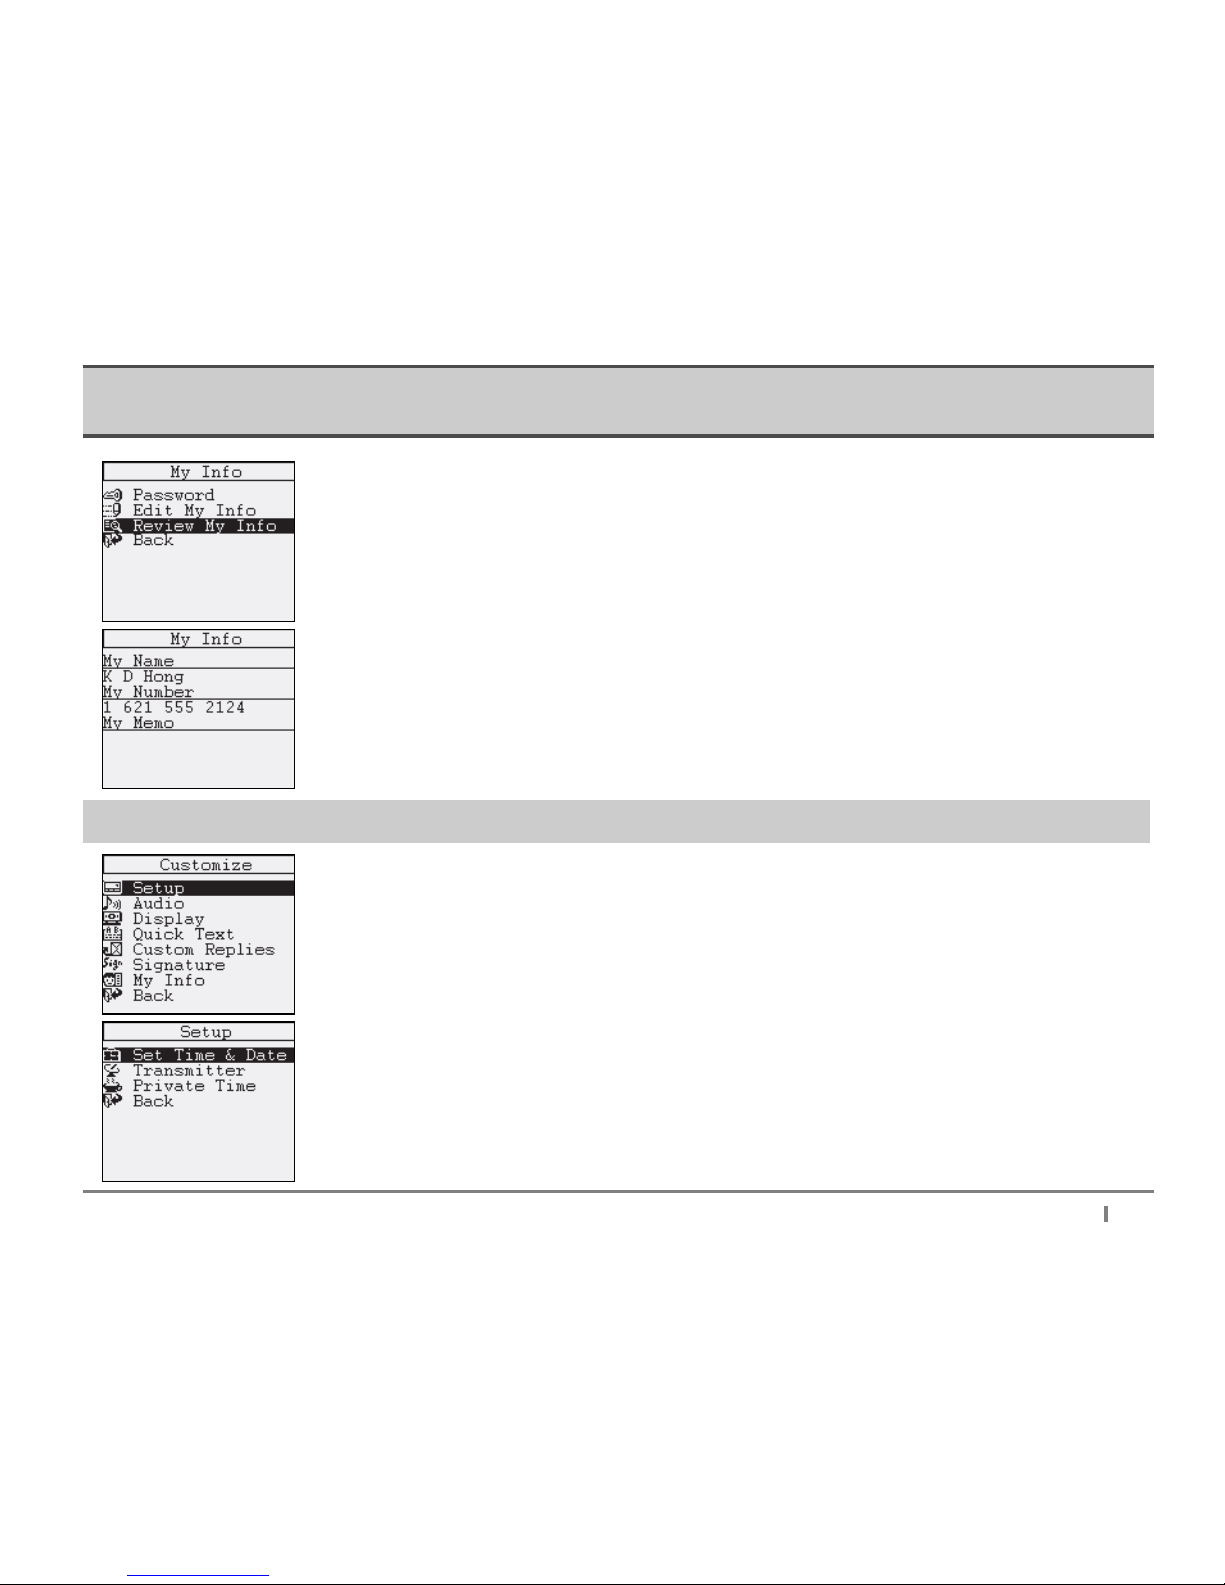
Review My Info
Review the information stored in " My Info " by selecting the Review My Info option on the My Info
menu. Select the option by pressing " Enter ".
The stored information is displayed. Press Esc to return to the menu.
Setting the Time and Date
After selecting the Customize icon from the main screen, select Setup and press " Enter " .
Select " Set Time and Date " and press " Enter " .
Page 22
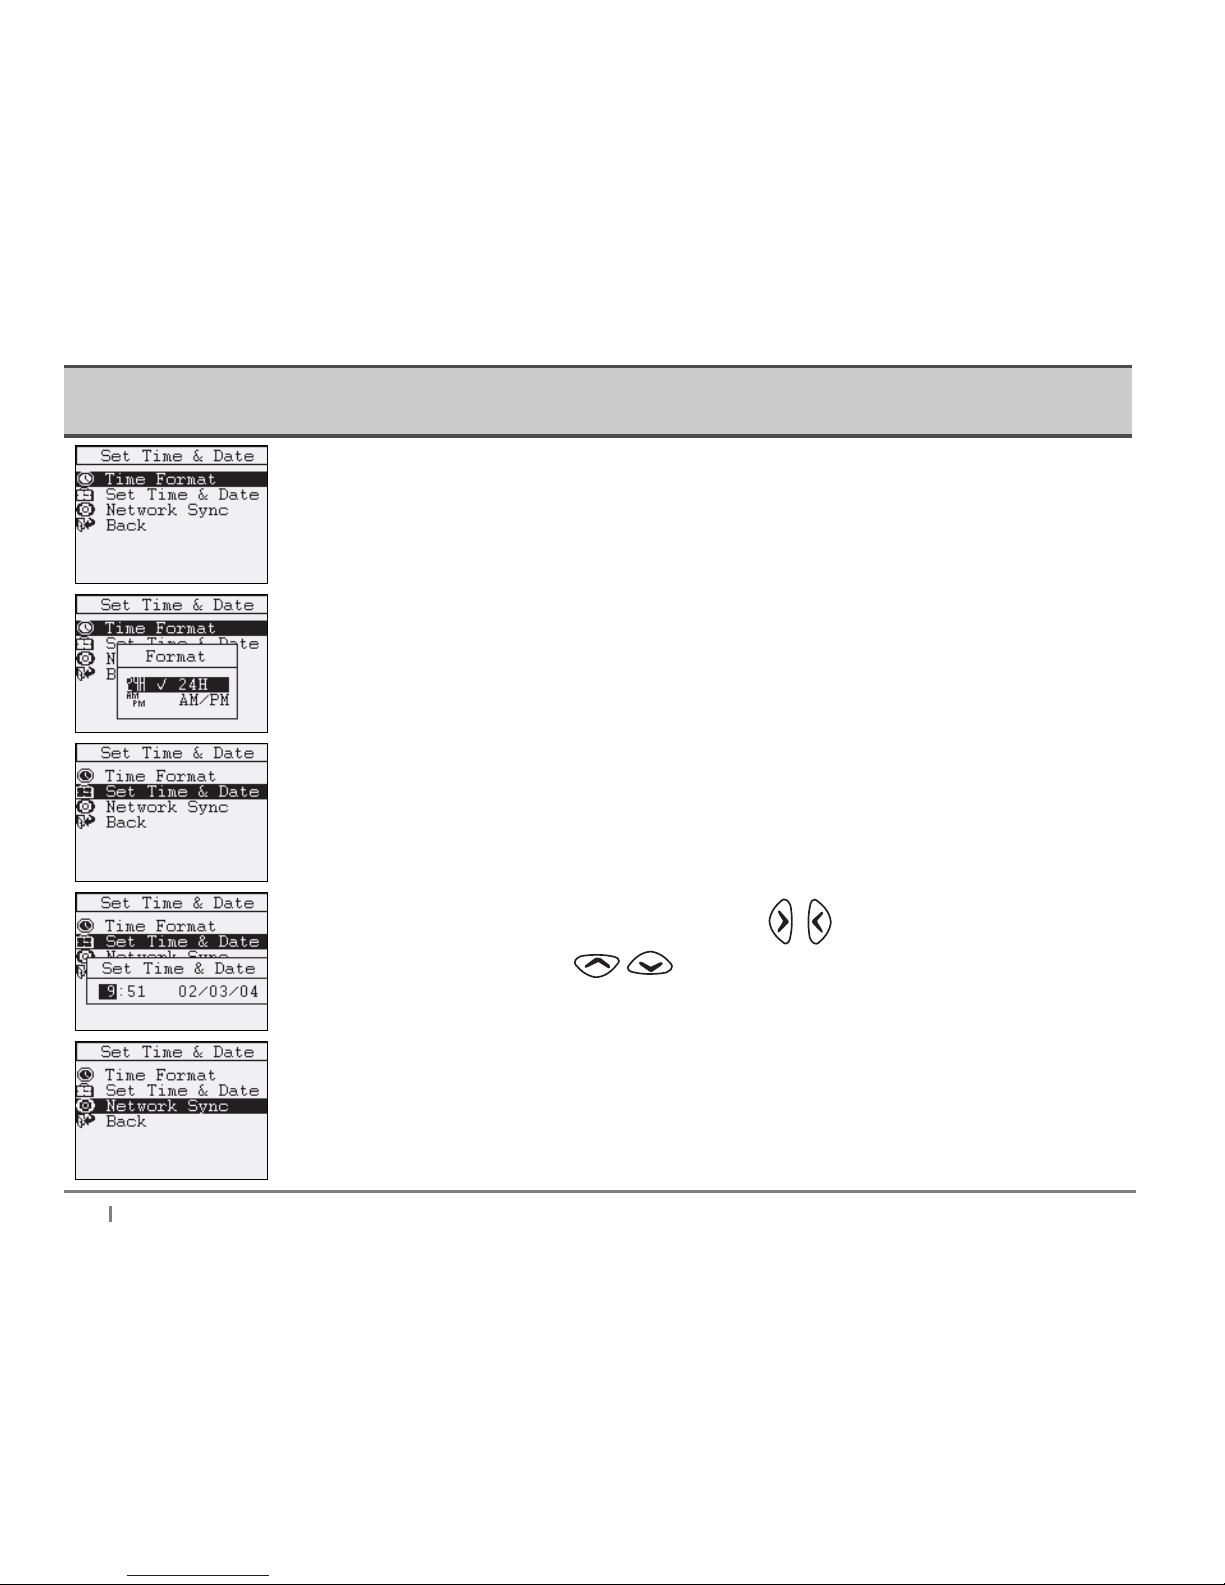
To set the time display format (12 or 24-hours), select " Time Format " and press " Enter " .
Move the cursor to the desired format and press "Enter ".
To set the clock, select " Set Time and Date " and press " Enter " .
In the pop up window, use the right and left navigation keys ( ) to move from field to field. Use
the up and down navigation keys ( ) to change the values. Press Enter to save your
settings.
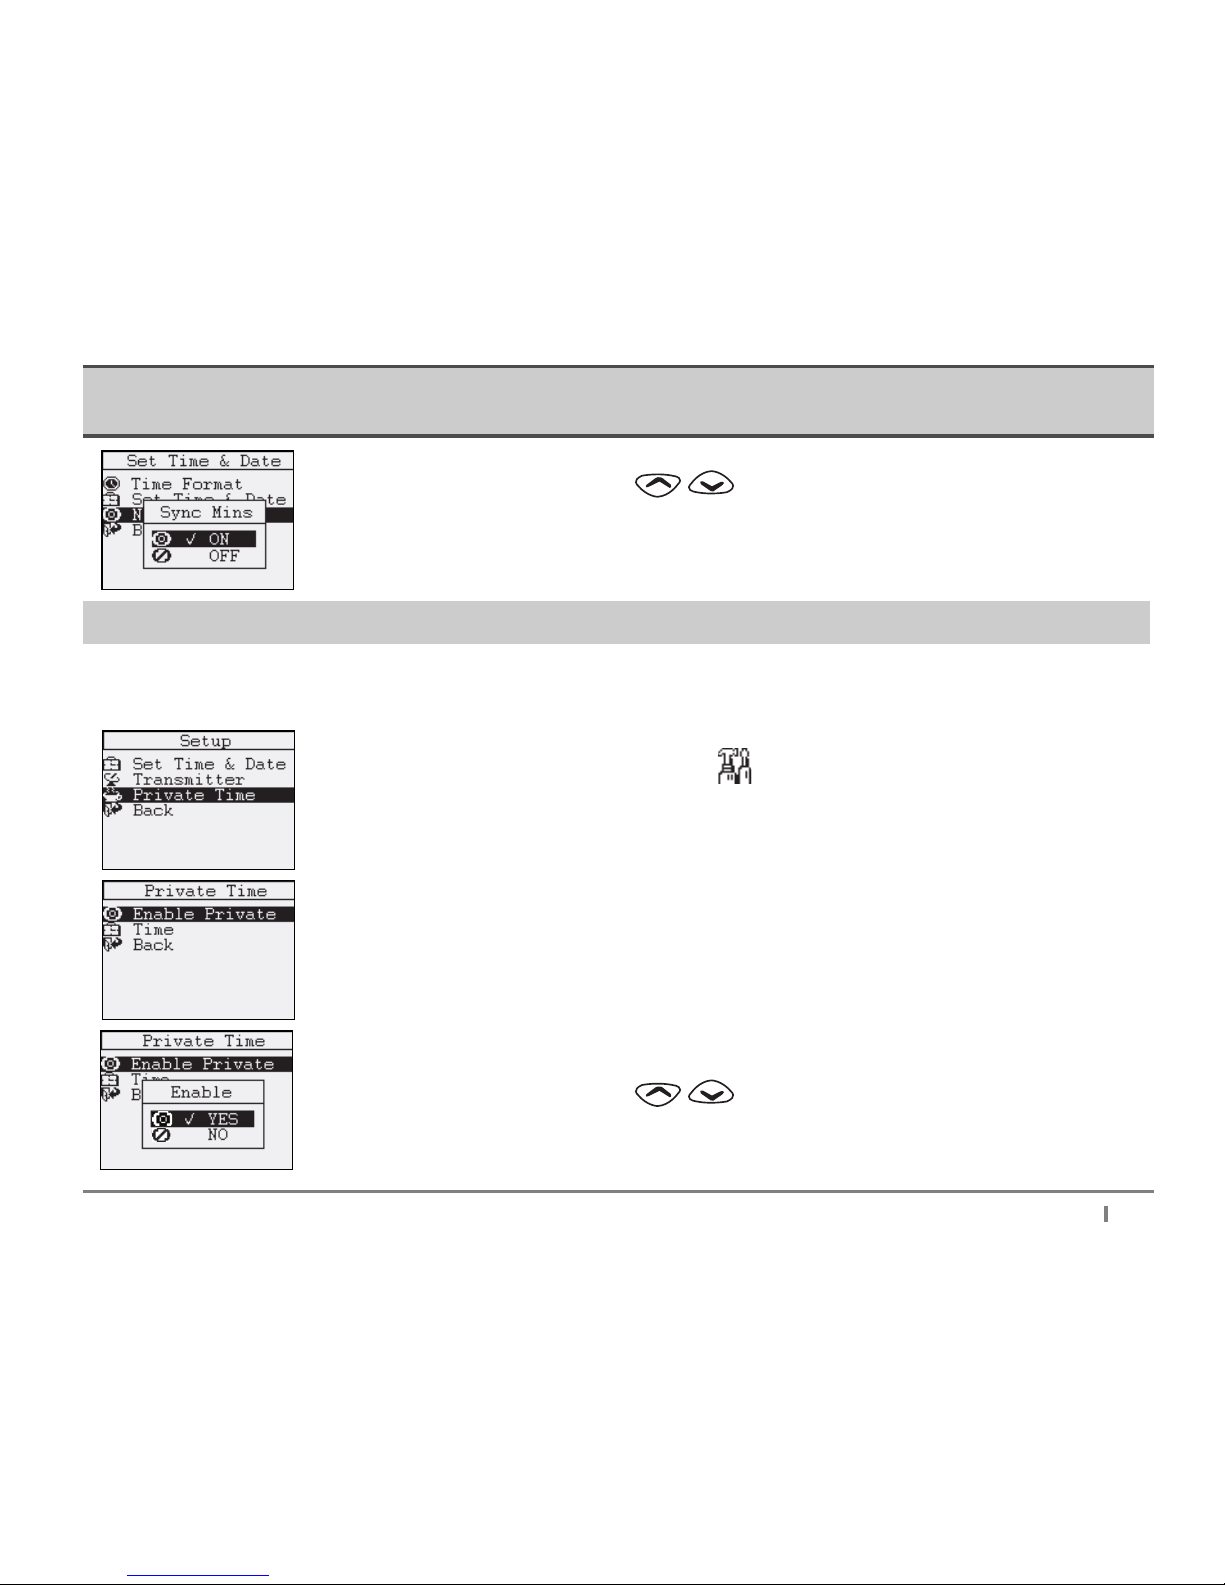
The Network Sync option automatically synchronizes minutes with the time on your provider s network.
To turn this option on or off, select " Network Sync " and press " Enter ".
Setting Up Your AT100
20
Page 23
Setting Up Your AT100
21
Use the up and down navigation keys ( ) in the popup window to choose " On " or " Off "
and press " Enter " .
Set Private Time
Use the Private Time setting to set a time when the AT100 will not produce a vibration or audible alert when it receives a message.
The device will still function normally during private time, but you will not be disturbed.
Private Time does not apply to any alarms you may have enabled.
To set Private Time, select the Customize icon [ ] from the main screen, and then select Setup
and press " Enter ". Select Private Time from menu that appears and press Enter again.
The Private Time options display. Select Enable Private to enable the function, and press " Enter ".
Use the up and down navigation keys ( ) in the popup window to choose " On " or " Off "
and press " Enter ".
Page 24
Setting Up Your AT100
22
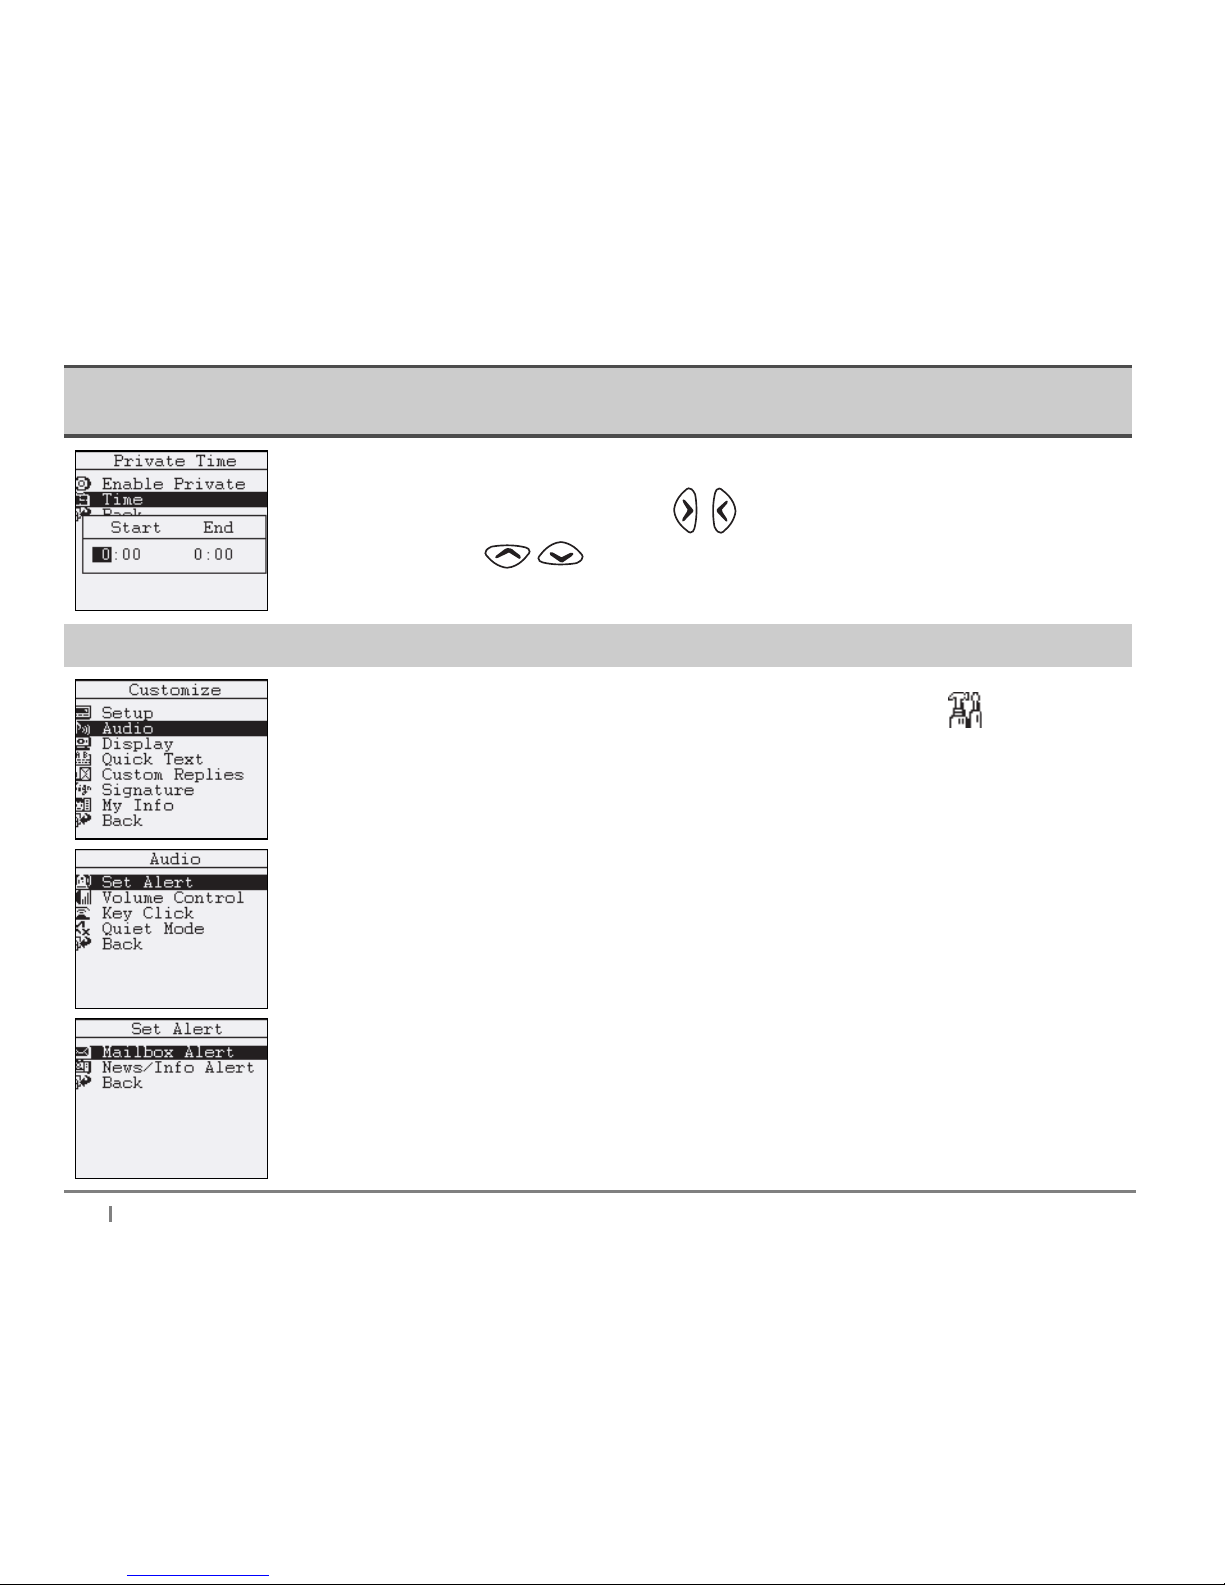
Select " Time " and press " Enter " to set the start and end times for Private Time. In the pop up
window, use the right and left navigation keys ( ) to move from field to field. Use the up and
down navigation keys ( ) to change the values. Press " Enter " to save your settings.
Setting Alerts
To set or change the alerts for incoming messages, open the Customize folder [ ] in the main
menu. Select Audio from the menu that displays and press "Enter " , and then select Set Alert from
the menu options.
Select Set Alert from the menu options and press " Enter ".
You can set distinct alerts for regular messages sent to your device (Mailbox Alert) and for news or
information (News/Info Alert). To set the Mailbox Alert select " Mailbox Alert " and press " Enter " .
Page 25
Setting Up Your AT100
23
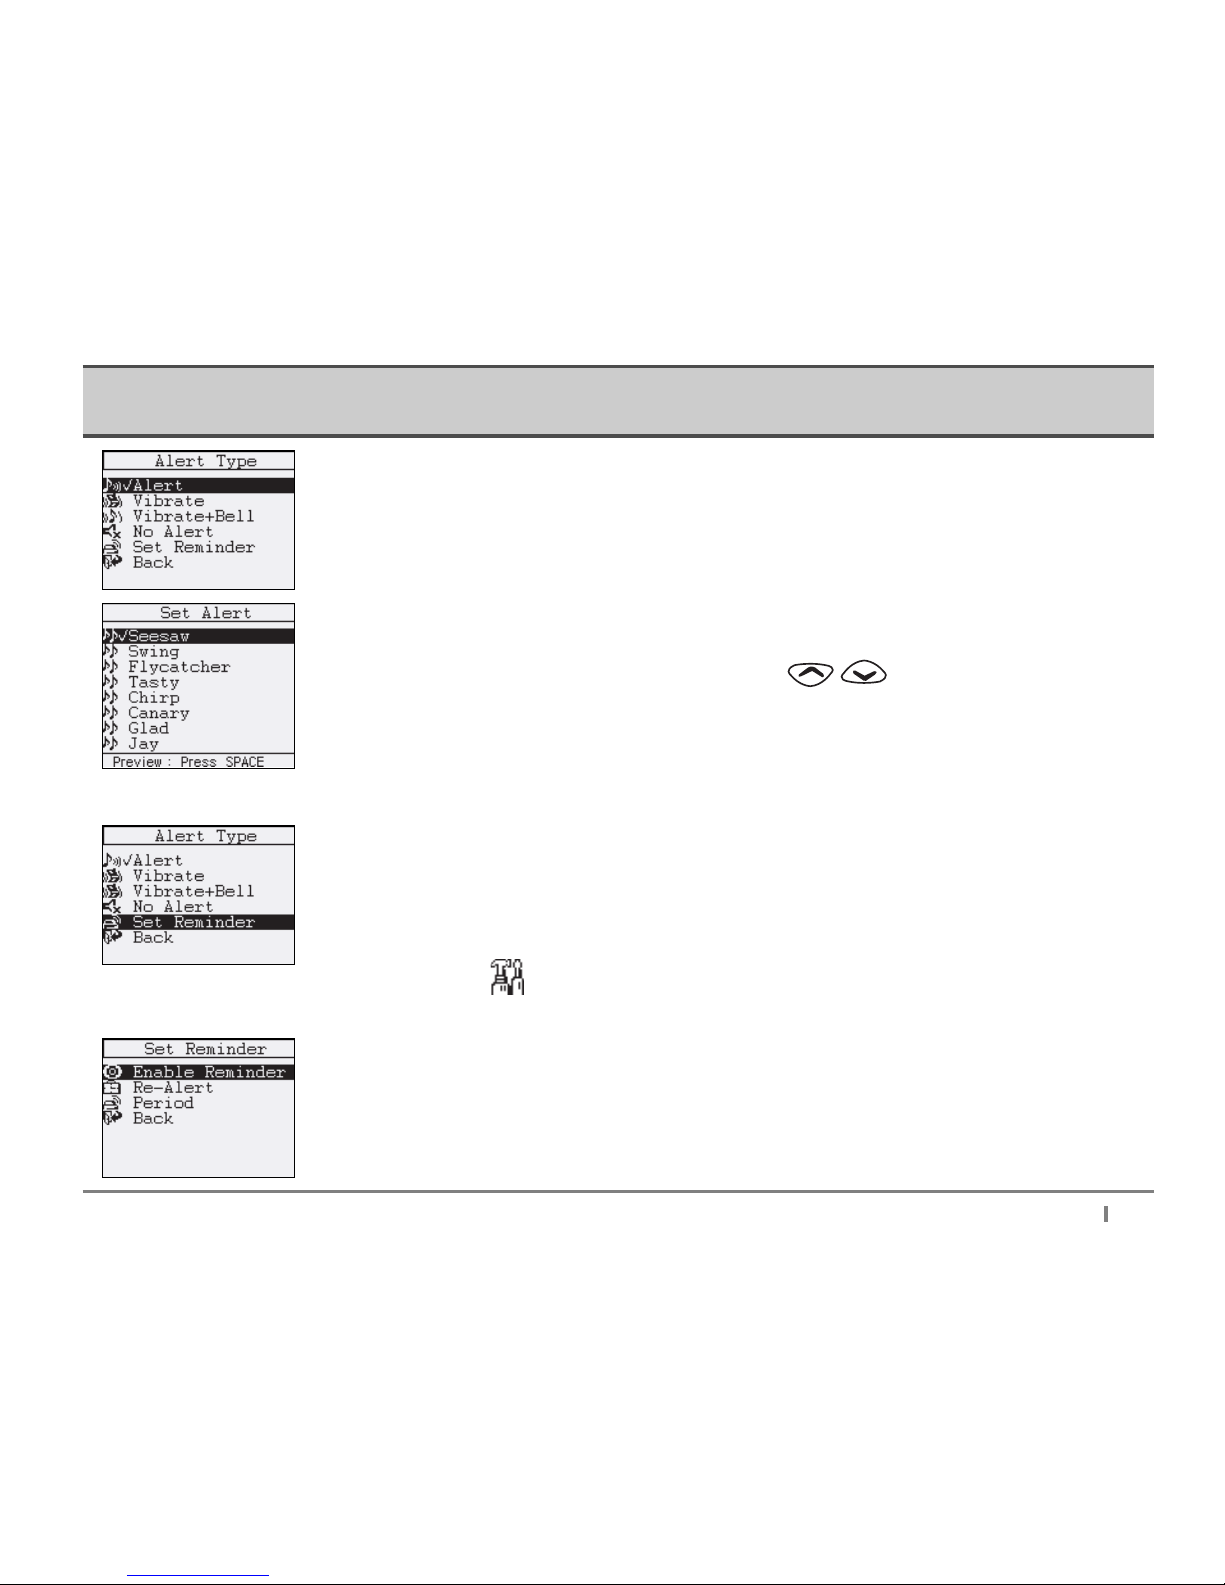
Select the alert type (Alert, Vibrate, Vibrate+Bell, or No Alert) and press " Enter " .
If you select "Alert " or Vibrate+Bell, a second set of menu options appears where you can select the
specific alert sound. Use the up and down navigation keys ( ) to scroll to your selection
and use the " Space " key to preview the sounds. Press " Enter " to select a sound. A check mark
appears on your selection and the screen returns to the Alert Type menu.
Alert Reminders
Alert reminders will continue to alert you that a new message has arrived after the initial alert ends.
For example, if you are unable to respond to a new message when it arrives, a reminder will continue to
alert you until so that you don t forget to read the message.
To set a reminder, open the Customize folder [ ] in the main menu. Select Audio from the menu that displays and press
Enter , and then select Set Alert from the menu options. Select Mailbox Alert, then Set Reminder.
Select Enable Reminder and press " Enter " .
Page 26

Setting Up Your AT100
24
Use the up and down navigation keys ( ) in the popup window to choose "Yes " and press
" Enter " .
Select Re-Alert to set the number of reminder alerts. Press " Enter " to continue.
Use the up and down navigation keys ( ) in the pop up window to choose the number of times
you want to be reminded and press " Enter " .
Select Period to set the time interval between reminder alerts. Press " Enter " to continue.
Use the up and down navigation keys ( ) in the pop up window to choose the interval between
reminder alerts and press " Enter ".
Page 27

Setting Up Your AT100
25
Setting Audio Features
Volume Control
To set or change your alert volume, open the Customize folder [ ] in the main menu. Select
Audio from the menu that displays and press "Enter".
Select Volume Control and press "Enter".
Volume Control has three settings, ranging from low (1) to high (3). Use the right and left
navigation keys to select the volume level, and press "Enter" to save your selection.
Key Click
Turning on the Key Click feature will have the device emit a sound each time a button is pressed on your
keyboard.
To turn on the Key Click feature, open the Customize folder [ ] in the main menu.
Select Audio from the menu that displays and press "Enter", and then select Key Click from the menu
options.
Page 28

Setting Up Your AT100
26
Use the up and down navigation keys ( ) in the popup window to choose "On" and press
"Enter".
Quiet Mode
Turn on the Quiet Mode feature when you want to continue receiving messages, but you don ’t want an alert to sound. Also keyclick
and alarm will not be activated
To turn on Quiet Mode, open the Customize folder [ ] in the main menu. Select Audio from the
menu that displays and press "Enter", and then select Quiet Mode from the menu options.
Use the up and down navigation keys ( ) in the popup window to choose "On" and press
"Enter".
Adjusting the Screen Display
You can change various settings that affect the AT100 screen, including Contrast level, the length of time the screen will display
without activity (Display Time out), and the Font attributes.
Page 29

Setting Up Your AT100
27
Contrast
Adjust the screen contrast by opening the Customize folder [ ] in the main menu.
Select Display from the following menu, and then select Contrast from the menu options.
Use the right and left navigation keys to select the contrast level, and press "Enter" to save
your selection.
Display Timeout
Display Timeout controls how long the screen display will remain visible without activity. Once the device
reaches the Timeout setting, the screen will go blank to save power. Press SPACE or ENTER key to
restore the display.
Set the Display Timeout by opening the Customize folder [ ] in the main menu. Select Display from the following menu,
and then select Display Timeout from the menu options.
Page 30

Setting Up Your AT100
28
Use the up and down navigation keys ( ) to select a Display Timeout setting
and press "Enter".
Font
The Font setting controls whether the display font used will be bold or normal.
Set the Font by opening the Customize folder [ ] in the main menu. Select Display from the
following menu, and then select Font from the menu options.
.
Use the up and down navigation keys ( ) to choose "BOLD" or "NORMAL" and press
"Enter" to save the setting.
Font Size
The Font Size setting controls the size of the font used, and consequently, how much information
you will see on the AT100 screen.
Set the Font Size by opening the Customize folder [ ] in the main menu. Select Display from the following menu, and
then select Font Size from the menu options.
Page 31

Setting Up Your AT100
29
Use the up and down navigation keys ( ) to choose "SMALL" or "LARGE" and press
“Enter”to save the setting.
Quick Text
Use Quick Text to save time when composing a message. You can create up to 10 phrases or sentences, each consisting of up to
48 characters. To use a Quick Text sentence or phrase during composition, press the key to access the Quick Text phrases.
Enter your Quick Text phrases by selecting the Customize icon [ ] from the main menu,
and pressing “Enter.”Select Quick Text from the menu options, and press “Enter”.
Choose the location using the up and down navigation keys and pressing, “Enter”.
Type in a short phrase or sentence of up to 48 characters, and press “Enter”.
Page 32

Setting Up Your AT100
30
Use the same procedure to create up to ten (10) phrases or sentences.
Press "ESC" to save the Quick Text phrases.
Select ”YES”and press "Enter" to save.
To cancel, select "NO" or press the "ESC" key.
Custom Replies
Enter up to 10 custom replies that can be used to send a quick reply without typing. Custom replies can be as simple as "Yes" and
"No", or can be an instruction, such as "Send a number to call". You can create up to ten (10) custom replies, each consisting of up
to forty-eight (48) characters.
Enter your Custom Replies by selecting the Customize icon [ ] from the main menu,
and pressing "Enter". Select Custom Replies from the menu options, and press "Enter".
Choose the location using the up and down navigation keys and pressing, “Enter.”
Page 33

Setting Up Your AT100
31
Type a custom reply and press the "Enter" key.
Continue to enter your custom replies. Press the "ESC" key when you are ready to save them.
Select "YES" and press "Enter" to save.
To cancel, select "NO "or press the "ESC" key.
Page 34

The AT100 Address Book
32
The AT100 Address Book
The AT100 address book can hold up to 250 individual contacts, and up to 20 groups with 20 contacts each.
Each individual contact can contain up to 10 pieces of information, including first and last name, wireless address, email address,
work, home, mobile and fax numbers, company name, mailing address, and notes.
Once you have entered individual contacts, you can define up to 20 Groups. Groups make quick work of sending the same
message to a number of individuals. Each group can hold up to 20 individual contacts.
Adding a New Contact
From the main menu, select Address Book [ ] and press "Enter".
Select New Contact and press "Enter".
Page 35

The AT100 Address Book
33
A pop up window displays where you can enter the new contact’s first name. Type the contact’s name
up to sixteen (16) characters, and press “Enter”to continue, or, press "Esc" to choose different field to fill
in. Choose an information field using the up and down navigation key and then press
"Enter" to select it.
As you enter information for your contact, a check mark ( ) appears beside the menu selection for each
field. When you press “Enter”to save your entries, the cursor will automatically move to the next field in
the menu.
Use the Wireless Address field to enter a contact’s 2Way number. Note that fields requiring numbers
are automatically set up for you to type numbers up to sixty four (64) charaters and digits. You will not
need to press "Alt" in these fields to type numbers.
You can enter up to three email addresses for each contact. The maximum number of each address is
sixty four (64) charcters.
To enter an email address, select an Email Address field from the contact menu, and press "Enter".
Use the "Alt" key to type the @ symbol (Alt+S) and the "dot" (Alt+N). For example, to type
"abc@abc.com" use the following sequence:
Page 36

The AT100 Address Book
34
Press "Enter" to save your entry.
When you have completed entering information for a contact, press the "ESC" key. Select “YES”and
press "Enter" to save all of the information entered for the contact. If you do not want to save your entry,
select "NO".
You can also select "Save Entry" from the menu and press "Enter" to save the contact information.
In either case, the screen displays "Entry Saved" for a moment, then returns to the "Address Book" menu.
Adding a New Group
Once you have added individual contacts to your AT100 Address Book, you can create groups from the individual contacts. With
groups, you can quickly send the same message to 20 individual contacts at once. For example, create a group containing all of the
people that report to you. Now, when you have a message that goes to your entire team, you’ll send it only once.
Page 37

The AT100 Address Book
35
To add a new group to your AT100 Address Book, select Address Book [ ] from the main menu,
and then select New Group from the option list. Press "Enter" to make your selections.
In the window that opens, enter the Group Name using keypad. Press "Enter" to continue.
To add an individual contact to the group, use the up and down navigation keys to select
the Add Entry option, and press "Enter".
Your list of individual contacts appears. To add an individual contact to the group, use the up and
down navigation keys to select the entry, and press . You can also search for a contact by typing
the first few letters of the contact name. The contact matching the letters typed is highlighted. Select the
contact by pressing .
The screen displays the address types entered for the contact. Use the up and down
navigation keys to choose an entry, and press to select it.
Page 38

The AT100 Address Book
36
Continue to add contacts (up to 20) to the group following the instructions above. When you have completed your contact selections,
press "Enter" to return to the previous menu.
Review your new group by choosing Review Entry from the menu and pressing, "Enter".
The addresses selected for the group will appear. Press "Enter" or "ESC" to return to the previous
menu.
Save your new group by selecting Save Group and pressing "Enter".
"Group Saved" will briefly appear on the screen.
Page 39

The AT100 Address Book
37
Review Contacts and Groups.
You can quickly look up contact and group information in the AT100 Address Book.
To review a contact or group, select Address Book [ ] from the main menu, and then select
Contacts or Groups from the option list. Press " Enter " to make your selections.
Use the up and down navigation keys to select a contact or group from the list that
appears and press "Enter ". You can also quickly scroll to a contact by typing the first few letters of the
contact or group name. The contact or group matching the letters typed is highlighted. Select the entry by
pressing " Enter ".
The stored address information appears on your screen. Press " Enter ". to return to the previous menu.
You can also edit the on this screen. Select the filed what you want to edit use the up and down
navigation keys and press .
Page 40

The AT100 Address Book
38
Deleting Contacts or Groups
To delete a contact or group, select Address Book [ ] from the main menu, and then select Contacts or Groups from the
option list. Press " Enter " to make your selections.
Use the up and down navigation keys to select a contact or group from the list that appears
and press Enter. You can also quickly scroll to a contact by typing the first few letters of the contact or
group name.
The contact or group matching the letters typed is highlighted. Select the entry by pressing " Enter ".
The stored address information appears on your screen. Press " Enter ". to continue.
Select Delete Entry from the option list.
Confirm your choice by selecting "YES " or " NO ". Press "Enter " to delete the selected contact or
group.
"Entry Deleted " will appear on the screen for a moment and you will be returned to the contact or
group list.
Page 41

The AT100 Address Book
39
Editing Contacts
To edit a contact, select Address Book [ ] from the main menu, and then select Contacts from the option list. Press "Enter"
to make your selections.
Use the up and down navigation keys to select a contact from the list that appears and
press " Enter ". You can also quickly scroll to a contact by typing the first few letters of the contact name.
The contact matching the letters typed is highlighted. Select the entry by pressing " Enter ".
The stored address information appears on your screen. Press " Enter " to continue.
Select Edit Entry from the option list.
The information fields for the contact will appear. Fields with stored information are marked with "".
Use the up and down navigation keys to select a field to modify and press " Enter ".
Edit the field contents and press " Enter " to save your changes. Continue to change or modify the
contact information by selecting fields and entering or changing the information.
Page 42

The AT100 Address Book
40
When you have completed modifying the contact information, press the "ESC " key. Select "YES " and
press "Enter " to save your edits. If you do not want to save your edits, select " NO ".
You can also select " Save Entry " from the menu and press "Enter " to save the edited contact
information.
In either case, the screen displays "Entry Saved " for a moment, then returns to the " Address Book "
menu.
Editing Groups
To edit a group, select Address Book [ ] from the main menu, and then select Groups from the option list. Press
" Enter " to make your selections.
Use the up and down navigation keys to select a group from the list that appears and press " Enter ". You can also
quickly scroll to a group by typing the first few letters of the group name. The group matching the letters typed is highlighted. Select
the entry by pressing " Enter ".
The stored address information appears on your screen. Press " Enter ". to continue.
Select Edit Group from the option list and press Enter to continue.
Page 43

Messages
41
You can change the Group name, and add and delete entries. Use the up and down
navigation keys to select an option, and make your changes on the screens that appear.
After changing group information, review the changed entries by selecting Review Entry from the option list.
Save your edited group by selecting Save Group and pressing " Enter ".
"Group Saved " will briefly appear on the screen.
Messages
This section explains how to compose a new message, how to select an addressee for your message, and how to send messages.
You can select an address or group for your message before or after composing the message text.
Composing and Sending a New Message
To compose a new message, select Compose [ ] from the main menu.
Press " Enter " to make your selection.
Page 44

Setting Up Your AT100
42
A new, blank screen appears. Use the keypad to enter your message.
After completing the message, press " Enter " to continue.
(You can save a draft of your composed message at this point by pressing the " ESC " key. Save the
unsent message by selecting " YES " in the " Save as Draft " popup box.)
Your list of contacts appears. Use the up and down navigation keys to select the recipient,
and press " Enter ". You can also search for a contact by typing the first few letters of the contact name.
The contact matching the letters typed is highlighted. Select the contact by pressing " Enter ".
The screen displays the address types entered for the contact. Use the up and down
navigation keys to choose an entry, and press " Enter " to select it.
Select Send Message from the option list, and press "Enter " to send the message.
Page 45

Setting Up Your AT100
43
" Sending " appears briefly on the screen, and you will be returned to the Main menu.
Specifying an Address Not in Your Address Book
You can send your message to an address that doesn’t appear in your address book by choosing Onetime Address on the
Select Address screen and pressing " Enter ".
Use the up and down navigation keys to select an address type and press " Enter ".
Type the address in the window that appears, and then press " Enter ".
Select Send Message from the option list, and press " Enter " to send the message.
Page 46

Setting Up Your AT100
44
" Sending " appears briefly on the screen, and you will be returned to the Main menu.
Custom Text Composing Options
You can access and use special characters (e.g., +, =, >, etc.) in your messages, add Multiple Choice Responses to your messages,
and use " Quick Text " entries to help you compose your messages.
Special Characters
To use a special character while composing a message, press .
Use the right and left navigation keys to scroll through the available special characters.
Choose a character by pressing " Enter " while the character is highlighted. The character will appear
on the Message screen and you can continue to compose and send the message normally.
Page 47

Setting Up Your AT100
45
Multiple Choice Responses (MCR)
Attach Multiple Choice Responses (MCRs) to your messages to make replying fast and easy. For example, you might want to add
your available meeting times to a message requesting a meeting:
Message : Let s meet to discuss the contract. Let me know what time works for you.
MCRs : 1:00, 2:00, and 4:00.
When you add MCRs to your message, the message recipient can quickly reply by using one of the attached MCRs. You can attach
up to eight (8) MCRs to each outgoing message, and each MCR can be up to 16 characters in length.
To add MCRs while composing a message, press .
Use the up and down navigation keys to choose Add Responses from the option list.
Press " Enter " to continue.
Press " Enter " again to begin entering MCRs for the current message.
Page 48

Setting Up Your AT100
46
Type a short response in the popup screen that appears, and then press " Enter " to save it. Use the
up and down navigation keys to choose another line and press " Enter " again.
Type a second short response and press Enter. Continue to enter up to 8 MCRs for the message,
then press " ESC " twice to return to the Message screen.
Note that a small " MCR " icon displays on the upper right corner of the screen.
From here, continue to compose and send the message normally.
Using Quick Text
Quick Text are short messages that you have entered and saved on your AT100 for use while composing messages. For example, you
might have a quick text entry for a long company name that you wouldn’t want to retype each time you need to use the name in a message.
To use a Quick Text entry while composing a message, press .
Use the up and down navigation keys to choose the Quick Text from the option list.
Press " Enter " to continue.
The selected Quick Text or Custom Relies entry will appear on the Message screen. Continue to compose and send the message
normally.
Page 49

Setting Up Your AT100
47
Choosing an Address Before Composing Your Message.
As an alternative to composing a message before choosing a contact or group, you can also choose the contact or group before
composing a message. This feature comes in handy when you need to add a new, permanent contact or group to your address
book and then immediately compose and send a message.
To choose a contact or group before composing a message, select Address Book from the main menu and press " Enter ".
Use the up and down navigation keys to choose either Contacts or Groups to use a current entry from your
address book and press " Enter ".
In the Contacts or Groups list, use the up and down navigation keys to choose a contact or group, and press to
view the menu options.
Press " Enter " to choose the Send Message option.
If you selected a " Contact ", you will need to also select the address type (wireless or email) from the
following pop up window.
The selected contact or group will be stored until after you compose your message.
Page 50

Setting Up Your AT100
48
Compose your message as you would normally. After composing, press " Enter " .
The message recipient (contact name or group name) appears at the top of the following screen, and
Send Message should be highlighted. (If not, use the up and down navigation keys to
highlight Send Message). Press " Enter " to send the message.
"Sending " appears briefly on your screen, and you are returned to the Address Book screen.
Receiving a New Message
When you receive a new message on your AT100, a " New Message " pop up window displays on your
screen and, if you have an audible alert enabled, an alert will sound.
To stop the alert, press any key.
If you have Reminders enabled, your AT100 will periodically remind you that you have received a new message until you read the
message.
Page 51

Setting Up Your AT100
49
To read the new message, choose " YES " by using the right and left navigation keys, and
then pressing " Enter " . The message appears on your screen.
If you do not want to read the message right away, choose " NO " in the " New Message " pop up.
The unread message will be filed in your Inbox so that you can view it at a later time.
Replying to a Message
After reading a message, press " Enter " or to send an immediate reply.
Use the up and down navigation keys to select Reply To Message from the option list
and press " Enter " to continue.
On the Reply option list, you have the option of writing a custom reply or choosing any of the custom
replies you might have entered previously.
To write a custom reply, use the up and down navigation keys to choose the
Write
Reply
option and press " Enter ". Write your reply in the Message window and press Enter to send
the reply.
To reply using a predefined custom reply, use the up and down navigation keys to choose your reply from the list
displayed, and press " Enter ". Your reply will be sent immediately.
Page 52

Setting Up Your AT100
50
Managing Your Messages
Your new AT100 contains three areas to store messages.
The Mailbox contains three folders: The Inbox, for received messages; the Outbox, for sent messages; and the Drafts folder, for
composed, unsent messages.
The News/Info Inbox stores news feeds sent by your service provider.
To permanently save important messages, use the Folders area. You can name and populate up to three subfolders for
messages that you do not want to lose.
Mailbox
The AT100 Mailbox area stores messages in three folders:
The Inbox stores received messages.
The Outbox stores messages you have sent (including forwarded messages) and pending messages (messages to be sent).
The Drafts folder stores messages that you have composed, but have not sent.
Page 53

Setting Up Your AT100
51
Inbox
The AT100 Inbox stores messages that have been sent to you. From the Inbox, you can read your messages, reply to them, forward
messages to other recipients, and delete messages. The inbox will hold up to 400 messages, deleting the oldest message as a new
message arrives.
To work with messages in your Inbox, select the Mailbox icon on the main screen and press "
Enter ".
The Inbox will be highlighted in the option list. On the right side of the screen, the numbers indicate the
number of unread messages and the total number of received messages stored in the Inbox.
Press " Enter " to work with the messages in the Inbox.
The Inbox displays a list of your received messages, with the newest message at the top of the list.The
icon indicates messages you have read. Unread messages display the icon, messages that
you have forwarded display the icon. and message that you have replied display the icon.
Up to nine messages are displayed on the screen at once. Use the up and down navigation keys to scroll to any of the
messages stored in the Inbox.
Page 54

Setting Up Your AT100
52
To read a message use the up and down navigation keys to highlight the message, and then press " Enter " to open it.
The selected message displays. The time and date that the message was received displays at the end of
the message. If the message is longer than one screen, press " Enter " to move to the next page,
or use the up and down navigation keys to scroll through the message.
Inbox Message Options
After reading a message from the Inbox, press " Enter " to see your options.
Depending on the length of the message, you may have to press " Enter " more than once.
You now have six (6) options:
Next Message. Choosing this option will display the next message in the message list.
Reply to Message. choose this option this option to reply the received message.
Forward Message. Choose this option to send the message to another 2Way device or email address, or to a message
Group that you have setup in your Address Book.
Delete Message. Select this option to permanently remove the message from the Inbox.
Move to Folder. This option gives you the ability to permanently save the message by moving it to one of three user-defined
folders.
Back. Select Back to return to the Inbox message list.
Use the up and down navigation keys to choose an option, and press " Enter " to select it.
Page 55

Setting Up Your AT100
53
Forward an Inbox message
After reading a message in your inbox, use the up and down navigation keys to select Forward Message from
the message option list and press " Enter ". You can forward the message to another 2Way pager, email or to Group in your
Address Book.
To edit or add to the message, select " YES " in the pop up box.
The original message appears on your screen. Use the up and down and the right and left navigation
keys to move to the place where you want to add or edit the message and type in your changes. Press " Enter " to continue.
Your list of contacts from your Address Book appears. Use the up and down navigation
keys to select the recipient, and press Enter. You can also search for a contact by typing the first few
letters of the contact name. The contact matching the letters typed is highlighted. Select the contact by
pressing " Enter ".
The screen displays the address types entered for the contact. Use the up and down
navigation keys to choose an entry, and press " Enter " to select it.
Select Send Message from the option list, and press " Enter " to send the message.
Page 56

Setting Up Your AT100
54
" Sending " appears briefly on the screen, and you will be returned to the Main menu.
Moving an Inbox Message to a Folder
To permanently save an Inbox message, select the Move to Folder option from the Inbox Options list.
The screen will display the available Folders. Use the up and down navigation keys to select a folder and
press " Enter ".
" Moved to Folder " briefly displays on your screen, and you will be returned to the Inbox message list.
Page 57

Setting Up Your AT100
55
Outbox
The AT100 Outbox stores messages that you have composed and sent, and also stores pending outbound messages and
outbound messages that where sending failed. This can occur when your AT100 is not in a full service coverage area, or if an
incorrect address was keyed. The Outbox stores up to 400 messages, deleting the oldest message as a new message is sent.
To work with messages in your Outbox, select the Mailbox icon on the main screen and press "
Enter ".
Use the up and down navigation keys to select Outbox in the option list. On the right side
of the screen, the numbers indicate the number of pending or failed messages and the total number of
sent messages stored in the Outbox. Press Enter to work with the messages in the Outbox.
The Outbox displays a list of your sent messages, with the last message sent at the top of the list.
Each message will display an icon indicating the message status, as follows :
Message sent Message forwarded
Sending in process Message pending
Sending failed Message replied
Up to nine (9) messages are displayed on the screen at once. Use the up and down navigation keys to scroll to any of
the messages stored in the Inbox.
Page 58

Setting Up Your AT100
56
To read a message use the up and down navigation keys to highlight the message, a
and then press Enter to open it.
The message is displayed on your screen..
Outbox Message Options
After reading a message from the Outbox, press Enter to see your options.
Depending on the length of the message, you may have to press Enter more than once.
Page 59

Setting Up Your AT100
57
You now have six options:
Next Message. Choosing this option will display the next message in the message list.
Resend Message. This option allows you to quickly resend a failed message to the same address
originally specified.
Forward Message. Choose this option to send the message to another 2Way device or email
address, or to a message Group that you have setup in your Address Book.
Delete Message. Select this option to permanently remove the message from the Outbox.
Move to Folder. This option gives you the ability to permanently save the message by moving it to
one of three user-defined folders.
Back. Select Back to return to the Outbox message list.
Use the up and down navigation keys to choose an option, and press " Enter " to select it.
Resending a Failed Message
A message may have failed to send due to coverage interference. To quickly resend the message to the same address originally
specified, select the failed message from your Outbox message list and press .
Use the up and down navigation keys to choose the Resend Message option,
and press " Enter " to select it.
Page 60

Setting Up Your AT100
58
" Sending " briefly displays on your screen, and you will be returned to the " Mailbox " menu.
Forwarding an Outbox message
After reading a message in your Outbox, use the up and down navigation keys to select Forward Message from
the message option list and press " Enter ". You can forward the message to another 2Way pager, email or to Group in your
Address Book.
To edit or add to the message, select YES in the pop up box.
The original message appears on your screen. Use the up and down and the right and left navigation keys to move
to the place where you want to add or edit the message and type in your changes. Press " Enter " to continue.
Your list of contacts from your Address Book appears. Use the up and down
navigation keys to select the recipient, and press " Enter ". You can also search for a contact by typing
the first few letters of the contact name. The contact matching the letters typed is highlighted. Select the
contact by pressing "Enter ".
The screen displays the address types entered for the contact. Use the up and down
navigation keys to choose an entry, and press " Enter " to select it.
Page 61

Setting Up Your AT100
59
Select Send Message from the option list, and press " Enter " to send the message.
" Sending " appears briefly on the screen, and you will be returned to the Main menu.
Moving an Outbox Message to a Folder
To permanently save an Outbox message, select the Move to Folder option from the Outbox Options list.
The screen will display the available Folders . Use the up and down navigation keys to select a folder and
press " Enter ".
" Moved to Folder " briefly displays on your screen, and you will be returned to the Outbox message list.
Page 62

Setting Up Your AT100
60
Deleting Groups of Messages from the Inbox or Outbox
You can quickly delete all read messages or all of the messages contained in your Inbox.
Select the Mailbox icon from the main screen, and press Enter. Choose Inbox or Outbox from the
option list and press " Enter " to make your selection. Press the key.
Choose Delete Read Msg or Delete All Msg from the option list using the up and
down navigation key. Press " Enter ",
Select YES in the confirmation pop up, and press " Enter ".
A message confirming your selection briefly appears, and you will be returned to the Mailbox menu.
Page 63

Setting Up Your AT100
61
News/Info Inbox
The News/Info Inbox stores news and information messages sent by your service provider. You can designate a different type of alert
for news messages so that you can distinguish a regular message from a news message. Your AT100 can store up to fifty (50) news
messages in any of eight folders.
To read a news message, select the News/Info Inbox icon ( ) from the main menu and press
" Enter ".
Use the up and down navigation keys to select a folder, and press " Enter ". If there is
no news messages in the folder, a " No Message " pop up window will appear.
If the folder contains news messages, a list of messages appears on the screen. Use the up and down navigation keys
to choose the news message you want to read, and press " Enter " to read the message.
The news message appears on your screen.
Page 64

Setting Up Your AT100
62
Folders
Use Folders to permanently save your important messages. You can name and populate up to three folders for messages that you
do not want to lose. Each folder stores forty (40) messages.
Naming Folders
You can individualize the three folders by giving each a name. For example, you might want to save messages pertaining to
important projects, and name each folder with a project title.
To name a folder, select the Folder icon ( ) in the main menu and press Enter.
Use the up and down navigation keys to choose a folder, and press .
Select Folder Name from the option list and press " Enter " .
Page 65

Setting Up Your AT100
63
Type the name of the folder and press " Enter " to save the name. Press " ESC " to return to the main
menu.
Reading Messages in Folders
Select the Folder icon ( ) in the main menu and press " Enter ".
Use the up and down navigation keys to choose a folder, and press " Enter ".
Select a message from the list by using the up and down navigation keys, and press " Enter
" to open the message. The message displays on the screen.
Page 66

Setting Up Your AT100
64
Folder Message Options
While reading a message in a folder, press to view a list of options for the message:
Next Message. Choosing this option will display the next message in the folder message list.
Forward Message. Choose this option to send the message to another 2Way device or email
address, or to a message Group that you have setup in your Address Book.
Delete Message. Select this option to permanently remove the message from the Folder.
Move to Folder. Use this option to move the message to a different folder.
Back. Select Back to return to the Folder message list.
For instructions on using these options, please refer to the " Mailbox " section in this manual.
Deleting Messages from a Folder
Quickly delete all of the messages contained in a folder to empty and reuse the space.
To delete all messages from the folder, select Delete All Msgs from the Folder option list, and press "
Enter ".
Page 67

Setting Up Your AT100
65
Confirm your selection by choosing " YES " in the confirmation popup box.
" All Msgs Deleted " will briefly display on your screen, and you will be returned to the " Folders " main
screen.
Page 68

Setting Up Your AT100
66
Features
Alarm
Use the AT100 Alarm feature to wake you up in the morning or remind you of an important meeting.
To set an Alarm, select the Applications icon ( ) in the main menu, and press " Enter ".
Select Alarm in the option list and press " Enter ".
Select Enable Alarm from the options and press " Enter ".
Page 69

Setting Up Your AT100
67
Choose " YES " from the pop up window and press " Enter " .
Select Period from the option list and press " Enter " to set how often the alarm should sound :
once, daily, or weekday.
Choose an option(Once, Daily, Weekday) from the pop up window and press " Enter "
Weekday option : AT100 alerts only on Mon, Tue, Wed, Thu, and Fri.
Set the type of alert sound by choosing Alert Type from the option list. Press " Enter " to continue.
Select one of four alert types and press " Enter " . (For information selecting an alert Type , refer to the Set
Up section in this manual.)
After selecting an Alert Type, select Back and press " Enter " or " ESC " to return to the previous screen.
We e k d ay
Page 70

Setting Up Your AT100
68
Select Alarm Time from the option list and press " Enter ". Use the right and left navigation keys
( ) to move from field to field. Use the up and down navigation keys ( ) to change
the values. Press " Enter" to save your settings.
Select Snooze from the option list to set the amount of time when the alarm will go off again after being
turned off. Press " Enter " to select the feature.
Select one of four options in the popup window and press " Enter ".
Select " Back" from the menu options and press " Enter " or press the " ESC " key to return to the main
menu.
Page 71

Setting Up Your AT100
69
Schedule and Calendar
Enter your daily schedule into your AT100 and you will be able to carry it with you where ever you go. You can also use this feature
as a handy reference calendar. You can store ten (10) schedule on your AT100.
To enter your schedule into the AT100, select the Applications icon ( ) in the main menu,
and press " Enter ".
Select Schedule from the option list and press " Enter " to continue.
The cursor will be placed on the date if it has been set. . Move to the day and month using the four
navigation keys ( ) and press " Enter " to select the date.
Set the time for your first event by use the right and left navigation keys ( ) to move from field to
field, and using the up and down navigation keys ( ) to change the values. Press " Enter " to
save your settings.
Type a description of the event and press Enter to save it.
Page 72

Setting Up Your AT100
70
After adding an event to your schedule, the date on the calendar will appear in bold. Repeat the procedure
above to add additional events to your AT100 schedule.
Play a Game
Play the Block Down game by select the Applications icon ( ) in the main menu, and pressing "
Enter ".
Select Game (Block Down) from the option list, and press " Enter" .
The simple instructions for the game appear on the screen. For example, to rotate a piece, use the up
navigation key. Adjust the difficulty level using the up and down navigation
keys.
Page 73

Setting Up Your AT100
71
Start the game by pressing " Enter ".
To quit the game, press " ESC ".
Page 74

Setting Up Your AT100
72
Device
Options found in the Device area include turning the device off, viewing the battery charge level, viewing the amount of memory
remaining in the mailbox and address book, and viewing information about your AT100, including the model number and cap code,
which you may need when calling customer service.
Power Off
Select the Device icon ( ) in the main menu, and press " Enter " .
To turn off the power, select Power Off from the option list, and press " Enter ".
Select " YES " in the popup window and press " Enter" to turn the device off.
Page 75

Setting Up Your AT100
73
Battery Level Check
Select the Device icon ( ) in the main menu, and press " Enter " .
To check the battery charge level, select Battery in the option list and press " Enter " .
The current charge level of the battery is displayed as a percentage (%) and on a bar graph.
Page 76

Setting Up Your AT100
74
Memory Check
Select the Device icon ( ) in the main menu, and press " Enter " .
To check the amount of memory being used by your mailbox and address book, select Memory from
the option list and press " Enter ".
The amount of memory being used by the Mailbox and Address Book features is displayed in a bar graph
format. Press " Enter" to view the memory being used by the Inbox, Outbox, Drafts, News and Folders.
The memory usage of each folder displays. Press " Enter " or" ESC " to return to the previous menu.
Page 77

Setting Up Your AT100
75
About Your AT100
Select the Device icon ( ) in the main menu, and press " Enter " .
Select About in the option list to view information about your AT100 device, and press " Enter ".
The device information displays. Press " Enter " or" ESC " to return to the previous menu.
Page 78

IMPORTANT SAFETY INSTRUCTIONS
1) Read and save these instructions for future reference. Heed all warnings and Follow all instructions.
2) Do not use this apparatus near water.
3) Clean only with dry cloth.
4) Do not block any ventilation openings. Install in accordance with the manufacturer’s instructions.
5) Do not install near any heat sources such as radiators, heat registers, stoves, or other apparatus
(including amplifiers) that produce heat. The whole concept of “ installation ”doesn’t apply here.
6) Only use the charging cable included with your device. Do not defeat the safety purpose of the
polarized or grounding-type plug. A polarized plug has two blades with one wider than the other.
A grounding type plug has two blades and a third grounding prong.
7) Protect the power cord from being walked on or pinched particularly at plugs, convenience receptacles,
and the point where they exit from the apparatus.
8) Only use attachments/accessories specified by the manufacturer.
9) Refer all servicing to qualified service personnel. Servicing is required when the apparatus has been damaged in any way,
such as power-supply cord or plug is damaged, liquid has been moisture, does not operate normally, or has been dropped.
10) The apparatus shall not be exposed to dripping or splashing and that no objects filled with liquids, such as vases, shall be placed
on the apparatus.
IMPORTANT SAFETY INSTRUCTIONS
76
Flgure-Portable cart warning
Page 79

WARNING: TO REDUCE THE RISK OF FIRE OR ELECTRIC SHOCK. DO NOT EXPOSE THIS APPATATUS TO
RAIN OR MOISTURE.)
THIS SYMBOL IS INTENDED TO ALERT THE USER TO THE PRESENCE OF UNINSULATED
“DANGEROUS VOLTAGE”WITHIN THE PRODUCTS ENCLOSURE THAT MAY BE OF SUFFICIENT
MAGNITUDE TO CONSTITUTE A RISK OF ELECTRIC SHOCK TO PERSONS.
THIS SYMBOL IS INTENDED TO ALERT THE USER TO THE PERSENCE OF INPORTANT
OPERATING AND MAINTENANCE (SERVICING) INSTRUCTIONS IN THE LITERATURE
ACCOMPANYING THE APPLIANCE.
CAUTION
Danger of explosion if battery is incorrectly replaced.
Replace only with the same or equivalent type.
IMPORTANT SAFETY INSTRUCTIONS
77
Page 80

FCC Compliance
78
FCC Compliance
This device complies with part 15 of the FCC Rules. Operation is subject to the following two conditions: (1) This device may not
cause harmful interference, and (2) this device must accept any interference received, including interference that may cause
undesired operation.
This equipment has been tested and found to comply with the limits for a Class B digital device, pursuant to part 15 of the FCC
Rules. These limits are designed to provide reasonable protection against harmful interference in a residential installation. This
equipment generates, uses and can radiate radio frequency energy and, if not installed and used in accordance with the instruction,
may cause harmful interference will not occur in a particular installation. If this equipment does cause harmful interference to radio or
television reception, which can e determined by turning the equipment off and on, the user is encouraged to try correct the
interference by one or more of the following measure:
Reorient or relocate the receiving antenna.
Increase the separation between the equipment and receiver.
Connect the equipment into an outlet on a circuit different from that which the receiver is connected.
Consult the dealer or an experienced radio/TV technician for help.
Page 81

Warranty
79
Limited Warranty
ATCOM WIRELESS LIMITED WARRANTY
ATCOM Wireless, Inc.("ATCOM") warrants to its original retail customer(s) within the United States, Canada and Mexico
that, for a period of one(1)year from date of purchase or first use, ATCOM Products purchased from ATCOM authorized
sellers will be free from defects in design, materials and workmanship under normal use, and will conform to ATCOM's
applicable specifications. ATCOM will, at its option and expense, repair, modify, or replace (with a same or substantially
same product, as determined by ATCOM) any Product, part or component which does not conform with this warranty
without additional charge when this Product is returned to ATCOM, postage prepaid. All replaced parts become property of
ATCOM. Repairs may be made with new or used components, provided that used components shall meet ATCOM' s
applicable standards. In the unlikely event that the Product has a recurring failure, ATCOM, at its discretion, may elect to
replace your Product with a comparable product as determined by ATCOM, resulted from accident, misuse, abuse or nonATCOM modification to this Product. Return of the repaired Product from ATCOM does not include insurance, postage,
shipping, handing, or applicable customs and duties, Your dated sales receipt showing the purchase of the Product is your
proof of purchase date.This warranty is not transferable from the original retail customer.
ATCOM's liability, and your exclusive remedy for breach of warranty, is limited to repair or replacement as provided above.
ATCOM's express warranty is contingent upon the proper use of the Product in accordance with ATCOM specifications and
instructions.
Page 82

Warranty
80
The warranty does not apply to Product which
have been tampered with or altered mechanically or electronically in any way including re-crystallization, or from defects or
failure due to (i) disaster, natural circuitry, water, fire, or chemical damage; (ii) Product whose warranty/quality stickers,
product serial number sticker, have been removed altered, or rendered illegible; (iv) use or operation outside of the usage
parameters set forth in ATCOM's specifications, or (v) anyone other than ATCOM or its authorized representative
modifying, repairing or servicing the Product In no event ATCOM be liable for any loss data, programs or information, loss
of profits, loss of goodwill, loss of use of facilities or equipment or other special, incidental, or consequential damages arising
from the defects of this Product, even if ATCOM has been notified of such defects. ATCOM is not liable for claims made
by you for a third party. ATCOM DOES NOT WARRANT ANY MERCHANTABILITY OR FITNESS FOR ANY
PARTICULAR PURPOSE FOR THE USE OF THIS PRODUCT. THIS LIMITED WARRANTY IS IN LIEU OF ALL
OTHER WARRANTIES, EXPRESS, IMPLIED OR OTHERWISE.
Some states do not allow the exclusion or limitation of incidental or consequential damages, so the above
limitations may not apply to you. Although this limited warranty gives you specific legal rights, you may have other
rights which vary from state to state.
 Loading...