

ATC Electrical & Mechanical RF500, RF750, RF1000, RF1250, RF1800 Installation Instructions
...Page 1

Manual SunRayRF_v10 · E1400270 · 20211112
Sun Ray RF
Electric Radiator
Operating and Installation Instructions
(Read these instructions carefully and retain for future reference)
Models:
Sun Ray RF 350w
Sun Ray RF 500w
Sun Ray RF 750w
Sun Ray RF 1000w
Sun Ray RF 1250w
Sun Ray RF 1500w
Sun Ray RF 1800w
NOTE:
A qualied electrician must carry out the electrical installation of this radiator. The Electrical
installation must comply with the current UK and Irish regulations. Any claim on the warranty
could be invalid if these requirements have not been met.
Page 2

CONTENT
IMPORTANT INFORMATION . . . . . . . . . . . . . . . . . . . . . . . . . . . 3
TECHNICAL DATA. . . . . . . . . . . . . . . . . . . . . . . . . . . . . . . . . 4
GENERAL INFORMATION . . . . . . . . . . . . . . . . . . . . . . . . . . . . 4
INSTALLATION INSTRUCTIONS . . . . . . . . . . . . . . . . . . . . . . . . . 5
Electrical Connection . . . . . . . . . . . . . . . . . . . . . . . . . . . . . . . . . . . . . .5
Location . . . . . . . . . . . . . . . . . . . . . . . . . . . . . . . . . . . . . . . . . . . .5
Mounting The Radiator . . . . . . . . . . . . . . . . . . . . . . . . . . . . . . . . . . . . .6
CONTROL OPTIONS . . . . . . . . . . . . . . . . . . . . . . . . . . . . . . . 7
OPERATING INSTRUCTIONS . . . . . . . . . . . . . . . . . . . . . . . . . . 8
Manual Programming . . . . . . . . . . . . . . . . . . . . . . . . . . . . .9
Set program temperatures . . . . . . . . . . . . . . . . . . . . . . . . . . .9
Setting the time and date. . . . . . . . . . . . . . . . . . . . . . . . . . . .9
Entering a program . . . . . . . . . . . . . . . . . . . . . . . . . . . . . 10
Boost . . . . . . . . . . . . . . . . . . . . . . . . . . . . . . . . . . 11
Display settings . . . . . . . . . . . . . . . . . . . . . . . . . . . . . . 11
Programming with APP . . . . . . . . . . . . . . . . . . . . . . . . . . . 12
Keypad Locking (Anti-Tamper) . . . . . . . . . . . . . . . . . . . . . . . . 12
Advanced settings . . . . . . . . . . . . . . . . . . . . . . . . . . . . . 12
Password . . . . . . . . . . . . . . . . . . . . . . . . . . . . . . . . . 14
Runback mode . . . . . . . . . . . . . . . . . . . . . . . . . . . . . . . 14
Error codes . . . . . . . . . . . . . . . . . . . . . . . . . . . . . . . . 16
Troubleshooting . . . . . . . . . . . . . . . . . . . . . . . . . . . . . . . . . . . . . . . 17
Default Values . . . . . . . . . . . . . . . . . . . . . . . . . . . . . . . . . . . . . . . . 18
ECODESIGN TABLE . . . . . . . . . . . . . . . . . . . . . . . . . . . . . . 19
MAINTENANCE AND CARE . . . . . . . . . . . . . . . . . . . . . . . . . . 20
GUARANTEE . . . . . . . . . . . . . . . . . . . . . . . . . . . . . . . . . . 20
CORRECT DISPOSAL OF THIS PRODUCT . . . . . . . . . . . . . . . . . . 20
2
Page 3

IMPORTANT INFORMATION
See Section “Installation Instructions – Location of Radiator” for important safety notes
regarding the positioning of the appliance.
• To prevent overheating, do not cover the radiator.
• You must not sit on the radiator.
• This appliance is not intended for outdoor use.
• If the power cord is damaged, it must be changed by the manufacturer, its after-sales
service or persons qualied to do so, to avoid possible danger.
• In case of breakdown or damage turn off the appliance at the main On/Off switch and
notify the supplier.
• The radiator should not be located underneath an electrical connection. The electric
supply line should be protected with a high sensitivity differential device (RCBO).
• The radiator must be installed so that around the radiator there is sufcient space for
proper circulation of hot air, with a minimum distance of 150 mm to curtains, furniture, etc.
• Do not dry clothes or towels on the radiator nor leave fabrics, magazines, spray cans,
volatile substances or similar objects within 250mm of the radiator.
• Anyone who is in the bathtub or shower should not have access to the switches and other
power operation devices. Always keep at least 0.6 m (UK) or 3.0 m (Ireland) between the
radiator and the bath or shower.(UK: Outside zone 2, Ireland: Outside zone 3)
• This heating apparatus holds a specic amount of special oil. Repairs where it is necessary
to open the oil tank must only be made by the manufacturer or ATC. ATC should be
contacted in case of any oil leakage.
• A Fused Spur must be included in the wiring to the radiator.
• This appliance can be used by children aged 8 years and above and persons with reduced
physical, sensory or mental abilities or lack of experience and knowledge, if they have
been given supervision or appropriate training regarding the use of the device in a safe
way and they understand the dangers involved.
• Children should not play with the appliance. Cleaning and maintenance should not be
performed by unsupervised children.
• Children under 3 years should be kept out of reach of the appliance unless they are
constantly supervised.
• Children between age 3 and younger than 8 years old should only turn on / off the device
whenever it has been placed or installed at its normal operating position provided they
are supervised or have received instructions concerning use of the appliance safely and
understand the risks that the device has. Children from 3 years and under 8 years old
should not plug in, regulate, clean the appliance or perform maintenance.
CAUTION - Some parts of this product can become hot and cause burns. Pay particular
attention when children and vulnerable people are present.
WARNING: In order to prevent overheating, do not cover this appliance. There has to be
free movement of air around all surfaces of the appliance.
This symbol “DO NOT COVER”, is placed on the radiator as a reminder to
the user.
• If the radiator is discarded, ensure it is recycled responsibly and follow any local provisions
concerning recycling of oil.
• A Safety Data Sheet is available from sales@atc.ie on request.
3
Page 4

TECHNICAL DATA
MODEL
Number Of
Fins
Power
Rating (W)
Size (mm)
HxWxD
Net Weight
(Kg.)
Fuse Rating
Sun Ray RF 350 3 350 580 x 340 x 100 6.9 5 Amp.
Sun Ray RF 500 4 500 580 x 420 x 100 8 5 Amp.
Sun Ray RF 750 6 750 580 x 580 x 100 12 5 Amp.
Sun Ray RF 1000 8 1000 580 x 740 x 100 16 10 Amp.
Sun Ray RF 1250 10 1250 580 x 900 x 100 20 10 Amp.
Sun Ray RF 1500 12 1500 580 x 1060 x 100 24 10 Amp.
Sun Ray RF 1800 12 1800 580 x 1060 x 100 24 10 Amp.
GENERAL INFORMATION
The Sun Ray RF has a special cast aluminium body specically designed to assure the maximum rate of heat radiation;
the air circulation channels provide a very efcient convection effect.
A unique manufacturing process provides bubble free lling so that the uid delivers warmth from the heating element
in a totally uniform way, ensuring that the entire surface of radiator provides comfortable heat.
A tube heating element ensures maximum heat output.
Designed and fabricated in accordance with EN 60335-1, EN 60335-2 and EN 55014 (regulations for domestic
appliances)
Standard colour White (RAL 9016)
Class I
Wall mounted (by quick xing system)
On-off main switch
Overheat protection
Key-pad locking optional code lock(anti-tamper)
NTC electronic sensor
Fitted with mains power cable approximately 1450mm long (without a plug)
Lithium battery CR2032
4
Page 5

INSTALLATION INSTRUCTIONS
ELECTRICAL CONNECTION
A qualied electrician must carry out the electrical installation of this radiator. The electrical installation must comply with
the current UK and Irish regulations. Any claim on the warranty could be invalid if these requirements have not been met.
The radiator requires a 230/240V 50/60Hz power supply.
Connecting wires:
Brown: Live
Blue: Neutral
Yellow-Green: Earth
The connecting wires must be of the appropriate section, in regards to the length of cable, type of cable and power rating
of the apparatus.
The apparatus must be connected into a fused connecting box tted with an appropriate sized fuse for the radiator – see
Technical Data on Page 4.
We recommend that the connecting box is positioned 10cm to the right of the apparatus and at 15cm above the oor.
According to regulations, the apparatus must be connected to the power supply by means of an all-pole circuit breaker
with a contact gap of at least 3mm or by a thermal-magnetic circuit breaker.
LOCATION
The ideal place to position the Sun Ray RF radiator is as close as possible to coolest wall in the room but it is not
recommended to site the radiator on un-insulated exterior walls, in this case, the part of the wall behind the radiator
should be insulated.
In bathrooms, the radiators must not be installed inside the protected areas. In the UK the heater must be mounted
outside Zone 2. In Ireland the heater must be mounted outside Zone 3. The control unit switches must not be reachable,
directly or indirectly, by a person in the bath / shower or using the wash basin.
The radiator, under no circumstances, should be installed below an electric power point.
Choose the location of the radiator in respect of the minimum distances that are indicated in Figure A.
Fig. A
window sill
150mm. min.
unobstructed space each side
150mm.
150mm.
Note: If the window sill protrudes less than 20mm the gap above the heater can be disregarded.
5
Page 6

MOUNTING THE RADIATOR
Place the radiator on the oor, as shown in Figure 1. For radiators with 4, 6, 8 or 10 elements position the supports
supplied with the radiator as shown in Figure 1. For radiators with 12 elements the supports should be positioned
between the second and third elements from each end.
Fig. 1
Place the supports between the elements as shown in Figure 2a, mark points on the walls through the xing holes as
shown in Figure 2b. This determines the spacing of the supports. Fix the supports to the wall with plugs and screws. Be
sure that the supports are mounted in the correct position.
Fig. 2a
Lift the radiator and hang it on the supports, as shown in Figures 3a and 3b.
Fig. 3a
Fig. 2b
Fig. 3b
6
Page 7

Once the heater is hanging as shown in gure 3b, place the locking bracket at the rear edge of the heater (Fig 4a) and
slide it until it aligns with the edge of the heater.
Mark the location of screw 1 on the wall and then remove the bracket. Drill the hole for the xing and insert the supplied
wall plug, re-attach the locking bracket to the heater and then x the heater to the wall with screw 1.
Fig. 4a
Fig. 4b
1
For locking the wall brackets, push on the left side of the locking plates on the top brackets until a click is heard. See
Figure 5.
Fig. 5
UNLOCKED LOCKED
CONTROL OPTIONS
The Sun Ray RF is designed to be used in conjunction with the SunRay Smart Gateway system and App, providing
total control of your radiators from anywhere in the world via the internet. The App is available for both Android and IOS
devices and offers the ultimate in control and energy monitoring.
Search for “Tevolve” on the either the Google Play store or the Apple App Store.
It is also possible to programme each radiator individually without the App by using the inbuilt buttons and LCD screen.
This may be convenient for single radiators however we recommend the Sun Ray RF Gateway to control multiple
radiators.
Finally the radiators can be used in manual mode or Easy mode which bypasses any programming and provides simple
On/Off operation.
7
Page 8

21
Wed.11:00h
21
Wed. 11:00
21
Wed.11:00
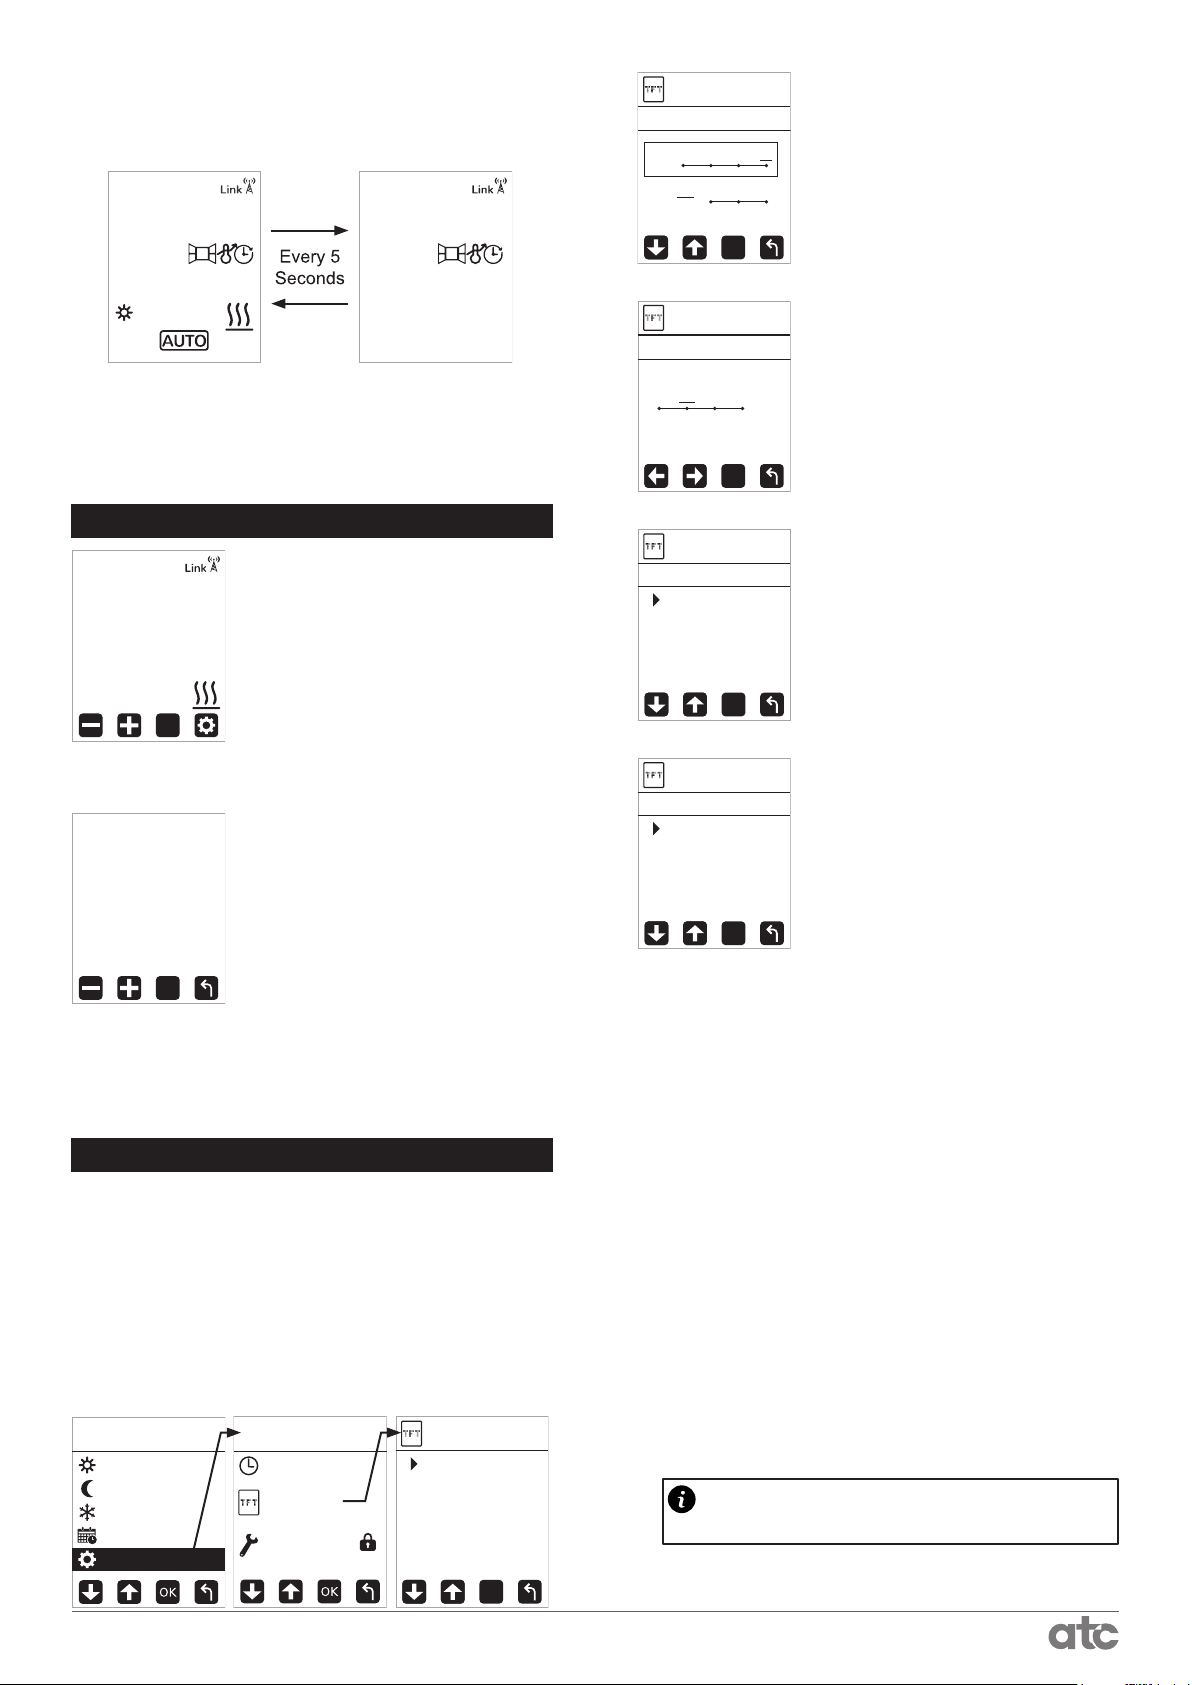
OPERATING INSTRUCTIONS
The control is based on four buttons and a TFT display.
Day of the week
Radio paired icon
Notication area
Set point temperature
Heating indicator
Current time
Current mode if
AUTO is selected
Current Mode
(AUTO, MANUAL, OFF)
Wed. 11:00
Set point:
21.5°C
COMFORT
BOOST
Switching ON (Master):
Once the radiator has been mounted on the wall
and correctly connected to the main electricity power
supply, press the main On-Off switch on the right
hand side of the radiator.
After around 3 seconds the screen will show various
information and the radiator is ready to operate. It is
recommended to leave the radiator on and use the
standby function (below) to turn the radiator off.
Switching OFF (Master):
To switch off the radiator press the main On-Off
switch on the right hand side of the radiator. The TFT
screen will turn blank and the radiator will lose any
connection with the SunRayRF Gateway.
Stand-by function:
From any on screen press the Mode/OK button
until the symbol is present as shown in the
following screen.
CONFIG.
BOOST
CONFIG
(long press)
Decrease
MODE
Increase Mode/OK
AUTO / MANUAL /OFF
Sun Ray RF Radiator Controls
The rst press of any button will wake up the radiator any
further button presses will activate the function required.
main
switch
Wednesday
11:00
When the radiator is in Stand-by Mode it will retain
programs and continue to communicate with the
SunRayRF Gateway(if connected) but will not heat.
To switch the radiator on again, press the MODE
button to choose programme mode or manual
mode you will see the following screens:
Set point:
.5°C
Set point:
.5°C
COMFORT
In any of the operation modes the area above
the temperature set point may display a message
showing the status of the Radiator, see the following
screens:
open window
self adaptive
Set point:
err03
error messages
EASY MODE
EASY
.5°C
LST 75%
Low Surface
Temperature
MODE
AWAY status for
geofencing
8
Page 9

Wed. 11:00
21
Wed.11:00
21
7
ANTI-FROST
21
Wed. 11:00
CONFIG
CONFIG
SETTINGS
TIME
MANUAL PROGRAMMING
To assist with programming the TFT screen is
backlit and will stay illuminated for approximately
10 seconds after the last button is pressed. (to
change the backlight time, see the section on
DISPLAY)
When the radiator is operational and the room
temperature is lower than the set temperature the
heating symbol will be shown indicating that
the radiator is producing heat. When the room
temperature equals or is above the set temperature
the heating symbol will not be present indicating
the radiator is not producing heat.
The following screens show OFF, AUTO and
MANUAL modes. To change between the different
modes press MODE/OK button.
SET PROGRAM TEMPERATURES
Adjusting the temperature set points in the
following way will only affect the temperatures that
are used for program modes.
To change these set up temperatures press and
hold the CONFIG button until the following screen
appears:
COMFORT
COMFORT
ECO
ANTI-FROST
PROGRAM
SETTINGS
Select either Comfort, Eco or Anti-Frost and
press OK to enter the menu.
Wednesday
11:00
Set point:
21.5°C
COMFORT
Set point:
.5°C
When the radiator is in AUTO mode the
temperature can be adjusted by pressing the +/buttons. This change will remain active until either
the next programme change or until midnight when
the temperature will revert to the preset value.
Set point:
.5°C
COMFORT
When the temperature has been adjusted in
AUTO mode a hand will show beside the auto
to symbol to show the amended setpoint. To
manually return the heater to the setpoint cycle
the modes until returning to AUTO.
Use the +/- keys to set the temperature when
the radiator is in MANUAL mode.
COMFORT
Set point:
.0°C
OK
ECO
Set point:
18.0°C
OK
Set point:
.0°C
OK
Press the +/- button to change the temperature
of each mode then press OK to conrm and return
to the main operation screen, repeat the above to
set the other temperature setpoints.
SETTING THE TIME AND DATE
If a radiator is paired with a Sun Ray RF
Gateway then the local time from the internet is
automatically applied to the radiator.
To set the Clock on an unpaired Radiator, press
and hold the Cong button until the CONFIG
menu is shown and then select SETTINGS and
the press OK.
COMFORT
ECO
ANTI-FROST
PROGRAM
SETTINGS
TIME
Settings
DISPLAY
Settings
ADVANCED
Settings
In the TIME menu the Time, Date and Daylight
Savings (DST) can be set.
SETTINGS
TIME
DAT E
DST
OK
9
Page 10

TIME
TIME
TIME
TIME
PROGRAM
PROGRAM
PROGRAM
PROGRAM
PROGRAM
CONFIG
PROGRAM
press OK.
change the Hours or Minutes move the underline
to the Hours and press OK.
to the correct value and Press OK, move to the
minutes and repeat to set the correct time. Once
complete press the CONFIG button to exit.
and enter the Day, Month and Year.
button.
offset for Daylight savings. To set this option on or
off choose ON or OFF in the DST menu
ENTERING A PROGRAM
to run a program designed to accommodate your
lifestyle. To enter a new program into the Heater
press and hold the CONFIG button until the
CONFIG menu appears, then use the +/- buttons
to select PROGRAM and press OK.
Select the TIME menu with the +/- keys and
The current set time is shown on the display, to
SETTINGS
TIME
22:00
OK
The hours will ash, use the +/- keys to adjust
To set the Date select the Date menu, press OK
SETTINGS
TIME
DAT E
DST
OK
TO exit the Date menu, press the CONFIG
The Radiator can automatically adjust the time
SETTINGS
DST
OFF
ON
The AUTO mode of the Sun Ray RF allows you
COMFORT
ECO
ANTI-FROST
PROGRAM
SETTINGS
SETTINGS
DAT E
Day
Month
Year
OK
Tuesday
ON OFF mode
01
01
2019
OK
COPY
add period
To enter a program into the
Tuesday COPY
ON OFF mode
00:00 23:59
radiator rst select the day of the
week in the upper left corner of
the week and press OK, change
the day to the day you want to
add period
OK
program and press ok.
Once the correct day is
selected, move the underline to
Tuesday COPY
ON OFF mode
00:00 23:59 x
add period
OK
the time of day. The underline
will change to a box around
the times that can be changed.
Press OK and the ON time will
begin to ash.
Change the on time to the
Starting time the radiator should
Tuesday COPY
ON OFF mode
00:00 23:59 ok x
heat (7:00 in our example),
Press OK and the OFF time
starts to Flash. Change the OFF
time to the end of the heating
period required (e.g.12:00).
add period
OK
Once the Times have been Entered, chose the
temperature set point required for the Heating
Period; either Comfort or Economy .
Any time periods outside of Comfort or Economy
are automatically set to Anti-Frost .
Once the set point is chosen choose either “ok”
on the screen to save the setting or “x” to delete.
Extra heating times can be
Tuesday COPY
ON OFF mode
07:00 12:00 x
13:00 14:00 x
17:00 20:00 x
add period
OK
added by selecting “add period”
and repeating the above
procedure.
Once the program for the day
is complete, it can be copied
to other days in the week
by selecting COPY from the
Copy Tuesday to:
Mon Tu e
Wed Thu
Fri Sat
Sun
OK CANCEL
OK
programming screen.
The copy screen will appear
and the day that is being copied
from will not be available. (e.g.
Tuesday)
Select the days to copy to and then move the
underline to “OK” on the screen and press the
OK button. The Screen will change back to the
program menu. To Exit press CONFIG or leave
the radiator and the display will revert to the
current running mode
10
Page 11
22
21
Tue. 15:00
21
Tue. 15:00
CONFIG
SETTINGS
DISPLAY
DISPLAY
DISPLAY
DISPLAY
DISPLAY
To make sure your program is running Press the
OK/MODE button until AUTO is shown at the
bottom of the screen.
Set point:
.5°C
COMFORT
Set point:
.5°C
Next Program ON Time
Starts at:Tue. 17:00
The screen will change between the operation
screen and the next time of operation.
At any time, the temperature can be changed with
the +/- buttons.
SETTINGS
Brightness Level
1 2 3 4
ON
Level
OFF
OFF
Level
1 2 3
OK
SETTINGS
Backlight Time
5 10 30 always
OK
To Adjust the brightness of the
screen, select Brightness level
and press OK, the ON levels are
between 1=25%, 2=50%, 3=75%
& 4=100%. The OFF levels are
Off, 1=3%, 2=10% and 3=20%.
Chose the level required and
Press OK.
To Set the time the screen
stays on for after the last button
press select Backlight from the
DISPLAY menu and chose how
many seconds are required. The
factory default is 10s.
BOOST
The Sun Ray RF heater has a
BOOST
1h 35m
built in Boost mode to allow the
user to temporarily over-ride
the current operating mode.
.5°C
set temp
MODE
The Boost button (short press
of CONFIG) will immediately
turn the heater on for 1 hour at
21ºC. as soon as the button is
pressed.
To adjust the temperature of
the boost period, use the +/-
BOOST
Set time:
buttons.
To adjust the duration, press the
1h
OK
CONFIG button, the boos time
setting screen will be displayed;
adjust the time required
between 1 hour and 24hours.
To return to the boost screen press CONFIG.
To return to normal operation from the Boost mode
Press the OK button.
SETTINGS
Eco Display
OFF
ON
OK
SETTINGS
Beep
OFF
ON
OK
The Sun Ray RF features a
“responsible consumption” Eco
Display mode, this mode will
show a coloured bar across
the bottom of the screen to
encourage the user to set an
economical temperature.
This feature is turned on and off
in the ECO DISPLAY menu.
To de-activate the beep when
each key is pressed enter the
BEEP menu and select either On
or OFF.
DISPLAY SETTINGS
The Display menu on the Sun Ray RF allows the
user to customise how the radiator looks whilst
the screen is on and off, it also allows the button
sound to be controlled.
To open the DISPLAY menu, press and hold
CONFIG until the menu appears, select
SETTINGS and press OK, nally select DISPLAY
and press OK.
COMFORT
ECO
ANTI-FROST
PROGRAM
SETTINGS
TIME
Settings
DISPLAY
Settings
ADVANCED
Settings
SETTINGS
Brightness Level
Backlight Time
Eco Display
Beep
OK
The rst press of any button will wake up the radiator any
further button presses will activate the function required.
11
Page 12

21
Tue. 15:00
ADVANCED
PROGRAMMING WITH APP
To programme your Sun Ray RF with a Sun
Ray RF Gateway you must pair the radiator to
the Gateway. First you must activate the pairing/
discovery mode in the Gateway, press Link button
for 2 seconds. Details of this can be found in the
Sun Ray RF Gateway instruction manual.
Once this is done, the way to pair the radiator
is to press the OK button for 3 seconds while the
radiator is in one of the main modes (OFF, AUTO,
MANUAL).
Set point:
.5°C
PAIRED WITH
GATEWAY
Your Sun Ray RF radiator is now ready to accept
programme instructions from the Gateway (you
will need to complete Sun Ray RF web activation.
http://tevolve.termoweb.net )
If the radiator has been linked to the Gateway
and for some reason communication is lost, the
Link icon disappears and the antenna starts
ashing in red alternating with Link text.
Next Program ON Time
Starts at:Tue. 17:00
When the keypad is locked the radiator will
still receive communications from the Sun Ray RF
Gateway.
ADVANCED SETTINGS
The Advanced settings menu
SETTINGS
Units
Control Type
Temp Offset
Open Window
Self Adaptive
OK
is password protected to prevent
any inadvertent changes to the
factory settings.
To access the Advanced
settings, enter the password
(default 0 0 0 0). It is
recommended to set a custom
password once installation is complete. (For more
information See password section).
UNITS
Celsius
Fahrenheit
The units menu allows the
main temperature units of the
radiator to be chosen between
Celsius (°C) and Fahrenheit (°F).
KEYPAD LOCKING (ANTI-TAMPER)
The keypad can be locked
to prevent any unauthorised
person (children, people in public
ENTER CODE
TO LOCK
- - - - OK
places, nurseries, ofces, hotels
etc.) altering the settings of the
radiator.
A Password is required to lock
the keypad (0 0 0 0 by default),
See Password Settings Chapter
for further details on changing
passwords.
LOCKED
To Lock the radiator Press and
hold the + and – buttons until
the lock screen appears. Enter
the password on the screen and
press Ok. The screen will change
to show the Lock screen and any
button presses will be ignored
ENTER CODE
TO UNLOCK
- - - - OK
OK
and the locked screen displayed.
To unlock the keypad press
and hold the + and - until the
unlock screen appears. Enter the
password and press OK. If the incorrect password
is entered “INVALID CODE” will be displayed.
OK
Control Type
PID
Hysteresis
Hysteresis .35°C
Hysteresis .5°C
Hysteresis .75°C
.25°C
OK
The Control Type menu
allows two types of control of
the temperature control setting.
PID will calculate the best
switching point for the heater
depending on previous room
readings. Hysteresis is the
amount of difference between
the detected temperature and the setpoint. It is
not recommended to change these settings.
Temp. Offset
Display temp
22.5°C
The temperature offset menu
allows the display temp to be
adjusted by ± 3. Adjusting this
setpoint will affect the operation
Offset +1.1°C
of the thermostat setpoints,
changing this setting is only
OK
recommended if the displayed
temperature is noticeably
different from another sensor in the space.
12
Page 13

OFF
Open Window
21
Tue. 11:00
EASY mode
21
Tue. 15:00
21
21
Tue. 11:00
ON
OK
Set point:
.5°C
The Open window setting will
turn the heating of the radiator off
if the unit detects a rapid drop in
temperature over a short period
of time.
To reactivate the heating once
the open window function has
activated press any button the
radiator. If the temperature rises
above the minimum detected
temperature then the heater
will reactivate and turn the open
window function off.
If this function comes on
frequently e.g. in an area where
there is an external doorway, it is
recommended to turn the open
window function off.
OFF
ON
Set point:
set temp
OK
EASY
.5°C
EASY Mode is a simple mode
of operation where by only the
+ and – buttons on the radiator
operate to increase or decrease
the temperature. The OK button
is deactivated. To turn the
radiator on or off use the Main
power button on the side of the
heater.
When running in Easy mode
the Screen will show EASY in
the notication area to let the use
know that the mode is active.
To exit EASY mode press and
hold the CONFIG button for 10
seconds, then select “off”.
Self Adaptive
OFF
ON
OK
Set point:
.5°C
COMFORT
LowSurfaceTemp
OFF (100%)
75%
50%
23%
OK
Set point:
LST 23%
.5°C
The Self Adaptive setting will
allow the radiator to calculate the
optimum time to start the heating
cycle when running in Program
mode.
If this setting is turned on it will
be shown in the Notication area
and the heating will come on prior
to the programmed starting time
so that the room is at the correct
temperature at the programmed
starting time.
The Low Surface Temperature
(LST) menu will allow the output
of the heater to be limited to a
lower setting to prevent the
surface of the heater becoming
too hot. If a surface temperature
of less than 43°C is required use
the lowest setting.
It is recommended that if the
LST function is activated then
the radiator should be locked
with a non standard password
after activation.
(See Password Section)
Runback
Runback
Setback
Max. Temp.
OK
Password
Status ON
Change
OK
RESET
Confirm
OK CANCEL
OK
Runback: See Runback
Section on page
Password: See Password
Section on page
Resetting the radiator will
return all settings to the factory
defaults and will also delete
any ‘pairing’ with a Sun Ray RF
Gateway.
To activate the RESET feature
select with arrow buttons OK,
and press the OK button.
The rst press of any button will wake up the radiator any
further button presses will activate the function required.
13
Page 14

PASSWORD
The Password Function of the Sunray RF
Radiator serves a number of functions; Keylock,
Advanced menu access and also Runback access
when the runback is activated. The Default
password from the factory is four Zero’s (0 0 0
0), however it is strongly recommended that once
installation is complete that an alternative code is
set.
To access the password function enter the
ADVANCED SETTINGS menu and then select
PASSWORD.
The password can be turned on or off and
changed.
To Turn the password on or off, Select Change
and press OK.
Password
Status ON
Change
Password
Status
ON
OFF
RUNBACK MODE
The Sunray RF Heater comes with a runback
mode for use when the heater will be installed in
areas where restricted user control is required.
When Runback Mode is active it allows the user
to set the radiator to run for a specic pre-set
amount of time and temperature. It is also possible
to set a maximum temperature (Max Temp) above
the Runback setting to allow the user to increase
the temperature within the limits allowed.
Before activating Runback mode it is strongly
recommended that an alternative password is set
and activated and the comfort mode temperature
setpoint is set to 35°C. When the password is
activated the user will have no access to the
radiator settings without the password.
NOTE: Any Display settings will be used in
RUNBACK mode, eg. Backlight time and intensity,
Eco mode etc.
OK
OK
Select either ON or OFF and press OK. If you
are reactivating the password then the Enter New
password screen is shown (The password will
always default back to 0 0 0 0).
If the password is turned off, the Keylock,
Advanced Settings menu and Runback controls
are accessible without entering a password.
To Change the password code when the
password is active select Change from the
password screen and press OK.
Password
Status ON
Change
ENTER NEW
PASSWORD
0 0 0 0 OK
OK
CONFIRM
NEW PASSWORD
1 2 3 4 OK
Enter and conrm the new password and press
OK.
After the runback time period ends the room
temperature will return to off (7°C minimum) until
the runback is restarted.
It is also possible to set a minimum temperature
to be maintained (Setback) outside of the runback
mode; when setback mode is activated the room
temperature will only fall as low as the Setback
temp and be maintained at this point until runback
is restarted.
ACTIVATING RUNBACK MODE
Runback
Runback
Setback
Max. Temp.
Runback mode is activated
from the Advanced settings
menu.
The main runback screen has
3 options:
• Runback Cong
OK
• Setback Cong
• Max Temp
Runback
Runback Config.
OFF
ON
Settings
Set Runback to ON to activate
the mode.
14
OK
Page 15

Runback
Settings
Runback
Runback
22.5°C
TIME
set temp
30Minutes
Runback
Setback Config
OFF
ON
Settings
Runback
OK
Setback Temp.
17°C
Runback
OK
Setback
17°C
TIME
set temp
Time
Runback ON, Setback ON,
Max Temp OFF
Runback
Set point
Temperature
Temp Range available to User
Heating End
Heating Start
Setback Limit
Temperature
Max Time
RunBack Temp
The Default time for Runback
to operate is 30 minutes, this can
be increased in ½ hour sections
up to 8 hours (480 mins) by using
the + & - and OK.
OK
Runback
Max Time
30 min
0 → 30 → 60 → 90 → 120 →
150 → 180 → 210 → 240 → 270
→ 300 → 330 → 360 → 390 →
420 → 450 → 480 →0
OK
The time can be limited to any of the above
values, when the user activates the Runback
timer, they can choose any of the times up to the
maximum set on installation.
The temperature that the
Temp
22°C min
radiator runs at when runback is
activated is set in the Runback
Temp menu. Use + & - to Set the
temperature and Press OK.
OK
MAX TEMPERATURE
Runback
Runback
Setback
Max. Temp.
The Max Temperature mode
allows the installer to set a
temperature higher than the
Runback temperature to give
the user some leeway in the
temperature of the room.
OK
Typically this is set 1-2°C higher
than the runback setting.
Max Temp.
25.5°C
Both the Setback and Max
temp are set with the +&- buttons
from their respective menus.
OK
The graphs below show typical scenarios for
each of the settings.
Runback ON, Setback OFF,
Max Temp OFF
Initial room Temperature
Heating End
Temp Range available to User
Runback
Set point
Temperature
SETBACK
Please note that the Runback
temperature cannot be set
higher than the Comfort setting
in the main menu.
The setback mode can be
used to limit the temperature
that the area where the heater
is installed can fall to outside
of the Runback operation. This
temperature can be set between
7°C and 0.5°C less than the
Runback temperature.
When Setback
is operational,
the screen will
show setback
and the setpoint.
Heating Start
Time
Min radiator
Temp (7ºC)
When Setback and Max temp is OFF, the user
has a choice between the minimum radiator
temperature of 7°C and the Runback temp setting.
Outside of the Runback period the temperature
will fall as low as 7°C if the radiator is not reactivated.
When Runback and Setback are activated then
the user has a limited choice of temperature
between the Setback setting and the Runback
setting.
Outside of the Runback period the temperature
will fall to the Setback temperature if the radiator
is not re-activated. (Building Fabric Protection)
15
Page 16

Runback ON, Setback ON,
Max Temp ON
Temperature
Runback
Set point
Heating End
Time
Temp Range available to User
Temp. increased
By user to Max.
Max Temp.
Set point
Heating Start
Setback Limit
Temperature
When all 3 settings are activated then the user
has a choice between Setback as a minimum and
the Max temp setting as a maximum.
The Radiator will always come on at the Runback
set point.
In the example above the user has activated
runback and then increased the temperature to
the Max Temp set point after a time.
ERROR CODES
The Sun Ray RF Radiator continuously checks
te ensure that it is working correctly all the time,
however in some cases the radiator may display
an Error code on the screen.
In the case of an error code please contact
Technical@ATC.ie for support
16
Page 17
21
Wed. 11:00
21
Wed. 11:00
21
Wed. 11:00
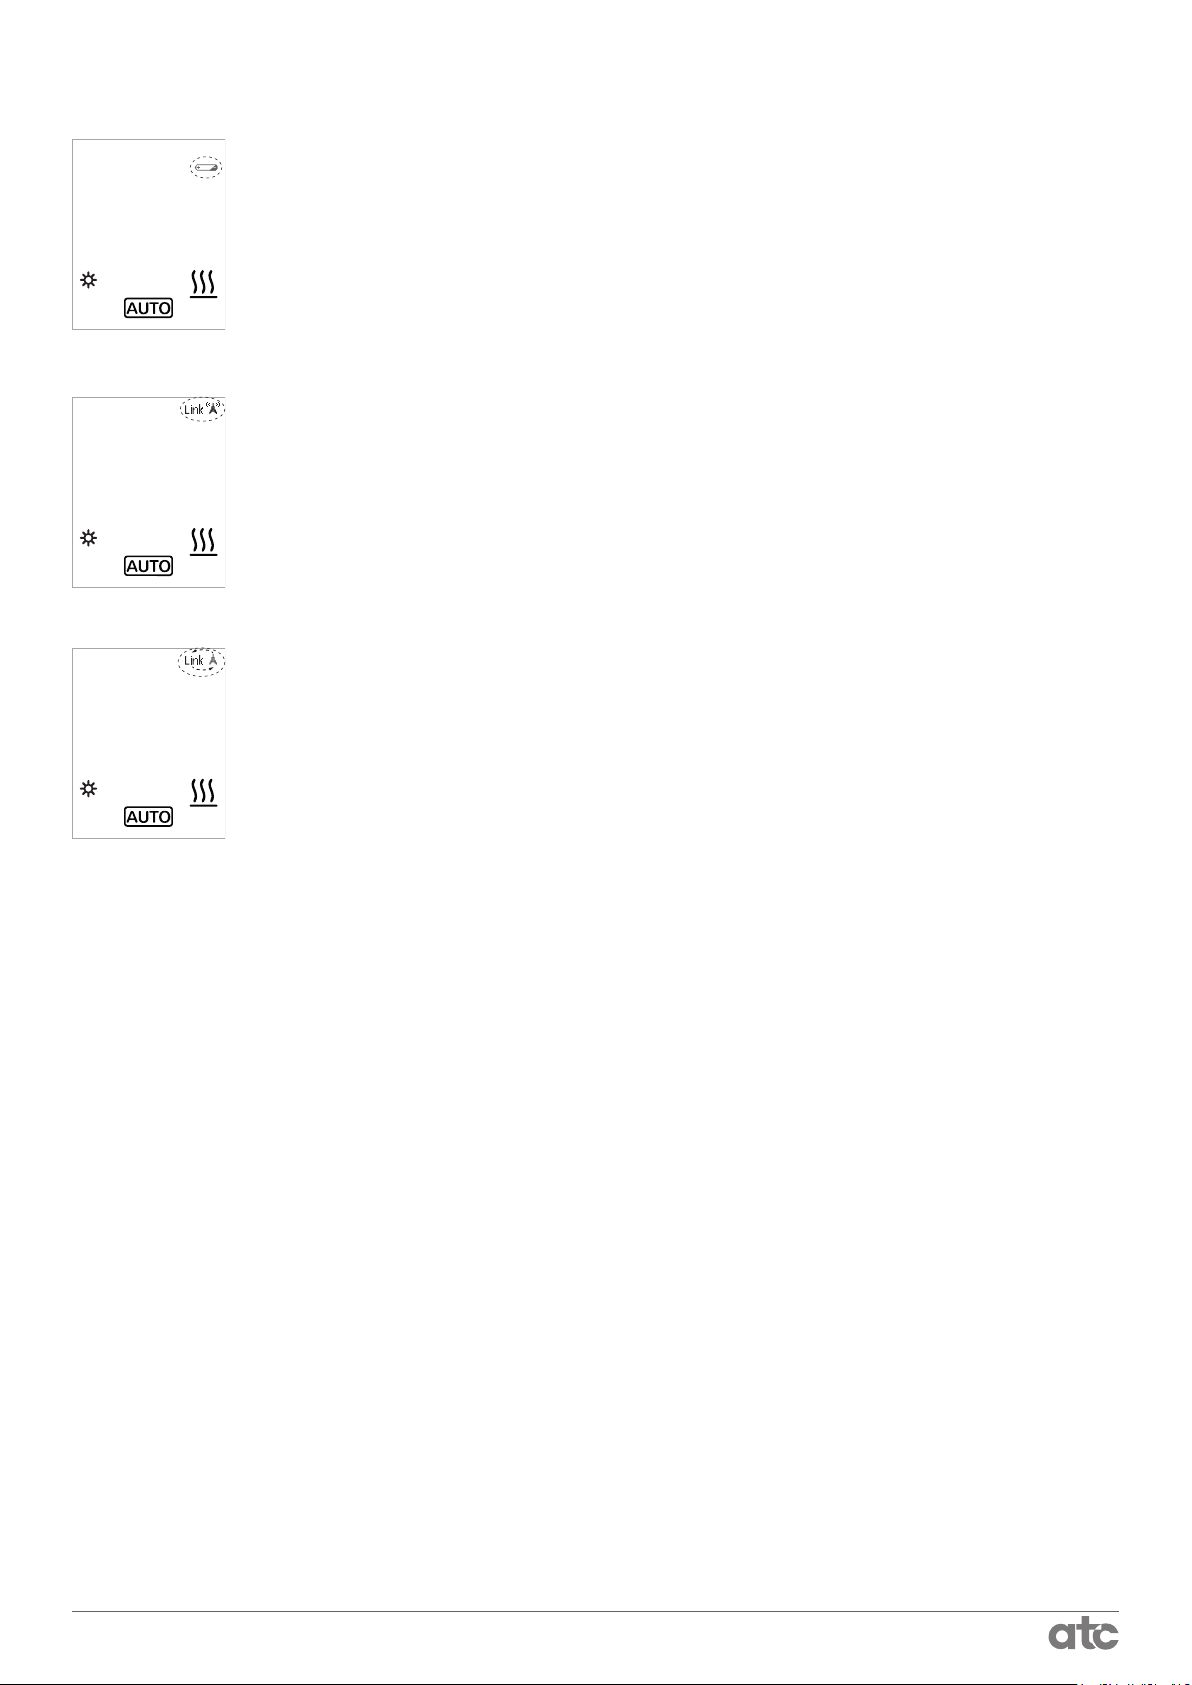
TROUBLESHOOTING
If the power of the Lithium
battery drops, in every active
Set point:
.5°C
COMFORT
Set point:
.5°C
COMFORT
screen a small icon will remind
the user that the battery is at.
The time and date is not retained
if the radiator main switch is
disconnected.
If the radiator is paired with
an internet connected gateway
the time and date are always
updated when the radiator
reconnects to the gateway.
When a radiator has been
paired with a Gateway, the text
“Link” and an antenna with
ashing waves appears on the
top right of the screen.
When the Gateway is not
Set point:
.5°C
COMFORT
If radiator is paired with a gateway, and the
internet connection is lost the heating system is
not accessible from the app. However the running
schedule remains in the radiator memory and
continues with the last user setting if the lithium
battery is not at.
(Lithium battery CR2032 life is around 5 years
from date of manufacture, this life can be
decreased depending storage conditions)
powered or it is too far away from
radiator, the Link text alternates
with a red antenna without
waves to alert the user that the
radiator cannot comunicate with
the gateway.
17
Page 18

DEFAULT VALUES
Default mode: OFF
Type of control: PID
Temperature offset: 0ºC
Open window detection: disabled
Autoadaptive: disabled
Programming in one hour intervals, all hours in antifrost mode
Setpoint temperatures:
Anti-freeze 7ºC
Eco 18ºC
Comfort 21ºC
Manual temperature: 21ºC
Boost mode temperature: 21ºC
Boost mode time: 1h
Low Surface Temperature: disabled
Password status: activated
Password: 0000
Units: ºC
Keyboard: unlocked
Easy mode: disabled
Runback mode: disabled
Setback: disabled
Runback temperatures:
Antifreeze: 7ºC
Eco: 18ºC
Comfort: 21ºC
Max. Temperature of Runback: 21ºC
Max time of Runback: 30min
Screen brightness on: max (4)
Screen brightness on: min (OFF)
Screen time on: min (5s)
Beep: disabled
EcoDisplay: disabled
DST: enabled
Default date: 01-01-2019 (Tuesday)
18
Page 19

ECODESIGN TABLE
Models
Heat output
Nominal heat output (P
nom
)
Maximum continuous heat output
(P
max,c
)
Auxiliary electricity consumption
At nominal heat output (el
At minimum heat output (el
max
min
)
)
In standby mode (elSB)
Type of heat output/room
temperature control:
Sun Ray
RF 350
0.35kW 0.5 kW 0.75 kW 1.0 kW 1.25kW 1.5 kW 1.8 kW
0.35kW 0.5 kW 0.75 kW 1.0 kW 1.25kW 1.5 kW 1.8 kW
0.0005 kW0.0005 kW0.0005 kW0.0005 kW0.0005 kW0.0005 kW0.0005
0.0005 kW0.0005 kW0.0005 kW0.0005 kW0.0005 kW0.0005 kW0.0005
0.0005 kW0.0005 kW0.0005 kW0.0005 kW0.0005 kW0.0005 kW0.0005
Sun Ray
RF 500
Sun Ray
RF 750
Sun Ray
RF 1000
Sun Ray
RF 1250
Sun Ray
RF 1500
Sun Ray
RF 1800
kW
kW
kW
Electronic room temperature control plus week timer
Other control options: Room temperature control, with open window detection
With adaptive start control
With distance control option
ATC Electrical and Mechanical
Head Ofce & Showrooms
ATC House, Broomhill Drive, Tallaght, D24 EF99, Ireland.
IRL Tel: +353 (0)1 4625111
UK Tel: +44 (0)203 5649164
Fax: +353 (1) 452 0887
Email: sales@atc.ie
19
Page 20

MAINTENANCE AND CARE
Sun Ray RF radiators require very little maintenance.
The surfaces of the radiator must not be cleaned with an abrasive product or those containing granular substances.
We recommend regular cleaning with PH neutral products.
In order to clean the radiator, it is recommended that the electric power is switched off. Failure to keep the SunRay
Radiators clean may result in dust becoming burnt and depositing on the wall above the heater in the form of dark
streaks or patches. This type of marking is expressly due to failure to keep the heater and surrounding area clean. ATC
take no responsability for any such damage caused
GUARANTEE
Your appliance is guaranteed for 20 years for the aluminium and 3 years electric and electronic components from the
date of purchase – during this period we will repair or exchange, at our discretion, any faulty or defective parts providing
the appliance has been used in accordance with the operating & installation instructions and has not been misused or
mistreated in any way.
Any unauthorised repair or attempted repair will invalidate the guarantee. You may be asked to return the product to our
workshop for inspection to establish whether the fault is covered under the guarantee. The guarantee is valid in the UK
and Ireland only.
This guarantee is additional to your statutory rights.
In the unlikely event of a problem with your appliance please contact your supplier.
CORRECT DISPOSAL OF THIS PRODUCT
(Waste Electrical & Electronic Equipment)
(Applicable in the European Union and other European countries with separate collection
systems)
This marking shown on the product or its literature, indicates that it should not be disposed of
with other household wastes at the end of its working life.
To prevent possible harm to the environment or human health from uncontrolled waste
disposal, please separate this from other types of wastes and recycle it responsibly to promote
the sustainable reuse of material resources.
Household users should contact either the retailer where they purchased this product, or their local government ofce,
for details of where and how they can take this item for environmentally safe recycling.
Business users should contact their supplier and check the terms and conditions of the purchase contract. This product
should not be mixed with other commercial wastes for disposal.
www.atc.ie
Head Ofce & Energy Showrooms:
ATC House, Broomhill Drive,
Tallaght, D24 EF99
Ireland.
Tel: 353 (1) 467 8301
UK Tel: 0044 (0)203 5649164
Email: sales@atc.ie
20
 Loading...