

Page 1

Page 2

Page 3

Table
of
Contents
ATARI
Hooking
AtariArtist Your Key to
Using
Making
Drawing a Picture 8
Unleashing AtariArtist
Additional Infonnation
Saving/Loading a Picture
Creating
Touch Tablet 2
it
Up 3
the
ATARI
Menu
a Sample Drawing
Touch
Selections 6
Computer
Tablet with AtariArtist 5
Graphics
on
the
Art 4
Features II
18
19
9
Page 4

ATARI Touch Tablet
CONTROL
Used
to
as
make
trigger
BUTTON
menu selections
buttons for video games.
or
CONTROL
BUTTON
TABLET
Clear
plastic
surface
STYLUS
FACE
overlay
, lets you trace
CONTROL
pro
tects tablet
over
pictures.
BUTTON
2
Page 5

The
ATAR
controller
puters. You
computer
programs
- using the AtariArtist™ software included
I Touch Tablet is an art
designed
can
art
for u
quickly
and
se
and
graphics-without
with all AT
easi
and
graphics
ARI
ly
create
Home Com-
your own
writing complex
with the Touch Tablet.
You
can
draw
with just about
package,
You
a pen,
can
draw
anything-the
or
you should always
pictures on
your finger.
right on the Touch Tablet itself, but
place
the
ATARI
stylus that comes
the
clear
plastic overlay on
Touch Tablet
in
the
the tablet surface. The plastic overlay not only protects the Touch Tablet surface, but acts like tracing
paper
- just put the picture you want to trace
the overlay
trace
U
Touch Tablet.
cursor
could
Tablet's surface,
t
erfere
ti
on. Lifting the drawing tool from the tablet surface
causes
screen-to
and
tablet surface, then
the picture onto your
se
moderate
appear
tear
the plastic overlay
with
the
cursor-the
Press
on your
and
proper
pressure
only
TV
pressing
cursor
white crosshairs on the
vanish.
screen.
use
when drawing on the
hard
enough
screen.
Pressing too
or
damage
too lightly could
movement
and
The two control buttons on the Touch Tablet
the o
ne
controllers. They
on the stylus act like "fire" buttons on other
stylus
and
menu
selections or
are
used
in
the Touch Tablet's
begin
an activity-moving from a
conjunction with the
drawing
between
the stylus
to
make the
the Touch
drawing ac-
surface to
hard
in-
and
make
to
menu
to
ticular color,
tons work
that
the button on the stylus
tons on the tablet to
cursor, or begin
a picture, drawing a line, choosing a par-
or
With one exception (see
erasing
identically-when
comes
with the Touch Tablet , you can
dra
the
screen.
page
5),
you're
or
one of the t
make
menu selections,
wing. When you'
the control but-
using the stylus
wo
re
press
control but-
erase
drawing
either
the
wit
something other than the stylus, use either button on
to
the Touch Tablet
select one of the AtariArtist
features.
You
dle
controllers
the stylu s on the Touch Tablet surface imitates
action, so wherever
the tablet surface, the
the television or monitor
can also
Hoo
ki
ng
it
Plug the stylus into the jack on the
Touch Tablet , then plug the
Controller Jack
tridge into your
in
its owner's guide.
to
Up
use
the Touch Tablet instead of pad-
play certain
ATARI
games. Moving
you move your stylus or
cursor
(or oth
screen
er
follows.
indicator)
back
1.
ATARI
Insert the AtariArtist softwa
ATARI
Home Computer as explained
Touch Tablet into
paddle
pen
of the
re
car-
on
on
h
3
Page 6

AtariArtist ™ Your
Key
To Computer Art
The AtariArtist software
Touch Tablet
graphics
features of traditional
choice of
puter
graphics-patterned
and
squares,
ing tool
creativity.
Your
Tablet,
and
12
magnify any portion of your
work dot-by-dot on your
circles,
You
or cassette, then
pictures.
On the following
to
operate
make
AtariArtist menu selections,
plete
details about AtariArtist 's features, instructions
for loading
cassette,
structions
opens
possibilities. AtariArtist
brush
with the
ATARI
and
AtariArtist give you
pre-designed
squares,
can
also file the pictures you
this amazing system. You'll
and
and-beginning
to
create
up
width
and
mirror im
power
Home Computer,
and
use
pages,
saving your
the
included
an exciting world of art
painting-sketching,
and
style-with
colors, automatic
ages-to
to match your artistic
patterns
straight lines.
them again
drawings
TV
screen,
you'll
pictures
on
page
sample
(in
with
combines
those
produce
ATARI
access
drawing
to
128
colors), let you
to modify
or
draw
draw
later
with
learn
how
learn
and
you'll find com-
to
diskette
19-step-by-step
on this
the
ATARI
and
the
erasing,
of com-
circles
a draw-
Touch
128
colors
your
perfect
to diskette
other
easy
how
or
page.
to
it
is
in-
4
Page 7

Insert
the
cartridge
the LEFT SLOT
you're
on
When
sert
turn
guide
programs),
have
control buttons on
to
key
up
tions that'll
almost
your TV
surface
space
between
simply
surface,
draw
stylus
using
your
the
a DOS-formatted
your
for
After the AtariArtist
two options:
the
AtariArtist menu,
(if
your
the
help
as
Then
bar
repeat
To
begin
a line, for
or
slot (the
a disk
disk
drive
BUSY
computer
complete
computer
screen,
have
soon
you
can
screen
and
pressing
on your
the
"canvas"
then
press
an
other
AtariArtist
in
as
this
example-you
writing tool to
cartridge
cartridge
an ATARI
drive
to
before you turn on your
light on
you
by
activity-make a menu
your
diskette
on
(see
instructions for loading
1)
You
the
The
you turn your
call your
removing
computer,
step-lift
a control button
your
welcome
can
Touch
or
2)
has
one)
help
drawing
"electronic
one
of
and
the
the
into the
should
800™ Home Computer),
store
the
be
your drawings, turn
disk
drive
into your disk
disk
screen
press
ElJD
Tablet
You
the
or
can
or
type
screen
on your Touch
the
To
provides
computer
stylus from
control buttons
move
menu
at
stylus from
or
must first touch
Touch
computer's
inserted
computer.
goes
drive
owner's
and
appears,
or
any
stylus to
press
the
the
[?J
on,
canvas"
back
any
time,
the
the
space
selection
Tablet
into
off,
drive
saving
of
move
II1D
to call
direc-
Tablet
to
the
tablet
or
and
forth
tablet
bar.
or
the
surface,
Usmg the ATARI Touch Tablet with AtariArtist
then
press
one
of
the
three
in-
and
you
the
the
If
when
using
the
then
press
when
using
press
then
drawing
when
you
When
the
button on
"ON"
position-so
tinuously holding
stylus to the Touch Tablet surface, then
button on
create a picture
from the Touch
then
touch
drawing,
turn
it
off.
left of the Touch Tablet, however, must
continuously
If
you're
a
finger-the
covered
simultaneously at two points,
way
between
Watch
while
drawing
required
DRAW
one
of
the
the
DRAW
a control button again
to
"lay"
lift
you
the
Press
The button on the stylus
area,
the television
to
your
the
stylus off
select
the
right of
you
down a button-by
right
side
on your
Tablet
the
,stylus to the
the right-hand button a
when
you're
drawing
cursor
do
appears
If
you touch the Touch Tablet
them,
on
the
this will soon
control buttons,
and
POINT features, you must
three
control buttons,
and
POINT features, you must
work
the DRAW feature, you
the
can
of the tablet. This lets you
TV
surface
using the DRAW feature,
with a blunt
screen
Touch Tablet. The coordination
when
in
or
it
the
draw
screen
surface
will
tablet.
Touch Tablet into the
freehand
and
to
check
again
or
instrument-such
at
the
center
the
cursor
instead
become
Except
Except
you're
disappear
first touching the
second
the button on the
of your
second
finished
can
without con-
pressing
lift
the
to
resume
pressed
of
the
hand
nature,
stylus
time
your work,
be
appears
lock
the
to
as
mid-
5
Page 8

Making
Menu Selections
AtariArtist offers you a
and
ing
and
from , plus
etc.,
your drawing.
the Touch Tablet
eit
the
and
w
6
painting
12
pre-designed
and
fill
To
view
her
one of
space
forth
hen
between
your stylus is on
tools-128
the
capability to
in
specific
the
menu at
and
the
control buttons on
bar
on your
the
complete
colors, eight
patterns
draw
areas
any
press
the
comp
menu
the
tablet
palette
in
128
with color,
time,
button on
uter
also
and
surface
brush
colors to
circles, boxes, discs,
your
even
lift
your
the
tablet.
takes
picture-even
.
the
of draw-
widths,
choose
magnify
stylus from
stylus
or
Pressing
you
back
The AtariArtist
of boxes.
the
can't
the
the
dition, you
top
Each
feature
read-can
stylus
to
feature you want
three
can
rows
The AtariArtist M
menu
box
does
place
contains a picture showing what
, so
anyone-including
use
it.
the
and
select
some
and
the next-to-last
en
u
consists of six horizontal rows
To
make a menu
cursor
over
press
features-the
a control button. In ad-
children who
selection,
the box containing
ones
row-from
in
your
use
the
Page 9

computer
keyboard
by
typing the letter or
number
shown on the menu. The features you're using
highlighted on the menu.
remains
menu-until
stylus
the
ton; or you
keyboard,
in
effect-and
you choose another.
To
select the
to
move the cursor
upper
right-hand
can
and
RAYS
simply type the letter R on your
the word
the menu on your
on your electronic canvas
the keyboard-controlled features, you don't
display the
press
just
menu-if
it.
Once
will
you select a feature,
be
highlighted on the main
feature, for example, use your
to
TV
corner
RAYS
screen
and
the box
and
. When you're drawing
press
will
want
labeled
a control but-
be
highlighted
to
select one of
need
you know which key you want,
are
RAYS
to
in
in
With two exceptions, the features
it
DRAW
you'll
features, however, can work
rows cannot
be
after you've
override
used
simultaneously-
selected
RAYS.
The MAGNIFY
RAYS,
in
another or with any of the other menu selections.
can magnify a section of a circle or ray, or
rored
frames, for example. In addition, the Color Menu
can also
in
style, color,
with the features
be
the top
used
three
The features
and
in
conjunction with the other features
rows.
in
the bottom
pattern-can
in
the top
be
three
in
the top three
if
you select
for
example,
and
MIRROR
tandem with one
create
three
rows-brush
used
simultaneously
rows without affecting
You
mir-
the choice of feature. The brush size, color, or pattern
by
you're using is indicated
upper
right-hand
corner
diagonal markings
of their boxes.
in
the
7
Page 10

Drawing a Picture
Creating a picture
AtariArtist is a
1)
First
DISC-by
DISC box,
Q on your
the
space
Place
,2)
Touch
Tablet
move
the stylus
DISC, you'll
cle
expand
across
the tablet.
select
using
then
keyboard.
bar
across
three-step
the
feature
the
stylus to
pressing
move
stylus
across
the
Then
or
and
screen
to
the
surface
see a "rubber
with
the
Touch
process:
you
want-for
place
a control button
press
from
other
press
the
surface-if
banded"
the
a control button
the
menu
drawing
a control button,
as
you
Tablet
cursor
or
to
the
tool
you've
(see
slide
examp
by
"canvas
on
page
the
and
le ,
over
the
typing
or
the
then
selected
11)
cir-
stylus
."
3
3)
Press
DISC-if
the
figure, it'll shift position
the
to
you
remove
buttons
the
control button, you'll
the
with
NOTE:
features,
second
you've
a control
you
Touch
the
or
return
currently
When
you
time-your
pushed
don
't
Table
stylus
don't
a button
to
using
button
press
a control button
surface
and
the
menu.
see
selected
the
need
to
sketches
once.
again
to
when
you
again
or
press
the
color.
DRAW
push
stay
disappear
any
After
you've
circle
and
a control button a
on
the
"lay
touch
of
the
you
POINT
screen
in"
after
the
control
pressed
drew
the
drawing
stylus
when
fill
after
in
8
Page 11
Unleashing AtariArtist Graphics
Point
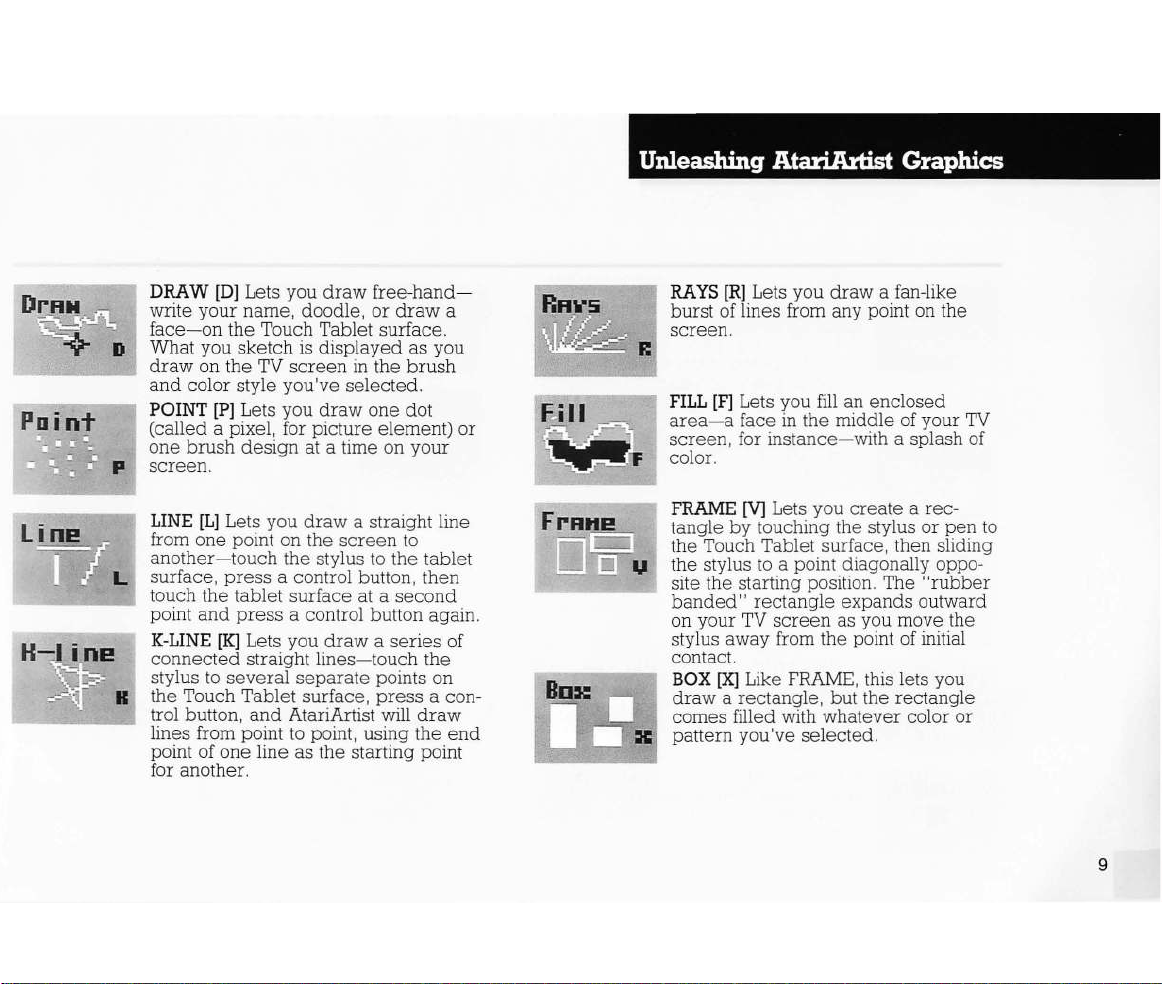
DRAW
write your name, doodle, or
[D]
Lets you
draw
free-hand-
draw
face- on the Touch Tablet surface.
What you sketch is displayed
draw
on the TV
and
color style you've selected.
POINT
[P]
screen
in
the
Lets you draw one dot
(called a pixel, for picture e lement) or
one brush design at a time on your
screen.
LINE
[L]
from one point on the
Lets you
another-touch
surface,
press
touch the tablet surface at a
point and
K-LINE
press
[K]
connected
stylus
to
several
H the Touch Tablet surface,
trol button,
lines fro m point
point of one line
draw
a straight line
screen
the stylus
to
a control button, then
a control button again.
Lets you
straight
draw a series
lines-touch
separate
points on
press
and
AtariArtist will
to
point, using the
as
the starting point
the tablet
second
for another.
as
you
brush
to
the
a con-
draw
a
of
end
RRYS
RAYS
[R]
Lets you draw a fan-like
burst of lines from any point on the
screen.
FILL
[F]
area-a
face
screen, for
Lets you
fill
in
the middle
instance-
an enclosed
of
with
your
a splash of
TV
color.
FRAME
tangle
[V]
Lets you
by
touching the stylus or
create
a rec-
pen
the Touch Tablet surface, then sliding
to
the stylus
site the starting position. The
banded"
on your
a point diagonally oppo-
"rubber
rectangle expands outward
TV
screen
as you move the
stylus away from the point of initial
contact.
BOX
[Xl
Like
draw a rectang
comes filled
wit
pattern you've
FRAME,
le , but the rectangle
se
this lets you
h whatever color or
lected.
to
9
Page 12

Unleashing AtariArtist Graphics
10
E.rR
s e
ScrEen
CIRCLE
you
touchi
Touch T
stylus
"rubber
into a
draw.
DISC
draw
filled with
you've
ERASE [E] L
your electronic canvas.
Page
[0]
L
crea
ng
to a second
circle
[0]
a circle, but the
12.
ets
te the
the
stylus or
ablet
surface, then slidi
band"
on your
Like CIRCL
whatever
selected.
ets
E
STORAGE
delete
sette. Also gi
pictur
mat a disk.
MAGNIFY
area
normal size, th
picture to the normal size.
[S]
pictures
es
on the disk
[Z]
around
L
ves
L
your stylus
en
you
draw
circle's
line
you
ets
on diskette
ets
rad
pen
point. You'll
expand
TV
screen
E,
this l
circle
color or
erase-or
See details on
you save, load,
you an i
returns
and lets
you
enlarge
to
ndex
the enl
a circl
ius
by
to
the
ng
see
outward
ets
comes
pattern
clear-
or
cas-
of the
you for -
the
eight ti
e-
the
the
as
you
you
or
mes
arged
Color
"enLi
MIRROR
dupli
your TV
reflecting-your
Tou
COLOR MENU
from
capability
add
c
BRUSHES
and
brush
drawing-i.e.,
etc.
HELP
instructions.
SOLID
from four solid colors.
PATTERNS L
pattern
[M]
cate-b
ut-
screen
ch
Tablet
128
colors
to
rainbows
Lets you paint
size of
the
styles
-features.
Provides a quick
COLORS
from those shown.
Lets you
oppos
as
change bri
to
brushes
work
RAY,
ets
crea
ing i
by
movements on the
you
[C]
and
your
[0-3]
you select
mages
mirroring- or
draw
Lets you
gives you the
ghtness
drawings.
in
shown.
with any of the line-
DRAW, K-LINE,
set
Lets you choose
te
on
.
select
or
the variety
All
of
drawing
any
col
or
the
Page 13

After
RA
"rubber
screen
Tablet, This allows you to see what
look
don't
can cancel
and
choosing another feature
keyboard,
you've selected a starting
YS,
LINES, FRAMES,
band"
as
like
after
If,
want the
pushing
Jines
you move
before
your
selecting a
Jine,
it
by
Jifting the stylus
any
your
box, circle,
of
the three control buttons
BOXES,
follow
your
stylus
actually "lay
starting
point, you
by
typing a key
CIRCLES,
cursor on the
around
etc"
off
RAYS
Touch your stylus
control button
button
and
surface
to
slide your stylus
to
create a "rubber
control button again
tablet surface,
c
reated
ray
lines
the
brush
Release
the
effect you want. The actual
is
determined
size you've
to
select
a starting point.
and
the
by
selected
the
tablet
across
band"
swing the stylus
button when
your
drawing
,
FILL
The
cursor
dlsplaymg
area
and
filled must adjoin
horizontall
FILL
over
y,
indicates
beneath
the
color to
the
whe
n you
it.
Put
the
be
changed, Pixe
starting pixel either
point
to
draw
or
DISCS,
the Touch
your
it
in, "
to
start there, you
the Touch Tablet
surface
TV
drawing
decide
or
on the
and
Release
the Touch Tablet
ray, then
press
across
you've
spacing
speed
are
in
"FILL"
cursor
inside
ls to
vertica
will
you
by
press
the
a
the
of the
and
by
the
be
lly
or
Adclitionallnformation on the Features
After
the
starting pixel
the
joining pixel of
ting point. The
horizontally adjoining pixels
a
ored
differently than the original pixel remain un-
same
process
changed,
A solid color
color but,
FILL,
ing a
a pattern, which
pixels,
Conversely, a pattern
because
FILL
can't
is
can
diagonal pixels
comprised
a solid color,
FILL
The
will not
solid line that is a different color than the original pixel.
but
even
When a leak
12
occurs, you
a control button on
damage
a one-pixel hole
such
as
can
caused
by
stop
the
a leak, first
has
been
colors
altered, an ad-
becomes
continues until all vertically or
are
changed
be
used
to
fill
over
are
be
used
to
fill
a solid col
of alternately
can
be
used
spread,
the
or "le
ak," through a
in
a line will
one
shown at the top of
the
FILL
process
stylus or tablet.
select
the
new
, Pixels co
another solid
not
altered
or
colored
to
FILL
allow a
by
pressing
To
repair
the
necessary
star-
l-
dur-
over
over
leak
page
the
,
11
Page 14

Additional Information on the Features
brush
stroke
and
ed
area
and
pamt
It
m.
ne
w color again.
other
appropriate
Then,
Remember
function
. A line of a single color
lme consists of vertically
the color of the pixels
els
of the
same
border
a
color. This lets you
around you picture.
FRAME
Touch the stylus
starting point
cursor
band" lines
draw
on the Touch Tablet surface. The
mark
on the tablet surface. This is
to
and
the
push a control button, then
out
the
when enclosmg an object
desired
tangle
space.
in.
Press
a control button to
FILL
to
select
before
can
be
or
horizontally adjoining pix-
tablet
proposed
or
fitting a frame into a
in
the
the
area
DRAW
with
or
fixing the h ole.
filled
as
long
change
surface
to
the
select
slide
"rubber
rectangle
especially
helpful
"lay"
damag-
the
some
as
color of
as
you
the
the
a
the
rec-
BOX
AND
DISC
has
Brush style
FILL,
Unlike
to
fill
a solid color
helpful for
erasing
color within a
perimeters
choose
then
ERASE
the
enclose
of
background
This feature
Make
sure
erased
See
part of a
STORAGE
To
.
dIsk drIve
turned
gram
To
cassette,
choose
keyboard.
you've
.
BOX
screen.
store
your
must
on.
ThIS
Recorder.
store
and
use
Storage
This
Although
on
the
mam menu, they work in this function only after
you've
selected
no effect on a
you
can
use
over
areas
box
or
figure
area
disc
to
the
the
erases
SAVED
AND DISC ,
pictures to an
be
turned
IS
not
true
See
page
retrieve
your
stylus
or
press
produces
some
of
the
Storage on
the
a pattern.
of
covers
drawn. to
color
be
the entire electronic canvas.
above
on
for
18
your
and
S on
the
letters in this
box
BOX
or
and
DISC features
These
the
screen,
everything within
erase
as
your
, for
current
with a
you
the
erased
everything
ATARI
before
storage
for
full
your
to
details.
pictures
a control button
your
computer
storage
menu.
menu
the main menu.
disc drawn.
features
because
an
area
are
the
,
color,
box
or disc.
don't
want
way
to
erase
Disk Drive,
computer
the Atari Pro-
on
diskette
to
appear
All
of
the
the
the
is
or
12
Page 15

The Storage Menu
Storage functions
Touch Tablet
function you want
tons. You
select
propriate
can
the Storage function you want
key
The simplest
lyon
diskette is to
can
surface
and
also
use
.
way
use
be
called
by
moving the
up directly from the
cursor
to
the
pushing any of the control but-
your
computer
to
load
the stylus
a picture
to
by
place
keyboard
to
typing the ap-
saved
previous-
the
cursor
on
I)
Index
buttons (or
use
the stylus
type
to
I on your
move the
the picture you want
Disk Pictures
picture w
your
TV
ill
load
screen.
and
and
press
computer
cursor
and
press
a control button. The
automatically
any of the control
keyboard). Then
over the filename of
be
displ
MAGNIFY
Since MAGNIFY works with all of the AtariArtist
features, it's ideal
corrections, particularly
picture.
square
When
of color
drawing. After selecting MAGNIFY, you
your picture pixel
the pixel you wa
for
doing detail
erasing
the picture
represents
by
pixel
nt
to
change
ed
work
or
small areas, in your
is
magnified,
each
a pixel on a normal-sized
can
by
placing the cursor over
and
pressing
button.
When
using
FILL
returns
to
during
its normal state until
magnification, the picture
FILL
is
completed, then
is magnified again.
ayed
on
making
small
alter
a control
13
Page 16

14
Additionallnfonnation on the Features
You
can
magnified
and
sliding
magnified picture from left
the stylus at the right
slide
it
pull the picture
position you want.
MIRROR
Use this feature
shapes-a
duplicate images horizontally, vertically, diagonally,
in
all four directions
option from the menu that
Mirror.
For
windows side-by-side
the
stylus
MIRROR (or
main menu. Then
ror
menu
vas. Touch the stylus
control button
screen.
surface,
banded"
right, however,
each
other.
mirrored
the
To
move your
by
placing
it
along the
left. Repeat this touch-and-slide
example, to
Slide the stylus
and
cancel
across
frame, box, or
and
a control button
type V and
to
move from
to
you'll
boxes. Moving
creates
Press
"windows."
a Mirror selection after you've
picture
the
tablet
edge
your
when
by
selecting
draw
and
M on your
select
A)
the
to
the
see
four identical dots on
up
see
four identical sets of
the
mirrored
a control button again
on
stylus on
to
of
you want
whatever.
appears
what looks like a
above
ALL
menu
table
and
the
the
surface.
right, for
the
tablet
screen
until you
to
the
when
each
to
select
keyboard)
(4
Way) from
to the electronic can-
surface,
to
the
stylus down
boxes
screen
Touch Tablet
To
move a
example,
surface
manuever
reach
create
You
appropriate
left on
identical
can
create
you
select
set
other, first
FRAME
the
then
your
the
"rubber
and
to
overlapping
to
crystalize
moved
while it's
place
and
to
of four
use
and
from
Mir-
press
TV
tablet
the
the
or
the
to
The Mirror Menu
a
the canvas,
keyboard), then
computer
HELP
The
drawing
select
sor
over
press
key
on
keyboard.
Help
as
the
Help
the
the
lIm
your
return
to
type
box
provides
soon
as
menu,
HELP
key
keyboard
the
Mirror
N (for
No
you turn on
box
(if
instructions that'll
use
your stylus to
and
press
your
computer
to
call
menu
(type M on
Reflection) on your
your
computer.
has
Help
place
one) or
screen.
a control button, or
up
the
have
To
the
your
you
cur-
[?]
Page 17

COLOR
MENU
The Color
brightness
and
color of
changing
To
,
first call
or
position
your
When
reg
ister you want
keyboard
the
appropriate
co
ntrol button,
The
Level
12
splash
change
up
TV
screen
the Color
colors of
of
guides
pre-arranged
the
or
pre-designed
and
bnghtness
uides
g
from
arrows
and
the
Color
the
of Level
eight
compasses
register
at the right of
one
color
beside
down
and
vertical
or
Level
default
You
4,
can
color
Color
brightnesses
two
or
pattern-use
Menu
your
lets you
TV
to
produce
of rainbow
the
the
color of any of the color registers,
Color
cursor
and
press
Menu
by
by
typing
using the stylus
horizontal color
the
four color
patterns
levels
the
register
the
Color
that
bars
the
change,
you're
in
color
g,
select
any
(0
to
bars)
to
display-you
change
128
patterns, or
to
Menu
(type C on your
over
the
one
appears,
0,
are
determined
in
the
vertical Color
the color
can
colors,
add
use
or
the
change
Color
the
a constantly
your drawings,
keyboard
Color Menu
box
on
of the control buttons),
select
the
and
color
your
the
pressing
and
by
the color
and
cursor
the
Level
1.
2,
or 3 on
to
place
box
registers
Color Menu, As you switch
to another, you'll note that the
and
Level guid
colors
and
These
currently
register
of
16
colors
15,
since
change
the
stylus
arrows indicate
using, For
each
the
es
brightness
move
within
example,
3 is a
blue
made
(0
through
brightness
color of a color
to
position
the
the
15)
a
12
up
up
and
en-
cur-
on
sor
next
guide,
move
an
guide,
as
in
the
After you
register
draw-plus
you
register
to
the
then
number
press
arrow
changes
solid colors
change
and
move
-will
be
Color Menu
The
you want in the Color or Level
a control button,
to
change
also
to
color
occur
in the other guide
and
color patterns,
the
color
your electronic canvas, anything
anything previously
in
the
new
Whenever
or
brightness
or
brightness of a color
drawn
color,
in
you
in
as
that
one
well
15
Page 18

Additional Infonnation on the Features
The
12
the
of
allow you
Color
terns
can
If,
appears
currently
background
Also
features
in
your pictures.
after
move
you'll
Adding
R)
of color to
in sections of your
color
To
ple,
register
keyboard
tronic
face
Draw a box
pre-designed col
TV
screen
to
change
and Level
for u
se
do
you've
to
select
register
use
canvas
and
in a
that only from
when
using a
on
the
screen,
using is not
you're
included
that
enhance
selected
the
Color Menu
RAYS,
a Rainbow to Your
Rainbow Color le ts you
your
pictures. T
create a rainbow
you're currently
the
stylus
2 and B
OX
) from the main
by
pressing
filled with the col
are
their col
guides
drawi
feature
attempting to
in
the
Remember,
not Rainbow
drawings
and a co
(or ty
lifting
a control button
or
included
the
the
the Color
or
. But you
ng from
main menu.
on
make
certain
same
Color
your
ability to control
these
and
type
Pictures
add
he
rainbow will
that
enclosed
ntrol button to
pe
2 and X on yo
men
u ,
the
stylus from
or
patterns
in
the
Color
or
brightness
can't
the Col
your
picture, nothi
the
color
as
draw
Menu
are
features
Menu-if
R,
for
(see
below).
a p ulsati
were
using.
in a box, for
then
move
or
the
from
register 2 by
at
the
bottom
Menu
select
the
using
the
you're
screen
other
the
work
ng
rainbow
appear
in
exam
ur
to t
he elec-
tablet
pat-
color
the
sur-
bar.
or Menu-yo
color
the
onto.
four
you forget to
example
drawn
select col
space
ng
,
to
the
u
only
only
-
or
tou
chi
ng
the
stylus to the
control b utton,
(you'
ll
see
and
pressing
pand
with color.
Now, call up
type
C on
ture
to
ll
pulse
D)
ist
your
Level
10
If you
the
Gift
bar),
over
Default
ers
changed
or
and
for
like
menu
space
cursor
b utton . U
Rainbow Color (or
automatically
wi
Returning
reg
you've
Use
Colors
and
tions- O
and
Restoring a Previous
don't
then
the
"rubber
a control button
the
your
keyboard
Color Menu,
the
stylus
then
select
the Col
se
the
styl
type
move
with a
rapidly
the
Color
Colors
to
their
original-or
the Color
stylus
and
type
D on
arrows
register 2,
change a Color
the
0 for
res
to their
register
ults of a
tablet
sli
ding
band"
Col
or
but
and
press
the
or
Menu box
us
and
R on
to your picture.
changing
Registers
lets you
a control button to
your
and 9
Color
surface
the
stylus to a
lines foll
aga
in to
Men
u- i
to
go
directly
you
can
a control button
Color
Menu
and pushing
a control button to
your
keyboard)
array
to
Their
return
defa u
and Level guide settings.
keyboard
respective
0, 2 and
and
4 for
or Level guide
change,
you can
and
second
ow
see
t's
easiest
from
return
by
The
box
of colors.
Original
all of
lt-color
select
to
return
default
8 for
register
register
acciden
pressing
your
stylus)
the
box ex-
to si
the
to
the
or
moving
a control
select
to
you
Color
the
color
after
Default
the
posi-
3.
return
point
mply
pic-
main
the
the
drew
Color
1,
12
tly
or
to
the
a
16
Page 19

previous color
your stylus
your keyboard). This automatically return the Color
and
Level arrows
returns the color register
Making On-Canvas Color and Level Changes
A)
Adjust Colors on Picture lets you
to
change
returning
make a change. Use the stylus
select Adjust colors on Picture (or type A on your
keyboard). This automatically moves you
picture.
Use the stylus
you want
or any part of your pictur
ton. When you slide the stylus across the Touch Tablet
surface , the color you
or
and
ing the stylus horizontally
the stylus left
guide
changes
stylus up from the bottom of the
in
control button
cedure
drawing.
brightness
arow from
g the Level
When
to
by
selecting Restore Last Color with
and
a control button (or
to
their previous positions
to
its previous color .
the Color
to
the Color Menu
to
change-it
the Level (brightness)
your picture is the color you wan
change
and
Level
to
place
the cursor over the color
can
be
e-then
selected
to
another on your
to
right simulates moving the Color
15
guide
to
lock the color
any of the other colors
changes
to
O-while moving
from 0
to 15.
by
in
your picture without
each
time you want
and
a control button
the
background
press
will
shift from one col-
TV
the
guide-moving
screen
in.
Repeat this pro-
typing L on
and
use
the stylus
to
to
your
a control but-
Color-moving
it
simulates mov-
color
screen.
vertically
the
t,
press
in
your
Mov-
a
to
When making corrections, additions, or erasing,
it's important
rather than erasing them.
Color Menu
background. Then return
cursor over the pixel you want
and push a control button
remember
to
select the color
that you're replacing pixels
To
"erase" a pixel, use the
of
to
your picture's
your picture, place the
to
to
change
replace the original color
(i.e
with the background color.
BRUSHES
The
brush
sizes you
choose one,
choice
discover that
and
of drawing.
each
from the main menu,
to
your drawing. Simply choose the
the size or sh
go
color. Then use the
returning them
and
each will
brush
draw
You
to
the Color Menu
menu displays the brush shapes
can
use
in
place
press
An interesting way
stroke is
free-hand on the screen.
can
use the
ape
drawing your creations.
the cursor over the brush of your
any control button. You'll soon
each
brush has
be
especially useful
to
and
brushes
of the
and
brush
to
the original background color.
its
own characteristics,
select MAGNIFY and
area
to
then use
to
erase
you want
select the background
to
paint over the
in
particular types
see
the effects of
each
brush stroke
small
brush
style closest
to
erase, then
., erase),
and
To
DRAW
areas
pixels-
of
to
17
Page 20

18
Saving /Loading a Picture
DISK
DRIVE
Turn on your disk
In
puter on.
puter
Operating
AUTORUN.SYS file) into
computer.
use
the
type
(or
select
follow the instructions on
If
type
response
If
your system has two
ve
dri
press
you want
type D2:
your computer.
To
diskette,
and
menu, then
menu
Use the stylus
you want, then
ture automatically into
pick
change
sert
and
a formatted
System
When
stylus
and
S with your
S)
Save Picture on
your system has just
just
the
filename, followed
to
the
number
mg
retrieve
a control button, sele
(or
up
and
. For
is
on a diskette in disk
DRA
W,
follo
w the
I)
Index Disk Pictures from the
type
S,
to
press
whe
re
colors, etc.
you left
drive
the AtariArtist
(DOS)
you're
a control button
keyboard)
"Enter DEVICE:FILENAME" prompt.
a colon,
examp
then
a previously
above
then I on your
place
a control button to load
before
diskette
disk
press
the
your
off-add a burst
cartridge
containing Disk
files (but without an
your
drive, then turn on
ready
to
on
the
secondary
the
screen.
one
disk
by
drives
then
le,
if
the picture DRAW that
mg
stored
steps, then, using
ct Storage from
computer
cursor
computer. You
you turn your
into
save
your picture,
to
select
the
main
menu
drive
, you
a
mg
, you must
the
filename
drive
No.2,
to
load
picture from
the
over
the filen
of color,
com
your
com-
your
Storage
menu, and
, then
can
,
in
type
0,
and
you must
DRAW into
the
stylus
main
secondary
keyboard).
ame
the
pic-
can
now
PROGRAM
-
a
When
bl
ank
tape
and
a control button to sel
menu, then
type
follow the instructions on the
puter
on, then
simultaneously
recorder,
cassette
heard
be
stored
To
the picture you want is
rewind
than
vance
recorder's
Use the stylus
Storage
from the
computer
mg
PLA Y on the
The picture l
filling
where
RECORDER
you're
cassette
counter reset
S,
then S on
keyboard
through
retrieve
the
one
the
.
When
the screen
you left
tape
S)
Save
type
recorder
picture
from
secondary
to
mg
press
then
press
your
on
the
a picture, insert
tape
to
tape
to
tape
counter.
the
keyboard).
the
recorder,
oads
off.
ready
to
save
your
into
the
button
Picture on
your
type
.
will start running, a tone will
TV
tape.
its beginning.
on a
the
and
main menu, then
menu
computer sounds
automatically into your computer,
as
it
recorder
to
set
ect
Storage on
computer
screen.
the letter C followed
When
the
RECORD
mg
on
speaker,
the
first
cassette
correct
Type C
loads. You
number
a control button
(or
type
and
then
mg
picture, insert a
and
it
to
the
secondary
keyboard), then
computer
and
the
and
the
one
If
you
tape,
L)
S,
a colon,
can
press
000.
Use
the
Use
your
beeps
PLAY
computer. The
on the computer.
on
your picture will
proper
on that cassette,
have
be
sure
on
your
to
select
Load Picture
then L on your
then
one
beep,
now
pick
the
main
menu
com-
by
the
cassette.
more
to
ad-
press
up
the
stylus
(or
a col-
twice,
be
If
press
Page 21

Creating a Sample Drawing
Creating
ATARI
easy-just
tions
to
page.
Don't
slightly different than
it
virtually impossible to duplicate
of
the
mountains,
the
cloud
black
not
After
periment-add
color of the mountains, put
(triangles
Then, just for
d iskette
ture
and
the mountain side, for
Use
almost unlimited artistic
at yo ur disposal. , ,
NOTE:
its original (i.e.
e
nsure
and a control button
s
elect
control button or your
return
surface
a colorful
Touch Tablet
follow
draw
the
be
concerned
streaks. And your picture will
and
white.
you've
a rainbow,
are
perfect)
or
cassette, if
add
something
your
imagination,
Make
you're
D)
to the main
and
default) colors
using
Default Colors with either the stylus
press
and
attractive
and
these
sample
placement
finished,
practice, sa
sure
menu
AtariArtist
step-by-step illustrated instruc-
picture shown at right on this
if
your final
the
sample
of
don
't
if
you like, or
trees
or
birds
ve the pIcture
you
have
else-a
example.
and
you '
resources
your
AtariArtist
the
to
computer
a control button
before
right colors,
select
the Color Menu, then
(lift
the
picture
program
artwork
drawing
exactly
the
sun,
be
afraid
in
the
in
the sky.
one. Reload
stream
ll
soon
that AtanArtlst
you begin.
use
keyboard.
stylus from the tablet
or
the
with your
really
looks
. You'll find
the
outline
and
length of
be
in color,
to
ex-
change
foreground
flowing down
program
your
space
the
to
a .
the
PIC-
discover
IS
To
stylus
and
Then
bar).
IS
the
puts
m
a
1. Use the st ylus
box
, then
2. Use
the
the
regular
brush
the
3.
Lift
the stylus from the tablet surface, then
control button or the
"electronic
4. Select a spot on
the
ing
stylus on that spot
Move the stylus
see
the stylus
button. Then, without lifting
"valley
control 'button
outline of the entire mountain range.
outline of
the
to
press
stylus
and
cursor
stroke next
canvas."
"rubber
across
" then
to
as
pla
ce
the
a control button
a control button
(the crosshairs-shaped one) or
the
tablet
the
and
to
form
band
the tablet)
another
necessary
cursor
to
it
on
the
space
bar
surface
mountains, then
press
a control button.
one
mountain
" line stretch as you sllde
and
the
peak, etc
until you 've
over the
to
highlight
to
brush-stroke lme
to
move
to
press
stylus, move
.,
K-LINE
select
press
to
your
begin
dra
place
the
peak
a control
pressing
drawn
K-LINE
either
(you'll
It
w-
to
the
the
.
a
a
19
Page 22

Creating a Sample Drawing
20
5. Return
tablet
space
to
your
6. Select
button
to
surface
bar)
select
computer
FILL
or
the
main
and
color
(use either
type F on
the electronic canvas
surface
7. Use
tains
a
the
and
deep
and
stylus
press
blue
press
color (the
you watch),
menu
(lift
and
press
use
the
register
keyboard
your
(lift
a control button or
to
place
the stylus from
a control button or
stylus
and
3 (you
to
the
stylus
a control button
can
also type 3 on
select
color
and
a control
keyboard), then return to
the
stylus from the tablet
the
the
cursor
inside the moun-
a control button to turn the
fill
process
takes
the
the
register
space
peaks
place
as
3),
bar),
8. Go
back
to
or
the
first
select
use
either
Q, then
the
space
DISC, then color
the
Ion
tions),
9. Return
the
sun
to
in
the
the
stylus on that point
then slide
outline a
(you'll
as
you draw),
fill
the
the
circle
see
the
circle
main
menu
(press
bar
with the stylus off the tablet)
a control button
register
stylus
and
your
canvas
sky
stylus
about
"rubber
Press
in with
a control button or
keyboard
and
above
and
across
to
select a center
the mountains,
press
a control button,
the
two
inches
band"
lines form a
a control button
orange,
make
tablet
in
1 (you
can
these
selec-
point for
Place
surface
diameter
circle
to
automatically
and
type
the
to
Page 23

10.
Without
returning
register 2 and
sion on your
ll.
Begin
stylus on the
pears
computer
drawing
tablet
just
above
button, then slide
When
you've
you want,
you move
zag line
each
press
the
rather
cloud
line you want
lines parallel, to finish
You
can
add
now
trees,
birds, a stream, or
to
the main menu,
L-LINE
by
first 2
and
keyboard.
the
cloud
lines
by
surface
placing
so that the
a mountain peak.
the
stylus
up
drawn
a straight line of
a control button
and
to
stylus off-center, you'll
than a straight one).
to
draw,
the
drawing
save
the
picture
to
cassette
erase
select
L in
succes-
cursor
Press
a control
to
the
the
length
"lay
it in"
draw
Repeat
keeping
.
it
and
color
the
ap-
right.
(if
a zigthis for
the
or diskette,
start over.
Every
ensure the
documentation in this manual.
However
stantly
compu
Atari, Inc. is unable
the
after
disclaims
errors
ment
is
perm
CA
Dompier
©
Graphics
effort has been
accur
, because we
improving
ter software and
accuracy
the
date
liability
or
omissions.
No
reproduction
or
any portion
allowed
without specific
ission
94086.
AtariArtist
and Robert
1983
Atari,
Corp.
acy
of
printed
of
publication and
of
Atari,
written
Inc
. and I sland
All
made
of
the
are
con-
and
updating
hardware,
to
guarantee
material
for changes,
of
this docu-
of
its contents
written
Inc
., Sunnyvale
by
Steven
Leyland
rights
reserved.
to
product
our
.
21
Page 24

 Loading...