

INSTRUCTION
MANUAL
MODEL NO: AR3220
AtGames Digital Media, Inc. www.atgames.net

1
IMPORTANT: READ BEFORE USE
In very rare circumstances, some people may experience epileptic seizures when viewing
flashing lights or patterns in our everyday life. Flashing lights and patterns are also common
to almost any video game. Please consult your physician before playing ANY video game
if you have had an epileptic condition or seizure OR if you experience any of the following
while playing - Altered vision, eye or muscle twitching, mental confusion or disorientation,
loss of awareness of the surroundings or involuntary movements.
It is advised to take a 20-minute rest after 1 hour of continuous play.
Classic Game Console Appearance and Key List
The image below shows the location of the connectors and buttons. Each
function is outlined below (the illustration is for reference only).
Power
Turn the game console’s power
ON/OFF.
START (Original RESET Button)
Press this button to begin or
reset most games.
Difficulty Button - Left Player
Press this button to switch
between one of two difficulty
levels in most games.
Difficulty Button - Right Player
Press this button to switch
between one of two difficulty
levels in most games.
SELECT
Select game option.
1
2
3
4
6
5
7
8
9
598
2
4
1
3
6
7
Left Player Game Controller Jack
Game controller connected to this
jack controls games in 1-player
games and controls the first player
in 2-player games. Note that some
2-player games alternate use of the
left player.
Right Player Game Controller Jack
Game controller connected to this
jack controls the second player in
2-player games.
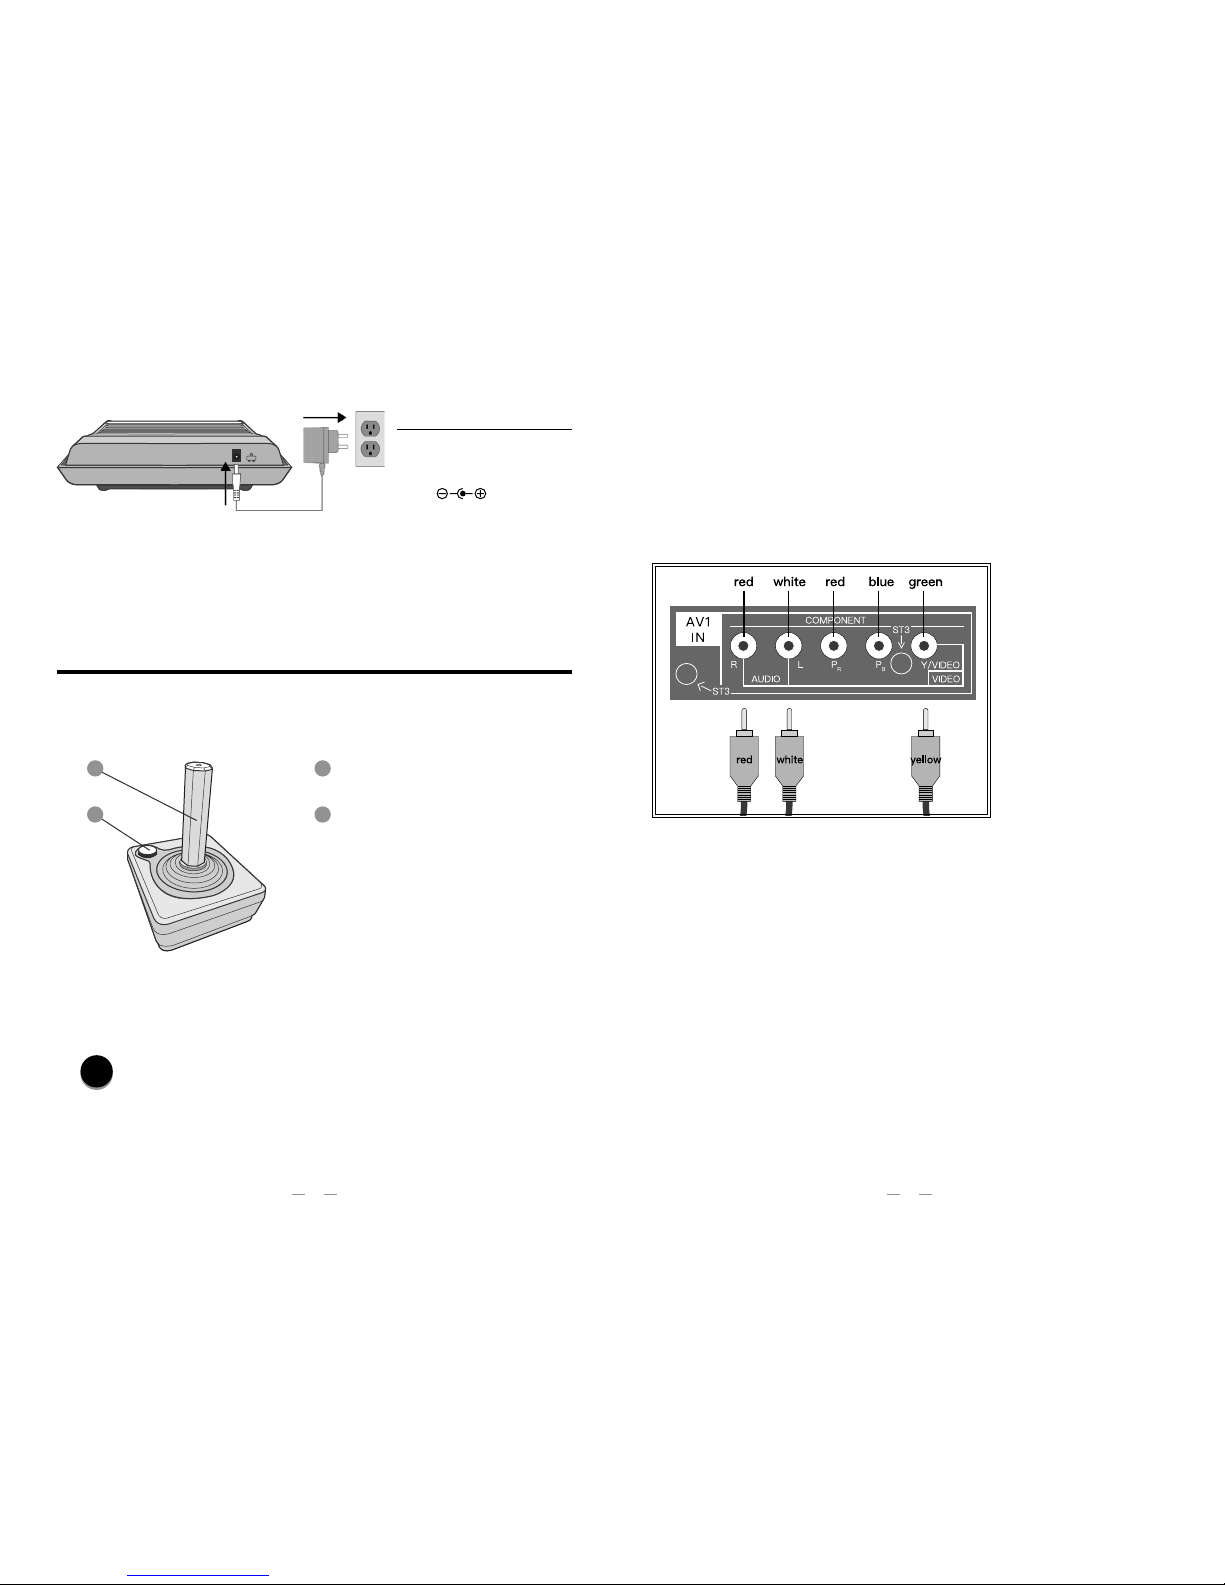
AC Adaptor Jack (DC 5V)
The power adaptor plugs into this
port, then into your AC outlet.
AV Cable
Audio and video output.
3
2
Input Instruction
If your TV does not have a dedicated composite input, it may support such a
connection through a shared component input. For TVs with shared compo nent
inputs, the diagram below indicates a typical setup, with the yellow composite
video connector plugging into the green component video input. Refer to your
TV's manual for additional information on available ports and how to change
inputs once connected.
What can I do if my TV can only support HDMI input?
Check out AtGames Flashback Zone for products that support HDMI
http://atgames.us/.
What are the two controller ports on the console for?
These ports are for the included wired joysticks and optional paddle controllers.
These ports are also compatible with original Atari 2600 wired joysticks and
paddle controllers.
How to connect wired controllers?
For 1 player games: Connect a wired controller to the left controller port.
For 2 player games: Connect a second wired controller to the right controller
port for player two.
Wired Game Controller Appearance and Key List
The image below shows the appearance and key list of the wired game
controllers (the illustration is for reference only).
Joystick
Push joystick to move.
BUTTON
Press button for most in-game
actions.
How to connect the console to a TV?
1. Connect the game console to TV using the enclosed AV cable.
2. Press the power button on the game console after configuring the TV
input to AV or Composite input.
NOTE
Display results will vary by TV. Consult your TV's manual to adjust Brightness, Sharpness,
Contrast, Aspect Ratio, and other features for best display results.
Do not unplug AV cable when console is on. Otherwise, please press POWER button to
restart the console.
AC Adapter Specification
INPUT: 100V-240V
AC/50HZ-60HZ
OUTPUT: 5V DC/500mA
PLUG:
1
2
1
2
POWER
NOTE
• Must use the AC adapter included as power supply to the console.
• Do not connect the AC adapter to the power input other than the above specifications.
• AC adapter is not a toy.
• The socket-outlet shall be installed near the equipment and shall be easily accessible.
5
4
This device complies with Part 15 of the FCC Rules. Operation is subject to the following
two conditions: (1) this device may not cause harmful interference, and (2) this device must
accept any interference received, including interference that may cause undesired operation.
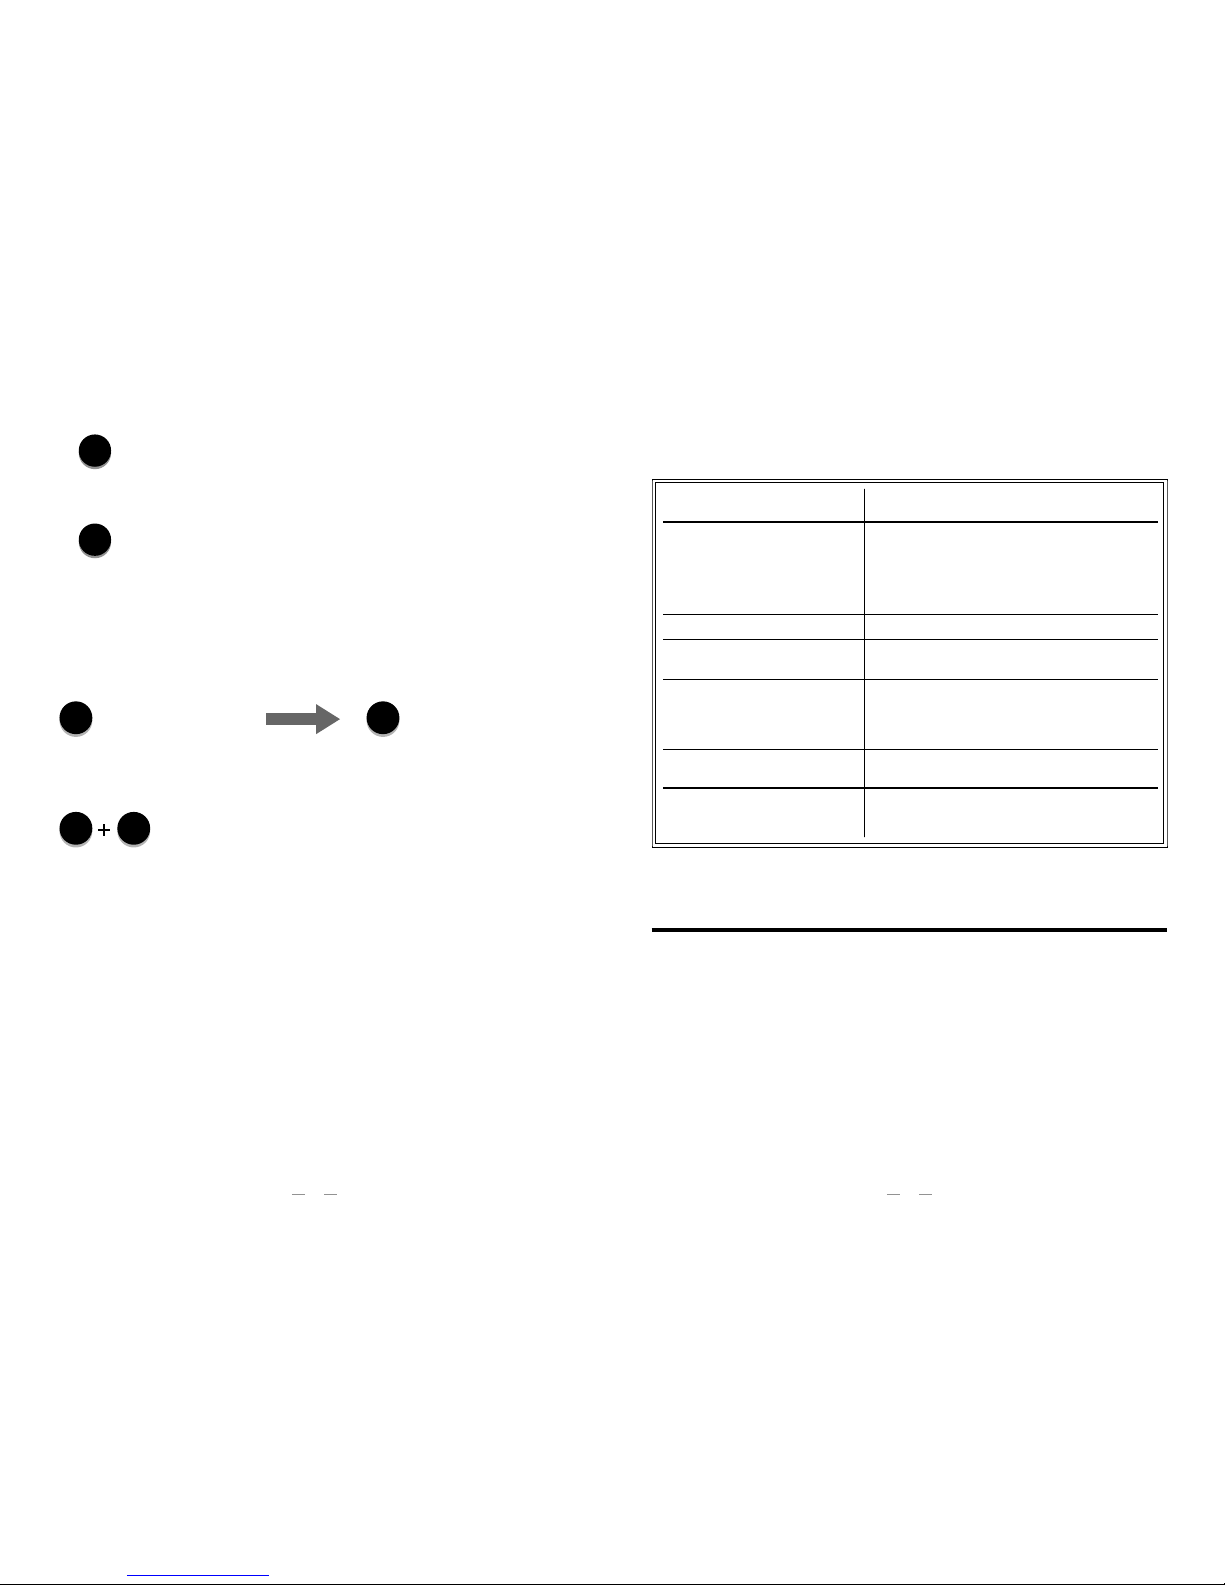
PROBLEM SOLUTION
No picture on the screen
Connect the AC adapter.
Connect the A/V cable.
Turn the console unit On.
Turn the TV On.
Set the TV to AV input.
Screen flickers or no color Adjust TV color controls.
No game sound
Increase or turn on the TV volume.
Connect the AV cable.
Picture on TV screen is unsteady
Adjust the vertical and horizontal hold
controls on your TV until the picture
becomes steady.
Connect the AV cable.
Picture is blinking or distorted
Power Off the console and then power On the
console.
Picture background color varies at
the beginning or end of the game.
This is normal.
Press START to enter or restart the game.
How do I start playing?
1. Press the button to turn on the game console.
2. Use the player 1 (P1) controller that is connected to the port to browse menu
and select game. Move the joystick of P1 controller left and right to navigate
the menu pages, and move up and down to highlight games on each page.
3. Press the button on the controller to select the highlighted game.
How do I play the 3- and 4-player games?
The 3- and 4-player games are designed for paddle controllers. Please plug
your paddle controllers into each controller port on the game console.
How do I adjust the game level?
How do I go back to game menu while playing the game?
Press the START button and SELECT button on the console
simultaneously, and the screen will go back to the game menu.
What do I do when the controller is not working?
If you only have a controller plugged into the P2 socket, turn off your console and
connect the controller to the P1 (left) controller port. Then, turn on the console
and try it again.
You might notice slight delay with joystick controller in games which are designed
for paddle controllers. Please plug your paddle controllers into each controller
port on the game console. (Purchase additional accessories at www.atgames.us)
What do I do when the power supply is not working?
You might be using the wrong AC adapter. Please use the one included in the
package, which is rated for 5V/500mA.
How do I play with wireless controllers?
IR-based controllers from previous AtGames' consoles are not supported.
STAR TSELECT
SELECT
STAR T
Press the button on
the game console.
POWER
FIRE
• Do not submerge the game console in water or expose it to extreme heat or to strong
magnetic fields. Doing so may cause permanent damage to your game player.
• Always use dry towel to clean the game console and controllers.
• Transformers suitable for indoor use only. Transformers and power supplies for toys
are not intended to be used as toys, and the use of these products by children shall be
under the full supervision of parents.
Warning
Changes or modifications not expressly approved by the party responsible for compliance
could void the user’s authority to operate the equipment.
Safety Notice
Press the button to
begin the selected level
in most games.

7
6
Game title: 3-D Tic-Tac-Toe
MENU TITLE: 3-D TIC-TAC-TOE
Place four X’s or four O’s in one horizontal, vertical, or diagonal row, or through
all the panes. Play against an opponent or against the computer. To win,
complete a row first.
Game title: Adventure
MENU TITLE: ADVENTURE
Rescue the Enchanted Chalice stolen by an evil magician and return it to the
Golden Castle without getting eaten by evil dragons.
Game title: Adventure II
MENU TITLE: ADVENTURE II
In this remixed sequel, once again rescue the Enchanted Chalice stolen by an
evil magician and place it inside the Golden Castle.
Game title: Air Raiders
MENU TITLE: AIR RAIDERS
As the pilot of your bomber, your mission is to blast the enemy out of the sky. But
be sure to keep track of your fuel and ammo, you may have to land to refuel.
Game title: Air•Sea Battle
MENU TITLE: AIR. SEA BATTLE
The object of this game is to score points by hitting moving objects. Air-Sea
Battle is made of six different shooting games that total 27 game variations.
Game title: Aquaventure
MENU TITLE: AQUAVENTURE
Discover what the ocean depths hide as you dive to retrieve the hidden
treasure. Along the way you must avoid fish, sea horses, and other underwater
creatures attempting to block your path.
Game title: Armor Ambush
MENU TITLE: ARMOR AMBUSH
Battlefield action with maneuverable tanks! A new battlefield every round!
Game Description
NOTE
This equipment has been tested and found to comply with the limits for a Class
B digital device, pursuant to Part 15 of the FCC Rules. These limits are designed
to provide reasonable protection against harmful interference in a residential
installation. This equipment generates, uses and can radiate radio frequency
energy and, if not installed and used in accordance with the instructions, may
cause harmful interference to radio communications. However, there is no
guarantee that interference will not occur in a particular installation. If this
equipment does cause harmful interference to radio or television reception,
which can be determined by turning the equipment off and on, the user is
encouraged to try to correct the interference by one or more of the following
measures:
• Reorient or relocate the receiving antenna.
• Increase the separation between the equipment and receiver.
• Connect the equipment into an outlet on a circuit different from that to
which the receiver is connected.
• Consult the dealer or an experienced radio/TV technician for help
Repair and Exchange Service
If the unit is damaged due to its improper use or simply wear and tear, and if
the place where the product was originally purchased can't do an exchange of
this product, a standard repair and exchange program may help. Please visit
http://www.atgames.us/Repair_c2.htm for more details about the repair and
exchange program.
With certain TV models, e.g., Vizio VOJ320F1A, SONY KDL-32BX310, SONY KDL-32EX308,
SONY KDL-46HX729, SONY KDL-50R550A, LG 47LA6900, LG 55UB8500, Samsung
UN40C7000WF and Panasonic TC-58AX800U0, this console may be incompatible and
cause undesired effects, like display shifting, which results in the picture not being centered
on the screen. Or horizontal display noise, it might move up and down on the screen. If this
happens, try the console on a different display or return the console to the point of purchase.

9
8
Game title: Breakout®
MENU TITLE: BREAKOUT
A brick wall appears at the top of the screen, and your mission is to smash it off the
playfield, one brick at a time! Up to four players can compete at the same time.
Game title: Human Cannonball™
MENU TITLE: CANNONBALL
Carefully judge angle, speed, and distance to launch your human cannonball to
the target.
Game title: Canyon Bomber®
MENU TITLE: CANYON BOMBER
Fly over a canyon full of colored bricks. Drop bombs on more bricks than
your opponent.
Game title: Centipede®
MENU TITLE: CENTIPEDE
Aim your magic wand and shoot sparks to stop the slithering Centipede,
poisonous scorpion, mischievous spider, and pesky flea in their tracks!
Game title: Super Challenge Baseball
MENU TITLE: CHALL BASEBALL
Two players can capture the excitement of real baseball. Nine full innings of
baseball - with extra innings if you need them. Pitch curve balls, hit, run, steal
bases…even turn double and triple plays.
Game title: Super Challenge Football
MENU TITLE: CHALL FOOTBALL
Realistic gridiron action for two players! Choose your play option on both
offense and defense. The scoreboard keeps you posted on quarter, downs,
time remaining, and the score.
Game title: Championship Soccer
MENU TITLE: CHAMP SOCCER
Score more goals than your opponent in this fast-paced soccer game.
Game title: Asteroids®
MENU TITLE: ASTEROIDS
Destroy as many asteroids as you can to keep your ship safe. Watch out for
satellites and UFOs as well!
Game title: Astroblast
MENU TITLE: ASTROBLAST
The excitement of defending your planet! Falling meteors, missiles, and enemy
spacecraft all might knock out your position, but you have both automatic and
semi-automatic firing sequences to defend against the onslaught.
Game title: Atari Climber
MENU TITLE: ATARI CLIMBER
A home run ball has landed on top of the roof of a building and you’ll need to
get it back. On your way up, you’ll need to avoid moving obstacles. Hurry, as
time is of the essence!
Game title: Backgammon
MENU TITLE: BACKGAMMON
Backgammon has four skill levels and follows the full rules of the game. There
are also four variations of the game acey-deucey.
Game title: Basketball
MENU TITLE: BASKETBALL
Get ready for a fast-paced game of one-on-one basketball!
Game title: Black Jack
MENU TITLE: BLACK JACK
It’s real casino-style blackjack where you and up to two of your buddies can try
your luck against the computer dealer. The object of the game is to obtain a
hand of cards that adds up to total higher than the dealer does, without going
over 21. Up to three players can compete at the same time.
Game title: Bowling
MENU TITLE: BOWLING
It’s bowling fun for one or two players. Choose between curve ball, steerable
ball, and straight ball variations!

11
10
Game title: Demons to Diamonds™
MENU TITLE: DEMNS TO DIMNDS
Shoot demons whose color matches that of your gun. If successful, the demon
transforms into a diamond, which can then be shot for even more points. Take
care, because shooting a demon with the wrong color transforms it into a skull!
Game title: Desert Falcon
MENU TITLE: DESERT FALCON
You are the royal Desert Falcon on a quest for precious gems and Egyptian
hieroglyphics hidden in an endless desert. Watch out for the flying beasts,
blazing firepots, and Howling Sphinxes as they guard the jewels you seek.
Game title: Dodge ‘Em
MENU TITLE: DODGE 'EM
Steer your car at high speed around a maze to collect dots. Be sure to avoid the
other car!
Game title: Double Dunk™
MENU TITLE: DOUBLE DUNK
Score the most baskets in this sophisticated two-on-two, half-court
basketball game.
Game title: Swordquest: Earthworld™
MENU TITLE: EARTHWORLD
As you explore EarthWorld, you will traverse 12 rooms, each named after a sign
of the zodiac. You will encounter danger such as the horns of a charging Taurus
bull, and you will be called upon to demonstrate your skill and ingenuity. A
variety of magical objects will assist you in the challenging journey ahead. By
leaving the right combination of objects in the right zodiac chamber, you'll
discover illuminating clues.
Game title: Escape It!
MENU TITLE: ESCAPE IT!
Escape It! is a one or two player game where the object is to escape from the
ever changing maze.
Game title: Chase It!
MENU TITLE: CHASE IT!
Chase It! is a game of chasing the red squares that appear randomly on the
screen. It’s blue against black! The goal is to reach the squares before your
opponent. Whoever collects 99 squares first wins.
Game title: Circus Atari®
MENU TITLE: CIRCUS ATARI
Bounce clowns on a seesaw to pop all the balloons. Be sure to catch the clown
on his way down!
Game title: Combat®
MENU TITLE: COMBAT
Arm yourself against your opponent with tanks, planes, or fighter jets in diverse
stages in this two player game. Blast your opponent as many times as you can
for the highest score.
Game title: Combat® Two
MENU TITLE: COMBAT TWO
Battle against your opponent’s tank for control of an expansive terrain in this
two player game.
Game title: Crystal Castles®
MENU TITLE: CRYSTAL CASTLES
Help Bentley Bear collect gems throughout various castle levels to escape
Berthilda the Witch’s evil clutches. Avoid the enemies, except when you wear
the magic hat!
Game title: Dark Cavern
MENU TITLE: DARK CAVERN
Relentless robots are the attackers in the Dark Cavern. Eliminate one robot and it
is replaced by an even smarter one. People-sized spiders, spider webs, and bats
also spell trouble. Use your laser gun to destroy the attackers and score points.

13
12
Game title: Frogs and Flies
MENU TITLE: FROGS & FLIES
An exciting and fun-filled fantasy for the younger set. Frogs and Flies gives you
complete control over jumping frog and scoring action as you try to catch the
elusive flies!
Game title: Front Line™
©TAITO CORP.1982
MENU TITLE: FRONT LINE
Single-handedly take on the bad guys and knock out their fortress with your
soldier. Start out on foot, but find the tanks and create even more mayhem.
Game title: Fun with Numbers
MENU TITLE: FUN WITH NUMBERS
Complete the equation by selecting the correct number. Pick between addition,
subtraction, multiplication, and division.
Game title: Golf
MENU TITLE: GOLF
It’s nine holes of golf, where you control the direction and the power of your
shot. Watch out for the hazards!
Game title: Gravitar®
MENU TITLE: GRAVITAR
The evil Gravitar has conquered four galaxies, each made up of three solar
systems. Fight against gravity and break Gravitar's hold on the 12 solar systems
under his power by destroying all bunkers on every planet, or by setting off the
reactor in the alien reactor base.
Game title: Hangman
MENU TITLE: HANGMAN
Complete the Hangman word before you make 11 incorrect letter guesses.
Game title: Haunted House®
MENU TITLE: HAUNTED HOUSE
To escape the haunted house, find the pieces of a magic urn. Along the way, you’ll
encounter terrifying monsters like hairy tarantulas, vampire bats, and a ghost.
Game title: Fatal Run
MENU TITLE: FATAL RUN
Drive through all 32 levels to release the life-saving satellite. Along the way you
must distribute the radiation vaccine throughout the major cities and collect the
pieces of a launch code. If you complete the code and all levels, the satellite
launches, and you win the game!
Game title: Swordquest: Fireworld™
MENU TITLE: FIREWORLD
In this second game in the Swordquest series, you enter FireWorld as a
mighty warrior. Your skill and courage will be tested with dangerous trials and
obstacles. The object of the game is to solve the puzzle.
Game title: Flag Capture
MENU TITLE: FLAG CAPTURE
Find the flag hidden somewhere in a 9x6 grid of squares. Clues under each
square can tell you how far you are from the flag or in which direction it lays.
Watch out for the bombs!
Game title: Football
MENU TITLE: FOOTBALL
This four-on-four football game focuses on high scoring touchdowns and
defensive safeties. Field goals are not included, so go for the big score in this
two player game!
Game title: Frog Pond
MENU TITLE: FROG POND
Leap and catch as many insects as you can with your hungry frog’s tongue.
Game title: Frogger
MENU TITLE: FROGGER
It's tough to be a frog! Life isn't all lazy days and lily pads - it abounds with
dangers. In fact, every leap Frogger takes could be his last! Help Frogger
survive the perils and hop home to safety.

15
14
Game title: Maze Craze
MENU TITLE: MAZE CRAZE
Control a blue or red cop and patrol a maze of robber-infested city blocks as
you try to make it to the exit.
Game title: Millipede®
MENU TITLE: MILLIPEDE
Blast the creepy, crawly bugs - jumping spiders, buzzing bees, bouncing
beetles, mosquitoes, dragonflies, inchworms, and earwigs – that have invaded
your little garden patch. But watch out, the millipedes - cousins to the famed
centipede - are the most insidious insects of all!
Game title: Miniature Golf
MENU TITLE: MINIATURE GOLF
Play a nine hole mini golf course, complete with moving obstacles. To beat the
par for each hole, you’ll need a good sense of timing, along with an ability to
judge distance. Win by getting the lowest score.
Game title: Miss It!
MENU TITLE: MISS IT!
Miss It! is a one player game where the object is to keep the square away from
all the other objects that are bouncing around the screen. The longer the game
goes on the crazier it gets. The game ends when you are touched by one of the
other objects. How long can you last?
Game title: Missile Command®
MENU TITLE: MISSILE COMMAND
Defend your cities and missile base from waves of ballistic and cruise missiles.
Game title: MotoRodeo
MENU TITLE: MOTORODEO
Use your monster truck to power through death-defying jumps, car crushing,
wall smashing, mud plowing, and more. To be king of the road, you’ll have to
outscore your competitor in this most dangerous obstacle course.
Game title: Return to Haunted House
MENU TITLE: HAUNTED HOUSE Ⅱ
Find the skull of old man Graves and return it to the crypt under the cemetery
by utilizing various keys and tools to explore the house and avoid the ghosts.
Game title: H.E.R.O.™
MENU TITLE: HERO
Guide R. Hero through caverns filled with flying critters, tentacles, moving walls,
and other dangers. He's equipped with a jetpack, laser beam, and a limited
supply of dynamite, all of which will be needed to negotiate a path to his
ultimate goal, the trapped miners.
Game title: Home Run
MENU TITLE: HOME RUN
Play a scaled-back, fast-paced version of baseball, America’s favorite pastime.
Game title: Indy 500™
MENU TITLE: INDY 500
Steer your car around one of the many tracks, racing around hairpin turns to
get to the finish line before your opponent.
Game title: International Soccer™
MENU TITLE: INTL SOCCER
A two-player game that adapts the fast-paced movement of soccer to your
video system. Realistic scrolling field action - feint, pass…and score! All
accompanied by exciting sound effects.
Game title: Jungle Hunt™
©TAITO CORP.1982
MENU TITLE: JUNGLE HUNT
Help Sir Dudley Dashly swing on vines, swim through crocodile-infested waters,
jump and duck through a landslide of boulders, and jump over cannibals to
save his wife, Lady Penelope Dashly.
Game title: KABOOM!™
MENU TITLE: KABOOM!
You're about to face the world's most unpredictable and relentless "Mad
Bomber." He hates losing as much as you love winning. So, to keep him
frowning, grab your water buckets to catch and extinguish his falling bombs!

17
16
Game title: Pressure Cooker™
MENU TITLE: PRESSURE COOKER
Help Short-Order Sam fill each order with the proper combination of tomatoes,
onions, lettuce, and cheese. And don't forget the bun! Be sure to rush the
completed orders to the Wrapping Room as fast as you can.
Game title: Radar Lock™
MENU TITLE: RADAR LOCK
The safety of a nearby aircraft carrier is in your hands. You are the ace of a
supersonic F-22, the latest, most powerful airborne weapon yet created.
Your allies are nowhere in sight, so it’s up to you to clear the skies of enemy
interceptors, stealth fighters, and bombers!
Game title: River Raid™
MENU TITLE: RIVER RAID
Your mission is to score as many points as possible by destroying enemy
tankers, helicopters, fuel depots, jets, and bridges before your jet crashes or
runs out of fuel.
Game title: Realsports® Baseball
MENU TITLE: RS BASEBALL
Hit a home run, make a spectacular catch, or force a triple play! Here’s your
chance to prove your skills on the baseball diamond. You control the ballplayers
and the strategy in this sophisticated, action-packed sports simulation.
Game title: Realsports® Basketball
MENU TITLE: RS BASKETBALL
It’s fast-breaking, two-on-two basketball excitement! Shoot the ball in the
basket and score more points than your opponent.
Game title: Realsports® Soccer
MENU TITLE: RS SOCCER
Fast moving player-control lets you kick, pass, and dribble the ball down the
field, around your opponents, and on to victory!
Game title: Realsports® Volleyball
MENU TITLE: RS VOLLEYBALL
Judge the height of the ball from its shadow in this fast-paced game of
volleyball. As the sun sets, the shadow disappears, and you’re on your own!
Game title: Night Driver™
MENU TITLE: NIGHT DRIVER
You're in the driver’s seat and the track is just ahead of you. All you have to do
is accelerate and steer your car through one of the four tracks. Each time you
veer off the track and hit one of the pylons or hit an oncoming car, you’ll crash.
How far can you get before time runs out?
Game title: Off the Wall
MENU TITLE: OFF THE WALL
Play as Kung Fu Lu in your quest to crush an ancient, evil wall guarded by a
mystical dragon and cunning blackbird. Use your staff to deflect the dragon’s
spell balls and destroy the wall.
Game title: Outlaw™
MENU TITLE: OUTLAW
As a gunslinger, take aim to shoot targets or your opponent’s gunslinger.
Game title: Pitfall!™
MENU TITLE: PITFALL!
Guide Pitfall Harry through a maze of jungle scenes, jump over or avoid many
deadly dangers, and grab the most treasures in the shortest possible time.
Game title: Polaris™
©TAITO CORP.1980
MENU TITLE: POLARIS
You’re the commander of a Polaris class nuclear submarine and your mission is to
defend your country from enemy attack. In your battle, you will be required to defend
against wave-after-wave of enemy planes and dive bombers. To make matters worse,
the enemy has sent their own subs and destroyers. In the course of your battles, you
will need to maneuver through dangerous channels full of mines!
Game title: Pong (Video Olympics)
MENU TITLE: PONG
Compete in classic ball and paddle games like Pong, Soccer, Hockey, Handball,
Volleyball, Basketball, and more!

19
18
Game title: Slot Machine
MENU TITLE: SLOT MACHINE
Standard slot machine rules apply in this Atari video adaptation. Choose from a
traditional jackpot type, in which you win based on which three symbols show
up in the center, or a payoff game, in which additional coins allow a payoff if a
winning combination shows up in the top, bottom, or diagonal lines.
Game title: Slot Racers
MENU TITLE: SLOT RACERS
The goal of this game is to drive a slot car around a maze and shoot your
opponent more times than they shoot you.
Game title: Solaris
MENU TITLE: SOLARIS
Save the brave Solaris Pioneers from the vicious Zylon fleet! Speed your
StarCruiser through the galaxy, firing photon torpedoes to show them you
mean business. Blast Cobra Ships, Star Pirates, and Mechnoids before they
blast you!
Game title: Space Attack™
MENU TITLE: SPACE ATTACK
It’s you and your squadron against the attacking aliens. Control the strategy and
the action for defending your Mother ship. Pinpoint alien attackers, then go to a
close-up pilot’s view for battle!
Game title: Space Invaders™
©TAITO CORP.1978
MENU TITLE: SPACE INVADERS
You are at war with invaders from space who are threatening the Earth! Your
objective is to destroy these invaders by firing your laser cannon. You must
wipe out the invaders either before they reach the bottom of the screen or
before they hit you three times with their laser bombs.
Game title: Space War
MENU TITLE: SPACE WAR
Blast off into space with 17 game variations for one or two players. Take control
of your starship and penetrate the boundaries of strange galaxies. Drift invisibly
through hyperspace, but beware of the gravity of a strange sun.
Game title: Saboteur®
MENU TITLE: SABOTEUR
Take the role of cybernetic life-form Hotot, who has discovered an alien missile
base hidden on his planet. Manned by strange blue aliens, these evil intruders
are using the planet as a launching site for their deadly warhead, which is
poised to destroy the galaxy's power source. With the help of the bird-like
Gorfons, you must destroy the warhead, and prevent the destruction of the
galaxy in this multi-level shooter!
Game title: Save Mary
MENU TITLE: SAVE MARY
User your crane to drop blocks for Mary to climb on top of and escape the
rising water level!
Game title: Sea Battle™
MENU TITLE: SEA BATTLE
Lots of action on the high seas, including fleets of ships, mines, and battle
sounds. A game that requires creative strategy to win.
Game title: Secret Quest
MENU TITLE: SECRET QUEST
Vicious creatures now occupy eight vital space stations in their effort to conquer
our peaceful solar system. It is up to you to destroy these locations and their
evil inhabitants in order to save the human race. It’s furious, non-stop action,
and you’ll need speed, courage, combat skills, and a sharp sense of direction.
: Bring up the required status screen.
Game title: Shield Shifter
MENU TITLE: SHIELD SHIFTER
Shoot your way through the shifting shields to give yourself a clean shot at the
attacking Alien Queen!
Game title: Sky Diver
MENU TITLE: SKY DIVER
You’re ready for the big jump! The longer you can wait to open your parachute,
the more points you score. Steer your parachute against the wind to guide
yourself towards the bull’s-eye.
SELECT

21
20
Game title: Super Baseball
MENU TITLE: SUPER BASEBALL
Take to the field and outscore the other team in this sophisticated baseball game.
Game title: Super Breakout®
MENU TITLE: SUPER BREAKOUT
It’s super-powered brick-breaking fun! Try your hand at Breakout, Cavity,
Double, Progressive, or Children’s versions.
Game title: Super Football
MENU TITLE: SUPER FOOTBALL
It’s five-on-five action in this sophisticated football game.
Game title: Surround
MENU TITLE: SURROUND
Control a moving wall to trap your opponent before they trap you. Watch out,
because you can crash into your own wall! And if drawing is more your speed,
try out the video graffiti mode.
Game title: Sword Fight™
MENU TITLE: SWORD FIGHT
Two swordfighters face off. Attack, feint, block, strike!
Game title: Tempest®
MENU TITLE: TEMPEST
Clear the screen of enemies on closed tubes or open playfields. Move freely
along the edges of the playfield to target and shoot each enemy. If you’re in a
tight spot, use your Superzapper to clear the screen!
Game title: Video Checkers
MENU TITLE: VIDEO CHECKERS
Compete against another player or the computer in regular, or give
away, checkers.
Game title: Video Chess
MENU TITLE: VIDEO CHESS
Compete against the computer in this classic game of chess.
Game title: Sprintmaster
MENU TITLE: SPRINTMASTER
Choose your track, from practice-caliber squares to the curvaceous
championship courses. Rev up at the starting line, and take off! You’ll need a
delicate touch and a cool head to avoid sliding into the wall on those sharp
turns.
Game title: Star Ship
MENU TITLE: STAR SHIP
Destroy as many spacecraft and robots as possible within the time limit, all
while avoiding asteroids and other objects as you try to cover the greatest
distance possible in one of three included game variations.
Game title: Star Strike™
MENU TITLE: STAR STRIKE
Hair-trigger action as you hurtle your spaceship through a trench to destroy the
alien force that is threatening the planet earth! Enemy starships try to blast you
into bits as you bomb their alien missile silos.
Game title: Steeplechase
MENU TITLE: STEEPLECHASE
Ride your horse against up to three other friends in racing and hurdle games.
Game title: Stellar Track™
MENU TITLE: STELLAR TRACK
Destroy the alien menace before time or energy runs out in this classic
game of strategy.
Game title: Street Racer
MENU TITLE: STREET RACER
Street Racer features car racing, slalom skiing, jet shooting, number crunching,
and scoop ball games for up to four players!
Game title: Submarine Commander®
MENU TITLE: SUB COMMANDER
You are at the helm of a submarine equipped with radar, sonar depth charge
indicators, torpedoes, and fuel and temperature gauges. As commander of the
submarine, you must sink the enemy ships before running out of fuel!

22
Game title: Video Pinball
MENU TITLE: VIDEO PINBALL
Hit bumpers, spinners, targets, and rollovers to rack up points!
Game title: Warlords®
MENU TITLE: WARLORDS
Destroy the other three warlords before your warlord is destroyed by moving your
catapult around your castle and catching or blocking the boulder to return fire.
Game title: Swordquest: Waterworld™
MENU TITLE: WATERWORLD
In this third game in the Swordquest series, there are seven puzzle-based
rooms. Scattered throughout these rooms are 16 magical objects that are
related to each other and the seven rooms. Isolating the rooms from each other
are three skill-and-action tests that you'll need to master in order to successfully
enter a room and correctly manipulate all of its objects.
Game title: Wizard
MENU TITLE: WIZARD
Control a wizard as you attempt to destroy an enemy imp.
Game title: Yars' Return
MENU TITLE: YARS' RETURN
Once again take to your Yar fly simulator to break a path through the shield and
destroy the Qotile with a blast from the Zorlon Cannon!
Game title: Yars' Revenge®
MENU TITLE: YARS' REVENGE
Use your Yar fly simulator to break a path through the shield and destroy the
Qotile with a blast from the Zorlon Cannon!
© 2017 AtGames Digital Media, Inc.
www.atgames.net
All rights reserved.
Made in China.
© 2017 Atari Interactive, Inc.
Atari and Atari logo are trademarks owned by Atari Interactive, Inc. All individual
Atari game names and logos are trademarks or registered trademarks of Atari
Interactive, Inc. or its affiliates. All other trademarks are the property of their
respective owners.
Distributed by AtGames under license from Atari, Inc.
© 2017 Activision Publishing, Inc. ACTIVISION is a registered trademark of Activision
Publishing, Inc. All other trademarks and trade names are the property of their
respective owners, including in some cases Activision Publishing, Inc.
SPACE INVADERS™© TAITO CORPORATION 1978 ALL RIGHTS RESERVED.
JUNGLE HUNT™© TAITO CORPORATION 1982 ALL RIGHTS RESERVED.
FRONT LINE™© TAITO CORPORATION 1982 ALL RIGHTS RESERVED.
POLARIS™© TAITO CORPORATION 1980 ALL RIGHTS RESERVED.
The versions of SPACE INVADERS™, JUNGLE HUNT™, FRONT LINE™, and POLARIS™
included in the Atari Flashback® 8 are based on those created for the ATARI 2600®
and therefore may differ in appearance and performance from the original arcade
and console editions developed by TAITO Corporation.
©Konami Digital Entertainment
Copyright Good Deal Games, Inc.
M Network™ Games® 2017 Intellivision Productions, Inc. All rights reserved.
All trademarks are the property of their respective owners.
SCAN
and find out more about this product.
More Classics at
www.atgames.us
The content of this document is subject to change without notice.
 Loading...