

Page 1
Gebruiksaanwijzing
oven
Instructions for use
oven
ZX4574M
ZX6574M
Page 2

NL Handleiding NL 3 - NL 47
EN Manual EN 3 - EN 47
Gebruikte pictogrammen - Pictograms used
Belangrijk om te weten - Important information
Tip - Tip
Page 3
INHOUD
Uw oven
Eerste gebruik
Bediening
Gebruik
Reinigen
Inleiding 4
Bedieningspaneel 5
Beschrijving 6
Aanraakscherm 9
Hoofdschermen 10
Functie-instelscherm 12
Stand-by scherm 13
Eerste gebruik 14
Gebruik van het ‘Plus’ menu 16
Toetsenbord openen 18
Ovenfunctie 19
Een ‘Extra’s’ functie gebruiken 21
Snel voorverwarmen 22
Functies tabel 23
Culisensor 27
Uitgestelde start 30
Meerfase koken 31
Aanvullende functies 34
Instellingen 38
Het toestel reinigen 40
Stoomreinigen 40
Pyrolyse 41
Inschuifgeleiders verwijderen en reinigen 42
Ovenlamp vervangen 42
Demonteren ovendeur 43
Demonteren ovenruit 44
Problemen oplossen
Algemeen 45
Uw oven en het milieu
Afvoer van het apparaat en de verpakking 47
NL 3
Page 4

UW OVEN
Inleiding
Gefeliciteerd met uw keuze voor deze Atag oven.
In het ontwerp van dit product heeft eenvoudige bediening en optimale
gebruiksvriendelijkheid centraal gestaan. De oven biedt een uitgebreide
reeks instellingen, zodat u altijd de juiste bereidingswijze kunt kiezen.
In deze handleiding leest u hoe u deze oven het best kunt
gebruiken. Naast informatie over de bediening, vindt u hier ook
achtergrondinformatie die u tijdens het gebruik van het apparaat van
pas kan komen.
Lees eerst de afzonderlijke veiligheidsinstructies
voordat u het apparaat gaat gebruiken!
Lees deze gebruikershandleiding door voordat u het apparaat
in gebruik neemt, en berg de handleiding daarna veilig op voor
toekomstig gebruik.
De installatie-instructies worden afzonderlijk meegeleverd.
NL 4
Page 5
UW OVEN
Bedieningspaneel
01 03
10 15
10 10 2015
040502
01. Aan/uit toets; te bedienen om:
▷ het toestel in te schakelen.
▷ het toestel naar de stand-by te schakelen.
▷ het toestel uit te schakelen. Houd hiervoor de ‘Aan/uit toets’
ingedrukt tot het toestel uitschakelt.
02. X toets; te bedienen om:
▷ een stap terug in het menu te gaan.
▷ een pop-up met “nee” te beantwoorden of te sluiten.
▷ een menu of functie te annuleren of te sluiten.
03. Toetsvergrendeling; te bedienen om:
▷ het bedieningspaneel schoon te maken of om te voorkomen dat
het toestel ongewenst in werking treedt. Houd hiervoor de toets
ingedrukt tot de toetsvergrendeling inschakelt.
04. Bevestigingstoets; te bedienen om:
▷ instellingen te bevestigen
▷ een functie te starten.
▷ een pop-up met “ja” te beantwoorden of te sluiten.
05. Aanraakscherm/display
NL 5
Page 6
UW OVEN
Beschrijving
1. Bedieningspaneel
2. Inschuifniveaus
▷ ZX6574M: 5 niveaus*
▷ ZX4574M: 4 niveaus
3. Ovendeur
4. Deurgreep
Niveau 5*
Niveau 4
Niveau 3
Niveau 2
Niveau 1
3
4
1
2
NL 6
Het volgende toebehoren wordt bij uw toestel geleverd:
• Bakplaat; wordt gebruikt voor gebak en cakes.
• Ovenrooster; wordt vooral gebruikt voor het grillen.
Het ovenrooster kan ook gebruikt worden om een schaal of
pan met een gerecht op te plaatsen.
Het ovenrooster is uitgerust met een veiligheidsnok. Til het rooster
aan de voorkant iets op en schuif het vervolgens uit de ovenruimte.
• Diepe bakplaat; wordt gebruikt voor het braden van vlees en het
bakken van vochtig gebak. De diepe bakplaat kan ook gebruikt
worden als vangschaal. Plaats, om te grillen of om als vangschaal
te gebruiken, de diepe bakplaat op het eerste niveau.
Page 7
UW OVEN
Culisensor
• De culisensor meet de kerntemperatuur van het gerecht.
Wanneer de gewenste temperatuur is bereikt stopt het
kookproces automatisch.
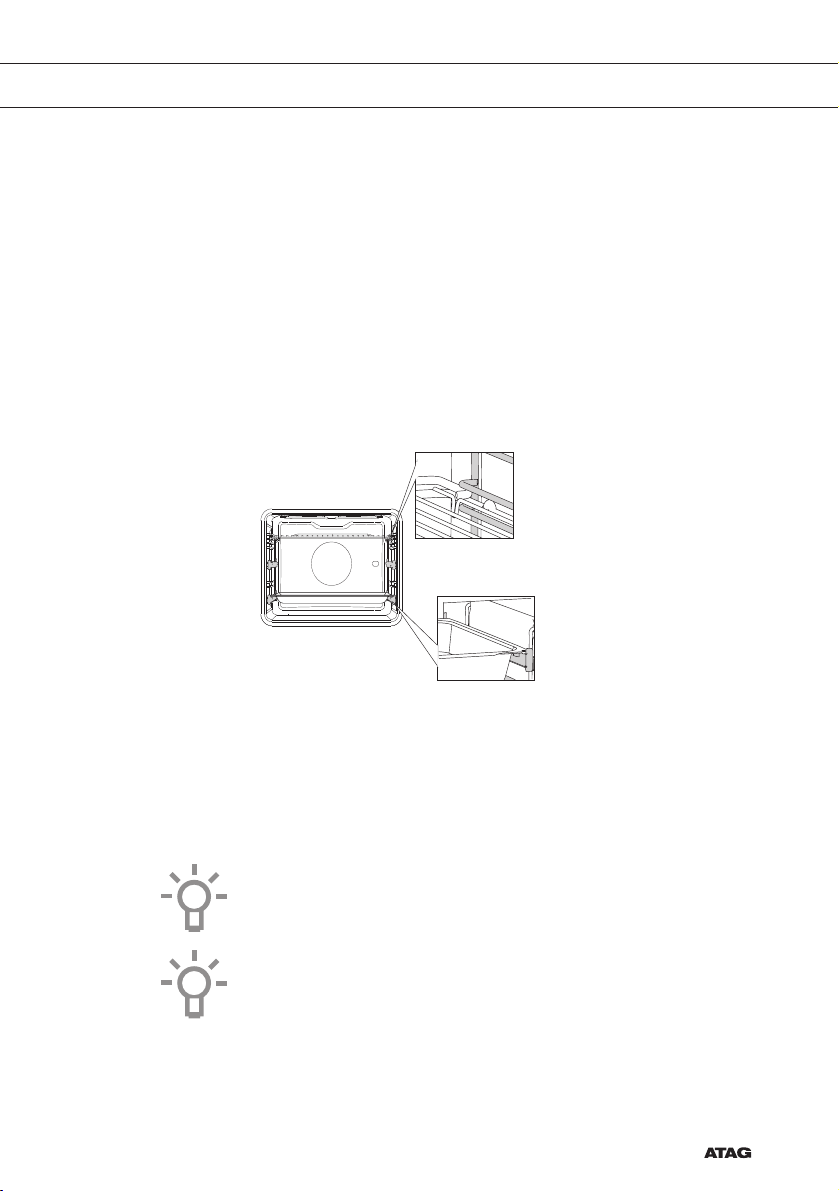
Inschuifgeleiders
• De oven heeft vier of vijf inschuifniveaus (niveau 1 t/m 4/5).
Niveau 1 wordt voornamelijk gebruikt in combinatie met
onderwarmte. De niveaus 3 en 4/5 worden voornamelijk gebruikt
voor de grillfunctie.
• Plaats het ovenrooster of bakplaat in de opening tussen de
draadprofielen van de inschuifgeleiders.
Telescoopgeleider
• Een aantal inschuifniveaus heeft een volledig uittrekbare
telescoopgeleider. Trek de telescoopgeleider geheel uit de
ovenruimte en plaats hierop het ovenrooster of de bakplaat.
Schuif vervolgens de geleider met ovenrooster of bakplaat in
de ovenruimte.
Sluit de ovendeur pas wanneer de telescoopgeleiders helemaal in
de ovenruimte geschoven zijn.
Pyrolyse geleider
• Gebruik deze voor pyrolyse-reiniging. Plaats deze geleiders
indien u ook de bakplaat met pyrolyse wilt reinigen.
• Let op; door de hoge temperatuur tijdens pyrolyse zullen
de geleiders verkleuren.
NL 7
Page 8
UW OVEN
Draaispit
Wordt gebruikt voor het braden van gerechten zoals rollade of kip
Het draaispit bestaat uit een spit met 2 klemmen, een verwijderbare
handgreep en een spitrooster dat past in het midden van de oven.
Het spit past in de draaispitmotor in de achterwand van de oven.
• Schuif de diepe bakplaat in niveau 1 om jus of vet op te vangen.
• Schuif één van de klemmen op het spit en schuif daarna het te
roosteren vlees aan het spit.
• Plaats de spitrooster in het middelste niveau van de oven met de
‘v’-vorm aan de voorzijde.
• Om het plaatsen van het spit te vergemakkelijken kan de handgreep
op het stompe eind van het spit geschroefd worden.
• Leg het spit op de spitrooster met het puntige uiteinde van u
af. Zachtjes aanduwen totdat het spit in de draaispitmotor in de
achterwand valt. Het stompe uiteinde van het spit moet in de
‘v’-vorm rusten. (Het spit heeft twee inkepingen die zich beide aan
de kant van de ovendeur moeten bevinden zodat het spit op zijn
plaats blijft. De inkepingen dienen ook als grip voor de handgreep.)
• De draaispitmotor begint automatisch te draaien wanneer een
functie met grill is gestart.
• Verwijder de handgreep voor het bakken of braden. Daarna kunt u
de handgreep weer aan het spit schroeven om deze gemakkelijk uit
de oven te verwijderen.
NL 8
Deur
• De deurschakelaars onderbreken de werking van de oven wanneer
de ovendeur tijdens het gebruik wordt geopend. Bij sluiten van de
deur vervolgt de oven zijn werking.
• Deze oven heeft een ‘Soft close’ deursysteem. Dit zorgt ervoor dat
de deur vanzelf en gedempt vanaf een bepaalde hoek sluit.
Koelventilator
• Het apparaat is uitgerust met een koelventilator die de behuizing en
het bedieningspaneel koelt.
Page 9
UW OVEN
Aanraakscherm (touch screen)
• Bedien het aanraakscherm van uw oven door erop te tikken of te
vegen.
• Tik op het scherm om een functie te openen of een instelling aan te
passen.
• Veeg over het scherm om meer informatie/opties te tonen of een
instelling aan te passen.
Tikken: Vegen:
EXTRA’SOVEN
Raak voor de beste werking de toetsen aan met een groot deel van een
vingertop. Steeds wanneer u tijdens gebruik op een toets tikt klinkt er
een korte toon (tenzij dit in de instellingen is aangepast).
SNEL VOORVERWARMEN
10:15
PROGRAMMA’S
180
Hetelucht
10:15
:
31
°C
:
30
NL 9
Page 10
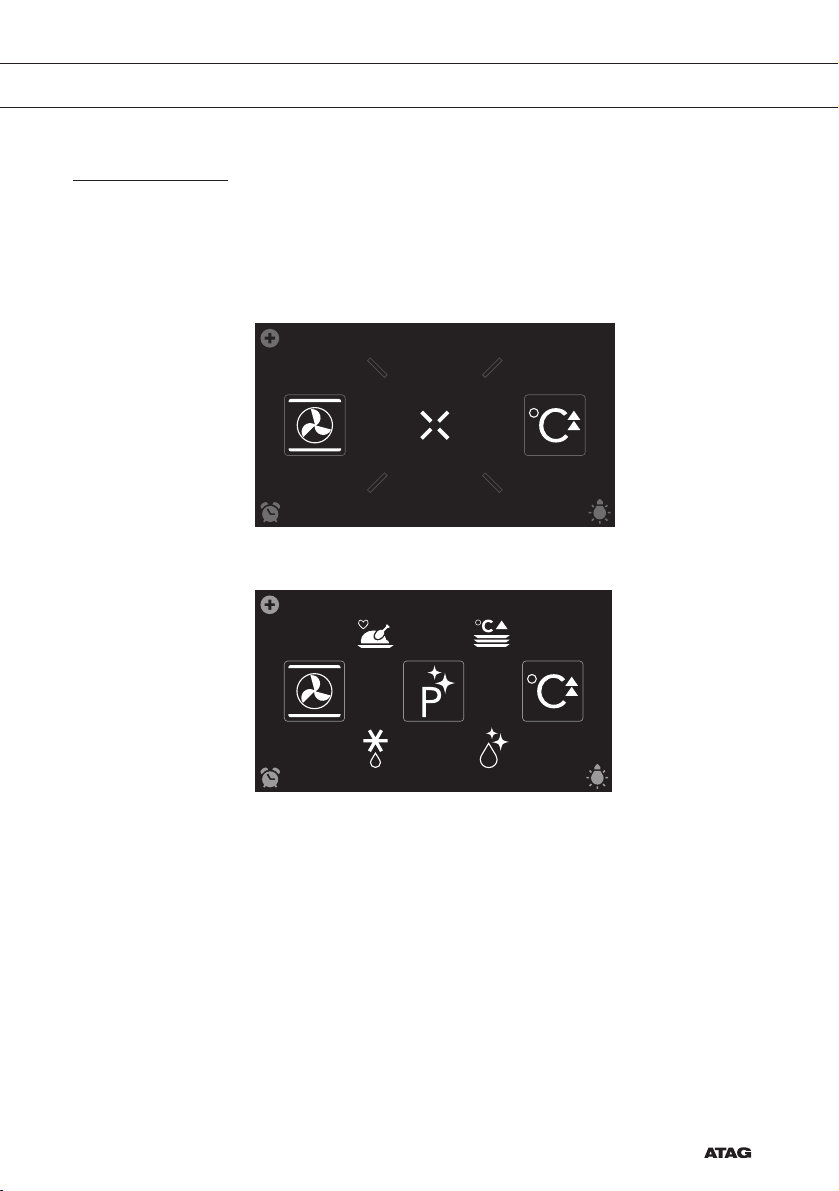
UW OVEN
10:15
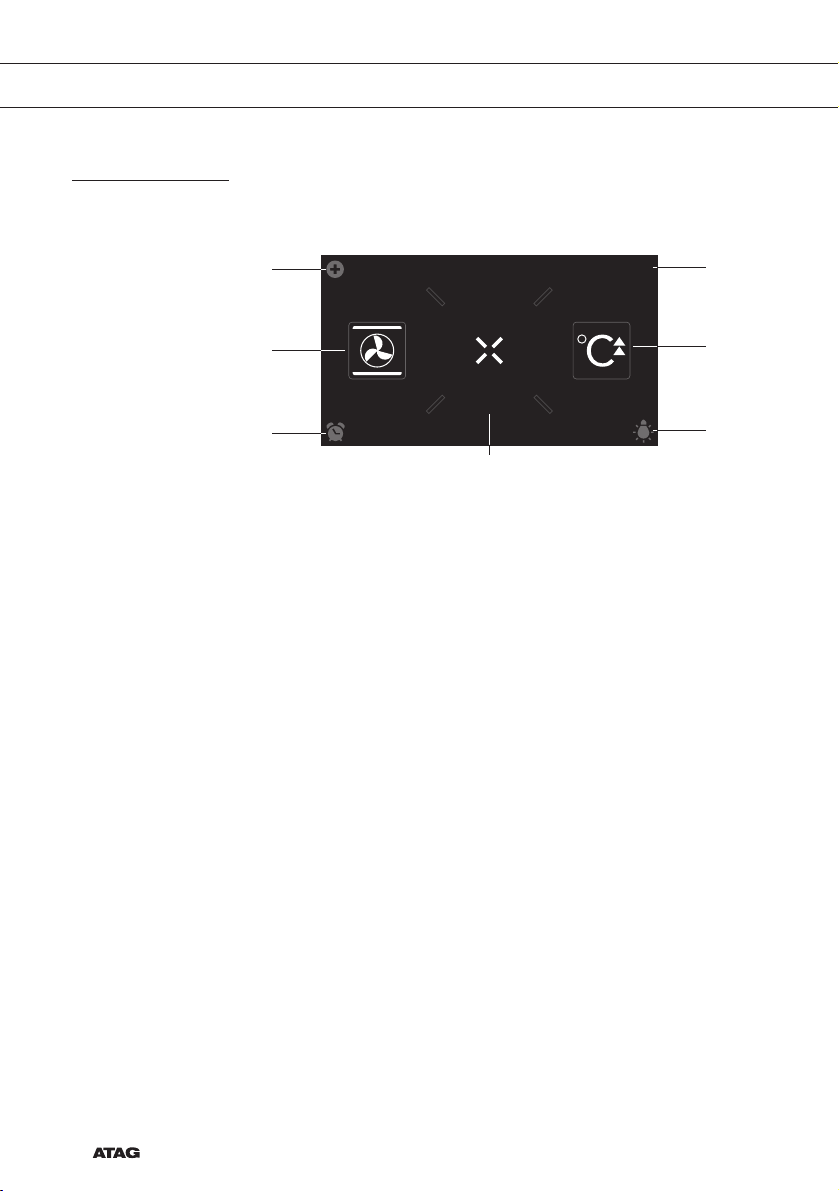
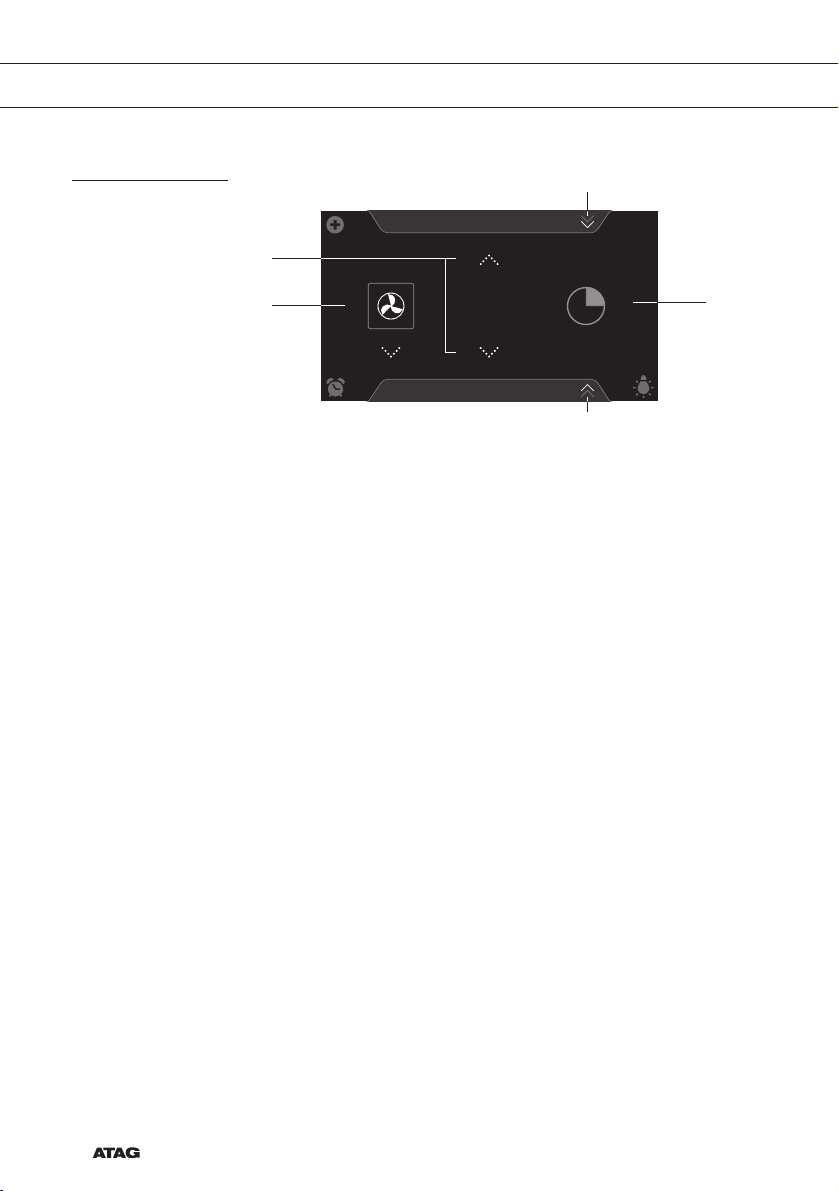
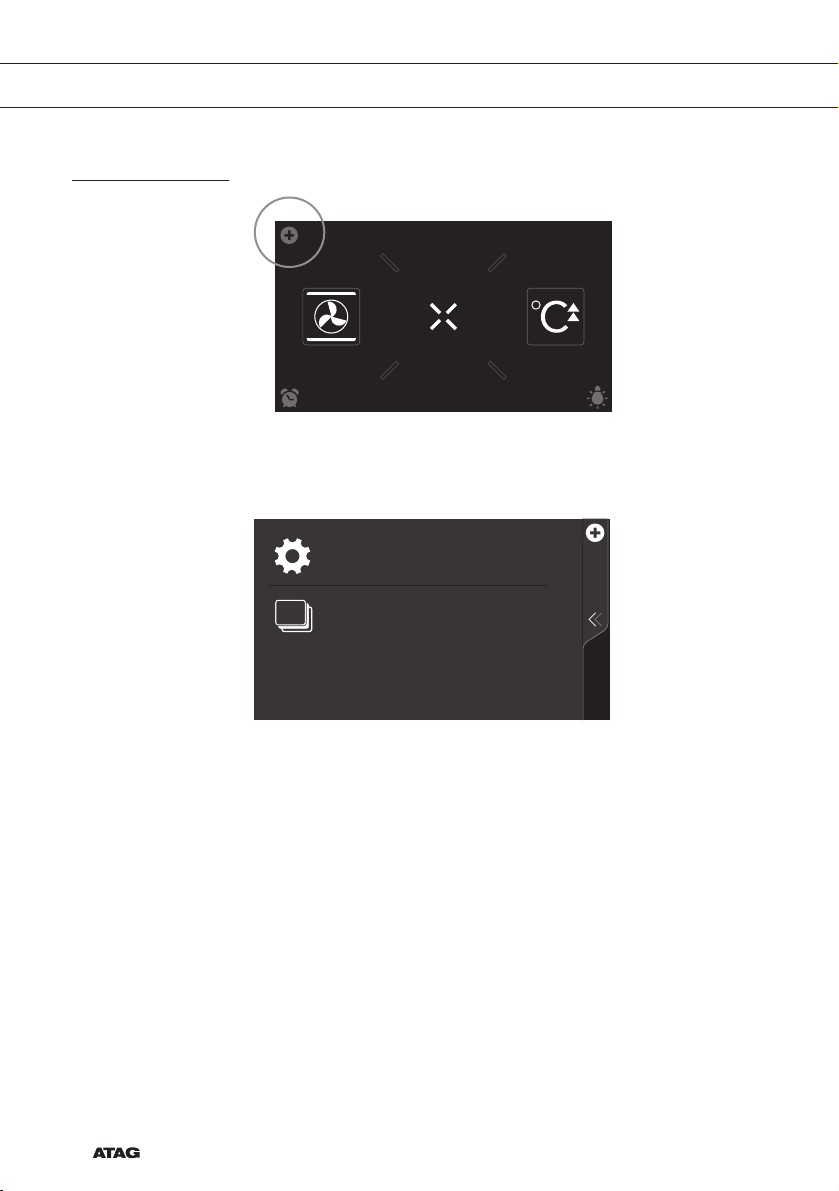
Hoofdschermen
Startscherm
01
02
03
EXTRA’SOVEN
SNEL VOOR-
VERWARMEN
05
06
07
04
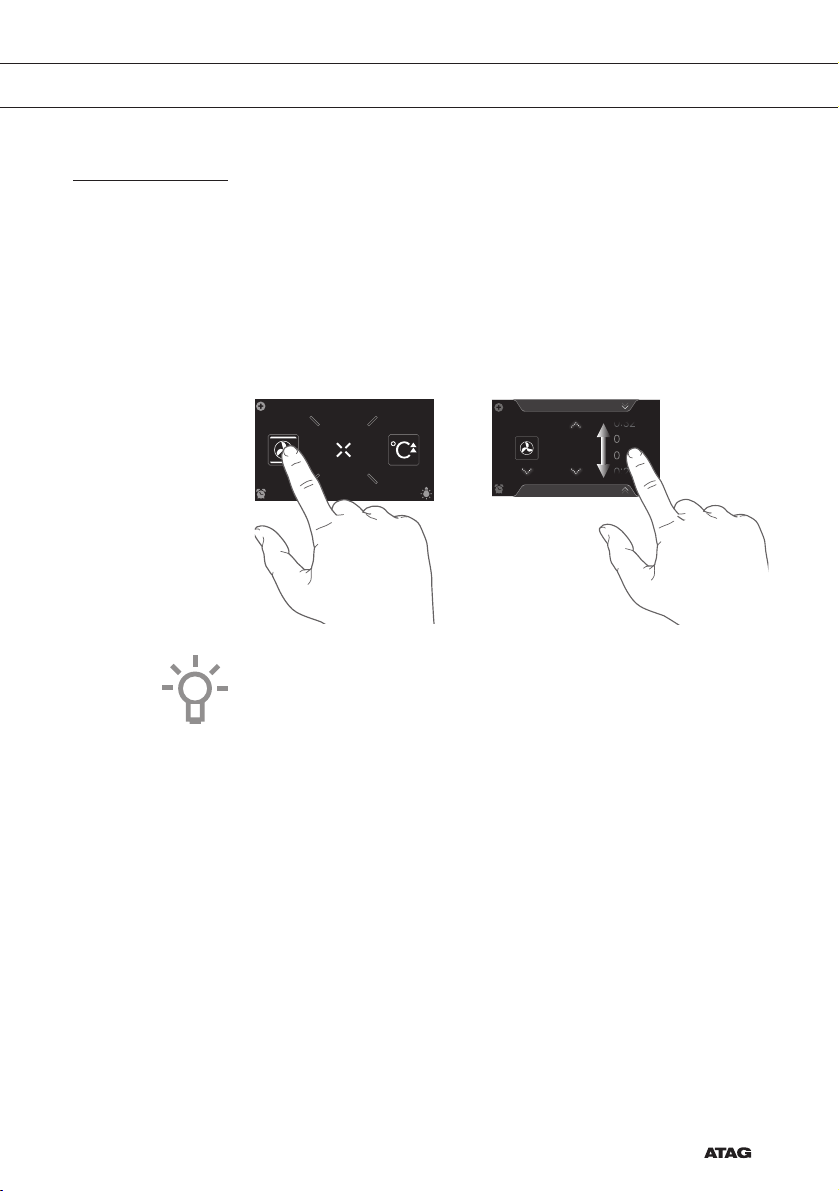
Plus menu (01)
• Tik op het plus symbool om het ‘Plus’ menu te openen. De inhoud
van dit menu past zich aan naar gelang de mogelijkheden op dat
moment in de bediening.
Oven (02)
• Tik op ‘OVEN’ om het ovenfunctie menu te openen.
Kookwekker (03)
• Tik op het kookwekker symbool om het kookwekker menu te
openen.
De kookwekker kan onafhankelijk van een ovenfunctie worden
gebruikt.
▷ De langst mogelijke wekkertijd is 24 uur.
▷ Wanneer de kookwekker afloopt, verschijnt er een pop-up en
klinkt er een geluidssignaal.
▷ Tik op de X toets, bevestigingstoets of het scherm om het
geluidssignaal uit te schakelen en de pop-up te sluiten.
Het geluid stopt ook automatisch na ongeveer 1 minuut.
NL 10
Extra’s (04)
• Tik op ‘EXTRA’S’ om de extra functies van het toestel te tonen.
Tijd (05)
• Hier wordt de dagtijd getoond.
Page 11

10:15
UW OVEN
Snel voorverwarmen (06)
• Tik op ‘SNEL VOORVERWARMEN’ om de snel voorverwarmen
functie te openen.
Verlichting (07)
• Tik op het ‘lamp’ symbool om de ovenverlichting in- of uit te
schakelen.
• De ovenverlichting gaat ook branden wanneer u de ovendeur opent
of een bereiding start. De ovenverlichting dooft automatisch (tenzij
dit in de instellingen is aangepast).
Extra’s scherm
05
PROGRAMMA’S VERWARMEN
PYROLYSE
REINIGENONTDOOIEN
04
0201 03
Ontdooien (01)
• Tik op ‘ONTDOOIEN’ om de ontdooifunctie te openen.
Pyrolyse (02)
• Tik op ‘PYROLYSE’ om de pyrolyse functie te openen.
Reinigen (03)
• Tik op ‘REINIGEN’ om de reinigingsfunctie te openen.
Verwarmen (04)
• Tik op ‘VERWARMEN’ om het verwarmfuncties menu te openen.
Hier zijn bordenwarmen en warmhouden te vinden.
Programma’s (05)
• Tik op ‘PROGRAMMA’S’ om het programma’s menu te openen.
Hier zijn de favorieten en de automatische programma’s te vinden.
NL 11
Page 12
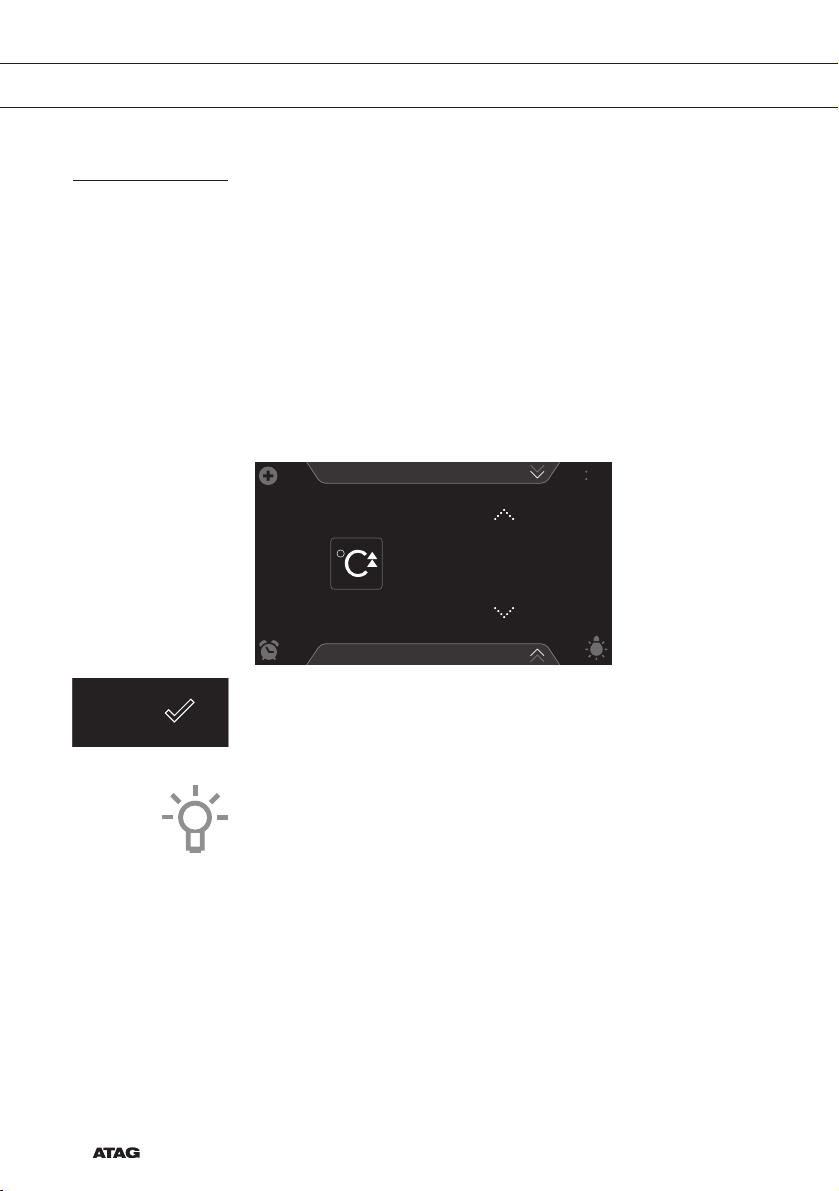
PROGRAMMA´S
UW OVEN
Functie-instelscherm
04
10:15
02
01
Functie kiezen (01)
• Tik op de pijltjes boven en onder de functie of veeg over het
symbool om een functie te kiezen (zie ook ‘Toetsenbord openen’).
Temperatuur instellen (02)
• Tik op de pijltjes boven en onder de temperatuur of veeg over de
temperatuur aanduiding om een temperatuur te kiezen (zie ook
‘Toetsenbord openen’).
Bereidingstijd (03)
• Tik op het bereidingstijd symbool als u een bereidingstijd in wilt
stellen. Als hier al een bereidingstijd staat is het noodzakelijk deze
in te stellen.
• Tik op de pijltjes boven en onder de tijd of veeg over de tijd om
deze aan te passen (zie ook ‘Toetsenbord openen’).
Programma’s (04)
• Tik op ‘PROGRAMMA’S’ om het programma’s menu te openen.
Hier zijn de favorieten en de automatische programma’s te vinden.
180
Hetelucht
°C
05
03
NL 12
Info tab (05)
• Onderaan het scherm verschijnt de naam van de gekozen functie in
de tab. Tik op de tab om meer informatie over de gekozen functie
op te vragen.
Page 13
UW OVEN
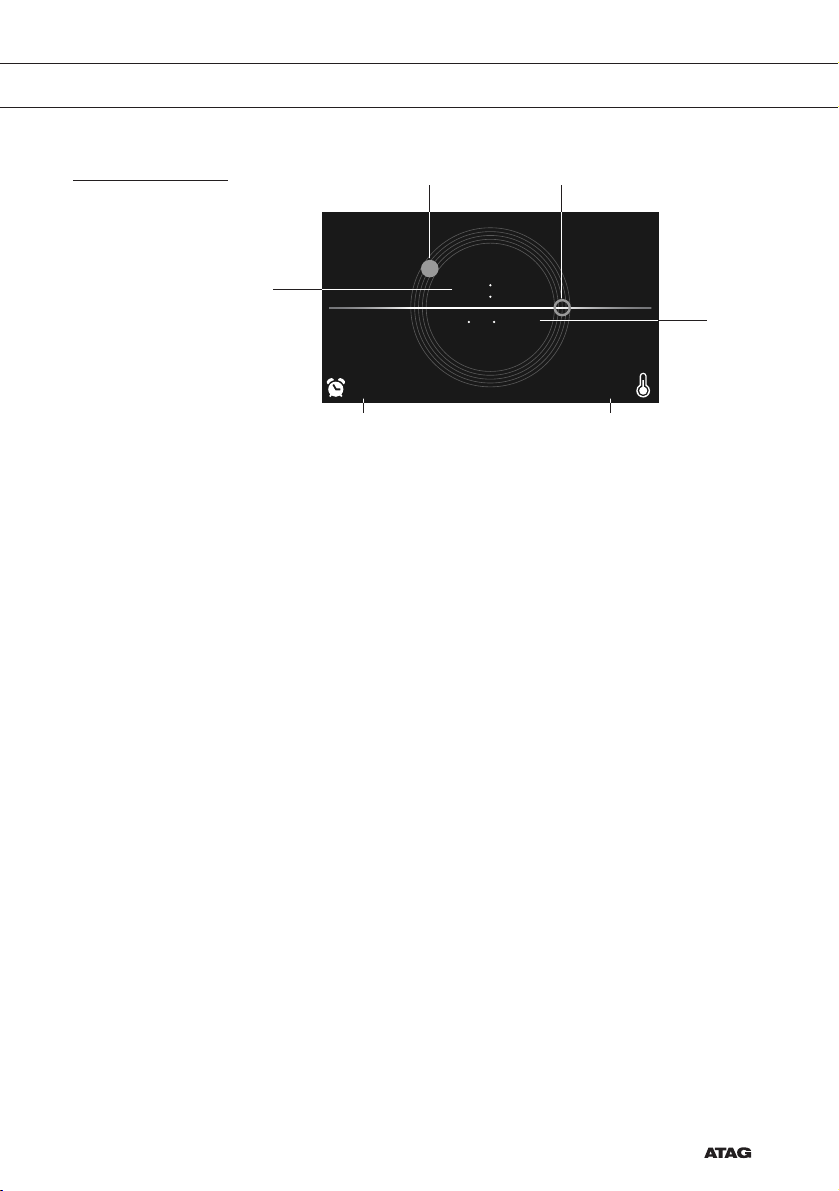
Stand-by scherm
02 03
01
9:27 125
05 06
Weergave tijd (digitaal/01)
• Actuele dagtijd.
Weergave tijd (analoog/02 en 03)
• Actuele dagtijd.
• De urenwijzer van de analoge klok wordt aangeduid met een
‘dichte’ cirkel (02) en de minutenwijzer met een ‘open’ cirkel (03).
Weergave datum (04)
• Actuele datum.
Weergave kookwekkertijd (05)
• De aflopende kookwekkertijd.
10 15
10 10 2015
°C
04
Weergave aflopende temperatuur (06)
• Temperatuur in de oven (restwarmte).
NL 13
Page 14
EERSTE GEBRUIK
Eerste gebruik
• Reinig de ovenruimte en de accessoires met warm water en
• Het is normaal dat wanneer de oven voor de eerste keer wordt
Als de oven (voor de eerste keer) wordt aangesloten op de netspanning
moet u de ‘Taal’, ‘Tijd’ en de ‘Datum’ instellen.
Taal instellen
LANGUAGE
afwasmiddel. Gebruik geen agressieve schoonmaakmiddelen,
schuursponzen, en dergelijke.
gebruikt u een vreemde geur ruikt. Zorg daarom voor een goede
ventilatie tijdens het eerste gebruik.
Nederlands
English
Deutsch
Francais
NL 14
Stel de gewenste taal in waarin de displayteksten van het toestel
verschijnen. Standaard is “English” geselecteerd.
1. Veeg over het scherm om alle talen te bekijken.
2. Tik op een taal om deze te selecteren.
3. Druk op de bevestigingstoets om de de ingestelde taal op te slaan.
Page 15
EERSTE GEBRUIK
Dagtijd instellen
TIJD
1. Tik op de pijltjes boven en onder de tijd of veeg over de tijd om
2. Tik voor snelle invoer op het midden van de tijd, er verschijnt
3. Druk op de bevestigingstoets om de ingestelde tijd op te slaan.
Datum instellen
DATUM
12:00
deze aan te passen.
dan een pop-up met toetsenbordje waarop de gewenste tijd kan
worden ingetypt (zie hoofdstuk ‘Toetsenbord openen’).
01 01 2015
DAG MAAND JAAR
1. Tik op de pijltjes boven en onder de dag, maand of het jaar of veeg
over de dag, maand of het jaar om deze aan te passen.
2. Druk op de bevestigingstoets om de ingestelde datum op te slaan.
Het toestel is nu gereed voor gebruik.
De taal, tijd en datum kunnen worden aangepast in het instellingen
menu (zie hoofdstuk “Instellingen”). Het instellingen menu is te openen
vanuit het startscherm via het ‘Plus’ menu.
NL 15
Page 16
BEDIENING
10:15
Gebruik van het ‘Plus’ menu
EXTRA’SOVEN
SNEL VOOR-
VERWARMEN
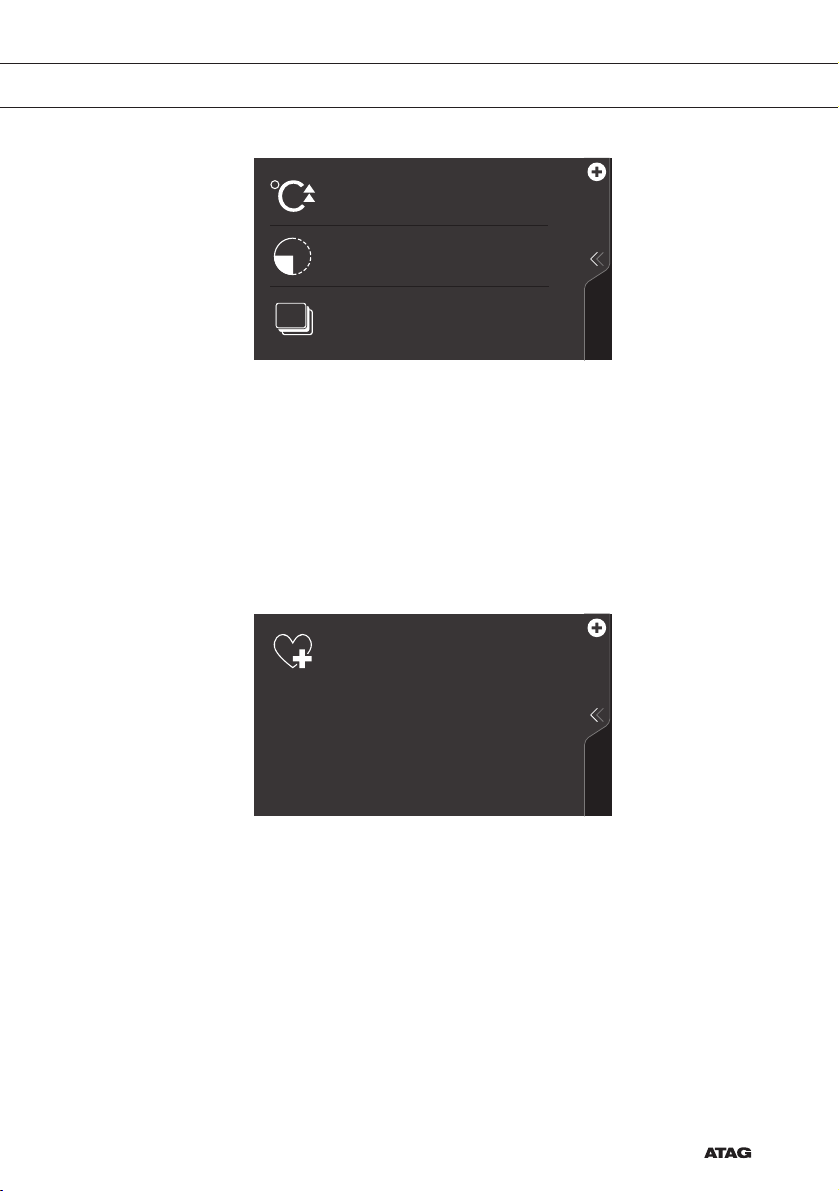
Het ‘Plus’ menu bevat een aantal functies of instellingen.
De aangeboden plus functies zijn afhankelijk van het actieve scherm.
INSTELLINGEN
Ga naar de instellingen van het toestel
MEERFASE KOKEN
Combineer tot drie functies binnen één
kookproces
• Vanuit het startscherm zijn de volgende functies/menu’s in het ‘Plus’
menu te vinden:
▷ Instellingen; Stel uw gebruiksvoorkeuren in (zie hoofdstuk
‘Instellingen’).
▷ Meerfase koken; Combineer tot drie functies binnen één
kookproces (zie hoofdstuk ‘Meerfase koken’).
NL 16
Page 17
BEDIENING
SNEL VOORVERWARMEN
Verwarm de ovenruimte snel voor
Plaats het gerecht nog niet
UITGESTELDE START
Het kookproces start automatisch op de
gewenste tijd
MEERFASE KOKEN
Combineer tot drie functies binnen één
kookproces
• Vanuit het ovenfunctie instelscherm zijn de volgende functies in het
‘Plus’ menu te vinden:
▷ Snel voorverwarmen; Verwarm de oven snel voor op de
gewenste temperatuur binnen een kookproces (zie hoofdstuk
‘Snel voorverwarmen’).
▷ Uitgestelde start; Het kookproces start automatisch op de door
u ingestelde tijd.
▷ Meerfase koken; Combineer tot drie functies binnen één
kookproces (zie hoofdstuk ‘Meerfase koken’).
TOEVOEGEN AAN FAVORIETEN
Voeg de huidige instellingen toe aan de
favorieten
• Wanneer een ovenfunctie is gestart zijn de volgende functies in het
‘Plus’ menu te vinden:
▷ Toevoegen aan favorieten; Voeg de instellingen van het bereide
gerecht toe aan uw favorieten ( zie hoofdstuk ‘Aanvullende
functies’).
NL 17
Page 18
PROGRAMMA’S
BEDIENING
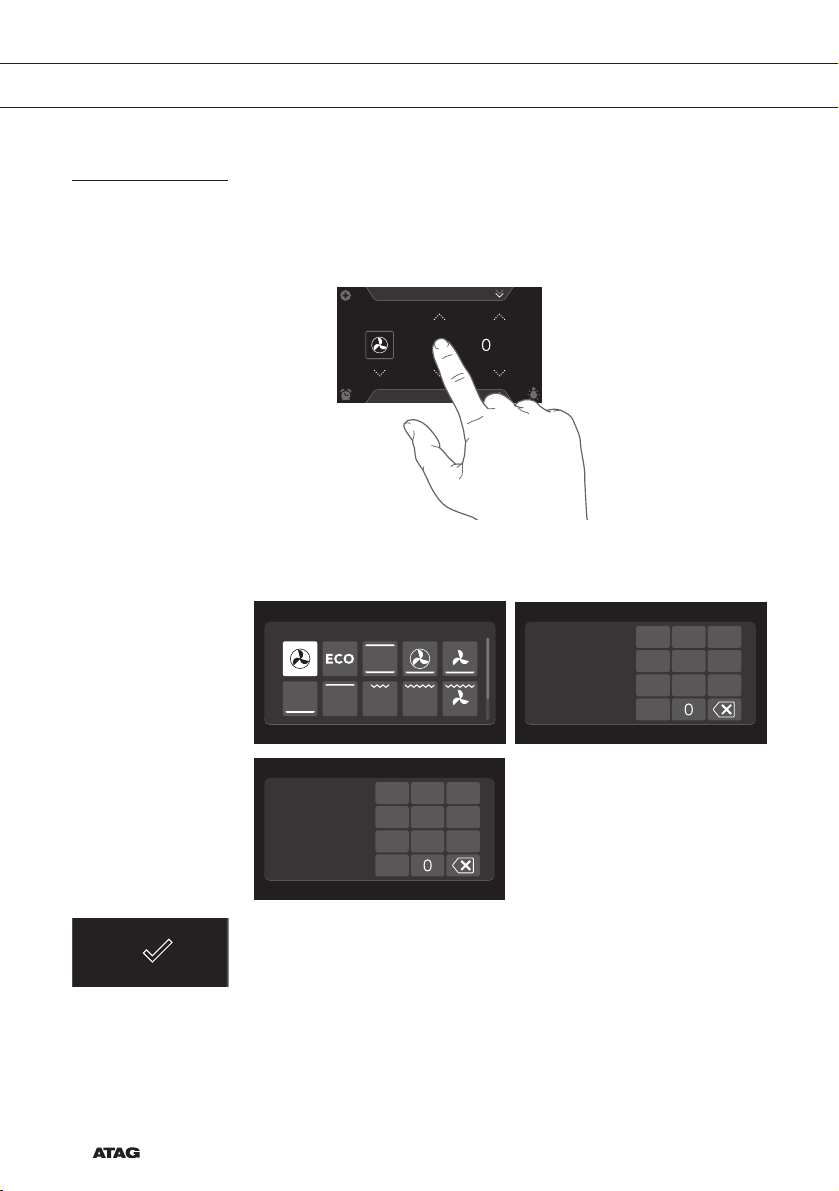
Toetsenbord openen
Voor het snel invoeren van een functie, temperatuur of bereidingstijd
kan een toetsenbord geopend worden. Hiermee kan er snel een
instelling worden gekozen of een waarde ingetypt worden.
10:15
180
Hetelucht
°C
H:M
:
30
1. Tik op het midden van het functiesymbool, temperatuur of
bereidingstijd (geactiveerd). Het toetsenbord verschijnt.
Functie instellen
Temperatuur instellen
°C
000
1
4 5
7 8
Bereidingstijd instellen
H:M
00:00
1
4 5
7 8
3
2
6
9
3
2
6
9
NL 18
2. Typ de gewenste waarde in of tik op de gewenste waarde.
3. Indien de instelde waarde niet automatisch word bevestigd,
druk dan op de bevestigingstoets.
Page 19

GEBRUIK
Hetelucht
PROGRAMMA´S
Ovenfuncties
Gebruik de ovenfuncties voor het bereiden van gerechten met behulp
van bijvoorbeeld hetelucht, onderwarmte of grill.
10:15
°C
180
• Er zijn verschillende ovenfuncties te selecteren.
• Bij elke ovenfunctie kan een temperatuur en een bereidingstijd
worden ingesteld.
• Tevens kunnen ‘plus’ menu functies zoals snel voorverwarmen,
meerfase koken en uitgestelde start worden geselecteerd.
Tik hiervoor op het plus symbool. Zie hoofdstuk ‘Gebruik van het
‘Plus’ menu’.
Een ovenfunctie gebruiken
Kies de ovenfunctie die past bij het te bereiden gerecht.
Raadpleeg hiervoor de Functies tabel. U kunt ook de info tab
raadplegen. Tik hiervoor op de tab onderaan het scherm om informatie
over de geselecteerde functie op te vragen.
1. Schakel de oven in met de ‘Aan/uit toets’.
2. Plaats het gerecht in de oven.
3. Tik op ‘OVEN’ om het ovenfunctie menu te openen.
4. Kies een ovenfunctie (zie hoofdstuk ‘Functie-instelscherm’).
5. Kies een temperatuur (zie hoofdstuk ‘Functie-instelscherm’).
6. Tik op het ‘bereidingstijdsymbool’ en kies een bereidingstijd (zie
hoofdstuk ‘Functie-instelscherm’).
De bereiding kan ook gestart worden zonder dat er een
bereidingstijd is ingesteld. Sla dan stap 6 over.
7. Kies eventueel aanvullende instellingen met het ‘Plus’ menu
(bijvoorbeeld snel voorverwarmen).
NL 19
Page 20
GEBRUIK
8. Start de bereiding van het gerecht met de bevestigingstoets.
10 21
°C
165
°C
180
• De volgende waarden zijn nu af te lezen in de display:
▷ huidige temperatuur (165 °C)
▷ ingestelde temperatuur (180 °C)
▷ status indicatie tijd (buitenste cirkel)
▷ status indicatie temperatuur (binnenste cirkel)
▷ bereidingstijd (23:54)
▷ eindtijd (10:45)
• Tik tijdens de bereiding op het midden van het scherm om een
pop-up scherm met de instellingen te openen. Pas deze instellingen
indien gewenst aan.
• Aan het einde van de bereiding van een gerecht klinkt een signaal.
Het signaal is uit te schakelen door de ovendeur te openen of door
op een toets te drukken.
• De gekozen instellingen kunnen opgeslagen worden in ‘Favorieten’.
Open hiervoor ‘Toevoegen aan favorieten’ vanuit het ‘Plus’ menu
(zie ‘Opslaan van een bereidingswijze’ in het hoofdstuk ‘Aanvullende
functies’).
23:54
10:45
NL 20
10 50
°C
165
Schermweergave aan het einde van een bereiding.
0:00
Page 21
GEBRUIK
Een ‘Extra’s’ functie gebruiken
Open het ‘Extra’s’ scherm om de pyrolyse reinigingsstand te
kiezen of om de oven snel voor te verwarmen. Ook kunnen een
reinigingsprogramma, verwarmfuncties of automatische programma’s
gekozen worden.
10:15
EXTRA’SOVEN
SNEL VOOR-
VERWARMEN
Tik op “EXTRA’S” om de extra functies van het toestel te tonen.
PROGRAMMA’S VERWARMEN
PYROLYSE
REINIGENONTDOOIEN
10:15
De volgende functies zijn nu te selecteren:
• Pyrolyse (zie hoofdstuk ‘Onderhoud’)
• Reinigen (zie hoofdstuk ‘Onderhoud’)
• Verwarmen (zie hoofdstuk ‘Aanvullende functies):
▷ Bordenwarmen
▷ Warmhouden
• Programma’s (zie hoofdstuk ‘Aanvullende functies):
▷ Favorieten
▷ Automatische programma’s
• Ontdooien
NL 21
Page 22
GEBRUIK
PROGRAMMA’S
Snel voorverwarmen
Snel voorverwarmen
Gebruik deze functie voor het snel voorverwarmen van de oven.
Gebruik deze functie niet met een gerecht in de ovenruimte.
Wanneer de oven is voorverwarmd tot de ingestelde temperatuur, is het
voorverwarmen klaar en is de oven gereed voor het bereiden van het
gerecht.
Snel voorverwarmen gebruiken
1. Schakel de oven in met de ‘Aan/uit toets’.
2. Tik op ‘SNEL VOORVERWARMEN’ om de snel voorverwarmen
functie te openen.
10 15
°C
180
NL 22
3. Kies een temperatuur (zie hoofdstuk ‘Functie-instelscherm’).
4. Start snel voorverwarmen met de bevestigingstoets.
• Snel voorverwarmen kan ook gekoppeld worden aan een
kookproces.
• Activeer hiervoor ‘SNEL VOORVERWARMEN’ vanuit het ‘Plus’
menu in het functie-instelscherm.
• Wanneer de ingestelde temperatuur is bereikt, verschijnt er een
pop-up en klinkt er een geluidssignaal.
• Na het sluiten van de deur begin de bereidingstijd op of af te lopen.
Page 23
GEBRUIK
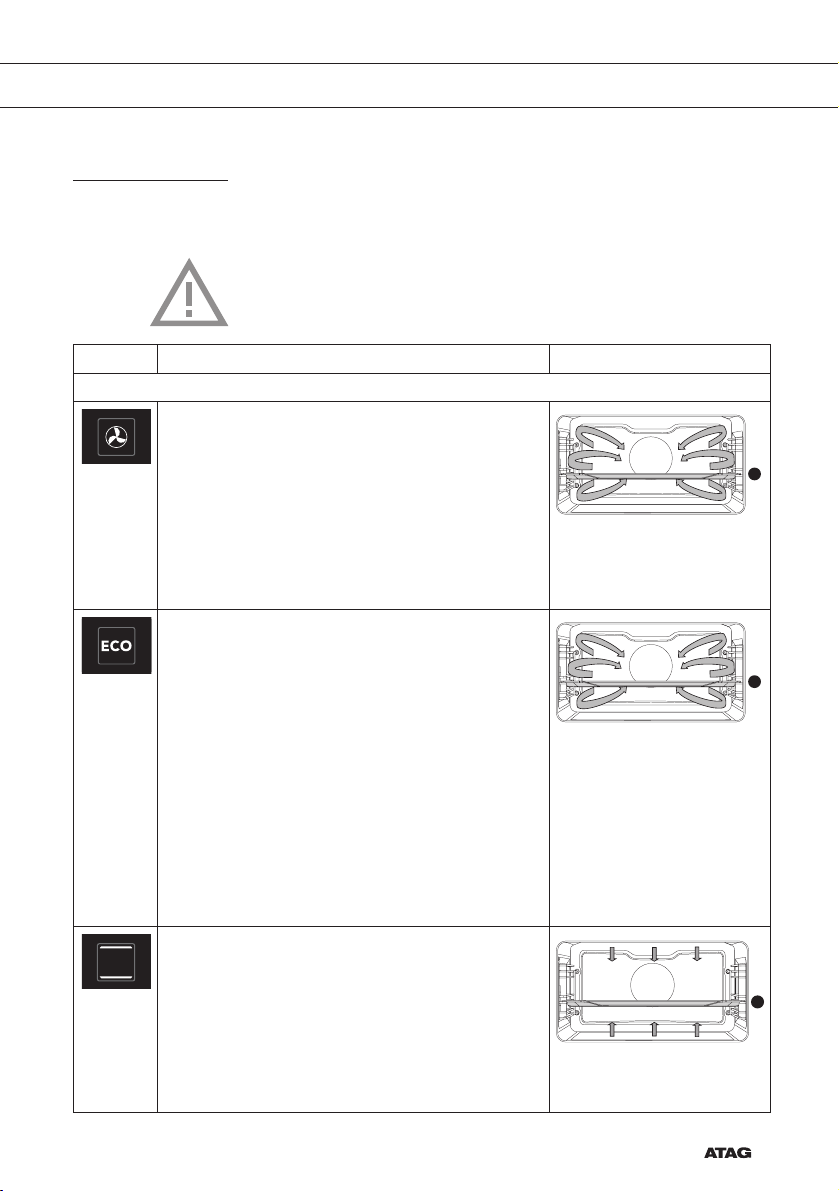
Functies tabel
Functie Beschrijving
Ovenfuncties
Hetelucht
• Het gerecht wordt verwarmd door hete lucht
die vanuit de achterkant van de oven wordt
aangevoerd.
• Deze functie maakt gebruik van gelijkmatige
verhitting en is ideaal voor bakken.
• Plaats de bakplaat op niveau 2.
• Aanbevolen temperatuur: 180 °C
• Voorverwarmen wordt aanbevolen.
ECO Hetelucht
• Het gerecht wordt verwarmd door hete lucht.
Eco hetelucht verbruikt minder energie maar geeft
hetzelfde resultaat als de hetelucht stand.
De bereiding duurt een aantal minuten langer.
• Deze functie wordt gebruikt voor bakken en
braden.
• Plaats de bakplaat op niveau 2.
• Aanbevolen temperatuur: 180 °C
• Door gebruik te maken van de restwarmte geeft
deze stand een laag energieverbruik (conform
energieklasse EN 60350-1). Bij deze functie
wordt niet de werkelijke temperatuur in de oven
weergegeven!
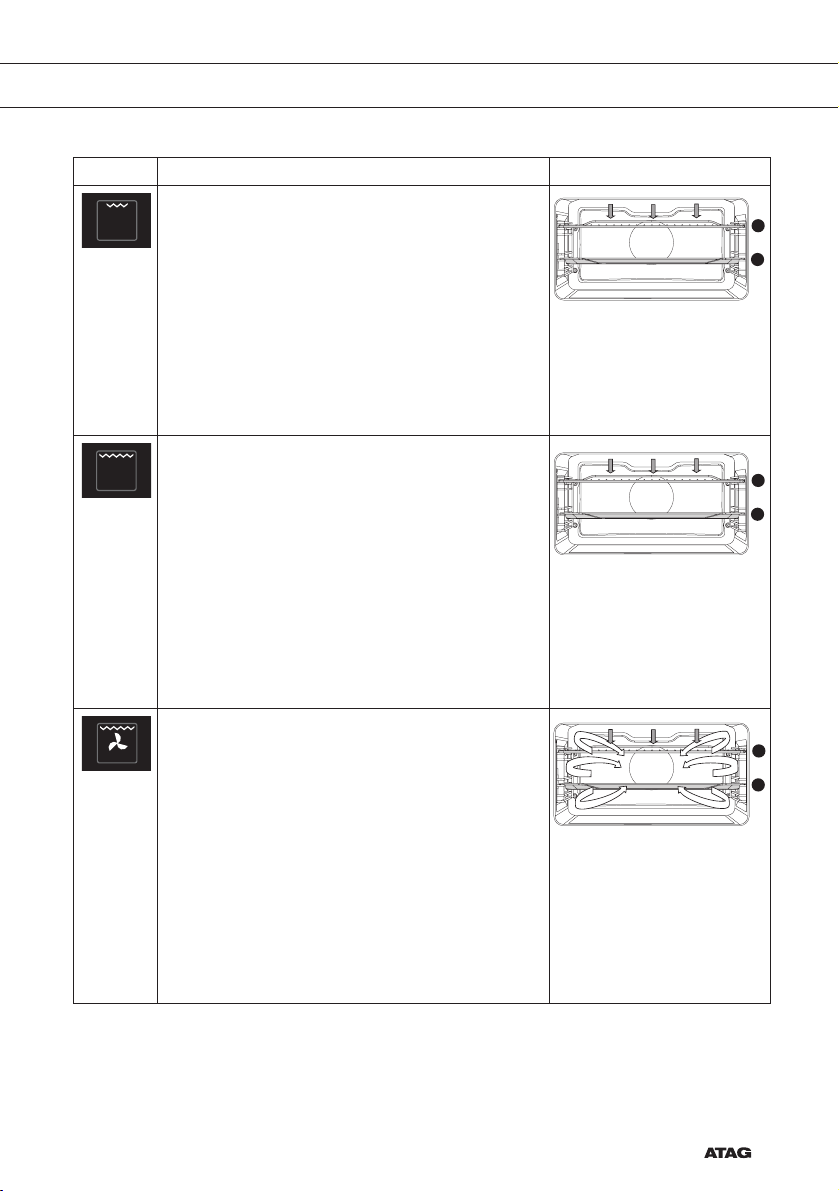
Bovenwarmte + Onderwarmte
• Het gerecht wordt verwarmd door verwarmingselementen boven en onder in de ovenruimte.
• Deze functie is geschikt voor traditioneel bakken
en braden.
• Plaats de bakplaat of het ovenrooster op niveau 2.
• Aanbevolen temperatuur: 200 °C
• Voorverwarmen wordt aanbevolen.
Raadpleeg onderstaande tabel voor het kiezen van de juiste functie.
Lees ook de instructies op de verpakking voor het bereiden van het
gerecht.
• Gebruik alleen glazen schalen die bestand zijn tegen een
temperatuur van 275 °C.
2
2
2
NL 23
Page 24
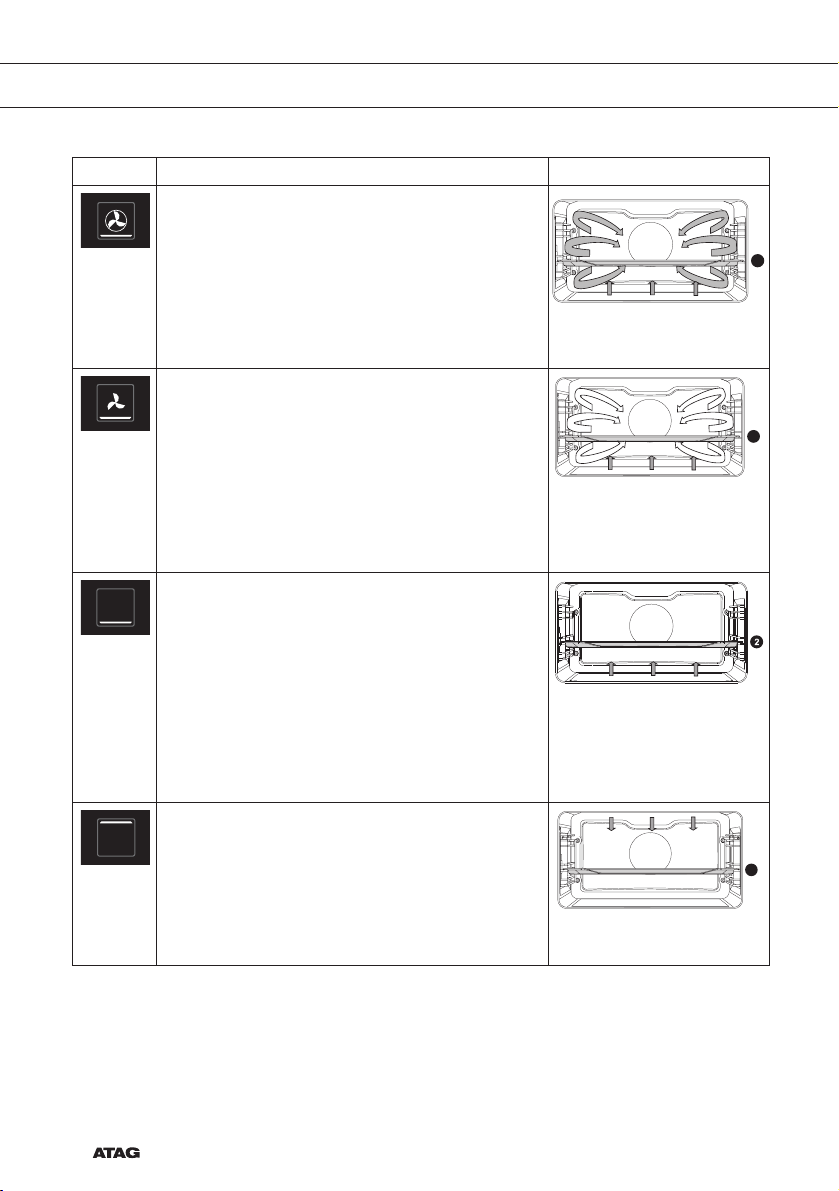
GEBRUIK
Functie Beschrijving
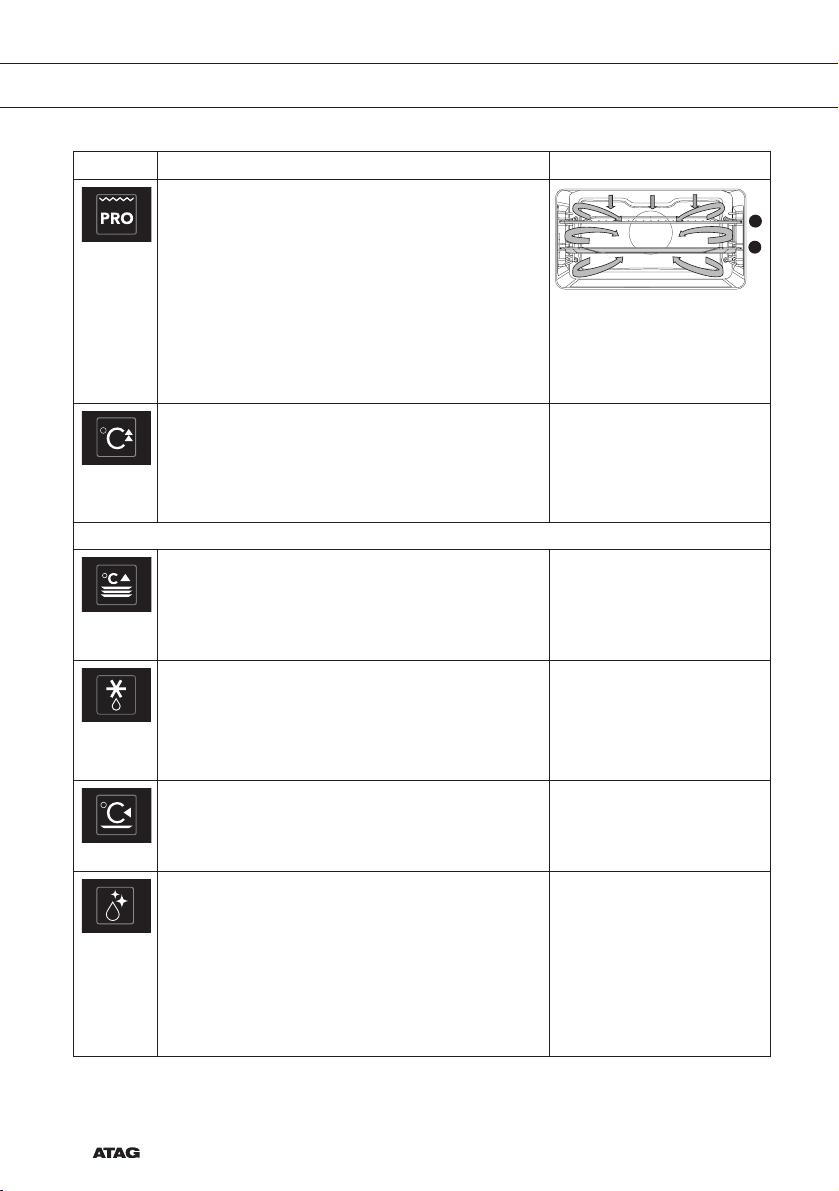
Hetelucht + Onderwarmte
• Het gerecht wordt verwarmd met zowel hete lucht
als onderwarmte.
• Deze functie wordt gebruikt voor een knapperig
en bruin resultaat.
• Plaats de bakplaat of het ovenrooster op niveau 2.
• Aanbevolen temperatuur: 200 °C
• Voorverwarmen wordt aanbevolen.
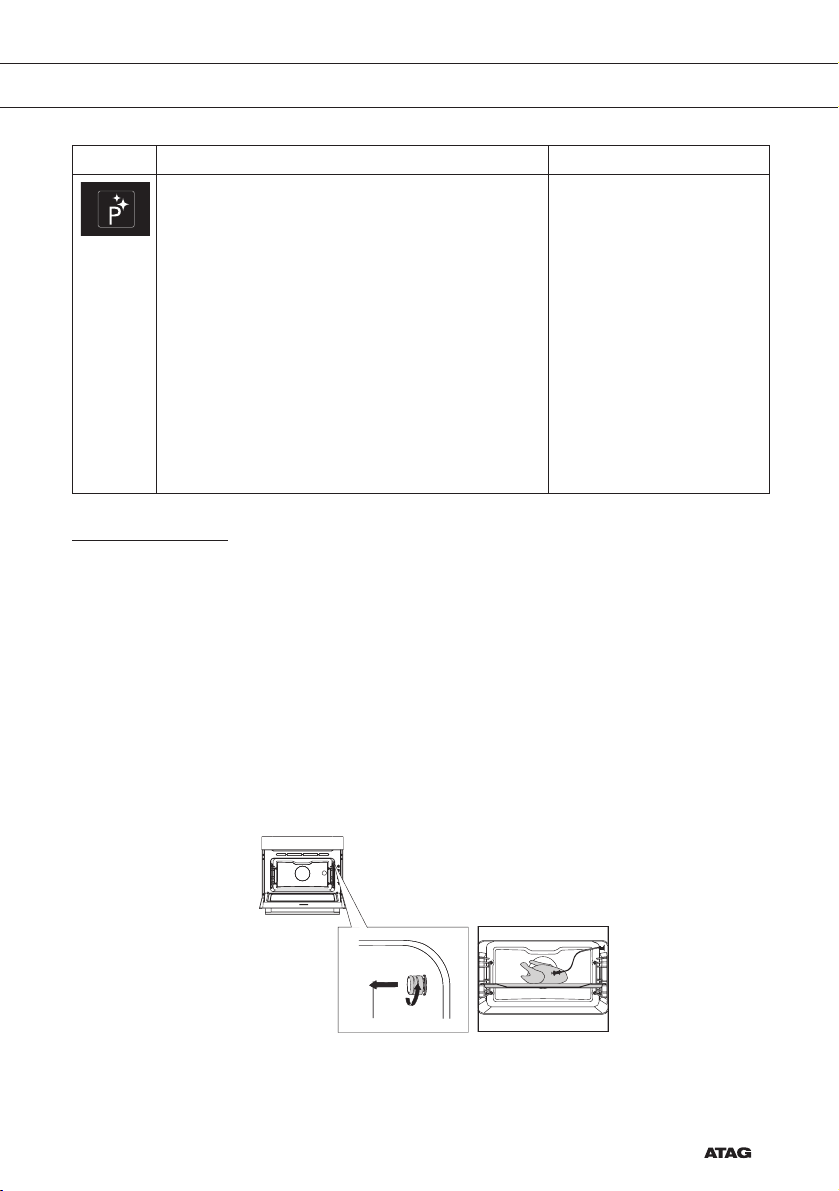
Onderwarmte + Ventilator
• Het gerecht wordt verwarmd door het onderste
verwarmingselement in combinatie met de
ventilator.
• De warmte circuleert langs het gerecht.
Deze functie wordt gebruikt voor het bakken van
gistdeeggebak.
• Plaats de bakplaat op niveau 2.
• Aanbevolen temperatuur: 180 °C
Onderwarmte
• Het gerecht wordt verwarmd door het onderste
verwarmingselement. Schakel deze stand in net
voor het einde van de bak- of braadtijd.
• Deze functie wordt gebruikt voor gerechten die
een bodemkorst of bruining nodig hebben.
• Plaats de bakplaat of het ovenrooster op niveau 2.
• Gebruik deze functie vlak voor het einde van het
bakken of braden.
• Aanbevolen temperatuur: 160 °C
Bovenwarmte
• Het gerecht wordt verwarmd door het bovenste
verwarmingselement.
• Deze functie wordt gebruikt voor het bruineren
van de bovenlaag van gerechten.
• Plaats de bakplaat of het ovenrooster op niveau 2.
• Aanbevolen temperatuur: 150 °C
2
2
2
NL 24
Page 25
GEBRUIK
Functie Beschrijving
Grill
• Het gerecht wordt verwarmd door het grillelement.
• Deze functie kan gebruikt worden voor het
gratineren van boterhammen, het roosteren van
brood en saucijsjes.
• Plaats het ovenrooster op niveau 4 of 5 en de
bakplaat op niveau 2.
• Maximaal toegestane temperatuur is 240 °C.
• Controleer regelmatig de bereiding. Door de hoge
temperatuur kan het vlees snel aanbranden.
• Verwarm 5 minuten voor.
Grote Grill
• Het gerecht wordt verwarmd door het
grillelement in combinatie met het bovenste
verwarmingselement.
• Deze functie wordt gebruikt voor schotels en
gebakken gerechten die bruining nodig hebben.
• Plaats het ovenrooster op niveau 4 of 5 en de
bakplaat op niveau 2.
• Maximaal toegestane temperatuur is 240 °C.
• Controleer regelmatig de bereiding. Door de hoge
temperatuur kan het vlees snel aanbranden.
• Verwarm 5 minuten voor.
Grote grill + Ventilator
• Het gerecht wordt verwarmd door het
grillelement in combinatie met het bovenste
verwarmingselement en verspreid door de
ventilator.
• Deze functie wordt gebruikt voor het grillen van
vis, vlees en groenten.
• Plaats het ovenrooster op niveau 4 of 5 en de
bakplaat op niveau 2.
• Aanbevolen temperatuur: 170 °C
• Controleer regelmatig de bereiding. Door de hoge
temperatuur kan het vlees snel aanbranden.
• Verwarm 5 minuten voor.
4
2
4
2
4
2
NL 25
Page 26
GEBRUIK
Functie Beschrijving
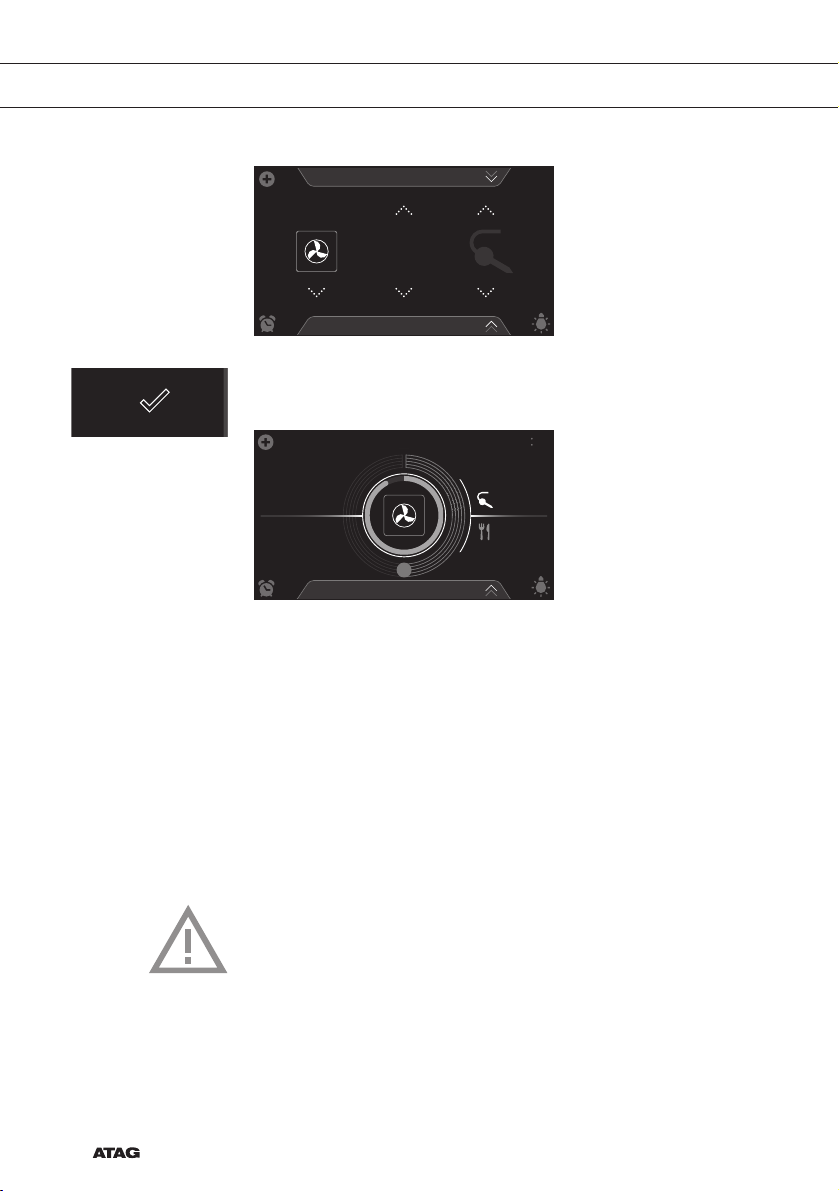
Pro roosteren
• Deze stand bevat een automatische
verwarmcyclus.
• Het vlees wordt eerst op hoge temperatuur
dichtgeschroeid door hete lucht en het bovenste
verwarmingselement.
• Hierna wordt het gerecht langzaam gegaard bij
de lage, vooraf ingestelde temperatuur, met de
bovenste en onderste verwarmingselementen.
• Deze functie is geschikt voor vlees, gevogelte en vis.
• Aanbevolen temperatuur: 180 °C
Snel voorverwarmen
• Met deze functie is de ovenruimte snel op de
gewenste temperatuur. Gebruik deze stand niet
met een gerecht in de ovenruimte.
• Aanbevolen temperatuur: 180 °C
Extra functies
Bordenwarmen
• Deze functie wordt gebruikt om servies te
verwarmen, zodat het geserveerde gerecht langer
warm blijft.
• Aanbevolen temperatuur: 60 °C
Ontdooien
• Bij deze functie circuleert de lucht met behulp van
de ventilator. De lucht wordt verwarmd tot 30 °C.
• Gebruik deze instelling voor het ontdooien van
bevroren gerechten, zoals cakes, brood en fruit.
Warmhouden
• Deze functie wordt gebruikt om reeds bereide
gerechten warm te houden.
• Aanbevolen temperatuur: 60 °C
Stoomreinigen
• Met deze functie en een vochtige doek verwijdert
u eenvoudig vet en vuil van de ovenwanden.
• Gebruik deze functie alleen als de oven volledig
is afgekoeld. Giet vóór aanvang van het
reinigingsproces 0,15 liter water op de bodem van
de ovenruimte.
• Na het inweken kunnen voedselresten met een
vochtige doek verwijderd worden.
3
2
NL 26
Page 27
GEBRUIK
Functie Beschrijving
Pyrolyse
• Deze functie is bedoeld om de oven automatisch
te reinigen. De oven warmt op naar een
temperatuur ver boven normaal gebruik, waardoor
vetresten en andere verontreinigingen tot as
vergaan.
• Verwijder alle accesoires en loszittende
voedselresten uit de ovenruimte voor aanvang
van het proces. Tijdens het pyrolytische
zelfreinigingsproces wordt boven een bepaalde
temperatuur de ovendeur automatisch
vergrendeld. Ook wordt de buitenkant van de
oven warmer dan normaal.
• Wanneer de oven volledig is afgekoeld kan de
binnenkant van de oven worden schoongeveegd
met een vochtige doek.
Culisensor
Braden met de culisensor
Stel voor braden met de culisensor de gewenste kerntemperatuur van
het gerecht in. De oven verwarmt totdat de kerntemperatuur van het
gerecht is bereikt. De culisensor meet de kerntemperatuur van het
gerecht.
1. Schakel de oven in met de ‘Aan/uit toets’.
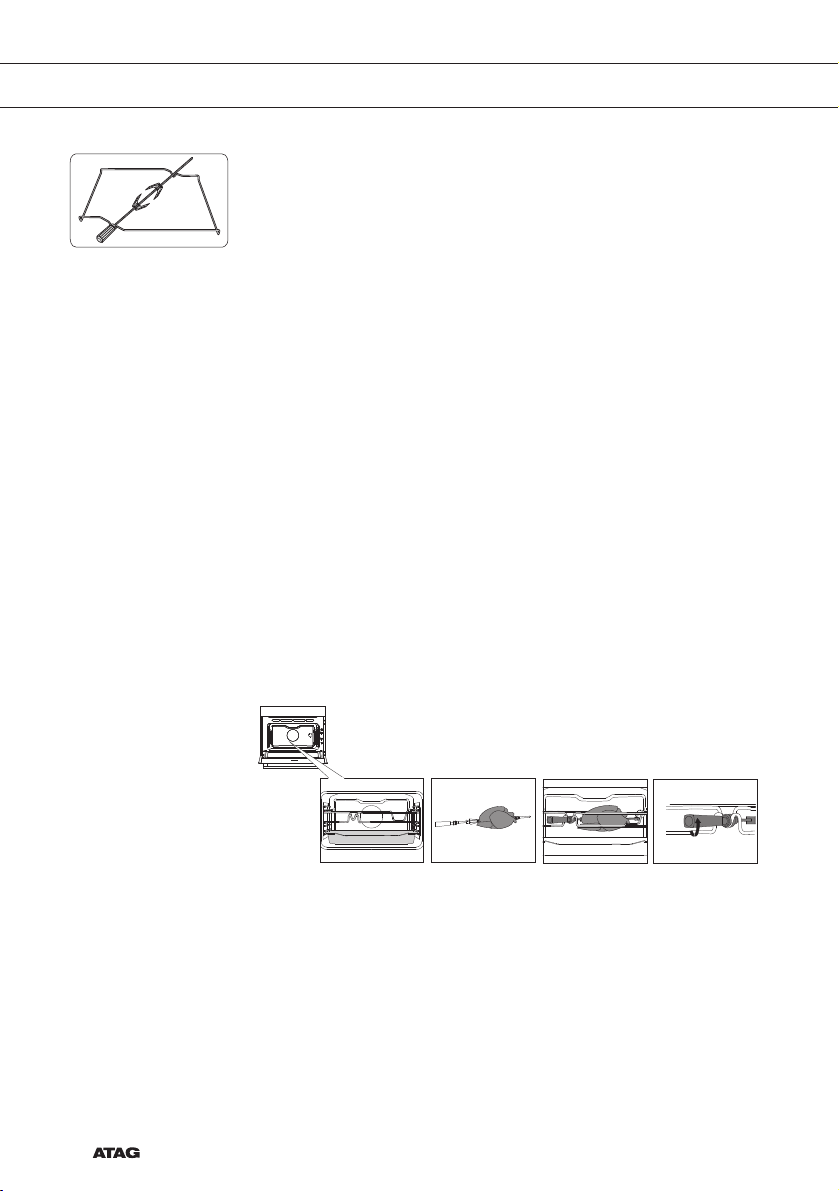
2. Schroef het metalen afdekplaatje van het aansluitpunt
(voorste bovenhoek van de rechter zijwand).
3. Steek de stekker van de culisensor in de aansluiting en steek de
culisensor volledig in het gerecht.
NL 27
Page 28
Culisensor-stand
PROGRAMMA´S
Culisensor-stand
GEBRUIK
10:15
°C °C
180 70
4. Kies een ovenfunctie, temperatuur en kerntemperatuur (zie
hoofdstuk ‘Functie-instelscherm’).
5. Start de bereiding van het gerecht met de bevestigingstoets.
10 21
165
180
°C
°C
35
70
°C
°C
• De volgende waarden zijn nu af te lezen in de display:
▷ huidige temperatuur (165 °C)
▷ de ingestelde temperatuur (180 °C)
▷ status indicatie kerntemperatuur (buitenste cirkel)
▷ status indicatie temperatuur (binnenste cirkel)
▷ Huidige kerntemperatuur (35 °C)
▷ Ingestelde kerntemperatuur (70 °C)
• Het kookproces eindigt, wanneer de ingestelde kerntemperatuur
bereikt is. Aan het einde van de bereiding van een gerecht klinkt een
signaal. Het signaal is uit te schakelen door de ovendeur te openen
of door een toets in te drukken.
• Plaats altijd de volledige metalen voeler van de culisensor in
het gerecht.
• Let op! Plaats na het kookproces altijd het metalen dopje terug
op de aansluiting van de culisensor.
• Gebruik de culisensor alleen voor toepassing in uw oven.
• Zorg ervoor dat tijdens het kookproces de culisensor niet in
aanraking komt met het verwarmingselement.
• Na het kookproces is de culisensor erg heet. Wees voorzichtig!
Voorkom brandwonden.
NL 28
Page 29
GEBRUIK
Richtwaarden kerntemperatuur
Rundvlees
Runderfilet/Lende medium 55 - 58 ºC
Roastbeef medium 55 - 60 ºC
Kogelbiefstuk doorbakken
Gebraden rundvlees doorbakken 80 - 85 ºC
Gekookt rundvlees doorbakken 90 ºC
Varkensvlees
Poot/bout doorbakken 75 ºC
Poot/bout licht rosé 65 - 68 ºC
Varkensrug licht rosé 65 - 70 ºC
Varkensschouder doorbakken 75 ºC
Varkensbuik/gevuld doorbakken 75 - 80 ºC
Varkensbuik/buikvlees doorbakken 80 - 85 ºC
Varkensachterpoot gebakken doorbakken 80 - 85 ºC
Varkenspoot doorbakken 80 - 85 ºC
Gekookte ham zeer mals 64 - 68 ºC
Casseler ribbetjes doorbakken 65 ºC
Ham in brooddeeg 65 - 68 ºC
Kalfsvlees
Kalfsrug licht rosé 58 - 65 ºC
Kalfpoot/Kalfsbout doorbakken 78 ºC
Gebakken nieren doorbakken 75 - 80 ºC
Gebraden kalfsvlees/Schouder doorbakken 75 - 80 ºC
Kalfsbout doorbakken 75 - 78 ºC
Schapenvlees
Schapenrug rosé 65 - 70 ºC
Schapenrug doorbakken 80 ºC
Schapenpoot rosé 70 - 75 ºC
Schapenbout 82 - 85 ºC
Lamsvlees
Lamsbout rosé 60 - 62 ºC
Lamsbout doorbakken 68 - 75 ºC
Lamsrug rosé 54 - 58 ºC
Lamsrug doorbakken 68 - 75 ºC
Lamsschouder doorbakken 78 - 85 ºC
Gevogelte
Haantjes doorbakken 85 ºC
Gans/Eend doorbakken 90 - 92 ºC
Kalkoen doorbakken 80 - 85 ºC
Pasteitjes e.d.
Pasteitjes 72 - 85 ºC
Terrines 60 - 70 ºC
Vis
Zalm zacht 60 ºC
Vis filet 62 - 65 ºC
Hele vis 65 ºC
Terrine 62 - 65 ºC
85 - 90 ºC
NL 29
Page 30

GEBRUIK
Uitgestelde start
Gebruik de “uitgestelde start” functie als u de bereiding op een later
tijdstip wilt starten. De uitgestelde start functie is via het ‘Plus’ menu
alleen in een ovenfunctie te selecteren. Zie hoofdstuk ‘Gebruik van het
‘Plus’ menu’.
Een uitgestelde starttijd instellen
1. Kies een functie, temperatuur en stel eventueel een bereidingstijd in
(zie hoofdstuk ‘Functie-instelscherm’).
Een uitgestelde starttijd kan ook zonder het instellen van een
bereidingstijd worden ingesteld.
2. Tik op het plus symbool om het ‘Plus’ menu te openen.
3. Tik op ‘UITGESTELDE START’ om de functie te openen.
UITGESTELDE START
10:45
NL 30
4. Kies een starttijd (zie hoofdstuk ‘Functie-instelscherm’).
5. Bevestig de ingestelde starttijd met de bevestigingstoets.
Het ‘uitgestelde starttijd’ icoontje verschijnt onder het plus symbool
ter indicatie van activering. De uitgestelde starttijd kan ongedaan
gemaakt worden door de instelling terug te zetten naar de dagtijd.
6. Bevestig het kookproces met de bevestigingstoets.
De bereiding start automatisch op de ingestelde tijd. Als er een
bereidingstijd is ingesteld, zal de bereiding ook automatisch
stoppen.
Page 31

Meerfase koken
00:10
GEBRUIK
Meerfase koken
10 15
10:45
°C
180
• De volgende waarden zijn nu af te lezen in de display:
▷ ingestelde temperatuur (180 °C)
▷ starttijd (10:45).
▷ eindtijd (11:15) (alleen zichtbaar als er een bereidingstijd
ingesteld is)
• Open de functie ‘Meerfase koken’ via het ‘Plus’ menu.
Zie hoofdstuk ‘Gebruik van het ‘Plus’ menu’.
• Met deze functie kunt u tot drie functies binnen één kookproces
combineren.
• Kies verschillende instellingen om de bereidingswijze af te stemmen
op uw voorkeur.
11:15
1. Tik op het plus symbool om het ‘Plus’ menu te openen.
2. Tik op MEERFASE KOKEN om de functie te openen (alleen te
openen als nog geen bereiding is gestart).
De instellingen van fase 1 zijn zichtbaar. Deze kunnen indien
gewenst aangepast worden.
10:15
0:10
H:M
°C
160
3. Kies een functie (zie hoofdstuk ‘Functie-instelscherm’).
4. Kies een temperatuur (zie hoofdstuk ‘Functie-instelscherm’).
5. Kies een bereidingstijd (zie hoofdstuk ‘Functie-instelscherm’).
6. Bevestig de instelling van fase 1 met de bevestigingstoets.
NL 31
Page 32

Meerfase koken
00:30
GEBRUIK
1
160
°C
00:10
H:M
2
3
00:10
7. Tik op “2” om de instellingen van fase 2 te tonen.
8. Wijzig indien gewenst de standaard waarden (functie, temperatuur
en bereidingstijd) van fase 2 (zie punt 3, 4 en 5).
10:15
°C
200
9. Bevestig de instelling van fase 2 met de bevestigingstoets.
°C
1
160
0:20
00:10
H:M
H:M
NL 32
2
200
°C
00:20
H:M
3
00:30
10. Tik (indien gewenst) op “3” om de instellingen van fase 3 te tonen.
11. Wijzig indien gewenst de standaard waarden (functie, temperatuur
en bereidingstijd) van fase 3 (zie punt 3, 4 en 5).
12. Bevestig de instelling van fase 3 met de bevestigingstoets.
Page 33

GEBRUIK
00:18
Verwijder een fase door op het kruisje naast de instellingen te tikken.
Een fase kan alleen worden verwijderd als deze nog niet is gestart.
13. Door opnieuw op de bevestigingstoets te drukken, begint de oven te
werken volgens fase 1 (actieve fase wordt in het wit weergegeven).
Wanneer de ingestelde tijd voorbij is, wordt de volgende fase
geactiveerd, d.w.z. fase 2, en later fase 3, als deze ingesteld is.
10 27
°C
185
°C
200
• De volgende waarden zijn nu af te lezen in de display:
▷ de actieve fase (2)
▷ de totale bereidingstijd (00:18)
▷ huidige temperatuur (185 °C) /
▷ ingestelde temperatuur actieve fase (200 °C)
▷ status indicatie tijd actieve fase (buitenste cirkel)
▷ status indicatie temperatuur actieve fase (binnenste cirkel)
▷ bereidingstijd van de actieve fase (17:32)
▷ eindtijd totaal (10:45)
De gekozen instellingen kunnen opgeslagen worden in ‘Favorieten’.
Open hiervoor ‘TOEVOEGEN AAN FAVORIETEN’ vanuit het ‘Plus’ menu
(zie ‘Opslaan van een bereidingswijze’ in het hoofdstuk ‘Aanvullende
functies’).
17:32
10:45
NL 33
Page 34

GEBRUIK
Aanvullende functies
Er zijn een aantal aanvullende functies of programma’s te selecteren.
1. Tik op ‘EXTRA’S’ om de extra functies van het toestel te tonen.
PROGRAMMA’S VERWARMEN
PYROLYSE
REINIGENONTDOOIEN
10:15
De volgende aanvullende functies en programma’s zijn nu te selecteren:
• Verwarmen:
▷ Bordenwarmen
▷ Warmhouden
• Programma’s:
▷ Favorieten
▷ Automatische programma’s
Verwarmen
• Bordenwarmen
▷ Deze functie wordt gebruikt wanneer u servies wilt verwarmen
(borden, kopjes) zodat het geserveerde langer warm blijft.
▷ Door het kiezen van deze functie kunt u de temperatuur en tijd
van het bordenwarmen bepalen.
• Warmhouden
▷ Gebruik deze functie om de temperatuur van al bereide
gerechten te behouden.
▷ Door het kiezen van deze functie kunt u de temperatuur en tijd
van het warmhouden bepalen.
NL 34
Verwarmfunctie selecteren
1. Tik op ‘EXTRA’S’ om de extra functies van het toestel te tonen.
2. Tik op ‘VERWARMEN’ om het verwarmfuncties menu te openen.
Page 35

GEBRUIK
Bordenwarmen
PROGRAMMA’S
10:15
1:00
10 15
H:M
°C
60
3. Kies een functie (bordenwarmen of warmhouden). Pas eventueel de
instellingen aan.
4. Start de functie met de bevestigingstoets.
Programma’s
• Favorieten
10:45
°C
180
▷ In ‘FAVORIETEN’ kunt u uw eigen opgeslagen recepten
selecteren. Zie ook ‘Opslaan van een bereidingswijze’.
• Automatische programma’s
▷ Met de automatische programma’s kunt u gerechten bereiden
door te kiezen uit een lijst voorgeprogrammeerde gerechten.
De programma’s zijn onderverdeeld in categoriën (VLEES,
GROENTEN etc.)
▷ Kies eerst de categorie en daarna uit de beschikbare lijst het
gerecht zelf.
11:15
Programma selecteren
1. Tik op ‘EXTRA’S’ om de extra functies van het toestel te tonen.
2. Tik op ‘PROGRAMMA’S’ om het programma’s menu te openen.
NL 35
Page 36

GEBRUIK
Lamsrack
PROGRAMMA’S
FAVORIETEN
VLEES
VIS EN SCHELPDIEREN
GROENTEN
PROGRAMMA’S
3. Tik op ‘FAVORIETEN’ of een van de automatische programma
categoriën.
▷ Kies bij ‘FAVORIETEN’ een van uw opgeslagen bereidingen.
▷ Kies bij de automatische programma categoriën een gerecht uit
de beschikbare lijst.
VLEES
VARKENSVLEES
RUNDVLEES
GEVOGELTE
OVERIGE VLEESGERECHTEN
NL 36
PROGRAMMA’S
10:15
1,0
KG
INTENSITEIT
1:00
H:M
4. Pas eventueel de intensiteit en/of het gewicht aan.
Niet bij alle automatische programma’s is de intensiteit of het gewicht
aan te passen.
5. Start het gekozen programma met de bevestigingstoets.
Page 37

GEBRUIK
• Open met de info tab informatie over het gekozen programma. In de
info tab is informatie te lezen over de benodigde accessoires en het
inschuifniveau in de oven. Ook is soms informatie over het bereiden
van het gerecht te vinden.
• Voor een aantal automatische programma’s is het mogelijk om deze
handmatig naar wens aan te passen. Open hiervoor het ‘Plus’ menu
en tik op ‘HANDMATIG’ (indien mogelijk).
Opslaan van een bereidingswijze
Een functie/bereiding is actief (de oven is gestart).
TOEVOEGEN AAN FAVORIETEN
Voeg de huidige instellingen toe aan de
favorieten
1. Open het ‘Plus’ menu en tik op ‘TOEVOEGEN AAN FAVORIETEN’.
TOEVOEGEN AAN FAVORIETEN
2. Geef de bereiding een naam door de betreffende letters te
selecteren. Tik op het ‘pijltje met kruisje’ symbool als u een foutief
gekozen letter wilt wissen.
3. Druk op de bevestigingstoets om de bereiding op te slaan.
Automatische programma’s zijn ook op de slaan onder ‘FAVORIETEN’.
NL 37
Page 38

GEBRUIK
Instellingen
1. Tik vanuit het startscherm op het plus symbool.
INSTELLINGEN
Ga naar de instellingen van het toestel
MEERFASE KOKEN
Combineer tot drie functies binnen één
kookproces
2. Tik op ‘INSTELLINGEN’.
INSTELLINGEN
ALGEMEEN
GELUID
SCHERM EN VERLICHTING
KOKEN
NL 38
Dit menu biedt de volgende keuzes:
• Algemeen
• Geluid
• Scherm en verlichting
• Koken
• Systeem
3. Tik op de gewenste categorie en de aan te passen instelling.
▷ tik op de gewenste keuze uit een lijst.
▷ pas een waarde aan door op de pijltjes boven en onder de
waarde te tikken of veeg over de waarde.
▷ zet een instelling aan of uit door op “AAN” of “UIT” te tikken.
4. Druk ter bevestiging op de bevestigingstoets.
ALGEMEEN
In dit menu kunt u het volgende instellen:
• Taal (taal van het aanraakscherm)
• Tijd (dagtijd)
Page 39

GEBRUIK
• Tijdsweergave (12 uurs of 24 uurs weergave)
• Datum (huidige datum)
• Datum weergave (datum wel/niet zichtbaar in het ‘stand-by’ scherm)
GELUID
In dit menu kunt u het volgende instellen:
• Algemeen geluid (volume van signalen en alarmen)
• Toetsgeluid (volume van het toetsgeluid)
• Opstart- / uitschakelgeluid (volume van in- en uitschakel geluid)
SCHERM EN VERLICHTING
In dit menu kunt u het volgende instellen:
• Scherm helderheid (in te stellen in 5 helderheden)
• Ovenverlichting (uitschakelduur vanaf laatste inschakeling)
• Toestel naar stand-by stand (hoeveel tijd na laatste bediening gaat
het toestel naar stand-by stand)
• Toestel uitschakelen (hoe lang staat toestel in stand-by)
• Opstart- / uitschakelanimatie (in- of uitschakelen van de merk
animatie)
• Nachtstand (begin en eindtijd voor lagere helderheid van het
scherm)
Wanneer bij “TOESTEL UITSCHAKELEN” voor de instelling
“Handmatig” is gekozen, schakelt het toestel niet automatisch uit.
Wanneer het toestel handmatig uitgeschakeld is, wordt deze instelling
teruggezet naar de fabrieksinstellingen. Dit in verband met de verplichte
maximale energieconsumptie.
KOKEN
In dit menu kunt u het volgende instellen:
• Standaard programma intensiteit (intensiteit van automatische
programma’s)
SYSTEEM
In dit menu kunt u het volgende instellen:
• Toestelinformatie (opvragen van toestelinformatie)
• Fabrieksinstellingen (terug naar fabrieksinstellingen)
NL 39
Page 40

REINIGEN
Het toestel reinigen
Stoomreinigen
Reinig de oven regelmatig om te voorkomen dat vet- en voedselresten
zich ophopen, vooral op de oppervlakken aan de binnen- en
buitenkant, de deur en de afdichting.
• Schakel de toetsvergrendeling in om te voorkomen dat het toestel
ongewenst in werking treedt.
• Reinig de oppervlakken aan de buitenkant met een zachte doek en
warm water met zeep.
• Veeg na met een schone natte doek en droog de oppervlakken af.
• Verwijder spetters en vlekken op de oppervlakken aan de
binnenkant met een doek met zeep.
• Veeg na met een schone natte doek en droog de oppervlakken af.
• Let erop dat er geen water in de ventilatieopeningen komt.
• Gebruik nooit schurende schoonmaakmiddelen of chemische
oplosmiddelen.
• Zorg er altijd voor dat de afdichting van de deur schoon is.
Zo voorkomt u de ophoping van vuil en kunt u de deur goed
sluiten.
NL 40
Met stoomreinigen en een vochtige doek verwijdert u eenvoudig vet en
vuil van de ovenwanden.
Stoomreinigen gebruiken
Gebruik stoomreinigen alleen als de oven volledig is afgekoeld. Als de
oven heet is, is vuil en vet moeilijk te verwijderen.
1. Verwijder alle accessoires uit de oven.
2. Giet 0,15 liter water op de bodem van de ovenruimte.
3. Tik op ´EXTRA’S´ om de extra functies van het toestel te tonen.
4. Tik op ´REINIGEN´ om de reinigingsfunctie te openen.
5. Druk op de bevestigingstoets om stoomreinigen te starten.
• Het programma duurt 30 minuten.
Na 30 minuten zijn de voedselresten aan de emaillen wanden
voldoende geweekt om ze met een vochtige doek te verwijderen.
• Open de deur niet tijdens gebruik van het reinigingsprogramma.
Page 41

REINIGEN
Pyrolyse
Bij gemiddeld gebruik van de oven raden wij aan de Pyrolyse-functie
eenmaal per maand te gebruiken.
Veeg de oven en de acessoires in de oven die gereinigd moeten
worden, af met een vochtige doek! Restanten voedsel en vet kunnen
ontbranden tijdens het pyrolyse proces. Brandgevaar!
1. Verwijder alle accessoires en geleiders uit de oven. Indien ook
de bakplaat gereinigd moet worden plaats dan eerst de pyrolyse
geleiders. Plaats maximaal 1 bakplaat.
2. Tik op ´EXTRA’S´ om de extra functies van het toestel te tonen.
3. Tik op ‘PYROLYSE’ om de pyrolyse functie te openen.
4. Kies de gewenste reinigingsintensiteit:
▷ Laag: ongeveer 3 uur
▷ Gemiddeld: ongeveer 3,5 uur
▷ Hoog: ongeveer 4 uur
Alleen de reinigingsintensiteit kan worden gekozen. De tijd staat vast en
hangt af van de gekozen reinigingsintensiteit.
5. Druk op de bevestigingstoets om pyrolysereinigen te starten.
• Na een bepaalde periode wordt de ovendeur voor uw eigen veiligheid
automatisch geblokkeerd.
• Er kan een onaangename geur vrijkomen uit de oven tijdens het
reinigingsproces.
• De ovendeur is te openen nadat het toestel afgekoeld is.
• Wanneer de oven afgekoeld is, veeg deze dan uit met een vochtige
doek. Veeg de ovendeur en de aangrenzende oppervlakken rondom
de afdichting schoon. Boen niet over de afdichting.
NL 41
Page 42

REINIGEN
Inschuifgeleiders verwijderen en reinigen.
Gebruik conventionele schoonmaakmiddelen om de insteekgeleiders te
reinigen.
• Verwijder de schroef met een schroevendraaier.
• Haal de insteekgeleiders los uit de gaten in de achterwand.
Ovenlamp vervangen
De lamp in dit huishoudelijke apparaat is uitsluitend bedoeld voor
verlichting van dit apparaat. De lamp is niet geschikt voor de
verlichting van een huishoudelijke ruimte.
NL 42
De lamp (halogeen G9, 230 V, 25 W) is een gebruiksartikel en valt
daarom niet onder de garantie. Verwijder eerst de bakplaat, de
ovenrooster en de inschuifgeleiders.
• Maak het toestel spanningsloos door de stekker uit de
stopcontact te verwijderen of de zekering in de meterkast uit te
schakelen!
• De halogeenlamp kan zeer heet zijn! Gebruik bescherming voor het
verwijderen van de lamp.
1. Gebruik een platte schroevendraaier om het afdekplaatje van de
verlichting uit de houder te klappen en deze te verwijderen.
Pas op dat u het email niet beschadigt.
2. Trek de halogeen lamp uit de fitting.
Page 43

B
A
REINIGEN
Demonteren ovendeur
Houd uw vingers uit de buurt van de scharnieren van de ovendeur.
De veren van de scharnieren staan onder hoge spanning en kunnen
verwondingen veroorzaken.
Zorg ervoor dat de scharnieren juist geplaatst en vergrendeld zijn.
Verwijderen van de ovendeur
1. Open de deur tot deze zich in horizontale positie bevindt.
2. Til de blokkeerhendels iets op (A) en klap deze naar voren (B).
3. Sluit langzaam de deur tot deze in een hoek van 45° staat
(ten opzichte van de deur in gesloten toestand).
4. Til de deur dan omhoog en verwijder deze.
NL 43
Page 44

REINIGEN
Demonteren ovenruit
Plaatsen van de ovendeur
1. Houd de deur voor de oven in een hoek van ongeveer 45°.
2. Schuif de scharnieren in de scharnieropeningen en controleer of
beide scharnieren goed geplaatst zijn.
3. Open de deur volledig.
4. Til de blokkeerhendels iets op (A) en klap deze naar de oven (B).
5. Sluit langzaam de ovendeur en controleer of de scharnieren goed in
de openingen zitten.
Als de ovendeur niet goed opent of sluit, controleer dan of de
scharnieren juist geplaatst zijn.
Het glas van de ovendeur kan van binnen gereinigd worden, maar u
moet het glas dan uit de deur verwijderen. Verwijder eerst de ovendeur
(zie hoofdstuk ‘Demonteren ovendeur’).
1. Til de nokjes aan de linker- en rechterkant van de deur aan de
achterzijde iets op (1) en schuif deze naar achter (2) zodat het glas
vrij komt.
2. Pak het glas aan de onderkant en til dit voorzichtig omhoog om het
uit de steun te verwijderen.
3. Het binnenste glas (afhankelijk van het model) kan worden
verwijderd door het voorzichtig op te tillen en te verwijderen.
Verwijder ook de rubber afdichtingen rond het glas.
NL 44
Plaats in omgekeerde volgorde het glas weer terug. De markeringen op
de ovendeur en het glas (een halve cirkel) moeten samenvallen.
Page 45

PROBLEMEN OPLOSSEN
Algemeen
Raadpleeg het onderstaande storingsoverzicht als er problemen zijn
met uw oven. Mochten de problemen niet verholpen kunnen worden
neem dan contact op met de klantenservice.
Het gerecht blijft rauw
• Controleer of de timer is ingesteld en er op de bevestigingstoets
gedrukt.
• Is de deur goed gesloten?
• Controleer of er geen zekering is doorgebrand en er geen
stroomonderbreker is geactiveerd.
Het gerecht is te gaar of niet gaar genoeg
• Controleer of de juiste bereidingstijd ingesteld is.
De sensoren reageren niet; de display is vastgelopen.
• Koppel het apparaat gedurende een paar minuten los van
de stroomvoorziening (draai de zekering los of schakel de
hoofdschakelaar uit); sluit vervolgens het toestel weer aan en
schakel het in.
Elektronische storingen kunnen de oorzaak zijn van het resetten
van de display.
• Haal de stekker uit het stopcontact en steek deze er weer in.
• Stel de tijd opnieuw in.
Er verschijnt condens in de oven.
• Dit is normaal. Veeg de oven na gebruik schoon.
De ventilator blijft werken nadat de oven is uitgeschakeld.
• Dit is normaal. De koelventilator blijft nog enige tijd werken nadat
de oven is uitgeschakeld.
Er is een luchtstroom voelbaar bij de deur en de buitenkant van
het apparaat.
• Dit is normaal.
Er ontsnapt stoom rond de deur of ventilatieopeningen.
• Dit is normaal.
NL 45
Page 46

PROBLEMEN OPLOSSEN
Er is een klikgeluid hoorbaar wanneer de oven in bedrijf is, in het
bijzonder in de ontdooifunctie.
• Dit is normaal.
De hoofdzekering slaat regelmatig uit.
• Raadpleeg een servicemonteur.
De display geeft de foutcode ERROR XX ...
(XX geeft het nummer van de fout weer).
• Er zit een storing in de elektronische module. Koppel het apparaat
enkele minuten los van de stroomvoorziening. Sluit het vervolgens
weer aan en stel de dagtijd in.
• Raadpleeg een servicemonteur als de fout niet is verholpen.
De oven opbergen en repareren
Reparaties mogen uitsluitend worden uitgevoerd door een gekwalificeerde
servicemonteur. Als er onderhoud moet worden gepleegd, haalt
u de stekker uit het stopcontact en neemt u contact op met de
klantenservice van Atag.
Houd de volgende informatie bij de hand wanneer u belt:
• Het modelnummer en serienummer (vermeld op de binnenzijde van
de ovendeur)
• Garantiegegevens
• Een duidelijke omschrijving van het probleem
NL 46
Kies een schone, droge plek als u de oven tijdelijk moet opbergen,
aangezien stof en vocht het apparaat kunnen beschadigen.
Page 47

UW OVEN EN HET MILIEU
Afvoer van het apparaat en de verpakking
Dit product is gemaakt van duurzame materialen. Aan het einde van zijn
nuttige leven moet het apparaat echter op een verantwoorde manier
worden afgevoerd. De overheid kan u hierover informeren.
De verpakking van het apparaat kan worden gerecycled. Er is
gebruikgemaakt van de volgende materialen:
• karton
• polyethyleenfolie (PE)
• CFC-vrij polystyreen (hard PS-schuim)
Gooi deze materialen op een verantwoorde manier weg conform de
wettelijke bepalingen.
Op het product staat een pictogram van een afvalcontainer met een
kruis erdoor. Dit geeft aan dat huishoudelijke apparatuur afzonderlijk
moet worden afgevoerd. Het apparaat mag aan het einde van zijn
nuttige leven dan ook niet worden verwerkt via de normale afvalstroom.
U moet het inleveren bij een gemeentelijk afvalinzamelingspunt of bij
een verkooppunt dat dit voor u aanbiedt.
Door huishoudelijke apparatuur afzonderlijk in te zamelen, wordt
voorkomen dat het milieu en de volksgezondheid schade wordt
berokkend. De materialen die bij de vervaardiging van dit apparaat zijn
gebruikt, kunnen worden hergebruikt en dat betekent een aanzienlijke
besparing in energie en grondstoffen.
Verklaring van overeenstemming
Wij verklaren hierbij dat onze producten voldoen aan de betreffende
Europese richtlijnen, normen en voorschriften, alsook aan alle vereisten
in de normen waarnaar wordt verwezen.
NL 47
Page 48

NL 48
Page 49

CONTENTS
Your oven
Initial use
Operation
Use
Introduction 4
Control panel 5
Description 6
Touch screen 9
Main displays 10
Function-setting display 12
Stand-by display 13
Initial use 14
Using the ‘Plus’ menu 16
Opening the keyboard 18
Oven function 19
Using the ‘Extras’ functions 21
Fast preheat 22
Functions table 23
Culisensor 27
Delayed start 30
Stage cooking 31
Additional functions 34
Settings 38
Cleaning
Cleaning the appliance 40
Steam clean 40
Pyrolysis 41
Removing and cleaning the guide rails 42
Replacing the oven light bulb 42
Removing the oven door 43
Removing the oven window 44
Solving problems
General 45
Your oven and the environment
Disposal of the appliance and packaging 47
EN 3
Page 50

YOUR OVEN
Introduction
Congratulations on choosing this ATAG oven.
This product is designed to offer simple operation and optimum
user-friendliness. The oven has a wide range of settings enabling you to
select the correct cooking method every time.
This manual shows how you can best use this oven. In addition to
information about operating the oven, you will also find background
information that may be useful when using the appliance.
Please read the separate safety instructions
carefully before using the appliance!
Read this manual before using the appliance and keep it in a safe
place for future use.
Installation instructions are supplied separately.
EN 4
Page 51

YOUR OVEN
Control panel
01 03
10 15
10 10 2015
040502
01. On/Off key; use to:
▷ switch on the appliance.
▷ switch to stand-by
▷ switch off the appliance. Keep the ‘On/Off’ key pressed until the
appliance switches off.
02. X key; use to:
▷ go a step back in the menu.
▷ close or answer ‘No’ to a pop-up.
▷ close or cancel a menu or function.
03. Key lock key; use to:
▷ Lock all the keys to clean the control panel or to prevent that the
appliance gets into progress accidentally. Hold the key pressed
until the key lock is enabled.
04. Confirm key; use to:
▷ confirm settings
▷ start a function.
▷ close or answer ‘Yes’ to a pop-up.
05. Touch screen/display
EN 5
Page 52

YOUR OVEN
Description
1. Control panel
2. Shelf levels
▷ ZX6574M: 5 levels*
▷ ZX4574M: 4 levels*
3. Oven door
4. Door handle
Level 5*
Level 4
Level 3
Level 2
Level 1
1
2
3
4
EN 6
The following accessories are supplied with your oven:
• Baking tray; used for pastries and cakes.
• Oven rack; mainly used for grilling.
A dish or pan with food can also be placed on the oven rack.
This oven rack is equipped with a safety peg. Lift the rack at the
front slightly to slide this out of the oven space.
• Deep baking tray; used for roasting meat and baking moist cakes.
The deep baking tray can also be used as a drip tray. Place the
deep baking tray on the first level to grill or to use as a drip tray.
Page 53

YOUR OVEN
Culisensor
• Culisensor; can be used to measure the core temperature of
the dish. When the desired temperature is reached, the cooking
process will be stopped automatically.
Guide rails
• The oven has four or five shelf levels, depending on the model.
Level 1 is mainly used in combination with bottom heat.
Levels 3 and 4/5 are used mainly for the grill function.
• Place the oven rack or baking tray in the gap between the guide
rail sliders.
Telescopic guide rail
• A number of shelf levels have a fully-retractable telescopic guide
rail.
• Pull the telescopic guide rails out of the oven cavity completely
and place the oven rack or baking tray. Then slide the oven rack or
baking tray, on the telescopic guide rails, back into the oven cavity.
Only close the oven door when the telescopic guide rails are returned
completely back into the oven cavity.
Pyrolysis guide rail
• Only use for pyrolysis cleaning. If you also want to clean the baking
tray with pyrolysis, then place these guide rails.
• Please note; the high temperature during pyrolysis can cause the
guide rails to discolour.
EN 7
Page 54

YOUR OVEN
Rotisserie
This is used for roasting all kinds of dishes such as rolled meats or
chicken. The rotisserie comprises a spit with 2 clamps, a detachable
handle and a spit roast that fits in the centre of the oven. The spit fits in
the rotisserie motor in the back wall of the oven.
• Slide the deep baking tray in at level 1 to catch juices or fat.
• Slide one of the clamps onto the spit and then slide the meat you
wish to roast onto the spit.
• Place the spit roast in the central oven level with the ‘v’ shape to
the front.
• The handle can be screwed onto the blunt end of the spit to make
positioning the spit easier.
• Place the spit on the spit roast with the pointed end away from you.
Push gently until the spit fits in the rotisserie motor in the back wall.
The blunt end of the spit needs to fit in the ‘v’ shape. (The spit has
two notches, both of which need to be mounted on the oven door
side so that the spit stays in position. The notches also serve as a
grip for the handle.)
• The rotisserie motor starts running when a function with grill has
been started
• Remove the handle prior to baking or roasting. You can then
reattach the handle to the spit to remove this from the oven easily.
EN 8
Door
• The door switches interrupt the operation of the oven when the oven
door is opened during use. The oven resumes operation when the
door is closed.
• This oven has a ‘Soft close door system’. When closing the oven
door, this system dampens the movement, from a certain angle, and
silently closes the oven door.
Page 55

YOUR OVEN
Touch screen
Cooling fan
• The appliance is equipped with a cooling fan that cools the casing
and control panel.
• Operate your oven’s touch screen by tapping or swiping it.
• Tap the display to open a function or adjust a setting.
• Swipe the display for further information/show options or adjust
a setting.
Tapping: Swiping:
10:15
EXTRASOVEN
FAST PREHEAT
PROGRAMS
180
Hot air
10:15
:
31
°C
:
30
For the best response, touch the keys with the main part of your
fingertip. Every time you tap a key during use, a short tone will sound
(unless this is adjusted in the settings).
EN 9
Page 56

YOUR OVEN
10:15
Main displays
Start display
01
02
EXTRASOVEN
03
04
Plus menu (01)
• Tap the plus symbol to open the ‘Plus’ menu. The contents of this
menu change according to the control options available at that time.
Oven (02)
• Tap ‘OVEN’ to open the oven function menu.
Egg timer (03)
• Tap the egg timer symbol to open the egg timer menu. The egg
timer can be used independently from the oven function.
▷ The longest possible alarm time is 24 hours.
▷ When an egg timer goes off, a pop-up will appear and an
acoustic signal will sound.
▷ Tap on the X key, confirm key or the display to switch off
the signal and close the pop-up. The sound signal will stop
automatically after approximately 1 minute.
FAST PREHEAT
05
06
07
EN 10
Extras (04)
• Tap on ‘EXTRAS’ to show the appliance’s extra functions.
Time (05)
• The time is shown here.
Fast preheat (06)
• Tap on ‘FAST PREHEAT’ to open the fast preheat function.
Page 57

10:15
YOUR OVEN
Light (07)
• Tap on the ‘lamp’ symbol to switch the oven light on or off.
• The oven light will also light up when you open the oven door or
start cooking. The oven light will dim automatically (unless this is
adjusted in the settings).
Extras display
05
PROGRAMS WARMING
PYROLYSIS
CLEANINGDEFROST
04
0201 03
Defrost (01)
• Tap on ‘DEFROST’ to open the defrost function.
Pyrolysis (02)
• Tap on ‘PYROLYSIS’ to open the pyrolysis function.
Cleaning (03)
• Tap on ‘CLEANING’ to open the cleaning function.
Warming (04)
• Tap on ‘WARMING’ to open the warming function menu.
Plate warming and keep warm can be found here.
Programs (05)
• Tap on ‘PROGRAMS’ to open the programs menu. The favourites
and automatic programs can be found here.
EN 11
Page 58

Hot air
PROGRAMS
YOUR OVEN
Function-setting display
02
04
10:15
01
Selecting a function (01)
• Tap on the arrows above and below the function or sweep over the
symbol to select a function (see also ‘Opening the Keyboard’).
Setting the temperature (02)
• Tap on the arrows above and below the temperature or sweep
over the temperature indicator to select a temperature or (see also
‘Opening the Keyboard’).
Cooking time (03)
• Tap the cooking time symbol if you want to set a cooking time. If a
cooking time is already stated, it is necessary to set this.
• Tap on the arrows above and below the time or swipe over the time
to adjust it (see also ‘Opening the Keyboard’).
Programs (04)
• Tap on ‘PROGRAMS’ to open the program menu. The favourites
and automatic programs can be found here.
180
°C
05
03
EN 12
Info tab (05)
• The name of the selected function appears in the bottom tab of
the display. Tap on the tab to request more information about the
selected function.
Page 59

YOUR OVEN
Stand-by display
02 03
01
9:27 125
05 06
Display time (digital/01)
• Actual time of day.
Display time (analog/02 and 03)
• Actual time of day.
• The hour hand of the analog clock is indicated with a ‘closed’
circle (02) and the minute hand with an ‘open’ circle (03).
Display of date (04)
• Actual date.
Display egg timer (05)
• The expiring egg timer.
10 15
10 10 2015
04
°C
Display descending temperature (06)
• Actual temperature in the oven (waste heat).
EN 13
Page 60

INITIAL USE
Initial use
• Clean the oven interior and accessories with hot water and
washing-up liquid. Do not use aggressive cleaning agents, abrasive
sponges and similar.
• The oven will emit a particular odor when it is used for the first
time; this is normal. Make sure that there is good ventilation during
initial use.
When the appliance is plugged in for the first time or after the appliance
was disconnected from the mains for a longer period of time, you have
to set ‘Language’, ‘Time’ and ‘Date’.
Setting the language
LANGUAGE
Nederlands
English
Deutsch
Francais
EN 14
Set the desired language in which the appliance’s display texts will
appear. ‘English’ is selected as standard.
1. Swipe over the display to view all languages.
2. Tap on a language to select this.
3. Press on the confirm key to save the set language.
Page 61

INITIAL USE
Setting the time
TIME
12:00
1. Tap on the arrows above and below the time or swipe over the time
to adjust it.
2. For fast entry, tap in the centre of the time display; a pop-up
keyboard will appear on which the desired time can be typed
(see ‘Opening the Keyboard’ chapter).
3. Press on the confirm key to save the set time.
Setting the date
DAT E
01 01 2015
DAY MONTH YEAR
1. Tap on the arrows above and below the day, month or year or
swipe over the day, month or year to adjust these.
2. Press on the confirm key to save the set date.
The appliance is now ready for use.
The language, time and date can be adjusted in the settings menu
(see ‘Settings’ chapter). The settings menu can be opened from the
start display via the ‘Plus’ menu.
EN 15
Page 62

OPERATION
Using the ‘Plus’ menu
10:15
EXTRASOVEN
FAST PREHEAT
The ‘Plus’ menu comprises a number of functions or settings.
The offered plus functions depend on the display that is active.
SETTINGS
Go to the appliance settings
STAGE COOKING
Combine up to three functions in one
cooking process
• From the start display, the following functions/menus can be found
in the ‘Plus’ menu:
▷ Settings; Set your preferences (see ‘Settings’ chapter).
▷ Stage cooking; Combine up to three functions in one cooking
process (see ‘Stage cooking’ chapter).
EN 16
Page 63

OPERATION
FAST PREHEAT
Preheat the oven space quickly
Don't insert the dish yet
DELAYED START
The cooking process starts automatically at
the preferred time
STAGE COOKING
Combine up to three functions in one
cooking process
• From the oven function-settings display, the following functions can
be found in the ‘Plus’ menu:
▷ Fast preheat; Preheat the oven space quickly to the desired
temperature within a cooking process (see ‘Fast preheat’
chapter).
▷ Delayed start; The cooking process will start automatically at
the time you set.
▷ Stage cooking; Combine up to three functions in one cooking
process (see ‘Stage cooking’ chapter).
ADD TO FAVOURITES
Save the current cooking settings to your
favourites
• When an oven function is started, the following functions can be
found in the ‘Plus’ menu:
▷ Add to favourites; Add the settings for the cooked dish to your
favourites (see ‘Additional functions’ chapter).
EN 17
Page 64

OPERATION
Opening the keyboard
A keyboard can be opened for fast entry of a function, temperature or
cooking time. A quick setting can be selected with this or a value can
be entered.
PROGRAMS
10:15
180
Hot air
°C
H:M
:
30
1. Tap in the centre of the function symbol, temperature or cooking
time (activated). The keyboard appears.
Set function
Set temperature
000
1
4 5
°C
7 8
3
2
6
9
Set cooking time
00:00
1
4 5
H:M
7 8
3
2
6
9
2. Enter the desired value or tap the desired value.
3. If the set value is not confirmed automatically, press on the confirm
key to confirm the entry.
EN 18
Page 65

USE
PROGRAMS
Oven function
Use the oven functions to cook dishes using, for instance, hot air,
bottom heat or grill.
10:15
°C
180
Hot air
• Various oven functions can be selected.
• A temperature and a cooking time can be set for each oven function.
• `Plus’ menu functions such as fast preheat, stage cooking and
delayed start can also be selected. Tap on the plus symbol for this.
See the ‘Using the ‘Plus’ menu’ chapter.
Using an oven function
Select the oven function appropriate for the meal you are cooking.
Consult the Functions table for this. You can also consult the info tab.
Tap on the tab at the bottom of the display to request more information
about the selected function.
1. Switch on the oven using the ‘On/Off’ key.
2. Place the dish in the oven.
3. Tap ‘OVEN’ to open the oven function menu.
4. Select an oven function (see ‘Function-setting display’ chapter).
5. Select a temperature (see ‘Function-setting display’ chapter).
6. Tap the ‘cooking time’ symbol and set a cooking time (see
‘Function-setting display’ chapter).
Cooking can also be started without a cooking time being set. You
should then skip step 6.
7. Select any additional settings using the ‘Plus’ menu (for example
fast preheat).
8. Start cooking the dish using the confirm key.
EN 19
Page 66

USE
10 21
°C
165
°C
180
• The following values can now be read in the display:
▷ current temperature (165 °C)
▷ set temperature (180 °C)
▷ status indicator time (outer circle)
▷ status indicator temperature (inner circle)
▷ cooking time (23:54)
▷ end time (10:45)
• Tap in the middle of the display during cooking to open a pop-up
display with settings. Adjust these if desired.
• At the end of a dish’s cooking time a sound signal will sound.
The signal can be switched off by opening the oven door or
pressing a key.
• The selected settings can be saved in ‘Favourites’.
Open ‘ADD TO FAVOURITES’ from the ‘Plus’ menu (see ‘Saving a
cooking method’ in the ‘Additional functions’ chapter).
23:54
10:45
10 50
EN 20
°C
165
Display view at the end of cooking.
0:00
Page 67

USE
Using the ‘Extras’ functions
Open the ‘Extras’ display to select the pyrolysis function. A cleaning
program, warming functions or automatic programs can also be
selected.
10:15
EXTRASOVEN
FAST PREHEAT
Tap on ‘EXTRAS’ to show the appliance’s extra functions.
PROGRAMS WARMING
PYROLYSIS
CLEANINGDEFROST
10:15
The following programs can now be selected:
• Pyrolysis (see ‘Cleaning’ chapter)
• Cleaning (see ‘Cleaning’ chapter)
• Warming (see ‘Additional functions’ chapter):
▷ Plate warming
▷ Keep warm
• Programs (see ‘Additional functions’ chapter):
▷ Favourites
▷ Automatic programs
• Defrost
EN 21
Page 68

USE
PROGRAMS
Fast preheat
Fast preheat
Use this oven function for preheating the oven quickly. Don’t insert
a dish during Fast preheat. When the oven is heated to the set
temperature, preheating is finished and the oven is ready to cook the dish.
Using fast preheat
1. Switch on the oven using the ‘On/Off’ key.
2. Tap on the ‘FAST PREHEAT’ to open fast preheat function.
10 15
°C
180
3. Select a temperature (see ‘Function-setting display’ chapter).
4. Start fast preheat using the confirm key.
EN 22
• Fast preheat can also be linked to a cooking process.
• Activate ‘FAST PREHEAT’ from the ‘Plus’ menu to do so.
• When the set temperature is reached, a pop-up will appear and a
sound signal sounds.
• The cooking time starts counting up or down after door closing.
Page 69

USE
Functions table
Function Description
Oven functions
Hot Air
• Heating by means of hot air from the back of the
oven.
• This mode provides uniform heating and is ideal
for baking.
• Place the tray on level 2.
• Suggested temperature: 180 °C
• Preheating is recommended.
ECO Hot air
• Heating by means of hot air. ECO hot air uses less
energy but gives the same result as the hot air
setting. Cooking takes a few minutes longer.
• This mode can be used for roasting meat and
baking pastry.
• Place the tray on level 2.
• Suggested temperature: 180 °C
• This setting makes use of the residual heat
(heating is not on the whole time) to achieve
low energy consumption (in accordance with
energy class EN 60350-1). In this mode the actual
temperature in the oven is not displayed.
Top + Bottom heat
• Heating by means of the upper and lower heating
elements.
• This mode can be used for traditional baking and
roasting.
• Place the baking tray or oven rack on level 2.
• Suggested temperature: 200 °C
• Preheating is recommended.
Consult the table to choose the desired function. Also consult the
instructions for preparation on the dish packaging.
• Only use glass dishes that can withstand temperatures of
250 °C.
2
2
2
EN 23
Page 70

USE
Function Description
Hot air + Bottom heat
• Heating by means of hot air from the back of the
oven and the bottom heating element.
• This mode can be used to bake pizza, moist
pastry, fruitcakes, leavened dough and short
crust.
• Place the baking tray or oven rack on level 2.
• Suggested temperature: 200 °C
• Preheating is recommended.
Bottom heat + Fan
• Heating by means of the lower heating element.
The heat is distributed by the fan.
• This mode can be used for baking low leavened
cakes, as well as for preservation of fruit and
vegetables.
• Place a not too high baking tray on level 2, so that
hot air can also circulate over the upper surface
of the food.
• Suggested temperature: 180 °C
Bottom Heat
• Heating only by means of the lower heating
element.
• This mode can be used with dishes and baked
goods that require a distinctive bottom crust or
browning.
• Place the baking tray or oven rack on level 2.
• Use just before the end of the baking or roasting
time.
• Suggested temperature: 160 °C
Top Heat
• Heating only by means of the upper heating
element.
• This mode can be used when you wish to bake/
roast the top part of your dish.
• Place the baking tray or oven rack on level 2.
• Suggested temperature: 150 °C
2
2
2
EN 24
Page 71

USE
Function Description
Grill
• Heating by means of the grill element.
• This mode can be used for grilling a smaller
amount of open sandwiches, beer sausages, and
for toasting bread.
• Place the oven rack is on level 4 and the baking
tray on level 2.
• Maximum allowed temperature 240 °C.
• Monitor the cooking process at all times. The dish
may burn quickly due to the high temperature.
• Preheat for 5 minutes.
Large Grill
• Heating by means of the upper element and grill
element.
• This mode can be used with dishes and baked
goods that require a distinctive bottom crust or
browning. Use just before the end of the baking or
roasting time.
• Place the the oven rack on level 4 and the baking
tray on level 2.
• Maximum allowed temperature 240 °C.
• Monitor the cooking process at all times. The dish
may burn quickly due to the high temperature.
• Preheat for 5 minutes.
Large grill + fan
• Heating by means of the top heating elements.
The heat is distributed by the fan.
• This mode can be used for grilling meat, fish and
vegetables.
• Place the oven rack on level 4 and the baking tray
on level 2.
• Suggested temperature: 170 °C
• Monitor the cooking process at all times. The dish
may burn quickly due to the high temperature.
• Preheat for 5 minutes.
4
2
4
2
4
2
EN 25
Page 72

USE
Function Description
Pro Roasting
• This setting has an automatic heating cycle.
• First the meat is sealed at a high temperature by
means of hot air and the top heating element.
• Then the dish is slowly cooked at the low, preset
temperature, with the top and bottom heating
elements.
• This function is suitable for meat, poultry and fish.
• Suggested temperature: 180 °C
Fast preheat
• With this function, the oven cavity is quickly
heated to the desired temperature. Do not use this
setting when you have a dish in the oven.
• Suggested temperature: 180 °C
Extra functions
Plate warming
• This function is used for warming tableware, so that
the served food stays hotter for longer.
• Suggested temperature: 60 °C
Defrost
• With this function, the air circulates by means of
the fan. The air will be heated to a temperature of
30 °C.
• Use this function to defrost frozen dishes.
Keep warm
• This function is used to keep already cooked
dishes warm.
• Suggested temperature: 60 °C
Steam clean
• With this function and a damp cloth, you can
easily remove grease and dirt from the oven walls.
• Use this function only when the oven has cooled
down fully. Pour 0,15 liters of water onto the
bottom of the oven space before starting the
cleaning process.
• After soaking, food residues can be removed with
a damp cloth.
3
2
EN 26
Page 73

USE
Function Description
Pyrolysis
• This function is intended for the automatic
cleaning of the oven. The oven heats up to a
temperature far above normal use, ensuring
grease residues and other dirt are reduced to ash.
• Before using this process, remove all accessories
and loose food residues from the oven cavity.
During the pyrolytic self-cleaning process, the
oven door is automatically locked above a certain
temperature. The outside of the oven becomes
hotter than usual.
• When the oven is completely cool, the inside can
be wiped clean with a damp cloth.
Culisensor
Roasting with the culisensor
For roasting with the culisensor, set the desired core temperature of the
dish. The oven will heat up until the dish’s core temperature is reached.
The culisensor measures the core temperature of the dish.
1. Switch on the oven using the ‘On/Off’ button.
2. Screw the metal cover from the connection point (front top corner
of the right side wall).
3. Put the culisensor plug in the connection and insert the culisensor
completely into the food.
EN 27
Page 74

Culisensor-mode
PROGRAMS
Culisensor mode
USE
10:15
°C °C
180 70
4. Select an oven function, temperature and core temperature. (see
‘Function-setting display’ chapter)
5. Start cooking the dish using the confirm key.
10 21
165
180
°C
°C
35
70
°C
°C
• The following values can now be read in the display:
▷ current temperature (165 °C)
▷ set temperature (180 °C)
▷ status indicator core temperature (outer circle)
▷ status indicator temperature (inner circle)
▷ current core temperature (35 °C)
▷ set core temperature (70 °C)
• The cooking process ends when the set core temperature has been
reached. At the end of the cooking process a sound signal will
sound. The signal can be switched off by opening the oven door or
pressing a key.
• Always place the culisensor’s entire metal sensor in the dish.
• Please note! After the cooking process always replace the
metal cap on the culisensor’s connection.
• Only use the culisensor in your oven.
• Ensure that the culisensor does not come into contact with the
heating element during cooking.
• The culisensor will be extremely hot after the cooking process.
Be careful! Avoid burns.
EN 28
Page 75

USE
Recommended core temperature
Beef
Fillet/sirloin medium 55 - 58° C
Roast beef medium 55 - 60° C
Round steak well-done 85 - 90 ºC
Roast beef well-done 80 - 85 ºC
Stewed beef well-done 90 ºC
Pork
Hoof/leg well-done 75 ºC
Hoof/leg slightly pink 65 - 68 ºC
Pork loin slightly pink 65 - 70 ºC
Pork shoulder well-done 75 ºC
Pork belly/stuffed well-done 75 - 80 ºC
Pork belly well-done 80 - 85 ºC
Roast pork hoof well-done 80 - 85 ºC
Pork hoof well-done 80 - 85 ºC
Pork
Cooked ham very tender 64 - 68 ºC
Kassel ribs well-done 65 ºC
Breaded ham 65 - 68 ºC
Veal
Veal loin slightly pink 58 - 65 ºC
Veal hoof/leg of veal well-done 78 ºC
Fried kidneys well-done 75 - 80 ºC
Roast veal/shoulder well-done 75 - 80 ºC
Leg of veal well-done 75 - 78 ºC
Mutton
Mutton loin pink 65 - 70 ºC
Mutton loin well-done 80 ºC
Mutton hoof pink 70 - 75 ºC
Leg of mutton 82 - 85 ºC
Lamb
Leg of lamb pink 60 - 62 ºC
Leg of lamb well-done 68 - 75 ºC
Lamb loin pink 54 - 58 ºC
Lamb loin well-done 68 - 75 ºC
Lamb shoulder well-done 78 - 85 ºC
Poultry
Chicken well-done 85 ºC
Goose/Duck well-done 90 - 92 ºC
Turkey well-done 80 - 85 ºC
Pastries etc
Pastries 72 - 85 ºC
Terrines 60 - 70 ºC
Fish
Salmon soft 60 ºC
Fish fillet 62 - 65 ºC
Entire fish 65 ºC
Terrine 62 - 65 ºC
EN 29
Page 76

USE
Delayed start
Use the ‘delayed start’ function to start cooking at a later time.
The delayed start function can be selected via the ‘Plus’ menu in an
oven function only. See the ‘Using the ‘Plus’ menu’ chapter.
Setting a delayed start time
1. Select a function, temperature and set a cooking time if necessary
(see ‘Function-setting display’ chapter).
A delayed start time can also be set without setting a cooking time.
2. Tap the ‘plus’ symbol to open the ‘Plus’ menu .
3. Tap on ‘DELAYED START’ to open the function.
DELAYED START
10:45
EN 30
4. Select a start time (see ‘Function-setting display’ chapter)..
5. Confirm the set start time using the confirm key.
The ‘delayed start time’ icon appears under the plus symbol to
indicate activation. The delayed start time can be deselected by
returning the setting to the current time.
6. Start cooking using the confirm key.
The cooking will start automatically at the set time. If a cooking time
has been set, the cooking will also stop automatically.
Page 77

Stage cooking
00:10
USE
Stage cooking
10 15
10:45
°C
180
• The following values can now be read in the display:
▷ set temperature (180 °C)
▷ start time (10:45)
▷ end time (11:15) (only visible if a cooking time has been set!)
• Open the ‘Stage cooking’ menu via the ‘Plus’ menu. See the ‘Using
the ‘Plus’ menu’ chapter.
• This function allows you to combine up to three functions in one
cooking process.
• Select different functions and settings to compose the cooking
process of your preference.
11:15
1. Tap the plus symbol to open the ‘Plus’ menu.
2. Tap ‘STAGE COOKING’ to open the function (can only be opened
if no cooking process has started). The stage 1 settings are visible.
These can be adjusted if desired.
10:15
0:10
H:M
°C
160
3. Select a function (see ‘Function-setting display’ chapter).
4. Select a temperature (see ‘Function-setting display’ chapter).
5. Select a cooking time (see ‘Function-setting display’ chapter).
6. Confirm the setting of stage 1 using the confirm key.
EN 31
Page 78

Stage cooking
00:30
USE
1
160
°C
00:10
H:M
2
3
00:10
7. Tap on ‘2’ to show the stage 2 settings.
8. If necessary, change the stage 2 default values (function,
temperature and cooking time) (see points 3, 4 and 5).
10:15
0:20
H:M
H:M
°C
200
9. Confirm the setting of stage 2 using the confirm key.
°C
1
160
00:10
EN 32
2
200
°C
00:20
H:M
3
00:30
10. If desired, tap on ‘3’ to show the stage 3 settings.
11. If necessary, change the stage 3 default values (function,
temperature and cooking time) (see points 3, 4 and 5).
12. Confirm the setting of stage 3 using the confirm key.
Delete a stage by tapping on the cross next to the settings. A stage can
only be deleted if it has not yet started.
Page 79

USE
00:18
13. By pressing the confirm key again, the oven starts to work
according to stage 1 (the active stage is displayed in white).
When the set time has elapsed, the following stage will be
activated, this being stage 2 and later stage 3 if this has been set.
10 27
°C
185
°C
200
• The following values can now be read in the display:
▷ active stage (2)
▷ total cooking time (00:18)
▷ current temperature (185 °C)
▷ active stage set temperature (200 °C)
▷ active stage status indicator time (outer circle)
▷ active stage status indicator temperature (inner circle)
▷ active stage cooking time (17:32)
▷ total end time (10:45)
The selected settings can be saved in ‘Favourites’. For this open the
‘ADD TO FAVOURITES’ menu from the ‘Plus’ menu (See ‘Saving a
cooking method’ in the ‘Additional functions’ chapter).
17:32
10:45
EN 33
Page 80

USE
Additional functions
Several additional functions or programs can be selected.
1. Tap on ‘EXTRAS’ to show the appliance’s extra functions.
PROGRAMS WARMING
PYROLYSIS
CLEANINGDEFROST
10:15
The following additional functions and programs can now be selected:
• Warming:
▷ Plate warming
▷ Keep warm
• Programs:
▷ Favourites
▷ Automatic programs
Warming
• Plate warming
▷ This function is used when you want to warm tableware (plates,
cups) so that the served food stays hotter for longer.
▷ By choosing this function you can determine the plate warming
temperature and duration.
• Keep warm
▷ Use this function to keep already cooked food at temperature.
▷ By choosing this function you can determine the keep warm
temperature and duration.
EN 34
Selecting warming functions
1. Tap on ‘EXTRAS’ to show the appliance’s extra functions.
2. Tap on ‘WARMING’ to open the warming function menu.
Page 81

USE
Plate warming
PROGRAMS
10:15
1:00
H:M
°C
60
3. Choose the desired warming function (plate warming or keep warm).
Adjust the settings if necessary (see ‘Function-setting display’
chapter).
4. Start the function using the confirm key.
Programs:
• Favourites
▷ You can select your own stored recipes in ‘FAVOURITES’. See
also ‘Saving a cooking method’.
• Automatic programs
▷ You can use ‘automatic programs’ for cooking by selecting a
dish from a list of pre-programmed dishes. The programs are
subdivided into categories (MEAT, VEGETABLES, etc.).
▷ First select the category and then the dish itself from the
available list.
Selecting program functions
1. Tap on ‘EXTRAS’ to show the appliance’s extra functions.
2. Tap on ‘PROGRAMS’ to open the programs menu.
FAVOURITES
ME AT
FISH AND CRUSTACEANS
VEGETABLES
PROGRAMS
EN 35
Page 82

USE
Lamb - ribs
PROGRAMS
3. Tap on ‘FAVOURITES’ or one of the automatic program categories.
▷ Select one of your saved dishes in ‘FAVOURITES’.
▷ Select a dish from the available list in the automatic programs.
ME AT
PORK
BEEF
POULTRY
OTHER MEAT
PROGRAMS
10:15
KG
1,0
4. If necessary adjust the intensity and/or the weight.
The intensity or weight cannot be adjusted in all automatic programs.
5. Start the chosen dish using the confirm key.
• Open information about the chosen program using the info tab.
Information about the required accessories and the shelf level in the
oven can be read in this tab. Sometimes information about cooking
the dish may also be found in this tab.
• For a number of automatic programs, it is sometimes possible to
adjust settings manually. For adjusting the settings open the ‘Plus’
menu and tap ‘MANUAL’.
INTENSITY
1:00
H:M
EN 36
Page 83

USE
Saving a cooking method
A function/cooking method is active (the oven has started).
ADD TO FAVOURITES
Save the current cooking settings to your
favourites
1. Open the ‘Plus’ menu and tap on ‘ADD TO FAVOURITES’.
ADD TO FAVOURITES
2. Give the dish you are preparing a name by selecting the appropriate
letters. Tap on the ‘arrow with cross’ symbol if you wish to delete a
letter.
3. Press on the confirm key to save the cooking method.
Automatic programs can also be saved under ‘FAVOURITES’.
EN 37
Page 84

USE
Settings
1. From the start display, tap on the plus symbol.
SETTINGS
Go to the appliance settings
STAGE COOKING
Combine up to three functions in one
cooking process
2. Tap on ‘SETTINGS’.
SETTINGS
GENERAL
SOUND
DISPLAY AND LIGHT
COOKING
EN 38
This menu offers the following choices:
• General
• Sound
• Display and light
• Cooking
• System
1. Tap on the desired category and the setting to be adjusted.
▷ tap on the desired choice from a list
▷ adjust a value by tapping the arrows above and below the value
or swiping over the value
▷ switch a setting on or off by tapping on ‘ON’ or ‘OFF’
2. Press the confirm key to confirm.
Page 85

USE
GENERAL
You can set the following from this menu:
• Language (language of the touch screen)
• Time (Current time)
• Time display (12 or 24 hour clock)
• Date (current date)
• Date display (date visible or not in the ‘stand-by’ display)
SOUND
You can set the following from this menu:
• General sounds (volume of sound signals and alarms)
• Key sounds (volume of key sounds)
• Start-up/shut-down sound (volume of start-up/shut-down sound)
DISPLAY AND LIGHT
You can set the following from this menu:
• Display brightness (adjustable in 5 brightness levels)
• Oven light (the time the light stays on after activation)
• Appliance to stand-by setting (the length of time before the
appliance goes to stand-by after the last operation)
• Appliance switch off (how long the appliance stays in stand-by)
• Start-up/shut-down animation (start-up/shut-down of the brand
animation)
• Night mode (start and end time for lower display brightness)
When for ‘APPLIANCE SWITCH OFF’ setting ‘Manual’ is selected,
the appliance does not switch off automatically. When the device is
switched off manually, this setting is put back to the factory setting.
This is a mandatory maximum energy consumption regulation.
COOKING
You can set the following from this menu:
• Default program intensity (intensity of automatic programs)
SYSTEM
You can set the following from this menu:
• Appliance information (request appliance information)
• Factory settings (back to factory settings)
EN 39
Page 86

CLEANING
Cleaning the appliance
Clean the oven regularly to prevent fat and food particles from
accumulating, especially on the surfaces of the interior and the exterior,
the door and the seal.
• Activate the child lock (to prevent that the appliance is switched on
• Clean the exterior surfaces with a soft cloth and warm soapy water.
• Next wipe with a clean, damp cloth and dry the surfaces.
• Remove splashes and stains on the interior surfaces with a
• Next wipe with a clean, damp cloth and dry the surfaces.
• Make sure that no water enters the vents.
• Never use abrasive cleaning materials or chemical solvents.
• Always make sure that the seal of the door is clean. This
Steam clean
accidentally).
cloth and soapy water.
prevents accumulation of dirt and allows you to close the door
properly.
EN 40
With the steam clean and a damp cloth, you can easily remove grease
and dirt from the oven walls.
Using steam clean
Only use steam clean when the oven has cooled down fully. It is more
difficult to remove dirt and grease if the oven is hot.
Remove all accessories from the oven.
1. Pour 0.15 litres of water into the bottom of the oven.
2. Tap on ‘EXTRAS’ to show the appliance’s extra functions.
3. Tap on ‘CLEANING’ to open the cleaning function.
4. Press on the confirm key to start steam clean.
• Do not open the door during the cleaning process.
• The process takes 30 minutes.
Food remains on the enamel walls will be sufficiently soaked after
30 minutes so they can be removed with a damp cloth.
Page 87

CLEANING
Pyrolysis
On average use of the oven we recommend using the pyrolysis function
once per month.
Wipe the oven and oven accessories that are to be cleaned with a
damp cloth! Food remains and grease can combust during the pyrolysis
process. Risk of fire!
1. Remove all accessories and guides from the oven. If the baking tray
also needs to be cleaned, first place the pyrolysis guide rails. Insert
1 baking tray at once.
2. Tap on ‘EXTRAS’ to show the appliance’s extra functions.
3. Tap on ‘PYROLYSIS’ to open the pyrolysis function.
4. Select the desired cleaning intensity:
▷ Low: approximately 3 hours
▷ Average: approximately 3,5 hours
▷ High: approximately 4 hours
Only the cleaning intensity can be selected. The time is fixed and
depends on the selected cleaning intensity.
5. Press on the confirm key to start pyrolysis clean.
• After a certain period the oven door will be locked automatically for
your own safety.
• An unpleasant smell may be released from the oven during the
cleaning process.
• The oven door can be opened once the appliance has cooled down
(after the end of the pyrolysis cleaning).
• When the oven has cooled down, wipe with a damp cloth. Wipe the
oven door and the adjacent surfaces around the door seal. Do not
rub the seal.
EN 41
Page 88

CLEANING
Removing and cleaning the guide rails
Use conventional cleaning products to clean the guide rails.
• Remove the screw using a screwdriver.
• Remove the guide rails from the holes in the back wall.
Replacing the oven light bulb
The lamp in this household appliance is only suitable for
illumination of this appliance. The lamp is not suitable for
household room illumination.
EN 42
The light bulbs (2x) (halogen G9, 230 V, 25 W) are a consumer items
and therefore not covered by warranty. To replace it, first remove the
baking tray, oven rack and guide rails.
Disconnect the appliance from the power supply by removing the
plug from the socket or by switching off the circuit breaker in the
fuse box.
Please note: the light bulb can be very hot! Use protection to
remove the bulb.
1. Use a flat-blade screwdriver to snap and remove the lamp cover
from the holder. Be careful not to damage the enamel.
2. Take the halogen light bulb out of the fitting.
Page 89

B
A
CLEANING
Removing the oven door
Keep your fingers away from the hinges of the oven door. The hinges
are spring loaded and can cause injury if they spring back.
Make sure that the hinge latches are applied correctly to lock the
hinges.
Remove the oven door.
1. Open the door to the fully open position.
2. Lift both hinge latches (A) and pull them towards the oven door (B).
The hinges will be locked in the 45° position.
3. Gently close the door until it reaches a 45° angle.
4. Remove the door by lifting and tilting it towards the oven (C). The
hinges need to come out of the slots in the oven.
EN 43
Page 90

CLEANING
Install the oven door.
1. Hold the door at an angle of approximately 45° in front of the oven.
2. Insert the hinges into the slots and make sure they are both
positioned correctly.
3. Open the door to the fully open position.
4. Lift both hinge latches and move them towards the oven.
5. Gently close the oven door and make sure that it closes correctly.
If the door does not open or close correctly, then make sure that the
hinges are positioned correctly in their slots.
Removing the oven door glass
The inside of the glass in the oven door can be cleaned. For this it must
be removed from the oven door.
1. Slightly lift (1) and shift (2) the clamps at the lower left and right of
the door to release the glass (A).
2. Grab the glass (A) at the bottom and gently lift (3) and shift (4) it to
remove it from the upper support.
3. The inner glass (B) (depending on the model) can be removed by
carefully lifting (5) and shifting (6) it to removing it from the lower
support. Also remove the rubber spacers (C) from the inner glass.
EN 44
Install the glass in reverse order.
Page 91

SOLVING PROBLEMS
General
If you have problems with your oven, then consult the error overview
below. Should the problems persist, then please contact the Customer
Services Department.
The food stays raw
• Check whether the timer has been set and you have pressed the
confirm key.
• Is the door closed properly?
• Check whether a fuse has blown and whether a circuit breaker has
been activated.
The food is overcooked or undercooked
• Check whether the correct cooking time has been set.
The sensors don’t respond; the display is locked.
• Disconnect the appliance from the power supply for a few minutes
(unscrew the fuse or switch off the mains); then reconnect the
appliance and switch it on.
Power failure can cause the display to reset.
• Disconnect the appliance from the power supply for a few minutes
(remove the mains plug from the socket or switch the circuit
breaker to off); then reconnect the appliance and switch it on.
• Set the time again.
There is condensation in the oven.
• This is normal. Wipe the oven clean after use.
The fan keeps working after the oven is switched off.
• This is normal. The fan will keep working for a while after the oven
is switched off.
Air flow can be felt at the door and the exterior of the appliance.
• This is normal.
Steam escapes via the door or the vents.
• This is normal.
EN 45
Page 92

SOLVING PROBLEMS
Clicking sounds can be heard when the oven is working,
particularly in the defrost setting.
• This is normal.
The circuit breaker switches off regularly.
• Consult a service technician.
The display gives an error code, ERROR XX ...
(XX indicates the number of the error).
• There is a fault in the electronic module. Disconnect the appliance
from the power supply for a few minutes. Then reconnect it and set
the current time.
• Consult a service technician if the error persists.
Storing and repairing the oven
Repairs should only be performed by a qualified service technician.
If maintenance is required, take the plug from the socket and contact
the ATAG customer service.
Have the following information to hand when you call:
• The model number and serial number (stated on the inside of the
oven door)
• Warranty details
• A clear description of the problem
EN 46
Choose a clean, dry place if you have to store the oven temporarily,
as dust and moisture can damage the appliance.
Page 93

YOUR OVEN AND THE ENVIRONMENT
Disposal of the appliance and packaging
This product is made from sustainable materials. However, the
appliance must be disposed of responsibly at the end of its useful life.
The government can provide you with information about this.
The packaging of the appliance can be recycled. The following
materials have been used:
• cardboard
• polyethylene wrap (PE)
• CFC-free polystyrene (hard PS foam)
Dispose of these materials responsibly in accordance with legal provisions.
The product has a pictogram of a rubbish bin with a cross through it.
This indicates that household appliances must be disposed of separately.
This means that the appliance may not be processed via the regular
waste flow at the end of its useful life. You should take it to a special
municipal waste depot or a sales outlet that offers to do this for you.
Collecting household equipment separately prevents harm to the
environment and public health. The materials used in manufacturing
this appliance can be recycled, which provides considerable savings in
energy and raw materials.
Declaration of conformity
We hereby declare that our products comply with the relevant European
directives, standards and regulations as well as all requirements referred
to in the standards.
EN 47
Page 94

Het toestel-identificatieplaatje bevindt zich aan de binnenzijde van het
toestel.
The appliance identification card is located on the inside of the appliance.
Houd, wanneer u contact opneemt met de serviceafdeling, het complete
typenummer bij de hand.
When contacting the service department,
have the complete type number to hand.
Adressen en telefoonnummers van de serviceorganisatie vindt u op de garantiekaart.
You will find the addresses and phone numbers of the service organisation on the
guarantee card.
508821
508821
508821 / VER 2 / 25-11-2015
 Loading...