

Page 1
NL
Aanwijzingen voor gebruik, opstelling en aansluiting
GB
Instructions for use, installation, and connection
FI6011E
700002851100
Vrijstaand fornuis met inductiekookgedeelte
Self-standing induction cooker
Page 2

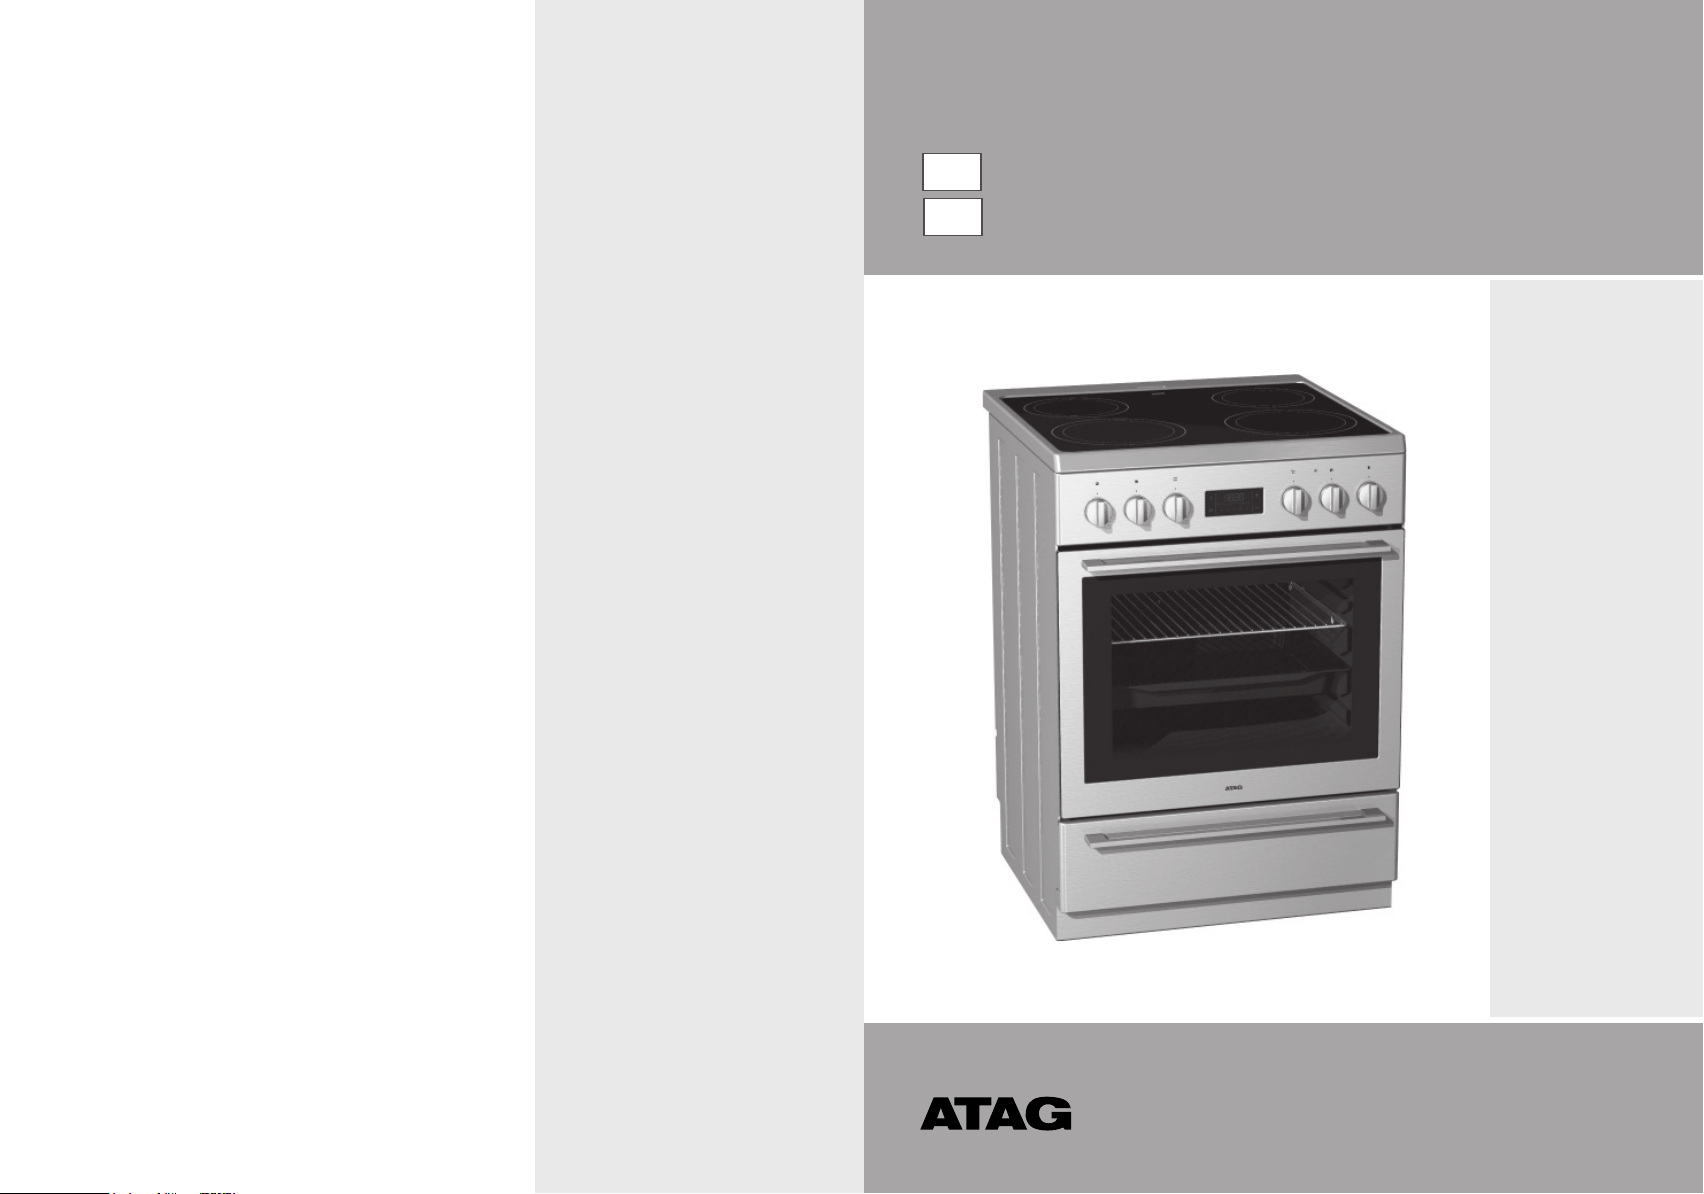
Vrijstaand fornuis met inductiekookgedeelte
Geachte koper
Aansluitinstructies
Typeplaatje
Hartelijk dank voor uw aankoop. Overtuig u zelf, op
onze producten kunt u vertrouwen. Om het gebruik van
ons product te vergemakkelijken, hebben wij een
uitvoerige gebruiksaanwijzing bijgevoegd. Met behulp hiervan
zult u snel vertrouwd zijn met uw nieuwe apparaat. Lees deze
gebruiksaanwijzing aandachtig voordat u het apparaat gaat
gebruiken.
Controleer in ieder geval direct of u een onbeschadigd apparaat
heeft ontvangen. Neem direct contact op met uw winkelier als u
transportschade vaststelt.
Wij wensen u veel plezier met uw nieuwe fornuis!
Dit toestel mag alleen door een erkend installateur worden
aangesloten. De gasaansluiting moet voldoen aan de nationale
en lokale voorschriften. Belangrijke aanwijzingen hieromtrent
staan vermeld in het hoofdstuk »Aanwijzingen voor het opstellen
en aansluiten«.
Het typeplaatje met aansluitgegevens bevindt zich achter de
ovendeur.
Lees de separate veiligheidsvoorschriften
voordat u het toestel in gebruik neemt!
Beschrijving van het apparaat ...................................5
Inductiekookplaat ........................................................ 7
Bediening van het kookgedeelte.............................. 10
De oven....................................................................... 13
Het bereiden van gerechten .....................................23
Reiniging en onderhoud
........................................... 31
Het verhelpen van kleine storingen ......................... 37
Aanwijzingen voor het opstellen en aansluiten ...... 39
Technische gegevens ............................................... 41
4
Page 3
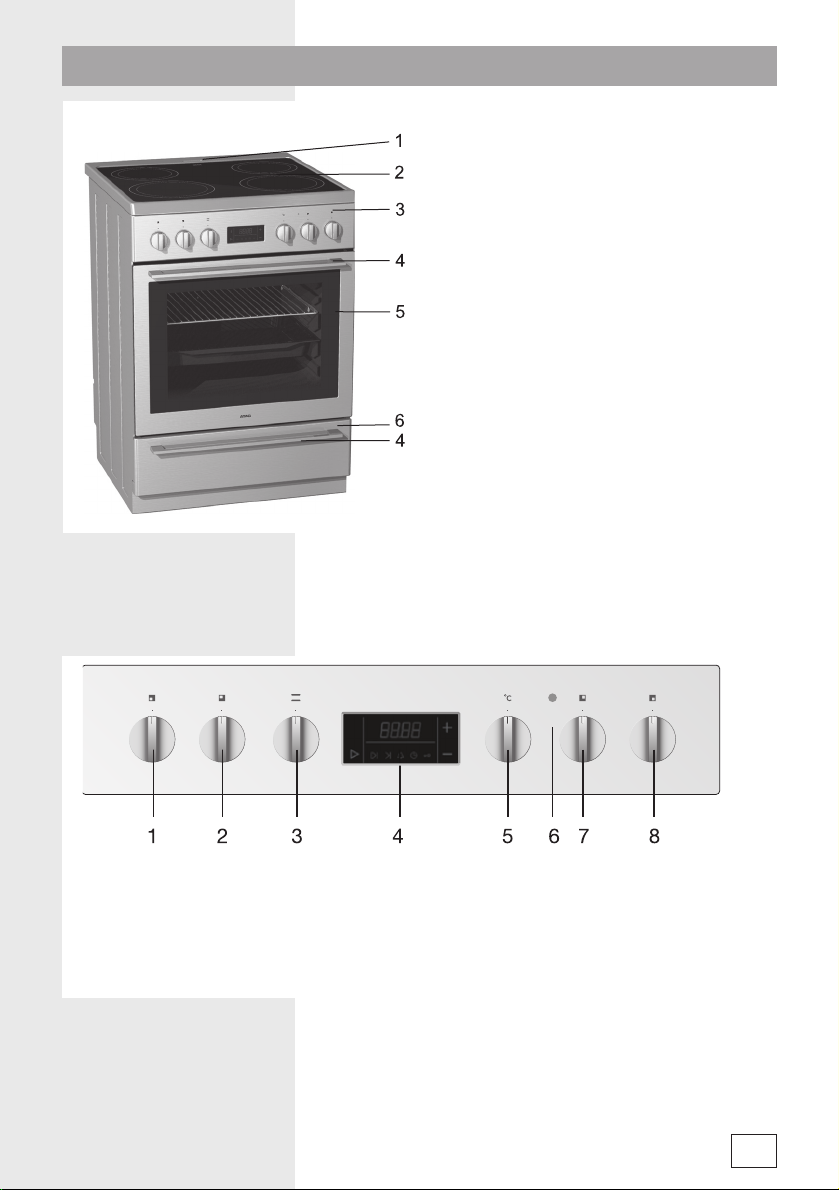
Beschrijving van het apparaat
1. Ventilatie-openingen
2. Glaskeramische plaat
3 Bedieningspaneel
4 Handgreep van de ovendeur/ovenlade
5 Ovendeur
6 Ovenlade
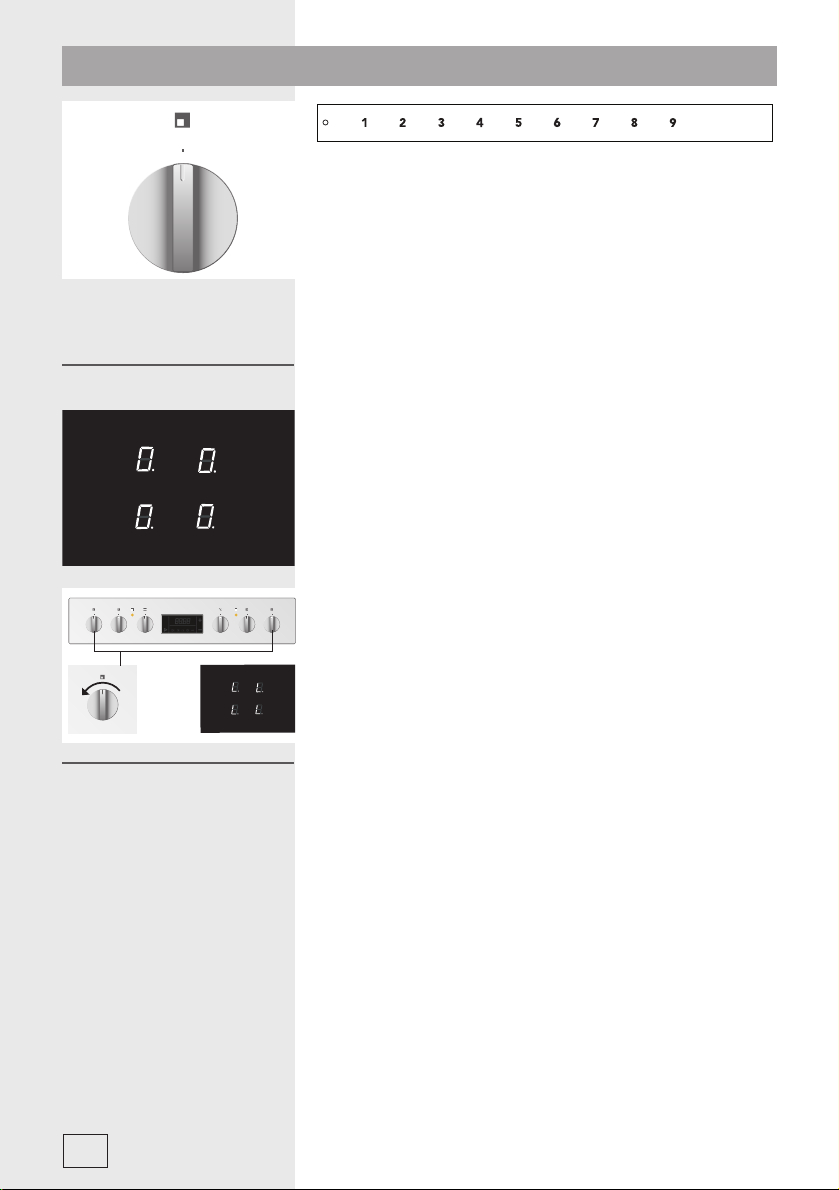
1. Bedieningsknop - kookzone links voor
2. Bedieningsknop - kookzone links achter
3. Functieknop
4. Automatische schakelklok
5. Thermostaatknop
6. Controlelampje van de oven. Brandt zolang
de oven verwarmt en gaat uit zodra de
ingestelde temperatuur is bereikt.
7. Bedieningsknop - kookzone rechts achter
8. Bedieningsknop - kookzone rechts voor
5
Page 4

Koelventilator
De ingebouwde koelventilator koelt de behuizing van het fornuis
en het bedieningspaneel.
Werking koelventilator
na uitschakelen oven
Wanneer de oven is uitgeschakeld werkt de koelventilator nog
een tijdje door om het apparaat af te koelen.
6
Page 5
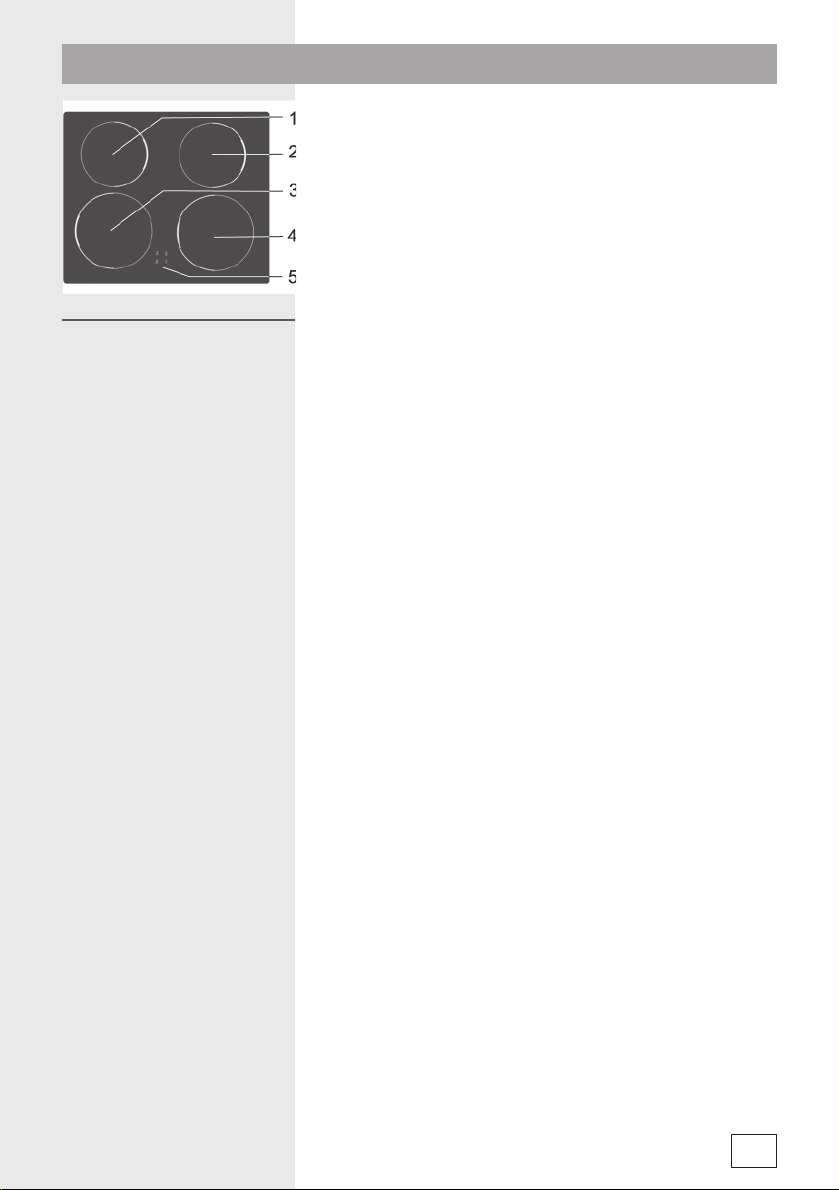
Inductie kookplaat
1. Kookzone linksachter
2. Kookzone rechtsachter
3. Kookzone linksvoor
4. Kookzone rechtsvoor
5. Hitteaanduiding
De werking van een
inductiekookplaat
In het toestel wordt een magnetisch veld opgewekt. Door een
pan met een ijzeren bodem op een kookzone te plaatsen
ontstaat in de panbodem een inductiestroom.
Deze inductiestroom wekt warmte op in de panbodem.
Comfortabel
De electronische regeling is nauwkeurig en eenvoudig in te
stellen. Op de laagste stand kunt u bijvoorbeeld chocolade direct
in de pan smelten of ingrediënten bereiden die u gewoonlijk au
bain marie verwarmt.
Snel
Door het hoge vermogen van de inductiekookplaat gaat het aan
de kook brengen erg snel. Het doorkoken kost even veel tijd als
koken op een andere kookplaat.
Schoon
De kookplaat is eenvoudig te reinigen. Doordat de kookzones
niet heter worden dan de pan zelf, kunnen voedselresten niet
inbranden.
Veilig
De warmte wordt opgewekt in de pan zelf. De glasplaat wordt
niet warmer dan de pan. Hierdoor blijft de kookzone een stuk
koeler dan die van bijvoorbeeld een keramische kookplaat of
gasbrander. Na het wegnemen van een pan is de kookzone snel
afgekoeld.
7
Page 6

Pannen die geschikt zijn
voor inductiekoken
• Een inductiekookplaat werkt alleen wanneer u de juiste
pannen gebruikt.
• Zet de pan altijd in het midden van de zone wanneer u wilt
koken.
• Gebruik alleen pannen die geschikt zijn voor inductiekoken
dus pannen van staal, geëmailleerde pannen of pannen van
gietijzer. Pannen van aluminium, of stalen pannen met een
aluminium of koperen bodem zijn ongeschikt, evenals glazen
servies.
• Wanneer u gebruik maakt van een snelkookpan moet u het
vermogen terugschakelen zodra het kookpunt is bereikt.
Volg altijd de instructies van de pannenfabrikant.
• Wanneer u nieuwe pannen aanschaft controleer dan of
deze zijn voorzien van het Class Induction keurmerk.
Kookzone Minimale pandiameter
Ø 145 mm Ø 90 mm
Ø 180 mm Ø 145 mm
Ø 210 mm Ø 170 mm
Ø 260 mm Ø 180 mm
magneet
De magneettest
Gebruik een kleine magneet om te testen of de pan geschikt is.
Alleen wanneer de magneet aan de bodem blijft kleven en de
pan een dikke bodem heeft is deze geschikt.
Pansignalering
Een van de voordelen van inductiekoken is het
signaleringssysteem voor pannen. Inductie verspilt nooit energie
omdat de kookzone niet zal inschakelen wanneer er geen of een
veel te kleine pan op de kookzone staat.
Zodra u de kookzone inschakelt verschijnt het symbool 'U' op het
display. Wanneer u binnen 10 minuten een geschikte pan op de
kookzone plaatst zal de kookzone inschakelen op het ingestelde
niveau.
Wanneer u de pan van de kookzone verwijderd zal de kookzone
automatisch uitschakelen. De energietoevoer naar de zone
wordt uitgeschakeld.
Wanneer er een kleine pan op de kookzone wordt geplaatst,
wordt deze herkend en het vermogen automatisch aangepast
aan de kleine diameter van de pan.
8
Page 7
Vermogen regelen
Vermogen Gebruik
0
1 - 2 Warmhouden van gerechten, zachtjes doorkoken van kleine hoeveelheden
3
4 - 5
6 Braden en aanbraden
7 - 8 Braden
9
A Aankookautomaat
De kookzone is uitgeschakeld, u kunt gebruik maken van de restwarmte van de
kookplaat
Zacht doorkoken (nadat het gerecht op een hogere stand aan de kook is
gebracht)
Doorkoken (na het aan de kook brengen op een hogere stand) van grotere
hoeveelheden, braden
Uitsluitend voor het aan de kook brengen als eerste fase bij het koken / braden.
Deze stand is te hoog voor het verhitten van boter of melk en veel te hoog voor
ontdooien.
Om beschadigingen aan het kookgedeelte te voorkomen:
• Nooit lege pannen op de kookzone plaatsen.
• Plaats alleen schone en droge pannen op de kookzone.
• Gebruik alleen pannen die geschikt zijn voor inductiekoken
(bij voorkeur met Class Induction keurmerk) bijvoorbeeld
pannen van staal, geëmailleerde stalen pannen of pannen van
gietijzer. Alleen dan zal de kookplaat naar behoren zijn werk
doen.
Op de knop zijn negen standen aangegeven. Onderstaande
tabel geeft u enig houvast bij het kiezen van het juiste
vermogen.
Energie besparen
• Let bij de aanschaf van de pan op de diameter van de bodem.
Deze kan afwijken van de opgegeven diameter
• Een snelkookpan kan ook op een inductiekookplaat een
energiebesparing opleveren. Door de korte kookduur blijven
vitaminen bovendien beter bewaard.
• Let er op dat er altijd voldoende water in de snelkookpan zit
zodat deze niet droog kookt en de kookplaat kan beschadigen.
• Kook altijd met de deksel op de pan.
• Gebruik pannen die passen bij de hoeveelheid. Een erg grote
pan die slechts voor een klein deel gevuld is zal meer energie
verbruiken dan een kleinere passende pan.
9
Page 8
Bediening van het kookgedeelte
• Schakel de kookzone in met de draaiknop op het
bedieningspaneel.
• Bij de knop staat aangegeven welke zone wordt bediend.
• U kunt het vermogen instellen tot stand 9.
• Het ingestelde vermogen wordt op het display, in de
keramische glasplaat, aangegeven.
Nadat een kookzone is uitgeschakeld blijft het display nog
10 seconden oplichten.
AA
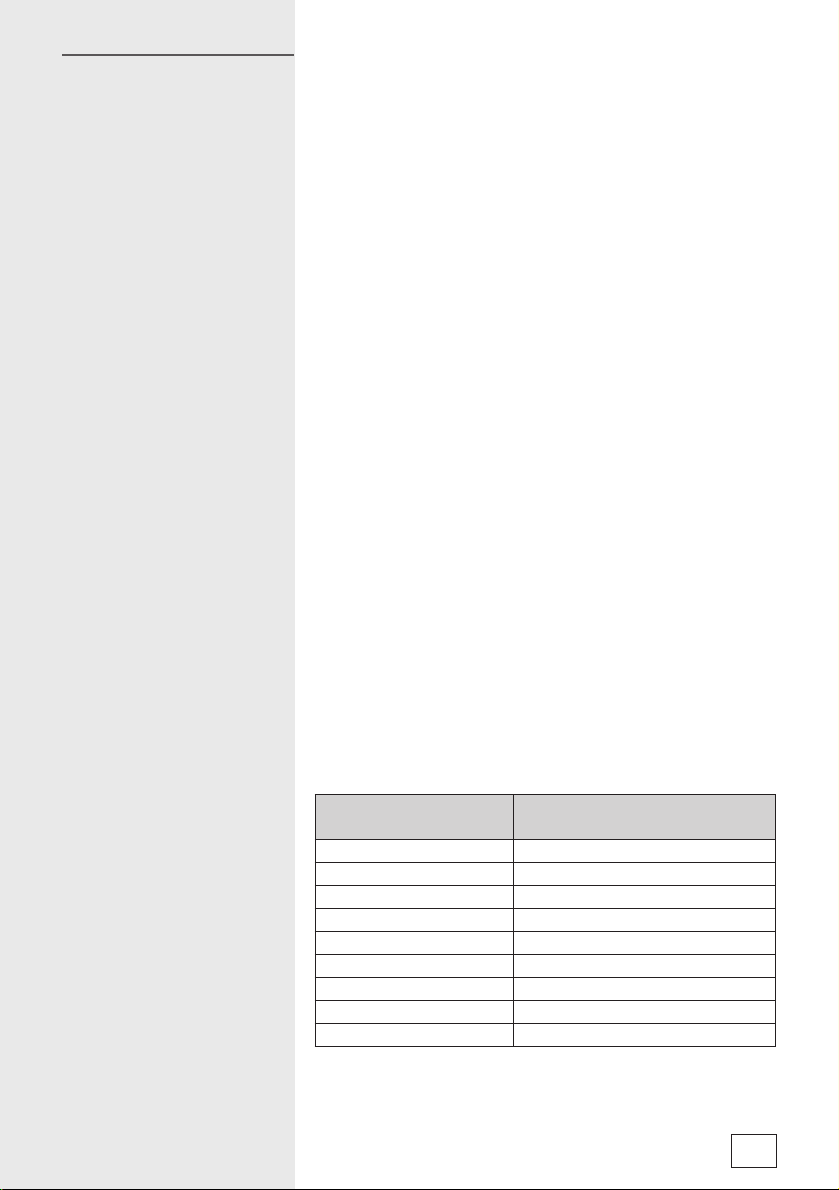
Kinderslot
Restwarmte-indicatie
Om ongewenst inschakelen van het kookgedeelte te voorkomen
kunt u het kinderslot inschakelen.
Inschakelen
• U kunt het kinderslot inschakelen wanneer het symbool 'O' of
'H' op alle vier displays staan aangegeven.
• Draai vervolgens beide bedieningsknoppen voor de achterste
kookzones één stand naar links. In het display verschijnt 'L'.
Het kinderslot is geactiveerd.
Uitschakelen
• Draai één van beide knoppen rustig naar rechts en daarna
terug naar 0. In het display zal het symbool 'L' verschijnen.
• Draai beide bedieningsknoppen van de achterste kookzones
opnieuw één stand naar links.
Het kookgedeelte is ook voorzien van een restwarmteindicatie in het display 'H'. Ook al wordt het glas niet door
elementen verwarmd, toch zal de panbodem warmte afgeven
aan de glasplaat. Zolang het symbool 'H' oplicht voor een
bepaalde uitgeschakelde kookzone kan de restwarmte worden
gebruikt voor het warmhouden van gerechten. Wanneer de
'H' net gedoofd is kan de kookzone nog steeds warm zijn. Blijf
voorzichtig met het aanraken omdat u zich dan kunt branden.
10
Alle vier de kookzones zijn voorzien van een aankookautomaat.
De aankookautomaat is geschikt voor het snel aan de kook
brengen van gerechten om die vervolgens op een lagere stand
door te koken. De aankookautomaat schakelt zelf terug naar de
doorkookstand.
Page 9
Aankookautomaat
De aankookautomaat is geschikt voor:
• Koude gerechten die aan de kook gebracht worden en
vervolgens voor een langere periode moeten koken
of sudderen (sudderlapjes, runderstoofpot). Door de
aankookautomaat hoeft u de knop na het inschakelen niet
meer te verzetten.
De aankookautomaat is niet geschikt voor:
• Braadvlees dat regelmatig gekeerd moet worden of waar
regelmatig vocht aan moet worden toegevoegd.
• Pasta of pastagerechten die in veel water worden gekookt.
• Gerechten die met een snelkookpan worden bereid.
Inschakelen van de aankookautomaat
• Zet een pan op een kookzone.
• Draai de knop van de betreffende zone tegen de klok in of
geheel rechtsom. Een 'A' verschijnt in het display.
• Stel binnen 5 sec. een gewenste doorkookstand in met de
draaiknop.
Wanneer u geen doorkookstand instelt, schakelt de zone weer uit.
Zodra de doorkookstand ingesteld is, knippert in het display
afwisselend een 'A' en de ingestelde doorkookstand. Wanneer
de aankooktijd verstreken is, stopt het knipperen en wordt de
doorkookstand permanent in het display getoond.
Opmerkingen
• Schakel de aankookautomaat uit door de knop terug te
draaien naar stand 0.
• Wanneer u de pan van de kookzone neemt en deze binnen
10 minuten weer op de kookzone plaatst zal de aankookautomaat het proces voorzetten en voldooien.
Ingestelde stand
1 40
2 72
3 120
4 176
5 256
6 432
7 120
8 192
9
Automatische aankooktijd op max.
vermogen (in seconden)
11
Page 10
Kookduurbegrenzing
Kookstand Uren
1 0,8
2 2,4
3 3,8
4 5,2
5 6,8
6 2,0
7 2,8
8 3,6
9 0,2
De kookduurbegrenzing is een veiligheidsfunctie van
uw kookplaat. Wanneer de tijd verstreken is schakelt de
zone automatisch uit. Deze stopfunctie wordt automatisch
ingeschakeld indien u uw kookplaat na een bereiding vergeet uit
te zetten. De kookplaat kan na het uitschakelen gewoon opnieuw
ingeschakeld worden. De tijd is afhankelijk van de ingestelde
kookstand:
Voorbeeld:
Wanneer de kookzone op stand 6 is ingesteld en het vermogen
wordt niet meer versteld met de bedieningsknop, dan zal de
kookplaat na 2 uur automatisch uitschakelen.
Oververhittingsbeveiliging
• Elke kookzone is voorzien van een koelventilator die zorgt
voor koeling van de elektronica. Na het uitschakelen van de
kookzone blijft de ventilator nog enige tijd ingeschakeld, totdat
ook het 'H' dooft.
• Het kookgedeelte is ook uitgerust met een oververhittings-
beveiliging die schade aan de elektronische componenten
helpt voorkomen. De beveiliging kent diverse niveaus.
Het vermogen van de kookzones wordt automatisch
teruggeschakeld wanneer de temperatuur te hoog wordt.
Wanneer dit niet afdoende is wordt het vermogen steeds
verder teruggedraaid en uiteindelijk volledig uitgeschakeld.
Wanneer dat het geval is verschijnt 'E2' in het display.
Wanneer het toestel voldoende is afgekoeld kunt u het
kookgedeelte weer gebruiken.
12
Page 11
De Oven
Voor ingebruikname van
de oven
Belangrijke
waarschuwingen
Elektronische
schakelklok
• Neem al het toebehoren uit de oven en reinig de oven met
warm water en een gewoon schoonmaakmiddel. Gebruik geen
schurende schoonmaakmiddelen!
• Wanneer u de oven voor de eerste keer verwarmt komt er een
typische reuk van »nieuwheid« vrij. De ruimte daarom goed
ventileren.
• Gebruik geëmailleerde braadsleden of bakplaten. Deze nemen
de warmte van de oven goed op.
• Verwarm de oven alleen voor wanneer dit in het recept of de
tabellen wordt aangegeven.
• Het voorverwarmen van een lege oven kost energie. Er kan
energie bespaard worden door de gerechten tijdens het
opwarmen van de oven al in de oven te plaatsen.
• Zet de oven ongeveer 10 minuten voor het einde van het
bakproces uit. Hierdoor bespaart u energie en maakt u
effectief gebruik van de nawarmte van het bakproces.
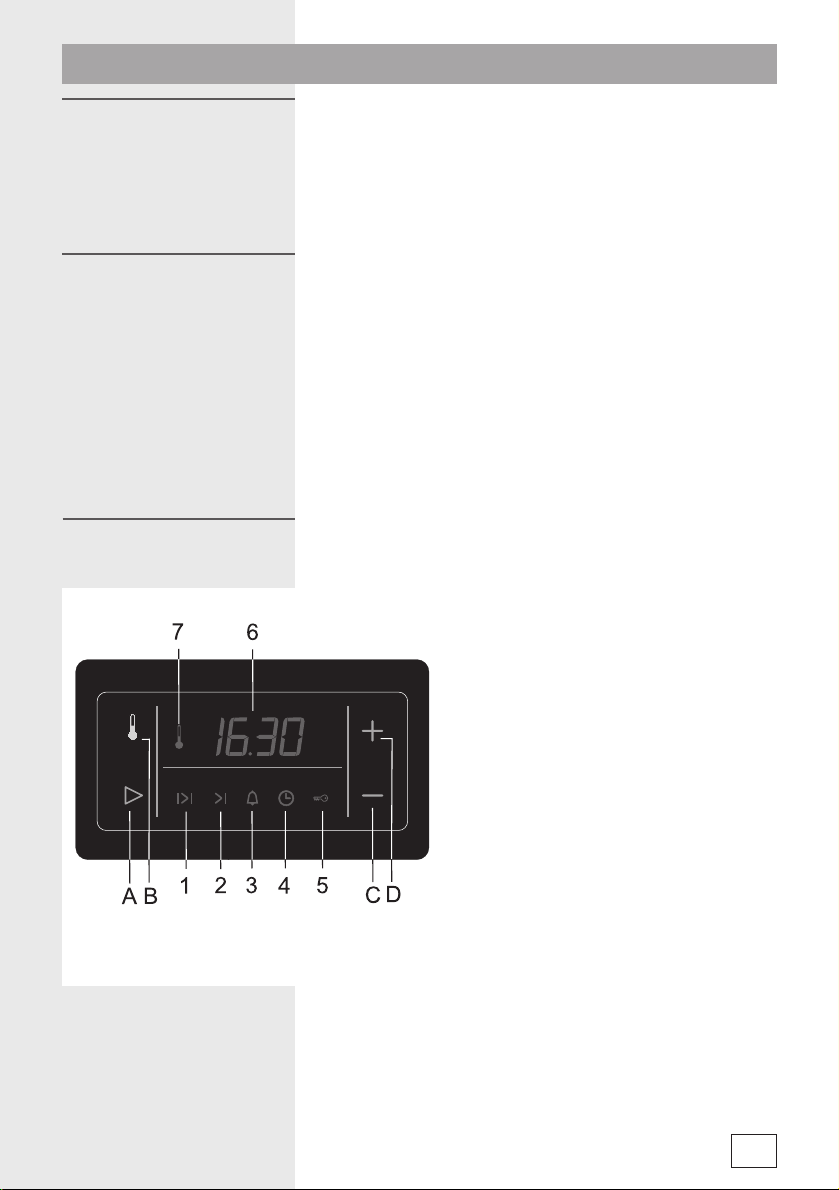
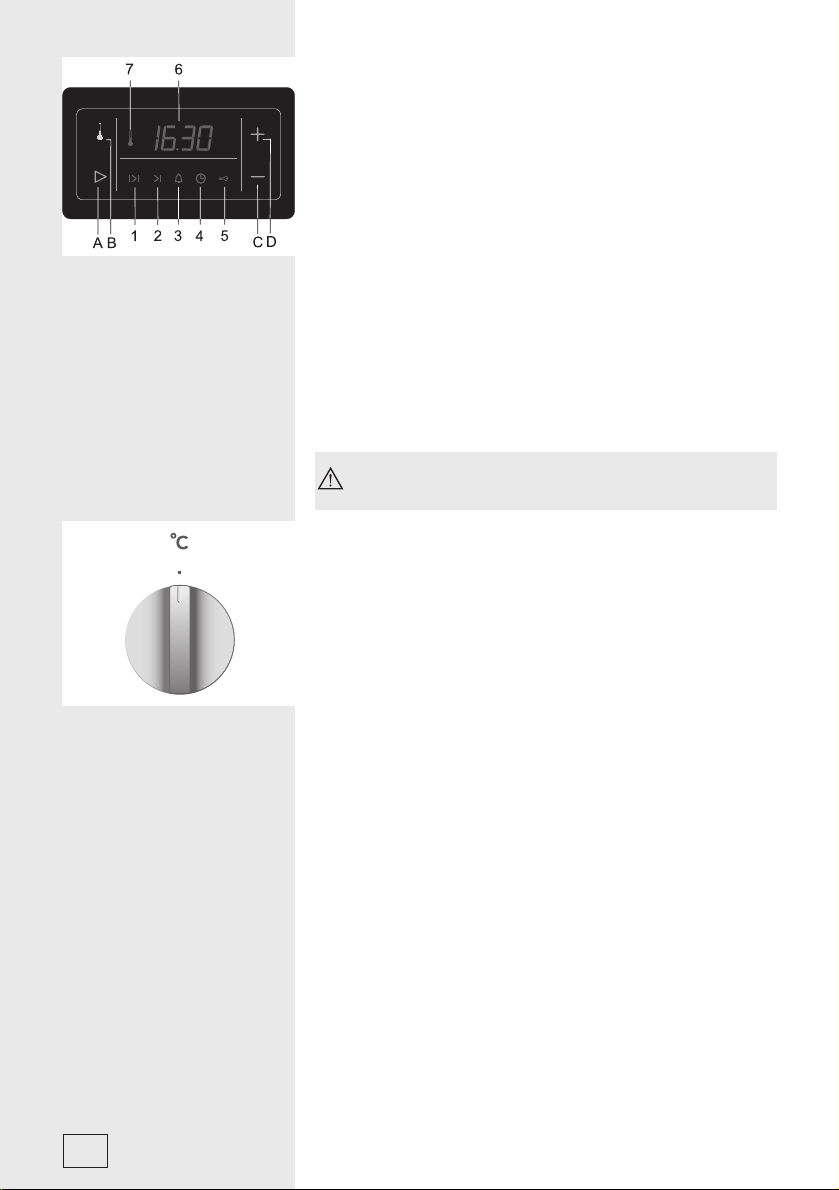
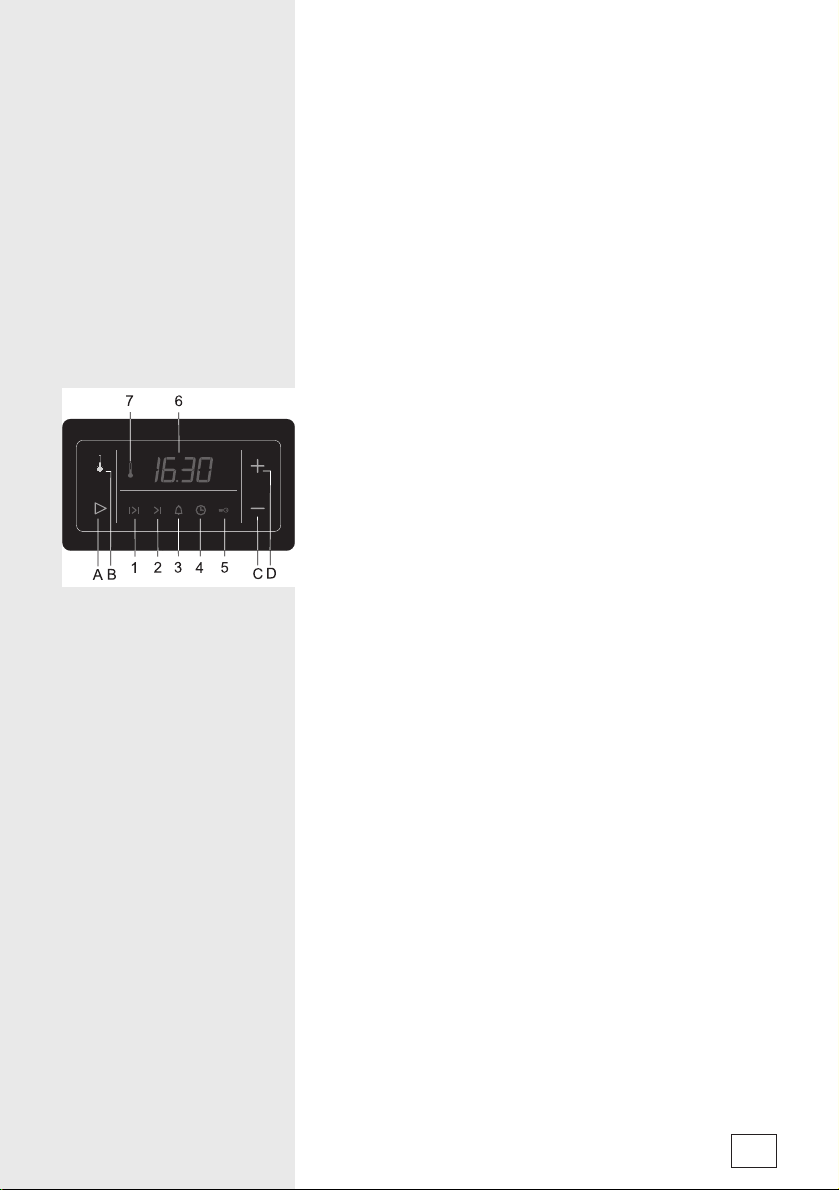
Functieomschrijving van de toetsen:
A Functies selecteren en bevestigen
B Temperatuur selecteren
C Verhogen (+)
D Verlagen (-)
Display:
1. Bereidingstijd (kookduur)
2. Einde bereidingstijd
3. Kookwekker
4. Dagtijd
5. Kinderslot
6. Weergave tijd
7. Thermostaatsymbool; dit verschijnt als
de oven opwarmt.
13
Page 12
• Wanneer u de stekker van het fornuis in het stopcontact steekt
of na een stroomonderbreking, staat er kort ‘META’ of ‘GLAS’ in
het display. Hierna knippert het display een aantal keer. Stel met
de toetsen C en D de dagtijd in. Dit is van belang voor een juiste
werking van de oven.
• Een geluidssignaal klinkt als bevestiging van de bediening van
een toets.
• Selecteer met de toets A de gewenste functie. Het symbool van
de gekozen functie knippert snel. Het knipperen geeft aan dat u
de functie nu kunt bevestigen of wijzigen. Na 5 seconden gaat het
symbool minder snel knipperen en verschijnt de tijd in de display
(6). De meest recente keuze is op het display te zien.
• Het instellen van de waarde verloopt sneller of trager al
naargelang u meer of minder druk op de »-«-toets D en
»+«-toets C uitoefent.
• Bij een stroomuitval van minder dan twee minuten, blijven alle
gekozen instellingen actief.
De tiptoetsen werken het beste waneer u deze met een
groot oppervlak van uw vinger aanraakt.
• Een aantal instellingen kunnen door middel van de draaiknop
aangepast worden ('+' voor verhogen, '-' voor verlagen).
Instellen dagtijd (klok)
• Druk op toets A. Kies daarna het de functie 'dagtijd' (4).
• Gebruik de toetsen C en D om de tijd aan te passen.
• Bevestig de ingestelde tijd door nogmaal op toets A te drukken.
Als toets A niet wordt aangeraakt wordt de tijd na 5 seconden
automatisch bevestigd.
14
Instellen kookwekker
De elektronische schakelklok kan ook gebruikt worden om een
kookwekker (3) in te stellen. Zowel de temperatuur als de kooktijd
kunnen zichtbaar zijn in hetzelfde display. Het gewenste display kiest
u met de toetsen A en B.
De automatische schakelklok kan gebruikt worden om de oven
op drie manieren te laten in en uitschakelen:
• Instellen bereidingstijd – de oven start direct; na de ingestelde
bereidingstijd schakelt de oven automatisch uit.
• Instellen eindtijd – het tijdstip waarop de uit moet schakelen kan
worden ingesteld.
• Instellen voorgeprogrammeerde bereidingstijd – de oven start
en eindigt automatisch op aangegeven tijden.
Page 13
Instellen bereidingstijd
Met dit programma kunt u de bereidingstijd van de oven instellen.
De maximale bereidingstijd is 10 uur.
• Druk op toets A en vervolgens op symbool 1 om de bereidingstijd
te selecteren. Gebruik toetsen C en D om de gewenste
bereidingstijd in te stellen.
• Zet de oven aan (stel de gewenste ovenfunctie en de temperatuur
in). Nadat de aangeven bereidingstijd is bereikt, gaat de oven
automatisch uit. Ook klinkt er een geluidsignaal. U kunt het
signaal stoppen door een willekeurige toets aan te raken. Het
geluidssignaal zal na één minuut automatisch stoppen.
• Op het display gaan symbool 1 en de bereidingstijd ‘0:00’
knipperen.
Als u door wil gaan met bakken/braden kunt u opnieuw een
bereidingstijd instellen.
Instellen eindtijd
Met dit programma kunt u het tijdstip instellen waarop de oven moet
uitschakelen. De maximale bereidingstijd is 10 uur.
• Controleer of de dagtijd goed is ingesteld.
• Druk op toets A en vervolgens op toets 2. De dagtijd verschijnt op
het display. Gebruik toetsen C en D om de eindtijd in te stellen.
• Zet de oven aan (stel de gewenste ovenfunctie en de
temperatuur in). Nadat de aangeven eindtijd is bereikt, gaat
de oven automatisch uit. Ook klinkt er een geluidssignaal dat
u kunt stoppen door een willekeurige toets aan te raken. Het
geluidssignaal zal na één minuut automatisch stoppen.
• Op het display gaan symbool 1 en de bereidingstijd ‘0:00’
knipperen.
Als u door wil gaan met bakken/braden kunt u opnieuw een
bereidingstijd instellen.
Instellen voorgeprogrammeerde bereidingstijd
Voor dit programma stelt u twee tijden in; de bereidingstijd en de
eindtijd (de tijd waarop u het gerecht gaar wilt hebben).
De eindtijd van de oven kan maximaal 24 uur vooruit liggen.
• Controleer of de dagtijd goed is ingesteld.
• Stel eerst de bereidingstijd in. Druk op toets A en vervolgens op
symbool 1. Gebruik toetsen C en D om de bereidingstijd in te
stellen.
• Stel hierna de eindtijd in. Druk op toets A en vevolgens op toets 2
De dagtijd verschijnt op het display. Gebruik toetsen C en D om de
eindtijd in te stellen.
• De schakelklok staat nu in pauze. De symbolen 1 en 2 lichten op.
• Zet de oven aan (stel de gewenste ovenfunctie en de gewenste
temperatuur in). De oven start en eindigt automatisch op de
ingestelde tijden. Nadat de aangeven eindtijd is bereikt, gaat de
oven automatisch uit. Ook klinkt er een geluidssignaal dat
15
Page 14
u kunt stoppen door een willekeurige toets aan te raken. Het
geluidssignaal zal na één minuut automatisch stoppen.
Instellen van de kookwekker
De kookwekker kan ook afzonderlijk van de oven worden ingesteld.
• Druk op toets A aan en vervolgens op symbool 3. Gebruik toetsen
C en D om de kookwekker in te stellen. De maximaal instelbare tijd
bedraagt 10 uur.
• Wanneer de ingestelde tijd is bereikt, klinkt er een geluidssignaal. U
kunt het geluidssignaal stoppen door een willekeurige toets aan te
raken. Het geluidssignaal zal na één minuut automatisch stoppen.
Het kooksymbool (3) zal doven.
Bij de kookwekker wordt de laatste minuut op het
display in seconden weergegeven.
Instellen van het volume van het geluidssignaal
Het volume van het geluidssignaal kan worden ingesteld. Dit kan
alleen wanneer er geen andere functie is ingesteld. (Alleen de
dagtijd staat in het display)
• Druk op toets D en houd deze toets drie seconden ingedrukt; het
volumescherm verschijnt en u hoort een voorbeeldsignaal.
- ‘0000’ geeft het maximale signaalvolume aan en
- ‘0’ geeft het minimale signaalvolume aan.
Gebruik toets D om het gewenste volume in te stellen.
• Bevestig het geselecteerde volume door toets A in te drukken.
Als toets A niet wordt ingedrukt, wordt het volume na een paar
seconden automatisch bevestigd.
16
Instellen van het kinderslot
Inschakelen: Druk op toets A en vervolgens op symbool 5. Gebruik
de toetsen C en D om het kinderslot te activeren. Op het display
verschijnt de tekst ‘ON’. Bevestig uw keuze met de toets A.
Uitschakelen: Gebruik de toetsen C en D om het kinderslot uit te
schakelen Op het display verschijnt de tekst ‘OFF’. Bevestig uw
keuze door op toets A te drukken.
• Als het kinderslot geactiveerd is, zal de oven niet werken en
kunnen er geen veranderingen in de instellingen plaatsvinden.
• Als het kinderslot geactiveerd is nadat er een programma
geselecteerd is, zal de oven gewoon werken maar zijn er geen
veranderingen in de instellingen mogelijk.
Displaydimmer
Tussen middernacht en 6.00 uur in de morgen zal de lichtsterkte van
het display automatisch dimmen. Dit gebeurt niet wanneer er een
programma actief is.
Page 15
Het verwijderen van de timerinstellingen
• Alle instellingen kunt u wissen door toets C en D tegelijkertijd
drie seconden ingedrukt te houden. De ingestelde programma’s
worden onderbroken, op het display verschijnt de dagtijd.
• Een instelling kunt u ook op de volgende manier verwijdeden:
- selecteer de ingestelde functie met toets A;
- druk vervolgens toets C en D tegelijkertijd in.
• De laatste manier om een instelling ongedaan te maken is de
timerinstellingen op ’0:00’ te zetten.
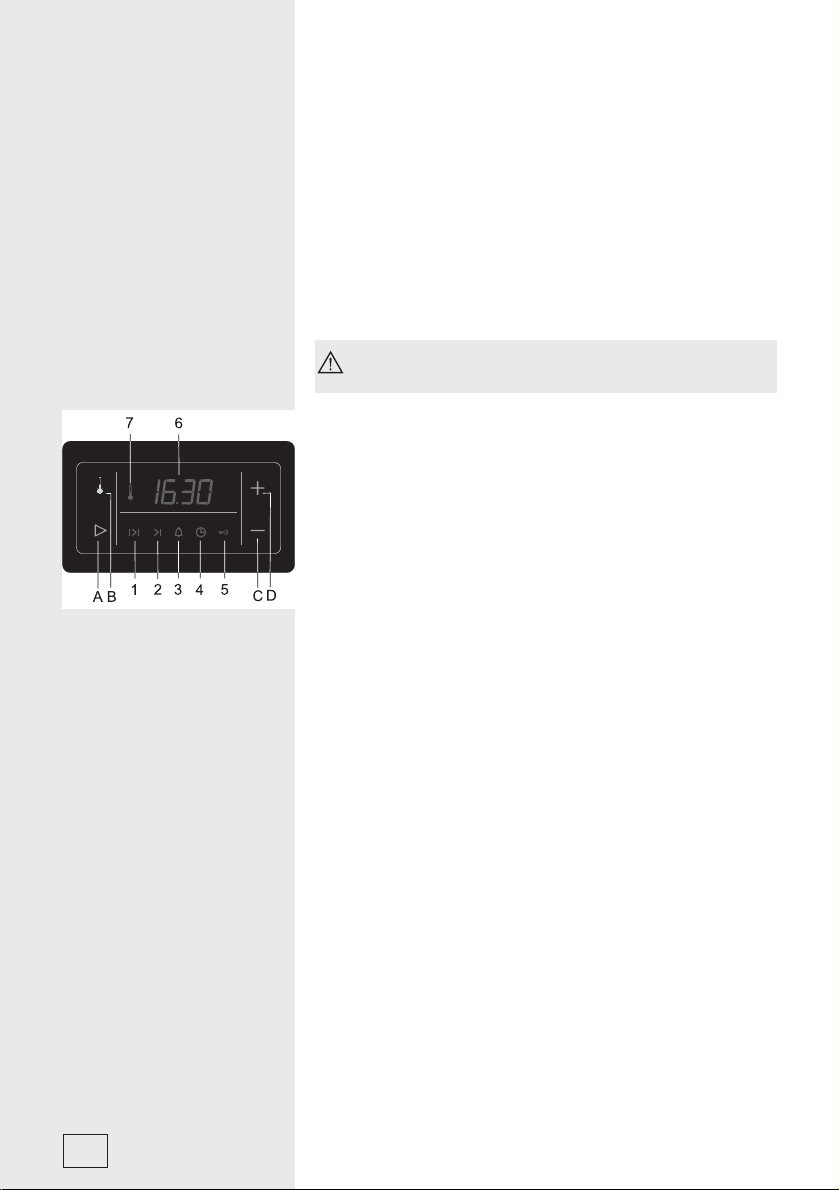
Bedienen van de oven
Oventemperatuur
instellen
U kunt de oven instellen met de functieknop en de elektronische
schakelklok.
Kies met de functieknop de gewenste ovenfunctie en stel met de
tempermostaatknop de gewenste temperatuur in. De oven start.
De gekozen ovenfunctie en de ingestelde temperatuur worden
op het display weergegeven.
Gebruik de elektronisch schakelklok om de gewenste
temperatuur in te stellen.
• Druk op toets B. In het display verschijnt »180 °C « en het
symbool ‘°C’ knippert een paar seconden. De oven gaat aan.
• Zolang het symbool ‘°C’ knippert, kunt u met de toetsen C en
D de gewenste temperatuur instellen. Per keer dat u de toets
indrukt verspringt de temperatuur 5 °C. Als u de toetsen langer
indrukt verspringt de temperatuur sneller.
• De temperatuur wordt in intervallen van 5 °C weergegeven op
het display. Wanneer de temperatuur onder de 30 °C blijft, zal
er ‘--‘ in het display verschijnen. Symbool 7 licht op. Dit geeft
aan dat de oven opwarmt.
• Wanneer de ingestelde temperatuur is bereikt, zal het symbool
7 doven.
• Tijdens het bereiden van gerechten zorgt de thermostaat
ervoor dat de temperatuur gehandhaafd blijft. Wanneer
de verwarmingselementen opnieuw worden ingeschakeld,
verschijnt het symbool 7 in het display.
• U kunt de temperatuur altijd aanpassen met toets B. Het
symbool ‘°C’ zal dan weer gaan knipperen. Wanneer dit
symbool knippert kan de temperatuur worden bijgesteld met
de toetsen C en D.
17
Page 16

Ovenknoppen
Met de functieknop kunt u de oven in- en uitschakelen en de
gewenste ovenfunctie instellen.
Met de thermostaatknop kunt u de temperatuur verhogen of
verlagen ('+' voor verhogen, '-' voor verlagen).
18
Page 17

De verschillende
ovenfuncties
Ovenverlichting
De oven wordt verlicht door 1 lamp: linksachter aan de
bovenkant. U kunt de ovenverlichting inschakelen, zonder daarbij
een andere functie te selecteren. Dit is vooral handig bij het
reinigen van de oven of, aan het einde van het bakproces, bij het
benutten van de nawarmte. Bij alle andere ovenfuncties schakelt
de ovenverlichting automatisch in.
Boven- en onderwarmte
De verwarmingselementen boven en onder in de oven geven
gelijkmatig warmte af. Bakken van gebak of braden van vlees is
maar op één niveau mogelijk.
Grill
Het grill-element dat bovenin de oven is bevestigd, straalt
warmte uit. Grillen is vooral geschikt voor het braden van
kleine stukken vlees zoals biefstukken, worstjes, schnitzels,
karbonades enz.
Maxi grill
Het grill-element wordt gelijktijdig met het bovenste ovenelement
ingeschakeld. Het grill-element straalt direct op het gerecht. Om
het verwarmingsproces te optimaliseren wordt het bovenelement
ook ingeschakeld. Deze verwarmingsmethode is ideaal voor het
bereiden van kleine stukken vlees zoals steaks, biefstukken,
worstjes en karbonades.
Hetelucht grill
Het grill-element en de ventilator werken tegelijkertijd. Deze
verwarmingsmethode is bijzonder geschikt voor het grillen van
vlees en het braden van grote stukken vlees of gevogelte op één
niveau van de oven. Het is ook geschikt voor het gratineren. De
hetelucht grill zorgt voor een knapperig korstje.
19
Page 18

Hetelucht en onderwarmte
Bij deze verwarmingsmethode werken het onderelement en de
hetelucht ventilator tegelijkertijd. Deze methode is bijzonder
geschikt voor het bakken van pizza's. Bij vochtig of zwaar
gebak op 2 niveaus, zoals vruchtentaart of plaatkoekdeeg en
kaassouffl és, geeft deze ovenfunctie het beste resultaat.
Hetelucht
De ventilator in de achterwand van de oven zorgt voor een
voortdurende circulatie van hetelucht rond het te braden vlees of
gebak. Deze ovenfunctie is met name geschikt voor het braden
van vlees en gebak op meerdere niveaus.
Ontdooien
Bij deze ovenfunctie circuleert de lucht in de oven zonder dat de
verwarmingselementen zijn ingeschakeld. Deze methode wordt
gebruikt voor langzaam ontdooien van bevroren levensmiddelen.
20
Onderwarmte met ventilator
Bij deze ovenfunctie zijn de ventilator en het onderelement
tegelijkertijd insgeschakeld. Deze methode is vooral bruikbaar
voor het bakken van dun gebak.
Gebruik de 1e richel van onder af en niet te hoge bakvormen,
zodat de warme lucht ook over de bovenkant van het gerecht
kan circuleren.
Aqua Clean
Gebruik deze ovenfunctie voor het reinigen van de oven. Stel de
temperatuurkeuzeknop in op 50 °C. Giet 0,6 l water in het bakblik
en plaats het op de onderste richel. Na een half uur worden de
voedselresten op het email van de oven zacht en kunt u ze met een
vochtige doek afvegen.
De richtlijnen voor het voorverwarmen, de niveaukeuze en de
bak/braadtijd vindt u in de tabel voor de ovenfunctie met het
boven- en onderwarmte. Stel de thermostaatknop in op de
gewenste temperatuur. De oven is voorverwarmd, wanneer het
rode lampje uitgaat.
Page 19

Bakniveaus
• Het toebehoren, rooster en bakblik, kunt u op vier niveaus in
de oven schuiven.
• In de bak/braadtabellen zijn de afzonderlijke niveaus
aangegeven. Houdt er rekening mee, dat de bakniveaus altijd
van beneden naar boven worden zijn aangegeven.
Uittrekbare telescopische
geleiders
• De richels 2, 3 en 4 hebben telescopisch uittrekbare geleiders.
Waarschuwing: de uittrekbare telescopische geleiders
en andere delen van het toebehoren worden warm!
Gebruik daarom altijd ovenwanten!
• Voor het plaatsen van het rooster en het bakblik, altijd eerst de
telescopische geleiders van één niveau uittrekken.
• Het rooster of het bakblik op de uitgetrokken geleiders plaatsen
en deze dan met de hand zover mogelijk terugduwen. Sluit de
ovendeur altijd pas wanneer de telescopische geleiders volledig
zijn ingeschoven.
21
Page 20

Easy Clean inzetstuk
Oventoebehoren
Het Easy Clean inzetstuk voorkomt afzetting van vetspatten op
de zijkanten in de oven.
Het Easy Clean inzetstuk is als volgt te installeren:
• Demonteer het rekje met de uittrekbare telescopisch geleiders
(zie het hoofdstuk ’Demonteren van het rekje met de
uittrekbare telescopische geleiders’).
• Plaats het Easy Clean inzetstuk op de geleiders. Steek
daarna de bovenkant van het inzetstuk in de gaatjes aan de
binnenwand van de oven en trek deze daarna naar beneden.
Gebruik bij het installeren van de uittrekbare telescopische
geleiders en het Easy Clean inzetstuk de vier bijgeleverde
klemmetjes. Plaats deze in het laagste gaatje in de binnenwand
van de oven. Plaats de geleiders in deze klemmetjes. De
klemmetjes zijn bedoeld om de geleiders te beschermen.
22
Het ovenrooster is geschikt om er ovenschotels en bakvormen
op te plaatsen. Uiteraard kunt u ook gerechten rechtsreeks
plaatsen.
Bakblik voor het bakken van plaatgebak en koekjes en voor het
opvangen van vet.
Page 21

Vetfi lter
Het vetfi lter in de achterwand van de oven beschermt de
ventilator en het hetelucht element tegen ongewenst vet. Plaats
het vetfi lter altijd in de oven wanneer u vlees braadt of grilt.
Verwijder het vetfi lter altijd wanneer u gebak bakt! Het vetfi lter
kan bij het bakken slechte resultaten geven.
Het bereiden van gerechten
Bakken van gebak
• Voor het bakken van gebak kunt u boven- en onderwarmte ,
hetelucht
• Verwijder altijd het vetfi lter uit de oven bij het bakken!
Aanwijzingen
• Houd bij het bakken van gebak altijd rekening met de keuze
van de richel, de temperatuur en baktijd uit de tabel voor
gebak. De waarden in de tabel voor het bakken van gebak zijn
speciaal voor deze oven vastgesteld en gecontroleerd.
• Wanneer u in de tabel voor het bakken een bepaald soort
gebak niet aantreft, kies dan de gegevens voor een soortgelijk
gebak.
Het bakken van gebak met boven- en onderwarmte
• Gebruik slechts één bakniveau.
• Boven- en onderwarmte is bijzonder geschikt voor het bakken
van droog gebak, brood en biscuit.
• Gebruik donkere bakblikken. In lichte bakblikken kleurt het
gebak minder goed omdat deze warmte weerkaatsen.
• Plaats bakvormen altijd op het rooster. Wanneer u het
bijgeleverde bakblik gebruikt, moet u het rooster verwijderen.
• Voorverwarmen verkort de baktijd. Plaats het gebak pas in de
oven wanneer de gekozen temperatuur bereikt is.
of hetelucht + onderwarmte gebruiken.
23
Page 22

Bakken van gebak met hetelucht
Het bakken van gebak met hetelucht is bijzonder geschikt
voor het bakken op meerdere niveaus, voor vochtig gebak en
vruchtentaarten. U kunt ook lichte bakvormen gebruiken.
• De temperatuur is gewoonlijk lager dan bij het bakken met
boven- en onderwarmte (zie ook de tabel voor het bakken van
gebak).
• Bij het bakken van vochtig gebak in een bakvorm
(vruchtentaart) kunt u vanwege het grote vochtigheidsgehalte
maar op hoogstens twee niveaus bakken.
• U kunt verschillende soorten gebak samen bakken, wanneer
de vereiste temperatuur ongeveer gelijk is.
• De baktijd kan bij het gebruik van meerdere bakblikken tegelijk
verschillen. Misschien zult u het ene bakblik eerder uit de oven
moeten halen dan het andere.
• Zorg ervoor dat koekjes ongeveer dezelfde dikte hebben.
Ongelijkmatig gebak zal ongelijkmatig bruin worden!
• Wanneer u meer gebak tegelijkertijd bakt, zal er meer
damp in de oven ontstaan die op de ovendeur condens kan
veroorzaken.
Raadgevingen voor het
bakken van gebak
Is het gebak door en door gaar?
Prik met een houten stokje in het hoogste gedeelte. Wanneer er
geen deeg op het stokje achterblijft, is het gebak gaar. U kunt de
oven uitschakelen en de nawarmte benutten.
Het gebak is ingezakt
Controleer het recept. Gebruik minder vloeistof de volgende
keer. Neem de tijd voor het mixen in acht, vooral bij het gebruik
van keukenmachines.
Het gebak is te licht aan de onderkant
Gebruik de volgende keer een donkere bakvorm voor het bakken
en plaats het gebak één richel lager of schakel tegen het einde
van het bakken de onderverwarming aan.
Gebak met een vochtige vulling, bijvoorbeeld kwarktaart, is
niet helemaal gaar.
Verlaag de volgende keer de temperatuur en verleng de baktijd.
Waarschuwingen bij de tabel voor het bakken van gebak:
• Bij de temperatuur is een minimum en een maximum
aangegeven. Stel eerst de lage temperatuur in. Als het
gebak niet bruin genoeg wordt verhoogt u de temperatuur de
volgende keer.
• De baktijden zijn bij benadering aangegeven en kunnen onder
verschillende omstandigheden afwijken.
24
Page 23

• De vetgedrukte gegevens vermelden de beste verwarm-
methode voor het soort gebak.
• Het * (sterretje) betekent dat u de oven moet voorverwarmen.
• Als u gebruik maakt van bakpapier, wees er dan zeker van dat
dit geschikt is voor hoge temperaturen.
Tabel voor bakken van gebak met boven- en onderwarmte en de heteluchtoven
Soort gebak Richel
(van
onderaf)
Zoet gebak
Marmercake, tulband 1 160-170 1 150-160 50-70
Rechthoekige cake 1 160-170 1 150-160 55-70
Cake in springvorm 1 160-170 2 150-160 45-60
Kwarkgebak in springvorm 1 170-180 2 150-160 65-85
Vruchtentaart, zandtaartdeeg 1 180-190 2 160-170 50-70
Vruchtentaart met garnering 1 170-180 2 160-170 60-70
Biscuittaart* 1 170-180 2 150-160 30-40
Taart met suikerglazuur 2 180-190 2 160-170 25-35
Vruchtentaart, roerbeslag 2 170-180 2 150-160 45-65
Kersencake 2 180-200 2 150-160 30-50
Biscuitrollade* 2 180-190 2 160-170 15-25
Gebak van roerbeslag 2 160-170 2 150-160 25-35
Broodvlecht, krans 2 180-200 2 160-170 35-50
Kerststol 2 170-180 2 150-160 45-70
Appeltaart 2 180-200 2 170-180 40-60
Donuts 1 170-180 2 150-160 40-55
Hartig gebak
Quiche 1 190-210 2 170-180 50-65
Pizza* 2 210-230 2 190-210 25-45
Brood 2 190-210 2 170-180 50-60
Broodjes* 2 200-220 2 180-190 30-40
Klein gebak en koekjes
Koekjes van zandtaartdeeg* 2 160-170 2 150-160 15-25
Spritskoekjes* 2 160-170 2 150-160 15-28
Koekjes van gistdeeg 2 180-190 2 170-180 20-35
Koekjes van bladerdeeg 2 190-200 2 170-180 20-30
Soesjes 2 180-190 2 180-190 25-45
Souffl és
Rijstsouffl é 1 190-200 2 180-190 35-50
Kaassouffl é 1 190-200 2 180-190 40-50
Diepvriesgebak
Appel- en kwarktaart 2 180-200 2 170-180 50-70
Kwarktaart 2 180-190 2 160-170 65-85
Pizza 2 200-220 2 170-180 20-30
Ovenfrites* 2 200-220 2 170-180 20-35
Ovenkroketten 2 200-220 2 170-180 20-35
Temperatuur
(in °C)
Richel
(van
onderaf)
Temperatuur
(in °C)
Baktijd
(in min.)
Let op: Het nummer in de kolom 'Richel' geeft de inschuifhoogte van het bakblik aan.
25
Page 24

Tabel voor het bakken van deegwaren met onderwarmte en heteluchtoven
Soort gebak Richel
Kwarktaart, kleine taarten 2 150-160 65-80
Pizza*, gistdeeg 2 200-210 15-20
Quiche Loraine, koekjes 2 180-200 35-40
Appeltaart met suikerglazuur,
koekjes van gistdeeg
Vruchtentaart van roerbeslag 2 150-160 45-55
Appeltaart, gevulde taarten 2 170-180 45-65
(van onderaf)
2 150-160 35-40
Temperatuur (in °C) Baktijd
(in min.)
Braden van vlees
• Voor het braden van vlees kunt u de boven- en onderwarmte
gebruiken
of de hetelucht functie gebruiken.
• De meest geschikt ovenfunctie voor een bepaalde gerecht is
vetgedrukt in de tabel voor het braden van vlees aangegeven.
• Plaats het vetfi lter alleen voor het braden van vlees!
Raadgevingen in verband met het serviesgoed
• U kunt een servies van email, vuurvast glas, aardewerk of
gietijzer gebruiken.
• Roestvrijstalen bakblikken zijn niet geschikt omdat ze zeer
sterk warmte weerkaatsen.
• Wanneer u het vlees afdekt, blijft het sappiger en blijft de oven
schoon.
• In een niet afgedekte schaal wordt het vlees sneller bruin.
Braadt grote stukken vlees op het rooster en plaats het bakblik
er onder om het druipende vet op te vangen.
Waarschuwingen voor het braden van vlees
• In de tabel voor het braden van vlees vindt u gegevens
omtrent de temperatuur, de ovenfunctie en de baktijd. Omdat
de baktijden sterk afhangen van het soort, het gewicht en de
kwaliteit van het vlees, kunnen afwijkingen optreden.
• Het braden van vlees, gevogelte en vis is in de oven pas
economisch bij hoeveelheden van meer dan 1 kg.
• Bij het bakken moet zoveel vocht worden toegevoegd, dat het
vet en het sap van het vlees niet verbranden. Dit betekent dat
bij langere braadtijden het vlees meerdere malen moet worden
gecontroleerd en er vocht moet worden toegevoegd.
• Na het verstrijken van de helft van de braadtijd moet u het
vlees keren, vooral bij braden in de braadslede. Het is daarom
het beste het vlees eerst met de bovenkant naar beneden te
braden.
• Bij het braden van grote stukken vlees kan veel damp
ontstaan. Dit zal op de ovendeur condenseren. Dit is een
natuurlijk verschijnsel en heeft geen invloed op de werking van
het apparaat. Veeg na het braden de deur en de glazen ruit
droog.
26
Page 25

• Wanneer u op het rooster braadt, plaats er dan het bakblik
onder om het sap uit het vlees op te vangen. Plaats het
rooster op de telescopische geleiders en schuif het bakblik op
de onderste richel.
• Laat gerechten niet in een gesloten oven afkoelen. Zo vermijdt
u condens.
Tabel voor het braden met boven- en onderwarmte en de heteluchtoven
Soort vlees Gewicht
(in g)
Rundvlees
Gebraden rundvlees 1000 2 200-220 2 180-190 100-120
Gebraden rundvlees 1500 2 200-220 2 170-180 120-150
Rosbief, rosé 1000 2 220-230 2 180-200 30-50
Rosbief, doorbakken 1000 2 220-230 2 180-200 40-60
Varkensvlees
Speklappen 1500 2 180-190 2 170-180 140-160
Buikstuk 1500 2 190-200 2 170-180 120-150
Buikstuk 2000 2 180-200 2 160-170 150-180
Schouderstuk 1500 2 200-210 2 160-170 120-140
Varkensrollade 1500 2 200-210 2 160-170 120-140
Casselerrib 1500 2 180-200 2 160-170 100-120
Gehakt 1500 2 210-220 2 170-180 60-70
Kalfsvlees
Kalfsrollade 1500 2 180-200 2 170-190 90-120
Kalfsschenkel 1700 2 180-200 2 170-180 120-130
Lamsvlees
Lamsrug 1500 2 190-200 2 170-180 100-120
Hamelbout 1500 2 190-200 2 170-180 120-130
Wildbraad
Hazenrug 1500 2 190-210 2 180-190 100-120
Reebout 1500 2 190-210 2 170-180 100-120
Wild zwijnbout 1500 2 190-210 2 170-180 100-120
Gevogelte
Hele kip 1200 2 200-210 2 180-190 60-70
Slachtkuiken 1500 2 200-210 2 180-190 70-90
Eend 1700 2 180-200 2 160-170 120-150
Gans 4000 2 160-170 2 150-160 180-200
Kalkoen 5000 2 150-160 2 140-150 180-240
Vis
Hele vis 1000 2 200-210 2 170-180 50-60
Vissouffl é 1500 2 180-200 2 150-170 50-70
Richel
(van
onderaf)
Tempera-
tuur (°C)
Richel
(van
onderaf)
Tempera-
tuur (°C)
Braadtijd
(in min.)
Let op: Het nummer in de kolom 'Richel' geeft de inschuifhoogte van het bakblik aan.
27
Page 26

Grillen en gratineren
• Wees extra voorzichtig bij het grillen. Door de hoge
temperatuur van de grill worden het rooster en de overige
toebehoren van de oven zeer heet. Gebruik daarom
ovenwanten en een speciale vleestang!
• Uit het vlees waarin u prikt kan heet vet spuiten (bijvoorbeeld
uit worstjes). Gebruik een vleestang om brandwonden te
voorkomen.
• Houd voortdurend toezicht bij het grillen. Het vlees kan snel
verbranden door de hoge temperatuur!
• Laat kinderen niet te dicht bij de grill komen.
• De grill is geschikt voor het bereiden van knapperige worstjes,
in stukken gesneden vlees en vismoten (biefstuk, schnitzel,
zalmmoten…) of om toast te bereiden of gerechten te
gratineren.
Tips voor het grillen
• Tijdens het grillen moet de ovendeur altijd gesloten zijn.
• In de tabel vindt u gegevens over de temperatuur, de stand
en de grilleertijd. Omdat de grilleertijd sterk afhankelijk is
van het soort, gewicht en de kwaliteit van het vlees, kunnen
afwijkingen optreden.
• Plaats bij het grillen van vlees altijd het vetfi lter in de oven.
• Verwarm de grill ongeveer 5 minuten voor.
• Vet het rooster even in zodat het vlees er niet aan vastbakt.
• Leg dunne stukken vlees op het rooster. Plaats het bakblik
onder het rooster om het druipende vet en vleessap op te
vangen. Plaats het rooster op de telescopische geleiders en
schuif het bakblik op de onderste richel.
• Keer het vlees dat u grilleert na het verstrijken van de helft van
de tijd. Keer dunne stukken maar één maal, grotere meerdere
malen. Gebruik bij het keren geen vork, maar een vleestang,
zodat er niet te veel vleessap uit het stuk loopt.
• Donkere vleessoorten worden beter en sneller bruin dan lichte
zoals varkens- of kalfsvlees.
• Reinig de oven en het toebehoren na elk gebruik, zodat het
vet de volgende keer niet kan inbranden.
28
Page 27

Tabel voor de maxi grill
Soort gerecht Gewicht
Vlees en worstjes
4 Runderfi letschnitzels, rood 180 g/stuk 4 240 - 14-16
4 Runderfi letschnitzels, rosé “ 4 240 - 16-20
4 Runderfi letschnitzels,
doorbakken
4 Varkensschnitzels - nekstuk “ 4 240 - 19-23
4 Karbonades “ 4 240 - 20-24
4 Kalfsschnitzels “ 4 240 - 19-22
6 Lamskarbonades 100 g/stuk 4 240 - 15-19
8 Grillworstjes 100 g/stuk 4 240 - 11-14
3 Stukken leverkaas 200 g/stuk 4 240 - 9-15
Halve haan 600 g 2 - 180-190 25 (
Vis
Zalmmoten 600 3 240 - 19-22
4 Forellen 200 g/stuk 2 - 170-180 45-50
Toast
6 Witte boterhammen / 4 240 - 1,5-3
4 Bruine boterhammen / 4 240 - 2-3
Belegde broodjes / 4 240 - 3,5-7
Vlees/gevogelte
Eend 2000 2 210 150-170 80-100
Kip 1500 2 210-220 160-170 60-85
Gebraden varkensvlees 1500 2 - 150-160 90-120
Varkensschouder 1500 2 - 150-160 120-160
Varkensschenkel 1000 2 - 150-160 120-140
Rosbief/biefstuk 1500 2 - 170-180 40-80
Groente
Bloemkool, boerenkool 750 2 - 210-230 15-25
Asperges 750 2 - 210-230 15-25
(g)
“4
Richel
(van onderaf)
Temperatuur
(°C)
240
Temperatuur
(°C)
-
Grilleertijd
(in min.)
18-21
1e kant)
20 (2e kant)
Let op: Het nummer in de kolom 'Richel' geeft de inschuifhoogte van het rooster aan.
Wanneer u vlees braad in een braadslede, zorg er dan voor dat er genoeg water in de braadslede
aanwezig is. Dit is om aanbranden te voorkomen. Keer het vlees halverwege het braadproces om.
Plaats een bakblik in de eerste of tweede richel bij het grillen van vlees op het rooster. Deze zal het
afdruipend vet opvangen zodat dit niet op de bodem van de oven komt en daar kan inbranden.
29
Page 28

Tabel voor de grill
Soort gerecht Gewicht
Vlees en worstjes
2 Runderfi letschnitzels,
doorbakken
2 Karbonades 4 240 - 20-22
2 Varkensschnitzels - nekstuk 180 g/stuk 4 240 18-22
4 Grillworstjes 100 g/stuk 4 240 - 11-14
4 Getoaste broodjes 4 240 - 5-7
Toast – gebruind 4 240 3-4
3 Forellen 200 g/stuk 2 - 160-170 40-50
Haantje 1500 g 2 - 160-170 60-80
Varkensschouder 1500 g 2 - 150-160 120-160
(in g)
180 g/stuk 4 240 - 180-21
Richel
(van onderaf)
Temperatuur
(°C)
Temperatuur
(°C)
Grilleertijd
(in min.)
DefrostingOntdooien
• De luchtcirculatie in de oven versnelt het ontdooien van
bevroren levensmiddelen. Stel hiervoor de oven in op
»Ontdooien« .
• Slagroom en crèmegebak, koekjes en ander gebak, brood en
broodjes, vruchten enz. zijn geschikt om te ontdooien.
• Uit hygiënisch oogpunt is het beter vlees en gevogelte niet in
de oven te ontdooien.
• Indien mogelijk de levensmiddelen meerdere malen keren of
doorroeren, zodat ze gelijkmatig ontdooien.
30
Page 29

Reiniging en onderhoud
U mag het fornuis niet reinigen met een stoom- of hogedrukstoomreiniger. Voor het reinigen het
fornuis altijd uitschakelen en af laten koelen.
Voorzijde van het fornuis
Voor het schoonmaken en het onderhoud van de voorkant van het fornuis gebruikt u een huishoud
reinigingsmiddel, waarbij u de aanwijzingen van de fabrikant in acht neemt. Gebruik geen
schurende reinigingsmiddelen, scherpe voorwerpen of sponsjes met een schuurlaag. Deze kunnen
krassen veroorzaken.
Aluminium oppervlakten
Voor het reinigen van aluminium delen gebruikt u een reinigingsmiddel dat bedoeld is voor
aluminium. Doe het reinigingsmiddel op een doek, verwijder het vuil en spoel af met water.
Breng het reinigingsmiddel niet rechtstreeks op de oppervlakten aan. Gebruik geen schurende
reinigingsmiddelen, scherpe voorwerpen of sponsjes met een schuurlaag. Deze kunnen krassen
veroorzaken. De aluminium delen mogen niet rechtstreeks in contact komen met reinigingssprays
voor ovens.
Roestvrijstalen voorkant van het fornuis (FG6011E)
Reinig de oppervlakte alleen met een zacht reinigingmiddel (sopje) en een zacht sponsje dat geen
krassen kan veroorzaken. Gebruik geen schurende reinigingsmiddelen of reinigingsmiddelen, die
een oplosmiddel bevatten. Door het niet opvolgen van de aanwijzingen kan de buitenkant van het
fornuis beschadigen.
Gelakte oppervlakten en kunststofdelen
Reinig de knoppen en de handgreep van de ovendeur met een zachte doek en een vloeibaar
reinigingsmiddel voor gelakte oppervlakten.
LET OP: De hierboven genoemde oppervlakten mogen nooit in contact komen met
reinigingssprays voor ovens. Deze sprays kunnen het oppervlak aantasten.
31
Page 30

Onderhoud
Afbeelding 1
Afbeelding 2
Inductiekookgedeelte
Maak het kookgedeelte (nadat deze iets is afgekoeld) direct na
gebruik schoon. Voedselresten kunnen anders aankoeken en
zijn dan moeilijker te verwijderen. Voor regelmatig onderhoud
zijn speciale schoonmaak- en onderhoudsmiddelen voor
inductiekookplaten verkrijgbaar die een beschermlaagje op het
kookvlak achterlaten. Veeg voordat u gaat koken de kookplaat
schoon. Een klein zandkorreltje kan door een schuivende
panbodem al een kras achterlaten (afb.1).
Let op: Staalwol, schuursponsjes en schuurmiddelen kunnen het
oppervlak ernstig beschadigen. Ook agressieve sprays en het
onvoldoende schudden of mengen van vloeibare reinigers kan
schade veroorzaken.
De lijnen en teksten op het oppervlak kunnen beschadigd raken
door agressieve schoonmaakmiddelen of een beschadigde
panbodem.
Lichte verontreiniging is het makkelijkst te verwijderen met een
vochtige doek. Het oppervlak altijd droog wrijven met een schone
doek.
Watervlekken kun u verwijderen met een oplossing van azijn.
Let op dat het azijn de metalen delen niet aantast. Gebruik nooit
agressieve ontkalkingsmiddelen of sprays.
32
Afbeelding 3
Afbeelding 4
Afbeelding 5
Sterke verontreiniging kunt u verwijderen met speciale
reinigingsmiddelen voor inductiekookplaten. Volg altijd de
instructies van de fabrikant wanneer u deze middelen gebruikt.
Zorg ervoor dat u resten van schoonmaakmiddelen
zorgvuldig verwijderd. Deze kunnen bij verwarming het
oppervlak ernstig beschadigen.
Aangekoekte etensresten kunt u verwijderen met een
glasschraper. Pas op dat het kunststof van de schraper niet in
contact komt met een heet oppervlak. Pas op dat u zichzelf niet
snijdt.
Suiker en suikerhoudende gerechten kunnen blijvende
schade veroorzaken aan het oppervlak en moeten daarom zo
snel mogelijk, wanneer het oppervlak nog warm is, verwijderd
worden. Een kleurafwijking in het oppervlak heeft geen invloed
op de werking van de kookplaat of sterkte van het keramisch
glas. Deze verkleuringen zijn vaak het gevolg aangebrande
voedselresten, of vlekken veroorzaak door slijtage van pannen
van bijvoorbeeld koper of aluminium.
Page 31

Let op: alle hierboven vermelde beschadigingen hebben
uitsluitend betrekking op het uiterlijk van het apparaat en
hebben geen invloed op de werking van het fornuis. Deze
beschadigingen vallen dan ook niet onder de garantie.
ATAG Shine
Atag heeft een serie schoonmaakmiddelen samengesteld onder
de naam ATAG Shine. Deze zijn te verkrijgen via de website
www.atagservice.nl. Hier vindt u ook diverse schoonmaak- en
gebruikerstips.
Oven
• U kunt de oven reinigen zoals u gewend bent (eventueel met
reinigings-middelen of ovenspray). Gebruik alleen oversprays
wanneer de oven erg vuil is en wanneer de vlekken hardnekkig
zijn.
• Om de oven regelmatig (na elk gebruik) te reinigen bevelen wij de
volgende procedure aan: Draai de keuzeknop van de afgekoelde
oven in de stand
in op 50 °C. Giet 0,6 l water in het bakblik en plaats het op de
onderste richel. Na een half uur worden de voedselresten op het
email van de oven zacht en kunt u ze met een vochtige doek
afvegen.
Tips tegen hardnekkige vervuiling:
De oven moet voor iedere reiniging afgekoeld zijn.
• Reinig de oven en het toebehoren na elk gebruik, zodat het vuil
niet inbrandt.
• Vet kunt u het gemakkelijkste met een sopje verwijderen terwijl de
oven nog wat warm is.
• Gebruik bij hardnekkige of sterke vervuiling een ovenreiniger.
Neem de oven daarna grondig af met schoon water, zodat u alle
resten van het reinigingsmiddel verwijdert.
• Gebruik nooit agressieve reinigingsmiddelen, zoals schuur-
middelen, sponsjes met een schuurlaag, roest- en vlekkenverwijderingsmiddelen en dergelijke.
• Gelakte, roestvrijstalen en verzinkte oppervlakten of
aluminiumdelen mogen niet met de ovenspray in aanraking
komen. Dit om het aantasten van het oppervlak en
kleurveranderingen te voorkomen. Hetzelfde geldt voor het
verwarmingselement boven in het fornuis.
• Let op de dosering van de reinigingsmiddelen. Denk aan het
milieu en volg de aanwijzingen van de fabrikant op.
(Aqua Clean). Stel de temperatuurkeuzeknop
33
Page 32

Praktische tips
• Grote stukken vlees kunt u het best in aluminiumfolie of een
ovenzak plaatsen. Dit voorkomt vetspetters aan de binnenzijde
van de oven.
• Plaats het bakblik onder het rooster om het druipende vet en
vleessap op te vangen.
Het schoonmaken van het plafond van de oven
• Om het schoonmaken van het plafond van de oven te
vergemakkelijken, beschikt de oven over een gedeeltelijk
demonteerbaar bovenelement.
• Voordat het bovenelement wordt gedemonteerd, moet de
stekker van de oven uit het stopcontact getrokken worden of
de zekering in de meterkast uitgeschakeld worden.
• Het verwarmingselement moet zijn afgekoeld; anders bestaat
het risico dat u zich brandt.
• Schakel de oven niet in zonder bovenelement!
Verwijder het bakblik, het ovenrooster en de geleiders voordat
u de oven schoonmaakt. Trek daarna het bovenelement naar
u toe. Trek met beide handen aan het bovenelement totdat
deze los raakt uit de linker- en rechterklemmen (zie afbeelding).
Monteer het bovenelement na het schoonmaken volgens
dezelfde procedure. Het element moet weer in de klemmen terug
geplaatst worden.
Toebehoren
Was het toebehoren, zoals bijvoorbeeld bakblikken, roosters en
dergelijke, af met heet water en een afwasmiddel.
34
Vetfi lter
Aanbevolen wordt, het vetfi lter na elk gebruik met een zacht
borsteltje in heet water met wat afwasmiddel schoon te maken.
U kunt het vetfi lter ook in de afwasmachine doen.
Easy Clean inzetstuk
Maak na elk gebruik de Easy Clean inzetstukken schoon in water
met reinigingsmiddel. Gebruik hiervoor een zachte borstel.
De inzetstukken kunt u ook in de afwasmachine reinigen.
Speciaal email
De oven, de binnenkant van de ovendeur en de bakblikken zijn
voorzien van een speciale emaillaag, waarvan de oppervlakte
glad en bestendig is. Deze speciale laag vereenvoudigt het
schoonmaken ervan.
Page 33

Onderhoud
afbeelding 1
Demonteren van het rekje met de telescopisch uittrekbare
geleiders
Om de zijwanden van de oven beter te reinigen, kunt u het rekje
met de uittrekbare telescopisch geleiders demonteren.
• Draai de rekjes aan de onderkant naar binnen en trek ze
boven uit de openingen.
• Reinig de rekjes met een mild reinigingsmiddel.
• U mag de uittrekbare telescopisch geleiders niet in de
afwasmachine reinigen.
De uittrekbare telescopisch geleiders niet invetten.
U kunt de geleiders daarna gewoon in de daarvoor bestemde
openingen terug hangen en naar beneden trekken.
Demonteer het glas aan de binnenzijde van de oven
Het glas aan de binnenzijde van de ovendeur kan alleen worden
schoongemaakt wanneer deze uit de ovendeur is genomen.
• Demonteer de ovendeur (zie de volgende pagina).
• Hou het glas van de deur bij de hoeken aan de onderkant
vast. Trek het voorzichtig naar u toe en til het op (tot een hoek
van ongeveer 10 graden) tot de hoeken van het glas vrijkomen
uit de opening (afbeelding 1).
• Verwijder het glas (in de richting van pijl 3) en verwijder de
beschermhoekjes.
• Verwijder het binnenste derde glas door de schroefjes in
de klemmetjes te verwijderen. Til hierna het glas op
(afbeelding 2). Verwijder de klemmetjes voor het
schoonmaken.
• Monteer de deur in omgekeerde volgorde.
afbeelding 2
afbeelding 3
Let op: Zet het glas met de beschermhoekjes in de opening en
druk deze aan (afbeelding 3).
35
Page 34

afbeelding 1
afbeelding 2
Verwijderen en plaatsen van de ovendeur
Open de ovendeur volledig en draai de pallen tot het einde terug
(afbeelding 1).
• Sluit de deur dan langzaam, zodat de pallen in de houder
zitten. Bij ongeveer 15° (ten aanzien van een gesloten positie
van de deur) tilt u de deur enigszins op en tilt u hem uit beide
scharnierhouders (afbeelding 2).
• Het monteren kan in omgekeerde volgorde. Plaats de deur
onder een hoek van 15° in de scharnieren aan de voorkant
van het apparaat en schuif de deur naar voren en naar
beneden, zodat de scharnieren in de inkepingen vallen.
Controleer of de inkepingen van de scharnieren goed op hun
plaats zitten.
• Open de deur daarna volledig en draai de pallen weer in
de beginpositie. Sluit de deur langzaam en controleer of
hij goed sluit. Als de deur niet goed open of dicht gaat,
controleer dan of de inkepingen van de scharnieren goed in de
scharnierhouders geplaatst zijn.
Let op!
Controleer of de ringetjes van de deurscharnieren goed
vastzitten bij het monteren van de deur. De ringetjes van de
deurscharnieren mogen er nooit uitspringen. Door de sterke
veerkracht kunnen er beschadigingen optreden.
Ovenlade
36
• De ovenlade is tegen ongewenst openen beveiligd. Wanneer
u hem wilt openen, moet u deze aan de voorzijde een beetje
optillen. Als u hem uit het fornuis wilt verwijderen, trek hem
dan eerst zo ver mogelijk uit, til hem dan nogmaals op en trek
hem uit.
• Bewaar geen brandbare, explosieve en niet
temperatuurbestendige voorwerpen in de ovenlade.
• Plaats de lade door de wieltjes in de geleiders te plaatsen en
de lade dicht te schuiven.
Page 35

Vervangen van het
ovenlampje
De fi tting van het ovenlampje staat onder spanning. Er
bestaat gevaar van een elektrische schok!
Ovenlampje
Schakel voor het vervangen van de ovenlamp het fornuis
volledig uit door de stekker uit het stopcontact te trekken of door
de zekering in de meterkast uit te schakelen.
Het lampje is verbruiksmateriaal en valt niet onder de garantie.
Voor het vervangen heeft u een ovenlampje met de volgende
specifi catie nodig: fi tting E 14, 230 V, 25W, 300 °C.
• Schroef het glazen kapje tegen de wijzers van de klok in los
en vervang het ovenlampje. Draai dan het glazen kapje weer
vast.
Het verhelpen van kleine storingen
Reparaties mogen alleen door een geautoriseerd vakman worden verricht. Onvakkundige
reparaties kunnen ernstig gevaar voor de gebruiker opleveren.
Alvorens aan een reparatie te beginnen moet u altijd de stekker uit het stopcontact trekken en de
zekering in de meterkast uitschakelen.
Onvakkundige ingrepen en reparaties kunnen een elektrische schok of kortsluiting veroorzaken. Laat
daarom zulke werkzaamheden alleen aan een geautoriseerd vakman of de servicedienst over.
Controleer, in geval van storingen, met behulp van deze gebruiksaanwijzing of u de oorzaken zelf kunt
verhelpen.
Belangrijk
Een bezoek van de servicedienst tijdens de garantieperiode is
niet gratis wanneer bij deze controle blijkt dat het apparaat niet
goed werkt door onjuiste behandeling.
Bewaar de gebruiksaanwijzing altijd binnen handbereik. Geef
deze gebruiksaanwijzing aan een volgende gebruiker wanneer u
het apparaat van de hand doet.
Onderstaand vindt u enkele tips in verband met het verhelpen
van kleine storingen.
37
Page 36

Het display reageert
niet
De zekering in de
meterkast schakelt
vaak uit
Ovenverlichting werkt
niet
De oven wordt niet
warm
Gebak is niet gaar • Heeft u het vetfi lter verwijderd?
De automatische
schakelklok geeft
ongewone waarden
aan of schakelt
ongecontroleerd in of uit
Display van de
programmeerklok
knippert
Controlelampje brandt
niet
• Trek de stekker uit het stopcontact of schakel de zekering uit. Sluit het
fornuis dan weer aan en stel de juiste dagtijd in.
• Bel de servicedienst of een geauroriseerd vakman!
• Het vervangen van het lampje in de oven is beschreven op
pagina 37.
• Is de juiste temperatuur en ovenfunctie ingesteld?
• Is de deur van de oven gesloten?
• Heeft u de aanwijzingen en raadgevingen van het hoofdstuk »Bakken
van gebak« opgevolgd?
• Heeft u de aanwijzingen uit de baktabel nauwkeurig opgevolgd?
• In het geval van foutieve werking van de schakelklok moet u de
stekker van het fornuis enkele minuten uit het stopcontact trekken of
de zekering in de meterkast uitschakelen. Sluit het fornuis dan weer
op het elektriciteitsnet aan en stel de juiste dagtijd in.
• De stroom is uitgevallen of het fornuis is zojuist op het elektriciteitsnet
aangesloten. Alle ingestelde tijden zijn gewist.
• Stel de juiste tijd in.
• Nadat de schakelklok de oven heeft uitgeschakeld, wordt de tijd
aangegeven en klinkt er een geluidssignaal. Neem het gerecht uit
de oven en zet de functieknop en de therostaatknop terug in de
beginstand.
• Heeft u alle nodige knoppen geactiveerd?
• Is de huiszekering uitgeschakeld?
• Is de temperatuurknop en selectieknop juist ingesteld?
38
Als de problemen niet te verhelpen zijn met behulp van
bovenstaande instructies, bel dan een geautoriseerd vakman.
Storingen die veroorzaakt zijn door onjuist gebruik van het
fornuis vallen niet onder onze garantievoorwaarden. In deze
gevallen zijn de kosten van de reparatie voor rekening van de
gebruiker.
Page 37

Aanwijzingen voor het opstellen en aansluiten
Belangrijke
waarschuwingen
• De aansluiting mag uitsluitend door een gastechnisch installteur, een bevoegde servicedienst
of een geautoriseerd vakman worden verricht. De opstelling en aansluiting van het fornuis moet
overeenkomstig de plaatselijk geldende voorschriften worden verricht. Voldoende ventilatie is
van groot belang.
• De ruimte waarin het apparaat staat moet regelmatig worden geventileerd.
• Overtuig u er voor de aansluiting van het apparaat van, dat de plaatselijke aansluitingseisen
(gassoort en gasdruk) overeenkomen met die van het apparaat.
• Het apparaat mag niet op een installatie voor de afvoer van verbrandingsproducten (bijvoorbeeld
een schoorsteen worden aangesloten). Het moet overeenkomstig de geldende voorschriften
voor de inbouw en aansluiting geplaatst en aangesloten zijn. Speciale aandacht moet worden
gewijd aan de ventilatie-eisen.
• De afstand tussen het apparaat en de afzuigkap moet minstens even groot zijn als in de
aanwijzingen voor de montage van de afzuigkap is beschreven.
• Het fornuis is geschikt voor inbouw tussen twee meubelelementen (klasse 2/1). Aan de ene
kant van het apparaat kunt u een meubelelement plaatsen, dat hoger is dan het fornuis. De
horizontale afstand tot de hoge kast of wand moet minstens 100 mm bedragen. Aan de andere
kant mag alleen een meubelelement van gelijke hoogte worden geplaatst. De hangende
elementen moeten op een hoogte zijn gemonteerd, dat ze niet hinderen bij het gebruik van het
fornuis. De minimale verticale afstand tot het apparaat moet minstens 650 mm bedragen.
• Alle ingrepen aan het fornuis, waarbij gebruik van gereedschap nodig is, mogen alleen door een
geautoriseerd vakman worden verricht.
• De gebruiker mag alleen reparaties zonder het gebruik van gereedschap verrichten.
• Fineer, lijm of kunststof van meubels, naast het fornuis opgesteld, moeten temperatuurbestendig
zijn (>90°C). Wanneer het fi neer en de kunststofbekleding niet voldoende temperatuurbestendig
zijn, kunnen ze vervormen.
• De aansluitkabel aan de achterkant van het apparaat moet zo geleid worden, dat hij de
achterwand van het fornuis niet raakt. Tijdens de werking van het fornuis wordt de achterwand
warm.
Het fornuis op de juiste hoogte brengen
Aan de voor en achterzijde bevinden zich twee stelvoetjes. De
voetjes zijn bereikbaar nadat u de ovenlade uittrekt. Naar wens
kunt u ze in- of uitdraaien totdat het apparaat horizontaal staat.
U kunt de verstelbare stelvoetjes makkelijker draaien wanneer u
het fornuis een beetje laat hellen.
39
Page 38

Elektrische aansluiting
3 fasen met 1 nul aansluiting (3 1N a.c. 400 V / 50 Hz / 10,7 kW):
De spanning tussen de fasen en de nul is 230 V ac. Tussen de
fasen staat een spanning van 400 V.
De elektrische aansluiting moet voldoen aan de nationale en
lokale voorschriften.
Wandcontactdoos en stekker moeten te allen tijde bereikbaar
blijven.
Als u een vaste aansluiting wilt maken, moet u er voor zorgen
dat er een omnipolaire schakelaar met een contactafstand van
minimaal 3 mm in de toevoerleiding wordt aangebracht.
Let op
Dit toestel moet altijd geaard zijn.
Indien de aansluitkabel beschadigd is mag deze alleen
worden vervangen door de fabrikant, zijn serviceorganisatie of
gelijkwaardig gekwalifi ceerde personen, teneinde gevaarlijke
situaties te voorkomen.
40
Page 39

Technische gegevens
Type plaatje
A Serienummer
B Model
C Type
D Merk
E Codenummer
F Technische informatie
G Veiligheidssymbolen
WIJ BEHOUDEN ONS HET RECHT OM ZONDER
VOORAFGAANDE MEDEDELING WIJZIGINGEN DOOR TE
VOEREN AAN HET FORNUIS. DEZE WIJZIGINGEN HEBBEN
GEEN INVLOED WWOP DE WERKING VAN HET APPARAAT.
41
Page 40

Self-standing induction cooker
GB
Dear customer!
Instructions for
connection
We sincerely thank you for your purchase. We believe
you will fi nd ample evidence that you can really rely on
our products soon. To make the usability of the
appliance easier, we attach these comprehensive instruction
manual.
The instructions should help you to get familiar with your
new appliance. Please, read these carefully before using the
appliance for the fi rst time.
These instructions are only valid if the country symbol is
indicated on the appliance. If there is NO country symbol in the
appliance, technical instructions should be observed for adapting
the appliance to comply with the requirements and regulations
for use in your country.
In any case, please make sure the appliance was supplied to you
undamaged. Should you identify and transport damage, contact
your sales representative or the regional warehouse from where
the product was delivered. You will fi nd the telephone number on
the receipt or delivery report. We wish you a lot of pleasure with
your new household appliance.
The connection should be carried out in compliance with the
instructions in the section “Instructions for installation”, and the
relevant effective regulations and standards. This should only be
performed by a qualifi ed technician.
Rating plate
42
The rating plate indicating the basic information on the appliance
is attached to the edge of the oven and is visible when you open
the oven door.
Read the separate safety instructions
before using the device!
Appliance description ............................................... 43
Glass ceramic cooking hob ...................................... 44
Operating the cooking hob ....................................... 47
The oven ..................................................................... 50
Food preparation ....................................................... 60
Cleaning and maintenance ....................................... 69
Special warnings and error reporting...................... 75
Instructions for installation and connection ........... 77
Technical characteristics .......................................... 79
Page 41

Appliance description
1 Vapor discharge opening
2 Induction zone
3 Control panel
4 Handle of the oven door/drawer
5 Oven door
6 Cooker drawer
1. Cooking zone knob, front left
2. Cooking zone knob, rear left
3. On/off operating mode selection knob
4. Program timer
5. Oven temperature selection knob
Cooling fan
Extended operation of
the cooling fan
The appliance features a built-in cooling fan which cools the
appliance housing and control panel.
When the oven is switched off, the cooling fan continues
to operate for a while in order to additionally cool down the
appliance.
6. Oven control light. It is on while the oven
heats up, and off when the set temperature
has been reached
7. Cooking zone knob, rear right
8. Cooking zone knob, front right
43
Page 42

Glass ceramic cooking hob
1. Induction cooking zone rear left
2. Induction cooking zone rear right
3. Induction cooking zone je front left
4. Induction cooking zone je front right
5. Remaining heat display module
Principle of induction
hob operation
• The induction cooking hob features highly effective induction
cooking zones. The heat is generated directly in the pan
bottom, where it is needed the most; thus, any losses incurred
for example during transfer of heat through a glass ceramic
surface are eliminated. As a result, energy consumption is
considerably lower than with conventional heaters that operate
by the principle of radiation.
• Glass ceramic cooking zone is not heated directly, but only
by the heat fed back from the pan bottom. After turning of a
cooking zone, this heat is displayed as the “remaining heat”.
In induction cooking fi eld, the heat is provided by the induction
coil installed under the glass ceramic surface. The coil sets up
a magnetic fi eld which causes, or induces, vortex fl ows in the
(magnetizable) bottom of the pan; these fl ows cause the pan
bottom to heat up.
If sugar or sugar-laden dish or liquid is spilt on the
glass ceramic hob, wipe the hob immediately or remove
the sugar using a scraper, although the cooking zone
may still be hot. Thus, you will prevent any damage
to the glass-ceramic surface. Do not clean a hot glass
ceramic surface with detergents, as this may damage
the hob.
44
Page 43

Cookware suitable for
use with an induction
hob
• Induction hobs will only work fl awlessly if appropriate
cookware is used.
• During cooking, the pan should be in the middle of the cooking
zone.
• Use only cookware that enables induction, e.g. steel
cookware, enamel-coated cookware, or cast iron cookware.
Cookware made of alloy steel with a copper or aluminum
bottom and glass cookware are not suitable.
• If using a pressure cooker, control the cooking process until
a suitable pressure is reached. The cooking zone should fi rst
operate at maximum power; subsequently, reduce the power
to a suitable level, following the cookware manufacturer’s
instructions.
• You are kindly asked to be particularly careful about the
note “induction” on the cookware”.
Cooking zones
Ø 145 mm Ø 90 mm
Ø 180 mm Ø 145 mm
Ø 210 mm Ø 170 mm
Ø 260 mm Ø 180 mm
The magnet test
You may use a small magnet to check whether the bottom of the
pan or pot can be magnetized. Only use cookware with which
the
magnet will stick to the bottom.
Pan recognition
One of the advantages of the induction cooking hob is the pan
recognition system. Even if there is no pan on the cooking zone,
or if the pan placed on the zone does not have a suffi cient
diameter, there are no energy losses. If the pan is considerably
smaller than the cooking zone, there is a possibility that the
cooking zone will not be activated at all. When a cooking zone is
activated, the symbol “U” will be lit on the power level display. If
a pan is placed on the induction cooking zone within the next ten
minutes, the zone will perceive the pan and it will be turned on to
the set power level. As soon as the pan is removed from the
cooking zone, power supply to the zone will be shut off. If a pan
that is smaller in diameter than the cooking zone is placed on
it, and is perceived, heating will only take the amount of energy
required, regardless of the pan size.
Minimum pan bottom
diameter
45
Page 44

To avoid damaging the cooking zone, observe the following
instructions:
• Do not place an empty pan on the cooking zone.
• Before placing a pan on the cooking zone, wipe the pan
bottom dry to enable the transfer of heat and to avoid
damaging the cooking zone.
• When cooking or frying, only use pans whose bottom has
magnetic properties, i.e. steel, enamel-coated, or cast iron
cookware. Only in such case will the induction hob work.
Power level
Power level Suggested use
0 The zone is switched off, making use of the remaining heat
1 - 2 Keeping the food warm, slow simmering of smaller quantities (minimum level)
3 Slow simmering (after a high-powered initial heating up)
4 - 5
6 Frying, browning
7 - 8 Frying
9 Initial level for heating up at the beginning of cooking / frying, frying
A Automatic rapid heat-up power level
Slow simmering (after initial heating up) of larger quantities of food, frying larger
chunks
Power saving advice
The power of each cooking zone may set to nine different levels.
The following table lists the examples of use for each individual
levels.
• When purchasing a pan, note that the diameter indicated on
the pan often refers to the diameter of the upper side, or lid,
which is often larger than the pan bottom diameter.
• Pressure cookers that make use of high pressure in a tightly
sealed container are particularly economical, as they save
both time and power. Furthermore, shorter cooking time
means more vitamins are retained in the food.
• Make sure there is always enough liquid in a pressure cooker
as an empty pot on the cooking zone may result in overheating
and damage to both the pot and the cooking hob.
• If possible, always cover the pots with a suitably sized lid.
• Use cookware that corresponds to the quantity of the food you
are preparing. Cooking in a large, only partly fi lled pan, will
consume much more energy than required.
46
Page 45

Operating the cooking hob
• Switch on the cooking zones using the buttons on the control
panel.
• The symbols next to the buttons indicate which cooking zone
is controlled by a particular button.
• Power level can be set to one of the nine levels (1-9).
• Heating power is also indicated on the display on the glass
ceramic cooking surface.
The display will remain active for ten seconds after turning off all
cooking zones.
AA
Child lock
Remaining heat display
Child lock can be activated to prevent operation or use of the
cooking zones. This way, it can be used as a safeguard mechanism to prevent children from tampering with the appliance.
Activating the child lock
• The child lock can be activated whenever either “0” or “H” is
indicated on all cooking zone displays.
• Simultaneously briefl y turn and hold the buttons for the rear
cooking zones one degree to the left. “L” will be indicated on
the display. The child lock is now activated. Whenever any
button is turned, the symbol “L” will light up on all displays.
Deactivating the child lock
Rotate one of the buttons briefl y to the right and then back to the
starting positions; the symbol “L” will appear on the display.
• Now, briefl y rotate the buttons for the rear cooking fi elds by
one step to the left.
The glass ceramic hob is also fi tted with a remaining / residual
heat display “H”. The cooking zone may not be heated directly;
however, some heat is fed back from the pan bottom. As long as
the symbol “H” is lit for a particular cooking zone after it has been
switched off, the residual heat can be used for keeping the food
warm, or for melting.
When the “H” symbol disappears, the cooking zone may still be
hot. Be careful, as there is a risk of burning.
All four cooking zones are fi tted with a special mechanism that
activates the cooking zone to maximum power when it is
switched on, regardless of the actual power setting. After a while,
heating power is switched back to the actually set value (1 to 8).
When using this mechanism, only the power level must be
47
Page 46

selected that will apply after the initial rapid heat-up mechanism
is deactivated.
Rapid heat-up
mechanism
Rapid heat-up mechanism is recommended in the following
cases:
• Dishes that are cold at the beginning of cooking, and must
be heated up and cooked for a longer period of time (e.g.
beef stew); the heat-up mechanism will allow you to do this
without constantly controlling the hob and changing the power
settings.
Rapid heat-up mechanism is not recommended in the
following cases:
• Food that is fried or stewed / braised, and must be turned
around often, that require adding liquid or stirring;
• Dumplings or pasta with a lot of liquid;
• Dishes that must be boiled for a prolonged period of time in a
pressure cooker.
Activating the rapid heat-up mechanism
There are two ways to activate the rapid heat-up mechanism:
• Turn the button all the way to the right, to the symbol “A”;
then, turn it to the desired cooking level. The symbol “A” and
the selected power level will be indicated intermittently on the
display. When the heat-up time elapses, the cooking zone
will automatically switch to the selected level which is then
constantly indicated on the display.
• Briefl y turn on the cooking hob; all displays will light up. Then,
rotate the button to the left to the “A” symbol, and immediately
afterwards to the desired cooking level 1-8.
48
Selected power level
1 40
2 72
3 120
4 176
5 256
6 432
7 120
8 192
9
Note
• If the power level button stays in the “0” position after the rapid
heat-up mechanism has been activated, i.e. if no cooking level
is selected, the heat-up mechanism will be deactivated after
three seconds.
Duration of the automatic
highpower heat-up (in seconds)
Page 47

• If the pan is removed from the cooking zone, and then
returned to it within ten minutes, rapid heat-up process will be
resumed and completed.
Safety switch-off
Selected power level
1 0,8
2 2,4
3 3,8
4 5,2
5 6,8
6 2,0
7 2,8
8 3,6
9 0,2
Continuous operation of each cooking zone is limited; it is
indicated for each power level in the table above. When the
safety mechanism switches off a cooking zone, “0” or “H” (if there
is some remaining heat) will be indicated on the corresponding
cooking zone display. Cooking zone can then be turned off using
the power settings button.
Example:
The cooking zone is set to power 6 and left to operate for a while.
If the power level is not changed within three hours, the safety
mechanism will switch off the cooking zone after this time.
Overheating protection
• Each cooking zone is fi tted with a cooling fan that cools the
electronic board during cooking and remains activated for
some time after the cooking is completed – as long as the
symbol “H” is indicated on the display.
• The induction hob is also fi tted with a built-in overheating
protection that prevents damage to the electronic components.
The safety mechanism operates on several levels. When the
temperature of a cooking zone rises drastically, cooking power
is automatically decreased. If this does not suffi ce, the power
of the hot cooking zones is further decreased, or they may
even be turned off completely if required. In this case, “E2” is
displayed on the hob. When the hob cools down, total power is
again available.
Hours before automatic
switch-off
49
Page 48

The oven
Before using the oven
for the fi rst time
Important warnings
Electronic program
digital timer
• Remove all accessories from the oven and clean them with
warm water and a conventional detergent. Do not use abrasive
cleaning aids.
• When the oven is heated up for the fi rst time, a specifi c odor of
a “new appliance” will be discharged; therefore, ventilate the
room thoroughly while the oven heats up.
• Use dark, black silicon coated or enamel coated baking trays,
as these transmit the heat particularly well.
• Only preheat the oven if specifi cally stated in the recipe or in
the instruction tables herein.
• Heating up an empty oven consumes a lot of energy;
therefore, a lot of power is saved if several types of pastry are
cooked consecutively, as the oven is already heated up.
• Approximately ten minutes before the anticipated end of the
cooking process, the oven may be turned off. This way, you
will save some power and make use of the accumulated heat.
Sensor keys:
A Settings selection and confi rmation
sensor key
B Temperature setting sensor key
C Value increase (plus) sensor key
D Value decrease (minus) sensor key
50
Display:
1 Oven operation duration
2 Oven operation stop time
3 Countdown alarm timer
4 Time of day
5 Child lock
6 Clock
7 Heater operation symbol
Page 49

• When the appliance is connected to the power supply or after a
power failure, the word “META” or “GLAS” is fi rst displayed for a
short while; then, the display fl ashes for some time. In order to
enable the operation of the oven, use the (C) and (D) sensor keys
to set the time of day.
• Each press / activation of a sensor key is acknowledged by a
beep.
• Select the type of setting you wish to make by pressing the (A)
sensor key. The selected symbol on the display fl ashes quickly,
indicating the function that you can set or change. After fi ve
seconds, the symbol starts fl ashing more slowly and the time
set is displayed. The symbols that are lit are selected, but not
currently shown on the display (6). The most recent setting made
is always displayed.
• If one of the value settings sensor keys (C) or (D) is touched and
kept pressed, the rate at which the value being set is changing will
increase.
• In case of a power failure which lasts less than two minutes, all
settings remain active.
To improve the response of the sensor keys, touch them
with a larger surface of your fi nger.
• Temperature and other settings may also be set using a special
knob that replaces touching the program timer sensor keys.
Setting the time of day (clock)
• Set the clock to the current time of day by pressing the settings
selection sensor key (A). Then, select the symbol (4).
• Use the (C) and (D) sensor key to set the exact time of day.
• Confi rm the setting by pressing the (A) sensor key again; if the (A)
key is not pressed, the setting is automatically confi rmed after a
few seconds.
Setting the timer functions
In addition to setting the temperature, the electronic program
timer can also be used to set the timer functions. Both settings are
indicated on the same display. Require display is set by pressing the
relevant sensor key (A) or (B).
The program timer can be used to program the oven operation
in three ways:
• Cooking time setting - immediate start of oven operation; after a
set period of time, the oven is turned off automatically.
• Cooking end time setting - the time at which oven operation is to
end is set.
• Delayed start setting - automatic start and end of oven operation
at a selected time.
51
Page 50

Setting the cooking time
With this program mode, the duration of oven operation is set
(cooking time). Maximum setting allowed is 10 hours.
• Press the (A) sensor key to select the symbol (1). Use the (C) and
(D) sensor keys to set the duration / cooking time.
• Turn on the oven (set the selector knob and cooking temperature).
After the expiration of the set time, the oven will automatically stop
operating (end of cooking time). An intermittent beep will sound,
which can be stopped by pressing any key; if no key is pressed,
the beep stops after one minute.
• Symbol (1) and the cooking time “0.00” on the display start to
fl ash. If you wish to resume cooking, press the (A) sensor key and
set a new duration if necessary.
Setting the cooking end time
This mode allows you to set the time at which the oven should
stop operating. Maximum setting allowed is 10 hours relative to the
current time of day.
• Make sure the current time of day is set correctly.
• Use the (A) sensor key and select the symbol (2). The current time
of day is indicated on the display. Press the (C) and (D) sensor
keys to set the cooking end time.
• Turn on the oven (set the selector knob and cooking temperature).
The oven starts to operate immediately and stops operation at the
set time. An intermittent beep will sound, which can be stopped by
pressing any key; if no key is pressed, the beep stops after one
minute.
• Symbol (1) and the cooking time “0.00” on the display start to
fl ash. If you wish to resume cooking, press the (A) sensor key and
set a new duration if necessary.
52
Setting the oven delayed start
With this operation mode, two settings have to be made: cooking
time (duration of oven operation) and cooking end time (tie at which
the operation should stop).
Cooking end time can be delayed by a maximum of 24 hours relative
to the current time of day.
• Make sure the current time of day is set correctly.
• First, set the cooking time: Press the (A) sensor key to select the
symbol (1). Use the (C) and (D) sensor keys to set the duration /
cooking time.
• Then, set the cooking end time: Use the (A) sensor key and select
the symbol (2). (A sum of the current time of day and the oven
operation time is automatically shown on the display). Press the
(C) and (D) sensor keys to set the cooking end time.
• The timer will wait for the start of the cooking – both symbols (1
and 2) are lit.
Page 51

• Turn on the oven (set the selector knob and cooking temperature).
At the corresponding time, the oven starts operating automatically
(the symbol (2) goes off upon the start of operation), and switches
off when the set cooking time has elapsed. An intermittent beep
will sound, which can be stopped by pressing any key; if no key is
pressed, the beep stops after one minute.
• Symbol (1) and the cooking time “0.00” on the display start to
fl ash. If you wish to resume cooking, press the (A) sensor key and
set a new duration if necessary.
Setting the alarm timer
The clock can also be used independently of the oven operation, as an
alarm timer that sounds an alarm after the expiration of a preset time.
• Use the (A) sensor key to select the symbol (3). Then, use the
(C) and (D) sensor keys to set the time before the alarm sounds.
Maximum setting allowed is 10 hours.
• When the set time has elapsed, an intermittent beep will sound,
which can be stopped by pressing any key; if no key is pressed,
the beep stops after one minute. The symbol (3) will go off.
The last minute of the timer countdown is displayed in
second intervals.
Setting the beep volume (loudness)
The alarm volume can be set when no timer function is activated
(only current time of day is displayed).
• Press the (D) sensor key and hold it approximately three seconds;
a volume indicator will appear, and the corresponding sample
sound will sound. “oooo” indicates maximum volume, and “o”
indicates minimum volume. Use the (D) sensor key to select
among the four loudness levels.
• Confi rm the selected volume level by pressing the (A) sensor key;
if the (A) sensor key is not pressed the setting will be confi rmed
and stored automatically after a few seconds.
Setting the child lock
Activation: Press the (A) sensor key to select the symbol (5). Use
the (B) and (C) sensor keys to activate the child lock; the display will
read “ON”. Confi rm the setting by pressing the (A) sensor key.
Deactivation: Press the (C) or (D) sensor to deactivate the child
lock; “OFF” is displayed.
The setting must be confi rmed by pressing the (A) sensor key.
- If the timer is locked when no timer function is set (only the
current time of day is displayed), the oven will not operate and no
changes to any setting will be allowed.
- If the timer is locked after one of the timer functions has been
set, the oven will operate as usually; however, no changes to the
settings will be possible.
53
Page 52

Display dimmer
Between midnight and 6 AM, the display automatically lights with
less intensity, if no timer function is set.
Deleting the timer settings
- All timer settings can be deleted any time by pressing the (C)
and (D) sensor keys simultaneously and holding them for three
seconds. The set programs are automatically interrupted and the
timer switches to display of the current time of day.
- Any timer setting can also be deleted in the following way:
selecting it using the (A) sensor key, then press the (B) and (C)
sensor keys simultaneously. Another way to delete a setting is by
setting the timer value to “0.00”.
Operating the oven
Setting the oven
temperature
54
The oven is controlled by the on/off and operation mode selection
knob and the electronic program timer with temperature display.
The on/off and operation mode selection knob
Rotate the selection knob to the desired cooking mode. The
operation mode and the preset temperature will appear on the
timer display. The oven starts to operate.
Use the electronic program timer to set the cooking temperature
and timer functions:
• As soon as the selector knob (operation mode selection knob)
is turned, the relevant cooking mode and the preset tempera-
ture are displayed; the symbol “°C” will fl ash for a few
seconds.
• As long as the symbol “°C” is fl ashing, the sensor keys (C)
and (D) can be used to set the required temperature in the
interval from 30-99 °C, in 5°C steps. Maximum temperature is
limited in some operation modes. Each time the sensor key is
pressed, the temperature is changed by one step (5 °C); if the
sensor key is pressed and held, the rate at which the value is
changing will increase.
• Rising actual oven temperature is indicated on the display,
in 5°C steps. As long as the oven temperature is less than
30°C, “---°C” will be displayed. Symbol (9) is also displayed,
indicating the operation of the heaters.
• When the set temperature is reached, the symbol (9) will go
off, and a short beep will sound.
• During cooking, the temperature is maintained by occasional
activation of the heaters; each time this happens, the symbol
(9) appears.
• Cooking temperature may be changed any time by touching the
(B) sensor key, which makes the “°C” symbol fl ash for a while,
Page 53

Operating the oven
and changing the value using the sensor keys (C) and (D).
On/off and operation mode knob.
Knob for changing several settings ('+' higher, '-' lower).
55
Page 54

The oven may be
operated in the following
modes
Oven lighting
The oven has one interior lighting lamp. Oven lighting can be
selected independently, without selecting another function.
With all other modes of operation, the oven lighting is turned on
automatically when the operation mode is selected. Example
of practical use: during oven cleaning, or when you want to
look inside the oven while making use of the accumulated heat
towards the end of the cooking process.
Upper / lower heater
The heaters on the upper and lower post of the oven radiate heat
uniformly and evenly into the oven interior. Pastry and meat can
be cooked on one shelf level only.
Grill
Only the infra heater is activated (which also operates, along
with the upper heater, in the Large grill mode). This mode is
appropriate for grilling smaller quantities of toasted sandwiches,
grill sausages, or simply for toasting bread.
56
Large grill
With this operation mode, the upper heater and the infra heater
are activated simultaneously. The infra heater installed on the
oven interior ceiling radiates heat directly. To boost the heating
effect or to make optimal use of the entire area of the oven
grid, the upper heater is also activated. This operation mode is
appropriate for cooking smaller chunks of meat, such as steaks,
roasts, chops, ribs, etc.
Grill & fan
With this operation mode, the infra heater and the fan are
activated simultaneously. It is appropriate for grilling meat
and large chunks of meat or poultry on one shelf level. Also
appropriate for cooking food au gratin or browning.
Page 55

Hot air and lower heater
With this operation mode, the lower heater and the hot air fan
operate simultaneously. This is particularly convenient for making
pizza. Also ideal for moist or heavy pastry, fruit cakes made of
leavened dough, short pastry, or cheesecakes.
Hot air
With this operation mode, the around heater and the fan operate
simultaneously. The fan at the oven back wall causes the hot air
to circulate constantly around a roast of pastry. This operation
mode is appropriate for roasting meat and making pastry on
several shelves simultaneously. Cooking temperature should be
putted lower than the conventional operation modes.
Defrosting
With this mode, the air is circulating without any heater being
turned on. Only the fan is in operating. This is used for slow
defrosting or thawing of frozen food.
Lower heater and fan
With this operation mode, the lower heater and the fan operate
simultaneously. Used for baking low leavened dough and
preserving fruit and vegetables. Use the fi rst shelf position from
the bottom and shallow rather than deep baking trays, to allow
the warm air to circulate around the upper part of the dish as
well.
Aqua Clean
Use this operation mode for cleaning the oven. Set the
temperature selection knob / dial to 50 °C. Pour 0.6 liter of water
into a baking tray and insert it into the lowermost guide. After thirty
minutes, the food residues on the enamel will have softened,
allowing you to wipe them with a dap cloth.
57
Page 56

Shelf levels
• Accessories (grid and baking tray) can be inserted into the
oven at four levels.
• Please note that the shelf levels are always referred to by
consecutive numbers starting from the bottom (particular shelf
levels are described in the cooking tables below)
Telescopic pull-out
guides
• Telescopic (pull-out or, retractable) guides are installed for the
second, third, and fourth level. They are installed on the leftand right-hand side wall of the oven interior at three levels.
Telescopic pull-out guides and other parts of oven
accessories will heat up! Use a kitchen glove or
similar protection when handling them.
• To insert the grid or baking tray, fi rst pull out the telescopic
guides of the desired level.
• Place the grid or the baking tray on the pull-out guides and push
it into the oven with your hand. Close the oven door only when
the telescopic guides have been fully retracted.
58
Page 57

Easy-clean inserts
Oven accessories
The easy-clean inserts prevent the fat from spattering directly on
the oven wall.
The easy-clean inserts are installed as follows:
• Remove the wire or telescopic guides (see the section
'Removing the telescopic pull-out guides').
• Place the easy-clean insert on the guide; hang them together
using the holes provided in the oven interior walls, and pull
downwards.
When installing telescopic retractable guides and the easy-clean
inserts, insert the four supplied clips into the lower openings on
the oven interior walls, and insert the guides into these clips.
The clips are intended to secure the guides.
The grid onto which the container with food, or the food directly,
can be placed.
The baking tray is only intended for baking pastry and cakes
and it can serve as a drip tray.
59
Page 58

Grease fi lter The grease fi lter installed at the back oven interior wall protects
the fan, round heater, and the oven from impurity, particularly
spattering grease. When cooking meat, we recommend using the
grease fi lter. When baking pastry, always remove the fi lter! If the
fi lter is installed when baking pastry or cakes, the results can be
quite poor.
Food preparation
Baking pastry
• For baking pastry, use the , or mode of operation.
• When baking pastry, always remove the grease fi lter.
Instructions
• When baking pastry, always observe the instructions on the
shelf / guide level, temperature, and cooking time indicated in
the pastry baking table. Do not be prejudiced by experience
you may have with other ovens. The values indicated in the
cooking table are defi ned and checked especially for this
particular oven.
• If the baking table does not specifi cally address a particular
type of pastry, see the information for a similar type of pastry.
Baking pastry with upper and lower heater
• Bake the pastry at one level only.
• Upper / lower heater combination is particularly appropriate for
baking various types of pastry, bread, and meat.
• Use dark-colored baking trays. Light-colored trays refl ect the
heat, which leads to poorer cooking (browning) results.
• Always place the models on the grid. If you are using the
supplied baking tray, remove the grid.
• Preheating will shorten the cooking time. Only place the
dish into the oven when the selected temperature has been
reached.
60
Page 59

Baking pastry with hot air
Baking pastry with hot air is particularly convenient when you
wish to bake on several shelf / guide levels simultaneously,
especially when preparing bite-size pastry in shallow trays.
Preheating and using the second and third guide level is
recommended. This mode is also appropriate for moist pastry
and fruit cakes (in this case, bake on a single level only).
• The temperature is normally set lower than when baking
with the upper/lower heater combination (see also the pastry
baking table).
• Various types of pastry can be baked simultaneously, if the
required temperature is approximately the same for all.
• Baking time can vary, even for equal baking trays. When
baking in several baking trays simultaneously – on two or even
three levels, baking time for each tray can be different. You
may have to remove one of the trays sooner (normally, this
would be the uppermost tray.
• If possible, prepare bite-size pastry, such as cupcakes, in
the same thickness and height. Unevenly sized pastry will be
unevenly browned!
• When baking several types of pastry simultaneously, there
will be a signifi cant amount of vapor in the oven, resulting in
accumulation of condens on the oven door.
Tips on baking pastry
Is the pastry completely done?
Use a wooden stick to pierce the pastry at the highest point.
If there are no traces of dough when the stick is removed,
the pastry is done. Turn off the oven and use the remaining
accumulated heat.
The pastry has collapsed
Check the recipe. Next time, use less liquid. Observe the
instructions on mixing / kneading time, especially when using
small household appliances.
The pastry is too light-colored
Next time, use a dark-colored baking tray, place the tray one
guide level lower, or turn on the lower heater towards the end of
the cooking process.
The pastry with a moist fi lling (e.g. cheesecake) is not
completely done
Next time, reduce the temperature and extend the cooking time.
61
Page 60

Notes on the pastry baking table:
• Two values are indicated for temperature, lower and upper.
Initially, set the lower temperature; if the pastry is not brown
enough, increase the temperature next time.
• Cooking times are given as an estimate and may vary subject
to a number of circumstances.
• The value printed in bold in the temperature table indicates
the most appropriate operating mode for a particular type of
pastry.
• The indication * means that the oven should be preheated with
the corresponding operating mode selected.
• When using baking paper, make sure it is resistant to high
temperature.
62
Page 61

Pastry baking table for combined upper and lower heater or hot air operating mode
Type of pastry Guide
(from the
bottom)
Sweet pastry
Marble cake, ring cake 1 160-170 1 150-160 50-70
Rectangle-shaped cake 1 160-170 1 150-160 55-70
Cake made in cake tin 1 160-170 2 150-160 45-60
Cake tin cheesecake 1 170-180 2 150-160 65-85
Fruit cake, short pastry 1 180-190 2 160-170 50-70
Fruit cake with dressing 1 170-180 2 160-170 60-70
Sponge cake* 1 170-180 2 150-160 30-40
Cake with icing 2 180-190 2 160-170 25-35
Fruit cake, mixed dough 2 170-180 2 150-160 45-65
Cherry cake 2 180-200 2 150-160 30-50
Sponge cake roll* 2 180-190 2 160-170 15-25
Leavened dough cake 2 160-170 2 150-160 25-35
Hefezopf (leavened dough) 2 180-200 2 160-170 35-50
Christmas cake 2 170-180 2 150-160 45-70
Apple pie 2 180-200 2 170-180 40-60
Oven-baked donuts 1 170-180 2 150-160 40-55
Savory pastry
Quiche Lorraine 1 190-210 2 170-180 50-65
Pizza* 2 210-230 2 190-210 25-45
Bread 2 190-210 2 170-180 50-60
Buns* 2 200-220 2 180-190 30-40
Bite-size pastry
Short pastry – cookies* 2 160-170 2 150-160 15-25
Merengue * 2 160-170 2 150-160 15-28
Leavened dough 2 180-190 2 170-180 20-35
Puff pastry 2 190-200 2 170-180 20-30
Choux pastry (cream fi lled) 2 180-190 2 180-190 25-45
Souffl és
Rice souffl é 1 190-200 2 180-190 35-50
Fresh cheese souffl é 1 190-200 2 180-190 40-50
Frozen pastry
Apple, cheese pie 2 180-200 2 170-180 50-70
Cheesecake 2 180-190
Pizza 2 200-220 2 170-180 20-30
French fries for oven * 2 200-220 2 170-180 20-35
Croquettes 2 200-220 2 170-180 20-35
Temperature
(°C)
Guide
(from the
bottom)
Temperature (°C) Cooking
2 160-170 65-85
time
(minutes)
Note: the indication of the recommended guide refers to the grid onto which baking trays are
placed.
63
Page 62

Settings table for baking pastry with hot air and lower heater
Type of pastry Guide (from the bottom) Temperature (°C) Cooking time
Cheesecake (750g cheese) short pastry
Pizza * - leavened dough 2 200-210 15-20
Quiche Loraine - short crust
dough
Apple pie with icing - leavened
dough
Fruit cake - mixed dough 2 150-160 45-55
Apple pie - fl aky pastry 2 170-180 45-65
2 150-160 65-80
2 180-200 35-40
2 150-160 35-40
(minutes)
Cooking / roasting meat
• To cook meat, use the operating modes and .
• Data printed in bold represent the most appropriate operation
mode for a particular type of meat.
• When cooking meat, the use of the grease fi lter is
recommended (depending on the model).
Tips on using the cookware
• Meat can be cooked in enamel coated cookware, tempered
glass (Pyrex) cookware, clay, or cast iron cookware.
• Stainless steel baking trays are less appropriate because they
refl ect the heat.
• If the roast is covered, it will remain juicier, and the oven will
be less dirty.
• In an open baking tray, the roast will brown sooner.
Some notes on cooking meat
• The meat cooking table indicates recommended temperatures,
guide/shelf level, and cooking time. Since cooking times
depend strongly on the type, weight, and quality of meat, they
may have to be adjusted.
• Cooking meat, poultry, and fi sh in an oven is only economical
for weights exceeding 1 kg.
• When cooking meat, add enough liquid to prevent the fat and
juices from the meat to be burnt onto the baking tray. This
means that, in case of longer cooking times, the roast should
be checked upon every once in a while, and liquid should be
added.
• After approximately half the cooking time, turn the roast
around, especially when baking in a tray. For better results,
start the cooking with the upper side turned downwards.
• When cooking larger chunks of meat, condens may
accumulate on the oven door. This is a natural phenomenon
which does not affect the operation of the appliance. After
cooking, wipe the door and door glass dry.
64
Page 63

• Insert a baking tray, which will serve as a drip tray in this case,
into the fi rst or second guide level to collect the dripping fat
and meat juices.
• In order to prevent accumulation of condens, do not let the
dishes cool down in the oven.
Meat cooking table for upper/lower heater combination or with hot air
Type of meat Weight
Beef
Beef roast 1000 2 200-220 2 180-190 100-120
Beef roast 1500 2 200-220 2 170-180 120-150
Roastbeef, medium done 1000 2 220-230 2 180-200 30-50
Roastbeef, well done 1000 2 220-230 2 180-200 40-60
Pork
Pork roast, incl. skin 1500 2 180-190 2 170-180 140-160
Pork belly 1500 2 190-200 2 170-180 120-150
Pork belly 2000 2 180-200 2 160-170 150-180
Shoulder 1500 2 200-210 2 160-170 120-140
Pork roll 1500 2 200-210 2 160-170 120-140
Cutlet 1500 2 180-200 2 160-170 100-120
Minced meet roast (pork
meat loaf)
Veal
Veal roll 1500 2 180-200 2 170-190 90-120
Veal joint 1700 2 180-200 2 170-180 120-130
Lamb
Lamb loin 1500 2 190-200 2 170-180 100-120
Sheep joint 1500 2 190-200 2 170-180 120-130
Venison
Rabbit loin 1500 2 190-210 2 180-190 100-120
Deer joint 1500 2 190-210 2 170-180 100-120
Wild boar joint 1500 2 190-210 2 170-180 100-120
Poultry
Chicken, whole 1200 2 200-210 2 180-190 60-70
Chicken 1500 2 200-210 2 180-190 70-90
Duck 1700 2 180-200 2 160-170 120-150
Goose 4000 2 160-170 2 150-160 180-200
Turkey 5000 2 150-160 2 140-150 180-240
Fish
Whole fi sh 1000 2 200-210 2 170-180 50-60
Fish souffl é 1500 2 180-200 2 150-170 50-70
Guide (from
(g)
1500 2 210-220 2 170-180 60-70
bottom)
Tempera-
ture (°C)
Guide (from
bottom)
Tempera-
ture (°C)
Cooking
time
(min.)
Note: the indication of the recommended guide refers to the grid onto which baking trays are
placed.
65
Page 64

Grilling and browning
• When grilling meat, you should be particularly careful. The
high temperatures and infra heater heat the grid and other
parts of the oven to very high degrees; use protective kitchen
gloves and special meat tongs.
• Hot fat may squirt out of pierced meat (e.g. from sausages). To
avoid burning your skin or eyes, use meat tongs.
• When grilling meat, control the process at all times. Due to
high temperature, meat can be burnt quickly!
• Do not let children anywhere near the grill.
• Roasting with infra heater is recommended for crisp and
low-fat preparation of grilled sausages. meat chunks, and fi sh
(steak, chops, salmon fi llets, etc.) or toasted bread, as well as
for browning.
Some tips on using the grill function
• When using the grill, the oven door should always be closed.
• The cooking table for grilling indicates recommended
temperature, guide level, and cooking time. Since cooking time
depends strongly on the type, quality, weight, and quality of
meat, it might have to be adjusted.
• When cooking meat, the use of grease fi lter is recommended
(depending on the model).
• The infra heater (Large grill and Grill operating mode) should
be preheated for fi ve minutes.
• When cooking on a grid, spread some oil over it to prevent the
meat from sticking onto it.
• Place thin slices of meat on the grid and insert it into the fourth
guide level.
• Insert a baking tray, which will serve as a drip tray in this case,
into the fi rst or second guide level to collect the dripping fat
and meat juices.
• Grilled meat should be turned halfway through the cooking
time. Cook the fi rst side somewhat longer than the other one.
• When grilling larger chunks of meat on a grid (chicken, fi sh),
insert the grid into the second level and the drip tray into the
fi rst level.
• Thinner slices of meat should only be turned once, while the
thicker ones should be turned several times. Use meat tongs
to turn the meat around, to prevent too much juice to be lost.
• Darker meat will brown better and sooner than pork or veal.
• After using the grill, clean the oven and accessories each time
to prevent the dirt to be burnt onto the oven the next time you
use it.
66
Page 65

Cooking table - large grill
Type of food Weight
(g)
Meat and sausages
4 beef loin chops, rare 180g/pc 4 240 - 14-16
4 beef loin chops, medium “ 4 240 - 16-20
4 beef loin chops, well done “ 4 240 - 18-21
4 pork neck chops “ 4 240 - 19-23
4 cutlets “ 4 240 - 20-24
4 veal steaks “ 4 240 - 19-22
6 lamb cutlets 100g/pc 4 240 - 15-19
8 grill sausages 100g/pc 4 240 - 11-14
3 pcs of meatloaf 200g/pc 4 240 - 9-15
1/2 chicken 600g 2 - 180-190 25 (
Fish
Salmon slices 600 3 240 - 19-22
4 trout 200g/pc 2 - 170-180 45-50
Toasted bread
6 slices white bread / 4 240 - 1,5-3
4 slices of mixed fl our bread / 4 240 - 2-3
Toasted sandwich / 4 240 - 3,5-7
Meat / poultry*
Duck* 2000 2 210 150-170 80-100
Chicken* 1500 2 210-220 160-170 60-85
Pork roast 1500 2 - 150-160 90-120
Pork shoulder 1500 2 - 150-160 120-160
Pork joint 1000 2 - 150-160 120-140
Roastbeef / beef loin 1500 2 - 170-180 40-80
Vegetables au gratin **
Caulifl ower, kale 750 2 - 210-230 15-25
Asparagus 750 2 - 210-230 15-25
Guide level
(from bot-
tom)
Temperature
(°C)
Temperature
(°C)
Cooking time
(min)
1.side)
20 (2. side)
Note: the guide level refers to the grid on which you place the meat; in the section meat/poultry, the
guide level refers to the tray, while with chicken, it refers to the grid.
When cooking meat in a tray, make sure there is enough liquid in the tray to prevent the meat from
burning; approximately halfway through the cooking progress, turn the chunk of meat around. When
grilling meat on the grid, insert the tray into the fi rst or second guide; this way, it will serve as a drip
tray (see tips on grilling meat).
67
Page 66

Cooking table - grill
Food type Weight (g) Guide level
(from bot-
tom)
Meat and sausages
2 beef loin stakes, well done 180g/pc 4 240 - 180-21
2 cutlets 4 240 - 20-22
2 pork neck steaks 180g/pc 4 240 18-22
4 grill sausages 100g/pc 4 240 - 11-14
4 toasted sandwiches 4 240 - 5-7
Toast - browning 4 240 3-4
3 trout - on the grid 200g/pc 2 - 160-170 40-50
Chicken - on the grid 1500g 2 - 160-170 60-80
Pork shoulder - deep tray 1500g 2 - 150-160 120-160
Temperature
(°C)
Temperature
(°C)
Cooking time
(min.)
Defrosting
• Air circulating in the oven may speed up the process of
defrosting frozen food. To do this, set the oven to “Defrosting”
mode .
• Food appropriate for defrosting includes cakes with heavy
cream or butter-based fi lling, other cakes and pastry, bread,
buns, and deep-frozen fruit.
• For reasons of hygiene, meat and poultry should not be
defrosted in an oven.
If possible, turn the food around or mix several times to make
sure they are defrosted evenly.
68
Page 67

Cleaning and maintenance
Do not use a steam cleaner or a high-pressure steam cleaner to clean the appliance. Before you
start cleaning the appliance, disconnect it from the power mains and let it cool down.
Appliance housing front
Clean the surfaces with liquid non-abrasive detergents intended for smooth surfaces, and a soft
cloth. Apply the detergent on the cloth and wipe off the dirt; then, rinse with water. Do not apply the
detergent directly on the surfaces. Do not use aggressive or abrasive cleaners, sharp objects or
steel wool, as these will scratch the appliance.
Aluminum surfaces
Aluminum surfaces should be cleaned with non-abrasive liquid detergents intended for such
materials. Apply the detergent on a wet cloth and clean the surface; then, rinse the surface with
water. Do not apply the cleaner directly on the aluminum surface. Do not use abrasive cleaners or
abrasive sponges. The surface should not come into contact with oven cleaning sprays.
Stainless steel front panels
Clean the surface with a mild cleaner (soapsuds) and a soft sponge that will not scratch the
material. Do not use abrasive or solvent-based cleaners. If these instructions are ignored, the
housing surface can be damaged.
Lacquer-coated and plastic surfaces
Clean the buttons / knobs and the door handle with a soft cloth and liquid detergents intended for
cleaning smooth lacquer-coated surfaces. You may also use the cleaners made especially for this
type of surfaces; in this case, follow the manufacturer’s instructions.
WARNING: The above surfaces should never come into contact with oven cleaning sprays, as
these will permanently damage the aluminum parts.
69
Page 68

Cleaning
Figure 1
Figure 2
Ceramic-glass hob
After each use of the glass-ceramic hob, wait for it to cool
down and clean it; otherwise, even the smallest food residue will
be burnt onto the hot surface next time you use the appliance.
For regular cleaning and maintenance of the glass-ceramic
surface, use special conditioning agents which form a
protective layer on the surface, shielding it from dirt. Before each
use, wipe any dust or other particles from the hob surface and
pan bottom as these could scratch the surface (Figure 1).
Careful: steel wool, abrasive sponges, and abrasive detergents
can scratch the hob surface. Glass ceramic surface can also be
damaged by aggressive sprays and inappropriate or insuffi ciently
shaken (mixed) liquid cleaning agents (Figure 1 and Figure 2).
Signs and indications on the hob may be worn if aggressive
cleaning aids are used on cooking zone edges, or if pans with
damaged bottom or used.
Light stains can be removed by a damp soft cloth; then, wipe
the surface dry (Figure 3).
Water stains can be removed using a mild solution of vinegar;
however, do not use this solution to clean the frame (only with
some models, as it may become dull. Do not use aggressive
sprays or decalcifi cation agents (Figure 3).
70
Figure 3
Figure 4
Figure 5
Heavier stains can be removed using special agents and
utensils for cleaning the glass-ceramic hobs. When using these
products, follow the instructions provided by their respective
manufacturers.
Make sure any residues of cleaning agents are thoroughly
removed, as they could damage the glass-ceramic hob when
the cooking zones heat up (Figure 3).
Stubborn and burnt residues can be removed using a scraper.
make sure the plastic part of the scraper does not come into
contact with a hot cooking zone. Be careful not to cut yourself
with the scraper!
Sugar and sugar-laden food may permanently damage the
glassceramic surface (Figure 5); therefore, they should be
removed from the glass-ceramic surface as soon as possible,
although the cooking zone may still be hot (Figure 4). Any
change in the color of the glass-ceramic surface does
not affect its operation or the stability of the surface. Such
Page 69

discolorations are mostly a result of burnt food residues or use of
cookware made of materials such as aluminum or copper; these
stains are diffi cult to remove.
Warning: All damage described above predominantly relates to
the aesthetics, i.e. appearance of the appliance and do not affect
its functionality directly. Such errors cannot be the subject of a
warranty claim.
ATAG Shine
Atag supplies a range of cleaning agents under the name ATAG
Shine.
These can be obtained via the website at www.atagservice.nl,
where you will also fi nd various cleaning and operating tips.
Oven
• The oven can be cleaned in conventional manner (with
detergents, oven spray), but only when there this very dirty and
when the stains are particularly stubborn.
• For regular cleaning of your oven (after each use), the following
procedure is recommended: rotate the operation mode selection
knob to the position
to 50 °C. Pour 0.6 liter of water into a baking tray and insert it into
the lowermost guide. After thirty minutes, the food residues on the
enamel will have softened, allowing you to wipe them with a dap
cloth.
. Set the temperature selection knob / dial
When dealing with stubborn stains, please act as follows:
The oven should be cooled down before each cleaning process.
• Clean the oven and accessories after each use to prevent the dirt
from being burnt onto the oven.
• The easiest way to remove grease is by using warm soapsuds
while the oven is still warm.
• In case of particularly stubborn dirt, use the conventional oven
cleaners. Then, rinse the oven thoroughly with clean water to
remove all residues of the cleaner.
• Never use aggressive cleaners such as steel wool, abrasive
dishwashing sponges, stain removers, etc.
• Lacquer-coated, stainless steel, and zinc-coated surfaces,
as well as aluminum parts, should never come into contact
with oven cleaning sprays, as these may cause damage and
discoloration. The same applies for the the heaters accessible
at the upper part.
• When purchasing and dispensing detergents, consider
the environment and observe the instructions provided by
respective cleaning agent manufacturers.
71
Page 70

Practical tips
• When cooking larger fatty chunks of meat, we recommend
wrapping them in aluminum foil of a suitable cooking bag, to
prevent the grease from being spattered on the oven interior
walls.
• When grilling meat on the grid, place a drip tray underneath.
Cleaning the oven interior ceiling
• To facilitate cleaning of the oven interior upper wall, the
appliance features a foldable upper infra heater.
• Before lowering the heater, the cooker must be disconnected
from the power mains by removing the fuse or tripping the
main switch.
• The heater should be cooled down; otherwise there is a risk of
burning!
• Do not use the heater when it is lowered!
Before cleaning the oven, remove the baking trays, the grid, and
the guides. Then, pull the horizontal heater towards yourself. Pull
the heater until the crossbar is released from the supports on the
left and right side of the oven (see fi gure). After cleaning, replace
the heater following the same procedure; the crossbar must be
reinserted into the two support brackets.
Accessories
Wash the accessories (baking trays, grid, etc.) with hot water and
some conventional detergent.
72
Grease fi lter
After each use, clean the grease fi lter with a soft brush in hot
water and some detergent, or wash it in a dishwasher.
Easy-clean inserts
After each use, clean the easy-clean inserts in water with some
detergent, using a soft brush, or wash them in a dishwasher.
Special enamel coating
The oven, interior side of the door, and baking trays, are covered
with special enamel that has a smooth and resistant surface.
This special layer enables easier cleaning at room temperature.
Page 71

Maintenance
fi gure 1
fi gure 2
Removing the telescopic pull-out guides
To facilitate cleaning of the oven interior side walls, the telescopic
pull-out guides can be removed
• Hold the guide rack by its lower end and rotate it inwards;
then, remove them from the holes on the upper side.
• Clean the racks with telescopic guides only with conventional
cleaners.
• Do not wash the telescopic pull-out guides in a dishwasher.
Do not attempt to grease the telescopic retractable
guides.
After cleaning, simply replace the guide rack by following the
procedure in reverse order.
Removing the inner glass pane
Door glass panes can also be cleaned from the inside; however,
they must fi rst be removed as follows:
• Remove the oven door (see section on removing and inserting
the oven door).
• Hold the door glass pane by its lower edge. Pull it gently
towards yourself and lift it slightly – but not too far – by a
maximum of 10 mm, until the glass support wedge slips out of
the groove (fi gure 1).
• Remove the glass (in the direction of arrow 3).
• Interior glass (only in some models) is removed by fi rst
undoing the screws on the glass supports and then by lifting
it (fi gure 2). Remove the supports before cleaning the glass
pane.
• Reinstall the door by following the same procedure in reverse
order.
Note: Insert the glass into the slot and push it forward
(fi gure 3).
fi gure 3
73
Page 72

fi gure 1
Removing and inserting the oven door
Completely open the oven door and rotate the attachment clips
completely backwards (fi gure 1).
• Slowly close the door until the clips are pressed against the
supports / seats. At approximately 15° (relative to the closed
door position), pull the door slightly upwards and pull them out
of the both hinge supports on the appliances (fi gure 2).
• Replace the door in the reverse order. Insert the door under
an angle of 15° into the hinge supports at the front side of the
appliance and push them downwards and to the front until they
slide into their supports / seats.
• Then, completely open the door and rotate the attachment
clips back to their initial position. Slowly close the door and
check, if they close properly. If the door does not open or close
correctly, make sure whether the hinge notches are correctly
placed in their seat hinges.
Cooker drawer
fi gure 2
Attention
Always make sure the hinge attachment clips are fi rmly seated in
their supports when installing the door. If this is not the case, the
main hinge that is operated by a strong spring may be released
any time while installing or removing the door. Risk of physical
injury.
• Cooker drawer is protected against accidental opening. If you
wish to open the drawer, raise it slightly. In order to remove the
drawer, fi rst pull it out to the stopper, then raise it again and
pull it out completely.
• Do not store fl ammable, explosive, or temperature-sensitive
objects and materials in the cooker drawer.
• Insert the drawer by inserting the wheels into the guides and
close the drawer.
74
Page 73

Replacing appliance
parts
The oven lamp base and socket are under voltage. There is
a risk of electric shock!
Before replacing the oven lighting bulb, disconnect the cooker
from the power mains by removing the fuses or tripping the main
network switch.
Oven bulb
Oven bulb is considered a replacement ware part and is not
covered by the warranty. Replace the bulb with a new one with
the following specifi cations: socket E 14, 230 V, 25 W, 300°C.
• Unscrew the glass cover in the counterclockwise direction,
replace the bulb, and replace the cover.
Special warnings and error reporting
During the warranty period, any repairs may only be performed by service technicians
authorized by the appliance manufacturer.
Before starting the repair, the appliance must be disconnected from the power mains by removing
the fuse or by removing the main cord from the wall outlet.
Unauthorized tampering and repairing may cause the risk of electric shock and short circuit;
therefore, do not attempt to fi x them yourselves. Leave such tasks to an expert or an authorized
service technician.
In case of minor faults or problems with the appliance operation, check the following instructions to
see whether you can eliminate the causes by yourselve.
Important
A visit by a service technician during the warranty period will be
charged if the appliance is not functioning because of improper
use. Store these instructions in a place where they are always
readily accessible; when passing the appliance on to another
person, the instructions should also be included.
Some advice on rectifying some common problems can be found
in the following:
75
Page 74

Sensors do not
respond, the display
has frozen
The main fuse is tripped
repetitively
Oven interior lighting
does not work
The oven does not heat
up...
The pastry is not
cooked thoroughly...
The program timer
shows extraordinary
fi gures or is turned on
and off uncontrolled
Program timer display is
blinking
Operation control lamp
is not lit...
• Disconnect the cooker from the power network for a few minutes
(remove the fuse or trip the main switch); then, reconnect it to
the power network and turn on the oven.
• Call a service technician!
• The process of replacing the bulb is described on page 75.
• Was the temperature and operating mode selected appropriately?
• Is the oven door closed?
• Have you removed the grease fi lter?
• Did you observe the instructions and tips from the section “Baking
pastry”?
• Did you follow the instructions in the baking table closely?
• In case of faulty operation of the program timer, disconnect the cooker
from the power mains for a few minutes (remove the fuse or trip the
main switch); then, reconnect it to the mains and set the time of day.
• There was a power supply failure, or your cooker was just connected
to the power mains. All set times have been deleted.
• Set the time of day to enable operation of the appliance.
• After the end of program timer controlled operation (automatic
operation), the oven goes off, the time of day is displayed, and an
audible signal is emitted for a certain period of time. Take the dish
out of the oven, return the operation mode selection knob and the
temperature knob/dial back to the starting position.
• Did you activate all necessary controls?
• Did the main fuse in your home network trip?
• Are the temperature knob /dial and the operating mode selection knob
set properly?
76
If the problem persists despite observing the instructions above,
call an authorized service technician. Elimination of any errors or
warranty claims that resulted from improper connection or use of
the appliance is not covered by our warranty. In such cases, the
costs of repair are borne by the user.
Page 75

Instructions for installation and connection
Important warnings
• The appliance may only be connected by a service technician authorized by the gas distribution
company or an authorized service center.
• The room in which the appliance is installed must be regularly ventilated.
• Before connecting the appliance, make sure that the local requirements for connection (gas type
and pressure) are compatible with the appliance version / adjustment.
• This appliance is not connected to a combustion fumes exhaust system (i.e. a chimney). The
appliance must be installed and connected in compliance with the relevant effective installation
regulations. Special care must be taken to ensure adequate ventilation / aeration.
• The distance between the cooking hob and the kitchen hood should be no less than indicated in
the instructions for kitchen hood installation.
• This appliance is appropriate for installation between two pieces of furniture (class 2/1); it
can be in direct contact with them on both sides. On one side of the appliance, a piece of
kitchen furniture that is higher than the appliance may be installed, if the distance between the
appliance and this piece of furniture is not less than 10 centimeters. In such case, only a piece
of furniture with a height not exceeding that of the cooker may be installed on the other side of
the appliances. Hanging, or wall-mounted kitchen elements should be installed high enough not
to interfere with the work process. The distance between the cooking hob and the kitchen hood
should be no less than 650 mm.
• All other repairs and similar tasks that require the use of any tool whatsoever should only be
carried out by an authorized service technician.
• The user may only perform those tasks that can be carried out without the use of tools.
• The walls and furniture closest to the appliance (fl oor, kitchen back wall, side walls) should be
resistant to temperatures of at least 90°C.
• Mains cords on the back side of the appliance must be secured in such way that it is not in direct
contact with the cooker back wall, as this wall heats up considerably during operation.
Leveling the cooker
The cooker has four adjustable feet, two at the front and two at
the back. The feet are accessible, when the cooker drawer is
removed; if required, they may be turned to increase or decrease
the height, until the appliance is not in a completely horizontal
position. The adjustment screws can easily be turned if the
cooker is tilted slightly to redistribute the load.
77
Page 76

Electrical connection
3 lives with 1 neutral connection (3 1N a.c. 400 V / 50 Hz / 10,7 kW):
The voltage between the phases and the neutral is 230 V a.c.
There is a voltage of 400 V between the lives.
The electrical connection must comply with national and local
regulations.
Wall socket and plug must be accessible at all times.
If you want to make a fi xed connection, ensure that a multi-pole
switch with a distance between contacts of 3 mm is installed in
the supply cable.
Please note
This appliance must be earthed.
If the connecting cable is damaged, it may only be replaced
by the manufacturer, the manufacturer's service organisation
or equivalently qualifi ed persons, in order to avoid dangerous
situations.
78
Page 77

Technical characteristics
Rating plate
A Serial number
B Model
C Type
D Trademark
E Code
F Technical information
G Compliance indications / symbols
WE RESERVE THE RIGHT TO MAKE ANY CHANGES THAT
DO NOT AFFECT THE FUNCTIONALITY OF THE APPLIANCE.
79
 Loading...