

Page 1
WL-500W Wireless Router User Manual
21
ASUS WL-500W Wireless Router provides two USB2.0 ports for connecting the
USB storage, the USB camera, and the USB printer. Thus, you can monitor the
working environment, share data and printer with both wired and wireless users in
your network. Furthermore, WL-500W provides a download utility -- the Download
Master -- to facilit ate and share the download les.
Warning:
Before unplugging the USB storage disk from WL-500W, you must eject
the disk in
Status & Log -> External USB Disk
page to prevent data corruption.
Note:
Before applying change and rebooting WL-500W, make sure all USB applications
are disabled, it would take more than 20 seconds for WL-500W to reboot.
1) Sharing USB storage
To use this feature, you need to plug a USB hard disk to the USB2.0 port on the rear
panel of WL-500W. Make sure the hard disk is formatted and partitioned properly.
Note:
FAT32 has a 2GB le size limitation and do not support les above that size. If
you want to use les of above 2GB, you must format the disk to EXT2 le system.
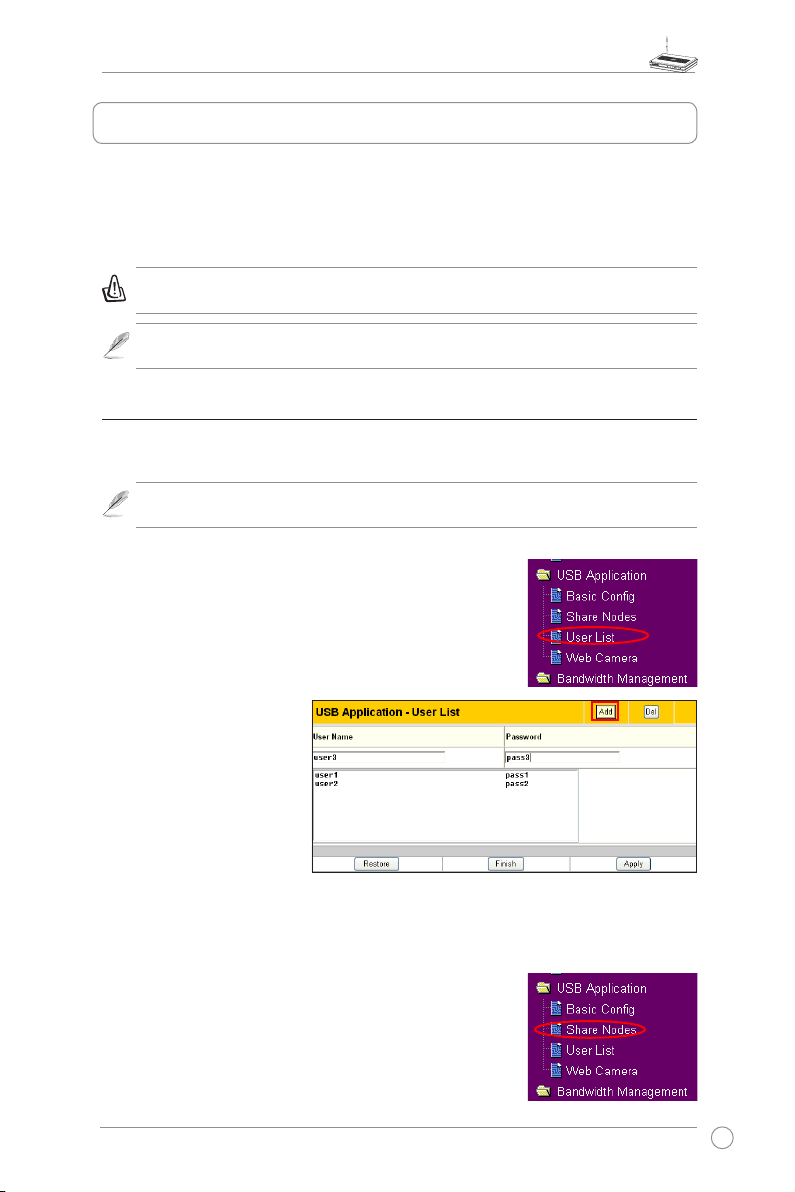
Creating user account
To share the data in the USB storage, you need to create
user accounts rst.
2. I np u t
U se r Nam e
a nd
Password
for the accounts.
C lick
A dd
to a d d the
account to the list.
3. To de le te an a cc o unt ,
se lect the a ccount from
the list and click
Del
.
4. Cli ck
App ly
to apply the
changes and restart the
wireless router.
Creating share folder and access right
You can create a new share folder or share an existing
folder in your hard disk.
1. Click
USB Application -> User List
in the left side
menu to open the conguration page.
1. Click
USB Application -> Share Nodes
in the left
side menu to open the conguration page.
5. Application features
Page 2
WL-500W Wireless Router User Manual
22
2. Click
Add
to add a share
folder.
3. Select the folder you want to share
from Folder Manager and click Ok.
To create a share folder, input the
folder name in
Add Folder
field
and press
Add
.
4. Dene the access right for
the share folder by appoint
User Name
and
Acces s
Ri ght
. Click
Ad d
to add
the access right rule. When
finished, click
Apply
to
save the conguration.
6. Click
Finish
.
5. Set Network Neighbourhood
Mode to
Apply rules in
shared node list
, Wo rk
Group to
WORKGROUP
to
enable all computers within
WORKGROUP t o access
WL-500W USB storage.
7. Cl ic k
Sa ve & Rest a r t
t o
restart the wireless router
and activate the settings.
8. Open
My Netw ork Place
from a computer connected
to WL-500 W. C l i c k
vi e w
work group compu ter s
,
you can s ee WL-500W in
the
Workgroup
category.
All les on the USB storage
are ready for sharing.
Page 3
WL-500W Wireless Router User Manual
23
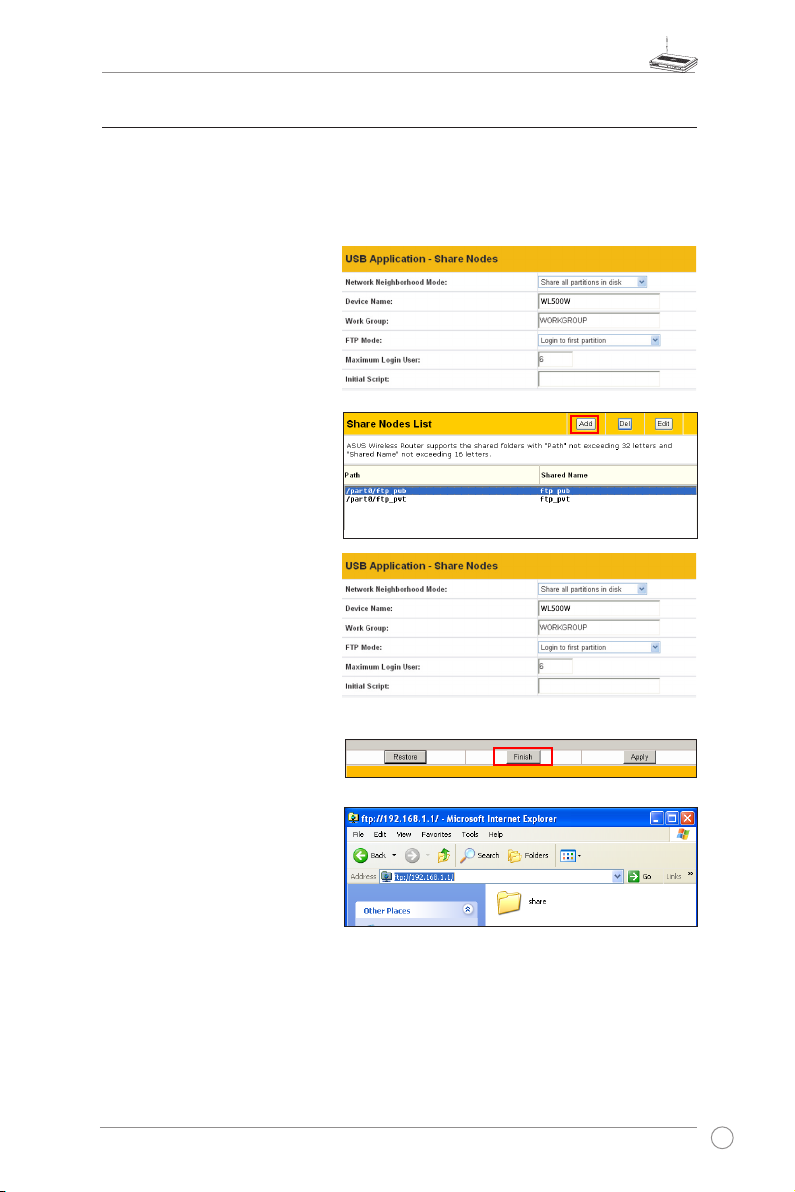
2) Setting up FTP site
WL-500W can also serve as an FTP site. You can make your FTP site accessible to
all users, or set up an access policy to restrict anonymous login. To use this feature,
you need to plug a USB storage disk to the USB2.0 port on the rear panel of WL500W. Make sure the hard disk is formatted and partitioned properly.
1. To allow anonymous login: Set
Network Neighborhood Mode
to
Share all partitions in disk
,
FT P Mod e to
Lo g in to fir s t
par t i t i on
. The an o n y mou s
lo g i n d i r e c t o ry is th e r o ot
directory of rst partition.
To allow account login only: Set
Network Neighborhood Mode
to
Apply rules in shared node
li s t
, F T P Mode t o
Lo g i n to
fir st matched shared nod e
.
Click
Add
in the Share Node List
to specify the access directory
and access right of FTP account.
2. The
Maximum Login User
fi eld spe cif ies t he m axim um
number of concu rrent users.
The default value is 6.
3. Click
Finish
t o a c t i v a t e t h e
settings and reboot. This process
may take several minutes.
4. Ty p e
ftp:// 1 9 2 . 1 6 8 . 1.1
i n to
the address box of y our Web
br o w s e r a n d p r e s s En t e r to
login the FTP site.
Page 4

WL-500W Wireless Router User Manual
24
1. Click
Basic Cong
page in USB Application folder.
2. Se t
En a b l e Downl o a d Mas t e r
to
Yes
. If you want to share the
do w n loade d fil e wit h you r LAN
use r s , se t
Ena b l e Do w n l oa d
Shar e
to
Yes
. Cli ck
Fini sh
and
sav e an d re s t a rt th e wi r ele s s
router.
3) Download Master
The Download Master helps to manage the download tasks without turning your
computer on. To use this function, you need to: 1) mount a USB storage to WL-500W
Wireless Router; and 2) install ASUS Utilities from the support CD. Refer to chapter 6
for utility installation procedures.
4.
HTTP download (1)
Right click the download link
on the Web page and click
Downl o a d us i n g A S U S
Downl o a d
. A windo w in
step 5 appears to indicate
download progress.
HTTP download (2)
Ri g h t clic k the d o w nload
link on the Web page and
click
Properties.
Copy the
download
Address (URL)
.
3. Open Download Master from Start
-> All Progr ams -> A SUS Uti lity
->WL- 500 W W irel ess Ro uter ->
Do wnlo a d M a ster. Cli ck
Fi le - >
Co nne c t
to a ssoc iat e wi t h W L-
500W.
Page 5

WL-500W Wireless Router User Manual
25
If you sel e c t
Do w nload usi n g
ASUS Down load
, you can see
th e dow nload tas k is added to
the
Transfer
list. The blue bars
indicate the progress of download
tasks.
If you copy the download address,
click
Assign
button in the utility.
Paste the a ddres s into
Gettin g
File From
box, select
HTTP
from
Op t i o n s
, a n d click
Do w n l o a d
button to start.
7. Click
Folder
butto n to view the
download le. Open the
Complete
folder to view or copy the nished
files to your local hard disk. The
unf i n i she d t a s ks ar e ke p t in
InComplete
folder.
4) Web camera
The ASUS Wireless Router implements several applications for a
USB Web camera, enabling you to capture images and send them
over the Internet. For this function, you need to plug a USB camera
onto WL-500W and enable ActiveX for your Web browser.
Web camera
1. Click
Web Camera
page in USB Application folder.
2.
Enab le Web Came ra
- Se lecti ng L AN Onl y enables Web C amera for LAN user s.
Selecting LAN and WAN enableds Web Camera for both LAN users and WAN users
through rewall.
5. FTP download
Cl i ck
Tr an s fe r
b u t t o n of t h e
Download Master and select
FTP
in the
Options
eld. Input the FTP
site address, Port number, User
Name, Password. Click Download
to start.
6. BT download
S a v e t h e B T s e e d o n y o u r
computer. Click
Transfer
button of
the Download Master and select
BT
i n the Option s fi e l d . Cl i c k
Browse
to loc ate the s eed file.
Click
Download
to start.
Page 6

WL-500W Wireless Router User Manual
26
Web Camera Mode
- Select the
approp riate came ra mod e from
the drop down list. ActiveX Only
enables user to execute ActiveX
c l ie n ts on an Wi n d ow s® IE
platform and get the best image
qua l i ty. A c t i ve X an d Re f r esh
enables user to get a basic image
on both IE and other browsers.
Refresh Only provides to all users
still images which are refreshed in
a specied interval.
Web Camera Driver
- When you plug a supported Web Camera into the USB2.0 port in
the wireless router, the appropriate driver is selected automatically. Refer to the USB Web
Camera support list on ASUS Website (www.asus.com) for supported Web Camera models.
Image Size
- Select the image size from the drop down list. 320 x 240 provides a larger
image while 160 x 120 provides faster transmission. Click Preview to see the effect.
Sense Level
- This eld indicates the sensitivity at which image movement is detected.
Refresh Time in Seconds
- This eld indicates the time interval in seconds in which the
system reloads images. The range of values is 1~65535.
HTTP Port
- This eld indicates the port that HTTP server listens on to communicate. For
example, by default, you can connect to your web camera by using http://192.168.1.1:7776
without password checking. (The password checking eld is unchecked.)
ActiveX Port
- This eld indicates the port that server listens on to communicate with
ActiveX clients.
Enabling ActiveX for your IE
If you use Internet Explorer®, you need to enable ActiveX or
the Web Camera cannot function properly. For clients using
Netscape or other browsers, ignore this part.
1. Open Internet Explorer 5.0 or above on your computer,
click
Tools -> Internet Options
.
3. Select
Security
tab and click
Custom
Level
button.
4. Enable the activeX controls and plug-ins.
By default, these items are disabled.
Page 7

WL-500W Wireless Router User Manual
27
1.
Enable Security Mode?
-Select
Yes to enable security function on
the data and time you set below.
Date to Enable Security Mode
-
This field defines the dat e th at
Security Mode is enabled.
Time to Enable Security Mode
-
This eld denes the time interval
that Security Mode is enabled.
Send to
- Input the E-mail address you wish WL-500W send the image to.
Email Server
- This eld indicates the E-mail server you use for exchanging E-mail. If you
leave this eld blank, WL-500W uses the mail server of your E-mail address in
Send to
eld.
Subject
- This eld is for the subject of E-mail.
Attach Image File?
- This eld allows you to attach the captured image in the E-mail.
Remote monitors
This function allows you to monitor up to 6 Web Cameras in your LAN. You can enter
the IP addresses of other ASUS Wireless Routers which have Web Camera attached.
Note:
When enabling "LAN and WAN" remote control in the Wireless Router, packets
from Internet with destination ports 8081 to 8086 will be forwarded to WL-500W
in Remote Control fields. To make sure packets from WL-500W are routed back
to Internet, you need to set a static route entry for WL-500W. The IP address and
gateway address are same as the address of WL-500W.
Enable Web Camera to WAN users
With proper setting to DDNS, you can monitor your working environment from
anywhere on Internet, even if dynamic WAN IP address is used. If any motion is
detected by the camera, WL-500W captures the images and send them to your
appointed E-mail box. Refer to page 15-17 for DDNS setup procedures.
5. By default, these three items are enabled.
Enable them if changed.
6. Click
Yes
to change the security settings.
Page 8

WL-500W Wireless Router User Manual
28
Re m o te Si te 1- 6
- Th i s fi e l d
st a n d s for t h e IP a d dress a n d
por t nu m b e r of Re m ot e Si t e.
Th e va l u e of th i s f i e l d i s [I P
Address]:[Connection Port].
Preview
- Clic k Previe w to see
the view of all the Web Camera
sites you set in Remote Site.
5) Sharing USB printer
You can connect a compatible USB printer to the USB2.0 port of WL-500W to
share the printer with your LAN users. Follow the procedures below to setup your
computers to utilize the printer server function of WL-500W.
Installing USB printer
Plug your USB printer to the USB2.0 port on WL-500W rear
panel. To verify whether your printer is properly installed and
to WL-500W Wireless router, click
Status & Log -> Status
. If
Printer Model
is correct and
Printer Status
is
On-Line
, you can
share this printer within your LAN.
Note:
Visit ASUS Website for
compatible printer vendor and
models.
Setting up printer client under Windows XP
Follow the steps below to install network printer on your clients.
1. Run Add Printer Wizard from
Start ->
Printers and Faxes -> Add a printer
.
2. Select
Local printer attached to this
computer
and click
Next
.
 Loading...