

Page 1

USB-BT211
Tiny Bluetooth dongle
User Manual
For Windows® XP OS
Page 2

E4687
First Edition
July 2009
Copyright © 2009 ASUSTeK Computer Inc. All Rights Reserved.
No part of this manual, including the products and software described in it, may be
reproduced, transmitted, transcribed, stored in a retrieval system, or translated into any
language in any form or by any means, except documentation kept by the purchaser for
backup purposes, without the express written permission of ASUSTeK Computer Inc.
(“ASUS”).
Product warranty or service will not be extended if: (1) the product is repaired, modied or
altered, unless such repair, modication of alteration is authorized in writing by ASUS; or (2)
the serial number of the product is defaced or missing.
ASUS PROVIDES THIS MANUAL “AS IS” WITHOUT WARRANTY OF ANY KIND, EITHER
EXPRESS OR IMPLIED, INCLUDING BUT NOT LIMITED TO THE IMPLIED WARRANTIES
OR CONDITIONS OF MERCHANTABILITY OR FITNESS FOR A PARTICULAR PURPOSE.
IN NO EVENT SHALL ASUS, ITS DIRECTORS, OFFICERS, EMPLOYEES OR AGENTS BE
LIABLE FOR ANY INDIRECT, SPECIAL, INCIDENTAL, OR CONSEQUENTIAL DAMAGES
(INCLUDING DAMAGES FOR LOSS OF PROFITS, LOSS OF BUSINESS, LOSS OF USE
OR DATA, INTERRUPTION OF BUSINESS AND THE LIKE), EVEN IF ASUS HAS BEEN
ADVISED OF THE POSSIBILITY OF SUCH DAMAGES ARISING FROM ANY DEFECT OR
ERROR IN THIS MANUAL OR PRODUCT.
SPECIFICATIONS AND INFORMATION CONTAINED IN THIS MANUAL ARE FURNISHED
FOR INFORMATIONAL USE ONLY, AND ARE SUBJECT TO CHANGE AT ANY TIME
WITHOUT NOTICE, AND SHOULD NOT BE CONSTRUED AS A COMMITMENT BY
ASUS. ASUS ASSUMES NO RESPONSIBILITY OR LIABILITY FOR ANY ERRORS OR
INACCURACIES THAT MAY APPEAR IN THIS MANUAL, INCLUDING THE PRODUCTS
AND SOFTWARE DESCRIBED IN IT.
Products and corporate names appearing in this manual may or may not be registered
trademarks or copyrights of their respective companies, and are used only for identication or
explanation and to the owners’ benet, without intent to infringe.
ii
Page 3

Table of contents
About this guide .................................................................................... v
How this guide is organized ...............................................................v
Conventions used in this guide ..........................................................v
Chapter 1: Knowing your Tiny Bluetooth dongle
Bluetooth® overview .............................................................................. 1
Package contents .................................................................................. 1
System requirements ............................................................................ 1
USB-BT211 specications summary ................................................... 2
Chapter 2: Getting started
Installing the Bluetooth XP Suite ......................................................... 3
Launching the Bluetooth XP Suite ....................................................... 5
Chapter 3: Bluetooth XP Suite
Bluetooth XP Suite screen .................................................................... 6
Bluetooth Suite Tray .............................................................................. 8
Bluetooth Suite Conguration .............................................................. 9
Bluetooth Suite Settings .................................................................... 9
Local Device .................................................................................... 10
Bluetooth Security ............................................................................11
Prole Manager ................................................................................11
Shared Folders ................................................................................ 14
Object Push ..................................................................................... 15
Audio ............................................................................................... 16
Basic Imaging .................................................................................. 17
Fax Server Conguration ................................................................ 17
Sync ................................................................................................ 18
iii
Page 4

Table of contents
Chapter 4: Communicating with a Bluetooth device
Pairing with a Bluetooth device ......................................................... 19
Connecting to a Bluetooth device ...................................................... 22
Using the Dial-up Networking Prole (DUN) ..................................... 24
Chapter 5: Appendices
Notices .................................................................................................. 32
ASUS Contact information .................................................................. 34
iv
Page 5

About this guide
This user guide contains information that you need to install and congure the
ASUS Tiny Bluetooth dongle.
How this guide is organized
This guide contains the following parts:
• Chapter 1: Knowing your Tiny Bluetooth dongle
This chapter provides information on the package contents, system
requirements, and specications of the ASUS Tiny Bluetooth dongle.
• Chapter 2: Getting started
This chapter describes how to install and launch the Bluetooth XP Suite.
• Chapter 3: Bluetooth XP Suite
This chapter gives a detailed description on the Bluetooth XP Suite.
• Chapter 4: Communicating with a Bluetooth device
This chapter describes how to connect your computer to a Bluetooth device
using the Bluetooth XP Suite.
• Chapter 5: Appendices
This chapter provides you with the regulatory Notices and Safety Statements.
Conventions used in this guide
WARNING: Information to prevent injury to yourself when trying to
complete a task.
CAUTION: Information to prevent damage to the components when
trying to complete a task.
IMPORTANT: Instructions that you MUST follow to complete a task.
NOTE: Tips and additional information to aid in completing a task.
v
Page 6

Knowing your Tiny
1
Bluetooth dongle
Bluetooth® overview
Bluetooth® is a short-range wireless technology that allows communication
among Bluetooth-enabled devices such as PCs, mobile devices, headsets, and
GPS receivers. Bluetooth® devices only need to be within the specied range to
exchange information and do not need any physical connection.
With Bluetooth® technology, you can:
• Connect your computer to the Internet using a Bluetooth-enabled mobile
phone.
• Connect your computer to other Bluetooth devices that are within range.
• Synchronize data between your computer and Bluetooth-enabled mobile
phone.
• Use a wireless mouse, keyboard, or game controller on your computer.
Package contents
Check your ASUS Tiny Bluetooth dongle package for the following items.
ASUS USB-BT211
Support CD (manual, utilities)
Quick Start Guide
If any of the items is damaged or missing, contact your retailer.
System requirements
Before using your ASUS Tiny Bluetooth dongle, ensure that your system meets
the following requirements:
Operating system: Microsoft® Windows® XP / Vista
System memory: 64MB or larger
Hard drive free space: 100MB
ASUS USB-BT211
1
Page 7

USB-BT211 specications summary
Model USB-BT211
Standard Bluetooth v2.1 + EDR
Interface USB 2.0/1.1
Range Up to 100 meters
A2DP, AVRCP, BIP, DUNP, FAX, FTP, HCRP, HID,
Bluetooth Prole
Frequency Band 2.400 ~ 2.4835GHz unlicensed ISM band
Modulation Method
Spread Spectrum FHSS (Frequency Hopping Spread Spectrum)
Transfer Rate (Maz) Max UARTbaud rates of 3Mbps
OS support Windows® XP / Vista
Power Consumption
Input Power DC 5V via USB port
Receiving Sensitivity <-85dBm at <0.1% BER
Physical Dimensions 19.52 x 13.5 x 6.8 mm (L x W x H)
Weight 2.2g
Operating Temperature 0ºC ~ 60ºC (32ºF ~ 140ºF)
Storage Temperature -10ºC ~ 70ºC (14ºF ~ 158ºF)
Humidity 5% ~ 90%, non-condensing
GAP, OPP, PAN, SPP, SYNC, HSP, HFP, BPP,
SAP
GFSK for 1Mbps, π/4-DQPSK for 2Mbps, 8-DPSK
for 3Mbps
Tx Typical: 51mA, Rx Typical: 43mA, Standby
Mode: 15mA
*Specications are subject to change without notice.
2
Chapter 1: Knowing your USB Bluetooth adapter
Page 8
Getting started
2
Installing the Bluetooth XP Suite
The Bluetooth XP Suite is a Bluetooth management tool that enables you to nd,
pair, and communicate with other Bluetooth devices easily.
• Remove any previously installed Bluetooth software on your computer.
Click Start > Settings > Control Panel > Add/Remove Programs to uninstall Bluetooth
software.
• Install the Bluetooth XP Suite before inserting the USB Bluetooth adapter.
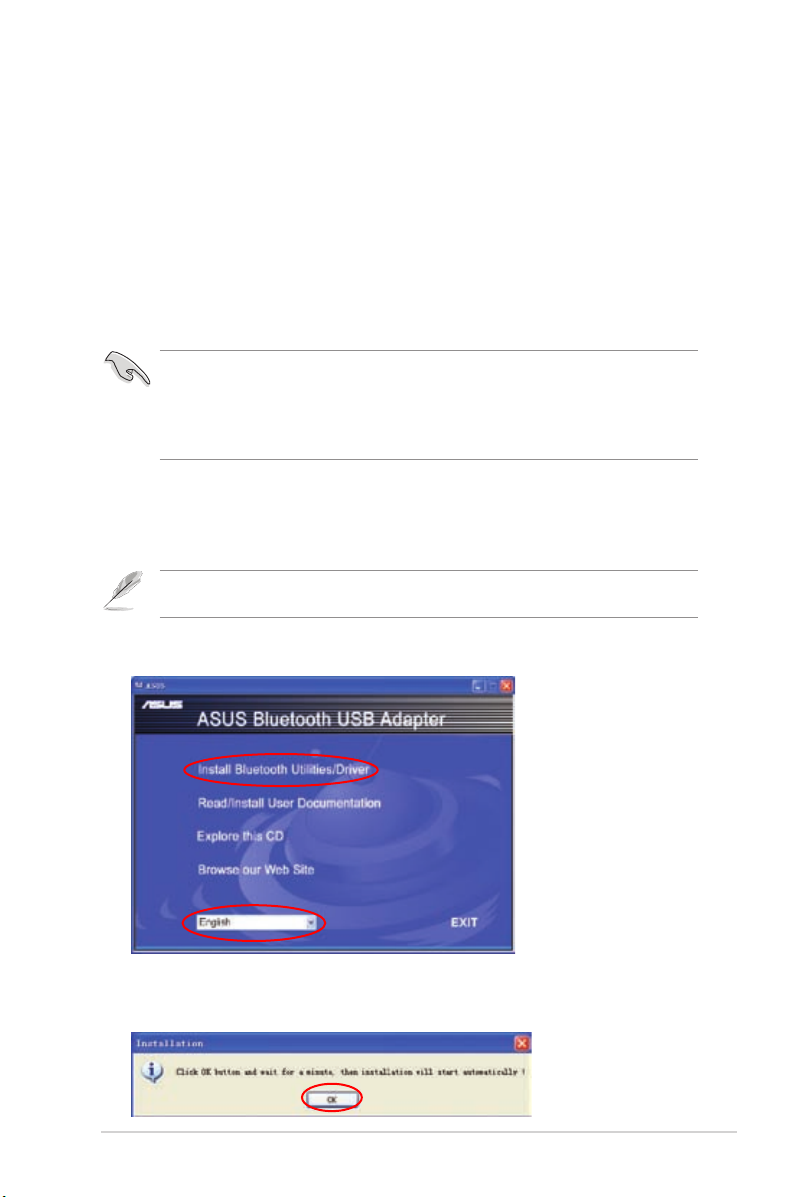
To install the Bluetooth XP Suite on your computer:
1. Place the Support CD into the optical drive. An autorun screen appears if the
Autorun function is enabled on your computer.
If the Autorun function is not enabled on your computer, double-click setup.exe in the Software
folder to run the CD.
2. Select your language and click Install Bluetooth Utilities/Driver.
3. Click OK.
USB-BT211
3
Page 9
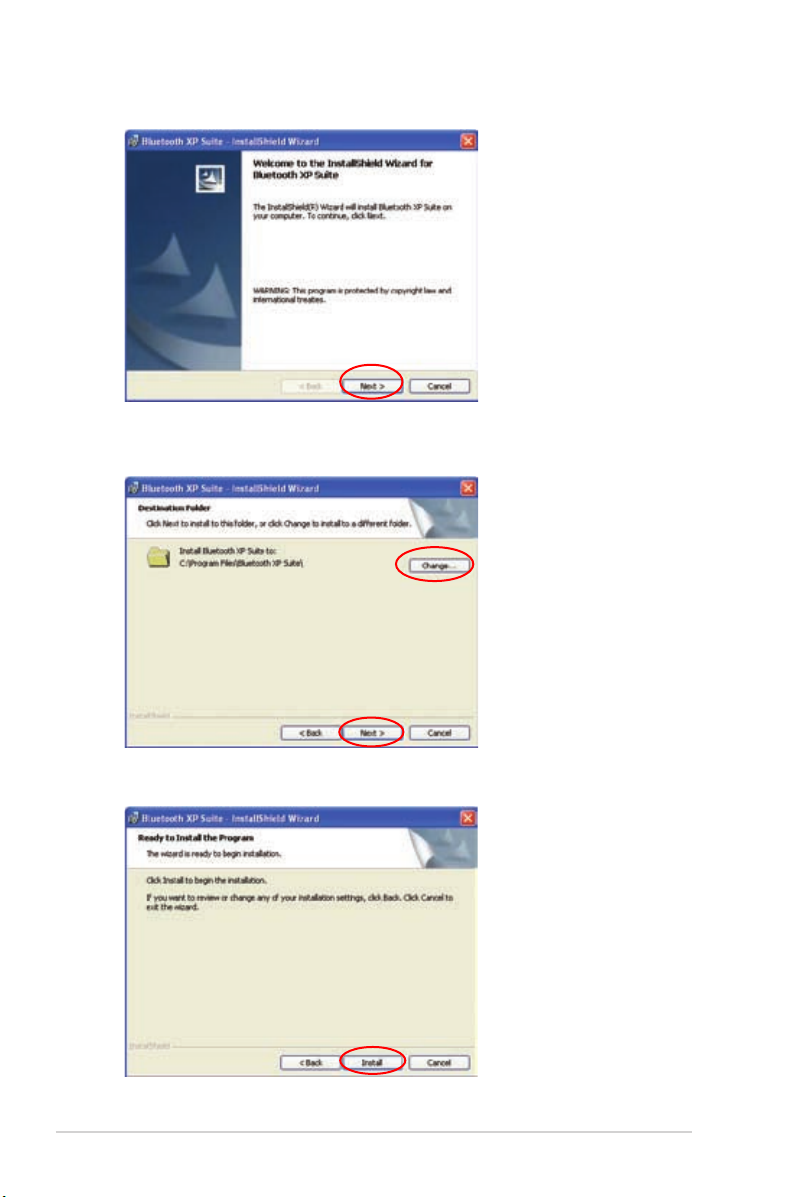
4. The InstallShield Wizard for Bluetooth XP Suite launches. Click Next to
continue.
5. Click Next to install the Bluetooth XP Suite to the default folder or click Change
to specify another folder.
6. Click Install to start the installation.
4
Chapter 2: Getting started
Page 10
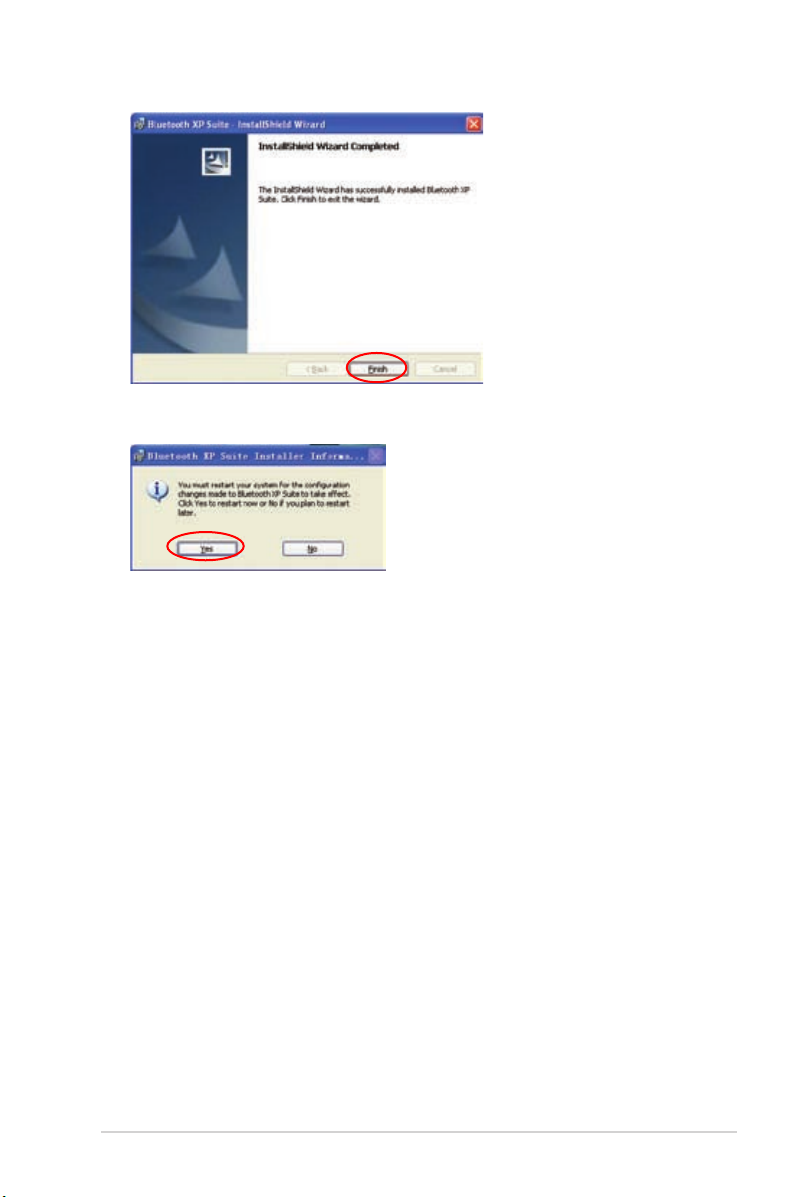
7. Click Finish to exit the installation wizard.
8. Click Yes to restart your computer and activate the changes.
9. Insert the USB Bluetooth adapter after your computer reboots, then the
computer detects the USB Bluetooth adapter and completes installing the
Bluetooth prole drivers.
Launching the Bluetooth XP Suite
To launch the Bluetooth XP Suite:
• Click Start > Programs > ASUS Bluetooth Suite > Launch Bluetooth Suite.
• Double-click Bluetooth Suite on the Windows® desktop.
USB-BT211
5
Page 11
Bluetooth XP Suite
Bluetooth XP Suite screen
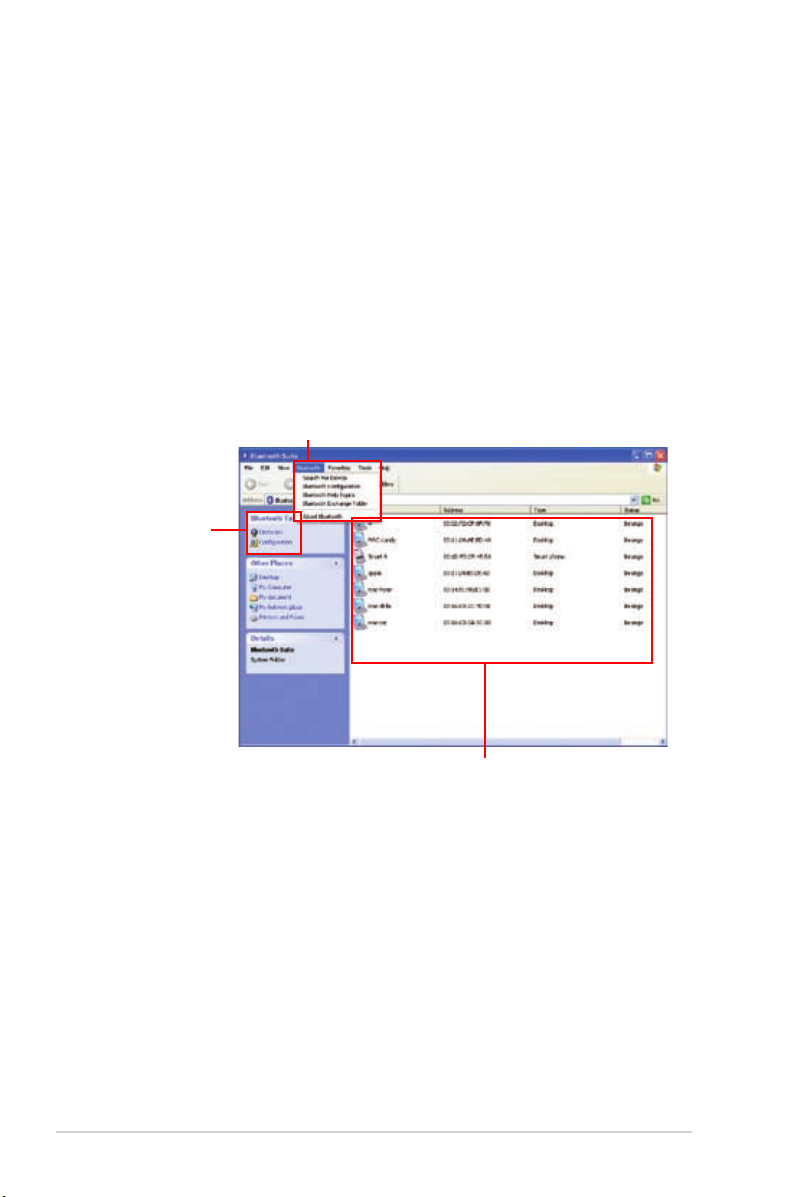
The Bluetooth XP Suite screen consists of three major parts:
• Bluetooth menu
• Bluetooth Tasks area
• Bluetooth device list
Bluetooth menu
Bluetooth Tasks area
3
Bluetooth device list
6
Chapter 3: Bluetooth XP Suite
Page 12
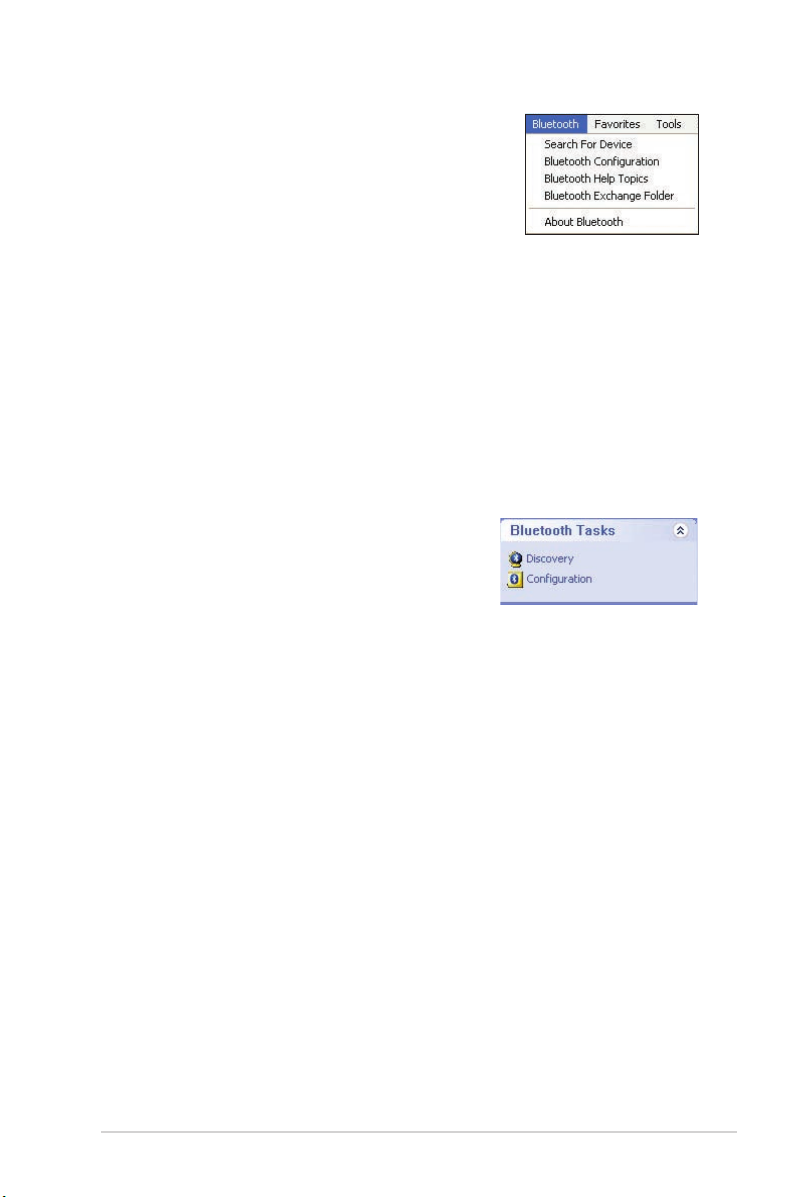
Bluetooth menu
Search For Device – Searches for Bluetooth devices
within range. The available devices are listed in the
right panel of the Bluetooth XP Suite screen.
Bluetooth Conguration – Launches Bluetooth Suite
Conguration which allows you to congure Bluetooth
XP Suite settings and Bluetooth proles. Refer to the
section Bluetooth Suite Conguration for details.
Bluetooth Help Topics – Opens Bluetooth help les.
Bluetooth Exchange Folder – Opens the Bluetooth exchange folder for the
Object Push service. Refer to the section Object Push for more details on the
Object Push service.
About Bluetooth – Displays the version of your Bluetooth XP Suite.
Bluetooth Tasks area
Discovery – Searches for Bluetooth devices within
range or displays the Bluetooth services that a
Bluetooth device supports. The available devices or
services are listed in the right panel of the Bluetooth
XP Suite screen.
Conguration – Launches Bluetooth Suite Conguration which allows you to
congure Bluetooth XP Suite settings and Bluetooth proles. Refer to Bluetooth
Suite Conguration for details.
USB-BT211
7
Page 13

Bluetooth device list
The Bluetooth device list displays the devices that are within range and their
addresses, types, and statuses.
Right-click a Bluetooth device in the list for the following options:
Name Discovery – Displays the Bluetooth device name.
Pair – Pairs with a Bluetooth device.
Service Discovery – Displays the services that the Bluetooth device supports.
Properties – Displays the name, address, type, connection status of the Bluetooth
device and the services it supports.
Bluetooth Suite Tray
After you launch the Bluetooth XP Suite, a Bluetooth
icon appears in the Windows® notication area.
Right-click the Bluetooth icon to display the
following options:
Show Messages – Displays application messages.
My Bluetooth Place – Launches the Bluetooth XP Suite.
Bluetooth Conguration – Launches Bluetooth Suite Conguration which allows
you to congure Bluetooth XP Suite settings and Bluetooth proles. Refer to the
section Bluetooth Suite Conguration for details.
8
Chapter 3: Bluetooth XP Suite
Page 14

Bluetooth Suite Conguration
Bluetooth Suite Conguration allows you to congure Bluetooth XP Suite settings
such as device discovery and security settings, and various Bluetooth proles
including Object Push, Audio, Basic Imaging, Fax Server, and Sync proles.
You may do any of the following to launch Bluetooth Suite Conguration:
• Select Bluetooth Conguration in the Bluetooth menu.
• Click Conguration in the Bluetooth Tasks area.
• Right-click the Bluetooth icon in the Windows® notication area then select
Bluetooth Conguration.
Bluetooth Suite Settings
The Bluetooth Suite Settings page allows you to congure the Bluetooth device
inquiry method and the kind of messages that are displayed when using the
application.
Allow Other Device To Discover My Computer
Tick this box to make your computer discoverable to other Bluetooth devices.
Bluetooth Device Inquiry On Startup
Tick this box to search for Bluetooth devices within range on startup.
Discover Bluetooth Device Names after Inquiry
Tick this box to display Bluetooth device names after the Bluetooth search.
Perform Bluetooth Device Inquiry: x Minutes
Tick this box to set the interval at which your computer runs a Bluetooth search
and refreshes the Bluetooth device list. Key in a value between 1 and 10.
USB-BT211
9
Page 15

Show Device Discovery Reminder Dialog
Tick this box to show the device discovery reminder before
searching for Bluetooth devices.
Show Pairing Reminder Dialog
Tick this box to show the pairing reminder before pairing with
other Bluetooth devices.
Show Connection Reminder Dialog
Tick this box to show the connection reminder before
connecting to other Bluetooth devices.
Show Application Messages
Tick this box to show the application messages.
Local Device
The Local Device page allows you to congure the Bluetooth settings on your
computer.
Bluetooth Device Name – customizes the name of your computer.
Bluetooth Device Type – selects the type of your computer.
10
Chapter 3: Bluetooth XP Suite
Page 16

Bluetooth Security
The Bluetooth Security page allows you to congure the security mode for
Bluetooth device connections.
Require Bluetooth pairing for all links
Tick this box to perform pairing on all Bluetooth device connections.
Prole Manager
The Prole Manager page displays the Bluetooth proles that the Bluetooth XP
Suite supports and the devices assigned to the Bluetooth proles.
A Bluetooth prole is a collection of settings that dene standard communication
methods for a particular type of Bluetooth device.
Right-click a Bluetooth service to do the following:
• Disable
• Uninstall
• Scan for changes
• Check properties
USB-BT211
11
Page 17

The Bluetooth XP Suite supports the following Bluetooth proles:
Human Interface Device Prole (HID)
This prole enables you to connect Bluetooth HIDs such as Bluetooth keyboards,
mouses, and game controllers to your computer. The Bluetooth XP Suite supports
multiple HID connections.
Serial Port Prole (SPP)
This prole enables you to set up virtual serial ports and connect your computer
with another Bluetooth enabled device.
Fax Prole (FAX)
This prole enables you to use a FAX gateway to send a Fax message to an
arbitrary recipient.
Dial-up Networking Prole (DUN)
This prole enables you to connect your computer to the Internet via a Bluetooth
enabled mobile phone.
Advanced Audio Distribution Prole (A2DP)
This prole enables you to stream stereo-quality audio from a source device to a
sink device (destination device). A source device delivers an audio stream, while
a sink device receives an audio stream. Bluetooth headphones, speakers, and
mobile phones are a few examples of the audio devices that use the A2DP prole.
Hands-Free Prole (HFP)
This prole enables you to use a hands-free device such as a Bluetooth headset
and a car kit to make and receive calls for a gateway device, typically a mobile
phone.
12
Chapter 3: Bluetooth XP Suite
Page 18

Audio / Video Remote Control Prole (AVRCP)
This prole enables you to use a single Bluetooth remote control device to control
the following applications on audiovisual devices:
• Windows® Media Player 11
• Windows® Media Player 10
• Windows® Media Player 9
• Winamp 5.33
• RealPlayer 10.5
• RealPlayer 10
The Bluetooth XP Suite accepts the following commands:
• Play
• Pause
• Stop
• Forward
• Backward
• Volume up
• Volume down
If multiple media applications are running, only one application receives
commands.
Personal Area Networking Prole (PAN)
This prole enables you to connect your computer to other Bluetooth enabled
devices and transfer les between your computer and these devices.
Hardcopy Cable Replacement Prole (HCRP)
This prole enables you to scan or print les from your computer on a Bluetooth
enabled printing device.
USB-BT211
13
Page 19

Shared Folders
The Shared Folders page allows you to congure the settings for the File Transfer
Prole (FTP). The FTP service enables you to browse the shared folder (often
named ‘FTP folder’ on your computer) on an FTP-enabled Bluetooth device that is
within range of your computer. You can also transfer les and folders between your
computer and the shared folder.
Allow Other Devices To Send Files And Folders To Your Shared Folders
Tick this box to accept les and folders from remote devices and save them to the
shared folder on your computer.
Add Share
Creates a new shared folder. You may assign read, write, and delete permissions
for the shared folder and the les in it.
Remove Share
Removes an existing shared folder.
Set Properties
Customizes the name of your shared folder and assigns read, write, and delete
permissions for the shared folder and the les in it.
14
Chapter 3: Bluetooth XP Suite
Page 20

Object Push
The Object Push page allows you to congure the settings for the Object Push
Prole (OPP) that enables you to exchange les such as vCards (virtual business
cards) and appointments with remote Bluetooth devices.
The following applications support the OPP service:
• Outlook 2007
• Outlook 2003
• Outlook 2002
• Outlook Express 6.0
• Outlook Express 5.0
Inbox
Species a folder to save the les that the remote devices send to your computer
via the OPP service.
Allow other devices to send objects to this computer
Tick this box to allow remote devices to send objects to your computer via the OPP
service.
Prompt before accepting incoming objects
Tick this box if you want Bluetooth XP Suite to prompt you before accepting
incoming objects.
Include Outlook Contacts
Tick this box to include Outlook Ofce contacts in pushing an object.
Include Outlook Express Address Book
Tick this box to include Outlook Express Address Book in pushing an object.
If Outlook Ofce is not installed on your computer, this box is ticked automatically.
You can include either Outlook Ofce Contacts or Outlook Express Address Book,
but not both.
USB-BT211
15
Page 21

Audio
The Audio page allows you to congure the settings for the Advanced Audio
Distribution Prole (A2DP).
Switch default audio card when Handsfree connects
Tick this box to switch to the handsfree device.
Ask me if the default audio card should be switched for Handsfree audio
Tick this box if you want Bluetooth XP Suite to ask you if the default audio card
should be switched to the handsfree device.
Switch default audio card when Stereo Audio connects
Tick this box to switch to the stereo audio device.
Ask me if the default audio card should be switched for Stereo Audio
Tick this box if you want Bluetooth XP Suite to ask you if the default audio card
should be switched to the stereo audio device.
16
Chapter 3: Bluetooth XP Suite
Page 22

Basic Imaging
The Basic Imaging page allows you to congure the settings for the Basic Imaging
Prole (BIP) that enables you to exchange images with remote Bluetooth devices.
Allow other devices to exchange images with this computer
Tick this box to allow remote devices to exchange images with your computer via
the BIP service.
Image folder
Species a folder to save the images that the remote devices send to your
computer via the BIP service.
Fax Server Conguration
The Fax Server Conguration page allows you to congure the settings for the Fax
Prole (FAX) which enables you to send and receive Fax messages.
Modems
Selects a fax modem from the dropdown list.
USB-BT211
17
Page 23

Sync
The Sync page allows you to congure the settings for the Synchronization Prole
(SYNC) that enables you to synchronize vCards and vCalendars with a remote
Bluetooth device.
There are two roles involved in synchronization: client and server. The client is the
device requesting or initiating the synchronization. The server is the device that the
client is synchronizing with.
The client can synchronize contacts, appointments, messages, and notes with the
server.
18
Chapter 3: Bluetooth XP Suite
Page 24

Communicating with
4
a Bluetooth device
Pairing with a Bluetooth device
• Before transferring data between your computer and another Bluetooth device, pair your
computer with the Bluetooth device.
• Before pairing with a Bluetooth device, ensure that the Bluetooth device is turned on and
discoverable. Refer to the documentation that came with the Bluetooth device for
instructions on how to make it discoverable.
To pair your computer with another Bluetooth device:
1. Insert the Tiny Bluetooth dongle into your computer’s USB port.
2. Launch the Bluetooth XP Suite.
3. Click Discovery in the Bluetooth Tasks area to search for Bluetooth devices
within range.
4. Ensure that the Bluetooth device you want to pair with is discoverable. Click
OK.
USB-BT211
19
Page 25

5. Your computer starts searching for other Bluetooth devices that are within
range.
6. When the search is completed, right-click the Bluetooth device then select pair.
7. Ensure that the Bluetooth device is in pairing mode. Click OK.
8. Key in a passcode to pair with the Bluetooth device. The default passcode for
USB-BT211 is 0000 (four zeroes). Click OK.
20
Chapter 4: Communicating with a Bluetooth device
Page 26

9. Key in the same passcode (0000) on the Bluetooth device.
A small red checkmark appears next to the Bluetooth device, indicating that
your computer has paired with it successfully.
USB-BT211
21
Page 27

Connecting to a Bluetooth device
You can connect to other Bluetooth devices using various Bluetooth services.
To connect to a Bluetooth device:
1. Pair your computer with the Bluetooth device.
2. Right-click the Bluetooth device then select Service Discovery to display the
Bluetooth services that it supports.
3. Ensure that the Bluetooth device is connectable. Click OK.
4. Select the Bluetooth service that you want to use.
The Bluetooth services available vary depending on the Bluetooth device.
22
Chapter 4: Communicating with a Bluetooth device
Page 28

To achieve the best signal quality when transferring data between two computers using two
Bluetooth sensor
Position 1
Position 2
USB-BT211 USB Bluetooth adapters, we suggest that the Bluetooth sensors be placed in either
Position 1 or Position 2:
USB-BT211
23
Page 29

Using the Dial-up Networking Prole (DUN)
Connect your computer to the Internet using a Bluetooth enabled mobile phone
that supports the Dial-up Networking Prole (DUN). The Bluetooth enabled mobile
phone acts as a dial-up modem for the Internet connection.
To use DUN:
1. Pair your computer with the Bluetooth mobile phone that you want to use as
the dial-up modem.
2. Right-click the Bluetooth mobile phone, then select Service Discovery to
display the Bluetooth services that it supports.
3. Right-click Dial-Up Networking, then select Connect.
24
Chapter 4: Communicating with a Bluetooth device
Page 30

4. Ensure that the Bluetooth mobile phone is connectable. Click OK.
The Dial-Up Networking status shows Connected.
5. Go to Start > Control Panel > Phone and Modem Options. On the Modems
tab, select Bluetooth DUN Modem, then click Properties.
USB-BT211
25
Page 31

6. On the Advanced tab, key in the extra initialization commands. Click OK to
save the changes.
The extra initialization commands vary with different mobile phone manufacturers. Contact your
mobile phone manufacturer for the commands.
7. Click Start > Control Panel > Network and Internet Connections > Network
Connections, then click Create a new connection in the Network Tasks area.
8. The New Connection Wizard launches. Click Next to continue.
26
Chapter 4: Communicating with a Bluetooth device
Page 32

9. Select Connect to the Internet, then click Next.
10. Select Set up my connection manually, then click Next.
11. Select Connect using a dial-up modem, then click Next.
USB-BT211
27
Page 33

12. Select Modem - Bluetooth DUN Modem, then click Next.
13. Create a name for your ISP, then click Next.
28
Chapter 4: Communicating with a Bluetooth device
Page 34

14. Key in the phone number to dial, then click Next.
Contact your mobile phone operator for the phone number.
15. Leave the elds in this screen blank. Click Next.
USB-BT211
29
Page 35

16. The dial-up connection setup is completed. Click Finish to exit the wizard.
17. Click Start > Control Panel > Network and Internet Connections > Network
Connections. You can nd the icon of the newly created dial-up connection is
added in the Dial-up category. Double-click the icon.
30
Chapter 4: Communicating with a Bluetooth device
Page 36

18. Click Dial to connect your computer to the Internet.
USB-BT211
31
Page 37

Appendices
5
Notices
Federal Communications Commission Statement
This device complies with Part 15 of the FCC Rules. Operation is subject to the
following two conditions:
• This device may not cause harmful interference.
• This device must accept any interference received including interference that
may cause undesired operation.
This equipment has been tested and found to comply with the limits for a class
B digital device, pursuant to part 15 of the FCC Rules. These limits are designed
to provide reasonable protection against harmful interference in a residential
installation.
This equipment generates, uses and can radiate radio frequency energy and, if
not installed and used in accordance with the instructions, may cause harmful
interference to radio communications. However, there is no guarantee that
interference will not occur in a particular installation. If this equipment does cause
harmful interference to radio or television reception, which can be determined
by turning the equipment off and on, the user is encouraged to try to correct the
interference by one or more of the following measures:
• Reorient or relocate the receiving antenna.
• Increase the separation between the equipment and receiver.
• Connect the equipment into an outlet on a circuit different from that to which
the receiver is connected.
• Consult the dealer or an experienced radio/TV technician for help.
Any changes or modications not expressly approved by the party responsible for compliance
could void the user’s authority to operate the equipment.
Prohibition of Co-location
This device and its antenna(s) must not be co-located or operating in conjunction
with any other antenna or transmitter.
32
Appendices
Page 38

Safety Information
To maintain compliance with FCC’s RF exposure guidelines, this equipment should
be installed and operated with minimum distance 20cm between the radiator and
your body. Use on the supplied antenna.
Declaration of Conformity for R&TTE directive
1999/5/EC
Essential requirements – Article 3
Protection requirements for health and safety – Article 3.1a
Testing for electric safety according to EN 60950-1 has been conducted. These are
considered relevant and sufcient.
Protection requirements for electromagnetic compatibility – Article 3.1b
Testing for electromagnetic compatibility according to EN 301 489-1 and EN 301
489-17 has been conducted. These are considered relevant and sufcient.
Effective use of the radio spectrum – Article 3.2
Testing for radio test suites according to EN 300 328- 2 has been conducted.
These are considered relevant and sufcient.
CE Mark Warning
This is a Class B product, in a domestic environment, this product may cause radio
interference, in which case the user may be required to take adequate measures.
DGT warning
REACH
Complying with the REACH (Registration, Evaluation, Authorisation, and
Restriction of Chemicals) regulatory framework, we published the chemical
substances in our products at ASUS REACH website at http://green.asus.com/
english/REACH.htm.
USB-BT211
33
Page 39

ASUS Contact information
ASUSTeK COMPUTER INC. (Asia Pacic)
Address 15 Li-Te Road, Peitou, Taipei, Taiwan 11259
Website www.asus.com.tw
Technical Support
Telephone +886228943447
Support Fax +886228907698
Software download support.asus.com*
ASUS COMPUTER INTERNATIONAL (America)
Address 800 Corporate Way, Fremont, CA 94539, USA
Telephone +15029550883
Fax +15029338713
Website usa.asus.com
Software download support.asus.com*
ASUS COMPUTER GmbH (Germany and Austria)
Address Harkort Str. 21-23, D-40880 Ratingen, Germany
Fax +492102959911
Online contact www.asus.com.de/sales
Technical Support
Telephone (Component) +491805010923
Telephone (System/Notebook/Eee/LCD) +491805010920
Fax +492102959911
Online support support.asus.com*
* Available on this site is an online Technical Inquiry Form that you can ll out to contact
technical support.
34
Appendices
Page 40

Manufacturer:
Authorised
representative
in Europe:
Authorised
distributors
in Turkey:
EEE Yönetmeliğine Uygundur.
ASUSTeK Computer Inc.
Tel: +886-2-2894-3447
Address: No. 150, LI-TE RD., PEITOU, TAIPEI
112, TAIWAN
ASUS Computer GmbH
Address: HARKORT STR. 21-23, 40880
RATINGEN, GERMANY
BOGAZICI BIL GISAYAR SAN. VE TIC. A.S.
Tel: +90 212 3311000
Address: AYAZAGA MAH. KEMERBURGAZ
CAD. NO.10 AYAZAGA/ISTANBUL
INDEX BILGISAYAR SISTEMLERI MUHENDISLIK
SAN. VE TIC. A.S.
Tel: +90 212 3312121
Address: AYAZAGA MAH. CENDERE YOLU
NO.9 AYAZAGA/ISTANBUL
USB-BT211
35
 Loading...