

Page 1
ASUS SRT-AC1900
Wireless Smart Router
Quick Start Guide
Page 1
Page 2
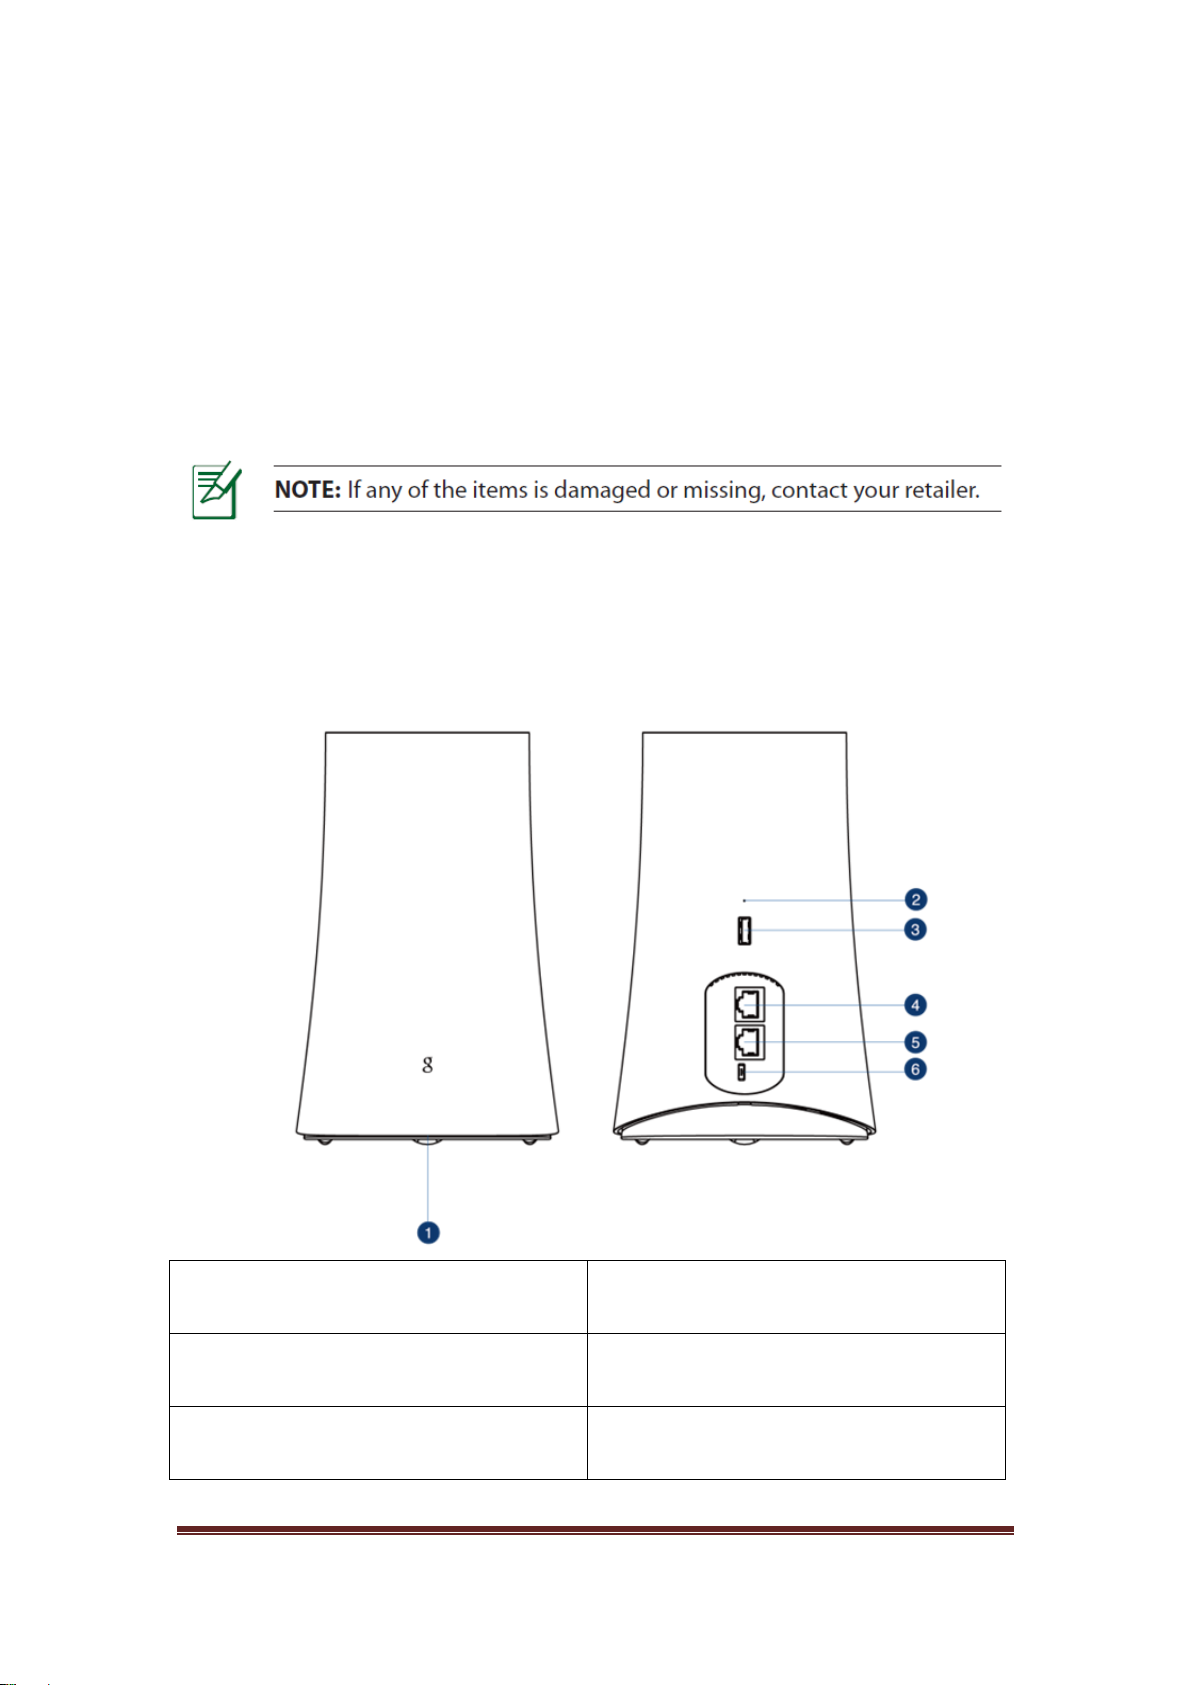
Package Contents
LED indicator
LAN
Firmware restoration
WAN
USB 3.0 port
Power (DC-IN) port
SRT-AC1900 AC adapter
Network cable (RJ-45) x 2 Quick Start Guide
Support CD (User manual) Cable management clip
A Quick look at your SRT-AC1900
Page 2
Page 3
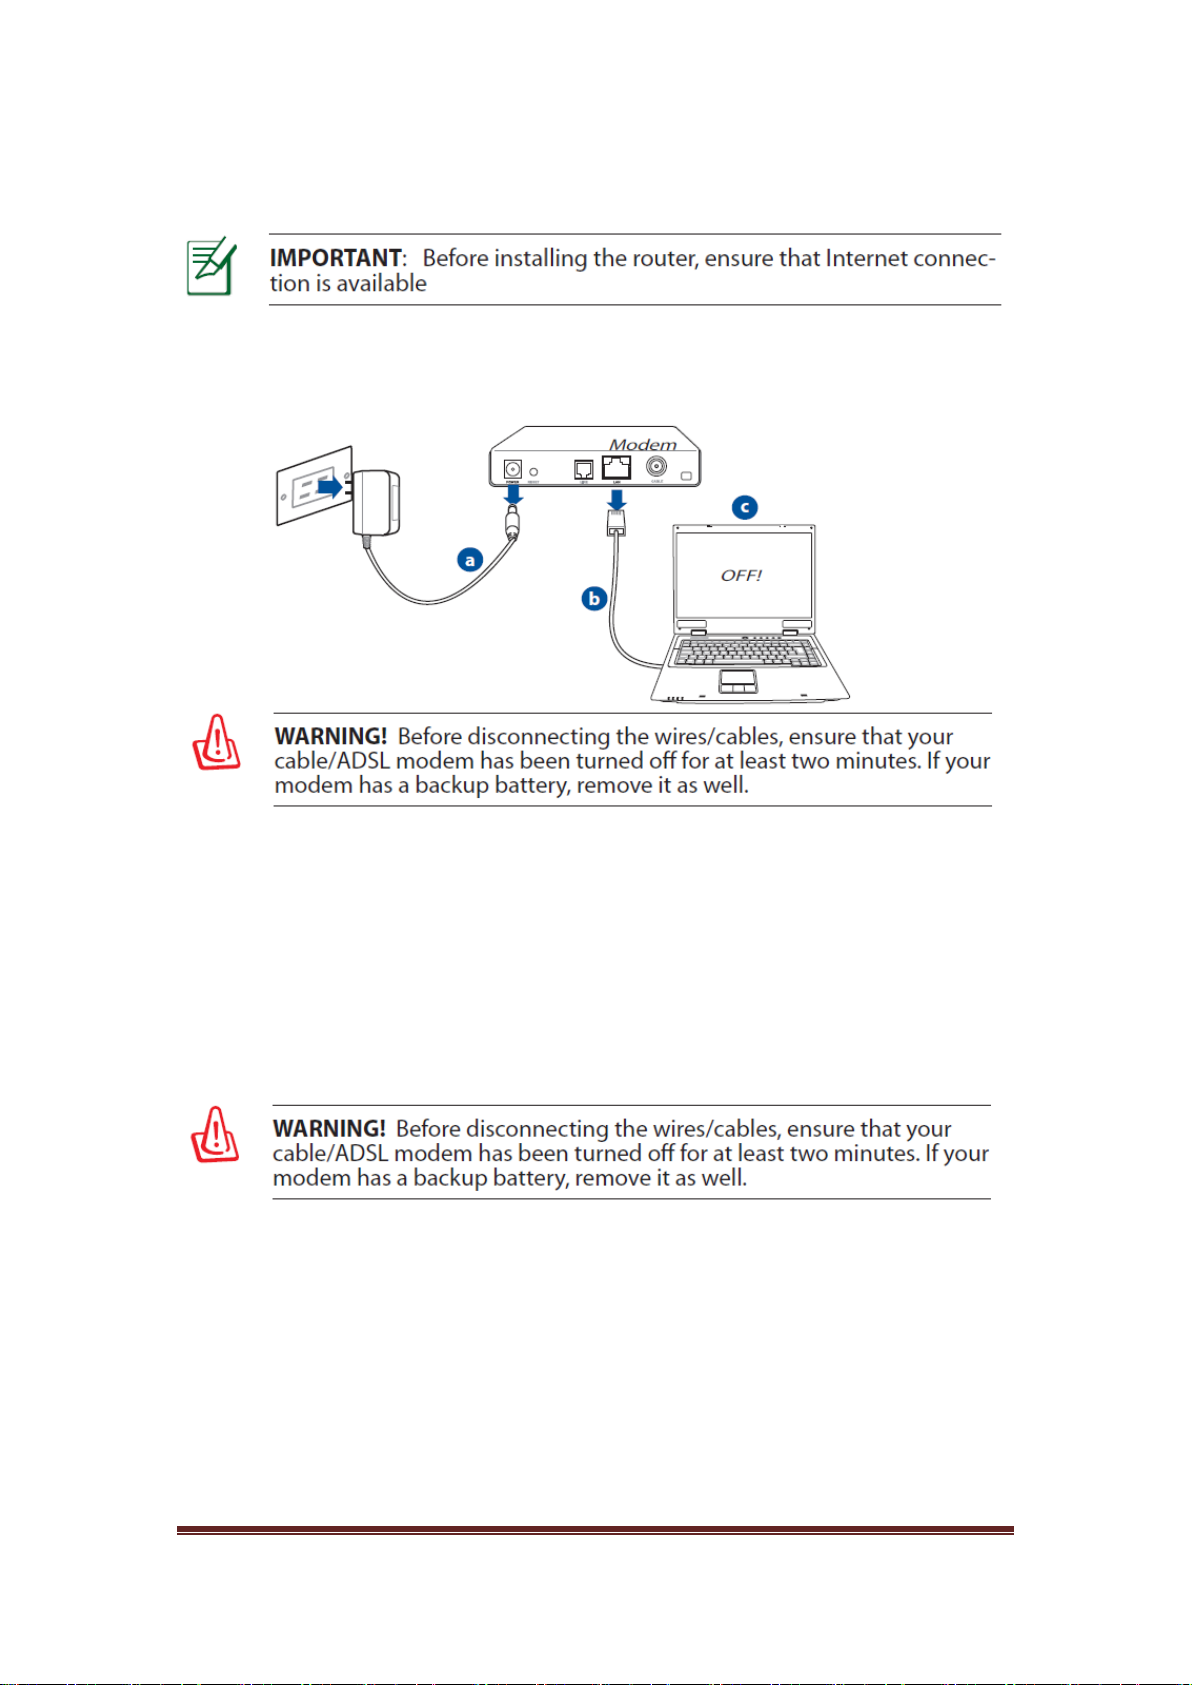
Installing your router
1. Prepare your modem
a、 Unplug the AC adapter from the power outlet and
disconnect it from your cable / ADSL modem
b、 Disconnect the network cable from your cable/ADSL
modem
c、 Reboot your computer (recommend).
Page 3
Page 4
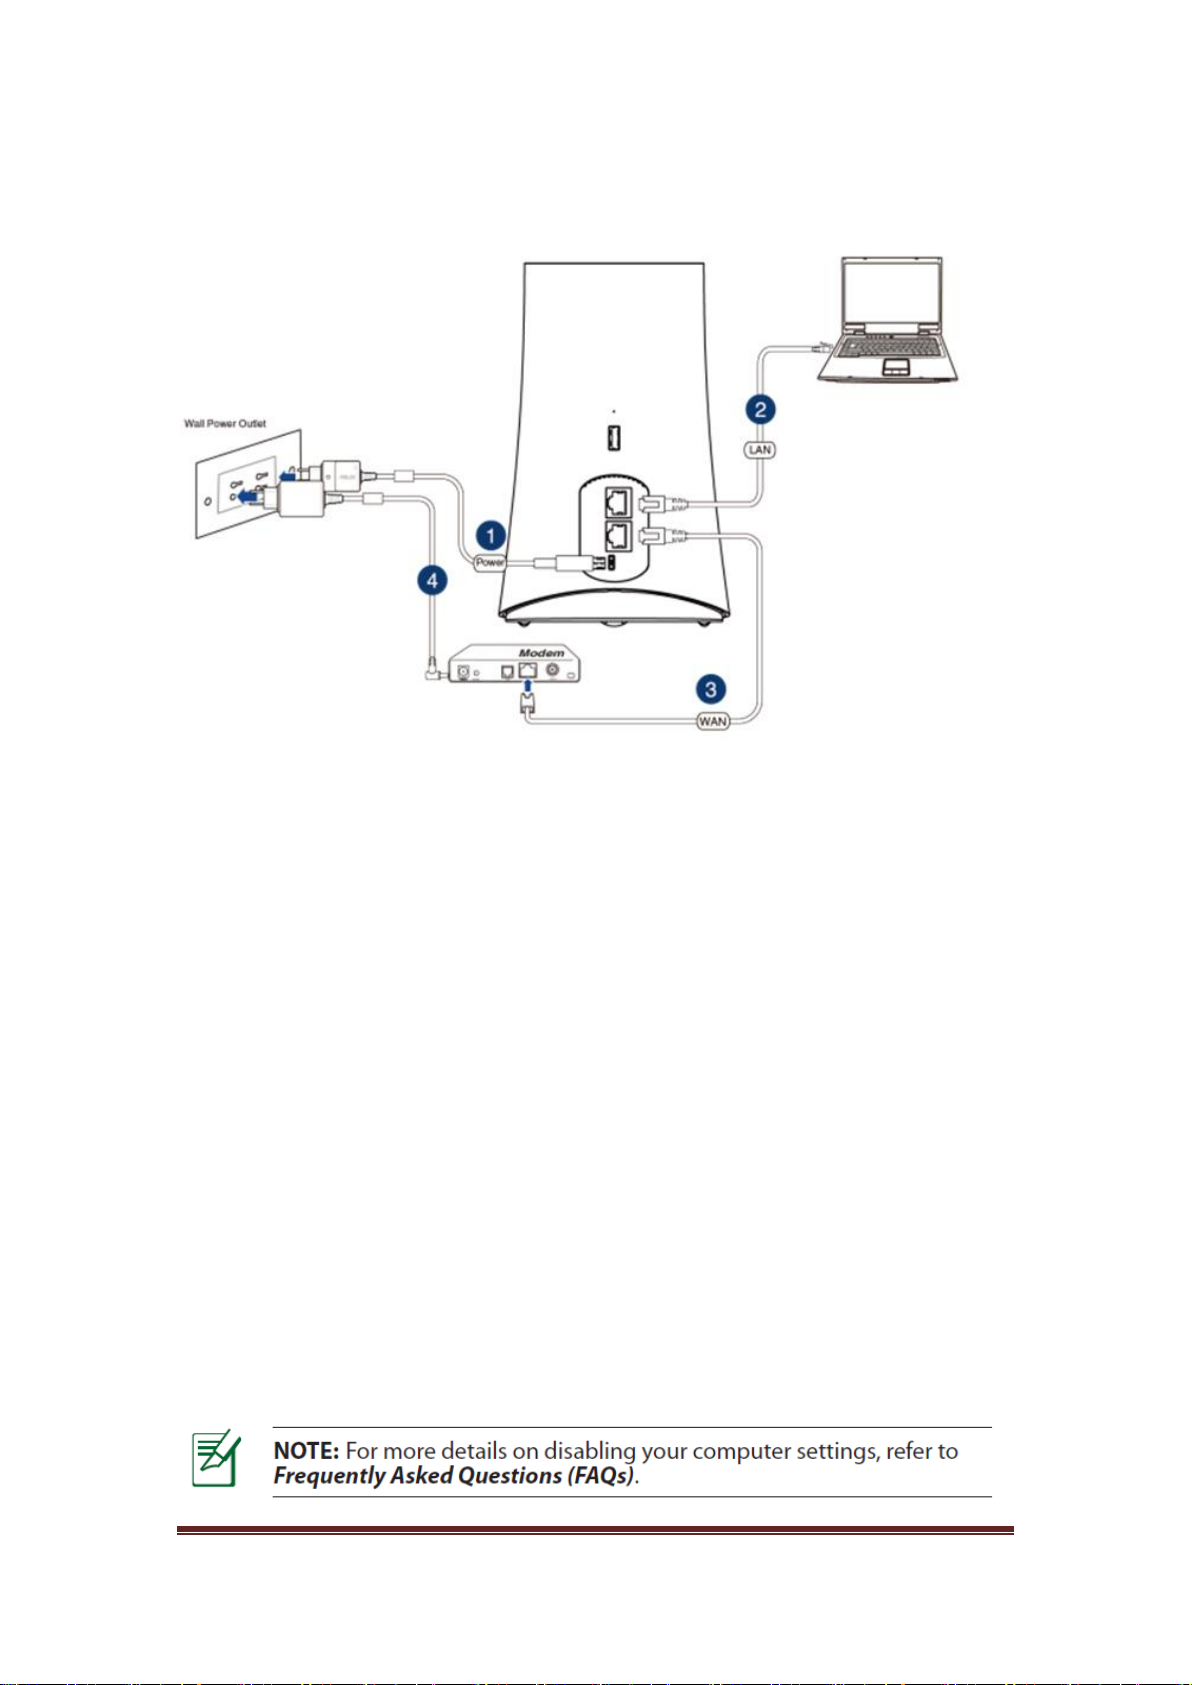
2. Set up your wireless environment
1. Insert your wireless router’s AC adapter to the DC-IN port
and plug it to a power outlet
2. Using another network cable, connect your modem to your
wireless router’s WAN port.
3. Insert your modem’s AC adapter to the DC-IN port and plug
it to a power outlet.
4. Using the bundled network cable, connect your computer to
your wireless router’s LAN port.
3. Disable some settings on your computer
a、 Disable the proxy server, if enabled.
b、 Set the TCP/IP settings to automatically obtain an IP
address.
c、 Disable the dial-up connection, if enabled.
Page 4
Page 5
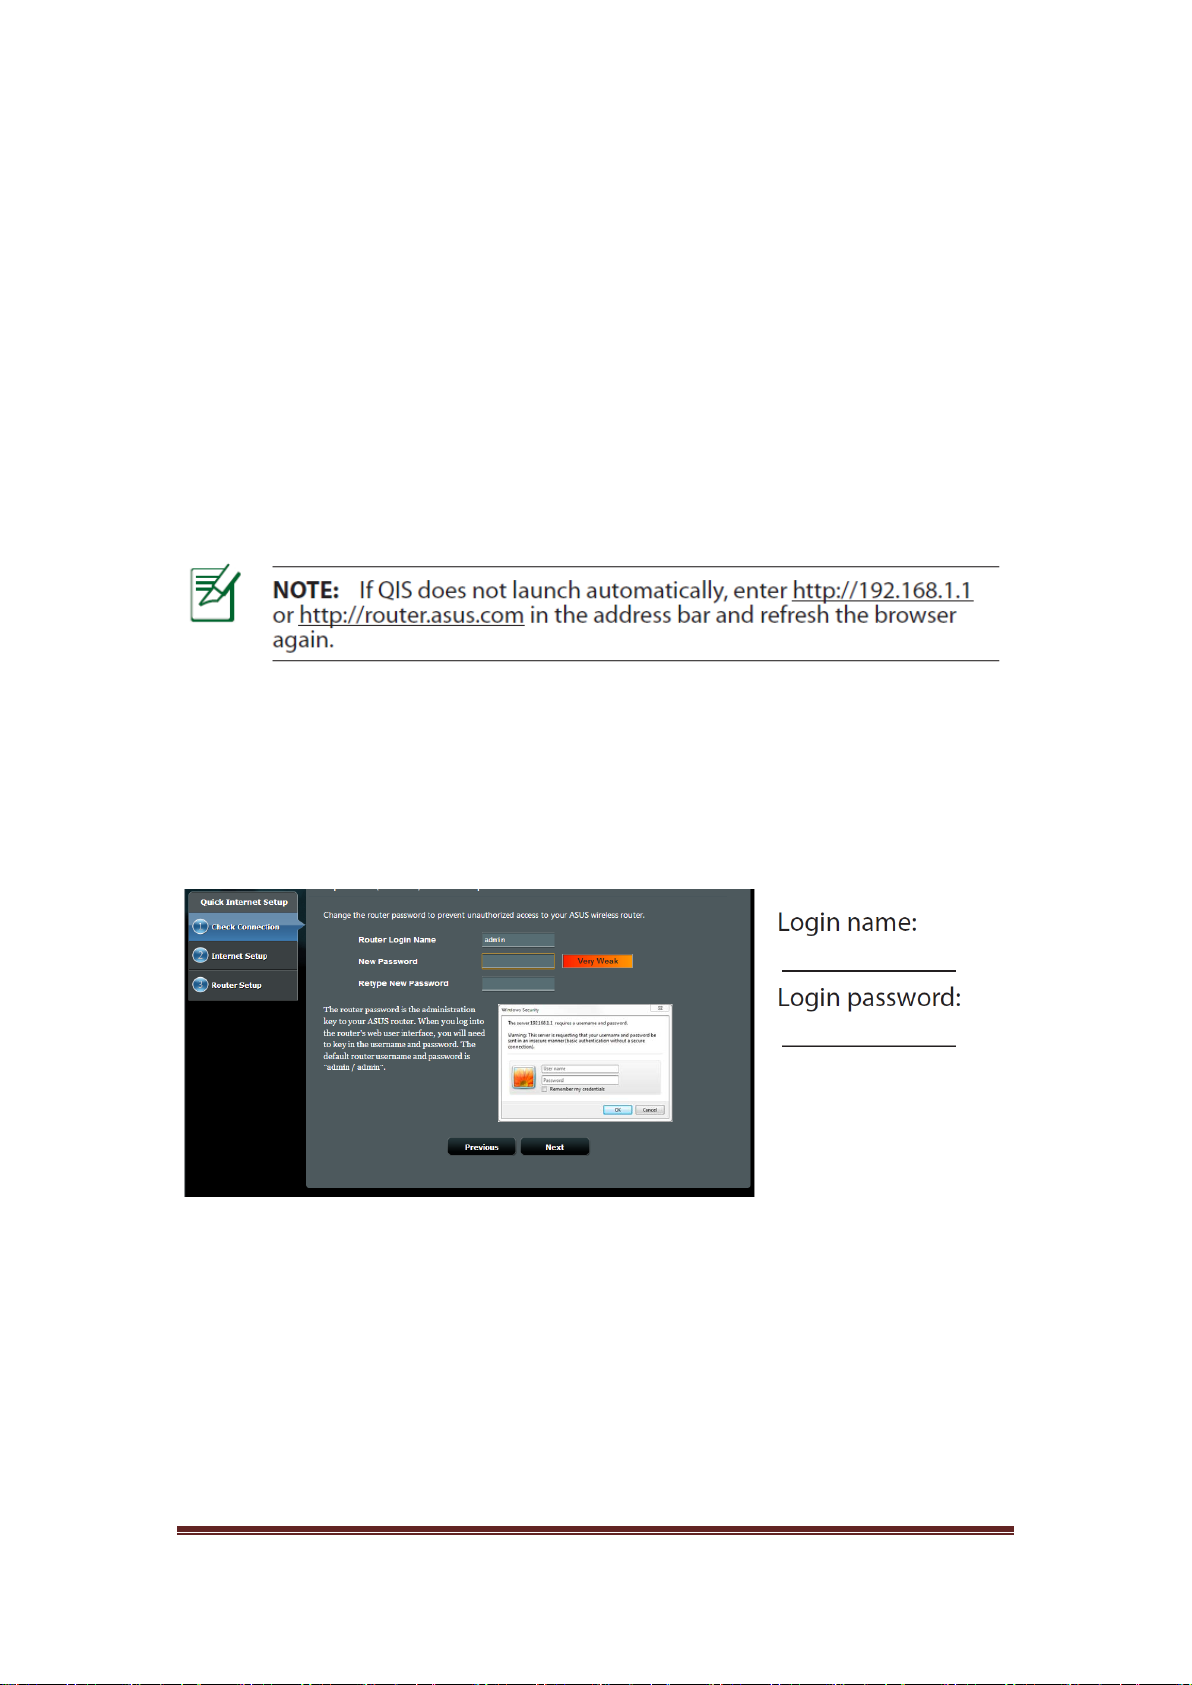
Setting up your router using the Quick Internet
Setup Wizard
To set up your router using QIS ((Quick Internet Setup):
1. Plug in the adapter at the back of your router. Ensure that the
LED in the front is on.
2. Launch your web browser such as Internet Explorer, Firefox,
Google Chrome, or Safari.
3. Assign your router login name and password and click Next. You
will need this login name and password to log into SRT-AC1900
to view or change the router settings. You can take note of your
router login name and password for future use.
4. The wireless router’s Quick Internet Setup (QIS) feature
automatically detects if your ISP connection type is Dynamic IP,
PPPoE, PPTP, L2TP, and Static IP. Please obtain the
necessary information about your Internet connection type from
your Internet Service Provider (ISP). If your connection type is
Dynamic IP (DHCP), QIS wizard will automatically direct you to
Page 5
Page 6

the next step.
5. Assign the network name (SSID) and security key for your
wireless connection. Click Apply when done.
6. Your Internet and wireless settings are displayed. Click Next to
continue.
7. Read the wireless network connection tutorial. When done, click
Finish.
Page 6
Page 7

Connect to the wireless network
To connect to the wireless network manually from your wireless
clients (notebook, tablet PC, smart phone and so on):
1. Enable the Wi-Fi function on your wireless client to scan for
available wireless networks.
2. Select the SSID or network name that you assigned to your
SRT-AC1900 network.
3. Enter the password and click Connect.
Managing the router via the ASUSWRT web
GUI
Your wireless router comes with the intuitive ASUSWRT web
graphical user interface. ASUSWRT allows you to easily configure
its various features through a web browser such as Internet
Explorer, Firefox, Safari or Google Chrome.
Page 7
Page 8

Frequently Asked Questions (FAQs)
1. After following the steps, I still cannot access the wireless
router’s web graphics user interface (web GUI) to configure the
wireless router settings.
Ensure that your PC's proxy settings are disabled and your PC'S IP
address is obtained from the DHCP server automatically. For
details on disabling the proxy settings, visit the ASUS Support site
at http://support.asus.com. For details on using the DHCP server to
obtain IP addresses automatically, refer to your Windows® or Mac
operating system’s help feature.
2. The client cannot establish a wireless connection with the router.
Out of Range:
• Put the router closer to the wireless client.
• Try to change the channel settings.
Authentication:
• Use wired connection to connect to the router.
• Check the wireless security settings.
• Press the Reset button at the rear panel for more than five
seconds.
Cannot find the router:
• Press the Reset button at the rear panel for more than five
seconds.
• Check the setting in the wireless adapter such as SSID and
encryption settings.
Page 8
Page 9

3. Cannot access the Internet via wireless LAN adapter.
• Move the router closer to the wireless client.
• Check whether the wireless adapter is connected to the correct
wireless router.
• Check whether the wireless channel in use conforms to the
channels available in your country/area.
• Check the encryption settings.
• Check if the ADSL or Cable connection is correct.
• Retry using another Ethernet cable.
4. If the ADSL “LINK” light blinks continuously or stays off, Internet
access is not possible - the Router is unable to establish a
connection with the ADSL network.
• Ensure that all your cables are all properly connected .
• Disconnect the power cord from the ADSL or cable modem, wait
a few minutes, then reconnect the cord.
• If the ADSL light continues to blink or stays OFF, contact your
ADSL service provider.
5. Network name or encryption keys are forgotten.
• Try setting up the wired connection and configuring the wireless
encryption again.
• Press the Reset button of the wireless router for more than five
seconds.
• Factory default settings:
Page 9
Page 10

6. Where can I find more information about the wireless router?
• User Manual in the support CD
• Online FAQ site: http://support.asus.com/faq
• Technical Support site: http://support.asus.com
• Customer Hotline: Refer to the Support Hotline in this Quick Start
Guide
Page 10
Page 11

ASUS Recycling/Takeback Services
ASUS recycling and takeback programs come from our
commitment to the highest standards for protecting our
environment. We believe in providing solutions for you to be able to
responsibly recycle our products, batteries, other components, as
well as the packaging materials. Please go to
http://csr.asus.com/english/Takeback.htm for the detailed recycling
information in different regions.
REACH
Complying with the REACH (Registration, Evaluation, Authorisation,
and Restriction of Chemicals) regulatory framework, we published
the chemical substances in our products at ASUS REACH website
at http://csr.asus.com/english/index.aspx
Federal Communications Commission Statement
Federal Communications Commission Statement
This device complies with Part 15 of the FCC Rules. Operation is
subject to the following two conditions:
• This device may not cause harmful interference.
• This device must accept any interference received, including
interference that may cause undesired operation.
This equipment has been tested and found to comply with the limits
for a class B digital device, pursuant to part 15 of the FCC Rules.
These limits are designed to provide reasonable protection against
harmful interference in a residential installation.
This equipment generates, uses and can radiate radio frequency
energy and, if not installed and used in accordance with the
instructions, may cause harmful interference to radio
communications. However, there is no guarantee that interference
will not occur in a particular installation. If this equipment does
cause harmful interference to radio or television reception, which
can be determined by turning the equipment off and on, the user is
encouraged to try to correct the interference by one or more of the
following measures:
• Reorient or relocate the receiving antenna.
• Increase the separation between the equipment and receiver.
• Connect the equipment into an outlet on a circuit different from
that to which the receiver is connected.
• Consult the dealer or an experienced radio/TV technician for help
The operation frequency of the device is in the 5150-5250 MHz
Page 11
Page 12

band is for indoor use only.
WARNING!
Any changes or modifications not expressly approved by
the party responsible for compliance could void the user’s authority
to
operate the equipment.
Prohibition of Co-location
This device and its antenna(s) must not be co-located or operating
in conjunction with any other antenna or transmitter.
IMPORTANT NOTE:
Radiation Exposure Statement: This equipment complies with FCC
radiation exposure limits set forth for an uncontrolled environment.
End users must follow the specific operating instructions for
satisfying RF exposure compliance. To maintain compliance with
FCC exposure compliance requirement, please follow operation
instruction as documented in this manual.
WARNING!
This equipment must be installed and operated in accordance with
provided instructions and the antenna(s) used for this transmitter
must be installed to provide a separation distance of at least 20 cm
from all persons and must not be co-located or operating in
conjunction with any other antenna or transmitter.
Page 12
Page 13

Canada, Industry Canada (IC) Notices
This Class B digital apparatus complies with Canadian ICES-003
and RSS-210.
Operation is subject to the following two conditions: (1) this device
may not cause interference, and (2) this device must accept any
interference, including interference that may cause undesired
operation of the device.
Radio Frequency (RF) Exposure Information
The radiated output power of the ASUS Wireless Device is below
the Industry Canada (IC) radio frequency exposure limits. The
ASUS Wireless Device should be used in such a manner such that
the potential for human contact during normal operation is
minimized.
This device has been evaluated for and shown compliant with the
IC Specific Absorption Rate (“SAR”) limits when installed in specific
host products operated in portable exposure conditions
This device has been certified for use in Canada. Status of the
listing in the Industry Canada’s REL (Radio Equipment List) can be
found at the following web address:
http://www.ic.gc.ca/app/sitt/reltel/srch/nwRdSrch.do?lang=eng
Additional Canadian information on RF exposure also can be found
at the following web:
http://www.ic.gc.ca/eic/site/smt-gst.nsf/eng/sf08792.html
Canada, avxs d’Industry Canada (IC) Cet appareil numerique de
classe B est conforme aux normes canadiennes ICES- 003 et
RSS-210.
Son fonctionnement est soumis aux deux conditions suivantes : (1)
Page 13
Page 14

cet appareil ne doit pas causer d’interference et (2) cet appareil doit
accepter toute interference, notamment les interferences qui
peuvent a ecter son fonctionnement.
Informations concernant l’exposition aux frequences radio (RF)
La puissance de sortie emise par l’appareil de sans l ASUS est
inferieure a la limite d’exposition aux frequences radio d’Industry
Canada (IC). Utilisez l’ appareil de sans l ASUS de facon a
minimiser les contacts humains lors du fonctionnement normal.
Ce peripherique a ete evalue et demontre conforme aux limites
SAR (Speci c Absorption Rate – Taux d’absorption speci que) d’IC
lorsqu’il est installe dans des produits hotes particuliers qui
fonctionnent dans des conditions d’exposition a des appareils
portables Les antennes a distance sont au moins 20 centimetres
ducorps d'une personne.
Ce peripherique est homologue pour l’utilisation au Canada. Pour
consulter l’ entree correspondant a l’appareil dans la liste
d’equipement radio (REL – Radio Equipment List) d’Industry
Canada rendez-vous sur:
http://www.ic.gc.ca/app/sitt/reltel/srch/nwRdSrch.do?lang=eng
Pour des informations supplementaires concernant l’exposition aux
RF au Canada rendezvous sur :
http://www.ic.gc.ca/eic/site/smt-gst.nsf/eng/sf08792.html
Prohibition of Co-location
This device and its antenna(s) must not be co-located or operating
in conjunction with any other antenna or transmitter except in
accordance with FCC multi-transmitter product procedures.
Safety Information
To maintain compliance with FCC’s RF exposure guidelines, this
equipment should be installed and operated with minimum distance
20cm between the radiator and your body. Use on the supplied
antenna.
Declaration of Conformity for R&TTE directive 1999/5/EC
Essential requirements – Article 3
Protection requirements for health and safety – Article 3.1a
Testing for electric safety according to EN 60950-1 has been
conducted. These are considered relevant and sufficient.
Protection requirements for electromagnetic compatibility – Article
Page 14
Page 15

3.1b
Testing for electromagnetic compatibility according to EN 301
489-1 and EN 301 489-17 has been conducted. These are
considered relevant and sufficient.
Effective use of the radio spectrum – Article 3.2
Testing for radio test suites according to EN 300 328 & EN 301 893
have been conducted.
These are considered relevant and sufficient.
Operate the device in 5150-5250 MHz frequency band for indoor
use only.
Declaration of Conformity for R&TTE directive 1999/5/EC
Essential requirements – Article 3
Protection requirements for health and safety – Article 3.1a
Testing for electric safety according to EN 60950-1 has been
conducted. These are considered relevant and sufficient.
Protection requirements for electromagnetic compatibility – Article
3.1b
Testing for electromagnetic compatibility according to EN 301
489-1 and EN 301 489-17 has been conducted. These are
considered relevant and sufficient. Effective use of the radio
spectrum – Article 3.2 Testing for radio test suites according to EN
300 328 & EN 301 893 have been conducted. These are
considered relevant and sufficient. The operation frequency
of the device is in the 5150-5250 MHz band is for indoor use only.
CE Mark Warning
This is a Class B product, in a domestic environment, this product
may cause radio
interference, in which case the user may be required to take
adequate measures.
Operation Channels: CH1~11 for N. America; Ch1~14 for Japan;
CH1~13 for
Europe (ETSI).
This equipment may be operated in AT, BE, CY, CZ, DK, EE, FI,
FR, DE, GR, HU, IE, IT, LU, MT, NL, PL, PT, SK, SL, ES, SE, GB,
IS, IS, LI, NO, CH, BG, RO, TR.
Page 15
Page 16
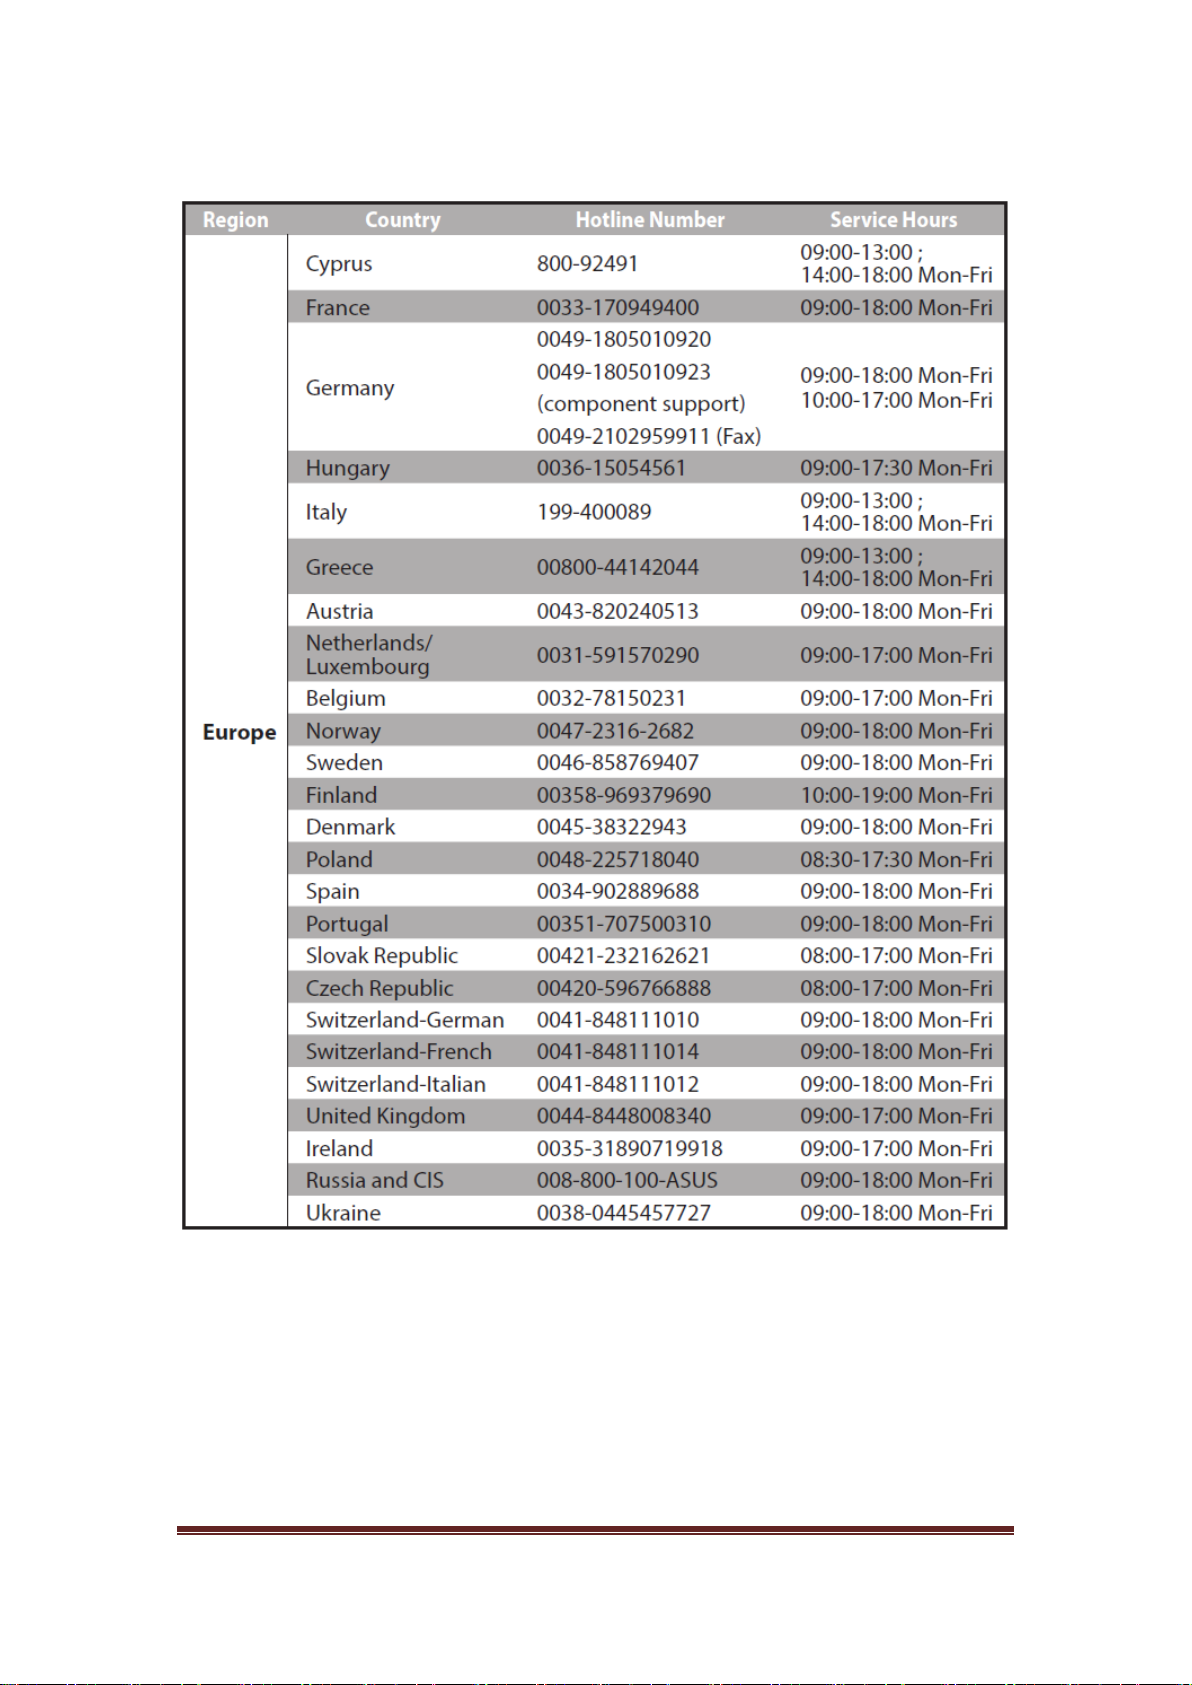
Networks Global Hotline Information
Page 16
Page 17

Page 17
Page 18

Page 18
Page 19

Page 19
Page 20

Page 20
 Loading...