

Page 1
Quick
Start Guide
Quick
Start Guide
R700
E3453
Page 2
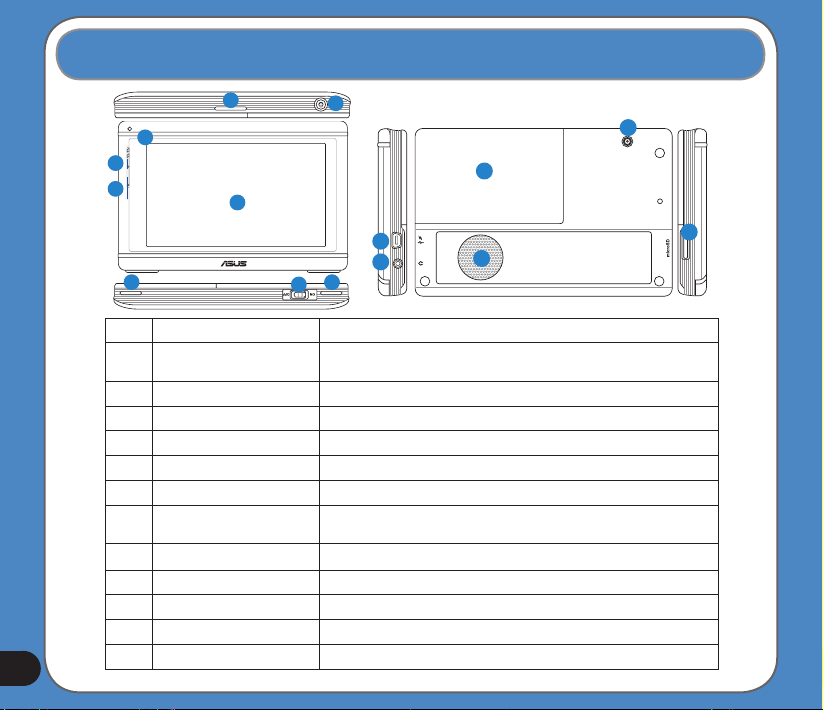
Layout Features
1
4
5
6
2
1
1 Car kit groove Allows you to secure the device while driving
2 Display Displays information and allows you to manipulate items and execute menus by
3 Sleep Mode Button Press to turn on the device, or to enter into sleep mode
4 Light Sensor Automatically adjusts the backlight according to the light in the environment
5 Charging LED Red- charging, Green- full charged
6 Microphone Microphone for handsfree function
7 Main Power switch Turns the main power on/off
8 External Antenna port Connects to an external antenna for better signal performance (the external
9 Micro SD Slot Insert the external Micro SD memory card to this slot
10 Speaker Allows you to listen to music, the navigation voice, and system warning
11 Audio Jack Allows you to connect headsets or two-channel speakers
12 Mini USB Allows you to charge the device or connect to a PC via a USB cable
2
13 Battery Battery cover
3
1
7
tapping the screen.
antenna is optional)
8
13
12
11
10
9
Page 3
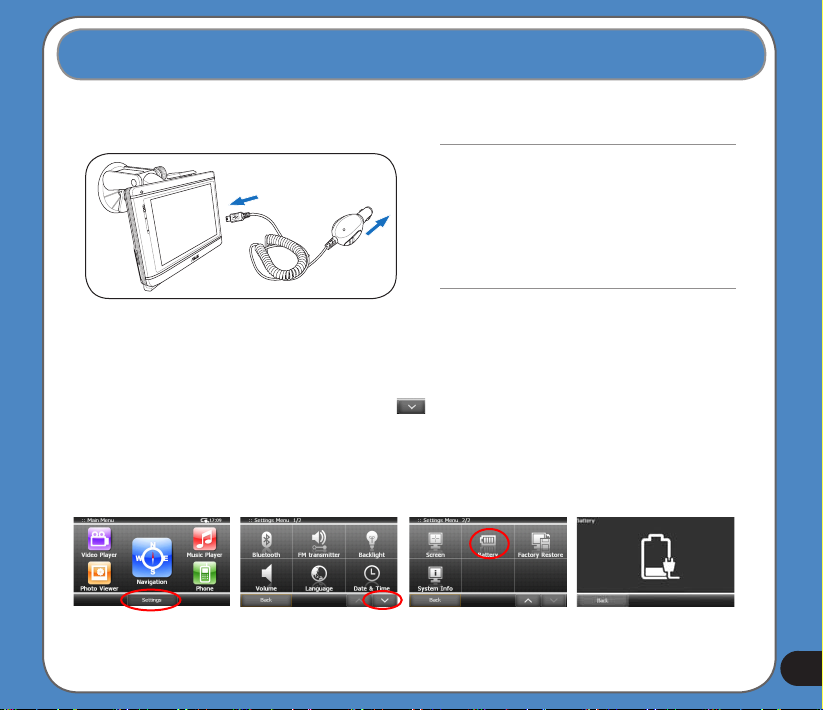
Charging the Battery
You can charge the device from a car charger kit. Plug the cable to the mini-USB port on the
right side of the device.
NOTE:
• Charge the battery before using the device.Charge the battery before using the device..
Car charger kit
To check how much battery power remains:
1. �rom the main menu, tap�rom the main menu, tap Settings (�igure 1).
2. TheThe Sub-menu Settings appears. Tap to display more options (�igure 2).
3. Tap the battery icon (�igure 3).
The battery screen appears and displays a battery showing the battery power that
remains (�igure 4).
Figure 1 Figure 2 Figure 3 Figure 4
• While charging, the power LED lights up in red.While charging, the power LED lights up in red.
When the battery is fully charged, the power LED
turns to green.
• Charging may take several hours.Charging may take several hours.
• You can use the device while charging. However,You can use the device while charging. However,
the device takes much less time to be fully charged
in sleep mode.
3
Page 4
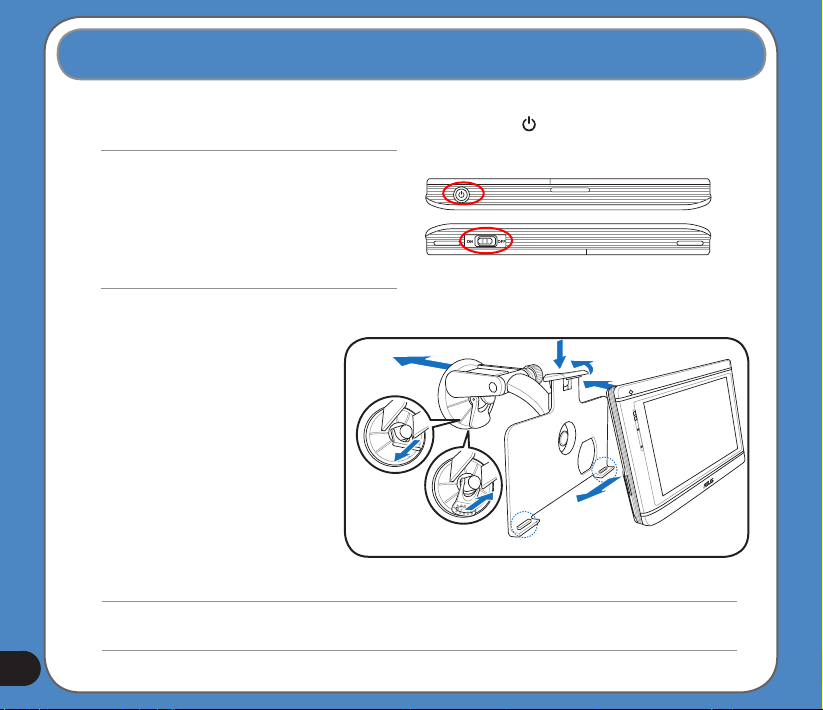
Install the Car Kit and Turn on the Device
To turn on the device, set the main power switch (at the bottom of the device) to ON. To enter
into/wake up from sleep mode, press the Sleep Mode Button ( ) on the top of the device.
NOTE:
•
If you press the Sleep Mode button when the
device is on, it enters into sleep mode.
•
When the device is on, it takes longer time for
the battery to be fully charged. When the device
is in sleep mode, the battery can be fully charged
quickly
.
To install the car kit:
1. Attached the cupula (1) to the
windshield inside your car.
2. Press the lever (2a) to secure
the cupula on the windshield
surface.
3. Adjust the angle of the
gooseneck, then secure it by
fastening screwcap (3).
4. Carefully place and slide the
device into the cradle (4).
NOTE:
Rise the lever (2b) to release the cupula from the windshield
4
Sleep Mode Button
.
Main power switch
1
3
4
2
2a
4
2b
.
Page 5
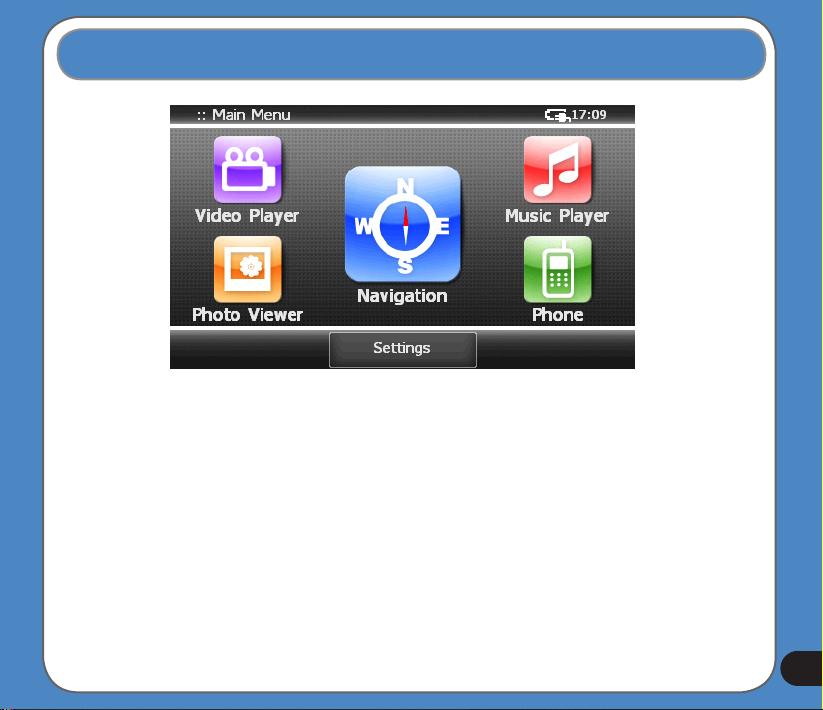
Main Menu and Basic Settings
The
Main Menu
• Tap Navigation to enter the navigation system.
• Tap Video Player to play videos.
• Tap Music Player to play music.
• Tap Photo Viewer to view photos.
• Tap Phone to set and use bluetooth and phone features.
• Tap Settings to adjust the device settings (see gures on the next page).
appears after you turn on the device. �rom the
Main Menu
, you can:
5
Page 6

The Settings Menu appears when you tap Settings from the Main Menu. Tap to
display more options.
• The System Info button allows you to view the system information.
• The Language button allows you to choose the language for the text.
• The Backlight button allows you to adjust the LCD brightness. It provides two
adjustment modes, Fix backlight brightness and Adjust by environment brightness.
R700 has Light Sensor function that allows you to adjust LCD brightness for either a
lighter or a darker environment.
• The Date & Time button allows you to set the date and time for your device.
• The Bluetooth button allows you to connect R700 to a cellphone.
• The Volume button allows you to adjust/mute the sound for the device and phone calls.
• The Screen button allows you to calibrate the LCD screen.
• The Battery button allows you to view battery status, see page 3 for detailed
information.
• The FM transmitter allows you to transmit navigation voice instruction and music/video
6
sounds to your car audio system through the �M radio.
Page 7

Multi-Media Features
R700 allows you to play music (mp3 and wma les), view photos (jpg. and bmp. les) and
videos (wmv. les). Tap the respective icons from the main menu to launch the applications.
Main Menu
Photo
Viewer
Music
Player
Video
Player
Playing music
back to
the main
menu
launch
the
playlist
circulate
(playlist)
play
randomly
adjust
the
volume
Viewing photos
back to
the main
menu
tap to view
the photos
as a slide
show
page
up
page
down
tap to choose the
default memory
where the photos
are stored
Playing movies
back to
the main
menu
launch
the
playlist
adjust
the
volume
the name
of the
movie
time
remains
the
length
of the
movie
7
Page 8

Using Navigation
The Navigation Menu
When ASUS GO is started, the Navigation Menu appears. �rom here you can reach all parts
of ASUS GO.
• Tap Find Address to specify an address as your destination.
• Tap Recent Places for a list of recent destinations.
• Tap Find POI to select one of the stored Points of Interest.
• Tap My Favourites for one of your favourite destinations.
The following actions are also possible in the Navigation Menu:
• Tap Map to browse the map
• Tap Settings to customise the way ASUS GO works.
• Tap Exit to stop navigation, and exit ASUS GO.
Operating modes
ASUS GO can operate in two different modes:
8
• Normal Mode - designed for easy operation when performing frequent tasks
Page 9

• Expert Mode - designed for performing complex tasks and for advanced settings This
Quick Start Guide covers actions in Normal Mode. See the online User Manual for
detailed instructions in both modes.
To switch to Expert Mode, tap Settings, then tap Expert mode. You can switch back from
Expert Mode to Normal Mode in a similar way.
Find an address
1. In the Navigation Menu tap Find Address.
2. Select the destination country. Tap the rst line on the list that shows the country you
are currently in (or searched for recently). On the next screen, select the country from
the list. In some countries, you are also asked to select the state.
9
Page 10

10
3. Select the destination city. Tap the second line on the list that shows the city you are
currently in (or searched for recently). Use the virtual keyboard to type the name of the
city. Once the matching city names t on one page, the list of results will be displayed
automatically. When typing, tap Done any time to display a full list of matching cities
immediately.
• Alternatively, tap the icon next to the city name to select a city from your search history.
4. Enter the street name. Tap the line that says <Enter Street Name> and type the name
of the destination street. �ollow the same method as for selecting the city.
5. Enter the house number. Tap the line that says <House Number> and type the house
number. You can also:
• Tap City Center after selecting the city if you do not have a specic address on your
mind,
• Tap Street Center after selecting the street if you are just looking for a street and
not a specic address, or
• Tap Intersection to nd the corner of two streets.
Your destination will be shown on the map, and the Cursor menu will appear with the
following choices:
• Tap Navigate To to select the address as your destination and start navigating there.
• Tap Add to �avorites to save the address as one of your favourite destinations.
Page 11

• Tap Map to browse the map without planning a route.
• Tap Info to display the address with its geographical coordinates and nearby POIs.
Find a POI
1. To select a Point of Interest, tap Find POI in the Navigation Menu. This will take you
to the POI Search Center.
2. Tap Around GPS, Around Cursor, Around Destination or Along Route to dene the
reference point around which you want to search for POIs.
3. Enter the list of POIs in one of the following ways:
• Tap one of the POI groups to open a list of its subgroups, then tap the needed subgroup to enter the list of POIs. Use the left and right arrow buttons to see additional
POI groups.
• �or a complete list of POIs near the selected reference point, tap All.
11
Page 12

12
4. A list of POIs is displayed, sorted by their distance from the reference point.
• Tap Search to narrow the list by entering a part of the POI name.
• To see the name and address of additional POIs, tap the left and right arrow but-
tons.
• Tap By Name to list POIs in alphabetical order instead of their distance.
5. Tap the name of the POI you were looking for. The location of the selected POI will be
displayed on the map.
• Tap Navigate To to select the POI as your destination and start navigating there.
• Tap Add to Favorites to save the POI as one of your favourite destinations.
• Tap Info to display detailed information on the POI.
Map and Navigation
ASUS GO can display two types of maps: 2D map that looks like a conventional road map
and works best for browsing 3D view that shows streets as well as buildings or landmarks
(where available), and works best for navigation
• Tap the 2D or 3D icon to change between the views.
• To return to the Navigation Menu, tap the Menu icon.
• Tap the Cursor icon to open the Cursor menu and navigate to the current position of
the cursor.
Page 13

• Zoom in and out by tapping the corresponding buttons. In 3D view, you can also tilt and
rotate the view with the arrow buttons.
In 2D map mode, you can also modify the planned route by tapping Detour. If you want to
avoid a certain route, you can set it here.
While navigating, a thick line shows the recommended route, and an arrow represents your
current position.
A pictogram indicating the next manoeuvre is displayed on the left side along with its
distance.
The left panel also shows information about your route, including the planned arrival date,
the distance to your destination, and the speed at which you are driving.
�ull voice guidance is provided to enable safe navigation without having to look at the
screen while driving.
13
Page 14

Setting Bluetooth and Using the Phone
The Phone function allows the hands-free communication through a bluetooth connection to
your phone. Click the Phone button from the main menu to launch the Phone program.
Main menu
To connect R700 to your cellphone:
1. Tap Dialer from the Phone Menu (�igure 1).
2. Tap Yes from the Connect to a Bluetooth handset rst screen.
The Bluetooth Device Found screen displays the devices (�igure 2).
4. Tap a device name.
A screen appears asking you to input the PIN number to your cellphone (�igure 3).
5. Input the PIN number to your cellphone.
Phone menu
14
Figure 1
Figure 2
Figure 3
Page 15

6. Tap the paired device name and tap Connect.
A screen appears showing the devices are connected after the bluetooth connection is
setup successfully
To make and receive calls:
1. Tap Dialer from the Phone Menu. The phone pad appears (�igure 1).
2. Dial the number and tap the green phone icon to call.
3. After talk, tap the red phone icon to end a call (�igure 2).
To receive a call, tap the green phone icon (�igure 3).
Figure 1 Figure 2 Figure 3
NOTE:
Before using the bluetooth and phone features of R700, make sure your cellphone has Bluetooth functions.
NOTE:
Some cellphones do not support the SMS and Contact functions of R700
NOTE:
�or more information, please see the full User Manual which is included in the support CD of your R700
NOTE:
The screens and procedures in this guide may not be exactly the same with the product in your hand, please
take them as reference only.
.
.
15
Page 16

Federal Communication Commission Interference Statement
This equipment has been tested and found to comply with the limits for a Class B digital device, pursuant to
Part 15 of the FCC Rules. These limits are designed to provide reasonable protection against harmful
interference in a residential installation. This equipment generates, uses and can radiate radio frequency
energy and, if not installed and used in accordance with the instructions, may cause harmful interference to
radio communications. However, there is no guarantee that interference will not occur in a particular
installation. If this equipment does cause harmful interference to radio or television reception, which can
be determined by turning the equipment off and on, the user is encouraged to try to correct the interference
by one of the following measures:
Reorient or relocate the receiving antenna.
Increase the separation between the equipment and receiver.
Connect the equipment into an outlet on a circuit different from that to which the receiver is
connected.
Consult the dealer or an experienced radio/TV technician for help.
FCC Caution: Any changes or modifications not expressly approved by the party responsible for
compliance could void the user's authority to operate this equipment.
This device complies with Part 15 of the FCC Rules. Operation is subject to the following two conditions: (1)
This device may not cause harmful interference, and (2) this device must accept any interference received,
including interference that may cause undesired operation.
 Loading...