

Page 1

Zoom
Allows you to change the maximum magnication allowed.
Self Timer
Sets the delay of shutter release to 5 or 10 seconds after you have pressed the
camera/shutter button.
Burst
Allows you to take 4 or 9 pictures in succession with one press of the camera/shutter button.
Frame
Allows you to set a frame.
NOTE: Ensure that you have set the screen resolution to 320 x 240 before setting frame.
Effect
The Effect option allows you to apply some effects to the subject. Select from the following conguration
options: Black-White, Negative, Sepia, and Solarize. Set to Normal for no effect.
Save to
Allows you to select the default storage for captured pictures.
NOTE: Prepare a microSD card before setting default storage to Storage Card.
Advanced
This option allows you to set the following: Filename prex format, Filename prex, File number, Date
and time stamp, Shutter sound, and Burst interval.
121
Page 2
Menu
Thumbnails
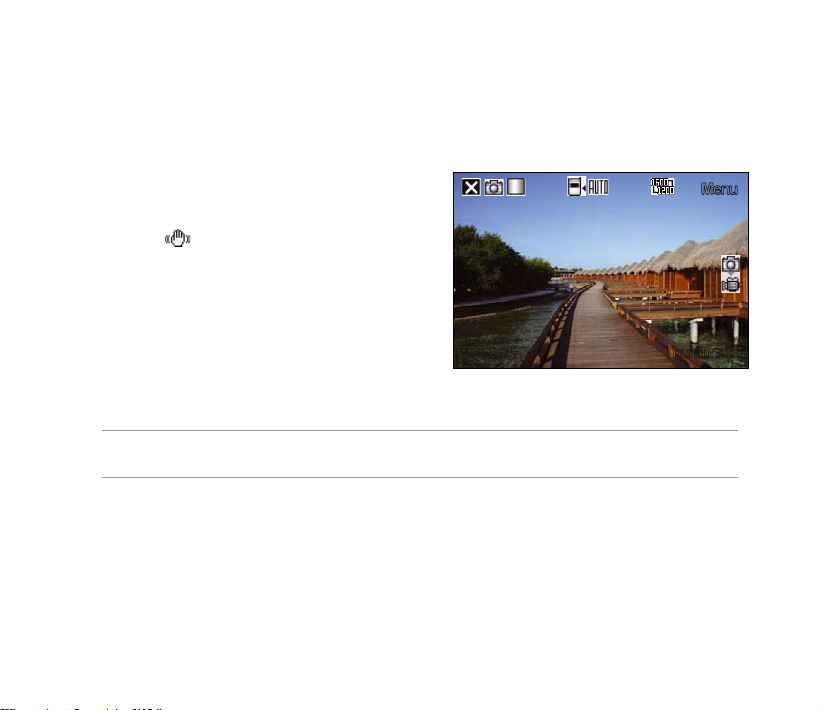
Taking photos
After launching the camera, your device is set to Camera mode by default. If set otherwise,
tap Menu > Change Mode > Camera Mode then tap Exit.
You can also tap the camera mode icon to set the camera mode.
To take a photo:
1. Aim your device at your subject then
press camera/shutter button.
2
. When the
device is stable.
3. Repeat steps 1 to 2 to take more photos.
NOTE: The image is automatically saved to the default storage location and can be viewed using the Pictures
and Videos application.
icon appears, ensure that your
122
Page 3

Video mode
The following describes the screen icons in Video mode:
Capture mode icon
Remaining video
recording time
Default storage icon
Effects icon
Video size icon
Tap to close camera
Recording indicator
Green: Ready
Red: Recording
Tap to zoom out
Tap to launch
video menu
Capture mode icons:
Camera mode
Video mode
Tap to zoom in
Tap to launch Pictures
and Videos
123
Page 4
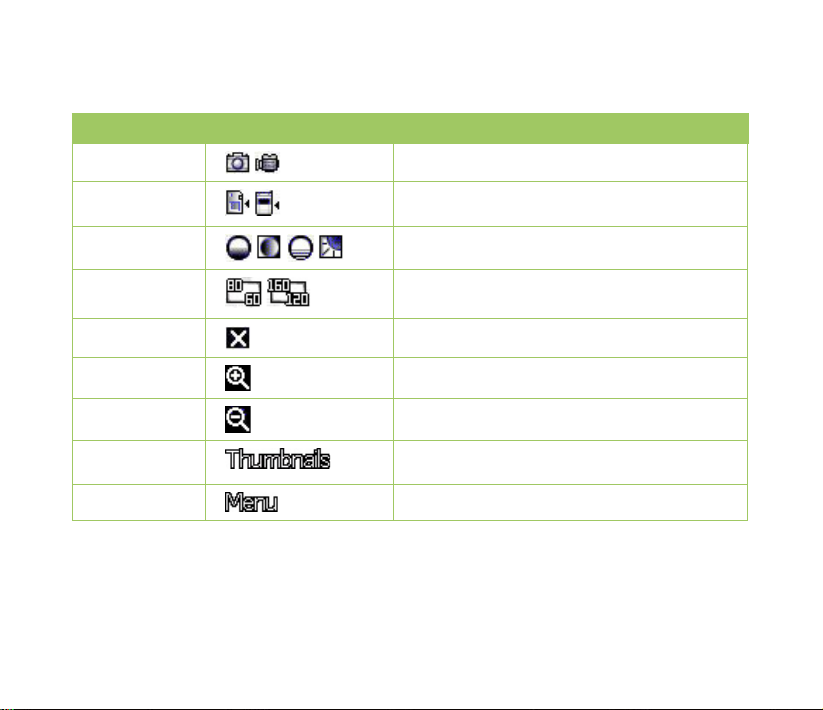
Video mode icons
Refer to the table below for the video mode icons.
Icon Description
Capture mode
Default storage
Effects
Video Size
Exit
/
/
/ / /
/
Indicates the current capture mode.
Indicates default storage for captured images and
videos clips.
Indicates the effects used.
Shows the resolution used.
Tap to exit video.
124
Zoom In
Zoom Out
Thumbnails
Menu
Tap to zoom in view of subject on screen.
Tap to zoom out view of subject on screen.
Tap to launch Pictures and Video application and
play your video.
Tap to launch video menu options.
Page 5

Video options menu
The video options menu allows you to change various video and playback settings.
To launch video options menu:
1. Tap Menu from the video screen.
2
. From the shortcut menu, tap an icon to display contents.
Change Mode
The Change Mode option allows you to set your device into Camera or Video capture mode.
Zoom
Allows you to change the maximum magnication allowed.
Video Size
Allows you to set the frame size of video.
Save to
Allows you to select the default storage location for captured pictures.
NOTE: Prepare a microSD card before setting default storage to Storage Card.
Effect
The Effect option allows you to apply some effects to the subject. Select from the following conguration
options: Black-White, Negative, Sepia, and Solarize. Set to Normal for no effect.
Advanced
This option allows you to set the following: Video le type, Filename prex format, Filename prex,
File number, and Enable or disable audio when recording.
125
Page 6

Recording videos
Set the device to video capture mode to record videos.
To set video mode:
• Tap Menu > Change Mode > Video Mode then tap Exit.
•
Tap the video mode icon on the screen.
To record video:
1.
Aim your device at your subject then press camera/shutter button to begin recording. The record
indicator turns from green to red while video is recording.
2
. Press the camera/shutter button again to stop recording.
NOTES:
• The video clip is automatically saved to the default storage location.
• Use Windows Media Player Mobile to playback video clip in your device.
• Use Apple® QuickTime™ player, if you wish to play video clips in your computer. You can download
QuickTime™ installer from www.apple.com/quicktime.
126
Page 7

Viewing pictures and videos
Use the Pictures and Video Application to preview stored images and playback video clips.
Viewing pictures and videos
To view pictures and videos:
1. Tap
2. Tap the picture or video clip you want to see.
• To view pictures or launch video clips stored in microSD card, tap the folder list (labeled
My Pictures), and tap microSD Card.
•
picture thumbnail.
• To playback video clips in My Videos folder on your device, tap My Videos then tap
video thumbnail.
Editing pictures
To edit pictures:
1. Tap
2. Tap Menu > Make Big Face.
3.
Refer to the tool icons and their descriptions on the next page.
> Programs > Pictures & Videos.
To view pictures stored in My Pictures folder on your device, tap My Pictures then tap
> Programs > Pictures & Videos. Tap the picture you want to edit.
Edit the image.
127
Page 8
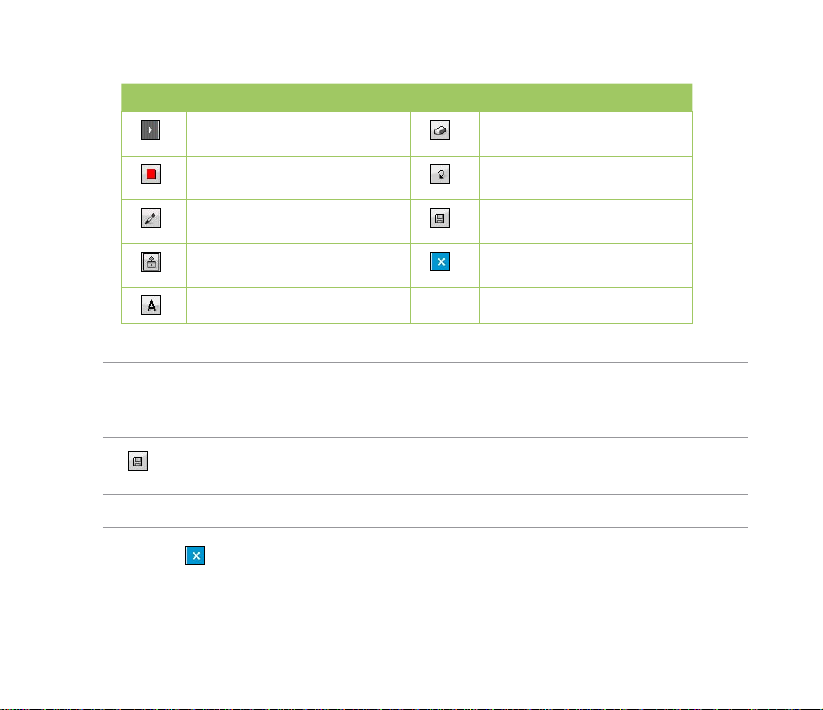
Tool bar
Icons Description Icons Description
Tap to hide the tool bar
Tap to select the color of your
editing stroke
Tap to select the size of the
pencil stroke
Tap to add some stamps in the
picture
Tap to add text
NOTES:
• This image editor function can only be applied to the pictures or photos with 320 x 240 resolution.
• The image bigger than 320 x 240 resolution will be zoomed into 320 x 240 resolution.
4. Tap to save the picture, then tap Yes to conrm.
NOTE: In this option, the original picture is replaced by the edited le.
You can also tap in the Tool bar and choose Save as to save the edited picture as another le name.
Tap to erase some parts in
the picture
Tap to undo editing
Tap to save the image
Tap to exit editing
128
Page 9
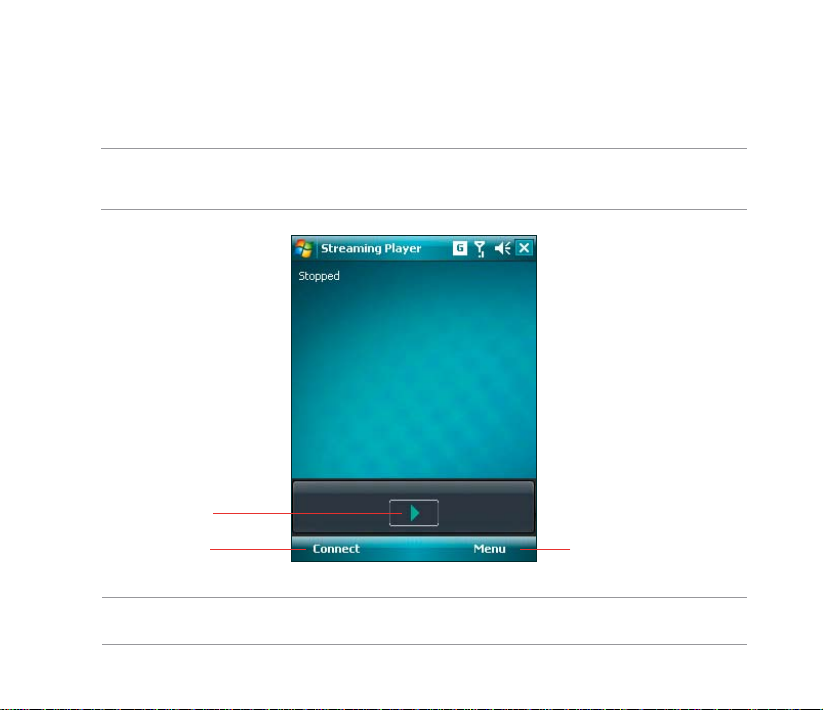
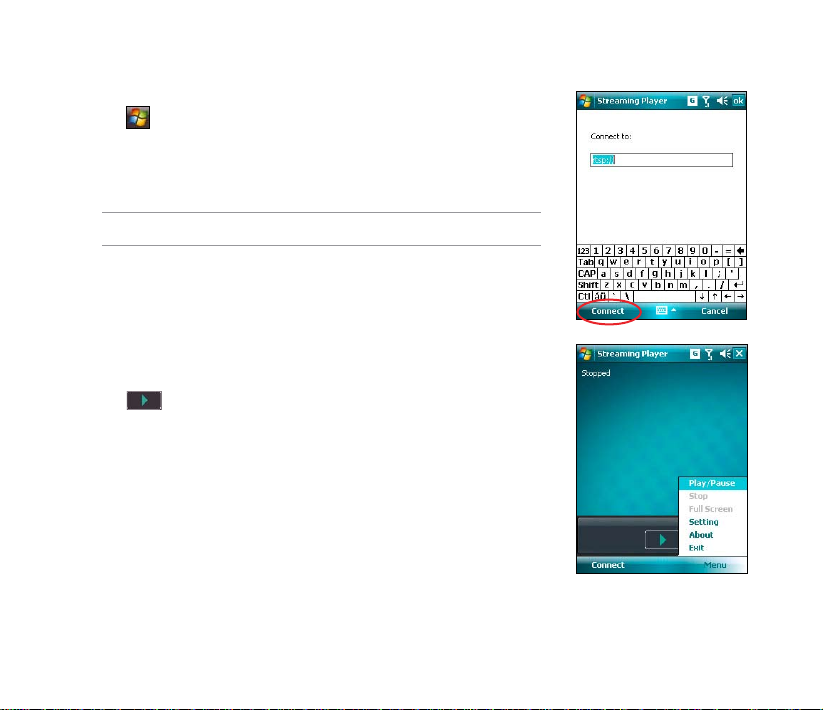
Streaming Player
Streaming Player allows you to play audio or video les streamed to your device from the Internet.
Supported formats include 3gp, 3g2, mp4, and sdp.
NOTE: Before using Streaming Player, ensure that you are connected to the Internet via Wi-Fi, or GPRS
connection. Refer to the sections on Wi-Fi, or GPRS in this user guide for activating any of these connections on
your device.
Tap to play a le
Tap to connect to an
rtsp:// URL website
NOTE: A Real Time Streaming Protocol (RTSP) website provides multimedia data streams such as audio or
video clips.
Tap to launch Menu
129
Page 10
Using the Streaming Player
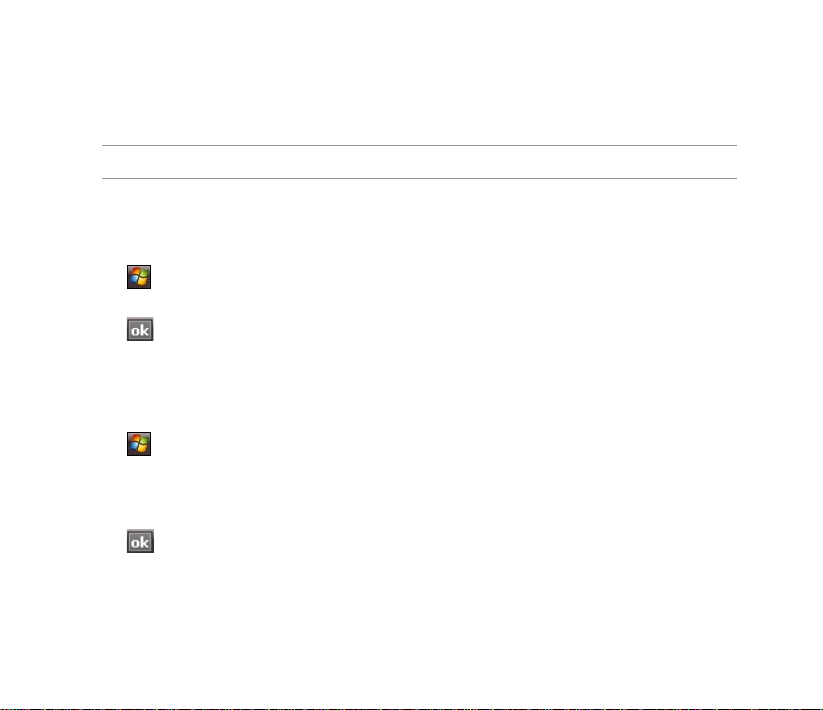
To play a streaming le:
1. Tap
2. Key in the web address then tap Connect.
3. Tap to play a streaming le from your preferred rtsp website.
You may also tap Menu to display the menu list and apply other
> Programs > Streaming Player, then tap Connect..
NOTE: Streaming Player only recognizes an rstp:// URL web address.
operations.
130
Page 11

Chapter 11
Business features
• Ur Time
• Remote Calendar
131
Page 12
Ur Time
Ur Time allows you to set the time and alarm at your current location as well set up the time for up to
four cities.
NOTE: Install Ur Time from the Bonus CD that comes with your device package.
Setting the time
To set the time:
1. Tap
2. Tap Menu > Time. Set the local time at your current location.
3.
Tap
Setting the alarm
To set the alarm:
1. Tap
2. Tap Menu > Alarm, then tap New to add a new alarm, or select an existing alarm and tap Edit.
3.
Set the alarm details. To activate anti-snooze feature, check the Snooze box and set snooze
4
. Tap
> Programs > Ur Time.
when nished.
> Programs > Ur Time.
interval.
when nished.
132
Page 13

Setting the World Clock
To set the World Clock:
1. Tap
2. Tap Menu > World Clock. You can set the time for up to four cities.
3.
Tap
> Programs > Ur Time.
. The World Clock appears on the Today screen.
133
Page 14

Remote Calendar
Remote Calendar allows you to access your Google Calendar from your device. You can either view the
calendar or synchronize events and agenda with your Google Calendar in bidirectional way. Download
events from Google calendar, or upload events to Google Calendar with your device.
IMPORTANT:
• Obtain a Google account before using this function. Visit www.google.com/calendar to register for a Google
account.
• Ensure that your device is connected to the Internet via GPRS.
Synchronizing your calendar
Downloading events from Google Calendar
To download agenda or events form your Google Calendar:
1. Tap
2. Key in the username and password, then tap Sync to start
3.
When the calendar is synchronized successfully, a popup message
> Programs > Remote Calendar
synchronizing.
appears. Tap Yes to open the calendar or tap No to exit.
134
Page 15

Uploading events to Google Calendar
To upload new events or modied events to your Google Calendar:
1. Tap
> Calendar.
2. Select the event you want to upload to Google Calendar, then tap Menu > Upload to Google.
Setting the Remote Calendar
The Remote Calendar allows you to set the synchronization mode.
To set your Remote Calendar:
Tap
1.
2. Set your desired synchronization mode, then tap to apply changes or tap Cancel to quit.
> Programs > Remote Calendar > Option > Setting.
Tap to select sync mode.
Tap to select sync interval.
This item is inactive when the sync mode is set to Manual.
Tap to select sync direction.
Tap to select priority when event conict happens.
135
Page 16

136
Page 17

Chapter 12
ASUS Special features
• ASUS status icon
• ASUS Zip
• Backup
• Newstation
• Auto Cleaner
137
Page 18

ASUS status icon
The ASUS status icon allows you to easily check and see the current status of the following device
components: USB, LCD Brightness, Battery power, Memory, and microSD card.
To check the status of these components, tap the ASUS Status icon on the Today screen.
USB: Allows you to set the USB connection mode.
Brightness: Tap to adjust the LCD brightness on
battery power or external power.
Power: Displays the remaining battery power and
allows you to set advanced power saving features.
Program Memory: Displays the total, currently
used, and remaining program storage memory.
Storage memory: Displays the total, currently
used, and remaining storage memory.
MicroSD card: Tap to display the contents of the
MicroSD card installed.
Settings: Allows you to select the items to
display in this ASUS Status popup menu.
138
Page 19

USB setting
Allows you to set the USB connection mode.
LCD Brightness
Adjusts the LCD brightness on battery power and external power.
Battery
Displays the battery power status.
The Advanced settings allows you to set a time when to turnoff the device if not used.
Memory
Displays the total, in use and free memory.
Storage card memory
Displays the total, in use, and available storage card memory.
Program memory
Displays the total, in use, and available program memory.
Settings
Allows you to select the items to display in the ASUS Settings popup menu.
139
Page 20

ASUS Zip
ASUS Zip allows you to compress les and save space in your memory card or device.
NOTE: Install ASUS Zip from the Bonus CD that comes with your device package.
To compress les:
1. Tap
2. Select the radio button before New compress le, then tap Next.
3.
Select les or folders and tap Add button, then tap Next.
4.
Rename the le and select the location and compression mode. Check
5.
Tap Done to exit. Check the Exit and open folder box if you want to
To add les to an existing compressed le:
1. Tap
2. Select the radio button before Add le to existing compressed le, then tap Next.
3.
Select a compressed le, then tap Next.
4.
Select les or folders you want to add and tap Add button, then tap Next.
5.
Tap Done to exit. Check the Exit and open folder box if you want to open the folder where the
> Programs > ASUS Zip.
the Password box if you want to set password for the le. Tap Next.
open the folder where the compressed les are stored.
> Programs > ASUS Zip.
compressed les are stored.
140
Page 21

To extract les from a compressed le:
1. Tap
2. Select the radio button before Extract le, then tap Next.
3.
Select a compressed le, then tap Next.
4.
Select a folder to save the extracted les, then tap Next.
5.
Tap Done to exit. Check the Exit and open folder box if you want to open the folder where the
> Programs > ASUS Zip.
compressed les are stored.
Backup
Backup allows you to back up or restore your les and data to your device or storage card.
NOTE: Install Backup from the Bonus CD that comes with your device package.
Backing up les
To back up les:
1. Tap
2. Select the items you want to backup, then tap Next.
3.
Rename the le and select the storage location for the backup, then tap Next.
4.
Key in a four-digit number as your password to encrypt the backup le, then tap Next.
5.
Tap Start to begin backup. Tap Back if you want to return to the previous screen.
> Programs > Backup > Backup.
NOTE: The system will turn off all processing applications when backing up les.
6. Tap Reset to reset the device.
141
Page 22

Restoring les
To restore les:
1. Tap
2. Select a le you want to restore, then tap Next.
3.
Key in the four-digit password to decrypt the backup le, then tap Next.
4
. Select the items you want to restore, then tap Next.
5.
Tap Start to begin restore, or tap Back to return to the last screen.
> Programs > Backup > Restore.
NOTE: The system will turn off all processing applications when restoring les.
Backup Setting
To set Backup:
1. Tap > Programs > Backup, then tap
Option.
142
2. Check the box if you want to reset the device
after backup, then tap
to nish.
Page 23

Newstation
With the Newstation in your device, you can conveniently browse news and blogs anywhere and anytime.
NOTE: Ensure that your device is connected to Internet when using Newstation.
Using Newstation
To read RSS news:
1. Tap > Programs > Newstation.
2. Tap a category folder to open.
3. Tap a channel name to open.
4. Browse your favorite subjects.
To create a new category folder:
1. Tap > Programs > Newstation.
2. Tap Menu > New Category then edit the category name.
To add a channel:
1. Tap
2. Tap Menu > New Channel. You can add a channel either from the Internet or an existing le.
> Programs > Newstation, then tap a category folder to
open.
•
Input from URL
Select the radio button of Input from URL and enter the URL address, then tap Next.
Select a category where you want to add the channel, then tap Finish.
143
Page 24

• Import from a le
Select the radio button of Import from a le, then tap Next.
Select a folder and choose a le from the list.
Choose channels from the list, then tap Next.
Select a category where you want to add the channel, then tap Finish.
NOTE: You may also tap from the ASUS Today screen to access the Newstation application and download
news updates.
Using Newstation menus
Category Menu
To use the category menu:
1. Tap
2. Select a category folder. Then tap Menu. The menu list pops up.
3.
Tap an option that you need.
Channel Menu
To use the channel menu:
1. Tap
2. Tap a category folder, then select a channel and tap Menu.
3.
Tap an option that you need.
> Programs > Newstation.
> Programs > Newstation.
144
Page 25

Subject Menu
To use the subject menu:
1. Tap
2. Tap a category folder. Then tap a channel to open. Select a subject and tap Menu. The menu list
3.
Tap an option that you need.
> Programs > Newstation.
pops up.
145
Page 26

Auto Cleaner
To free the memory in your device, you can use this function to conveniently close the running
applications that you are not using.
Setting the Auto Cleaner
To set the Auto Cleaner:
1. Tap Start > Settings > System tab > Auto Cleaner.
2
. Select the check box to active the Auto Cleaner function. Then select either Short or Long press X
to close the program.
3.
Tap Set button to set the Exception and the Force-closed List.
4
. Tap
when nished.
146
Page 27

Chapter 13
Other features
• Restoring default factory settings
• System information
• Task Manager
147
Page 28

Restoring default factory settings
This option allows you to restore the default factory settings.
To restore default settings:
1. Tap
2. Key in ‘1234’ in the Password eld to conrm that you want to restore to default settings.
3.
Tap
> Settings > System tab > Default Settings.
.
WARNING: This option will delete all les stored in this device.
System information
The System Information contains important device information including the current device settings and
version.
To launch the System Information:
1. Tap
2. Tap the Device Info tab for device hardware information.
3.
Tap Version tab to display the ROM, Boot, Radio, MP and Battery version.
> Settings > System tab > System Information.
148
Page 29

Task Manager
The Task Manager allows you to monitor the currently running programs, memory and CPU occupancy.
You can use this function to end these programs easily. You can also switch to any of the listed programs
from the Task Manager screen.
To use Task Manager:
• To launch the Task Manager, tap
• To end a program, select the program you want to end and tap End Task.
•
To end all tasks, tap Menu > End All Tasks.
•
To switch to a program, select a program and press down the Navigation key, or tap Menu > Switch
To.
> Programs > Task Manager.
149
Page 30

150
Page 31

Appendices
Appendices
• Notices
• Specic Absorption Rate (SAR)
• ASUS Contact information
151
Page 32

Notices
Federal Communications Commission (FCC) Regulations
This device complies with part 15 of the FCC Rules. Operation is subject to the following two conditions:
1. This device may not cause harmful interference; and
2. This device must accept any interference received, including interference that may cause
undesired operation.
This device has been tested and found to comply with the limits for a Class B digital device, pursuant to
Part 15 of the FCC Rules. These limits are designed to provide reasonable protection against harmful
interference in a residential installation. This equipment generates, uses and can radiated radio frequency
energy and, if not installed and used in accordance with the instructions, may cause harmful interference
to radio communications. However, there is no guarantee that interference will not occur in a particular
installation If this equipment does cause harmful interference to radio or television reception, which
can be determined by turning the equipment off and on, the user is encouraged to try to correct the
interference by one or more of the following measures:
•
Reorient or relocate the receiving antenna.
• Increase the separation between the equipment and receiver.
• Connect the equipment into an outlet on a circuit different from that to which the receiver is
connected.
• Consult the dealer or an experienced radio/TV technician for help.
Changes or modications not expressly approved by the party responsible for compliance could void the
user‘s authority to operate the equipment.
152
Page 33

Canadian Department of Communications Statement
Country Code selection feature to be disabled for products marketed to the US/CANADA Operation is
subject to the following two conditions:
1. This device may not cause interference; and
2. This device must accept any interference, including interference that may cause undesired
operation of the device.
This Class [B] digital apparatus complies with Canadian ICES-003.
Cet appareil numerique de la classe [B] est conforme a la norme NMB-003 du Canada.
This Category II radiocommunication device complies with Industry Canada Standard RSS-310.
Ce dispositif de radiocommunication de categorie II respecte la norme CNR-310 d’Industrie Canada.
Replaceable batteries
If an equipment is provided with a replaceable battery and if replacement by an incorrect type could result
in an explosion (e.g. with some lithium batteries), the following applies:
• if the battery is placed in an OPERATOR ACCESS AREA, there shall be a marking close to the
battery or a statement in both the operating and the servicing instructions;
• if the battery is placed elsewhere in the equipment, there shall be a marking close to the battery
or a statement in the servicing instructions.
The marking or statement shall include the following or similar text:
CAUTION:
• RISK OF EXPLOSION IF BATTERY IS REPLACED BY AN INCORRECT TYPE.
• DISPOSE USED BATTERIES ACCORDING TO THE INSTRUCTIONS.
153
Page 34

Operator access with a tool
If a TOOL is necessary to gain access to an OPERATOR ACCESS AREA, either all other compartments
within that area containing a hazard shall be inaccessible to the OPERATOR by the use of the same
TOOL, or such compartments shall be marked to discourage OPERATOR access.
An acceptable marking for an electric shock hazard is (ISO 3864, No. 5036).
Equipment for restricted access locations
For equipment intended only for installation in a RESTRICTED ACCESS LOCATION, the installation
instructions shall contain a statement to this effect.
WARNING: The user needs to switch off the device when exposed to areas with potentially explosive atmospheres
such as petrol stations, chemical storage depots and blasting operations.
Specic Absorption Rate (SAR)
Bodyworn operation
For bodyworn operation, this device has been tested and meets the FCC RF exposure guidelines for
use with an accessory that contains no metal and the positions the handset a minimum of 1.5 cm from
the body. Use of other enhancements may not ensure compliance with FCC RF exposure guidelines. If
you do no t use a body-worn accessory and are not holding the device at the ear, position the handset a
minimum of 1.5 cm from your body when the device is switched on.
Exposure to radio waves
THIS MODEL MEETS INTERNATIONAL GUIDELINES FOR EXPOSURE TO RADIO WAVES
Your mobile device is a radio transmitter and receiver. It is designed not to exceed the limits for exposure
to radio waves recommended by international guidelines. These guidelines were developed by the
154
Page 35

independent scientic organization ICNIRP and include safety margins designed to assure the protection
of all persons, regardless of age and health.
The guidelines use a unit of measurement known as the Specic Absorption Rate, or SAR. The ICNIRP
SAR limit for mobile devices used by the general public is 2 W/kg and the highest SAR value for this in
device when tested were 0.319 W/kg* at the ear, and 0.86 W/kg* on the body.
As SAR is measured utilizing the device’s highest transmitting power, the actual SAR of this device while
operating is typically below that indicated above. This is due to automatic changes to the power level of
the device to ensure it only uses the minimum level required to reach the network.
While there may be differences between the SAR levels of various phones and at various positions, they
all meet the governmental requirements for safe exposure. Please note that improvements to this product
model could cause differences in the SAR value for later products; in all cases, products are designed to
be within the guidelines.
The World Health Organization has stated that present scientic information does not indicate the need
for any special precautions for the use of mobile devices. They note that if you want to reduce your
exposure then you can do so by limiting the length of calls or using a ‘handsfree’ device to keep the
mobile phone away from the head and body.
Additional Information can be found on the websites of the World Health Organization
(http://www.who.int/emf).
* The tests are carried out in accordance with international guidelines for testing. The limit incorporates
a substantial margin for safety to give additional protection for the public and to account for any variations in
measurements. Additional related information includes the ASUS testing protocol, assessment procedure, and
measurement uncertainty range for this product.
155
Page 36

ASUS
Address: 15 Li-Te Road, Peitou, Taipei, Taiwan
Tel: 886228943447; Fax: 886228907698
Declaration
We declare that the IMEI codes for this product, P320, are unique to each unit and only assigned to
this model. The IMEI of each unit is factory set and cannot be altered by the user and that it complies
with the relevant IMEI integrity related requirements expressed in the GSM standards.
Should you have any questions or comments regarding this matter, please have our best attention.
Sincerely yours,
ASUSTeK COMPUTER INC.
Tel: 886228943447
Fax: 886228907698
Email: http://vip.asus.com/eservice/techserv.aspx
156
Page 37

ASUS Contact information
ASUSTeK COMPUTER INC. (AsiaPacic)
Address 15 Li-Te Road, Peitou, Taipei, Taiwan 11259
Website www.asus.com.tw
Technical Support
Telephone +886228943447
Support Fax +886228907698
Software download support.asus.com*
ASUS COMPUTER INTERNATIONAL (America)
Address 44370 Nobel Drive, Fremont, CA 94538, USA
Telephone +15029550883
Fax +15029338713
Website usa.asus.com
Software download support.asus.com*
ASUS COMPUTER GmbH (Germany and Austria)
Address Harkort Str. 25, D40880 Ratingen, Germany
Telephone +49210295990
Fax +492102959911
Online contact www.asus.com.de/sales
Technical Support
Telephone +49210295990
Fax +492102959911
Online support www.asus.com.de/support
Website www.asus.com.de/news
* Available on this site is an online Technical Inquiry Form that you can ll out to contact technical support.
157
 Loading...