

Page 1
KeytoneKeytone
Keytone
KeytoneKeytone
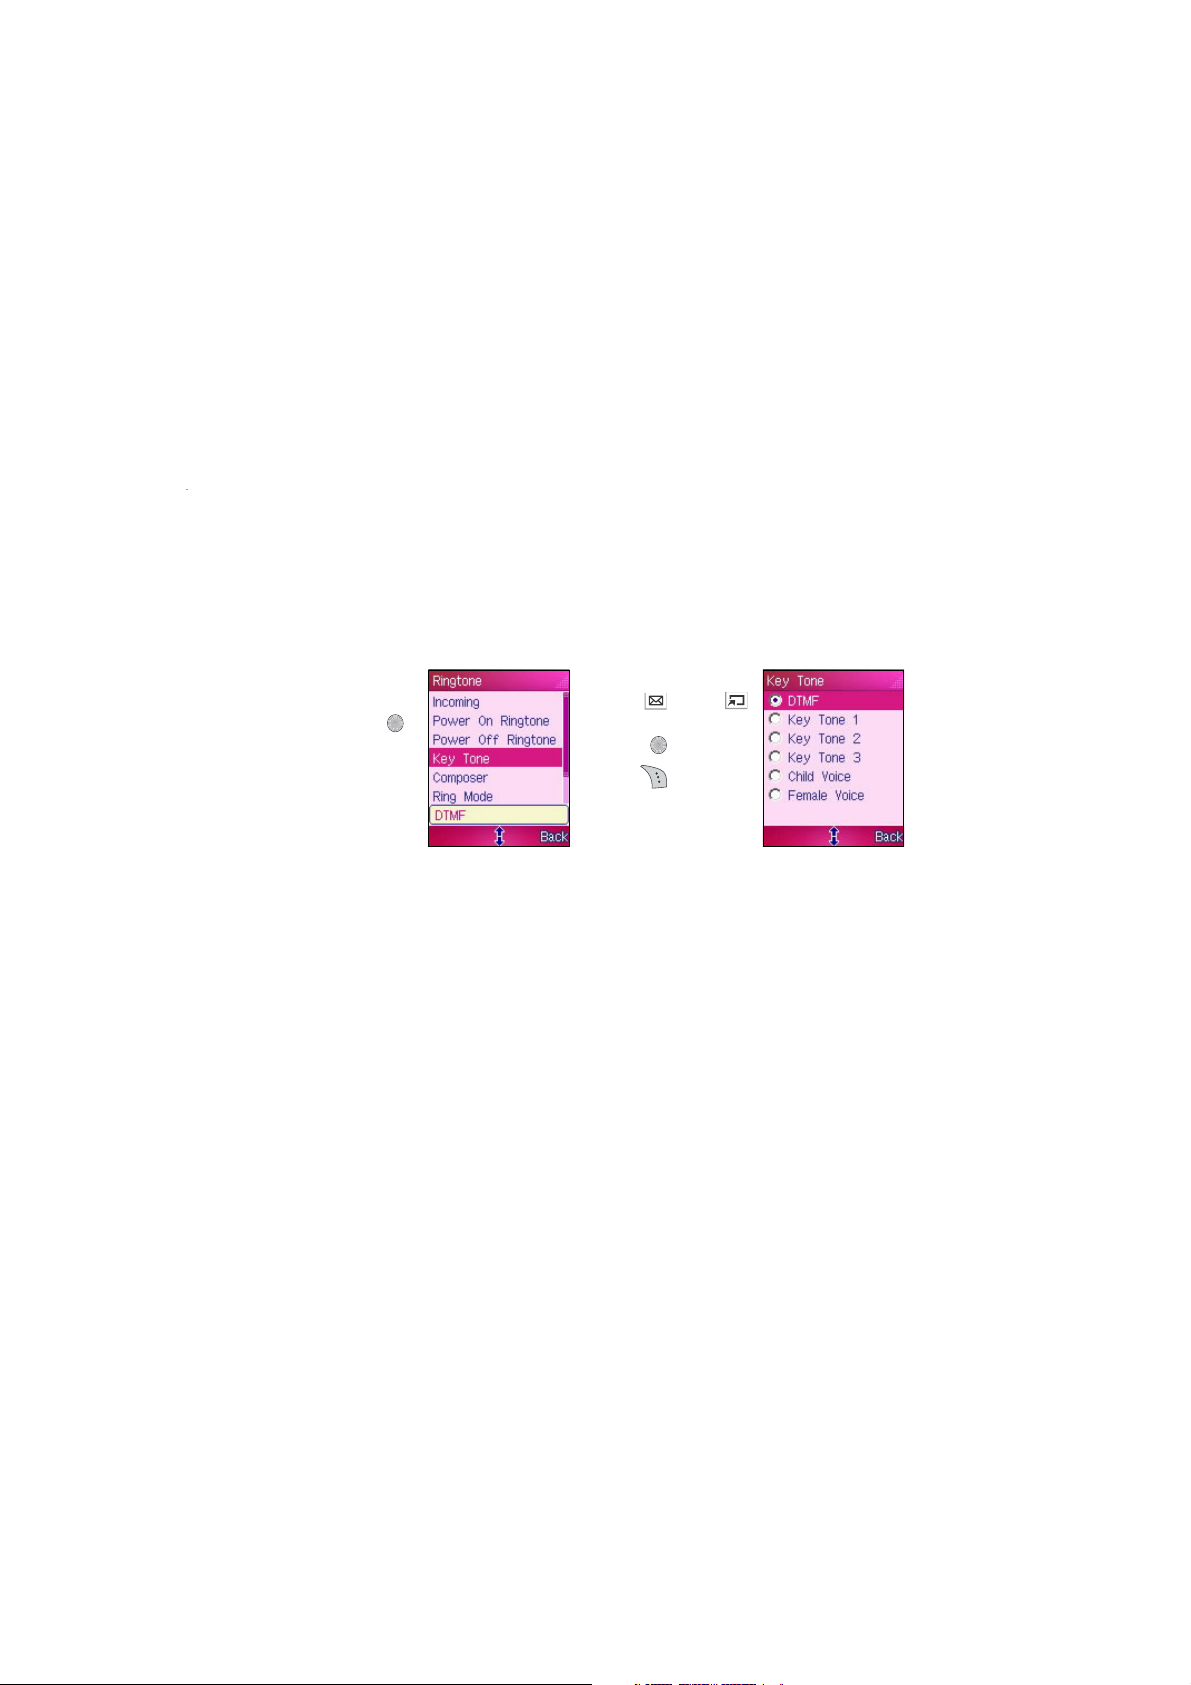
The keytone sounds off everytime you press any key on the keypad.
To select a keytone:
1. Select
KeytoneKeytone
Keytone
KeytoneKeytone
from the
menu, then press .
RingtoneRingtone
Ringtone
RingtoneRingtone
2. Highlight a key tone
using
(down), then
press
3. Click (Back) to
return to the
RingtoneRingtone
Ringtone menu.
RingtoneRingtone
(up) or
to select.
9999
99
9999
Page 2
ComposerComposer
Composer
ComposerComposer
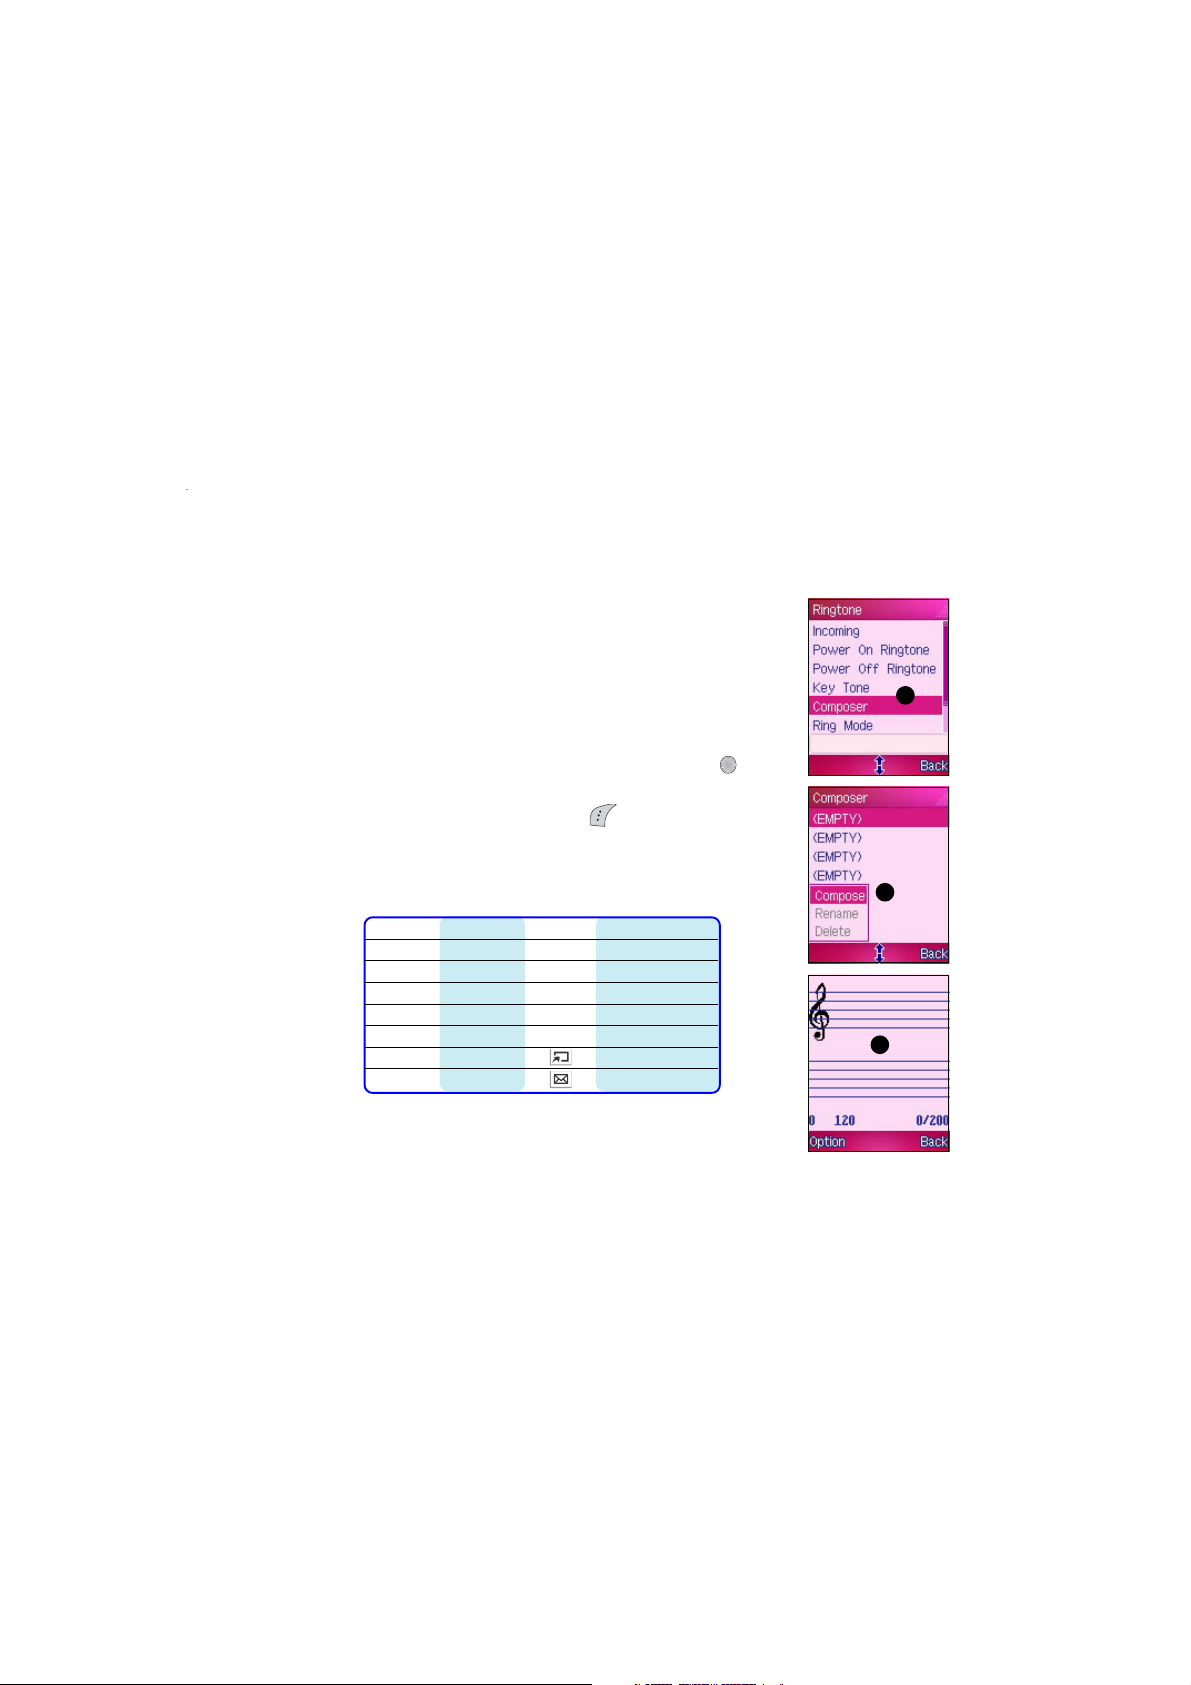
In addition to the pre-installed ringtones, you can compose five ring
tones, each with up to 200 notes, if you know how to compose with
musical notes.
Composing a ring toneComposing a ring tone
Composing a ring tone
Composing a ring toneComposing a ring tone
To compose a ring tone:
11
1
11
100100
100
100100
1. Select
ComposerComposer
Composer from the
ComposerComposer
RingtoneRingtone
Ringtone menu, then press to
RingtoneRingtone
display the list of composed ring tones.
2. Highlight an
ComposeCompose
Co m p o s e. The music staff appears on screen.
ComposeCompose
(EMPTY)(EMPTY)
( E M P T Y ) ring tone, press
(EMPTY)(EMPTY)
(Option), then select
3. Use the keypad button to key-in the notes. Refer to the table below
for the musical note equivalents of the keypad buttons.
KeyKey
Note/BeatNote/Beat
Key
Note/Beat
KeyKey
Note/BeatNote/Beat
1Do8 Rest
2 Re 9 longer beat
3 Mi 0 dotted note
4 Fa * octave
5 Sol # short beat
6 La half note lower
7 Si half note higher
KeyKey
Key
KeyKey
Note/BeatNote/Beat
Note/Beat
Note/BeatNote/Beat
22
2
22
33
3
33
Page 3
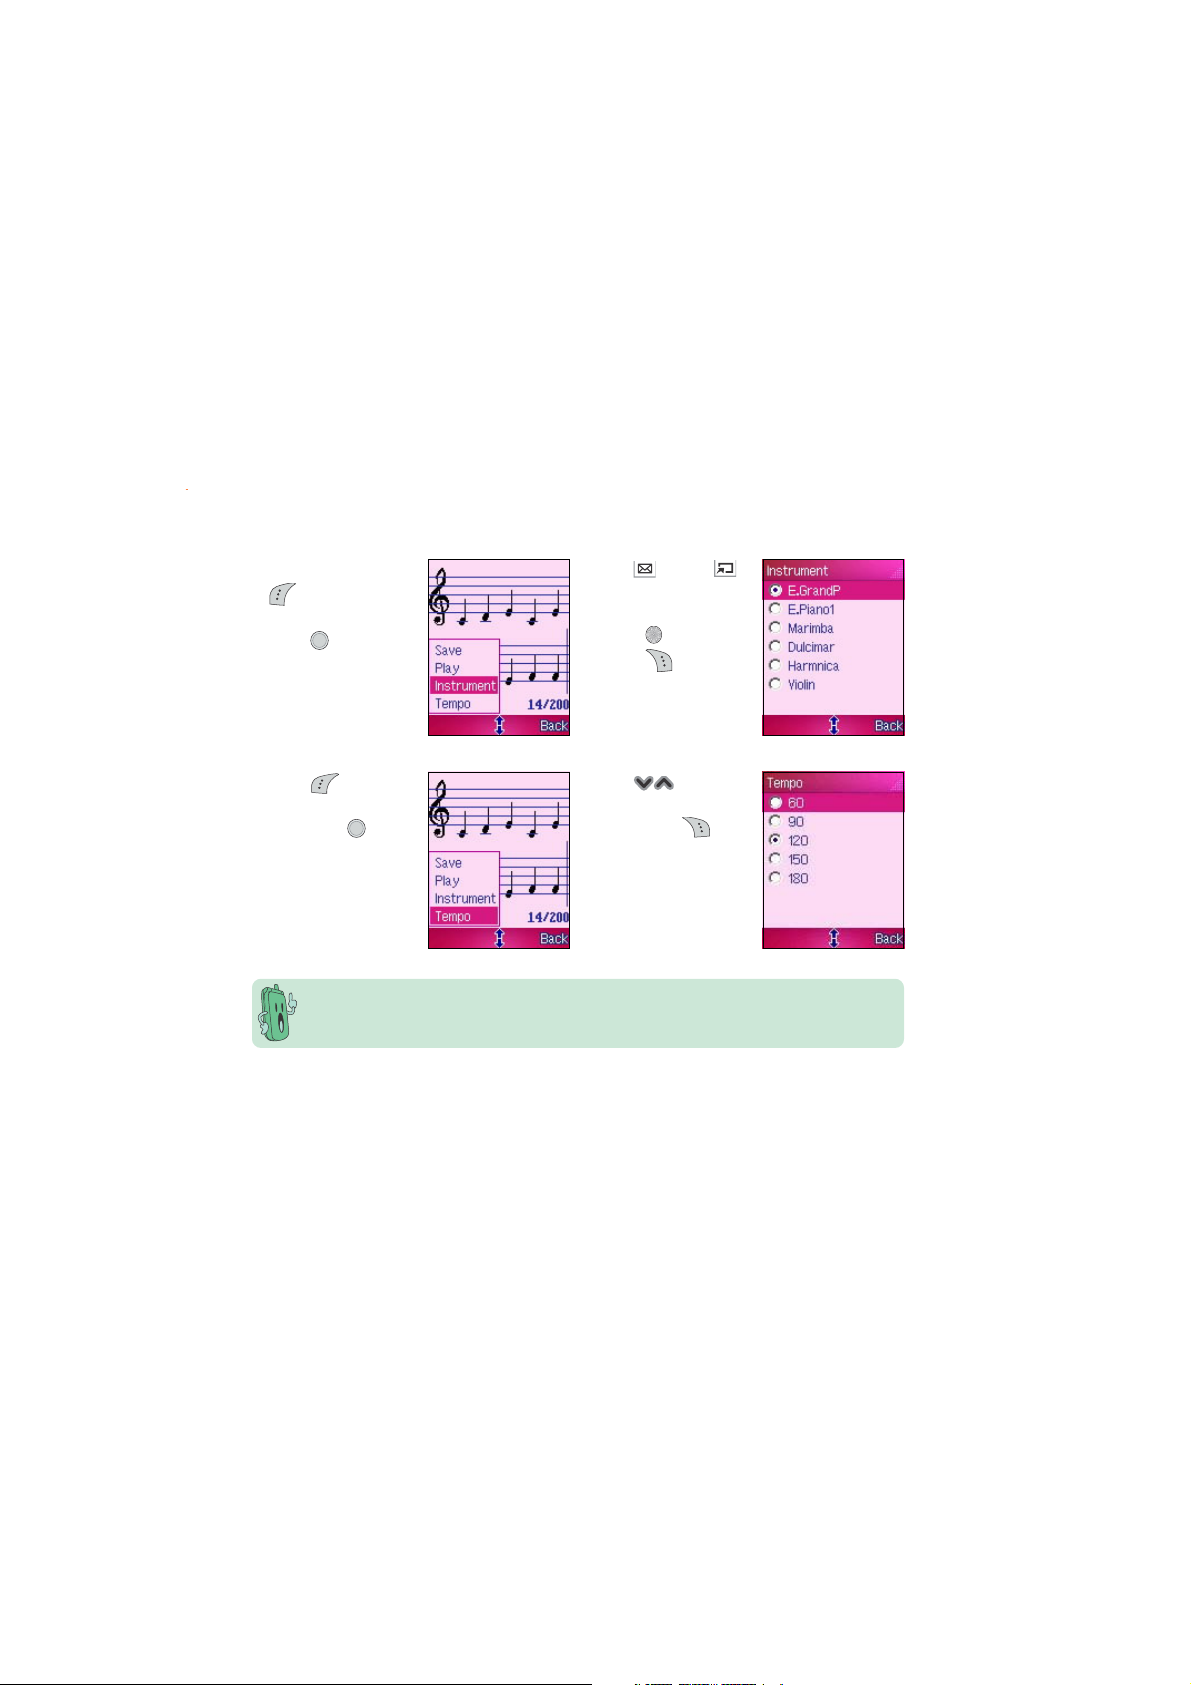
4. When done, press
(Option), select
InstrumentInstrument
Instrument, then
InstrumentInstrument
press
to display
the available
instrument sounds
that you can use.
5. Use
(up) or
(down) to highlight
an instrument, then
press to select.
Press (Back) to
return to your
composition.
6. Press (Option),
TempoTempo
select
Tempo,
TempoTempo
then press
to
display the available
tempo you can use
for the composed
ring tone.
A low number option means a slow tempo. The higher the number you select, the faster the
tempo. You may try several tempos until you find the appropriate one for your ring tone.
7. Use
to
highlight a tempo,
then press
(Back) to listen to
your composition.
101101
101
101101
Page 4
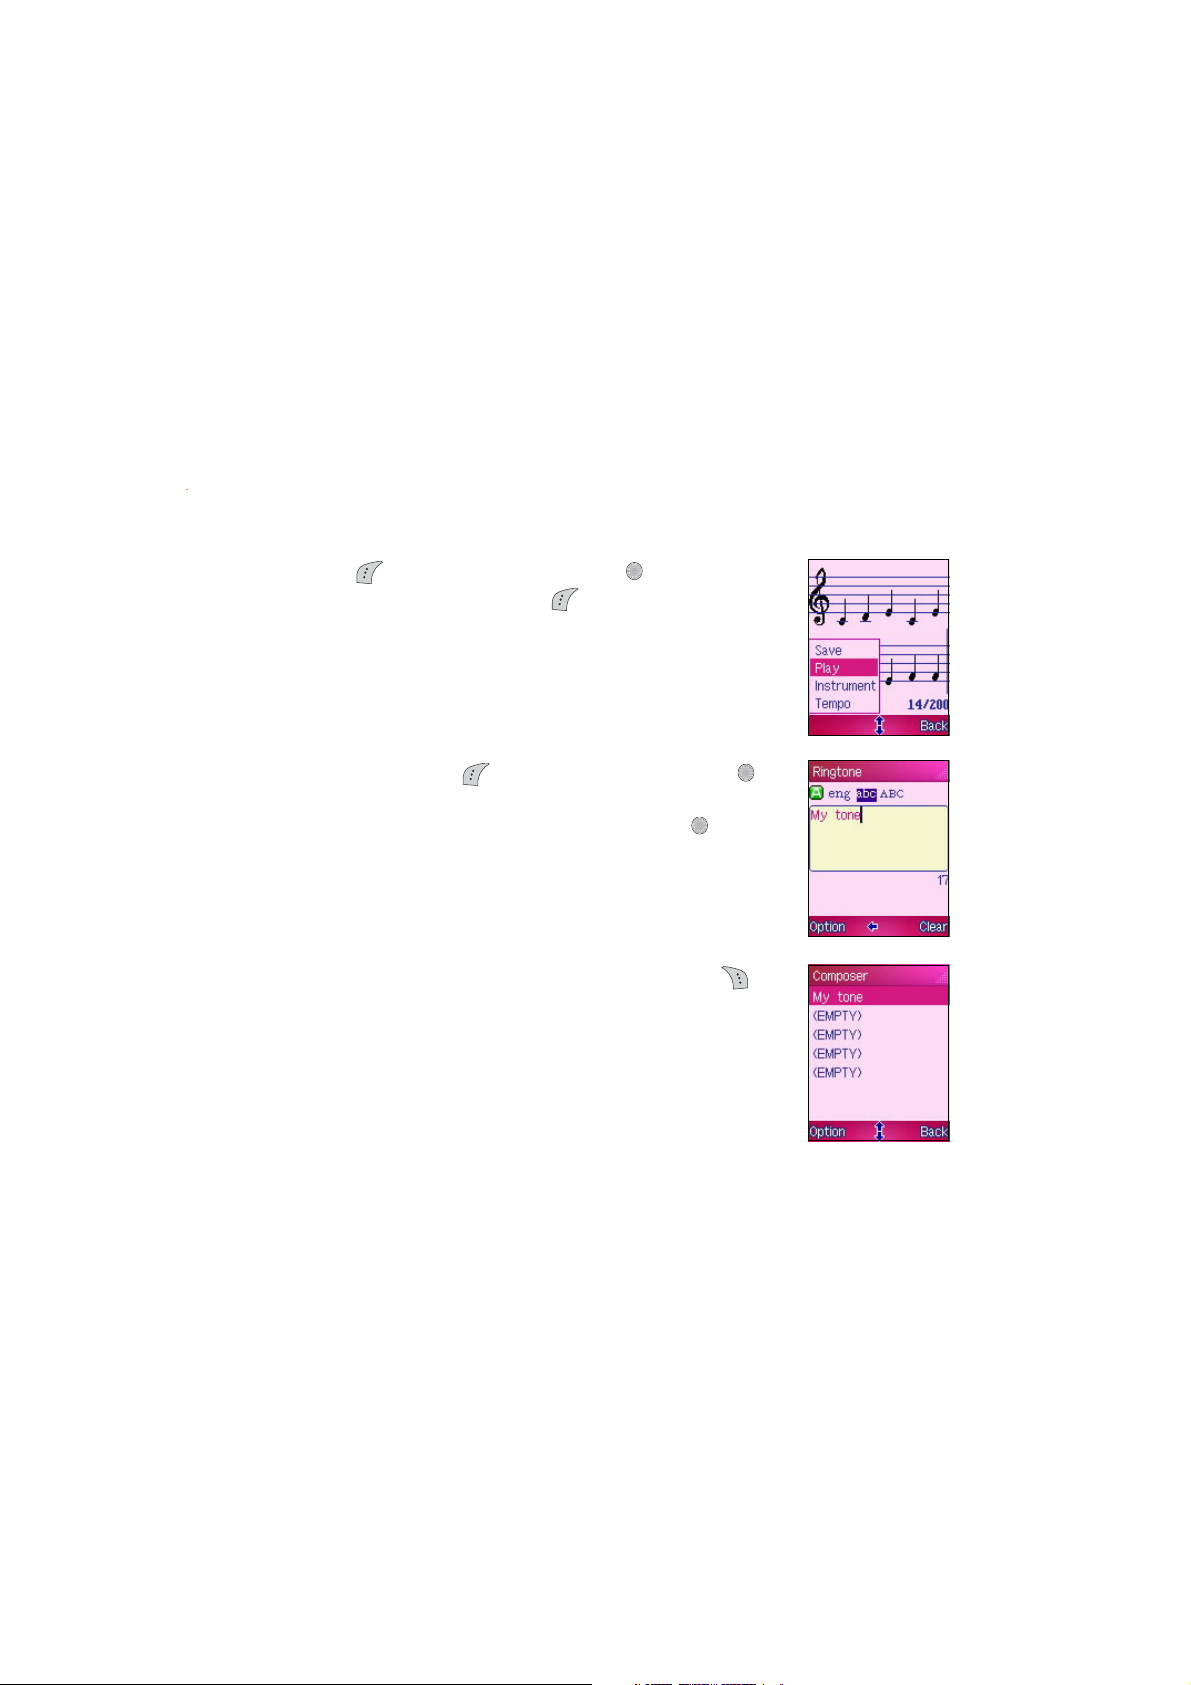
8. Press (Option), select
composition. When playing, press
PlayPlay
P l a y, then press to listen to your
PlayPlay
(Stop) to stop.
102102
102
102102
9. When finished, press (Option), select
text input screen appears.
10. Key-in a name for the composed ringtone, then press . A
successfully!successfully!
successfu l l y ! message appears indicating that you have
successfully!successfully!
successfully composed and saved the new ringtone.
11. The new ring tone is displayed in the Composer list. Press
(Back) to return to the
RingtoneRingtone
Ringtone menu.
RingtoneRingtone
SaveSave
S a v e, then press . The
SaveSave
SetSet
Set
SetSet
Page 5
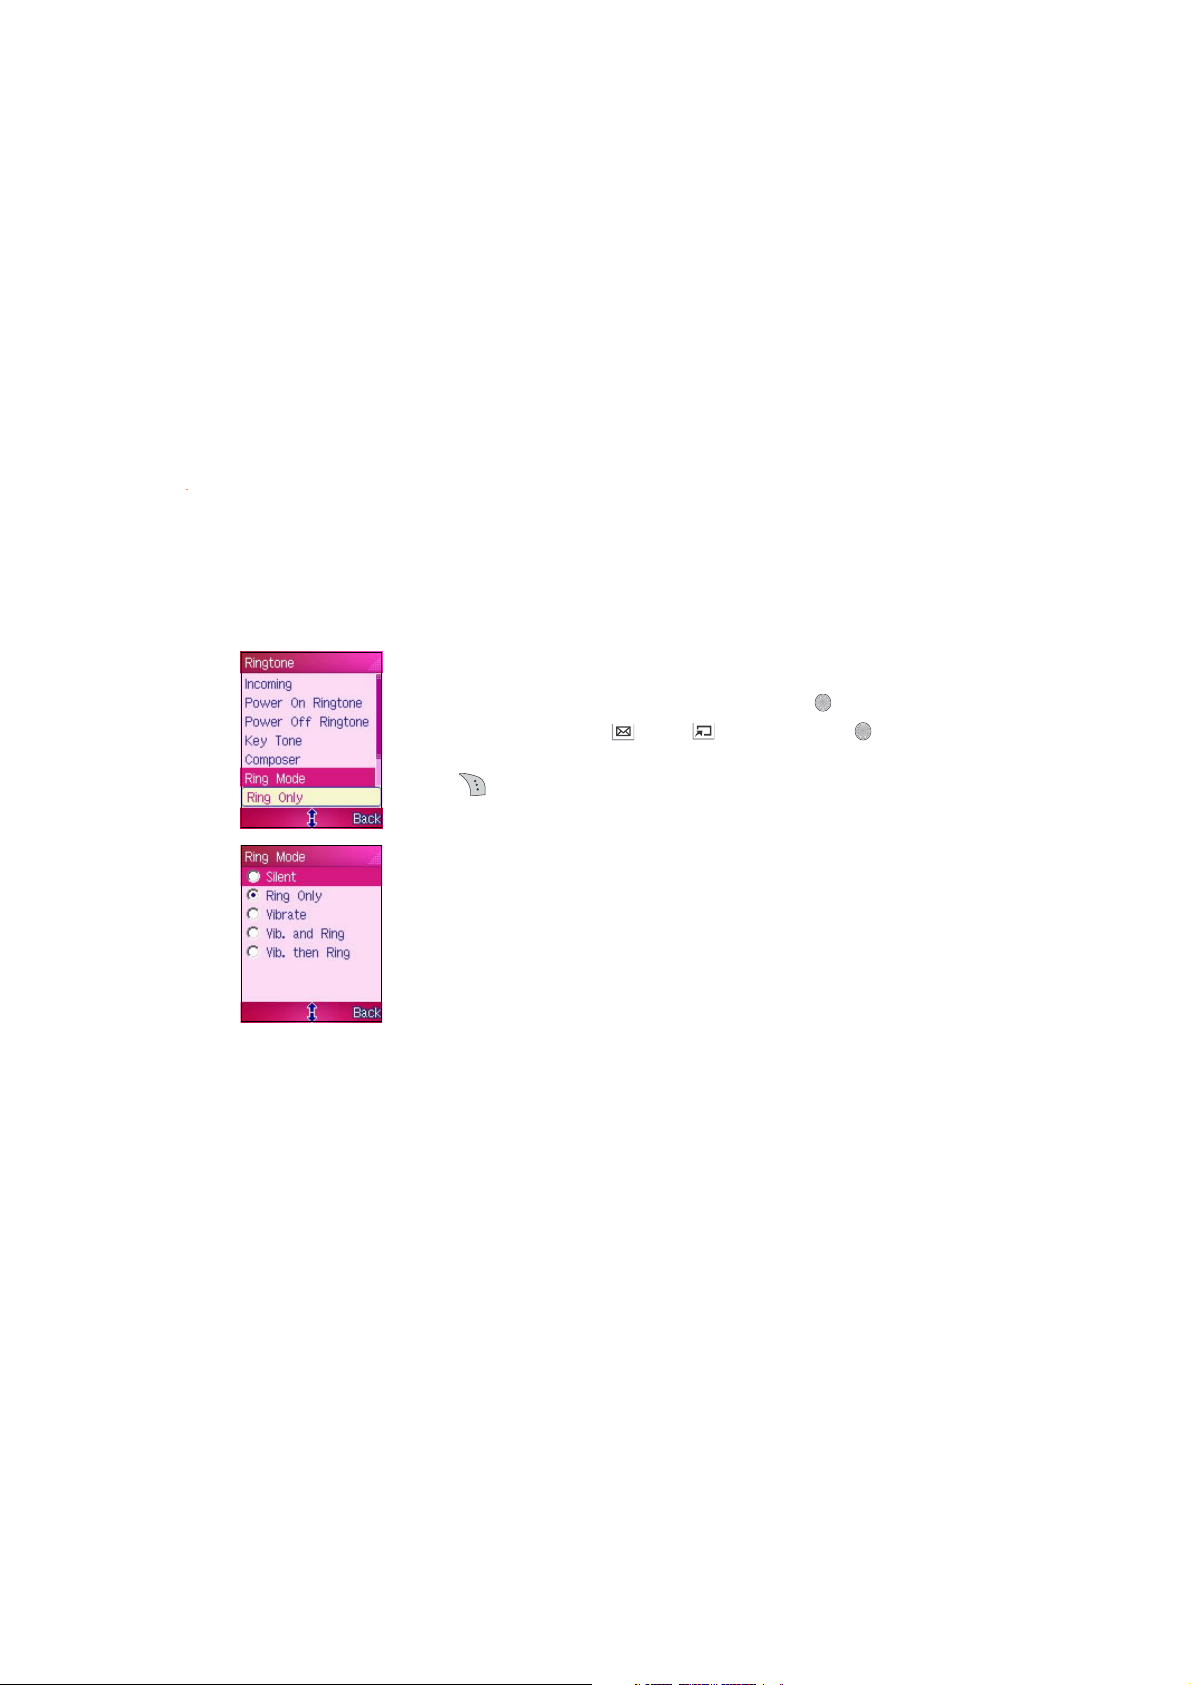
Ring modeRing mode
Ring mode
Ring modeRing mode
The ring mode menu allows you to select the behavior of your phone
everytime you receive an incoming call.
To select a ring mode:
1. Select
2. Highlight a ring mode using
3. Click (Back) to return to the
Ring ModeRing Mode
Ring Mode from the
Ring ModeRing Mode
select.
RingtoneRingtone
Ringtone menu, then press .
RingtoneRingtone
(up) or (down), then press to
RingtoneRingtone
Ringtone menu.
RingtoneRingtone
103103
103
103103
Page 6
VolumeVolume
Volume
VolumeVolume
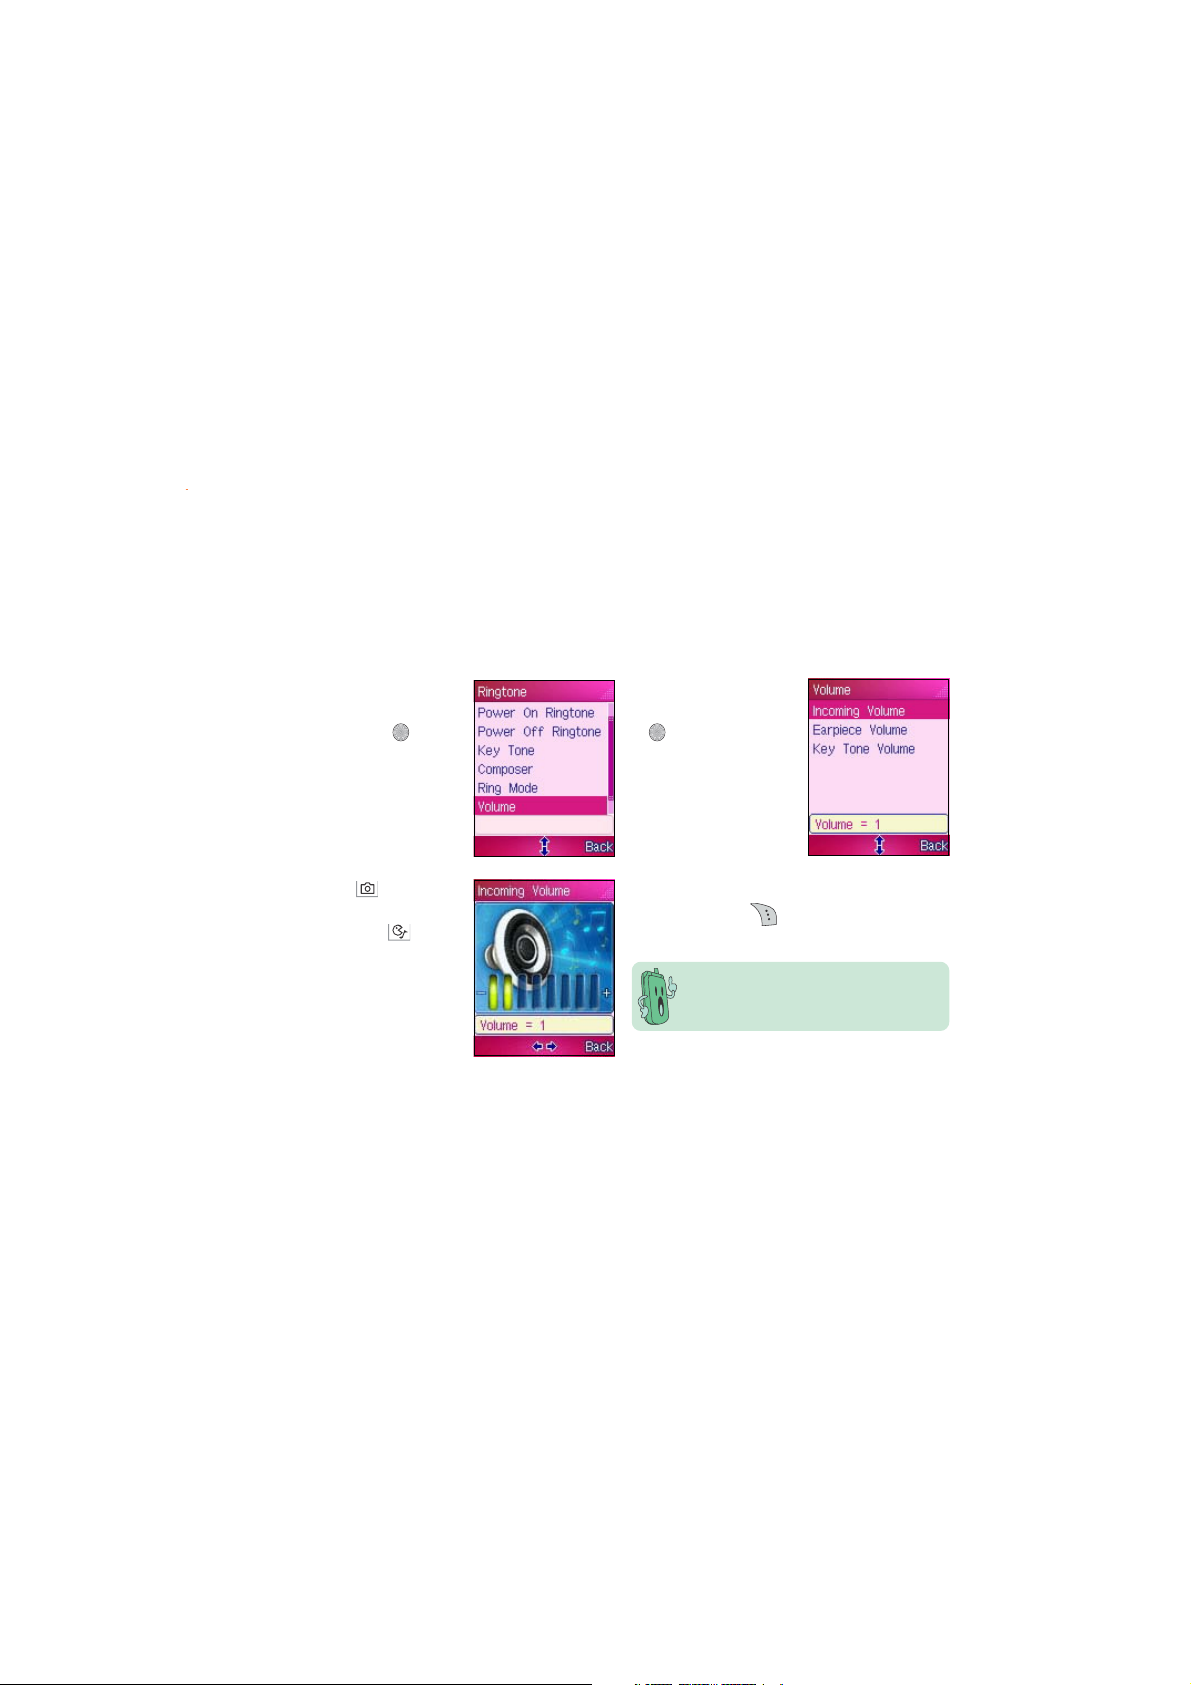
Adjusting the volumeAdjusting the volume
Adjusting the volume
Adjusting the volumeAdjusting the volume
To adjust the incoming ring volume:
104104
104
104104
1. Select
3. Press
VolumeVolume
V o l u m e from
VolumeVolume
RingtoneRingtone
the
Ringtone menu,
RingtoneRingtone
then press .
(left) to
decrease the
volume or
(right) to increase
the volume. The
default ring tone is
played the moment
you adjust the
volume.
2. Select
4. When finished setting the incoming
IncomingIncoming
Incoming
IncomingIncoming
VolumeVolume
V o l u m e, then press
VolumeVolume
to display the
Incoming Volume
screen. Eight (8)
bars indicate the
volume level. The
default setting is 2.
volume, press (Back) to return to the
VolumeVolume
V o l u m e menu.
VolumeVolume
You cannot adjust the ring volume if
you set the
or
VibrateVibrate
Vibrate.
VibrateVibrate
Ring Mode Ring Mode
Ring Mode to
Ring Mode Ring Mode
SilentSilent
Silent
SilentSilent
Page 7
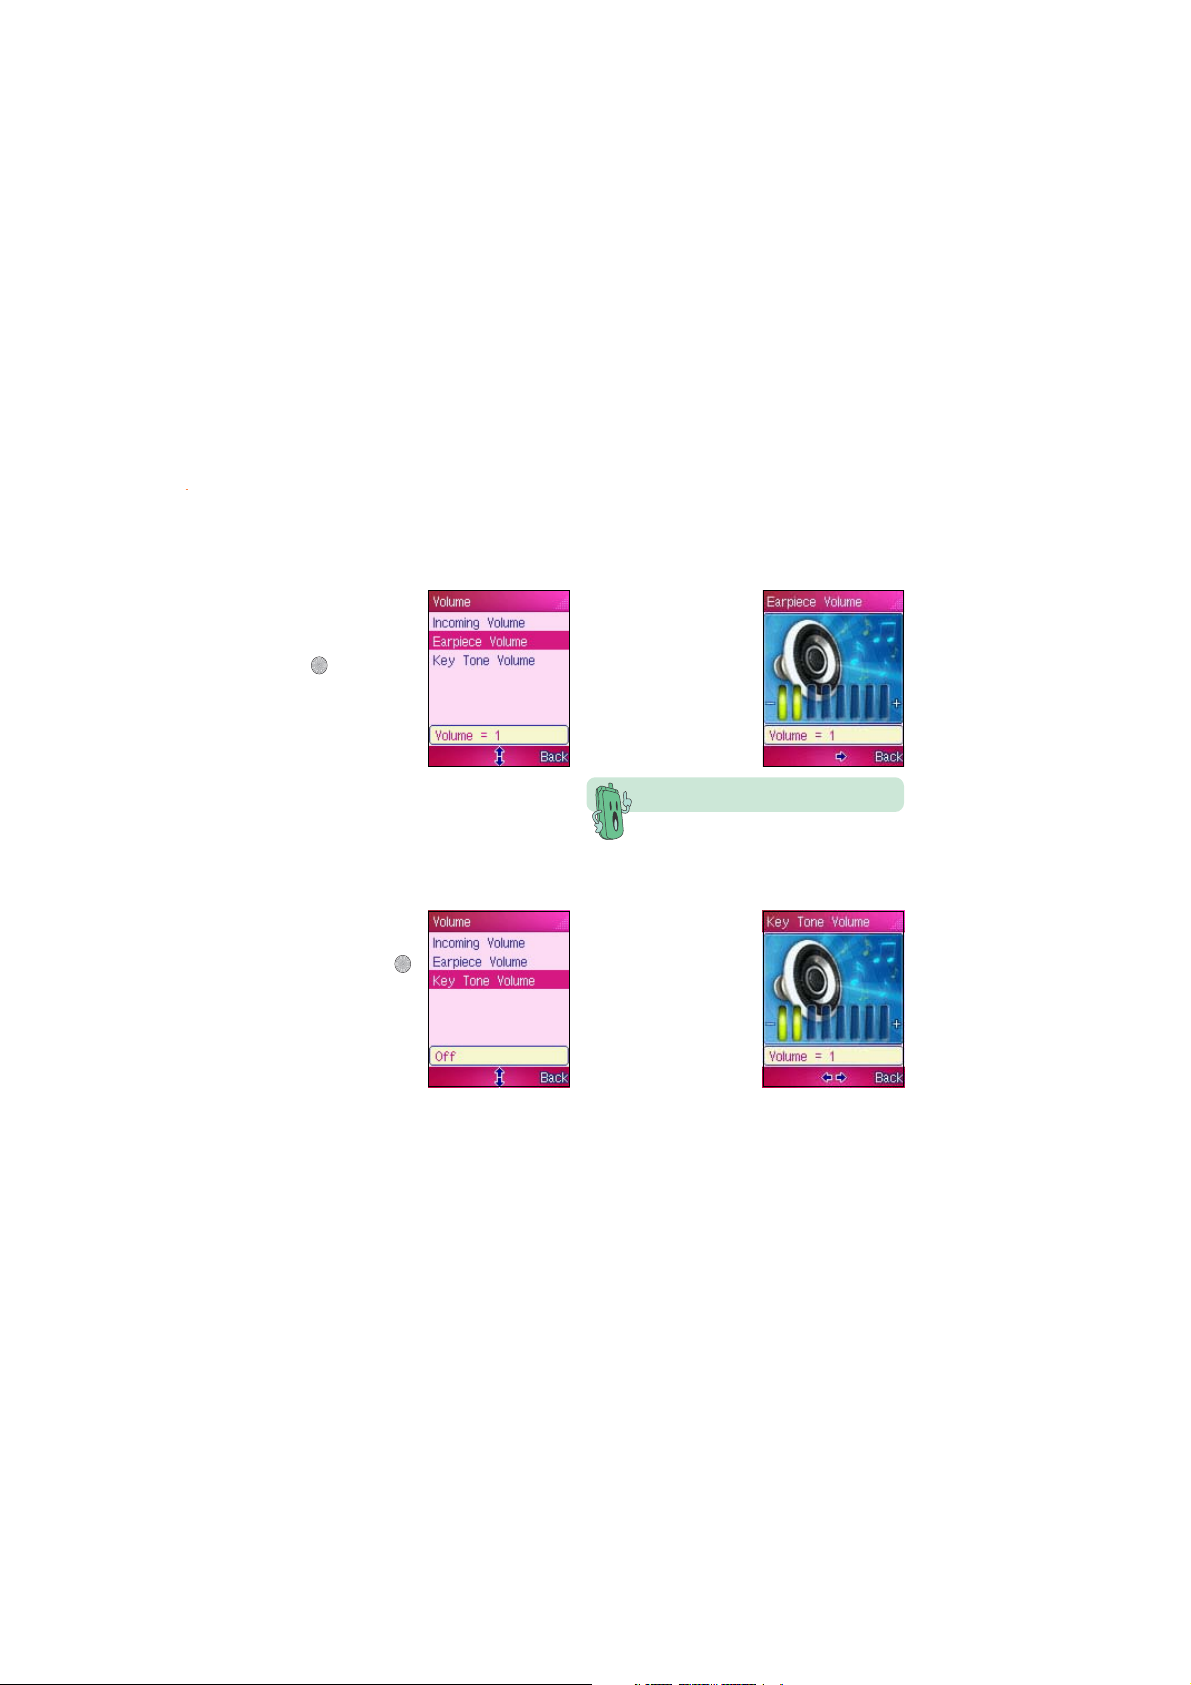
To adjust the earpiece volume:
1. Select
EarpieceEarpiece
Earpiece
EarpieceEarpiece
VolumeVolume
V o l u m e from the
VolumeVolume
Volume menu, then
press .
To adjust the key tone volume:
1. Select
Key ToneKey Tone
Key Tone
Key ToneKey Tone
from the Volume
menu, then press
.
2. Follow steps 3 to 4
of the previous
section to adjust the
earpiece volume.
The default earpiece volume is 4.
2. Follow steps 3 to 4
of the previous
section to adjust the
keytone volume.
105105
105
105105
Page 8
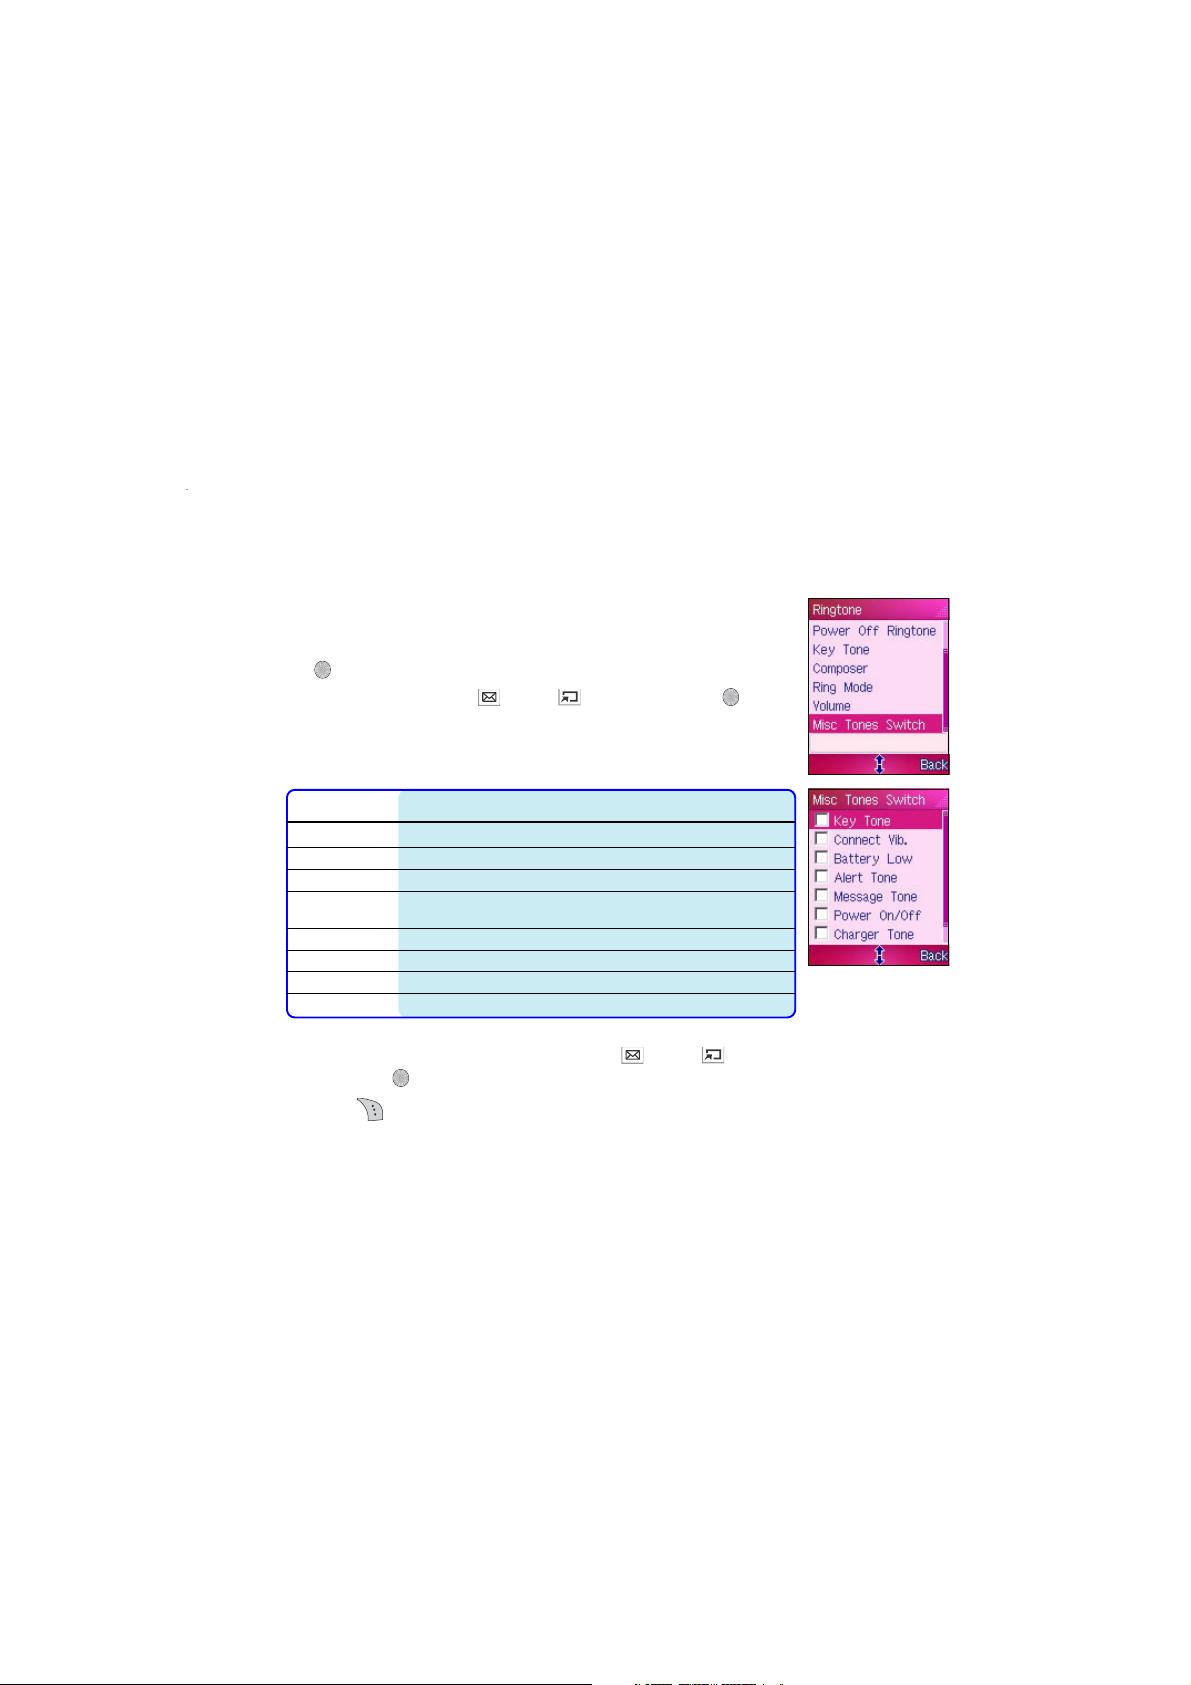
Misc Tones SwitchMisc Tones Switch
Misc Tones Switch
Misc Tones SwitchMisc Tones Switch
To set miscellaneous tone alerts:
106106
106
106106
1. Select
Misc Tones SwitchMisc Tones Switch
Misc Tones Switch from the
Misc Tones SwitchMisc Tones Switch
RingtoneRingtone
Ringtone menu, then press
RingtoneRingtone
to display a list of phone events that a tone alert can be assigned.
2. Highlight an item using (up) or (down), then press to
select. All the items are enabled by default. When selected, a check
mark appears on the box preceding the item.
ToneTone
Tone
ToneTone
Key Tone a tone plays everytime you press a key
Connect Vib. the phone vibrates when you are connected to the called party
Battery Low an alert tone sounds every 10 minutes when battery power is low
Alert Tone an alert tone sounds every 5 minutes when you missed a call
Message Tone a tone plays everytime you receive an SMS/MMS message
Power On/Off a tone plays everytime you turn on/off the phone
Charger Tone a tone plays everytime you connect/disconnect the battery charger
Flip Tone a tone plays everytime you open the phone flip
When enabledWhen enabled
When enabled
When enabledWhen enabled
or when you have an unread SMS/MMS message
3. If you want to enable or disable a tone, use (up) or (down) to highlight the item,
then press
4. Press (Back) to return to the
to uncheck the box preceding the tone.
RingtoneRingtone
Ringtone menu.
RingtoneRingtone
Page 9

M303
This chapter provides information on
how to save, use, share, and manage
contact information using the phone
book.
Managing the phonebook
Page 10

130130
130
130130
Chapter summaryChapter summary
Chapter summary
Chapter summaryChapter summary
Phonebook ...................................................................................... 132
Adding contact information ............................................................ 134
Adding a contact information to the SIM card ......................... 134
Adding a contact information to the phone memory .............. 136
Adding a photo to a phone book entry ................................... 139
Adding a voice recording to a phone book entry .................... 140
Searching phone book entries ........................................................ 141
Using Quick Find ....................................................................... 141
Using Name Search .................................................................. 142
Managing phone book entries ......................................................... 143
Viewing phone book entries ..................................................... 143
Displaying long entries ............................................................. 144
Modifying a phone book entry ................................................. 145
Deleting a phone book entry ................................................... 146
Copying name entries .............................................................. 148
Changing the phone book settings ................................................. 152
Customizing group settings ..................................................... 152
Classifying a phone book entry to a group .............................. 154
Changing the speed dial settings ............................................. 155
Selecting the phone book memory .......................................... 155
Viewing the phone book storage ............................................. 156
Page 11

Other phone book features ............................................................. 157
Sending an SMS/MMS message ................................................ 157
131131
131
131131
Page 12
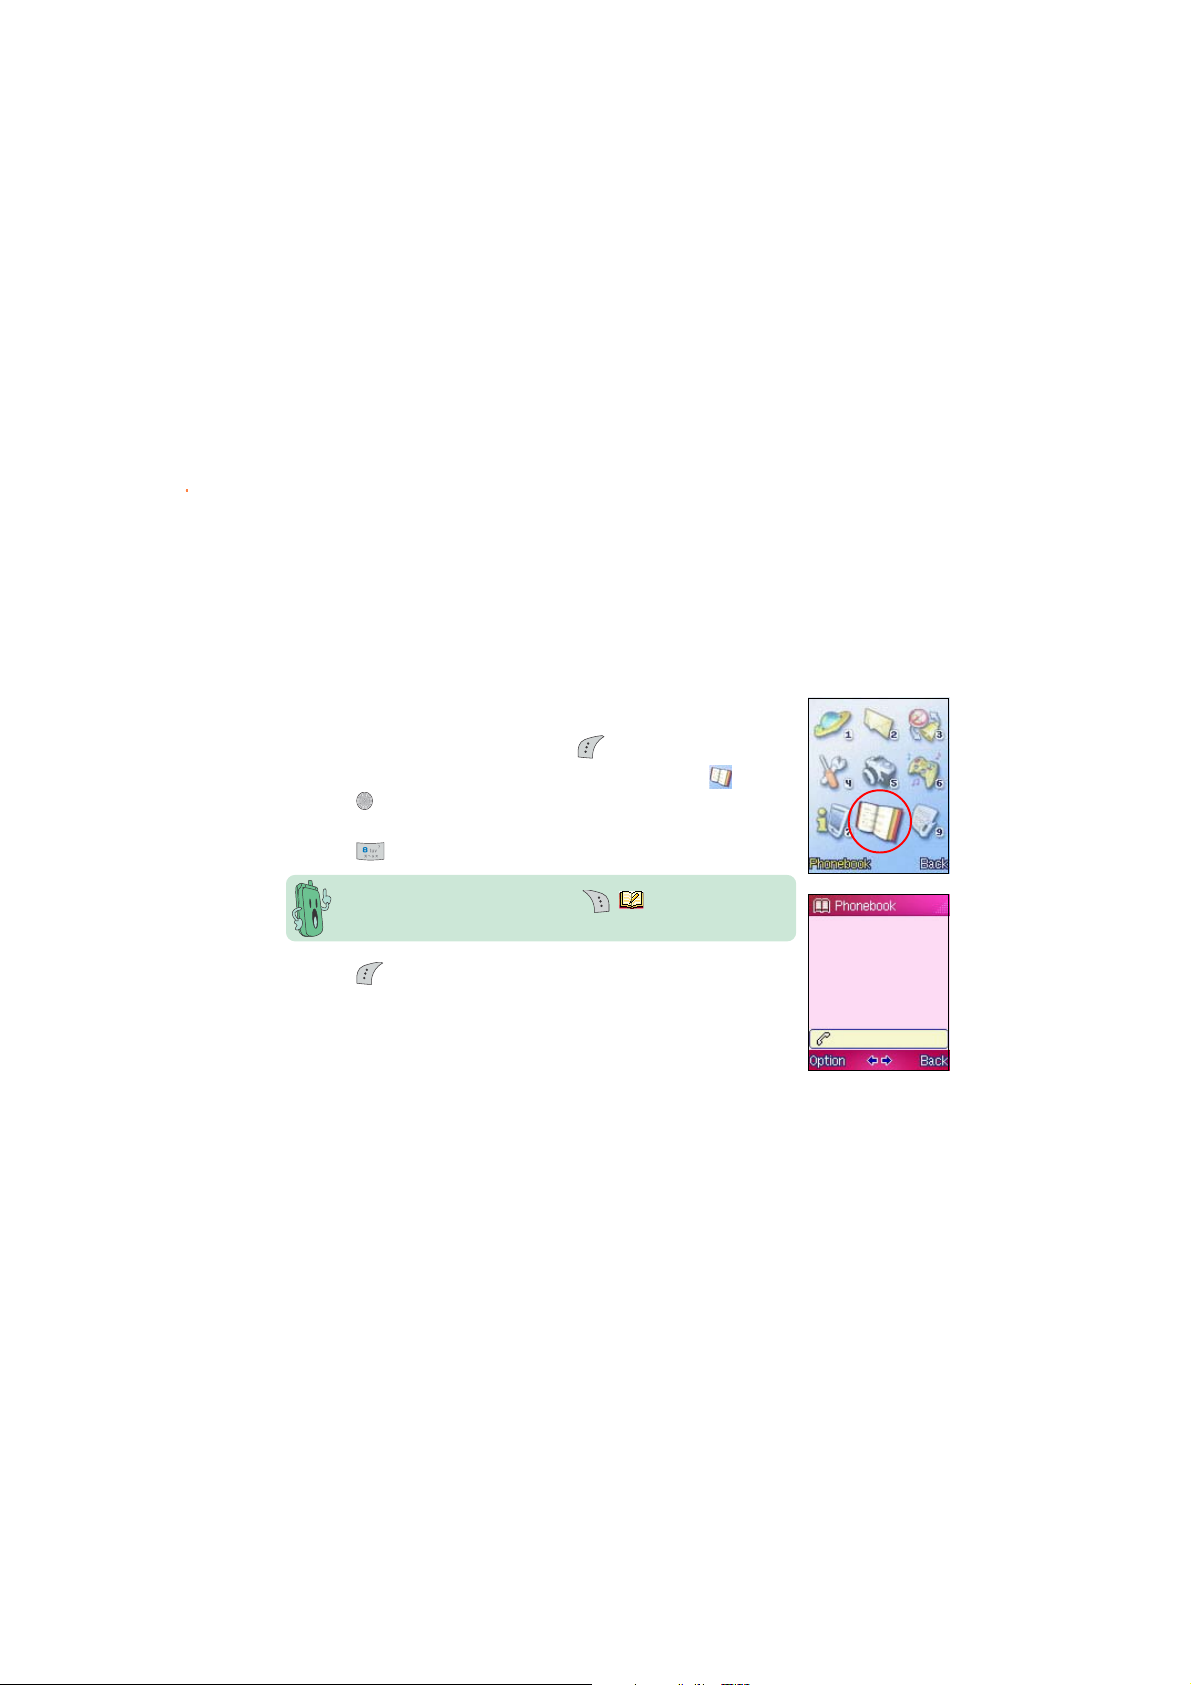
Phonebook
PhonebookPhonebook
The
Phonebook allows you to store, use, share, and manage contact
PhonebookPhonebook
information such as names, phone numbers, company and home
addresses, e-mail address, etc. You can also add a voice recording and
personalize the ringtone and LED settings for a particular contact using
this menu.
To access the
1. Put the phone in idle mode, then press to display the main menu.
2. Use the navigation keys to select the
press
OROR
OR
OROR
Press to open the
3. Press (Option) to display the phone book menu. Refer to the
next section for details.
PhonebookPhonebook
Phonebook:
PhonebookPhonebook
PhonebookPhonebook
Phonebook icon
PhonebookPhonebook
to open the
When in idle mode, you can press [ ] to open the phone
book.
PhonebookPhonebook
Phonebook.
PhonebookPhonebook
PhonebookPhonebook
Phonebook.
PhonebookPhonebook
, then
132132
132
132132
Page 13

OptionsOptions
Options
OptionsOptions
Quick FindQuick Find
Q u ick F i n d easily search for a contact in your phonebook by typing
Quick FindQuick Find
Name SearchName Search
N a me Search easily search for a contact in your phonebook by typing
Name SearchName Search
AddAdd
A d d add a contact record in the SIM or phone memory
AddAdd
DeleteDelete
D e l e t e delete a contact record in the SIM or phone memory
DeleteDelete
CopyCopy
C o p y copy a name entry from the SIM card to the phone
CopyCopy
SettingsSettings
S e t t i n g s allows you to modify the group and speed dial setting;
SettingsSettings
StorageStorage
S t o r a g e view the available phone and SIM phone book memory
StorageStorage
Allows you toAllows you to
Allows you to
Allows you toAllows you to
the initial letters of the contact name.
the contact name.
memory or vice versa
display the contact information saved in the phone
memory, SIM memory, or both.
133133
133
133133
Page 14

Adding contact information
The phone memory can store up to 300 phone book entries and
supports a SIM card that can store up to 255 phone book entries.
Adding a contact information to the SIM cardAdding a contact information to the SIM card
Adding a contact information to the SIM card
Adding a contact information to the SIM cardAdding a contact information to the SIM card
To add a phone book entry to the SIM card:
Because SIM card memory is limited, you can only save the name
and one phone number of an entry.
1. From the Phonebook, press (Option) to display a pop-up menu.
2. Use (up) or (down) to select
3. When prompted, select
bottom left corner of the screen, then press
screen appears.
To SIMTo SIM
T o S I M from the pop-up menu at the
To SIMTo SIM
AddAdd
Add, then press .
AddAdd
Add RecordAdd Record
. An
Add Record
Add RecordAdd Record
134134
134
134134
Page 15

4. Press to key-in
the contact name.
7. Use the keypad to
key-in the phone
number of the
contact, then
.
press
5. Use the keypad to
key-in the contact
PhonePhone
Phone
PhonePhone
.
name, then press
6. Press (down) to
highlight the
No1No1
N o 1 field, then
No1No1
press .
8. When finished, press
(Save) to save
the contact
information.
Data saved!Data saved!
A
Data saved!
Data saved!Data saved!
message appears
indicating that you
have saved the entry
to the SIM memory.
The created contact
appears in the
PhonebookPhonebook
Phonebook
PhonebookPhonebook
preceded by the SIM
.
icon
135135
135
135135
Page 16

Adding a contact information to the phone memoryAdding a contact information to the phone memory
Adding a contact information to the phone memory
Adding a contact information to the phone memoryAdding a contact information to the phone memory
Aside from the contact name and phone number, you can add other information to a phone
book entry when you save it to the phone memory. The phone memory can store up to four
phone numbers, fax number, office name, home and e-mail addresses, birthdate, notes, and
many more. You can also customize the contact group, melody, and LED settings or add a
photo and voice tag for voice command recognition.
Below are the contact information that you can select and change when you save a phone
book entry to the phone memory.
136136
136
136136
IconIcon
Icon
IconIcon
DescriptionDescription
Description
DescriptionDescription
Position E-mail address
Name Birthday
Mobile phone number Remarks
Home phone number Picture
Office phone number Voice Tag
Other phone no. Gender
Fax number Group
Company Melody
Title LED
Home Address
IconIcon
Icon
IconIcon
DescriptionDescription
Description
DescriptionDescription
Page 17

To add a phone book entry to the phone memory:
1. From the Phonebook,
press
to display a pop-up
menu.
2. Use (up) or
(down) to select
AddAdd
A d d, then press
AddAdd
(Option)
.
5. Use the keypad to
key-in the contact
name, then press .
3. When prompted,
To HandsetTo Handset
select
To Handset
To HandsetTo Handset
from the pop-up
menu at the bottom
left corner of the
screen, then press
Add RecordAdd Record
. An
Add Record
Add RecordAdd Record
screen appears.
4. Press to key-in
the contact name.
6. Press (down) to
.
PhonePhone
Phone
PhonePhone
highlight the
No1No1
N o 1 field, then
No1No1
press .
7. Use the keypad to
key-in the phone
number of the
contact, then
press
137137
137
137137
Page 18

8. Key-in other contact information including the home phone number,
office phone number, other phone number, fax number, company,
title, home address, e-mail address, birthday, remarks, and gender.
Refer to the next sections when adding a photo and/or voice tag, or
when classifying the phone book entry to a group.
You are not required to fill in all the phone book entry information.
You may add other information to the phone book entry later using
ModifyModify
the
M o d i f y command.
ModifyModify
9. When finished, press (Save) to save the contact information.
Data saved! Data saved!
A
Data save d ! message appears indicating that you have saved the
Data saved! Data saved!
entry to the phone memory.
138138
138
138138
The created contact appears in the
handset icon
.
PhonebookPhonebook
Phonebook preceded by the
PhonebookPhonebook
Page 19

Adding a photo to a phone book entryAdding a photo to a phone book entry
Adding a photo to a phone book entry
Adding a photo to a phone book entryAdding a photo to a phone book entry
• You can only add a photo to a phone book entry saved in the phone memory.
• You must have the photo saved in the
Image Gallery before you can attach to a phone book entry.
Sub Wallpaper (Portrait) Sub Wallpaper (Portrait)
Sub Wallpaper (Portrait) folder of the
Sub Wallpaper (Portrait) Sub Wallpaper (Portrait)
To add a photo to a phone book entry:
1. Highlight the
2. Select
PicturePicture
P i c t u r e field, then press to open the
PicturePicture
Sub Wallpaper (Portrait)Sub Wallpaper (Portrait)
Sub Wallpaper (Portrait), then press
Sub Wallpaper (Portrait)Sub Wallpaper (Portrait)
Image GalleryImage Gallery
Image Gallery.
Image GalleryImage Gallery
.
3. Use (up) or (down) to select the photo, then press .
The display returns to the
Add Record Add Record
Add Record window with the selected photo attached to the
Add Record Add Record
phone book entry.
22
2
11
1
11
Refer to the Camera section for details on capturing and saving
22
33
3
33
PortraitPortrait
Portrait photos.
PortraitPortrait
139139
139
139139
Page 20

Adding a voice recording to a phone book entryAdding a voice recording to a phone book entry
Adding a voice recording to a phone book entry
Adding a voice recording to a phone book entryAdding a voice recording to a phone book entry
• Voice recordings for phone book entries are used for voice dialing. Record the voice tag
in a quiet environment to achieve accurate recordings.
• Refer to Chapter 2 on how to use the Voice Dialing feature of the phone.
To add a voice tag to a phone book entry:
140140
140
140140
1. Highlight the
2. Select
VoiceVoice
V o i c e field, then press to open the
VoiceVoice
Record VoiceRecord Voice
Record Voice, then press .
Record VoiceRecord Voice
Select Voice Select Voice
Select Voice window.
Select Voice Select Voice
3. After the beep, use the microphone to say the name of the phone entry. The phone
processes the recording.
4. When prompted, repeat saying the name of the phone entry until the phone recognizes
the recording.
The phone automatically replays the recording and displays a
indicate that the voice tag is successfully created. The display returns to the
RecordRecord
R e c o r d window. The
RecordRecord
11
1
11
VoiceVoice
V o i c e field now shows
VoiceVoice
22
2
22
SetSet
Set.
SetSet
Data saved! Data saved!
Data saved! message to
Data saved! Data saved!
AddAdd
Add
AddAdd
33
3
33
44
4
44
Page 21

Searching phone book entries
Using Quick FindUsing Quick Find
Using Quick Find
Using Quick FindUsing Quick Find
To search a phone book entry using Quick Find:
22
2
22
1. From the Phonebook, press (Option) to display a pop-up menu.
2. Use (up) or (down) to select
Quick FindQuick Find
Quick Find, then press .
Quick FindQuick Find
3. Use the keypad to type the first letter of the entry you are
searching. The letter is displayed on top of the soft key bar.
The screen dispays all phone book entries having the first letter you
typed.
4. To narrow down the list, type the second and/or third letter of the
name you are searching.
The screen now dispays all phone book entries having the first three
letters you typed.
33
3
33
5. Use (up) or (down) to select the phone book entry, then
press to view.
• You can use Quick Find directly by pressing the first letter of
the entry while in the
• You can shift from English to Chinese input mode by pressing .
44
4
44
PhonebookPhonebook
Phonebook.
PhonebookPhonebook
141141
141
141141
Page 22

142142
142
142142
Using Name SearchUsing Name Search
Using Name Search
Using Name SearchUsing Name Search
To search a phone book entry using Name Search:
1. From the Phonebook, press (Option) to display a pop-up menu.
2. Use
3. Use the keypad to type the entry name, then press
4. When there is a match, the screen dispays the phone book entry
5. Press
(up) or (down) to select
you searched. If no such entry was found, the
shows blank.
(Back) to return to the
Name SearchName Search
Name Search, then press .
Name SearchName Search
.
PhonebookPhonebook
Phonebook screen
PhonebookPhonebook
PhonebookPhonebook
Phonebook.
PhonebookPhonebook
33
3
33
22
2
22
44
4
44
Page 23

Managing phone book entries
Viewing phone book entriesViewing phone book entries
Viewing phone book entries
Viewing phone book entriesViewing phone book entries
To display the phone book entry information:
1. Select a phone book entry using (up) or (down), then
View Record View Record
. The
press
2. Use
entry information.
3. Press
View Recor d screen appears.
View Record View Record
(up) or (down) to scroll and view additional phone book
(Back) to return to the
PhonebookPhonebook
Phonebook.
PhonebookPhonebook
143143
143
143143
Page 24

Displaying long entriesDisplaying long entries
Displaying long entries
Displaying long entriesDisplaying long entries
The phone book has a scrolling feature that allows you to see a name entry even if it is longer
than the screen width.
To display a long phone book entry:
1. Select a phone book entry with a long name, then press to view the phone book entry
record.
2. Notice that the name entry scrolls to the left until the last character is displayed. Compare
Screens 1 to 3.
144144
144
144144
Screen 1Screen 1
Screen 1
Screen 1Screen 1
Screen 2Screen 2
Screen 2
Screen 2Screen 2
Screen 3Screen 3
Screen 3
Screen 3Screen 3
Page 25

Modifying a phone book entryModifying a phone book entry
Modifying a phone book entry
Modifying a phone book entryModifying a phone book entry
You can change or add a contact information to a phone book entry
even after it has been saved to the phone memory.
To modify a phone book entry:
1. View an entry following the instructions in the
11
1
11
22
2
22
33
3
33
book entries”book entries”
book entr i e s ” section, then press
book entries”book entries”
2. Select
3. Use
4. Key-in the changes using the keypad, then press (Save) to save
ModifyModify
M o d i f y from the options, then press
ModifyModify
RecordRecord
R e c o r d screen appears.
RecordRecord
(up) or (down) to select the phone book entry
information that you want to modify, then press
your changes. Otherwise, press (Back) to return to the previous
screen.
Data Saved! Data Saved!
A
Data Save d ! message appears indicating that you have
Data Saved! Data Saved!
successfully modified the entry. The display returns to the previous
menu.-
“Viewing phone“Viewing phone
“Viewing phone
“Viewing phone“Viewing phone
(Options).
ModifyModify
. The
Modify
ModifyModify
.
145145
145
145145
Page 26

Deleting a phone book entryDeleting a phone book entry
Deleting a phone book entry
Deleting a phone book entryDeleting a phone book entry
To delete a phone book entry:
1. From the
PhonebookPhonebook
Phonebook, select
PhonebookPhonebook
the phone book
entry you want to
delete.
2. Press (Option),
then select
from the pop-up
menu.
DeleteDelete
Delete
DeleteDelete
146146
146
146146
3. Select whether to
delete only the
selected phone book
entry or all phone
book entries, then
press .
4. Press (Yes),
when a confirmation
window appears.
DeletedDeleted
A
Deleted
DeletedDeleted
successfully!successfully!
successfully!
successfully!successfully!
message appears
indicating that the
entry has been
deleted from the
phone book. The
display returns to
PhonebookPhonebook
the
Phonebook.
PhonebookPhonebook
Page 27

To delete a phone book entry from the
View Record View Record
View Record window:
View Record View Record
1. View an entry
following the
instructions in the
“Viewing“Viewing
section
“Viewing
“Viewing“Viewing
phone bookphone book
phone book
phone bookphone book
entries”entries”
entries”, then
entries”entries”
press
3. Press (Yes) when
a confirmation window
appears.
(Options).
2. Select
DeleteDelete
Delete from
DeleteDelete
the menu, then
.
press
DeletedDeleted
A
Deleted
DeletedDeleted
successfully!successfully!
successfully!
successfully!successfully!
message appears
indicating that the
entry has been
deleted from the
phone book. The
display returns to
PhonebookPhonebook
the
Phonebook.
PhonebookPhonebook
147147
147
147147
Page 28

Copying name entriesCopying name entries
Copying name entries
Copying name entriesCopying name entries
Copying a SIM phone book entry to the phone memoryCopying a SIM phone book entry to the phone memory
Copying a SIM phone book entry to the phone memory
Copying a SIM phone book entry to the phone memoryCopying a SIM phone book entry to the phone memory
To copy a SIM phone book entry to the phone memory:
148148
148
148148
1. From the
memory.
2. Press (Option),
then select
from the pop-up
menu.
4. From the pop-up
menu, select
HandsetHandset
Handset, then
HandsetHandset
press
PhonebookPhonebook
Phonebook, select the phone book entry you want to copy to the phone
PhonebookPhonebook
CopyCopy
Copy
CopyCopy
ToTo
To
ToTo
.
3. Select whether to
copy only the
selected phone book
entry or all the phone
book entries, then
press
.
Data saved!Data saved!
5. A
Data saved!
Data saved!Data saved!
message appears
indicating that the
entry has been
copied to the phone
memory. The display
returns to the
PhonebookPhonebook
Phonebook.
PhonebookPhonebook
Page 29

Copying a phone book entry to the SIM cardCopying a phone book entry to the SIM card
Copying a phone book entry to the SIM card
Copying a phone book entry to the SIM cardCopying a phone book entry to the SIM card
To copy a phone book entry to the SIM card:
1. Follow steps 1 to 3 of the previous section.
2. From the pop-up menu, select
To SIMTo SIM
To SIM, then press
To SIMTo SIM
.
3. A confirmation message appears to inform you that only the name
22
2
22
and phone number of the phone book entry will be saved, and that a
long phone book entry name will be cut. Press (Yes) to confirm.
Otherwise, press to cancel.
Data saved! Data saved!
4. A
Data saved! message appears indicating that the entry has
Data saved! Data saved!
been copied to the phone memory. The display returns to the
PhonebookPhonebook
Phonebook.
PhonebookPhonebook
33
3
33
44
4
44
149149
149
149149
Page 30

150150
150
150150
Copying multiple entriesCopying multiple entries
Copying multiple entries
Copying multiple entriesCopying multiple entries
To copy multiple phone book entries:
1. From the
PhonebookPhonebook
Phonebook, Press
PhonebookPhonebook
(Option), then
CopyCopy
select
C o p y from
CopyCopy
the pop-up menu.
3. From the pop-up
menu, select
Hanset to SIM Hanset to SIM
Hanset to SIM or
Hanset to SIM Hanset to SIM
SIM to HandsetSIM to Handset
SIM to Handset,
SIM to HandsetSIM to Handset
then press
.
2. Select
All RecordsAll Records
All Records,
All RecordsAll Records
then press
OptionsOptions
Options
OptionsOptions
Handset to SIMHandset to SIM
H andset t o S I M all phone book entries in
Handset to SIMHandset to SIM
SIM to HandsetSIM to Handset
S IM to H a n d s e t all phone book entries in
SIM to HandsetSIM to Handset
.
Allows you to copyAllows you to copy
Allows you to copy
Allows you to copyAllows you to copy
the phone memory to the
SIM card
the SIM card to the phone
memory
Page 31

4. When prompted for
confirmation, press
(Yes).
5. Another
confirmation screen
appears. Select
whether to keep or
delete the original
data after copying,
then press
.
When you select
SIM memory after copying them.
Data saved!Data saved!
6. A
Data saved!
Data saved!Data saved!
message appears
indicating that the
phone book entries
were copied to the
specified memory.
The display returns
PhonebookPhonebook
to the
Phonebook.
PhonebookPhonebook
Keep Original DataKeep Original Data
Keep Original Data, the phone book entries remain in the phone or
Keep Original DataKeep Original Data
The copied phone
entries now appear
in the phonebook.
151151
151
151151
Page 32

Changing the phone book settings
Customizing group settingsCustomizing group settings
Customizing group settings
Customizing group settingsCustomizing group settings
You can customize the phone book group name, ring tone and LED color.
To customize the group settings:
152152
152
152152
1. From the
PhonebookPhonebook
Phonebook, press (Option), then select
PhonebookPhonebook
from the pop-up menu.
2. Use (up) or (down) to select
3. Use
4. Select
5. Select the group
(up) or (down) to select the group you want to modify,
then press
(Option).
EditEdit
E d i t from the menu, then press .
EditEdit
NameName
MelodyMelody
Name,
Melody, or
NameName
MelodyMelody
Group SetGroup Set
Group Set, then press .
Group SetGroup Set
LED Color LED Color
LED Color field, then
LED Color LED Color
press to change their respective settings.
6. When finished, press
(Save) to save your changes and to close the
group settings window.
66
6
66
SettingsSettings
Settings
SettingsSettings
55
5
55
11
1
11
22
2
22
33
3
33
44
4
44
Page 33

Restoring a phone book group settingsRestoring a phone book group settings
Restoring a phone book group settings
Restoring a phone book group settingsRestoring a phone book group settings
To restore the default phone book group settings:
1. From the
PhonebookPhonebook
Phonebook, press (Option), then select
PhonebookPhonebook
SettingsSettings
Settings
SettingsSettings
from the pop-up menu.
11
2. Use
1
11
3. Use
(up) or (down) to select
(up) or (down) to select the group you want the
Group SetGroup Set
Group Set, then press .
Group SetGroup Set
settings restored, then press (Option).
4. Select
5. When prompted, press
22
2
22
33
3
33
44
4
44
55
5
55
RestoreRestore
Restore from the menu, then press .
RestoreRestore
(Yes). The display returns to the
PhonebookPhonebook
Phonebook.
PhonebookPhonebook
153153
153
153153
Page 34

154154
154
154154
Classifying a phone book entry to a groupClassifying a phone book entry to a group
Classifying a phone book entry to a group
Classifying a phone book entry to a groupClassifying a phone book entry to a group
To classify an entry to a group:
1. Select the phone book entry you want to classify to a group, then
to view the phone book record.
press
2. Press (Option), then select
3. Select the
When the entry is not classified, this field shows
4. Use
press
The selected group now appears in the
5. When finished, press
the
GroupGroup
Group
GroupGroup
(up) or (down) to select a group, then
.
PhonebookPhonebook
Phonebook.
PhonebookPhonebook
When classified to a group, the phone book entry adapts the Melody
and LED Color of the group. You can change these settings using
the instructions in the previous section.
field, then press to display the group list.
ModifyModify
M o d i f y from the pop-up menu.
ModifyModify
AllAll
All.
AllAll
GroupGroup
G r o u p field.
GroupGroup
(Save) to save your changes and return to
11
1
11
22
2
22
Page 35

Changing the speed dial settingsChanging the speed dial settings
Changing the speed dial settings
Changing the speed dial settingsChanging the speed dial settings
You can change the speed dial key assignments and other speed dial
settings using the
To change the speed dial settings:
SettingsSettings
Settings menu.
SettingsSettings
1. From the
from the pop-up menu.
2. Use
3. Follow the instructions in the section
assign and use the speed dial keys.
Selecting the phone book memorySelecting the phone book memory
Selecting the phone book memory
Selecting the phone book memorySelecting the phone book memory
You can choose to display all phone book entries saved in the phone
memory, SIM memory, or both.
To select the phone book memory in use:
1. From the
from the pop-up menu.
2. Use (up) or (down) to select
press
PhonebookPhonebook
Phonebook, press (Option), then select
PhonebookPhonebook
(up) or (down) to select
PhonebookPhonebook
Phonebook, press (Option), then select
PhonebookPhonebook
.
Speed DialSpeed Dial
Speed Dial, then press .
Speed DialSpeed Dial
Speed Dial Speed Dial
Speed Dial on page 109 to
Speed Dial Speed Dial
Memory in useMemory in use
Memory in use, then
Memory in useMemory in use
SettingsSettings
Settings
SettingsSettings
SettingsSettings
Settings
SettingsSettings
155155
155
155155
Page 36

3. Select an option from the menu, then press . Refer to the options
description below.
From SIMFrom SIM
From SIM Displays only all phone book entries saved in the
From SIMFrom SIM
SIM memory.
From HandsetFrom Handset
From Handse t Displays only all phone book entries saved in the
From HandsetFrom Handset
phone memory.
AllAll
A l l Displays only all phone book entries saved in the
AllAll
SIM memory.
156156
156
156156
4. When finished, press
Viewing the phone book storageViewing the phone book storage
Viewing the phone book storage
Viewing the phone book storageViewing the phone book storage
To view the phone book storage:
1. From the
from the pop-up menu.
2. The display shows the used memory over the total memory
capacities of the phone (handset) and the SIM card.
3. Press
PhonebookPhonebook
Phonebook, press (Option), then select
PhonebookPhonebook
(Back) to return to the
(Back) to return to the
PhonebookPhonebook
Phonebook.
PhonebookPhonebook
PhonebookPhonebook
Phonebook.
PhonebookPhonebook
StorageStorage
Storage
StorageStorage
Page 37

Other phone book features
Sending an SMS/MMS messageSending an SMS/MMS message
Sending an SMS/MMS message
Sending an SMS/MMS messageSending an SMS/MMS message
You can send an SMS or MMS message from the phone book entry.
To send an SMS message:
1. From the
message, then press .
2. Press
22
2
22
33
3
33
The
3. Follow the instructions in Chapter 5 “Messaging features” to
compose and send the SMS message.
PhonebookPhonebook
Phonebook, select the entry you want to send an SMS
PhonebookPhonebook
(Option), then select
Edit SMS Edit SMS
Edit SMS screen appears.
Edit SMS Edit SMS
Send SMS Send SMS
Send SMS from the pop-up menu.
Send SMS Send SMS
157157
157
157157
Page 38

To send an MMS message:
158158
158
158158
1. From the
message, then press
2. Press
The
PhonebookPhonebook
Phonebook, select the entry you want to send an MMS
PhonebookPhonebook
.
(Option), then select
Edit MMS Edit MMS
Edit MMS screen appears.
Edit MMS Edit MMS
Send MMS Send MMS
Send MMS from the pop-up menu.
Send MMS Send MMS
3. Follow the instructions in Chapter 6 “Messaging features” to
compose and send the MMS message.
22
2
22
33
3
33
Page 39

M303M303
M303
M303M303
This chapter provides information on
the MMS and SMS messaging features
of your mobile phone including
instructions on how to send text,
graphics, and audio files to other
mobile phones.
Messsaging FeaturesMesssaging Features
Messsaging Features
Messsaging FeaturesMesssaging Features
Page 40

160160
160
160160
Chapter summaryChapter summary
Chapter summary
Chapter summaryChapter summary
Messaging features ......................................................................... 162
Short Message Service (SMS) ......................................................... 163
Composing and sending an SMS message ......................... 163
Launching the SMS message editor .................................. 163
Choosing the message recipient(s) .................................. 163
Composing the SMS message ........................................... 164
Sending the SMS message ................................................ 165
Saving the SMS message .................................................. 166
Viewing an SMS message ......................................................... 167
Managing the SMS Inbox .......................................................... 168
Using the SMS Inbox menu ................................................ 168
Managing the SMS Outbox ....................................................... 169
Using the SMS Outbox menu ............................................. 169
Changing the SMS message settings ....................................... 170
Changing the service center number ................................ 171
Changing the message format .......................................... 172
Changing the SMS validity period ...................................... 173
Creating common message(s) .......................................... 174
Activating delivery reports ............................................... 175
Activating the reply path .................................................. 176
Auto moving SMS messages to the handset .................... 177
Viewing the SMS memory status ............................................. 178
Changing the cell broadcast settings ...................................... 179
 Loading...